

Page 1
for Version 3 Basic Edition
Lesson 2
Introduction to Main and the Soft Keyboard
Welcome
In this lesson, we will eventually explore the ClassPad’s Main
application and the soft keyboard. To begin, though, we need to cover
some terminology that is common to all PC applications and some
specific to the ClassPad.
Lesson Goals
• To learn basic window terminology
• To become comfortable using the Main Application
• To learn how to use the soft keyboard
• To learn how to change number format
In Lesson 2, you will learn how to:
• Identify specific parts of a window
• Use the ClassPad’s soft keyboard
• Store a number in a variable and clear variables
• Use the Main application’s buttons and menus
• Change number format
• Change from base 10 to other bases
Upon completion of this lesson, you will be able to
answer the following questions:
1. What is an application?
2. What are two ways to open the soft keyboard?
3. How do I change from the abc keyboard to the 2D keyboard?
4. What does the
5. What does the
6. What are mode settings and how do we change them?
7. What information shows in the status bar?
8. What is a single variable?
9. What is the imaginary unit?
button do?
button do?
Time required
About 60 minutes.
Page 2
Getting Started
What is an application? In the computer world, we define application as a
computer program with a user interface. You can think of an application as
any program that you can open on your computer and do work in. The
ClassPad Manager is an application with other applications inside. Most of its
components (or parts) are the same as other PC applications; only a few are
unique.
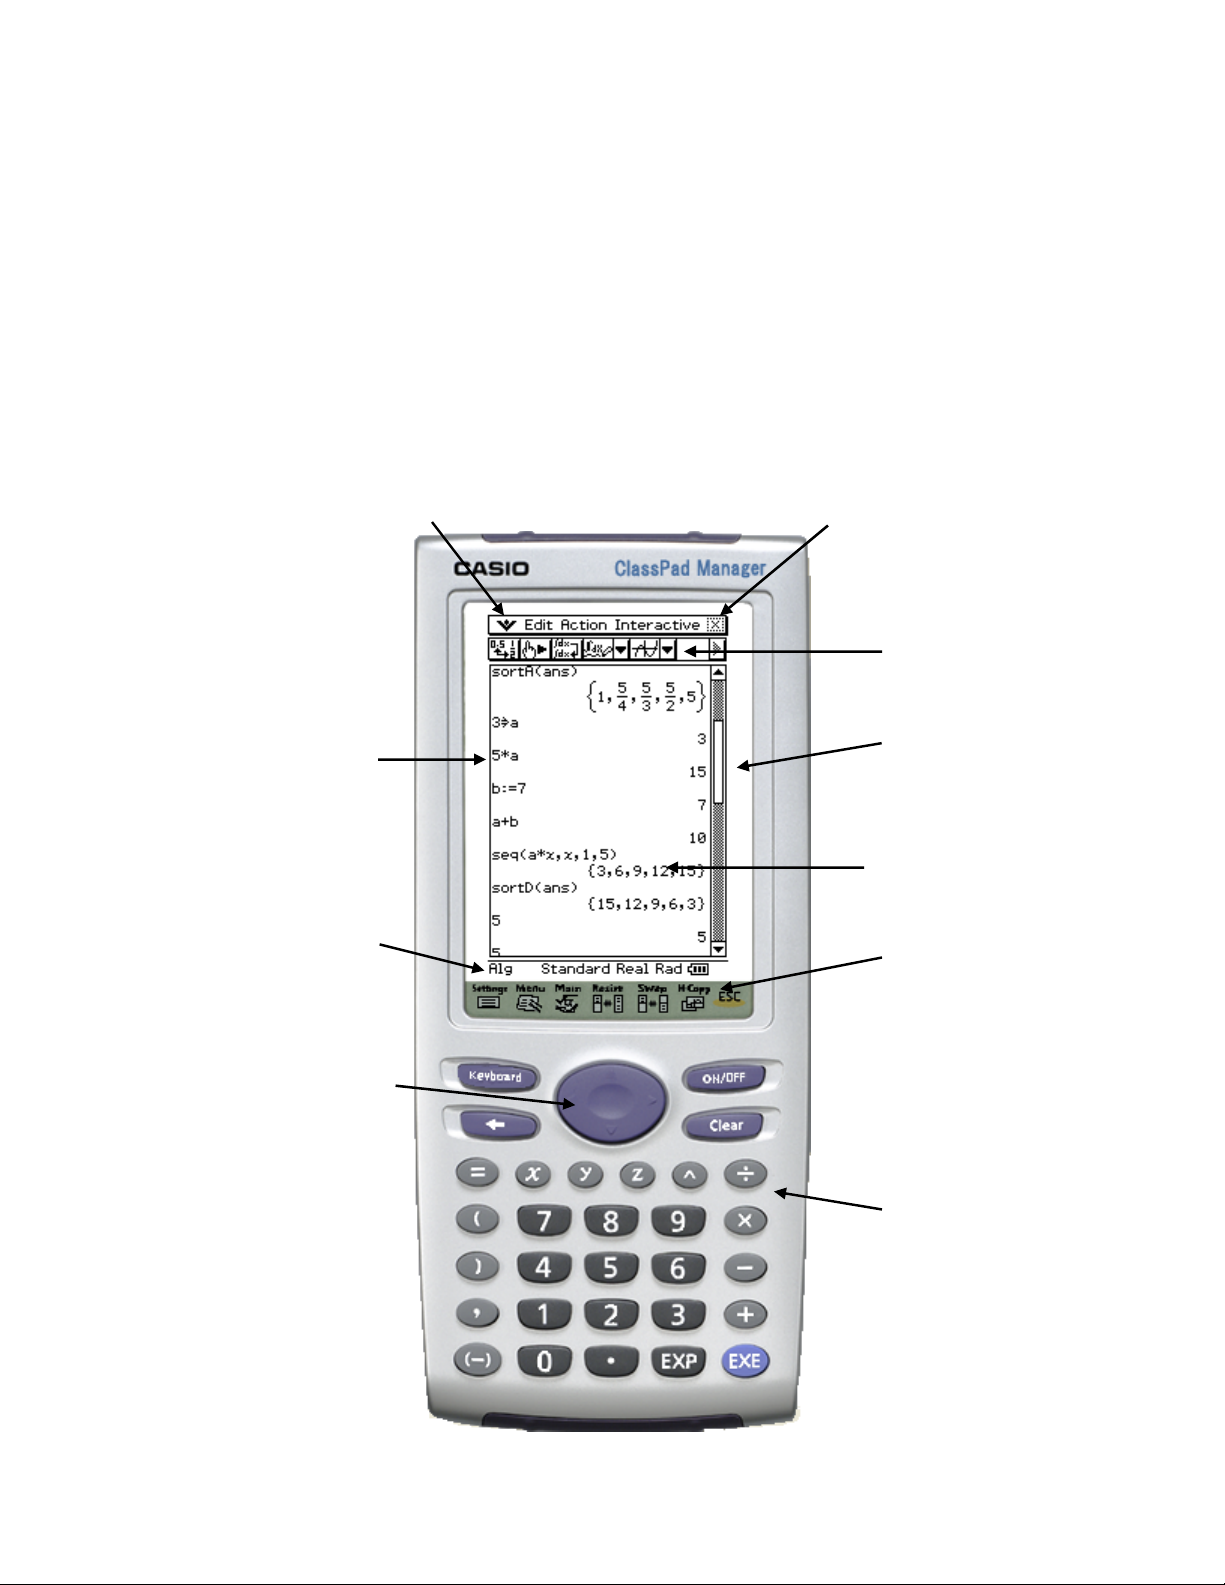
PART I
[Important] Become familiar with basic window terminology.
System Menu
Button
(ClassPad Specific)
Menu Bar
Toolbar
Window
Border
Status
Cursor Pad
(Calculator Specific)
Scrollbar
Work Area
Icon Panel
(ClassPad
Specific –
Very Useful!)
Keypad
(Calculator Specific)
ClassPad 101 Lesson 2 CASIO COPYRIGHT © 2007 Author: Diane Whitfield
CASIO MRD Center, Portland, Oregon, USA
2
Page 3

System Menu Button ( ) Opens a menu that looks similar in all
ClassPad applications. The System menu provides you with many
dialogs to set ClassPad modes and other window options.
Menu Bar Provides a row of menus that you can open and select
commands from. The ClassPad’s “Menu bar” will change for each
different application. For example, notice the different menu bars and
toolbars:
The Main
Application
The Geometry
The SpreadSheet
Application
Application
Toolbar Provides a row of buttons that you can click to get a
command or change modes. Some ClassPad toolbar buttons are in
dropdown button palettes.
The button on Main’s
toolbar toggles a result between
fraction and decimal quickly.
This dropdown button palette
provides a way to insert other
applications into
Main.
ClassPad 101 Lesson 2 CASIO COPYRIGHT © 2007 Author: Diane Whitfield
CASIO MRD Center, Portland, Oregon, USA
3
Page 4

Window Border A box or edge defining an application’s work area.
When more than one window is open, the active window (window
with focus) will have a bolder border.
You will learn a lot more about window borders and focus in the
next lesson. For now, please just notice the difference.
Notice the
toolbar
and
window
border
changed.
Notice the
toolbar and
bolder
window
border.
This window
is active
(has focus).
This window
is active
(has focus).
Scrollbar Provides a way to “pan” yo ur window. Useful hints:
Tap here to move up one line.
Tap in the space above the
thumb to move up one page.
Press and drag the “thumb” to
pan your window up or down.
Tap in the space below the
thumb to move down one page.
Tap here to move down one
line.
Work Area Window area where we can input data.
Status Bar Displays information about the application.
Icon Panel Provides a row of buttons that you can click at any
time.
Cursor Pad Provides a way to move cursor position up, down, left
or right.
Keypad Provides quick access to the most commonly used keys.
ClassPad 101 Lesson 2 CASIO COPYRIGHT © 2007 Author: Diane Whitfield
CASIO MRD Center, Portland, Oregon, USA
4
Page 5

PART I
Practice Exercises
Before beginning the practice exercises, open a word
document, type in the following information and then save it
as Lesson2 in your CASIO folder within My Documents:
• Date: (enter today's date)
• To: (put your instructor’s name here)
• From: (put your name here)
• Re: Lesson 2
1. Open your ClassPad Manager, if you have not already.
2. Click
3. Open the Main application.
4. Evaluate 32.7 – 18.9 (type it in and press EXE or Enter).
5. Select your answer by clicking on it and then click the
6. Get a screen capture and paste it into your Lesson2 document (under
a title of PART I).
7. Evaluate 8/9 + 5/6.
8. Place the cursor anywhere on the line that you just entered (click it) and
then click the
9. Get a screen capture. Please add two blank spaces following the first
screen capture and then paste this one.
10. Select your answer by clicking on it and then click the
Notice that the
decimal.
11. Click
12. Open the Geometry application. Notice how different the toolbar looks.
on the icon panel.
button.
button.
button again.
button toggles your answer between a fraction and
on the icon panel.
13. Click on the triangle toolbar button (
the window’s work area. You should see a triangle. We will return to
Geometry in lesson 3.
14. Get a screen capture. Add two blank spaces following the second
screen capture and then paste this one.
ClassPad 101 Lesson 2 CASIO COPYRIGHT © 2007 Author: Diane Whitfield
CASIO MRD Center, Portland, Oregon, USA
) and then click one time inside
5
Page 6

PART II
In this part, you will begin exploring the ClassPad’s soft keyboard. As you will
see, the soft keyboard is not just an everyday keyboard. It does contain a
regular keyboard, but also many other very useful keys.
1. 2D Math Page
Sometimes in the instructions you will see a “/” between words. The “/” is
a shorthand notation commonly used when writing instructions for
working with menus. For example, Edit/Clear All indicates that you
should open the Edit menu and select Clear All.
a. Open the Main
application (
b. Clear your window
(select Edit/Clear All)
c. Press k
d. Click the ) tab
e. Click the
f. Input
3
M)
N button
and press EXE
5
g. Click 5 and then N
[Hint: Click in the box or use to
h. Evaluate
*Try a few other 2D math symbols and see what happens. Click on the CALC
or ADV buttons to access other 2D forms.
9
4
move the cursor to the denominator]
2. mth Page (mth stands for math)
a. Clear your window
(select Edit/Clear All)
b. Click the 9 tab
c. Click the
(along the bottom)
d. Input 2
and press EXE or Enter
*Notice there is an x on
the soft keyboard (easy
to find)
e. Press the back arrow
button
ClassPad 101 Lesson 2 CASIO COPYRIGHT © 2007 Author: Diane Whitfield
OPTN button
x+5 U x =10
(I) to go back.
CASIO MRD Center, Portland, Oregon, USA
Very useful button!
6
Page 7

3. Single Variables
In Algebra we learn that no symbol between variables (letters) means
multiplication. The ClassPad also thinks this way when we use its single
variables (bolder letters). Sometimes, however, we want to define a variable
with more than one letter. For example, let width = length – 12. To do this,
we can use letters from the regular keyboard.
a. Clear your window
(select Edit/Clear All)
b. Click the 9 or )
tab
c. Click the
(along the bottom).
d. Input
*Notice the result
e. Click the 0 tab
f. Input ab and press EXE
*Notice the result
VAR button
ab and press EXE
4. The “Store” Key and Deleting Variables
a. Clear your window
(select Edit/Clear All)
b. Click the 9 or )
tab AND the I if it is
showing
c. Input 7 W
EXE
ab and press
d. Input
and press EXE
e. Input 10
EXE
f. Press the
g. Input 5 W ab where a and b are single variables (we get an error
message)
h. Delete the
i. To uninstall 7, type in DelVar
ab on the next line
ab and press
VAR key
b and press EXE (the error is gone!)
ab and press EXE (ab now returns ab!)
j. Important: To delete all variable contents at one time, select
Edit/Clear All Variables and then click OK.
ClassPad 101 Lesson 2 CASIO COPYRIGHT © 2007 Author: Diane Whitfield
CASIO MRD Center, Portland, Oregon, USA
7
Page 8

PART II
Practice Exercises
1. Open the Main application, clear your window and then open the system
menu (
the keyboard.
) and select Keyboard. This is another way to open and close
2. Using 2D math, input and evaluate
[Hint: After inputting
under the square root. Notice the blinking cursor becomes larger.]
3. Change your answer to a decimal.
4. Get a screen capture and paste it into your Lesson2 document (under
a title of PART II).
5. Click on the next math line (you will see the cursor). Open the Action
menu, select Transformation and then toDMS. DMS stands for
degrees minutes seconds and is used in angle measurements.
6. Evaluate toDMS(81.25).
7. Get a screen capture. Please add two blank spaces following the first
screen capture and then paste this one.
8. Open the Interactive menu, sele ct List-Create and then seq. Fill in
the dialog that appears as follows:
, press the right arrow key to get out from
9. Ok, now we will sum the sequence. Select your answer from step 9 and
drag to the next math line.
10. Select the sequence you just dragged and then open the Interactive
menu, select List-Calculation and then sum. Click Ok to the dialog
that appears.
11. Get a screen capture. Add two blank spaces following the second
screen capture and then paste this one.
ClassPad 101 Lesson 2 CASIO COPYRIGHT © 2007 Author: Diane Whitfield
CASIO MRD Center, Portland, Oregon, USA
8
Page 9

PART III
In this part, you will learn another way to store values, how to use the one
finger toolbar button, change base and change the form in which your
numbers display. For example, always show results as a decimal. Or, you
may want to work with angles in degrees instead of radians. To change most
settings we can use the Basic Format dialog box or just click the status bar.
We usually call these format settings “mode settings”. Mode settings control
how the ClassPad Manager handles math and other settings.
Important: What are your ClassPad’s mode settings? Your status bar (along
the bottom of this window) might say: Alg Standard Real Rad
This means your ClassPad is set to:
• Algebra mode
• Standard number output
• Real numbers only
• Radian Mode (not degrees)
1. Basic Format Settings
a. Open Main and clear the
window
b. Evaluate 5/6 (notice the
result is exact)
c. Open the
select Basic Format
d. Check the box for
Decimal Calculation
e. Click Set
f. Evaluate 5/6 and a few
other fractions
g. Open the Basic Format
dialog box again
h. Change Display to Fix 2
i. Click Set
j. Click on your first math
line and then EXE (nice!)
*But what if you want to go
one line at a time?
O menu and
ClassPad 101 Lesson 2 CASIO COPYRIGHT © 2007 Author: Diane Whitfield
CASIO MRD Center, Portland, Oregon, USA
9
Page 10

2. Status Bar and One Line at a Time
y)
a. Notice your status bar
b. Click Decimal to toggle
it back to Standard
c. Click on your first math
line and then the
button
d. Notice only the 1
st
output changed
*One line at a time please!
**Or, press EXE to re-
Just tap it!
execute everything.
3. Changing Base
What does “base” mean? It has to do with place value. Well, as you know,
234=2*100+3*10+4. This can also be written as 234=2*10
(note that any # raised to the 0 power equals 1 except 0
We work in base 10, but computers often work in b ase 2 or base 16. Base 2
is called binary and base 16 is called hexadecimal. For exa mple, 5 in base
2
2 is 101=1*2
+0*21+20. There are also many other bases that are common.
You could really write a number in any base you want to!
For now, we will experiment with base 2 (binary) only. You may someday
find this useful! It is definitely fun to think in a different base.
a. Open Main and clear the
window
st
b. Click the 1
toolbar and select
n on the
c. Input 101+11 and
press EXE
d. Input 2 and press EXE
e. Bin mode (base 2) only
knows 0 and 1!
f. Change 2 to 2d to let
the software know you
mean base 10
g. Press EXE
h. Note 10b=1*2
=2 (base 10)
1
+0*20
Notice the status bar
shows Bin (short for
Binar
0
2
+3*101+4*100
).
.
ClassPad 101 Lesson 2 CASIO COPYRIGHT © 2007 Author: Diane Whitfield
CASIO MRD Center, Portland, Oregon, USA
10
Page 11

PART III
Practice Exercises
1. Open the Main application and select Edit/Clear All. Notice the status
bar changed to show all modes again (no longer in Bin mo de). This is a
good thing!
2. A flea traveled 3.76 yards on the first day of it s journey, 2.57 yards on
the second and 1.99 yards on the last day. Using the Main application,
calculate the total distance traveled.
3. To the nearest tenth, how far did the flea travel? Hint: Change your mode
setting to Fix 1 and re-execute line one to display a decimal.
4. Get a screen capture and paste it into your Lesson2 document (under a
title of PART III).
5. Complex number and real number results are sometimes different.
“Complex” numbers occur when there is a negative under a square root.
6. Using 2D math, try to evaluate
undefined in the real mode (notice Real shows in your status bar). If
square roots are new to you, be patient, you will learn about them
someday. For now, just experiment with the ClassPad.
7. Click Real in the status bar to toggle to Cplx or op en the Basic Format
dialog box and check the box for Complex Format. Re-evaluate
you see
sense does NOT mean non-existent; it means not a real number (not on
the real number line).]
8. Get a screen capture. Please add two blank spaces following the first
screen capture and then paste this one.
9. Ok, time to explore the soft keyboard. Try to find two music note symbols
within the soft keyboard (they look like:
[Hint: You will find them by looking in one of the pages that appear when
you click a lower button on the abc page! Remember to click the back
arrow button to get back and the down arrows on the right to see more of
a page.]
= i.[i is often called the imaginary unit. “imagina ry” in this
. We get an error because is
. So,
).
10. Click the symbols when you find them so that they show in your window.
Get a screen capture. Add two blank spaces following the second screen
capture and then paste this one.
ClassPad 101 Lesson 2 CASIO COPYRIGHT © 2007 Author: Diane Whitfield
CASIO MRD Center, Portland, Oregon, USA
11
Page 12

PART IV
Written Exercises
Please copy and paste the following questions into your Lesson2 document
and answer them.
1. What information shows in the status bar?
2. What are two ways to open the soft keyboard?
3. What does the
4. What does the
button do?
button do?
Reflection Exercises
You have just completed the second lesson in ClassPad 101, g reat! Learning
terminology is not as much fun as entering things into the ClassPad, but
learning the terminology is important so that we can talk in a technical way!
Try to review pages 2 and 3 until you are comfortable with each term. Or,
you can print them so that you can refer to them quickly as needed.
Please take a few moments to copy and paste the following three questions
at the end of your Lesson2 document and answer them.
1. Approximately how long did it take you to complete this lesson?
2. Which activity did you enjoy the most?
3. Did you find any part of this activity difficult to follow? If so, which part?
Also, how did you overcome the difficulty?
Assessment 2: Introduction to Main and the Soft Keyboard
• Checkpoint: Your word processed document, titled "Lesson2",
should contain the following activities:
1. Three screen captures from PART I.
2. Three screen captures from PART II.
3. Three screen captures from PART III.
4. Four questions with answers and three reflection questions
with answers from PART IV.
• Submit your Lesson2 document to your instructor for grading. Once
your lesson is submitted, your lesson for ClassPad 101 “Intro to Main
and the Soft keyboard” is complete.
ClassPad 101 Lesson 2 CASIO COPYRIGHT © 2007 Author: Diane Whitfield
CASIO MRD Center, Portland, Oregon, USA
12
 Loading...