

Page 1
DE
Gebrauchsanweisung
EN
Operating Instructions
FR
Mode d’emploi
IT
Manuale per l’utente
PL
Instrukcja obsługi
Ref : ABIW
Page 2

DE 03
Gebrauchsanweisung
EN 18
FR 33
IT 48
PL 63
Operating Instructions
Mode d’emploi
Manuale per l’utente
Instrukcję obsługi
IMPORTED BY
The symbol on the product or its packaging indicates that the product should
not be disposed of in the household waste but recycled appropriately. With your
support and by recycling the product correctly, you contribute to the protection
of the environment and people. The environment and people are endangered
MSA INTERNATIONAL SA
Avenue de L’Eur ope
Pôle Européen de Développement (PED)
L-4802 L AMADEL AINE • LUXEMBOURG
by poor recycling. Recycling materials helps to reduce the consumption of raw
materials. Further information about recycling can be obtained from your municipality, recycling and waste disposal sites.
Page 3
DE
GEBRAUCHSAN WEISUNG
AB-IW900
3
Page 4

e) Wenn Sie mit einem Elektrowerkzeug im Freien arbeiten, verwenden
Sie nur Verlängerungskabel, die auch für den Außenbereich
geeignet sind. Die Anwendung eines für den Außenbereich geeigneten
Verlängerungskabels verringert das Risiko eines elektrischen Schlages.
f) Wenn der Betrieb des Elektrowerkzeuges in feuchter Umgebung
nicht vermeidbar ist, verwenden Sie einen Fehlerstromschutz-
schalter. Der Einsatz eines Fehlerstromschutzschalters vermindert das Risiko
eines elektrischen Schlages.
a) Seien Sie aufmerksam, achten Sie darauf, was Sie tun, und gehen
Sie mit Vernunft an die Arbeit mit einem Elektrowerkzeug. Benutzen
Sie kein Elektrowerkzeug, wenn Sie müde sind oder unter dem
Einfluss von Drogen, Alkohol oder Medikamenten stehen. Ein
Mo ment der Unachtsamkeit beim Gebrauch des Elektrowerkzeuges kann zu
ernsthaften Verletzungen führen.
b) Tragen Sie persönliche Schutzausrüstung und immer eine Schutz-
brille. Das Tragen persönlicher Schutzausrüstung, wie Staubmaske,
rutsch feste Sicherheitsschuhe, Schutzhelm oder Gehörschutz, je nach Art und
Einsatz des Elektrowerkzeuges, verringert das Risiko von Verletzungen.
c) Vermeiden Sie eine unbeabsichtigte Inbetriebnahme. Vergewissern
Sie sich, dass das Elektrowerkzeug ausgeschaltet ist, bevor Sie es
an die Stromversorgung und/oder den Akku anschließen, es auf-
nehmen oder tragen. Wenn Sie beim Tragen des Elektrowerkzeuges den
Finger am Schalter haben oder das Elektrowerkzeug eingeschaltet an die
Stromversorgung anschließen, kann dies zu Unfällen führen.
d) Entfernen Sie Einstellwerkzeuge oder Schraubenschlüssel, bevor
Sie das Elektrowerkzeug einschalten. Ein Werkzeug oder Schlüssel, der
sich in einem drehenden Geräteteil befindet, kann zu Verletzungen führen.
e)
Vermeiden Sie eine abnormale Körperhaltung. Sorgen Sie für einen sich-
eren Stand und halten Sie jederzeit das Gleichgewicht. Dadurch können
Sie das Elektrowerkzeug in unerwarteten Situationen besser kontrollieren.
f) Tragen Sie geeignete Kleidung. Tragen Sie keine weite Kleidung
oder Schmuck. Halten Sie Haare, Kleidung und Handschuhe fern von
sich bewegenden Teilen. Lockere Kleidung, Schmuck oder lange Haare
können von sich bewegenden Teilen erfasst werden.
g) Wenn Staubabsaug- und -auffangeinrichtungen montiert werden
können, vergewissern Sie sich, dass diese angeschlossen sind und
richtig verwendet werden. Verwendung einer Staubabsaugung kann
Gefährdungen durch Staub verringern.
Sicherheit von
Personen
DE
GEBRAUCHSAN WEISUNG
AB-IW900
WARNUNG
Lesen Sie alle Sicherheitshinweise und Anweisungen!
Versäumnisse bei der Einhaltung der Sicherheitshinweise und
Anweisungen können elektrischen Schlag, Brand und/oder schwere
Verletzungen verursachen!
Bewahren Sie alle Sicherheitshinweise und Anweisungen für die Zukunft
auf und geben Sie sie ggf. an andere Benutzer oder nachfolgende Besitzer
weiter.
Der in den Sicherheitshinweisen verwendete Begriff „Elektrowerkzeug“ bezieht
sich auf netzbetriebene Elektrowerkzeuge (mit Netzkabel) und auf akkubetriebene
Elektrowerkzeuge (ohne Netzkabel).
a) Halten Sie Ihren Arbeitsbereich sauber und gut beleuchtet. Unordnung
b) Arbeiten Sie mit dem Elektrowerkzeug nicht in
c) Halten Sie Kinder und andere Personen während der Benutzung des
a) Der Anschlussstecker des Elektrowerkzeuges muss in die
b) Vermeiden Sie Körperkontakt mit geerdeten Oberflächen wie von
c) Halten Sie Elektrowerkzeuge von Regen oder Nässe fern. Das
d) Zweckentfremden Sie das Kabel nicht, um das Elektrowerkzeug
oder unbeleuchtete Arbeitsbereiche können zu Unfällen führen.
explosionsgefährdeter Umgebung, in der sich brennbare
Flüssigkeiten, Gase oder Stäube befinden. Elektrowerkzeuge erzeugen
Funken, die den Staub oder die Dämpfe entzünden können.
Elektrowerkzeugs fern. Bei Ablenkung können Sie die Kontrolle über das
Elektrowerkzeug verlieren.
Steckdose passen. Der Stecker darf in keiner Weise verändert
werden. Verwenden Sie keine Adapterstecker gemeinsam mit
schutzgeerdeten Elektrowerkzeugen. Unveränderte Stecker und
passende Steckdosen verringern das Risiko eines elektrischen Schlages.
Rohren, Heizungen, Herden und Kühlschränken. Es besteht ein erhöhtes
Risiko durch elektrischen Schlag, wenn Ihr Körper geerdet ist.
Eindringen von Wasser in ein Elektrowerkzeug erhöht das Risiko eines
elektrischen Schlages.
zu tragen, aufzuhängen oder um den Stecker aus der Steckdose zu
ziehen. Halten Sie das Kabel fern von Hitze, Öl, scharfen Kanten oder
sich bewegenden Geräteteilen. Beschädigte oder verwickelte Kabel
erhöhen das Risiko eines elektrischen Schlages.
1. Sicherheitshinweise
1.1 Allgemeine
Sicherheitshinweise für
Elektro werk zeuge
Arbeits platzsicherheit
Elektrische
Sicherheit
4
Page 5

DE
GEBRAUCHSAN WEISUNG
AB-IW900
e) Wenn Sie mit einem Elektrowerkzeug im Freien arbeiten, verwenden
Sie nur Verlängerungskabel, die auch für den Außenbereich
geeignet sind. Die Anwendung eines für den Außenbereich geeigneten
Verlängerungskabels verringert das Risiko eines elektrischen Schlages.
f) Wenn der Betrieb des Elektrowerkzeuges in feuchter Umgebung
nicht vermeidbar ist, verwenden Sie einen Fehlerstromschutzschalter. Der Einsatz eines Fehlerstromschutzschalters vermindert das Risiko
eines elektrischen Schlages.
Sicherheit von
Personen
a) Seien Sie aufmerksam, achten Sie darauf, was Sie tun, und gehen
Sie mit Vernunft an die Arbeit mit einem Elektrowerkzeug. Benutzen
Sie kein Elektrowerkzeug, wenn Sie müde sind oder unter dem
Einfluss von Drogen, Alkohol oder Medikamenten stehen. Ein
Mo ment der Unachtsamkeit beim Gebrauch des Elektrowerkzeuges kann zu
ernsthaften Verletzungen führen.
b) Tragen Sie persönliche Schutzausrüstung und immer eine Schutz-
brille. Das Tragen persönlicher Schutzausrüstung, wie Staubmaske,
rutsch feste Sicherheitsschuhe, Schutzhelm oder Gehörschutz, je nach Art und
Einsatz des Elektrowerkzeuges, verringert das Risiko von Verletzungen.
c) Vermeiden Sie eine unbeabsichtigte Inbetriebnahme. Vergewissern
Sie sich, dass das Elektrowerkzeug ausgeschaltet ist, bevor Sie es
an die Stromversorgung und/oder den Akku anschließen, es aufnehmen oder tragen. Wenn Sie beim Tragen des Elektrowerkzeuges den
Finger am Schalter haben oder das Elektrowerkzeug eingeschaltet an die
Stromversorgung anschließen, kann dies zu Unfällen führen.
d) Entfernen Sie Einstellwerkzeuge oder Schraubenschlüssel, bevor
Sie das Elektrowerkzeug einschalten. Ein Werkzeug oder Schlüssel, der
sich in einem drehenden Geräteteil befindet, kann zu Verletzungen führen.
Vermeiden Sie eine abnormale Körperhaltung. Sorgen Sie für einen sich-
e)
eren Stand und halten Sie jederzeit das Gleichgewicht. Dadurch können
Sie das Elektrowerkzeug in unerwarteten Situationen besser kontrollieren.
f) Tragen Sie geeignete Kleidung. Tragen Sie keine weite Kleidung
oder Schmuck. Halten Sie Haare, Kleidung und Handschuhe fern von
sich bewegenden Teilen. Lockere Kleidung, Schmuck oder lange Haare
können von sich bewegenden Teilen erfasst werden.
g) Wenn Staubabsaug- und -auffangeinrichtungen montiert werden
können, vergewissern Sie sich, dass diese angeschlossen sind und
richtig verwendet werden. Verwendung einer Staubabsaugung kann
Gefährdungen durch Staub verringern.
5
Page 6

• Beim Wechsel der Fahrzeugreifen zusätzliche Hebevorrichtungen und
Sicherheitsstützvorrichtungen verwenden.
• Beim Gebrauch den Antrieb des Schlagschraubers nicht mit den Händen
berühren.
Auch wenn Sie dieses Elektrowerkzeug vorschriftsmäßig bedienen, bleiben
immer Restrisiken bestehen. Folgende Gefahren können im Zu sammen hang
mit der Bauweise und Ausführung dieses Elektro werkzeugs auftreten:
1. Lungenschäden, falls keine geeignete Staubschutzmaske getragen wird.
2. Gehörschäden, falls kein geeigneter Gehörschutz getragen wird.
3. Gesundheitsschäden, die aus Hand-Arm-Schwingungen resultieren, falls das
Gerät über einen längeren Zeitraum verwendet wird oder nicht ordnungsgemäß
geführt und gewartet wird.
Warnung! Dieses Elektrowerkzeug erzeugt während des Betriebs ein
elektromagnetisches Feld. Dieses Feld kann unter bestimmten Umständen
aktive oder passive medizinische Implantate beeinträchtigen. Um die Gefahr von
ernsthaften oder tödlichen Verletzungen zu verringern, empfehlen wir Personen
mit medizinischen Implantaten ihren Arzt und den Hersteller vom medizinischen
Implantat zu konsultieren, bevor das Elektrowerkzeug bedient wird.
Tragen Sie eine Staubschutzmaske. Beim Bearbeiten von
Holz und anderer Materialien kann gesundheitsschädlicher Staub
entstehen.
Tragen Sie stets eine Schutzbrille. Verletzungsgefahr für die
Augen durch Splitter oder Stäube.
Tragen Sie Gehörschutz. Die Einwirkung von Lärm kann
Gehörverlust bewirken.
Tragen Sie Schutzkleidung. Wie zusätzliche Arbeitshemden,
Overalls und Mützen.
Restrisiken
DE
GEBRAUCHSAN WEISUNG
AB-IW900
a) Überlasten Sie das Gerät nicht. Verwenden Sie für Ihre Arbeit das
dafür bestimmte Elektrowerkzeug. Mit dem passenden Elektrowerkzeug
arbeiten Sie besser und sicherer im angegebenen Leistungsbereich.
b) Benutzen Sie kein Elektrowerkzeug, dessen Schalter defekt ist.
Ein Elektrowerkzeug, das sich nicht mehr ein- oder ausschalten lässt, ist
gefährlich und muss repariert werden.
c) Ziehen Sie den Stecker aus der Steckdose und/oder entfernen
Sie den Akku, bevor Sie Geräteeinstellungen vornehmen,
Zu behör teile wechseln oder das Elektrowerkzeug weglegen.
Diese Vorsichtsmaßnahme verhindert den unbeabsichtigten Start des
Elektrowerkzeuges.
d) Bewahren Sie unbenutzte Elektrowerkzeuge außerhalb der Reich-
weite von Kindern auf. Lassen Sie Personen das Elektrowerkzeug
nicht benutzen, die mit diesem nicht vertraut sind oder diese
Anweisungen nicht gelesen haben. Elektrowerkzeuge sind gefährlich,
wenn Sie von unerfahrenen Personen benutzt werden.
e) Pflegen Sie Elektrowerkzeuge mit Sorgfalt. Kontrollieren Sie, ob
bewegliche Teile einwandfrei funktionieren und nicht klemmen,
ob Teile gebrochen oder so beschädigt sind, dass die Funktion des
Elektrowerkzeuges beeinträchtigt ist. Lassen Sie beschädigte Teile
vor dem Einsatz des Elektrowerkzeuges reparieren. Viele Unfälle
haben ihre Ursache in schlecht gewarteten Elektrowerkzeugen.
f) Halten Sie Schneidwerkzeuge scharf und sauber. Sorgfältig gepflegte
Schneidwerkzeuge mit scharfen Schneidkanten verklemmen sich weniger und
sind leichter zu führen.
g) Verwenden Sie Elektrowerkzeug, Zubehör, Einsatzwerkzeuge usw.
entsprechend diesen Anweisungen. Berücksichtigen Sie dabei die
Arbeitsbedingungen und die auszuführende Tätigkeit. Der Gebrauch
von Elektrowerkzeugen für andere als die vorgesehenen Anwendungen kann
zu gefährlichen Situationen führen.
h) Lassen Sie Ihr Elektrowerkzeug nur von qualifiziertem Fachpersonal
und nur mit Original- Ersatzteilen reparieren. Damit wird sichergestellt,
dass die Sicherheit des Elektrowerkzeuges erhalten bleibt.
Verwen dung
und Behand lung
des
Elektro-
werk zeuges
Service
Halten Sie das Gerät an den isolierten Griffflächen, wenn Sie Arbeiten
ausführen, bei denen die Schraube verborgene Stromleitungen oder
das eigene Netzkabel treffen kann. Der Kontakt der Schraube mit einer
spannungsführenden Leitung kann auch metallene Geräteteile unter Spannung
setzen und zu einem elektrischen Schlag führen.
• Die Räder vor Gebrauch des Produkts stets blockieren oder verkeilen und die
Feststellbremse anziehen.
• Beim Entfernen oder Anbringen der Radkappe äußerste Vorsicht walten lassen,
um Personen- oder Sachschäden zu vermeiden.
6
1.2 Sicherheitshinweise für
Schlag schrauber
Page 7
DE
GEBRAUCHSAN WEISUNG
AB-IW900
• Beim Wechsel der Fahrzeugreifen zusätzliche Hebevorrichtungen und
Sicherheitsstützvorrichtungen verwenden.
• Beim Gebrauch den Antrieb des Schlagschraubers nicht mit den Händen
berühren.
Restrisiken
Auch wenn Sie dieses Elektrowerkzeug vorschriftsmäßig bedienen, bleiben
immer Restrisiken bestehen. Folgende Gefahren können im Zu sammen hang
mit der Bauweise und Ausführung dieses Elektro werkzeugs auftreten:
1. Lungenschäden, falls keine geeignete Staubschutzmaske getragen wird.
2. Gehörschäden, falls kein geeigneter Gehörschutz getragen wird.
3. Gesundheitsschäden, die aus Hand-Arm-Schwingungen resultieren, falls das
Gerät über einen längeren Zeitraum verwendet wird oder nicht ordnungsgemäß
geführt und gewartet wird.
Warnung! Dieses Elektrowerkzeug erzeugt während des Betriebs ein
elektromagnetisches Feld. Dieses Feld kann unter bestimmten Umständen
aktive oder passive medizinische Implantate beeinträchtigen. Um die Gefahr von
ernsthaften oder tödlichen Verletzungen zu verringern, empfehlen wir Personen
mit medizinischen Implantaten ihren Arzt und den Hersteller vom medizinischen
Implantat zu konsultieren, bevor das Elektrowerkzeug bedient wird.
Tragen Sie eine Staubschutzmaske. Beim Bearbeiten von
Holz und anderer Materialien kann gesundheitsschädlicher Staub
entstehen.
Tragen Sie stets eine Schutzbrille. Verletzungsgefahr für die
Augen durch Splitter oder Stäube.
Tragen Sie Gehörschutz. Die Einwirkung von Lärm kann
Gehörverlust bewirken.
Tragen Sie Schutzkleidung. Wie zusätzliche Arbeitshemden,
Overalls und Mützen.
7
Page 8
4. Bedien-
elemente
5. Gebrauch
5.1 Bestimmungs-
gemäßer Gebrauch
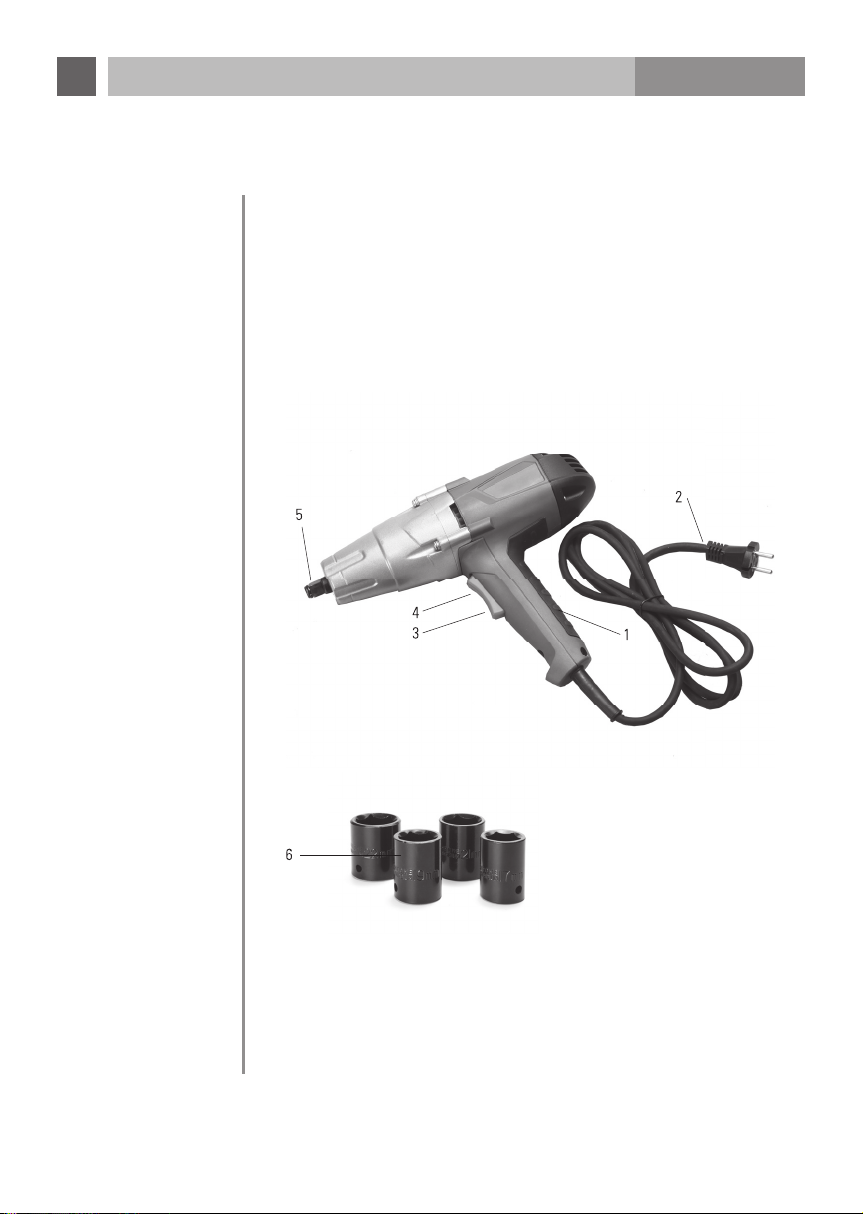
1. Handgriff
2. Netzkabel mit Netzstecker
3. Wippschalter Rechtslauf (F)
4. Wippschalter Linkslauf (R)
5. Steckschlüsselhalter
6. Steckschlüsseleinsätze (Zubehör)
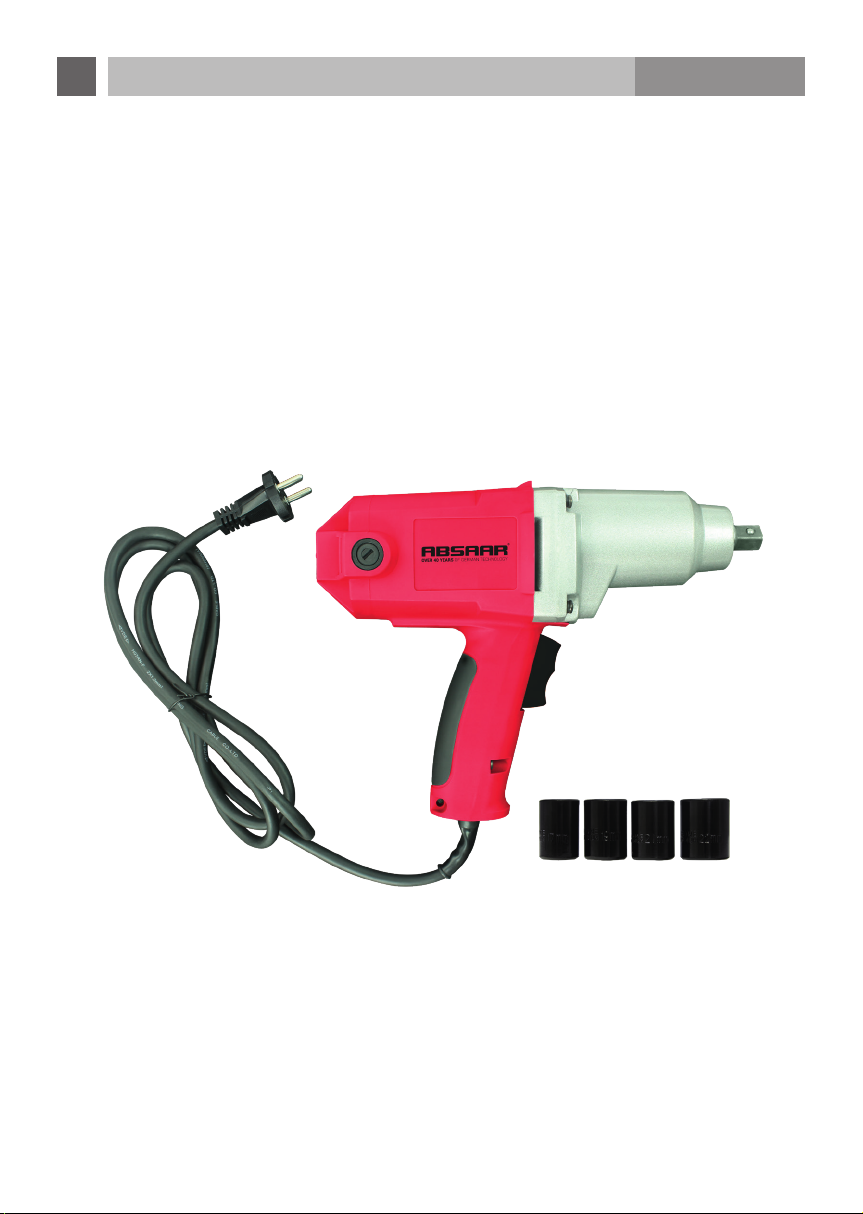
Dieser Schlagschrauber ist geeignet, um Bolzen, Schrauben und Muttern
ein- bzw. auszudrehen. Benutzen Sie ihn nicht für andere Zwecke. Nicht
bestimmungsgemäße Benutzung des Werkzeugs kann Personen- oder
Sachschäden verursachen.
Mit diesem Schlagschrauber dürfen ausschließlich Steckschlüssel mit
Vierkanteinsätzen (12,7 mm, ½") verwendet werden.
22 mm
21 mm
19 mm
17 mm
DE
GEBRAUCHSAN WEISUNG
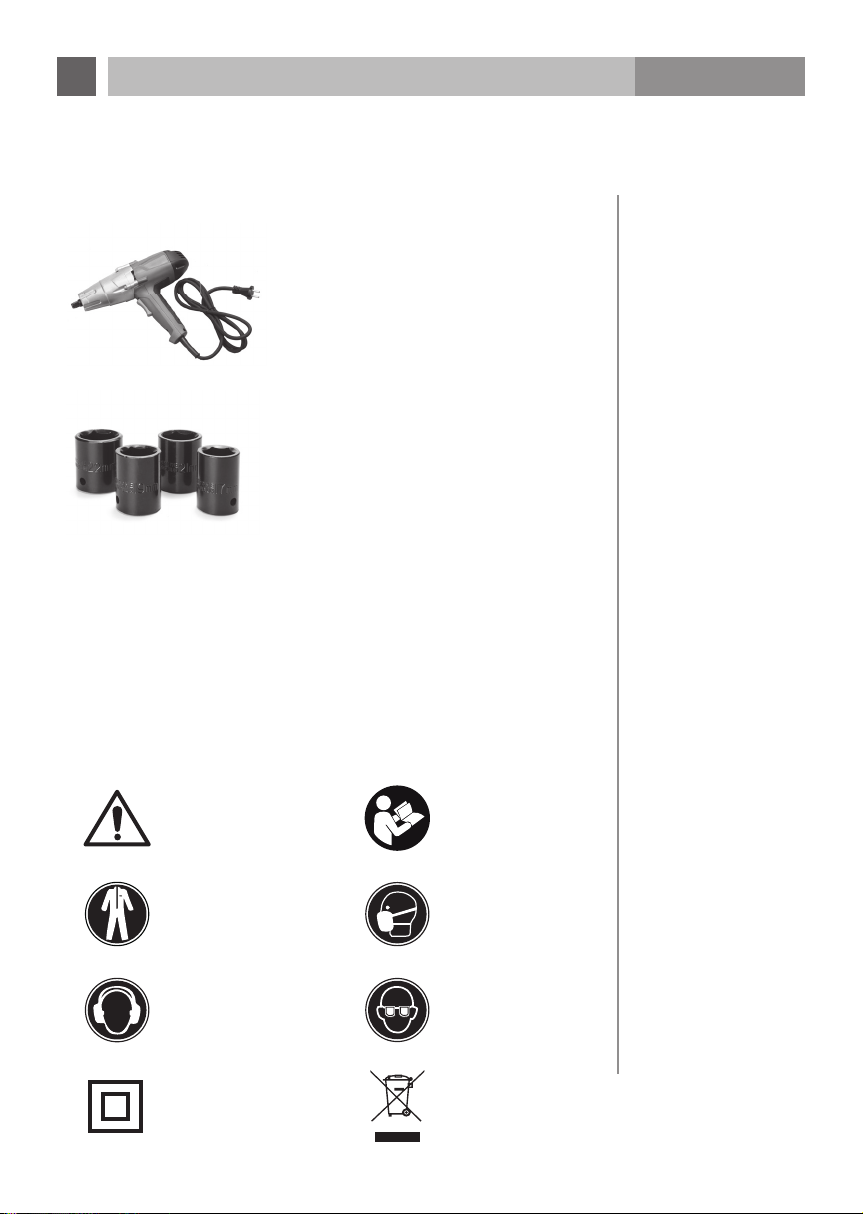
1 Schlagschrauber
mit Netzkabel
4 Steckschlüsseleinsätze
(17 mm, 19 mm, 21 mm, 22 mm)
AB-IW900
gnafmu refeiL .2
Diese Symbole werden auf den folgenden Seiten verwendet:
Warnung Anmerkung
Schutzkleidung Staubmaske
Gehörschutz Sichtschutz
Schutzklasse II Umweltschutz
3. Erklärung
verwendeter
Symbole
8
Page 9
DE
GEBRAUCHSAN WEISUNG
AB-IW900
4. Bedien-
elemente
1. Handgriff
2. Netzkabel mit Netzstecker
3. Wippschalter Rechtslauf (F)
4. Wippschalter Linkslauf (R)
5. Steckschlüsselhalter
6. Steckschlüsseleinsätze (Zubehör)
5. Gebrauch
5.1 Bestimmungs-
gemäßer Gebrauch
22 mm
21 mm
19 mm
17 mm
Dieser Schlagschrauber ist geeignet, um Bolzen, Schrauben und Muttern
ein- bzw. auszudrehen. Benutzen Sie ihn nicht für andere Zwecke. Nicht
bestimmungsgemäße Benutzung des Werkzeugs kann Personen- oder
Sachschäden verursachen.
Mit diesem Schlagschrauber dürfen ausschließlich Steckschlüssel mit
Vierkanteinsätzen (12,7 mm, ½") verwendet werden.
9
Page 10
Dieser Schlagschrauber ist mit einem Wippschalter ausgestattet, mit dem von
Rechtslauf auf Linkslauf umgeschaltet werden kann.
• Verbinden Sie den Netzstecker (2) mit einer geeigneten Netzsteckdose.
• Wählen Sie einen geeigneten Steckschlüssel aus. Achten Sie beim Einsetzen
darauf, dass der Steckschlüssel fest und sicher auf dem Steckschlüsselhalter
(5) sitzt.
• Setzen Sie das Werkzeug fest auf das zu bearbeitende Befestigungsmaterial
(Bolzen bzw. Mutter) an.
• Für Rechtslauf-Rotation (im Uhrzeigersinn, zum Eindrehen von
Befestigungsmaterial) drücken Sie den Wippschalter auf die Rechtslauf-
Position (F) (3). Prüfen Sie vor der Benutzung, ob die Rotationsrichtung korrekt
ist.
Aus Sicherheitsgründen ist das Drehmoment beim Rechtslauf
auf 100 Nm begrenzt. Bitte ziehen Sie die Radbolzen mit einem
Drehmomentschlüssel und einem Drehmoment von ca. 120 Nm
fest. Wir weisen Sie darauf hin, dass nach einer Fahrstrecke von
ca. 50 km die Radbolzen nachgezogen werden müssen. Überprüfen
Sie den festen Sitz der Radbolzen.
• Für Linkslauf-Rotation (entgegen Uhrzeigersinn, zum Lösen von
Befestigungsmaterial) drücken Sie den Wippschalter auf die Linkslauf-Position
(R) (4). Prüfen Sie vor der Benutzung, ob die Rotationsrichtung korrekt ist.
•
Lassen Sie den Wippschalter (3 oder 4) los, um das Werkzeug stoppen zu lassen.
• Trennen Sie den Netzstecker (2) nach der Arbeit von der Netzstromverbindung.
6.2 Ein-/Ausschalten
1
DE
GEBRAUCHSAN WEISUNG
AB-IW900
Alle Anwendungen mit dem Gerät die nicht im Kapitel "Bestimmungsgemäße
Verwendung" genannt sind, gelten als eine nicht bestimmungsgemäße Verwendung.
Das Gerät darf nicht zu folgenden Zwecken eingesetzt werden:
• Zum Mischen von Farben oder Baustoffen,
• Polieren, Schleifen, Schärfen, Gravieren mit entsprechenden Vorsätzen,
• Antrieb für weitere Geräte.
Es besteht Verletzungsgefahr.
Für alle daraus entstandenen Sachschäden sowie Personenschäden, die aufgrund
einer Fehlanwendung entstanden sind, haftet der Benutzer des Gerätes.
Bei Verwendung anderer bzw. nicht Original-Bauteile an der Maschine erlischt
herstellerseitig die Garantieleistung.
Warnung!
• Um das Risiko von Verletzungen zu verringern, trennen Sie das
Werkzeug stets von der Netzversorgung, bevor Sie Zubehörteile
einsetzen bzw. entfernen oder bevor Sie Einstellungen verändern.
• Benutzen Sie ausschließlich speziell für Schlagschrauber
entworfene Steckschlüssel bzw. anderes Zubehör. Andere
Steckschlüssel bzw. anderes Zubehör könnte/n splittern oder
zerbrechen und dadurch Verletzungen verursachen.
Führen Sie vor der Benutzung des Werkzeugs eine visuelle Prüfung durch:
Weisen z.B. die Steckschlüssel Sprünge auf und sitzen sie korrekt auf dem
Steckschlüsselhalter? Hat sich der Steckschlüsselhalter verzogen? Sind
Wippschalter, Netzkabel oder Netzstecker beschädigt?
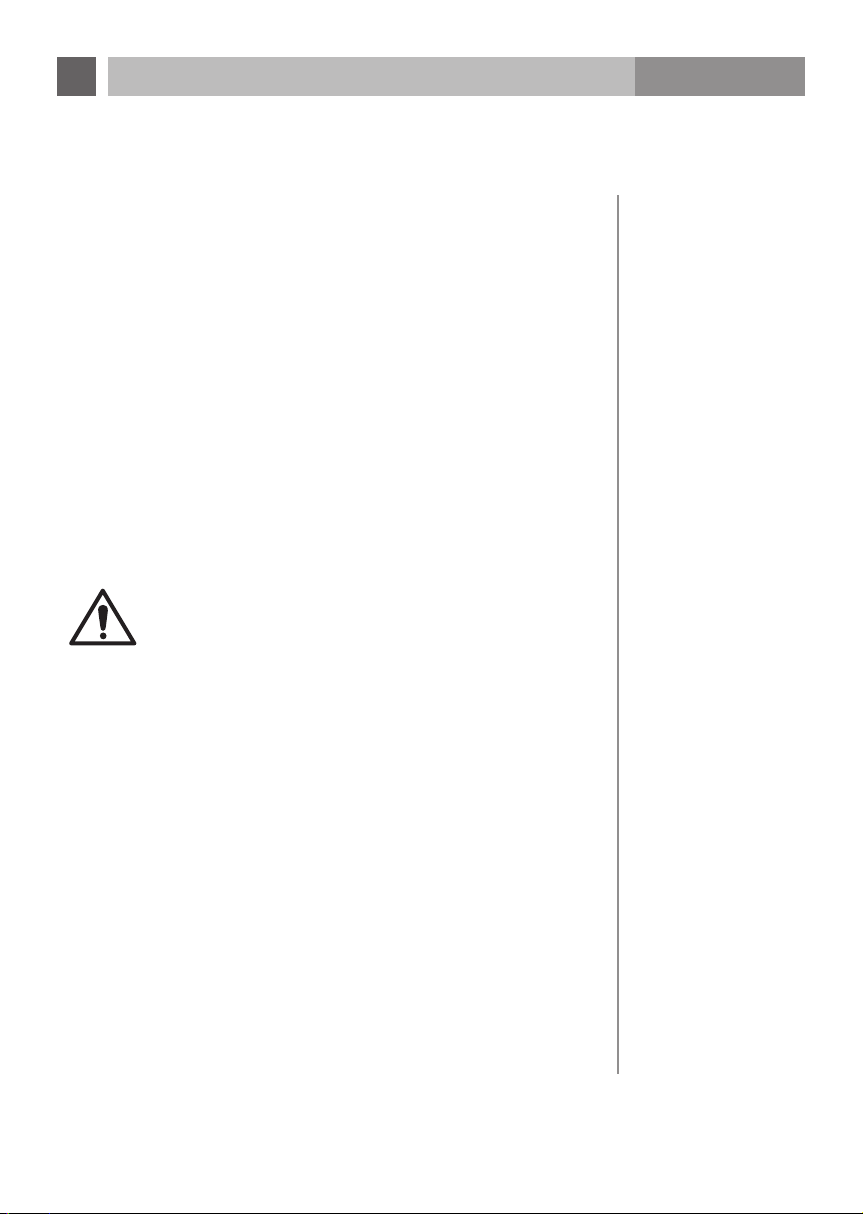
• Steckschlüssel (6) befestigen: Führen Sie den Steckschlüssel an den
Steckschlüsselhalter (5) und drücken Sie ihn bis zum Einrasten in den
Steckschlüsselhalter ein.
• Steckschlüssel (6) abnehmen: Halten Sie den Steckschlüssel fest und ziehen
Sie ihn aus dem Steckschlüsselhalter (5).
5.2 Nicht
be stimmungsgemäßer Ge brauch
6. Bedienung
6.1 Steckschlüssel
einsetzen/
abnehmen
10
Page 11
DE
GEBRAUCHSAN WEISUNG
AB-IW900
1
6.2 Ein-/Ausschalten
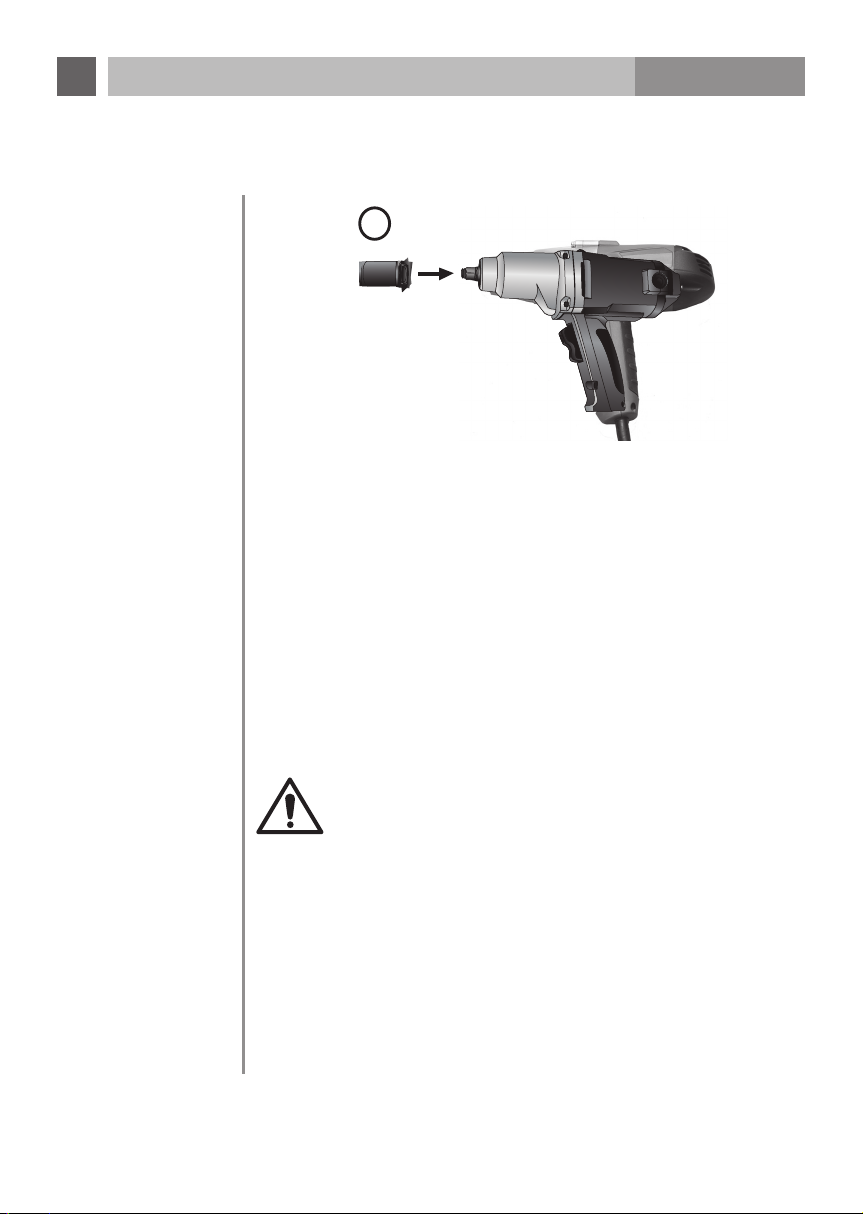
Dieser Schlagschrauber ist mit einem Wippschalter ausgestattet, mit dem von
Rechtslauf auf Linkslauf umgeschaltet werden kann.
• Verbinden Sie den Netzstecker (2) mit einer geeigneten Netzsteckdose.
• Wählen Sie einen geeigneten Steckschlüssel aus. Achten Sie beim Einsetzen
darauf, dass der Steckschlüssel fest und sicher auf dem Steckschlüsselhalter
(5) sitzt.
• Setzen Sie das Werkzeug fest auf das zu bearbeitende Befestigungsmaterial
(Bolzen bzw. Mutter) an.
• Für Rechtslauf-Rotation (im Uhrzeigersinn, zum Eindrehen von
Befestigungsmaterial) drücken Sie den Wippschalter auf die RechtslaufPosition (F) (3). Prüfen Sie vor der Benutzung, ob die Rotationsrichtung korrekt
ist.
Aus Sicherheitsgründen ist das Drehmoment beim Rechtslauf
auf 100 Nm begrenzt. Bitte ziehen Sie die Radbolzen mit einem
Drehmomentschlüssel und einem Drehmoment von ca. 120 Nm
fest. Wir weisen Sie darauf hin, dass nach einer Fahrstrecke von
ca. 50 km die Radbolzen nachgezogen werden müssen. Überprüfen
Sie den festen Sitz der Radbolzen.
• Für Linkslauf-Rotation (entgegen Uhrzeigersinn, zum Lösen von
Befestigungsmaterial) drücken Sie den Wippschalter auf die Linkslauf-Position
(R) (4). Prüfen Sie vor der Benutzung, ob die Rotationsrichtung korrekt ist.
•
Lassen Sie den Wippschalter (3 oder 4) los, um das Werkzeug stoppen zu lassen.
• Trennen Sie den Netzstecker (2) nach der Arbeit von der Netzstromverbindung.
11
Page 12
• Heben Sie das KFZ mit dem Original-Zubehör und -Werkzeug des KFZ-
Herstellers an. Halten Sie sich strikt an die Bedienungsanleitung des
Herstellers.
• Wählen Sie einen geeigneten Steckschlüssel aus. Achten Sie beim Einsetzen
darauf, dass der Steckschlüssel fest und sicher auf dem Steckschlüsselhalter
(5) sitzt.
• Setzen Sie das Werkzeug fest auf das zu bearbeitende Befestigungsmaterial
des Reifens an.
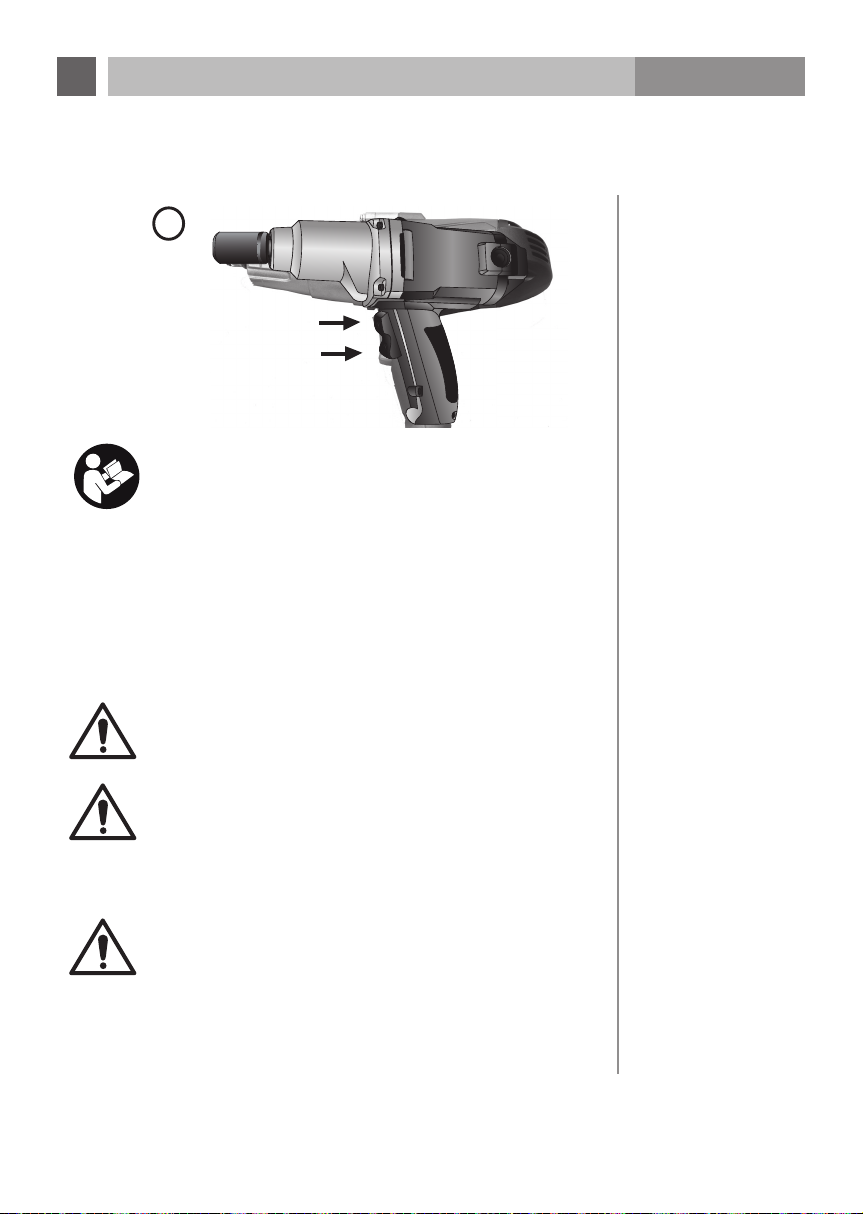
• Zum Eindrehen (im Uhrzeigersinn) drücken Sie den Wippschalter auf
die Rechtslauf-Position (F) (3). Prüfen Sie vor der Benutzung, ob die
Rotationsrichtung korrekt ist.
Aus Sicherheitsgründen ist das Drehmoment beim Rechtslauf
auf 100 Nm begrenzt. Bitte ziehen Sie die Radbolzen mit einem
Drehmomentschlüssel und einem Drehmoment von ca. 120 Nm
fest. Wir weisen Sie darauf hin, dass nach einer Fahrstrecke von
ca. 50 km die Radbolzen nachgezogen werden müssen. Überprüfen
Sie den festen Sitz der Radbolzen.
• Zum Lösen (entgegen dem Uhrzeigersinn) stellen Sie den Wippschalter
auf die Linkslauf-Position (R) (4). Prüfen Sie vor der Benutzung, ob die
Rotationsrichtung korrekt ist.
• Das Lösen der Radmuttern/-schrauben kann mehrere Schläge erfordern.
• Lassen Sie den Wippschalter (3 oder 4) los, um das Werkzeug stoppen zu
lassen.
• Trennen Sie den Netzstecker (2) nach der Arbeit von der Netzstromverbindung.
Anmerkungen:
• Beachten Sie strikt die Herstellerhinweise bezüglich des zu
verwendenden Drehmoments. Es gibt hier keine generellen
Werte für Alufelgen oder Stahlfelgen.
• Bitte prüfen Sie vor Fahrtantritt mit einem Drehmomentschlüssel
den korrekten Sitz der Radmuttern/-schrauben.
• Prüfen Sie nach 30-50 km Fahrtstrecke mit einem Drehmoment-
schlüssel den korrekten Sitz der Radmuttern/-schrauben.
DE
GEBRAUCHSAN WEISUNG
2
Arbeitshinweise:
• Das Lösen/Festdrehen von Bolzen, Schrauben oder Muttern kann
mehrere Schläge benötigen.
• Je länger Sie einen Bolzen, eine Schraube oder eine
Mutter eindrehen, desto fester wird sie sitzen. Vermeiden
Sie verlängertes Eindrehen, um Beschädigungen des
Befestigungsmaterials oder des Mauerwerks zu verhindern.
• Beachten Sie insbesondere, dass kleineres Befestigungsmaterial
häufi g geringere Festigkeit benötigt.
• Öl, Schmutz, Rost und andere auf den Gewinden bzw. unter den
Schraubenköpfen befi ndliche Stoffe können die Festigkeit der
Befestigungsmaterialien beeinfl ussen.
Warnung! Halten Sie Hände und Netzkabel in genügendem
Abstand der Steckschlüssel und sich bewegender Teile.
Warnung! Lassen Sie den Motor vor dem Umschalten zwischen
Rechtslauf und Linkslauf vollständig zur Ruhe kommen, um
Beschädigung des Motors und anderer Werkzeugteile zu verhindern.
AB-IW900
Linkslauf (R)
Rechtslauf (F)
Warnung! Befolgen Sie bitte die Hinweise im Handbuch des
Herstellers des Fahrzeugs zum Gebrauch dieses Produkts. Die
empfohlenen Angaben in keinem Fall überschreiten. Die Radmuttern
entsprechend den in der Bedienungsanleitung des Fahrzeugs
aufgeführten Drehmomentangaben anziehen. Zu fest oder zu locker
angezogene Radmuttern können zum Versagen des Rades führen.
• Legen Sie einen Gang ein, oder stellen Sie das Automatikgetriebe auf „P“.
Blockieren Sie die Räder mit der Handbremse.
• Verbinden Sie den Netzstecker (2) mit einer geeigneten Netzsteckdose.
12
6.3 Reifen wechseln
Page 13
DE
GEBRAUCHSAN WEISUNG
AB-IW900
• Heben Sie das KFZ mit dem Original-Zubehör und -Werkzeug des KFZHerstellers an. Halten Sie sich strikt an die Bedienungsanleitung des
Herstellers.
• Wählen Sie einen geeigneten Steckschlüssel aus. Achten Sie beim Einsetzen
darauf, dass der Steckschlüssel fest und sicher auf dem Steckschlüsselhalter
(5) sitzt.
• Setzen Sie das Werkzeug fest auf das zu bearbeitende Befestigungsmaterial
des Reifens an.
• Zum Eindrehen (im Uhrzeigersinn) drücken Sie den Wippschalter auf
die Rechtslauf-Position (F) (3). Prüfen Sie vor der Benutzung, ob die
Rotationsrichtung korrekt ist.
Aus Sicherheitsgründen ist das Drehmoment beim Rechtslauf
auf 100 Nm begrenzt. Bitte ziehen Sie die Radbolzen mit einem
Drehmomentschlüssel und einem Drehmoment von ca. 120 Nm
fest. Wir weisen Sie darauf hin, dass nach einer Fahrstrecke von
ca. 50 km die Radbolzen nachgezogen werden müssen. Überprüfen
Sie den festen Sitz der Radbolzen.
• Zum Lösen (entgegen dem Uhrzeigersinn) stellen Sie den Wippschalter
auf die Linkslauf-Position (R) (4). Prüfen Sie vor der Benutzung, ob die
Rotationsrichtung korrekt ist.
• Das Lösen der Radmuttern/-schrauben kann mehrere Schläge erfordern.
• Lassen Sie den Wippschalter (3 oder 4) los, um das Werkzeug stoppen zu
lassen.
• Trennen Sie den Netzstecker (2) nach der Arbeit von der Netzstromverbindung.
Anmerkungen:
• Beachten Sie strikt die Herstellerhinweise bezüglich des zu
verwendenden Drehmoments. Es gibt hier keine generellen
Werte für Alufelgen oder Stahlfelgen.
• Bitte prüfen Sie vor Fahrtantritt mit einem Drehmomentschlüssel
den korrekten Sitz der Radmuttern/-schrauben.
• Prüfen Sie nach 30-50 km Fahrtstrecke mit einem Drehmomentschlüssel den korrekten Sitz der Radmuttern/-schrauben.
13
Page 14
8. Umwelt-
schutz
9. Problem -
behebung
Alt-Elektrogeräte sind Wertstoffe, sie gehören daher nicht in den
Hausmüll! Wir möchten Sie daher bitten, uns mit Ihrem aktiven
Beitrag bei der Ressourcenschonung und beim Umweltschutz
zu unterstützen und dieses Gerät bei den – falls vorhanden –
eingerichteten Rücknahmestellen abzugeben.
Problem Ursache Lösung
Das Werkzeug arbeitet
nicht.
Der Netzstecker (2)
ist nicht korrekt mit
einer Netzsteckdose
verbunden.
Die Netzsteckdose
liefert keinen Strom.
Verbinden Sie den
Netzstecker (2) korrekt mit
einer Netzsteckdose.
Stellen Sie sicher, dass
die Netzsteckdose Strom
anliefert.
Anomale Geräusche
oder Vibrationen.
Steckschlüssel (6)
nicht korrekt am
Werkzeug eingesetzt.
Werkzeugschrauben
lose.
Werkzeugmotor muss
geölt oder repariert
werden.
Setzen Sie den
Steckschlüssel (6) korrekt
ein.
Ziehen Sie alle
Werkzeugschrauben an.
Lassen Sie das Werkzeug
von einer autorisierten
Werkstatt reparieren.
Steckschlüssel (6)
kann nicht problemlos
auf Bolzen oder
Muttern angesetzt
werden.
Der ausgewählte
Steckschlüssel
(6) ist für das
zu bearbeitende
Befestigungsmaterial
(Bolzen, Mutter) nicht
geeignet.
Wählen Sie einen
geeigneten Steckschlüssel
(6), mit dem der Bolzen/die
Mutter bearbeitet werden
kann.
DE
GEBRAUCHSAN WEISUNG
AB-IW900
Warnung! Trennen Sie das Werkzeug vor Reinigung oder Pflege
stets von der Netzversorgung, um das Risiko von Verletzungen
• Ziehen Sie den Netzstecker (2) aus der Netzsteckdose.
• Entfernen Sie den Steckschlüssel (6) aus dem Steckschlüsselhalter (5).
• Reinigen Sie die Entlüftungsschlitze von Staub und Schmutz.
• Benutzen Sie eine milde Seife und ein angefeuchtetes Tuch, um das Gehäuse
und den Handgriff (1) des Schlagschraubers zu reinigen. Halten Sie den
Handgriff stets frei von Öl und Schmierfett.
• Wir empfehlen, das Werkzeug und die Zubehörteile im Tragekoffer (7) an
einem trockenen und sauberen Ort aufzubewahren.
• Wenn die Netzanschlussleitung dieses Gerätes beschädigt wird, muss sie
durch den Hersteller oder seinen Kundendienst oder eine ähnlich qualifizierte
Person ersetzt werden, um Gefährdungen zu vermeiden.
zu vermindern. Versuchen Sie niemals, das Werkzeug selber zu
reparieren.
Warnung!
• Benutzen Sie keine Reinigungsmittel, Alkohol oder
Verdünnungsmittel, um das Werkzeug zu reinigen. Diese
könnten die Kunststoffteile und andere isolierte Teile des
Werkzeuges beschädigen.
• Benutzen Sie niemals brennbare oder entflammbare
Verdünnungsmittel in der Nähe des Werkzeuges!
• Tauchen Sie das Werkzeug niemals in Flüssigkeiten ein und
achten Sie darauf, dass keine Flüssigkeiten in das Werkzeug
einlaufen können.
7. Reinigung
und Pflege
Schalten Sie das Gerät aus. Ziehen Sie den Netzstecker aus der Steckdose.
Wenn die Kohlebürste so weit abgenutzt ist, dass der Kunststoff-Isolierstift in
ihrem Inneren den Kollektor berührt, wird der Motor automatisch abgeschaltet.
Wenn dies eintritt, müssen beide Kohlebürsten gleichzeitig erneuert werden.
Verwenden Sie nur identische Kohlebürsten.
Um die Sicherheit und Zuverlässigkeit dieser Maschine zu gewährleisten, sollten
Reparatur-, Wartungs-, und Einstellarbeiten nur in vom Hersteller autorisierten
Werkstätten oder Kundendienstzentren unter ausschließlicher Verwendung von
Hersteller-Originalersatzteilen ausgeführt werden.
14
7.1 Auswechseln
der Kohlebürsten
Page 15

DE
GEBRAUCHSAN WEISUNG
AB-IW900
8. Umweltschutz
9. Problem behebung
Alt-Elektrogeräte sind Wertstoffe, sie gehören daher nicht in den
Hausmüll! Wir möchten Sie daher bitten, uns mit Ihrem aktiven
Beitrag bei der Ressourcenschonung und beim Umweltschutz
zu unterstützen und dieses Gerät bei den – falls vorhanden –
eingerichteten Rücknahmestellen abzugeben.
Problem Ursache Lösung
Das Werkzeug arbeitet
nicht.
Anomale Geräusche
oder Vibrationen.
Der Netzstecker (2)
ist nicht korrekt mit
einer Netzsteckdose
verbunden.
Die Netzsteckdose
liefert keinen Strom.
Steckschlüssel (6)
nicht korrekt am
Werkzeug eingesetzt.
Werkzeugschrauben
lose.
Verbinden Sie den
Netzstecker (2) korrekt mit
einer Netzsteckdose.
Stellen Sie sicher, dass
die Netzsteckdose Strom
anliefert.
Setzen Sie den
Steckschlüssel (6) korrekt
ein.
Ziehen Sie alle
Werkzeugschrauben an.
Steckschlüssel (6)
kann nicht problemlos
auf Bolzen oder
Muttern angesetzt
werden.
Werkzeugmotor muss
geölt oder repariert
werden.
Der ausgewählte
Steckschlüssel
(6) ist für das
zu bearbeitende
Befestigungsmaterial
(Bolzen, Mutter) nicht
geeignet.
15
Lassen Sie das Werkzeug
von einer autorisierten
Werkstatt reparieren.
Wählen Sie einen
geeigneten Steckschlüssel
(6), mit dem der Bolzen/die
Mutter bearbeitet werden
kann.
Page 16
10.3 Hinweis zur
Lärmbelästigung
11. Garantie-
erklärung
Eine gewisse Lärmbelästigung durch dieses Werkzeug ist nicht
vermeidbar. Verlegen Sie lärmintensive Arbeiten auf zugelassene und dafür
bestimmte Zeiten. Halten Sie sich ggf. an Ruhezeiten und beschränken Sie die
Arbeitsdauer auf das Notwendigste. Zu Ihrem persönlichen Schutz und zum Schutz
von in der Nähe befindlicher Personen ist ein geeigneter Gehörschutz zu tragen.
Unbeschadet der gesetzlichen Gewährleistungsansprüche gewährt der Hersteller
eine Garantie gemäß den Gesetzen Ihres Landes, mindestens jedoch 1 Jahr (in
Deutschland 2 Jahre).
Garantiebeginn ist das Verkaufsdatum des Gerätes an den Endverbraucher.
Die Garantie erstreckt sich ausschließlich auf Mängel, die auf Material- oder
Herstellungsfehler zurückzuführen sind.
Garantiereparaturen dürfen ausschließlich von einem autorisierten Kundendienst
durchgeführt werden. Um Ihren Garantieanspruch geltend zu machen ist der
Original-Verkaufsbeleg (mit Verkaufsdatum) beizufügen.
Von der Garantie ausgeschlossen sind:
• Normaler Verschleiß
• Unsachgemäße Anwendungen, wie z.B. Überlastung des Gerätes, nicht
zugelassene Zubehörteile
• Beschädigung durch Fremdeinwirkungen, Gewaltanwendung oder durch
Fremdkörper
• Schäden die durch Nichtbeachtung der Gebrauchsanleitung entstehen,
z.B. Anschluss an eine falsche Netzspannung oder Nichtbeachtung der
Montageanleitung
• Komplett oder teilweise demontierte Geräte.
DE
GEBRAUCHSAN WEISUNG
AB-IW900
Nennspannung: 230 V~, 50 Hz
Nennaufnahmeleistung: 900 W
Steckschlüsseleinsatz – Vierkant-Größe: 12,7 mm, ½"
Maximales Drehmoment: 300 Nm Linkslauf (lösen)
100 Nm Rechtslauf (eindrehen)
Schutzklasse: Klasse II
IP-Schutzklasse: IPXO
Leerlaufdrehzahl n
Steckschlüsselgrößen: SW17, SW19, SW21 und SW22
Gewicht (Netto): 3,23 kg
Schalldruckpegel L
Schallleistungspegel L
Hand-Arm-Vibration a
ah mit der Arbeitsweise
„Anziehen von Schrauben
und Muttern max. zulässiger
Größe”
• Hinweis: Die Schall- und Vibrationswerte wurden gemessen gemäß
EN 60745-1 und EN 60745-2-2.
• Hinweis: Der angegebene Vibrationswert ist nach einem genormten
Prüfverfahren ermittelt worden und kann verwendet werden, um
verschiedene Elektrowerkzeuge miteinander zu vergleichen. Zudem eignet
sich dieser Wert, um Belastungen für den Benutzer, die durch Vibrationen
entstehen, im Vorhinein einschätzen zu können.
• Warnung! Abhängig davon, wie Sie das Elektrowerkzeug
einsetzen, können die tatsächlichen Vibrationswerte von dem
angegebenen abweichen.
• Ergreifen Sie Maßnahmen, um sich gegen Vibrationsbelastungen
zu schützen. Berücksichtigen Sie dabei den gesamten
Arbeitsablauf, also auch Zeitpunkte, zu denen das
Elektrowerkzeug ohne Last arbeitet oder ausgeschaltet ist.
• Geeignete Maßnahmen umfassen unter anderem eine
regelmäßige Wartung und Pflege des Elektrowerkzeuges und der
Werkzeugaufsätze, Warmhalten der Hände, regelmäßige Pausen
sowie eine gute Planung der Arbeitsabläufe.
: 2200 min
0
: 96,34 dB(A); KPA: 3,0 dB(A)
PA
: 107,34 dB(A); KWA: 3,0 dB(A)
WA
: 19,652 m/s2; K: 1,5 m/s
h
-1
2
10. Technische
Daten
10.1 Schall und
Vibration
10.2 Hinweise
für Schall- und
Vibrationswerte
16
Page 17

DE
GEBRAUCHSAN WEISUNG
AB-IW900
10.3 Hinweis zur
Lärmbelästigung
11. Garantieerklärung
Eine gewisse Lärmbelästigung durch dieses Werkzeug ist nicht
vermeidbar. Verlegen Sie lärmintensive Arbeiten auf zugelassene und dafür
bestimmte Zeiten. Halten Sie sich ggf. an Ruhezeiten und beschränken Sie die
Arbeitsdauer auf das Notwendigste. Zu Ihrem persönlichen Schutz und zum Schutz
von in der Nähe befindlicher Personen ist ein geeigneter Gehörschutz zu tragen.
Unbeschadet der gesetzlichen Gewährleistungsansprüche gewährt der Hersteller
eine Garantie gemäß den Gesetzen Ihres Landes, mindestens jedoch 1 Jahr (in
Deutschland 2 Jahre).
Garantiebeginn ist das Verkaufsdatum des Gerätes an den Endverbraucher.
Die Garantie erstreckt sich ausschließlich auf Mängel, die auf Material- oder
Herstellungsfehler zurückzuführen sind.
Garantiereparaturen dürfen ausschließlich von einem autorisierten Kundendienst
durchgeführt werden. Um Ihren Garantieanspruch geltend zu machen ist der
Original-Verkaufsbeleg (mit Verkaufsdatum) beizufügen.
Von der Garantie ausgeschlossen sind:
• Normaler Verschleiß
• Unsachgemäße Anwendungen, wie z.B. Überlastung des Gerätes, nicht
zugelassene Zubehörteile
• Beschädigung durch Fremdeinwirkungen, Gewaltanwendung oder durch
Fremdkörper
• Schäden die durch Nichtbeachtung der Gebrauchsanleitung entstehen,
z.B. Anschluss an eine falsche Netzspannung oder Nichtbeachtung der
Montageanleitung
• Komplett oder teilweise demontierte Geräte.
17
Page 18
WARNING
Read all the safety instructions and directions!
Failure to observe the safety instructions and directions may cause
electric shocks, fires and/or serious injury!
Retain all safety instructions and directions for future use and pass them on to any
other users or subsequent owners.
The term „power tool“ used in these safety instructions relates to mains-
operated power tools (with a mains cable) and to battery-operated power tools
(without a mains cable).
a) Keep your workplace clean and well lit. Untidy or unlit work areas
may lead to accidents.
b) Do not work with power tools in environments with an explosion
risk in which there are flammable liquids, gases or dust. Power tools
generate sparks that might ignite the dust or vapour.
c) Keep children and other people at a distance when using power
tools. If you are distracted you might lose control of the power tool.
a) The plug on the power tool must fit the socket. The plug must not be
modified in any way. Do not use adapters together with tools with
earth protection. Unmodified plugs and fitting sockets reduce the risk of an
electric shock.
b) Avoid bodily contact with earthed surfaces such as those of pipes,
heating units, stoves and fridges. There is an increased risk of an electric
shock if your body is earthed.
c) Keep power tools out of rain or damp. Water penetration into a power
tool increases the risk of an electric shock.
d) Do not misuse the cable to carry the power tool, to hang it up or to
pull the plug out of the socket. Keep the cable away from heat, oil,
sharp edges or moving equipment parts. Damaged or tangled cables
increase the risk of an electric shock.
e) If you are working outdoors with a power tool, use only extension
cables that are actually suitable for outdoor use. Using an extension
cable suitable for outdoor use reduces the risk of an electric shock.
f) If you cannot avoid using the power tool in a damp environment,
use a residual current circuit breaker. Using a residual current circuit
breaker eliminates the risk of an electric shock.
1. Safety
instructions
1.1 General safety
instructions for
power tools
Safety in the
workplace
Electrical safety
EN
OPERATING INSTRUCTIONS
AB-IW900
18
Page 19

EN
OPERATING INSTRUCTIONS
AB-IW900
WARNING
Read all the safety instructions and directions!
Failure to observe the safety instructions and directions may cause
electric shocks, fires and/or serious injury!
Retain all safety instructions and directions for future use and pass them on to any
other users or subsequent owners.
The term „power tool“ used in these safety instructions relates to mainsoperated power tools (with a mains cable) and to battery-operated power tools
(without a mains cable).
a) Keep your workplace clean and well lit. Untidy or unlit work areas
may lead to accidents.
b) Do not work with power tools in environments with an explosion
risk in which there are flammable liquids, gases or dust. Power tools
generate sparks that might ignite the dust or vapour.
c) Keep children and other people at a distance when using power
tools. If you are distracted you might lose control of the power tool.
a) The plug on the power tool must fit the socket. The plug must not be
modified in any way. Do not use adapters together with tools with
earth protection. Unmodified plugs and fitting sockets reduce the risk of an
electric shock.
b) Avoid bodily contact with earthed surfaces such as those of pipes,
heating units, stoves and fridges. There is an increased risk of an electric
shock if your body is earthed.
c) Keep power tools out of rain or damp. Water penetration into a power
tool increases the risk of an electric shock.
d) Do not misuse the cable to carry the power tool, to hang it up or to
pull the plug out of the socket. Keep the cable away from heat, oil,
sharp edges or moving equipment parts. Damaged or tangled cables
increase the risk of an electric shock.
e) If you are working outdoors with a power tool, use only extension
cables that are actually suitable for outdoor use. Using an extension
cable suitable for outdoor use reduces the risk of an electric shock.
f) If you cannot avoid using the power tool in a damp environment,
use a residual current circuit breaker. Using a residual current circuit
breaker eliminates the risk of an electric shock.
1. Safety
instructions
1.1 General safety
instructions for
power tools
Safety in the
workplace
Electrical safety
19
Page 20

a) Do not overload the device. Use the correct power tool for the job.
With the appropriate power tool you will work better and more safely within
the stated performance range.
b) Do not use a power tool if its switch is defective. A power tool that can
no longer be turned on and off is dangerous and must be repaired.
c) Pull the plug out of the socket and/or remove the battery before
adjusting the device’s settings, changing accessories or putting
away the power tool. These safety measures prevent unintended starting
up of the power tool.
d) Keep unused power tools out of the reach of children. Do not let
people who are not familiar with the power tool or who have not
read these instructions use it. Power tools are dangerous if they are used
by inexperienced people.
e) Take good care of power tools. Check whether moving parts operate
properly and do not jam, whether parts are broken or damaged in
such a way that this adversely affects the working of the power tool.
Have damaged parts repaired before using the power tool.
Many accidents are caused by poorly maintained power tools.
f) Keep cutting tools sharp and clean. Carefully looked after cutting tools
with sharp cutting edges stick less frequently and are easier to control.
g) Use power tools, accessories, attachments etc. in accordance with
these instructions. Bear in mind the working conditions and the
work to be carried out. Using power tools for purposes other than those
for which they are intended can lead to dangerous situations.
h) Only allow qualified specialists to repair your power tool and only
allow them to use original spare parts. This will ensure that the power
tool remains safe.
Hold the device by its insulated grip surfaces if you are working on jobs
in which the screw might hit hidden electric wires or the tool’s own
mains cable. Allowing the screw to come into contact with a live wire may also
make metal parts of the device live and lead to an electric shock.
• Before using the product, always lock the wheels or put a chock under them
and apply the parking brake.
• When removing or attaching a hubcap, take every precaution so as to avoid
personal injury or damage to property.
• When changing a vehicle’s tyres use extra lifting devices and safety support
equipment.
• When using the impact wrench, do not touch the drive with your hands.
Using and
handling power
tools
Service
1.2 Safety
instructions
for impact
wrenches
EN
OPERATING INSTRUCTIONS
AB-IW900
Safety of
people
a) Pay attention, watch what you are doing and approach work with
power tools with patience. Do not use power tools if you are tired
or under the influence of drugs, alcohol or medicine. One moment’s
inattention when using a power tool may lead to serious injury.
b) Wear personal protection equipment and always wear safety
glasses. Wearing personal protection equipment such as dust masks,
non-slip safety shoes, protective helmets and/or hearing protection,
depending on the nature and use of the power tool, reduces the risk
of injury.
c) Prevent unintended operation. Make sure that the power tool has
been switched off before you connect it to the mains and/or the
battery, pick it up or carry it. If you have your finger on the switch when
carrying the power tool or if you connect the power tool to the electricity
supply when the tool is switched on, this may lead to accidents.
d) Remove any adjustment tools and/or spanners before switching
on the power tool. A tool or spanner left in a rotating equipment part may
lead to injury.
e)
Avoid any abnormal postures. Make sure that you are standing firm and
keep your balance at all times. In this way you will have better control over
the power tool in unexpected situations.
f) Wear suitable clothing. Do not wear baggy clothing or jewellery.
Keep your hair, clothing and gloves away from moving parts.
Loose clothing, jewellery or long hair may be caught by moving parts.
g) If vacuum cleaning and dust extraction equipment can be fitted,
make sure that they are connected and being correctly used.
Vacuuming up dust may reduce risks from dust.
20
Page 21

EN
OPERATING INSTRUCTIONS
AB-IW900
a) Do not overload the device. Use the correct power tool for the job.
With the appropriate power tool you will work better and more safely within
the stated performance range.
b) Do not use a power tool if its switch is defective. A power tool that can
no longer be turned on and off is dangerous and must be repaired.
c) Pull the plug out of the socket and/or remove the battery before
adjusting the device’s settings, changing accessories or putting
away the power tool. These safety measures prevent unintended starting
up of the power tool.
d) Keep unused power tools out of the reach of children. Do not let
people who are not familiar with the power tool or who have not
read these instructions use it. Power tools are dangerous if they are used
by inexperienced people.
e) Take good care of power tools. Check whether moving parts operate
properly and do not jam, whether parts are broken or damaged in
such a way that this adversely affects the working of the power tool.
Have damaged parts repaired before using the power tool.
Many accidents are caused by poorly maintained power tools.
f) Keep cutting tools sharp and clean. Carefully looked after cutting tools
with sharp cutting edges stick less frequently and are easier to control.
g) Use power tools, accessories, attachments etc. in accordance with
these instructions. Bear in mind the working conditions and the
work to be carried out. Using power tools for purposes other than those
for which they are intended can lead to dangerous situations.
h) Only allow qualified specialists to repair your power tool and only
allow them to use original spare parts. This will ensure that the power
tool remains safe.
Using and
handling power
tools
Service
Hold the device by its insulated grip surfaces if you are working on jobs
in which the screw might hit hidden electric wires or the tool’s own
mains cable. Allowing the screw to come into contact with a live wire may also
make metal parts of the device live and lead to an electric shock.
• Before using the product, always lock the wheels or put a chock under them
and apply the parking brake.
• When removing or attaching a hubcap, take every precaution so as to avoid
personal injury or damage to property.
• When changing a vehicle’s tyres use extra lifting devices and safety support
equipment.
• When using the impact wrench, do not touch the drive with your hands.
21
1.2 Safety
instructions
for impact
wrenches
Page 22
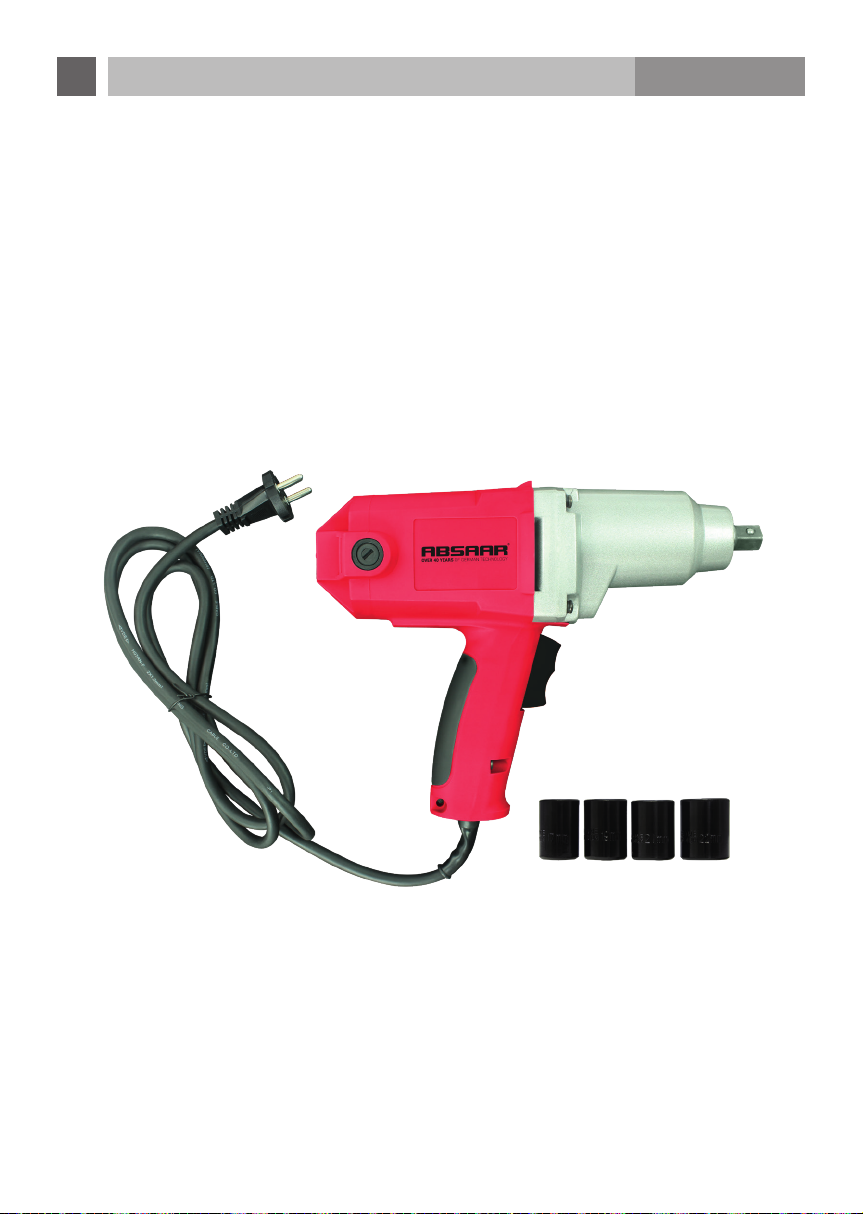
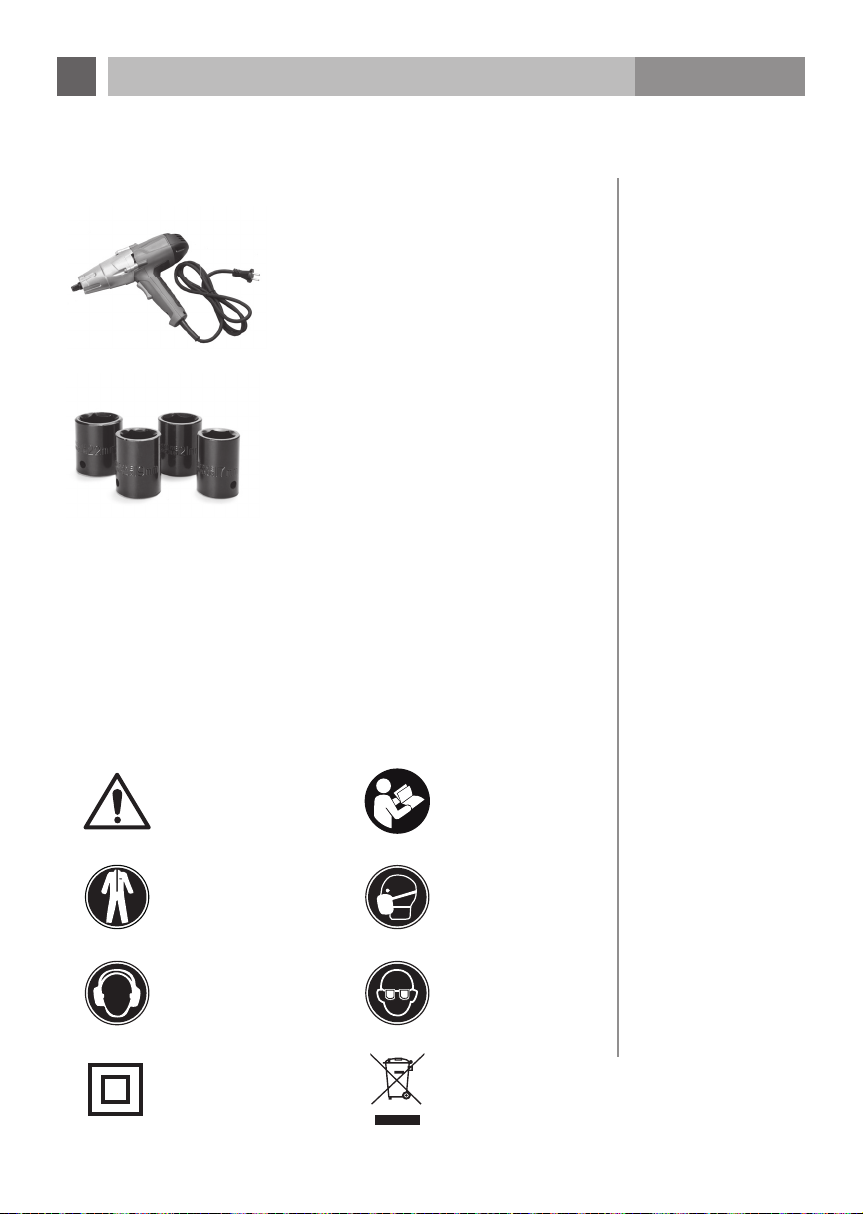
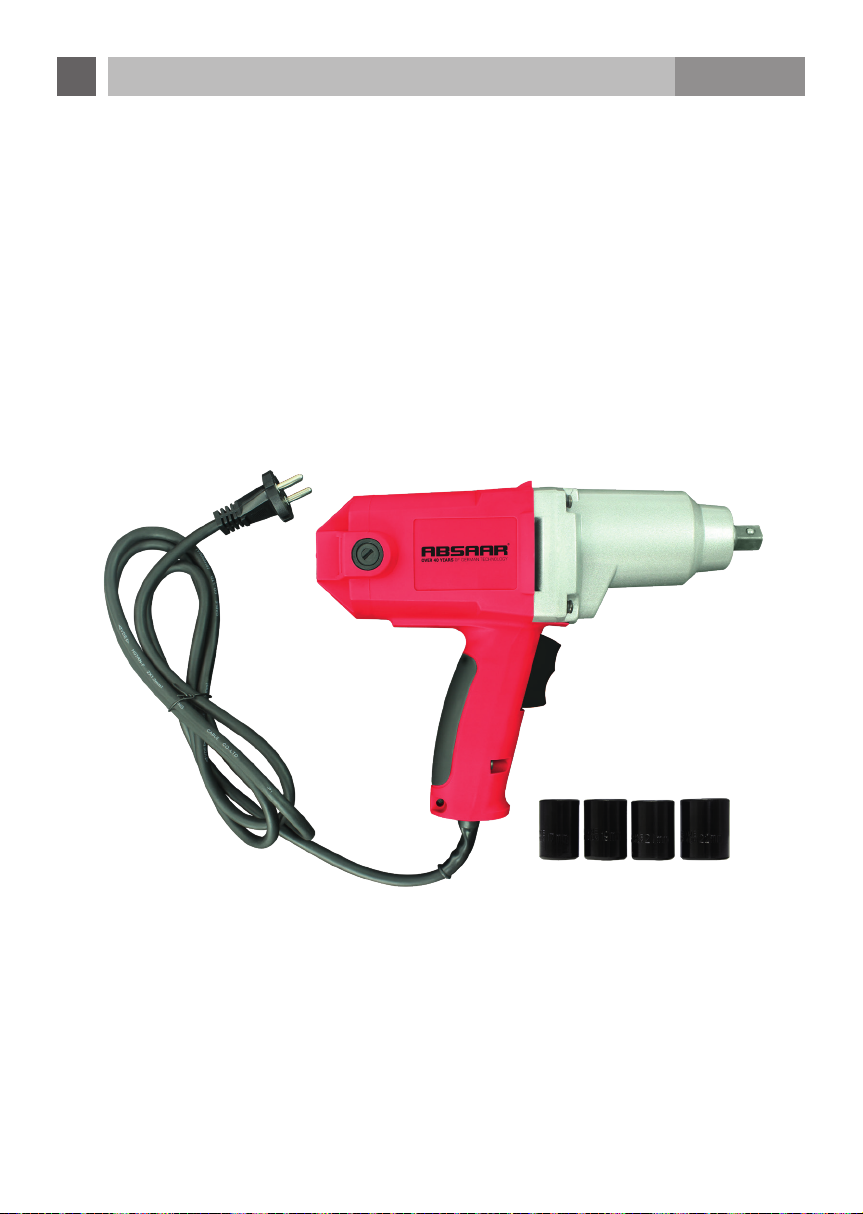
1 Impact wrench with mains cable
4 socket spanner attachments
(17 mm, 19 mm, 21 mm, 22 mm)
These symbols are used on the following pages:
Warning Note
Protective clothing Dust mask
Hearing protection Eye protection
Protection class II
Environmental
protection
2. Supplied
with the
product
3. Explanation
of the symbols
used
EN
OPERATING INSTRUCTIONS
AB-IW900
Residual risks
Even if you use this power tool according to the instructions, there are
still residual risks. The following risks may occur in connection with the
construction and design of this power tool:
1. Lung damage if a suitable dust mask is not worn.
2. Hearing damage if suitable hearing protection is not worn.
3. Damage to health resulting from hand and arm vibrations if the device is used
for a lengthy period or is not controlled or maintained correctly.
Warning! During operation this power tool generates an electromagnetic field.
In certain circumstances this field may affect active or passive medical implants.
To reduce the risk of serious or fatal injury, we recommend that people with
medical implants consult their doctors and the manufacturer of the medical
implant before operating the power tool.
Wear a dust protection mask. Dust that is harmful to health
may be generated when working on wood and other materials.
Always wear safety glasses.
Risk of eye injury from splinters or dust.
Wear hearing protection.
Noise penetration can cause loss of hearing.
Wear protective clothing such as extra work shirts,
overalls and caps.
22
Page 23
EN
OPERATING INSTRUCTIONS
1 Impact wrench with mains cable
4 socket spanner attachments
(17 mm, 19 mm, 21 mm, 22 mm)
AB-IW900
2. Supplied
with the
product
These symbols are used on the following pages:
Warning Note
Protective clothing Dust mask
Hearing protection Eye protection
Protection class II
3. Explanation
of the symbols
used
Environmental
protection
23
Page 24
All applications with this device that are not mentioned in the “Correct use” section
are deemed to be incorrect use.
The device must not be used for the following purposes:
• For mixing paints or building materials
• For polishing, grinding, sharpening, engraving with appropriate attachments,
• As a drive for other devices.
There is a risk of injury.
The user is liable for all resulting damage to property and/or personal injury
arising from incorrect use.
In the event of the use of other or non-original components on or in the machine,
the manufacturer’s warranty lapses.
Warning!
• In order to reduce the risk of injury, always disconnect the tool from
the mains power supply before attaching or removing accessories
or before changing settings.
• Use only socket spanners and/or other accessories specifically
designed for impact wrenches. Other socket spanners and/or other
accessories might splinter or disintegrate and thereby cause injury.
Before using the tool perform a visual inspection: e.g. do the socket spanners
have any visible cracks and do they sit correctly on the socket spanner holder?
Has the socket spanner holder become warped? Are the rocker switches, mains
cable or mains plug damaged?
• Attaching a socket spanner (6): Fit the socket spanner on to the socket spanner
holder (5) and press it in until it is seated in the socket spanner holder.
• Removing a socket spanner (6): Grip the socket spanner firmly and pull it out of
the socket spanner holder (5).
5.2 Incorrect use
6. Operation
6.1 Attaching/
removing socket
spanners
EN
OPERATING INSTRUCTIONS
AB-IW900
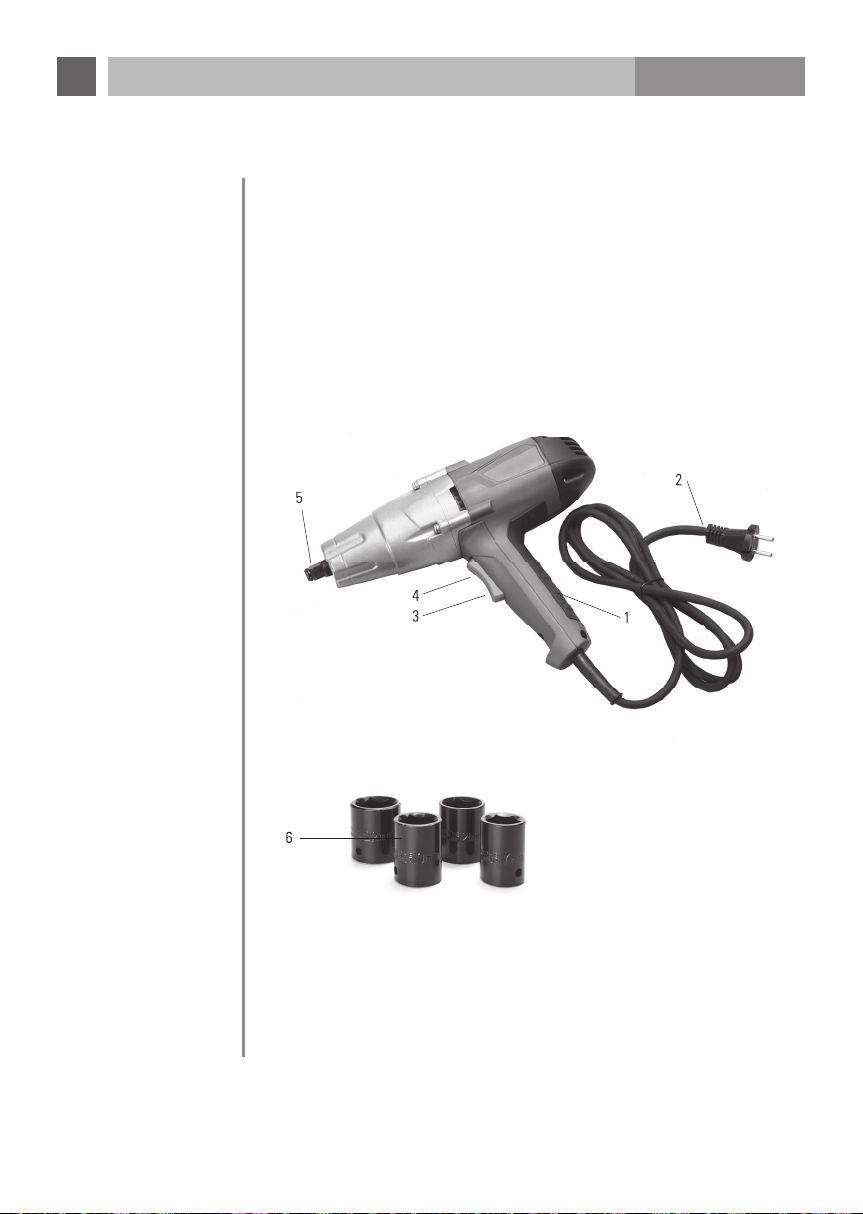
4. Operating
elements
1. Handle
2. Mains cable with mains plug
3. Rocker switch, rotation to the right (F)
4. Rocker switch, rotation to the left (R)
5. Socket spanner holder
6. Socket spanner attachments (accessories)
22 mm
5. Use
5.1 Correct use
This impact wrench is suitable for tightening or loosening bolts, screws and nuts.
Do not use it for any other purposes. Incorrect use of the tool may cause personal
injury or damage to property.
Only socket spanners with square attachments (12.7 mm, ½") may be used with
this impact wrench.
24
21 mm
19 mm
17 mm
Page 25
EN
OPERATING INSTRUCTIONS
AB-IW900
All applications with this device that are not mentioned in the “Correct use” section
are deemed to be incorrect use.
The device must not be used for the following purposes:
• For mixing paints or building materials
• For polishing, grinding, sharpening, engraving with appropriate attachments,
• As a drive for other devices.
There is a risk of injury.
The user is liable for all resulting damage to property and/or personal injury
arising from incorrect use.
In the event of the use of other or non-original components on or in the machine,
the manufacturer’s warranty lapses.
Warning!
• In order to reduce the risk of injury, always disconnect the tool from
the mains power supply before attaching or removing accessories
or before changing settings.
• Use only socket spanners and/or other accessories specifically
designed for impact wrenches. Other socket spanners and/or other
accessories might splinter or disintegrate and thereby cause injury.
Before using the tool perform a visual inspection: e.g. do the socket spanners
have any visible cracks and do they sit correctly on the socket spanner holder?
Has the socket spanner holder become warped? Are the rocker switches, mains
cable or mains plug damaged?
• Attaching a socket spanner (6): Fit the socket spanner on to the socket spanner
holder (5) and press it in until it is seated in the socket spanner holder.
• Removing a socket spanner (6): Grip the socket spanner firmly and pull it out of
the socket spanner holder (5).
5.2 Incorrect use
6. Operation
6.1 Attaching/
removing socket
spanners
25
Page 26
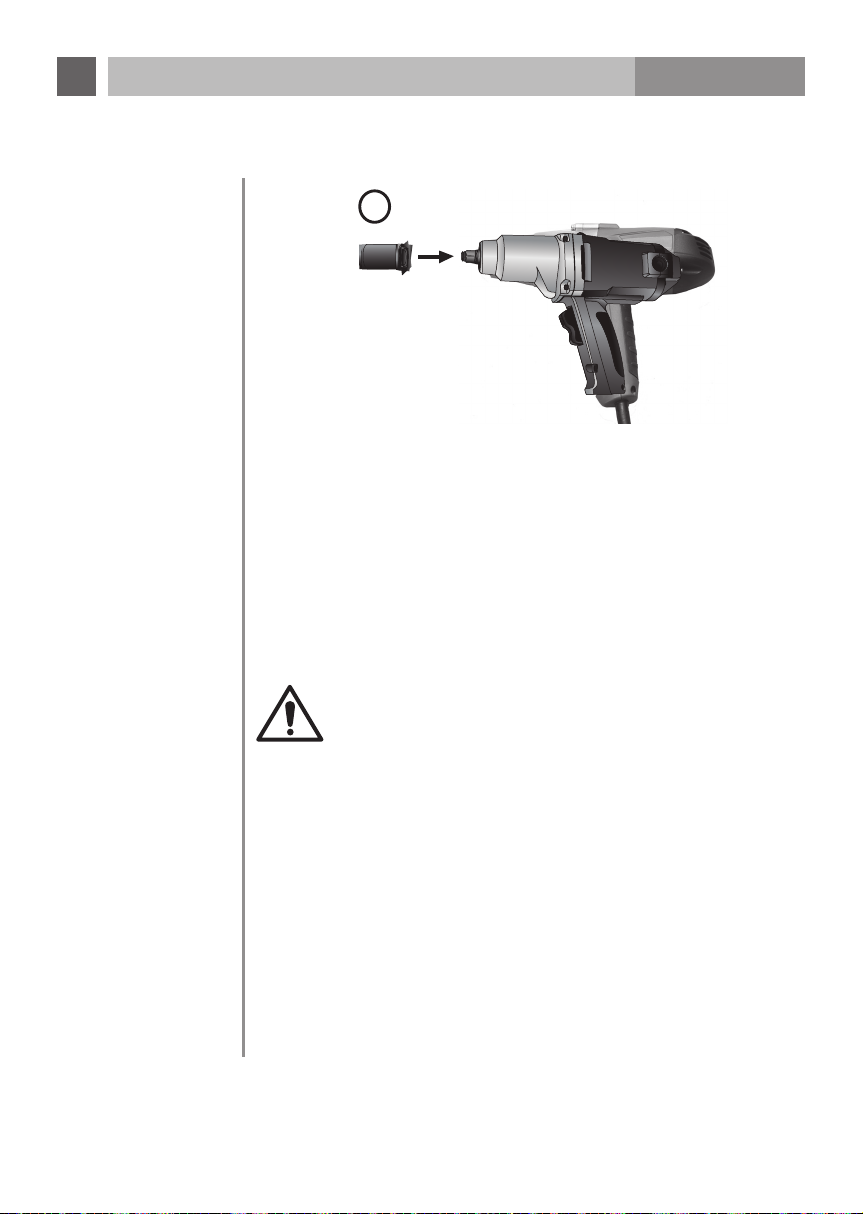
Instructions on working:
• Loosening/tightening bolts, screws or nuts may require several
impacts.
• The longer you tighten a bolt, screw or nut, the more fi rmly it will
be seated. Avoid extended tightening to prevent damage to the
fi xing element or to masonry/brickwork.
• In particular you should note that smaller fi xing elements often
require less tightening.
• Oil, dirt, rust and other substances on threads or under screw
heads may affect the secure seating of fi xing elements.
Warning! Keep your hands and mains cables at a suffi cient
distance from socket spanners and moving parts.
Warning! Before switching between rotation to the right and
rotation to the left, let the motor come to a complete stop so as to
prevent damage to the motor or other parts of the tool.
Warning! Please follow the instructions on the use of this
product in the vehicle manufacturer’s manual. Do not in any event
exceed the stated recommended levels. Tighten the wheel nuts
in accordance with the stated torque levels given in the vehicle’s
operating instructions. Over- or under-tightened wheel nuts may
lead to the wheel coming off.
• Select a gear or put the automatic gears into “P”. Lock the wheels with the
handbrake.
• Put the mains plug (2) into a suitable mains socket.
• Raise the vehicle with the vehicle manufacturer’s original accessories and
tools. Strictly observe the manufacturer’s operating instructions.
6.3 Changing tyres
2
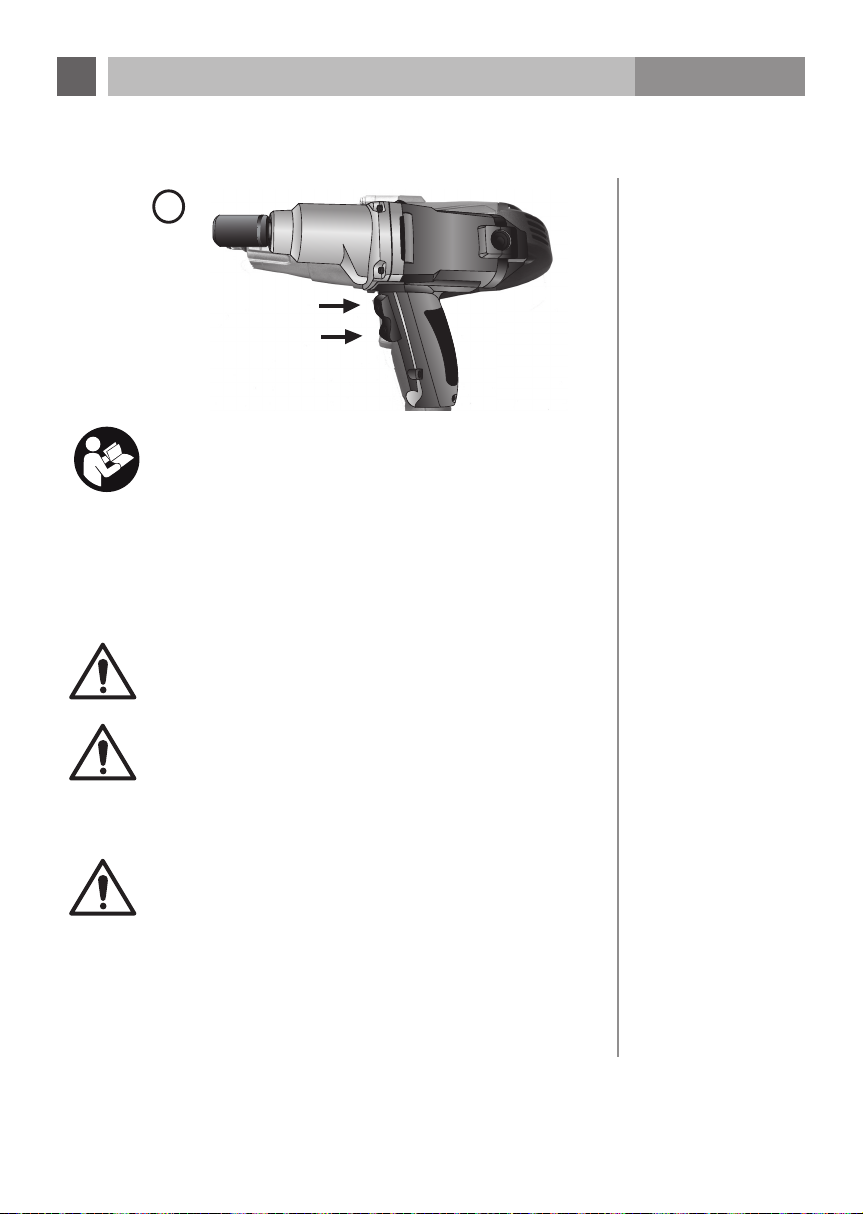
Rotation to the left (R)
Rotation to the right (F)
EN
OPERATING INSTRUCTIONS
AB-IW900
1
6.2 Switching on/off
This impact wrench is equipped with a rocker switch with which you can switch
from rotation to the right to rotation to the left.
• Put the mains plug (2) into a suitable mains socket.
• Select a suitable socket spanner. When attaching it, make sure that the socket
spanner sits fi rmly and securely on the socket spanner holder (5).
• Place the tool fi rmly on the fi xing element to be worked on (bolt or nut).
• For rotation to the right (clockwise, for tightening the fi xing element), push the
rocker switch to the rotation to the right position (F) (3). Before use, check that
the direction of rotation is correct.
For safety reasons the torque is restricted to 100 Nm in rotation
to the right. Please tighten wheel bolts with a torque wrench and
a torque of about 120 Nm. We would like to point out that wheel
bolts must be tightened again after the vehicle has been driven
about 50 km. Check that the wheel bolts are fi rmly seated.
• For rotation to the left (anticlockwise, to loosen fi xing elements) push the
rocker switch to the rotation to the left position (R) (4). Before use, check that
the direction of rotation is correct.
• Release the rocker switch (3 or 4) to stop the tool.
• Pull the mains plug (2) out of the mains socket after you have fi nished working.
26
Page 27
EN
OPERATING INSTRUCTIONS
2
Rotation to the left (R)
Rotation to the right (F)
Instructions on working:
• Loosening/tightening bolts, screws or nuts may require several
impacts.
• The longer you tighten a bolt, screw or nut, the more fi rmly it will
be seated. Avoid extended tightening to prevent damage to the
fi xing element or to masonry/brickwork.
• In particular you should note that smaller fi xing elements often
require less tightening.
• Oil, dirt, rust and other substances on threads or under screw
heads may affect the secure seating of fi xing elements.
Warning! Keep your hands and mains cables at a suffi cient
distance from socket spanners and moving parts.
AB-IW900
Warning! Before switching between rotation to the right and
rotation to the left, let the motor come to a complete stop so as to
prevent damage to the motor or other parts of the tool.
Warning! Please follow the instructions on the use of this
product in the vehicle manufacturer’s manual. Do not in any event
exceed the stated recommended levels. Tighten the wheel nuts
in accordance with the stated torque levels given in the vehicle’s
operating instructions. Over- or under-tightened wheel nuts may
lead to the wheel coming off.
• Select a gear or put the automatic gears into “P”. Lock the wheels with the
handbrake.
• Put the mains plug (2) into a suitable mains socket.
• Raise the vehicle with the vehicle manufacturer’s original accessories and
tools. Strictly observe the manufacturer’s operating instructions.
27
6.3 Changing tyres
Page 28
Warning! Always disconnect the tool from the mains supply before
cleaning or care so as to reduce the risk of injury. Never try to repair
the tool yourself.
• Pull the mains plug (2) out of the mains socket.
• Remove the socket spanner (6) from the socket spanner holder (5).
• Clean dirt and dust off the ventilation slits.
• Use a mild soap and a damp cloth to clean the impact wrench’s housing and
handle (1). Always keep the handle free of oil and lubricating grease.
• We recommend keeping the tool and accessories in the carry case (7) in a
clean, dry location.
• If the mains cable of this device is damaged, it must be replaced by the
manufacturer or its Customer Service or a similarly qualified person so as to
avoid hazards.
Warning!
• Do not use any cleaning agents, alcohol or thinners to clean the
tool. These might damage the plastic parts and other insulated
parts of the tool.
• Never use flammable or combustible thinners in the vicinity of
the tool!
• Never immerse the tool in liquids and make sure that no liquids
can seep into the tool.
Switch the device off. Pull the mains plug out of the socket.
If a carbon brush is so worn out that the plastic insulation pin inside touches
the collector, the motor is automatically switched off. If this occurs, both carbon
brushes must be replaced at the same time. Use only identical carbon brushes.
To guarantee the safety and reliability of this machine, repair, maintenance and
adjustment work should only be carried out in workshops or customer service
centres authorised by the manufacturer using only the manufacturer’s original
spare parts.
7. Cleaning
and care
7.1 Changing the
carbon brushes
EN
OPERATING INSTRUCTIONS
AB-IW900
• Select a suitable socket spanner. When attaching it make sure that the socket
spanner is firmly and securely seated on the socket spanner holder (5).
• Place the tool firmly on the tyre’s fixing element to be worked on.
• To tighten (clockwise) push the rocker switch to the rotation to the right
position (F) (3). Before use, check that the direction of rotation is correct.
• To loosen bolts (anticlockwise) push the rocker switch to the rotation to the
left position (R) (4). Before use, check that the direction of rotation is correct.
• Loosening wheel nuts/bolts may require several impacts.
• Release the rocker switch (3 or 4) to stop the tool.
• After you have finished working, pull the mains plug (2) out of the mains
socket.
For safety reasons the torque is restricted to 100 Nm in rotation to
the right. Please tighten wheel bolts with a torque wrench and a
torque of about 120 Nm. We would like to point out that wheel bolts
must be tightened again after the vehicle has been driven about
50 km. Check that the wheel bolts are firmly seated.
Remarks:
• Strictly observe the manufacturer’s instructions regarding the
torque to use. There are no general rules here for torque levels
for aluminium or steel rims.
• Please check the correct seating of the wheel nuts/bolts with a
torque wrench before the vehicle is driven off.
• Check the correct seating of wheel nuts/bolts with a torque
wrench after 30-50 km of driving.
28
Page 29
EN
OPERATING INSTRUCTIONS
AB-IW900
Warning! Always disconnect the tool from the mains supply before
cleaning or care so as to reduce the risk of injury. Never try to repair
the tool yourself.
• Pull the mains plug (2) out of the mains socket.
• Remove the socket spanner (6) from the socket spanner holder (5).
• Clean dirt and dust off the ventilation slits.
• Use a mild soap and a damp cloth to clean the impact wrench’s housing and
handle (1). Always keep the handle free of oil and lubricating grease.
• We recommend keeping the tool and accessories in the carry case (7) in a
clean, dry location.
• If the mains cable of this device is damaged, it must be replaced by the
manufacturer or its Customer Service or a similarly qualified person so as to
avoid hazards.
Warning!
• Do not use any cleaning agents, alcohol or thinners to clean the
tool. These might damage the plastic parts and other insulated
parts of the tool.
• Never use flammable or combustible thinners in the vicinity of
the tool!
• Never immerse the tool in liquids and make sure that no liquids
can seep into the tool.
Switch the device off. Pull the mains plug out of the socket.
If a carbon brush is so worn out that the plastic insulation pin inside touches
the collector, the motor is automatically switched off. If this occurs, both carbon
brushes must be replaced at the same time. Use only identical carbon brushes.
To guarantee the safety and reliability of this machine, repair, maintenance and
adjustment work should only be carried out in workshops or customer service
centres authorised by the manufacturer using only the manufacturer’s original
spare parts.
7. Cleaning
and care
7.1 Changing the
carbon brushes
29
Page 30

10. Technical
data
10.1 Noise and
vibration
10.2 Instructions on
noise and vibration
levels
Nominal voltage: 230 V~, 50 Hz
Nominal power consumption: 900 W
Socket spanner attachment – square, size: 12,7 mm, ½"
Maximum torque: 300 Nm rotation to the left (loosening)
100 Nm rotation to the right
(tightening)
Protection class: Class II
IP protection class: IPXO
Idling rotation speed n0: 2200 rpm
Socket spanner sizes: SW17, SW19, SW21 and SW22
Weight (net): 3.23 kg
Acoustic pressure level L
PA
: 96.34 dB(A); KPA: 3.0 dB(A)
Noise output level L
WA
: 107.34 dB(A); KWA: 3.0 dB(A)
Hand/arm vibration a
h
: 19.652 m/s2; K: 1.5 m/s
2
ah when working on
“Tightening screws and nuts
of max. permitted size”
• Note: The noise and vibration levels have been measured in accordance with
EN 60745-1 and EN 60745-2-2.
• Note: The stated vibration level has been determined according to a
standardised test procedure and may be used to compare various power
tools with each other. This level is also suitable for estimating in advance the
stresses on the user resulting from vibration.
• Warning! Actual vibration levels may vary from those stated
depending on how you use the power tool.
• Take measures to protect yourself from vibration stresses. Take
into account here the entire work process, in other words also
including times at which the power tool is idling or switched off.
• Suitable measures include, among other things, regular
maintenance and care of the power tool and tool attachments,
keeping your hands warm, regular breaks and good scheduling
of the work processes.
EN
OPERATING INSTRUCTIONS
AB-IW900
8.
Environmental
protection
9. Trouble-
Problem Cause Solution
shooting
The tool is not
working..
Anomalous noises or
vibrations.
Socket spanner (6)
cannot be placed on
bolts or nuts without
problems.
Old electrical devices are made of valuable materials so they do
not belong in the household refuse! We would therefore ask you
to support us with your active contribution to saving resources and
with environmental protection and to take this device to a return
point set up for this purpose if there is one available.
The mains plug
(2) is not correctly
connected to a mains
socket.
The mains socket is
not supplying any
electricity.
Socket spanner (6) not
correctly attached to
the tool.
Tool’s screws loose.
Tool’s motor must be
oiled or repaired.
.
The socket spanner
(6) selected is not
suitable for the fixing
element (bolt, nut) to
be worked on.
Connect the mains
plug (2) correctly to a mains
socket.
Makes sure that the
mains socket is supplying
electricity.
Attach the socket
spanner (6) correctly.
Tighten all the tool’s
screws.
Have the tool repaired by an
authorised workshop.
.
Select a suitable socket
spanner (6) with which the
bolt/nut can be worked on.
30
Page 31
EN
OPERATING INSTRUCTIONS
AB-IW900
Nominal voltage: 230 V~, 50 Hz
Nominal power consumption: 900 W
Socket spanner attachment – square, size: 12,7 mm, ½"
Maximum torque: 300 Nm rotation to the left (loosening)
100 Nm rotation to the right
(tightening)
Protection class: Class II
IP protection class: IPXO
Idling rotation speed n0: 2200 rpm
Socket spanner sizes: SW17, SW19, SW21 and SW22
Weight (net): 3.23 kg
Acoustic pressure level L
Noise output level L
Hand/arm vibration a
ah when working on
“Tightening screws and nuts
of max. permitted size”
• Note: The noise and vibration levels have been measured in accordance with
EN 60745-1 and EN 60745-2-2.
• Note: The stated vibration level has been determined according to a
standardised test procedure and may be used to compare various power
tools with each other. This level is also suitable for estimating in advance the
stresses on the user resulting from vibration.
: 96.34 dB(A); KPA: 3.0 dB(A)
PA
: 107.34 dB(A); KWA: 3.0 dB(A)
WA
: 19.652 m/s2; K: 1.5 m/s
h
2
10. Technical
data
10.1 Noise and
vibration
• Warning! Actual vibration levels may vary from those stated
depending on how you use the power tool.
• Take measures to protect yourself from vibration stresses. Take
into account here the entire work process, in other words also
including times at which the power tool is idling or switched off.
• Suitable measures include, among other things, regular
maintenance and care of the power tool and tool attachments,
keeping your hands warm, regular breaks and good scheduling
of the work processes.
31
10.2 Instructions on
noise and vibration
levels
Page 32

EN
OPERATING INSTRUCTIONS
AB-IW900
10.3 Instructions
on noise
pollution
11. Warranty
statement
A certain amount of noise pollution from this tool is unavoidable.
Postpone noisy jobs to authorised and permitted times. Observe any quiet times
and restrict the time of working to what is essential. Suitable hearing protection
is to be worn for your personal protection and for the protection of people in the
vicinity.
Without prejudice to your statutory warranty rights the manufacturer grants
a warranty in accordance with your country’s legislation but in any event for
a minimum of 1 year (in Germany 2 years).
The warranty commences on the date of sale of the device to the end consumer.
The warranty covers only defects attributable to faults in the materials or
manufacture.
Repairs under the warranty may only be carried out by an authorised Customer
Service. In order to validate your warranty claim you must enclose your proof of
purchase (with the date of purchase).
The warranty excludes:
• Normal wear and tear
• Incorrect use e.g. overloading the device, unauthorised accessories
• Damage caused by external factors, the use of force or foreign bodies
• Damage caused by failure to observe the operating instructions e.g. connection
to the wrong mains voltage or failure to observe the assembly instructions
• Completely or partly dismantled devices.
32
Page 33
FR
MODE D’EMPLOI
AB-IW900
33
Page 34

e) Si vous travaillez avec un outil électrique au dehors, utilisez
uniquement des rallonges appropriées au travail à l’extérieur.
L’utilisation d’une rallonge appropriée à l’extérieur réduit le risque de
décharge électrique.
f) Si l’utilisation de l’outil électrique dans un environnement humide
ne peut être évité, utilisez un disjoncteur-protecteur à courant de
défaut. L’utilisation d’un disjoncteur-protecteur à courant de défaut réduit le
risque de décharge électrique.
a) Soyez attentif, faites attention à ce que vous faites et travaillez
raisonnablement avec un outil électrique. N’utilisez aucun outil
électrique si vous êtes fatigué ou sous l’influence de drogues, de
l’alcool ou de médicaments. Un moment d’inattention lors de l’utilisation
de l’outil électrique peut conduire à de graves blessures.
b) Portez un équipement de protection individuel et toujours
des lunettes de protection. Le port d’un équipement de protection
individuel comme un masque anti-poussière, des chaussures de sécurité
antidérapantes, un casque de protection ou une protection auditive, selon le
type d’utilisation de l’outil électrique, réduit le risque de blessures.
c) Evitez une mise en service non intentionnelle. Assurez-vous que
l’outil électrique est à l’arrêt avant le branchement à l’alimentation
secteur et/ou de l’accu, de le saisir ou de le porter. Des accidents
peuvent se produire si vous avez le doigt sur l’interrupteur ou que vous
branchez l’outil électrique en marche à l’alimentation secteur en le portant.
d) Retirez les outils de réglage ou les clés à vis avant de mettre l’outil
électrique en marche. Un outil ou une clé présent dans une pièce rotative
de l’outil peut conduire à des blessures.
e) Evitez une position du corps anormale. Veillez à une bonne stabilité
et gardez l’équilibre à tout moment. Vous pourrez ainsi mieux contrôler
l’outil électrique dans des situations inattendues.
f) Portez des vêtements appropriés. Ne portez pas de vêtements
amples ou de bijoux. Tenez vos cheveux, vos vêtements et vos gants
à distance des pièces mobiles. Les vêtements amples, les bijoux ou les
cheveux longs peuvent être happés par les pièces mobiles.
g) Si des dispositifs d’aspiration ou de collecte de la poussière peuvent
être montés, assurez-vous qu’ils sont raccordés et correctement
utilisés. L’utilisation d’une aspiration de la poussière peut réduire les
dangers dus à la poussière.
Sécurité des
personnes
FR
MODE D’EMPLOI
AB-IW900
AVERTISSEMENT
Lisez toutes les consignes de sécurité et instructions !
Les manquements dans le respect des consignes de sécurité et des
instructions peuvent causer une décharge électrique, un incendie
et/ou de graves blessures !
Conservez l’ensemble des instructions de sécurité et des instructions pour
le futur et remettez-les éventuellement aux autres utilisateurs ou futurs
propriétaires.
Le terme « outil électrique » utilisé dans les consignes de sécurité se réfère aux
outils électriques alimentés sur secteur (avec câble d’alimentation) et aux outils
électriques alimentés par accus (sans câble d’alimentation).
a) Maintenez votre zone de travail propre et bien éclairée. Le désordre ou
les zones de travail non éclairée peuvent conduire à des accidents.
b) Ne travaillez pas avec l’outil électrique dans un environnement
explosif dans lequel se trouvent des liquides, des gaz ou des
poussières inflammables. Les outils électriques génèrent des étincelles
qui peuvent enflammer la poussière ou les vapeurs.
c) Tenez les enfants et les autres personnes à distance pendant
l’utilisation de l’outil électrique. Vous pouvez perdre le contrôle de l’outil
électrique en cas de diversion.
a) La fiche de raccordement de l’outil électrique doit convenir à la
prise. La fiche ne doit être en aucun cas modifiée. N’utilisez aucune
fiche d’adaptateur avec des outils électriques avec protection de
terre. Les fiches non modifiées et les prises convenant réduisent le risque de
décharge électrique.
b) Evitez le contact corporel avec les surfaces mises à la terre comme
les tubes, les chauffages, les réchauds et les réfrigérateurs. Il existe
un risque de décharge électrique élevé si votre corps est mis à la terre.
c) Tenez les outils électriques éloignés de la pluie ou de l’humidité.
La pénétration d’eau dans un outil électrique augmente le risque de
décharge électrique.
d) Ne détournez pas l’usage du câble pour porter l’outil électrique,
l’accrocher ou pour retirer la fiche de la prise. Tenez le câble à
distance de la chaleur, de l’huile, des bords tranchants ou des pièces
mobiles de l’outil. Les câbles endommagés ou enroulés augmentent le
risque de décharge électrique.
1. Consignes
de sécurité
1.1 Consignes de
sécurité générales
– Outils électriques
Sécurité du poste
de travail
Sécurité
électrique
34
Page 35

FR
MODE D’EMPLOI
AB-IW900
e) Si vous travaillez avec un outil électrique au dehors, utilisez
uniquement des rallonges appropriées au travail à l’extérieur.
L’utilisation d’une rallonge appropriée à l’extérieur réduit le risque de
décharge électrique.
f) Si l’utilisation de l’outil électrique dans un environnement humide
ne peut être évité, utilisez un disjoncteur-protecteur à courant de
défaut. L’utilisation d’un disjoncteur-protecteur à courant de défaut réduit le
risque de décharge électrique.
Sécurité des
personnes
a) Soyez attentif, faites attention à ce que vous faites et travaillez
raisonnablement avec un outil électrique. N’utilisez aucun outil
électrique si vous êtes fatigué ou sous l’influence de drogues, de
l’alcool ou de médicaments. Un moment d’inattention lors de l’utilisation
de l’outil électrique peut conduire à de graves blessures.
b) Portez un équipement de protection individuel et toujours
des lunettes de protection. Le port d’un équipement de protection
individuel comme un masque anti-poussière, des chaussures de sécurité
antidérapantes, un casque de protection ou une protection auditive, selon le
type d’utilisation de l’outil électrique, réduit le risque de blessures.
c) Evitez une mise en service non intentionnelle. Assurez-vous que
l’outil électrique est à l’arrêt avant le branchement à l’alimentation
secteur et/ou de l’accu, de le saisir ou de le porter. Des accidents
peuvent se produire si vous avez le doigt sur l’interrupteur ou que vous
branchez l’outil électrique en marche à l’alimentation secteur en le portant.
d) Retirez les outils de réglage ou les clés à vis avant de mettre l’outil
électrique en marche. Un outil ou une clé présent dans une pièce rotative
de l’outil peut conduire à des blessures.
e) Evitez une position du corps anormale. Veillez à une bonne stabilité
et gardez l’équilibre à tout moment. Vous pourrez ainsi mieux contrôler
l’outil électrique dans des situations inattendues.
f) Portez des vêtements appropriés. Ne portez pas de vêtements
amples ou de bijoux. Tenez vos cheveux, vos vêtements et vos gants
à distance des pièces mobiles. Les vêtements amples, les bijoux ou les
cheveux longs peuvent être happés par les pièces mobiles.
g) Si des dispositifs d’aspiration ou de collecte de la poussière peuvent
être montés, assurez-vous qu’ils sont raccordés et correctement
utilisés. L’utilisation d’une aspiration de la poussière peut réduire les
dangers dus à la poussière.
35
Page 36

• Utiliser des dispositifs de levage et d’appui de sécurité supplémentaires pour
changer les pneus du véhicule.
• Lors de l’utilisation de la clé à chocs, ne pas toucher la commande avec les
mains.
Des risques résiduels existent toujours, même si vous vous servez de
cet outil électrique de manière conforme. Les dangers suivants peuvent
survenir en liaison avec le type de construction et la confection de cet outil
électrique :
1. Dommages pulmonaires si vous ne portez pas de masque anti-poussière
approprié.
2. Dommages auditifs si vous ne portez pas de protection auditive appropriée.
3. Dommages de santé résultant des vibrations de la main et du bras si l’outil est
utilisé pendant longtemps ou ni manié, ni entretenu de façon conforme.
Avertissement ! Cet outil électrique génère un champ électromagnétique
pendant son fonctionnement. Dans certaines conditions, le champ peut avoir une
incidence sur des implants médicaux actifs ou passifs. Pour réduire le danger de
blessures graves ou mortelles, nous recommandons aux personnes ayant des
implants médicaux de consulter leur médecin ou le fabricant de l’implant avec de
se servir de l’outil électrique.
Portez un masque anti-poussière. Une poussière nocive pour
la santé peut se produire lors de traitement du bois ou d’autres
matériaux.
Portez toujours des lunettes de protection. Danger de blessure
aux yeux par des éclats ou des poussières.
Portez une protection auditive. L’effet du bruit peut provoquer
la perte de l’audition.
Portez des vêtements de protection. Comme une chemise de
travail supplémentaire, un bleu de travail ou une casquette.
Risques résiduels
FR
MODE D’EMPLOI
AB-IW900
a) Ne surchargez pas l’outil. Utilisez l’outil électrique pour le travail
auquel il est destiné. Avec l’outil électrique approprié, vous travaillez
mieux et avec plus de sécurité dans le domaine de performance indiqué.
b) N’utilisez aucun outil électrique dont l’interrupteur est défectueux.
Un outil électrique qui ne se laisse pas mettre en marche ou arrêter est
dangereux et doit être réparé.
c) Débranchez la fiche de la prise et/ou retirez l’accu avant d’effectuer
des réglages sur l’outil, Changer les accessoires ou ranger l’outil
électrique. Cette mesure de précaution empêche le démarrage non
intentionnel de l’outil électrique.
d) Conservez les outils électriques inutilisés hors de la portée des
enfants. Ne laissez pas des personnes non familiarisées à l’outil
ou n’ayant pas lu ces instructions utiliser l’outil électrique. Les
outils électriques sont dangereux quand ils sont utilisés par des personnes
inexpérimentées.
e) Entretenez soigneusement les outils électriques. Contrôlez si les
pièces mobiles fonctionnent parfaitement et ne coincent pas, si des
pièces sont cassées ou endommagées et si cela porte préjudice
à la fonction de l’outil électrique. Faites réparer les pièces
endommagées avant d’utiliser l’outil électrique. De nombreux accidents
sont dus à des outils électriques mal entretenus.
f) Conservez les outils de coupe tranchants et propres. Des outils de
coupe soigneusement entretenus aux arêtes tranchantes coincent moins et
sont plus faciles à manier.
g) Utilisez l’outil électrique, les accessoires, les outils d’application
etc. conformément à ces instructions. A cet effet, tenez compte des
conditions de travail et de l’activité à réaliser. L’utilisation d’outils
électriques pour des applications autres que celles prévues peut conduire
à des situations dangereuses.
h) Ne faites réparer votre outil électrique que par des spécialistes
qualifiés et avec des pièces de rechange d’origine. La sécurité de
l’outil électrique sera ainsi garantie.
Tenez l’outil aux surfaces de prise isolées quand vous effectuez des
travaux lors desquels la vis peut toucher des conduites électriques
cachées ou le propre câble d’alimentation. Le contact de la vis avec une
conduite sous tension peut aussi mettre des pièces métalliques de l’appareil sous
tension et provoquer une décharge électrique.
• Toujours bloquer ou caler les roues avant d’utiliser le produit et serrer
le frein à main.
• Travailler avec une extrême précaution pour retirer ou remettre les enjoliveurs
pour éviter les dommages corporels ou matériels.
Utilisation
et traitement de
l’outil électrique
Service
1.2 Consignes
de sécurité –
Clés à chocs
36
Page 37
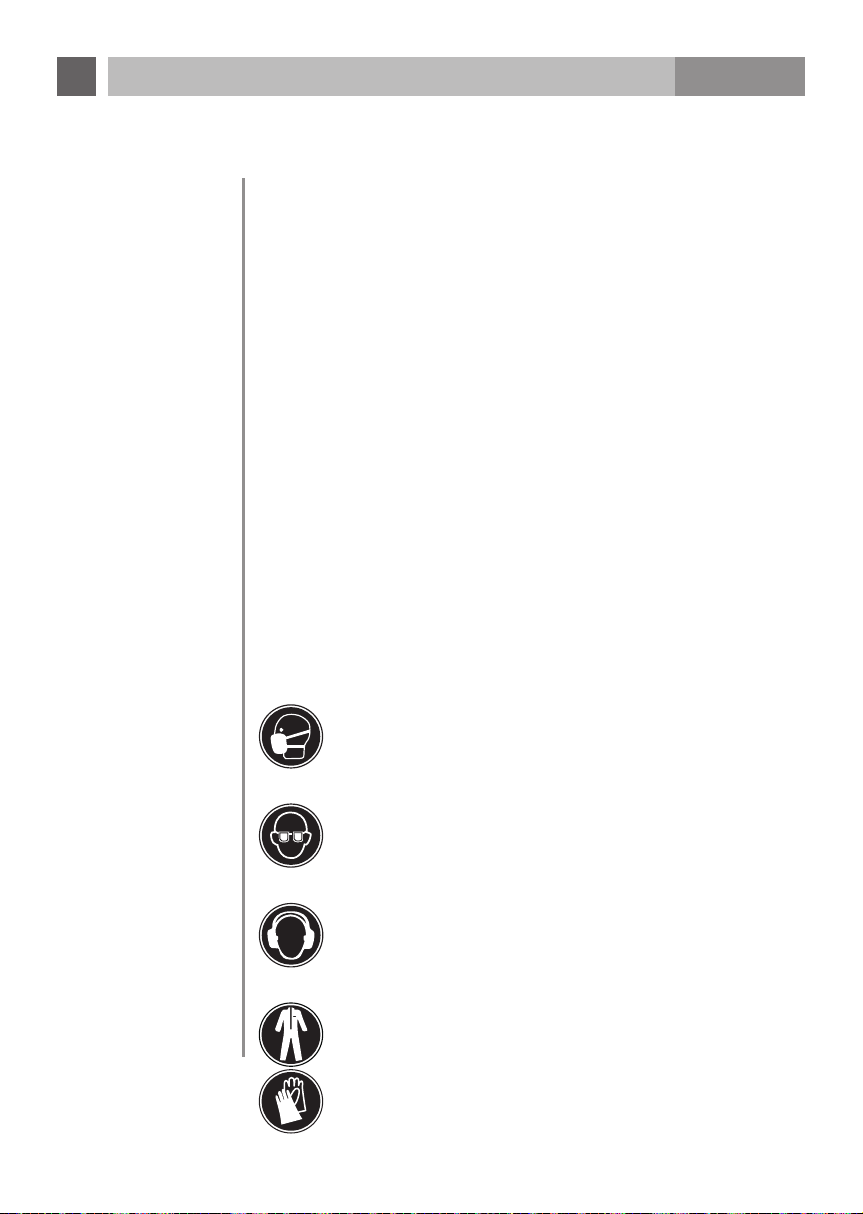
FR
MODE D’EMPLOI
AB-IW900
• Utiliser des dispositifs de levage et d’appui de sécurité supplémentaires pour
changer les pneus du véhicule.
• Lors de l’utilisation de la clé à chocs, ne pas toucher la commande avec les
mains.
Risques résiduels
Des risques résiduels existent toujours, même si vous vous servez de
cet outil électrique de manière conforme. Les dangers suivants peuvent
survenir en liaison avec le type de construction et la confection de cet outil
électrique :
1. Dommages pulmonaires si vous ne portez pas de masque anti-poussière
approprié.
2. Dommages auditifs si vous ne portez pas de protection auditive appropriée.
3. Dommages de santé résultant des vibrations de la main et du bras si l’outil est
utilisé pendant longtemps ou ni manié, ni entretenu de façon conforme.
Avertissement ! Cet outil électrique génère un champ électromagnétique
pendant son fonctionnement. Dans certaines conditions, le champ peut avoir une
incidence sur des implants médicaux actifs ou passifs. Pour réduire le danger de
blessures graves ou mortelles, nous recommandons aux personnes ayant des
implants médicaux de consulter leur médecin ou le fabricant de l’implant avec de
se servir de l’outil électrique.
Portez un masque anti-poussière. Une poussière nocive pour
la santé peut se produire lors de traitement du bois ou d’autres
matériaux.
Portez toujours des lunettes de protection. Danger de blessure
aux yeux par des éclats ou des poussières.
Portez une protection auditive. L’effet du bruit peut provoquer
la perte de l’audition.
Portez des vêtements de protection. Comme une chemise de
travail supplémentaire, un bleu de travail ou une casquette.
37
Page 38
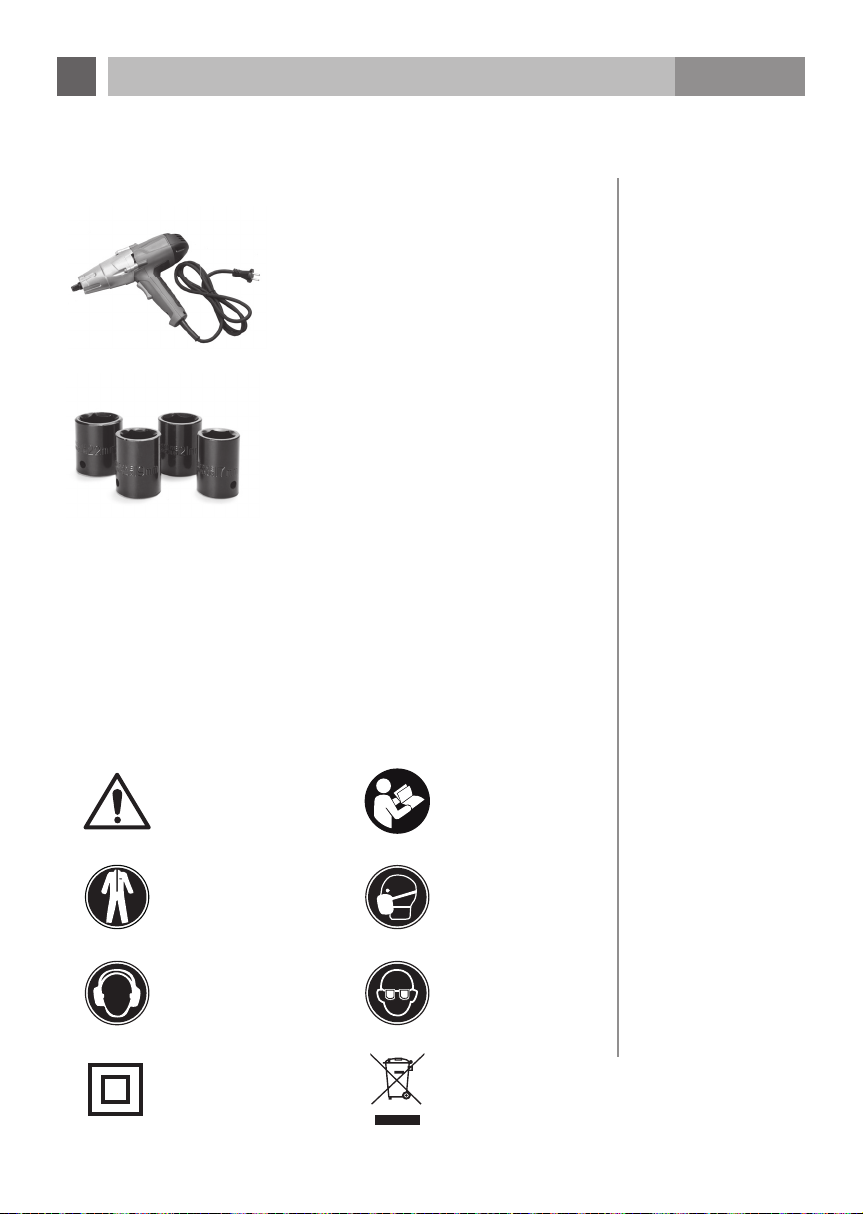
4. Eléments de
commande
5. Usage
5.1 Usage
conforme
1. Poignée
2. Câble d’alimentation avec fi che secteur
3. Interrupteur à bascule marche à droite (F)
4. Interrupteur à bascule marche à gauche (R)
5. Support de douille
6. Douilles (accessoires)
Cette clé à chocs est appropriée à serrer et à desserrer les boulons, les vis et
les écrous. Ne l’utilisez pas à d’autres fi ns. L’usage non conforme de l’outil peut
provoquer des dommages corporels ou matériels.
Seules les clés à douille avec insert carré (12,7 mm, ½") doivent être utilisées
avec cette clé à chocs.
22 mm
21 mm
19 mm
17 mm
FR
MODE D’EMPLOI
1 clé à chocs avec câble d’alimentation
4 douilles
(17 mm, 19 mm, 21 mm, 22 mm)
AB-IW900
2. Etendue de
la livraison
Ces symboles sont utilisés dans les pages suivantes :
Avertissement Remarque
Vêtements de protection
Protection auditive Protection visuelle
Classe de protection II
Masque
anti-poussière
Protection de
l’environnement
38
3. Explication
des symboles
utilisés
Page 39
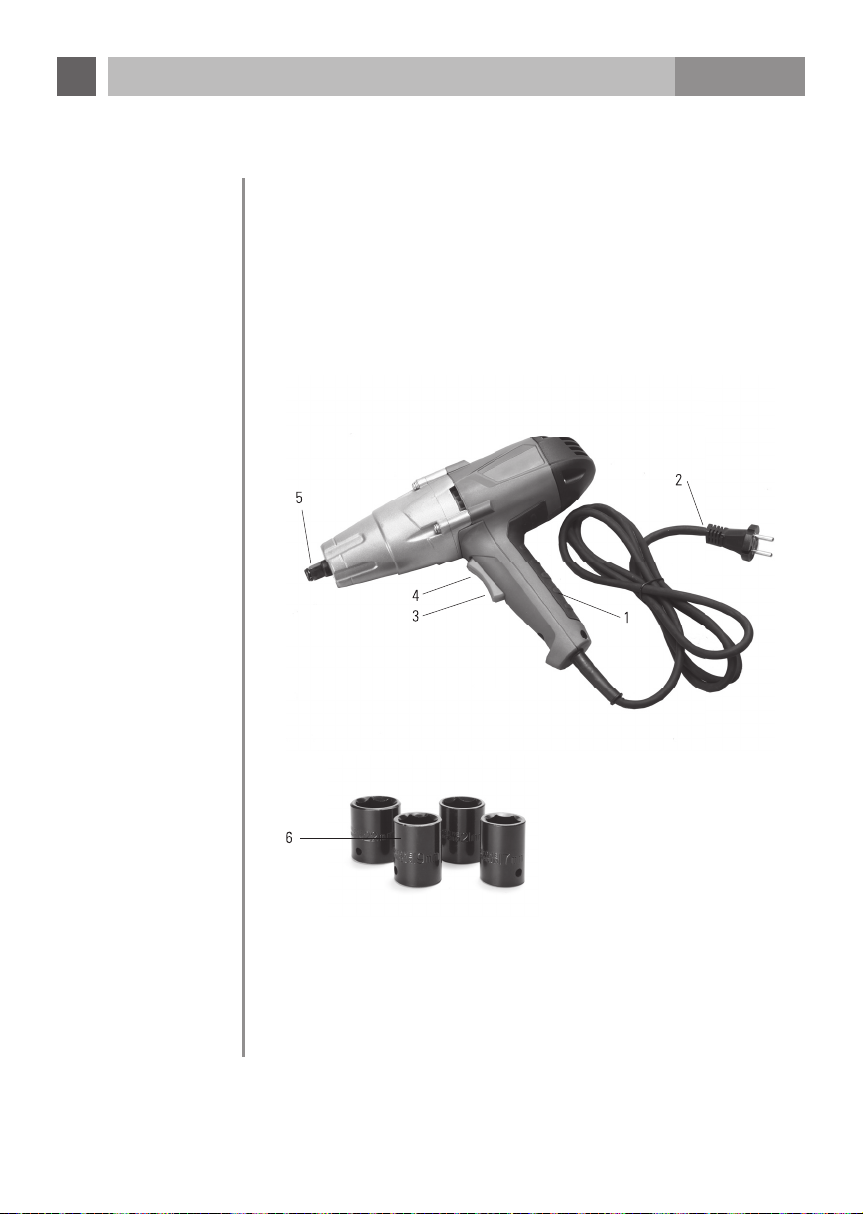
FR
MODE D’EMPLOI
AB-IW900
4. Eléments de
commande
1. Poignée
2. Câble d’alimentation avec fi che secteur
3. Interrupteur à bascule marche à droite (F)
4. Interrupteur à bascule marche à gauche (R)
5. Support de douille
6. Douilles (accessoires)
5. Usage
5.1 Usage
conforme
22 mm
21 mm
19 mm
17 mm
Cette clé à chocs est appropriée à serrer et à desserrer les boulons, les vis et
les écrous. Ne l’utilisez pas à d’autres fi ns. L’usage non conforme de l’outil peut
provoquer des dommages corporels ou matériels.
Seules les clés à douille avec insert carré (12,7 mm, ½") doivent être utilisées
avec cette clé à chocs.
39
Page 40
Cette clé à chocs est équipée d’un interrupteur à bascule pouvant être commuté
sur de marche à droite à marche à gauche.
• Branchez la fi che (2) sur une prise appropriée.
• Sélectionnez la clé à douille qui convient. Veillez à ce que la clé à douille soit
fi xée solidement et de manière sûre sur le support de clé (5).
• Placez solidement l’outil sur le matériau de fi xation à traiter (boulon ou écrou).
• Pour la rotation à droite (dans le sens horaire, pour serrer le matériau de
fi xation), actionnez l’interrupteur à bascule sur la position marche à droite
(F) (3). Contrôlez si le sens de rotation est correct avant l’usage.
Le couple de rotation de la marche à droite est limité à 100 Nm
pour des raisons de sécurité. Serrez les boulons de roue avec une
clé dynamométrique à un couple d’env. 120 Nm. Nous vous faisons
remarquer que les boulons de roue doivent être resserrés après un
trajet d’env. 50 km. Contrôlez le bon serrage des boulons de roue.
• Pour la rotation à gauche (dans le sens antihoraire, pour desserrer le
matériau de fi xation), actionnez l’interrupteur à bascule sur la position marche
à gauche (R) (4). Contrôlez si le sens de rotation est correct avant l’usage.
• Relâchez l’interrupteur à bascule (3 ou 4) pour arrêter l’appareil.
• Après le travail, débranchez la fi che (2) de l’alimentation secteur.
6.2 Mise en
marche / Arrêt
1
FR
MODE D’EMPLOI
AB-IW900
Toutes les applications de l’outil qui ne sont pas nommées au chapitre
« Usage conforme » sont considérées comme d’usage non conforme.
L’outil ne doit pas être utilisé pour les travaux suivants :
• pour mélanger les peintures ou les matériaux,
• pour polir, poncer, ébarber, graver avec des adaptateurs correspondants,
• pour entraîner d’autres outils.
Il existe un risque de blessure.
L’utilisateur de l’outil est responsable de tous les dommages matériels et corporels
occasionnés en raison d’un usage non conforme.
La prestation de garantie du fabricant cesse en cas d’utilisation d’autres pièces,
respectivement de pièces non d’origine sur la machine.
Avertissement !
• Pour réduire le risque de blessures, débranchez toujours l’outil
de l’alimentation secteur avant de monter ou de démonter des
accessoires ou encore de modifier des réglages.
• Utilisez exclusivement les clés à douille, respectivement les autres
accessoires conçus pour la clé à chocs. D’autres clés à douille ou
accessoires pourraient éclater ou casser et ainsi provoquer des
blessures.
Effectuez un contrôle visuel de l’outil avant de l’utiliser : les clés à douille
présentent-elles par exemple des fissures, sont-elles correctement montées sur le
support de clé ? Le support de clé est-il tordu ? L’interrupteur à bascule, le câble
d’alimentation ou la fiche secteur sont-ils endommagés ?
• Fixer la clé à douille (6) : placez la clé à douille sur le support de clé (5) et
appuyez jusqu’à ce qu’elle prenne encoche dans le support de clé.
• Retirer la clé à douille (6) : tenez solidement la clé à douille et retirez-la du
support de clé (5).
5.2 Usage non
conforme
6. Commande
6.1 Insérer / Retirer
la clé à douille
40
Page 41
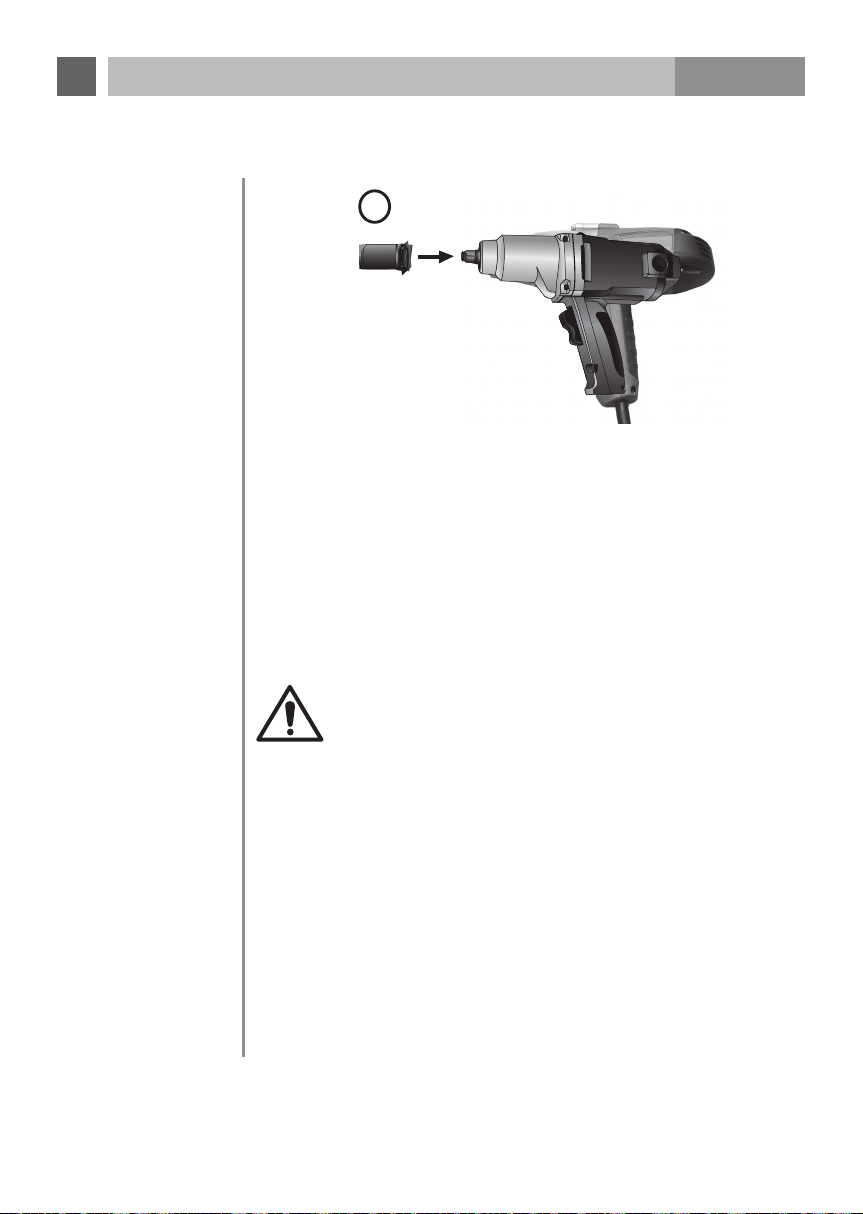
FR
MODE D’EMPLOI
AB-IW900
1
6.2 Mise en
marche / Arrêt
Cette clé à chocs est équipée d’un interrupteur à bascule pouvant être commuté
sur de marche à droite à marche à gauche.
• Branchez la fi che (2) sur une prise appropriée.
• Sélectionnez la clé à douille qui convient. Veillez à ce que la clé à douille soit
fi xée solidement et de manière sûre sur le support de clé (5).
• Placez solidement l’outil sur le matériau de fi xation à traiter (boulon ou écrou).
• Pour la rotation à droite (dans le sens horaire, pour serrer le matériau de
fi xation), actionnez l’interrupteur à bascule sur la position marche à droite
(F) (3). Contrôlez si le sens de rotation est correct avant l’usage.
Le couple de rotation de la marche à droite est limité à 100 Nm
pour des raisons de sécurité. Serrez les boulons de roue avec une
clé dynamométrique à un couple d’env. 120 Nm. Nous vous faisons
remarquer que les boulons de roue doivent être resserrés après un
trajet d’env. 50 km. Contrôlez le bon serrage des boulons de roue.
• Pour la rotation à gauche (dans le sens antihoraire, pour desserrer le
matériau de fi xation), actionnez l’interrupteur à bascule sur la position marche
à gauche (R) (4). Contrôlez si le sens de rotation est correct avant l’usage.
• Relâchez l’interrupteur à bascule (3 ou 4) pour arrêter l’appareil.
• Après le travail, débranchez la fi che (2) de l’alimentation secteur.
41
Page 42
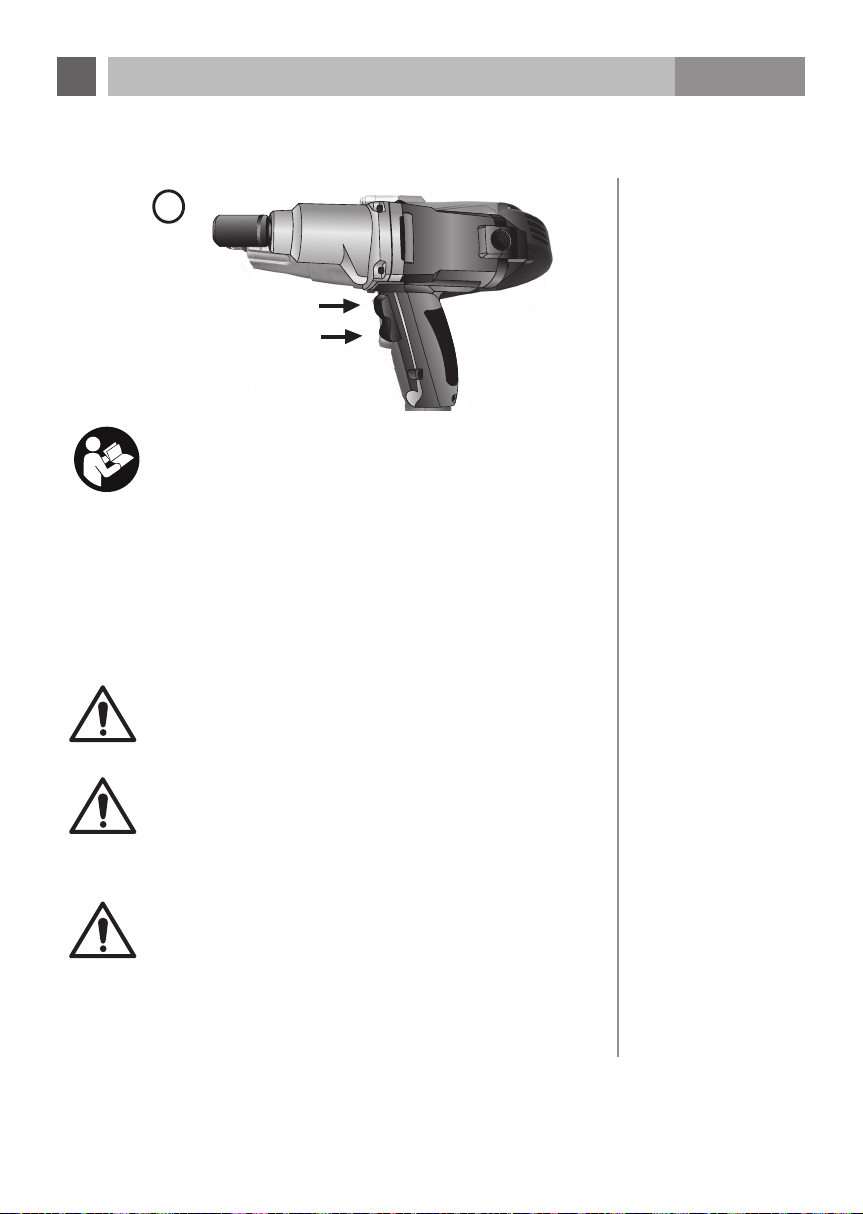
• Levez le véhicule avec l’accessoire et l’outil d’origine du constructeur du
véhicule. Observez strictement la notice d’instruction du fabricant.
• Sélectionnez une clé à douille qui convient. Veillez à ce que la clé à douille
soit fixée solidement et de manière sûre sur le support de clé (5).
• Placez solidement l’outil sur le matériau de fixation à traiter du pneu.
• Pour serrer (dans le sens horaire), mettez l’interrupteur à bascule sur la
position marche à droite (F) (3). Contrôlez si le sens de rotation est correct
avant l’usage.
Le couple de rotation de la marche à droite est limité à 100 Nm
pour des raisons de sécurité. Serrez les boulons de roue avec une
clé dynamométrique à un couple d’env. 120 Nm. Nous vous faisons
remarquer que les boulons de roue doivent être resserrés après un
trajet d’env. 50 km. Contrôlez le bon serrage des boulons de roue.
• Pour desserrer (dans le sens antihoraire), mettez l’interrupteur à bascule sur la
position marche à gauche (R) (4). Contrôlez si le sens de rotation est correct
avant l’usage.
• Le desserrage des écrous/vis de roue peut exiger plusieurs coups.
• Relâchez l’interrupteur à bascule (3 ou 4) pour arrêter l’appareil.
• Après le travail, débranchez la fiche (2) de l’alimentation secteur.
Remarques :
• Observez strictement les consignes du fabricant relatives au
couple à utiliser. Il n’existe pas de valeurs générales pour les
jantes en alu ou en acier.
• Contrôlez le serrage correct des écrous/vis de roue avec une clé
dynamométrique avant de prendre la route.
• Contrôlez le serrage correct des écrous/vis de roue avec une clé
dynamométrique après 30-50 km de distance parcourue.
FR
MODE D’EMPLOI
2
Marche à gauche (R)
Marche à droite (F)
Consignes de travail :
• De serrage/desserrage des boulons, vis ou écrous peut nécessiter
plusieurs coups.
• Plus vous serrez longtemps un boulon, une vis, ou un écrou,
puis il sera solidement fi xé. Evitez de prolonger le serrage pour
empêcher l’endommagement du matériau de fi xation ou de la
maçonnerie.
• Notez particulièrement que le petit matériau de fi xation nécessite
fréquemment une moindre solidité.
• L’huile, la saleté, la rouille ou d’autres matières présentes sur les
fi letages, respectivement les têtes de vis, peuvent infl uencer la
solidité des matériaux de fi xation.
Avertissement ! Maintenez vos mains et le câble d’alimentation à
une distance suffi sante des clés à douille et des pièces mobiles.
AB-IW900
Avertissement ! Laissez le moteur s’arrêter complètement avant
de commuter entre marche à droite et marche à gauche pour
empêcher que celui-ci ou d’autres pièces de l’outil ne subissent un
dommage.
Avertissement ! Veuillez suivre les consignes dans le manuel
du fabricant du véhicule pour utiliser ce produit. Ne dépasser en
aucun cas les indications recommandées. Serrer les écrous de roue
conformément aux indications de couple indiquées dans le mode
d’emploi du véhicule. Des écrous de roue serrés trop fort ou pas
assez peuvent conduire à une défaillance de la roue.
• Enclenchez une vitesse ou mettez la boîte automatique sur „P“. Bloquez les
roues avec le frein à main.
• Branchez la fi che (2) à une prise appropriée.
42
6.3 Changement
de pneu
Page 43
FR
MODE D’EMPLOI
AB-IW900
• Levez le véhicule avec l’accessoire et l’outil d’origine du constructeur du
véhicule. Observez strictement la notice d’instruction du fabricant.
• Sélectionnez une clé à douille qui convient. Veillez à ce que la clé à douille
soit fixée solidement et de manière sûre sur le support de clé (5).
• Placez solidement l’outil sur le matériau de fixation à traiter du pneu.
• Pour serrer (dans le sens horaire), mettez l’interrupteur à bascule sur la
position marche à droite (F) (3). Contrôlez si le sens de rotation est correct
avant l’usage.
Le couple de rotation de la marche à droite est limité à 100 Nm
pour des raisons de sécurité. Serrez les boulons de roue avec une
clé dynamométrique à un couple d’env. 120 Nm. Nous vous faisons
remarquer que les boulons de roue doivent être resserrés après un
trajet d’env. 50 km. Contrôlez le bon serrage des boulons de roue.
• Pour desserrer (dans le sens antihoraire), mettez l’interrupteur à bascule sur la
position marche à gauche (R) (4). Contrôlez si le sens de rotation est correct
avant l’usage.
• Le desserrage des écrous/vis de roue peut exiger plusieurs coups.
• Relâchez l’interrupteur à bascule (3 ou 4) pour arrêter l’appareil.
• Après le travail, débranchez la fiche (2) de l’alimentation secteur.
Remarques :
• Observez strictement les consignes du fabricant relatives au
couple à utiliser. Il n’existe pas de valeurs générales pour les
jantes en alu ou en acier.
• Contrôlez le serrage correct des écrous/vis de roue avec une clé
dynamométrique avant de prendre la route.
• Contrôlez le serrage correct des écrous/vis de roue avec une clé
dynamométrique après 30-50 km de distance parcourue.
43
Page 44
8. Protection
de l'environne-
ment
9. Elimination
des problèmes
Les appareils électriques usagés sont des appareils de valeur
qui ne doivent pas être jetés aux déchets ménagers ! Nous
vous demandons donc, par votre contribution active, de nous
soutenir dans le ménagement des ressources et la protection de
l’environnement et de remettre cet outil aux points de reprises
aménagés à cet effet s’il en existe.
Problème Cause Solution
L’outil ne fonctionne
pas.
La fiche (2) n’est pas
correctement branchée
à la prise.
La prise ne fournit
aucun courant.
Brancher correctement la
fiche (2) à la prise.
Assurez-vous que la prise
fournit du courant.
Bruits ou vibrations
anormaux.
Clé à douille (6) non
insérée correctement
dans l’outil.
Vis de l’outil mal
serrées.
Le moteur de l’outil
doit être huilé ou
réparé.
nsérez correctement la
clé à douille (6).
Serrez toutes les vis de
l’outil.
Faites réparer l’outil dans
un atelier agréé.
La clé à douille (6) ne
peut pas être placée
sans problème sur le
boulon ou l’écrou.
La clé à douille
sélectionnée (6)
ne convient pas au
matériau de fixation à
traiter (boulon, écrou).
Sélectionnez une clé à
douille appropriée (6), avec
laquelle le boulon/l’écrou
peut être traité.
FR
MODE D’EMPLOI
AB-IW900
Avertissement ! Débranchez toujours l’outil de l’alimentation
secteur avant de le nettoyer ou de l’entretenir pour réduire le risque
de blessure. N’essayez jamais de réparer vous-même l’outil.
• Débranchez la fiche (2) de la prise.
• Retirez la clé à douille (6) du support de clé (5).
• Nettoyez la fente d’aération de la poussière et de la saleté.
• Utilisez un savon doux et un chiffon humidifié pour nettoyer la boîte et la
poignée (1) de la clé à chocs. Conservez toujours la poignée nettoyée de l’huile
et du lubrifiant.
• Nous vous recommandons de conserver l’outil et les accessoires dans la
mallette (7) dans un endroit sec et propre.
• Si le câble de raccordement au secteur de cet outil est endommagé, il doit
être remplacé par le fabricant, son service après-vente ou une personne de
qualification identique pour éviter les mises en danger.
.
Avertissement !
• N’utilisez pas de nettoyant, d’alcool ou de diluant pour nettoyer
l’outil. Ils pourraient endommager les pièces en plastique et
d’autres pièces isolées de l’outil.
• N’utilisez jamais de diluants combustibles ou inflammables à
proximité de l’outil !
• Ne plongez jamais l’outil dans des liquides et veillez à ce
qu’aucun liquide ne puisse pénétrer dans l’outil.
7. Nettoyage et
entretien
Arrêtez l’outil. Débranchez la fiche de la prise.
Le moteur s’arrêt automatiquement si les balais à charbon sont si usés que
l’intérieur de la goupille isolante en plastique est en contact avec le collecteur.
Si cela se produit, les deux balais à charbon doivent alors être renouvelés
simultanément. Utilisez uniquement des balais à charbon identiques.
Pour garantir la sécurité et la fiabilité de cette machine, les travaux de réparation,
d’entretien et de réglage ne doit être effectués que dans des ateliers agrées par le
fabricant ou des centres de service après-vente et en utilisant exclusivement des
pièces d’origine du fabricant.
44
7.1 Changement des
balais en charbon
Page 45

FR
MODE D’EMPLOI
AB-IW900
8. Protection
de l'environne-
ment
9. Elimination
des problèmes
Les appareils électriques usagés sont des appareils de valeur
qui ne doivent pas être jetés aux déchets ménagers ! Nous
vous demandons donc, par votre contribution active, de nous
soutenir dans le ménagement des ressources et la protection de
l’environnement et de remettre cet outil aux points de reprises
aménagés à cet effet s’il en existe.
Problème Cause Solution
L’outil ne fonctionne
pas.
Bruits ou vibrations
anormaux.
La fiche (2) n’est pas
correctement branchée
à la prise.
La prise ne fournit
aucun courant.
Clé à douille (6) non
insérée correctement
dans l’outil.
Vis de l’outil mal
serrées.
Brancher correctement la
fiche (2) à la prise.
Assurez-vous que la prise
fournit du courant.
nsérez correctement la
clé à douille (6).
Serrez toutes les vis de
l’outil.
La clé à douille (6) ne
peut pas être placée
sans problème sur le
boulon ou l’écrou.
Le moteur de l’outil
doit être huilé ou
réparé.
La clé à douille
sélectionnée (6)
ne convient pas au
matériau de fixation à
traiter (boulon, écrou).
45
Faites réparer l’outil dans
un atelier agréé.
Sélectionnez une clé à
douille appropriée (6), avec
laquelle le boulon/l’écrou
peut être traité.
Page 46
10.3 Remarque
sur les
nuisances
sonores
11.
Déclaration
de garantie
Une certaine nuisance sonore due à cet outil ne peut pas être évitée.
Effectuez les travaux générant un bruit élevé à des heures autorisées et
appropriées. Respectez éventuellement les temps de repos et limitez la durée de
travail au strict nécessaire. Portez une protection auditive pour votre protection
personnelle et celle des personnes se trouvant près de vous.
Nonobstant les droits de garantie légaux, le fabricant accorde une garantie
conforme aux lois de votre pays, au minimum 1 an (en Allemagne 2 ans).
La garantie prend effet à la date de vente de l’outil au consommateur final.
La garantie s’applique exclusivement aux vices dus à des défauts de matériau ou
de fabrication.
Les réparations de garantie doivent être exclusivement effectuées par un service
après-vente agréé. Le justificatif d’achat d’origine (avec la date de vente) est à
joindre pour pouvoir faire valoir votre droit de garantie.
La garantie exclut :
• l’usure normale
• les utilisations non conformes, comme par exemple la surcharge de l’outil, les
accessoires non homologués
• les dommages dus à des interventions externes, l’usage de la force ou des
corps étrangers
• les dommages résultant de la non-observation du mode d’emploi, par exemple
le branchement à une tension secteur fausse ou le non-respect de l’instruction
de montage
• le démontage entier ou partiel des outils.
FR
MODE D’EMPLOI
AB-IW900
Tension nominale : 230 V~, 50 Hz
Puissance nominale absorbée : 900 W
Dimension insert clé à douille hexagonale : 12,7 mm, ½"
Couple de rotation maximal : 300 Nm marche à gauche (desserrer)
100 Nm marche à droite (serrer)
Classe de protection : Classe II
Classe de protection IP : IPXO
Vitesse à vide n
Dimensions des clés à douille : SW17, SW19, SW21 und SW22
Poids (net) : 3,23 kg
Niveau de pression acoustique L
Niveau de puissance acoustique L
Vibration main-bras a
ah avec mode de travail
« serrage vis et écrous dimension
max. autorisée »
• Remarque : les valeurs acoustiques et de vibration ont été mesurées
conformément à EN 60745-1 et EN 60745-2-2.
• Remarque : la valeur de vibration indiquée a été établie suivant une
procédure de contrôle normée et peut être utilisée pour comparer différents
outils électriques entre eux. Cette valeur est en outre appropriée à estimer au
préalable les charges subies par l’utilisateur par les vibrations générées.
: 2200 min
0
• Avertissement ! Les valeurs de vibrations réelles peuvent
varier de celles indiquées suivant l’utilisation de l’outil
électrique.
• Prenez des mesures pour vous protéger des charges dues aux
vibrations. A cet effet, tenez compte du processus de travail
complet, aussi des moments où l’outil électrique fonctionne sans
charge ou est à l’arrêt.
• Les mesures appropriées comprennent entre autres la
maintenance et l’entretien réguliers de l’outil électrique et des
pièces montées, le maintien au chaud des mains, des pauses
régulières et un bon planning des opérations de travail.
: 96,34 dB(A); KPA: 3,0 dB(A)
PA
: 107,34 dB(A); KWA: 3,0 dB(A)
WA
: 19,652 m/s2; K: 1,5 m/s
h
-1
2
10. Caractéristiques
techniques
10.1 Acoustique et
vibration
10.2 Remarques
sur les valeurs
acoustiques et de
vibration
46
Page 47

FR
MODE D’EMPLOI
AB-IW900
10.3 Remarque
sur les
nuisances
sonores
11.
Déclaration
de garantie
Une certaine nuisance sonore due à cet outil ne peut pas être évitée.
Effectuez les travaux générant un bruit élevé à des heures autorisées et
appropriées. Respectez éventuellement les temps de repos et limitez la durée de
travail au strict nécessaire. Portez une protection auditive pour votre protection
personnelle et celle des personnes se trouvant près de vous.
Nonobstant les droits de garantie légaux, le fabricant accorde une garantie
conforme aux lois de votre pays, au minimum 1 an (en Allemagne 2 ans).
La garantie prend effet à la date de vente de l’outil au consommateur final.
La garantie s’applique exclusivement aux vices dus à des défauts de matériau ou
de fabrication.
Les réparations de garantie doivent être exclusivement effectuées par un service
après-vente agréé. Le justificatif d’achat d’origine (avec la date de vente) est à
joindre pour pouvoir faire valoir votre droit de garantie.
La garantie exclut :
• l’usure normale
• les utilisations non conformes, comme par exemple la surcharge de l’outil, les
accessoires non homologués
• les dommages dus à des interventions externes, l’usage de la force ou des
corps étrangers
• les dommages résultant de la non-observation du mode d’emploi, par exemple
le branchement à une tension secteur fausse ou le non-respect de l’instruction
de montage
• le démontage entier ou partiel des outils.
47
Page 48
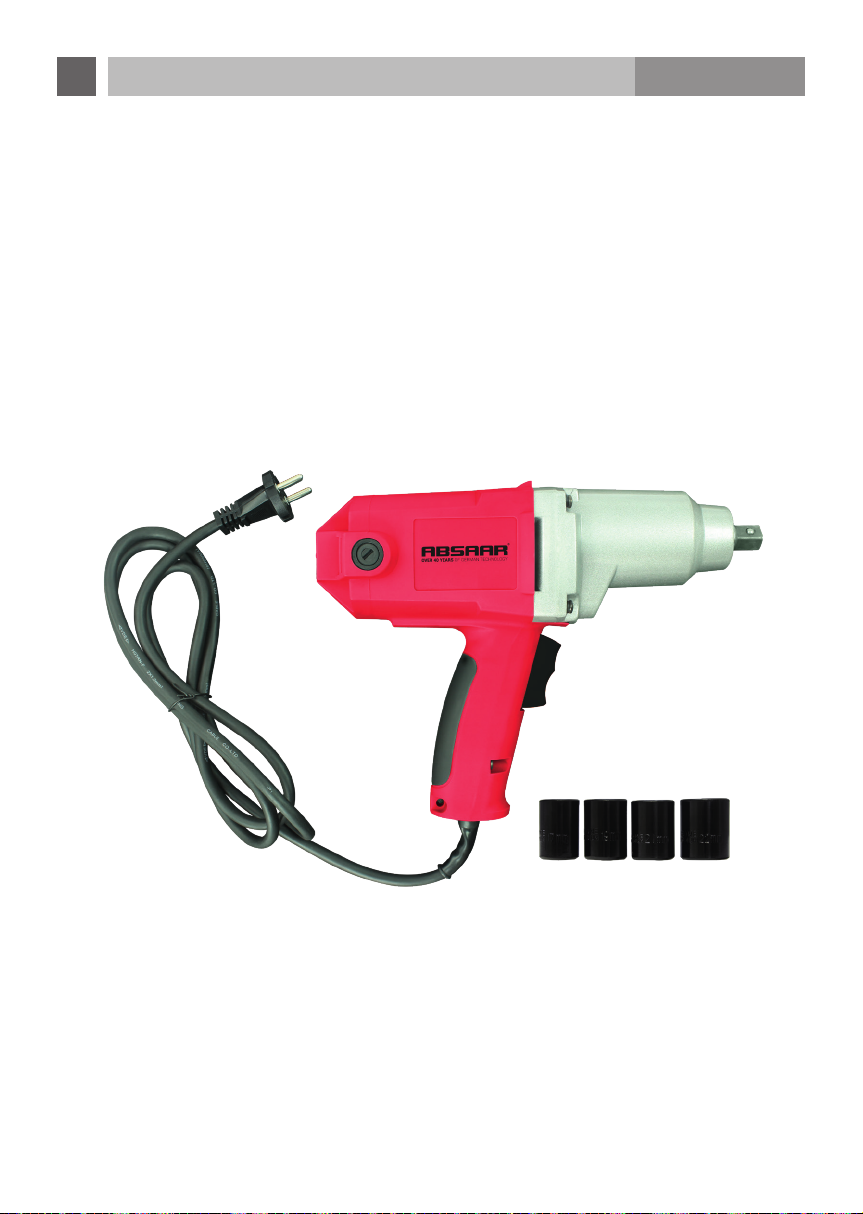
AVVISO
Leggere tutte le avvertenze di sicurezza e le istruzioni. La
mancata osservanza delle avvertenze di sicurezza e delle istruzioni può
causare scosse elettriche, incendi e/o lesioni gravi.
Conservare tutte le avvertenze di sicurezza e le istruzioni per il futuro,
consegnandole eventualmente ad altri utilizzatori o ai successivi proprietari.
Il termine "elettroutensile" utilizzato nelle avvertenze di sicurezza si riferisce
agli elettroutensili collegati alla rete (con cavo) o agli elettroutensili a batteria
(senza cavo).
a) Mantenere l’area di lavoro pulita e ben illuminata. Il disordine o le aree
di lavoro non illuminate favoriscono gli infortuni.
b) Non lavorare con un elettroutensile in ambienti con pericolo di
esplosioni, nei quali si trovano liquidi infiammabili, gas o polveri.
Gli elettroutensili producono scintille che possono far infiammare le polveri
o i vapori.
c) Tenere lontani i bambini e le altre persone durante l’utilizzo di un
elettroutensile. In caso di distrazioni, è possibile perdere il controllo
dell’elettroutensile.
a) La spina di collegamento dell’elettroutensile deve adattarsi alla
presa. La spina non deve essere modificata in alcun modo. Non
utilizzare adattatori con gli elettroutensili collegati a terra. Le spine
non modificate e le prese adeguate riducono il rischio di scosse elettriche.
b) Evitare il contatto del corpo con superfici collegate a terra, come
tubi, riscaldamenti, fornelli e frigoriferi. Se il corpo è messo a terra,
aumenta il rischio di scossa elettrica.
c) Non esporre gli elettroutensili alla pioggia o all’umidità. La
penetrazione di acqua in un elettroutensile aumenta il rischio di scosse
elettriche.
d) Non utilizzare il cavo per uno scopo diverso da quello previsto,
ad esempio per trasportare l’elettroutensile, per appenderlo o per
staccare la spina dalla presa della corrente. Tenere il cavo lontano
da fonti di calore, olio, bordi taglienti o parti in movimento. I cavi
danneggiati o aggrovigliati aumentano il rischio di scosse elettriche.
1. Avvertenze
di sicurezza
1.1 Avvertenze di
sicurezza generali
per elettroutensili
Sicurezza sul luogo
di lavoro
Sicurezza
elettrica
IT
MANUALE PER L’UTENTE
AB-IW900
48
Page 49

IT
MANUALE PER L’UTENTE
AB-IW900
AVVISO
Leggere tutte le avvertenze di sicurezza e le istruzioni. La
mancata osservanza delle avvertenze di sicurezza e delle istruzioni può
causare scosse elettriche, incendi e/o lesioni gravi.
Conservare tutte le avvertenze di sicurezza e le istruzioni per il futuro,
consegnandole eventualmente ad altri utilizzatori o ai successivi proprietari.
Il termine "elettroutensile" utilizzato nelle avvertenze di sicurezza si riferisce
agli elettroutensili collegati alla rete (con cavo) o agli elettroutensili a batteria
(senza cavo).
a) Mantenere l’area di lavoro pulita e ben illuminata. Il disordine o le aree
di lavoro non illuminate favoriscono gli infortuni.
b) Non lavorare con un elettroutensile in ambienti con pericolo di
esplosioni, nei quali si trovano liquidi infiammabili, gas o polveri.
Gli elettroutensili producono scintille che possono far infiammare le polveri
o i vapori.
c) Tenere lontani i bambini e le altre persone durante l’utilizzo di un
elettroutensile. In caso di distrazioni, è possibile perdere il controllo
dell’elettroutensile.
a) La spina di collegamento dell’elettroutensile deve adattarsi alla
presa. La spina non deve essere modificata in alcun modo. Non
utilizzare adattatori con gli elettroutensili collegati a terra. Le spine
non modificate e le prese adeguate riducono il rischio di scosse elettriche.
b) Evitare il contatto del corpo con superfici collegate a terra, come
tubi, riscaldamenti, fornelli e frigoriferi. Se il corpo è messo a terra,
aumenta il rischio di scossa elettrica.
c) Non esporre gli elettroutensili alla pioggia o all’umidità. La
penetrazione di acqua in un elettroutensile aumenta il rischio di scosse
elettriche.
d) Non utilizzare il cavo per uno scopo diverso da quello previsto,
ad esempio per trasportare l’elettroutensile, per appenderlo o per
staccare la spina dalla presa della corrente. Tenere il cavo lontano
da fonti di calore, olio, bordi taglienti o parti in movimento. I cavi
danneggiati o aggrovigliati aumentano il rischio di scosse elettriche.
1. Avvertenze
di sicurezza
1.1 Avvertenze di
sicurezza generali
per elettroutensili
Sicurezza sul luogo
di lavoro
Sicurezza
elettrica
49
Page 50

a) Non sovraccaricare l’apparecchio. Per il proprio lavoro utilizzare
l’elettroutensile adeguato. Con l’elettroutensile adeguato, sarà possibile
lavorare meglio e in modo più sicuro nei valori di carico indicati.
b) Non utilizzare elettroutensili con interruttori difettosi.
Un elettroutensile che non è più possibile accendere o spegnere
è pericoloso e necessita di riparazione.
c) Scollegare la spina dalla presa di corrente e/o rimuovere la batteria
prima di effettuare qualsiasi regolazione dell’apparecchio, sostituire
gli accessori o riporre l’elettroutensile. Questa misura precauzionale
impedisce l’avvio accidentale dell’elettroutensile.
d) Conservare gli elettroutensili non utilizzati fuori dalla portata dei
bambini. Non lasciare che l’elettroutensile sia utilizzato da persone
che non hanno familiarità con esso o non hanno letto le istruzioni.
Gli elettroutensili sono pericolosi nelle mani di persone inesperte.
e) Mantenere gli elettroutensili con cura. Controllare che le parti
mobili funzionino correttamente e non si blocchino, che non siano
rotte o danneggiate, di modo che la funzione dell’elettroutensile
non sia compromessa. Far riparare le parti danneggiate prima di
utilizzare l’elettroutensile. Molti incidenti sono causati da una scarsa
manutenzione degli elettroutensili.
f) Mantenere gli utensili da taglio affilati e puliti. Gli utensili da taglio ben
curati e con bordi affilati si inceppano meno e sono più facili da controllare.
g) Utilizzare l’elettroutensile, gli accessori, gli utensili per applicazioni
specifiche, ecc. attenendosi alle presenti istruzioni. Così facendo,
tenere sempre presente le condizioni di lavoro e l’attività da
eseguire. L’impiego di elettroutensili per usi diversi da quelli consentiti
potrà dar luogo a situazioni di pericolo.
h) Fare riparare l’elettroutensile esclusivamente da personale
specializzato e solo impiegando pezzi di ricambio originali.
In tale maniera potrà essere salvaguardata la sicurezza
dell’elettroutensile.
Tenere l’apparecchio per le superfici di impugnatura isolate quando si
eseguono operazioni in cui la vite può venire a contatto con fili nascosti
o il proprio cavo. Il contatto della vite con un filo in tensione può anche mettere
sotto tensione parti dell’apparecchio in metallo e causare scosse elettriche.
• Bloccare o ancorare sempre le ruote prima di utilizzare il prodotto e tirare
il freno di stazionamento.
• Durante la rimozione o il fissaggio del copriruota, procedere con estrema
cautela per evitare lesioni alle persone o danni materiali..
Utilizzo e
trattamento degli
elettroutensili
Assistenza
1.2 Avvertenze
di sicurezza
per avvitatori a
impulsi
IT
MANUALE PER L’UTENTE
e) Qualora si intenda operare con l’elettroutensile all’esterno, utilizzare
una prolunga adeguata anche per l’uso esterno. L’utilizzo di una
Sicurezza delle
persone
prolunga adeguata per l’esterno riduce il rischio di scosse elettriche.
f) Se non è possibile evitare l’utilizzo di un elettroutensile in un luogo
umido, utilizzare un interruttore differenziale. L’utilizzo di un interruttore
differenziale riduce il rischio di scosse elettriche.
a) Prestare attenzione a ciò che si sta facendo e usare il buon
senso durante l’utilizzo di un elettroutensile. Non utilizzare un
elettroutensile se si è stanchi o sotto l’effetto di droghe, alcol o
farmaci. Un attimo di distrazione durante l’uso dell’elettroutensile può
provocare gravi lesioni.
b) Indossare equipaggiamento di protezione personale e sempre gli
occhiali protettivi. L’uso di equipaggiamento di protezione personale
quali maschera antipolvere, scarpe protettive antiscivolo, elmetto di
protezione o protezioni per l’udito, a seconda della natura e dell’utilizzo
dell’elettroutensile, riduce il rischio di lesioni.
c) Evitare la messa in funzione involontaria. Assicurarsi che
l’elettroutensile sia spento prima di collegarlo all’alimentazione di
corrente e/o alla batteria, di afferrarlo o di trasportarlo. Se durante
il trasporto dell’elettroutensile si ha il dito sull’interruttore o se si collega
l’elettroutensile attivato all’alimentazione di corrente, possono verificarsi
degli incidenti.
d) Rimuovere gli utensili di regolazione o la chiave per dadi prima di
regolare l’elettroutensile. Un utensile o una chiave che si trova in una
parte dell’apparecchio in rotazione può provocare lesioni.
e) Evitare una postura anomala. Assicurare una posizione sicura e mantenere
l’equilibrio in qualsiasi momento. Ciò consente un migliore controllo
dell’elettroutensile in situazioni inaspettate.
f) Indossare un abbigliamento adeguato. Non indossare abiti larghi,
né gioielli. Tenere i capelli, i vestiti e i guanti lontano dalle parti in
movimento. Vestiti ampi, gioielli o capelli lunghi possono rimanere impigliati
nelle parti in movimento.
g) Se è possibile installare dispositivi di aspirazione e di raccolta
della polvere, assicurarsi che questi siano collegati e utilizzati
correttamente. L’utilizzo di un dispositivo di aspirazione della polvere può
ridurre i rischi legati alla polvere.
AB-IW900
50
Page 51

IT
MANUALE PER L’UTENTE
AB-IW900
a) Non sovraccaricare l’apparecchio. Per il proprio lavoro utilizzare
l’elettroutensile adeguato. Con l’elettroutensile adeguato, sarà possibile
lavorare meglio e in modo più sicuro nei valori di carico indicati.
b) Non utilizzare elettroutensili con interruttori difettosi.
Un elettroutensile che non è più possibile accendere o spegnere
è pericoloso e necessita di riparazione.
c) Scollegare la spina dalla presa di corrente e/o rimuovere la batteria
prima di effettuare qualsiasi regolazione dell’apparecchio, sostituire
gli accessori o riporre l’elettroutensile. Questa misura precauzionale
impedisce l’avvio accidentale dell’elettroutensile.
d) Conservare gli elettroutensili non utilizzati fuori dalla portata dei
bambini. Non lasciare che l’elettroutensile sia utilizzato da persone
che non hanno familiarità con esso o non hanno letto le istruzioni.
Gli elettroutensili sono pericolosi nelle mani di persone inesperte.
e) Mantenere gli elettroutensili con cura. Controllare che le parti
mobili funzionino correttamente e non si blocchino, che non siano
rotte o danneggiate, di modo che la funzione dell’elettroutensile
non sia compromessa. Far riparare le parti danneggiate prima di
utilizzare l’elettroutensile. Molti incidenti sono causati da una scarsa
manutenzione degli elettroutensili.
f) Mantenere gli utensili da taglio affilati e puliti. Gli utensili da taglio ben
curati e con bordi affilati si inceppano meno e sono più facili da controllare.
g) Utilizzare l’elettroutensile, gli accessori, gli utensili per applicazioni
specifiche, ecc. attenendosi alle presenti istruzioni. Così facendo,
tenere sempre presente le condizioni di lavoro e l’attività da
eseguire. L’impiego di elettroutensili per usi diversi da quelli consentiti
potrà dar luogo a situazioni di pericolo.
h) Fare riparare l’elettroutensile esclusivamente da personale
specializzato e solo impiegando pezzi di ricambio originali.
In tale maniera potrà essere salvaguardata la sicurezza
dell’elettroutensile.
Utilizzo e
trattamento degli
elettroutensili
Assistenza
Tenere l’apparecchio per le superfici di impugnatura isolate quando si
eseguono operazioni in cui la vite può venire a contatto con fili nascosti
o il proprio cavo. Il contatto della vite con un filo in tensione può anche mettere
sotto tensione parti dell’apparecchio in metallo e causare scosse elettriche.
• Bloccare o ancorare sempre le ruote prima di utilizzare il prodotto e tirare
il freno di stazionamento.
• Durante la rimozione o il fissaggio del copriruota, procedere con estrema
cautela per evitare lesioni alle persone o danni materiali..
51
1.2 Avvertenze
di sicurezza
per avvitatori a
impulsi
Page 52
1 avvitatore a impulsi con cavo
4 inserti chiave a tubo
(17 mm, 19 mm, 21 mm, 22 mm)
Questi simboli sono utilizzati sulle seguenti pagine:
Avviso Nota
Indumenti di protezione Maschera antipolvere
Protezione per l’udito Protezione visiva
Classe di protezione II
Tutela ambientale
2. Materiale
consegnato
3. Spiegazione
dei simboli
utilizzati
IT
MANUALE PER L’UTENTE
Rischi residui
AB-IW900
• Utilizzare dispositivi di sollevamento supplementare e dispositivi di supporto di
sicurezza durante la sostituzione degli pneumatici del veicolo.
• Quando si utilizza l’avvitatore a impulsi, non toccarlo con le mani..
Anche se si utilizza correttamente questo elettroutensile, sussistono
comunque sempre rischi residui. Possono manifestarsi i seguenti rischi
relativamente alla struttura e alla versione di questo elettroutensile:
1. Danni polmonari se non si indossa alcuna maschera antipolvere adeguata.
2. Danni all’udito se non si indossa alcuna protezione per l’udito adeguata.
3. Danni alla salute derivanti da vibrazioni mano-braccio se si utilizza
l’apparecchio per un lungo periodo o se l’uso o la manutenzione non sono
adeguati.
Avviso! Questo elettroutensile produce un campo elettromagnetico durante
il funzionamento. Questo campo può interferire con impianti medici attivi
o passivi in determinate circostanze. Per ridurre il rischio di lesioni gravi o mortali,
i portatori di tali impianti medici devono consultare il proprio medico e il
produttore dell’impianto consultato prima di utilizzare l’elettroutensile.
Indossare una maschera antipolvere. Nella lavorazione del
legno e di altri materiali possono avere origine polveri nocive per
la salute.
Indossare sempre occhiali protettivi. Pericolo di lesioni agli
occhi da schegge o polveri.
Indossare una protezione per l’udito. L’esposizione al rumore
può causare la perdita dell’udito.
Indossare abbigliamento protettivo. Ad esempio camicie da
lavoro, tute e berretti aggiuntivi.
52
Page 53
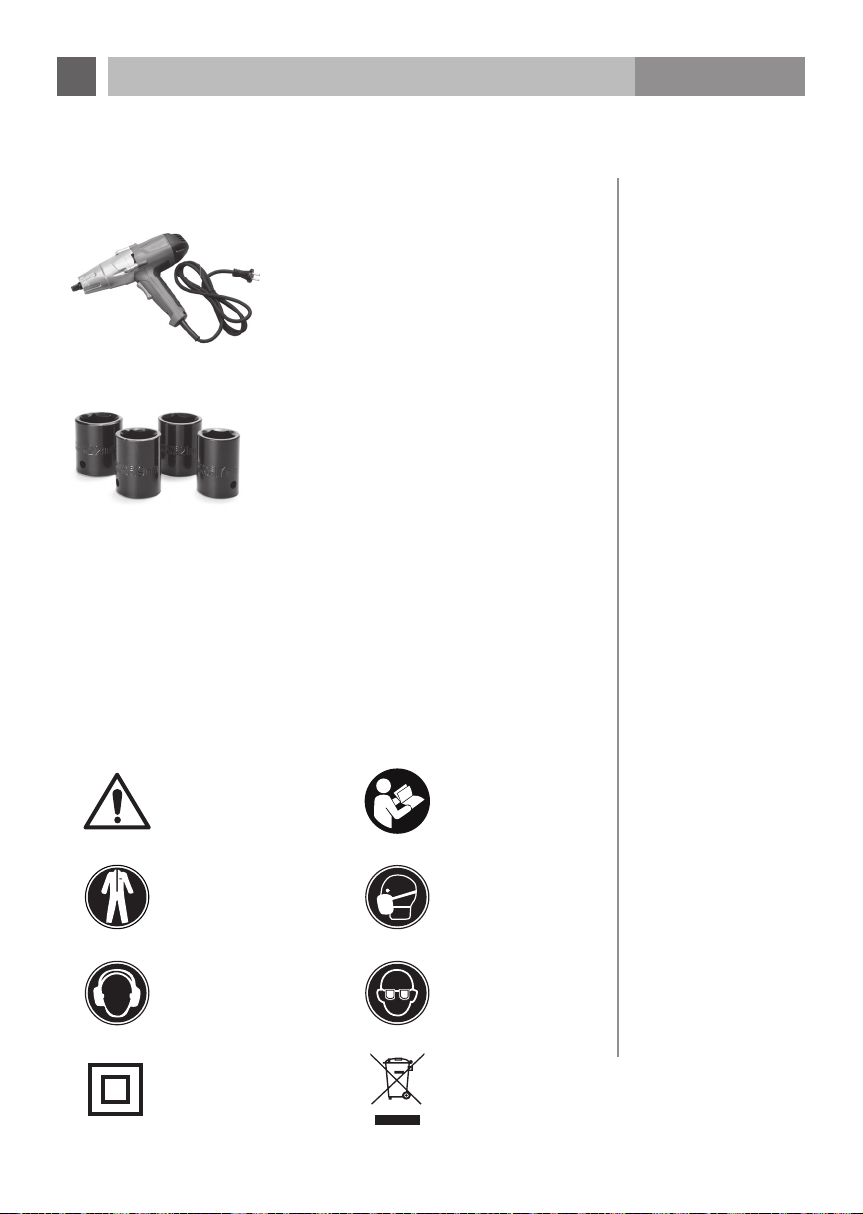
IT
MANUALE PER L’UTENTE
AB-IW900
2. Materiale
consegnato
1 avvitatore a impulsi con cavo
4 inserti chiave a tubo
(17 mm, 19 mm, 21 mm, 22 mm)
Questi simboli sono utilizzati sulle seguenti pagine:
Avviso Nota
Indumenti di protezione Maschera antipolvere
Protezione per l’udito Protezione visiva
Classe di protezione II Tutela ambientale
3. Spiegazione
dei simboli
utilizzati
53
Page 54
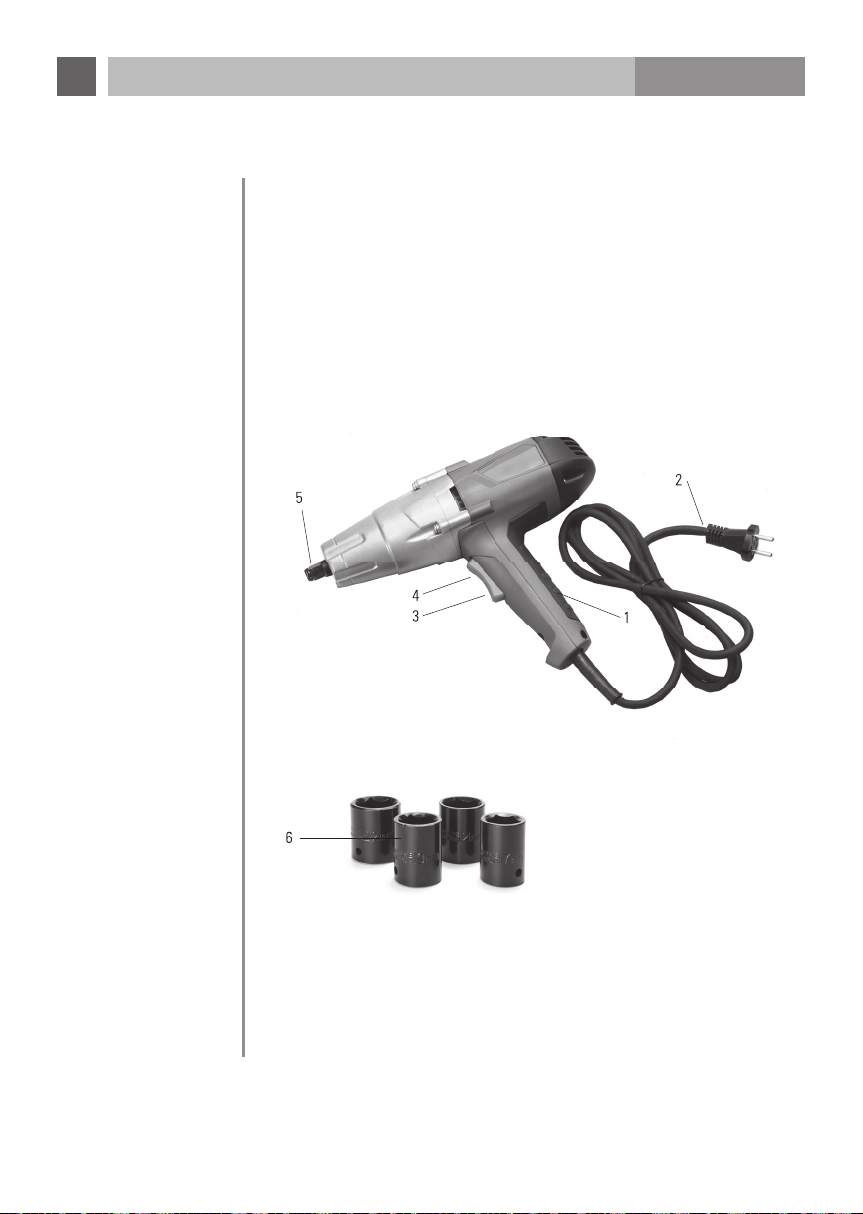
Tutte le applicazioni con l’apparecchio che non sono indicate nel capitolo
"Uso conforme alle disposizioni" sono considerate come un utilizzo non conforme.
L’apparecchio non deve essere utilizzato per le seguenti finalità:
• per la miscelazione di vernici o materiali da costruzione,
• per la lucidatura, la smerigliatura, l’affilatura con i corrispondenti margini
di guardia
• come motore per ulteriori apparecchi.
Esiste il pericolo di lesioni.
Per tutti i danni conseguenti, nonché per le lesioni personali derivanti da uso
improprio, è responsabile l’utilizzatore dell’apparecchio.
Quando si utilizzano componenti di altri produttori o non originali sulla macchina,
è invalidata la garanzia.
Avviso!
• Per ridurre il rischio di lesioni, scollegare l’utensile
dall’alimentazione elettrica prima di inserire o rimuovere
accessori o prima di effettuare regolazioni.
• Utilizzare solo chiavi a tubo o altri accessori appositamente
progettati per avvitatori a impulsi. Altre chiavi a tubo o altri
accessori potrebbero scheggiarsi o rompersi, provocando
quindi lesioni.
Prima dell’utilizzo dell’utensile eseguire un controllo visivo: Le chiavi a tubo ad
es. presentano collegamenti e sono posizionate correttamente sul supporto della
chiave a tubo? Il supporto della chiave a tubo si è deformato? L’interruttore a
bilico, il cavo di rete o la spina di alimentazione sono danneggiati?
• Fissare la chiave a tubo (6): Inserire la chiave a tubo sul relativo supporto (5)
e premerla fino all’aggancio nello stesso.
• Rimuovere la chiave a tubo (6): Tenere ferma la chiave a tubo ed estrarla dal
relativo supporto (5).
5.2 Uso non
conforme alle
disposizioni
6. Funziona-
mento
6.1 Inserimento/
rimozione della
chiave a tubo
IT
MANUALE PER L’UTENTE
AB-IW900
4. Elementi
di comando
5.1 Uso conforme
alle disposizioni
5. Uso
1. Impugnatura
2. Cavo di rete con spina di alimentazione
3. Rotazione destrorsa interruttore a bilico (F)
4. Rotazione sinistrorsa interruttore a bilico (R)
5. Supporto della chiave a tubo
6. Inserti chiave a tubo (accessori)
22 mm
21 mm
19 mm
17 mm
Questo avvitatore a impulsi è adatto per avvitare e svitare bulloni, viti e dadi.
Non utilizzarlo per fi ni diversi. L’uso improprio dell’utensile può provocare lesioni
alle persone o danni alle cose.
Con questo avvitatore a impulsi possono essere utilizzate solo chiavi a tubo con
barrette quadre (12,7 mm, ½").
54
Page 55
IT
MANUALE PER L’UTENTE
AB-IW900
Tutte le applicazioni con l’apparecchio che non sono indicate nel capitolo
"Uso conforme alle disposizioni" sono considerate come un utilizzo non conforme.
L’apparecchio non deve essere utilizzato per le seguenti finalità:
• per la miscelazione di vernici o materiali da costruzione,
• per la lucidatura, la smerigliatura, l’affilatura con i corrispondenti margini
di guardia
• come motore per ulteriori apparecchi.
Esiste il pericolo di lesioni.
Per tutti i danni conseguenti, nonché per le lesioni personali derivanti da uso
improprio, è responsabile l’utilizzatore dell’apparecchio.
Quando si utilizzano componenti di altri produttori o non originali sulla macchina,
è invalidata la garanzia.
Avviso!
• Per ridurre il rischio di lesioni, scollegare l’utensile
dall’alimentazione elettrica prima di inserire o rimuovere
accessori o prima di effettuare regolazioni.
• Utilizzare solo chiavi a tubo o altri accessori appositamente
progettati per avvitatori a impulsi. Altre chiavi a tubo o altri
accessori potrebbero scheggiarsi o rompersi, provocando
quindi lesioni.
5.2 Uso non
conforme alle
disposizioni
6. Funzionamento
Prima dell’utilizzo dell’utensile eseguire un controllo visivo: Le chiavi a tubo ad
es. presentano collegamenti e sono posizionate correttamente sul supporto della
chiave a tubo? Il supporto della chiave a tubo si è deformato? L’interruttore a
bilico, il cavo di rete o la spina di alimentazione sono danneggiati?
• Fissare la chiave a tubo (6): Inserire la chiave a tubo sul relativo supporto (5)
e premerla fino all’aggancio nello stesso.
• Rimuovere la chiave a tubo (6): Tenere ferma la chiave a tubo ed estrarla dal
relativo supporto (5).
55
6.1 Inserimento/
rimozione della
chiave a tubo
Page 56
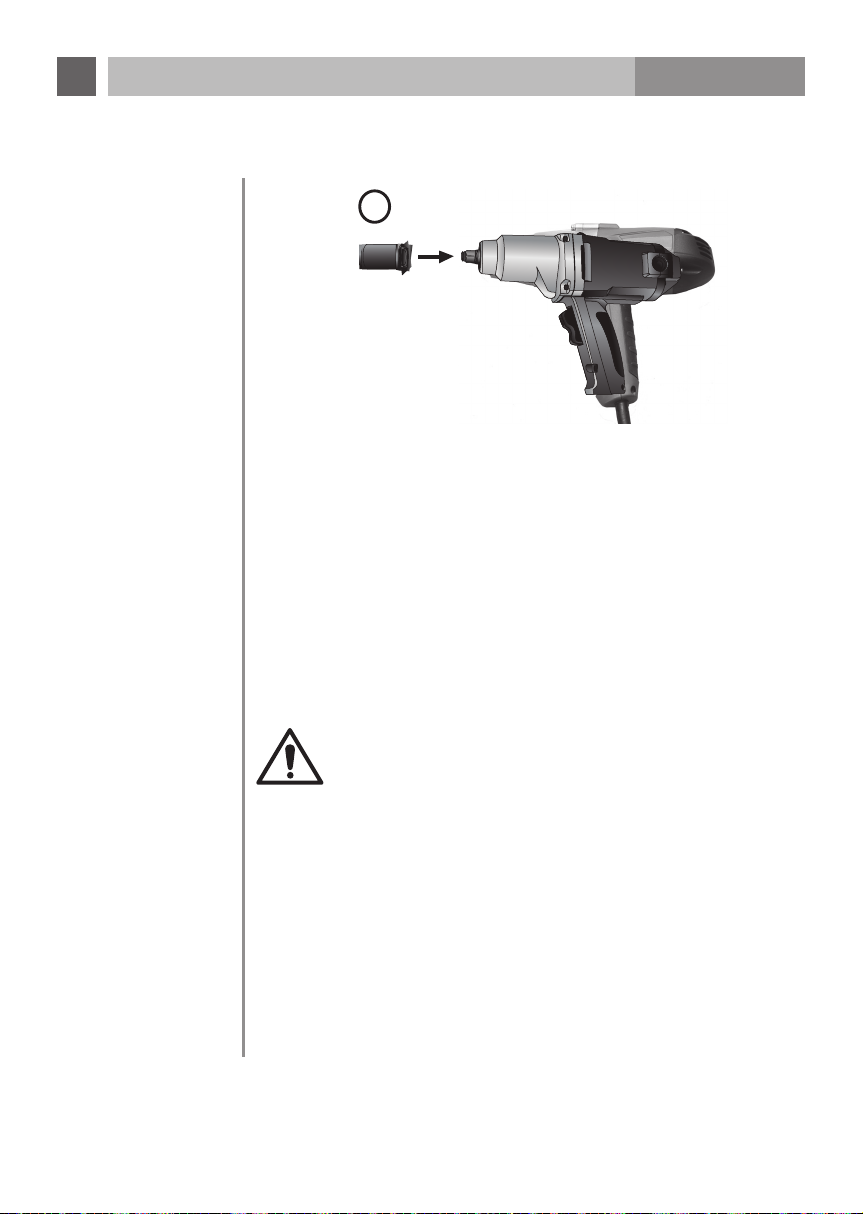
Indicazioni di funzionamento:
• L’allentamento/serraggio di bulloni, viti o dadi può richiedere
diversi colpi.
• Più si stringe un bullone, una vite o un dado, più saldo sarà.
Evitare un serraggio prolungato per evitare danni al materiale di
fi ssaggio o alle opere di muratura.
• Notare in particolare, che il materiale di montaggio più piccolo
spesso richiede meno forza.
• Olio, sporco, ruggine e altri materiali che si trovano sui fi letti
oppure sotto le teste delle viti possono infl uenzare la resistenza
dei materiali di fi ssaggio.
Avviso! Tenere le mani e il cavo di alimentazione a una distanza
suffi ciente tra la chiave a tubo e parti in movimento.
Avviso! Lasciare che il motore prima di passare da rotazione
destrorsa a sinistrorsa si arresti completamente per evitare danni
al motore e ad altre parti dell’utensile.
Avviso! Seguire le istruzioni contenute nel manuale del costruttore
del veicolo per l’uso di questo prodotto. Le specifi che consigliate
non devono essere superate in alcun caso. Serrare i dadi delle
ruote in base alle specifi che di serraggio indicate nelle istruzioni
di funzionamento del veicolo. Dadi serrati troppo stretti o troppo
allentati possono provocare la rottura della ruota.
• nserire una marcia o impostare il cambio automatico su "P". Bloccare le ruote
con il freno a mano.
• Collegare la spina di alimentazione (2) con una presa di corrente adatta.
6.3 Sostituzione
degli pneumatici
2
Rotazione sinistrorsa (R)
Rotazione destrorsa (F)
IT
MANUALE PER L’UTENTE
AB-IW900
1
6.2 Accensione/
spegnimento
Questo avvitatore a impulsi è dotato di un interruttore a bilico, con il quale è
possibile passare da rotazione destrorsa a quella sinistrorsa.
• Collegare la spina di alimentazione (2) con una presa di corrente adatta.
• Selezionare una chiave a tubo adatta. Durante l’inserimento prestare
attenzione che la chiave a tubo sia posizionata saldamente e in modo sicuro
nel relativo supporto (5).
• Posizionare l’utensile saldamente sul materiale di fi ssaggio da lavorare
(bullone o dado).
• Per la rotazione destrorsa (in senso orario per avvitare il materiale di fi ssaggio),
premere l’interruttore a bilico sulla posizione destrorsa (F) (3).
Prima dell’utilizzo, verifi care che il senso di rotazione sia corretto.
Per motivi di sicurezza, la coppia viene limitata durante la rotazione
destrorsa a 100 Nm. Stringere i bulloni della ruota con una chiave
dinamometrica e una coppia di circa 120 Nm. Si segnala che, dopo
un percorso di circa 50 km, i bulloni devono essere nuovamente
serrati. Controllare che i bulloni della ruota siano saldi.
• Per la rotazione sinistrorsa (in senso antiorario per allentare il materiale di
fi ssaggio), premere l’interruttore a bilico sulla posizione sinistrorsa (R) (4).
Prima dell’utilizzo, verifi care che il senso di rotazione sia corretto.
• Rilasciare l’interruttore a bilico (3 o 4) per far fermare l’utensile.
• Disconnettere la spina di alimentazione (2) dopo aver operato con il
collegamento dell’alimentazione.
56
Page 57
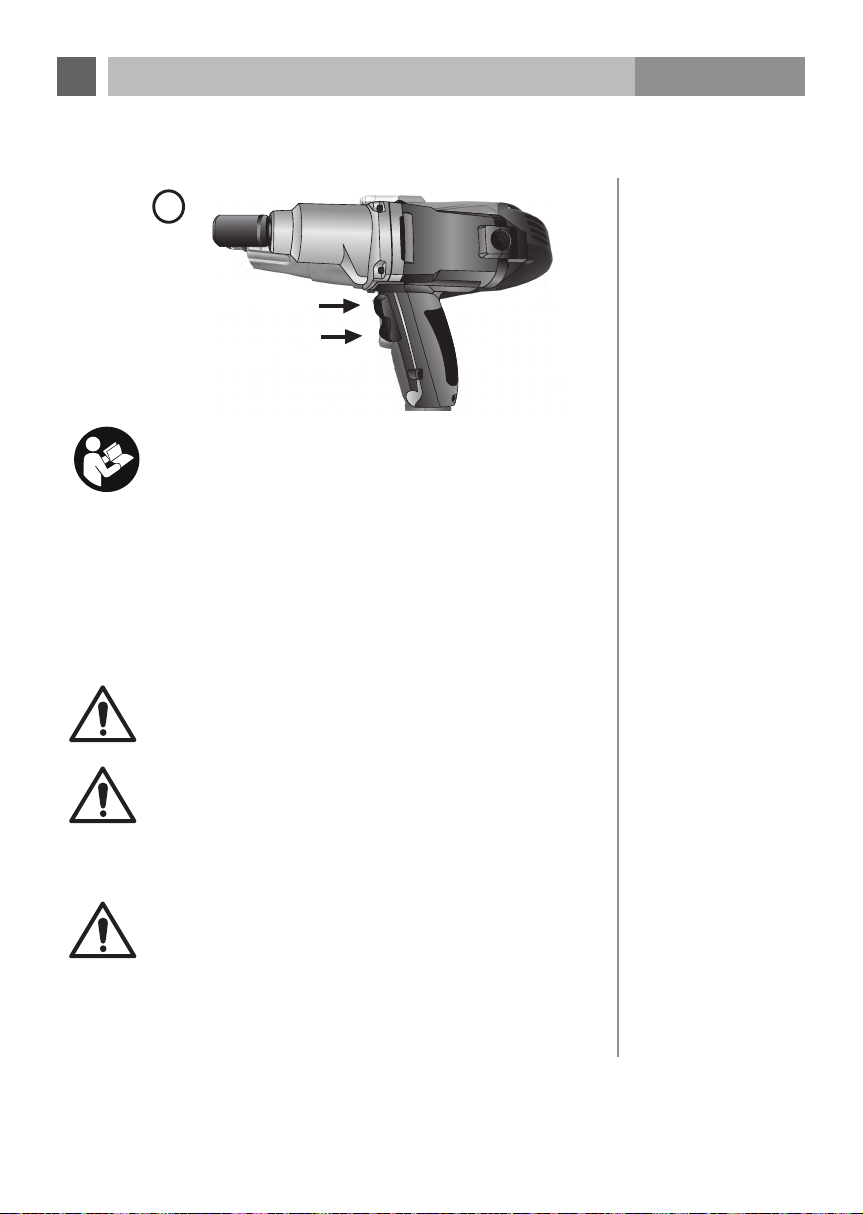
IT
MANUALE PER L’UTENTE
2
Rotazione sinistrorsa (R)
Rotazione destrorsa (F)
Indicazioni di funzionamento:
• L’allentamento/serraggio di bulloni, viti o dadi può richiedere
diversi colpi.
• Più si stringe un bullone, una vite o un dado, più saldo sarà.
Evitare un serraggio prolungato per evitare danni al materiale di
fi ssaggio o alle opere di muratura.
• Notare in particolare, che il materiale di montaggio più piccolo
spesso richiede meno forza.
• Olio, sporco, ruggine e altri materiali che si trovano sui fi letti
oppure sotto le teste delle viti possono infl uenzare la resistenza
dei materiali di fi ssaggio.
AB-IW900
Avviso! Tenere le mani e il cavo di alimentazione a una distanza
suffi ciente tra la chiave a tubo e parti in movimento.
Avviso! Lasciare che il motore prima di passare da rotazione
destrorsa a sinistrorsa si arresti completamente per evitare danni
al motore e ad altre parti dell’utensile.
Avviso! Seguire le istruzioni contenute nel manuale del costruttore
del veicolo per l’uso di questo prodotto. Le specifi che consigliate
non devono essere superate in alcun caso. Serrare i dadi delle
ruote in base alle specifi che di serraggio indicate nelle istruzioni
di funzionamento del veicolo. Dadi serrati troppo stretti o troppo
allentati possono provocare la rottura della ruota.
• nserire una marcia o impostare il cambio automatico su "P". Bloccare le ruote
con il freno a mano.
• Collegare la spina di alimentazione (2) con una presa di corrente adatta.
57
6.3 Sostituzione
degli pneumatici
Page 58
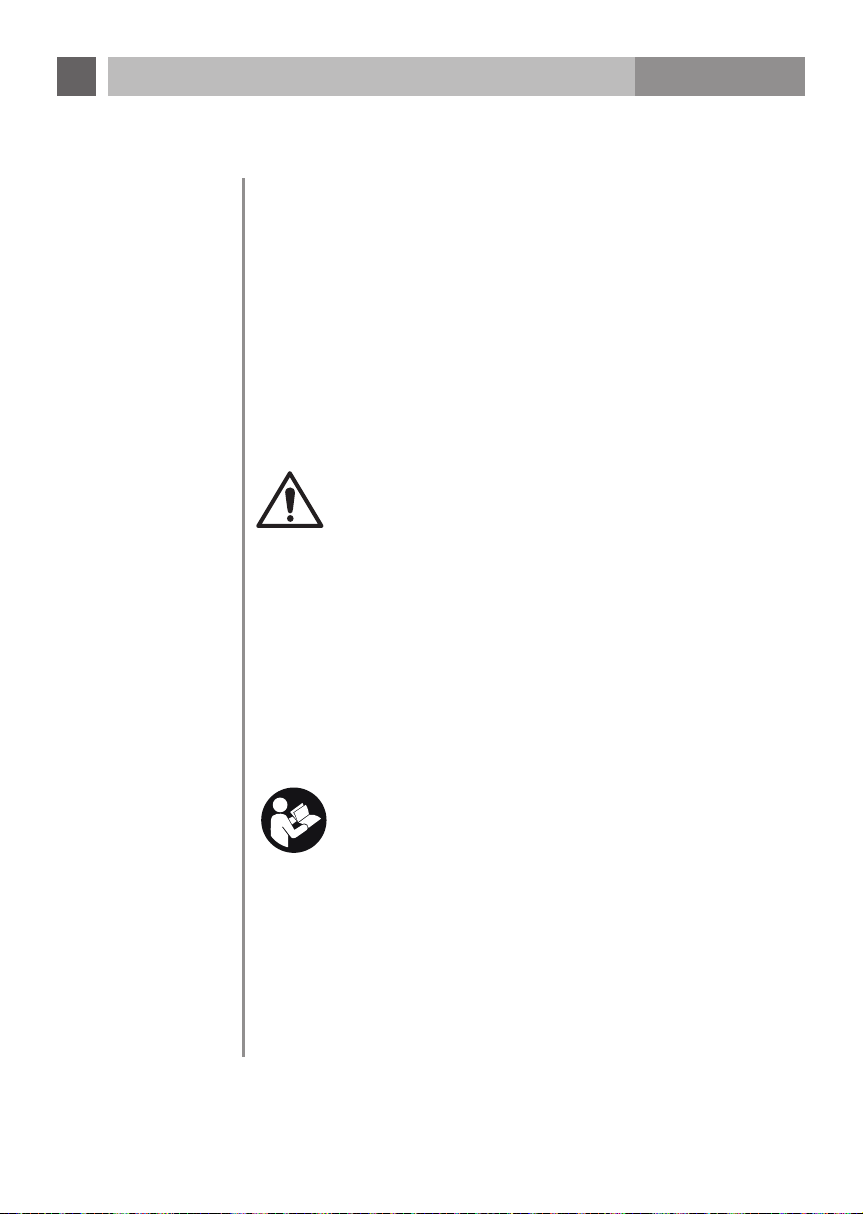
Avviso! Prima della pulizia o della manutenzione scollegare
sempre l’utensile dalla rete elettrica per ridurre il rischio di lesioni.
Non tentare mai di riparare da soli l’utensile.
• Staccare la spina di alimentazione (2) dalla presa di corrente.
• Rimuovere la chiave a tubo (6) dal rispettivo supporto (5).
• Pulire le prese d’aria da polvere e sporcizia.
• Per pulire utilizzare un sapone delicato e un panno inumidito per pulire
l’alloggiamento e la maniglia (1) dell’avvitatore a impulsi. Mantenere il manico
sempre pulito da olio e grasso.
• Si consiglia di conservare l’utensile e i rispettivi accessori in una custodia per
il trasporto (7) in un luogo asciutto e pulito.
• Se il cavo di alimentazione del presente apparecchio è danneggiato, deve
essere sostituito dal costruttore o dal rispettivo servizio clienti o da una
persona qualificata al fine di evitare situazioni pericolose.
Avviso!
• Non usare detergenti, alcol o diluenti per pulire l’utensile.
Essi potrebbero graffiare le parti in plastica e altre parti isolate
dell’utensile.
• Non usare mai diluenti infiammabili o combustibili in prossimità
dell’utensile.
• Non immergere l’utensile in liquidi e fare attenzione che non
penetrino eventuali liquidi al suo interno..
Spegnere l’apparecchio. Staccare la spina di alimentazione dalla presa di corrente.
Se la spazzola di carbone è molto usurata, al punto che il perno di
isolamento in plastica tocca il collettore al suo interno, il motore si spegne
automaticamente. Se ciò si verifica, entrambe le spazzole devono essere sostituite
contemporaneamente. Utilizzare solo spazzole di carbone identiche.
Al fine di garantire la sicurezza e l’affidabilità di questa macchina, i lavori
di riparazione, manutenzione e regolazione devono essere eseguiti presso
officine autorizzate dal produttore o presso i centri di servizio clienti utilizzando
esclusivamente ricambi originali del costruttore.
7. Pulizia e
manutenzione
7.1 Sostituzione
delle spazzole di
carbone
IT
MANUALE PER L’UTENTE
• Sollevare il veicolo con gli accessori e gli utensili originali del produttore di
automobili. Rispettare rigorosamente le istruzioni per l’uso del produttore.
• Selezionare una chiave a tubo adatta. Durante l’inserimento prestare
attenzione che la chiave a tubo sia posizionata saldamente e in modo sicuro
nel relativo supporto (5).
• Posizionare l’utensile saldamente sul materiale di fissaggio da lavorare dello
pneumatico.
• Per l’avvitamento (in senso orario), premere l’interruttore a bilico sulla
posizione di rotazione destrorsa (F) (3). Prima dell’utilizzo, verificare che il
senso di rotazione sia corretto.
Per motivi di sicurezza, la coppia viene limitata durante la rotazione
destrorsa a 100 Nm. Stringere i bulloni della ruota con una chiave
dinamometrica e una coppia di circa 120 Nm. Si segnala che, dopo
un percorso di circa 50 km, i bulloni devono essere nuovamente
serrati. Controllare che i bulloni della ruota siano saldi.
• Per allentare (in senso antiorario), impostare l’interruttore a bilico sulla
posizione di rotazione sinistrorsa (R) (4). Prima dell’utilizzo, verificare che
il senso di rotazione sia corretto.
• L’allentamento di dadi/viti delle ruote può richiedere diversi colpi.
• Rilasciare l’interruttore a bilico (3 o 4) per far fermare l’utensile.
• Disconnettere la spina di alimentazione (2) dopo aver operato con
il collegamento dell’alimentazione.
Note:
• Rispettare rigorosamente le istruzioni del produttore per quanto
riguarda la coppia da utilizzare. Non ci sono valori generali per
cerchi in lega e cerchi in acciaio.
• Prima di guidare controllare con una chiave dinamometrica la
posizione corretta di dadi/viti delle ruote.
• Dopo un percorso di 30-50 km, controllare con una chiave
dinamometrica la posizione corretta di dadi/viti delle ruote.
AB-IW900
58
Page 59
IT
MANUALE PER L’UTENTE
AB-IW900
Avviso! Prima della pulizia o della manutenzione scollegare
sempre l’utensile dalla rete elettrica per ridurre il rischio di lesioni.
Non tentare mai di riparare da soli l’utensile.
• Staccare la spina di alimentazione (2) dalla presa di corrente.
• Rimuovere la chiave a tubo (6) dal rispettivo supporto (5).
• Pulire le prese d’aria da polvere e sporcizia.
• Per pulire utilizzare un sapone delicato e un panno inumidito per pulire
l’alloggiamento e la maniglia (1) dell’avvitatore a impulsi. Mantenere il manico
sempre pulito da olio e grasso.
• Si consiglia di conservare l’utensile e i rispettivi accessori in una custodia per
il trasporto (7) in un luogo asciutto e pulito.
• Se il cavo di alimentazione del presente apparecchio è danneggiato, deve
essere sostituito dal costruttore o dal rispettivo servizio clienti o da una
persona qualificata al fine di evitare situazioni pericolose.
Avviso!
• Non usare detergenti, alcol o diluenti per pulire l’utensile.
Essi potrebbero graffiare le parti in plastica e altre parti isolate
dell’utensile.
• Non usare mai diluenti infiammabili o combustibili in prossimità
dell’utensile.
• Non immergere l’utensile in liquidi e fare attenzione che non
penetrino eventuali liquidi al suo interno..
7. Pulizia e
manutenzione
Spegnere l’apparecchio. Staccare la spina di alimentazione dalla presa di corrente.
Se la spazzola di carbone è molto usurata, al punto che il perno di
isolamento in plastica tocca il collettore al suo interno, il motore si spegne
automaticamente. Se ciò si verifica, entrambe le spazzole devono essere sostituite
contemporaneamente. Utilizzare solo spazzole di carbone identiche.
Al fine di garantire la sicurezza e l’affidabilità di questa macchina, i lavori
di riparazione, manutenzione e regolazione devono essere eseguiti presso
officine autorizzate dal produttore o presso i centri di servizio clienti utilizzando
esclusivamente ricambi originali del costruttore.
59
7.1 Sostituzione
delle spazzole di
carbone
Page 60

10. Dati
tecnici
10.1 Rumorosità
e vibrazione
10.2 Avvertenze
per i valori di
rumorosità e
vibrazione
Tensione nominale: 230 V~, 50 Hz
Potenza d’ingresso nominale: 900 W
Inserto chiave a tubo – dimensioni quadrate: 12,7 mm, ½"
Coppia massima: 300 Nm rotazione sinistrorsa
(allentare)
100 Nm rotazione destrorsa (avvitare)
Classe di protezione: Classe II
Classe di protezione IP: IPXO
Numero di giri al minimo n
0
: 2200 min
-1
Dimensioni chiave a tubo: SW17, SW19, SW21 und SW22
Peso (netto): 3,23 kg
Soglia di rumorosità L
PA
: 96,34 dB(A); KPA: 3,0 dB(A)
Livello di potenza acustica L
WA
: 107,34 dB(A); KWA: 3,0 dB(A)
Vibrazione mano-braccio a
h
: 19,652 m/s2; K: 1,5 m/s
2
ah con la modalità di lavoro
“Serraggio di viti
e dadi dimensioni max.
consentite”
• Nota: I livelli di rumorosità e vibrazioni sono stati misurati secondo le
normative EN 60745-1 ed EN 60745-2-2.
• Nota: Il valore di vibrazione indicato è stato determinato da una procedura
di controllo standardizzata e può essere utilizzato per confrontare diversi
elettroutensili con altri. Inoltre, questo valore è adatto per poter fare una
stima anticipata per l’utente dei carichi causati da vibrazioni.
• Avviso! A seconda di come si utilizza l’elettroutensile, i valori
effettivi delle vibrazioni possono variare rispetto a quelli indicati.
• Adottare provvedimenti per proteggersi contro i carichi da
vibrazioni. Prendere in considerazione l’intero processo di lavoro,
compresi anche i momenti in cui l’elettroutensile funziona a
vuoto o è disattivato.
• Tra gli interventi appropriati sono inclusi una regolare
manutenzione e cura degli elettroutensili e degli accessori, la
conservazione delle mani al caldo, pause regolari e una buona
programmazione dei processi di lavoro.
IT
MANUALE PER L’UTENTE
AB-IW900
8. Tutela
ambientale
9. Problem behebung
Problema Causa Soluzione
L’utensile non
funziona.
Rumori o vibrazioni
anomali.
La chiave a tubo
(6) non può essere
posizionata senza
problemi sui bulloni o
sui dadi.
Le apparecchiature elettriche vecchie sono materiali riciclabili e
pertanto non devono essere smaltite nei rifiuti domestici. Invitiamo
pertanto tutti a supportare con un contributo attivo la conservazione
delle risorse e la tutela dell’ambiente, e a consegnare questo
apparecchio presso i punti di raccolta autorizzati, ove presenti.
La spina di
alimentazione (2)
non è collegata
correttamente con una
presa di corrente.
La presa non eroga
corrente.
Chiave a tubo (6) non
inserita correttamente
sull’utensile.
Viti dell’utensile
allentate.
Il motore dell’utensile
deve essere oliato o
riparato.
La chiave a tubo
selezionata (6) non è
adatta per il materiale
di fissaggio con il
quale lavorare
(bulloni, dadi).
Collegare correttamente la
spina di alimentazione (2)
con una presa di corrente
adatta.
Assicurarsi che la presa
eroghi corrente.
Inserire correttamente la
chiave a tubo (6).
Stringere tutte le viti
dell’utensile.
Far riparare l’utensile da
un’officina autorizzata.
Selezionare una chiave a
tubo adeguata (6), che può
essere utilizzata per
i bulloni/dadi.
60
Page 61
IT
MANUALE PER L’UTENTE
AB-IW900
Tensione nominale: 230 V~, 50 Hz
Potenza d’ingresso nominale: 900 W
Inserto chiave a tubo – dimensioni quadrate: 12,7 mm, ½"
Coppia massima: 300 Nm rotazione sinistrorsa
(allentare)
100 Nm rotazione destrorsa (avvitare)
Classe di protezione: Classe II
Classe di protezione IP: IPXO
Numero di giri al minimo n
Dimensioni chiave a tubo: SW17, SW19, SW21 und SW22
Peso (netto): 3,23 kg
Soglia di rumorosità L
Livello di potenza acustica L
Vibrazione mano-braccio a
ah con la modalità di lavoro
“Serraggio di viti
e dadi dimensioni max.
consentite”
• Nota: I livelli di rumorosità e vibrazioni sono stati misurati secondo le
normative EN 60745-1 ed EN 60745-2-2.
• Nota: Il valore di vibrazione indicato è stato determinato da una procedura
di controllo standardizzata e può essere utilizzato per confrontare diversi
elettroutensili con altri. Inoltre, questo valore è adatto per poter fare una
stima anticipata per l’utente dei carichi causati da vibrazioni.
: 2200 min
0
: 96,34 dB(A); KPA: 3,0 dB(A)
PA
: 107,34 dB(A); KWA: 3,0 dB(A)
WA
: 19,652 m/s2; K: 1,5 m/s
h
-1
2
10. Dati
tecnici
10.1 Rumorosità
e vibrazione
• Avviso! A seconda di come si utilizza l’elettroutensile, i valori
effettivi delle vibrazioni possono variare rispetto a quelli indicati.
• Adottare provvedimenti per proteggersi contro i carichi da
vibrazioni. Prendere in considerazione l’intero processo di lavoro,
compresi anche i momenti in cui l’elettroutensile funziona a
vuoto o è disattivato.
• Tra gli interventi appropriati sono inclusi una regolare
manutenzione e cura degli elettroutensili e degli accessori, la
conservazione delle mani al caldo, pause regolari e una buona
programmazione dei processi di lavoro.
61
10.2 Avvertenze
per i valori di
rumorosità e
vibrazione
Page 62

IT
MANUALE PER L’UTENTE
AB-IW900
10.3 Avvertenza
di disturbo
acustico
11. Dichiarazione di
garanzia
Non è possibile evitare una determinata quantità di rumore che proviene
dall’utensile. Rimandare i lavori rumorosi nei momenti consentiti e determinati.
Attenersi ai periodi di riposo e limitare al minimo necessario la durata del lavoro.
Per la propria sicurezza personale e per la tutela delle persone che si trovano nelle
vicinanze, è opportuno indossare una protezione per l’udito.
Fatti salvi i diritti di garanzia legale, il produttore fornisce una garanzia in base
alla legislazione vigente nel Paese dell’utilizzatore, per un periodo minimo
di 1 anno (in Germania 2 anni).
La garanzia ha inizio a partire dalla data di vendita dell’apparecchio
all’utilizzatore finale.
La garanzia si estende solo a difetti di materiale o di lavorazione.
Le riparazioni in garanzia possono essere eseguite solo da un centro di assistenza
autorizzato. Per far valere il proprio diritto alla garanzia, è necessario allegare la
ricevuta di acquisto originale (con data di vendita).
Sono esclusi dalla garanzia:
• Usura normale
• Utilizzi non conformi, quali ad es. sovraccarico dell’apparecchio, accessori
non approvati
• Danni per cause esterne, in seguito all’uso della forza o da corpi estranei
• Danni causati dalla mancata osservanza delle istruzioni per l’uso, ad es.
collegamento a una tensione di rete errata o mancata osservanza delle
istruzioni di montaggio
• Apparecchi completamente o parzialmente smontati.
62
Page 63
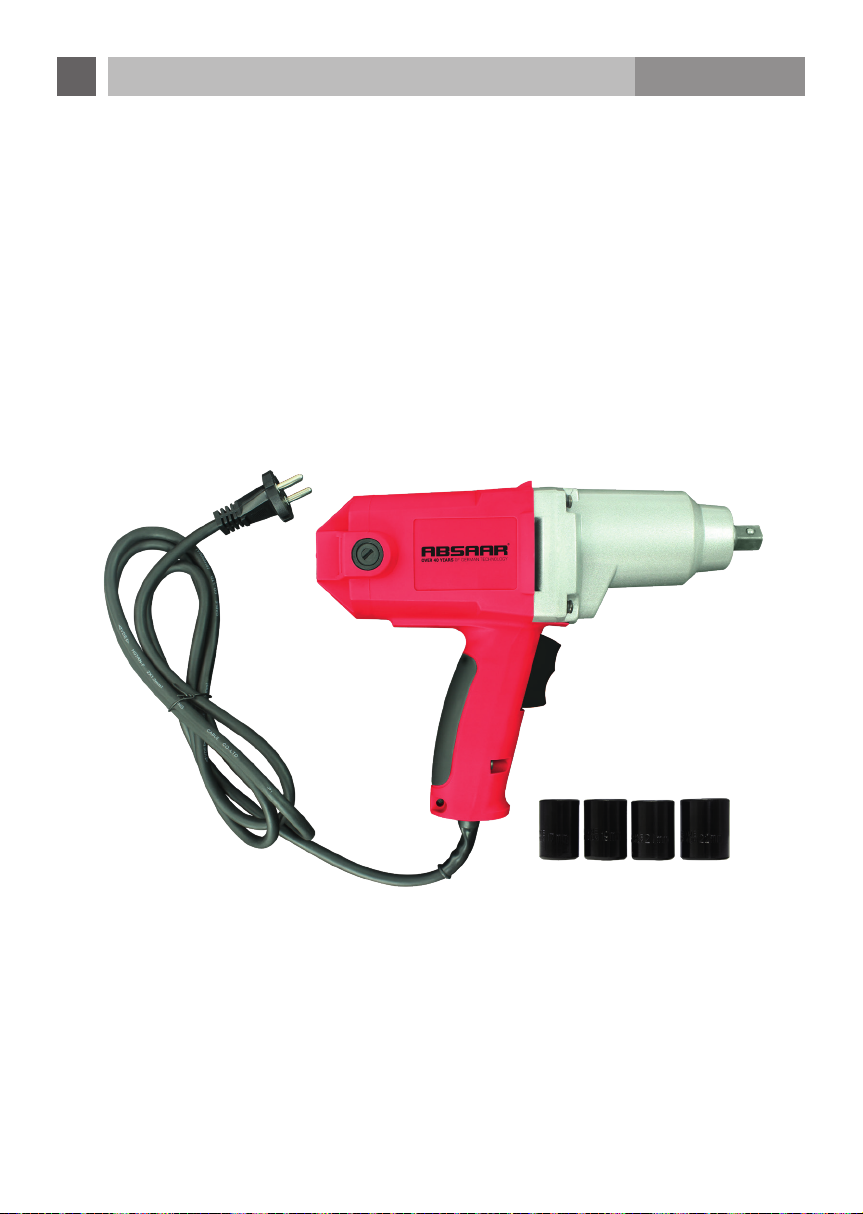
PL
INSTRUKCJĘ OBSŁUGI
AB-IW900
63
Page 64

e) Gdy narzêdzie elektryczne stosowane jest na zewn¹trz, nale¿y
stosowaæ wy³¹cznie przewody przed³u¿aj¹ce, które nadaj¹ siê
tak¿e do u¿ycia na zewn¹trz. Stosowanie przewodu przed³u¿aj¹cego
nadaj¹cego siê do u¿ycia na zewn¹trz zmniejsza ryzyko pora¿enia przez
pr¹d elektryczny.
f) Je¿eli nie mo¿na unikn¹æ stosowania narzêdzia elektrycznego
w wilgotnym otoczeniu, nale¿y u¿ywaæ wy³¹cznika ochronnego
pr¹dowego. U¿ywanie wy³¹cznika ochronnego pr¹dowego zmniejsza
ryzyko pora¿enia przez pr¹d elektryczny.
a)
Nale¿y zachowaæ ostro¿nośæ i zwracaæ uwagê na to, co siê robi.
Podczas pracy z narzêdziem elektrycznym nale¿y zachowywaæ siê
rozwa¿nie. Nie nale¿y u¿ywaæ narzêdzi elektrycznych, gdy jest siê
zmêczonym, pod wp³ywem narkotyków, alkoholu czy leków. Chwila
nieuwagi podczas u¿ywania narzêdzia elektrycznego wystarczy, by
spowodowaæ ciê¿kie obra¿enia cia³a.
b) Nale¿y nosiæ osobiste wyposa¿enie ochronne i bezwzglêdnie zawsze
okulary ochronne. Noszenie osobistego wyposa¿enia ochronnego, takiego
jak maska przeciwpy³owa, obuwie ochronne z podeszw¹ antypoślizgow¹,
kask ochronny czy ochrona s³uchu, w zale¿ności od rodzaju u¿ywanego
narzêdzia elektrycznego, zmniejsza ryzyko obra¿eñ cia³a.
c) Nale¿y unikaæ niezamierzonego uruchomienia narzêdzia. Przed
pod³¹czeniem narzêdzia do sieci elektrycznej oraz/i do akumulatora,
nale¿y upewniæ siê, ¿e narzêdzie elektryczne jest wy³¹czone. Trzymanie
palca na w³¹czniku podczas przenoszenia narzêdzia lub pod³¹czanie
w³¹czonego narzêdzia elektrycznego do sieci elektrycznej, mo¿e
spow
odowaæ wypadek.
d) Przed w³¹czeniem narzêdzia elektrycznego nale¿y usun¹æ narzêdzia
nastawcze oraz klucze p³askie. Narzêdzie lub klucz pod³¹czone do
elementu obrotowego narzêdzia elektrycznego mo¿e spowodowaæ
obra¿enia cia³a.
e) Nale¿y unikaæ przyjmowania niestandardowej postawy cia³a. Nale¿y
zapewniæ sobie stabilne oparcie i przez ca³y czas utrzymywaæ
równowagê. Pozwoli to w nieoczekiwanych sytuacjach lepiej kontrolowaæ
narzêdzie elektryczne.
f) Nale¿y nosiæ odpowiedni¹ odzie¿. Nie nale¿y nosiæ szerokich ubrañ
ani bi¿uterii. Zapewniæ, aby w³osy, czêści garderoby oraz rêkawice
znajdowa³y siê z dala od poruszaj¹cych siê elementów. Luźna odzie¿,
bi¿uteria czy d³ugie w³osy mog¹ zostaæ wci¹gniête przez ruchome czêści.
g) W przypadku monta¿u urz¹dzeñ odsysaj¹cych oraz wychwytuj¹cych
py³ nale¿y upewniæ siê, ¿e urz¹dzenia te s¹ pod³¹czone i odpowiednio
wykorzystywane. Stosowanie
odsysacza py³u mo¿e zmniejszyæ
zagro¿enia powodowane przez py³y.
Bezpieczeñstwo
osób
PL
INSTRUKCJĘ OBSŁUGI
AB-IW900
OSTRZE¯ENIE
Nale¿y przeczytaæ wskazówki bezpieczeñstwa oraz
instrukcje!
bezpieczeñstwa oraz instrukcji mog¹ spowodowaæ pora¿enia
przez pr¹d elektryczny, po¿ary i/lub ciê¿kie obra¿enia cia³a!
Wszystkie wskazówki dotycz¹ce bezpieczeñstwa oraz instrukcje nale¿y
zachowaæ na przysz³ośæ i w razie potrzeby przekazaæ innym u¿ytkownikom
lub kolejnym w³aścicielom.
U¿yte we wskazówkach bezpieczeñstwa określenie „narzêdzie
elektryczne” odnosi siê do zasilanych z sieci rêcznych narzêdzi elektrycznych
(z kablem sieciowym) oraz zasilanych na baterie rêcznych narzêdzi
elektrycznych (bez kabla sieciowego).
a) Stanowisko pracy nale¿y utrzymywaæ w czystości i nale¿y
zapewniæ w nim dobr¹ wentylacjê. Nieporz¹dek oraz niedoświetlony
zakres roboczy mog¹ staæ siê przyczyn¹ wypadków.
b) Nie nale¿y u¿ywaæ narzêdzi elektrycznych w otoczeniu
zagro¿onym wybuchem, w którym znajduj¹ siê palne ciecze,
gazy oraz py³y. Narzêdzia elektryczne generuj¹ iskry, które mog¹
spowodowaæ zap³on py³ów lub oparów.
c) Podczas u¿ywania narzêdzi elektrycznych w pobli¿u nie mog¹
znajdowaæ siê dzieci ani osoby trzecie. Odwrócenie uwagi mo¿e
przyczyniæ siê do utraty kontroli nad narzêdziem elektrycznym.
Wtyczka pod³¹czeniowa narzêdzia elektrycznego musi pasowaæ
a)
do gniazda wtykowego. Nie wolno w ¿aden sposób zmieniaæ ani
modyfikowaæ wtyczki pod³¹czeniowej. Podczas u¿ywania uziemionych
narzêdzi elektrycznych nie stosowaæ przejściówek. Stosowanie wtyczek,
rych nie wprowadzono ¿adnych zmian, oraz odpowiednich gniazd
w któ
wtykowych zmniejsza ryzyko pora¿enia przez pr¹d elektryczny.
b)
Nale¿y unikaæ dotykania uziemionych powierzchni przedmiotów takich
jak np. rury, kaloryfery, kuchenki oraz lodówki. Istnieje podwy¿szone
ryzyko pora¿enia przez pr¹d elektryczny, gdy cia³o jest uziemione.
c)
Narzêdzia elektryczne nale¿y chroniæ przed deszczem oraz wilgoci¹.
Wnikniêcie wody do narzêdzia elektrycznego zwiêksza ryzyko pora¿enia
przez pr¹d elektryczny.
d)
Nie u¿ywaæ kabla niezgodnie z jego przeznaczeniem np. do noszenia
narzêdzia elektrycznego, zawieszania go. Nie od³¹czaæ wtyczki,
ci¹gn¹c za kabel. Kabel nale¿y chroniæ przed wysokimi temperaturami,
olejami, ostrymi krawêdziami oraz ruchomymi elementami urz¹dzeñ.
Uszkodzone lub zapl¹tane kable zwiêkszaj¹ ryzyko pora¿enia przez pr¹d
elektryczny.
Zaniedbania w zakresie przestrzegania wskazówek
64
1. Wskazówki
dotycz¹ce
bezpieczeñstwa
1.1 1.1
Ogólne wskazówki
dotycz¹ce
bezpiecznego
stosowania
narzêdzi
elektrycznych
Bezpieczeñstwo
w miejscu pracy
Bezpieczeñstwo
elektryczne
Page 65

PL
INSTRUKCJĘ OBSŁUGI
Bezpieczeñstwo
osób
AB-IW900
e) Gdy narzêdzie elektryczne stosowane jest na zewn¹trz, nale¿y
stosowaæ wy³¹cznie przewody przed³u¿aj¹ce, które nadaj¹ siê
tak¿e do u¿ycia na zewn¹trz. Stosowanie przewodu przed³u¿aj¹cego
nadaj¹cego siê do u¿ycia na zewn¹trz zmniejsza ryzyko pora¿enia przez
pr¹d elektryczny.
f) Je¿eli nie mo¿na unikn¹æ stosowania narzêdzia elektrycznego
w wilgotnym otoczeniu, nale¿y u¿ywaæ wy³¹cznika ochronnego
pr¹dowego. U¿ywanie wy³¹cznika ochronnego pr¹dowego zmniejsza
ryzyko pora¿enia przez pr¹d elektryczny.
a)
Nale¿y zachowaæ ostro¿nośæ i zwracaæ uwagê na to, co siê robi.
Podczas pracy z narzêdziem elektrycznym nale¿y zachowywaæ siê
rozwa¿nie. Nie nale¿y u¿ywaæ narzêdzi elektrycznych, gdy jest siê
zmêczonym, pod wp³ywem narkotyków, alkoholu czy leków. Chwila
nieuwagi podczas u¿ywania narzêdzia elektrycznego wystarczy, by
spowodowaæ ciê¿kie obra¿enia cia³a.
b) Nale¿y nosiæ osobiste wyposa¿enie ochronne i bezwzglêdnie zawsze
okulary ochronne. Noszenie osobistego wyposa¿enia ochronnego, takiego
jak maska przeciwpy³owa, obuwie ochronne z podeszw¹ antypoślizgow¹,
kask ochronny czy ochrona s³uchu, w zale¿ności od rodzaju u¿ywanego
narzêdzia elektrycznego, zmniejsza ryzyko obra¿eñ cia³a.
c) Nale¿y unikaæ niezamierzonego uruchomienia narzêdzia. Przed
pod³¹czeniem narzêdzia do sieci elektrycznej oraz/i do akumulatora,
nale¿y upewniæ siê, ¿e narzêdzie elektryczne jest wy³¹czone. Trzymanie
palca na w³¹czniku podczas przenoszenia narzêdzia lub pod³¹czanie
w³¹czonego narzêdzia elektrycznego do sieci elektrycznej, mo¿e
odowaæ wypadek.
spow
d) Przed w³¹czeniem narzêdzia elektrycznego nale¿y usun¹æ narzêdzia
nastawcze oraz klucze p³askie. Narzêdzie lub klucz pod³¹czone do
elementu obrotowego narzêdzia elektrycznego mo¿e spowodowaæ
obra¿enia cia³a.
e) Nale¿y unikaæ przyjmowania niestandardowej postawy cia³a. Nale¿y
zapewniæ sobie stabilne oparcie i przez ca³y czas utrzymywaæ
równowagê. Pozwoli to w nieoczekiwanych sytuacjach lepiej kontrolowaæ
narzêdzie elektryczne.
f) Nale¿y nosiæ odpowiedni¹ odzie¿. Nie nale¿y nosiæ szerokich ubrañ
ani bi¿uterii. Zapewniæ, aby w³osy, czêści garderoby oraz rêkawice
znajdowa³y siê z dala od poruszaj¹cych siê elementów. Luźna odzie¿,
bi¿uteria czy d³ugie w³osy mog¹ zostaæ wci¹gniête przez ruchome czêści.
g) W przypadku monta¿u urz¹dzeñ odsysaj¹cych oraz wychwytuj¹cych
py³ nale¿y upewniæ siê, ¿e urz¹dzenia te s¹ pod³¹czone i odpowiednio
wykorzystywane. Stosowanie
zagro¿enia powodowane przez py³y.
odsysacza py³u mo¿e zmniejszyæ
65
Page 66

•
Podczas zmiany opon stosowaæ dodatkowy podnośnik oraz
zabezpieczaj¹ce urz¹dzenia podporowe.
•
Podczas u¿ywania wkrêtarki udarowej nie dotykaæ rêkami jej napêdu.
Nawet je¿eli narzêdzie elektryczne u¿ywane jest zgodnie z przepisami,
istniej¹ ryzyka szcz¹tkowe. Potencjalne zagro¿enia zwi¹zane z budow¹
oraz wersj¹ tego narzêdzia elektrycznego:
1. Uszkodzenia p³uc w przypadku nienoszenia odpowiedniej maski
przeciwpy³owej
2. Uszkodzenia s³uchu w przypadku nienoszenia odpowiedniej ochrony s³uchu
3. Pogorszenie zdrowia zwi¹zane z wibracjami przenoszonymi przez
d³onie i ramiona w przypadku d³u¿szego stosowania urz¹dzenia lub jego
niezgodnego z zaleceniami prowadzenia i konserwacji.
Ostrze¿enie! Podczas pracy niniejsze narzêdzie elektryczne wytwarza pole
elektromagnetyczne. W określonych okolicznościach pole to mo¿e mieæ
negatywny wp³yw na aktywne lub pasywne implanty medyczne. Aby zmniejszyæ
niebezpieczeñstwo powa¿nych lub śmiertelnych urazów cia³a, zaleca siê, aby
przed przyst¹pieniem do pracy z narzêdziem elektrycznym osoby z implantami
medycznymi skonsultowa³y siê ze swoim lekarzem lub producentem implantu.
Nale¿y nosiæ maskê przeciwpy³ow¹. Podczas obróbki
drewna lub innych materia³ów mo¿e powstawaæ szkodliwy dla
zdrowia py³.
Nale¿y zawsze nosiæ okulary ochronne. Niebezpieczeñstwo
skaleczenia oczu przez odpryski lub py³y.
Nale¿y nosiæ ochronê s³uchu. Na skutek ha³asu mo¿e dojśæ
do utraty s³uchu.
TNale¿y nosiæ odzie¿ ochronn¹. Np. dodatkowe koszule
robocze, kombinezony lub czapki.
Ryzyka
PL
INSTRUKCJĘ OBSŁUGI
AB-IW900
a) Nie wolno przeci¹¿aæ urz¹dzenia. Podczas prac nale¿y u¿ywaæ
przeznaczonego do danego zastosowania narzêdzia elektrycznego.
U¿ywaj¹c odpowiedniego narzêdzia, nale¿y pracowaæ w podanym zakresie
mocy. Pozwoli to zapewniæ wydajniejsz¹ i bezpieczniejsz¹ pracê.
b) Nie wolno u¿ywaæ narzêdzia elektrycznego, je¿eli jego w³¹cznik jest
uszkodzony. Narzêdzie elektryczne, którego nie mo¿na w³¹czyæ
ani wy³¹czyæ, stanowi zagro¿enie i wymaga naprawy.
c) Przed dokonaniem ustawieñ, wymian¹ akcesoriów czy od³o¿eniem
d) Nieu¿ywane narzêdzia elektryczne nale¿y przechowywaæ poza zasiêgiem
e) Nale¿y starannie dbaæ o dobry stan urz¹dzenia. Nale¿y sprawdziæ, czy
f) Nale¿y zadbaæ o to, by narzêdzia skrawaj¹ce by³y ostre i czyste. Starannie
g) Narzêdzi elektrycznych, akcesoriów, narzêdzi roboczych itd. nale¿y
h) Naprawê narzêdzia elektrycznego nale¿y zlecaæ wy³¹cznie
narzêdzia elektrycznego w miejsce jego przechowywania nale¿y wyj¹æ
wtyczkê z gniazda sieciowego i/lub wyj¹æ baterie. Te środki zapobiegawcze
pozwol¹ zapobiec niezamierzonemu uruchomieniu narzêdzia elektrycznego.
dzieci. Nie wolno pozwalaæ na u¿ywanie narzêdzia elektrycznego
osobom, które nie zapozna³y siê z jego obs³ug¹
i nie przeczyta³y niniejszych wskazówek. Narzêdzia elektryczne s¹
niebezpieczne, gdy u¿ywane s¹ przez osoby bez doświadczenia.
ruchome czêści urz¹dzenia dzia³aj¹ bez zarzutu i siê nie zakleszczaj¹, czy
czêści nie s¹ po³amane lub uszkodzone, czy dzia³anie urz¹dzenia nie jest
zak³ócone. Przed u¿yciem narzêdzia elektrycznego nale¿y zleciæ naprawê
uszkodzonych czêści. Wiele wypadków ma swoje źród³o w niew³aściwej
pielêgnacji narzêdzi elektrycznych.
utrzymane narzêdzia skrawaj¹ce z ostrymi krawêdziami tn¹cymi rzadziej siê
zakleszczaj¹ i s¹ ³atwiejsze do prowadzenia.
u¿ywaæ zgodnie z niniejszymi instrukcjami. Nale¿y uwzglêdniaæ przy
tym warunki robocze oraz rodzaj wykonywanej pracy. U¿ycie narzêdzi
elektrycznych niezgodnie z ich przeznaczeniem mo¿e doprowadziæ do
niebezpiecznych sytuacji.
wykwalifikowanemu personelowi. Nale¿y u¿ywaæ wy³¹cznie oryginalnych
czêści zamiennych. Pozwoli to zachowaæ bezpieczeñstwo pracy z narzêdziem
elektrycznym.
Stosowanie
narzêdzia
elektrycznego
i obchodzenie
siê z nim
Serwis
Podczas wykonywania prac, podczas których mo¿e dojśæ do kontaktu
śruby z ukrytymi przewodami przewodz¹cymi pr¹d elektryczny lub z
kablem sieciowym urz¹dzenia, nale¿y trzymaæ urz¹dzenie za izolowane
powierzchnie uchwytów. Kontakt śruby z przewodem przewodz¹cym pr¹d
elektryczny mo¿e spowodowaæ przeniesienie napiêcia elektrycznego tak¿e na
metalowe czêści urz¹dzenia i doprowadziæ do pora¿enia przez pr¹d elektryczny.
•
Przed u¿yciem produktu zawsze blokowaæ lub zabezpieczaæ klinami ko³a
pojazdu i zaci¹gaæ hamulec postojowy.
•
Podczas zdejmowania i zak³adania ko³paków kó³ zachowaæ najwy¿sz¹
66
1.2 Wskazówki
dotycz¹ce
bezpiecznego
stosowania
wkrêtarek
Page 67
PL
INSTRUKCJĘ OBSŁUGI
AB-IW900
•
Podczas zmiany opon stosowaæ dodatkowy podnośnik oraz
zabezpieczaj¹ce urz¹dzenia podporowe.
•
Podczas u¿ywania wkrêtarki udarowej nie dotykaæ rêkami jej napêdu.
Ryzyka
Nawet je¿eli narzêdzie elektryczne u¿ywane jest zgodnie z przepisami,
istniej¹ ryzyka szcz¹tkowe. Potencjalne zagro¿enia zwi¹zane z budow¹
oraz wersj¹ tego narzêdzia elektrycznego:
1. Uszkodzenia p³uc w przypadku nienoszenia odpowiedniej maski
przeciwpy³owej
2. Uszkodzenia s³uchu w przypadku nienoszenia odpowiedniej ochrony s³uchu
3. Pogorszenie zdrowia zwi¹zane z wibracjami przenoszonymi przez
d³onie i ramiona w przypadku d³u¿szego stosowania urz¹dzenia lub jego
niezgodnego z zaleceniami prowadzenia i konserwacji.
Ostrze¿enie! Podczas pracy niniejsze narzêdzie elektryczne wytwarza pole
elektromagnetyczne. W określonych okolicznościach pole to mo¿e mieæ
negatywny wp³yw na aktywne lub pasywne implanty medyczne. Aby zmniejszyæ
niebezpieczeñstwo powa¿nych lub śmiertelnych urazów cia³a, zaleca siê, aby
przed przyst¹pieniem do pracy z narzêdziem elektrycznym osoby z implantami
medycznymi skonsultowa³y siê ze swoim lekarzem lub producentem implantu.
Nale¿y nosiæ maskê przeciwpy³ow¹. Podczas obróbki
drewna lub innych materia³ów mo¿e powstawaæ szkodliwy dla
zdrowia py³.
Nale¿y zawsze nosiæ okulary ochronne. Niebezpieczeñstwo
skaleczenia oczu przez odpryski lub py³y.
Nale¿y nosiæ ochronê s³uchu. Na skutek ha³asu mo¿e dojśæ
do utraty s³uchu.
TNale¿y nosiæ odzie¿ ochronn¹. Np. dodatkowe koszule
robocze, kombinezony lub czapki.
67
Page 68
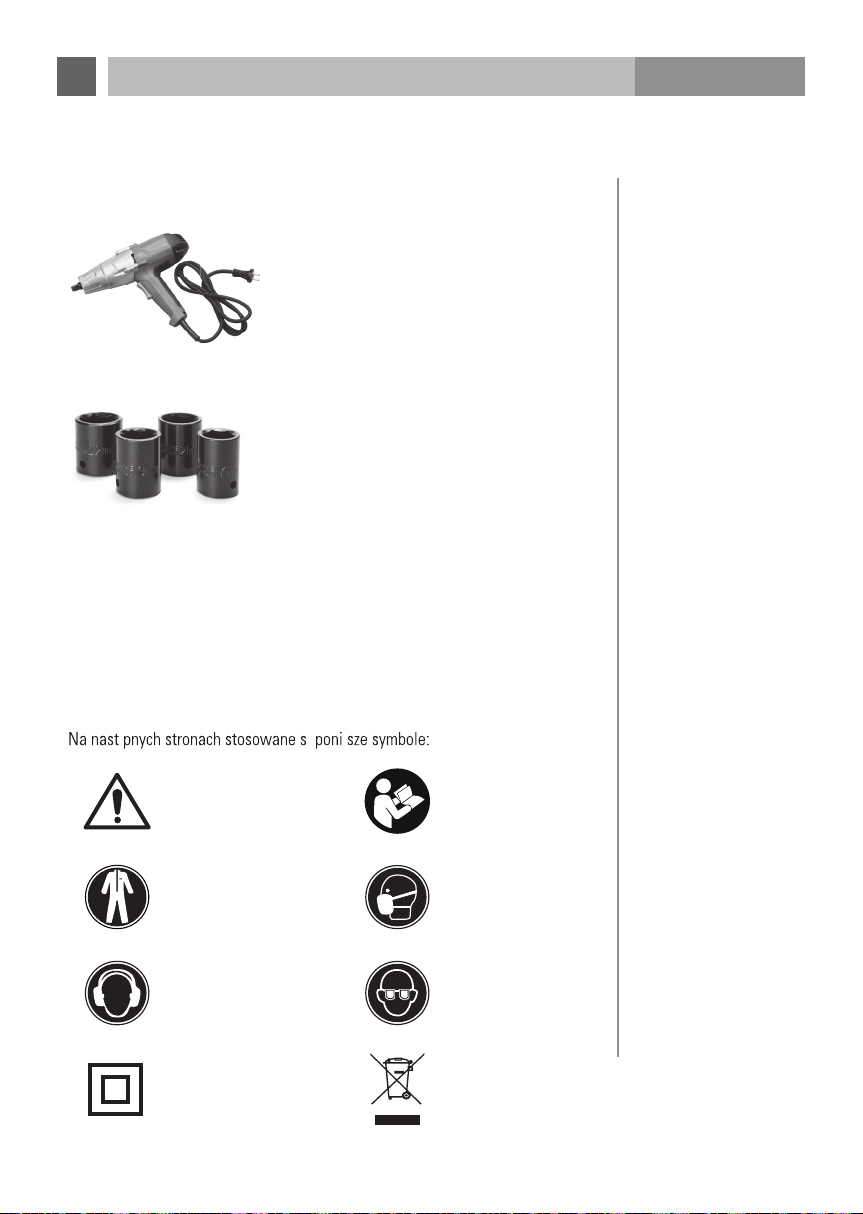
4. Elementy
obs³ugowe
5.
U¿ytkowanie
5.1 U¿ytkowanie
zgodne z
przeznaczeniem
1. Rêkojeśæ
2. Kabel sieciowy z wtyczk¹
3. Prze³¹cznik ko³yskowy – bieg w prawo (F)
4. Prze³¹cznik ko³yskowy – bieg w lewo (R)
5. Uchwyt kluczy nasadowych
6. Nasadki kluczy nasadowych (akcesoria)
Opisana wkrêtarka udarowa jest przeznaczona do wkrêcania i wykrêcania
trzpieni, śrub i nakrêtek. Nie nale¿y jej u¿ywaæ do innych celów. U¿ytkowanie
narzêdzia niezgodnie z przeznaczeniem mo¿e powodowaæ obra¿enia cia³a lub
szkody rzeczowe.
Do wkrêtarki udarowej mo¿na u¿ywaæ wy³¹cznie kluczy nasadowych
z nak³adk¹ czworok¹tn¹ (12,7 mm, ½").
22 mm
21 mm
19 mm
17 mm
PL
INSTRUKCJĘ OBSŁUGI
1 wkrêtarka udarowa z kablem sieciowym
4 nasadki kluczy nasadowych
(17 mm, 19 mm, 21 mm, 22 mm)
AB-IW900
2. Zakres
dostawy
Ostrze¿enie Uwaga
Odzie¿ ochronna
Ochrona s³uchu Ochrona wzroku
Klasa ochrony II Ochrona środowiska
Maska
przeciwpy³owa
68
3. Objaśnienie
stosowanych
symboli
Page 69
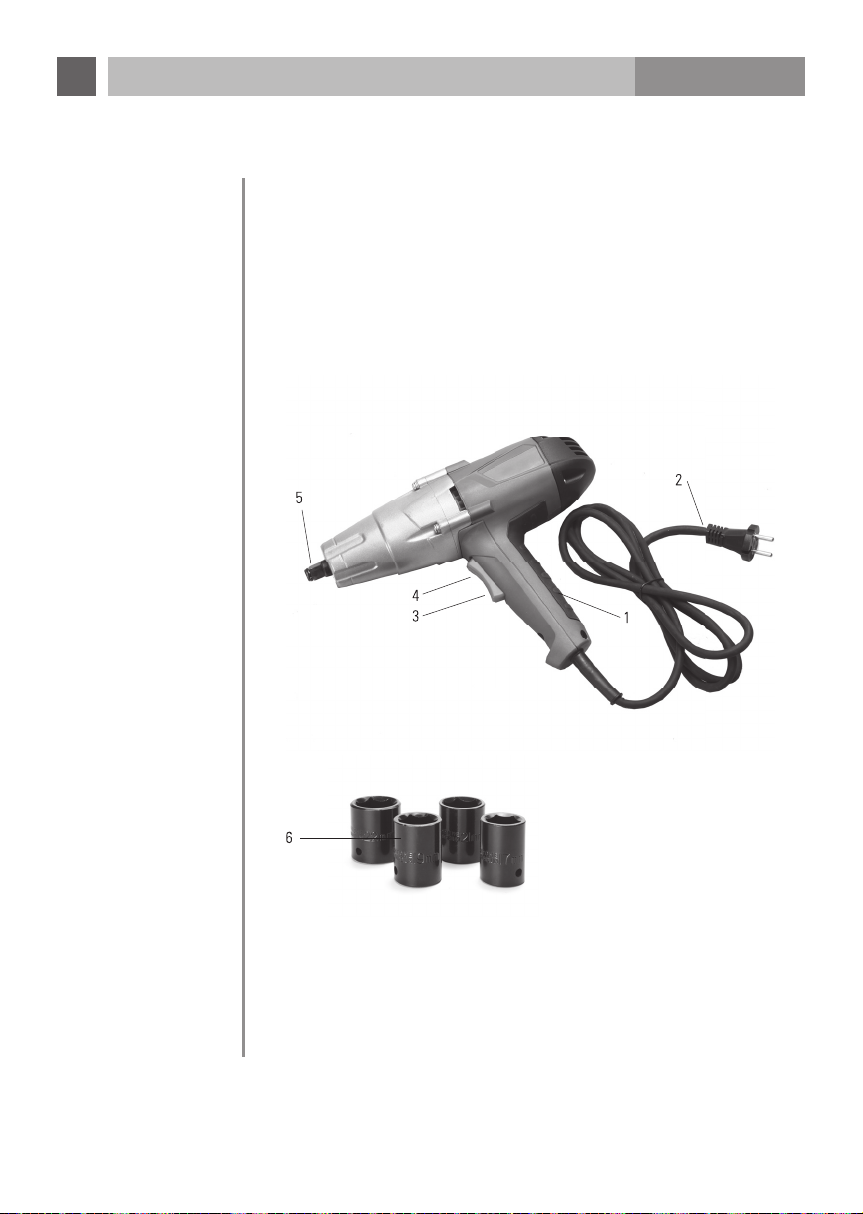
PL
INSTRUKCJĘ OBSŁUGI
AB-IW900
4. Elementy
obs³ugowe
1. Rêkojeśæ
2. Kabel sieciowy z wtyczk¹
3. Prze³¹cznik ko³yskowy – bieg w prawo (F)
4. Prze³¹cznik ko³yskowy – bieg w lewo (R)
5. Uchwyt kluczy nasadowych
6. Nasadki kluczy nasadowych (akcesoria)
5.
U¿ytkowanie
5.1 U¿ytkowanie
zgodne z
przeznaczeniem
22 mm
21 mm
19 mm
17 mm
Opisana wkrêtarka udarowa jest przeznaczona do wkrêcania i wykrêcania
trzpieni, śrub i nakrêtek. Nie nale¿y jej u¿ywaæ do innych celów. U¿ytkowanie
narzêdzia niezgodnie z przeznaczeniem mo¿e powodowaæ obra¿enia cia³a lub
szkody rzeczowe.
Do wkrêtarki udarowej mo¿na u¿ywaæ wy³¹cznie kluczy nasadowych
z nak³adk¹ czworok¹tn¹ (12,7 mm, ½").
69
Page 70
Niniejsza wkrêtarka udarowa wyposa¿ona jest w prze³¹cznik ko³yskowy,
za pomoc¹ którego mo¿na prze³¹czaæ pomiêdzy biegiem w prawo i biegiem
w lewo.
•
Nale¿y pod³¹czyæ zasilacz (2) do odpowiedniego gniazda sieciowego.
•
Nale¿y wybraæ odpowiedni klucz nasadowy. Po w³o¿eniu klucza
nasadowego nale¿y sprawdziæ, czy jest prawid³owo i bezpiecznie
zamocowany w uchwycie (5).
•
Nale¿y mocno przy³o¿yæ narzêdzie do obrabianego elementu mocuj¹cego
(trzpienia lub nakrêtki) .
•
Aby w³¹czyæ obroty w prawo (zgodnie z ruchem wskazówek zegara, w
celu wkrêcenia elementu mocuj¹cego), nale¿y nacisn¹æ i przytrzymaæ
prze³¹cznik ko³yskowy w pozycji dla biegu w prawo (F) (3). Przed
rozpoczêciem prac z u¿yciem narzêdzia nale¿y sprawdziæ, czy kierunek
obrotu jest prawid³owy.
Ze wzglêdów bezpieczeñstwa moment obrotowy podczas
biegu w prawo jest ograniczony do 100 Nm. Nale¿y dokrêciæ
sworznie ko³a za pomoc¹ klucza dynamometrycznego z
momentem obrotowym ok. 120 Nm. Nale¿y pamiêtaæ, ¿e po
przejechaniu ok. 50 km nale¿y ponownie dokrêciæ sworznie
kó³. Nale¿y sprawdziæ sworznie kó³ pod k¹tem prawid³owego
osadzenia.
•
Aby w³¹czyæ obroty w lewo (przeciwnie do ruchu wskazówek zegara, w
celu odkrêcenia elementu mocuj¹cego), nale¿y nacisn¹æ i przytrzymaæ
prze³¹cznik ko³yskowy w pozycji dla biegu w lewo (R) (4). Przed
rozpoczêciem prac z u¿yciem narzêdzia nale¿y sprawdziæ, czy kierunek
obrotu jest prawid³owy.
•
Nale¿y zwolniæ prze³¹cznik ko³yskowy (3 lub 4), aby narzêdzie zatrzyma³o
siê.
•
Po zakoñczeniu pracy nale¿y od³¹czyæ zasilacz (2) od gniazda sieciowego.
6.2 W³¹czanie/
wy³¹czanie
1
PL
INSTRUKCJĘ OBSŁUGI
AB-IW900
Wszystkie zastosowania urz¹dzenia, które nie zosta³y wymienione
w rozdziale „U¿ytkowanie zgodne z przeznaczeniem” uznawane s¹ za
niezgodne z przeznaczeniem.
Nie wolno u¿ywaæ urz¹dzenia do nastêpuj¹cych celów:
•
do mieszania farb i materia³ów,
•
polerowania, szlifowania, ostrzenia, grawerowania z odpowiednimi
nasadkami,
•
napêdzania innych urz¹dzeñ..
Istnieje niebezpieczeñstwo odniesienia obra¿eñ cia³a.
Odpowiedzialnośæ za wszystkie szkody rzeczowe oraz osobowe, które
powsta³y wskutek niew³aściwego u¿ywania urz¹dzenia ponosi u¿ytkownik.
W przypadku u¿ywania urz¹dzenia z zastosowaniem innych lub
nieoryginalnych czêści wygasa gwarancja producenta..
Ostrze¿enie!
•
Aby zmniejszyæ ryzyko odniesienia obra¿eñ, przed monta¿em
lub demonta¿em akcesoriów dodatkowych i przed zmian¹
ustawieñ nale¿y zawsze od³¹czaæ narzêdzie od zasilania
sieciowego.
• Nale¿y u¿ywaæ wy³¹cznie kluczy nasadowych i innych
akcesoriów specjalnie zaprojektowanych do stosowania
z wkrêtark¹ udarow¹. Inne klucze nasadowe lub akcesoria
mog³yby rozprysn¹æ siê lub z³amaæ i spowodowaæ obra¿enia.
5.2 U¿ytkowanie
niezgodne z
przeznaczeniem
6. Obs³uga
Przed rozpoczêciem prac z u¿yciem narzêdzia nale¿y przeprowadziæ kontrolê
wzrokow¹ pod k¹tem nastêpuj¹cych aspektów: Czy na kluczu nasadowym
nie s¹ widoczne na przyk³ad pêkniêcia i czy jest prawid³owo osadzony
w uchwycie? Czy klucz nasadowy nie jest skrzywiony? Czy prze³¹cznik
ko³yskowy, kabel sieciowy lub wtyczka nie s¹ uszkodzone?
•
Zak³adanie klucza nasadowego (6): W³o¿yæ klucz nasadowy w uchwyt (5)
i dociskaæ do momentu, a¿ klucz zatrzaśnie siê w uchwycie.
•
Zdejmowanie klucza nasadowego (6): Nale¿y chwyciæ klucz nasadowy
i wyci¹gn¹æ go z uchwytu (5).
70
6.1 Wk³adanie/
zdejmowanie
klucza nasadowego
Page 71
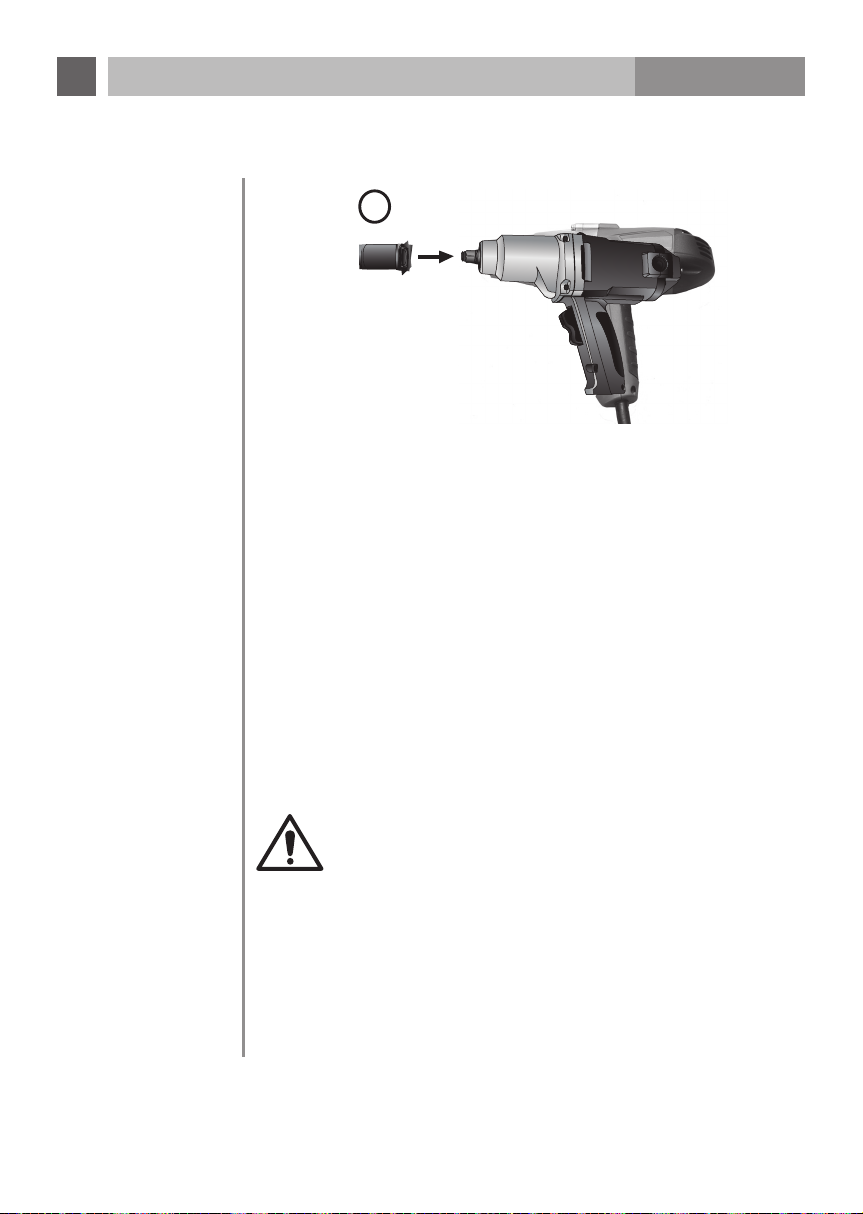
PL
INSTRUKCJĘ OBSŁUGI
AB-IW900
1
6.2 W³¹czanie/
wy³¹czanie
Niniejsza wkrêtarka udarowa wyposa¿ona jest w prze³¹cznik ko³yskowy,
za pomoc¹ którego mo¿na prze³¹czaæ pomiêdzy biegiem w prawo i biegiem
w lewo.
•
Nale¿y pod³¹czyæ zasilacz (2) do odpowiedniego gniazda sieciowego.
•
Nale¿y wybraæ odpowiedni klucz nasadowy. Po w³o¿eniu klucza
nasadowego nale¿y sprawdziæ, czy jest prawid³owo i bezpiecznie
zamocowany w uchwycie (5).
•
Nale¿y mocno przy³o¿yæ narzêdzie do obrabianego elementu mocuj¹cego
(trzpienia lub nakrêtki) .
•
Aby w³¹czyæ obroty w prawo (zgodnie z ruchem wskazówek zegara, w
celu wkrêcenia elementu mocuj¹cego), nale¿y nacisn¹æ i przytrzymaæ
prze³¹cznik ko³yskowy w pozycji dla biegu w prawo (F) (3). Przed
rozpoczêciem prac z u¿yciem narzêdzia nale¿y sprawdziæ, czy kierunek
obrotu jest prawid³owy.
Ze wzglêdów bezpieczeñstwa moment obrotowy podczas
biegu w prawo jest ograniczony do 100 Nm. Nale¿y dokrêciæ
sworznie ko³a za pomoc¹ klucza dynamometrycznego z
momentem obrotowym ok. 120 Nm. Nale¿y pamiêtaæ, ¿e po
przejechaniu ok. 50 km nale¿y ponownie dokrêciæ sworznie
kó³. Nale¿y sprawdziæ sworznie kó³ pod k¹tem prawid³owego
osadzenia.
•
Aby w³¹czyæ obroty w lewo (przeciwnie do ruchu wskazówek zegara, w
celu odkrêcenia elementu mocuj¹cego), nale¿y nacisn¹æ i przytrzymaæ
prze³¹cznik ko³yskowy w pozycji dla biegu w lewo (R) (4). Przed
rozpoczêciem prac z u¿yciem narzêdzia nale¿y sprawdziæ, czy kierunek
obrotu jest prawid³owy.
•
Nale¿y zwolniæ prze³¹cznik ko³yskowy (3 lub 4), aby narzêdzie zatrzyma³o
siê.
•
Po zakoñczeniu pracy nale¿y od³¹czyæ zasilacz (2) od gniazda sieciowego.
71
Page 72
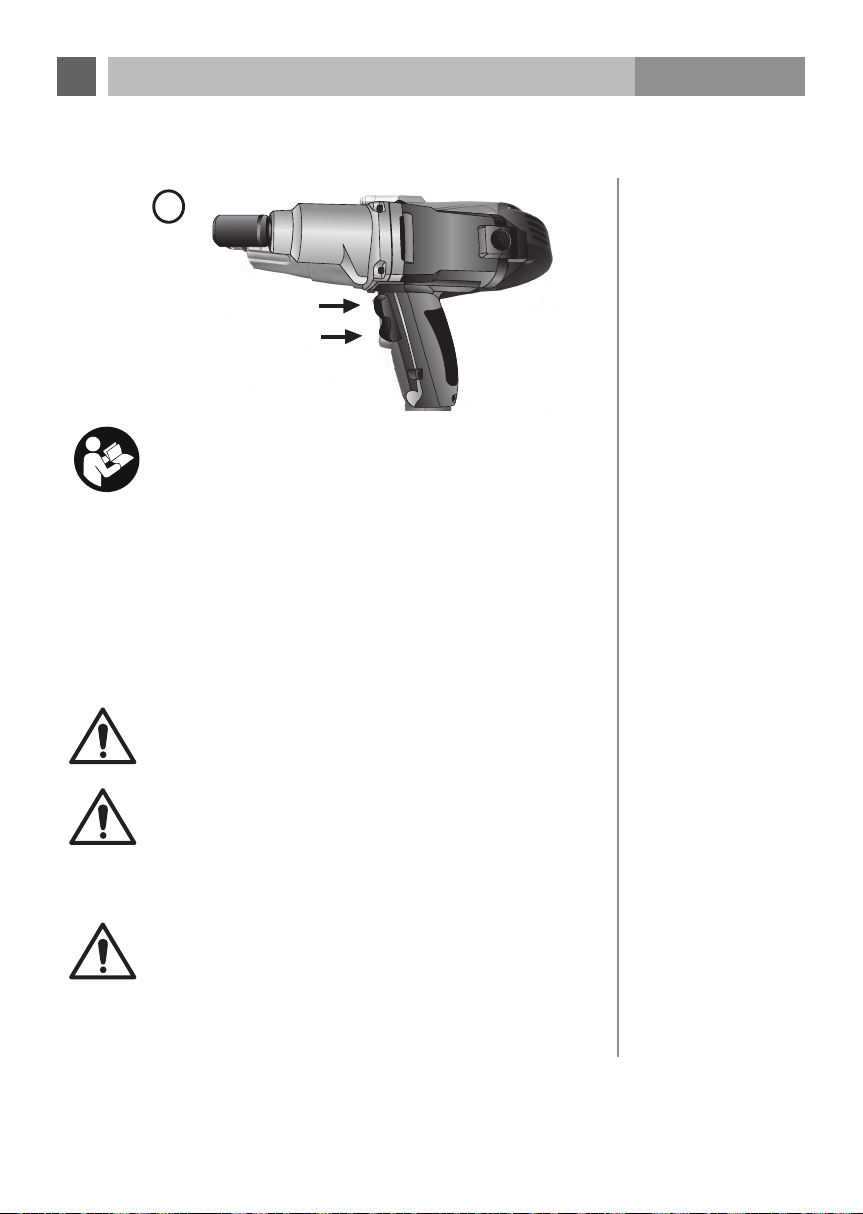
•
Nale¿y podnieśæ pojazd za pomoc¹ oryginalnych narzêdzi i akcesoriów
producenta pojazdu. Nale¿y ściśle przestrzegaæ instrukcji obs³ugi
producenta.
•
Nale¿y wybraæ odpowiedni klucz nasadowy. Po w³o¿eniu klucza
nasadowego nale¿y sprawdziæ, czy jest prawid³owo i bezpiecznie
zamocowany w uchwycie (5).
•
Nale¿y mocno przy³o¿yæ narzêdzie do obrabianego elementu mocuj¹cego.
•
W celu wkrêcenia elementu mocuj¹cego (zgodnie z ruchem wskazówek
zegara) nale¿y nacisn¹æ i przytrzymaæ prze³¹cznik ko³yskowy w pozycji
dla biegu w prawo (F) (3). Przed rozpoczêciem prac z u¿yciem narzêdzia
nale¿y sprawdziæ, czy kierunek obrotu jest prawid³owy.
Ze wzglêdów bezpieczeñstwa moment obrotowy podczas
biegu w prawo jest ograniczony do 100 Nm. Nale¿y dokrêciæ
sworznie ko³a za pomoc¹ klucza dynamometrycznego z
momentem obrotowym ok. 120 Nm. Nale¿y pamiêtaæ, ¿e po
przejechaniu ok. 50 km nale¿y ponownie dokrêciæ sworznie
kó³. Nale¿y sprawdziæ sworznie kó³ pod k¹tem prawid³owego
osadzenia.
•
W celu odkrêcenia elementu mocuj¹cego (w kierunku przeciwnym do
ruchu wskazówek zegara) nale¿y nacisn¹æ i przytrzymaæ prze³¹cznik
ko³yskowy w pozycji dla biegu w lewo (R) (4). Przed rozpoczêciem prac z
u¿yciem narzêdzia nale¿y sprawdziæ, czy kierunek obrotu jest prawid³owy.
•
Odkrêcenie nakrêtek/ śrub mocuj¹cych ko³o mo¿e wymagaæ
kilkukrotnego przy³o¿enia narzêdzia.
•
Nale¿y zwolniæ prze³¹cznik ko³yskowy (3 lub 4), aby narzêdzie zatrzyma³o
siê.
•
Po zakoñczeniu pracy nale¿y od³¹czyæ zasilacz (2) od gniazda sieciowego.
Uwagi:
•
Nale¿y ściśle przestrzegaæ wskazówek producenta
dotycz¹cych zalecanego momentu obrotowego. Nie ma
¿adnych zalecanych ogólnych wartości dla aluminiowych i
stalowych obrêczy ko³a.
•
Przed rozpoczêciem jazdy nale¿y sprawdziæ przy u¿yciu
klucza dynamometrycznego prawid³owe osadzenie nakrêtek/
śrub mocuj¹cych ko³o.
•
Po przejechaniu 30-50 km nale¿y sprawdziæ przy u¿yciu
klucza dynamometrycznego prawid³owe osadzenie nakrêtek/
śrub mocuj¹cych ko³o.
7. Czyszczenie
i pielêgnacja
7.1 Wymiana
szczotek
wêglowych
PL
INSTRUKCJĘ OBSŁUGI
2
Bieg w lewo (R)
Bieg w prawo (F)
Wskazówki dotycz¹ce u¿ytkowania narzêdzia:
• Odkrêcenie/ dokrêcenie trzpieni, śrub lub nakrêtek mo¿e
wymagaæ kilkukrotnego przy³o¿enia narzêdzia.
•
Im d³u¿ej trzpienie, śruby lub nakrêtki s¹ wkrêcane, tym
s¹ stabilniej zamocowane. Nale¿y unikaæ zbyt mocnego
dokrêcania, aby nie uszkodziæ elementów mocuj¹cych lub muru.
•
Nale¿y w szczególności pamiêtaæ, ¿e w przypadku mniejszych
elementów mocuj¹cych nie jest wymagana du¿a si³a
dokrêcania.
•
Olej, zabrudzenia, rdza i inne substancje znajduj¹ce siê na
gwintach śrub lub pod ich ³bami mog¹ wp³ywaæ na osadzenie
elementów mocuj¹cych.
AB-IW900
Ostrze¿enie! Nale¿y zapewniæ, aby rêce i kabel sieciowy znajdowa³y
siê z dala od klucza nasadowego i poruszaj¹cych siê czêści.
Ostrze¿enie! Przed prze³¹czeniem pomiêdzy biegiem w prawo
i biegiem w lewo nale¿y odczekaæ, a¿ silnik zatrzyma siê, aby
zapobiec uszkodzeniu silnika i innych czêści narzêdzia.
Ostrze¿enie! Nale¿y przestrzegaæ wskazówek zawartych
•
Nale¿y w³¹czyæ bieg lub ustawiæ automatyczn¹ skrzyniê biegów na
pozycjê „P”. Nale¿y zablokowaæ ko³a, zaci¹gaj¹c hamulec rêczny.
•
Nale¿y pod³¹czyæ zasilacz (2) do odpowiedniego gniazda sieciowego.
w instrukcji producenta pojazdu, dotycz¹cej u¿ytkowania
niniejszego produktu. W ¿adnym wypadku nie wolno
przekraczaæ zalecanych wartości. Nakrêtki mocuj¹ce ko³a nale¿y
dokrêciæ zgodnie z podanymi w instrukcji obs³ugi pojazdu
wartościami momentów obrotowych. Zbyt mocne lub zbyt
luźne dokrêcenie nakrêtek mocuj¹cych ko³a mo¿e prowadziæ do
nieprawid³owego dzia³ania ko³a.
72
6.3 Wymiana
opon
Page 73
PL
INSTRUKCJĘ OBSŁUGI
7. Czyszczenie
i pielêgnacja
AB-IW900
•
Nale¿y podnieśæ pojazd za pomoc¹ oryginalnych narzêdzi i akcesoriów
producenta pojazdu. Nale¿y ściśle przestrzegaæ instrukcji obs³ugi
producenta.
•
Nale¿y wybraæ odpowiedni klucz nasadowy. Po w³o¿eniu klucza
nasadowego nale¿y sprawdziæ, czy jest prawid³owo i bezpiecznie
zamocowany w uchwycie (5).
•
Nale¿y mocno przy³o¿yæ narzêdzie do obrabianego elementu mocuj¹cego.
•
W celu wkrêcenia elementu mocuj¹cego (zgodnie z ruchem wskazówek
zegara) nale¿y nacisn¹æ i przytrzymaæ prze³¹cznik ko³yskowy w pozycji
dla biegu w prawo (F) (3). Przed rozpoczêciem prac z u¿yciem narzêdzia
nale¿y sprawdziæ, czy kierunek obrotu jest prawid³owy.
Ze wzglêdów bezpieczeñstwa moment obrotowy podczas
biegu w prawo jest ograniczony do 100 Nm. Nale¿y dokrêciæ
sworznie ko³a za pomoc¹ klucza dynamometrycznego z
momentem obrotowym ok. 120 Nm. Nale¿y pamiêtaæ, ¿e po
przejechaniu ok. 50 km nale¿y ponownie dokrêciæ sworznie
kó³. Nale¿y sprawdziæ sworznie kó³ pod k¹tem prawid³owego
osadzenia.
7.1 Wymiana
szczotek
wêglowych
•
W celu odkrêcenia elementu mocuj¹cego (w kierunku przeciwnym do
ruchu wskazówek zegara) nale¿y nacisn¹æ i przytrzymaæ prze³¹cznik
ko³yskowy w pozycji dla biegu w lewo (R) (4). Przed rozpoczêciem prac z
u¿yciem narzêdzia nale¿y sprawdziæ, czy kierunek obrotu jest prawid³owy.
•
Odkrêcenie nakrêtek/ śrub mocuj¹cych ko³o mo¿e wymagaæ
kilkukrotnego przy³o¿enia narzêdzia.
•
Nale¿y zwolniæ prze³¹cznik ko³yskowy (3 lub 4), aby narzêdzie zatrzyma³o
siê.
•
Po zakoñczeniu pracy nale¿y od³¹czyæ zasilacz (2) od gniazda sieciowego.
Uwagi:
•
Nale¿y ściśle przestrzegaæ wskazówek producenta
dotycz¹cych zalecanego momentu obrotowego. Nie ma
¿adnych zalecanych ogólnych wartości dla aluminiowych i
stalowych obrêczy ko³a.
•
Przed rozpoczêciem jazdy nale¿y sprawdziæ przy u¿yciu
klucza dynamometrycznego prawid³owe osadzenie nakrêtek/
śrub mocuj¹cych ko³o.
•
Po przejechaniu 30-50 km nale¿y sprawdziæ przy u¿yciu
klucza dynamometrycznego prawid³owe osadzenie nakrêtek/
śrub mocuj¹cych ko³o.
73
Page 74
8.
Ochrona
środowiska
9.
Rozwi¹zywanie
problemów
Zu¿yte narzêdzia elektryczne zaliczaj¹ siê do surowców wtórnych i
nie mog¹ byæ wyrzucane wraz z innymi odpadami z gospodarstwa
domowego! Dlatego zwracamy siê z prośb¹ o oddanie niniejszego
urz¹dzenia do odpowiedniego punktu zbiórki – je¿eli taki istnieje – i
udzielenia nam tym samym wsparcia poprzez aktywny udzia³ w
dzia³aniach maj¹cych na celu ochronê zasobów i środowiska.
Problem Przyczyna Rozwi¹zanie
Narzêdzie nie dzia³a.
Wtyczka (2) nie
jest prawid³owo
w³o¿ona do gniazda
sieciowego.
Brak pr¹du w
gnieździe sieciowym.
Nale¿y prawid³owo w³o¿yæ
wtyczkê (2) do gniazda
sieciowego.
Nale¿y upewniæ siê, ¿e w
gnieździe sieciowym jest
pr¹d.
Nietypowe odg³osy
i wibracje.
Klucz nasadowy (6)
zosta³ nieprawid³owo
w³o¿ony do
narzêdzia.
Śruby w narzêdziu
poluzowa³y siê.
Nale¿y naoliwiæ lub
naprawiæ silnik.
Nale¿y prawid³owo w³o¿yæ
klucz nasadowy (6).
Nale¿y dokrêciæ wszystkie
śruby w narzêdziu.
Nale¿y zleciæ
naprawê narzêdzia
w autoryzowanym
warsztacie.
Nie mo¿na
prawid³owo przy³o¿yæ
klucza nasadowego
(6) do trzpieni i
nakrêtek.
Wybrany klucz
nasadowy (6)
nie nadaje siê do
u¿ycia w przypadku
zastosowanego
elementu mocuj¹cego
(trzpienia, nakrêtki).
Nale¿y wybraæ
odpowiedni klucz
nasadowy (6), nadaj¹cy
siê do zastosowania w
przypadku u¿ywanego
trzpienia/ nakrêtki.
PL
INSTRUKCJĘ OBSŁUGI
AB-IW900
Ostrze¿enie! Przed rozpoczêciem prac zwi¹zanych z
czyszczeniem i pielêgnacj¹ narzêdzia nale¿y od³¹czyæ je od
zasilania sieciowego, aby zmniejszyæ ryzyko odniesienia obra¿eñ
cia³a. Nigdy nie wolno podejmowaæ prób samodzielnej naprawy
narzêdzia.
•
Nale¿y wyci¹gn¹æ wtyczkê (2) z gniazda sieciowego.
•
Nale¿y wyj¹æ klucz nasadowy (6) z uchwytu (5).
•
Nale¿y usun¹æ py³ i zabrudzenia ze szczelin wentylacyjnych.
•
Przy u¿yciu delikatnego myd³a i zwil¿onej ściereczki oczyściæ obudowê
i rêkojeśæ (1) wkrêtarki udarowej. Nale¿y zawsze zwracaæ uwagê na to,
aby rêkojeśæ nie by³a zabrudzona olejem i smarem.
•
Zaleca siê przechowywanie narzêdzia i akcesoriów w walizce (7) w
suchym i czystym miejscu.
•
W przypadku uszkodzenia kabla sieciowego niniejszego urz¹dzenia nale¿y
zleciæ jego wymianê producentowi, serwisantowi lub wykwalifikowanej
w tym zakresie osobie, aby unikn¹æ zagro¿enia.
Ostrze¿enie!
•
Do czyszczenia narzêdzia nie wolno u¿ywaæ ¿adnych
środków czyszcz¹cych, alkoholu ani rozpuszczalników.
Mog³yby one uszkodziæ wykonane z tworzywa sztucznego
lub izolowane czêści narzêdzia.
•
Nigdy nie wolno u¿ywaæ w pobli¿u narzêdzia palnych ani
zapalnych rozpuszczalników!
•
Nigdy nie wolno zanurzaæ narzêdzia w cieczy i nale¿y
uwa¿aæ na to, aby ciecz nie dosta³a siê do wnêtrza
narzêdzia.
8. Umweltschutz
9. Problem behebung
Nale¿y wy³¹czyæ urz¹dzenie. Nale¿y wyci¹gn¹æ wtyczkê z gniazda
sieciowego.
Je¿eli szczotka wêglowa zu¿yje siê do tego stopnia, ¿e wykonana
z tworzywa sztucznego tuleja izoluj¹ca bêdzie stykaæ siê w jej wnêtrzu
z kolektorem, silnik wy³¹czy siê automatycznie. Je¿eli to nast¹pi, nale¿y
równocześnie wymieniæ obie szczotki wêglowe. Nale¿y u¿ywaæ wy³¹cznie
jednakowych szczotek wêglowych.
Aby zapewniæ bezpieczeñstwo u¿ytkowania i niezawodne dzia³anie
niniejszego narzêdzia, prace zwi¹zane z napraw¹, konserwacj¹ i kalibracj¹
narzêdzia powinny byæ wykonywane wy³¹cznie w autoryzowanych przez
producenta warsztatach lub centrach serwisowych i z zastosowaniem tylko
oryginalnych czêści zamiennych producenta..
74
Page 75

PL
INSTRUKCJĘ OBSŁUGI
AB-IW900
8.
Ochrona
środowiska
9.
Rozwi¹zywanie
problemów
Zu¿yte narzêdzia elektryczne zaliczaj¹ siê do surowców wtórnych i
nie mog¹ byæ wyrzucane wraz z innymi odpadami z gospodarstwa
domowego! Dlatego zwracamy siê z prośb¹ o oddanie niniejszego
urz¹dzenia do odpowiedniego punktu zbiórki – je¿eli taki istnieje – i
udzielenia nam tym samym wsparcia poprzez aktywny udzia³ w
dzia³aniach maj¹cych na celu ochronê zasobów i środowiska.
Problem Przyczyna Rozwi¹zanie
Narzêdzie nie dzia³a.
Nietypowe odg³osy
i wibracje.
Wtyczka (2) nie
jest prawid³owo
w³o¿ona do gniazda
sieciowego.
Brak pr¹du w
gnieździe sieciowym.
Klucz nasadowy (6)
zosta³ nieprawid³owo
w³o¿ony do
narzêdzia.
Śruby w narzêdziu
poluzowa³y siê.
Nale¿y prawid³owo w³o¿yæ
wtyczkê (2) do gniazda
sieciowego.
Nale¿y upewniæ siê, ¿e w
gnieździe sieciowym jest
pr¹d.
Nale¿y prawid³owo w³o¿yæ
klucz nasadowy (6).
Nale¿y dokrêciæ wszystkie
śruby w narzêdziu.
Nie mo¿na
prawid³owo przy³o¿yæ
klucza nasadowego
(6) do trzpieni i
nakrêtek.
Nale¿y naoliwiæ lub
naprawiæ silnik.
Wybrany klucz
nasadowy (6)
nie nadaje siê do
u¿ycia w przypadku
zastosowanego
elementu mocuj¹cego
(trzpienia, nakrêtki).
75
Nale¿y zleciæ
naprawê narzêdzia
w autoryzowanym
warsztacie.
Nale¿y wybraæ
odpowiedni klucz
nasadowy (6), nadaj¹cy
siê do zastosowania w
przypadku u¿ywanego
trzpienia/ nakrêtki.
Page 76
10.3 Wskazówki
dotycz¹ce
obci¹¿enia ha³asem
11.
Oświadczenie
gwarancyjne
Pewne obci¹¿enie ha³asem przy u¿ytkowaniu tego narzêdzia jest
nieuniknione. Prace zwi¹zane z du¿ym obci¹¿eniem ha³asem nale¿y
zaplanowaæ na godziny, w których jest to dozwolone. Nale¿y przestrzegaæ
godzin ciszy nocnej itp. i mo¿liwie maksymalnie ograniczyæ czas pracy. Dla
zapewnienia ochrony sobie oraz osobom przebywaj¹cym w pobli¿u zaleca
siê stosowanie odpowiedniej ochrony s³uchu.
Nie naruszaj¹c ustawowych roszczeñ gwarancyjnych, producent udziela
gwarancji zgodnie z przepisami prawnymi kraju u¿ytkownika, przy czym
minimalny okres gwarancji wynosi 1 rok (w Niemczech 2 lata).
Za pocz¹tek obowi¹zywania gwarancji uznaje siê datê sprzeda¿y urz¹dzenia
u¿ytkownikowi koñcowemu.
Gwarancja obejmuje wy³¹cznie braki, które wynikaj¹ z b³êdów materia³owych
lub produkcyjnych.
Naprawy gwarancyjne mog¹ byæ wykonywane wy³¹cznie przez
autoryzowany punkt obs³ugi klienta. Aby móc skorzystaæ z przys³uguj¹cego
prawa do gwarancji, nale¿y do³¹czyæ do zg³oszenia oryginalny dowód zakupu
(z dat¹ zakupu).
Z gwarancji wy³¹czone s¹:
•
normalne zu¿ycie
•
niew³aściwe u¿ycie, np. przeci¹¿anie urz¹dzenia, stosowanie
niedopuszczonych akcesoriów
•
uszkodzenie przez oddzia³ywanie osób trzecich, zastosowanie zbyt du¿ej
si³y czy cia³a obce
•
szkody powsta³e wskutek nieprzestrzegania instrukcji obs³ugi, np.
pod³¹czenie do nieprawid³owego napiêcia lub nieprzestrzeganie instrukcji
monta¿u
•
ca³kowicie lub czêściowo rozmontowane urz¹dzenia.
PL
INSTRUKCJĘ OBSŁUGI
AB-IW900
Napiêcie znamionowe: 230 V~, 50 Hz
Znamionowy pobór mocy: 900 W
Rozmiar nasadki czworok¹tnej
do klucza nasadowego: 12,7 mm, ½"
Maksymalny moment obrotowy: 300 Nm dla biegu w lewo (odkrêcanie)
100 Nm dla biegu w prawo (wkrêcanie)
Klasa ochrony: klasa II
Stopieñ ochrony IP: IPXO
Prêdkośæ obrotowa biegu ja³owego n
Rozmiary kluczy nasadowych: SW17, SW19, SW21 und SW22
Ciê¿ar (netto): 3,23 kg
Poziom ciśnienia akustycznego L
Poziom mocy akustycznej L
Drgania miejscowe (przenoszone przez
koñczyny górne) a
ah przy sposobie pracy
dopuszczalnym rozmiarze”
•
Wskazówka: Wartości dotycz¹ce ha³asu i wibracji zosta³y zmierzone
zgodnie z norm¹ EN 60745-1 i EN 60745-2-2.
•
Wskazówka: Podana wartośæ dotycz¹ca poziomu wibracji zosta³a
określona przy pomocy standardowej metody badawczej i mo¿e
byæ zastosowana do porównania ró¿nych elektronarzêdzi. Ponadto
na podstawie tej wartości mo¿na z góry oszacowaæ obci¹¿enia dla
u¿ytkownika, które powstaj¹ w wyniku wibracji.
•
Ostrze¿enie! W zale¿ności od tego, jak u¿ywane jest
narzêdzie elektryczne, faktyczny poziom wibracji mo¿e
ró¿niæ siê od podanego.
•
Nale¿y przedsiêwzi¹æ odpowiednie kroki chroni¹ce przed
obci¹¿eniem wibracjami. Nale¿y uwzglêdniæ przy tym ca³y
przebieg prac, a wiêc tak¿e momenty, w których narzêdzie
elektryczne jest u¿ywane bez obci¹¿enia lub gdy jest
wy³¹czone.
•
Odpowiednie środki obejmuj¹ miêdzy innymi regularn¹
konserwacjê oraz pielêgnacjê narzêdzia elektrycznego oraz
zestawu narzêdzi, utrzymanie ciep³oty d³oni, regularne
przerwy oraz dobre planowanie przebiegu pracy.
: 2200 min
WA
: 19,652 m/s2; K: 1,5 m/s
h
0
: 96,34 dB(A); KPA: 3,0 dB(A)
PA
: 107,34 dB(A); KWA: 3,0 dB(A)
„Dokrêcanie śrub i nakrêtek o maks.
-1
2
10. Dane
techniczne
10.1 Ha³as i
wibracje
10.2 Wskazówki
dotycz¹ce ha³asu
oraz wibracji
76
Page 77

PL
INSTRUKCJĘ OBSŁUGI
AB-IW900
10.3 Wskazówki
dotycz¹ce
obci¹¿enia ha³asem
11.
Oświadczenie
gwarancyjne
Pewne obci¹¿enie ha³asem przy u¿ytkowaniu tego narzêdzia jest
nieuniknione. Prace zwi¹zane z du¿ym obci¹¿eniem ha³asem nale¿y
zaplanowaæ na godziny, w których jest to dozwolone. Nale¿y przestrzegaæ
godzin ciszy nocnej itp. i mo¿liwie maksymalnie ograniczyæ czas pracy. Dla
zapewnienia ochrony sobie oraz osobom przebywaj¹cym w pobli¿u zaleca
siê stosowanie odpowiedniej ochrony s³uchu.
Nie naruszaj¹c ustawowych roszczeñ gwarancyjnych, producent udziela
gwarancji zgodnie z przepisami prawnymi kraju u¿ytkownika, przy czym
minimalny okres gwarancji wynosi 1 rok (w Niemczech 2 lata).
Za pocz¹tek obowi¹zywania gwarancji uznaje siê datê sprzeda¿y urz¹dzenia
u¿ytkownikowi koñcowemu.
Gwarancja obejmuje wy³¹cznie braki, które wynikaj¹ z b³êdów materia³owych
lub produkcyjnych.
Naprawy gwarancyjne mog¹ byæ wykonywane wy³¹cznie przez
autoryzowany punkt obs³ugi klienta. Aby móc skorzystaæ z przys³uguj¹cego
prawa do gwarancji, nale¿y do³¹czyæ do zg³oszenia oryginalny dowód zakupu
(z dat¹ zakupu).
Z gwarancji wy³¹czone s¹:
•
normalne zu¿ycie
•
niew³aściwe u¿ycie, np. przeci¹¿anie urz¹dzenia, stosowanie
niedopuszczonych akcesoriów
•
uszkodzenie przez oddzia³ywanie osób trzecich, zastosowanie zbyt du¿ej
si³y czy cia³a obce
•
szkody powsta³e wskutek nieprzestrzegania instrukcji obs³ugi, np.
pod³¹czenie do nieprawid³owego napiêcia lub nieprzestrzeganie instrukcji
monta¿u
•
ca³kowicie lub czêściowo rozmontowane urz¹dzenia.
77
 Loading...