

Page 1
ENG
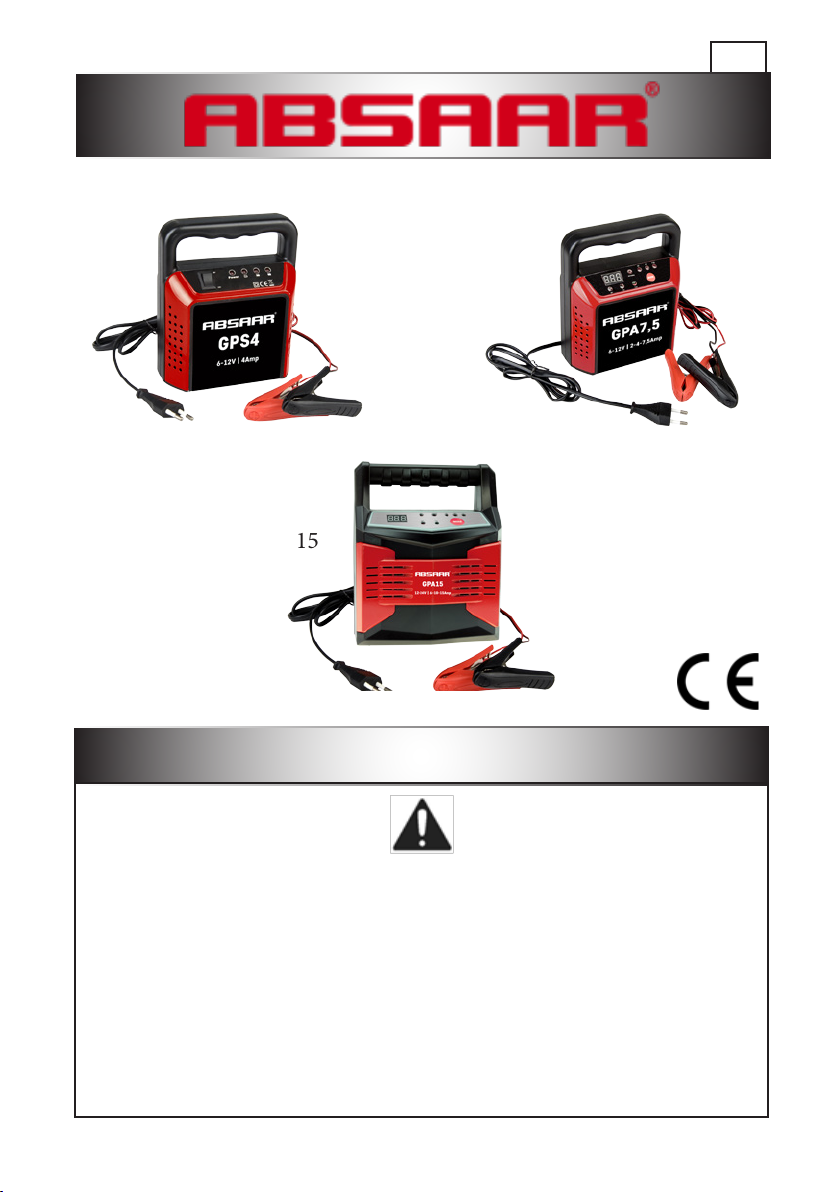
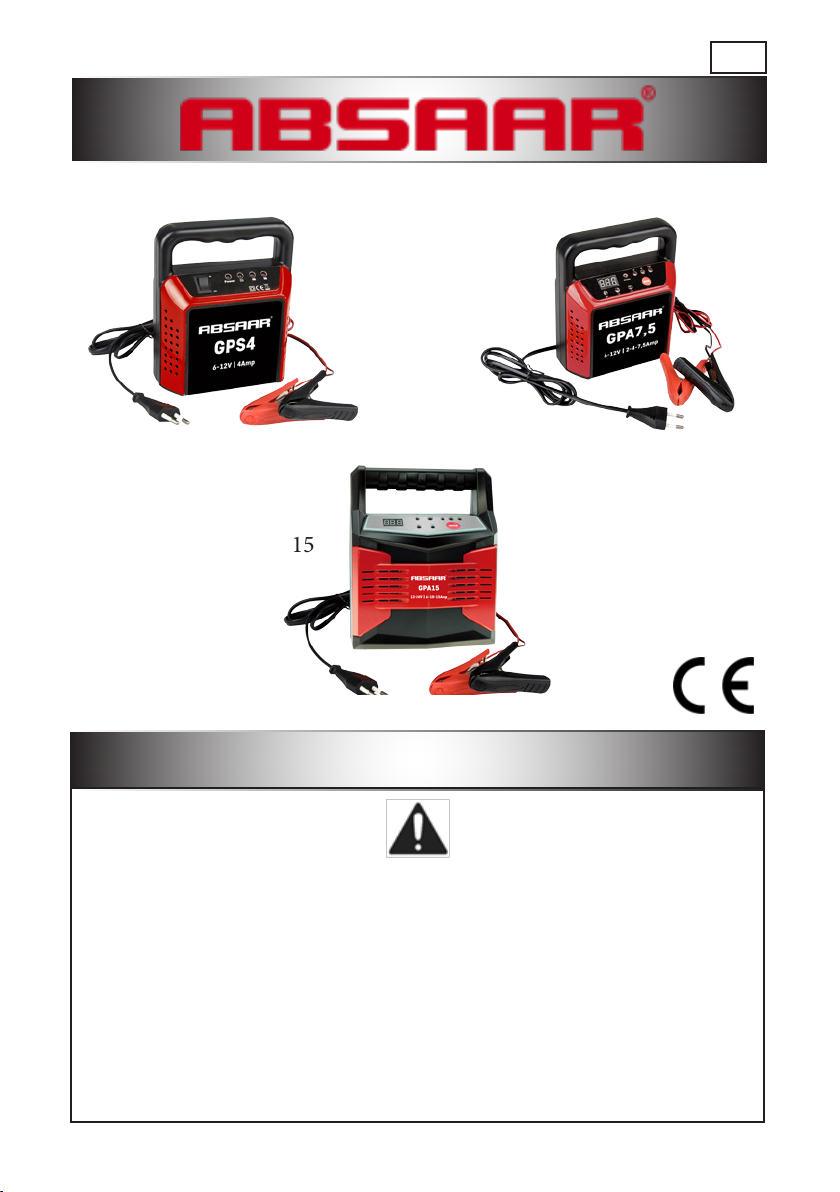
AB100-1204
GPS4
AB100-1275
GPA7.5
AB100-1215
GPA15
User’s Guide
Battery Chargers GPS4 - GPA 7.5 - GPA15
Please make sure you read this manual carefully before using this product. Failure
to do so may lead to serious injuries.
PLEASE KEEP THIS MANUAL SAFE FOR FUTURE USE
is device is not intended for use by young children or people who cannot read
or understand the manual, unless supervised by a responsible person who ensures
that they can use the battery charger without any risk.
Please keep the battery charger out of the reach of children and ensure that they
don’t play with it.
Check the charger cables prior to use. Make sure that neither the cables nor the
cable protector are slit. Do not use the charger if the cable is damaged.
e power cord cannot be replaced. Dispose of the device if the cable is damaged.
Page 1
vers.3
Page 2

ENG
Contents
1. Symbols explained 3
2. Important safety and operation warnings 4
3. Safety instructions 4
4. Specications 5
5. Description 6
6. Usage instructions:
A/Model - GPS4 7
B/ Model - GPA7.5 8
C/ Model - GPA15 9
7. Warranty Terms & Conditions 10
vers.3
Page 2
Page 3
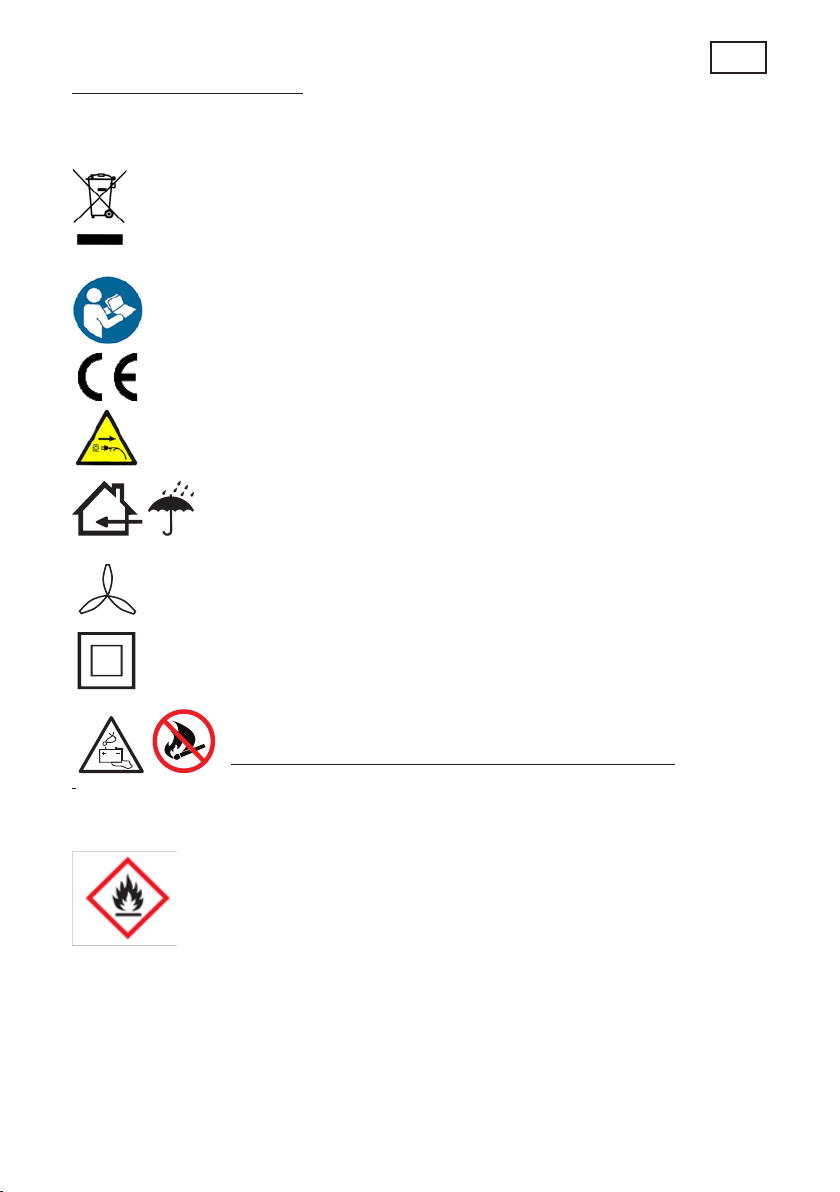
1-Symbols explained.
Electrical waste must not be disposed of with household waste. Please, check
with your local authority or retailer for recycling advice.
WARNING – Please read the instruction manual to reduce the risk of injury.
In accordance with the essential applicable safety standards of European
directives.
Remove the mains plug immediately if the cable is damaged or cut. .
Do not expose the charger to rain.
Operate the charger in a properly ventilated area
ENG
Class II equipment – Double insulation
WARNING: Explosive gases. Avoid ames and sparks
THIS EASILY FLAMMABLE GAS CAN ESCAPE THROUGH VENTS
AND CREATE AN EXPLOSIVE MIXTURE IN THE ATMOSPHERE
CLOSE TO THE BATTERY IN POOR VENTILATION CONDITIONS.
NO SPARKS, FLAMES, LIT CIGARETTES OR OTHER SOURCES OF
COMBUSTION NEAR A BATTERY.
Page 3
vers.3
Page 4
ENG
2-Important safety and operation warnings:
Caution: e batteries contain abrasive acids and explosive gases may escape. Do
not smoke! Please ensure that there are no naked ames or sparks near
the device. If any part of your body comes in contact with the battery’s
electrolyte, wash the area immediately with plenty of cold water. If any
acid gets into your eyes, rinse them immediately with plenty of water
and consult a doctor as soon as possible. Keep children and pets
away from the device while charging. If the battery or charger becomes
hot while charging, stop the operation and have the battery checked by a
professional
Caution: We recommend removing the battery from the vehicle before commencing
the charging operation. Should this not be possible, disconnect the negative
battery pin that connects the battery to the vehicle body while charging.
Caution: Before you disconnect the battery, make sure you have the PIN codes of
the car radio, etc. that are required to use devices which are code protected.
Check your vehicle owner’s manual to see if there are other vehicle systems that are reset or cleared when the battery is disconnected. If in doubt,
contact your car dealer.
Caution: Batteries that have not been used for a long time may not operate proper-
ly due to self-discharge or sulfation. ese batteries cannot be charged
properly.
Do not use these chargers for such batteries.
e battery charger must not be used in lieu of power supply.
e battery charger must not be installed in a vehicle.
When the battery is charging, the vehicle engine should not be turned
on.
3- SAFETY INSTRUCTIONS:
- Do not attempt to recharge non-rechargeable batteries!
- Do not expose the battery to direct sunlight!
- When using the charger, do not smoke and ensure that there are no naked ames
near the device.
- Avoid contact with the battery’s electrolyte – it is highly abrasive!
- To allow rapid dissipation of gases generated during the charging process, open the
lids of the battery cells and ensure that there are no naked ames or sparks near the
device.
e escaping gases are explosive
vers.3
Page 4
Page 5
ENG
Some chargers contain components such as switches and relays that may produce
sparks.
Please ensure that the charger is kept in a suitable place.
Dispose of faulty batteries by placing them at the designated battery
collection points or in a garage. When disposing of a battery charger,
remember the following: Do not dispose of metal or plastic parts along
with household waste!
Take all these parts to a public collection point!
Instructions to be followed for the disposal of this product: If the product bears the symbol of a crossed-out bin, it means that it is subject to
the European Directive 2002/96/EC.
If the power cable of this device is damaged, it must be replaced either by the manufacturer or an authorised service centre or by qualied personnel. To avoid danger, please
do not make any changes to the power cable yourself!
Individuals (children in particular) who do not have sucient knowledge
or experience of operating this device or those with physical, sensory or
mental disability must not use this device unless supervised by someone
who is able to ensure their safety. Children must be supervised and must
not be allowed to play with this device
4-SPECIFICATION:
Model GPS4 GPA7.5 GPA15
Supply voltage 230/240V 230/240V 230/240V
Frequency 50Hz 50Hz 50Hz
Charging current (max) 4 Amp 2/4/7.5 Amp 6/10/15Amp
Charging voltage 6/12 V 6/12 V 12/24 V
For battery capacity 6V 5-20AH
12V 5-40AH
6V 5-20 AH
12V 5-60AH
12V 5-60AH
24V 5-150AH
Page 5
vers.3
Page 6
ENG
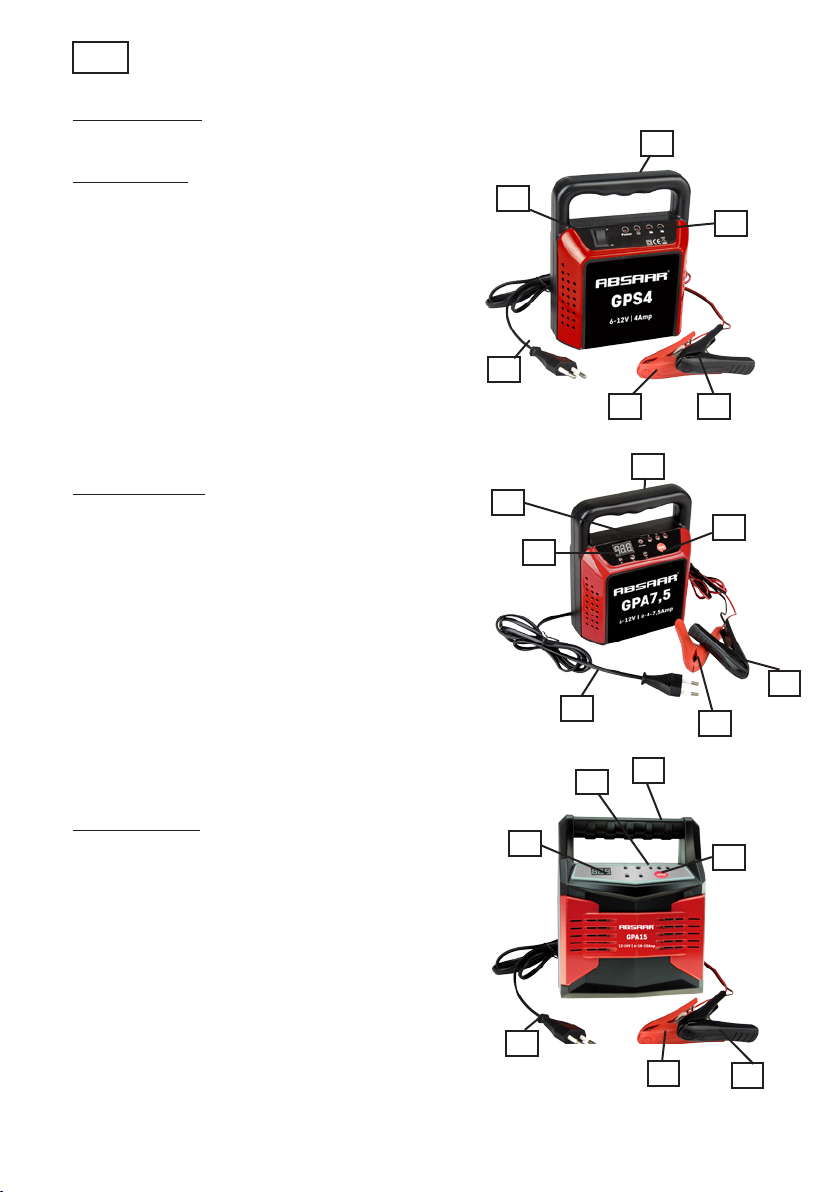
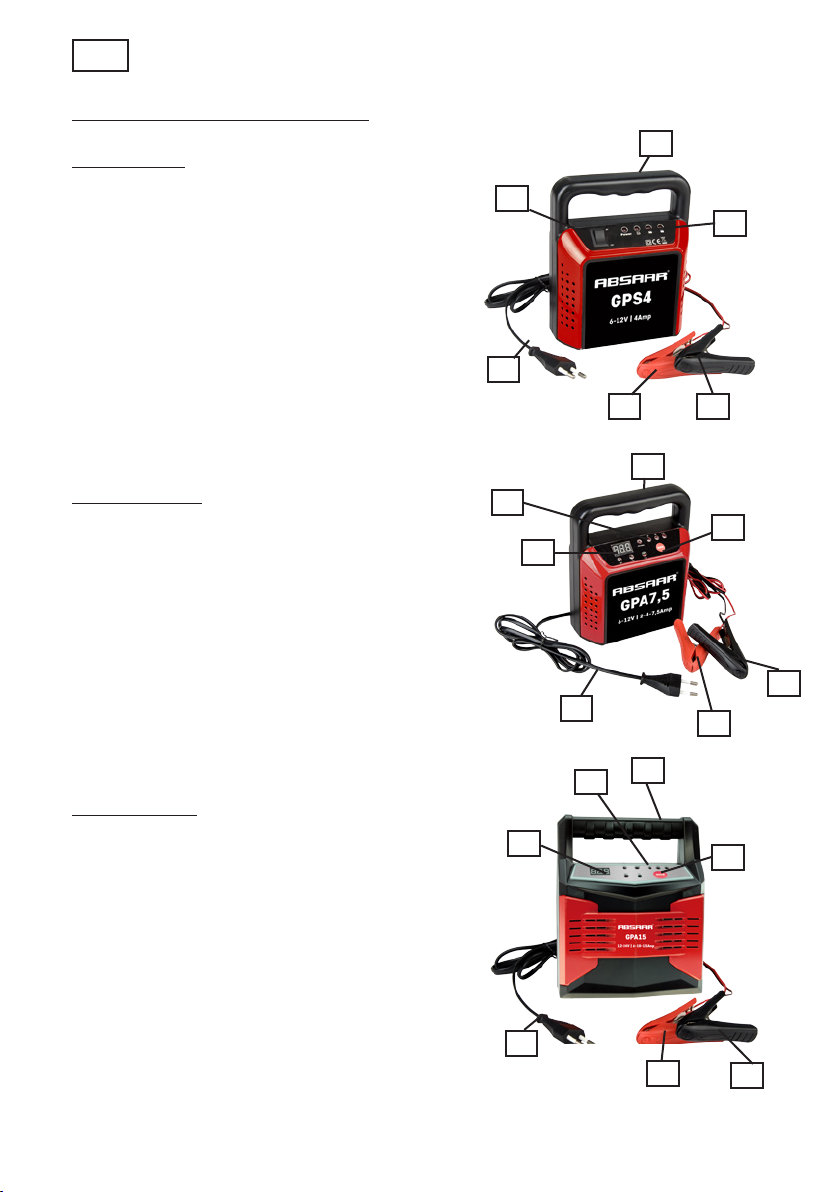
Description
Model - GPS4
1. Carry handle
2. 6 volt/12 volt switch
3. LED indicator
4. Red positive (+) clamp
5. Black negative (-) clamp
6. Mains power cable with power plug
1
2
3
6
4 5
Model - GPA7.5
1. Carry handle
2. Charging current selector
3. LED indicator.
4. Red positive (+) clamp.
5. Black negative (-) clamp.
6. Mains power cable with power plug.
7. Voltmeter.
Model - GPA15
1. Carry handle.
2. Charging current selector
3. LED indicator.
4. Red positive (+) clamp.
5. Black negative (-) clamp.
6. Mains power cable with power plug.
7. Voltmeter.
1
3
2
7
5
6
1
3
7
4
2
6
4
5
vers.3
Page 6
Page 7
ENG
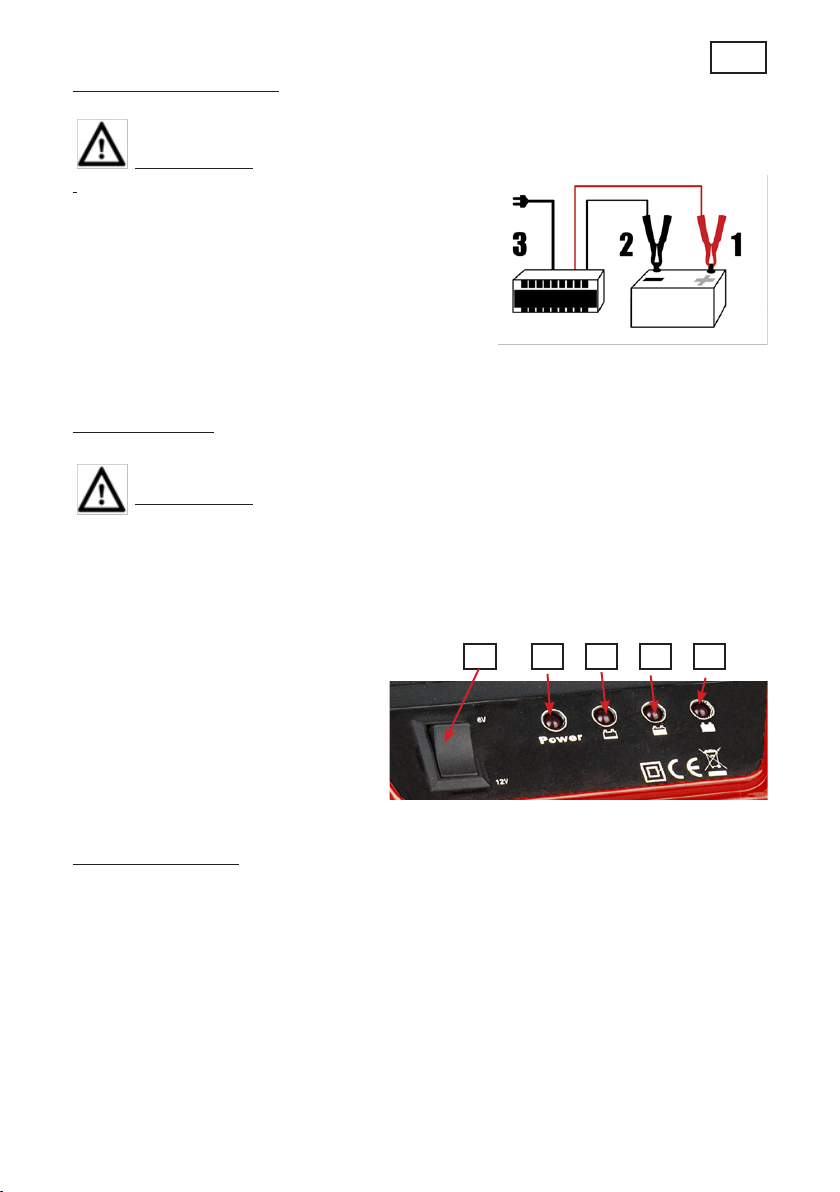
6-Usage instructions:
IMPORTANT
Always follow the procedure below to connect
a battery to a charger:
1- Connect the red (+) clamp to the positive terminal of the battery
2- Connect the black (-) clamp to the negative terminalof the battery.
3- Plug in the power cable
A/Model - GPS4.
IMPORTANT
e ABSAAR GPS4 charger is a STANDARD charger, which means it needs to be
disconnected manually once the battery is fully charged. Do not leave the charger permanently connected to the battery as this could result in the battery being
destroyed.
1. 6 volts/12 volts switch
Red light indicates: Power indic ator
Red light indicates: Low battery load
Yellow light indicates: Medium battery
load
5. Green light indicates: Battery fully
charged
Charging the battery:
1- Select battery voltage - 6 volts or 12 volts – using the switch (1) and referring to the
indication on the battery (voltage displayed in volts).
2- Connect the battery to the charger following the connection procedure.
3- Kindly refer to the indicators below to understand the battery charging status:
• Red light indicates: Low battery load
• Yellow light indicates: Medium battery load
• Green light indicates: Battery fully charged
4- Disconnect the battery manually once it is fully charged.
Page 7
1 2 3 4 5
vers.3
Page 8
ENG
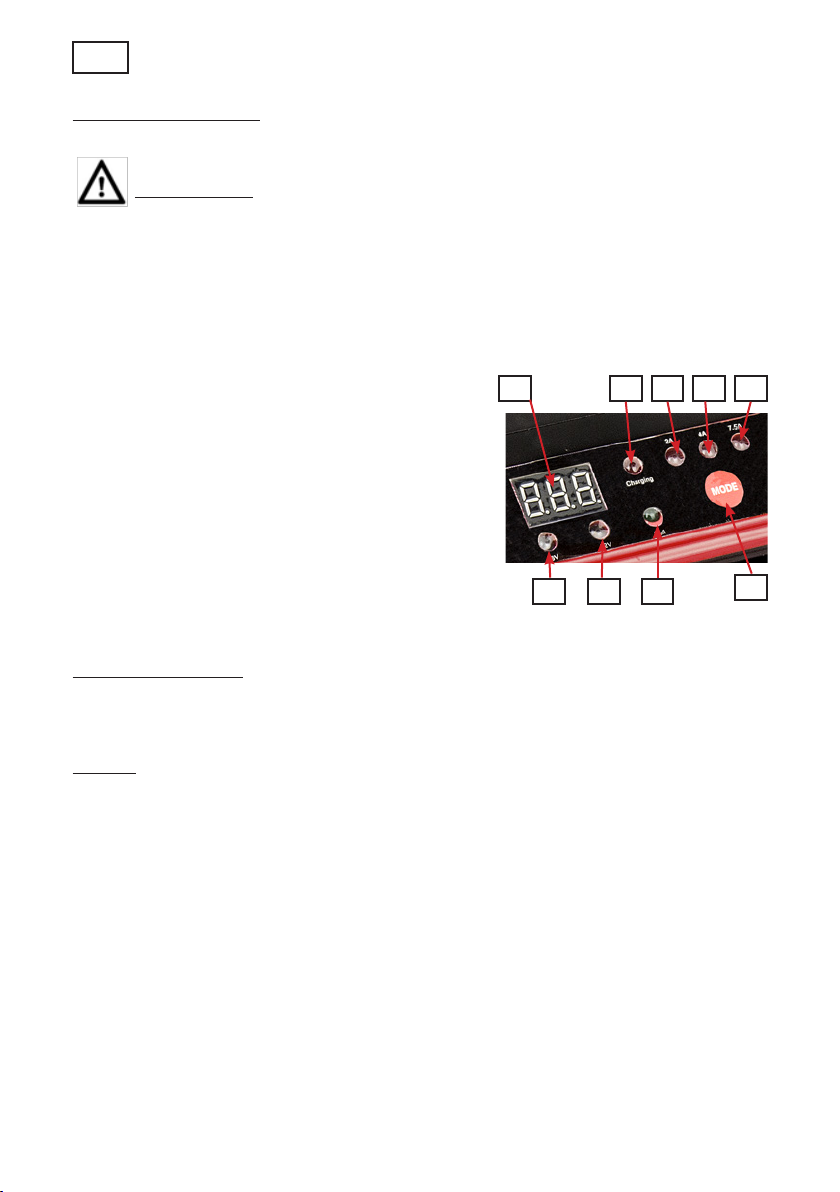
B/ Model- GPA 7.5
IMPORTANT
e ABSAAR GPA7.5 is an ‘‘AUTOMATIC’’ charger, which means you do not need
to manually disconnect it once the battery is fully charged. You can leave the charger connected to the battery and the charger will automatically stop the charging
process once the battery is fully charged. It will also resume charging automatically
once the battery needs charging.
1. Charging current selector
Red light indicates: Charging in progress
Red light indicates: Load current 2A
Red light indicates: Load current 4A
Red light indicates: Charging current 7.5A
6. Voltmeter
7. Red light indicates: 6V
8. Red light indicates: 12V
9. Green light indicates: Battery fully charged
Charging the battery:
1- Connect the battery to the charger following the connection procedure.
NOTE: Battery voltage is selected automatically by the charger. If the battery is
discharged or defective, there is a possibility of an automatic selection error, for
example, if a 12-volt battery with a deep discharge has been mistaken for a 6-volt
battery. Should this be the case, test the battery and/or use a STANDARD charger
to run a “forced” charge. You can check the battery voltage on the voltmeter (6) at
all times.
2- Using the charging current selector (1), select the desired charging current
2A/4A/7.4A depending on the charging speed and the capacity of the battery. e
desired option is displayed on the LED indicators 3/4/5.
3- Once the battery is fully charged, the green LED indicator (9) will light up, indicating
that the battery is now fully charged and will stop the charging automatically.
4- You can leave the battery connected to the charger and it will set o the charging
automatically when required.
7 8 9
2 3 546
1
vers.3
Page 8
Page 9
ENG
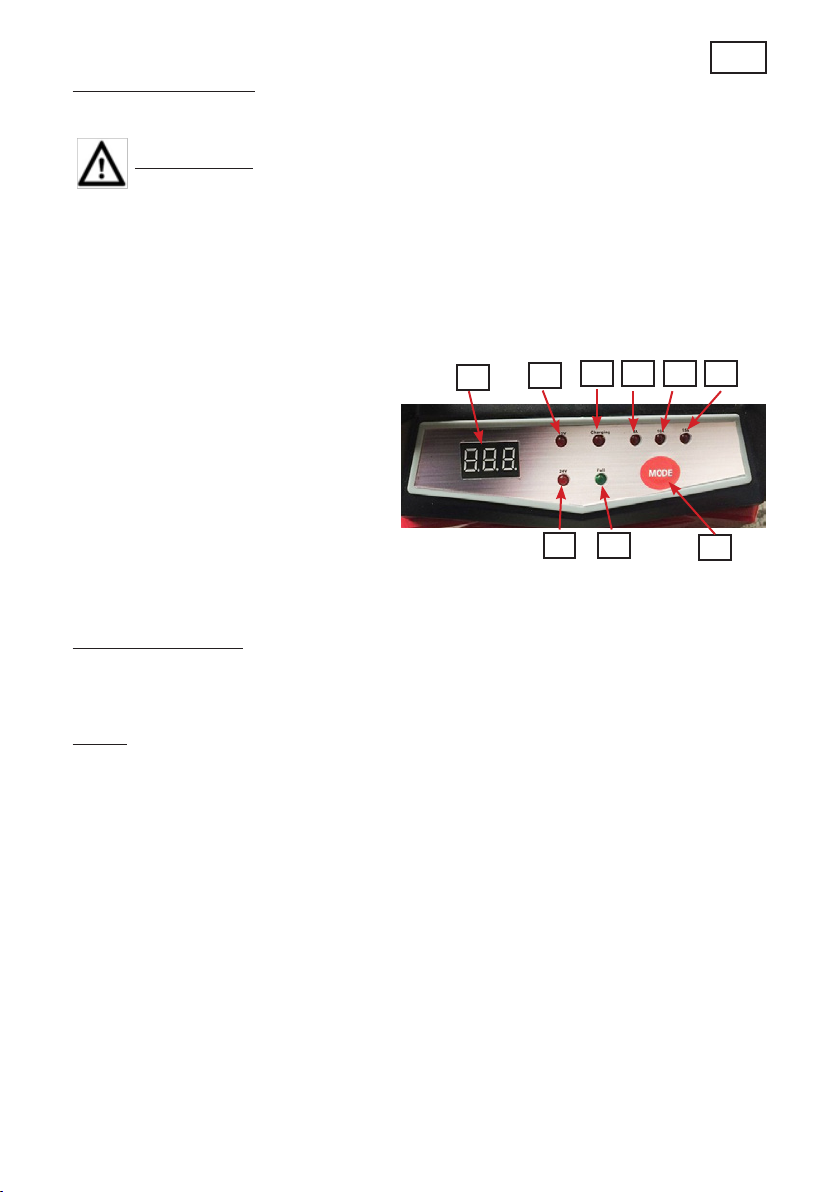
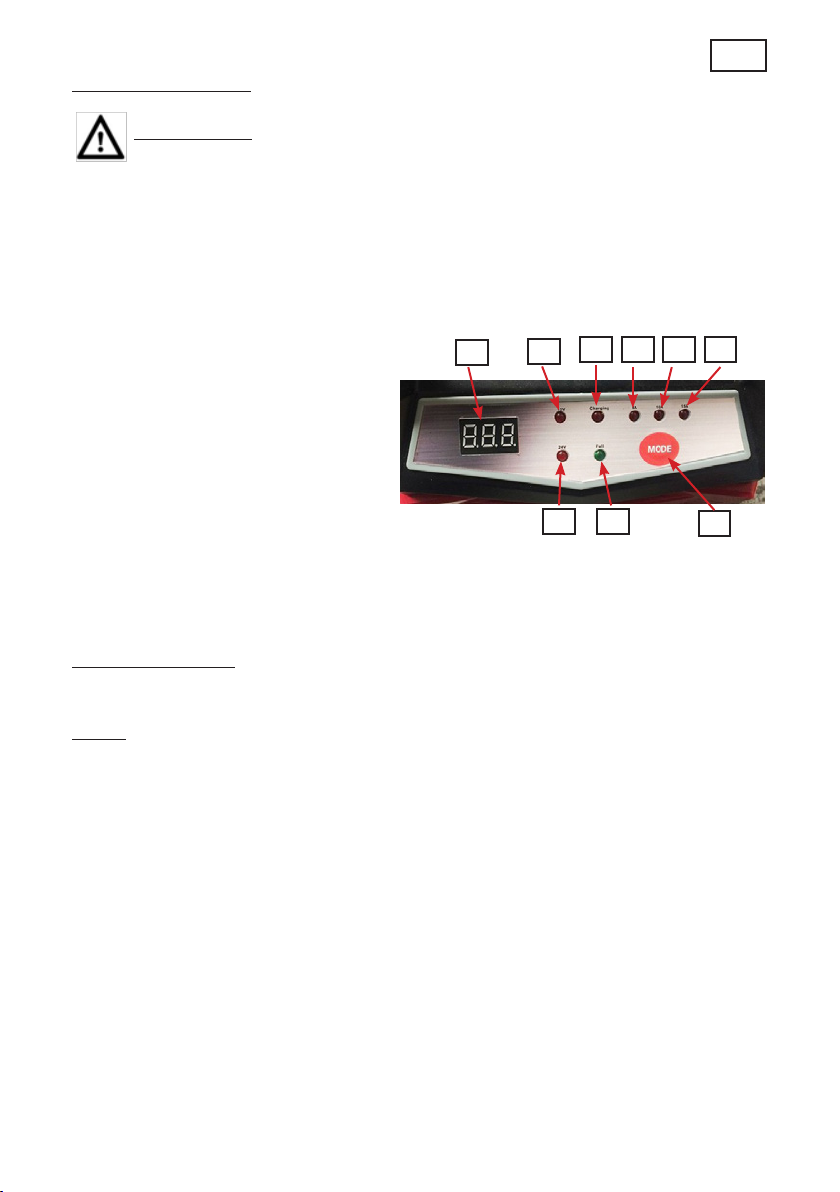
C/ Model - GPA15
IMPORTANT
e ABSAAR GPA15 is an ‘‘AUTOMATIC’’ charger, which means you do not need
to manually disconnect it once the battery is fully charged. You can leave the charger connected to the battery and the charger will automatically stop the charging
process once the battery is fully charged. It will also resume charging automatically
once the battery needs charging.
2
6
1. Charging current selector
Red light indicates: Charging in progress
Red light indicates: Load current 6A
Red light indicates: Load current 10A
Red light indicates: Load current 15A
6. Voltmeter.
7. Red light indicates: 12V
8. Red light indicates: 24V
9. Green light indicates: [Green light indicates:] Battery fully charged
Charging the battery:
7
8
3 4 5
9
1
1- Connect the battery to the charger following the connection procedure.
NOTE: Battery voltage is selected automatically by the charger. If the battery is
discharged or defective, there is a possibility of an automatic selection error, for
example, if a 24-volt battery with a deep discharge has been mistaken for a 12-volt
battery. Should this be the case, test the battery and/or use a STANDARD charger
to run a “forced” charge. You can check the battery voltage on the voltmeter (6) at
all times.
2- Using the charging current selector (1), select the desired charging current
6A/10A/15A depending on the charging speed and the capacity of the battery. e
desired option is displayed on the LED indicators 3/4/5.
3- Once the battery is fully charged, the green LED indicator (9) will light up, indicating
that the battery is now fully charged and will stop the charging automatically.
4- You can leave the battery connected to the charger. It will set o the charging automatically when required.
Page 9
vers.3
Page 10

ENG
Warranty Terms & Conditions
1) e warranty covers all manufacturing and material defects. e
manufacturer guarantees free replacement (of the parts or of the entire
product) for two years from the date of purchase. Shipping costs, however, will be borne by the customer.
2) Requests for warranty will be accepted only if they are accompanied
by a proof of purchase (invoice or sales receipt).
3) e warranty does not cover repairs that may be necessary due to an
accident, improper disassembly, damage due to falls or blows, improper
use or connection to a voltage higher than the one indicated.
4) e warranty does not, in any case, cover entitlement to compensation and/or refund.
For damages:
Please contact your dealer.
vers.3
Page 10
Page 11
ENG
Electrical equipment cannot be disposed of like household waste. According to Waste Electrical
and Electronic Equipment European directive 2002/96/EC and its translation into national law,
used electrical goods should be collected separately and disposed of in specic collection points.
Ask your local authorities or reseller for advice on recycling. Recycle takes little eort on your
part, for a big dierence to our world
Postal address:
P.O. Box 146 146
L-4902 BASCHARAGE
MSA INTERNATIONAL - ZAE Robert Steichen, 5 Rue de Bommel - L-4940 HAUTCHARAGE TEL.: +35 226 6565 FAX:
+35 2266 5651- Email: INFO@MSAINTERNATIONAL.COM
Page 11
vers.3
Page 12

ENG
vers.3
Page 12
Page 13

FR
AB100-1204
GPS4
AB100-1275
GPA7.5
AB100-1215
GPA15
Manuel de l’utilisateur
Chargeur GPS4 - GPA 7.5 - GPA15
Veuillez lire attentivement ce document avant d’utiliser ce produit. Ne pas le faire
peut entraîner des blessures graves.
VEUILLEZ CONSERVER CE MANUEL
Cet appareil ne doit pas être utilisé par de jeunes enfants ou par des personnes ne pouvant pas
lire ou comprendre le manuel, sauf sous la surveillance d’une personne responsable qui s’assure
que le chargeur de batterie puisse être utilisé sans aucun risque.
Stockez et utilisez le chargeur de batterie hors de la portée des enfants et vériez qu’ils ne
peuvent pas jouer avec. Contrôlez les câbles du chargeur avant l’utilisation. Vériez les câbles
et le boitier, ils ne doivent pas être fendus ou endommagés. N’utilisez pas un chargeur dont
les câbles sont endommagés. Le câble d’alimentation ne peut pas être remplacé. Si le câble est
endommagé, jetez l’appareil.
Page 13 vers.3
Page 14

FR
Sommaire
1. Explication des symboles 15
2. Avertissements de sécurité et préparation 16
3. Instruction de sécurité 16
4. Spécications 17
5. Description des produits 18
6. Utilisation:
A/ Modèle GPS4 19
B/ Modèle GPA7.5 20
C/ Modèle GPA15 21
7. Conditions de garantie 22
vers.3
Page 14
Page 15

1-Explication des symboles.
Les déchets électriques ne doivent pas être jetés avec les ordures ménagères.
S’il vous plaît, vériez auprès de votre autorité locale ou le détaillant pour
obtenir des conseils de recyclage.
AVERTISSEMENT - Pour réduire le risque de blessures, l’utilisateur doit
lire le manuel d’instruction.
En conformité avec les normes de sécurité applicables essentielles des directives européennes.
Retirer la prise secteur immédiatement si le câble est endommagé ou coupé.
Ne pas exposer à la pluie.
Veillez à une ventilation appropriée pendant la charge
FR
Double isolation Classe II
AVERTISSEMENT: Gas explosifs. Evitez les ammes et étincelles
CE GAZ FACILEMENT INFLAMMABLE PEUT S’ÉCHAPPER PAR
LES ÉVENTS ET FORMER UN MÉLANGE EXPLOSIF DANS L’ATMOSPHÈRE PRES DE LA BATTERIE DANS DES CONDITIONS DE
MAUVAISE VENTILATION.
PAS D’ÉTINCELLES, FLAMMES, CIGARETTES ALLUMÉES ET
AUTRES SOURCES D'INFLAMMATION PRES D'UNE BATTERIE.
Page 15 vers.3
Page 16
FR
2-Avertissements de sécurité et préparation :
Attention: Les batteries contiennent des acides abrasifs et des gaz explosifs peuvent
s’en échapper. Ne pas fumer ! Aucune amme nue ou source d‘étincelles
ne doit pas placer à proximité. Si une partie de votre corps entre en
contact avec l’électrolyte de la batterie, lavez immédiatement et abondamment la zone à l’eau froide. Si de l’acide pénètre dans vos yeux,
rincez-les immédiatement avec une grande quantité d’eau et consultez
un médecin dans les plus brefs délais. Tenez les enfants et les animaux
domestiques à l‘écart pendant le processus de charge. Au cas où la batterie ou le chargeur deviendraient chauds pendant la recharge, arrêtez
l’opération et faites vérier la batterie par un professionnel.
Attention: Nous vous recommandons de retirer la batterie du véhicule avant de
commencer le processus de charge. Au cas où cela ne serait pas possible,
débranchez la broche négative de la batterie qui raccorde la batterie à la
carrosserie pendant la recharge.
Important: Sur certains véhicules, le débranchement de la batterie peut entraîner
la perte des informations comme les codes de l’autoradio, du code de
démarrage du véhicule et donc une éventuelle impossibilité de redémarrage. Se reporter à la notice du constructeur, ou vous rapprocher d’un
concessionnaire automobile.
Lire absolument les présentes instructions et les conseils avant chaque
utilisation de l’appareil.
Attention: Les batteries qui n’ont pas été utilisées depuis longtemps peuvent ne plus
fonctionner correctement à cause d’une auto-décharge ou d’un phénomène de sulfatation. Ces batteries ne peuvent pas être chargées correctement. N’utilisez pas ces chargeurs pour ce type de batteries.
Attention: Le chargeur de batterie ne doit pas être utilisé en guise d’alimentation
électrique. Le chargeur de batterie ne doit pas être installé dans un
véhicule. Pendant le processus de recharge de la batterie, le moteur du
véhicule ne doit pas être allumé.
3-INSTRUCTION DE SÉCURITÉ:
-N’essayez pas de recharger des batteries primaires non rechargeables!
-N’exposez pas la batterie aux rayons du soleil!
-Lorsque vous utilisez le chargeur, ne fumez pas et évitez toute amme nue!
-Évitez tout contact avec l‘électrolyte – il est très abrasif !
-Pour permettre une dissipation rapide des gaz générés pendant le processus de charge,
ouvrez les couvercles des cellules de la batterie et évitez toute amme nue ou étincelle.
vers.3
Page 16
Page 17
FR
Les gaz qui s’échappent sont explosifs.
Certains chargeurs contiennent des composants tels que des commutateurs et des relais
susceptibles de produire des étincelles.
Veillez à placer le chargeur dans un endroit ventilé.
Pour vous débarrasser des batteries défectueuses, déposez-les dans un
point de collecte public ou dans un garage. Lors de la mise au rebut d’un
chargeur de batterie, souvenez-vous des points suivants : Ne jetez pas des
pièces en métal ou en plastique avec les déchets ménagers !
Portez toutes les pièces dans un point de collecte public !
Merci de suivre les consignes à suivre pour l’élimination de ce produit:
le produit signie qu’il est soumis à la Directive Européenne 2002/96/
CE, relative aux déchets d’équipements électrique et électroniques.
Si le câble d‘alimentation de cet appareil est endommagé, il doit être remplacé par le
fabricant, l’un de ses centres de service agréés ou par une personne de qualication
similaire. Pour éviter tout danger, n’apportez aucune modication au câble d’alimentation vous-même !
Les personnes (notamment les enfants) qui ne possèdent pas de connaissances ou d’une expérience susantes de l’appareil ou qui présentent un
handicap physique, sensoriel ou mental, ne peuvent utiliser l’appareil que
sous la surveillance d’une personne responsable qui assurera leur sécurité.
Les enfants doivent être gardés sous surveillance et ne doivent pas jouer
avec l’appareil.
4- SPÉCIFICATIONS:
Modèle GPS4 GPA7.5 GPA15
Tension alimentation 230-240V 230-240V 230-240V
Fréquence 50HZ 50HZ 50HZ
Intensité de charge
(maximum)
Tension de charge 6/12 volts 6/12 volts 12/24 volts
Capacité de la batterie 6v 5-20AH
4 Amp 2/4/7.5 Amp 6/10/15Amp
12v 5-40AH
6v 5-30AH
12v 5-80AH
12v 5-60AH
24v 5-150AH
Page 17 vers.3
Page 18
FR
5- Description des produits
Modèle GPS4
1. Poignée de transport
2. Commutateur 6 volts/12 volts
3. Indicateur LED
4. Pince positif (+) de couleur Rouge
5. Pince négative (-) de couleur Noir
6. Câble d’alimentation avec prise d’alimentation.
Modèle GPA7.5
1. Poignée de transport.
2. Sélecteur d’intensité de charge.
3. Indicateur LED.
4. Pince positif (+) de couleur Rouge.
5. Pince négative (-) de couleur Noir.
6. Câble d’alimentation avec prise d’alimentation.
7. Voltmètre.
1
2
3
6
4 5
1
3
2
7
5
6
4
Modèle GPA15
1. Poignée de transport.
2. Sélecteur d’intensité de charge.
3. Indicateur LED.
4. Pince positif (+) de couleur Rouge.
5. Pince négative (-) de couleur Noir.
6. Câble d’alimentation avec prise d’alimentation.
7. Voltmètre.
vers.3
Page 18
1
3
7
2
6
4
5
Page 19

FR
6-Utilisation:
IMPORTANT: INSTRUCTION DE CONNEXION
Toujours suivre l’ordre ci-dessous pour connecter
une batterie à un chargeur:
1- Connecter la pince rouge (+) à la borne positive
(+) de la batterie.
2- Connecter la pince noir (-) à la borne négative (-)
de la batterie.
3- Connecter l’alimentation du chargeur
A/Modèle GPS4.
IMPORTANT
Le chargeur ABSAAR GPS4 est un chargeur de type ‘‘STANDARD’’ , c’est à dire
qu’il faut déconnecter le chargeur manuellement dès que la batterie est totalement
chargée. Une surveillance est donc nécessaire pour ce type de chargeur. Une fois la
batterie chargée à 100%, il ne faut en aucun cas et laisser en permanence le chargeur
connecté à la batterie ce qui pourrais engendré la destruction de la batterie.
1.Comutateur 6volt/12volts
2.Diode LED rouge: indicateur de
marche
3.Diode LED rouge: charge batterie
basse
4.Diode LED jaune: charge batterie
moyenne
5.Diode LED verte: batterie totalement
chargée
1 2 3 4 5
Procédure de charge:
1- Sélectionner la tension batterie 6 volts ou 12 volts à l’aide du commutateur (1) en se
référant aux indications sur la batterie (Tension en volts).
2- Connecter la batterie au chargeur en suivant les instructions de connexion expliquées en page 7.
3- Veuillez suivre les instructions d’état de charge batterie :
•Diode LED rouge: charge batterie basse
•Diode LED jaune: charge batterie moyenne
•Diode LED verte: batterie totalement chargée
4-Déconnecter manuellement la batterie une fois la batterie chargée.
Page 19 vers.3
Page 20

FR
B/ Modèle GPA 7.5
IMPORTANT
Le chargeur ABSAAR GPA7.5 est un chargeur de type ‘‘AUTOMATIQUE’’ , c’est à
dire qu’il n’y a pas besoin de déconnecté manuellement une fois la batterie totalement chargée. Il est possible de laisser le chargeur connecter à la batterie, dans ce
cas, le chargeur va automatiquement stopper la charge une fois la batterie totalement chargé, et relancera une phase de charge automatiquement une fois la tension
batterie en dessous de son seuil de charge maximum.
1. Sélecteur d’intensité de charge
2.Diode LED rouge: charge en cours
3.Diode LED rouge: Intensité de charge 2A
4.Diode LED rouge: Intensité de charge 4A
5.Diode LED rouge: Intensité de charge 7.5A
6.Voltmètre
7. Diode LED rouge: 6 volts
8. Diode LED rouge: 12 volts
9. Diode LED Verte: Indicateur de batterie totalement
chargé.
Procédure de charge:
1- Connecter la batterie au chargeur en suivant les instructions de connexion expliquées en page 7.
NOTE: La tension de la batterie est sélectionnée automatiquement par le chargeur.
Si la batterie et trop déchargée ou défectueuse, il peut y avoir une erreur de sélection automatique. Par exemple: si une batterie de 12 volts avec une très déchargée,
le chargeur pourra peut être se mettre en position 6 volts. NE PAS UTILISER SI LE
VOLTAGE EST DIFFÉRENT ENTRE LE CHARGEUR ET LA BATTERIE. Si c’est le
cas la batterie devra être soit testée, soit chargée avec un chargeur de type ‘‘STANDARD’’ pour eectuer une charge ‘‘forcée’’. Vous pouvez vérier à tout moment la
tension de la batterie à l’aide du voltmètre (6).
2- A l’aide du sélecteur d’intensité (1), sélectionnez l’intensité de charge désirée
2A/4A/7.4A selon la rapidité de charge et capacité de la batterie. La sélection désirée est
indiqué par les diodes LED 3/4/5
3- Une fois la batterie totalement chargée la diode LED verte (9) s’allume, pour vous
indiquer la charge totale de la batterie et l’arrêt automatique de la phase de charge.
4-Vous pouvez laisser la batterie connectée au chargeur, celui-ci se réenclenchera automatiquement au besoin.
vers.3
Page 20
7 8 9
2 3 546
1
Page 21
FR
C/ Modèle GPA15
IMPORTANT
Le chargeur ABSAAR GPA15 est un chargeur de type ‘‘AUTOMATIQUE’’ , c’est à
dire qu’il n’y a pas besoin d’être déconnecté manuellement une fois la batterie totalement chargée. Il est possible de laisser le chargeur connecté à la batterie, dans ce
cas, le chargeur va automatiquement stopper la charge une fois la batterie totalement chargé, et relancera une phase de charge automatiquement une fois la tension
batterie en dessous de son seuil de charge maximum.
1. Sélecteur d’intensité de charge
2.Diode LED rouge: charge en cours
3.Diode LED rouge: Intensité de charge
6A
4.Diode LED rouge: Intensité de charge
10A
5.Diode LED rouge: Intensité de charge
15A
6.Voltmètre
7. Diode LED rouge: 12 volts
8. Diode LED rouge: 24 volts
9. Diode LED Verte: Indicateur de batterie totalement chargé.
Procédure de charge:
1- Connecter la batterie au chargeur en suivant les instructions de connexion expliquées en page 7.
NOTE: La tension de la batterie est sélectionnée automatiquement par le chargeur.
Si la batterie et trop déchargée ou défectueuse, il peut y avoir une erreur de sélection automatique. Par exemple: si une batterie de 12 volts avec une très déchargée,
le chargeur pourra peut être se mettre en position 6 volts. NE PAS UTILISER SI LE
VOLTAGE EST DIFFÉRENT ENTRE LE CHARGEUR ET LA BATTERIE. Si c’est le
cas la batterie devra être soit testée, soit chargée avec un chargeur de type ‘‘STANDARD’’ pour eectuer une charge ‘‘forcée’’. Vous pouvez vérier à tout moment la
tension de la batterie à l’aide du voltmètre (6).
2- A l’aide du sélecteur d’intensité (1), sélectionnez l’intensité de charge désirée
6A/10A/15A selon la rapidité de charge et capacité de la batterie. La sélection désirée
est indiquée par les diodes LED 3/4/5.
3- Une fois la batterie totalement chargée la diode LED verte (9) s’allume, pour vous
indiquer la charge totale de la batterie et l’arrêt automatique de la phase de charge.
4-Vous pouvez laisser la batterie connecté au chargeur, celui-ci se réenclenchera automatiquement au besoin.
6
2
7
8
3 4 5
9
1
Page 21 vers.3
Page 22

FR
Conditions de garantie:
1) La garantie couvre tous les défauts de fabrication ou de matériau. Le
fabricant garantit le remplacement gratuit (des pièces ou du produit tout
entier) pendant deux ans à compter de la date d‘achat. Seuls les frais
d’expédition sont à la charge du client.
2) Les demandes d’application de la garantie ne seront acceptées que
si elles sont accompagnées d’une preuve d’achat (facture ou ticket de
caisse).
3) La garantie ne couvre pas les réparations s’avérant nécessaires suite à
un accident, un démontage inapproprié, des dommages dus à une chute
ou des coups, une utilisation incorrecte ou le raccordement à une tension d’alimentation supérieure à celle indiquée.
4) La garantie n‘englobe en aucun cas de droit à dommages et intérêts et/
ou remboursement.
En cas de dommage:
Veuillez contacter votre revendeur.
vers.3
Page 22
Page 23

FR
Les produits électriques ne doivent pas être mis au rebut avec les produits ménagers. Selon la Directive Européenne 2002/96/EC pour le rebut des matériels électriques et électroniques et de son
exécution dans le droit national, les produits électriques usagés doivent être collectés séparément
et disposés dans des points de collecte prévus à cet eet.
Adressez-vous auprès des autorités locales ou de votre revendeur pour obtenir des conseils sur le
recyclage. En eectuant ces gestes, vous participez à la protection de l’environnement
Adresse Postale :
B.P. 146
L-4902 Bascharage
MSA INTERNATIONAL - ZAE Robert Steichen, 5 Rue de Bommel - L-4940 HAUTCHARAGE
TEL: +352.26.65.65 FAX : +352.26.65.65.1- e-Mail: INFO@MSAINTERNATIONAL.COM
Page 23 vers.3
Page 24

FR
vers.3
Page 24
Page 25
DE
AB100-1204
GPS4
AB100-1275
GPA7.5
AB100-1215
GPA15
Benutzerhandbuch
Ladegerät GPS4 - GPA 7.5 - GPA15
Bitte vor der Benutzung des Produkts dieses Dokument aufmerksam lesen. Anderenfalls kann es zu schwerwiegenden
Dieses Gerät darf nicht von kleinen Kindern oder Personen verwendet werden, die das Handbuch nicht lesen oder
verstehen können, außer die Benutzung erfolgt unter der Aufsicht einer verantwortlichen Person, die sicherstellt, dass
die Verwendung des Batterieladegeräts gefahrlos erfolgen kann.
Verwahren und benutzen Sie das Batterieladegerät außerhalb der Reichweite von Kindern und achten Sie darauf, dass
Kontrollieren Sie vor der Benutzung die Verkabelung des Ladegeräts. Prüfen Sie, dass die Kabel oder der Bie-
gungsschutz nicht ausgefranst sind. Verwenden Sie kein Ladegerät, dessen Kabel beschädigt sind.
Das Stromkabel kann nicht ausgetauscht werden. Wenn dieses Kabel beschädigt ist, entsorgen Sie das Gerät.
Verletzungen kommen.
HANDBUCH BITTE AUFBEWAHREN
diese nicht damit spielen können.
Page 25
vers.3
Page 26

DE
Contents
1. Erklärung der verwendeten Symbole 27
2. Warnhinweise zur Sicherheit und Vorbereitung 28
3. Sicherheitshinweise 28
4. Spezikationen 29
5. Beschreibung 30
6. Verwendung:
A/Modell - GPS4 31
B/Modell - GPA7.5 32
C/ Modell - GPA15 33
7. Garantiebedingungen 34
vers.3
Page 26
Page 27

1-Erklärung der verwendeten Symbole.
Elektroabfälle dürfen nicht mit dem Hausmüll entsorgt werden. Kontaktieren Sie bitte die Behörden vor Ort oder Ihren Einzelhändler, um Tipps zum
Recycling zu erhalten
WARNUNG – Zur Verringerung der Verletzungsgefahr muss der Benutzer
das Handbuch lesen.
Entspricht den wesentlichen anwendbaren Sicherheitsnormen der europäischen Richtlinien.
Sofort den Stecker ziehen, wenn das Kabel beschädigt oder abgeschnitten ist.
Vor Regen schützen.
Während dem Laden auf eine angemessene Belüung achten
DE
Doppelte Isolierung - Schutzklasse II
ACHTUNG: Explosive Gase. Flammen und Funken verhindern
DIESES LEICHT ENTFLAMMBARE GAS KANN DURCH DIE LÜFTUNGSLÖCHER ENTWEICHEN UND BEI UNZUREICHENDEN
BELÜFTUNGSVERHÄLTNISSEN IN DER NÄHE DER BATTERIE
EINE EXPLOSIONSFÄHIGE ATMOSPHÄRE BILDEN.
KEINE FUNKEN, FLAMMEN, BRENNENDE ZIGARETTEN UND
ANDERE ZÜNDQUELLEN IN DER NÄHE EINER BATTERIE.
Page 27
vers.3
Page 28

DE
2-Warnhinweise zur Sicherheit und Vorbereitung:
Achtung: Die Batterien enthalten Säuren und explosive Gase können austreten.
Nicht rauchen! In der näheren Umgebung dürfen keine oenen Flammen oder Zündquellen vorhanden sein. Kommt ein Teil Ihres Körpers
mit dem Elektrolyt der Batterie in Kontakt, waschen Sie den betroenen Bereich sofort mit reichlich kaltem Wasser. Gelangt Säure in Ihre
Augen, sofort mit viel Wasser ausspülen und unverzüglich einen Arzt
aufsuchen. Achten Sie darauf, dass keine Kinder und Haustiere
während des Ladevorgangs in der Nähe sind. Sollten die Batterie oder
das Ladegerät während dem Auaden heiß werden, stoppen Sie den Vorgang und lassen Sie die Batterie von einem Fachmann überprüfen
Achtung: Wir empfehlen Ihnen, die Batterie aus dem Fahrzeug zu entfernen, bevor
Sie den Ladevorgang starten. Falls dies nicht möglich ist, klemmen Sie den
negativen Kontakt der Batterie ab, der diese während dem Laden an die
Karosserie anschließt.
Achtung: Bevor Sie den Anschluss der Batterie trennen, prüfen Sie bitte, dass Sie die
PIN-Codes des Autoradios usw. haben, die für die Nutzung von codegeschützten Geräten notwendig sind. Prüfen Sie im Benutzerhandbuch des
Fahrzeugs, ob andere Systeme des Fahrzeugs zurückgesetzt oder gelöscht
werden, wenn die Batterie abgeschaltet wird. Im Zweifelsfall kontaktieren
Sie Ihren Automobilhändler.
Achtung: Es kann vorkommen, dass Batterien, die lange nicht verwendet wurden,
aufgrund von Selbstentladung oder Sulfatierung nicht mehr korrekt
funktionieren Solche Batterien können nicht mehr korrekt aufgeladen
werden.
Verwenden Sie diese Ladegeräte nicht für derartige Batterien.
Das Batterieladegerät darf nicht als Netzteil
verwendet werden.
Das Batterieladegerät darf nicht in einem Fahrzeug eingebaut werden.
Während dem Auaden der Batterie darf der Motor des Fahrzeugs nicht
laufen.
3-SICHERHEITSHINWEISE:
--Versuchen Sie nicht, nicht auadbare Primärbatterien wieder aufzuladen!
-Die Batterie darf keiner Sonneneinstrahlung ausgesetzt werden!
-Während der Benutzung des Ladegeräts nicht rauchen und oene Flammen verhindern!
- Jeglichen Kontakt mit dem Elektrolyt verhindern - stark scheuernd!
- Damit die während dem Ladevorgang entstehenden Gase schnell veriegen,
vers.3
Page 28
Page 29

önen Sie die Deckel der Batteriezellen und vermeiden Sie oene Flammen oder Fun-
DE
ken.
Die austretenden Gase sind explosiv.
Einige Ladegerät enthalten Komponenten wie Umschalter und Relais, die möglicherweise Funken bilden.
Stellen Sie das Ladegerät an einen geeigneten Ort.
Defekte Batterien können Sie an einer öentlichen Sammelstelle oder
in einer Autowerkstatt entsorgen. Beachten Sie bitte folgende Punkte,
wenn Sie ein Batterieladegerät entsorgen: Keine Metall- oder Plastikteile
mit dem Hausmüll entsorgen!
Alle Teile zu einer öentlichen Sammelstelle bringen!
Beachten Sie bei der Entsorgung dieses Produktes folgende Hinweise:
bendet sich auf dem Produkt das Symbol eines durchgestrichenen
Mülleimers, fällt es unter die Europäische Richtlinie 2002/96/EG.
Ist das Stromkabel dieses Geräts beschädigt, muss es vom Hersteller, einem
anerkannten Servicezentrum oder einer Person mit vergleichbarer Qualikation
ausgetauscht werden. Um jedwede Gefahr zu verhindern, nehmen Sie selbst keinerlei
Änderungen am Stromkabel vor!
Personen (insbesondere Kinder), die nicht über ausreichende Kenntnisse
oder Erfahrung mit dem Gerät verfügen oder körperlich, sensorisch oder
geistig eingeschränkt sind, dürfen das Gerät nur unter der Aufsicht einer
verantwortlichen
Person verwenden, die deren Sicherheit gewährleistet. Kinder müssen
unter Aufsicht bleiben und dürfen nicht mit dem Gerät spielen.
4-SPEZIFIKATION:
Modell GPS4 GPA7.5 GPA15
Versorgungsspannung 230-240V 230-240V 230-240V
Frequenz 50 Hz 50 Hz 50 Hz
Ladeintensität (max) 4 Amp 2/4/7.5 Amp 6/10/15Amp
Ladespannung 6/12 Volt 6/12 Volt 12/24 Volt
Für Kapazität Batterie 6V 5-20AH
12V 5-40AH
6V 5-30AH
12V 5-60AH
12V 5-60AH
24V 5-150AH
Page 29
vers.3
Page 30

DE
5-Beschreibung
Model - GPS4
1. Transportgri
2. Umschalter 6 Volt / 12 Volt
3. LED-Anzeige
4. Positive Klemme (+) Rot
5. Negative Klemme (-) Schwarz
6. Stromkabel mit Stecker.
Model - GPA7.5
1
2
3
6
4 5
1
1. Transportgri
2. Auswahltaste Ladeintensität
3. LED-Anzeige.
4. Positive Klemme (+) Rot.
5. Negative Klemme (-) Schwarz.
6. Stromkabel mit Stecker.
7. Voltmeter.
Model - GPA15
1. Transportgri.
2. Auswahltaste Ladeintensität
3. LED-Anzeige.
4. Positive Klemme (+) Rot.
5. Negative Klemme (-) Schwarz.
6. Stromkabel mit Stecker.
7. Voltmeter.
3
2
7
5
6
1
3
7
4
2
6
4
5
vers.3
Page 30
Page 31

DE
6-Verwendung:
WICHTIG
Gehen Sie immer in der nachfolgend beschriebenen
Reihenfolge vor, um eine Batterie an ein Ladegerät
anzuschließen:
1- Verbinden Sie die rote Klemme (+) mit dem
positiven Anschluss (+) der Batterie.
2- Verbinden Sie die schwarze Klemme (-) mit
dem negativen Anschluss (-) der Batterie.
3- Schließen Sie das Ladegerät an das Stromnetz an.
A/Model - GPS4.
WICHTIG
Das Ladegerät ABSAAR GPS4 ist ein „STANDARD“-Ladegerät, das heißt, es muss
manuell ausgesteckt werden, wenn die Batterie komplett geladen ist; das Ladegerät
darf nicht permanent an die Batterie angeschlossen sein. Dadurch könnte die Batterie kaputt gehen.
1.Umschalter 6 Volt / 12 Volt
rotes LED: On-/O-Anzeige
rotes LED: Batterie wenig geladen
gelbes LED: Batterie etwa zur Häle
geladen
5. grünes LED: Batterie komplett geladen
Ladevorgang:
1- Mit Hilfe des Umschalters (1) die Batteriespannung 6 Volt oder 12 Volt entsprechend
der Angabe auf der Batterie (Spannung in Volt) auswählen.
2- Die Batterie gemäß den entsprechenden Anweisungen an das Ladegerät anschließen.
3- Die Hinweise zum Ladezustand der Batterie beachten:
• rotes LED: Batterie wenig geladen
• gelbes LED: Batterie etwa zur Häle geladen
•5. grünes LED: Batterie komplett geladen
4-Die Batterie manuell ausstecken, wenn sie geladen ist.
Page 31
1 2 3 4 5
vers.3
Page 32

DE
B/ Model- GPA 7.5
WICHTIG
Das Ladegerät ABSAAR GPA7.5 ist ein „AUTOMATIK“-Gerät, das heißt, es muss
nicht manuell ausgesteckt werden, wenn die Batterie komplett geladen ist. Die Batterie kann angesteckt bleiben und das Ladegerät stoppt den Ladevorgang, wenn die
Batterie komplett geladen ist; ebenso startet es automatisch eine neue Ladephase,
wenn die Batteriespannung unter die maximale Ladegrenze sinkt.
1. Auswahltaste Ladeintensität
rotes LED: lädt gerade
rotes LED: Ladeintensität 2 A
rotes LED: Ladeintensität 4 A
rotes LED: Ladeintensität 7,5 A
6. Voltmeter
7. rotes LED: 6 volt
8. rotes LED: 12 volt
9. grünes LED: Anzeige komplett geladene Batterie.
Ladevorgang:
1- Die Batterie gemäß den entsprechenden Anweisungen an das Ladegerät
anschließen.
HINWEIS: Die Batteriespannung wird automatisch vom Ladegerät ausgewählt;
wenn die Batterie zu stark entladen oder defekt ist, kann es zu einem Fehler bei der
automatischen Auswahl kommen, zum Beispiel: wenn eine 12-Volt-Batterie stark
entladen ist, kann möglicherweise 6 Volt ausgewählt werden; in diesem Fall sollte
die Batterie getestet und / oder ein „STANDARD“-Ladegerät verwendet werden,
um eine „Zwangsladung“ durchzuführen. Sie können jederzeit die Spannung der
Batterie mit Hilfe des Voltmeters (6) prüfen.
2- Mit Hilfe des Auswahlknopfs für die Intensität (1) können Sie die gewünschte
Ladeintensität 2A/4A/7.4A je nach Ladegeschwindigkeit und Kapazität der Batterie
auswählen. Die gewünschte Auswahl wird durch die LED 3/4/5 angezeigt.
3- Ist die Batterie komplett geladen, leuchtet die grüne LED auf (9) und zeigt Ihnen an,
dass die Ladephase automatisch beendet wird.
4-Sie können die Batterie an das Ladegerät angeschlossen lassen, dieses schaltet sich
bei Bedarf automatisch wieder ein.
vers.3
Page 32
7 8 9
2 3 546
1
Page 33

DE
C/ Model - GPA15
WICHTIG
Das Ladegerät ABSAAR GPA15 ist ein „AUTOMATIK“-Gerät, das heißt, es muss
nicht manuell ausgesteckt werden, wenn die Batterie komplett geladen ist. Die Batterie kann angesteckt bleiben und das Ladegerät stoppt den Ladevorgang, wenn die
Batterie komplett geladen ist; ebenso startet es automatisch eine neue Ladephase,
wenn die Batteriespannung unter die maximale Ladegrenze sinkt.
1. Auswahltaste Ladeintensität6
2
rotes LED: lädt gerade
rotes LED: Ladeintensität 6 A
rotes LED: Ladeintensität 10 A
rotes LED: Ladeintensität 15 A
6. Voltmeter
7. rotes LED: 12 volt
8. rotes LED: 24 volt
9. grünes LED: Anzeige komplett geladene Batterie.
Ladevorgang:
1- Die Batterie gemäß den entsprechenden Anweisungen an das Ladegerät
anschließen.
6
7
8
3 4 5
9
1
HINWEIS: Die Batteriespannung wird automatisch vom Ladegerät ausgewählt ;
wenn die Batterie zu stark entladen oder defekt ist, kann es zu einem Fehler bei der
automatischen Auswahl kommen, zum Beispiel: wenn eine 24-Volt-Batterie stark
entladen ist, kann möglicherweise 12 Volt ausgewählt werden; in diesem Fall sollte
die Batterie getestet und / oder ein „STANDARD“-Ladegerät verwendet werden,
um eine „Zwangsladung“ durchzuführen. Siekönnen jederzeit die Spannung der
Batterie mit Hilfe des Voltmeters (6) prüfen.
2- Mit Hilfe des Auswahlknopfs für die Intensität (1) können Sie die gewünschte
Ladeintensität 6A/10A/15A je nach Ladegeschwindigkeit und Kapazität der Batterie
auswählen. Die gewünschte Auswahl wird durch die LED 3/4/5 angezeigt.
3- Ist die Batterie komplett geladen, leuchtet die grüne LED auf (9) und zeigt Ihnen an,
dass die Ladephase automatisch beendet wird..
4-Sie können die Batterie an das Ladegerät angeschlossen lassen, dieses schaltet sich
bei Bedarf automatisch wieder ein.
Page 33
vers.3
Page 34

DE
7-Garantiebedingungen:
1) Die Garantie deckt sämtliche Herstellungs- und Materialfehler ab.
Der Hersteller garantiert den kostenlosen Austausch (von Ersatzteilen
oder des gesamten Produkts) für die Dauer von zwei Jahren ab Kaufdatum. Nur die Versandkosten gehen zu Lasten des Kunden.
2) Garantieanfragen werden nur akzeptiert, wenn ein Kaufnachweis
(Rechnung oder Kassenzettel) beiliegt.
3) Die Garantie erstreckt sich nicht über Reparaturen, die notwendig
wurden infolge eines Unfalls, einer unangemessenen Demontage, Schäden aufgrund eines Sturzes oder Schlägen, einer falschen Benutzung
oder dem Anschluss an eine höhere Stromspannung als angegeben.
4) Die Garantie beinhaltet in keinem Fall einen Anspruch auf Schadensersatz und / oder Rückerstattung.
Im Schadensfall:
kontaktieren Sie bitte Ihren Händler.
vers.3
Page 34
Page 35

DE
Elektrische Produkte dürfen nicht mit dem Hausmüll entsorgt werden. Gemäß der Europäischen
Richtlinie 2002/96/EG zur Entsorgung von Elektro- und Elektronikmaterial und deren Ausführung im nationalen Recht müssen gebrauchte elektrische Produkte getrennt gesammelt und an
speziellen Sammelstellen abgegeben werden.
Wenden Sie sich an die Behörden vor Ort oder an Ihren Händler, um Tipps zum Recycling zu
erhalten. Dadurch leisten Sie einen wichtigen Beitrag zum Umweltschutz.
Postanschri
B.P. Box 146
L-4902 BASCHARAGE
MSA INTERNATIONAL - ZAE Robert Steichen, 5 Rue de Bommel - L-4940 HAUTCHARAGE TEL.: +35 226 6565 FAX:
+35 2266 5651- Email: INFO@MSAINTERNATIONAL.COM
Page 35
vers.3
Page 36

NL
vers.3
Page 36
Page 37

NL
AB100-1204
GPS4
AB100-1275
GPA7.5
AB100-1215
GPA15
Gebruikershandleiding
Oplader GPS4 - GPA 7.5 - GPA15
Lees dit document aandachtig door vooraleer u dit product gebruikt.
Indien u dit niet doet, kunnen personen ernstig gewond raken.
BEWAAR DEZE HANDLEIDING.
Dit toestel werd niet ontworpen om gebruikt te worden door jonge kinderen of
door personen die de handleiding niet kunnen lezen of begrijpen, behalve als ze onder
toezicht staan van een verantwoordelijke persoon die ervoor zorgt dat ze de accuoplader
zonder risico kunnen gebruiken. Gebruik de accuoplader als er geen kinderen in de buurt
zijn, berg hem op buiten hun bereik en zorg ervoor dat ze er niet mee kunnen spelen.
Controleer de kabels van de oplader vooraleer u hem gebruikt. Ga na of de kabels of de
knikbeveiliging niet gebarsten zijn. Gebruik geen oplader waarvan de kabels beschadigd
zijn. De voedingskabel kan niet vervangen worden. Als de kabel beschadigd is, moet u het
toestel weggooien.
Page 37
vers.3
Page 38

NL
Inhoudsopgave
1. Verklaring van de symbolen 39
2. Waarschuwingen i.v.m. de veiligheid en voorbereiding 40
3. Veiligheidsinstructies 40
4. Specicaties 41
5. Beschrijving 42
6. Gebruik:
A/Model - GPS4 43
B/Model - GPA7.5 44
C/ Model - GPA15 45
7. Waarborgvoorwaarden 46
vers.3
Page 38
Page 39

1-Verklaring van de symbolen.
Elektrisch afval mag niet met het huishoudelijk afval worden weggegooid. Informeer a.u.b. bij uw gemeente of bij uw kleinhandelaar hoe u moet recyclen.
WAARSCHUWING – Om het gevaar voor verwondingen zo veel mogelijk te
beperken, moet de gebruiker de gebruikershandleiding lezen.
Conform met de van toepassing zijnde, essentiële veiligheidsnormen van de
Europese richtlijnen.
Haal onmiddellijk de stekker uit het stopcontact indien de kabel beschadigd
of doorgesneden is .
Stel het toestel niet bloot aan regen.
Zorg voor voldoende ventilatie wanneer de oplader in werking is
NL
Dubbele isolatie klasse II
WAARSCHUWING: ontploaar gas. Vermijd vlammen en
vonken
DIT LICHT ONTVLAMBARE GAS KAN ONTSNAPPEN VIA DE
VENTILATIEOPENINGEN EN, ALS ER EEN SLECHTE VENTILATIE
IS, EEN EXPLOSIEF MENGSEL VORMEN IN DE ATMOSFEER IN DE
BUURT VAN DE BATTERIJ.
DAAROM MOGEN ER VLAK BIJ EEN BATTERIJ GEEN VONKEN, VLAMMEN, AANGESTOKEN SIGARETTEN OF ANDERE
ONTSTEKINGSBRONNEN ZIJN.
Page 39
vers.3
Page 40

NL
2-Waarschuwingen i.v.m. de veiligheid en voorbereiding:
Opgelet: batterijen bevatten bijtende zuren en explosieve gassen, die kunnen
ontsnappen. U mag dan ook niet roken! In de buurt van het toestel
mogen geen open vlammen of vonken geproduceerd worden. Als een
deel van uw lichaam in contact komt met de elektrolyt van de batterij,
moet u dit onmiddellijk en overvloedig met koud water wassen. Als het
zuur in uw ogen terechtkomt, moet u ze onmiddellijk met een grote
hoeveelheid water spoelen en zo snel mogelijk een arts raadplegen.
Houd kinderen en huisdieren op afstand tijdens het laadproces. Indien
de batterij of de oplader tijdens het laden heet wordt, moet u de operatie
stoppen en de oplader door een vakman laten controleren
Opgelet: Wij raden u aan om de batterij uit het voertuig te halen vooraleer u ze
begint op te laden. Indien dit niet mogelijk is, moet u de negatieve pin van
de batterij loskoppelen; deze verbindt de batterij met de carrosserie tijdens
het opladen.
Opgelet: Vooraleer u de batterij loskoppelt, moet u nagaan of u de pincodes van de
autoradio, enz. in uw bezit hebt: u hebt deze nodig om de met een code
beschermde apparaten later opnieuw te kunnen gebruiken. Raadpleeg de
handleiding van uw voertuig om te weten of er in uw wagen nog meer systemen zijn die worden gereset of gewist als de batterij wordt losgekoppeld.
Raadpleeg uw concessiehouder indien u twijfelt
Opgelet: Batterijen die lange tijd niet werden gebruikt, werken mogelijk niet
meer naar behoren, doordat ze volledig ontladen zijn of doordat zich
sulfaatvorming hee voorgedaan. Deze batterijen kunnen niet correct
worden opgeladen.
Gebruik deze opladers niet voor dit soort batterijen.
De accuoplader mag niet als elektrische voeding worden gebruikt.
De accuoplader mag niet in een voertuig worden geïnstalleerd.
Terwijl de batterij oplaadt, moet de motor van het voertuig uitgeschakeld zijn.
3-VEILIGHEIDSINSTRUCTIES.
- Probeer geen primaire, niet-herlaadbare batterijen op te laden!
- Stel de batterij niet bloot aan zonnestralen!
- Als de oplader in gebruik is, mag u in de buurt niet roken en mogen er geen open
vlammen vlakbij zijn!
- Vermijd elk contact met de elektrolyt – deze vreet sterk in!
- Om de gassen die door het oplaadproces vrijkomen, zo snel mogelijk te evacueren,
vers.3
Page 40
Page 41

moet u de deksels van de batterijcellen openen en elke open vlam of vonk vermijden.
NL
De gassen die vrijkomen, zijn explosief
Sommige opladers bevatten bestanddelen zoals schakelaars en relais, die vonken kunnen teweegbrengen.
Daarom moet u de oplader in een aangepaste ruimte plaatsen
Defecte batterijen moet u in een openbaar afvalinzamelpunt of bij een
garagehouder achterlaten. Vooraleer u een accuoplader weggooit, moet
u aan de volgende punten denken: gooi geen metalen of plastic onderdelen weg met het huishoudelijk afval!
Breng alle onderdelen naar een openbaar afvalinzamelpunt!
Instructies voor het verwijderen van dit product: het doorkruiste symbool van een vuilnisbak op een product wijst erop dat het onderworpen
is aan Europese richtlijn 2002/96/EG
Indien de voedingskabel van dit toestel beschadigd is, moet hij door de fabrikant, in
een van de erkende servicecentra of door een gelijkwaardig bevoegd persoon worden vervangen. Om elk risico te vermijden mag u de voedingskabel zelf in geen geval
vervangen!
Personen (en in het bijzonder kinderen) die i.v.m. het toestel niet over
de nodige kennis of ervaring beschikken of personen met een fysieke,
sensorische of mentale handicap mogen het toestel alleen gebruiken onder
toezicht van een verantwoordelijk iemand die hun veiligheid kan garanderen. Kinderen moeten in de gaten worden gehouden en mogen niet met
het toestel spelen
4- SPECIFICATIES.
Model GPS4 GPA7.5 GPA15
Voedingsspanning 230/240V 230/240V 230/240V
Frequentie 50Hz 50Hz 50Hz
Laadstroomsterkte
(max.)
Laadspanning 6/12 V 6/12 V 12/24 V
Voor een batterij-capa-
citeit van
4 Amp 2/4/7.5 Amp 6/10/15Amp
6V 5-20AH
12V 5-40AH
6V 5-20 AH
12V 5-60AH
12V 5-60AH
24V 5-150AH
Page 41
vers.3
Page 42

NL
5-Beschrijving
Model - GPS4
1. Transporthandvat
2. Schakelaar 6 volt/12 volt
3. Led-indicator
4. Klem positief (+) Rood
5. Klem negatief (-) Zwart
6. Voedingskabel met voedingscontactstop
1
2
3
6
4 5
Model - GPA7.5
1. Transporthandvat
2. Instelknop laadstroomsterkte
3. Led-indicator
4. Klem positief (+) Rood
5. Klem negatief (-) Zwart
6. Voedingskabel met voedingscontactstop
7. Voltmeter.
Model - GPA15
1. Transporthandvat
2. Instelknop laadstroomsterkte
3. Led-indicator
4. Klem positief (+) Rood
5. Klem negatief (-) Zwart
6. Voedingskabel met voedingscontactstop
7. Voltmeter
1
3
2
7
5
6
1
3
7
4
2
6
4
5
vers.3
Page 42
Page 43

NL
6-Gebruik:
BELANGRIJK
Ga altijd in de onderstaande volgorde te werk om
een batterij aan een oplader te koppelen:
1- verbind de rode klem (+) met de positieve
contactklem (+) op de batterij.
2- verbind de zwarte klem (-) met de negatieve
contactklem (-) op de batterij.
3- stop de stekker van de voedingskabel van
de oplader in het stopcontact
A/Model - GPS4.
BELANGRIJK
Oplader ABSAAR GPS4 is een oplader van het “STANDAARD”-type; dat wil zeggen dat de oplader manueel moet losgekoppeld worden zodra de batterij volledig
opgeladen is; u mag de oplader niet permanent aan de batterij aangekoppeld laten,
want zo kan de batterij stukgaan. .
1. Schakelaar 6 volt/12 volt
2. Rode led: aan-/uit-controlelampje
3. Rode led: batterij bijna leeg
4. Gele led: batterij half vol
5. Groene led: batterij volledig geladen
Laadprocedure:
1- Selecteer aan de hand van schakelaar (1) de batterijspanning (6 of 12 volt); deze staat
op de batterij vermeld (spanning in volt).
2- Koppel de batterij aan de oplader volgens de instructies voor de aansluiting.
3- Volg de instructies i.v.m. de laadstatus van de batterij:
• rode led: batterij bijna leeg
• gele led: batterij half vol
• groene led: batterij volledig geladen
4- Koppel de batterij manueel los zodra ze volledig opgeladen is.
Page 43
1 2 3 4 5
vers.3
Page 44

NL
B/ Model- GPA 7.5
BELANGRIJK
De oplader ABSAAR GPA15 is een oplader van het “AUTOMATISCHE” type; dat
wil zeggen dat u hem niet manueel hoe los te koppelen zodra de batterij volledig
is opgeladen. U kunt de oplader aan de batterij aangekoppeld laten; de oplader
stopt automatisch met laden als de batterij volledig is opgeladen. Als de batterijspanning opnieuw onder de maximumlaaddrempel daalt, begint hij automatisch
opnieuw op te laden.
1. Instelknop laadstroomsterkte
2. Rode led: bezig met opladen
3. Rode led: laadstroomsterkte 2 A
4. Rode led: laadstroomsterkte 4 A
5. Rode led: laadstroomsterkte 7,5 A
6. Voltmeter
7. Rode led: 6 volt
8. Rode led: 12 volt
9. Groene led: controlelampje batterij volledig
opgeladen.
7 8 9
2 3 546
1
Laadprocedure:
1- Koppel de batterij aan de oplader volgens de instructies voor de aansluiting.
OPMERKING: de oplader selecteert automatisch de batterijspanning; als de batterij te veel ontladen is of stuk is, dan is het mogelijk dat de selectie niet automatisch
gebeurt; zo kan een batterij van 12 volt die bijna helemaal leeg is, als 6 volt worden
geselecteerd. Als dat het geval is, moet u de batterij laten testen en/of een oplader
van het “STANDAARD”-type gebruiken om het opladen “af te dwingen”. U kunt
op om het even welk ogenblik de batterijspanning controleren, door middel van de
voltmeter (6).
2- Selecteer aan de hand van de daarvoor voorziene instelknop (1) de gewenste
laad-stroomsterkte – 2 A / 4 A / 7,4 A – naargelang van de laadsnelheid en de batterij-capaciteit. De gekozen laadstroomsterkte wordt met leds 3/4/5 weergegeven.
3- Als de batterij volledig is opgeladen, begint de groene led (9) te branden, wat erop
wijst dat de batterij volledig is opgeladen en dat de oplaadfase automatisch werd stopgezet.
4- U kunt de batterij aangekoppeld laten aan de oplader; deze gaat automatisch uit als
dat nodig is.
vers.3
Page 44
Page 45

NL
C/ Model - GPA15
BELANGRIJK
De oplader ABSAAR GPA15 is een oplader van het “AUTOMATISCHE” type; dat
wil zeggen dat u hem niet manueel hoe los te koppelen zodra de batterij volledig
is opgeladen. U kunt de oplader aan de batterij aangekoppeld laten; de oplader
stopt automatisch met laden als de batterij volledig is opgeladen. Als de batterijspanning opnieuw onder de maximumlaaddrempel daalt, begint hij automatisch
opnieuw op te laden.
2
6
1. Instelknop laadstroomsterkte
2. Rode led: bezig met opladen
3. Rode led: laadstroomsterkte 6 A
4. Rode led: laadstroomsterkte 10 A
5. Rode led: laadstroomsterkte 15 A
6. Voltmeter
7. Rode led: 12 volt
8. Rode led: 24 volt
9. Groene led: controlelampje batterij volledig opgeladen.
7
8
3 4 5
9
1
Laadprocedure:
1- Koppel de batterij aan de oplader volgens de instructies voor de aansluiting.
OPMERKING: de oplader selecteert automatisch de batterijspanning; als de batterij te veel ontladen is of stuk is, dan is het mogelijk dat de selectie niet automatisch
gebeurt; zo kan een batterij van 24 volt die bijna helemaal leeg is, als 12 volt worden
geselecteerd. Als dat het geval is, moet u de batterij laten testen en/of een oplader
van het “STANDAARD”-type gebruiken om het opladen “af te dwingen”. U kunt
op om het even welk ogenblik de batterijspanning controleren, door middel van de
voltmeter (6).
2- Selecteer aan de hand van de daarvoor voorziene instelknop (1) de gewenste
laad-stroomsterkte – 6 A / 10 A / 15 A – naargelang van de laadsnelheid en de batterij-capaciteit. De gekozen laadstroomsterkte wordt met leds 3/4/5 weergegeven.
3- Als de batterij volledig is opgeladen, begint de groene led (9) te branden, wat erop wijst
dat de batterij volledig is opgeladen en dat de oplaadfase automatisch werd stopgezet.
4- U kunt de batterij aangekoppeld laten aan de oplader; deze gaat automatisch uit als
dat nodig is.
Page 45
vers.3
Page 46

NL
7-Waarborgvoorwaarden:
1) De waarborg dekt alle fabricage- of materiaalfouten. De fabrikant
garandeert gedurende twee jaar vanaf de aankoopdatum dat stukken of
het volledige product worden vervangen. Alleen de verzendingskosten
zijn ten laste van de klant.
2) Aanvragen voor toepassing van de waarborg worden maar aanvaard
als ze vergezeld zijn van een aankoopbewijs (factuur of kasticket).
3) De waarborg dekt geen herstellingen die nodig zijn ten gevolge van
een ongeval, demontage door onbevoegden, schade die het gevolg is van
vallen of stoten, onjuist gebruik of aansluiting op een voedings-spanning
die hoger ligt dan is aangewezen.
4) De waarborg houdt in geen geval een recht op schadevergoeding en/
of terugbetaling in.
In geval van schade:
Contacteer uw verdeler.
vers.3
Page 46
Page 47

NL
Elektrische toestellen mogen niet met het gewone huishoudelijk afval worden meegegeven.
Volgens Europese richtlijn 2002/96/EG betreende afgedankte elektrische en elektronische apparatuur en de omzetting daarvan in het nationaal recht, moeten afgedankte elektrische toestellen
afzonderlijk worden ingezameld en worden achtergelaten op hiervoor voorziene inzamelpunten.
Vraag bij de gemeentelijke overheid of aan uw verkoper om advies aangaande de recycling. Door
dit te doen draagt u bij tot de bescherming van het milieu.
Postadres
P.O. Box 146 146
L-4902 BASCHARAGE
MSA INTERNATIONAL - ZAE Robert Steichen, 5 Rue de Bommel - L-4940 HAUTCHARAGE TEL.: +35 226 6565
FAX: +35 2266 5651- Email: INFO@MSAINTERNATIONAL.COM
Page 47
vers.3
Page 48

NL
vers.3
Page 48
Page 49

ES
AB100-1204
GPS4
AB100-1275
GPA7.5
AB100-1215
GPA15
Manual de usuario
Cargador GPS4 - GPA 7.5 - GPA15
Lea detenidamente este documento antes de utilizar el producto. No hacerlo po-
dría conllevar heridas graves.
CONSERVE ESTE MANUAL
Este aparato no debe ser utilizado por niños ni personas adultas que no puedan leer o comprender el manual, salvo que estén bajo la supervisión de una persona responsable que se asegure de
que el cargador de baterías pueda utilizarse sin riesgo alguno.
Mantenga el cargador de batería fuera del alcance de los niños y asegúrese de que no puedan
tener acceso a este. Compruebe los cables del cargador antes de su utilización. Compruebe que
los cables y la unidad no estén dañados de ningún modo. No utilice ningún cargador con los
cables estropeados. El cable de alimentación no puede reemplazarse. Si el cable está estropeado,
tire el aparato
Page 49
vers.3
Page 50

ES
Índice
1. Explicación de los símbolos 51
2. Advertencias de seguridad y preparación 52
3. Instrucciones de seguridad 52
4. Especicaciones 53
5. Descripción de los productos 54
6. Uso:
A/ Modelo GPS4 55
B/ Modelo GPA7.5 56
C/ Modelo GPA15 57
7. Condiciones de garantía 58
vers.3
Page 50
Page 51

1-Explicación de los símbolos.
Los residuos eléctricos no deben eliminarse junto con los residuos domésticos. Consulte con la autoridad local competente o con su distribuidor para
obtener asesoramiento sobre reciclaje
ADVERTENCIA - Para reducir el riesgo de lesiones, el usuario debe leer el
manual de instrucciones.
Conforme a las exigencias fundamentales de los reglamentos y las directivas
europeos
Retirar el enchufe de inmediato si el cable está dañado o cortado. .
No se debe exponer a la lluvia.
Prevea una ventilación adecuada durante la carga
ES
Doble aislamiento de clase II
ADVERTENCIA: Gases explosivos
ESTE GAS FÁCILMENTE INFLAMABLE PUEDE EMANAR DE LOS
ORIFICIOS DE VENTILACIÓN Y FORMAR UNA MEZCLA EXPLOSIVA EN LA ATMÓSFERA CERCA DE LA BATERÍA EN CONDICIONES DE VENTILACIÓN INADECUADA.
ALEJAR LA BATERÍA DE CHISPAS, LLAMAS, CIGARRILLOS ENCENDIDOS U OTRAS FUENTES DE IGNICIÓN.
Page 51
vers.3
Page 52

ES
2-Advertencias de seguridad y preparación :
Atención: Las baterías contienen ácidos abrasivos y gases explosivos que pue-
den desprenderse de estas últimas. ¡No fumar! Alejar el cargador de
cualquier fuente de ignición como, por ejemplo, llamas o chispas. Si alguna parte del cuerpo entrar en contacto con el electrolito de la batería,
lávese de inmediato la zona con abundante agua fría. Si el ácido entra en
los ojos, aclárelos de inmediato con abundante agua y consulte con un
médico lo antes posible. Mantenga a niños y animales domésticos alejados durante el proceso de carga. Si la batería o el cargador se calientan
durante la carga, detenga la operación y haga revisar la batería por un
profesional.
Atención Le recomendamos retirar la batería del vehículo antes de iniciar el
proceso de carga. De no ser posible, desconecte la clavija negativa de la
batería que conecta la batería a la carrocería durante la carga.
Antes de desconectar la batería, asegúrese de que tiene los códigos
PIN del autorradio, etc.; éstos son necesarios para utilizar los aparatos
protegidos mediante código. Consulte el manual de uso del vehículo
para comprobar que no haya otros sistemas del vehículo que tengan
que reiniciarse o borrarse al desconectar la batería. En caso de duda,
consulte con su concesionario de automóviles.
Atención: Si la batería no se ha utilizado durante un largo periodo de tiempo,
podría no funcionar correctamente a causa de una autodescarga o de un
fenómeno de sulfatación. En tal caso, no podrá cargarse correctamente.
No utilice estos cargadores para este tipo de batería
Atención: El cargador de baterías no debe utilizarse a modo de alimentación eléc-
trica. El cargador de baterías no debe instalarse en un vehículo.
Durante el proceso de carga de la batería, el motor del vehículo no debe
estar encendido
3-INSTRUCCIONES DE SEGURIDAD:
-No trate de cargar baterías primarias no recargables.
-No exponga la batería a los rayos solares.
-Cuando utilice el cargador, no fume y evite cualquier llama sin protección.
-Evite cualquier contacto con el electrolito; es muy abrasivo.
-Para permitir una disipación rápida de los gases generados durante el proceso de
carga, abra las tapas de las celdas de la batería y evite cualquier llama sin protección o
chispa.
vers.3
Page 52
Page 53

ES
Los gases que se emiten son explosivos.
Algunos cargadores contienen componentes como, por ejemplo, conmutadores y relés
que pueden producir chispas.
Asegúrese de colocar el cargador en un lugar adaptado y ventilado.
Para eliminar las baterías defectuosas, llévelas a un punto de recogida
público o a un taller. Al eliminar un cargador de baterías, recuerde los
siguientes puntos: No tire piezas metálicas o de plástico con los residuos
domésticos.
Lleve todas las piezas a un punto de recogida público o punto limpio.
Siga las instrucciones relativas a la eliminación de este producto: el producto está sujeto a la Directiva europea 2002/96/CE sobre residuos de
aparatos eléctricos y electrónicos.
Si el cable eléctrico de este aparato estuviera dañado, deberá ser sustituido por el fabricante, por uno de sus centros de servicio autorizados o por una persona debidamente
cualicada. Para evitar peligros, no realice ninguna modicación en el cable eléctrico
usted mismo.
Las personas (especialmente los niños) que no cuenten con sucientes
conocimientos o experiencia en cuanto al uso del aparato, o que tengan
alguna discapacidad física, sensorial o mental, sólo podrán utilizar el aparato bajo la supervisión estricta de una persona responsable de su seguridad. Los niños no deben jugar con el aparato.
4- ESPECIFICACIONES:
Modelo GPS4 GPA7.5 GPA15
Tensión de alimentación 230-240V 230-240V 230-240V
Frecuencia 50HZ 50HZ 50HZ
Intensidad de carga(máxima)
Tensión de carga 6/12 voltios 6/12 voltios 12/24 voltios
Capacidad de la batería 6v 5-20AH
4 Amp 2/4/7.5 Amp 6/10/15Amp
12v 5-40AH
6v 5-30AH
12v 5-80AH
12v 5-60AH
24v 5-150AH
Page 53
vers.3
Page 54

ES
5- Descripción de los productos
Modelo GPS4
1. Asa de transporte
2. Conmutador 6 volts/12 volts
3. Indicador LED
4. Pinza positiva (+) de color rojo
5.Pinza negativa (-) de color negro
6. Cable eléctrico con enchufe
Modelo GPA7.5
1. Asa de transporte.
2. Selector de intensidad de carga
3. Indicador LED.
4. Pinza positiva (+) de color rojo
5. Pinza negativa (-) de color negro
6. Cable eléctrico con enchufe
7. Voltímetro.
1
2
3
6
4 5
1
3
2
7
5
6
4
Modèle GPA15
1. Asa de transporte
2. Selector de intensidad de carga
3. Indicador LED.
4. Pinza positiva (+) de color rojo
5. Pinza negativa (-) de color negro
6. Cable eléctrico con enchufe
7. Voltímetro.
vers.3
Page 54
1
3
7
2
6
4
5
Page 55

ES
6-Uso:
IMPORTANTE: INSTRUCCIONES DE CONEXIÓN
Respete siempre el orden a continuación para
conectar una batería a un cargador:
1- Conectar la pinza roja (+) al borne positivo
(+) de la batería.
2- Conectar la pinza negra (-) al borne negativo (-)
de la batería.
3- Conectar la alimentación del cargador.
A/Modelo GPS4.
IMPORTANTE
El cargador ABSAAR GPS4 es un cargador de tipo “ESTÁNDAR”, lo que signica
que hay que desconectar el cargador manualmente en cuanto la batería esté totalmente cargada. Por lo tanto, este tipo de cargador requiere supervisión. Una vez
cargada la batería al 100 %, en ningún caso se deberá dejar el cargador conectado a
la batería, ya que podría provocar la destrucción de esta última.
1.Conmutador 6volt/12volts
2.Diodo LED rojo: indicador de funcionamiento
3.Diodo LED rojo: carga de batería baja
4.Diodo LED amarillo: carga de batería
media
5.Diodo LED verde: batería totalmente
cargada
1 2 3 4 5
Proceso de carga:
1- Seleccione la tensión de la batería de 6 voltios/12 voltios con el conmutador (1).
Consulte las indicaciones de la batería (tensión en voltios).
2- Conecte la batería al cargador siguiendo las instrucciones de conexión de la página
7.
3- Siga las indicaciones de estado de carga de la batería:
•Diodo LED rojo: carga de batería baja
•Diodo LED amarillo: carga de batería media
•Diodo LED verde: batería totalmente cargada
4-Desconecte manualmente la batería una vez cargada.
Page 55
vers.3
Page 56

ES
B/ Modelo GPA 7.5
IMPORTANTE
El cargador ABSAAR GPA7.5 es un cargador de tipo “AUTOMÁTICO”, lo que
signica que no es necesario desconectarlo manualmente cuando la batería esté
totalmente cargada. Es posible dejar el cargador conectado a la batería; en este
caso, el cargador detendrá automáticamente la carga una vez que la batería se haya
cargado totalmente y reiniciará una fase de carga automática cuando la tensión de
la batería esté por debajo de su límite de carga máxima
1. Selector de intensidad de carga
2.Diodo LED rojo: carga en curso
3.Diodo LED rojo: Intensidad de carga 2 A
4.Diodo LED rojo: Intensidad de carga 4 A
5.Diodo LED rojo: Intensidad de carga 7,5 A
6.Voltímetro
7. Diodo LED rojo: 6 voltios
8. Diodo LED rojo: 12 voltios
9. Diodo LED verde: Indicador de batería totalmente
cargada
Proceso de carga.
1- Conecte la batería al cargador siguiendo las instrucciones de conexión de la página
7.
NOTA: El cargador selecciona automáticamente la tensión de la batería. Si la
batería está demasiado descargada o defectuosa, puede haber un error de selección automática. Por ejemplo: si una batería de 12 voltios está muy descargada, el
cargador podría ponerse en la posición de 6 voltios. NO UTILIZAR SI EL VOLTAJE ES DIFERENTE ENTRE EL CARGADOR Y LA BATERÍA. Si éste fuera el caso,
la batería deberá probarse o cargarse con un cargador de tipo “ESTÁNDAR” para
realizar una carga “forzada”. Puede comprobar en todo momento la tensión de la
batería con el voltímetro (6).
2- Con ayuda del selector de intensidad (1), seleccione la intensidad de carga deseada 2
A/4 A/7,4 A según la rapidez de carga y la capacidad de la batería. La selección deseada
se indica mediante los diodos LED 3/4/5
3- Una vez que la batería está totalmente cargada, el diodo LED verde (9) se enciende
para indicarle la carga total de la batería y la detención automática de la fase de carga.
4-Puede dejar la batería conectada al cargador; este último se reactivará automáticamente en caso necesario.
vers.3
Page 56
7 8 9
2 3 546
1
Page 57

ES
C/ Modelo GPA15
IMPORTANTE
El cargador ABSAAR GPA15 es un cargador de tipo “AUTOMÁTICO”, lo que signica que no es necesario desconectarlo manualmente cuando la batería esté totalmente cargada. Es posible dejar el cargador conectado a la batería; en este caso, el
cargador detendrá automáticamente la carga una vez que la batería se haya cargado
totalmente y reiniciará una fase de carga automática cuando la tensión de la batería
esté por debajo de su límite de carga máxima.
1. Selector de intensidad de carga
2.Diodo LED rojo: carga en curso
3.Diodo LED rojo: Intensidad de carga
6A
4.Diodo LED rojo: Intensidad de carga
10A
5.Diodo LED rojo: Intensidad de carga
15A
6.Voltímetro
7. Diodo LED rojo: 12 voltios
8. Diodo LED rojo: 24 voltios
9. Diodo LED verde: Indicador de batería totalmente cargada.
Proceso de carga:
1- Conecte la batería al cargador siguiendo las instrucciones de conexión de la página
7.
NOTA: El cargador selecciona automáticamente la tensión de la batería. Si la
batería está demasiado descargada o defectuosa, puede haber un error de selección
automática. Por ejemplo: si una batería de 24 voltios está muy descargada, el cargador podría ponerse en la posición de 12 voltios. NO UTILIZAR SI EL VOLTAJE
ES DIFERENTE ENTRE EL CARGADOR Y LA BATERÍA. Si éste fuera el caso,
la batería deberá probarse o cargarse con un cargador de tipo “ESTÁNDAR” para
realizar una carga “forzada”. Puede comprobar en todo momento la tensión de la
batería con el voltímetro (6).
2- Con ayuda del selector de intensidad (1), seleccione la intensidad de carga deseada 6
A/10 A/15 A según la rapidez de carga y la capacidad de la batería. La selección deseada se indica mediante los diodos LED 3/4/5.
3- Una vez que la batería está totalmente cargada, el diodo LED verde (9) se enciende
para indicarle la carga total de la batería y la detención automática de la fase de carga.
4-Puede dejar la batería conectada al cargador; este último se reactivará automáticamente en caso necesario.
6
2
7
8
3 4 5
9
1
Page 57
vers.3
Page 58

ES
7-Condiciones de garantía:
1) La garantía cubre todos los defectos de fabricación o de materiales. El
fabricante garantiza la sustitución gratuita (de las piezas o del producto
completo) durante dos años a partir de la fecha de compra. El cliente
sólo correrá con los gastos de envío
2) Las solicitudes de aplicación de garantía sólo se aceptarán si van
acompañadas de una prueba de compra (factura o recibo de compra)..
3) La garantía no cubre las reparaciones necesarias a raíz de un accidente, un desmontaje inadecuado, daños debidos a caídas o golpes, un
uso incorrecto o la conexión a una tensión eléctrica superior a la indicada.
4) La garantía no cubre en ningún caso el derecho a daños y perjuicios
ni el derecho a reembolsos.
En caso de daño:
Contacte con su distribuidor.
vers.3
Page 58
Page 59

ES
Los productos eléctricos no deben ser tirados junto con los productos domésticos. Conforme a
la Directiva Europea 2002/96/CE sobre residuos de aparatos eléctricos y electrónicos y su ejecución en virtud de la legislación nacional, los productos usados deberán recogerse por separado y
llevarse a puntos de recogida previstos para este efecto.
Consulte con las autoridades locales o con su distribuidor para obtener asesoramiento sobre
reciclaje. Al realizar estos pequeños gestos, usted también participará en la protección del medio
ambiente
Dirección postal: :
B.P. 146
L-4902 Bascharage
MSA INTERNATIONAL - ZAE Robert Steichen, 5 Rue de Bommel - L-4940 HAUTCHARAGE
TEL: +352.26.65.65 FAX : +352.26.65.65.1- e-Mail: INFO@MSAINTERNATIONAL.COM
Page 59
vers.3
Page 60

ES
vers.3
Page 60
Page 61

PT
AB100-1204
GPS4
AB100-1275
GPA7.5
AB100-1215
GPA15
Manual do utilizador
Carregador GPS4 - GPA 7.5 - GPA15
Leia atentamente este documento antes de utilizar este produto. Não fazê-lo pode
provocar ferimentos graves..
GUARDE ESTE MANUAL
Este aparelho não deve ser utilizado por crianças pequenas nem por pessoas que não saibam
ler nem compreender o manual, excepto sob a supervisão de uma pessoa responsável que se
certique de que o carregador de bateria possa ser utilizado sem qualquer risco.
Mantenha e utilize o carregador de bateria fora do alcance das crianças e certique-se de que
estas não possam brincar com o mesmo. Controle os cabos do carregador antes da utilização.
Verique os cabos e a caixa; estes não devem estar rachados nem danicados. Não utilize um
carregador cujos cabos estejam danicados. O cabo de alimentação não pode ser substituído. Se
o cabo estiver danicado, deite fora o aparelho.
Page 61
vers.3
Page 62

PT
Índice
1. Explicação dos símbolos 63
2. Avisos de segurança e preparação 64
3. Instruções de segurança 64
4. Especicações 65
5. Descrição dos produtos 66
6. Utilização:
A/ Modelo GPS4 67
B/ Modelo GPA7.5 68
C/ Modelo GPA15 69
7. Condições da garantia 70
vers.3
Page 62
Page 63

1-Explicação dos símbolos
Os resíduos eléctricos não devem ser eliminados juntamente com o lixo
doméstico. Queira vericar junto da sua autarquia local ou revendedor para
obtenção de conselhos de reciclagem.
AVISO – De modo a reduzir o risco de ferimentos, o utilizador deve ler o
manual de instruções.
Em conformidade com as exigências fundamentais dos regulamentos e directivas europeus..
Retirar imediatamente a tomada da corrente se o cabo estiver danicado ou
cortado.
Não expor à chuva.
Mantenha uma ventilação apropriada durante a carga
PT
Isolamento duplo Classe II
AVISO: Gases explosivos.
ESTE GÁS FACILMENTE INFLAMÁVEL PODE ESCAPAR PELOS
RESPIRADOUROS E FORMAR UMA MISTURA EXPLOSIVA NA
ATMOSFERA JUNTO DA BATERIA EM CONDIÇÕES DE MÁ VENTILAÇÃO.
NÃO FAÇA FAÍSCAS, CHAMAS, NÃO DEIXE CIGARROS ACESOS
NEM OUTRAS FONTES DE INFLAMAÇÃO JUNTO DE UMA BATERIA.
Page 63
vers.3
Page 64

PT
2-Avisos de segurança e preparação:
Atenção: As baterias contêm ácidos abrasivos e gases explosivos que podem esca-
par das mesmas. Não fumar! Nenhuma chama ou qualquer outra fonte
de ignição deve ser colocada perto do carregador. Se uma parte do seu
corpo entrar em contacto com o electrólito da bateria, lave imediata e
abundantemente a zona com água fria. Se penetrar ácido nos seus olhos,
lave-os imediatamente com uma grande quantidade de água e consulte
um médico o mais brevemente possível. Mantenha as crianças e os animais domésticos afastados durante o processo de carga. Se a bateria ou
o carregador carem quentes durante a carga, parar a operação e fazer
com que um prossional verique a bateria.
Atenção : Recomendamos que retire a bateria do veículo antes de começar o
processo de carga. Caso não seja possível, desligue o pino negativo da
bateria que liga a bateria à carroçaria durante a recarga.
Atenção: Antes de ligar a bateria, certique-se de que possui os códigos PIN do
auto-rádio, etc. que são necessários para utilizar os aparelhos protegidos
por um código. Consulte o manual de utilização do veículo de modo a
vericar que não existem outros sistemas do veículo que tenham de ser
reiniciados ou apagados quando se ligar a bateria. Em caso de dúvida,
consulte o seu concessionário automóvel.
Atenção: Se a bateria não tiver sido utilizada há muito tempo, pode já não funcio-
nar correctamente devido a uma descarga automática ou a um fenómeno de sulfatação. Se for o caso, não poderá ser carregada correctamente.
Não utilizar estes carregadores para este tipo de bateria
Atenção : O carregador de bateria não deve ser utilizado como alimentação eléc-
trica.
O carregador de bateria não deve ser instalado num veículo.
Durante o processo de recarga da bateria, o motor do veículo não deve
ser ligado.
3-INSTRUÇÕES DE SEGURANÇA:
-Não tente recarregar baterias primárias não recarregáveis!
-Não exponha a bateria aos raios do sol!
-Quando utilizar o carregador, não fume e evite qualquer chama aberta!
-Evite qualquer contacto com o electrólito pois este é muito abrasivo!
-De modo a permitir uma dissipação rápida dos gases gerados durante o processo de
carga, abra as tampas das células da bateria e evite qualquer chama aberta ou faísca.
vers.3
Page 64
Page 65

Os gases que escapam são explosivos.
PT
Alguns carregadores contêm componentes como comutadores e relés susceptíveis de
produzir faíscas.
Coloque o carregador num local adaptado e ventilado.
Para eliminar as baterias com defeito, coloque-as num ponto de recolha
pública ou numa garagem. No momento da eliminação de um carregador de bateria, lembre-se dos seguintes pontos: Não deite peças de metal
ou plástico juntamente com os resíduos domésticos!
Leve todas as peças para um ponto de recolha pública!
Siga as instruções para a eliminação desse produto: o produto está sujeito à Directiva Europeia 2002/96/CE em matéria de resíduos de equipamentos eléctricos e electrónicos.
Se o cabo de alimentação deste aparelho estiver danicado, tem de ser substituído pelo
fabricante, por um dos respectivos centros de serviço aprovados ou por uma pessoa
com qualicação semelhante. Para evitar perigos, não faça sozinho qualquer modicação ao cabo de alimentação!
As pessoas (nomeadamente as crianças) que não possuem conhecimentos
nem experiência suciente do aparelho ou que apresentam uma deciência física, sensorial ou mental, apenas podem utilizar o aparelho sob a
supervisão de uma pessoa responsável que assegure a sua segurança. As
crianças devem ser mantidas sob vigilância e não devem brincar com o
aparelho.
4- ESPECIFICAÇÕES:
Modelo GPS4 GPA7.5 GPA15
Tensão alimentação 230-240V 230-240V 230-240V
Frequência 50HZ 50HZ 50HZ
Intensidade de carga
(máxima)
Tensão de carga 6/12 volts 6/12 volts 12/24 volts
Capacidade da bateria 6v 5-20AH
4 Amp 2/4/7.5 Amp 6/10/15Amp
12v 5-40AH
6v 5-30AH
12v 5-80AH
12v 5-60AH
24v 5-150AH
Page 65
vers.3
Page 66

PT
5- Descrição dos produtos
Modelo GPS4
1. Punho de transporte
2. Comutador 6 volts/12 volts
3. Indicador LED
4. Pinça positiva (+) de cor vermelha
5. Pinça negativa (-) de cor preta
6. Cabo de alimentação com tomada de
alimentação.
Modelo GPA7.5
1. Punho de transporte
2. Selector de intensidade de carga
3. Indicador LED
4. Pinça positiva (+) de cor vermelha
5. Pinça negativa (-) de cor preta
6. Cabo de alimentação com tomada de alimentação
7. Voltímetro.
1
2
3
6
4 5
1
3
2
7
5
6
4
Modelo GPA15
1. Punho de transporte
2. Selector de intensidade de carga
3. Indicador LED
4. Pinça positiva (+) de cor vermelha
5. Pinça negativa (-) de cor preta
6. Cabo de alimentação com tomada de alimentação
7. Voltímetro.
vers.3
Page 66
1
3
7
2
6
4
5
Page 67

PT
6-Utilização:
IMPORTANTE: INSTRUÇÕES DE LIGAÇÃO
Seguir sempre a ordem abaixo para ligar
uma bateria a um carregador:
1- Ligar a pinça vermelha (+) ao terminal positivo
(+) da bateria.
2- Ligar a pinça preta (-) ao terminal negativo (-)
da bateria.
3- Ligar a alimentação do carregador.
A/Modelo GPS4.
IMPORTANTE
O carregador ABSAAR GPS4 é um carregador de tipo “STANDARD”, ou seja, tem
que se desligar o carregador manualmente assim que a bateria estiver totalmente
carregada. É portanto necessária supervisão para este tipo de carregador. Quando a
bateria estiver carregada a 100%, não se pode, em caso algum, deixar permanentemente o carregador ligado à bateria, pois pode levar à destruição da bateria.
1.Comutador 6 volts/12 volts
2.Diodo LED vermelho: indicador de
funcionamento
3.Diodo LED vermelho: carga bateria
baixa
4.Diodo LED amarelo: carga bateria
média
5.Diodo LED verde: bateria totalmente
carregada
1 2 3 4 5
Procedimento de carga:
1- Seleccionar a tensão da bateria a 6 ou 12 volts com o comutador (1) consultando as
indicações na bateria (Tensão em volts).
2- Ligar a bateria ao carregador seguindo as instruções de ligação explicadas na página
7.
3- Siga as instruções de estado de carga de bateria:
•Diodo LED vermelho: carga bateria baixa
•Diodo LED amarelo: carga bateria média
•Diodo LED verde: bateria totalmente carregada
4-Desligar manualmente a bateria depois de carregada.
Page 67
vers.3
Page 68

PT
B/ Modelo GPA 7.5
IMPORTANTE
O carregador ABSAAR GPA7,5 é um carregador de tipo “AUTOMÁTICO”, ou seja,
não precisa de ser desligado manualmente assim que a bateria estiver totalmente
carregada. É possível deixar o carregador ligado à bateria; nesse caso, o carregador
vai parar automaticamente a carga assim que a bateria estiver totalmente carregada
e relançará automaticamente uma fase de carga quando a tensão da bateria estiver
abaixo do limiar de carga máximo.
1. Selector de intensidade de carga
2.Diodo LED vermelho: carga em curso
3.Diodo LED vermelho: Intensidade de carga 2A
4.Diodo LED vermelho: Intensidade de carga 4A
5.Diodo LED vermelho: Intensidade de carga 7,5A
6.Voltímetro
7. Diodo LED vermelho: 6 volts
8. Diodo LED vermelho: 12 volts
9. Diodo LED verde: Indicador de bateria totalmente
carregado.
Procedimento de carga:
1- Ligar a bateria ao carregador seguindo as instruções de ligação explicadas na página
7.
NOTA: A tensão da bateria é automaticamente seleccionada pelo carregador. Se
a bateria estiver demasiado descarregada ou defeituosa, pode haver um erro de
selecção automática. Por exemplo: se uma bateria de 12 volts estiver muito descarregada, o carregador talvez possa ser colocado na posição 6 volts. NÃO UTILIZAR
SE A VOLTAGEM FOR DIFERENTE ENTRE O CARREGADOR E A BATERIA.
Se for o caso, a bateria deverá ser testada ou carregada com um carregador de tipo
“STANDARD” para efectuar uma carga “forçada”. Pode vericar a tensão da bateria
com o voltímetro (6) em qualquer altura.
2- Com o selector de intensidade (1), seleccione a intensidade de carga desejada
2A/4A/7.4A de acordo com a rapidez de carga e a capacidade da bateria. A selecção
desejada é indicado pelos diodos LED 3/4/5
3- Depois de a bateria estar totalmente carregada, o diodo LED verde (9) acende para
indicar a carga total da bateria e a paragem automática da fase de carga.
4-Pode deixar a bateria ligada ao carregador, este activar-se-á automaticamente se
necessário.
7 8 9
2 3 546
1
vers.3
Page 68
Page 69

PT
C/ Modelo GPA15
IMPORTANTE
O carregador ABSAAR GPA15 é um carregador de tipo “AUTOMÁTICO”, ou seja,
não precisa de ser desligado manualmente assim que a bateria estiver totalmente
carregada. É possível deixar o carregador ligado à bateria; nesse caso, o carregador
vai parar automaticamente a carga assim que a bateria estiver totalmente carregada
e relançará automaticamente uma fase de carga quando a tensão da bateria estiver
abaixo do limiar de carga máximo.
1. Selector de intensidade de carga
2.Diodo LED vermelho: carga em curso
3.Diodo LED vermelho: Intensidade de
carga 6A
4.Diodo LED vermelho: Intensidade de
carga 10A
5.Diodo LED vermelho: Intensidade de
carga 15A
6.Voltímetro
7. Diodo LED vermelho: 12 volts
8. Diodo LED vermelho: 24 volts
9. Diodo LED verde: Indicador de bateria totalmente carregado
Procedimento de carga:
1- Ligar a bateria ao carregador seguindo as instruções de ligação explicadas na página
7.
NOTA: A tensão da bateria é automaticamente seleccionada pelo carregador. Se
a bateria estiver demasiado descarregada ou defeituosa, pode haver um erro de
selecção automática. Por exemplo: se uma bateria de 24 volts estiver muito descarregada, o carregador talvez possa ser colocado na posição 12 volts. NÃO UTILIZAR
SE A VOLTAGEM FOR DIFERENTE ENTRE O CARREGADOR E A BATERIA.
Se for o caso, a bateria deverá ser testada ou carregada com um carregador de tipo
“STANDARD” para efectuar uma carga “forçada”. Pode vericar a tensão da bateria
com o voltímetro (6) em qualquer altura.
2- Com o selector de intensidade (1), seleccione a intensidade de carga desejada
6A/10A/15A de acordo com a rapidez de carga e a capacidade da bateria. A selecção
desejada é indicado pelos diodos LED 3/4/5.
3- Depois de a bateria estar totalmente carregada, o diodo LED verde (9) acende para
indicar a carga total da bateria e a paragem automática da fase de carga.
4-Pode deixar a bateria ligada ao carregador, este activar-se-á automaticamente se
necessário.
6
2
7
8
3 4 5
9
1
Page 69
vers.3
Page 70

PT
7- Condições da garantia
1) A garantia cobre todos os defeitos de fabrico ou de material. O
fabricante garante a substituição gratuita (das peças ou do produto inteiro) durante dois anos a partir da data de compra. Apenas as despesas de
expedição cam a cargo do cliente.
2) Os pedidos de aplicação da garantia apenas serão aceites se acompanhados por uma prova de compra (factura ou talão de compra).
3) A garantia não cobre as reparações necessárias após um acidente,
uma desmontagem inapropriada, danos devidos a uma queda ou golpes,
uma utilização incorrecta ou ligação a uma tensão de alimentação superior à indicada.
4) A garantia não engloba, em caso algum, direito a indemnização e/ou
reembolso.
Em caso de danos:
Contactar o revendedor.
.
vers.3
Page 70
Page 71

PT
Os produtos eléctricos não devem ser eliminados juntamente com os produtos domésticos. De
acordo com a Directiva Europeia 2002/96/EC em matéria de eliminação dos materiais eléctricos
e electrónicos e da sua execução no direito nacional, os produtos eléctricos usados devem ser
recolhidos separadamente e eliminados em pontos de recolha previstos para o efeito..
Dirija-se às autoridades locais ou ao seu revendedor para obter conselhos sobre a reciclagem. Ao
realizar estes gestos, está a participar na protecção do ambientet
Endereço postal:
B.P. 146
L-4902 Bascharage
MSA INTERNATIONAL - ZAE Robert Steichen, 5 Rue de Bommel - L-4940 HAUTCHARAGE
TEL: +352.26.65.65 FAX : +352.26.65.65.1- e-Mail: INFO@MSAINTERNATIONAL.COM
Page 71
vers.3
Page 72

FR
vers.3
Page 72
Page 73

PL
AB100-1204
GPS4
AB100-1275
GPA7.5
AB100-1215
GPA15
Instrukcja użytkowania
Ładowarka GPS4 - GPA 7.5 - GPA15
Przed uruchomieniem urządzenia należy uważnie przeczytać niniejszą instrukcję
obsługi. Zaniedbanie tego może skutkować poważnymi obrażeniami.
NALEŻY ZACHOWAĆ INSTRUKCJĘ OBSŁUGI
Urządzenie nie może być użytkowane przez małe dzieci ani osoby niebędące w stanie przeczytać
lub zrozumieć instrukcji obsługi, chyba że pod nadzorem osoby upoważnionej, mogącej zagwa-
rantować, że urządzenie będzie użytkowane w sposób niestwarzający zagrożenia.
Ładowarkę należy przechowywać i użytkować w miejscu niedostępnym dla dzieci, należy
zadbać, aby nie mogły one bawić się urządzeniem. Przed uruchomieniem ładowarki należy
skontrolować stan jej przewodów, sprawdzić, czy obudowa i przewody urządzenia nie są
pęknięte lub uszkodzone. Nie należy używać ładowarki, której przewody uległy uszkodzeniu.
Przewód zasilający nie może zostać wymieniony. W razie uszkodzenia przewodu, urządzenie
należy wyrzucić.
Page 73
vers.3
Page 74

PL
Spis treści
1. Objaśnienie oznaczeń 75
2. Ostrzeżenia dotyczące bezpieczeństwa i przygotowanie 76
3.Zalecenia dotyczące bezpieczeństwa 76
4. Dane techniczne 77
5. Opis urządzeń 78
6. Obsługa:
A/ Modèle GPS4 79
B/ Modèle GPA7.5 80
C/ Modèle GPA15 81
7. Warunki gwarancji 82
vers.3
Page 74
Page 75

1-Objaśnienie oznaczeń.
Zużyty sprzęt elektryczny nie powinien być usuwany razem z innymi odpadami z gospodarstwa domowego. W celu uzyskania informacji o recyklingu,
należy zwrócić się do lokalnych władz lub do dystrybutora sprzętu.
OSTRZEŻENIE – Aby ograniczyć ryzyko obrażeń, użytkownik powinien
zapoznać się z instrukcją obsługi urządzenia.
Zgodne z zasadniczymi wymaganiami rozporządzeń i dyrektyw europejskich.
W razie uszkodzenia lub przecięcia przewodu zasilającego, natychmiast wyjąć
wtyczkę z gniazda sieciowego.
Nie wystawiać na działanie deszczu.
Zapewnić właściwą wentylację podczas ładowania
PL
Podwójna izolacja. Klasa ochronności II
OSTRZEŻENIE: Gazy wybuchowe.
Z ZAWORU BEZPIECZEŃSTWA MOŻE WYDOBYWAĆ SIĘ ŁATWOPALNY GAZ I W WARUNKACH NIEDOSTATECZNEJ WENTYLACJI, W POBLIŻU AKUMULATORA, TWORZYĆ W POWIETRZU
WYBUCHOWĄ MIESZANINĘ.
W POBLIŻU AKUMULATORA, UNIKAĆ ISKIER, OTWARTEGO
OGNIA, ZAPALONYCH PAPIEROSÓW I INNYCH ŹRÓDEŁ ZAPŁONU.
Page 75
vers.3
Page 76

PL
2-Ostrzeżenia dotyczące bezpieczeństwa i przygotowanie :
Uwaga : W akumulatorze znajduje się żrący kwas i gaz wybuchowy. Mogą one
wydostać się na zewnątrz. Zabrania się palenia ! Należy unikać wszelkiego rodzaju źródeł ognia i iskier w pobliżu ładowarki. W razie kontaktu
elektrolitu akumulatora z nieosłoniętą skórą, należy ją natychmiast obcie
przemyć zimną wodą. Jeżeli kwas dostał się do oczu, należy je natychmiast
przemyć dużą ilością wody i jak najszybciej skontaktować się z lekarzem.
Na czas operacji ładowania należy oddalić dzieci i zwierzęta domowe na
bezpieczną odległość. Jeżeli w trakcie ładowania akumulator lub ładowarka
nagrzewa się, należy przerwać operację i oddać akumulator do kontroli w
autoryzowanym serwisie.
Uwaga : Przed przystąpieniem do operacji ładowania wskazane jest wyjęcie aku-
mulatora z samochodu. Jeżeli jest to niemożliwe, odłącz na czas ładowania ujemny zacisk akumulatora podłączony do karoserii pojazdu.
Przed odłączeniem akumulatora upewń się, że posiadasz kody PIN
radia i innych zabezpieczanych cyfrowo urządzeń, niezbędne do ich
ponownego uruchomienia. Sprawdź w instrukcji obsługi samochodu,
czy odłączenie akumulatora nie spowoduje utraty danych i konieczności
reinicjalizacji systemów pojazdu. W razie wątpliwości skontaktuj się z
dealerem marki samochodu.
Uwaga : Jeżeli akumulator był nieużywany przez dłuższy czas, może nie działać
prawidłowo na skutek samowyładowania lub zasiarczenia płyt. W takiej
sytuacji niemożliwe jest jego poprawne naładowanie. Nie należy używać
niniejszych urządzeń do ładowania akumulatora w takim stanie.
Uwaga: Nie należy używać ładowarki do akumulatorów jako źródła zasilania.
Nie należy umieszczać ładowarki do akumulatorów w samochodzie.
Ładowanie akumulatora powinno odbywać się przy wyłączonym silniku.
3-ZALECENIA BEZPIECZEŃSTWA :
-Nie podejmuj próby ładowania akumulatorów pierwotnych nieładowalnych !
- Nie wystawiaj akumulatora na bezpośrednie działanie promieni słonecznych !
- Używając ładowarki nie pal i unikaj otwartego ognia !
- Unikaj kontaktu z elektrolitem – jest to substancja żrąca !
- Aby ułatwić szybkie rozpraszanie gazów wydzielających się w trakcie ładowania
akumulatora, zdejmij pokrywy z jego komór i bezwzględnie unikaj otwartego ognia i
iskier.
Wydobywające się gazy tworzą mieszaniny wybuchowe.
Niektóre ładowarki zawierają komponenty (np. przełącznik lub przekaźnik) mogące
vers.3
Page 76
Page 77

być źródłem iskier.
PL
Zadbaj, aby ładowarka była umieszczona w bezpiecznym i właściwie wentylowanym
miejscu.
Aby pozbyć się uszkodzonego akumulatora, oddaj go do autoryzowanego punktu odbioru lub warsztatu samochodowego. Pozbywając się
ładowarki do akumulatorów przestrzegaj poniższych zasad: Nie wyrzucaj części metalowych i plastikowych razem z innymi odpadami z
gospodarstwa domowego !
Oddaj wszystkie części do autoryzowanego punktu odbioru i utylizacji !
Pozbywając się urządzenia przestrzegaj odnośnych zaleceń : produkt jest
objęty Dyrektywą Europejską 2002/96/CE w sprawie zużytego sprzętu
elektrycznego i elektronicznego.
Uszkodzony przewód zasilający ładowarki powinien zostać wymieniony przez producenta urządzenia, autoryzowany punkt serwisowy lub inną kompetentną osobę. Aby
uniknąć zagrożenia, nie dokonuj samodzielnie żadnej modykacji przewodu zasilającego !e !
Osoby, a zwłaszcza dzieci, nieposiadające wystarczającej wiedzy lub
doświadczenia w obsłudze urządzenia, osoby niepełnosprawne zycznie,
sensorycznie lub umysłowo, nie mogą obsługiwać urządzenia, chyba że
są one nadzorowane lub instruowane przez osobę odpowiedzialną za ich
bezpieczeństwo. Dzieci nie mogą bawić się urządzeniem, powinny pozostawać pod nadzorem.
4- DANE TECHNICZNE:
Model GPS4 GPA7.5 GPA15
Napięcie zasilania 230-240V 230-240V 230-240V
Częstotliwość 50HZ 50HZ 50HZ
Prąd ładowania (max) 4 Amp 2/4/7.5 Amp 6/10/15Amp
Napięcie ładowania 6/12V 6/12V 12/24V
Pojemność akumulatora
6v 5-20AH
12v 5-40AH
6v 5-30AH
12v 5-80AH
12v 5-60AH
24v 5-150AH
Page 77
vers.3
Page 78

PL
5- Opis urządzeń:
Model GPS4
1.Uchwyt transportowy.
2. Przełącznik 6V/12V.
3. Wskaźnik LED.
4. Zacisk dodatni (+) kolor czerwony.
5. Zacisk ujemny (-) kolor czarny.
6. Przewód zasilający z wtyczką sieciową.
Model GPA7.5
1. Uchwyt transportowy.
2. Przycisk wyboru prądu ładowania.
3. Wskaźnik LED.
4. Zacisk dodatni (+) kolor czerwony.
5. Zacisk ujemny (-) kolor czarny.
6. Przewód zasilający z wtyczką sieciową.
7. Woltomierz.
1
2
3
6
4 5
1
3
2
7
5
6
4
Model GPA15
1. Uchwyt transportowy.
2. Przycisk wyboru prądu ładowania.
3. Wskaźnik LED.
4. Zacisk dodatni (+) kolor czerwony.
5. Zacisk ujemny (-) kolor czarny.
6. Przewód zasilający z wtyczką sieciową.
7. Woltomierz.
vers.3
Page 78
1
3
7
2
6
4
5
Page 79

PL
6-Obsługa :
UWAGA : SPOSÓB PODŁĄCZANIA.
Należy zawsze przestrzegać następującej kolejności
podłączania akumulatora do ładowarki :
1- Podłączyć czerwony zacisk (+) do dodatniego bie-
guna (+) akumulatora.
2- Podłączyć czarny zacisk (-) do ujemnego bieguna
(-) akumulatora
3- Włączyć zasilanie ładowarki.
A/Model GPS4.
UWAGA
Ładowarka ABSAAR GPS4 jest urządzeniem typu „STANDARD”, co oznacza,
że należy ją ręcznie odłączyć, gdy akumulator został całkowicie naładowany.
Ładowarka tego typu wymaga nadzoru. Po całkowitym naładowaniu akumulatora,
nie wolno w żadnym wypadku pozostawiać ładowarki podłączonej, mogłoby to
spowodować zniszczenie akumulatora.
1.Przełącznik 6V/12V
2.Czerwony LED : wkaźnik zasilania.
3.Czerwony LED : niski poziom
naładowania akumulatora.
4.Żółty LED : średni poziom naładowania.
5.Zielony LED akumulator całkowicie
naładowany.
Procedura ładowania :
1- Za pomocą przełącznika (1) wybierz napięcie akumulatora 6V lub 12V, bazując na
wartości podanej na akumulatorze (Napięcie podane w V)
2- Podłącz akumulator do ładowarki zgodnie z zaleceniami podanymi na str.7,.
3-Postępuj zgodnie ze wskazaniami stanu naładowania akumulatora :
•Czerwony LED : niski poziom naładowania akumulatora.
•Żółty LED : średni poziom naładowania
•Zielony LED akumulator całkowicie naładowany
4-Po całkowitym naładowaniu akumulatora odłącz ręcznie ładowarkę.
Page 79
1 2 3 4 5
vers.3
Page 80

PL
B/ Model GPA 7.5
UWAGA
Ładowarka ABSAAR GPA15 jest urządzeniem „AUTOMATYCZNYM”, co oznacza,
że nie jest konieczne jej ręczne odłączanie po całkowitym naładowaniu akumulatora. Ładowarka może pozostać podłączona do akumulatora, wówczas automatycznie
zakończy ona operację ładowania po całkowitym naładowaniu akumulatora i automatycznie ją wznowi, gdy napięcie akumulatora spadnie poniżej progu maksymalnego naładowania.
1. Przycisk wyboru prądu ładowania.
2.Czerwony LED : ładowanie w toku
3.Czerwony LED : Prąd ładowania 2A
4.Czerwony LED : Prąd ładowania 4A
5.Czerwony LED : Prąd ładowania 7.5A
6.Woltomierz
7. Czerwony LED : 6V
8. Czerwony LED : 12V
9. Zielony LED Wskaźnik całkowitego naładowania
akumulatora.
Procedura ładowania:
1- Podłącz akumulator do ładowarki zgodnie z zaleceniami podanymi na str.7,.
UWAGA : Ładowarka automatycznie rozpoznaje napięcie akumulatora. Jeżeli
akumulator jest głęboko rozładowany lub uszkodzony, może wystąpić błąd automatycznego wyboru napięcia. Przykładowo : jeżeli akumulator 12V jest głęboko
rozładowany, ładowarka może wybrać tryb ładowania 6V. NIE PODEJMUJ PRÓBY
ŁADOWANIA JEŻELI NAPIĘCIE ŁADOWARKI JEST INNE NIŻ AKUMULATORA. W takim przypadku, akumulator należy przetestować lub naładować przy
użyciu ładowarki „STANDARD”, w trybie ładowania „wymuszonego.” Posługując
się woltomierzem (6), możesz w każdej chwili sprawdzić napięcie akumulatora.
2- Korzystając z przycisku wyboru prądu (1), wybierz pożądany prąd ładowania
2A/4A/7.4A w funkcji szybkości ładowania i pojemności akumulatora. LED 3/4/5
wskazuje wybraną wartość prądu.
3- Gdy akumulator zostanie całkowicie naładowany, zapala się zielony LED (9) , wskazując całkowite naładowanie akumulatora i automatyczne zakończenie cyklu ładowania
4-Możesz pozostawić ładowarkę podłączoną do akumulatora, w razie potrzeby włączy
się ona automatycznie.
7 8 9
2 3 546
1
vers.3
Page 80
Page 81

PL
C/ Model GPA15
UWAGA
Ładowarka ABSAAR GPA15 jest urządzeniem „AUTOMATYCZNYM”, co oznacza,
że nie jest konieczne jej ręczne odłączanie po całkowitym naładowaniu akumulatora. Ładowarka może pozostać podłączona do akumulatora, wówczas automatycznie
zakończy ona operację ładowania po całkowitym naładowaniu akumulatora i automatycznie ją wznowi, gdy napięcie akumulatora spadnie poniżej progu maksymalnego naładowania.
2
1.Przycisk wyboru prądu ładowania
2.Czerwony LED : ładowanie w toku
3.Czerwony LED : Prąd ładowania 6A
4.Czerwony LED : Prąd ładowania 10A
5.Czerwony LED : Prąd ładowania 15A
6.Woltomierz
7. Czerwony LED : 12V
8. Czerwony LED : 24V
9. Zielony LED Wskaźnik całkowitego naładowania akumulatora.
Procedura ładowania
1- Podłącz akumulator do ładowarki zgodnie z zaleceniami podanymi na str.7,.
UWAGA : Ładowarka automatycznie rozpoznaje napięcie akumulatora. Jeżeli
akumulator jest głęboko rozładowany lub uszkodzony, może wystąpić błąd automatycznego wyboru napięcia. Przykładowo : jeżeli akumulator 24V jest głęboko rozładowany, ładowarka może wybrać tryb ładowania 12V. NIE PODEJMUJ
PRÓBY ŁADOWANIA JEŻELI NAPIĘCIE ŁADOWARKI JEST INNE NIŻ AKUMULATORA. W takim przypadku, akumulator należy przetestować lub naładować
przy użyciu ładowarki „STANDARD”, w trybie ładowania „wymuszonego.” Posługując się woltomierzem (6), możesz w każdej chwili sprawdzić napięcie akumulatora.
2-Korzystając z przycisku wyboru prądu (1), wybierz pożądany prąd ładowania
6A/10A/15A w funkcji szybkości ładowania i pojemności akumulatora. LED 3/4/5
wskazuje wybraną wartość prądu
3- Gdy akumulator zostanie całkowicie naładowany, zapala się zielony LED (9) , wskazując całkowite naładowanie akumulatora i automatyczne zakończenie cyklu ładowania..
4-Możesz pozostawić ładowarkę podłączoną do akumulatora, w razie potrzeby włączy
się ona automatycznie.
6
7
8
3 4 5
9
1
Page 81
vers.3
Page 82

PL
7-Warunki gwarancji:
1)Gwarancja obejmuje wszystkie usterki i wady produkcyjne i materiałowe. W ciągu dwóch lat od daty zakupu, producent zapewnia
bezpłatną wymianę komponentów lub całego urządzenia, jeżeli
obarczone jest ono wspomnianymi wadami lub usterkami. Koszty wysyłki obciążają klienta.
2) Podstawą uznania roszczeń gwarancyjnych jest okazanie dowodu
zakupu (faktury lub paragonu kasowego).
3) Gwarancja nie obejmuje napraw uszkodzeń powstałych w wyniku
wypadku, demontażu niezgodnego z zasadami sztuki oraz szkód spowodowanych upadkiem lub uderzeniem, użytkowaniem niegodnie z
przeznaczeniem lub podłączeniem do zasilania o napięciu wyższym niż
podane na tabliczce znamionowej.
4) Gwarancja nie obejmuje w żadnym wypadku prawa do odszkodowania i/lub zwrotu kosztów.
W przypadku zaistnienia szkody :
Skontaktuj się z dystrybutorem urządzenia.
vers.3
Page 82
Page 83

PL
Urządzenia elektryczne nie powinny być usuwane z razem z odpadami z gospodarstwa domowego. Zgodnie z Dyrektywą Europejską 2002/96 w / WE w sprawie zużytego sprzętu elektrycznego
i elektronicznego oraz jej implementacją do prawa krajowego, zużyte urządzenia elektryczne
powinny być zbierane oddzielnie i oddawane do autoryzowanych specjalistycznych punktów
odbioru.
W celu uzyskania informacji o recyklingu, należy zwrócić się do lokalnych władz lub do dystrybutora sprzętu. Postępując w ten sposób pomagasz chronić środowisko naturalne
Adres pocztowy :
B.P. 146
L-4902 Bascharage
MSA INTERNATIONAL - ZAE Robert Steichen, 5 Rue de Bommel - L-4940 HAUTCHARAGE
TEL: +352.26.65.65 FAX : +352.26.65.65.1- e-Mail: INFO@MSAINTERNATIONAL.COM
Page 83
vers.3
Page 84

vers.3
Page 84
 Loading...