

Page 1
Voice of Abell, Crisp as an Apple
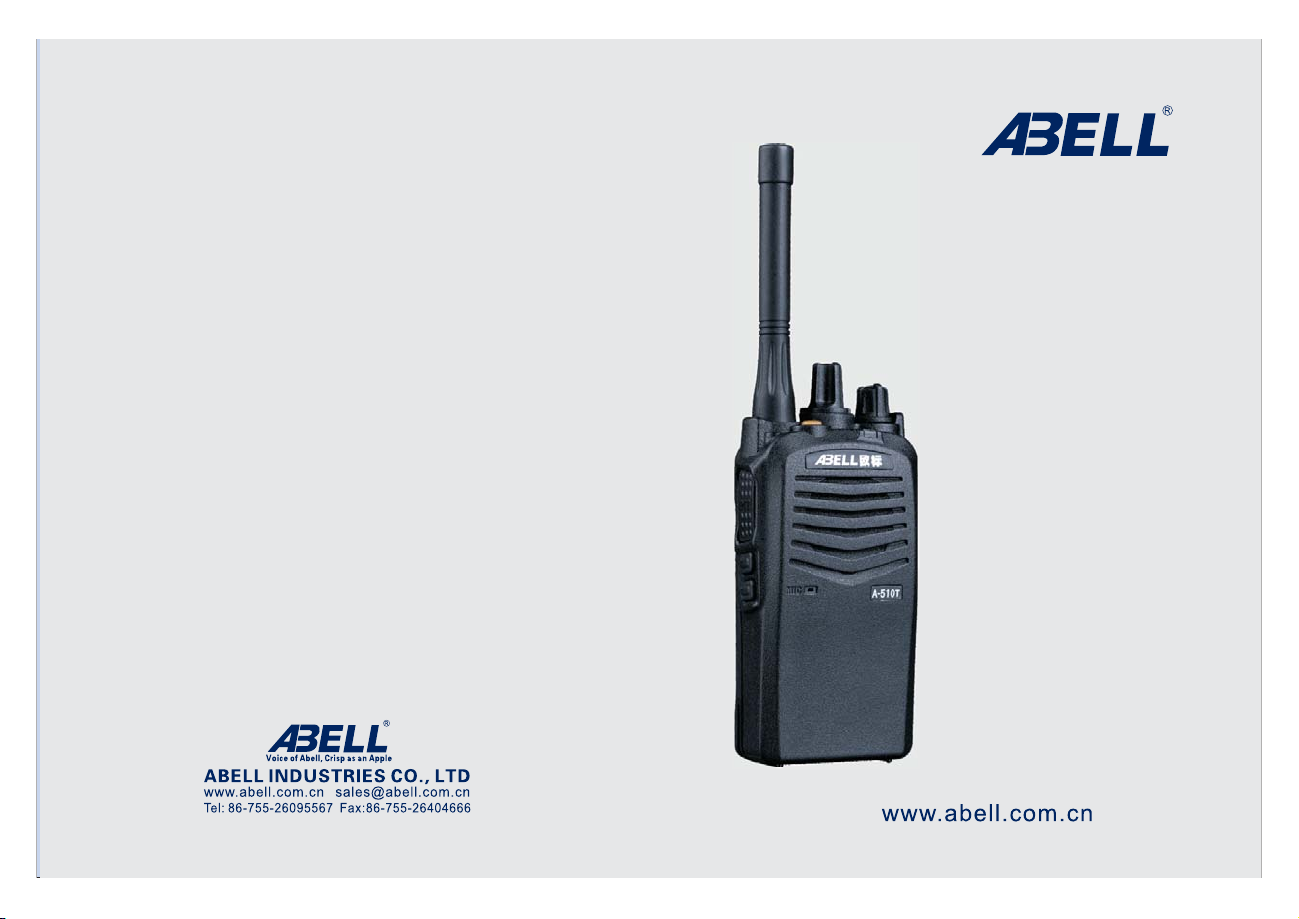
A-510T
INSTRUCTION MANUAL
ABELL INDUSTRIES CO., LTD
Page 2
Introduction
Thank you for choosing ABELL DMR Digital
Radio. We believe that
you made a wis e choice for we applying the best
technology, the most stable components and
advanced
productive technology. ABELL radio will provide
you
with stable performance and high quality.
Safety Instruction
Please comply with the following tips for fear of any accidents
such as fire disaster, personal injury or radio damages.
.Do not modify this radio or its charger in any way.
1
.Do not leave the radio under direct sunlight for extended
2
periods of time,nearby heaters or appliances.
.Do not put the radios in any area that with much dust, moist
3
or put it in the area not smooth and steady.
4
.If the receive external interference, should keep the unit away
from jamming devices (Such as TV, generator).
5. If the unit emitting smoke or strange smell, should cut off the power
supply immediately , and
.Th is r ad io i s wi th h ig h po we r an d li tt le s iz e, i f th er e is a s light
6
fever phenomenon please feel free to use.
If there is any problem with it, please contact with ABELL or the local distributor.
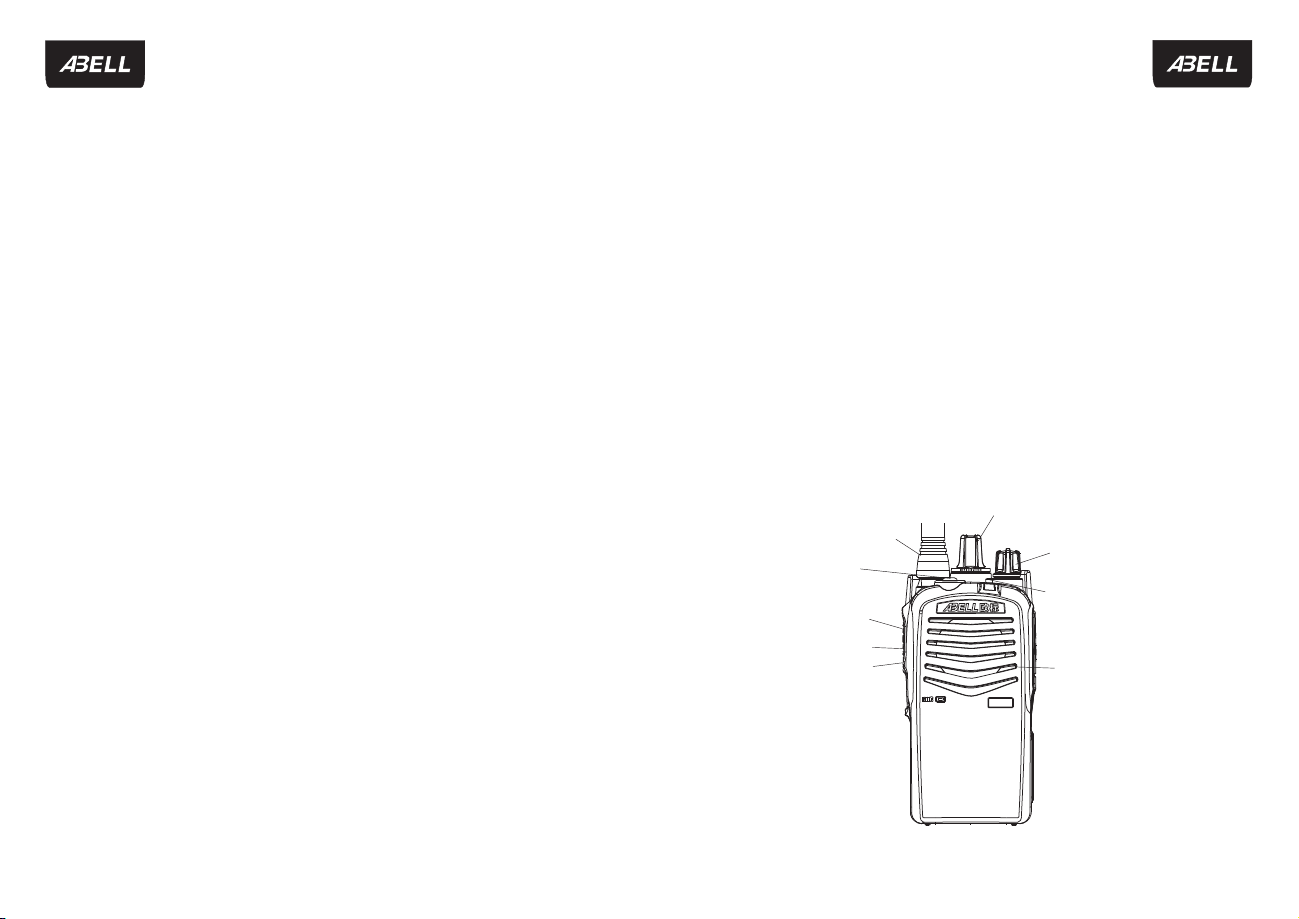
Overall View
send it to the closest repair service station.
Antenna
K3
PTT
K1
K2
Channel Knob
Volume/Power knob
LED indicator
Speaker
Page 3

ABELL Radios quality warranty and liability
The warranty range and limitation
ABELL admitted to customer,during the quality warranty
commitment ,products are repaired or replaced by free, the radio
which has been repaired or replaced is still in the quality warranty
period, but the replaced components or circuit board are owned
by ABELL.
The warranty policy not include the flowing conditions:
1.Defect or injuries caused by working in abnormal situation.
2.Defect or injuries caused by misuse, accident, or be into water.
3.Defect or injuries caused by the users test, operate, repair,
install or adjustment.
4.The product information on the back aluminum board
disappear, the seri es N o. w as c ha ng ed or can not
identify.
5.There is any damage or unsealed on the sealed battery
case.
6.Appearance scratches or other decoration damages but
not eff ec t no rm ally use.
General Items
This warranty policy ruled that all the liability of the
product quality, ABELL has the right to decide to repair,
replace, or refund according to the purchase price; it is
the only way to reimbursement solution. This quality
warranty replace all other public quality warranty,
defaulted quality warranty, include not restrict to a spec if ic
purpose or use the defaulted warranty, limited to this warranty
period.
Battery information
Battery protection
This product uses lithium batteries as a power source,
the lightweight,environmentally
with
and some other advantages, the following battery tips
that can help you to get the best performance and
most enduring cycle life when us ABELL batteries.
the
1. Be sure to use the original ABELL charger to charge the battery.
2. Battery with radios also can be charged, please switch off the
radios to ensure battery can be fully and effectively charged.
3. The new batteries can be stored for long period, but should be
stored in a cool
three months to active the electrical properties, otherwise it will
be damaged and can not use.)
4. The stored battery need to be fully charged before use.
5. Yo u can only use the battery charger and power supply specified
by ABELL.
6. Extreme temperatures
be stored in a dry warm environment.
7. The battery can not be placed in hot or cold place, otherwise it
will reduce battery capacity and using life, the battery should
always be stored at normal temperature, and radios equipped
with cold batteries may not
charged, lithium batteries will be apparently affected at subzero.
8. Do not let the battery short circuit, when metal objects(Such as
metal bench, pins,ect.) directly connected to the battery positive
(metal stripes on the battery). For example, the radios on metal
table,while carrying batteries in pocket or bag, batteries
accidental short circuit, damage to battery or the object caused by
short circuit.
9. In accordance with local laws dispose of used batteries,usually
recycling.
10. Do not discard the batteries into the fire, in order to avoid
explosion damage.
, dry place. (Need to be recharged once every
will effect capacity of the battery, should
work temporarily, even if fully
Battery attention
1. Do not use the damaged charge or batteries.
2. Do not put the batteries to other use.
3. Battery charging time is determined by the remaining capacity
of the battery, the battery type and charger type, the battery can
be repeatedly charged and discharged more than 300 times,but
gradually aging, when using time shorter than the normal time obviously,
should buy a new battery.
4. Unused batteries for long time will discharged automatically.
friendly, no memory,
may be
Page 4
Contents
Unpacking and device checking
Accessories
Getting Start
Familiar with the Radio
Charging
LED Indicator
Programmed Key
Function and basic operation
Tur ni ng y ou r ra di o on a nd o ff
Volume adjustment
Select district
Push-to-talk operation
Digital Channel calling
output power Levels
TOT
usy channel lockout
B
Scaning
One key calling
Adjust Squelch Level
Monitoring
CTCSS CDCSS
/
Squelch Off
Emergency Call
Digital Channel Information
Safety Information
10
10
10
11
11
11
11
12
12
12
14
Unpacking and device check
1
1
2
4
5
5
6
7
7
7
7
8
9
9
Please take the radio out of the package carefully, and before
abandon the package material, we advise you to check the
accessories according to the following list. If any part is lost
ordamage, please give the claim letter to the carrier or deliverer.
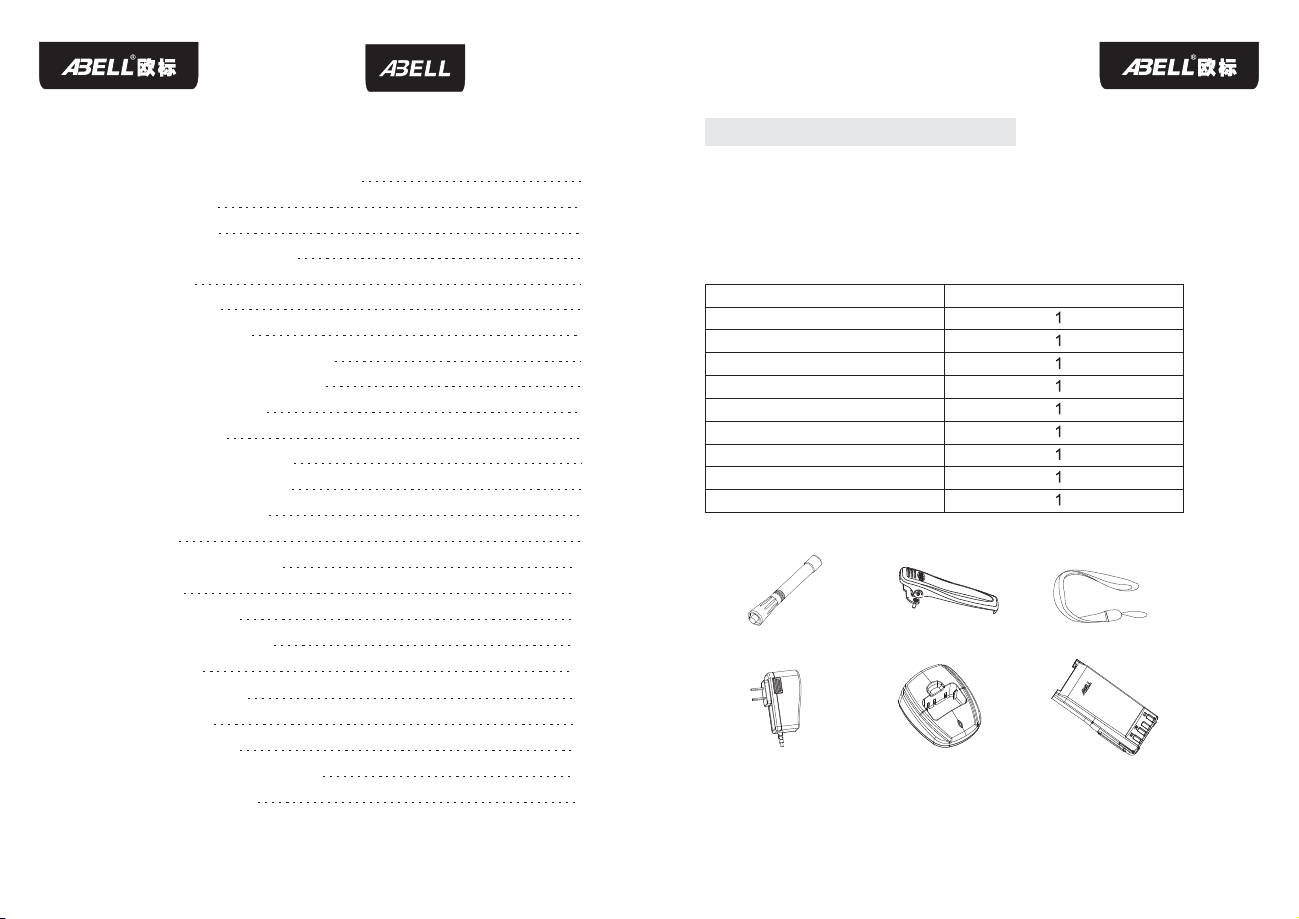
Accessories
Items
Antenna
Belt Clip
Power Supplier
Battery
Charger
Lanyard
Instruction Manual
Warranty Card
Quality Certification
Antenna
Power Supplier
Belt Clip
Charger
Quantity
Lanyard
Battery
1
Page 5

Getting Start
Install Battery
Ali gn the batte ry with t he
rabbet, Push and p ress do wn
until “click” in .
Disassemble the battery
Lift the metal cov er, then p ress
down the“lock” t o relea se the
battery to take th e batte ry down.
Assemble the antenna
Lift the metal cov er, then p ress
down the“lock” t o relea se the
battery to take th e batte ry down.
Assemble/Disassemble the belt chip
Assemble: Fix the belt clip in
the uppe r en d of rear side with
two screws until they are
screwed down.
Disassemble: Disassemble the
two screws from the belt clip with
a screwdriver.
Assemble Speaker/MIC
Fix the rubber cover when not
use. Open the rubber cover to
insert the earphone.
Insert the earphone
Open the rubber cover to insert
the Earphone.
2 3
Page 6

Familiar with the Radio
Channel Selector(1-16)
Antenna
K3
MIC
Charging
Please use original Abell charger to charge the battery, schematic
diagram of charging below.
Power/Vol ume Knob
LED indicator
Speaker
Indications:
1 Stea dy y el low: Read y to b e ch arged.
2 Stea dy r ed : Rapid cha rg in g.
3 Steady green: Fully charged
Push to talk
K1
K2
SP/MIC Jack
LED Indications:
Indicator status
Green light on 2- 3 seconds
Steady Green Light
Green Light Flashing
Steady Red light
Red light Flashing
Radio
Powering on
Receiving
Signal Received
Transmitting
Battery running low while
transmitting
4 5
Page 7

Programmable keys Function:
Function and basic operation
Key
No Function,alarm, TOT, VOX, Emergency Call;Stable Monitoring
(Analog);scanning; Squelch on: squelch off;one key calling 1-5
Short
(DMR);Channel annunciation ; Power annunciation; capacity
Press
annunciation; channel type annunciation;User ID annunciation
Functions
Tur ni ng your rad io o n an d off
Tur n th e Vol ume/Power kno b cl ockwise to turn the radio on and
anticlockwise to turn off.A prompt tone will be announced after power
on if the radios pre-programmed to have prompt tone, otherwise, no
prompt tone.
K1
No Function,alarm, TOT, VOX, Emergency Call;Stable Monitoring
(Analog);scanning; Squelch on: squelch off;one key calling 1-5
Long
(DMR);Channel annunciation ; Power annunciation; capacity
Press
annunciation; channel type annunciation;User ID annunciation
No Function,alarm, TOT, VOX, Emergency Call;Stable Monitoring
(Analog);scanning; Squelch on: squelch off;one key calling 1-5
Short
(DMR);Channel annunciation ; Power annunciation; capacity
Press
annunciation;
channel type annunciation;User ID annunciation
K2
No Function,alarm, TOT, VOX, Emergency Call;Stable Monitoring
(Analog);scanning; Squelch on: squelch off;one key calling 1-5
Long
Press
(DMR);Channel annunciation ; Power annunciation; capacity
annunciation; channel type annunciation;User ID annunciation
Switch On
Switch Off
Volume adjustment
No Function,alarm, TOT, VOX, Emergency Call;Stable Monitoring
(Analog);scanning; Squelch on: squelch off;one key calling 1-5
K3
Short
(DMR);Channel annunciation
Press
annunciation; channel type annunciation;User ID annunciation
No Function,alarm, TOT, VOX, Emergency Call;Stable Monitoring
(Analog);scanning; Squelch on: squelch off;one key calling 1-5
Long
(DMR);Channel annunciation ; Power annunciation; capacity
Press
annunciation; channel type annunciation;User ID annunciation
; Power annunciation; capacity
6 7
Press and hold down the squelch off momentary key to hear
the continuous beep and turn the volume/power knob to adjust.
Select District
District is a group of channels, this radio can provides
three districts, each district has 16 channels.
Operations:
1. press the preprogrammed district button.
2. Yo u will hear a confirmed prompt tone, indicates radio
has transferred from district 1 to district 3, or you will
hear a negative prompt tone, indicates radio has
transferred from district 3 to district 1.
Page 8

Push-to-talk operation
switch the channel selector to the channel needed.
Transmit: Hold the radio in a vertical position with the microphone 2 cm away
from your lip, press PTT, speak to the MIC.
Receive: The LED Indicator turns in gree n whe n receive signals,while the
speaker making sounds. Adjust Volume knob to change the audio volume.
Private Call:one radio make a call to another radio.
Group Call: The system allows groups of radios to remain muted while other
users are talking on the channel.
All Call: The all call means one radio calls to all the other radios
which at the same channel.
Digital Channel calling
You can do private call,group call and all call(The authority right of all call
has to be opened by Agent).
The operation method is the same of each call, the difference is that : When
a Group Call is received, you hold down the PTT key within the preset time
period to call back; When a private call is received,you can hold down the
PTT key within the preset time period to call back ; You cannot respond to an
All Call.
Take single call user A and B for example, operation process as below:
1) A and B select the same
2) A press PTT to launch a call
3) LED indicator turn in red, A speak to the MIC, release the PTT after
speaking.
4) B can receive the call without any operation, the LED is green during the
broadcasting.
5) The operation of B calling back will be
Analog Channel Calling
The difference is that the call object is every radio on the channel, not the
contacts who related to signal.
digital channel
the same above.
Select Channel
Rotate channel selector to choose channel. A prompt tone will be announced
after openning the channel annunciation function. If you hear ‘Dee’
continuously which indicate that the channel has been programmed.
Channel Selector
Output Power levels
Function description
When people talk about a power supply's output, they usually say it produces a
certain number of watts.The more watts a ra dio h as , the f ar the r it c an tran sm it.
Whe n a 2- way radio is used in for short range communication, it's always best to
use the low power mode.The high-power mode should be reserved for long-range
com mu nicat io n, or f or w hen t he re ar e lo ts of o bs tacle s to p ene trate
Value range: Low power/ High power
Default value: Low Power
PTT
Power rating table
Power Levels
High Power
Low Power
Wattage
51W
W
Operation method:
Define the programmable key to adjust High/ low power modes.
8
9
Page 9

Time out timer(TOT)
The purpose of TOT is to prevent any user from occupying a channel for
an extended period. If the preset time expires, the radio will
automatically terminate transmission and keep beeping. To stop
beeping, please release the PTT key. You must wait for a certain ti me
period (preset by your dealer) to initiate another transmission.
One Key calling
One key calning function including SMS, Voice call.
Operation:
To enable the feature, press the programmed key, then hold the PTT
to launch the call.
Operation:
Use the Abell programming software to set this feature.
The default time is 60 seconds.
Busy channel lockout
Set or delete the function of busy channel lockout in the channel
parameter b y so ft wa re . Wh en the function i s en ab le , no t ra nsmitting i s
permitted in the busy channel. The radio will have a be ep sound to
inform that t he c ha nn el i s bu sy when you press P TT.To st op b ee ping,
please release the PTT key. When the channel is free, you can press
and hold down t he P TT k ey to transmit.
Scanning
This feature allows you to listen to communication activities on oth er
channels so that you can keep a close tr ac k of y ou r te am members.
Operation:
1. To enable the feature, press the programmed Scan key in standby
mode ; or Switc h to a c hannel on which the feature “Auto Scan” is
enabled via the programming software.
2. After the feature is enabled, your radio will scan according to
the scan list set for the channel on which scanning starts. The
scanning process is as follows:During scanning, the LED flashes
red.
W hen activitie s ar e de te ct ed on a channel, the radio will stay on the
channel to receive current activities, and the LED glows green.
To disable this feature, p re ss t he p ro gr ammed Scan ke y ag ai n.
10
Adjust Squelch Level
This feature allows you to adjust the squelch threshold required for t he
radio to unmute. Generally, “High” is used in high noise environment.
Higher squelch level requires stronger signal for the radio to unmute. .
Operation:
Press the programmed Adjust Squelch Level key to switch among
Normal, High and Low.
Monitor
To receive the weak signal, you can enable the feature “Monitor”.
Operation:Press the programmed Monitor key to enable the feature.
To disable the feature, press this key again.
CTCSS/CDCSS Function
CTCSS is a circuit that is used to reduce the annoyance of listening to
other users o n a sh ar ed two-way radi o c ommunications channel. It is
sometimes called tone squelch.
CDCSS is a circuit that is used to reduce the annoyance of listening to
other users o n a sh ar ed two-way radi o c om munications channel.
Where more than one user group is on the same channel , CD CS S
mutes the oth er u se rs i f th ey a re using a diff er en t CD CSS tone or no
CDCSS.
Operation: Use the Abell programming softw ar e to set this feature.
11
Page 10

Squelch Off
If the feature “Squelch Off” is enabled, the speaker will keep unmuted
no matter whe th er c ar ri er i s present.
Operation:
Press the programmed Squelch Off key to enable the feature, and
the radio sounds background noise . To disa bl e th e feature, pres s th is
key again .
Hold down the programmed Squelch Off Momentary key to enable
the feature, and the radio sounds background noise . To dis able the
feature, release this key
Emergency Call
Press the Emergency Key to enable this feature, which k3 is always
programed as this feature.
(Only can be set with short press, hold down has to be defined as
disable Emergency Call)
Disable Emergency Call
Hold down the Emergency Key to enable this feature, which k3 is
always programed as this feature.
(Only can be set with hold down, press has to be defined as Emergency
Call)
Digital Channel Information
Group Call ma in ta in ed Time
Users can ext en d gr ou p ca ll s tatus after cal li ng b y se tt in g this feature
via program mi ng s of tw ar e. During this pe ri od , ea ch m em ber of this
group can call back directly.
Private Call maintain Time
Users can ext en d gr ou p ca ll s tatus after cal li ng b y se tt in g this feature
via programming software. During this period,each unit can call back
directly.
Receiving Groups List
This feature allows users receive several different groups calls on one
Digital Channel.
Trans mi tt ing Groups Li st
Sele ct t he p eople you w an t to c all from the co nt act list.
DMR
DMR uses TDMA technology which allows two simultaneous
conversations within a 12. 5kHz Channel without any interference.
TDMA Di rect Mode
Under TDMA direct mode one channel allows two simultaneous
conversations. Every unit of one group has to use the same Time
division which can avoid interference.
Operation
This feature has been turned on via programming software. After this
featue been turned on, switch to Digital channel of TDMA select mode
manually or turn on the unit at the Digital channel of TDMA select mode,
which can enter TDMA Direct Mode.
12
13
Page 11

Safety Information
Safety and convenient operation
This document provides users security and convenient to use
ABELL Radios information.
If you need to k no w how to use the rad io s in a h azardous
environment, please refer to the operate manual and instruction
identified by the factory, the radios with this instruction card
what with this function.
In ord er t o en sure the us er i s al ways keep it in t he a bove criter ia
and guidelines to allow it in range of t he electromagnetic energy
security please hold on the flowing operating procedures.
Radio operating and electromagnetic exposure
When t he p or table rad io s tr ansmittin g, k eep it in vertical
position, keep the distance between the speakers and mouse
2.5-5
about centimeters
from the body or the head about centimeters when
transmitting. If you k ee p th e radios on use rs b ody, pl ease
conf ir m th at when the rad io i s transmitt in g, keep the dis ta nc e
betw ee n th e body and th e an te nna about 2.5 -5 c entimeter s.
Electromagnetic interference/ electromagnetic compatibility
Notice:If you do n ot take proper EMC compatibility protection,
by design or EMC or internal structure design to ensure EMC
compatibility, Almost all electronic devices are affecte d by
electromagnetic interference.
In order to avoid the effect caused by electromagnetic
interference or electromagnetic compatibility, please notice,
wherever there is a mark “please shu t do wn t he radio”, please
comp ly w it h it, for example,hospital will use some of the RF
energy sensitive equipment in hospitals and other health facilities.
If required to shut down the radio when you take airplane, please
comply with it, please keep aware of the provision and the
indicating when you use the radio on the airplane.
14
. Also make the radio antenna away
2.5-5
Operating warning
Cars with airbags
Do not p ut t he r adios on th e ai rb ags or the regi on i t may
reached
when the airbags spread out, if it is in the region may reached
when the airbags spread out, the radios may hurt people
foll ow in g the airba g sp re ad out.
Potentially explosive environment.
If you are in the any potentially explosive environment, please
shut d ow n th e radios, u nl es s your radios w er e passed the
special
auth en ti cate (suc h as F M or C enelec cert if icate), in th at
environment, electric Spark could cause an explosion or fire ,
Resulting in bodily in ju ry o r even death.
Battery
Plea se d o no t change th e ba tt ery or charge t he b attery when
you
are in the potentially explosive environment, it may result in
explosion when you install or disassembly the batteries.
Blas t ar ea o r Area with detonators
The environment close to blast area or area with detonators
please shut down the radios in advance, in order to avoid the
possibly explosive, in blast area or other area with the mark
that
“plea se s hu t down the ra di os”, b e sure to compl y wi th the
relevant provisions.
Notice: Potentially explosive atmosphere environment
mentioned include fueling areas, such as: the ship's hold,
Fuels
and chemicals transport facility and storage si te s, w ith
chemicals or dust in t he a ir , the area usually ar e re mi nded of
shut off the engines, there always with the warning sign in the
potentially explosive environment, but not necessarily.
warning
15
Page 12

Operate warning
Broken antenna
Please do not use the broken antenna; it may hurt you if the
broken antenna touches your skin.
Battery
If the m et al c onductor su ch a s Jewelry, keys touc he s the bare
electrode, all the batteries maybe cause into broken or personal
injury, such as Combustion, metal conductor maybe cause into
battery short-circuit and fever, plea se t ake care of the c ha rg ed
batteries, especially when it is loaded into a po ck et, wallet,
or other container with metal objects, need special care.
Be arefulc
Radios general maintenance
*Chemicals such as detergents, sprays, alcohol, oil,
May ca us e da mage to the housing surface and
radios.
*Light to take and grabbing put radios, do not take by antenna.
*Please put on a dust cover when y ou d on' t use the acces so ries.
*Whe n cl ea n the radio s, u se t he cloth dipped in water or
neutral soap, Please be careful no t ma ke water flow s in to t he
interior of radios.
Be arefulc
16
 Loading...