

Page 1
Page 2

目錄
Product Features ........................................................................ 1
Notes ......................................................................................... 2
Product Appearance ................................................................... 3
Hardware Installation Guideline .................................................. 4
Operational Guideline ................................................................. 6
i. Turn on / Turn off .................................................................................................. 6
ii. Recording ............................................................................................................... 6
iii. Emergency Recording ............................................................................................ 8
iv. Video playback/Locked file/Unlock/Delete ......................................................... 9
v. Menu function ..................................................................................................... 11
vi. Memory card (Micro SD) PC connection instruction ......................................... 12
vii. DVR Player program ADR Player: software operational, file playback and
access instruction ........................................................................................................ 12
Specifications ........................................................................... 20
Page 3

V10
Car Recorder Manual
Product Features
English
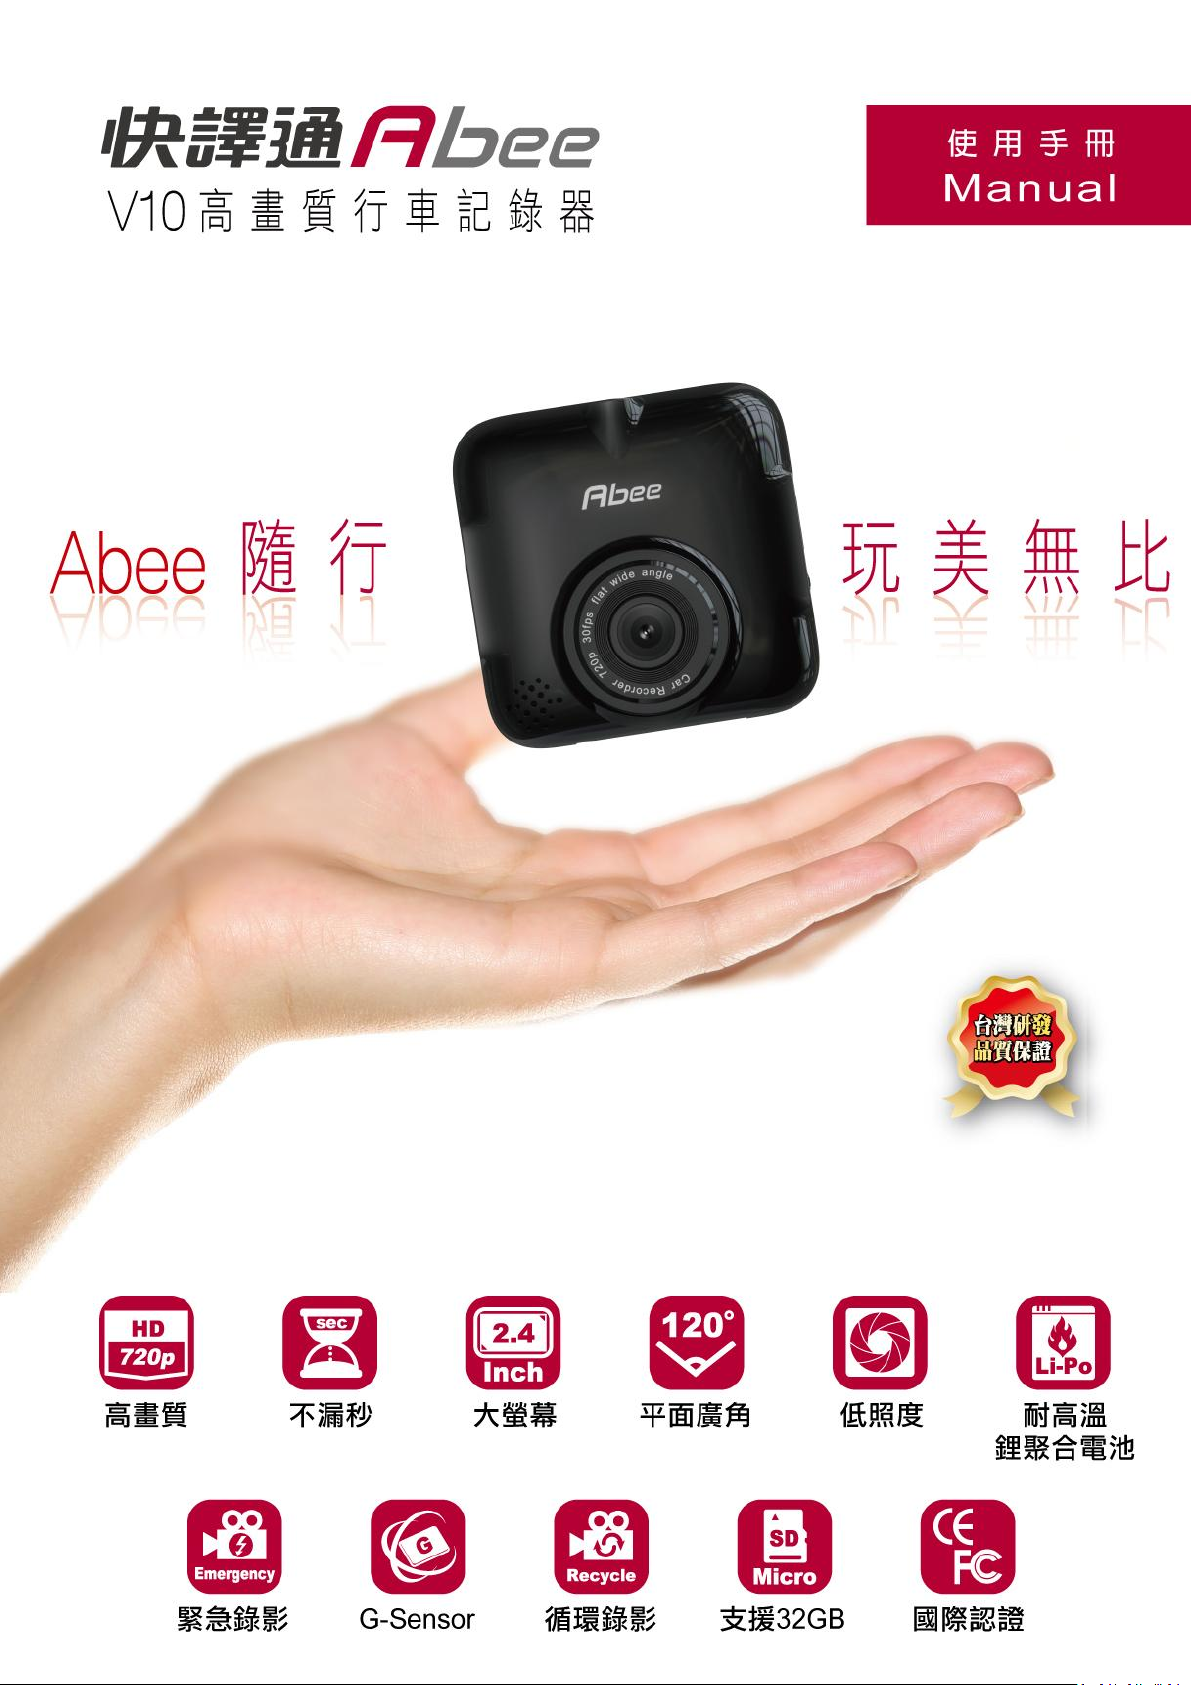
Product Features
●
High-definition video recording: HD 720P
●
Auto loop recording: with No Interval Time File Saving Technology; no gap between
each interval, every second count.
●
Emergency record function for protecting important incidents.
●
CMOS HD Sensor
●
Ultra-Wide-angle lens: 120 degrees flat wide angle lens, reduce distortion cause by
fisheye lens.
●
G-Sensor: V10 will automatically record and protect the file when have an accident or
impact occur.
●
2.4" TFT LCD, providing clearer image, convenient for installation adjusting and video
playback.
●
Automatically Record: When the car started, V10 will start to record automatically.
●
Automatically save and shut down: After the car engine been turned off V10 will save
the file and shutdown automatically.
●
Date / Time: Date and time can be recorded in to video.
●
White Balance auto sensing
●
Auto exposure control
●
High temperature resistance, the parts and battery are all pass the high temperature
test, very save to use in the car.
●
High temperature resistance Build-in Lithium polymer battery: Can use as a handy cam
in any situation.
●
Memory card: Support up to 32G Micro SDHC Memory card
●
ROHS compliance, and achieve CE/FCC/BSMI international certification
●
DVR Player:
‧Built-in DVR player software, all stored data can be play on PC without needing to
download new program.
‧
The password for Micro SD card can be set to ensure data security.
‧
Can repair the damaged video which due to suddenly pull card or power outage,
this can ensures that critical evidence is not lost.
‧
G-Sensor Information are displayed when playback the video.
1
Page 4

V10
Car Recorder Manual
Notes
English
Notes
Usage
1. Please use Class6 (or higher class) Micro SD card, to avoid the lag of image.
2. Please format the memory card with V10 before using it, while formatting DVR player
will automatically stored in to memory card.
3. Please use Abee V10 original car charger and accessories.
4. In vehicles where power to the cigarette lighter remains on after the engine has been
turned off, please remove the cigarette lighter plug to avoid draining your car battery
or other accidents.
5. After the car engine has stopped, the power supply been cut off, or any event that
interrupts the power supply occurs, a spare battery allows continued recording to the
memory card. Do not remove the Micro SD memory card before the write operation
has completed or the file may be damaged.
6. Do not expose your product to direct sunlight.
7. Do not connect car adaptor to car battery power directly (this installation is not in
covered under the product warranty).
8. Do not disassemble or modify your product. Consult your dealer or our customer
service center in case of having problem with product.
9. Do not drop or subject the product to blows or force. Do not press hard on the LCD
screen. This may damage it or cause it to malfunction.
10. Abee V10 emergency recording feature, in general recording mode, press the record
button to enter emergency recording mode, on the upper right corner of the screen
will immediately show “Lock” icon, this means the file is protected. The file will not be
deleted from loop recording. 4G memory card can save up to 5 emergency video files,
8G memory card (or above) can save up to 10 emergency video files. Please refer to
the manual for Details of the emergency recording feature.
11. Do not expose your product to flame or moisture, please keep your hand dry when
operate the device.
12. Do not clean the product with cleaners containing strong acid or alkaline
13.
Micro SD memory card
1.
2. Please format the memory card with V10 before using it.
Before using your device, please read the user's instructions carefully.
Please use Micro SDHC memory cards, class 6 or upper. 4G or more of memory space
is recommended, Support up to 32G.
2
Page 5
V10
Car Recorder Manual
Product Appearance
English
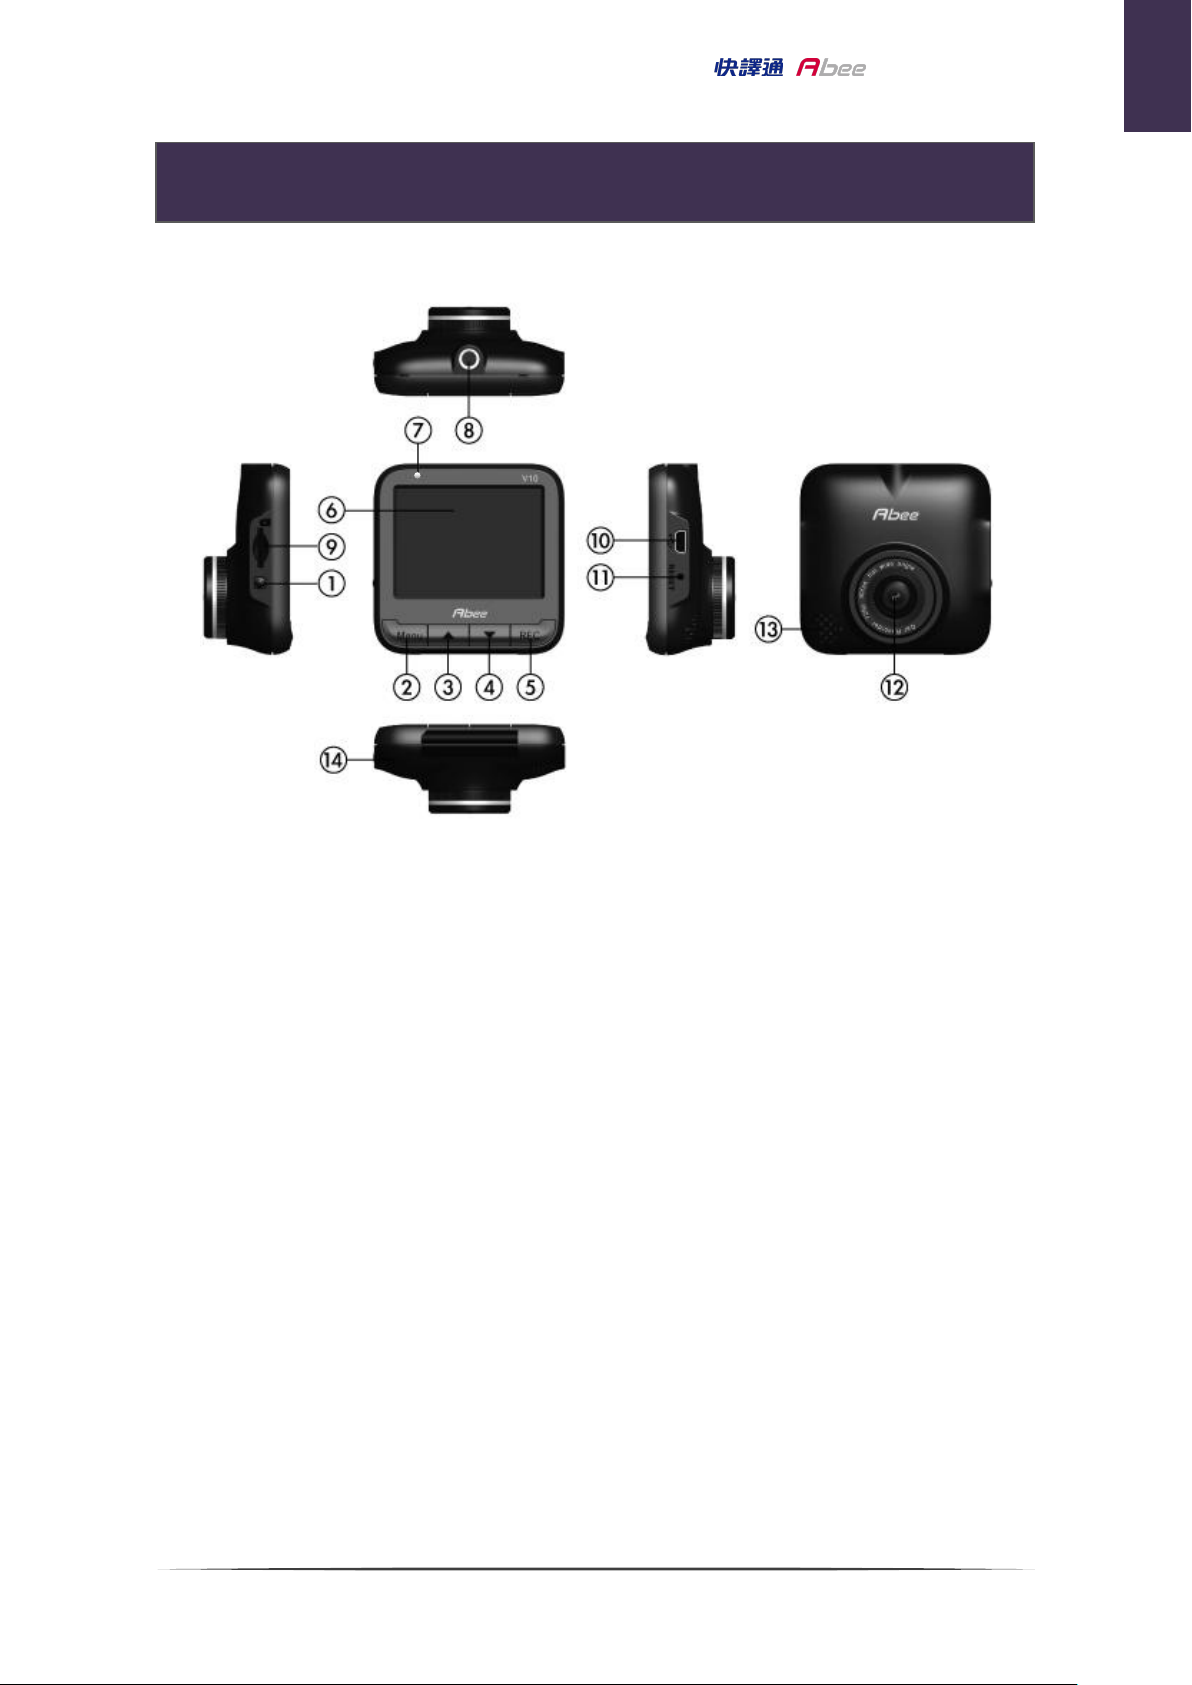
Product Appearance
1 On/Off Key
○
2 Menu/Exit Key
○
3 Up/Photo Key/Delete
○
4 Down/Stop/Lock、Unlock
○
5 Record/Lock/OK/Pause、Resume
○
6 Display
○
7 Recording indicator
○
8 Bracket slot
○
9 Memory card slot(Micro SD)
○
10 Mini USB port
○
11 RESET
○
12 Lens
○
13 Speaker
○
14 Microphone
○
3
Page 6
V10
Car Recorder Manual
1.
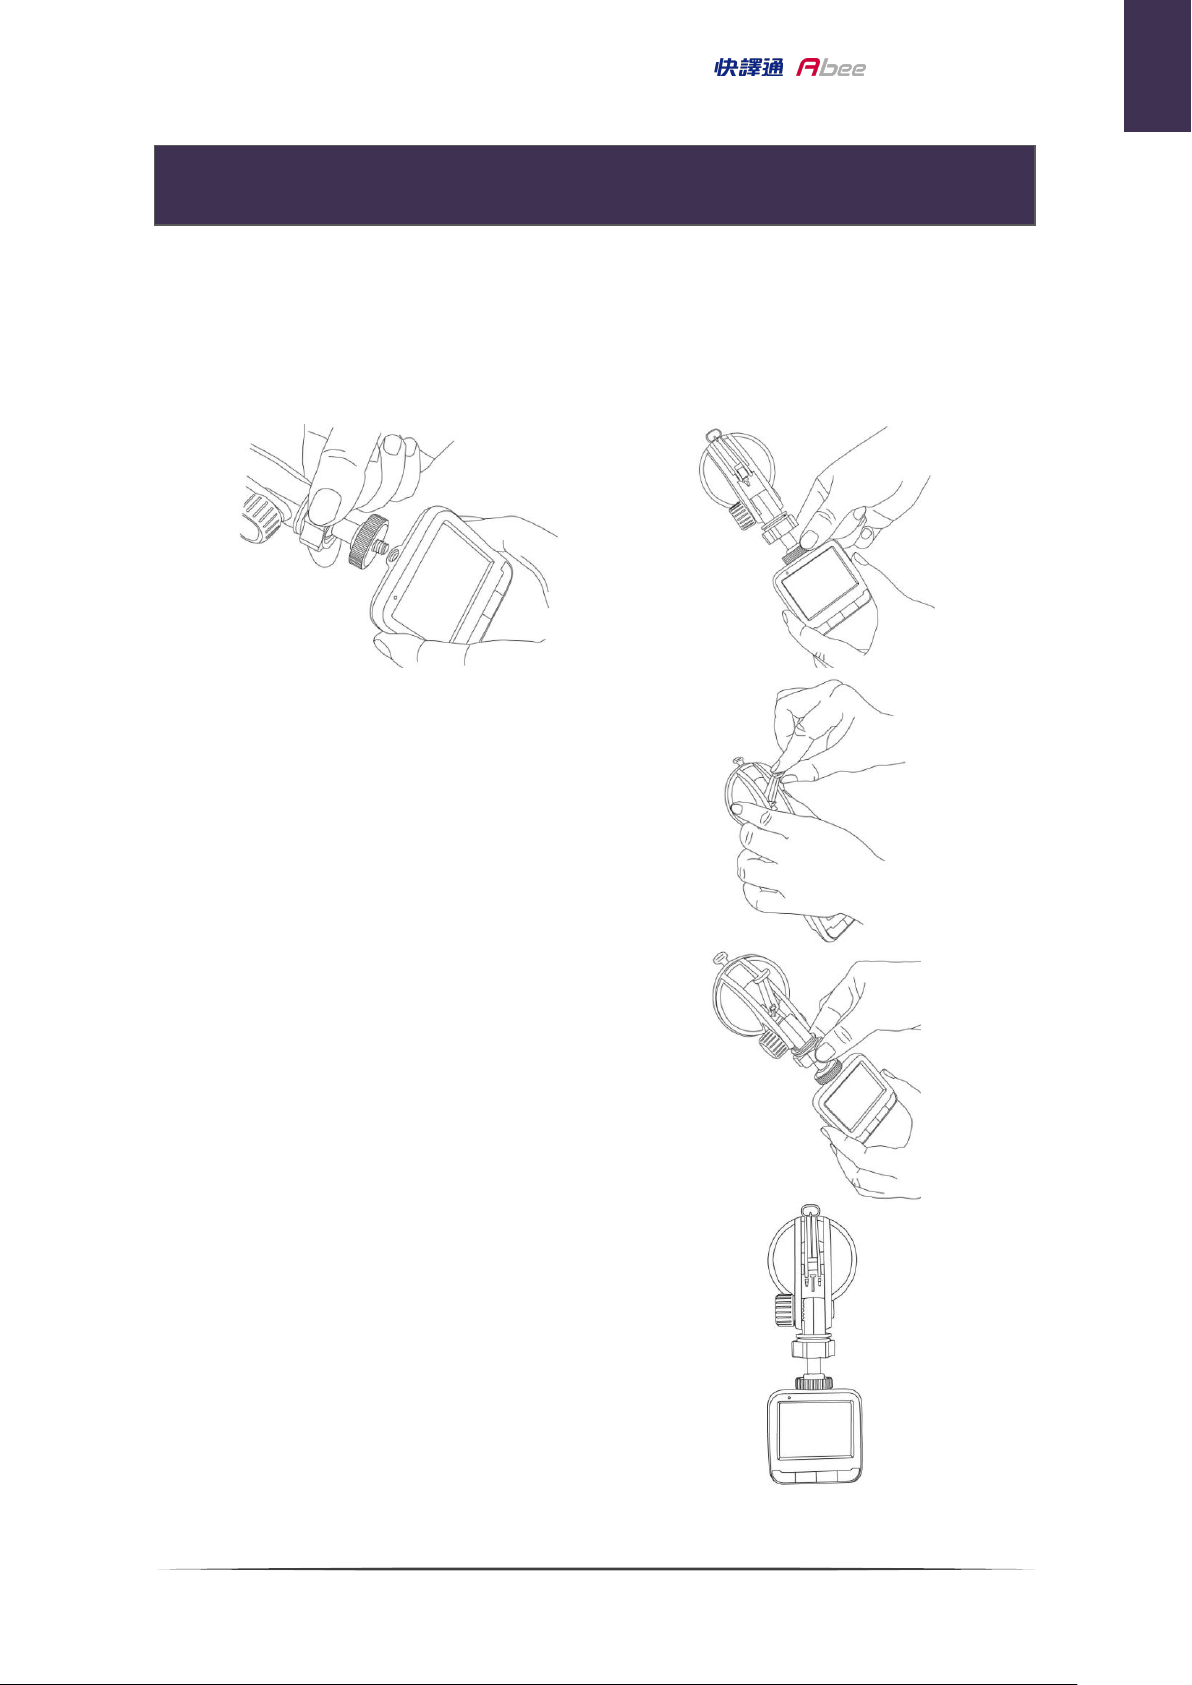
Connect the device with the bracket by inserting the screw hole on top of
your device in the screw of the bracket; turn the screw knob in clockwise
direction until it firm.
2.
Place your Driving Recorder in the proper
position, stick the suction plate to the
windshield, and press the plate button to
secure the stand
.
3.
After install the bracket, release the
adjust knob below the suction plate to
adjust the shooting angle.
4.
After finishing adjust shooting angle, turn
the adjust knob until it firm to lock the
position of the device.
5.
Insert Micro SD card in to Micro SD card
socket.
6.
Insert car charger it to cigar socket and
connect to V10
.
Hardware Installation Guideline
English
Hardware Installation Guideline
Installation
4
Page 7
V10
Car Recorder Manual
※
Warning
Do not install Abee products over an air bag cover or within the air bag deployment
zone. The company assumes no responsibility of liability for injury or death as a result
of car crashes and/or air bag deployment.
English
Uninstall
1.
Uninstall the device: hold the bracket firmly, turn the device in clockwise direction.
2.
Uninstall car bracket: Pull up the car stand suction plate button to remove it.
Installation Recommendations
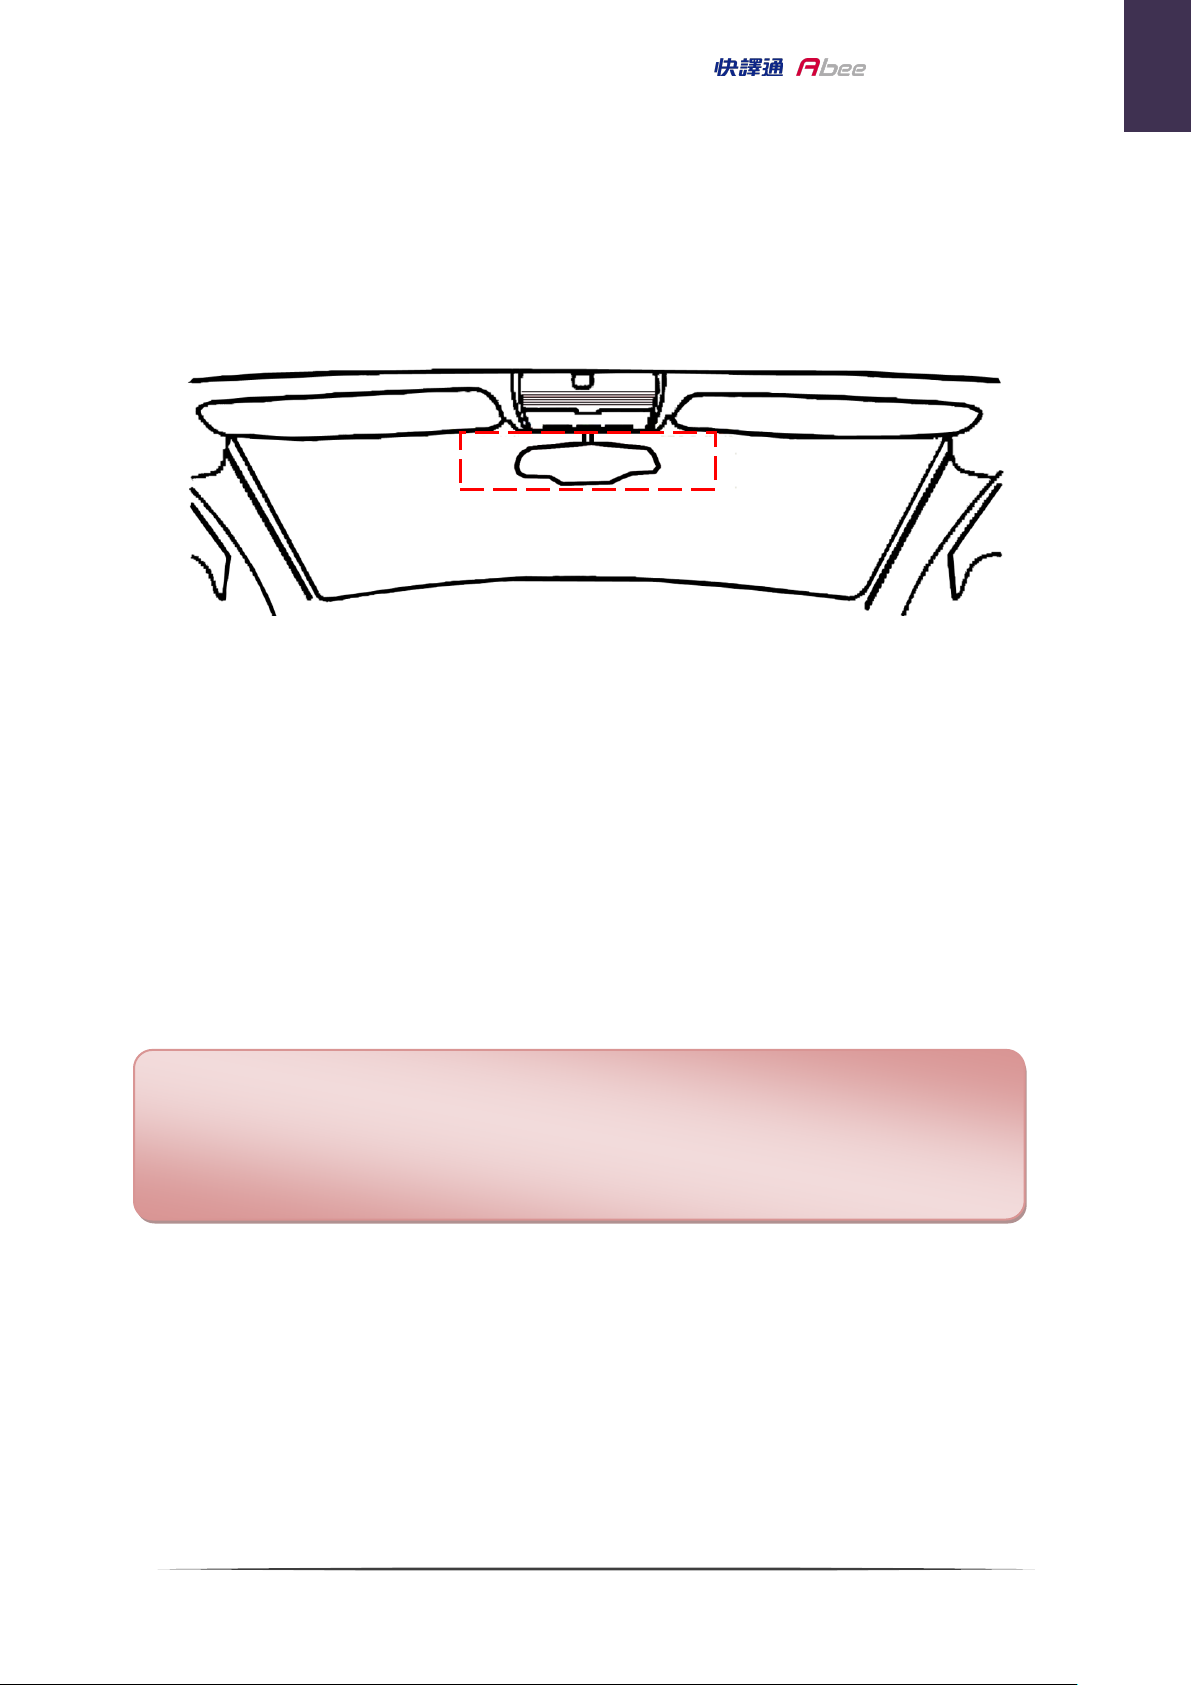
1.
Install your product as close as possible to the rear view mirror in your car to get the
best view.
2.
The lens should be in the area that windshield can be cleaned by your wipers to get
good images on a rainy day.
3.
Do not install your product in a place that may interfere with operation of the air bags
in your car.
4.
Do not place your product in a position that may be blocked by the heat insulation.
5.
Clean the bracket suction plate before installation.
5
Page 8

V10
Car Recorder Manual
※
Trouble shooting
1.
Check the memory card (Micro SDHC) is inserted.
2.
Check that there is enough free memory space on your memory card and
there are no existing file system errors.
3.
If problems persist, please backup files from the memory card and use the
device to format your memory card.
Operational Guideline
English
Operational Guideline
i. Turn on / Turn off
1.
Turn on
When the device is not connect to external power, press ON/OFF key and
hold for 2 seconds to turn on the device.
2.
Turn off
When the device is power on, press ON/OFF key and hold for 2 seconds to
turn off the device.
3.
Auto turn on and off
※
When the car charger is powered by the cigarette lighter socket, your device
will automatically turns on when the engine is started.
※
When the car charger is powered by the cigarette lighter socket, your device
will automatically turns off when the engine is stopped.
※
If your device is powered by the cigarette lighter socket, it will automatically
turn off if the external power is removed (by unplugging the USB cable).
※
In case the device is still powered by car cigarette charger when the engine is
off, in this case the auto power-off function is not supported
ii. Recording
1.
General recording
Under general mode, press
corner of the screen will show red dot
.
key
, to start recording mode, on the upper left
●and time.
6
Page 9

V10
Car Recorder Manual
English
2.
Auto Recording
In the auto recording mode, the device will turns on and enters the recording
mode automatically when the power is connected.
3.
Stop Recording
Under recording mode, press key to stop recording
4. Stop recording after power off
.
Under the recording mod, when turn off the power, the device will stops
recording, saves the file and automatically turns off.
7
Page 10

V10
Car Recorder Manual
English
iii. Emergency Recording
1.
Under the recording mode, press key for
Lock,
the device will automatically
lock the file, on the upper right corner of the screen will immediately show
"lock" icon, the file will not be deleted from loop recording, and press key
to stop recording.
2.
With the collision detection on: when the collision occurs, the device will
automatically trigger the emergency recording mode to protect the file. On the
upper right corner of the screen will immediately show "Lock" icon
key to stop recording.
3.
When the emergency video files in more than 30% of the card capacity, in the
, and
next emergency record, the message "emergency recording space is less than 30
percent backup locked movie" will show on the screen. Please refer to the
fourth section of manual regarding unlock, or file backup
4.
When emergency recording file is full, the next emergency recording screen will
.
press
appear “emergency recording file is full, please back up the locked film
refer to the fourth section of manual regarding unlock, or file backup
5.
4G memory card can save up to 5 emergency video files, 8G memory card (or
above) can save up to 10 emergency video files.
”.
.
Please
6. When the emergency recording file is full, under the recording mode press
to enter emergency recording mode, it will show the message “emergency
file is full” and the oldest emergency file will be overwritten.
8
Page 11
V10
Car Recorder Manual
English
iv. Video playback/Locked file/Unlock/Delete
1. Vide preview
Under general mode, press key to choose Play, to enter the video playback menu,
use key to select the file type
key to choose OK, after choosing the type of video, and you will see the videos
playlist. Use key to choose the video, press key to choose OK, to
playback. Press key to choose Back, to return to the playlist.
2. Lock video
Under general mode, press key to choose Play, to enter the video playback menu,
use key to select
type of video you will see the videos playlist. Use key to choose the video
you want to lock, press key to choose OK, to playback. While playing the video
press key to choose Pause, to stop the video, press key to choose Lock, the
video will be moved to emergency video list.
recording
3. Unlock video
.
video, Press key to choose OK, after choosing the
Normal Records or Locked Records, Press
The file will not be deleted from loop
Under general mode, press key to choose Play ,to enter the video playback menu,
use key to select
choosing the type of video you will see the videos playlist. Use key to
choose the video you want to unlock, press key to choose OK, to playback. While
playing the video press key to choose Pause ,to stop the video, press key to
choose Unlock, the video will be moved to general video list, and the screen will return
to the emergency video playlist.
File deleting
4.
Under general mode, press key to choose Play ,to enter the video playback menu,
use key to select the file type
key to choose OK, after choosing the type of video you will see the videos playlist.
Use key to choose the video you want to play, press key to choose
OK, to playback. While playing the video press key to choose Delete, the
Locked Records, Press key to choose OK, after
Normal Records or Locked Records, Press
9
Page 12

V10
Car Recorder Manual
English
screen will show the confirmation message, use to choose Yes or No, then
press key to choose OK, to delete file. Press key to choose Back, to
return to the pause screen. Press key to choose Resume to playback. Press
key to choose Back, to return to the playlist.
10
Page 13

V10
Car Recorder Manual
English
v. Menu function
In general mode, press the
1.
Time Setup: Set up the current time
In the menu screen: Select
time then press key to choose OK. After setup has been completed it will
automatically return to the previous screen.
2.
Time Stamp: to set up the recording date & time on video
In the menu screen, select
3.
LCD Setting: to set up whether to turn on the screen while recording
In the menu screen, select
minutes or Off.
4.
Audio Recording: to set up whether to record sound in to video
In the menu screen, select
5.
Sound Effect: to set up whether to turn on the keypad tone
In the menu screen, select
6.
Auto Recording: to set up auto turn-on and record when engine is started.
In the menu screen, select
key to choose
Time Setup.
Time stamp, then select On or Off.
LCD Setting, then select on, Off in 30 Seconds, Off in 3
Audio Recording,
Sound Effect, then select On or Off.
Auto Recording, then select On or Off.
Menu
, to enter the menu screen.
Use key to set up the date and
then select
On or Off.
7.
Collision Detection: in recording mode, when accident or impact occurs the
device will automatically lock the current file. The sensitivity of collision can be
, collision information will be shown through ADR Player.
set
In the menu screen
Sensitivity、Low Sensitivity or Off.
8.
Frequency Setting: to set the display frequency to avoid the images flashing
In the menu screen
9.
Shutdown Delay: the device will keep recording for a short footage before
shutdown.
In menu screen, select S
10.
Language: to set up the language for operational interface.
In menu screen, select
Simplify Chinese(
11.
Format: Format memory card (Micro SD).
In the menu screen, select
, select Collision Detection,
, select Frequency setting, then select 50Hz or 60Hz.
hutdown Delay, then
Language,
简体中文
) or English(English) .
then select
Format, then select Cancel or OK. Select OK
then select
select S
Traditional Chinese(
High Sensitivity、Normal
hutdown in 10 Sec or Off.
繁體中文
your memory card. Please backup important data before formatting your card.
12.
Default Setting: Reset all the setting to factory default.
) ,
to format
In the menu screen, select
the setting to the factory defaults.
Default Setting, select No or Yes. Select Yes
11
to reset all
Page 14

V10
Car Recorder Manual
English
vi. Memory card (Micro SD) PC connection instruction
1. With card reader
Remove the memory card after turning off the device. Insert the memory card
in a PC card reader. Your PC will detect a removable device. Open Windows
Explorer to browse the files on the V10 memory card.
2. Memory card content operational, please refer to the next section, ADR player software
operational.
vii. DVR Player program ADR Player: software operational, file playback and access
instruction
After connect (Micro SD) to your PC, in the folder will show application,
double click to open the program.
1.
System requirement
CPU: At least Pentium 4 2.4GHz or above
Monitor: Required to support 1280 * 720 or 1280 * 1024 resolution of the
screen
RAM: At least 1 GB of memory
OS: Required to support Windows XP、Windows Vista(32 bit & 64bit) &
Windows 7 (32 bit& 64bit)
2.
Audio: System must have the audio device installed
USB 2.0 High Speed supported of SD / SDHC card reader
Software installation
ADR Player no need to install, user can execute the program directly, and
the program can e executed in the SD card (SD card cannot be noted for
the write-protected) or according to user their own copy to the hard disk to
execute.
In Windows Vista and Windows 7, the executive shall be the system
administrator permissions to open the normal execution
.
12
Page 15
V10
Car Recorder Manual
English
3.
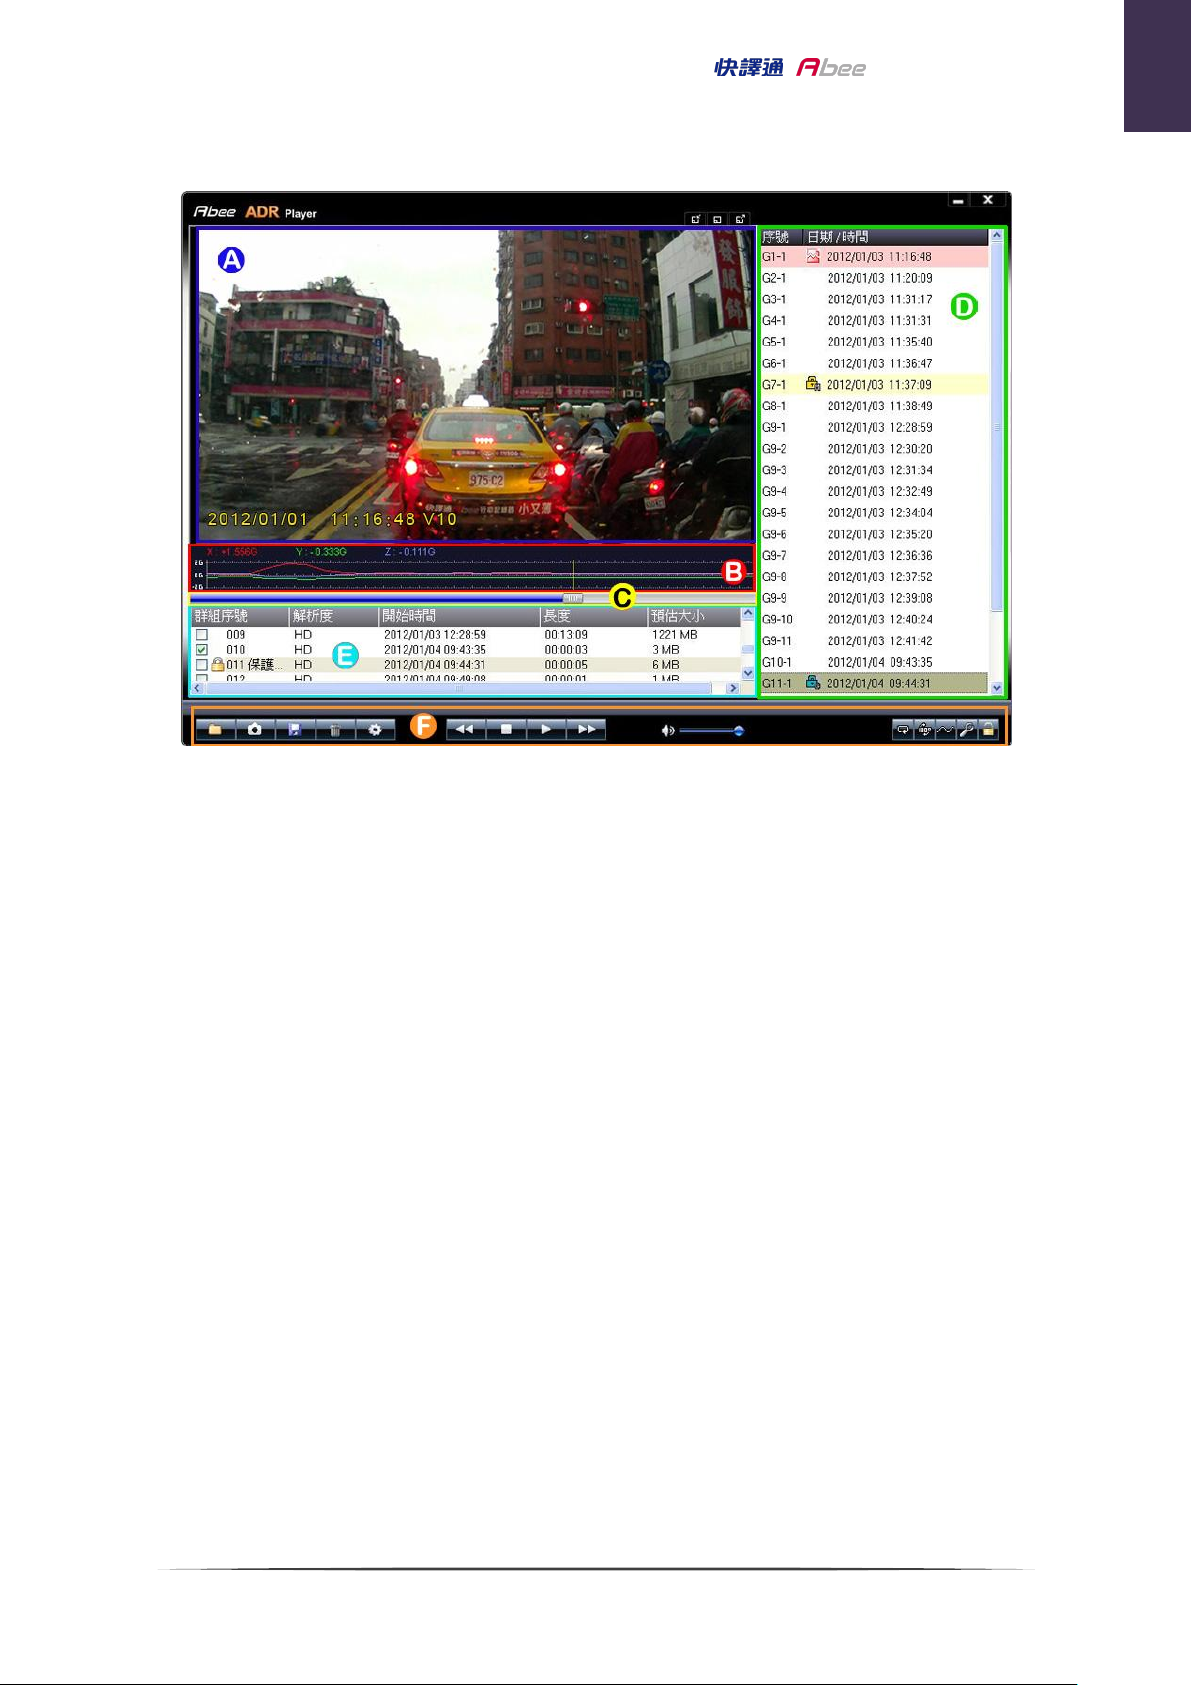
Software interface description
A. Image display area: Displays the current playback image.
B. G-Sensor display: Show G-sensor information of current video.
C. Playback progress bar: Shows the progress of video playback, you can drag
the mouse to the video position where you want to see.
D. Video section list: Displays the current Micro SD card list of all the videos
section.
E. Video Groups List: Micro SD card shows the current group information list of
all the videos.
F. Function Bar
13
Page 16
V10
Car Recorder Manual
English
4. Operational guideline: Buttons instructions
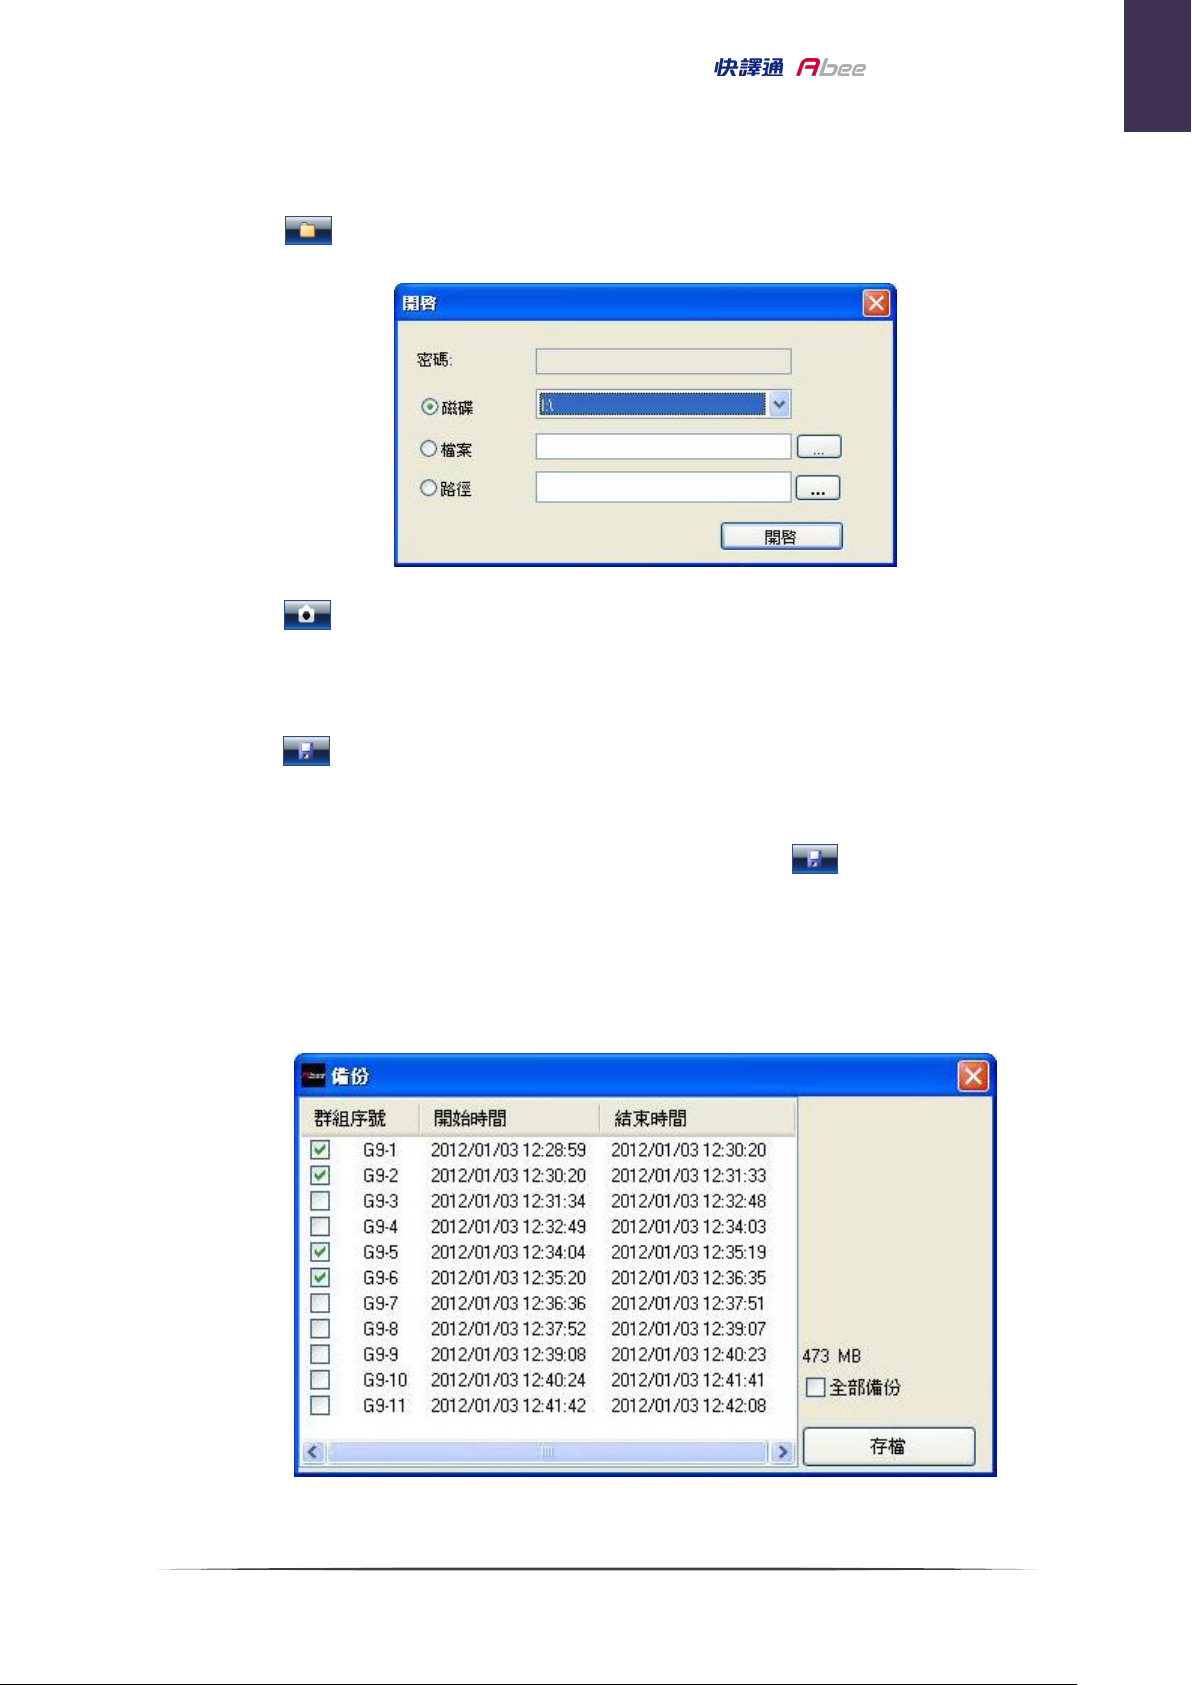
A. Open disk: Open the video in which SD card drive
B. Snapshot button: Save the current screen captured into a JPG image file.
During playback or pause playback of the video, you can press this button to save as a
JPG
image file, file name will be saved to screen name at the time.
C. Save button: The recorded video image will be transferred and save as AVI
video.
a. If you want to store a single group within a certain segment of the video, you
can directly select the group list in the film, the group, click save button, After
the election, the path you want to archive the following screen will appear, then you
can choose to back up to check the video section, or choose to save the entire group all
of the backup. At bottom right, estimate the file size, can help you to confirm the
purpose of backup storage disk in the adequacy of the space to archive.
14
Page 17
V10
Car Recorder Manual
English
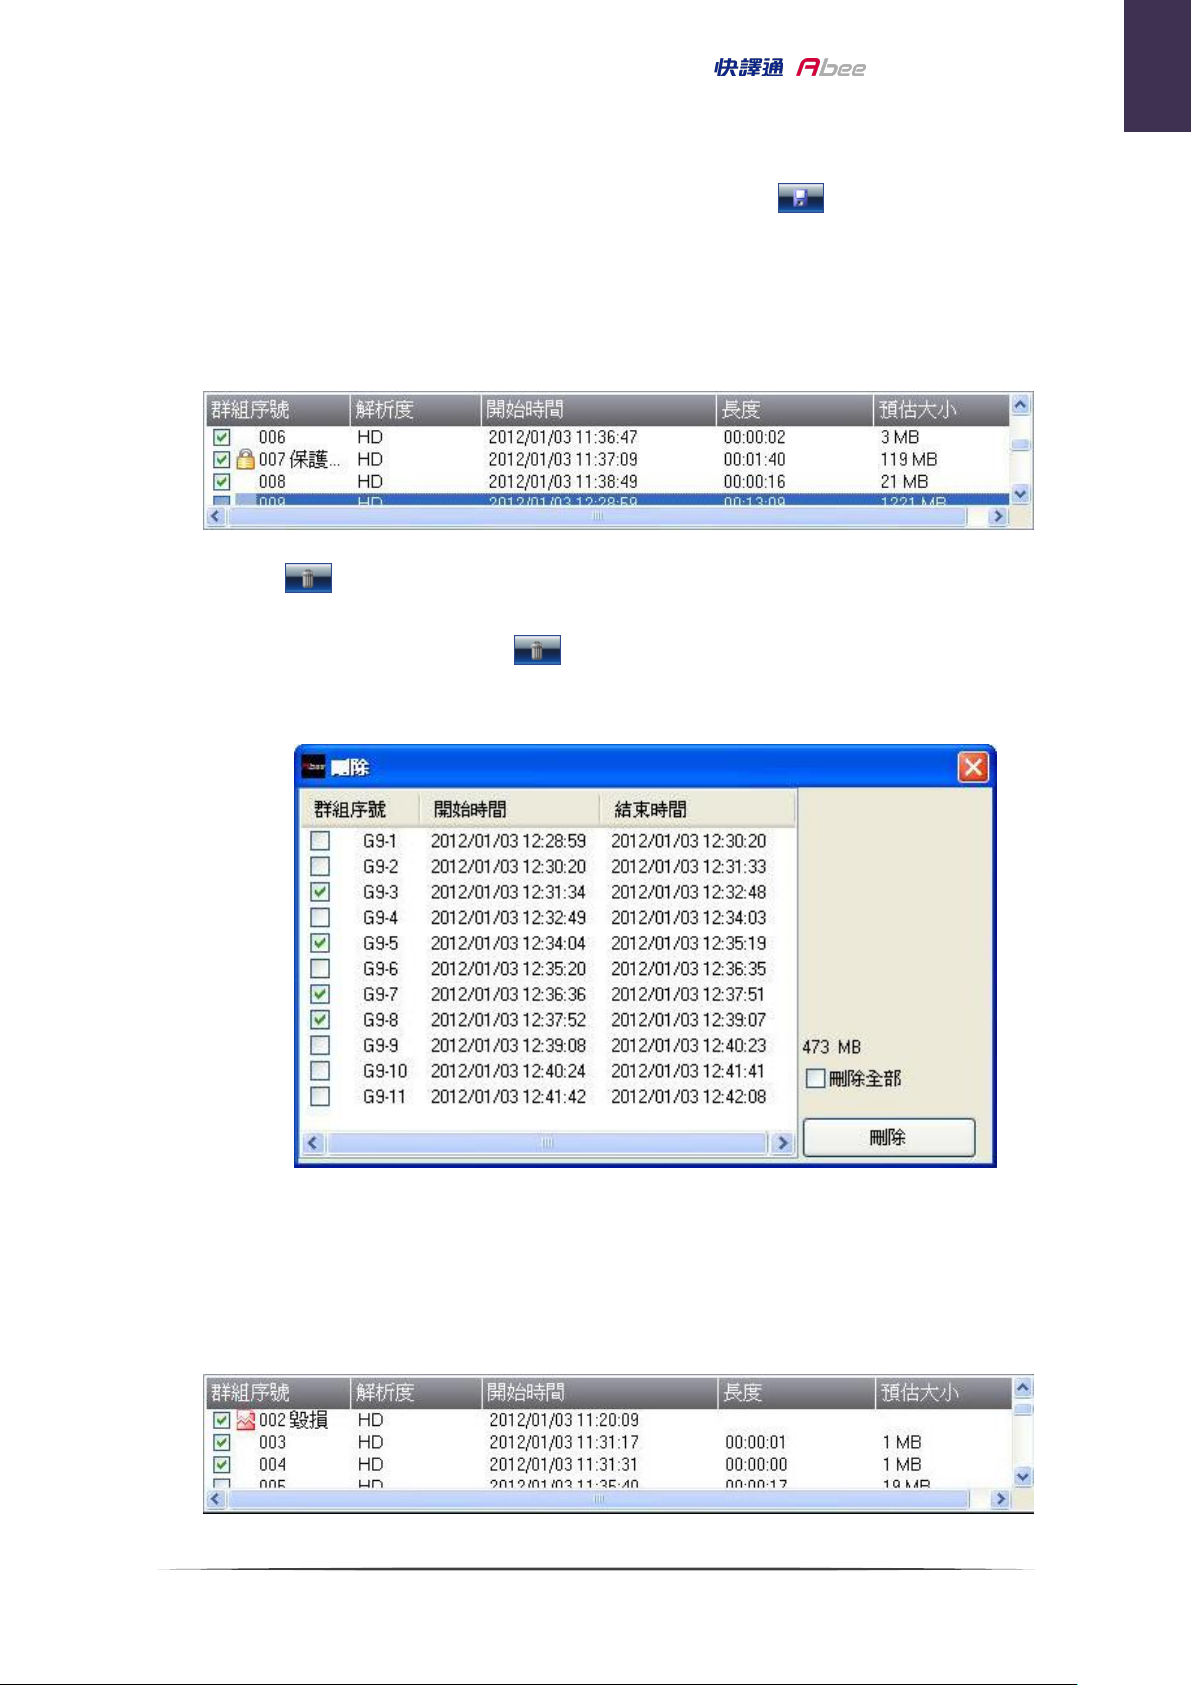
b. If you want to save more than one group of films shown in the video group list,
check the groups you want to save (see below), then click save button, these
groups were transferred directly saved as AVI File. If the video a long time, transfer
process may take some time, please be patient and you may press stop button to
cancel during transfer processing. AVI files transferred out of maximum of each file size
2GB, if more than 2GB will be automatically saved as another AVI file.
D. Delete video button: Delete recorded video in the Micro SD card.
a. Remove certain videos within a single section of the group: Selected in the
group to the group list, click Delete button will appear as below, then choose to
delete the video section or the use of select Delete All to delete the entire
group.(
b.
below)
Delete more than one group of videos: In the group list, check you want
to delete the group (below), then click the delete button, the confirmation
deletion message will pop up, press the “yes” button then the video will be
removed.
15
Page 18
V10
Car Recorder Manual
English
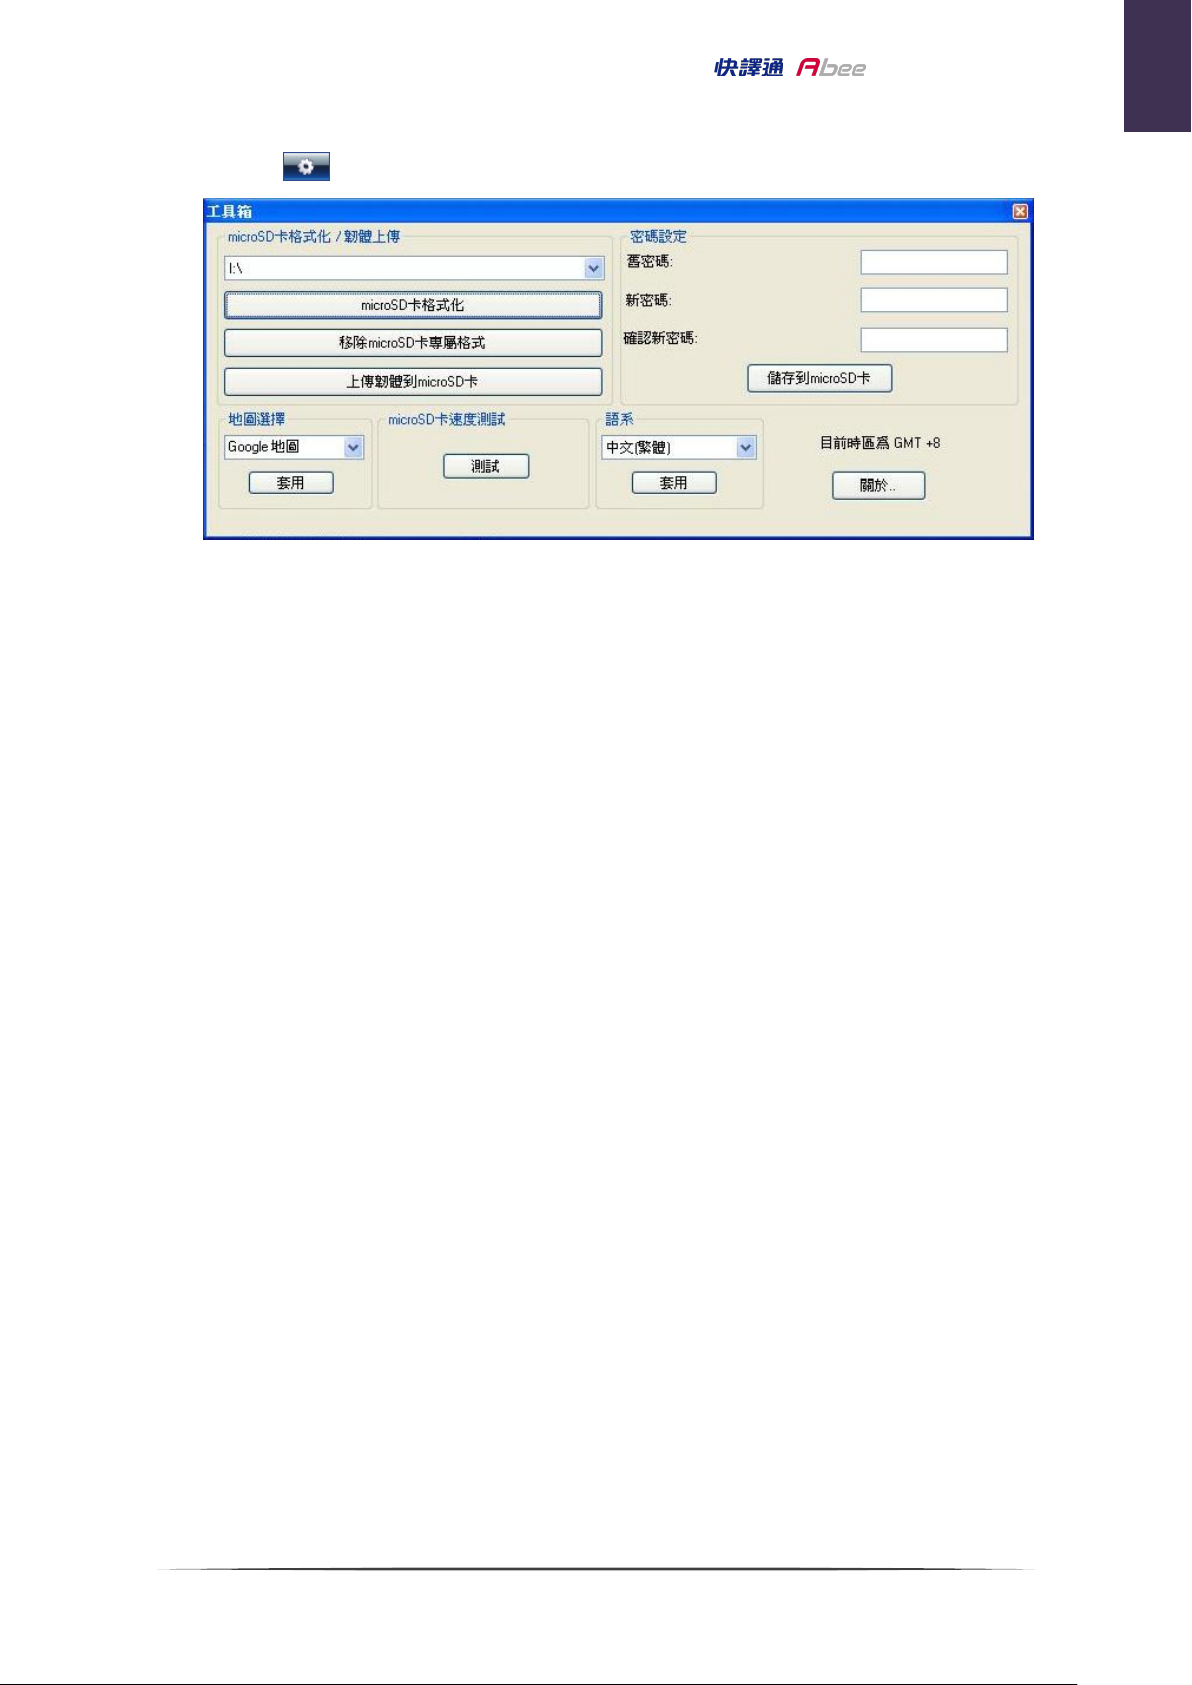
E.
Tool button: For system setup
a. Format Micro SD card
(as picture below)
Will format the Micro SD card reader into the Abee V10 proprietary file format,
and then of ADR Player software will be copied in to the memory card so you
can use any computer to watch the video
.
※ Format Card
password.
b. Remove
all data will be removed after Micro SD card formatted
Micro SD
card exclusive file format
User could use ADRplayer to remove the
Abee V10 exclusive file format,
including
and
restore the Micro SD card as common FAT format for other purpose use, also
you can use Windows itself function to format the Micro SD card.
※ After”Remove
card will be deleted.
c. Download firmware to
Users can upload Abee V10 Firmware to
have released new firmware, users can use this function to load the Abee firmware of
the BIN file to the
※ Before the implementation of this feature, make sure you have selected the correct
Micro SD
Micro SD
card exclusive file format.” all the information in
Micro SD
Card.
card
Micro SD
card via this function. When Abee
Micro SD
disk and it has been placed in the
state.
※ Make sure the
before implement this function.
Micro SD
Micro SD
card has been formatted to Abee exclusive file format
16
card and
Micro SD
card is not in the Lock
Page 19

V10
Car Recorder Manual
English
※
If the firmware BIN file is correct and upload into Micro SD card, it will pop
up a message of "firmware upload complete!!” Please follow Firmware update
instruction which describe in Abee Firmware specification to update firmware if
there is new Abee firmware version released
d.
Password settings
User can set a password to protection
new password, user must enter the old password before setting a new password. To
cancel the password, just keep the new password field as blank. After setting, press the
right column of the "Save to
Micro SD
※ !!Remind!! Please remember the Password which you set in
otherwise, user will need to “Format
this will caused all videos or data will be deleted.
Test currently used Micro SD card read and write speed, for the smooth of Abee V10
HD video, the speed test from the Micro SD card write speed should be at least
card. User needs to input password then can open
e. Micro SD speed test
Micro SD
Micro SD
card" button that will set the password value
Micro SD
.
card content, if the use need to set a
Micro SD
Micro SD
card” in order to remove password, but
card.
card,
4000KB/sec.
f. Language: Change the language for operational interface.
g. Record time information: Show the record time in Micro SD.
h. About:
F. Stop button: Stop video during play back, also can stop video transferring to
AVI file.
G. Play/Pause button: Start to play video or pause video.
H. Slow down button: button: The video playback speed to provide1/2 X ~ 1/5 X
speed also can slow down speed when the video is under fast forward playing.
I. Fast forward button: The video playback speed to provide 2 X ~ 5 X speeds, if
the video is under slow down speed, it can be adjusted quickly.
Display ADR player version and released date
.
17
Page 20

V10
Car Recorder Manual
English
J. Play back volume: adjust play back volume.
K. Unlock button: to unlock the protected video
for the video list displayed in the group that been protected, press this button will pop
up a whether determine to unlock the video message, press “yes” then can unlock the
group videos.
※
It cannot lock again after unlocked, please make sure you have saved the copy file
then do unlock function.
18
Page 21
V10
Car Recorder Manual
English
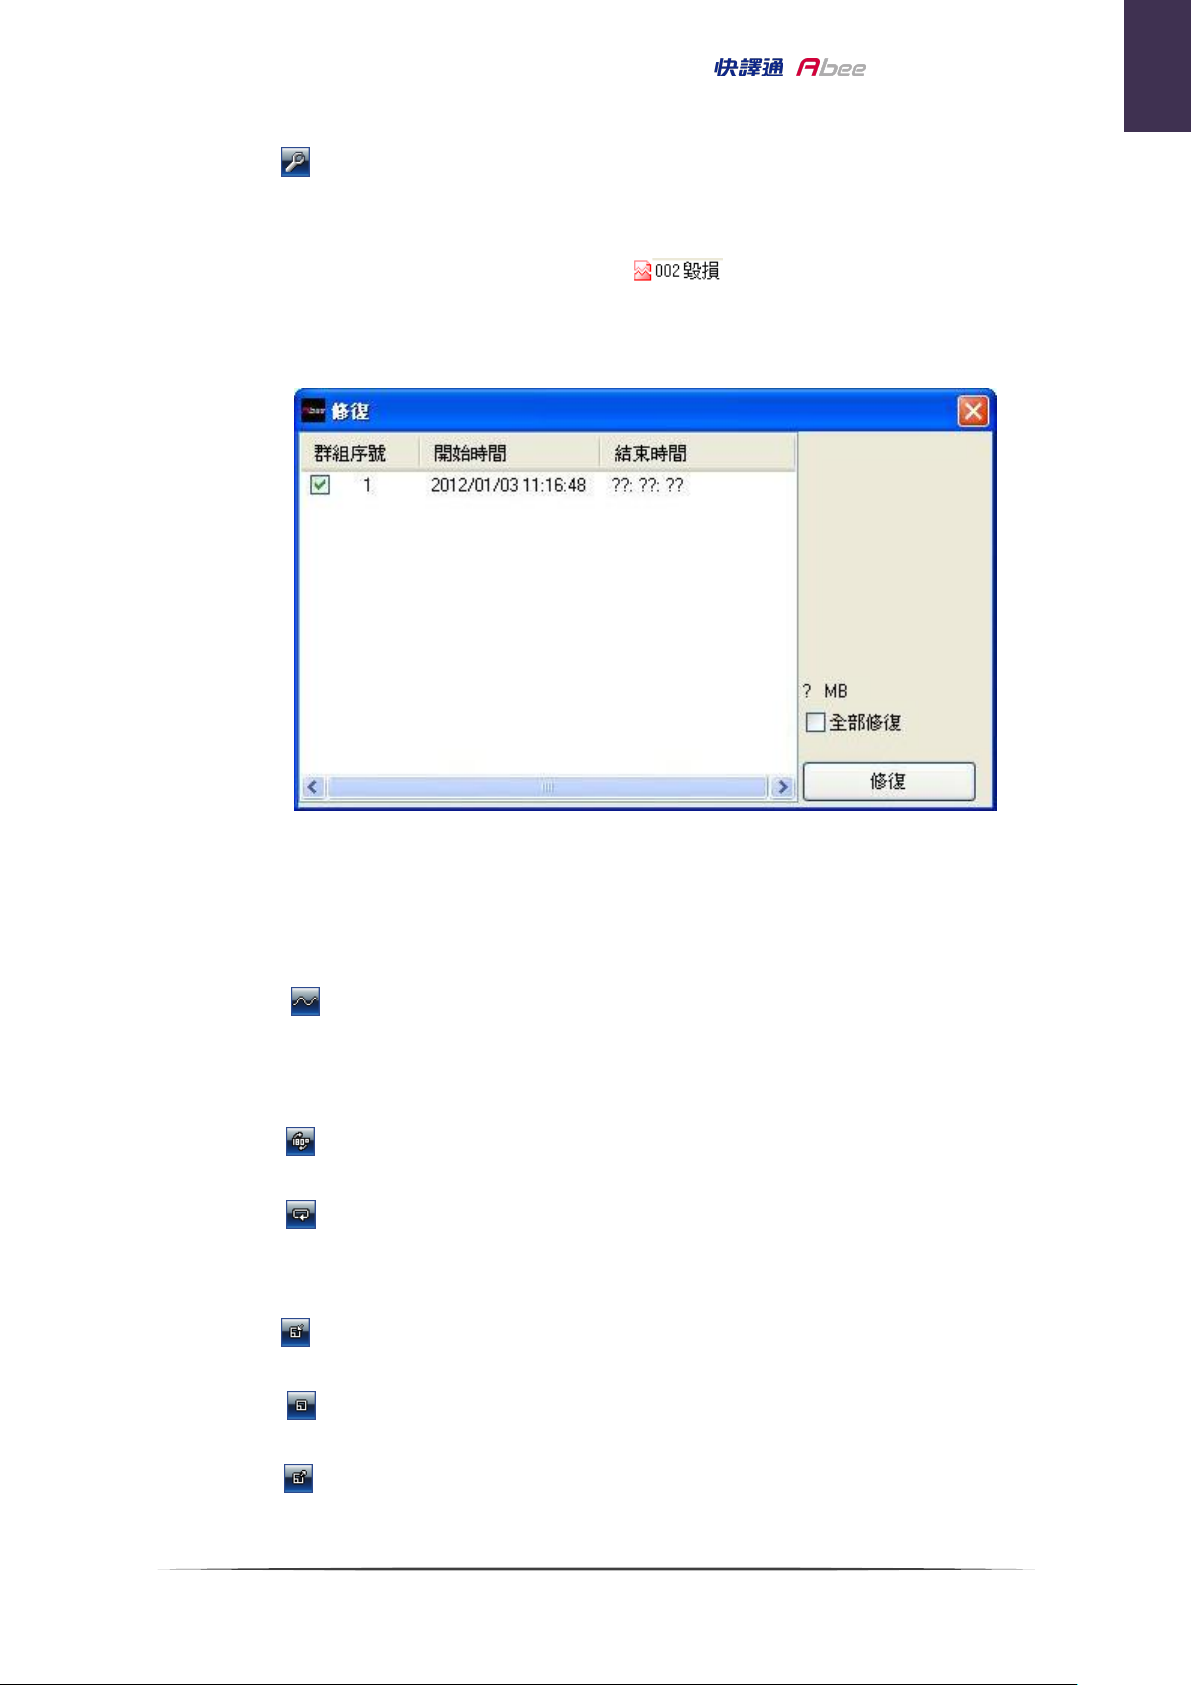
L. Repair button: can repair the damage video
For the result of abnormal pull cards, power outages and other factors led to the end of
the video destruction without the normal power off process (the group list of the
damage file will show the red background: ), press this button, it will display
all of damaged group list (as blow photograph), user can check the video section you
want or choose to repair all damage repair to a revision of all the videos.
※The video shall be restored to normal video after repaired, the restoration of the
video if its start time and end time on the difference between a group of less than two
seconds, will be incorporated into the last group, not a single display, and will not show
"fixed" in the group list.
M. G-Sensor information display switch: the G-Sensor information display area
can be turned on or off. Press to open or close the G-Sensor information display area,
the G-Sensor X, Y, and Z axes of information available to be the accident reference.
N. Rotate 180°: video rotate 180° display.
O. Repeat button: to repeat the current play back video, if this function is
activated the button will turn blue.
P. Small window size: for small resolution on desk top.
Q. Medium window size: For normal resolution of desktop.
R. Large window size: For high resolution of desktop (such Full HD) of desktop.
19
Page 22
V10
Car Recorder Manual
Display
2.4” TFT LCD color screen
Image sensor
CMOS HD Sensor
Lens
120° wide angle lens
Video Resolution
HD 1280×720 (30fps)
Video Format
AVI
Video Compression
MJPEG
Loop recording
auto loop recording with no Interval Time File Saving
Technology
Power supply
Cigar car charger (INPUT: 12V~24V;OUTPUT: DC5V/1A)
Built-in high-temperature resistance lithium polymer
battery
External Memory
Micro SD card (4GB-32GB), SDHC Class 6 or higher
LED indicator
2 colors indicator(Green: Power on;Red: Record in
process)
Operating Temperature
-20°C~70°C
Storage Temperature
-30°C~80°C
Certification
BSMI / CE / FCC / RoHS
Dimension
6.5(L)×6.5(W)×3(H) cm
Weight
~65g
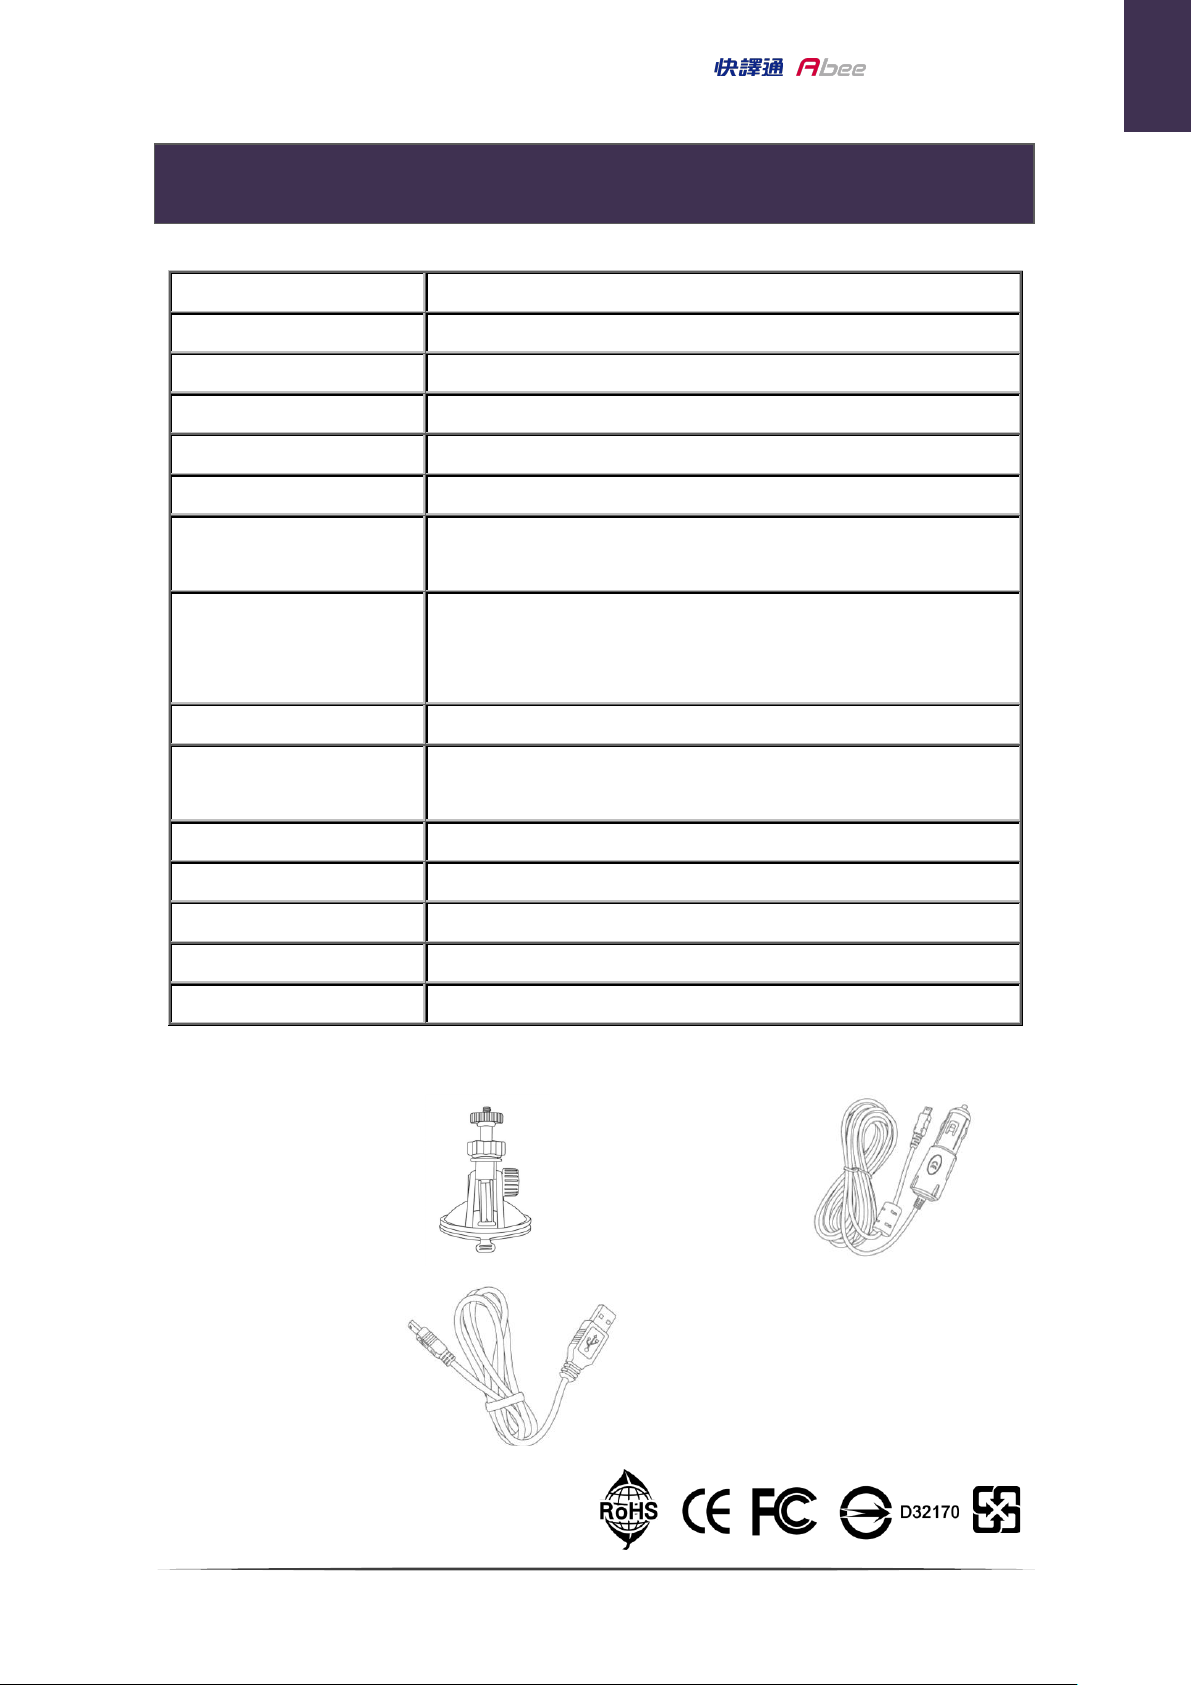
Bracket
Car cigar
charger
USB cable
Specifications
English
Specifications
配件圖
20
Page 23

V10
Car Recorder Manual
Add: 1F., No.3, Lane 316, Rueiguang Rd., Neihu District, Taipei 114, Taiwan, R.O.C.
快譯通股份有限公司
: 114
地址
: (02)8752-5008
台北
網址
Service Center: 886-2-8752-5007 Fax: 886-2-8752-5277
INSTANT TECHNOLOGY CO., LTD.
台北市內湖區瑞光路
: (04)2472-6552
台中
: http://www.instant.com.tw
客服專線
: (02)8752-5007
21
316巷3號1樓
: (07)536-5989
高雄
 Loading...