

Page 1

We are very proud of the design and quality of
the Ab Coaster® Pro. This product has been manufactured
to the highest standards. Should you have any problem
our friendly customer service staff is here to help you
if you have a question.
We are available at:
973-287-5180
8:00am– 9:00 pm EST Monday – Friday
9:00am– 5:00 pm EST Saturday & Sunday
www.abcoaster.com
© 2008 TRIS TA R PRODU CT S, I NC.
ALL RIG HT S RE SERVE D.
U.S. Pa t. N os. 7,6 11 ,445 an d D5 65,13 4 an d other Pat ents Pend ing
U.S. Tr ad emark R egistra tion Nu mb ers 340 73 62 and 2632 152
Distributed by: Tristar Products, Inc., Fairfield, NJ 07004
© 2008 Ab Coa ster, LLC A ll R ights Res erved .
AbCPRO_IB_QVC_ENG_V2_101223
Page 2
Page 3
CONTENTS
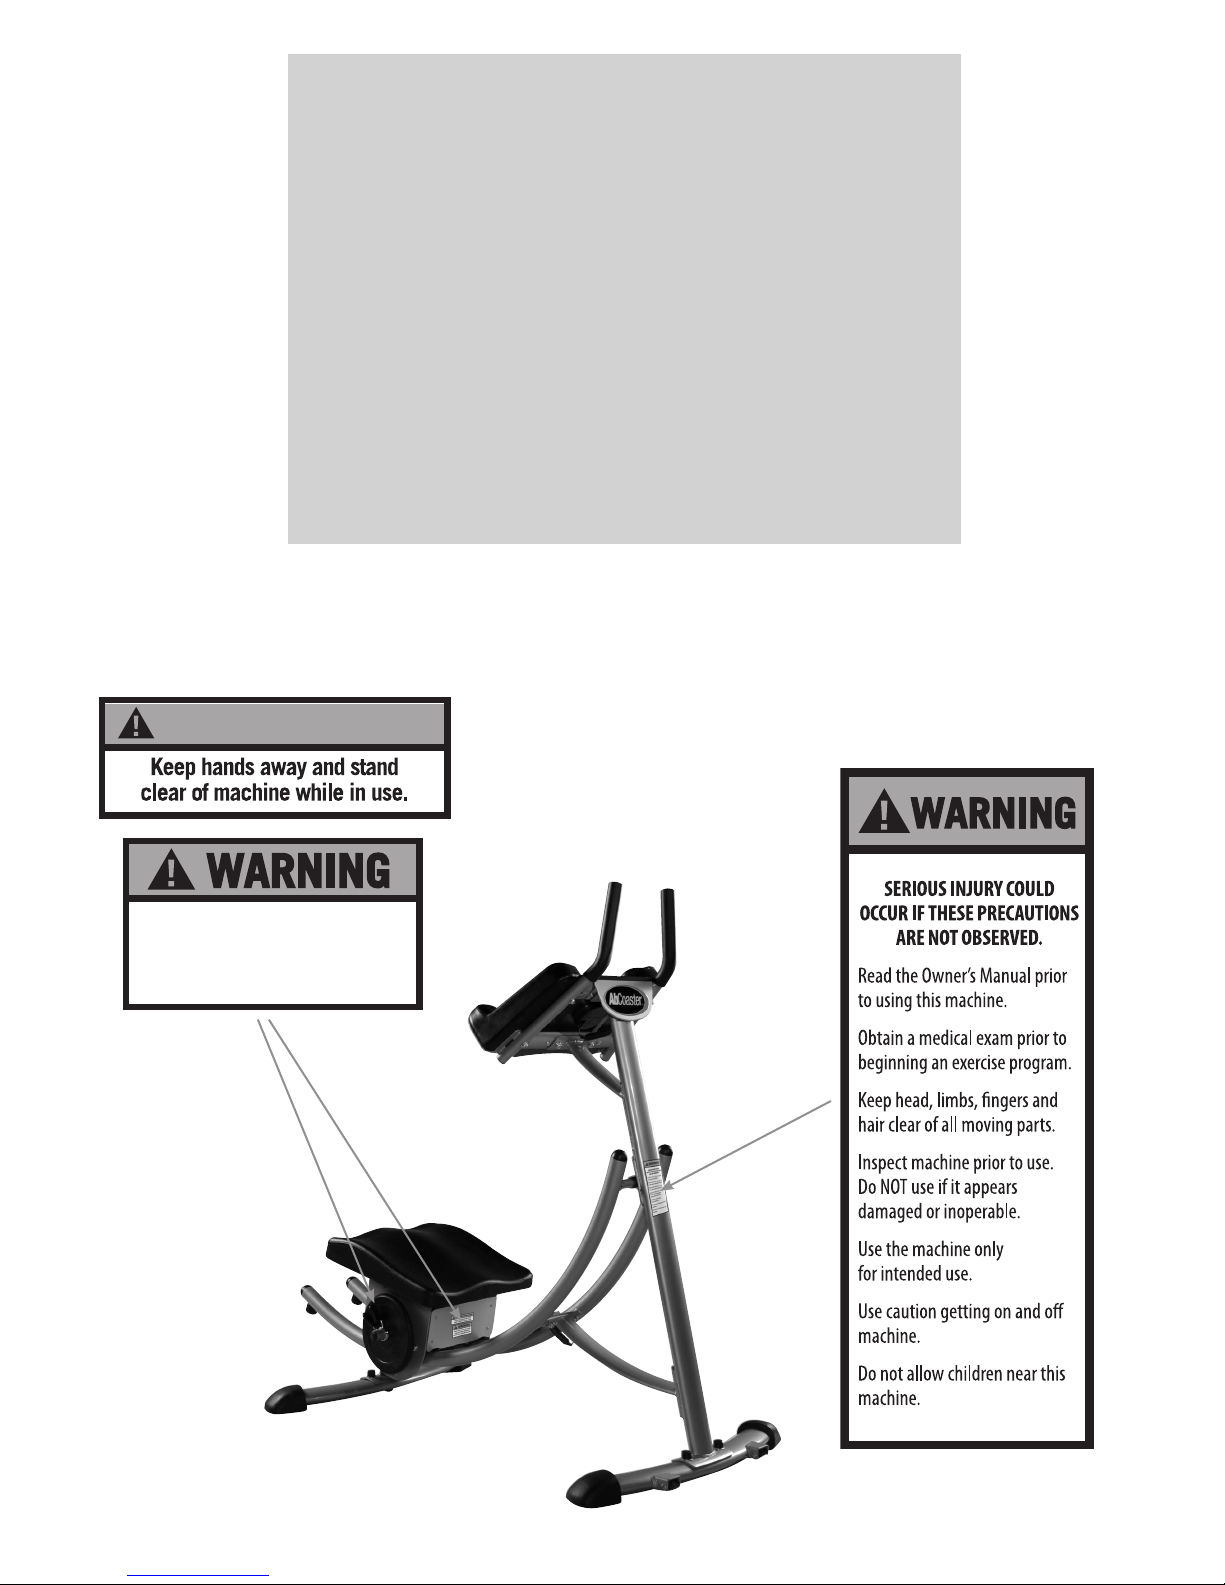
CAUTION: PINCH POINT
Make sure locking pin is fully
engaged before beginning
forward and side lift exercises.
Make sure locking pin is fully
engaged before beginning
forward and side lift exercises.
CAUTION: PINCH POINT
3 Important Safety Information
4 Assembly Instructions
6 Adjusting the Seat
6 Getting On and Off the Ab Coaster® Pro
7 Ab Coaster® Pro Exercises
a. Forward Lift
b. Side Lift (Obliques)
c. “Free-Style Motion” Training
d. Resistance Training
10 Digital Counter
10 Moving, Storing and Maintaining the Ab Coaster® Pro
11 Parts List and View
SAFETY LABELS
2
Page 4
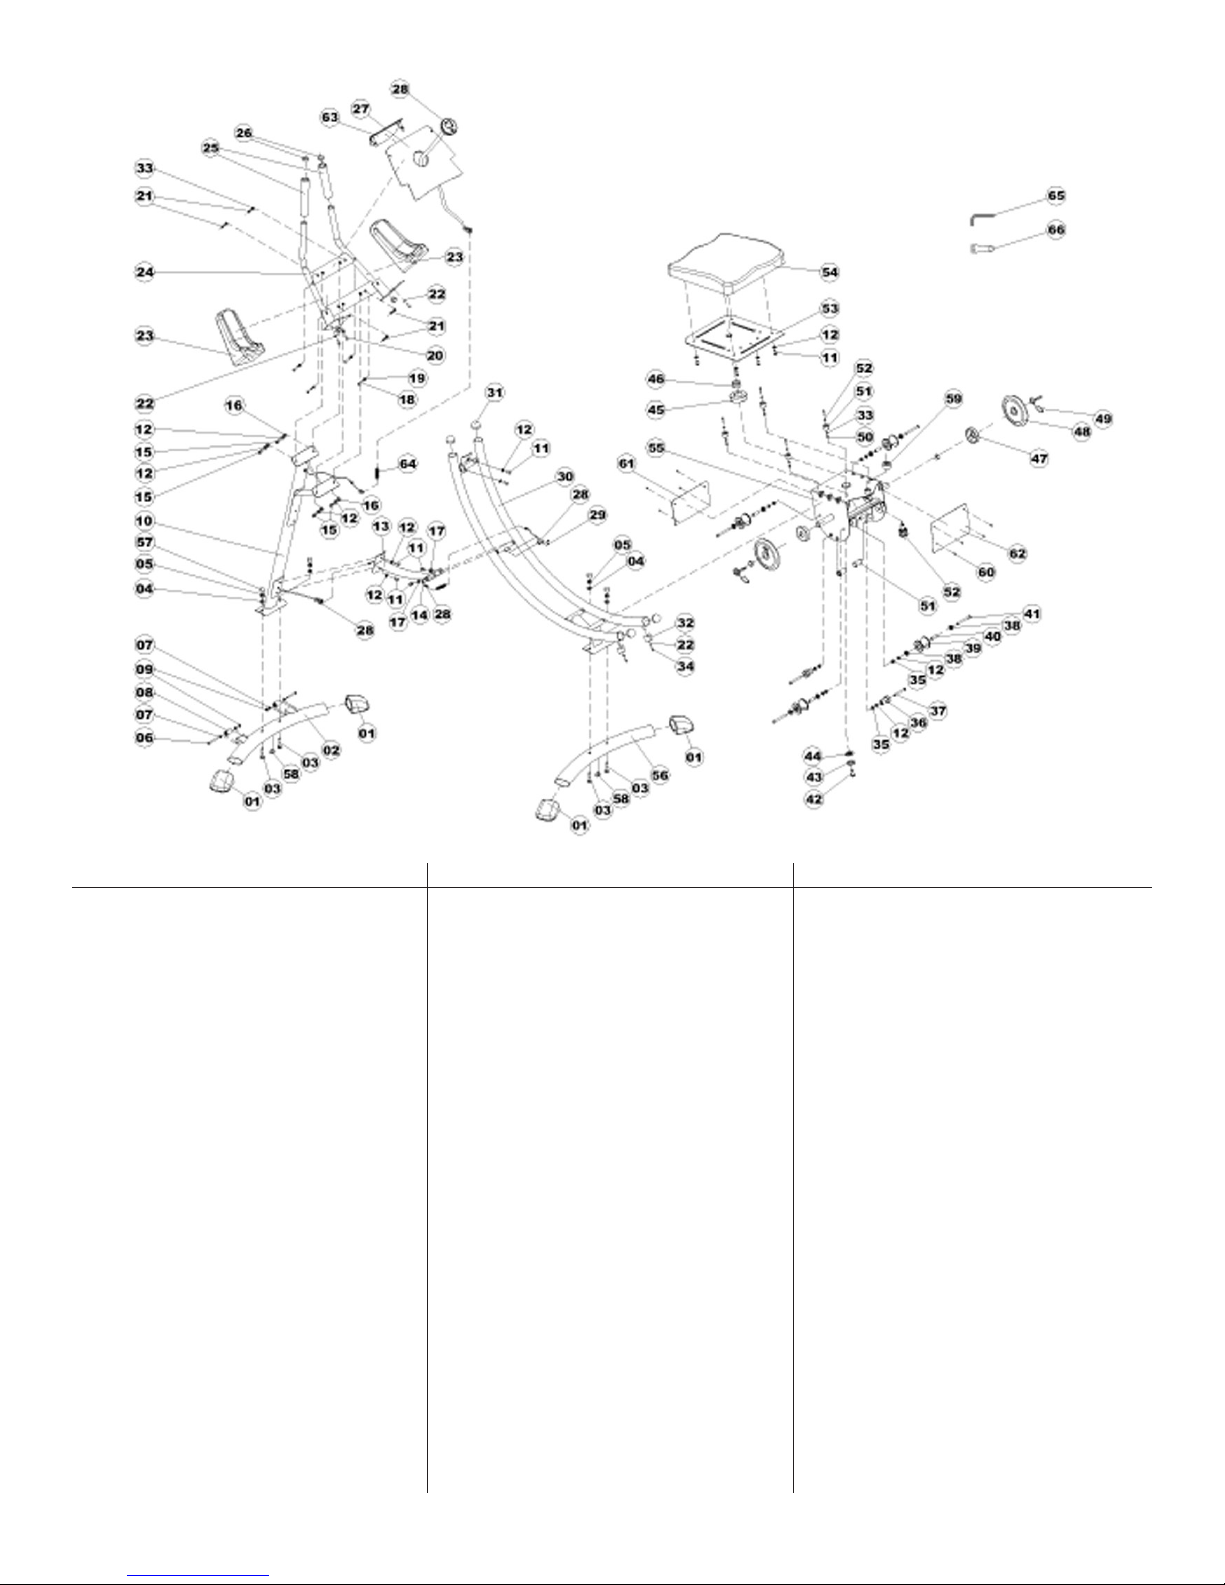
PARTS LIST AND VIEW
NO. Part Name Specification QTY (PCS)
01 foot grip match 70*35*1.5 elliptical tubing 4
02 front leg 1
03 M10*45 screw M10*45(15mm thread) 4
04 R71 arc washer ø25*d10*2.0_R71 4
05 M10 nut M10 4
06 M6*50 flanged-hex screw M6*50(15mm thread) 2
07 ø13 flat washer ø13*d6*1.2 4
08 front leg wheel ø20*ø7*25 2
09 m6 nut M6 2
10 front support post 1
11 M8*15 hex screw M8*15 10
12 ø16 flat washer ø16*d8*1.5 22
13 front support brace 1
14 wire clip ø15*12 2
15 M8*20 hex screw M8*20 4
16 ø8 spring washer ø8 4
17 R12.5 ø16 arc washer ø16*d8*1.5, R12.5 2
18 M6*40 hex screw M6*40 4
19 R12.7 ø16 arc washer ø16*d6*1.2_R12.7 4
20 M6*15 screw M6*15 4
21 ST4.8*15 self-drilling phillips screw ST4.8*15 4
22 ø18 flat washer ø18*d6*1.2 6
NO. Part Name Specification QTY (PCS)
23 arm cushion 2
24 handlebar frame 1
25 handlebar grip ø29*ø23*220 2
26 circular piston match ø25.4*1.5 tubing 6
27 arm plate 337*267*_24 1
28 counter including sensor, magnet, and ø76 wire 1set
29 M3*6 phillips screw M3*6 2
30 ab coaster track 1
31 ball piston match ø38*1.5 tubing 4
32 bumper ø32*26.5 2
33 ø10 flat washer ø10*d5*1.0 12
34 M5*10 phillips screw M5*10 2
35 M8 nut M8 6
36 spacing wheel ø32*42 2
37 M8*65 hex screw M8*65(15mm thread) 2
38 bearing 608ZZ_ABEC-5 8
39 roller wheel ø54*48 4
40 roller wheel axle 12*1.5*30 4
41 M8*75 hex screw M8*75_15mm thread) 4
42 M10*25 hex screw M10*25 1
43 ø10 spring washer ø10 1
44 lifted washer ø38*ø10.5*2 1
NO. Part Name Specification QTY (PCS)
45 nylon bushing ø70*ø40*20 1
46 ø38 nylon sleeve ø38*ø25*19 2
47 weight post collar ø70*8 2
48 weight plate (not included) 2.5KG/pcs, ø26.5 4
49
weight plate clip (not included)
50 M5 nut M5 4
51 seat swivel bushings ø25*20 4
52 M5*20 phillips screw M5*20 4
53 seat plate 1
54 seat cushion 1
55 U shape seat carriage 1
56 rear leg 70*35*1.5 1
57 m10 nut M10 4
58 leg support pad ø25*10 2
59 muffler ø28*13 1
60 ST3.5*10 self-drilling phillips screw ST3.5*10 8
61 front seat cover 1
62 rear seat cover 1
63 front logo plate 1
64 wire protection cover ø14.2*90*0.8 2
65 tool A S5 1
66 tool B S10/S13/S17 1
ø25.4*1.5__ 2
11
Page 5
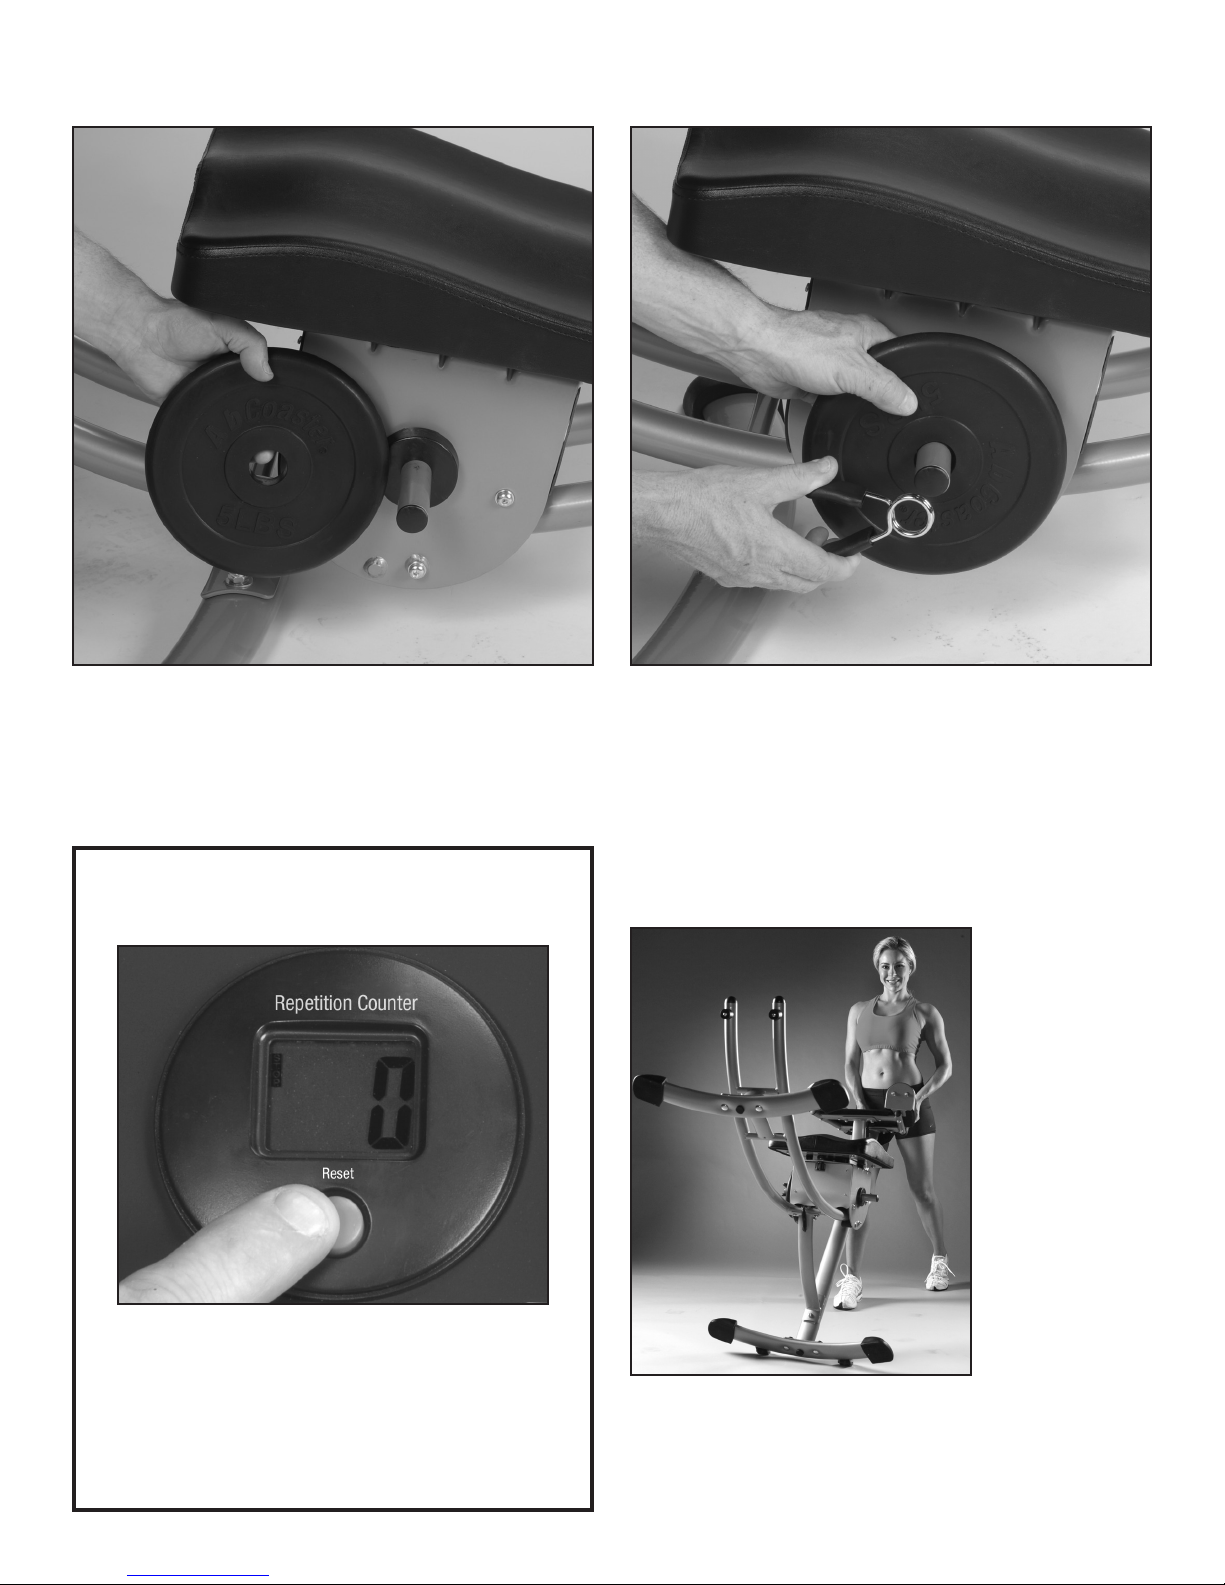
D. RESISTANCE TRAINING (Weights Not Included)
Using Added Weight for Resistance: There are 2 weight posts on the sides of the Ab Coaster® Pro Seat for adding
weights (not included) for extra resistance during exercise.
CAUTION: Do not add more than 20 lbs. of weight in total to the posts (4 plates of 5 lbs. each). Before adding any
weight, ensure that you are able to perform the exercise with proper form without any additional weights.
Please visit www.AbCoaster.com to view video of proper usage of the machine.
Moving, Storing And
DIGITAL
Maintaining The Ab Coaster® Pro
REPETITION COUNTER
The digital repetition counter helps to keep your workout
on track. You focus on exercising correctly and the
counter keeps track of your repetitions.
Requires 2 “AAA” batteries (included).
Press the mode key to start the count function.
To reset the counter,
press and hold the button for 3 seconds.
you should cover the unit with a cloth or other material to protect
the unit from excessive dust or dirt accumulation.
Maintenance:
Keep curved track clean and free of debris. Wipe periodically
with cloth to keep track smooth and clean.
Moving
and Storing:
There are 2 wheels
attached to the front
leg support of the
Ab Coaster® Pro in
order to aid in the
moving and storage
of the unit. Stand
in the front of the
unit and grasp the
handle bars.
Push down on the
handle bars tilting
the rear up until the
front wheels are
engaged.
For storage, keep
the unit in a dry
place. If placed in
long-term storage,
10
Page 6

IMPORTANT SAFETY INFORMATION
IMPORTANT: Please read and follow all instructions thoroughly before using your Ab Coaster® Pro.
• Maximum user weight is 350 lbs.
• ALWAYS USE CAUTION WHEN GETTING ON AND OFF THE Ab Coaster® Pro. READ INSTRUCTIONS ABOUT
PROPER WAYS TO GET ON AND OFF THE Ab Coaster® Pro.
• KEEP BODY PARTS, HANDS AND FEET AWAY FROM THE SEAT, WHEELS AND THE CURVED TRACK WHILE
USING THE Ab Coaster® Pro. SEVERE INJURY CAN RESULT IF BODY PARTS, HANDS OR FEET ARE PLACED
ON TRACK WHILE SOMEONE IS USING THE UNIT.
• KEEP THE Ab Coaster® Pro OUT OF THE REACH OF CHILDREN. The Ab Coaster® Pro is not a toy and is not
meant to be used by or near children and pets. Please keep children and pets away from the Ab Coaster® Pro
and during use, as well as when the product is left unattended. If you have children, it is your responsibility to
ensure that they do not place any part of their body such as their fingers near the unit while you are exercising.
• Consult your physician before beginning any exercise or diet program, especially if you have concerns about your
physical and fitness levels and overall suitability for exercising with the Ab Coaster® Pro.
• If you experience any pain or unusual discomfort during exercising, stop your workout at once and consult a
physician before continuing.
• When using the Ab Coaster® Pro, follow the instructions provided in this booklet. Do not use the product for any
other exercises or motions which are not contained herein.
• ONLY USE THE Ab Coaster® Pro ON A FLAT, STABLE SURFACE. DO NOT USE THE Ab Coaster® Pro ON A
SMALL AREA RUG THAT MAY TEND TO MOVE WHILE EXERCISING.
• DO NOT ATTEMPT TO USE THE Ab Coaster® Pro WITHOUT RESTING YOUR ARMS ON THE ARM REST
AND HOLDING ONTO THE HANDLES.
• Do not pick up the Ab Coaster® Pro to move it. Follow the instructions in this booklet for moving the
Ab Coaster® Pro.
• Do not leave the Ab Coaster® Pro in the direct sun for extended periods of time.
• Use only accessories and attachments recommended by the manufacturer. Use of any other attachments or
accessories not recommended by the manufacturer will void the warranty and could possibly cause serious
personal injury or damage to you and the unit.
• Always choose the proper workout level which best suits your physical strength and flexibility.
• Know your limits and train within them. Always use common sense when exercising. If you have any questions
regarding your exercise program, please see your physician.
• DO NOT USE THE Ab Coaster® Pro if it is damaged in any manner. Inspect before each use. Failure to observe
this warning could result in personal injury while exercising.
• Use the machine only for intended use as described herein. DO NOT modify the machine.
• Do not replace any parts with parts from other equipment or other manufacturers. Use only parts provided
by the manufacturer.
• This product is intended for Residential use only and is not intended for commercial facilities such as Health
Clubs, Hotels or Fitness Centers.
SAVE THESE INSTRUCTIONS AND ENSURE THAT OTHER EXERCISERS READ
THESE INSTRUCTIONS PRIOR TO USING THE Ab Coaster® Pro FOR THE FIRST TIME.
3
Page 7
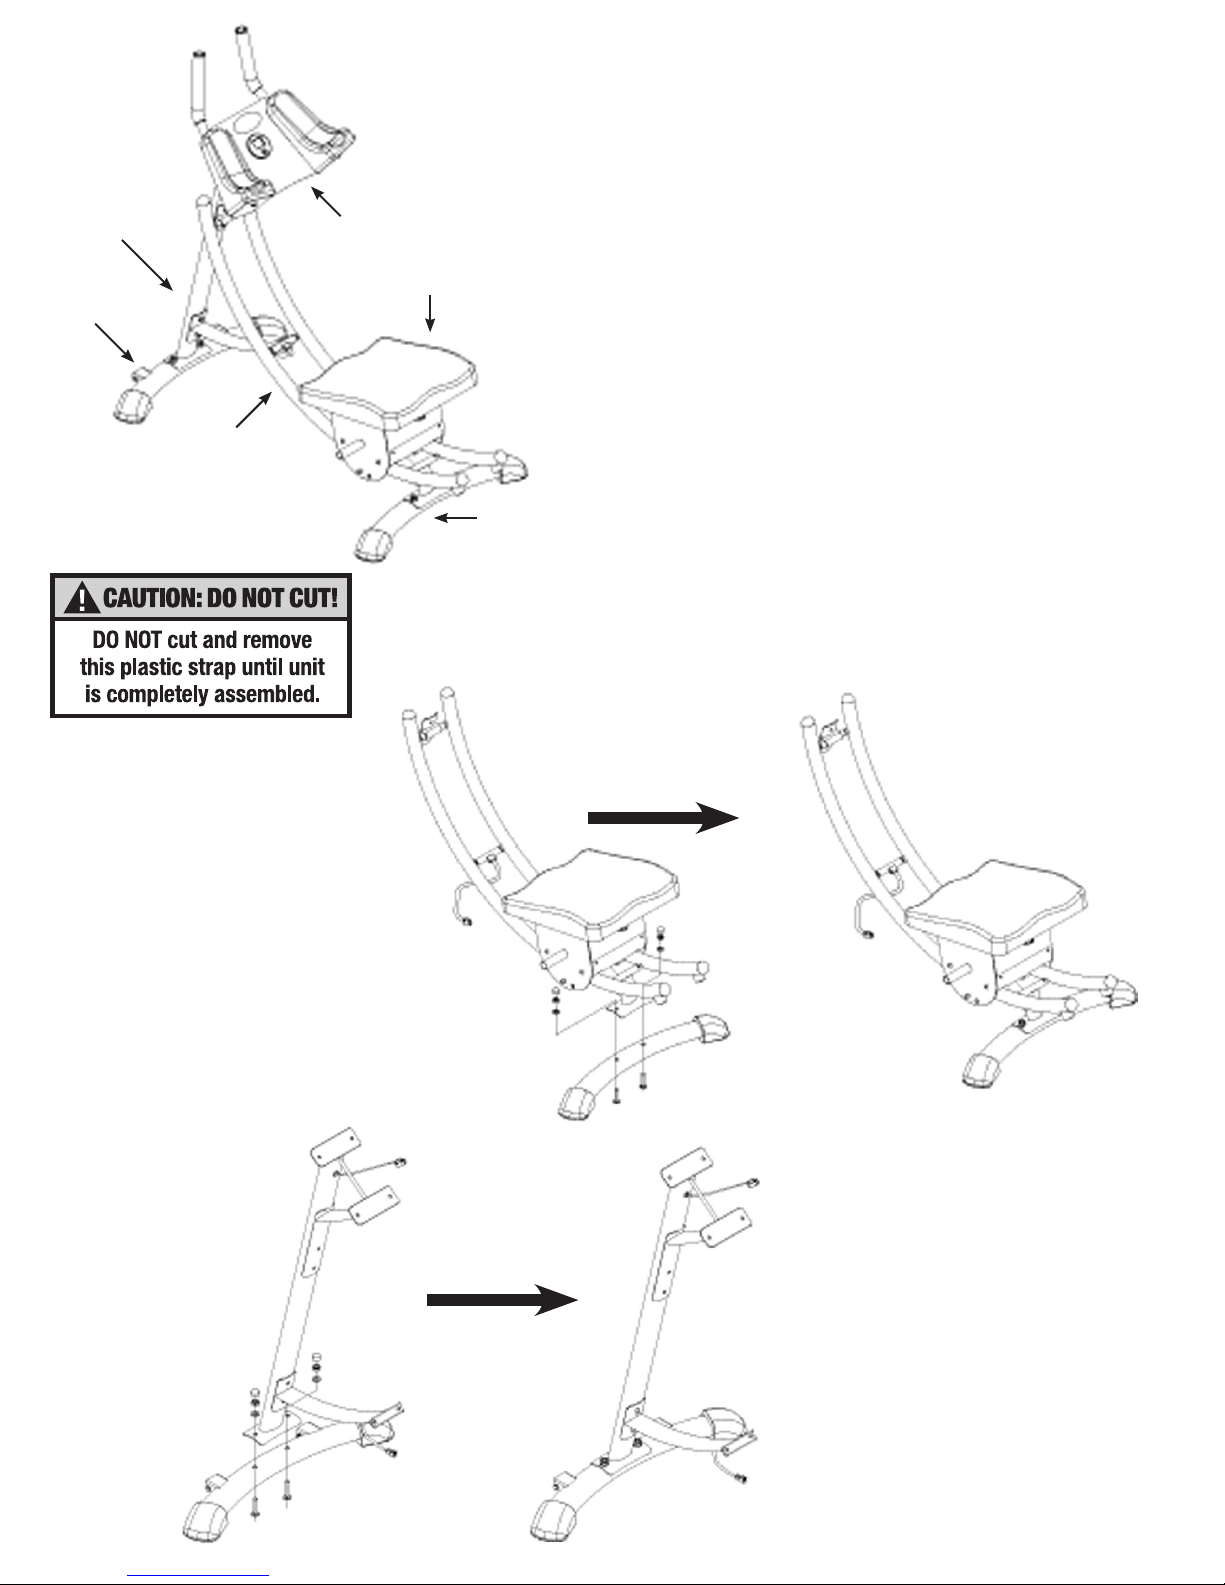
FRONT POST
FRONT
FOOT
CURVED
TRACK
ASSEMBLY INSTRUCTIONS
ARMREST
CONSOLE
CAUTION: Do not cut and remove the plastic strap with this label
attached until unit is completely assembed. The strap keeps the
SEAT secure to the CURVED TRACK for easy assembly.
Your Ab Coaster® Pro has been thoroughly inspected and partly assembled
before shipment. You will need to take a few additional steps as described
below to complete assembly. If you have any questions, please call our
customer service center at 973-287-5180.
SEAT
Step 1: Attach Rear Foot
Step 2: Attach Front Foot
Step 3: Attach Front Post
Step 4: Attach Armrest Console
Step 5: Connect Wires
REAR
FOOT
IMPORTANT: Remove all parts from packing and inspect for
damage. Retain packing materials if possible.
Step 1: Attach rear foot
(without wheels) to rear of
curved track. Remove the 2
bolts which have been preattached to the rear foot,
then re-attach the bolts to
connect foot to track. Finger
tighten bolts only. Do not
tighten bolts with tool until
unit is fully assembled.
Step 2: Attach front foot
(with wheels) to front post
using the 2 pre-attached
bolts. Finger tighten only.
4
Page 8
C. FREE-STYLE MOTION TRAINING
WARNING: Free-Style Motion Training is an advanced exercise. Do not attempt Free-Style Motion exercise until
you have mastered the Forward and Side Lift exercises and you feel comfortable using the machine.
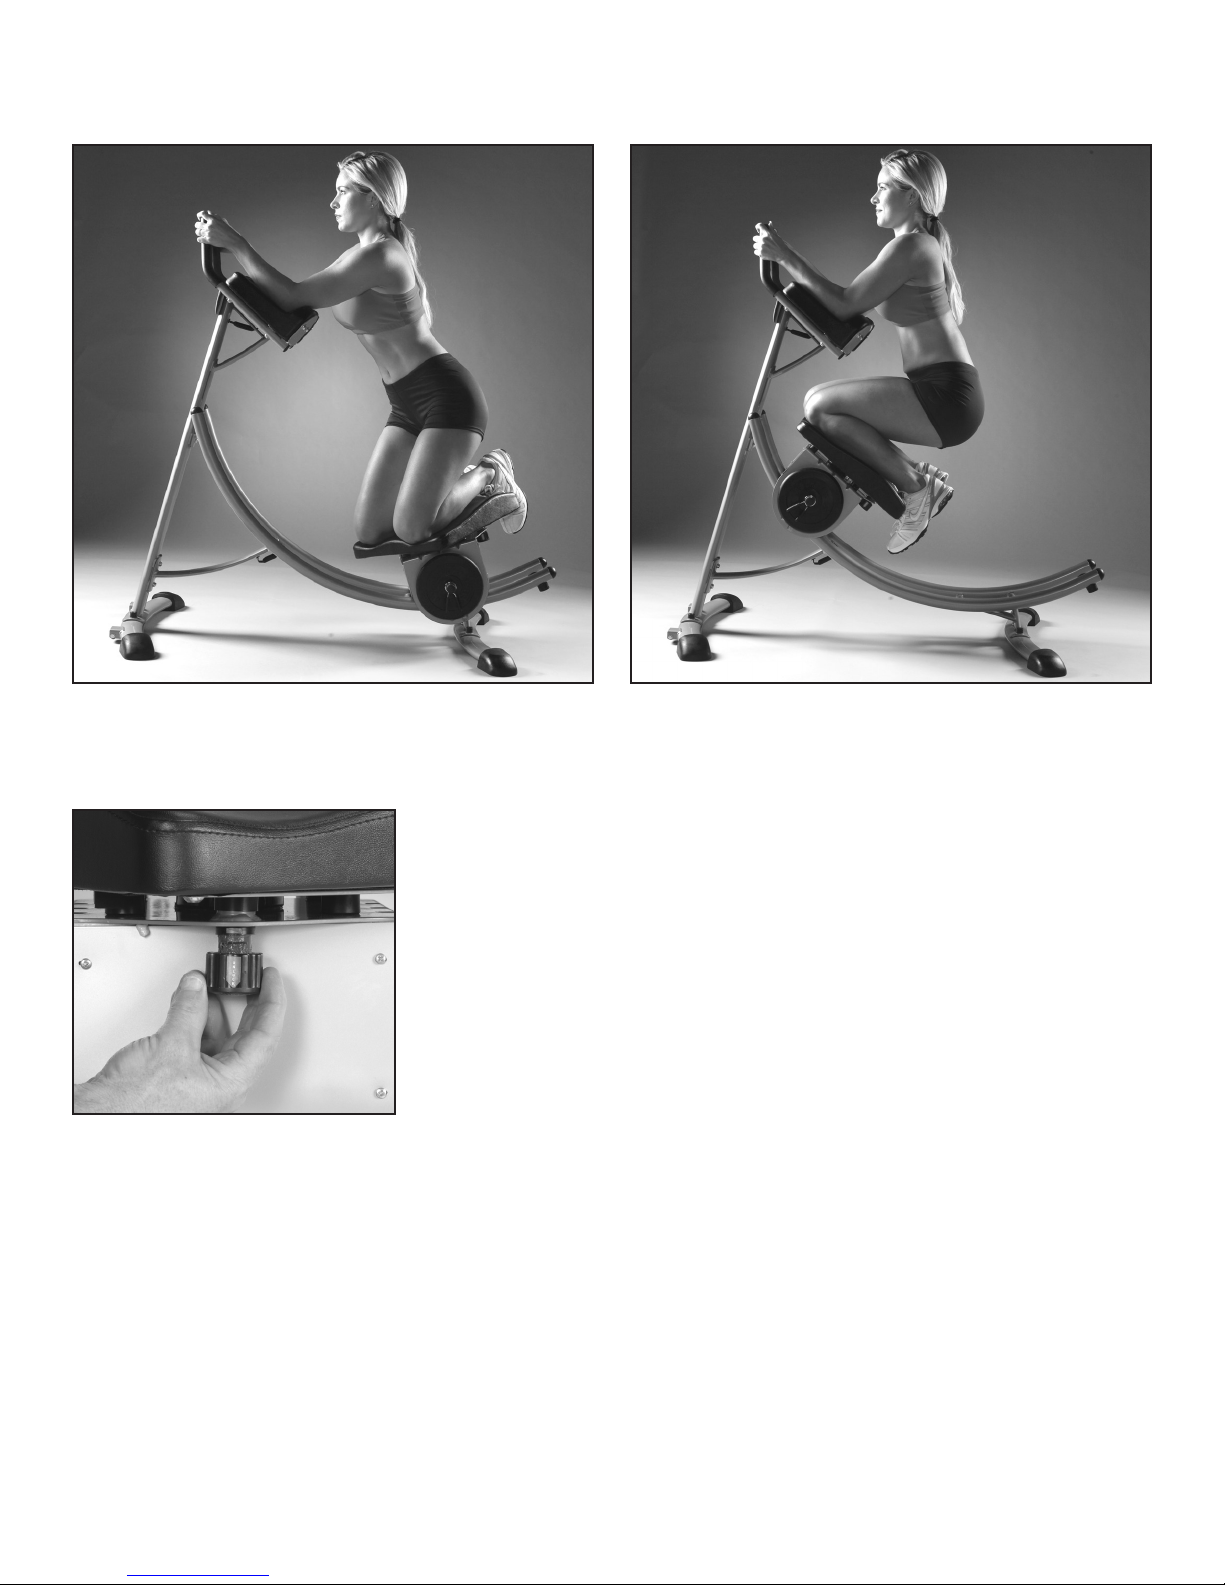
1. Adjust pull pin under the Seat so that it is in the “unlocked” mode.
2. Prior to kneeling on Seat, place forearms and elbows on arm pads. Grasp
handles firmly to balance your body prior to kneeling on Seat.
3. Kneel on Seat so that your feet are hooked on the back edge of the pad.
WARNING: Use caution when kneeling on seat in “unlocked” position; make sure you
move slowly and grasp handles first to keep your body steady before kneeling on the
Seat. DO NOT kneel on Seat before you grasp the handles and stabilize your upper body
first.
4. In “Free-Style Motion” position, you may create your own workout and use
a variety of forward and side lifts. You can twist your core as you rotate the
Seat from side to side through the range of motion along the track. (visit www.
AbCoaster.com for sample Free-Style Workouts)
5. While exercising in the Free-Style Motion position, keep the speed of exercise
at a steady rate. Lift and return the Seat using steady and slow speed. Do not
use momentum to lift – concentrate on contracting and using your abs to lift.
Do not use excessive force when lifting or returning Seat to starting position and avoid banging Seat against the track.
CAUTION: DO NOT LEAVE THE Ab Coaster® Pro SEAT “UNLOCKED” IN THE FREE-MOTION SETTING WHEN YOU
ARE FINISHED WITH EXERCISE. LOCK THE SEAT INTO A FIXED POSITION AFTER YOU COMPLETE EXERCISE.
9
Page 9
B. SIDE LIFT– FOR OBLIQUES (LEFT AND RIGHT)
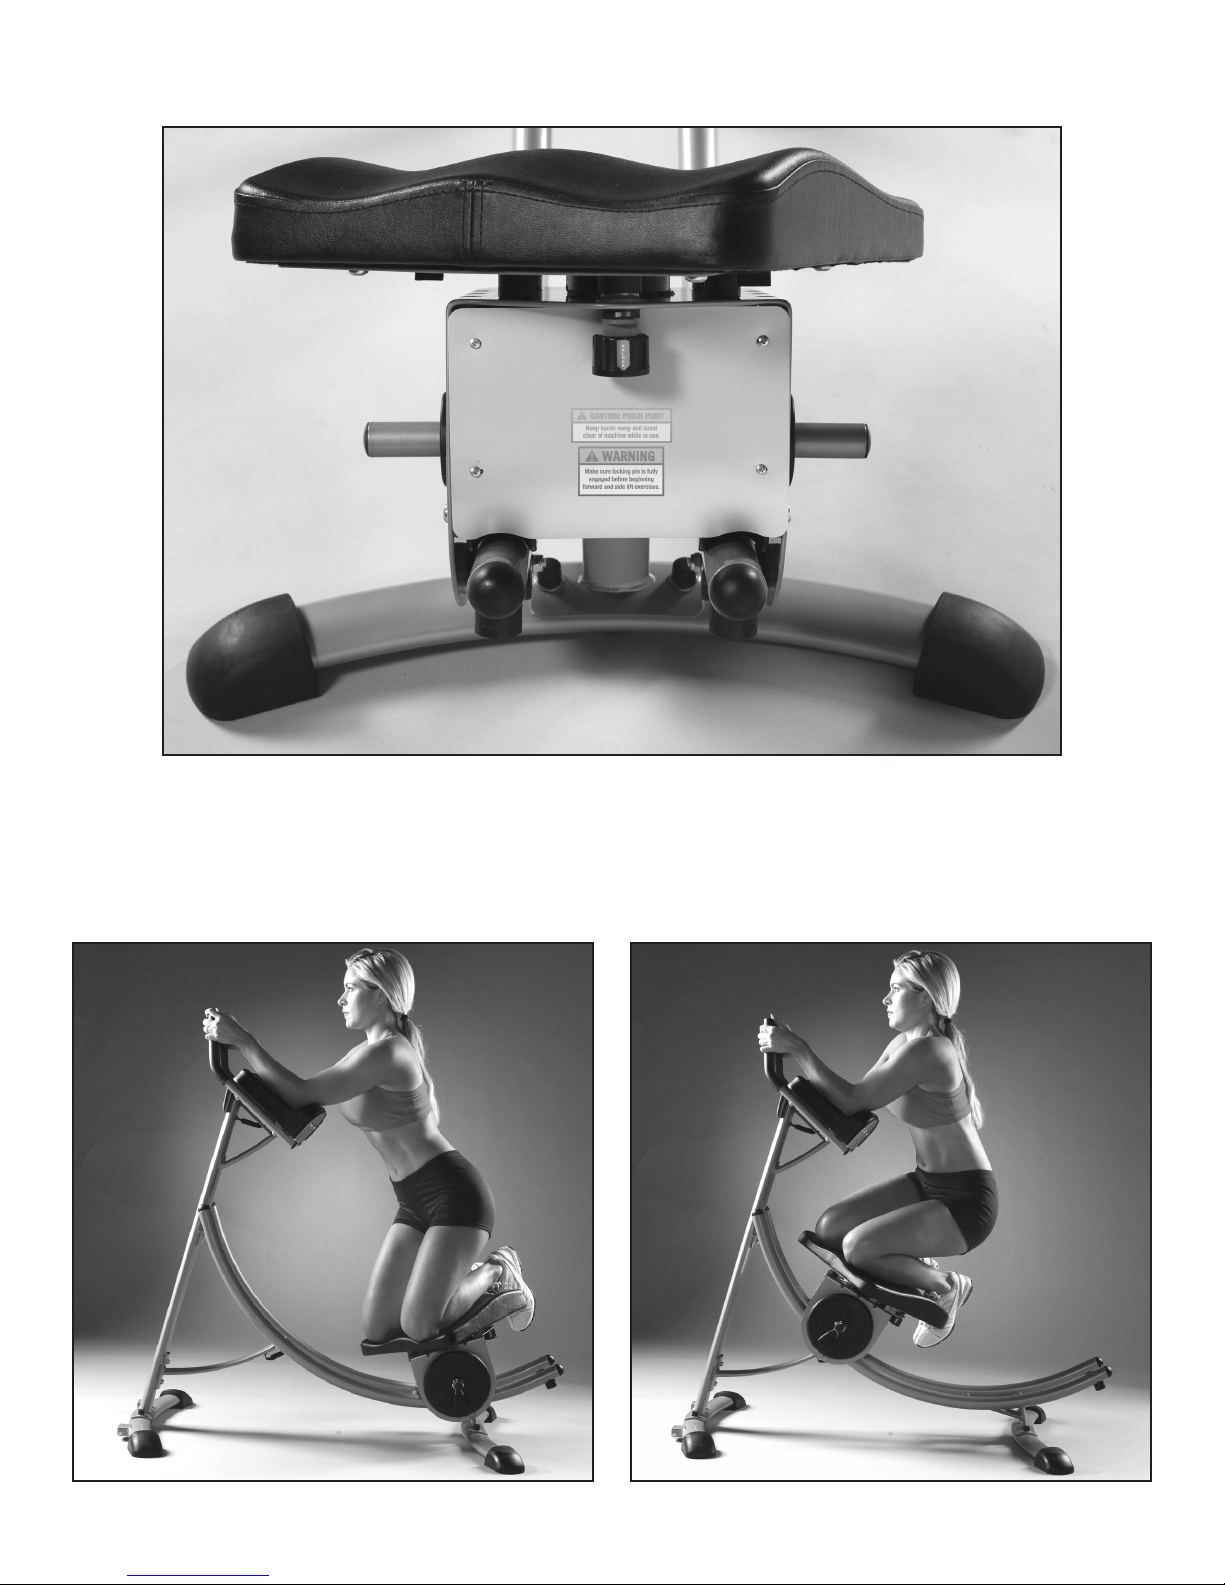
1. Adjust Seat to the side you want to work (left or right). Make sure Seat pin is in “locked” position
and the Seat is not moving freely.
2. Follow Steps 2 - 6 from the Forward Lift exercise above.
3. During exercise, focus on contracting the oblique muscles to lift. After completing one side,
adjust the seat and perform Side Lift exercise for other side (left or right).
8
Page 10
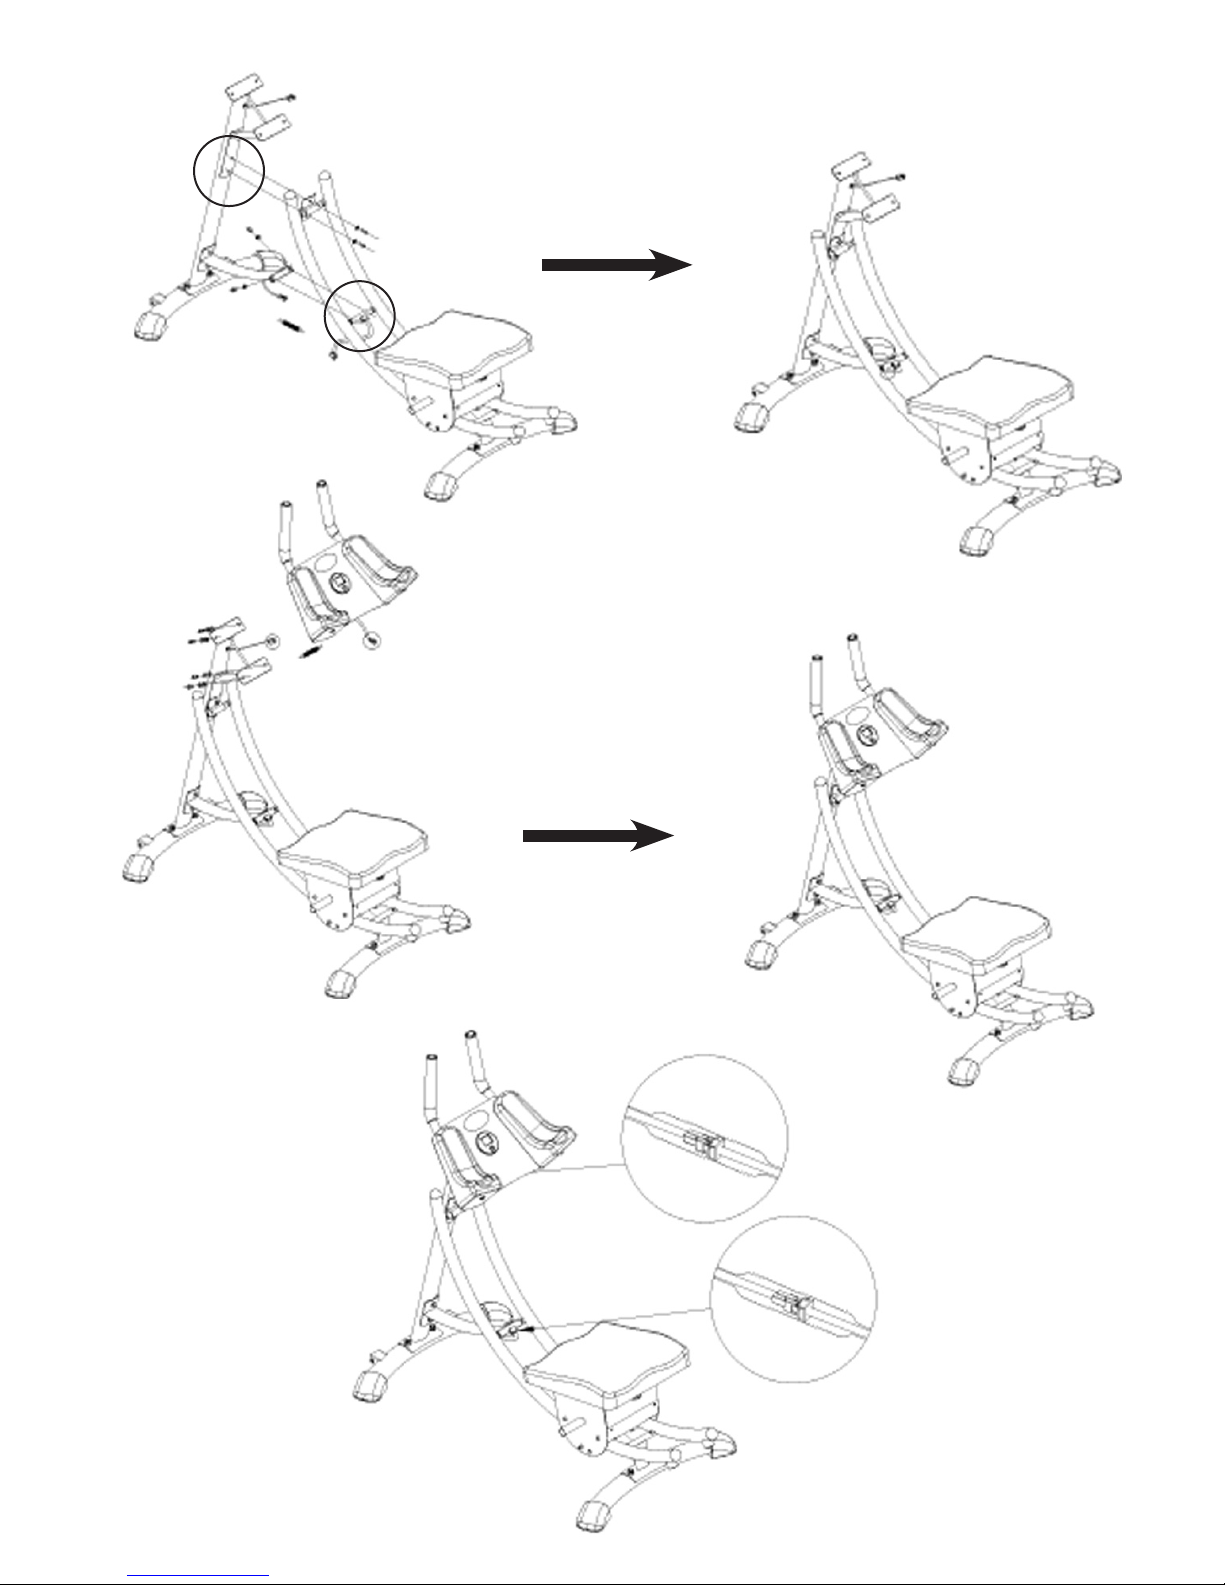
Step 3: Attach front post to curved
track. The front post is attached
to track in 2 locations as shown
using the 2 pre-attached Allen
head screws for each location.
Finger tighten only.
Step 4: Attach armrest
console to top of front post
using the 4 pre-attached
Allen head screws. Tighten
all bolts and screws using
tools provided. Cover bolts
with black plastic caps.
Step 5: Connect counter
wires in 2 locations
as shown. Install wire
protection covers to cover
wire connections.
Now you may safely cut
the strap that secures the
SEAT. (The strap with the
Caution label that says
“Do Not Cut”).
5
Page 11
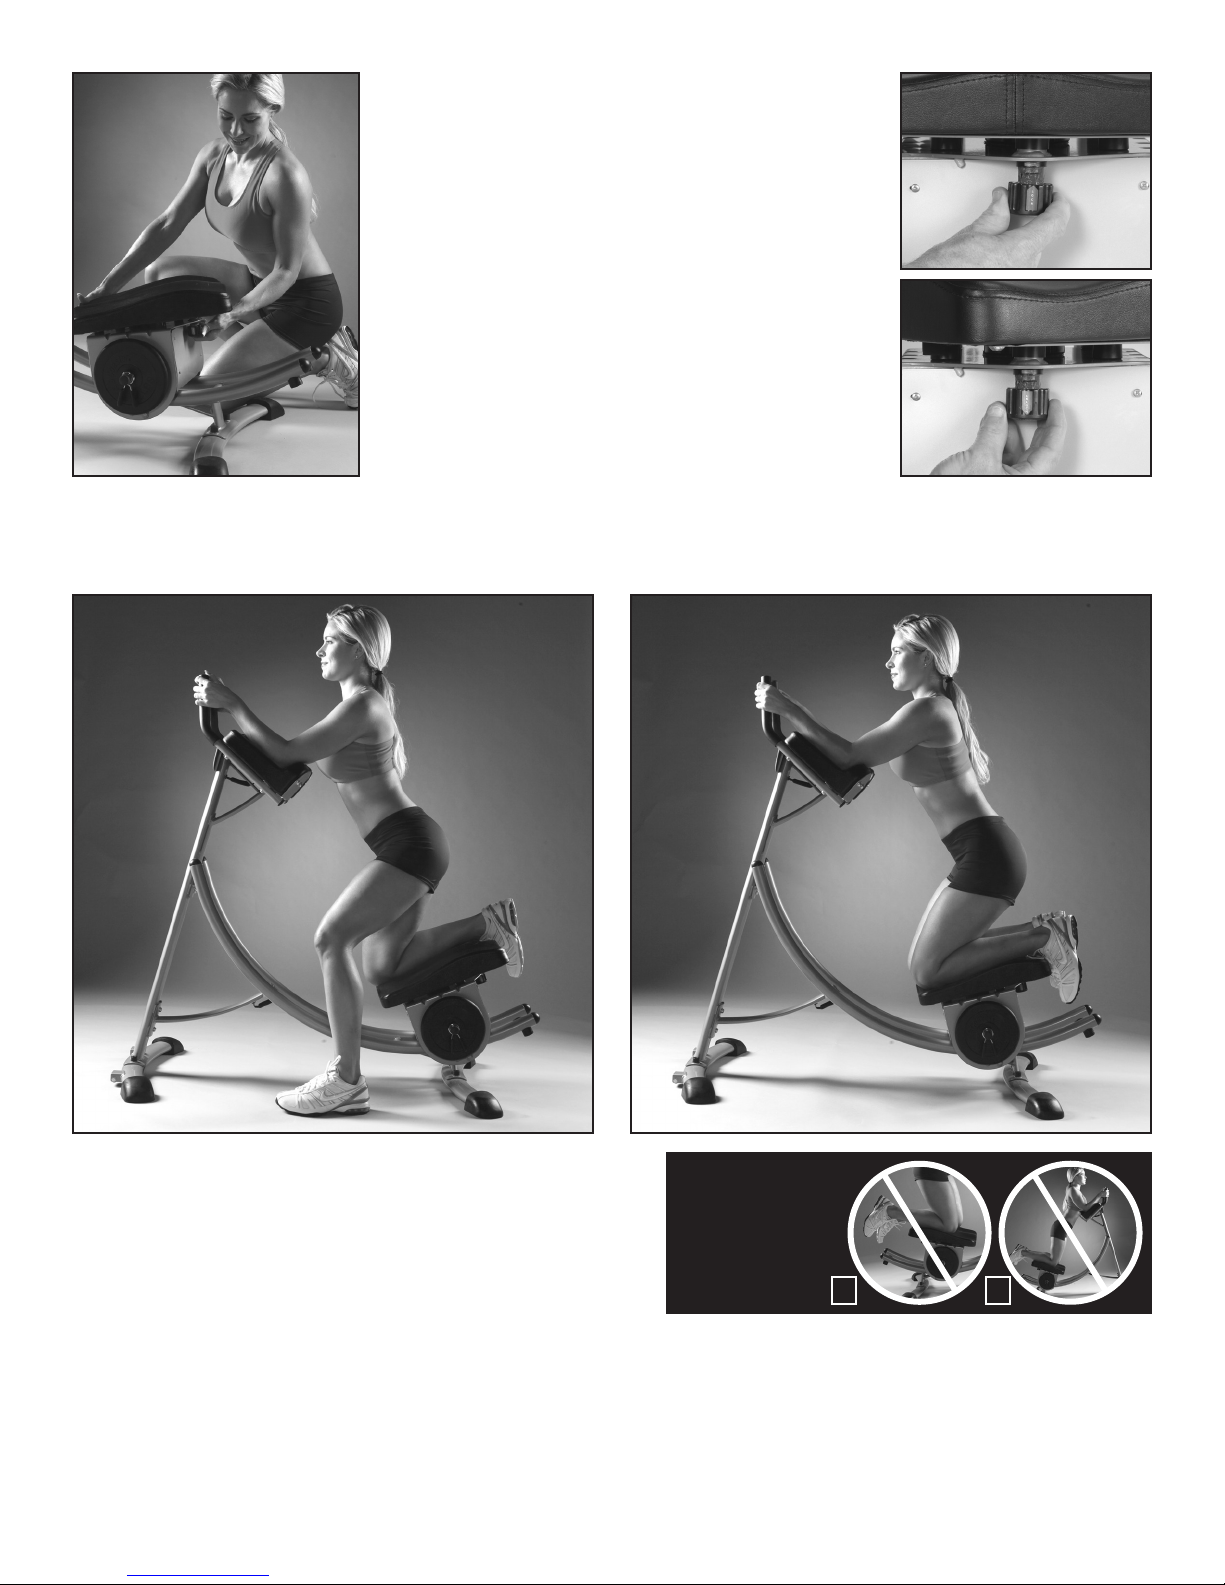
ADJUSTING THE SEAT
The Seat on your Ab Coaster® Pro can be adjusted to
target different areas of your abdominal muscle. The Seat
adjustment pin is located at the rear of the Seat below
the cushion.
There are 4 Seat settings:
Front, Left, Right and Free-Style Motion.
To lock the Seat into the Front, Right or Left settings, pull
down the pin and move the Seat to the desired setting (Front,
Right or Left). Release the pin and adjust the Seat until the
pin “pops” into the hole underneath the Seat at the desired
setting. Make sure the pin is in the “locked” position and the
Seat is secure before you use the Ab Coaster® Pro.
To adjust the Seat for the Free-Style Motion setting, pull
down the pin and twist the pin to the “unlocked” setting.
Rotate the Seat by hand to ensure that it is moving freely.
LOCKED
UNLOCKED
Unlocked position is for
Free-Style Motion.
GETTING ON AND OFF THE AB COASTER® PRO
Step 1: Make sure the Ab Coaster® Pro is placed on a flat, stable surface.
Step 2: Approach the Ab Coaster® Pro from the side, not the back, of the unit.
Step 3: Place forearms and elbows on arm pads. Grasp handles to maintain
your balance.
Step 4: While grasping handles, place knees on Seat so that your feet are
hooked on the back edge of the seat. You are now ready to exercise.
CAUTION:
Getting On and Off the Ab Coaster® Pro When Seat is in “Unlocked” Free-Style Motion Position: Use extra caution
when getting on or getting off Ab Coaster® Pro while Seat is “unlocked” in Free-Style Motion setting. Since the Seat
is not fixed and locked while in the Free-Style Motion position, make sure you move slowly and grasp handles first to
keep your body steady before kneeling on the Seat. DO NOT kneel on Seat before you grasp the handles and stabilize
your upper body first. Grasping handles first will help prevent you from losing your balance.
6
WRONG!
1 2
1 - Foot should be hooked on back edge of seat.
2 - Do not lean forward; sit back toward your heels.
Page 12
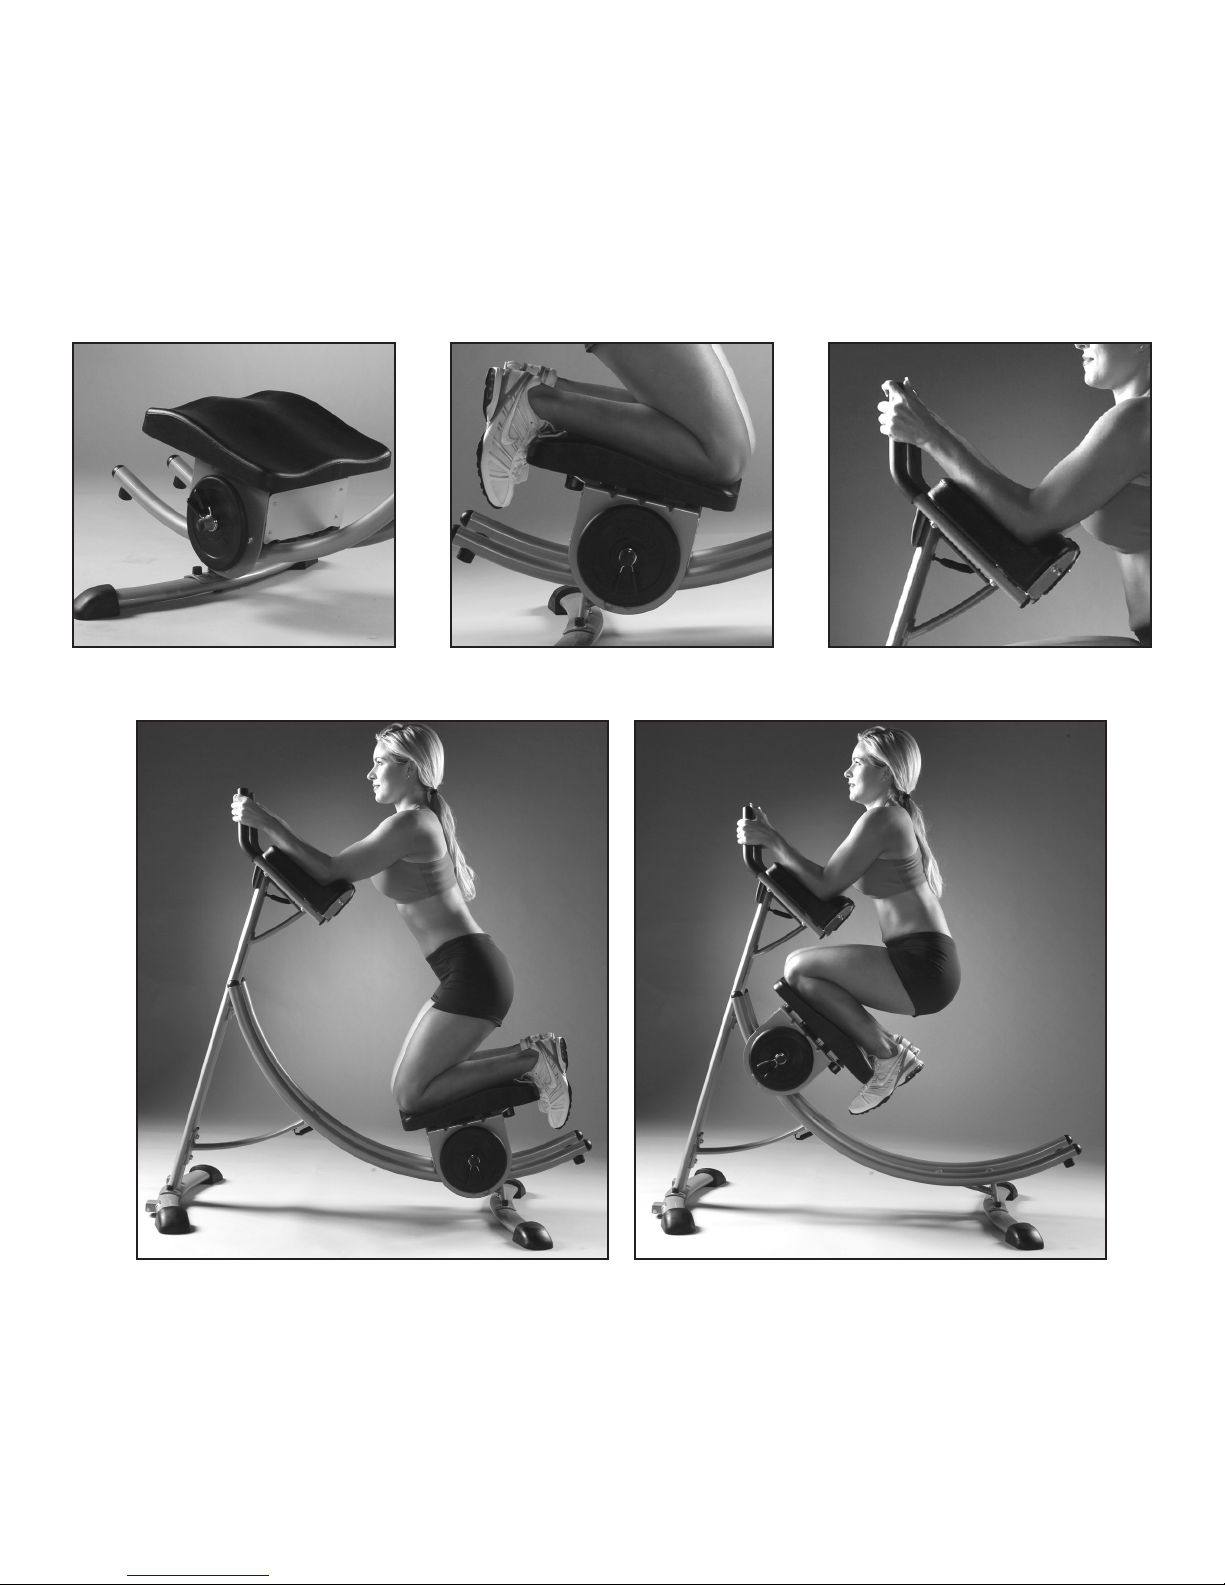
AB COASTER® PRO EXERCISES
How It Works: The Ab Coaster® Pro is designed to help you exercise your abdominal muscles via a leg lift motion.
Unlike the popular sit-up or ab crunch exercise, which works your abdominals from the “top down”, the Ab Coaster®
Pro moves in the opposite direction, working your abs from the “bottom up.” The basic motion requires you to lift your
knees and legs while contracting your abs.
The Ab Coaster® Pro features a Seat moving along a curved track to aid you in performing the abdominal lifting motion.
The starting position requires you to kneel on the Seat while resting your arms on the arm rests. The exercise requires you
to lift the Seat along the track by using your abdominal muscles, not by using your arms or your upper body. The key to
performing the exercise properly is to concentrate on contracting your ab muscles prior to and while you lift the Seat.
Your upper body should be stable and should not be moving or swaying while you exercise.
A. FORWARD LIFT
1. Adjust Seat so that it faces forward.
2. Place forearms and elbows on arm pads. Lightly grasp handles.
3. Kneel on Seat so that your feet are hooked on the back edge of the pad. DO NOT lean forward; sit back toward your heels.
4. While contracting your abs, lift your knees forward along the track. DO NOT move your upper body while performing exercise.
Make sure you use your abs to lift the Seat carriage; DO NOT use your upper body or your arms to lift.
5. Return slowly to starting position, and repeat.
6. Use steady and slow speed while exercising. DO NOT use momentum to lift – concentrate on contracting and using your abs to lift.
Do not use excessive force when lifting or returning Seat to starting position and avoid banging Seat against the track.
7
 Loading...