

Page 1

Optical Character Recognition Program
ABBYY FineReader
®
Version 7.0
User’s Guide
© 2003 ABBYY Software Ltd. All rights reserved.
Page 2

Information in this document is subject to change without notice and does not bear any commitment on the part of
ABBYY.
The software described in this document is supplied under a license agreement. The software may only be used or copied
in strict accordance with the terms of the agreement. It is a breach of the “On legal protection of software and databases”
law of the Russian Federation and of international law to copy the software onto any medium unless specifically allowed
in the license agreement or nondisclosure agreements.
No part of this document may be reproduced or transmitted in any from or by any means, electronic or other, for any
purpose, without the express written permission of ABBYY.
© 2003 ABBYY Software Ltd. All rights reserved.
© 2001 ParaType, Inc. Type 1 fonts are licensed from ParaType, Inc.
ABBYY, FINEREADER, ABBYY FineReader and Scan&Read are either registered trademarks or trademarks
of ABBYY Software Ltd.
Adobe, the Adobe logo, Adobe PDF and Adobe Acrobat are trademarks of Adobe Systems Incorporated. Microsoft,
Outlook, PowerPoint, Windows, Windows NT are either registered trademarks or trademarks of Microsoft Corporation
in the United States and/or other countries. All other trademarks are the property of their respective owners.
ABBYY: P.O. Box 72, 127015, Moscow, Russia office@abbyy.com; www.abbyy.com; www.finereader.com.
Page 3

Contents
Welcome. . . . . . . . . . . . . . . . . . . . . . . . . . . . . . . . . . . . . . . . . . . . . . . . . . . . . . . . . . . . . . . . . . 7
Chapter 1
Installing and Starting ABBYY FineReader . . . . . . . . . . . . . . . . . . . . . . . . 9
Software and hardware requirements. . . . . . . . . . . . . . . . . . . . . . . . . . . . . . . . . . . . . . . . . . . . . . 10
Installing ABBYY FineReader . . . . . . . . . . . . . . . . . . . . . . . . . . . . . . . . . . . . . . . . . . . . . . . . . . . . . 10
Network server/workstation installation . . . . . . . . . . . . . . . . . . . . . . . . . . . . . . . . . . . . . . . . . . 11
Starting ABBYY FineReader . . . . . . . . . . . . . . . . . . . . . . . . . . . . . . . . . . . . . . . . . . . . . . . . . . . . . . 12
About ABBYY FineReader activation . . . . . . . . . . . . . . . . . . . . . . . . . . . . . . . . . . . . . . . . . . . . . . 12
Chapter 2
Quick Start . . . . . . . . . . . . . . . . . . . . . . . . . . . . . . . . . . . . . . . . . . . . . . . . . . . . . . . . . . . . . 15
How to input a document in less than a minute . . . . . . . . . . . . . . . . . . . . . . . . . . . . . . . . . . . . 16
The ABBYY FineReader main window. . . . . . . . . . . . . . . . . . . . . . . . . . . . . . . . . . . . . . . . . . . . . 16
ABBYY FineReader toolbars . . . . . . . . . . . . . . . . . . . . . . . . . . . . . . . . . . . . . . . . . . . . . . . . . . . . . . 18
Chapter 3
General Features of ABBYY FineReader . . . . . . . . . . . . . . . . . . . . . . . . . . . 23
What is an OCR system? . . . . . . . . . . . . . . . . . . . . . . . . . . . . . . . . . . . . . . . . . . . . . . . . . . . . . . . . . 24
New features of ABBYY FineReader 7.0. . . . . . . . . . . . . . . . . . . . . . . . . . . . . . . . . . . . . . . . . . . . 25
Supported document saving formats . . . . . . . . . . . . . . . . . . . . . . . . . . . . . . . . . . . . . . . . . . . . . . 27
Supported image formats . . . . . . . . . . . . . . . . . . . . . . . . . . . . . . . . . . . . . . . . . . . . . . . . . . . . . . . . 28
Chapter 4
Acquiring the Image . . . . . . . . . . . . . . . . . . . . . . . . . . . . . . . . . . . . . . . . . . . . . . . . . . 29
Scanning . . . . . . . . . . . . . . . . . . . . . . . . . . . . . . . . . . . . . . . . . . . . . . . . . . . . . . . . . . . . . . . . . . . . . . . 30
Setting scanning parameters. . . . . . . . . . . . . . . . . . . . . . . . . . . . . . . . . . . . . . . . . . . . . . . . . . . . . . 31
Tips on brightness tuning . . . . . . . . . . . . . . . . . . . . . . . . . . . . . . . . . . . . . . . . . . . . . . . . . . . . . . . 32
Scanning multipage documents . . . . . . . . . . . . . . . . . . . . . . . . . . . . . . . . . . . . . . . . . . . . . . . . . 33
Opening images . . . . . . . . . . . . . . . . . . . . . . . . . . . . . . . . . . . . . . . . . . . . . . . . . . . . . . . . . . . . . . . . 35
Acquiring images from the Hot Folder. . . . . . . . . . . . . . . . . . . . . . . . . . . . . . . . . . . . . . . . . . . . . 36
Scanning dual pages. . . . . . . . . . . . . . . . . . . . . . . . . . . . . . . . . . . . . . . . . . . . . . . . . . . . . . . . . . . . . 36
Adding business cards images to a batch. . . . . . . . . . . . . . . . . . . . . . . . . . . . . . . . . . . . . . . . . . . 37
Page numbering . . . . . . . . . . . . . . . . . . . . . . . . . . . . . . . . . . . . . . . . . . . . . . . . . . . . . . . . . . . . . . . . 37
Working with an image . . . . . . . . . . . . . . . . . . . . . . . . . . . . . . . . . . . . . . . . . . . . . . . . . . . . . . . . . . 38
Batch image options . . . . . . . . . . . . . . . . . . . . . . . . . . . . . . . . . . . . . . . . . . . . . . . . . . . . . . . . . . . . 40
3
Contents
Page 4

Chapter 5
Page Layout Analysis . . . . . . . . . . . . . . . . . . . . . . . . . . . . . . . . . . . . . . . . . . . . . . . . . 41
General information on page layout analysis . . . . . . . . . . . . . . . . . . . . . . . . . . . . . . . . . . . . . . . 42
Block types. . . . . . . . . . . . . . . . . . . . . . . . . . . . . . . . . . . . . . . . . . . . . . . . . . . . . . . . . . . . . . . . . . . . . 42
Automatic page layout analysis options . . . . . . . . . . . . . . . . . . . . . . . . . . . . . . . . . . . . . . . . . . . . 43
Drawing and editing blocks manually . . . . . . . . . . . . . . . . . . . . . . . . . . . . . . . . . . . . . . . . . . . . . 45
Manual table layout analysis. . . . . . . . . . . . . . . . . . . . . . . . . . . . . . . . . . . . . . . . . . . . . . . . . . . . . . 48
Using block templates . . . . . . . . . . . . . . . . . . . . . . . . . . . . . . . . . . . . . . . . . . . . . . . . . . . . . . . . . . . 49
Chapter 6
Recognition. . . . . . . . . . . . . . . . . . . . . . . . . . . . . . . . . . . . . . . . . . . . . . . . . . . . . . . . . . . . . 51
General information on recognition. . . . . . . . . . . . . . . . . . . . . . . . . . . . . . . . . . . . . . . . . . . . . . . 52
Recognition languages. . . . . . . . . . . . . . . . . . . . . . . . . . . . . . . . . . . . . . . . . . . . . . . . . . . . . . . . . . . 53
Source text print type . . . . . . . . . . . . . . . . . . . . . . . . . . . . . . . . . . . . . . . . . . . . . . . . . . . . . . . . . . . 54
Other recognition options . . . . . . . . . . . . . . . . . . . . . . . . . . . . . . . . . . . . . . . . . . . . . . . . . . . . . . . 55
Background recognition . . . . . . . . . . . . . . . . . . . . . . . . . . . . . . . . . . . . . . . . . . . . . . . . . . . . . . . . . 55
Recognition with training . . . . . . . . . . . . . . . . . . . . . . . . . . . . . . . . . . . . . . . . . . . . . . . . . . . . . . . 56
How to train a user pattern . . . . . . . . . . . . . . . . . . . . . . . . . . . . . . . . . . . . . . . . . . . . . . . . . . . . . . 58
How to edit a user pattern . . . . . . . . . . . . . . . . . . . . . . . . . . . . . . . . . . . . . . . . . . . . . . . . . . . . . . . 59
User languages and language groups . . . . . . . . . . . . . . . . . . . . . . . . . . . . . . . . . . . . . . . . . . . . . . 60
How to create a new language. . . . . . . . . . . . . . . . . . . . . . . . . . . . . . . . . . . . . . . . . . . . . . . . . . . . 61
How to create a new language group. . . . . . . . . . . . . . . . . . . . . . . . . . . . . . . . . . . . . . . . . . . . . . 62
Chapter 7
Checking and Editing Text. . . . . . . . . . . . . . . . . . . . . . . . . . . . . . . . . . . . . . . . . . . . 65
Checking text in ABBYY FineReader . . . . . . . . . . . . . . . . . . . . . . . . . . . . . . . . . . . . . . . . . . . . . . 66
Check and edit text options. . . . . . . . . . . . . . . . . . . . . . . . . . . . . . . . . . . . . . . . . . . . . . . . . . . . . . 68
Adding and deleting words to/from the user dictionary . . . . . . . . . . . . . . . . . . . . . . . . . . . . . 69
Editing text in ABBYY FineReader . . . . . . . . . . . . . . . . . . . . . . . . . . . . . . . . . . . . . . . . . . . . . . . . 70
Editing tables . . . . . . . . . . . . . . . . . . . . . . . . . . . . . . . . . . . . . . . . . . . . . . . . . . . . . . . . . . . . . . . . . . . 74
Chapter 8
Saving into External Applications and Formats. . . . . . . . . . . . . . . . . . 75
General information on saving recognized text. . . . . . . . . . . . . . . . . . . . . . . . . . . . . . . . . . . . . 76
Text saving options . . . . . . . . . . . . . . . . . . . . . . . . . . . . . . . . . . . . . . . . . . . . . . . . . . . . . . . . . . . . . 76
Saving the recognized text in RTF, DOC and Word XML formats . . . . . . . . . . . . . . . . . . . . . 79
Saving the recognized text in PDF format. . . . . . . . . . . . . . . . . . . . . . . . . . . . . . . . . . . . . . . . . . 79
Saving the recognized text in HTML format . . . . . . . . . . . . . . . . . . . . . . . . . . . . . . . . . . . . . . . . 80
Saving the recognized text in PPT format . . . . . . . . . . . . . . . . . . . . . . . . . . . . . . . . . . . . . . . . . . 82
Saving the page image . . . . . . . . . . . . . . . . . . . . . . . . . . . . . . . . . . . . . . . . . . . . . . . . . . . . . . . . . . . 82
4
ABBYY FineReader 7.0 User’s Guide
Page 5

Chapter 9
Working with Batches . . . . . . . . . . . . . . . . . . . . . . . . . . . . . . . . . . . . . . . . . . . . . . . . 83
General information on working with batches . . . . . . . . . . . . . . . . . . . . . . . . . . . . . . . . . . . . . 84
Creating a new batch. . . . . . . . . . . . . . . . . . . . . . . . . . . . . . . . . . . . . . . . . . . . . . . . . . . . . . . . . . . . 85
Opening a batch . . . . . . . . . . . . . . . . . . . . . . . . . . . . . . . . . . . . . . . . . . . . . . . . . . . . . . . . . . . . . . . . 85
Adding images to a batch . . . . . . . . . . . . . . . . . . . . . . . . . . . . . . . . . . . . . . . . . . . . . . . . . . . . . . . . 86
Batch page number . . . . . . . . . . . . . . . . . . . . . . . . . . . . . . . . . . . . . . . . . . . . . . . . . . . . . . . . . . . . . 86
Saving a batch . . . . . . . . . . . . . . . . . . . . . . . . . . . . . . . . . . . . . . . . . . . . . . . . . . . . . . . . . . . . . . . . . . 87
Closing a batch page or the whole batch . . . . . . . . . . . . . . . . . . . . . . . . . . . . . . . . . . . . . . . . . . 87
Deleting a batch . . . . . . . . . . . . . . . . . . . . . . . . . . . . . . . . . . . . . . . . . . . . . . . . . . . . . . . . . . . . . . . . 88
Batch settings . . . . . . . . . . . . . . . . . . . . . . . . . . . . . . . . . . . . . . . . . . . . . . . . . . . . . . . . . . . . . . . . . . 88
Full–text search in recognized batch pages . . . . . . . . . . . . . . . . . . . . . . . . . . . . . . . . . . . . . . . . 89
Chapter 10
Network Document Processing. . . . . . . . . . . . . . . . . . . . . . . . . . . . . . . . . . . . . 91
Working with the same batch over a network . . . . . . . . . . . . . . . . . . . . . . . . . . . . . . . . . . . . . . 93
Group work with the same user languages and dictionaries. . . . . . . . . . . . . . . . . . . . . . . . . . 94
Group work with customized dictionaries
(languages with dictionary support only) . . . . . . . . . . . . . . . . . . . . . . . . . . . . . . . . . . . . . . . . . . 95
Appendix
Hot Keys and Glossary . . . . . . . . . . . . . . . . . . . . . . . . . . . . . . . . . . . . . . . . . . . . . . . . 97
Hot Keys . . . . . . . . . . . . . . . . . . . . . . . . . . . . . . . . . . . . . . . . . . . . . . . . . . . . . . . . . . . . . . . . . . . . . . . 98
Glossary . . . . . . . . . . . . . . . . . . . . . . . . . . . . . . . . . . . . . . . . . . . . . . . . . . . . . . . . . . . . . . . . . . . . . . 100
5
Contents
Page 6

ABBYY FineReader 7.0 User’s Guide
Page 7

Welcome!
Thank you for choosing ABBYY FineReader!
ABBYY FineReader is an Optical Character Recognition (OCR) system
that helps convert printed and PDF documents into editable formats
while retaining the original layout of the document. The program allows
users to create a digital copy of any document in minutes without man
ually retyping it. Although incredibly easy to use, ABBYY FineReader also
provides more sophisticated settings and options to meet the needs of
professional users who want finetune the application to suit their
needs.
Page 8

8
ABBYY FineReader 7.0 User’s Guide
User’s Guide
The User’s Guide introduces you to the basics of using ABBYY FineReader. Each chapter starts
with a short summary description and a list of the chapter’s contents.
Online Help
FineReader’s online Help contains basic and advanced information on program features, set
tings and dialogs. Online Help is provided in HTML format and has been designed for quick
and easy information retrieval.
Readme File
The Readme file contains the latest information on the software.
Technical Support
If you have any questions on how to use FineReader, please consult all the documentation you
have available (the User’s Guide and the Help file) before contacting our technical support
service. Also, take a look at the technical support section on our website at www.abbyy.com.
You may find the information you need there.
If, after having consulted both your documentation and the ABBYY website, you still require
assistance, email us at support@abbyy.com. Note that our technical support experts will need
the following information from you to be able to deal with your enquiries:
● The serial number of your copy of FineReader
● Your scanner make and model
● A general description of the problem and the full error message text
(if you have encountered an error message)
● Your Windows operating system version
● Any other information you consider important.
Note: Some system information can be obtained by clicking on System Info in the
About... dialog (menu Help/About).
Page 9

Chapter 1
Installing and Starting
ABBYY FineReader
This chapter provides detailed instructions on installing ABBYY
FineReader, outlines the system requirements of the program and
offers instructions for installing the program on workstations and
networks. ABBYY FineReader 7.0 includes a specialized installation
program that automates the setup process.To insure proper instal
lation, always use the ABBYY FineReader CDROM for installation.
Chapter Contents:
● Software and hardware requirements
● Installing ABBYY FineReader
● Network server/workstation installation
● Starting ABBYY FineReader
● About ABBYY FineReader activation
Page 10

Software and Hardware Requirements
ABBYY FineReader 7.0 requires the following:
1. PC with Intel®Pentium®/Celeron®/Xeon™, AMD K6/ Athlon™/Duron™ or
compatible processor. Processor must be 200MHz or higher
2. Microsoft
®
Windows®XP, Microsoft®Windows®2000, Windows®NT®4.0 with
Service Pack 6 or greater, Windows
®
ME/98 (for working with localized inter
faces, corresponding language support is required)
3. 64 MB (Windows XP/2000/NT 4.0), 32 MB (Windows ME/98), plus 16 MB of
RAM for each additional processor (in the case of a multiprocessor system)
4. 150 MB of free harddisk space for typical program installation
5. 70 MB of free harddisk space for program operation
6. TWAINcompatible scanner, digital camera or fax–modem
7. Video card and monitor (min. resolution 800×600)
8. Keyboard, mouse or other pointing device
Note: Microsoft Internet Explorer 4.0 or later is required to search in recognized pages and
to read news on the ABBYY Community news channel (only for ABBYY FineReader
7.0 Professional Edition).
Installing ABBYY FineReader
The installation program will guide you through installation of ABBYY FineReader . Please
close all applications prior to installing ABBYY FineReader.
To install ABBYY FineReader:
1. Insert the ABBYY FineReader 7.0 CDROM into the CDROM drive.
The installation program will launch automatically.
2. Follow the installation instructions.
If the installation program does not automatically launched:
1. Click the Start button on the Taskbar and select the Settings/Control
Panel.
2. Double–click on the Add/Remove Programs icon.
3. Select the Install/Uninstall tab and click the Install button.
4. Follow the installation program instructions.
10
ABBYY FineReader 7.0 User’s Guide
Page 11

Installation options
During the installation, you will be asked to select one of the two installation options:
● Typical (recommended) – This option installs all components of the pro
gram, including all recognition languages. You will be prompted to choose a
single interface language during installation.
● Custom installation – This option allows you to choose to install only specific
components of the program, including all available recognition languages.
Consult the readme.htm file on the ABBYY FineReader CDROM if you encounter an error
message.
Note: If you wish to retain your user dictionaries and patterns from a previously installed
version of ABBYY FineReader, do not uninstall the older version of the program prior
to installing the new version. All existing user dictionaries and patterns will then
be available for use in the latest version.
Network Server/Workstation Installation
Only the system administrator may install ABBYY FineReader 7.0 Corporate Edition on a net
work server. There are two stages to the installation. First, the program is installed on the serv
er. From the server, the program can be installed on workstations using one of the four
methods:
● using Active Directory
● using Microsoft System Management Service (SMS)
● form the command line
● manually in interactive mode
To install ABBYY FineReader 7.0 Corporate Edition on the server:
1. Insert the ABBYY FineReader CDROM into the CDROM drive.
2. Run setup.exe from the FineReader CDROM with the /a commandline
option.
The System Administrator's Guide (which can be found in the Administrator’s Guide folder
on the server where ABBYY FineReader is installed) provides additional information about
installing ABBYY FineReader on workstations, working with the License Manager and working
with the program in a local area network.
11
Chapter 1. Installing and Starting ABBYY FineReader
Page 12

Starting ABBYY FineReader
To start ABBYY FineReader:
● Select the ABBYY FineReader 7.0 Professional Edition (Corporate Edition)
item in the Start/Programs menu.
Note: Make sure your scanner is connected to your computer, pluggedin, and turned on
before you start FineReader. To install a scanner after installing the program, please
consult the user guide supplied with the scanner for installation instructions. If you do
not have a scanner, you can still recognize image files using ABBYY FineReader 7.0.
You will find sample image files in the ABBYY FineReader/Demo folder on the
program CDROM.
About ABBYY FineReader Activation
Software piracy hurts software manufacturers and end users alikeusing an illegal product is
never safe.Legal software ensures that third party companies cannot introduce detrimental
code changes. ABBYY makes every effort to protect its intellectual property rights and the
security of its customer through a variety of antipiracy measures.
ABBYY FineReader 7.0 incorporates a specialized activation technology that prohibits illegal
copying and distribution of the software. This technology effectively stops the unauthorized
use of ABBYY products by those who have not signed a License Agreement with ABBYY.
A singleuser License Agreement allows for installation on a single PC. Installation of the soft
ware on additional PCs breaches the License Agreement, as well as international copyright
laws. The activation technology controls copying of the software and prevents the installation
of a licensed copy on multiple workstations. At the same time, the technology allows the soft
ware to be reinstalled on the licensed PC as often as necessary.
Depending on the product version and territory of distribution, the functionality of the soft
ware may be limited in the following ways:
● the program cannot save or print recognized Cyrillic texts
(ABBYY FineReader 7.0 Professional Edition);
●
the program cannot save or print recognized text in any language
(ABBYY FineReader 7.0 Professional Edition);
●
the program will not function prior to activation
(ABBYY FineReader 7.0 Corporate Edition).
12
ABBYY FineReader 7.0 User’s Guide
Page 13

StepbyStep Activation Instructions
The builtin Activation Wizard will quickly and efficiently activate the program. A friendly
user interface collects and sends all necessary activation information directly to ABBYY. You
will also use the Activation Wizard to enter the Activation Code (Professional Edition) or
Activation File (Corporate Edition) that you receive from ABBYY during activation.
The Wizard will generate a code (called an Installation ID), which contains all of the neces
sary activation information including system parameters and program information. The
Installation ID does not include personal information about the computer user or the system,
and the code cannot be used to identify the user.
You may choose one of three activation methods:
● Via Internet (recommended)
Over the Internet If you have an Internet connection, you can activate the
software automatically within a few seconds. Using this method allows for
activation to be carried out automatically.
● By email
By email You may send an email message (which is generated by the pro
gram and contains all of the necessary activation information) to ABBYY.
To ensure a quick reply from the automated registration system, do not alter
the information in the message body or subject field. When you have received
your Activation Code or Activation File, enter it into the corresponding field of
the Activation Wizard.
● By fax or phone(Professional Edition only)
You may phone the nearest ABBYY office or partner and provide your
Installation ID and serial number to the operator. In most countries, you may
also fax the information. To use this method, simply print and fax the activa
tion message that is automatically generated by the Wizard to the nearest
ABBYY office or partner. An Activation Code will be provided in a reply fax.
Enter it into the corresponding field of the Activation Wizard.
After activation, FineReader 7.0 will be fully functional on the registered system. The program
can be reinstalled on that computer as often as desired without reactivation. The FineReader
Activation Wizard detects and tolerates changes to your PC configuration. Minor upgrades will
not require reactivation. If major upgrades are made to the system (i.e. reformatting the hard
drive, reinstallation of the operating system, etc.), an additional activation may be required.
13
Chapter 1. Installing and Starting ABBYY FineReader
Page 14

14
ABBYY FineReader 7.0 User’s Guide
ABBYY’s Activation Privacy Policy
Activation may be required to access the full functionality of FineReader 7.0. This process veri
fies that you are installing a genuine ABBYY product. ABBYY guarantees that activation of the
product does not entail the communication of personal information to ABBYY. In fact, activa
tion may be completely anonymous, if desired.
At activation, the FineReader Activation Wizard creates a unique Installation ID that indicates
only the configuration of your PC at the time of activation. The Installation ID does not
include: personal information about the user; information about other software or data that
may reside on the PC; or information about the specific make or model of the PC. The code is
used solely for the purpose of activation. The Installation Wizard sends only limited informa
tion to the ABBYY activation server, including: your specific Installation ID and the name, seri
al number, version number, and interface language of your copy of the FineReader software.
This information is used only to select the correct language for the program and to generate
the contents of a reply message that is sent to you to confirm the results of activation. None of
this data will be used for any other purpose.
Page 15

Chapter 2
Quick Start
This chapter will teach you how to input a document in a few
easy steps, even if you know nothing about how ABBYY
FineReader works!
If you already know how to use ABBYY FineReader, you may
wish to skip this chapter and go to the chapter called “New fea
tures of ABBYY FineReader 7.0”.
Chapter Contents:
● How to input a document in less than a minute
● The ABBYY FineReader main window
● ABBYY FineReader toolbars
Page 16

How to Input a Document in Less than a Minute
1. Turn on your scanner prior to starting ABBYY FineReader.
(Many scanner models require the unit to be turned on before you start your PC.)
Next, turn on the computer and start ABBYY FineReader
(Start/Programs/ABBYY FineReader 7.0 Professional Edition or
Corporate Edition). The main window of ABBYY FineReader will appear on
your screen.
2. Place the document on the scanner.
3. Click the arrow to the right of the Scan&Read button in the main window.
Select the Scan&Read Wizard item in the local menu.
The Scan&Read Wizard has Scan&Read and Open&Read
modes to guide you through each step of the scanning
process. You can use a sample image file contained in the
Demo folder of FineReader.
4. Follow the Scan&Read Wizard instructions.
There are four steps to input a document: scanning, reading, spellchecking and saving
recognized text. Once scanning is complete, the scanned document will appear in the Image
window. The application then asks you to set up the recognition parameters (i.e. resolution,
scan mode and brightness). Once you have identified your preferred parameters, FineReader
will start reading the image and analyzing its layout. Recognized text will be shown highlight
ed in blue within the document. The recognized data will also be displayed as editable text in
the Text window. Once you have finished correcting your text, the Scan&Read Wizard will
prompt you to send the final text to an application, save it to a file, or start processing another
document.
The ABBYY FineReader Main Window
ABBYY FineReader uses a batch mode for all document processing. Simply, a batch is a folder
that contains images, recognized text files and other FineReader information files. Each
scanned image is converted into a separate batch file. If there are several images in a single
image file (for example, if you are dealing with a multipage TIFF), each image file will be con
tained in a separate batch file.
As a default, FineReader opens a new batch at startup. You may choose to work with the newly
opened batch or to open a previously created batch. Please see “General Information on
Working with Batches” for more information.
16
ABBYY FineReader 7.0 User’s Guide
Page 17
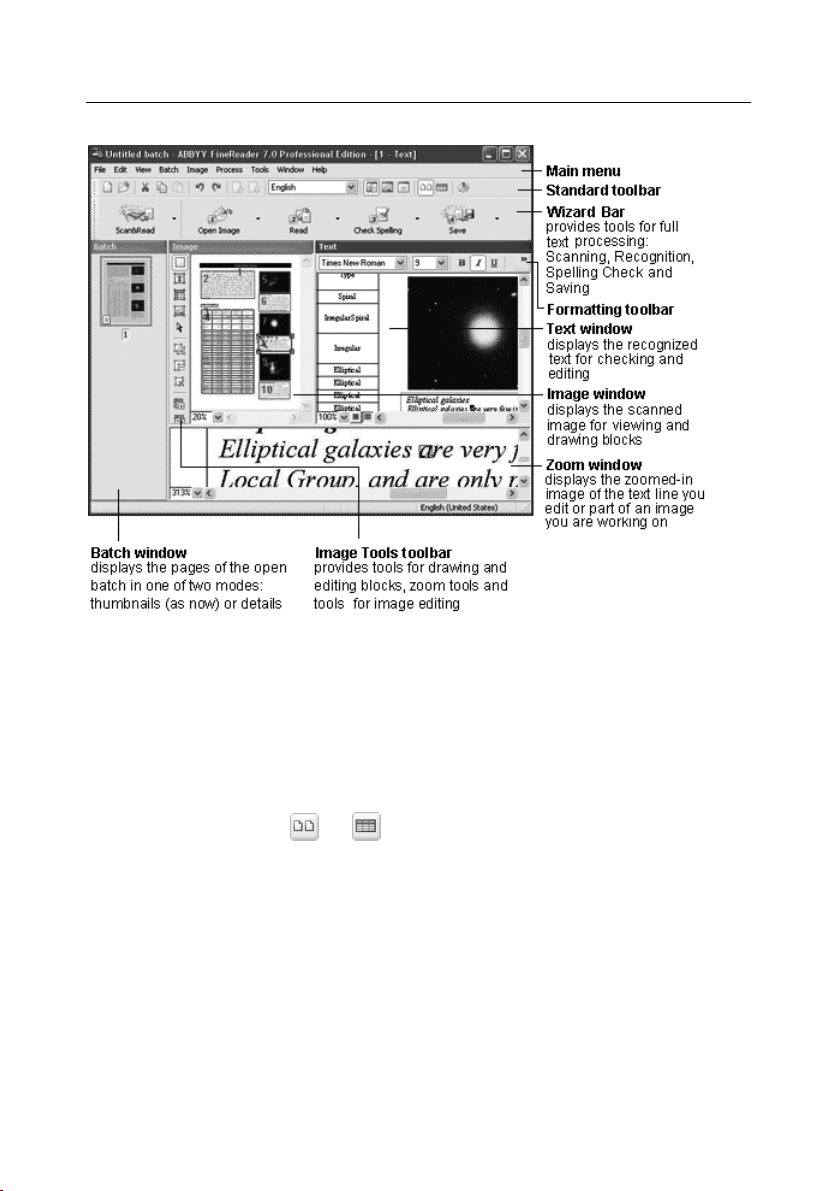
Find the FineReader main menu at the top of the FineReader Main window. Four toolbars are
displayed on the main menu: Standard, Formatting, Image Tools, and WizardBar. You
may display or hide any toolbar by clicking on the View menu and selecting the Toolbar. You
can also rightclick on any toolbar to open the local menu and then click on the name of the
toolbar that you want to display or hide (currently selected toolbars are highlighted).
To select the page view in the Batch window:
● Click either or on the Standard toolbar, or
● Rightclick the Batch window and select the View item in the local menu.
A status bar, located at the bottom of the ABBYY FineReader main window, displays informa
tion on the application’s status and operations currently being performed, as well as a brief
description of menu items and selected buttons.
Other windows in the main window include the Batch, Image, Zoom, and Text windows.
The Image, Zoom and Text windows are interconnected: doubleclicking on an image area
in the Image window causes that area to be displayed in the Zoom window, and moves the
17
Chapter 2. Quick Start
Page 18

pointer in the Text window to the position you clicked on (if text has already been recog
nized on the page). You can customize the onscreen windows arrangement To alter the on
screen windows arrangement:
● In the View menu, select one of the following items: Batch Window; Image
and Text Windows; Zoom Window.
Useful keyboard commands:
● Press CTRL+TAB, to switch between windows.
● Press ALT+1 to activate the Batch window.
● Press ALT+2 to activate the Image window.
● Press ALT+3 to activate the Text window.
ABBYY FineReader Toolbars
There are four toolbars in FineReader: the Standard, Image Tools, Formatting and
WizardBar. These toolbars provide quick and convenient access to the functions of the
application. However, you can also access the same functions using the menus or hot keys.
Allowing the mouse pointer to hover over a toolbar button displays the function of that but
ton. The button's tooltip will be displayed, and the status bar will display additional button
details.
...editing recognized text.Batch window at the top; Batch View: Details; Text
and Zoom windows
...layout analysis and recogni
tion.
Batch window at the top; Batch View: Details; Image
and Zoom windows
...a batch that contains many
pages.
Batch window at the top: Batch View: Details; Image,
Text and Zoom windows
…a batch that contains only a
small number of pages.
Batch window on the left; Batch View: Thumbnails;
Image, Text and Zoom windows
Useful if/when:Some recommended windows arrangements:
18
ABBYY FineReader 7.0 User’s Guide
Page 19
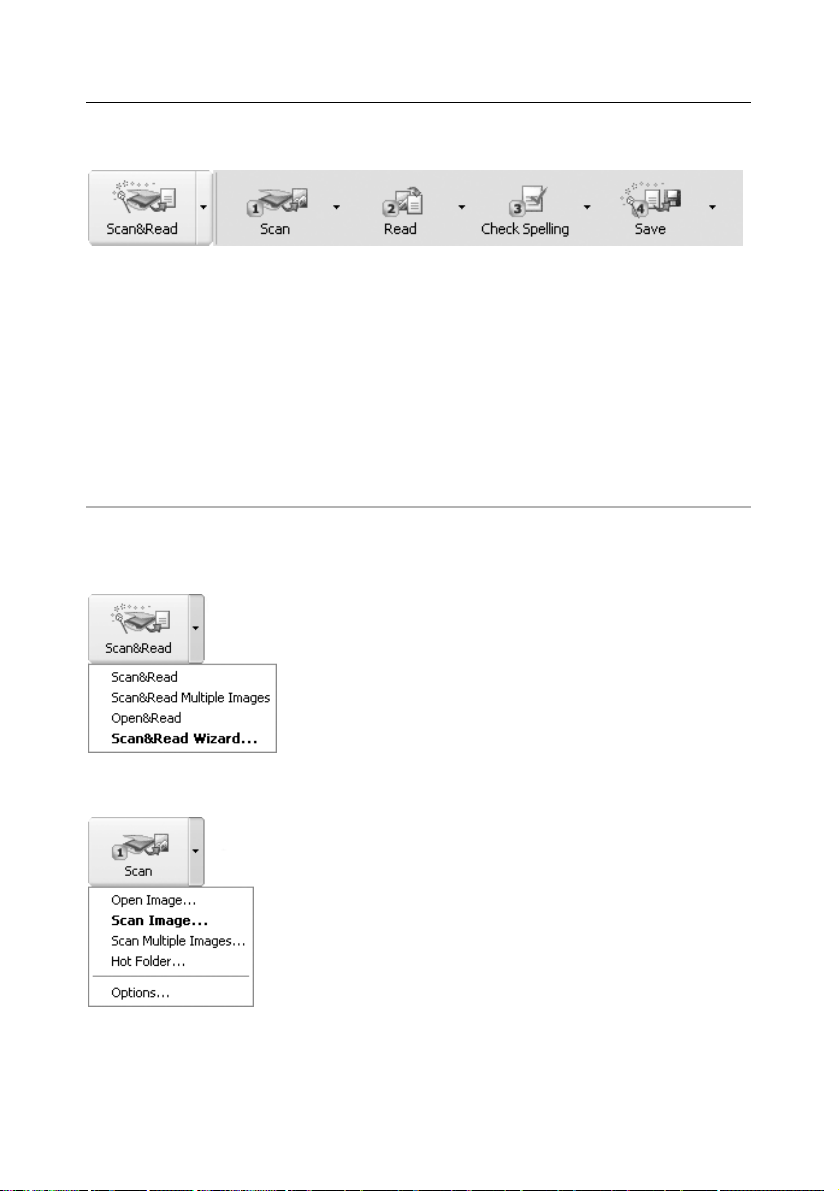
The WizardBar
The buttons on the WizardBar launch the main FineReader functions: Scanning, Reading,
Checking and Saving recognition results. The numbers on the buttons indicate the order in
which the document input actions should be performed. You may perform each action sepa
rately or combine them into a single action by clicking the Scan&Read Wizard button to
perform the full document processing cycle automatically.
Each button offers several function modes. Click the small downwardpointing arrow located
at the right side of each button and select the mode of your choice in that local menu. The
button icon automatically displays the previously selected mode. Click the button itself to run
this mode again.
Scan&Read
1–Scan
Open Image – adds image(s) to the batch. Each added image
is copied to the batch folder.
Scan Image – scans an image.
Scan Multiple Images – scans images continuously. Select
the Stop Scanning item in the File menu to stop scanning.
Hot Folder (Corporate Edition only) – launches folder moni
toring (all images that are added to a specified folder will be
automatically opened in the ABBYY FineReader window). To
disable folder monitoring, select Disable Hot Folder in the
File menu.
Options – opens the Scan/Open Image tab (Options dia
log) to allow you to set scanning options.
Scan&Read – scans and read a document using the current
options.
Scan&Read Multiple Images – scans and reads several con
secutive images.
Open&Read – opens and reads the images selected in the
Open dialog.
Scan&Read Wizard – launches Scan&Read mode. ABBYY
FineReader guides you through the document processing steps
and helps you to obtain the desired results.
19
Chapter 2. Quick Start
Page 20
20
ABBYY FineReader 7.0 User’s Guide
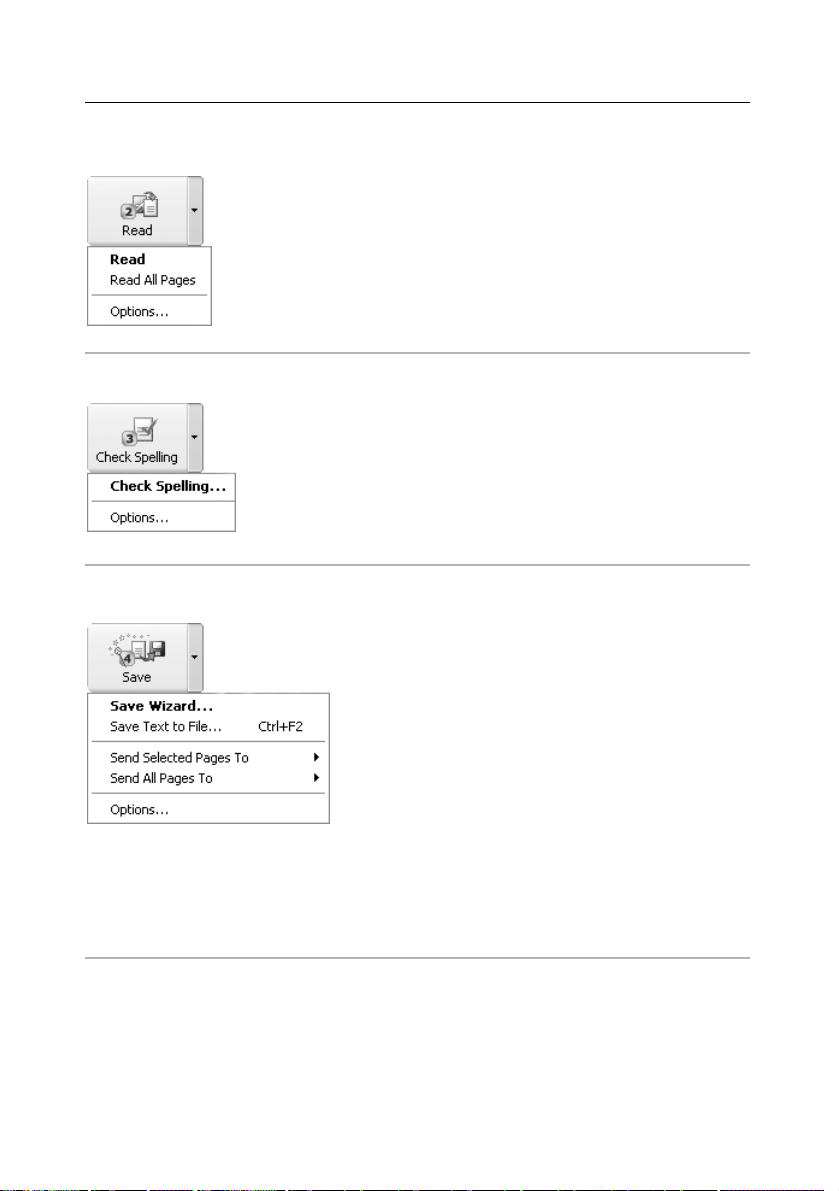
2 – Read
3 – Check Spelling
4 – Save
The Standard toolbar
The Standard toolbar features file and image tools (e.g. undo/redo an action, scroll the batch
pages, clean and rotate the image) and a list of Recognition Languages.
Save Wizard – opens the Save Wizard to allow you
to select saving options and the destination application.
Save Text to File – saves the recognized text to a file.
Send Selected Pages To – allows you to export only
selected batch pages when you select the desired pages
and export destination application. ABBYY FineReader
will export the pages to the application of your choice
without saving the text first.
Send All Pages To – exports all recognized pages to
the application of your choice without saving the text
first.
Options – opens the Formatting tab (Options dia
logue) to allow you to set saving options.
Check Spelling – searches the text for misspelled and
uncertain words (i.e. those words where character rec
ognized was uncertain).
Options – opens the Check Spelling tab (Options
dialog) to allow you to set spelling checker options.
Read – reads the open batch page.
Read All – reads all unrecognized batch pages.
Options – opens the Recognition tab (Options dia
log) to allow you to set document recognition options.
Page 21
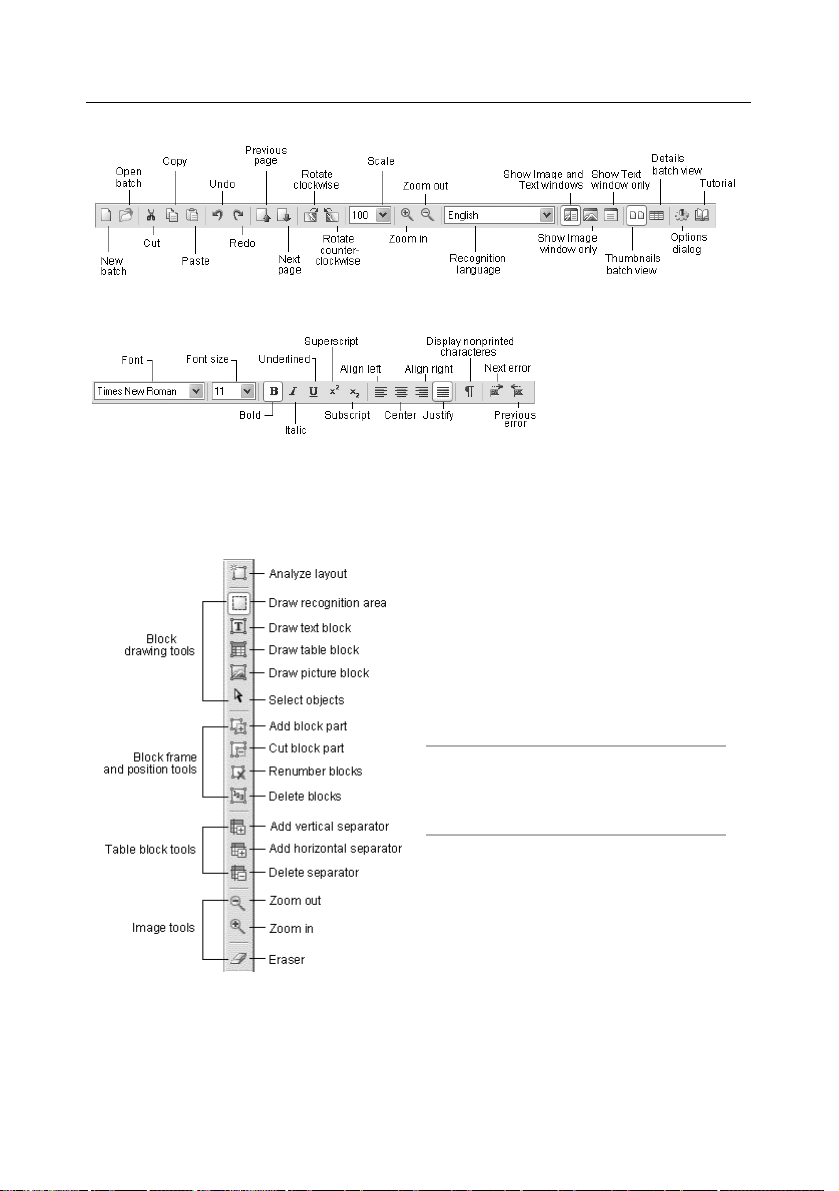
The Formatting toolbar
The Formatting toolbar features various text formatting tools. You can edit and format text
in the Text window.
The Image toolbar
The Image toolbar features page layout
analysis (e.g. block creation and editing)
tools, as well as tools for scaling (increas
ing/decreasing the size) and editing (eras
ing portions of an image, for example)
images.
Note: Block creation and editing but
tons may be used both in the
Zoom and in the Image windows.
21
Chapter 2. Quick Start
Page 22

22
ABBYY FineReader 7.0 User’s Guide
Setting up the toolbar
Note: Low monitor resolution may limit the number of buttons desplayed on ABBYY
FineReader's toolbars. Although all of FineReader's functionality is available through
the program menus, you must increase the monitor's resolution to display all available
buttons. FineReader allows you to customize the Standard, Image and Formatting
toolbars by removing or adding application command buttons.
Each menu item has its own icon. You can access the full list of commands and their respec
tive buttons in the Customize (Tools>Customize menu) dialog in the Commands list.
To add a button to a toolbar:
1. Select a category in the Categories field.
Note: The list of commands is grouped according to menu item, and the
choice of category will affect the list of commands displayed in the
Commands list.
2. Select the toolbar in the Toolbars field where you want to add a button.
3. Select a command in the Commands list and click the () button.
The selected command will be added to the list of toolbar commands and displayed on the
chosen toolbar in the main window.
To remove a button from a toolbar:
● Select the button you wish removed in the Toolbar buttons list and click the
() button.
Note:
1. The Toolbar buttons list determines the order of the buttons on the toolbar. To
change the order, select the command you wish to move and click the Up
(Down) button to move the command.
2. Commands may be distributed between a set of groups: select the Separator
item in the Commands list and click the Add button. A separator will be
added to the list of toolbar buttons. The separator may be moved.
3. To restore the default set of buttons on a given toolbar, select the toolbar in
the Toolbars list and click the Reset button. To restore the default set of but
tons on all toolbars, click the Reset All option.
Page 23

Chapter 3
General Features
of ABBYY FineReader
ABBYY FineReader is designed to help you easily convert docu
ments into editable files. A single click of the Scan&Read button
initiates the automated process so that you can start working
without spending hours studying the User’s Guide. FineReader
supports a wide range of formats and you can send recognized
text to the application of your choice or save it into any support
ed format.
Chapter Contents:
● What is an OCR system?
● New features of ABBYY FineReader 7.0
● Supported document saving formats
● Supported image formats
Page 24

What is an OCR System?
Optical character recognition (OCR) is the translation of optically scanned bitmaps of printed
text characters into character codes, such as ASCII. An OCR system is an efficient way to help
you turn printed/scanned documents, image or PDF files into files that can be edited, searched
and otherwise manipulated on a computer.
ABBYY FineReader is an easytouse program that recognizes texts in practically any font with
out any prior training. The program features high recognition accuracy and low sensitivity to
print defects due to its incorporation of special recognition technology based on the princi
ples of Integrity, Purposeful and Adaptable (IPA) perception.
ABBYY’s IPA Technology:
ABBYY FineReader’s recognition process is based on the principles of ABBYY’s IPA
perception. Three principles determine the behavior of the system:
● Integrity – the identification of recognition objects based on a set of basic
elements and their interrelations.
● Purposefulness – the generation and purposeful verification of recognition
hypotheses.
● Adaptability – the system’s ability to learn and be trained.
There are two stages in the process of inputting a document for
OCR:
1. Scanning. During the scanning stage, a scanner reads the image and transfers
it into a computer. The acquired image is nothing more than a picture (a set
of black, white and color dots that is not editable with a word processor).
2. Recognition. During the recognition stage, FineReader analyzes the image
file transmitted by the scanner (layout analysis) and recognizes each character.
The layout analysis (selecting the recognition areas, tables, pictures, lines, and
individual characters) and image reading processes are closely related. Page
layout analysis is more accurate when the nature of the text is known to the
application.
The system generates a hypothesis about a recognition object (a character, part of a character,
or several glued characters) and then accepts or rejects the hypothesis according to whether
the structural elements are present. These structural elements are computer equivalents of
character parts crucial for human perception (arcs, circles, dots, etc.). The application then
adapts itself to the text according to the degree of accuracy attained. Purposeful searching and
context information enable the system to recognize even torn and distorted characters mak
ing the system oblivious to print defects. Recognized text, which can be edited or saved in a
convenient format, is displayed in FineReader Text window. The final result is the recognized
24
ABBYY FineReader 7.0 User’s Guide
Page 25

text that you see in the FineReader Text window, a text you can edit and save in any conven
ient format.
New Features of ABBYY FineReader 7.0
Recognition Accuracy
● Recognition accuracy has been improved up to 25% over the previous version.
Analysis and recognition of documents with complex layouts has been
improved, particularly, on documents with text on a color or raster back
ground and documents with complex tables (including tables with white grid
lines and tables with color cells).
● Specialized English and German dictionaries have been added that include the
most frequently used legal and medical terminology, providing unmatched
recognition accuracy of specialized legal and medical texts.
● Recognition of barcodes has been improved and support for PDF417 2D
barcodes has been added.
XML Support and Integration with Microsoft Office
● ABBYY FineReader now supports the Microsoft Word XML format.
● The program is fully integrated with Microsoft Word 2003, to allow you to
check and edit recognition results by using Microsoft Word tools. At the same
time, users can compare the exported results that have been saved in
Microsoft Word with the original image from ABBYY FineReader’s Zoom win
dow from within Microsoft Word.
● ABBYY FineReader can insert recognized documents directly within Microsoft
Word. This provides flexibility to allow you to collect and transform informa
tion from papers or PDF documents into a single electronic document.
Improved PDF Conversions
● The quality of recognition of PDF documents has been drastically improved in
version 7.0. ABBYY FineReader can extract and recognize texts that are placed
on a background from PDF file.
● The recognized PDF documents can be edited in the ABBYY FineReader edi
tor. The results can be saved in any of the supported saving formats including
PDF.
● PDF documents created by ABBYY FineReader are optimized for publishing
on the World Wide Web. The first page of the document is viewable before the
entire document has been downloaded.
25
Chapter 3. General Features of ABBYY FineReader
Page 26

New Saving Options
● A new saving format, Microsoft PowerPoint, supports the quick creation of
new presentations or the editing of existing documents from PowerPoint
slides or handouts.
● Results saved in Microsoft Word are smaller files than in previous versions.
The program more accurately retains the formatting of documents with vari
ous separators. In addition, new saving options for images have been added.
● The program more accurately retains complex formatting elements in HTML
(e.g. text flowing around nonrectangular images) documents. The output files
are now smaller in size for more efficient document publishing on the
Internet.
Interface
● The program interface has been improved to be more user friendly. Users
can customize toolbars. New customization tools allow for the finetuning and
personalization of the ABBYY FineReader windows. For example, individual
Zoom settings can be created for each window.
● A new Tutorial provides beginners with easytofollow instructions for quick
ly getting started with ABBYY FineReader. Savvy users will find advanced tips
to maximize the recognition quality and productivity.
Additional Features
New capabilities in FineReader 7.0 Professional Edition include:
● The image splitting tool lets you split an image into multiple areas and save
them as separate pages. This mode is particularly useful for recognizing a page
of business cards, books, and PowerPoint printouts.
● Search with morphology support. Any batch created in ABBYY
FineReader can be used as a fully searchable small database. You can search for
words in any grammatical form. (This feature is available for the 34 languages
that have dictionary support.)
● Intel HyperThreading Technology support. This technology greatly
increases the productivity in recognizing large or numerous documents.
● Duplex scanning. The program creates two separate images if you scan a
twosided document using a duplex scanner. This option can be turned off if
you do not need duplex scanning.
● JPEG 2000 image files can be opened and saved.
26
ABBYY FineReader 7.0 User’s Guide
Page 27

Network Capabilities of ABBYY FineReader Corporate Edition
● Network installation. FineReader Corporate Edition supports installation
from servers to workstations using Active Directory, Microsoft Systems
Management Server, and the command line.
● Support for multi–functional devices, including network MFPs. MFPs
that combine the functionality of a scanner, printer, copier and fax are
becoming increasingly popular.
ABBYY FineReader works with such devices when they are connected to a
workstation or a network. Special program settings allow users to open and
recognize scanned images automatically from anywhere in the network or
from an FTP server.
● Multiple corporate licensing program. In addition to the concurrent
licensing program, ABBYY offers multiple corporate licensing. Choose the
licensing policy that best suits your needs.
● License Manager. This utility manages licenses in a network environment.
This feature allows administrators to monitor the usage of ABBYY FineReader
Corporate Edition on workstations, assign licenses to particular workstations,
and add new licenses.
Refer to the “System Administrator’s Guide” in the Administrator’s Guide folder (located on the
server where ABBYY FineReader is installed) for more information about installing ABBYY
FineReader on workstations, working with the License Manager, and working with the pro
gram in a local area network.
Supported Document Saving Formats
ABBYY FineReader saves recognition results in the following
formats:
● Microsoft Word Document (*.DOC)
● Rich Text Format (*.RTF)
● Microsoft Word XML Document (*.XML) (MS Word 2003 only)
● Adobe Acrobat Format (*.PDF)
● Hypertext Markup Language HTML
● Microsoft PowerPoint Format (*.PPT)
● Comma Separated Values (*.CSV)
● Plain Text (*.TXT). FineReader supports various code pages (Windows, DOS,
Mac, ISO) and Unicode encoding
● Microsoft Excel Spreadsheet (*.XLS)
● Database Format (*.DBF)
27
Chapter 3. General Features of ABBYY FineReader
Page 28

28
ABBYY FineReader 7.0 User’s Guide
Supported Image Formats
ABBYY FineReader opens image files in the following formats:
PDF:
Files in PDF format (Version 1.4 or earlier)
BMP:
2–bit – black and white
4– and 8–bit – Palette
16–bit – Mask
24–bit – Palette and TrueColor
32–bit – Mask
PCX, DCX:
2–bit – black and white
4– and 8–bit – Palette
24bit – TrueColor
JPEG:
gray, color
JPEG 2000:
gray, color
TIFF:
black and white – uncompressed, CCITT3,
CCITT3FAX, CCITT4, Packbits
gray – uncompressed, Packbits, JPEG
TrueColor – uncompressed, JPEG
Palette – uncompressed, Packbits
multi–image TIFF
PNG:
black and white, gray, color
BMP:
black and white, gray, color
PCX:
black and white, gray
JPEG:
gray, color
JPEG 2000:
gray, color
TIFF:
black and white – uncompressed, CCITT3,
CCITT3FAX, CCITT4, Packbits
gray – uncompressed, Packbits, JPEG
color – uncompressed and JPEG
PNG:
black and white, gray, color
ABBYY FineReader saves image files in the following formats:
Page 29

Chapter 4
Acquiring the Image
The quality of the source image greatly impacts recognition qual
ity. In this chapter, you will learn how to scan documents for
best results, how to open and read saved images (see the list of
supported image formats in “Supported Image Formats” section),
and how to process images to improve recognition quality (by
eliminating scanning “dust” etc.).
Chapter Contents
● Scanning
● Setting scanning parameters
● Tips on brightness tuning
● Scanning multipage documents
● Opening images
● Acquiring images from the Hot Folder
● Scanning dual pages
● Adding business cards images to a batch
● Page numbering
● Working with the image
● Batch image options
Page 30

Scanning
ABBYY FineReader communicates with the scanner through a TWAIN interface. The TWAIN
standard, which was adopted in 1992, is a universal standard that unifies the interaction
between a computer image input device (such as a scanner) and an external application.
ABBYY FineReader communicates with a scanner through a TWAIN driver in two ways:
● through the ABBYY FineReader interface. In this case, use the Scanner
Settings dialog and select Use FineReader interface;
● using the scanner’s TWAIN interface. In this case, use the scanner’s
TWAIN dialog to set scanning options; select Use TWAIN–Source interface.
Each mode has its advantages and disadvantages.
Using the TWAIN source interface makes the “preview image” option available so that you can
set the scanning area and tune the brightness precisely, and see how these changes effect the
previewed image. Every scanner has a unique TWAIN driver dialog. Consult your scanner’s doc
umentation for precise instructions on using the TWAIN dialog. Using the ABBYY FineReader
interface provides access to a couple of additional features; a) the ability to scan multiple
pages with a scanner that does not have an automatic document feeder (ADF); and b) the
ability to access scanning options in the batch template file (*.fbt) and use them for other
batches.
Switching between modes is easy:
● Select the Scan/Open Image tab in the Options dialog (menu
Tools>Options) select the interface either Use TWAINSource interface
or Use FineReader interface.
Note:
1. The Use FineReader interface may be unavailable (or disabled) in certain
scanner models.
2. If you wish to see the Scanner Settings dialog in Use FineReader inter
face mode, select the Display options dialog before scanning item on the
Scan/Open Image tab (Tools>Options).
Important: Consult your scanner’s documentation to ensure it is set up correctly. After
connecting the scanner to the computer, install a TWAIN driver and/or the scanner software.
30
ABBYY FineReader 7.0 User’s Guide
Page 31

To start scanning:
Click the 1Scan button or select the Scan item in the File menu. The
Image window containing a scanned imageof the page will appear in
ABBYY FineReader’s Main window.
To scan multiple pages simultaneously, click the arrow to the right of the 1Scan button and
select the Scan Multiple Images item.
If scanning does not begin immediately, one of two dialogs will open:
● The scanner’s TWAINSource dialog. Check the scanning options and click
the OK button to start scanning.
● The Scanner Settings dialog. Check the scanning options and click the OK
button to start scanning.
Tip: To start recognition immediately after the source images are scanned, use the
Scan&Read or Scan&Read Multiple Images option:
Click the arrow at the right of the Scan&Read button and select either
Scan&Read or Scan&Read Multiple Images item in the local menu.
ABBYY FineReader will scan and read the images. The scanned image will appear in the
Image window and the recognition results will be displayed in the Text window of the main
window. From there, the text may be exported to an external application or saved in any of a
variety of formats.
Setting Scanning Parameters
Recognition quality depends greatly on the quality of the scanned image. You can improve the
image quality by altering the main scanning parameters: resolution, scan mode and brightness.
The main scanning parameters are:
● Resolution – use 300 dpi resolution for regular texts (font size 10 pts or
greater) and 400–600 dpi resolution for texts set in smaller font sizes (9 pts
or less).
● Scan mode – gray.
Scanning in grayscale mode is best for recognition purposes. During grayscale
scanning, brightness is adjusted automatically..
31
Chapter 4. Acquiring the Image
Page 32

● Scan mode – black and white.
Black and white scanning maximizes scanning speed but may result in the loss
of some character information. This may lower recognition in documents of
medium and low print quality.
● Scan mode – color.
Select this mode for documents that contain pictures, colored text or colored
backgrounds, so that you can retain the original colors. In all other cases, gray
scan mode is preferable.
● Brightness – a medium brightness value of around 50% should suffice for
most documents. Some documents scanned in black and white mode may
require additional brightness tuning.
Note: Scanning at 400 to 600 dpi resolution (instead of the default 300 dpi) or scanning in
grayscale or color (instead of black & white) mode takes more time. Some scanners
may take up to four times longer to scan at 600 dpi rather than 300 dpi resolution
scanning.
Set scanning parameters:
● To scan images using the ABBYY FineReader TWAIN interface, select the
Scanner Settings item in the Tools menu. The Scanner Settings dialog will
open. Select the appropriate scanning options from the dialog.
● If you wish to scan your images using the TWAINSource interface, your
scanner’s TWAIN dialog will open automatically when you click the 1Scan
button. Set the scanning parameters in the dialogue. Scanning options may
have different names depending on the scanner model. For example, for
brightness the word “threshold”, a “sun” symbol or a black and white circle
may be used. Consult your scanner documentation for a full description of
available options.
Tips on Brightness Tuning
To be recognized, a scanned image must be legible. Check the legibility of the image in the
Zoom window.
– an example of an image that is appropriate for OCR
If you see that the scanned image is compromised (characters are glued or torn), consult the
table below to find ways to improve image quality.
32
ABBYY FineReader 7.0 User’s Guide
Page 33

Scanning MultiPage Documents
ABBYY FineReader offers a specialized scanning mode (Scan Multiple Images) to allow for
convenient multipage document scanning. This mode will allow you to scan an unlimited
number of pages. However, note the following:
● If you use the ABBYY FineReader TWAIN interface, scanning will be con
tinuous so that when one page is finished, the program will automatically start
on the next.
● If you use the TWAINSource interface, the TWAINdialog of the scanner
will remain open after scanning a page so that the next page can be placed
onto the scanner immediately.
The process of scanning a large number of pages changes if you are using a scanner with an
Automatic Document Feeder (ADF) or one without.
ADF Scanning:
1. If you are using the ABBYY FineReader interface, select the Use ADF
option in the Scanner Settings dialog (menu Tools>Scanner Settings) and
then select File>Scan Multiple Images to start scanning.
2. If you are using the TWAINSource interface, select the Use ADF option in
the TWAIN dialog of your scanner (remember that each scanner may name
this option differently; consult your scanner documentation for details) and
then select File>Scan Multiple Images to start scanning.
● Increase the brightness (to make the image
brighter).
● Scan in gray mode (to activate brightness auto
tuning ).
● Lower the brightness (to make the image
darker).
● Scan it in gray mode (to activate brightness
autotuning).
Possible remedy:Your image looks like this:
33
Chapter 4. Acquiring the Image
characters are “torn” or very light
characters are distorted, glued,
or filled
Page 34

34
ABBYY FineReader 7.0 User’s Guide
Non–ADF Scanning
● If you are using the ABBYY FineReader interface, select Scan Multiple
Images from the File menu.
If you are using a flatbed scanner without an ADF and the ABBYY FineReader
interface, there are two ways to increase its efficiency:
● Set a pause value (i.e. the time that will elapse between the scanning of one
page and the next). To do this, select the Pause between pages option and
then set the pause value (in seconds) in the Scanner Settings dialog
(Tools>Scanner Settings menu). The scanner will pause for the predefined
time before scanning the next page to allow you to place the next page onto
the scanner. After the pause, scanning continues automatically.
● Select the Stop between pages option in the Scanner Settings dialog
(Tools>Scanner Settings menu). Each time a page scan is completed, a dia
log will ask you if you wish to continue scanning. Click the Ye s button to con
tinue scanning or No to end the process.
When you have finished scanning your pages, select the Stop Scanning item in the File menu.
If you are using the TWAIN–Source interface
● Select the Scan Multiple Images item in the File menu. The TWAIN dialog
of your scanner will open. Click the Scan (Final, or other) button to start
scanning.
Scan a page, insert the next page into the scanner and click the Scan button in the TWAIN
dialog of your scanner to continue scanning.
When all pages have been scanned, click the Close or other scannerspecific button in the
TWAIN dialog of your scanner.
Tip: To have greater control over the quality of your scanned images, select the Open image
during scanning option on the Scanning tab (Tools>Options). This command
opens each scanned page in the Image window immediately after it has been scanned.
Reject the scanned page and halt the scanning process by clicking on Stop Scanning in
the File menu. Next, rescan the image.
Page 35

Opening Images
You can recognize image files without using a scanner (see the list of supported image formats
under “Supported Image Formats”).
To open an image:
● Click on the downwardpointing arrow to the right of the 1Scan button and
select the Open Image item in the local menu. An Open caption will replace
the Scan caption on the button.
● Select the Open Image from the File menu.
● In Windows Explorer, rightclick the image file you want to open and select
Open with FineReader from the local menu. If ABBYY FineReader is running,
the image will be added to the current batch. Otherwise, the program will be
launched and the most recently used batch opened before the image is added.
● In Microsoft Outlook or Windows Explorer, click on the image file you want
to open and drag it onto the minimized ABBYY FineReader window. The
image will be added to the current batch and opened in the Image window.
Select one or several images in the Open dialog. The selected images will be displayed in the
Batch window, and the last selected image displayed in the Image and Zoom windows. All
selected images are copied into the batch folder. See “General Information on Working with
Batches” section for more information on batch organization and a description of how pages
are displayed within batches.
Tip: If you want the opened images to be recognized immediately, select the Open&Read
mode:
1. Select the Open&Read item from the Process menu or press
CTRL+SHIFT+D. The Open dialog will open.
2. Select the images for recognition in the Open dialog.
35
Chapter 4. Acquiring the Image
Page 36

Acquiring Images from the Hot Folder
(Corporate Edition only)
Multifunction devices, which combine a scanner, printer and scanner into a single device, may
be used with ABBYY FineReader to automatically acquire images.
The folder monitoring feature directs the program to monitor a specified folder on a local
disk, in a network, or on an FTP server for new items. In this mode, the program automatically
opens all the scanned images, faxes and PDF documents that are placed in the “hot” folder.
New items will be added to the ABBYY FineReader batch and deleted from the monitored
folder.
To enable the Hot Folder:
● Select the Hot Folder… item in the File menu, or
● Select the Hot Folder item from the local menu of the Scan&Read toolbar.
When the Hot Folder mode is enabled, the Scan&Read icon on the status bar will be replaced
with the Hot Folder button
.
If an error occurs, it will change again to . Double
clicking this icon to view the error message.
To disable the Hot Folder mode:
● Select the Disable Hot Folder item in the File menu, or
● Select the Disable Hot Folder on the Scan&Read toolbar.
Scanning Dual Pages
When scanning a bound document (i.e. a book), a dualpage scan, which scans both pages
simultaneously, is easiest. You can increase recognition quality, though, by splitting the two
sides after scanning, in order to perform recognition, layout analysis, and deskewing (if neces
sary).
To split a dual page:
● Select the Split Dual Pages option on the Scan/Open Image tab
(Tools>Options menu) prior to scanning.
This command splits each dual page into two batch pages. See “General Information on
Working with Batches” section for more information on batches.
Note: If a dual page has been split incorrectly, deselect the Split dual pages checkbox and
rescan the dual page, or add the page images to the batch again. Finally, try to split
the image manually using the Split Image dialog (Image>Split Image).
36
ABBYY FineReader 7.0 User’s Guide
Page 37

Adding Bussiness Card Images to a Batch
The most efficient way of inputting business cards is to fit as many cards as possible onto the
scanner plate. After input, though, each card should be recognized as a separate page (particu
larly if deskewing has been done). You may choose either automatic or manual splitting tools
to separate the business card image into individual cards.
Note: This process requires that the cards be arranged in a specific order. Consult the “Working
with Business Cards” section in the ABBYY FineReader Tutorial for more information.
To split the image:
1. Select the image in the Batch window.
2. Select the Split Image from the Image menu to open the Split Image
dialog.
3. Click the Split business cards.
Note:
1. This process removes the split page from the batch and replaces it with indi
vidual card images. For more detailed information, see “General Information
on Working with Batches” section.
2. If the image has been split incorrectly, try to split the image manually by using
the Add vertical separator/Add horizontal separator button.
3. In order to delete all separators, click the Remove all separators button.
4. To move a separator, switch to Select separator mode (click the
button).
5. To delete a separator, switch to Select separator mode (click the but
ton) and move the separator outside of the image.
Page Numbering
A number is assigned to each scanned page. The default number is the number of the last
batch page plus one.
You may set page numbers manually if you want to retain the original page numbers in the
document or if you want to scan pages according to page number. To specify page numbers:
● Select the Ask for page number before adding page to the batch item
on the Scan/Open Image tab (Tools>Options menu).
To scan a large number of double–sided pages according to page number:
1. Select the Ask for page number before adding page to the batch item
on the Scan/Open Image tab (Tools>Options).
37
Chapter 4. Acquiring the Image
Page 38

2. Specify a number for the first scanned page in the Page number dialog, then
select Odd and even separately in the Page numbering field. Select an
order for the pages: ascending or descending to reflect the way in which the
doublesided pages have been entered into the automatic document feeder
(i.e. whether the last page or the first page has been placed on top).
Working with an Image
● Despeckle image
● Invert image
● Rotate or flip image
● Clear block
● Increase/Decrease image scale
● Get image information
● Print image
● Undo the last action
1. Despeckle image
The recognized image may contain a large amount of “dust” (i.e. excess dots) if the original is
mediumtolow print quality. Dust, when it resides close to character outlines, may adversely
effect recognition quality. To decrease the number of dots:
● Select the Despeckle Image from the Image menu.
To despeckle a particular block:
● Select the Despeckle Block from the Image menu.
Note: Despeckling may decrease recognition quaility if the original document is very faint or
contains a light font. Very small characters, such as periods or commas, and parts of
very thin characters may disappear.
If you scan or open a “dusty” image, select Despeckle image in the Image Preprocessing
group on the Scan/Open Image tab (Tools>Options menu) to despeckle the image prior to
adding them to the batch.
2. Invert image
Some scanners invert images (turning black into white and vice versa) during scanning.
You may wish to apply the Invert Image option to create a uniform or standard appearance
(e.g. a black font against a white background) among the documents. To do this:
● Select the Invert Image from the Image menu.
38
ABBYY FineReader 7.0 User’s Guide
Page 39

Note: If you scan or open inverted images, select the Invert image item in the Image
Preprocessing group on the Scan/Open Image tab (Tools>Options menu) prior
to adding these images to the batch.
3. Rotate or Flip Image
Recognition quality relies on the image having a standard orientation (the text should be read
from top to bottom and all lines should be horizontal). ABBYY FineReader automatically
detects page orientation during the recognition stage. If the program detects page orientation
incorrectly, clear Detect image orientation (during recognition) on the Scan/Open
Image tab and rotate the image manually. To do this:
● Click or select the Rotate Clockwise from the Image menu to rotate
the image 90° clockwise.
● Click or select the Rotate Counter–Clockwise from the Image menu
to rotate the image 90° counter–clockwise.
● Select Rotate Upside Down item in the Image menu to rotate the image
180°.
To flip the image:
● horizontally (around the vertical axis) – select the Flip Horizontal from the
Image menu,
● vertically (around the horizontal axis) – select the Flip Vertical from the
Image menu.
4. Clear block
You may choose to skip recognizing a particular image area or eradicate large areas of dust on
the image by erasing them. To do this:
● Select and then select the image area you want to erase by holding down
the left mouse button. Release the button to erase the selected image area.
5. Increase/Decrease image scale
● Select / on the Image bar (from the Image window) and click on
the image. The image scale will double/halve.
● Right–click the image and select the Scale. Input the desired scale (by per
centage) from the local menu.
6. Get image information
You can obtain a number of parameters about your image: image width and height in pixels;
vertical and horizontal resolution per inch (dpi); and image type. To do this:
● Rightclick on the image and select the Properties item from the local menu.
In the open dialog, select the Image tab.
39
Chapter 4. Acquiring the Image
Page 40

7. Print image
You can print the image in the Image window, the pages selected in the Batch window, or all
batch page images. To do this:
● Select Print image from the File menu. The Print dialog will open. Set the
desired printing parameters (the printer to be used, number of pages to be
printed, the number of copies etc.).
8. Undo the previous action
● Click the Undo button on the Standard bar .
Tip: To undo the Undo action click the Redo button on the Standard bar .
Batch Image Options
Convert color and gray images to black and white (Scan/Open Image tab, Tools>Options
menu)
Select Convert color and gray images to black and white to scan images in grayscale
using the TWAINSource interface. The scanned images will not retain color pictures or col
ored fonts or backgrounds. This option reduces the amount of disk space needed to store
scanned images.
40
ABBYY FineReader 7.0 User’s Guide
Page 41

Chapter 5
Page Layout Analysis
Before starting the recognition process, ABBYY FineReader must
know which image areas it needs to recognize. To achieve this,
the page layout analysis process identifies text blocks, picture
blocks, table blocks, and barcode blocks.
In this chapter you will learn more about: when manual page
analysis is necessary; what block types are available; how to edit
blocks drawn using automatic layout analysis; and how to
streamline the layout analysis with block templates.
Chapter Contents:
● General information on page layout analysis
● Block types
● Automatic page layout analysis options
● Drawing and editing blocks manually
● Manual table layout analysis
● Using block templates
Page 42

General Information on Page Layout Analysis
Page layout analysis can be done either automatically or manually. In most cases, ABBYY
FineReader manages the complex task of analyzing page layout by itself. Start automatic analy
sis by clicking on the 2Read button. Recognition and layout analysis are performed simulta
neously.
Note: Standalone page layout analysis is also available (Process>Analyze Layout menu).
This process may be needed at times, but often this approach provides inferior page
layout analysis, since coupled layout analysis/recognition uses information acquired
during recognition to improve layout analysis
You may opt to draw blocks manually if:
1. Only part of a page is to be recognized;
2. Automatic layout analysis drew blocks incorrectly.
Tip:
● In some cases, the quality of the automatic layout analysis can be improved by
altering the page layout analysis options. To view the current layout analysis
options, go to the Recognition tab (Tools>Options menu).
● If the application has drawn some blocks incorrectly, it is often faster to edit
the incorrect blocks with the block editing tools than to delete the blocks and
draw them again manually.
Block Types
Blocks are image areas enclosed in frames. Blocks tell the system which image areas should be
recognized and in what order. The blocks also influence how the original page layout is
retained. The differently colored frames indicate different types of blocks. The frame colors of
the blocks can be changed on the View tab of the Options dialog (Tools>Options menu) in
the Appearance group. Select the required block type in the Item field and the desired color
in the Color field.
The following block types are available:
Recognition Area – this is used for automatic recognition and analysis. After the 2Read
button is clicked, all blocks of this type will be automatically analyzed and recognized.
Text – this is used for text image areas and should only contain singlecolumn text. If there
are pictures within the text, draw separate blocks around them.
42
ABBYY FineReader 7.0 User’s Guide
Page 43

Table – this is used for table image areas or for areas of text that are structured in a table.
When the application reads this type of block, it draws vertical and horizontal separators
inside the block to form a table. This block is represented as a table in the output text. You can
draw and edit tables manually.
Picture – this is used for image areas that contain pictures. This type of block may enclose an
actual picture or any other object that should be displayed as a picture (e.g. a section of text).
Barcode – this is used for barcode image areas. If your document contains a barcode that
should be displayed as a series of numbers and letters rather than as a picture, draw a separate
block for the barcode and set the block type to barcode.
Note: It is possible to have barcode analysis and recognition carried out automatically, but
this is not a default option. To enable it, select the Look for barcodes item on the
Recognition tab (Tools>Options menu).
Automatic Page Layout Analysis Options
As part of automatic page layout analysis the following types of blocks are drawn: text, table,
picture, and barcode.
To start automatic layout analysis (and text recognition), click the 2Read button. Before click
ing this button, however, select the main layout analysis options: document type and table
analysis options.
Document type
Usually, text layout is determined automatically. Automatic detection is performed if the
Autodetect layout value on the Recognition tab in the Document Type group
(Tools>Options menu) is selected. Note that the default value is set.
To select the document type manually:
● Select the desired type in the Document type group on the Recognition
tab in the Options dialog (Tools>Options menu).
43
Chapter 5. Page Layout Analysis
Page 44

Available document types :
Table analysis options
Usually, the application divides tables into rows and columns automatically. If additional tun
ing of table options is needed, open the Recognition tab (Tools>Options) and in the Tables
group select the desired item. Change these options if:
● Automatic page layout analysis has drawn the table rows and columns incor
rectly;
● The document contains a large number of simple tables of the same type (i.e.
there are no merged cells or there is always only one line of text per cell).
1. Use the One line of text per cell option if your table has no (or minimal) black separators
and each cell has only a single line of text. For example:
Kilometers Miles – This table has only one line of text per cell
10.62
5 3.2
0Water freezing
point
100Water boiling
point
– This table has more than one line of text per cellt, degrees
centigrade
Physical
phenomenon
– The text is formatted into a single column and set in a uniformly
sized, monospaced font. In the recognized text, left indents are
represented by spaces, each line is separated into a separate para
graph, and empty lines separate original paragraphs. This
approach is useful, for example, when recognizing C++ code
printouts or old computer printouts.
Plain text
formatted with
spaces
– The text is formatted into one column. Use this option if auto
matic page layout analysis incorrectly determines the text type as
multicolumn.
Single column
– (set by default) Text layout is determined automatically.
Recognition of all text types, including texts containing multiple
columns or tables and pictures, is performed automatically.
Auto detect
layout
44
ABBYY FineReader 7.0 User’s Guide
Page 45

2. Use the No merged cells in table option if your table has no merged cells in it. For example:
Note: Do not select One line of text per cell and/or No merged cells in table if the text con
tains tables with differing structures. Selecting these options may result in errors during
layout analysis and may adversely affect recognition quality.
Drawing and Editing Blocks Manually
373100
0273
Degrees
Kelvin
Degrees
centigrade
– the Temperature cell is a merged cellTemperature
45
Chapter 5. Page Layout Analysis
Page 46

46
ABBYY FineReader 7.0 User’s Guide
To create a new block:
1. Select one of the following tools:
– to draw a recognition area;
– to draw a text block;
– to draw a picture block;
– to draw a table block.
2. Position the mouse where you want a corner of your block to be. Hold down
the left mouse button and drag the mouse pointer to the point where you
want the opposite block corner to be.
3. Release the mouse button.
A frame will enclose the image area selected.
You may change the drawn block type to any of the following: Recognition Area, Text, Table,
Picture, or Barcode. To change a block type:
● Rightclick the block and select the Block Type item followed by the corre
sponding block type in the local menu.
Modifying blocks
To move the block borders:
1. Click the block border and hold down the left mouse button. The mouse
pointer will become a twoheaded arrow.
2. Drag the pointer in the desired direction.
3. Release the mouse button.
Note: you click a block corner, you can move both horizontal and vertical borders of the
block simultaneously.
To add a rectangular block part:
1. Select the tool.
2. Click the block you wish to add to. Press and hold down the left mouse but
ton and drag the mouse pointer diagonally. Select the desired image area and
release the button. The resulting rectangle will be added to the block.
3. If necessary, move the block border.
Page 47

To cut a rectangular block part:
1. Select the tool.
2. Click on the portion of the block you wish to cut. Press and hold down the
left mouse button then drag the mouse pointer diagonally. Select the desired
area and release the button. The selected rectangle will be cut from the block.
3. If necessary, move the block border.
Note:
1. You can alter block borders by adding new nodes (splitting points). Use the
mouse to move split border segments in any direction.
To add a new node, press Shift, place the mouse pointer to where you want a
new node (the pointer will become a cross) and click on the border. A new
node will be created.
2. ABBYY FineReader imposes certain limitations on block form. To be success
fully recognized, text lines within blocks must be unbroken. To enforce these
requirements, ABBYY FineReader automatically corrects block borders as parts
are added or deleted. For example, if you delete a portion from the top or
bottom of a block, a whole block corner will automatically be cut. Similarly, if
you try to cut off a part from between the two upper or lower corners, the
application will cut the right block corner (upper or lower) as well. The pro
gram will also forbid operations that involve moving the segments that form
the block borders.
To select a block or a group of blocks:
● Select the tool and click on the desired block or press the left mouse but
ton and draw a rectangle around all the blocks you want to select.
Note: You can select one or more blocks using the block drawing tools. To select several
blocks at once, hold down SHIFT or CTRL when one of the following tools is activated: ,
, or Drag the arrow over the blocks you want to select. To invert the
selection (i.e. to select an unselected block or vice versa), hold down the CTRL key while one
of the tools is activated: , , or and drag the arrow over the desired blocks.
To move blocks:
l Hold down ALT with one of the tools activated:
, ,
or
and move the blocks.
47
Chapter 5. Page Layout Analysis
Page 48

To renumber blocks:
1. Select the tool.
2. Click the blocks in the desired order. The contents of blocks will be displayed
in the output text in the same order.
Note: If you delete blocks on an image that has already been recognized, the recognized text
in the Text window will also be deleted.
To delete a block:
● Select the tool and click the block you wish to delete, or
● Select the blocks you wish to delete and press DEL on the keyboard.
Note: If you delete a previously recognized block, its associated text in the Text window will
be deleted as well.
To delete all image blocks:
● Select Delete blocks and text in the Batch menu.
Note: If you delete blocks on an image that has already been recognized, the recognized text
in the Text window will also be deleted.
Manual Table Layout Analysis
Tip: If automatic table layout analysis has incorrectly drawn table rows and columns, editing
the automatic analysis results instead of deleting all the blocks and redrawing them
manually is usually more efficient.
Editing a table manually:
Use the following Image tools to edit a table:
– Add a vertical separator
– Add a horizontal separator
– Remove a separator
48
ABBYY FineReader 7.0 User’s Guide
Page 49

If the table cell only contains a picture, select Treat cell as picture in the Block Properties
dialog (View>Properties menu). If the table cell contains both text and pictures, draw a sep
arate picture block (or blocks) inside the cell.
To merge table cells or rows:
7. Select the Merge Table Cells or Merge Table Rows in the Edit menu.
Note: You can split previously merged cells using the Split Table Cells command (Edit
menu). The Merge Table Rows option does not affect the division of the table into
columns.
Note: To avoid drawing horizontal and vertical separators manually, draw a separate table
block, then rightclick on it. Select Analyze Table Structure in the local menu. The sys
tem will then draw all the necessary separators. Should the system draw any separa
tors incorrectly, you can edit the table manually.
Using Block Templates
If you are processing a large number of documents with an identical layout (e.g. forms or
questionnaires), analyzing the layout of every page will be time consuming. To save time, cre
ate a block template (i.e. a standard set of a particular type blocks that correspond to a page's
layout) and then apply the template to all pages you wish recognized that have the same lay
out.
Note: Documents should always be scanned using their respective template(s) and using the
resolution that was used to create the template(s).
To create a block template:
1. Open an image and draw the blocks automatically or manually.
2. Select Save Blocks in the Image menu. The Save Blocks As dialog will open.
Type a file name for the block template in the dialog.
49
Chapter 5. Page Layout Analysis
Page 50

To load a block template:
1. Click the Batch Window and select the pages you want to apply the block
template to.
2. Select the Load Blocks in the Image menu. The Open Blocks dialog will
open.
3. Select the relevant block template file in the dialog.
4. Click the appropriate Apply to item in the group. The All pages item applies
the block template to all batch pages, the Selected pages applies the block
template only to selected pages.
5. Click the Open button.
50
ABBYY FineReader 7.0 User’s Guide
Page 51

Chapter 6
Recognition
The goal of OCR is to read a text from a source image and retain
the source page layout. To succeed, however, the main recogni
tion parameters (recognition language, font type of the source
text, and document type) must be identified. This chapter deals
with these parameters and other important recognition issues,
including the use of different recognition settings.
Chapter Contents:
● General information on recognition
● Recognition languages
● Source text print type
● Other recognition options
● Background recognition
● Recognition with training
● How to train a user pattern
● How to edit a user pattern
● User languages and language groups
● How to create a new language
● How to create a new language group
Page 52

General Information on Recognition
Note: Always confirm that recognition options (including recognition language, print type of
the source text, and document type) have been set correctly prior to beginning recog
nition.
You may:
1. Recognize a block or several blocks drawn on an image.
2. Recognize an open page or all pages selected in the Batch window.
3. Recognize all unrecognized batch pages.
4. Recognize all pages in background mode. Background mode allows you to
edit and recognize pages simultaneously.
5. Recognize pages in training mode. Training mode recognizes texts set in deco
rative fonts or expedites processing of large documents (over a hundred
pages) of inferior print quality.
6. Recognize the same batch on several workstations.
To start recognition:
● Click 2–Read on the WizardBar toolbar, or
● Select the item of your choice in the Process menu:
Read – To recognize the open page or all the pages selected in the Batch window;
Read All Pages – To recognize all unrecognized batch pages;
Read Block – To recognize a block or multiple blocks drawn on the image;
Start Background Recognition – To begin recognition in background mode.
As a default, the 2Read button recognizes the open image. To change the
mode of the 2Read button, click the small downward arrow to the right of
the button and select the mode of your choice in the local menu.
Note: When you perform OCR on a page that has already been recognized, only new or
modified blocks will be recognized.
52
ABBYY FineReader 7.0 User’s Guide
Page 53

Recognition Languages
ABBYY FineReader recognizes documents containing a single or multiple languages. When
recognizing documents in English or in German, you may also use the corresponding special
ized medical or legal dictionaries in addition to the generalpurpose ABBYY FineReader dic
tionaries.
To set the text recognition language, select it in the drop–down list on the Standard toolbar.
To recognize a multi–lingual document:
1. Select Select multiple languages in the language list on the Standard tool
bar. The Recognition Language dialog will open.
2. Select the desired language in the Recognition Language dialog.
Note:
1. You may choose to create a language group that includes the language combi
nations that you use regularly.
2. Increasing the number of the recognition languages used simultaneously may
reduce recognition quality. For best results, limit the number of languages to
two or three.
3. Before recognizing a document, check that the fonts selected on the
Formatting tab support all the characters contained in the recognition lan
guage(s) chosen. Unsupported characters will be displayed incorrectly (“?” or
“_” symbols will appear instead of letters). See “Fonts for Recognition
Languages that may be Displayed in Text Editor Incorrectly” in ABBYY
FineReader Help for more information.
Your desired language may not be listed if:
1. ABBYY FineReader does not support the language. See the complete list of
recognition languages under “Supported Languages” in the ABBYY FineReader
Help.
2. The language hasn’t added to the recognition language list on the
Recognition toolbar. To add a language, select Choose more languages in
53
Chapter 6. Recognition
Page 54

the language list on the Standard toolbar. The Recognition Language dia
log will open. Select the desired language.
3. The language was disabled during custom installation.
Note: Always use the folder that contains ABBYY FineReader.
To show/hide a language in the drop–down list on the toolbar:
● Select the language of your choice in the Language Editor dialog
(Tools>Language Editor) and then check or uncheck the Show this lan
guage in the drop–down list on the toolbar item.
Tip: You may specify recognition language down to the block level. To do this, rightclick the
desired block and select Properties in the local menu. The Properties dialog will
open. Select the Block tab in the dialog and then select the block recognition language
in the Languages field on the tab.
Source Text Print Type
Usually, source text print type is determined automatically. To ensure this is the case, select
Autodetect in the Print Type group (Tools>Options menu, Recognition tab).
Select an alternate print type to increase recognition quality of dot matrix printouts done in
draft mode or typewritten texts:
● Select the Typewriter item if you wish to recognize typewritten texts
● Select the Dot Matrix Printer item if you wish to recognize dot matrix
printouts.
An example of draft mode dot matrix text. Character lines
are made up of individual dots.
An example of typewritten text. All letters are of equal
width (compare, for example, “w” and “a”).
To change print type:
● Select the print type of your choice on the Recognition tab in the Options
dialog (Tools>Options menu).
Note: Once you have completed recognition of typewritten texts or dot matrix printouts, re
enable the Autodetect item to recognize normal texts again.
54
ABBYY FineReader 7.0 User’s Guide
Page 55

Other Recognition Options
Show image during recognition
When processing large numbers of pages, recognition is invariably faster if the processed
image is not displayed on–screen. To run recognition without displaying the image:
● Clear the Show image during recognition item on the General tab
(Tools>Options menu).
Text direction
If the application recognizes blocks containing vertical text incorrectly (a text block or a
table cell):
● right–click the block with vertical text and select the Properties item in the
local menu. The Block properties dialog will open. Select the relevant item
in the Text direction list in the dialog and re–recognize the image.
Inverted or flipped block
If the application recognizes blocks containing inverted or flipped text incorrectly (a text
block, a table cell, or a whole table):
● Rightclick on the appropriate block and select Properties in the local menu.
The Block properties dialog will open. Select the Inverted or Flipped item
in the dialog and re–recognize the image.
Background Recognition
If you wish to simultaneously edit previously recognized pages and run recognition, you may
find background recognition mode useful. To start background recognition:
● Select the Start Background Recognition item in the Process menu.
The sign will appear in the status line at the bottom of FineReader’s main
window. If the Details view mode is active in the Batch window (to activate
Details view mode, right–click on the Batch window and select
View>Details in the local menu), the page currently being recognized will
display the icon in the Opened by column.
When background recognition mode is activated, recognition will resume automatically if an
unrecognized page is added to the batch.
Note: Running in Background mode on a multiprocessor system increases recognition speed
if the batch being processed contains a large number of pages.
55
Chapter 6. Recognition
Page 56

56
ABBYY FineReader 7.0 User’s Guide
To stop background recognition:
● Select the Stop Background Recognition item in the Process menu.
Note: The background recognition mode uses the recognition options that were active
when the process started.
Recognition with Training
As noted, ABBYY FineReader can read texts set in practically any font regardless of print quali
ty. Consequently, no prior training is required prior to recognition. Regardless, ABBYY
FineReader offers a number of user pattern training tools.
The Train User Pattern mode may come in useful when:
1. Recognizing texts set in decorative fonts;
2. Recognizing texts containing unusual characters (e.g. mathematical symbols);
3. Recognizing large volumes (more than a hundred pages) of low printquality
texts.
Tip: Use Train User Pattern mode only if one of the above applies. In other cases, the time
and effort required will outweigh the slight increase in recognition quality..
Pattern training creates a pattern based on one or two pages recognized in training mode.
ABBYY FineReader uses this pattern to improve recognition of the remaining text.
Sometimes two or three characters may get “glued” together, and ABBYY FineReader may be
unable to enclose each character in an individual frame to separate them. If you cannot move
the frame so that it contains only one whole character, you can train ABBYY FineReader to
recognize the entire character combination. Examples of character combinations (or ligatures)
that are frequently found glued together include ff, fi, and fl.
Note:
1. A pattern is only useful when a document has the same font, font size, and
resolution as the document used to create the user pattern.
2. Each pattern is created specifically for a particular batch. Consequently, it is
deleted if the associated batch is deleted. Patterns can, however, be copied
into other batches. To transfer a user pattern to another batch, simply save the
batch options in a batch template format file.
3. If you switch to recognizing texts set in a different font, always disable any
user patterns – choose Do not use user pattern on the Recognition tab,
menu Tools>Options.
Page 57

To train a user pattern:
1. Start Train user pattern mode by clicking the Train user pattern radio
button on the Recognition tab, Tools>Options menu, in the Training
group. The default pattern name (“Default”) will be displayed in the status
line.
2. Click the 2–Read button.
3. Train your pattern by recognizing one or more pages in Train user pattern
mode. Trained characters are saved in the default pattern. Once you have
completed training the pattern, ABBYY FineReader will save the pattern
(Default.ptn) in the current batch folder
4. Edit your pattern.
5. Deactivate the training mode (click Use user pattern on the Recognition
tab).
6. Recognize the rest of the text by clicking the 2Read button.
Note:
1. To create several patterns for the same batch, use the Pattern Editor dialog
(click the Pattern Editor button on the Recognition tab or select the
Tools>Pattern Editor menu item). Create a new pattern by clicking on the
New button in the dialog and select it by clicking on the Set Active button.
Working with a created pattern is no different than working with a default
pattern (see steps 15). Keep in mind, however, that only one pattern may be
active at a time.
2. If you’ve created several patterns for the same batch, the last created pattern
will be active. The status bar displays the active pattern. To activate another
pattern, select the desired pattern from the pattern list in the Pattern Editor
dialog (Tools>Pattern Editor menu) and click Set Active. Next, click on
Use user pattern on the Recognition tab, Tools>Options menu, in the
Training group.
3. If the Use builtin patterns option is set, ABBYY FineReader will recognize
all texts using its builtin patterns and stop only at uncertain characters. If you
are training the system to read decorative and/or nonstandard fonts (for
example, Tibetan) the use of inbuilt patterns may result in characters being
read incorrectly. To avoid this problem, disable the use of builtin patterns
(clear the Use builtin patterns checkbox on the Recognition tab) and
train the system to recognize each unknown character.
57
Chapter 6. Recognition
Page 58

How to Train a User Pattern
1. Make sure the Train user pattern radio button is enabled on the Recognition
tab (Tools>Options menu) in the Training group.
2. Click 2Read. ABBYY FineReader will start recognition. When the program
encounters an unknown character, the Pattern Training dialog will open,
and the character image will be displayed..
Training to recognize a character:
The frame in the top dialog window should enclose a single character, and this character
must be fully enclosed by the frame. If the frame encloses only part of a character or more
than one character, click the frame borders and move them to enclose the character. The
and buttons may be used to move the frame border (and are useful for training
italic symbols — see below). Once you have positioned the frame correctly, type in the charac
ter and click the Tra in button.
Note:
1. The system can only be trained to recognize characters that are in the alpha
bet of the language being recognized. If the keyboard does not contain the
character that you want to train, denote the character by combining two char
acters or copy the required character from the Character Table. To access
this table, click the button in the Pattern Training dialog.
58
ABBYY FineReader 7.0 User’s Guide
Page 59

2. The system can be trained to retain character formatting. Select the corre
sponding Italic or Bold item in the Pattern Training dialog and then click
the Train button.
3. Training is case sensitive. During training, make sure that you use upper or
lower case characters as appropriate.
Correct mistakes made during training by clicking the Back button to return the frame to its
previous position. The last “imagecharacter” pair to be entered will automatically be removed
from the pattern. The “undo” function is limited to the last word trained.
Training to recognize ligatures
Ligatures, which are a combination of two or three “glued” characters (such as fi, fl, ffi, etc.),
are difficult to separate because they are “glued” as part of the printing process. Better results
can be obtained training the software to recognize the compound characters as a single
unique character.
Train the same way that you would train separate characters:
1. Type the necessary character combination and click the Train button.
2. The frame in the top dialog window should enclose the entire ligature.You
can move the frame border using the mouse or by clicking the and
buttons.
Each pattern may contain up to 1000 new characters. Limit the number of ligatures that you
train, since these characters may lower recognition quality.
When you train ABBYY FineReader, please remember:
1. ABBYY FineReader doesn’t differentiate between certain characters that are
unique to the human eye. These multiple characters will be categorized
together and assigned a certain character. For example, the straight (‘), right
(‘) and left (‘) apostrophes are all identified as a single character – the straight
apostrophe. These characters will never appear in recognized text even if you
try to train them.
2. The recognition of some characters depends on their environment.
How to Edit a User Pattern
You may want to edit your newly created pattern before you begin recognition, since an incor
rectly trained pattern will reduce recognition quality. Remove characters with cut edges and
incorrectly labeled characters from the pattern.
59
Chapter 6. Recognition
Page 60

To edit a user pattern:
1. Select Pattern Editor in the Tools menu. The Pattern Editor dialog will
open.
2. Select the desired pattern and click Edit in the dialog. The User Pattern dia
log will open.
3. Select a character and click Properties to edit the character caption and set
the correct typeface: italic, bold, subscript or superscript. You may also click
the Delete button to remove incorrectly trained characters from the batch.
User Languages and Language Groups
In addition to the builtin languages and language groups, you may also create a new language
or a new language group (from languages supported by FineReader) and use it for
recognition.
You may want to create a new language if you need:
1. Connect a user dictionary.
● For example, you might need to recognize an English text that contains abbre
viations. Create an abbreviation dictionary, create a new language and connect
the dictionary to the English language. Next, create a new language group that
consists of the English language (with the system dictionary) and the new lan
guage (with the abbreviations dictionary). Use this language group to recog
nize your texts.
2. Recognize specialized documents, such as:
● Supermarket product lists that contain only product codes. These codes are a
combination of letters and numbers. Create a new language that consists of
only the necessary characters and use it to recognize these documents.
● Documents that are made up of only capitalized text. You may increase the
recognition quality in these documents by creating a language that prohibits
all lowercase letters.
Create a language group for oftenused language combinations. To create a new language or a
language group, open the Language Editor dialog (Tools menu, Language Editor item).
60
ABBYY FineReader 7.0 User’s Guide
Page 61

How to Create a New Language
To create a new recognition language:
1. Select the Language Editor item in the Tools menu.
2. Click on New, select the Create a Copy of the Language radio button. Then
select the appropriate source language.
3. The Simple Language Properties dialog will open.
Set the following language parameters for the new language in the Simple
Language Properties dialog:
1. The new language name.
2. The basic alphabet that should be used by the new language. This parameter is
set in the Alphabet field. If necessary, edit the alphabet by clicking
the button.
3. The dictionary that ABBYY FineReader should use for recognition and spelling
checking. Choose one of the following:
● None (no dictionary to be used).
● Built–in (the dictionary supplied with FineReader)
● User dictionary
You can add words to the ABBYY FineReader dictionary; use an existing user
dictionary; or use a text file in Windows (ANSI) or Unicode encoding (the
only requirement is that words be separated by spaces or other nonalphabet
ic characters). To do this, click on Edit Dictionary.
61
Chapter 6. Recognition
Page 62

Note: The spelling checker will consider capitalization of words in the user dictionary to be
correct if they are found in the text with any of the following capitalizations: diction
ary set capitalization; lowercase only; uppercase only; sentence case capitalization
(first letter capitalized, remaining letters lowercase). Examples include:
Dictionary set capitalization: Correct occurrences of the word:
abc abc, Abc, ABC
Abc abc, Abc, ABC
ABC abc, Abc, ABC
aBc aBc, abc, Abc, ABC
● Regular expression (used to specify the grammatical rules of the new lan
guage; see the Regular Expressions section in ABBYY FineReader Help for
details.).
Note:
1. Click on the Advanced button in the Simple Language Properties dialog to set
advanced properties for the new language (e.g. characters to be ignored, pro
hibited characters, etc.).
2. As a default, new user languages are saved into the batch folder. Note that
ABBYY FineReader Corporate Edition allows you to specify a folder where the
language should be saved. For more information on group work with user lan
guages and dictionaries, see “Group work with the same user languages and
user dictionaries” in ABBYY FineReader Help.
How to Create a New Language Group
If you often recognize texts written in a certain language combination (e.g. English/German or
Italian/French), you may create a language group that combines these languages. The created
group will be displayed in the language list on the Standard toolbar..
Note: Customize the recognition languages that are shown on the language list of the
Standard toolbar by selecting Select multiple languages in the list. The
Recognition Language dialog will open. Select the desired languages in the dialog..
62
ABBYY FineReader 7.0 User’s Guide
Page 63

To create a recognition language group:
1. Select Language Editor in the Tools menu and click the New button. A dia
log will open. Select the Create a new group of languages item in the dialog.
2. The Language Group Properties dialog will open.
Set the following new language group parameters (all parameters are set
in the Language Group Properties dialog):
1. Group name.
2. Languages contained in the group.
Note:
1. If you know that your text will not contain certain characters, you may wish
to prohibit the characters in the relevant language group’s properties. Limiting
the characters to be recognized will increase recognition speed and quality. To
prohibit characters, click the Advanced button in the Language Group
Properties dialog. The Advanced Language Group Properties dialog will
open. Specify the set of prohibited characters in the Prohibited characters
line.
2. By default, the newly created user language group will be saved in the batch
folder. In ABBYY FineReader Corporate Edition, you may specify the destina
tion folder. For more information on group work with user languages and dic
tionaries, see “Group work with the same user languages and user dictionaries”
in ABBYY FineReader Help.
63
Chapter 6. Recognition
Page 64

ABBYY FineReader 7.0 User’s Guide
Page 65

Chapter 7
Checking and Editing Text
After recognition, the Text window will display the recognized
text. The Text window is ABBYY FineReader’s builtin editor, and
should be used to check recognition results and edit recognized
text.
The FineReader text editor has two distinctive features:
1. A builtin spell check system (see the list of languages with
spell check support under “Supported Languages” in ABBYY
FineReader Help).
2. To increase readability, the Zoom window displays the
source image of the text line being edited.
The built–in spelling checker features:
1. Tools for finding uncertain words (words containing
uncertain characters).
2. Tools for finding misspelled words.
3. Tools for adding unknown words to the ABBYY
FineReader dictionary. Adding words to the dictionary
improves recognition quality.
Chapter Contents:
● Checking text in ABBYY FineReader
● Check and edit text options
● Adding and deleting words to/from the user dictionary
● Editing text in ABBYY FineReader
● Editing tables
Page 66

Checking Text in ABBYY FineReader
ABBYY FineReader highlights uncertainly recognized characters and words not found in the
dictionary in different colors. Usually, light blue is used for uncertain characters and pink for
words not found in the dictionary. To change the default colors:
● Select the Uncertain Character (or Not in Dictionary Word) item fol
lowed by the desired color in the Color item on the View tab
(Tools>Options menu) in the Appearance group
To check recognition results:
1. Click the 3–Check Spelling button on the WizardBar toolbar (or select the
Check Spelling item in the Tools menu).
2. The Check Spelling dialog will open.
3. The Check Spelling dialog contains three windows. The top window is similar
to the ABBYY FineReader Zoom window and displays the original image of
the word. The middle window displays the actual word, while the line above it
identifies the error type. The Suggestions window at the bottom provides
replacement suggestions (if any). Note that suggestions are based on the dic
tionary selected in the Dictionary language dropdown list; any language may
be chosen from this list.
66
ABBYY FineReader 7.0 User’s Guide
Page 67

Note: You can enlarge the Check Spelling dialog to make it easier to check and
edit text. Simply click the dialog border; the mouse pointer will become a
doubleheaded arrow. Drag the border to make the dialog larger or smaller.
4. If words have been misspelled, you may:
● Click the Ignore button to leave the word unchanged.
● Click the Ignore All button to leave all misspelled words in the text
unchanged.
Note: When you click the Ignore or Ignore All button, the “uncertain” flag is
removed from the word and the system assumes that the word no longer
contains unrecognized or uncertain characters and removes the highlight
ing. As a result, when you export such words in .PDF format and select the
Replace uncertain words with images mode, the software will not
replace these with images.
● Select a replacement suggestion and then click the Replace or Replace All
button to replace the current word or all words in the text. If none of the
options in the Suggestions window are correct, you can enter one yourself in
the middle window. (Important: When you switch to edit mode, certain but
tons may change function and adopt new captions.) Click the Confirm
(Confirm All) button to change the current word (or all such words) in the
text and move to the next uncertainly recognized word.
● Click Add... to add the word to the dictionary. Once a word is added, all sub
sequent occurrences of this word will be recognized.
● Click Options... to set the spell check options.
● Click Close to close the dialog window.
Moving between uncertain words
To check the recognition results quickly, you can use the button and button to move
to the next or previous uncertain word respectively.
You can also use the F4 (SHIFT F4) hotkey to navigate between uncertain words.
67
Chapter 7. Checking and Editing Text
Page 68

Check and Edit Text Options
These options are set on the Check Spelling tab (Tools>Options menu).
● Error display level
Note: This option must be set before you start recognition.
● Stop at words with uncertain characters
● Stop at words not found in the dictionary
● Stop at compound words
● Ignore words with digits and other nonalphabetic characters
● Correct spaces before and after punctuation marks
Error display level
In the Error display level list, you may select the following values:
● None – recognition errors are not highlighted.
● Standard – unrecognized and uncertainly recognized characters are high
lighted.
● Thorough – the same as Standard, but words not found in the dictionary
are also highlighted.
Note: The number of errors displayed in the Text window will change after you
re–recognize the page.
Stop at words with uncertain characters
This option stops the spell checker at words with uncertain characters.
Stop at words not found in the dictionary
This option stops the spelling checker at words not found in the dictionary. If a word is not
found in the dictionary, it may have been incorrectly recognized.
Stop at compound words
This option stops the spelling checker at the words not in the dictionary, which can be either
made up according to the available morphology models or from the words in the dictionary.
Ignore words with digits and other non–alphabetic characters
This option causes the spell checker to treat all words with digits and other not included in
the recognition language characters as correct, unless they contain uncertain characters.
68
ABBYY FineReader 7.0 User’s Guide
Page 69

Correct spaces before and after punctuation marks
This option will automatically correct spacing before or after punctuation marks without stop
ping the spell check.
Adding and Deleting Words to/from the User
Dictionary
Adding words to the user dictionary
Enlarging the dictionary increases recognition quality. During recognition, ABBYY FineReader
checks every word it encounters for possible dictionary entries. Add new words that are likely
to come up frequently (e.g. specialized terms, abbreviations, names etc.) to the user dictionary.
A distinctive feature of ABBYY FineReader’s spell checker is that, in addition to adding each
word in its original form, the program also adds its paradigm (i.e. the set of all of its forms). This
feature allows ABBYY FineReader to recognize an entered word in all of its forms.
To add a word to the dictionary during the spell check:
● Click Add in the Check Spelling dialog.
Set the following parameters in the Primary Form dialog:
1. Part of speech (Noun, Adjective, Verb, Uninflected).
2. If a capital letter always begins the word, select Proper name. If you add an
abbreviation, select the Abbreviation item.
3. The primary form of the word.
Click OK. The Create Paradigm dialog will open. ABBYY FineReader will query you about
the word forms in order to construct a paradigm for the new word. Select Ye s or No to
answer these questions. If you make a mistake, click Anew to have ABBYY FineReader ask the
question again. The Paradigm dialog will display the constructed paradigm.
Note:
1. If you want to add uninflected words rather than creating a paradigm, select
the Add without prompting for word forms option (English dictionary
only) on the Check Spelling tab (Tools>Options menu).
2. You may also add words when you view the list of added words. Simply select
View Dictionaries in the Tools menu. The Select Dictionary dialog will
open. Select the desired language in the Select Language dialog and click
View. The dictionary with the list of the added words will open. Add words by
clicking on the Add button.
69
Chapter 7. Checking and Editing Text
Page 70

70
ABBYY FineReader 7.0 User’s Guide
3. The following languages support paradigms: Armenian (Eastern, Western,
Grabar), English, Italian, French, German (Old and New spelling), Russian,
Spanish and Ukrainian.
The program will notify you if you try to add a word that already exists in the dictionary. You
may view its paradigm and construct a new one if you think the existing paradigm is incorrect
(as with homonyms, for example. Click the Add button in the Add Word dialog.
Tip:
1. ABBYY FineReader allows you to import user dictionaries created by previous
versions (3.0, 4.0 and 5.0).
2. ABBYY FineReader also allows you to import user dictionaries (*.dic) created
using Microsoft Word 6.0, 7.0, 97, and 2000.
To import a dictionary:
1. Select View Dictionaries from the Tools menu, then select the dictionary
language, and click View.
2. Click Import in the opened dialog and select files with *.pmd, *.txt or *.dic
extensions.
To delete a word from the dictionary:
1. Select View Dictionaries from the Tools menu. Select the desired language
and click OK. A dialog will open.
2. Select the word you want to delete and click Delete.
Editing Text in ABBYY FineReader
Note: If the ABBYY FineReader Text window displays characters incorrectly (i.e. “?” replaces
some or all of the letters), your current font is not supported in full by your recogni
tion language alphabet. To correct the problem, select a font that supports your entire
recognition set (for example, Arial Unicode or Bitstream Cyberbit) on the Formatting
tab (Tools>Options menu) in the Fonts group, and recognize the document again.
See under “Fonts for Recognition Languages that May be Displayed in Text Editor
Incorrectly” in ABBYY FineReader Help.
Page 71

After recognition, the page text is displayed in the Text window. When you send your text to
an external application, the layout retention options mandate how the text layout is retained.
Set these options on the Formatting tab (Tools>Options menu) and in the format dialogs.
The program automatically highlights uncertainly recognized characters. To disable this fea
ture, unselect Highlight uncertain characters on the View tab (Tools>Options menu).
ABBYY FineReader editor features two document viewing modes: full mode (the full layout is
displayed) and draft mode.
In full mode blocks with recognized text, tables and pictures are displayed exactly as they are
to be found on the original image. The complete original layout is retained: columns, tables,
pictures and dropped capitals (oversized letters that are several line widths high). The block
where the pointer is located is the active block. If the pointer is moved using the arrow keys,
the order of navigation between blocks is determined by their numbering on the original
image. If editing makes the amount of text inside a particular block too large to be contained
in the block, parts of other inactive blocks may become invisible. The borders of these block(s)
will be displayed with red markers. When a block is active, its borders are enlarged to display
all of the text.
Draft mode displays the following text features: left indent; paragraph alignment (all para
graphs are aligned to the left); and text and background color. Draft mode uses a predeter
mined font size (12pt by default) throughout to display text. Effects (bold, italic, underlined,
superscript and subscript) are retained.
Switch between draft and full modes by clicking the (full mode) or (draft mode)
buttons in the Text window.
To change font size in draft mode:
1. Select the Options item in the Tools menu.
2. Set your preferred font size by selecting in the Draft editor font size item
on the View tab.
71
Chapter 7. Checking and Editing Text
Page 72

The FineReader built–in editor is supplied with the following
text editing features:
● Copy, cut, paste
● Search and replace
● Font effects
● Text alignment
● Undo and redo
Copy, cut, paste
1. Before you use the copy, cut, and paste commands, highlight the relevant text.
2. Follow the instructions below depending on the action you wish to carry out:
To copy the selection:
● Click Copy on the Standard toolbar
or
● Select Copy in the Edit menu or local menu
or
● Press CTRL+C
To cut the selection:
● Click Cut on the Standard toolbar
or
● Select Cut in the Edit menu or local menu
or
● Press CTRL+X
To paste the copied text:
● Click Paste on the Standard toolbar
or
● Select Paste in the Edit menu or the local menu
or
● Press CTRL+V
Search and replace
To find a word or phrase in the text you are editing:
1. Try one of the following:
● Select Find in the Edit menu, or
● Press CTRL+F
2. The Search dialog will open. Type the word or phrase you wish to find in the
Find what line of the dialog and set the search parameters.
Note: To redo an identical, press F3.
72
ABBYY FineReader 7.0 User’s Guide
Copy button
Cut button
Paste button
Page 73

To search and replace a word or phrase in the text you are editing:
1. Try one of the following:
● Select Replace in the Edit menu, or
● Press CTRL+H
2. The Replace dialog will open. Type the word or the phrase you want to find
in the Find what line of the dialog, type the word or phrase that is to replace
the search pattern in Replace with line, and set the search parameters.
Font effects
1. Click on the desired word or highlight the appropriate text.
2. Try one of the following:
● Click the appropriate fonteffect button (e.g. ) ) on the Formatting
bar, or
● Rightclick the Text window and select Character Properties in the
local menu. The Character dialog will open. Select the desired font and
set the required font parameters in the dialog, or
● Press CTRL+B for boldface, CTRL+I for italics, CTRL+U for underliningt.
Note: The program allows you to specify the following parameters in the Font
dialog: character spacing, character scale, and use of lowercase capitals.
These formatting changes will only be visible once you export your docu
ment to an application that supports formatting (such as MS Word) and
cannot be seen in ABBYY FineReader’s builtin text.
Text alignment
1. Select the text you wish to align.
2. Try one of the following:
● Click the desired alignment button (e.g. ) on the Formatting bar, or
● Rightclick on Text and select Character Properties in the local menu.
The Character dialog will open. Select the necessary item in the
Alignment field.
Undo and redo
Perform one of the following actions:
To undo an action:
● Click Undo on the Standard toolbar
or
● Select Undo in the Edit menu
or
● Press CTRL+Z
73
Chapter 7. Checking and Editing Text
Undo button
Page 74

To redo an undone action:
● Click Redo on the Standard toolbar
or
● Select Redo in the Edit menu
or
● Press CTRL+Y
Editing Tables
The table editor provides you with tools
to carry out the following:
● Merge cell or row contents
● Split cell contents
● Split row/column contents
● Delete cell contents
To merge cell or row contents:
● Hold down the CTRL key and select the cells or rows you wish to merge, and
then press Merge Table Cells or Merge Table Rows in the Edit menu.
To split cell contents:
● Select Split Table Cells in the Edit menu.
Note: This command may only be applied to cells merged previously.
To split row or column contents:
● Select the or tool on the toolbar in the Image window, then click
the row/column you wish to split or add a new horizontal/vertical separator to.
Tip: You can merge row contents by using the tool or the Merge Table
Rows command (Edit menu).
To delete cell contents:
● Select the cell(s) you wish to delete in the Text window and press DEL.
74
ABBYY FineReader 7.0 User’s Guide
Redo button
Page 75

Chapter 8
Saving into External Applications
and Formats
You can choose to save recognition results to a file, export them
to an external application without saving them, copy them to the
Clipboard or email them in a supported file saving formats. You
can save specific pages or all of the pages in the document.
FineReader can export recognition results to the folowing
applications:
Microsoft Word 6.0, 7.0, 97 (8.0), 2000 (9.0), 2002 (10.0) and
2003 (11.0); Microsoft Excel 6.0, 7.0, 97 (8.0), 2000 (9.0),
2002 (10.0) and 2003 (11.0); Microsoft PowerPoint 2002 (10.0),
2003 (11.0); Corel WordPerfect 7.0, 8.0, 9.0, 2002 (10.0) and 11;
Lotus Word Pro 9.5, 97 and Millennium Edition; StarWriter 4.x and
5.x, PROMT 98, and other applications that support the ODMA
standard..
Chapter Contents:
● General information on saving recognized text
● Text saving options
● Saving the recognized text in RTF, DOC and Word XML formats
● Saving the recognized text in PDF format
● Saving the recognized text in HTML format
● Saving the recognized text in PPT format
● Saving the page image
Page 76

General Information on Saving Recognized Text
You may:
● save recognized text using the Save Wizard,
● save opened or selected pages to a file or send them to an external applica
tion,
● save all the batch pages to file or export them into an external application,
● save page image.
Send recognition results to a certain application or save them to a file by
clicking on 4Save. The icon appearance changes to reflect the current sav
ing mode. The Save button caption displays the name of the currently
selected export application..
To save the recognized text:
1. Click on the downwardpointing arrow to the right to the 4Save button and
select the desired item in the local menu.
Note: To save a specific number of pages, select them prior to clicking the 4Save button.
After the export is finished, the 4Save button icon will change to reflect the previous action
(sending the recognized text to an application, sending it by email, copying it to the
Clipboard or saving it to a file). The last export mode becomes the default for the 4Save but
ton, so that clicking the icon will use that save option without going to the button's local
menu.
Text Saving Options
Text saving options can be specified on the Formatting tab in the Tools>Options menu.
Some saving options can also be set in the Save Wizard and Save Text As dialogs. This sec
tion will outline.
● Formatting and text layout retention modes
● The retain pictures option
● Image resolution (saving in RTF, etc.)
● JPEG quality
● Fonts to use
● Save all or selected batch pages
● Recognized text saving modes
76
ABBYY FineReader 7.0 User’s Guide
Page 77

Formatting and text layout retention modes
(saving in RTF/DOC/Word XML, PPT and HTML formats)
● Retain full page layout – Document layout is fully retained, including para
graph arrangement, font type and font size, columns, text direction, text color,
and table structure.
● Retain font and font size – Table structure, paragraph arrangement, font
type, and font size are all retained.
● Remove all formatting – Only table structure and paragraph arrangement
are retained.
Note: Some additional options may become available depending on the chosen export for
mat. In the case of the RTF/DOC/Word XML formats, you can set the default page
size and highlight uncertain characters. In the HTML format, you can set the picture
resolution and code page. To set these options, go to the Formats Settings dialog
(Tools>Formats Settings menu). Since the dialog has a separate tab for each format,
just click on the desired format tab and set the options.
Retain pictures
If you chose this option, pictures will be saved together with recognized text. The option is
only available in the case of RTF/DOC/Word XML, PPT and HTML formats.
Image resolution
(RTF/DOC/Word XML, PDF, PPT and HTML formats)
Sometimes you may want to reduce the image resolution that you are using. For example,
HTML files are normally viewed using browsers, and highresolution files, due to their size, are
usually unwelcome on the Internet. To reduce image resolution (and, consequently, HTML file
size) without lowering image quality, enter a lower resolution value in the Reduce picture
resolution to field on the Formats>RTF/DOC/Word XML (PDF, PPT, HTML) tab.
Note: Entering a higher resolution value than the one originally entered in the Reduce pic
ture resolution to field will cause the value to be ignored. Instead, the pictures will
be saved using the source resolution.
JPEG quality
(saving in RTF, DOC, Word XML, PDF, PPT and HTML)
When saving text in PDF, PPT and HTML formats, JPEG format is used.
When saving results in RTF, DOC, Word XML formats, you can specify that the image be saved
in the JPEG format.
77
Chapter 8. Saving into External Applications and Formats
Page 78

The JPEG format uses a "quality loss" algorithm to compress the image (i.e. the compressing
technology averages groups of pixels and saves the entire region as a single number rather
than assigning numbers to each pixel). The quality of the image will be determined by the
value specified in the JPEG quality field (Tools>Formats Settings, PDF, RTF/DOC/Word
XML, PPT and HTML tabs). Specify a value from 1 to 100 (the default value is 50 the aver
age value).
A higher value will result in a higher quality saved image. This value also effects image size:
higher values result in the creation of a larger JPEG file. To achieve the most favorable
size/quality ratio, save the image using different JPEG values, and open it in an image viewing
application. The JPEG quality value is set on the Formats Settings>PDF (PPT,
RTF/DOC/Word XML, HTML) tab.
Fonts to use (when saving in RTF/DOC/Word XML, PPT or HTML format)
The fonts specified on the Formatting tab are used as the default when saving in
RTF/DOC/Word XML, PPT or HTML formats. You can, specify which fonts are used. To change
fonts, go to the Text window or select other fonts on the Formatting tab in the Fonts group.
Save all batch pages or selected ones only
You may choose to save all of the pages in a batch or only selected ones. To save specific pages,
select them before saving.
Recognized text saving modes (when saving several batch
pages at a time)
● Create a separate file for each page – The program saves each batch page
as a separate file. The batch page number is automatically appended to the file
name.
● Name files as source images – This option saves each page in a separate
file and retains the name of the original image.
Note:
1. Pages that are unrelated to the original image (e.g. scanned pages) will not be
saved in this mode. A warning will be displayed when this type of page is
encountered.
2. If consecutive batch pages share the same image as the original image or if all
images are named the same thing, the program will treat the pages as a multi
page TIFF and save the text into a single file. If several pages have identical
names but are not in consecutive order, the pages will be treated as individual
image files, and the text will be saved in different files, with an index appended
to their file names ( _1, _2, etc.).
78
ABBYY FineReader 7.0 User’s Guide
Page 79

● Create a new file at each blank page – This option treats the entire batch
as a set of page groups that contain a blank page at the end of each group.
Pages from different groups are saved into different files with file names con
sisting of the userspecified name and index number: 1, 2, 3, etc.
● Create a single file for all pages – All (or all selected) batch pages are
saved as a single file.
Saving the Recognized Text in RTF, DOC and
Word XML Formats
Important! The option of saving in Word XML is only available for MS Word 2003.
Layout retention modes are set on the Formatting tab in the Options dialog (Tools>Options
menu).
Note: When you save the text in RTF, DOC and Word XML formats, the program uses the
fonts that are specified on the Formatting tab in the Options dialog
(Tools>Options menu) or those you set during text editing in the Text window.
Tips:
● If you edit the recognized text in Microsoft Word rather than in the
FineReader text window, uncertain characters can still be highlighted. Select
the With background color and/or the With text color items on the
RTF/DOC/Word XML tab in the Highlight uncertain characters group.
All uncertain characters will be highlighted with the specified color.
● When saving results in Word XML, the recognized image can be viewed in the
Zoom window integrated into MS Word. This window presents the magnified
image of the current line or portion of the document. By default, the Open
FineReader's Zoom window in MS Word 2003 option is checked on the
RTF/DOC/Word XML tab.
Saving the Recognized Text in PDF Format
Document save modes:
1. Text and pictures only – This option saves only the recognized text and the
associated pictures.
2. Page image only – This option saves only the image.
79
Chapter 8. Saving into External Applications and Formats
Page 80

80
ABBYY FineReader 7.0 User’s Guide
3. Text over the page image – This option saves the entire image as a picture
and saves text areas over the picture.
4. Text under the page image – This option saves the entire image as a pic
ture and puts recognized text under it. This option is useful if you export your
text to document archives: the fullpage layout is retained and the fulltext
search is available in this mode.
To set these options:
1. Select Formats Settings in the Tools menu. The Formats Settings dialog
will open.
2. Set the options you need on the PDF tab in the dialog.
Note:
1. A special Replace uncertain words with images option is available if you
use the Text and pictures only or the Text over the page image mode.
This option replaces all uncertain words with their images. Set this option on
the PDF tab in the Formats Settings dialog.
2. When you save texts that use a nonLatin codepage (such as Cyrillic, Greek,
Czech, etc.), ABBYY FineReader uses the fonts provided by ParaType company
(www.paratype.com/shop).
3. If during the export in PDF, a message indicates that nonstandard fonts are
present in the textis, you must select a mode of working with Type 1 fonts and
the Type 1 fonts themselves as well. These fonts must be available via Adobe
Type Manager or via postscript font installer (in Windows 2000). See more
detail about Type 1 fonts in "Using Type 1 fonts during export to PDF" section
of ABBYY FineReader Help.
4. Before you can edit PDF files that use nonLatin code page (such as Cyrillic,
Greek, Czech, etc.) in Adobe Acrobat, you must change the font of the current
text section to a font installed on your computer.
Saving the Recognized Text in HTML Format
Layout retention modes are set on the Formatting tab in the Options dialog
(Tools>Options menu).
Note: When you save text in HTML format, set the used fonts on the Formatting tab in the
Options dialog (Tools>Options menu) or in the Text window during text editing.
Page 81

To retain pictures in a HTML file:
● Set the Keep pictures option on the Formatting tab in the Options dialog
(Tools>Options menu).
Note: Each picture is saved into a separate *.jpg file. Determine the resolution and quality of
the images on the HTML tab of the Formats dialog (Tools>Formats).
HTML formats available:
1. Full (uses CSS and requires Internet Explorer 4.0 or later) – Uses the
latest HTML format (HTML 4). HTML 4 supports all document layout retention
types (the actual retention type used depends on the options set on the
Formatting tab in the Retain layout group). The builtin style sheet is used.
2. Simple (compatible with all Internetbrowsers) Uses the HTML 3 for
mat. The approximate document layout is retained (i.e. the program retains
the approximate font size but not the first line indent). HTML 3 format sup
ports only a limited number of font sizes, so ABBYY FineReader chooses the
HTML 3 format font size that corresponds most closely to the actual font size
of the text. HTML 3 is supported by all browsers (Netscape Navigator, Internet
Explorer 3.0 and later).
3. Auto (saves Full and Simple formats in a single file with autoselec
tion depending on browser type) – Saves both formats (Simple and Full)
to the same file. The browser you use will determine the format that is used.
Note: If your browser does not have full HTML4/CSS support (e.g. Microsoft Internet
Explorer 3.0 or earlier, Netscape 4.x, etc.), use the Simple saving mode.
To set the HTML format of your choice:
● Click the appropriate button on the HTML tab in the Formats Settings dia
log (Tools>Formats menu) in the Formats group.
Note: The application detects the code page automatically. To switch the code page, select
the code page of your choice in the Code page field on the HTML tab in the
Formats Settings dialog.
81
Chapter 8. Saving into External Applications and Formats
Page 82

Saving the Recognized Text in PPT Format
Set layout retention modes on the Formatting tab in the Options dialog (Tools>Options
menu).
Note: When you save text in the HTML format, ABBYY FineReader uses either the fonts
specified on the Formatting tab in the Options dialog (Tools>Options menu) or
those set during text editing in the Text window.
Important! When saving results in the .PPT format, ABBYY FineReader creates special
HTML files that contain the different parts of the presentation. To save the
presentation as a single file, resave it using PowerPoint (select Save As in the
File menu and specify PPT as the saving format).
Saving the Page Image
1. Select a batch page.
2. Select Save Image As item in the File menu. The Save Image As dialog will
open.
3. Select the disk or the folder where you want to save the file and the file for
mat.
Note: You may want to save only some of the image areas enclosed by blocks (regardless of
type). To do this, select the block or blocks you wish to save, and then check the Save
only selected blocks checkbox in the Save Image As dialog. This is only an option
when saving a single image. Next, enter the file name.
4. Click OK.
Note: To save several images to a single file (a multipage TIFF):
— Select the images from the Batch window.
— Select the Save Image As item in the File menu. Select the TIFF format
and the Save as multipage image file option.
Note: If you save several page images from the Batch window as separate files (i.e. the
images are not being saved as one multipage TIFF), the file names will consist of the
file name entered, the page number (4 digits), and the file suffix.
82
ABBYY FineReader 7.0 User’s Guide
Page 83

Chapter 9
Working with Batches
Batches are the main data depository in ABBYY FineReader, and
contain scanned images, recognized text and other data. Most
ABBYY FineReader settings are batch settings: scanning, recogni
tion, saving options, etc. User patterns, user languages and user
language groups are also property of a batch. New batches can
be assigned the default batch settings, the settings of the current
batch, or settings saved in an *.fbt file.
Chapter Contents:
● General information on working with batches
● Creating a new batch
● Opening a batch
● Adding images to a batch
● Batch page number
● Saving a batch
● Closing a batch page or the whole batch
● Deleting a batch
● Batch settings
● Full–text search in recognized batch pages
Page 84

General Information on Working with Batches
ABBYY FineReader automatically creates a new batch upon starting. A batch may contain up
to 9,999 pages.
Tip: Saving similartype pages (e.g. pages from the same book, those written in the same lan
guage, or those with a similar layout) in the same batch is often useful, since it stream
lines the work process.
The Batch window displays a list of the pages contained in the open batch. To view a page,
click on its icon or doubleclick on its page number. All files related to this batch page will
open in the appropriate windows, i.e. the text file in the Text window, the image file in the
Image window, etc.
There are two main ways of displaying pages
in the Batch window:
To choose the page view in the Batch window:
● Click either or on the Standard toolbar, or
● Right–click the Batch window and select the View >... item in the local
menu.
To customize the Batch window to display specific features or sort according to certain
criteria:
● Rightclick the Batch window and select Batch View>Customize in the
local menu. A dialog will open. Select the appropriate options on the
Thumbnails and Details tabs of the dialog.
This view provides detailed information about each batch page in the
batch window and offers page lists organized by a userspecified fea
ture. The batch window accommodates a large number of pages,
which is useful when organizing large batches. Open a page by double
clicking on it.
Details
Batch pages are displayed as thumbnails (a miniature image of the
original page). Additional icons appear on the thumbnails as the
images are processed, to provide information about which actions
have been performed on them (e.g. recognition, saving, etc.).
Thumbnail images are particularly useful when searching for a particu
lar batch page. To open an image, click on its thumbnail.
Thumbnails
DescriptionBatch View
84
ABBYY FineReader 7.0 User’s Guide
Page 85

You may select several different pages, or a number of consecutive pages, or all of
the batch pages in a row:
● To select a number of consecutive pages, hold down the SHIFT key and
click the first and then the last page of the group you want to select.
● To select several pages, hold down the CTRL key and click the desired
pages.
● To select all batch pages, activate the Batch window and choose the
Select All item in the Edit menu or press CTRL+A.
Creating a New Batch
To create a new batch:
● Select New Batch item in the File menu, or
● Click on New Batch button ( ).
Opening a Batch
ABBYY FineReader automatically creates a new batch at startup.
Note: To tell ABBYY FineReader to open the last open batch at startup, ccheck Open the
last batch at startup on the General tab of the Options dialog (Tools>Options).
To open another batch:
1. Select Open Batch item in the File menu or click the Open Batch button
( ). The Open Batch dialog will open.
2. Select the appropriate folder in the Open Batch dialog.
When you open a batch, ABBYY FineReader automatically closes and saves the
previous batch. Prior to exiting the program, save any new batch that might
be needed in the future.
Batches can be opened directly from Windows Explorer:
● Rightclick the batch folder (represented by the icon) and select the
Open with FineReader item in the local menu. ABBYY FineReader will
launch and open the chosen batch.
85
Chapter 9. Working with Batches
Page 86

Adding Images to a Batch
● Select Open Image item in the File menu or press CTRL+O.
● Select the desired image(s) in the Open Image dialog.
ABBYY FineReader will add the image to the open batch and copy the image
to the batch folder.
Note: You can also add images directly from Windows Explorer:
1. Select an image file or group of files in Windows Explorer.
2. Rightclick the selection and select Open with FineReader from the local
menu. If ABBYY FineReader is currently running, the selected files will be
added to the current batch. Otherwise, ABBYY FineReader will be launched
and the selected files will be added to a new batch.
This local menu item is only enabled in Windows Explorer if ABBYY
FineReader 7.0 supports the file format.
Batch Page Number
All batch pages are numbered. A batch may contain up to 9,999 pages. The batch page num
bers are displayed in the batch.
You can renumber pages directly in the Batch window or from the Renumber Pages dialog.
To renumber pages directly in the Batch window :
1. Click a page in the Batch window or press F2.
2. Enter the new page number.
Once the page number has been changed, all pages in the Batch window will be re–ordered
to reflect the new numbering.
Note: Doubleclicking a page number opens the page.
To renumber pages in the Renumber Pages dialog:
1. Select a single page or several pages.
2. Select the Renumber Pages item in the Batch menu.
3. Set the new number for the first page selected
(the page with the lowest number).
86
ABBYY FineReader 7.0 User’s Guide
Page 87

Note :
1. To renumber all batch pages, select the All Pages item in the Renumber
Pages dialog.
2. To renumber only part of a batch:
● Select the pages you wish to renumber in the Batch window.
● Select the Selected pages item in the Renumber Pages dialog.
3. To renumber selected pages continuously, select the Continuous page num
bering option. An example: The renumbering option would cause pages num
bered 2, 5, and 6 (assuming 1 was chosen as the first number) to be renumbered
as 1, 2, and 3. Otherwise (i.e. if the Continuous page numbering option is not
selected), on renumbering page numbers 2, 5, and 6 would become 1, 5, 6. The
first page has been assigned the chosen number, but the remaining pages have
retained their original numbers.
Note: If you renumber only certain batch pages, and allocate a number to a page that has
been used, a warning will be issued and the operation will be cancelled.
Saving a Batch
To save a batch:
● Select Save Batch As in the File menu.
● In the Save Batch As dialog, specify the name of the batch and the desired
storage location .
Closing a batch page or the whole batch
To close a batch page:
● Select Close current page item in the Batch menu.
To close a batch:
● Select Close Batch item in the File menu.
87
Chapter 9. Working with Batches
Page 88

88
ABBYY FineReader 7.0 User’s Guide
Deleting a Batch
Note: When a batch is deleted, all of its contents (including image and text pages, related
files, user patterns, user languages, etc.) will be deleted, leaving the folder empty.
To delete a batch:
● Delete Delete Batch in the Batch menu.
To delete a batch page:
1. Select the page(s) you wish to delete in the Batch window.
2. Select Delete Page in the Batch menu or just press DEL.
Batch Settings
To save batch settings in a file:
● Click the Save button on the General tab (Tools>Options). The Save
Batch Template As dialog will open.
● Enter the file name.
The following settings will be saved: the Recognition, Scan/Open Image, Formatting, and
Check Spelling tab settings, and the settings on the Formats Settings tab. The user lan
guages, user language groups and user patterns will also be saved in the file. To apply the tem
plate to all new batches, check Apply this template to new batches in the Save Batch
Template As dialog.
To return to the default settings:
● Click on Use defaults button on the General tab.
To load the settings:
● Click Load on the General tab and select the FineReader batch template
(*.fbt) file that contains the desired settings.
Page 89

Full–Text Search in Recognized Batch Pages
Important! You need Internet Explorer 4.0 or later to accept this option.
ABBYY FineReader allows you to search all recognized pages for words in every possible gram
matical form. The search pattern may consist of one or several words. The search term may be
in any form (for languages with dictionary support), and the search process will identify the
indicated words anywhere within the text (no matter how far apart) and in any order.
To do a full–text search:
1. Select Advanced search item in the Edit menu or press ALT+F3.
2. The Search window will open below the Zoom window.
3. Enter the desired text in the Find what field. You can also paste the
Clipboard contents into the field or select a previous search from the drop
down list.
4. Click Find.
The Search results window will display the list of batch page numbers that contain all of the
words from the Find what field. The date that each identified page was modified will be dis
played and the first page section to contain the search pattern will be highlighted. Click on a
page number to open it in the Image, Text and Zoom windows. The found words will be
highlighted in color in all three windows.
Note: The search function cannot locate specialized characters, such as endofline charac
ters or paragraph marks.
89
Chapter 9. Working with Batches
Page 90

ABBYY FineReader 7.0 User’s Guide
Page 91

Chapter 10
Network Document Processing
ABBYY FineReader Corporate Edition is especially designed for
network document processing. You must install a separate copy
of ABBYY FineReader on each computer involved in network
processing. (For more information about installing ABBYY
FineReader on workstations, working with the License Manager,
and working with the program on a local area network, please
refer to the “System Administrator’s Guide” which can be found
in the Administrator’s Guide folder on the server on which
ABBYY FineReader was installed.)
ABBYY FineReader Corporate Edition allows you to:
1. Work with the same batch over a network
The Corporate Edition allows you to process documents more
quickly. In addition, the program tracks the entire process, and
reports the logins and computer I.D. numbers of everyone
involved in opening, scanning, recognizing, and checking batch
pages. Changes made by a specific user are not tracked, but are
simply assigned to all users of that batch.
2. Group work with the same user languages and user
dictionaries
The ABBYY FineReader Corporate Edition allows users to work
with and expand (e.g. while running a spell checker) user lan
guages and dictionaries simultaneously.
Page 92

3. Group work with customized dictionaries for languages with dic
tionary support
ABBYY FineReader provides builtin dictionaries for languages that support
it. These dictionaries contain the most commonly encountered words, but
may not include proper names, specialized technical terms, acronyms, etc.
Adding these types of terms to customized dictionaries increases recognition
quality and speeds up the spell check because ABBYY FineReader will
encounter fewer words that are not included in the dictionary. In addition,
the ABBYY FineReader 7.0 Corporate Edition allows multiple users to work
with the same customized dictionarysimultaneously.
Chapter Contents:
● Working with the same batch over a network
● Group work with the same user languages and dictionaries
● Group work with customized dictionaries (languages with dictionary sup
port only)
92
ABBYY FineReader 7.0 User’s Guide
Page 93

Working with the Same Batch over a Network
(Available only in ABBYY FineReader 7.0 Corporate Edition)
1. Create or open a batch and set up the necessary scanning and recognition
options.
Run ABBYY FineReader and open the batch to be processed on all of the
involved computers.
2. Run Background recognition (Process>Start background recognition) on
all computers involved in recognizing the batch.
3. Start the scanning on the computer with an ADF scanner.
Tip: If your highspeed scanner doesn’t support TWAIN, scan your pages directly into the
ABBYY FineReader batch folder. To do this, scan the images with any scanning applica
tion on the local computer to which the scanner is attached and save the images to the
ABBYY FineReader batch folder. The scanned images must then be named according to
the following rule: the files must be named (in the order they are scanned) 0001.tif,
0002.tif, 0003.tif..., etc. ABBYY FineReader will automatically detect and process all of the
scanned images.
4. You may edit the recognized text and save it to a file or send it to a selected
application.
You may monitor the status of the page (scanned, recognized, edited or exported) in the
Batch window. This information is displayed in the corresponding columns in the Details
batch page view. To set up the Details page view:
● Click on the Standard toolbar, or
● Rightclick the Batch window and select the View>Details item in the local
menu.
Customize the Details page view by specifying the columns you want to display in the Batch
window or selecting a column to sort the pages on:
● Rightclick the Batch window and select the View>Customize. Set the
desired options on the Details tab of the Batch View Settings dialog.
If several computers process the batch, ABBYY FineReader will automatically distribute the
workload between them. As each scanned page becomes available, the first free workstation
running the background recognition will begin processing it. All other computers are locked
out of the page. Refresh the batch page list by pressing F5 or by selecting Update page list in
the Batch menu. At the same time, any of the workstations can open already recognized pages
for checking, editing and saving. All users of the batch can access the changes made by other
users.
93
Chapter 9. Network Document Processing
Page 94

Note: Recognition speed enhancements from this approach will be particularly noticeable in
batches that contain a lot of pages.
Group Work with the Same User Languages
and Dictionaries
(Available only in FineReader 7.0 Corporate Edition)
Create a batch and set up the necessary scanning and recognition options.
All of the user languages and dictionaries will be stored in one folder. The default is the batch
folder. Prior to creating a user language, you must specify a folder where user languages will be
stored with the other user dictionaries. To specify a folder:
● Click Change in the Language Editor dialog (Tools>Language Editor)
and select the appropriate folder from the dialog.
This folder will become the default storage folder for all user languages and dictionaries.
After the setup is complete, save the batch settings in a batch template file (*.fbt). To do this:
● Click Save on the Options>General tab (Tools>Options). In the Save
Batch Template As dialog select the folder and enter the file name.
Each user who wants to work with the user languages and their associated dictionaries will
have to load the batch settings from the previously saved *.fbt file when creating a new batch.
To do this:
Select Batch template (.fbt) in the Template field. In the Open Batch Template dialog,
select the necessary *.fbt file. This will set the previously saved batch settings, including the
path to user languages and their dictionaries. Once this is done, all users will have the same
path to user languages and the associated dictionaries.
You can edit user dictionaries using these user languages for recognition. All users can access
changes made by another user. In addition, all users who load the batch template can access
the user languages created in this folder. View the list of available user languages and their
properties in the Language Editor dialog in the Userdefined languages group.
The dictionary is locked while a user adds or removes terms. To update a dictionary, click on
Add in the Check Spelling dialog or any button in the Select Dictionary dialog.
94
ABBYY FineReader 7.0 User’s Guide
Page 95

Note:
1. You must give read/write access to all users who access a dictionary if you are
using a folder in which the dictionaries of multiple users are stored.
2. User languages that are shared between multiple users are available as “read
only” files (which do not allow changing any parameter of the user language
that has already been created). Entries may be added or removed from the
user dictionary.
Group Work with Customized Dictionaries
(Languages with Dictionary Support Only)
(Available only in ABBYY FineReader 7.0 Corporate Edition)
Create a batch and set up the necessary scanning and recognition options. By default, the cus
tom dictionaries for predefined main languages (languages with dictionary support) are saved
in the folder where the application is installed (for Windows 2000, the file path is: Documents
and Settings\[user profile]\Application Data\ABBYY\FineReader\7.00\UserDictionaries).
To enable the shared use of custom dictionaries for predefined languages by multiple users,
specify a public folder where all such dictionaries are saved. It can be either a local or a net
work folder. To specify the folder:
● Click Browse on the Check Spelling tab of the Options dialog
(Tools>Options menu). Select the appropriate folder for storage of user dic
tionaries for predefined languages.
Every user can expand these custom dictionaries. The dictionary is locked while a user
adds/removes a word. Changes made by a user are available for all users of the folder. To
update the dictionary, click Add in the Check Spelling dialog or any button in the Select
Dictionary dialog.
Note: If several users share a folder where custom dictionaries are stored, all of them must
have read/write access to this folder.
95
Chapter 9. Network Document Processing
Page 96

ABBYY FineReader 7.0 User’s Guide
Page 97

Appendix
Hot Keys and Glossary
Chapter Contents:
● Hot Keys
● Glossary
Page 98

98
ABBYY FineReader 7.0 User’s Guide
Hot Keys
Menu Command Shortcut Key
File Open image from file Ctrl+O
Scan image Ctrl+K
Scan multiple images Ctrl+Shift+K
Stop scanning Ctrl+T
Create new batch Ctrl+N
Open a batch Ctrl+P
Save text to file Ctrl+F2
Save image to file F12
Edit Undo the last action Ctrl+Z
Redo the last undone action Ctrl+Y
Cut the selection and put it to the Clipboard Ctrl+X
Copy the selection to the Clipboard Ctrl+INS or Ctrl+C
Paste the Clipboard contents Ctrl+V or Shift+INS
Delete the active block, the selection, DEL
the selected pages
Select all text in the Text window, Ctrl+A
select all batch pages, select all blocks
on the open image
Find the specified text Ctrl+F
Find the next occurrence of the search text F3
Search for and replace the specified text Ctrl+H
View Magnify the image in the Image window Ctrl+Shift+Num+
Zoom Out the image in the Image window Ctrl+Shift+Num –
Zoom In to selected blocks Ctrl+Shift+Num *
Properties Alt+ENTER
Batch Open next batch page Alt+Down
Open previous batch page Alt+Up
Open page with specified number Ctrl+G
Close the current page Ctrl+F4
Delete the recognized text in the Text window Ctrl+Shift+DEL
Delete all blocks in the Image window and all Ctrl+DEL
recognized text in the Text window
Update page list F5
Page 99

99
Appendix. Hot Keys and Glossary
Menu Command Shortcut Key
Process Scan and read an image Ctrl+D
Open and read an image Ctrl+Shift+D
Start Scan&Read Wizard Ctrl+W
Analyze layout Ctrl+E
Analyze layout on all batch pages Ctrl+Shift+E
Read active or selected pages Ctrl+R
Read all batch pages Ctrl+Shift+R
Read active or selected blocks Ctrl+Shift+B
Tools Spell the recognized text F7
Move to the next error or uncertain word. F4
Move to the previous error or uncertain word. Shift+F4
View Dictionaries Ctrl+Shift+V
Translate word with Lingvo Ctrl+Shift+T
Open the Language Editor dialog to create Ctrl+Shift+L
and edit languages and language groups
Open the Pattern Editor dialog Ctrl+Shift+A
where you can create and edit the user’s patterns
Set the scanner parameters Ctrl+Shift+S
Open the Formats Settings dialog where you Ctrl+Shift+X
can set save options for supported output formats
Open the Options dialog Ctrl+Shift+O
Window Open the next window Ctrl+F6
Open the previous window Ctrl+Shift+F6
Open the Batch window Alt+1
Open the Image window Alt+2
Open the Text window Alt+3
Open the Zoom window Alt+4
Switch to the Advanced search window Alt+5
Open the Advanced search window Alt+F3
Help Open help F1
General Make the selection bold Ctrl+B
Make the selection italic Ctrl+I
Make the selection underlined
Ctrl+U
Go to the next table cell left arrow,
right arrow,
up arrow,
down arrow
Page 100

A
Abbreviation
A shortened form of a word or phrase used
to represent the whole. For example, MS
DOS (for Microsoft Disk Operating System),
UN (for United Nations), etc.
Activation
The process of obtaining a special code from
ABBYY which allows the user to use his copy
of the software in fullfunction mode on a
given computer.
Activation Code
A code that is issued by ABBYY to each user
of ABBYY FineReader Professional Edition
during the activation procedure. The
Activation Code is required to activate
ABBYY FineReader on the computer that
generated the Installation ID.
Activation File
A file issued by ABBYY to each user of
ABBYY FineReader Corporate Edition during
the activation procedure. The Activation File
contains information required to activate the
software on the server or on a standalone
computer as the case may be. From the serv
er, the product will be activated on worksta
tions.
Active block
Indicates the block that is currently ready to
have actions (e.g. deleting, changing type,
etc.) applied to it. The active block frame is
bold and there are “squares” in its corners.
ADF (Automatic Document Feeder)
A device that automatically feeds documents
through a scanner. A scanner with an ADF
can scan any number of pages without man
ual intervention. ABBYY FineReader also sup
ports scanning multiple images.
B
Background recognition
A special recognition mode that allows the
user to edit and save already recognized
pages while ABBYY FineReader recognizes
other pages at the same time.
Batch
A folder that contains image files, recognized
text files and other ABBYY FineReader infor
mation files. There may be up to 9,999 pages
in a batch. It is useful to save similar pages
(such as all pages from the same book, those
in the same language, or images with the
same layout) in the same batch to streamline
the work process.
Block
A framed image area.
Block template
A particular block arrangement that can be
used to recognize pages of similar layout. A
block template may be saved in a special file.
Block type
Each block has a type. The following block
types are available in ABBYY FineReader:
Recognition Area, Text, Picture, Table and
Barcode.
Brightness
A scanning parameter that indicates the con
trast between black and white image areas.
Setting the correct brightness increases
recognition quality.
Brightness autotuning
Automatic brightness tuning performed
either by scanner or ABBYY FineReader. The
autotuning process sets the brightness for
every image area separately.
100
ABBYY FineReader 7.0 User’s Guide
Glossary
 Loading...