

Page 1

ENGLISH
The FreeStyle® Lite Meter and How It Works
System Check Screen
This screen always appears when the meter is turned on
so that you can make sure the display is working properly.
Do not use the meter if the system check screen does not
match the example here. Please call Customer Care.
Display Screen
Displays your test results and other important information.
m (Mode) Button
Move to different mode settings.•
Scrolls backward.•
Silence a reminder alarm.•
Light Button
Controls the display backlight and test light.
Sample Areas (dark-colored half-circles on Test Strip)
Apply blood or control solution to one Sample Area only.
Insert strip into the meter printed side up (see image to the
right.)
Call Customer Care Toll Free at 1-888-522-5226 www.AbbottDiabetesCare.com
5
Page 2
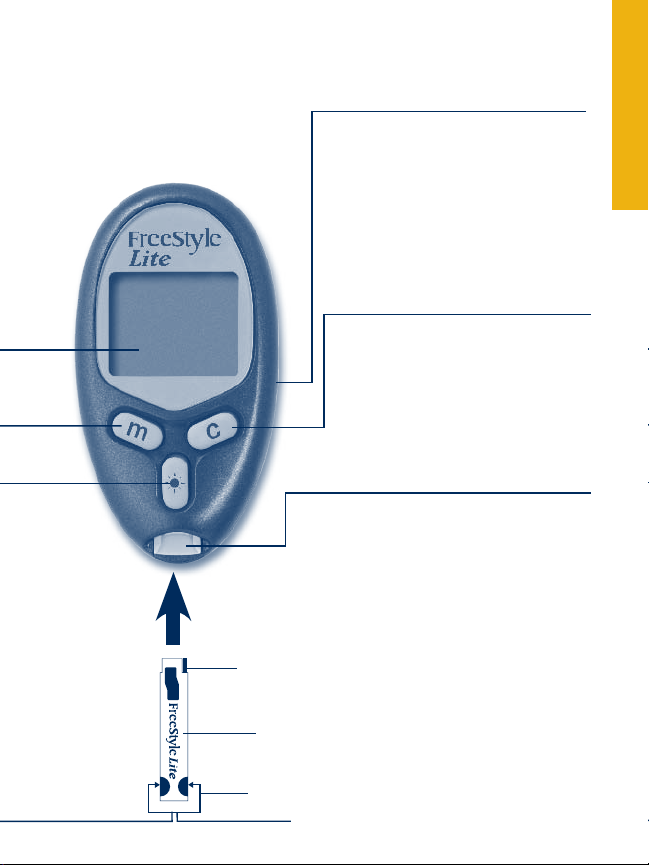
Data Port
Download test results. Requires
a compatible data management
system. For more information,
please go to our website or call
Customer Care.
c (Configure) Button
Marks a control solution test.•
Scrolls forward.•
Displays clock.•
Silence a reminder alarm.•
Test Strip Port
Insert the Top end of a new FreeStyle
Lite Test Strip here. The meter powers
on when you insert the test strip.
ENGLISH ESPAÑOL
To p
FreeStyle Lite Test Strip
Bottom
Sample Area
6
Page 3
ENGLISH
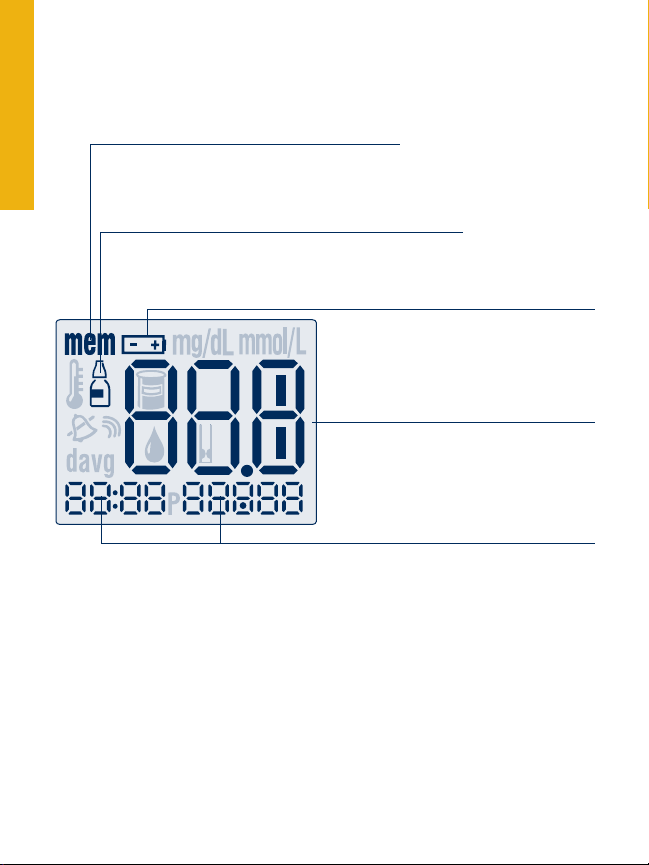
The FreeStyle® Lite Meter Display
Memory Mode Symbol
Shows you test results stored in the
meter memory.
Control Solution Test Result Symbol
Shows that you have marked a test result as a
control solution test.
Battery Symbol
Appears when you should replace
your meter battery.
Test Result Area
Displays test results.
Message Area
Displays date, time, and number of tests.
Call Customer Care Toll Free at 1-888-522-5226 www.AbbottDiabetesCare.com
7
Page 4
ENGLISH ESPAÑOL
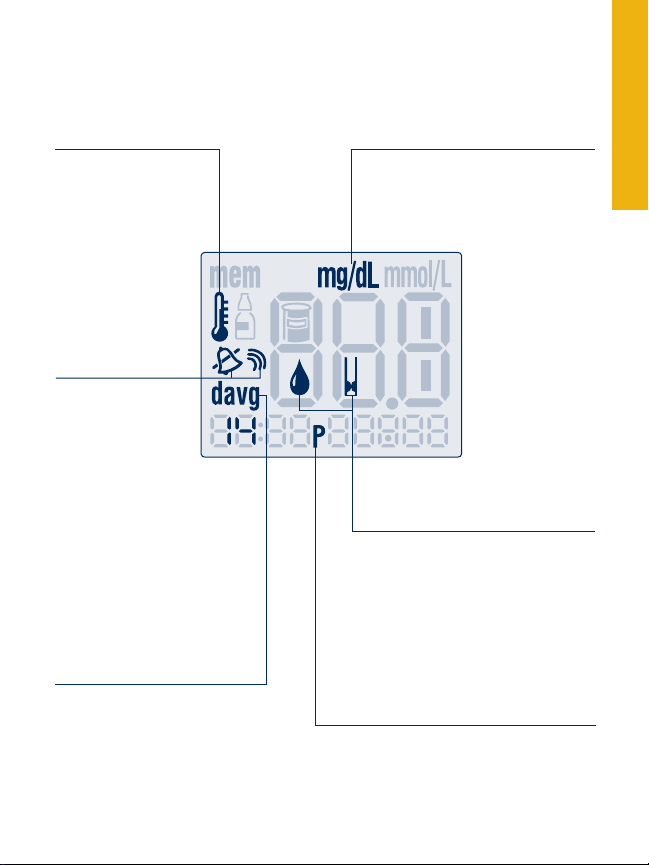
Thermometer Symbol
Appears if your meter
is out of operating
temperature range.
Sound Level
Symbols
Indicates high,
low, or off sound
volume.
Day Average Symbol
Shows the average
value of glucose read-
ings from the last 7-,
14- or 30-days.
mg/dL (U.S. Standard)
Indicates unit of
measurement.
Blood Drop and
Test Strip Symbols
These symbols work together in
an animation to tell you when
the meter is ready for you to
apply blood or control solution.
P Symbol
Indicates PM in 12-hour format
only (for example 4:00 p.m.)
8
Page 5

ENGLISH
The FreeStyle Lite Test Strip
Apply blood or control solution to only one Test Strip
Sample Area per test.
Important: Use only one sample area of the test strip per
test. Do not apply blood to both sample areas. Test strips
may be used only once. Discard used test strips. You can
continue to fill the test strip for up to 60 seconds. Be sure
to reapply the sample to the same sample area.
WARNING:
The cap or vial contains drying agents that may be harmful if
inhaled or swallowed and may cause skin or eye irritation.
Important: The FreeStyle Lite Meter should only be used with FreeStyle
Lite Test Strips. Using other test strips with this meter can produce
inaccurate results.
Important Test Strip Information
The FreeStyle Lite System has an operating range of 40° to 104° F •
(4º to 40° C).
Store the test strip package in a cool, dry place between 40° and 86° F •
(4° to 30° C).
Use test strips only within the system operating temperature range.•
Keep away from direct sunlight and heat.•
Store your test strips in their original vial only; never transfer them •
to another vial or any other container.
Never store individual test strips outside the vial.•
After removing a FreeStyle Lite Test Strip from the vial, immediately •
close the vial cap tightly.
With clean, dry hands, you may touch the test strip anywhere when •
removing it from the vial or inserting it into the meter.
Call Customer Care Toll Free at 1-888-522-5226 www.AbbottDiabetesCare.com
9
Test Strip
Sample Area
Page 6
Do not use test strips beyond the expiration date. This may cause •
inaccurate results.
Do not bend, cut, or alter FreeStyle Lite Test Strips.•
Note: For further information, refer to the FreeStyle Lite Test Strip
package insert.
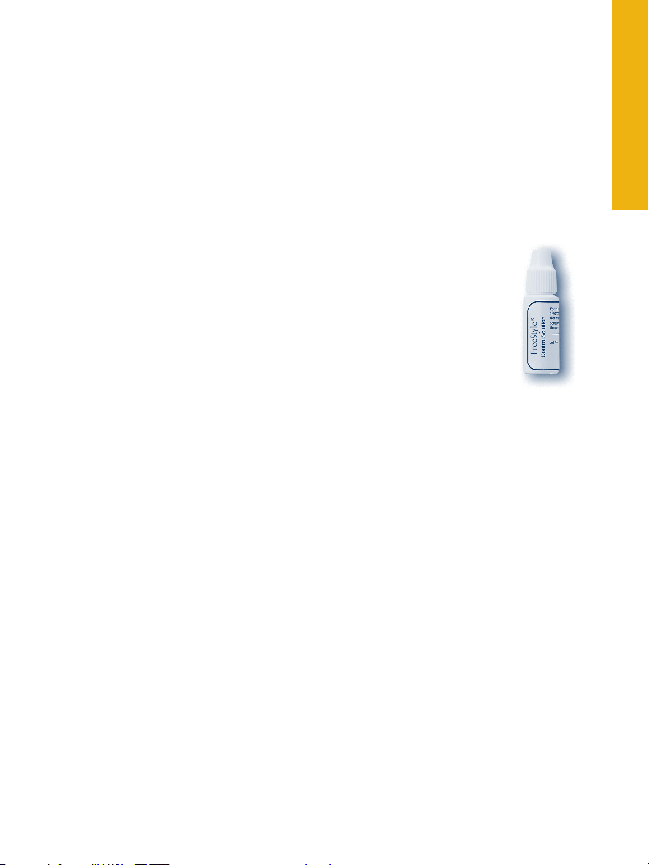
The FreeStyle® Control Solution
FreeStyle Control Solution is a red liquid that contains a
fixed amount of glucose that is used to:
Practice testing without having to use your own blood.•
Ensure that your meter and test strips are working •
together properly.
A control solution test should be performed when you
question your results and want to confirm that your monitor and test
strips are working properly.
For information on how to obtain Control Solution, call Customer
Care at 1-888-522-5226.
ENGLISH ESPAÑOL
10
Page 7

Testing Your Blood Glucose
Important: To ensure accurate results, wash your
hands and test site (for example, your forearm) with
soap and water. Make sure there is no cream or lotion
on the test site. Thoroughly dry your hands and test
site.
With the FreeStyle® Lite Meter, you can test your blood glucose on •
your forearm, fingers, upper arm, hand, thigh, or calf.
Testing with the FreeStyle Lite Meter requires a very small sample •
size, 0.3 microliters of blood; about the size of pinhead
(example:•).
WARNING:
We recommend that you test on your fingers if you are testing
for hypoglycemia (low blood glucose) or if you suffer from
hypoglycemia unawareness.
Times when you may be checking for low blood glucose include:
When you are feeling symptoms such as weakness, sweating, •
nervousness, headache, or confusion.
When you have delayed a meal after taking insulin.•
When your healthcare professional advises you to do so.•
ENGLISH ESPAÑOL
14
Page 8

ENGLISH
Performing a Blood Glucose Test
1
Note: If you do not start the test within two minutes, the meter will
turn o. To restart your meter, take out the unused FreeStyle Lite Test
Strip and reinsert it into the meter.
Prepare Your Meter
Insert a FreeStyle Lite Test Strip into the meter
until it stops. e meter will power on.
System Check Screen
When the meter powers on, this screen will
appear so that you can make sure the display is
working properly.
System Check
e Blood Drop and Test Strip symbols will
appear on the display screen. Your meter is now
ready to apply blood sample.
Blood Drop and
Test Strip Symbols
Important: The FreeStyle Lite Meter should only be used with FreeStyle
Lite Test Strips. Using other test strips with this meter can produce
inaccurate results.
Call Customer Care Toll Free at 1-888-522-5226 www.AbbottDiabetesCare.com
15
Page 9

Obtain a Blood Sample
2
Select a test site. ere are dierences in testing on ngers versus
other alternative sites.
Use your lancing device to obtain a blood sample. Refer to the
Lancing Device insert for detailed instructions on how to use
the FreeStyle Lancing Device.
WARNING: If you are testing for hypoglycemia (low blood
glucose), or if you suffer from hypoglycemia unawareness, we
recommend that you test on your fingers.
ENGLISH ESPAÑOL
3
Filling the FreeStyle Lite Test Strip
with Blood
Make sure that the FreeStyle Lite Test Strip a.
is in the meter and the meter is powered
on. (If the meter is off, take out the test
strip and reinsert it into the meter.) You
are now ready to apply the blood sample.
Bring the FreeStyle Lite Test Strip to theb.
blood sample at a slight angle.
The FreeStyle Lite Test Strip acts like ac.
sponge and pulls the blood into the strip
through the sample area.
Test Strip Sample Area
16
Page 10

ENGLISH
4
If after five seconds your meter does not show a short line moving •
around the display screen, the sample may be too small. You may
add blood to the same sample area of the test strip from which you
started for up to 60 seconds from the time of the first application.
Do not press the FreeStyle Lite Test Strip against the test site.•
Do not scrape the blood onto the FreeStyle Lite Test Strip.•
Do not apply blood to the flat side of the FreeStyle Lite Test •
Strip.
Do not apply blood to the FreeStyle Lite Test Strip when the •
FreeStyle Lite Test Strip is out of the meter.
Do not put blood or foreign objects into the FreeStyle Lite Test •
Strip port.
Waiting for Result
Do not pull the • FreeStyle Lite Test Strip away
until you hear one beep or see the short line
moving clockwise on your meter screen. This
means you have enough blood and the meter
is reading your glucose.
The test result is complete when your blood •
glucose test result is shown on the display
screen and you will hear two beeps.
On average, your reading will display in 5 •
seconds. The time that the meter takes depends
on your blood glucose level. The higher your
glucose level, the longer it takes to get a result.
Potential Bruising
It is possible you may experience bruising at the test site. If bruising
does occur, you may choose to lance another test site.
Call Customer Care Toll Free at 1-888-522-5226 www.AbbottDiabetesCare.com
17
Page 11

LO and HI Readings
Important: Low or high blood glucose readings can indicate a potentially
serious medical condition. The FreeStyle® Lite Meter displays results from
20 to 500 mg/dL.
If your test result is lower than 20 mg/dL, LO will appear on the meter
display screen. This reading indicates severe hypoglycemia (low blood
glucose).
LO Reading with Symptoms
If you have a LO reading and have symptoms
such as weakness, sweating, nervousness,
headache or confusion, then follow your doctor’s
recommendation to treat hypoglycemia.
LO Reading
LO Reading without Symptoms
If you get a LO reading, but have no symptoms of low blood glucose,
then retest with a new test strip on your fingers. If you still get a LO
reading, follow your doctor’s recommendation to treat hypoglycemia.
If your test is above 500 mg/dL, HI will appear on the display screen.
This indicates severe hyperglycemia (high blood glucose).
HI Reading with Symptoms
If you feel symptoms such as fatigue, thirst, excess
urination, or blurry vision, then follow your
doctor’s recommendation to treat hyperglycemia.
ENGLISH ESPAÑOL
HI Reading
HI Reading without Symptoms
If you get a HI reading, but have no symptoms of high blood glucose,
then retest with a new test strip. If you still get a HI reading, follow
your doctor’s recommendation to treat hyperglycemia.
18
Page 12

ENGLISH
Using Your Meter’s Lights
Depending on what mode your meter is in, pressing the light button
(
) turns on either the display backlight or the test light.
Using the Display Backlight
Pressing the light button powers on the display
backlight in all modes except when applying a
sample. When applying a sample, the light button
turns the test light on.
e display backlight goes out when you press the light button ( )
again or when the meter is inactive for 10 seconds.
Using the Test Light
Pressing the light button while the Blood Drop and
Test Strip symbols appear on the display screen
powers on the test light
e test light goes out:
When you press the light button again.•
When the meter receives the correct amount of blood for a test (the •
FreeStyle Lite Test Strip is lled).
Aer 60 seconds of no activity.•
When a FreeStyle Lite Test Strip is removed from the meter.•
If you use either the backlight or the test light during the test mode,
the backlight lights again to show you the test results aer the
measurement is complete.
Call Customer Care Toll Free at 1-888-522-5226 www.AbbottDiabetesCare.com
19
Page 13

Meter Set-Up
•
To Enter Setup Mode
Start with the meter off (no test strip inserted).
Press and firmly hold the “m” button until the
display screen appears.
To Exit at Any Time •
Press and hold the “m” button until the meter turns off.
To Move Through the Screens •
Press the “m” button to move through all the setup screens such
as reminder alarms, sound level, time, date, and so on.
To Change Settings Within the Screen•
Press the “c” (configure) button.
Setting the Reminder Alarms
You may set up any or all of the reminder alarms (1-4). Note: A
reminder alarm will never sound during a test.
To set a reminder alarm or multiple reminder alarms, please follow
these steps.
Start with the meter off. Press the “1. m” button
and hold until the
01234. You are now in the reminder alarm
setting mode and the “0” is blinking.
To move to the first reminder alarm press the “c” 2.
button once. You are now ready to set reminder
alarm 1 (“1” is blinking).
display appears with
ENGLISH ESPAÑOL
Select reminder
alarm
20
Page 14

ENGLISH
Press the “3. m” button to move to the hour setting.
With the hour blinking, press the “c” button
until the correct hour appears.
Select hour
Press the “4. m” button to move to the minute
setting. With the minute blinking, press the “c”
button until the correct minute appears.
Select minute
Press the “5. m” button to move to the reminder
alarm volume setting. Default setting is off.
Press the “c” button to select the desired volume
Select reminder
alarm volume
setting: low, high, or off.
Press the “6. m” button to finalize your alarm
setting. This will bring you back to the reminder
alarm setting
mode.
If you wish to set multiple reminder alarms press
Select reminder
alarm
“c” to move to reminder alarm 2. Repeat.
Note: To save your reminder alarm settings and exit set up mode,
press and hold the “m” button until the meter turns off. Press the “m”
button when “0” is blinking to move to the next set-up screen without
setting any reminder alarms.
Call Customer Care Toll Free at 1-888-522-5226 www.AbbottDiabetesCare.com
21
Page 15

Setting the Sound
There are three (3) sound volume options:
Off Low High
There are three sound volume options to let you know when the test
strip is full, when the reading is done, and when an error occurs:
Press the 1. “c” button until the desired sound level appears
Press the 2. “m” button to move to “Setting the Time.”
Setting the Time
With the hour blinking, press the “1. c” button
until the correct hour appears. The default for
the meter is the 12-hour time format. The “P”
displays for “PM” times.
Hour
Press the “2. m” button to move to minute
setting.
With the m3. inute blinking, press the “c” button
until the correct minute appears.
Minute
Press the “4. m” button to move to “Setting the
Time Format.”
Setting the Time Format
With the hour mode blinking, press the “1. c”
button to move between 12-hour and 24-hour
format. The time automatically updates to the
format selected.
Press the “2. m” button to move to “Setting the
Time Format
Date.”
ENGLISH ESPAÑOL
22
Page 16

ENGLISH
Setting the Date and Date Format
With the month blinking, press the “1. c” button
until the correct month appears.
Press the “2. m” button to move to the day setting.
Month
With the day blinking, press the “3. c” button until
the correct day appears.
Press the “4. m” button to move to “Date Format.”
With the date blinking, press the “5. c” button
to select month-day or day-month format.
Day
The date automatically updates to the format
selected.
Press the “6. m” button to move to the year setting.
With the year blinking, press the “7. c” button
until the correct year appears.
Ye a r
You have completed Meter Set-Up.
To move to “Setting the User Reminder Alarms” press the “• m”
button.
To exit press and hold the “• m” button.
Call Customer Care Toll Free at 1-888-522-5226 www.AbbottDiabetesCare.com
23
Page 17

Meter Results
Meter Memory
To En t e r•
Start with the meter o (no test strip inserted). Press the “m” button
and release; the rst memory screen to appear will be your 7-day
average.
To Exit•
Press and hold the “m” button until the meter turns off.
7-, 14-, 30- Day Average
The first memory display screen you see is your 7-day average. This
includes all the readings from the last 7 days starting from the current
date and time shown on the meter. (Control solution, LO, and HI
readings are not included in the average.)
7davg: Example:
7davg = your 7-day average
n = indicates the number of results
included in your average
The “c” button allows you to scroll forward to 14- and 30-day
averages. Continue to press the “c” button to view stored test results.
Your most recent result will display first.
The “m” button allows you to scroll backward.
ENGLISH ESPAÑOL
24
Page 18

ENGLISH
Test Results
The meter stores the last 400 test readings with time and date. You
may scroll through all of the readings by pressing and holding the “c”
button. The first reading you see is the most recent result.
Temperature: A result with a thermometer
symbol indicates that the reading was taken
outside of the meter’s specified operating
temperature range and may not be accurate.
This value is included in your 7-, 14- and 30-day
averages.
LO Reading: A LO reading (under 20 mg/dL) is included in the
memory as LO.
HI Reading: A HI reading (over 500 mg/dL) is included in the
memory as HI.
Blood Glucose Test
A result without a control solution symbol ( )
indicates that it is a blood glucose reading. The
date and time of the test will appear on the bottom
of the screen.
Control Solution Test
A value with ( ) indicates that you have marked
this reading as a control solution test. The date
and time of the control solution reading will
appear on the bottom of the screen.
Call Customer Care Toll Free at 1-888-522-5226 www.AbbottDiabetesCare.com
25
 Loading...