

Page 1
Owner’s Booklet
DO NOT PRINT FROM THIS FILE -
FOR REFERENCE ONLY
Blood Glucose Monitoring System
ART22311-101_rev-B.indd 1 8/28/14 11:30 AM
Page 2
The FreeStyle Freedom Lite Meter and How It Works
System Check Screen
This display always appears when the meter is
turned on. You should check that your meter
matches the example exactly every time
your meter turns on. Do not use the
meter if the display check screen
does not exactly match the
example. If the screen does
not match, the meter may show an incorrect
result. Please contact Customer Care.
Display Screen
Displays your test results and other
important information.
m (Mode) Button
• Moves to different mode settings
• Scrolls backward
• Silences a reminder alarm
Sample Areas (dark-colored half-circles on test strip)
Apply blood or control solution to one sample
area only. Insert strip into the meter printed side
up (see image to the right).
Data Port
Downloads test results. Requires
a compatible data management
system. For more information,
please go to our website or
contact Customer Care.
c (Configure) Button
• Marks a control solution test
• Scrolls forward
• Silences a reminder alarm
• Changes the date, time, alarm
settings, sound options and
reviews stored readings
Test Strip Port
Insert the To p end of a new
FreeStyle Lite test strip here.
The meter powers on when
you insert the test strip.
Top
FreeStyle Lite test strip
Bottom
Sample area
i
ART22311-101_rev-B.indd 2-1 8/28/14 11:30 AM
Page 3

Table of Contents
The FreeStyle Freedom Lite Meter and How It Works . . . . . . . . . . . . . . . . . . . . . . . . .i
Important Information About Your Blood Glucose Monitoring System. . . . . . 1
Intended Use . . . . . . . . . . . . . . . . . . . . . . . . . . . . . . . . . . . . . . . . . . . . . . . . . . . . . . . . . . . . . . . . .1
Setting Up the Meter ........................................................2
Purpose .......................................................................2
Set Sound Volume .............................................................3
Set Time.......................................................................4
Set Date.......................................................................5
Testing Your Blood Glucose. . . . . . . . . . . . . . . . . . . . . . . . . . . . . . . . . . . . . . . . . . . . . . . . . . 7
Purpose .......................................................................7
Prepare to Test . . . . . . . . . . . . . . . . . . . . . . . . . . . . . . . . . . . . . . . . . . . . . . . . . . . . . . . . . . . . . . . .7
Important Test Strip Information ...............................................9
Performing a Blood Glucose Test . . . . . . . . . . . . . . . . . . . . . . . . . . . . . . . . . . . . . . . . . . . . . 10
Understanding Blood Glucose Test Results . . . . . . . . . . . . . . . . . . . . . . . . . . . . . . . . . 12
Low and High Blood Glucose Results .........................................13
Error Codes .................................................................16
Troubleshooting. . . . . . . . . . . . . . . . . . . . . . . . . . . . . . . . . . . . . . . . . . . . . . . . . . . . . . . . . . . . 19
ART22311-101_rev-B.indd 2-3 8/28/14 11:30 AM
FreeStyle Control Solution ..................................................21
Purpose .....................................................................21
Control Solution Information . . . . . . . . . . . . . . . . . . . . . . . . . . . . . . . . . . . . . . . . . . . . . . . . 21
Out of Range Control Solution Results........................................ 22
Performing a Control Solution Test ........................................... 23
Using Your Meter Memory ..................................................26
Purpose .....................................................................26
Viewing Blood Glucose Averages in Memory ................................. 26
Viewing Test Results in Memory .............................................. 27
Setting Reminder Alarms (optional) . . . . . . . . . . . . . . . . . . . . . . . . . . . . . . . . . . . . . . . . 28
Purpose .....................................................................28
Transferring Test Results To a Computer . . . . . . . . . . . . . . . . . . . . . . . . . . . . . . . . . . . . . . 29
Maintaining the Meter ......................................................30
Replacing the Battery........................................................ 30
Cleaning the Meter .......................................................... 32
Specications. . . . . . . . . . . . . . . . . . . . . . . . . . . . . . . . . . . . . . . . . . . . . . . . . . . . . . . . . . . . . . . 33
Denition of Symbols. . . . . . . . . . . . . . . . . . . . . . . . . . . . . . . . . . . . . . . . . . . . . . . . . . . . . . . 35
Page 4
Important Information About Your Blood Glucose Monitoring System
m
m
Intended Use
Use outside the body only (in vitro diagnostic use).
The FreeStyle Freedom Lite Blood Glucose Monitoring System is intended for use in the quantitative
measurement of glucose in capillary whole blood from the forearm, upper arm, thigh, calf,
ngers and hand and venous whole blood. It is intended for self testing and for use by healthcare
professionals for people with diabetes mellitus at home as an aid in monitoring the eectiveness of a
diabetes control programme. It is not intended for the diagnosis of or screening for diabetes mellitus,
and it is not intended for use on neonates or arterial blood.
IMPORTANT: Use only FreeStyle Lite test strips and
FreeStyle control solution with this meter. Other products
can produce inaccurate results.
Caution: Please read all the instructions provided in this owner’s booklet and practise
the testing procedures before using the FreeStyle Freedom Lite system. Blood glucose
monitoring should be done with the guidance of a healthcare professional.
Setting Up the Meter
Purpose
The purpose of this section is to set the meter sound volume, time and date.
1. With the meter o, press and hold
for 3 seconds until appears.
Warning:
• Test on your ngers if you are testing for low blood glucose (hypoglycaemia) or if you suer
from hypoglycaemia unawareness.
2. Press
set these later (see Setting Reminder Alarms section).
to bypass setting the optional reminder alarms. You may choose to
• This system contains small parts that may be dangerous if swallowed.
1
ART22311-101_rev-B.indd 1-2 8/28/14 11:30 AM
www.AbbottDiabetesCare.com
2
Page 5
Set Sound Volume
c
m
c
c
m
c
m
m
c
m
Set Time
With the sound volume on, your meter will beep when:
• The test strip is full of blood
• The test result appears on the display
• An error occurs
You may also choose to silence your meter.
Time Format
Note: Your meter can display either the 12-hour (1:24P) or the 24-hour (13:24)
time formats. If you prefer the 12-hour format, there is no “A” for AM. If setting a
PM time, continue to press
until you see the “P” displayed for PM.
3. Set sound volume
4. Set hour
If you prefer:
No sound
A low beep
A louder beep
Press
until you see:
• Press
Then
• Press
• Press
Hour
to save
5. Set minutes
• Press
• Press
Minutes
to display correct hour
to save
to display correct minutes
to save
6. Set time format
• Press
• Press
• Press
Time Format
3
www.AbbottDiabetesCare.com
to accept time format or
to change
to save
4
ART22311-101_rev-B.indd 3-4 8/28/14 11:30 AM
Page 6
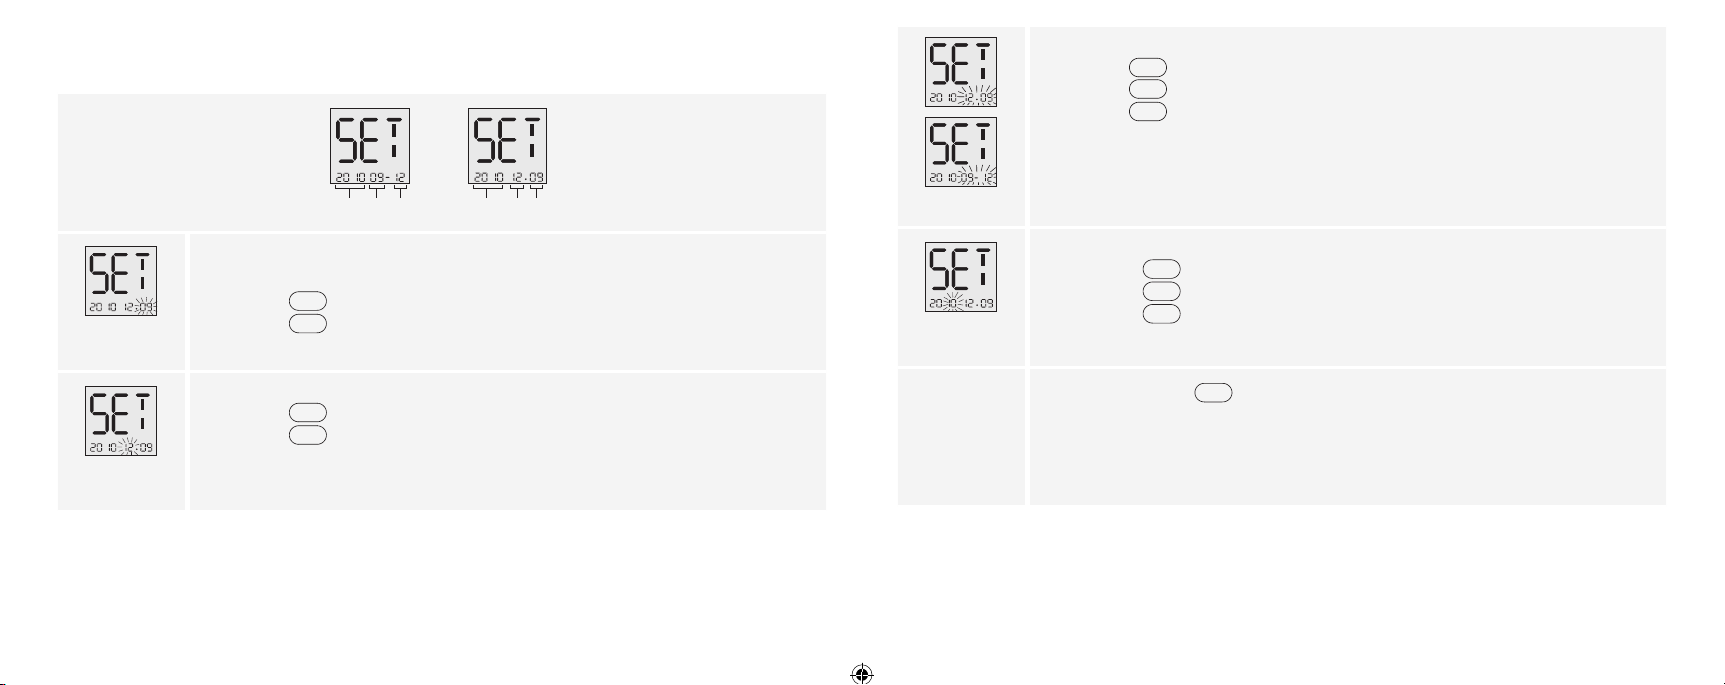
Set Date
c
m
c
m
m
c
m
m
c
m
m
Note: The date format can display either:
OR
9. Set date format
• Press
• Press
• Press
to accept date format or
to change
to save
Year Month Day Day Month
The month will ash rst
Year
7. Set month
Month
• Press
• Press
to display correct month
to save
8. Set day
• Press
• Press
Day
5
ART22311-101_rev-B.indd 5-6 8/28/14 11:30 AM
to display correct day
to save
www.AbbottDiabetesCare.com
Date Format
Year
10. Set year
• Press
• Press
• Press
11. Press and hold
complete.
to accept year or
to change
to save
for 3 seconds until meter turns o. Meter set up is
6
Page 7
Testing Your Blood Glucose
Purpose
The purpose of this section is to produce an accurate blood glucose test result.
Prepare to Test
Available
Test Sites
Upper arm
Forearm
Hand
Fingertips
Thigh
Calf
1. Select your test site.
Note: Avoid moles, veins, bones and tendons. Bruising may
occur at the test site. If bruising occurs, consider selecting
another site.
There are dierences in testing on ngers versus
alternative sites.
Warning:
Test on your ngers if you are testing for low blood glucose
(hypoglycaemia) or if you suer from hypoglycaemia
unawareness.
Check for low blood glucose when:
• You feel symptoms such as weakness, sweating,
shakiness, headache or confusion
• You eat a delayed meal after taking insulin
• You are following your healthcare professional’s
advice
IMPORTANT:
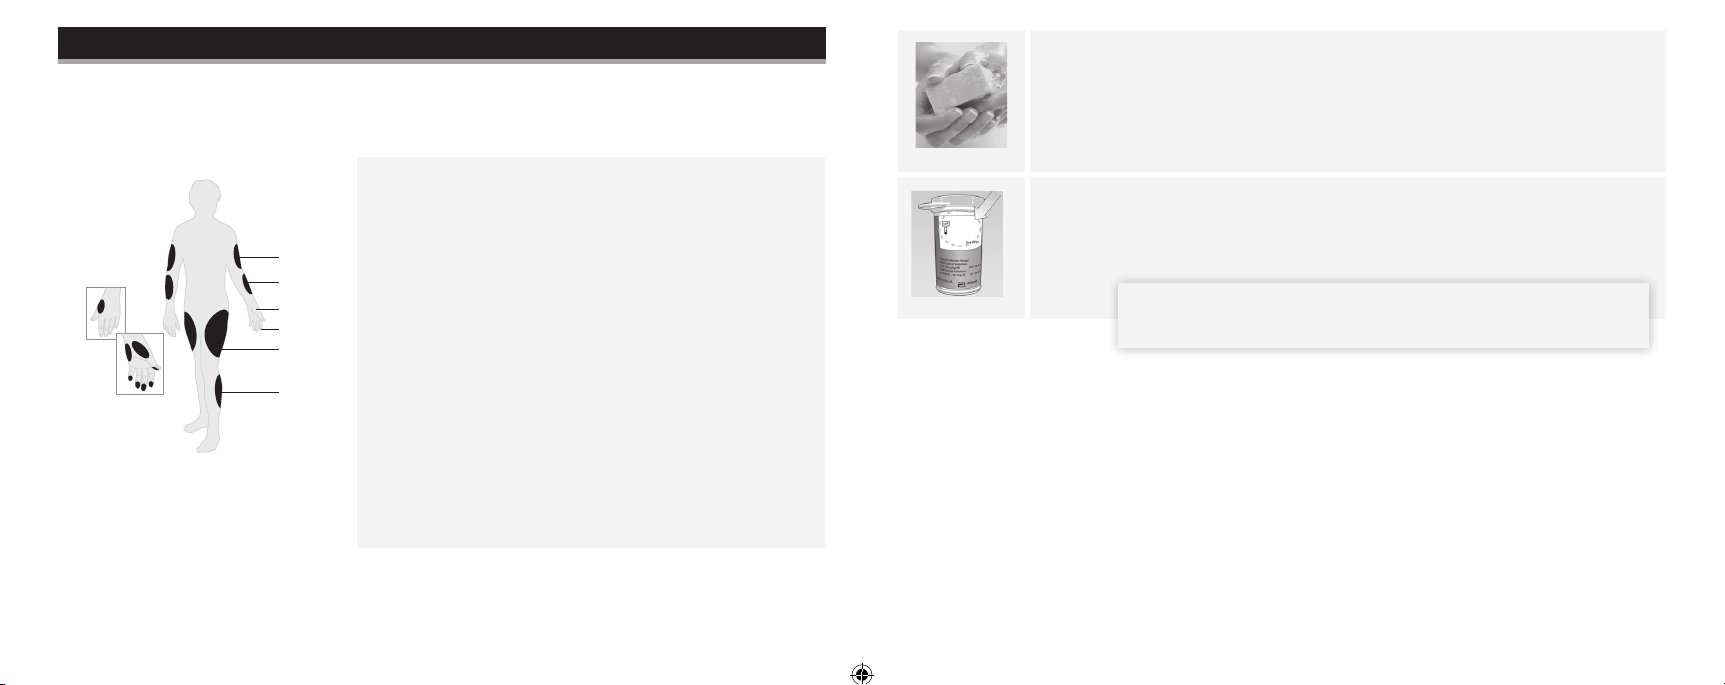
2. Wash your hands and the test site with warm soapy water to ensure accurate
results.
• Thoroughly dry your hands and the test site.
• Do not use lotion or cream on the test site.
3. Check test strip expiry date.
Do not use expired test strips; they may produce inaccurate results.
IMPORTANT: Use only FreeStyle Lite test strips. Other test strips can
produce inaccurate results. The test strips are for single use only.
7
ART22311-101_rev-B.indd 7-8 8/28/14 11:30 AM
www.AbbottDiabetesCare.com
8
Page 8

Important Test Strip Information
Sample areas
Performing a Blood Glucose Test
Please read the FreeStyle Lite test strip package insert for more information.
• Use the test strips within the meter’s operating range: 40° – 104° F (4° – 40° C).
• Store test strips in a cool, dry place between 40° – 86° F (4° – 30° C).
• Store test strips away from direct sunlight and heat.
• Store test strips in their original vial only.
• Clean and dry your hands before removing a strip from the vial.
• Close the vial cap tightly immediately after removing a test strip.
• Do not transfer test strips to another container.
• Do not store test strips outside the vial.
• Do not bend, cut or alter test strips.
• Do not apply blood to both sides of the test strip.
• Do not press the test strip against the test site.
• Do not scrape the blood onto the test strip.
• Do not apply blood to the at side of the test strip.
• Do not apply blood to the test strip when the test strip is out of the meter.
• Do not put blood or foreign objects into the meter.
Warning: Drying agents in the test strip vial or cap may be harmful if inhaled or
swallowed and may irritate skin and eyes.
9
www.AbbottDiabetesCare.com
1. Remove test strip from vial.
Top
2. Insert test strip to turn meter on.
Note: The meter turns o after 2 minutes of inactivity.
Remove and reinsert the unused test strip to restart
the meter.
If the meter does not turn on, go to Troubleshooting section.
Printed side up
3. Conrm System Check Screen.
• This display appears when you turn on the meter. Do not use the meter if
the display check screen does not exactly match the example. Contact
Customer Care.
• See The FreeStyle Freedom Lite Meter and How It Works section for more
information.
• If the system check screen does not appear, go to Troubleshooting section.
4. Obtain a blood drop.
When the
(See FreeStyle lancing device insert for instructions.)
The test strip requires only a 0.3 microliter of blood for accurate results.
and appears, use the lancing device to obtain a blood drop.
10
ART22311-101_rev-B.indd 9-10 8/28/14 11:30 AM
Page 9

5. Apply and hold blood to 1 sample area of the test strip until:
• You see short lines moving clockwise on the display or
• You hear a beep
This indicates the test strip obtained enough blood and the meter is checking
your glucose level. If a short line does not appear after 5 seconds, the sample may
be too small. You can add blood to the same side only for up to 60 seconds. If the
test does not start after applying blood drop, go to Troubleshooting section.
Understanding Blood Glucose Test Results
The meter displays results in mmol/L. The unit of measurement is preset. You cannot change
this setting.
IMPORTANT: The meter displays results from 1.1 – 27.8 mmol/L. Low or
high blood glucose results can indicate a potentially serious medical
condition.
• The expected normal fasting blood glucose level for an adult without diabetes is less than
6.1 mmol/L.
• Two hours after meals, the blood glucose level for an adult without diabetes should be less than
7.8 mmol/L.
1
1
• Consult your healthcare professional to determine the range that is appropriate for you.
(Example only)
6. View result
The result appears on the display when the test is complete. The time that the
meter takes to display a result depends on your blood glucose level. Higher
glucose levels require more time.
Note: If you see an “Er1, Er2, Er3 or Er4” on the display, it is an error code. Go to
Error Codes section.
7. Remove test strip to turn meter o.
Dispose of used lancet and test strip correctly.
Reference:
1
Denition and diagnosis of diabetes mellitus and intermediate hyperglycemia: report of a WHO/IDF consultation.
11
ART22311-101_rev-B.indd 11-12 8/28/14 11:30 AM
www.AbbottDiabetesCare.com
World Health Organization, Geneva, Switzerland 2006.
12
Page 10

Low and High Blood Glucose Results
Result What It Means What To Do
lower than
3.3 mmol/L
Low (hypoglycaemic) Repeat the test with a new test strip, even if you do
not feel that you have low blood glucose.
If your blood glucose result is still not consistent with
your symptoms, contact your healthcare professional
and follow his or her treatment advice.
Display What It Means Symptoms What To Do
Severe low blood
glucose
Appears when
result is:
lower than
1.1 mmol/L
Weakness
Sweating
Shakiness
Headache
Confusion
Follow your healthcare professional’s
advice to treat low blood glucose.
If your blood glucose result does
not match how you feel, perform a
control solution test to conrm that
your meter and strips are working
properly.
higher than
13.3 mmol/L
13
ART22311-101_rev-B.indd 13-14 8/28/14 11:30 AM
High (hyperglycaemic) Repeat the test with a new test strip, even if you do
not feel that you have high blood glucose.
If your blood glucose result is still not consistent with
your symptoms, contact your healthcare professional
and follow his or her treatment advice.
www.AbbottDiabetesCare.com
IMPORTANT:
• Severe dehydration may cause false low results. If you believe you are suering
from severe dehydration, contact your healthcare professional immediately.
• Contact your healthcare professional if you have symptoms that do not match
your test result, and you have followed the instructions in this owner’s booklet.
14
Page 11

Display What It Means Symptoms What To Do
Severe high blood
glucose
Appears when
result is:
higher than
27.8 mmol/L
Fatigue
Thirst
Excess Urination
Blurry Vision
Follow your healthcare professional’s
advice to treat high blood glucose.
If your blood glucose result does
not match how you feel, perform a
control solution test to conrm that
your meter and strips are working
properly.
Error Codes
Message What It Means What To Do
• The sample is too small
• There may be a problem
with the test strip
• Meter error
• Very low blood glucose
lower than 1.1 mmol/L
1. Follow your healthcare professional’s advice to
treat low blood glucose if you have symptoms
such as:
• Weakness • Shakiness
• Sweating • Headache
• Confusion
2. Perform a control solution test using a new
test strip. If the test results are within the range
printed on the test strip vial, retest using blood
and a new test strip.
3. If the control solution result is out of range or the
error reappears, contact Customer Care.
15
ART22311-101_rev-B.indd 15-16 8/28/14 11:30 AM
www.AbbottDiabetesCare.com
16
Page 12

Message What It Means What To Do
• There may be a problem
with the test strip
• Meter error
• Very high blood glucose
higher than 27.8 mmol/L
• HIGH control solution
was applied when the
temperature was too
cold. (Applies only to
control solution labeled
as HIGH).
1. Follow your healthcare professional’s advice to
treat high blood glucose if you have symptoms
such as:
• Fatigue • Thirst
• Excess urination • Blurry vision
2. Perform a control solution test using a new
test strip. If the test results are within the range
printed on the test strip vial, retest using blood
and a new test strip.
3. If the control solution result is out of range or the
error reappears, contact Customer Care.
Message What It Means What To Do
• Incorrect test procedure.
For example, putting
blood on the test strip
before inserting it into
the meter or applying
blood before
appear
and
• There may be a problem
with the test strip
1. Wait for
blood or control solution.
2. Perform a control solution test using a new
test strip. If the test results are within the range
printed on the test strip vial, retest using blood
and a new test strip.
3. If the control solution result is out of range or the
error reappears, contact Customer Care.
and to appear before applying
• Meter error
• There may be a problem
with the test strip
• Meter error
17
ART22311-101_rev-B.indd 17-18 8/28/14 11:30 AM
www.AbbottDiabetesCare.com
1. Perform a control solution test using a new
test strip. If the test results are within the range
printed on the test strip vial, retest using blood
and a new test strip.
2. If the control solution result is out of range or the
error reappears, contact Customer Care.
18
Page 13

Troubleshooting
1. The meter
does not
enter test
mode after
inserting a
test strip.
• Test strip is inserted
• No battery is installed
• Battery is installed
• Dead battery 1. Replace battery. Reset date and time, if
What It Means What To Do
1. Insert test strip print side up, top end in.
upside down, or bottom
end in, or not fully
inserted into the meter
1. Install battery with (+) facing up.
incorrectly
necessary.
2. If meter still does not enter test mode,
contact Customer Care.
2. The test
does not
start after
applying
the blood
drop.
What It Means What To Do
• Blood drop is too small 1. Add blood to the same sample area within
60 seconds, or repeat the test using a new
test strip and a larger blood drop.
• Defective test strip
• Sample applied after
meter turns o
1. Repeat the test using a new test strip. Wait for
or control solution.
2. If problem persists, contact Customer Care.
to appear before applying blood
and
• Defective meter 1. Contact Customer Care.
• Defective test strip or
meter
1. Contact Customer Care.
• Blood or foreign objects
put in the test strip port
19
ART22311-101_rev-B.indd 19-20 8/28/14 11:30 AM
www.AbbottDiabetesCare.com
20
Page 14

FreeStyle Control Solution
Out of Range Control Solution Results
Purpose
FreeStyle control solution is a red liquid that contains a xed amount of glucose.
The purpose of doing a control solution test is:
• To practise testing without using your own blood
• To conrm that the meter and test strips work together properly
• When you are unsure of your blood glucose test results
Contact Customer Care for information on how to obtain control solution.
Control Solution Information
• Use only FreeStyle control solution with the meter.
• Replace the cap securely on the bottle immediately after use.
• Control solution results are accurate only between 59° – 104° F (15° – 40° C).
• Do not add water or other liquid to control solution.
• There are three levels of control solution available (Low, Normal, High).
For information on how to obtain control solution, contact Customer Care.
IMPORTANT: Control solution results should fall within the control
solution range printed on the test strip vial. Do not use this range
when testing blood glucose.
21
www.AbbottDiabetesCare.com
• Repeat the test if control solution results are outside the range printed on
the test strip vial.
• Stop using the meter if control solution results are consistently outside the
range printed on the test strip vial. Contact Customer Care.
Causes of out-of-range results include:
• Expired or bad control solution
• Expired or bad test strip
• Testing error
• Watered-down control solution
• Meter malfunction
• Test strip deterioration
• Control solution test done outside 59° – 104° F (15° – 40° C)
22
ART22311-101_rev-B.indd 21-22 8/28/14 11:30 AM
Page 15

Performing a Control Solution Test
Sample areas
1. Check control solution expiry date.
IMPORTANT: Do not use control solution past expiry date. Discard
control solution 3 months after opening or on the expiry date printed on
the bottle whichever comes rst. (Example: open April 15, discard July
15; write the discard date on the side of the bottle.)
2. Remove test strip from vial.
3. Insert test strip to turn meter on.
Note: The meter turns o after 2 minutes of inactivity.
Remove and reinsert the unused test strip to restart
the meter.
If the meter does not turn on go to Troubleshooting section.
Top
Printed side up
4. Conrm System Check Screen.
• This display appears when you turn on the meter. Do not use the meter if
the display check screen does not exactly match the example. Contact
Customer Care.
• See The FreeStyle Freedom Lite Meter and How It Works section for more
information.
• If the system check screen does not appear, go to Troubleshooting section.
5. Apply and hold control solution to 1 sample area of the test strip until:
• You see short lines moving clockwise on the display or
• You hear a beep
This indicates the test strip obtained enough control solution and the meter is
processing. If the test does not start after applying the control solution, go to
Troubleshooting section.
IMPORTANT: If a short line does not appear after 5 seconds, the
sample may be too small. Do not add control solution to both sides
of the strip. The test strips are for single use only. Do not reuse test
strips. Dispose of used test strips.
23
ART22311-101_rev-B.indd 23-24 8/28/14 11:30 AM
www.AbbottDiabetesCare.com
24
Page 16

(Example only)
c
c
m
m
c
m
(Example only)
6. View result.
The result appears on the display when the test is complete.
7. Compare the control solution result to the range printed on the test strip vial.
The result should fall within the range.
Note: If you see an “Er1, Er2, Er3 or Er4” on the display, it is an error code. Go to
Error Codes section.
8. Press and hold
the result as a control solution result. To unmark a control solution test result,
press and hold
marked this reading as a control solution test.
for 2 seconds until appears on the display to mark
for 2 seconds. A value with the indicates you have
9. Remove the test strip to turn meter o.
Using Your Meter Memory
Purpose
The purpose of this section is to review your stored test results and 7-, 14- and 30-day averages.
Viewing Blood Glucose Averages in Memory
Start with the meter o (no test strip inserted). Press
appears (control solution, LO and HI readings not included).
Note: To exit meter memory at any time, press and hold
Example:
Memory Display
your average
n= number of results included in your average
• Press
results. The most recent result appears rst.
• Press
to scroll through 14- and 30-day averages and all stored test
to scroll backward.
. Your 7-day average
.
25
ART22311-101_rev-B.indd 25-26 8/28/14 11:30 AM
www.AbbottDiabetesCare.com
26
Page 17

Viewing Test Results in Memory
m
c
m
c
m
c
m
Meter memory stores the last 400 test results with time and date. Press c to scroll through the
results. The most recent result appears rst.
on the display indicates that you are viewing stored test results.
Setting Reminder Alarms (optional)
Purpose
The purpose of this section is to set up to four reminder alarms to prompt you to test throughout
the day.
shows the average value of glucose readings from the last 7-, 14- or 30-days.
on the display indicates that the test result occurred when it was too hot or too
cold to use the meter and may not be accurate. This result is included in 7-, 14and 30-day averages.
a test result of under 1.1 mmol/L is included in memory as LO.
a test result of over 27.8 mmol/L is included in memory as HI.
indicates a control solution test result.
Reminder Alarm
Hour
1. With the meter o, press and hold
and 0 is ashing.
2. Press
Note: You are setting time for Reminder Alarm not clock time.
. Reminder alarm 1 ashes.
3. Set hour
• Press
• Press
• Press
to set hour
to display correct hour
to save
for 3 seconds until appears
4. Set minutes
• Press
• Press
Minutes
27
ART22311-101_rev-B.indd 27-28 8/28/14 11:30 AM
www.AbbottDiabetesCare.com
to display correct minutes
to save
28
Page 18

5. Set alarm sound volume
c
m
c
m
Maintaining the Meter
If you prefer:
No sound
A low beep
A louder beep
6. Press
and repeat 2, 3, 4 and 5 to set remaining reminder alarms or
7. Press and hold
Press
for 3 seconds until meter turns o.
until you see:
Transferring Test Results To a Computer
appears on the display when you insert a data cable in the data port. The computer
must have a compatible data management system to complete the transfer. Remove
this cable before performing a test.
Contact Customer Care to learn more about the data management system.
29
www.AbbottDiabetesCare.com
• Press
Then
to save
Replacing the Battery
The meter comes with a #2032, 3-volt, lithium battery installed. It provides power
for about 1000 tests.
• When appears on the display, the battery is low.
• When appears, the meter may fail to turn on.
IMPORTANT: When appears, replace the battery immediately.
• When you are ready to install a new battery, remove the old battery and
install the new battery within 60 seconds to avoid losing time and date
settings.
• If time and date settings are lost, both time and date will
ash until reset. Reset time and date to get the correct 7-, 14- and 30-day
averages. If the time and date settings are lost, you may still perform an
accurate blood glucose test.
• Memory log and previously stored user settings, such as date and time
format, are not aected by removing the battery.
30
ART22311-101_rev-B.indd 29-30 8/28/14 11:30 AM
Page 19

1. Slide the battery door to the right to open.
2. To remove the battery, pull the plastic tab up to release the battery.
3. Insert a new battery: (+) facing up.
4. To close, slide the battery door in until it snaps into place.
Note: The European Battery Directive requires separate collection of spent batteries,
aiming to facilitate recycling and to protect the environment. The batteries in this
product should be removed and disposed of in accordance with local regulations for
separate collection of spent batteries.
Cleaning the Meter
Avoid getting dirt, dust, blood, control solution or liquid in the meter test strip and data ports.
Clean the outside of the meter using a damp cloth and:
• Mild detergent/soap and water, or
• 70% isopropyl alcohol, or
• A mixture of 1 part household bleach, 9 parts water
IMPORTANT:
Do not immerse the meter in water or other liquid.
31
ART22311-101_rev-B.indd 31-32 8/28/14 11:30 AM
www.AbbottDiabetesCare.com
32
Page 20

Specifications
Operating relative
humidity
5% to 90% (non-condensing)
Assay method Coulometric electrochemical sensor
Automatic shuto 2 minutes of inactivity
Battery life 1000 tests
Calibration Plasma equivalent
Haematocrit 15% to 65%
Measurement units mmol/L
Meter storage temperature – 4° to 140° F (–20° to 60° C)
Memory 400 blood glucose and control solution tests with date and time
33
ART22311-101_rev-B.indd 33-34 8/28/14 11:30 AM
www.AbbottDiabetesCare.com
Operating temperature 40° to 104° F (4° to 40° C)
Power source One CR 2032, 3V lithium battery, replaceable
Result range 1.1 to 27.8 mmol/L
Sample Fresh capillary and venous whole blood samples
Sample size 0.3 microliter (300 nanoliters)
Size 2.0 in (w) x 3.3 in (l) x 0.63 in (d) 5.1 cm (w) x 8.4 cm (l) x 1.6 cm (d)
Weight 1.4 to 1.6 oz. (39.7 to 45.4 g) including battery
34
Page 21

Definition of Symbols
Consult instructions for use Use by
Temperature limitation For in vitro diagnostic medical device
Manufacturer Catalogue number
CE Mark Recycle
Authorised representative in the
European Community
Serial number
Batch code Do not reuse
The European Battery Directive requires separate collection of spent batteries, aiming
to facilitate recycling and to protect the environment. The batteries in this product
should be removed and disposed of in accordance with local regulations for separate
collection of spent batteries.
35
ART22311-101_rev-B.indd 35-36 8/28/14 11:30 AM
www.AbbottDiabetesCare.com
Page 22

Distributed by:
Abbott Laboratories Ltd.
Abbott Diabetes Care
Abbott House
Vanwall Business Park
Vanwall Road
Maidenhead
Berkshire
Abbott Laboratories Ireland, Ltd.
Abbott Diabetes Care
4051 Kingswood Drive
Citywest Business Campus
Dublin 24
Ireland
1800 77 66 33
SL6 4UD
UK
0500 467 466
Abbott Diabetes Care
666 Doncaster Road
Doncaster 3108
Victoria, Australia
ABN 95000 180 389
1800-801-478
FreeStyle and related brand marks are trademarks of Abbott Diabetes Care Inc. in various jurisdictions.
This product(s) and/or its use are protected by one or more of the following patents: US6,071,391; US6,120,676;
US6,143,164; US6,156,173; US6,299,757; US6,338,790; US6,503,381; US6,591,125; US6,616,819; US6,618,934; US6,676,816;
US6,749,740; US6,893,545; US6,942,518; US7,058,437; US7,615,637; US7,713,406; US7,740,581; US7,802,467; US7,866,026;
US7,895,740; US7,901,554; USD611,854S; USD613,190S; USD615,884S; EP1119637; EP1145000; EP0958495, CA2346415;
CA2358993; CA2351796; CA2423837; CA121137. Additional patents may be issued and/or pending.
Abbott Laboratories (N. Z.) Ltd.
Ground Floor Bldg. D, 4 Pacic Rise
Mount Wellington
P.O. Box 22-801 Otahuhu
Auckland, New Zealand
0800 106 100
©2010-2014 Abbott
ART22311-101 Rev. B 08/14
Manufacturer:
ART22311-101_rev-B.indd 43 8/28/14 11:30 AM
 Loading...