

Page 1

DCS550
Quick Guide
DCS550 Drives (20 A to 1000 A)
Page 2

DCS550 Quick Guide
english Contents
DC Drives Worldwide Service Network .............................. 3
DCS550 Manuals ...............................................................4
DCS550 DC Drives ............................................................. 5
Brief instructions for CD and documents overview ............. 7
Notes on EMC .................................................................... 8
Standard function assignments for the terminals ...............10
Connection example .........................................................11
Fan power connection ...................................................... 13
Terminal locations on the converter ...................................14
Notes For North American Installations .............................15
Safety and operating instructions .....................................17
Installing the DCS550 PC tools on Your computer ............ 18
Commissioning .................................................................19
DCS550 Control Panel .....................................................20
Dimensions, drilling patterns and weights ........................ 77
Fault / Alarm list ............................................................... 80
Diagnosis messages.......................................... ...............86
Macro & Firmware structure ..............................................91
Declaration of conformity ................................................ 104
Declaration of Incorporation ........................................... 105
deutsch Inhalt
DC Drives Worldwide Service Network .............................. 3
DCS550 Manuals / DCS550 Handbücher ...........................4
DCS550 Gleichstromantriebe ........................................... 21
Kurzanweisung CD und Dokumentationsübersicht ..........23
EMV Filter ......................................................................... 24
Digitaler und analoger E-A/Anschluss von SDCS-CON-F .. 26
Anschlussbeispiel .............................................................27
Lüfterkühlung ...................................................................29
Klemmen- und Steckeranordnung des Stromrichters ........ 30
Sicherheits- und Anwendungshinweise ............................. 31
Installation der DCS550 Programme auf dem PC ............. 32
Inbetriebnahme ................................................................33
DCS550 Steuertafel .......................................................... 34
Abmessungen, Bohrbild und Gewichte ............................ 77
Fehler- / Alarmliste ........................................................... 80
Diagnosemeldungen.......................................... ............... 86
Makro & Firmware Struktur ............................................... 91
Declaration of conformity ................................................ 104
Declaration of Incorporation ........................................... 105
español Contenido
DC Drives Worldwide Service Network ............................... 3
DCS550 Manuals / Manuales de DCS550 ..........................4
Convertidores de CC DCS550 ......................................... 49
Instrucciones para el CD y de la documentación ..............51
Notas acerca de EMC .....................................................52
Asignaciones de funciones estándar para los terminales ... 54
Ejemplo de conexión ........................................................ 55
Conexión de alimentación del ventilador ..........................57
Ubicación de los terminales en el convertidor ...................58
Instrucciones de seguridad ............................................... 59
Cómo instalar las herramientas para PC del DCS550 ......60
Puesta en funcionamiento ...............................................61
Panel de control del DCS550 ........................................... 62
Dimensiones, patrones de taladrado y pesos....................77
Lista de errores / alarmas ................................................80
Mensajes de diagnóstico .................................................86
Estructura del macro & firmware ....................................... 91
Declaration of conformity ................................................ 104
Declaration of Incorporation ............................................ 105
français Sommaire
DC Drives Worldwide Service Network .............................. 3
DCS550 Manuals / Manuels du DCS550 ............................ 4
Variateurs à courant continu DCS550 ............................... 63
Documentation technique ................................................ 65
Compatibilité électromagnétique (CEM) ............................ 66
Raccordement standard des signaux d’E/S ...................... 68
Exemple de schéma de câblage ....................................... 69
Câblage du ventilateur ...................................................... 71
Emplacement des bornes sur le convertisseur .................. 72
Consignes de sécurité et d’exploitation............................. 73
Installation des outils logiciels du DCS550 sur votre PC .... 74
Mise en service ................................................................. 75
Micro-console DCS550 .................................................... 76
Dimensions, perçages et poids ........................................ 77
Liste des erreurs / alarmes ............................................... 80
Messages de diagnostic.......................................... ......... 86
Structure du logiciel macro & système .............................. 91
Declaration of conformity ................................................ 104
Declaration of Incorporation ........................................... 105
italiano Indice
DC Drives Worldwide Service Network .............................. 3
DCS550 Manuals / DCS550 Manuali .................................. 4
DCS550 DC Drives ........................................................... 35
Brevi istruzioni CD e documentazione Panoramica ...........37
Note sulle EMC ................................................................. 38
Assegnazione funzioni standard per i morsetti ..................40
Esempi schemi di collegamento........................................41
Ventole di raffreddamento ................................................. 43
Posizioni terminali sul convertitore ..................................... 44
Istruzioni per la sicurezza .................................................. 45
Installa i DCS550 PC tools sul Tuo computer .................... 46
Messa in servizio ..............................................................47
DCS550 Pannello di controllo ...........................................48
Dimensioni, schemi di foratura e pesi ............................... 77
Errore / Allarme di lista ..................................................... 80
Messaggi di diagnostica.......................................... ......... 86
Struttura macro & firmware ............................................... 91
Declaration of conformity ................................................ 104
Declaration of Incorporation ........................................... 105
2 3ADW000395R0100 DCS550 Quick guide edisf a2 3ADW000395R0100 DCS550 Quick guide edisf a
Page 3

ABB Drive Service EN
In order to offer the same after sales
service to our customer around the
world, ABB has created the DRIVE
SERVICE CONCEPT.
ABB's after sales service is globally
consistent due to common targets,
rules, and the way of operation. This
means for our customers:
Please visit the ABB drive service
homepage
www.abb.com/drivesservices
ABB Drive Service FR
Pour offrir la même qualité de service
à tous nos clients, ABB a créé DRIVE
SERVICE CONCEPT.
Dans le monde entier, les équipes de
service proposent les mêmes prestations aux mêmes conditions avec les
mêmes objectifs.
Pour en savoir plus, connectez-vous
sur ABB drive service homepage
www.abb.com/drivesservices
ABB Drive Service DE
Um jedem Kunden rund um die Welt
die gleiche Service Dienstleistung anbieten zu können, hat ABB das DRIVE
SERVICE CONCEPT entwickelt.
Durch die Definition von einheitlichen
Zielen, Regeln, und Arbeitsvorschriften kann ABB die Dienstleitungs
Produkte weltweit auf gleichwertig
hohem Qualitätsniveau anbieten. Für
unsere Kunden bedeuted dies:
Bitte besuchen Sie die ABB-Homepage Service für Antriebe
www.abb.com/drivesservices
ABB Drive Service IT
ABB ha creato il DRIVE SERVICE
CENCEPT, con lo scopo di offrire ai
nostri clienti lo stesso servizio post
vendita in tutto il mondo.
Attraverso la definizione di obbiettivi
comuni, ruoli e modo di operare, le
attività post vendita di ABB offrono
sevizi coerenti nella loro globalità. Per
i nostri clienti questo significa:
Vi invitiamo a visitare la homepage
ABB drive service
www.abb.com/drivesservices
ABB Drive Service ES
Para poder ofrecer el mismo servicio
posventa a nuestros clientes en todo
el mundo, ABB ha creado el CONCEPTO DE SERVICIO DE CONVERTIDORES.
El servicio posventa de ABB está
mundialmente consolidado gracias a
unos objetivos y normas comunes,
así como a su funcionamiento. Esto
significa para nuestros clientes:
Visiten el portal de convertidores de
ABB
www.abb.com/drivesservices
english
DC Drives Worldwide Service Network
Country Local ABB Service Town Service Phone No.
Argentina Asea Brown Boveri S.A. BUENOS AIRES +54 (0) 12 29 55 00
Australia ABB NOTTING HILL +61 (0) 3 85 44 00 00
Austria ABB AG WIEN +43 1 60 10 90
Belgium ABB N.V. ZAVENTEM
Brazil ABB Ltda. OSASCO +55 (0) 11 70 84 91 11
Canada ABB Inc. SAINT-LAURENT +1800 865 7628
China ABB China Ltd BEIJING +86 40 08 10 88 85 - 24h service
Czech Republic ABB S.R.O. PRAHA +42 02 34 32 23 60
Finland ABB Oy Service KUUSANKOSKI +35 8 10 22 51 00
Finland ABB Oy Product Service HELSINKI +35 8 10 22 20 00
Finland ABB Oy Service NOKIA +35 8 10 22 51 40
France
ABB Automation
ABB Process Industry
MONTLUEL from abroad
France
Germany ABB Process Industries MANNHEIM +49 18 05 22 25 80
Greece ABB SA METAMORPHOSSIS +30 69 36 58 45 74
Ireland ABB Ireland Ltd. TALLAGHT +35 3 14 05 73 00
Italy ABB MILAN +39 02 90 34 73 91
Korea, Republic ABB Ltd., Korea CHONAN +82 (0) 4 15 29 22
Malaysia ABB Malaysia Sdn. Bhd. KUALA LUMPUR +60 3 56 28 42 65
Mexico ABB Sistemas S.A. DE C.V. TLALNEPANTLA +52 53 28 14 00
Netherlands ABB B.V. ROTTERDAM +31 1 04 07 88 66
New Zealand ABB Service ltd AUCKLAND +64 92 76 60 16
Poland ABB Centrum IT Sp.zo.o
WROCLAW
LODZ
Russia ABB Automation LLC MOSCOW +74 95 96 0
Switzerland ABB AG DÄTTWIL +41 5 85 86 87 86
Singapore ABB Industry Pte Ltd SINGAPORE +65 67 76 57 11
Slovakia ABB Elektro s.r.o. BANSKA BYSTRICA +42 19 05 58 12 78
South Africa ABB South Africa (Pty) Lt JOHANNESBURG +27 1 16 17 20 00
Spain ABB Automation Products BARCELONA +34 9 37 28 73 00
Taiwan ABB Ltd. TAIPEI 105 +88 62 25 77 60 90
Thailand ABB Limited SAMUTPRAKARN +66 27 09 33 46
Turkey ABB Elektirk Sanayi A.S ISTANBUL +90 2 16 36 52 90
USA ABB Industrial Products NEW BERLIN
Venezuela ABB S.A. CRCS +58 (0) 22 38 24 11 / 12
+32 27 18 64 86
+32 27 18 65 00 - 24h service
+33 1 34 40 25 81
+0810 02 00 00
+48 42 61 34 96 2
+48 42 29 93 91 39 5
+1 26 27 85 32 00
+1 262 435 7365
33ADW000395R0100 DCS550 Quick guide edisf a 33ADW000395R0100 DCS550 Quick guide edisf a
Page 4

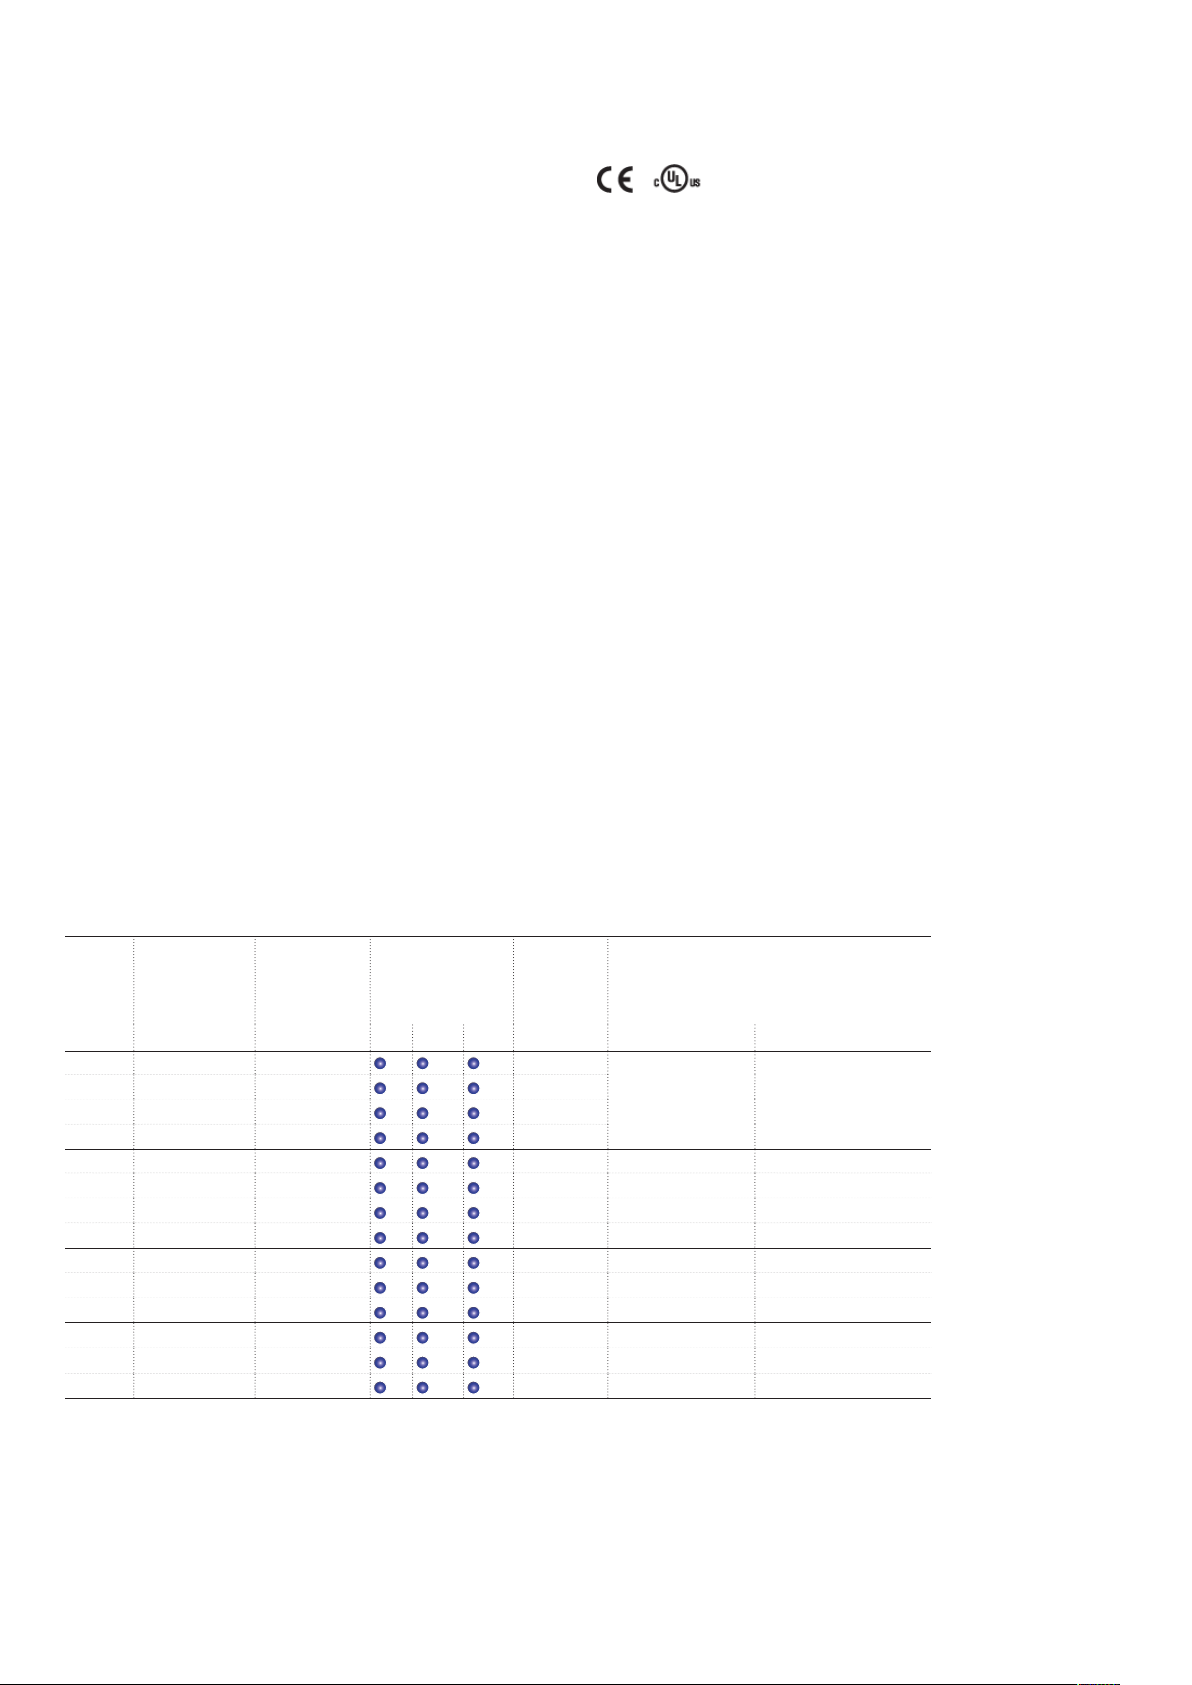
DCS550 Manuals
Language
Public. number E D I ES F CN RU
Quick Guide 3ADW000395 x x x x x
DCS550 Tools & Documentation CD 3ADW000377 x
DCS550 Modules
DCS550 Flyer 3ADW000374 x x
DCS550 Technical Catalog 3ADW000378 p
DCS550 Manual 3ADW000379 x
DCS550 Service Manual 3ADW000399 p
Installation according to EMC 3ADW000032 x
Technical Guide 3ADW000163 x
Extension Modules
RAIO-01 Analog IO Extension 3AFE64484567 x
RDIO-01 Digital IO Extension 3AFE64485733 x
Serial Communication
RPBA-01 PROFIBUS 3AFE64504215 x
RCAN-01 CANopen 3AFE64504231 x
RCNA-01 ControlNet 3AFE64506005 x
RDNA-01 DeviceNet 3AFE64504223 x
RMBA-01 MODBUS 3AFE64498851 x
RETA-01 Ethernet 3AFE64539736 x
x -> existing p -> planned
Status 05.2011
DCS550 Drive Manuals-List_d.doc
4 3ADW000395R0100 DCS550 Quick guide edisf a4 3ADW000395R0100 DCS550 Quick guide edisf a
Page 5
english
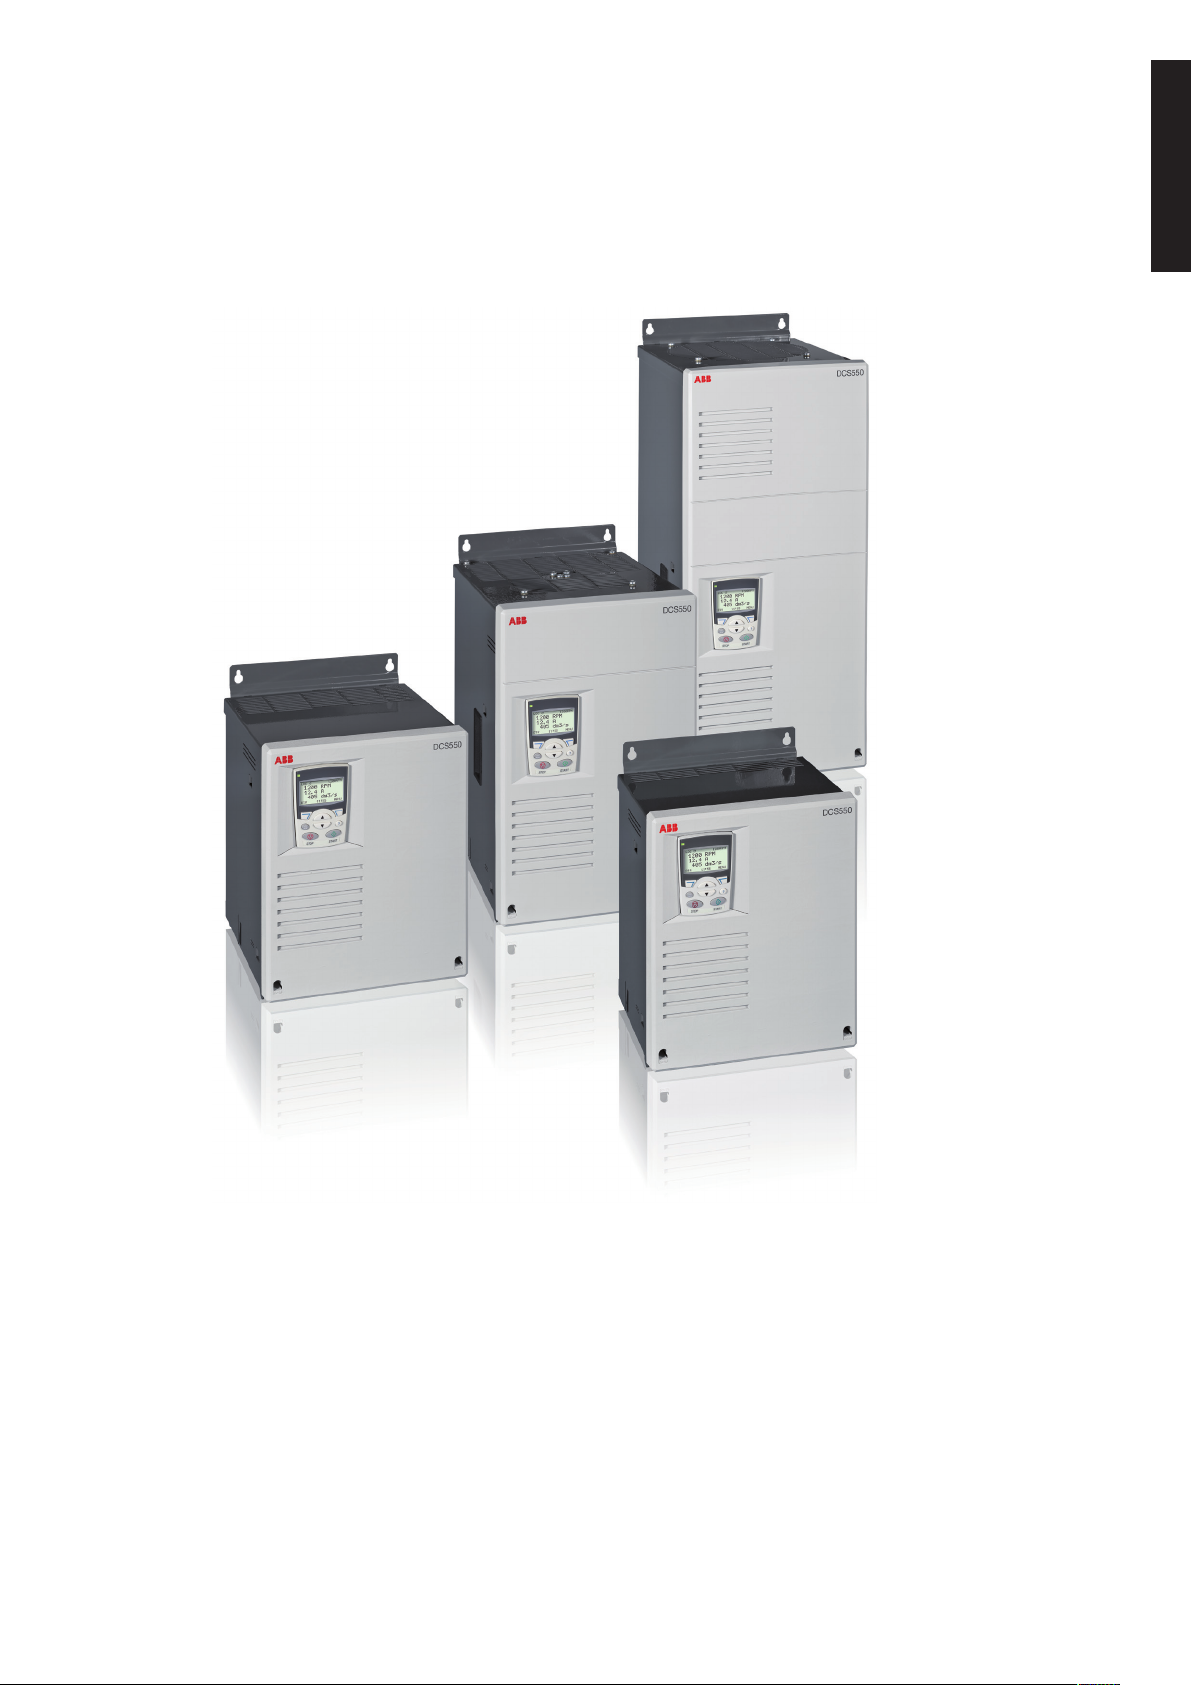
Standard Features
− compact
− highest power ability
− simple operation
− comfortable assistants, e.g. for autotuning or commissioning
3ADW000395R0100 DCS550 Quick guide edisf a
5
53ADW000395R0100 DCS550 Quick guide edisf a
Page 6
DCS550 DC Drives
Technical data
Mains supply volt. 230...525 V,
+/–10 %, 3~
Frequency 50...60 Hz, +/–5
Hz
Electronics supply 115...230 V,
–15 % / +10 %, 1~
DC Output current 20...1000 A
Overload capability 200 %
Ambient conditions
Ambient temperat. 0° ... +40° C
40° ... 50°C with
reduction
Storage temperat. –40° ... +55° C
Transport temper. –40° ... +70° C
Relative humidity 5 ... 95 %, not
condensing
(max. 50 % betw.
0°...5° C)
Pollution degree Class 2
Protection class IP 00
Altitude < 1,000 m height
above sea level:
nominal Current
> 1,000 m height
above sea level:
with reduction
I/O
Digital inputs: 8 standard, up to
14 optional
Digital outputs: 5 standard, up
to 9 optional
Analog inputs: 4 standard +/–
10 V; 0/2…10 V, up to 8 optional
+/ 20 mA; 0/4…20 mA
Analog outputs: 3 standard (1x
I
) +/-10 V; 0/2…10 V, up to 7
act
optional –20 mA; 0/4…20 mA
PC-Tools
DriveWindow Light: free of
charge with every converter,
Standard RS232 PC-connection
Approvals
(in preparation 12/2011)
Adaptive Programming
pre-defined drive-specific function
blocks, e.g.
• Free process controller (PIController)
• I/O- and digital Operations
With control panel or PC-Tool, no
need for additional hardware
Speed Feedback
EMF
Analog tacho
Encoder
Communication
Serial communication
• Ethernet • Profibus
• CANopen • DeviceNet
• ControlNet • EtherCat
• Modbus • ProfiNet
Industrial IT© enabled
Protections
Speed feedback monitoring •
Temperature • Overload • Over
speed • Motor stalled • Motor
over current • Motor over voltage
• Field over current • Minimum
field current • Zero speed •
Armature current ripple • Mains
over- and under voltage
Current ratings, dimensions
Unit
size
F1 20 25 12 370 x 270 x 208 14.56 x 10.65 x 8.20
45 50
65 75
90 100
F2 135 150 18 370 x 270 x 264 14.56 x 10.65 x 10.40
270 300
F3 315 350 25 459 x 270 x 310 18.07 x 10,65 x 12,25
405 450
470 520
F4 610 680 35 644 x 270 x 345 25.35 x 10.65 x 13.60
740 820
900 1000
2-Q
rated Current
DCS550-S01
IDC[A] IDC[A] 230 400 525 [ADC] h x w x d [mm] h x w x d [inch]
180 200
225 250
4-Q
rated Current
DCS550-S02
Supply voltage
[V
]
AC
max. field
current
internal
Dimensions
6 3ADW000395R0100 DCS550 Quick guide edisf a6 3ADW000395R0100 DCS550 Quick guide edisf a
Page 7

Brief instructions for CD and documents overview
©
2
0
1
1
A
B
B
A
u
t
o
m
a
t
i
o
n
P
r
o
d
u
t
G
m
b
H
-
A
l
l
R
i
g
h
t
R
e
e
r
e
d
3ADW 000 377 R0201 / April 2011
System configuration
WINDOWS 98, NT, 2000, XP
Acrobat Reader 4.0 or higher
Internet Explorer 5.0 or higher
I
f
t
h
e
C
D
R
O
M
w
o
n
’
t
s
t
a
r
t
a
u
t
o
m
a
t
i
c
a
l
l
y
p
l
e
a
s
e
e
x
e
c
u
t
e
S
T
A
R
T
.
B
A
T
System confirmation
Win2000, WinXP
Before installation of PC tools
remove previous version by
CONTROL PANEL of your
PC
Read more details in
Quick Guide 3ADW000191
Content
This CD ROM provides
information about DCS550 and
contains PC tools:
DWL 2.93 for DC drives
+Commissioning Wizard 1.0
+DWL AP 2.2
FDT 2.2 Firmware
download kit
+ workspace
Firmware 1.1
DCS550
Ver.: 1.10
System confirmation
Win7, Win2000, WinXP
Before installation of PC tools
remove previous version by
CONTROL PANEL of your PC
We appreciate that you purchased an ABB DC drive power
converter and thank you for the trust you put in our products.
This brochure was put together to make sure that you continue to be satisfied with our product. It is intended to provide
you with a brief overview of the product's key data, EMC
notes, typical applications, start-up and trouble-shooting.
If you need more information about the product you are provided with a CD-ROM in addition to this brief documentation.
The CD-ROM is part of the delivery and features the following
contents:
Technical catalog (3ADW000378)
Comprehensive information to engineer complete DC drive
systems.
Manual (3ADW000379)
Detailed information, with all important particulars about the
individual components, like module dimensions, electronic
boards, fans and auxiliary components.
Information for mechanical and electrical installation are also
included.
Detailed information with all important issues about firmware
and setting of parameters. The manual includes information
for start-up and maintenance of the entire drive, in detailed
form.
This manual also includes Fault and Alarm codes and information for trouble shooting.
Service Manual (3ADW000399)
for maintenance and repair of the converters.
Additional information about applications and technical
accessories (e.g. Hardware extension or Field bus interfaces)
are handled by separate manuals.
See table DCS550 manuals.
System requirements to use the CD-ROM
c
− Operating system
WINDOWS 7, 2000, XP
s
s
s
v
− ACROBAT READER
In case the CD ROM does not
start automatically, please
double click on Setup.exe.
Further support
In addition we offer further support, since we can only be
satisfied when you, as our customer, are satisfied with us and
our products.
Internet
On the ABB homepage under
www.abb.com/dc
you'll find abundant information for
− DC products
− service support
− the latest updates
− tools
− downloads, etc.
Please don't hesitate to visit us.
Contacts
If you require any further information, please contact your
nearest ABB Drives office or send an email to:
DC-Drives@de.abb.com
Please give us your name, your company address and phone
number. We immediately put you in contact with our specialist.
english
3ADW000395R0100 DCS550 Quick guide edisf a
7
73ADW000395R0100 DCS550 Quick guide edisf a
Page 8

Notes on EMC
M
M
Mains filter
Converter
Line reactor
Supply transformer for a residential
area (rating normally
≤
1,2 MVA)
Earthed public 400-V
network with neutral
conductor
Medium-voltage network
Earthed
neutral
To other loads, e.g. drive systems
An isolating transformer
with an earthed screen
and earthed iron core
renders mains filter and
line reactor superfluous.
Operation at public
low-voltage network
together with other
loads of all kinds.
Residential area
To other loads which have to be protected from the system disturbances caused by
power converters (HF interference and commutation notches)
Converter
M
M
M
M
M
M
alternative
alternative
Line reactor +
Y-capacitor
Medium-voltage network
Supply transformer for a residential
area (rating normally
≤
1.2 MVA)
Earthed
neutral
Earthed public 400-V
network with neutral
conductor
To other loads, e.g. drive systems
Mains filter
Line reactor
Converter Converter
Mains filter
Line reactor
Converter Converter
An isolating transformer
with an earthed screen
and earthed iron core
renders mains filter and
line reactor superfluous.
Operation at public
low-voltage network
together with other
loads of all kinds.
To other loads, e.g. drive systems
To other loads which have to be protected from the system disturbances caused by
power converters (HF interference and commutation notches)
Earthed public 400-V
network with neutral
conductor
Operation at public
low-voltage network
together with other
loads of all kinds.
Light industry
Residential area
Commutaion notches < 20%
You will find further information in publication:
Technical Guide chapter:
EMC Compliant Installation
and Configuration for a
Power Drive System
The paragraphs below describe selection
of the electrical components in conformity
with the EMC Guideline.
The aim of the EMC Guideline is, as the
name implies, to achieve electromagnetic
compatibility with other products and
systems. The guideline ensures that the
emissions from the product concerned
are so low that they do not impair another
product‘s interference immunity.
In the context of the EMC Guideline, two
The EMC Guideline expects EMC to be taken
into account when a product is being developed; however, EMC cannot be designed in, it
can only be quantitatively measured.
Note on EMC conformity
The conformity procedure is the responsibility
of both the power converter‘s supplier and the
manufacturer of the machine or system concerned, in proportion to their share in expand-
ing the electrical equipment involved.
aspects must be borne in mind:
– the product‘s interference immunity
– the product‘s actual emissions
First environment (residential area with light industry) with PDS category C2 Second environment (industry) with PDS categories C3, C4
Not applied, since category C1 (general distribution sales channel) excluded Not applicable
satisfied satisfied
Not applicable
satisfied satisfied
8 3ADW000395R0100 DCS550 Quick guide edisf a8 3ADW000395R0100 DCS550 Quick guide edisf a
Page 9
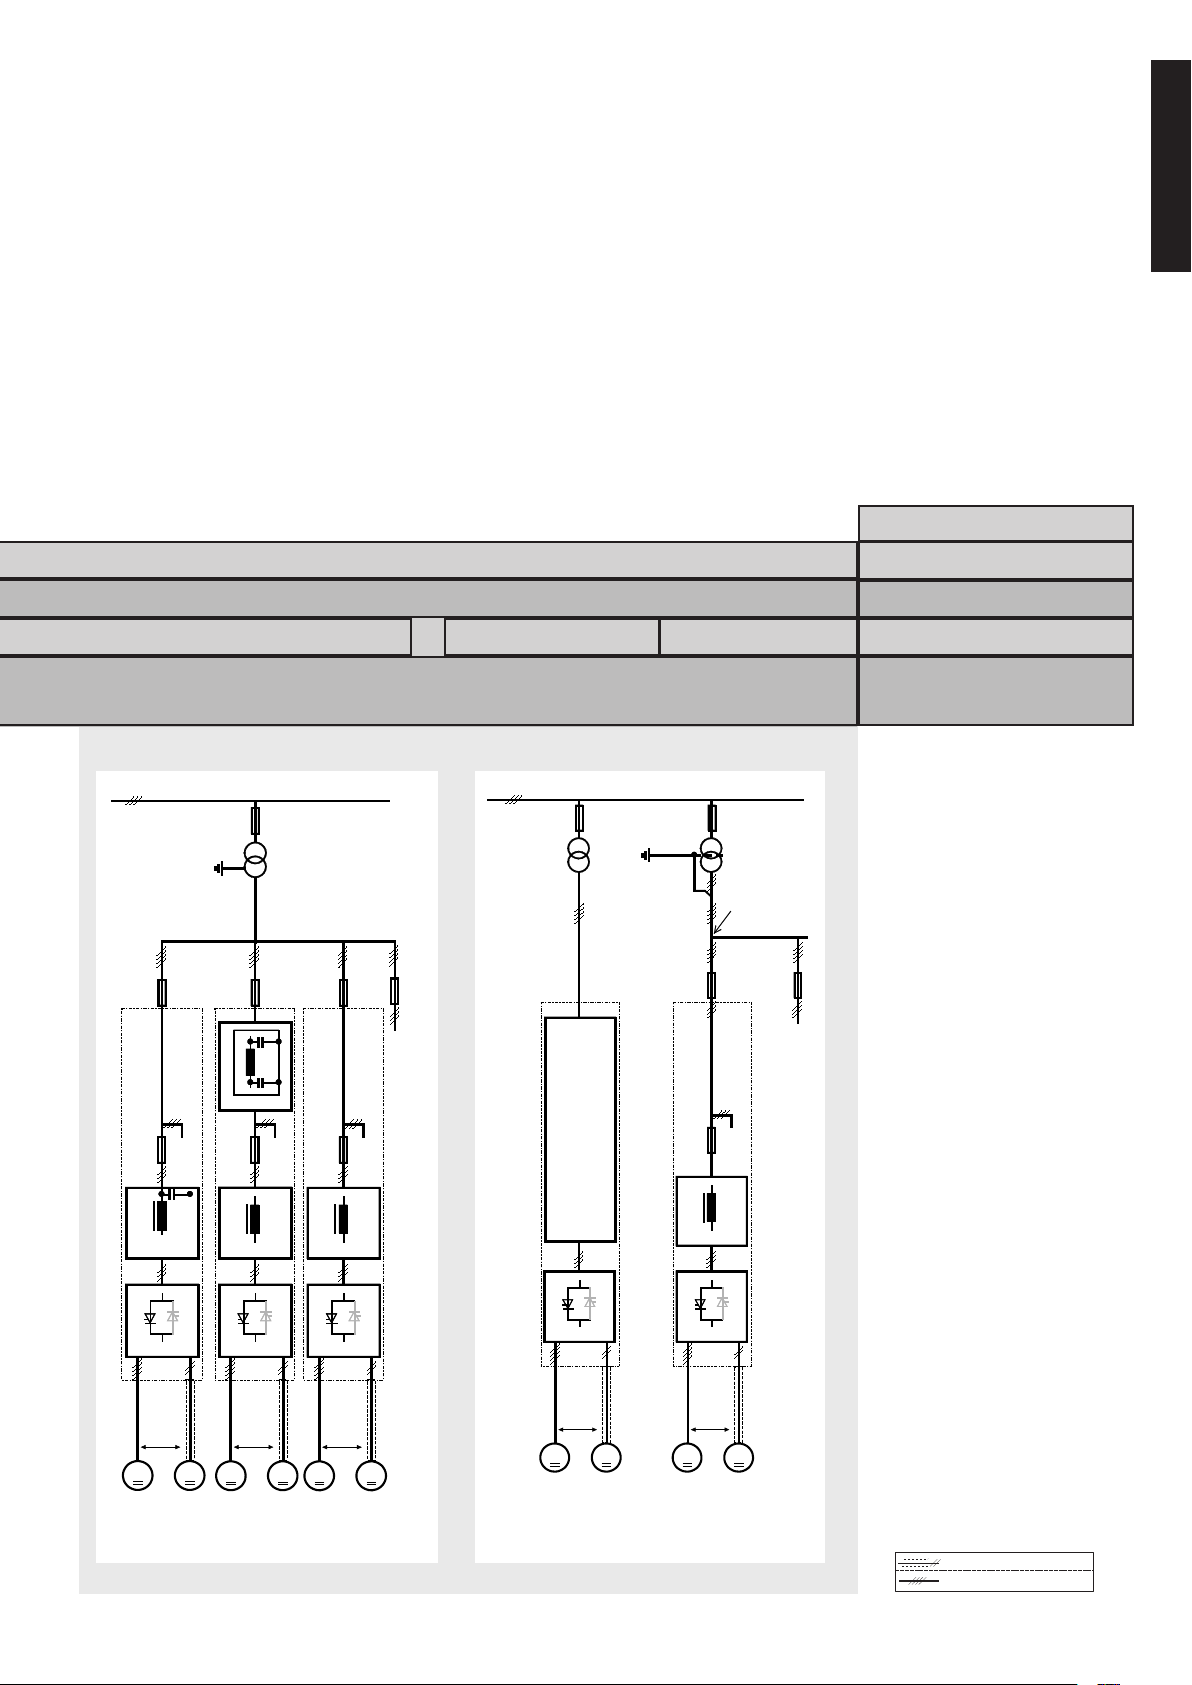
For compliance with the protection ob-
MMMM
emv_clssif_b.dsf
Converter
transformer
Case-referenced EMC analysis
alternative
Converter
transformer
with earthed
iron core
(and earthed
screen where
appropriate)
alternative
I > 400 A
and/or
U > 500 V
Operation with separate power converter transformer. If there
are other loads at the same secondary winding, these must be
able to cope with the commutation gaps caused by the power
converter. In some cases, commutating reactors will be
required.
To other loads, e.g. drive systems
Converter Converter
Line reactor
Medium-voltage network
Industrial
zone
Legend
Unscreened cable with restriction
Screened cable
M
M
M
M
M
M
I
DC
< 100 A
I
DC
< 100 A
I
DC
>100 A
Supply transformer for a
residential area (rating
normally
≤
1.2 MVA)
Earthed 400-V network
with neutral conductor
;
3~
≤
400 A
Operation at low-voltage network together with
other loads of all kinds, apart from some kinds
of sensitive communication equipment.
To other loads, e.g. drive systems
Line reactor +
Y-capacitor
Line reactor
Converter Converter
Mains filter
Earthed
neutral
Medium-voltage network
Industrial zone
alternative
alternative
Line reactor
Converter
alternative
Commutation notches < 40%
jectives of the German EMC Act (EMVG)
in systems and machines, the following
EMC standards must be satisfied:
Product Standard EN 61800-3
EMC standard for drive systems (Pow-
erDriveSystem), interference immunity
and emissions in residential areas,
enterprise zones with light industry and
in industrial facilities.
This standard must be complied with in
the EU for satisfying the EMC requirements for systems and machines!
For emitted interference, the following apply:
EN 61000-6-3 Specialised basic standard for emissions in light industry
can be satisfied with special features (mains filters,
screened power cables) in the lower rating range *(EN 50081-1).
EN 61000-6-4 Specialised basic standard for emissions in industry *(EN 50081-2)
For interference immunity, the following apply:
EN 61000-6-1 Specialised basic standard for interference immunity in
residential areas *(EN 50082-1)
EN 61000-6-2 Specialised basic standard for interference immunity in
industry. If this standard is satisfied, then the EN 61000-6-1
standard is automatically satisfied as well *(EN 50082-2)
* The generic standards are given in brackets
Standards
EN 61800-3
EN 61000-6/3
english
PDS category C3
on customer's request
PDS category C4
satisfied
EN 61000-6/3
EN 61000-6-2
EN 61000-6-1
Classification
The following overview
utilises the terminology and
indicates the action required
in accordance with Product
Standard EN 61800-3.
For the DCS550 series,
the limit values for emitted
interference are complied
with, provided the measure
indicated is carried out. PDS
of category C2 (formerly
restricted distribution in first
environment) is intended to
be installed and commissioned only by a professional
(person or organization with
necessary skills in installing
and/or commissioning PDS
including their EMC aspects).
For power converters without
additional components, the
following warning applies:
This is a product of category
C2 under IEC 61800-3:2004.
In a domestic/residential
environment this product
may cause radio interference
in which case supplementary
mitigation measures my be
required.
The field supply is not depicted in this overview diagram.
For the field current cables,
the same rules apply as for
the armature-circuit cables.
3ADW000395R0100 DCS550 Quick guide edisf a
9
93ADW000395R0100 DCS550 Quick guide edisf a
Page 10
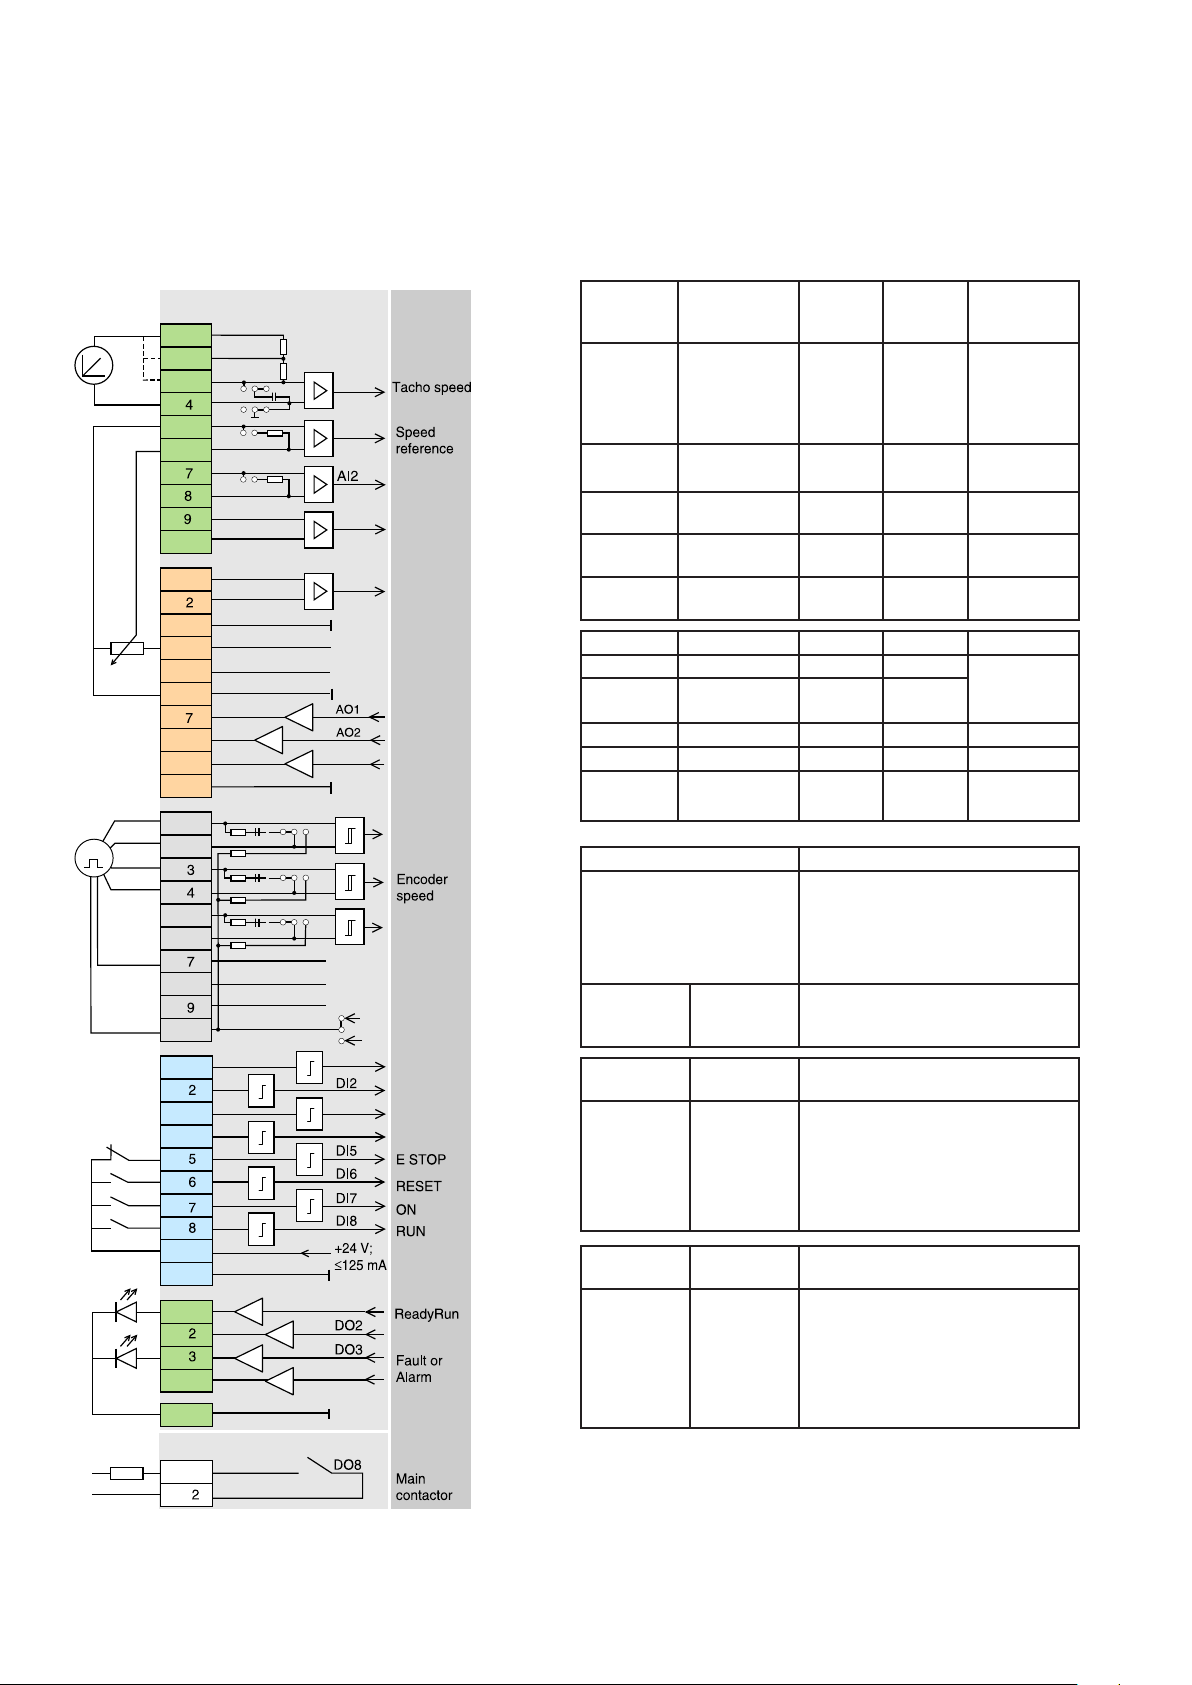
±90...±270 V
±
30...±90 V
±
8...±30 V
AI4
GND
GND
Power
Sense 0 V
Sense 5 V
AI3
AI1
I-act
GND
+10V
GND
-10V
DI1
DI3
DI4
DO4
DO1
3
4
5
6
9
X4:1
3
4
10
4
1
2
3
6
5
10
8
9
10
5
2
6
8
10
8
X1:1
X2:1
X3:1
X5:
SDCS-CON-F
B22_001_0_a.dsf
+
-
S2
3
4
250
S3
3
4
250
ATACH
+
-
+
-
+
-
+
-
GND
10
+
-
+
-
+
-
5V
S4
11
12
24V
K1
X96:1
t
230V
E
SDCS-PIN-F
1
3
4
6
S1
S1
1
3
S4
2
121
100nF
4
6
S4
5
121
100nF
7S48
121
100nF
10k
10k
10k
9
ChA
ChB
ChZ
ChA
ChB
ChZ
Firmware
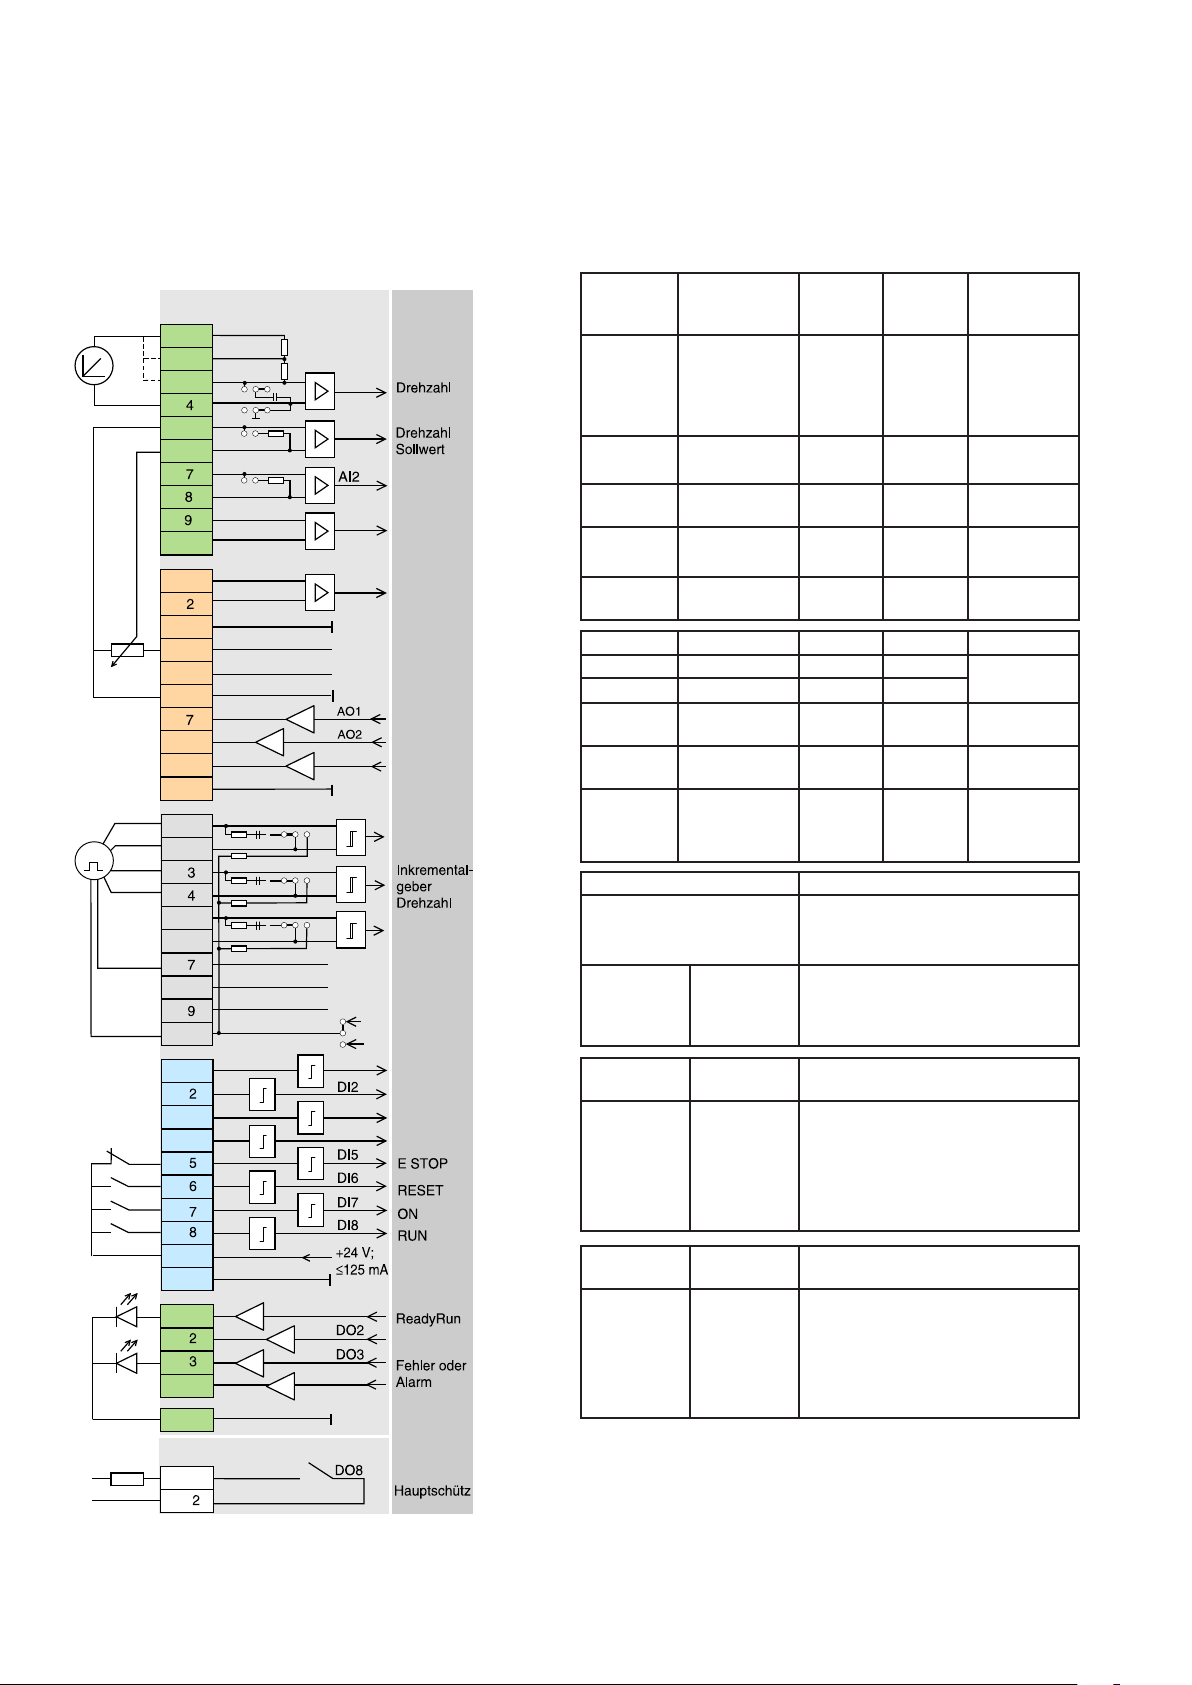
Standard function assignments for the terminals
Resolution
[bit]
15 + sign ±90...270 V
Input/output
values
Hardware
±30...90 V
ScalingbyCommon
mode
range
①
±15 V
Firmware
Remarks
±8...30 V
15 + sign -10...0...+10 V Firmware ±15 V
15 + sign -10...0...+10 V Firmware ±15 V
15 + sign -10...0...+10 V Firmware ±15 V
15 + sign -10...0...+10 V Firmware ±15V
Power
+10 V ≤ 5 mA
-10 V ≤ 5 mA
11 + sign -10...0...+10 V Firmware ≤ 5 mA
11 + sign -10...0...+10 V Firmware ≤ 5 mA
-10...0...+10 V Firmware+
≤ 5 mA
Hardware
for ext. use
e.g. refer. pot.
8 V -> min. of
325% of [99.03] or
230% of [4.05]
Encoder supply Remarks
5 V
24 V
≤ 250 mA
≤ 250 mA
Input value Signal
definition by
0...7.3 V
Firmware
7.5...50 V
Inputs not isolated
Impedance = 120 W, if selected
max. frequency ≤ 300 kHz
Sense lines for GND and supply
to correct voltage drops on cable
(only if 5 V encoder is in use).
Remarks
-> “0“ status
-> “1“ status
10 3ADW000395R0100 DCS550 Quick guide edisf a10 3ADW000395R0100 DCS550 Quick guide edisf a
Output value Signal
Remarks
definition by
50 * mA
22 V at no
load
Firmware
Current limit for all 7
outputs = 160 mA
Do not apply any reverse
voltages!
* short circuit protected
① gain can be varied in 15 steps between 1 and 4 by software
parameter
Page 11
F6
DCS550_ans_1_c.dsf
Connection example
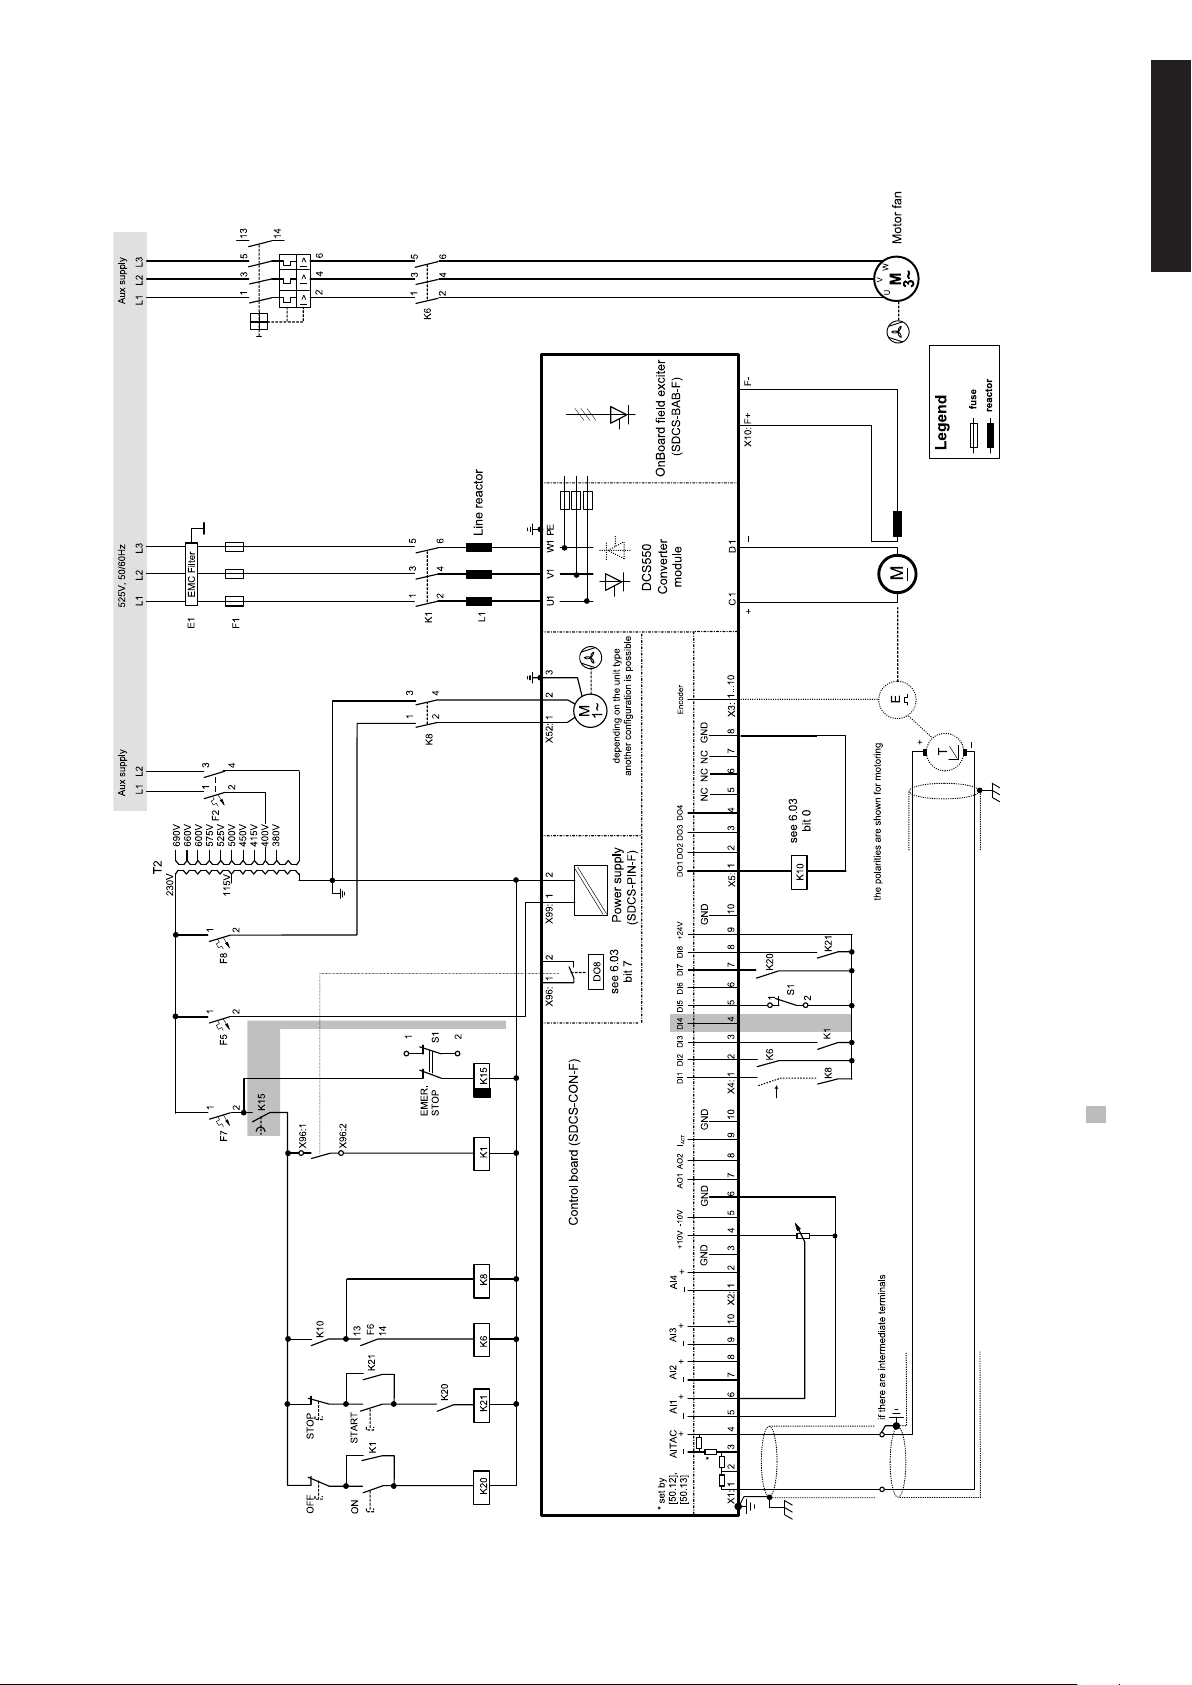
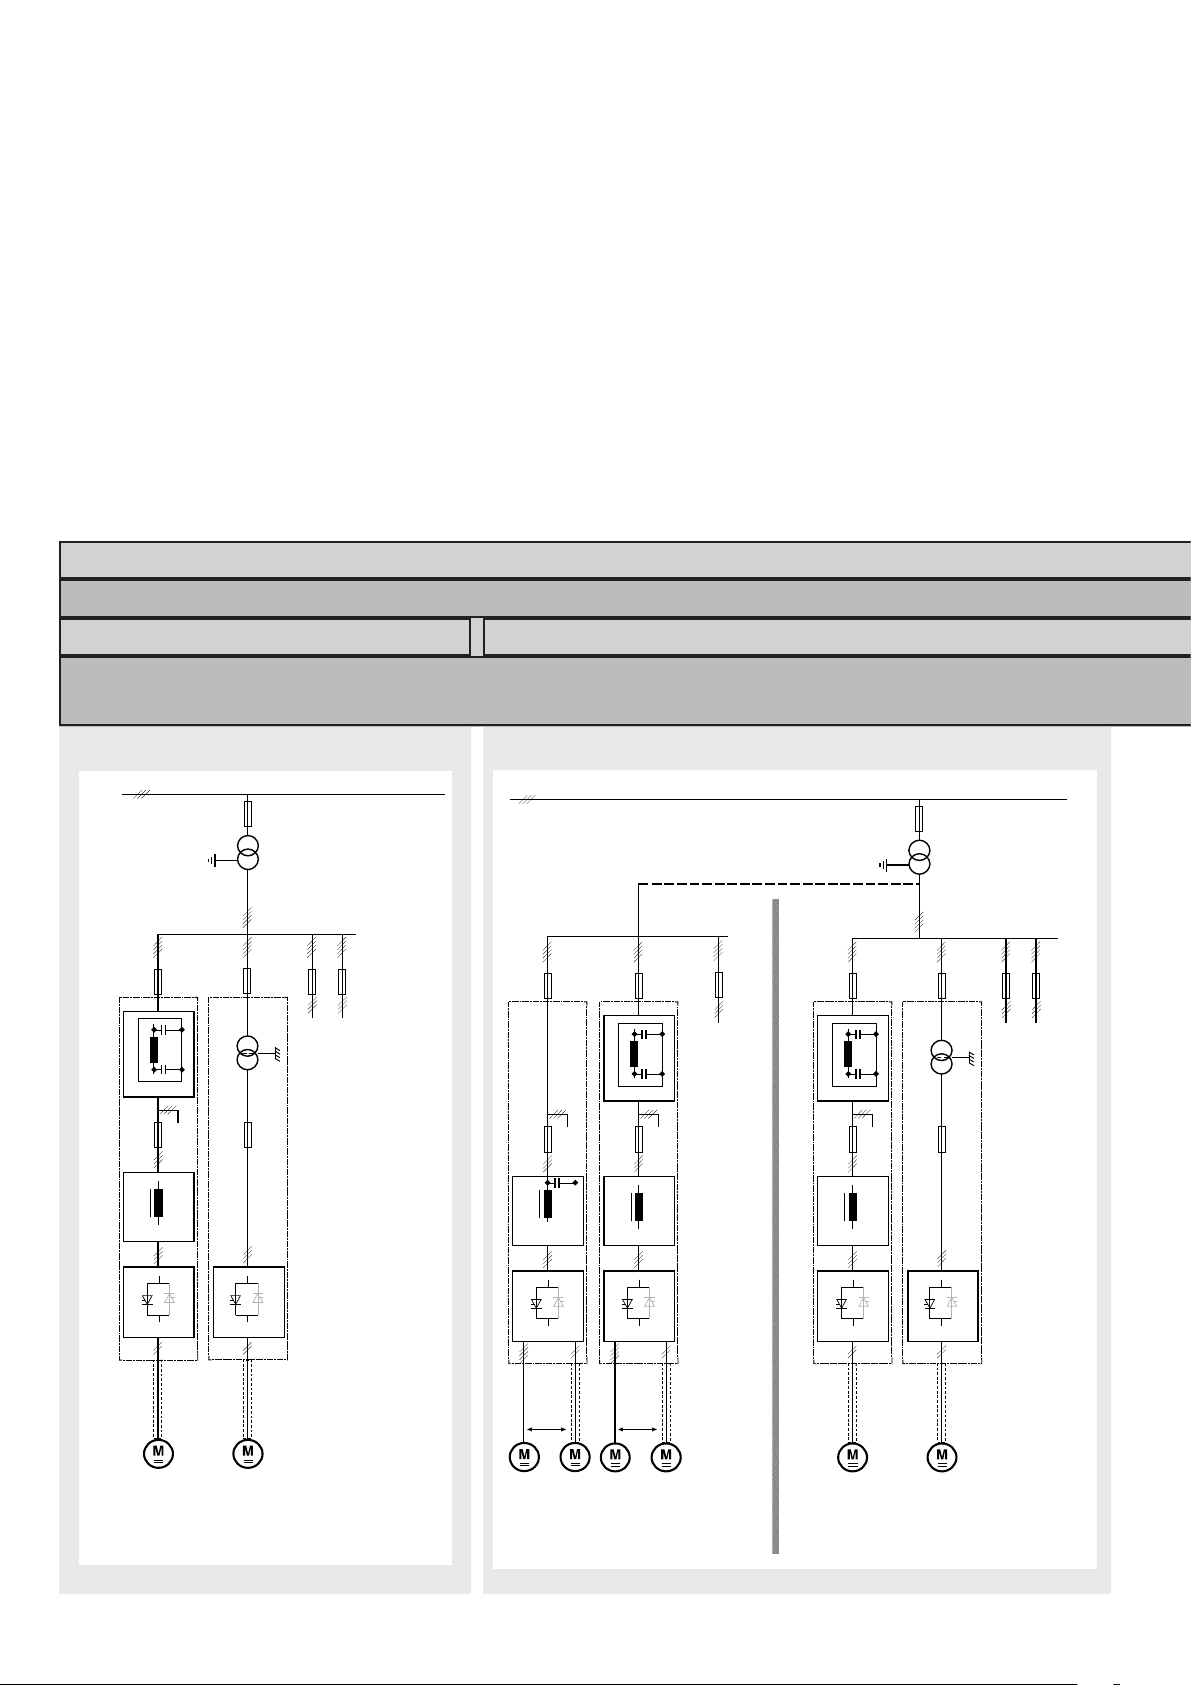
Converters F1...F4 drive configuration using ‘OnBoard‘ field exciter
Terminal selection according FACTORY macro (default)
english
3ADW000395R0100 DCS550 Quick guide edisf a
further information see the following page
11
113ADW000395R0100 DCS550 Quick guide edisf a
Page 12
START, STOP and E-STOP control
gen_ctrl_cmd_c.dsf
Anschl_special_b.dsf
The relay logic can be split into three parts:
a: Generation of the ON/OFF and START/STOP command:
The commands represented by K20 and K21 (latching interface relay) can be e.g. generated by a PLC and transferred to
the terminals of the converter either by relays, using galvanic
isolation or directly via 24V signals.
These commands can be as well transferred via serial communication. Even a mixed solution can be realized by selecting different possibilities for the one or the other signal (see
parameter group 11).
b: Generation of control and monitoring signals:
The main contactor K1 for the armature circuit is controlled
by a dry contact (DO 8) located on the SDCS-PIN-F. Status
of fans and fans klixon can be monitored by means of fan ack
signals: MotFanAck (10.06).
If the drive has not finished the function within the K15 timer
setting, the drive must get the command to switch OFF the
current via K16. After K16 timer set has elapsed the main
contactor is opened independent of the drives status.
E-STOP
speed
Timer K15
c: OFF2, OFF3 Stop function:
Beside ON/OFF and START/STOP, the drive is equipped with
two additional stop functions, OFF2 and OFF3, according to
Profibus standard. OFF3 is a scalable stop function (rampstop, max torque stop, dynamic braking …) to perform stop
category 1. This function should be connected to the E-STOP
button without any time delay. In case of ramp stop selection
the, K 15 timer relay must be set longer than the EStopRamp
(22.04). For COAST selection, the drive opens the main contactor immediately.
OFF2 switches off DC current as fast as possible and prepares the drive for opening main contactor or drop down
mains supply. For a normal DC motor load the time to switch
OFF the DC current is below 20 ms. This function should be
connected to all signals and safety functions opening the main
contactor. This function is important for 4-quadrant drives. Do
not open main contactor during regenerative current.
The correct sequence is
1. switch off regenerative current
2. then open the main contactor
In case of the E-STOP is hit, the information is transferred to
the converter via digital input 5. In case of rampstop, or max
torque selection the converter will decelerate the motor and
then open main contactor.
Timer K16
Block current control
K1 main contactor
E-Stop ramp Coast
Stop-Mode_a.dsf
E-Stop reaction
12 3ADW000395R0100 DCS550 Quick guide edisf a12 3ADW000395R0100 DCS550 Quick guide edisf a
Page 13
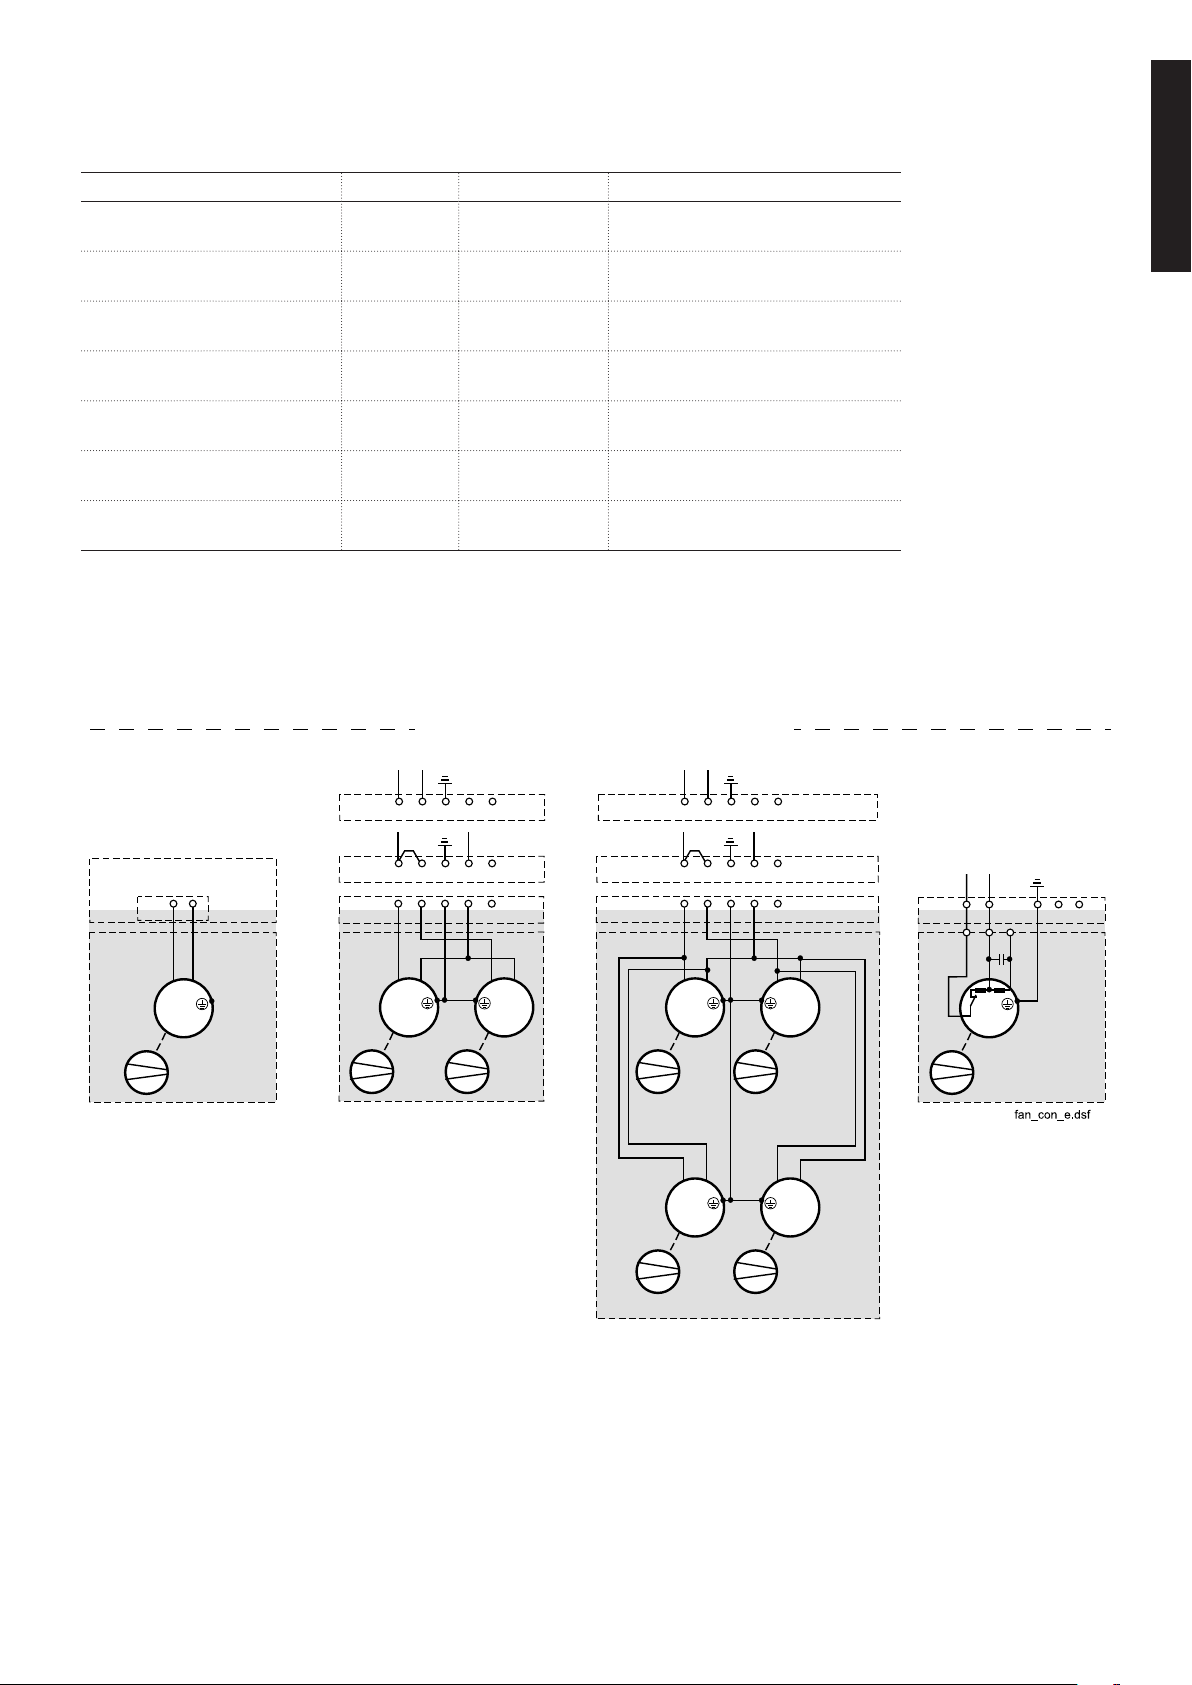
Fan power connection
1 2 3
X52:
4 5
L
N
230 V
AC
1 2 3
X52:
4 5
L
N
115 V
AC
M
~
1 2 3
X52:
M
~
4 5
M55 M56
M
~
1 2 3
X52:
M
~
4 5
M55 M56
M
~
M
~
M57 M58
M55
M
~
1 2 3 4 5
X52:
L
N
L
N
1 2 3
X52:
4 5
L
N
230 V
AC
1 2 3
X52:
4 5
L
N
115 V
AC
ϑ
only 230 V
AC
M55
M
~
X19:
SDCS-PIN-F
Configuration 4
F4
Configuration 3
F3
Configuration 2
F2, F3
Configuration 1
F1
Terminals are located on top of the converter housing
Fan assignment for DCS550
Converter type Model Configuration Fan voltage
DCS550-S01-0020, ...,
F1 - no fan, convection cooled
DCS550-S02-0025
DCS550-S01-0045, ...,
F1 1 1 x 3110KL-05W... (internal 24 V
DCS550-S02-0100
DCS550-S01-0135, ...,
F2 2 2 x 4715MS (115 / 230 V
DCS550-S02-0300
DCS550-S01-0315, ...,
F3 2 2 x 4715MS (115 / 230 V
DCS550-S02-0450
DCS550-S01-0470, ...,
DCS550-S02-0520
DCS550-S01-0610, ...,
F3 3 2 x 4715MS (115 / 230 V
2 x 3115FS (115 / 230 V
F4 4 1 x W2E200 (230 V
DCS550-S02-0820
DCS550-S01-0900, ...,
F4 4 1 x W2E250 (230 V
DCS550-S02-1000
Fan connection for DCS550
english
)
DC
)
AC
)
AC
)
AC
)
AC
)
AC
)
AC
3ADW000395R0100 DCS550 Quick guide edisf a
13
133ADW000395R0100 DCS550 Quick guide edisf a
Page 14

Terminal locations on the converter
X2X1 X3 X4 X5
1 1 1 1 1
S5
15
6 9
S3
S2
S4
1
2
1
2
1
2
1
2
D2100
1
D2001
D2002
D1000
1 30
1
2
1
2
S1
1
42
1
2
3
10
11
12
1
82
1
42
1
2
3
7
8
9
DCS550 terminal alloc_c.dsf
1 2 3 4 5 6 7 8 9 10 1 2 3 4 5 6 7 8 9 10 1 2 3 4 5 6 7 8 9 10 1 2 3 4 5 6 7 8 9 10 1 2 3 4 5 6 7 8
Macro finder
Macro name
Main
Contactor
ON / OFF
Start/Stop
Standard
AC Static
2-wire DC cont. US
DC Static
3-wire DC cont. US
DC Pulse
3-wire Standard
AC Pulse
Torque limit
AC Static
Manual / Const
AC Pulse
Hand / Auto
Hand / Mot Pot
Motor Pot
AC Static
AC Pulse
AC Static
Torque Ctrl
AC Static
14 3ADW000395R0100 DCS550 Quick guide edisf a14 3ADW000395R0100 DCS550 Quick guide edisf a
DI function
Jog1 --> DI1
Jog2 --> DI2
Ext Fault --> DI 3
Ext Alarm --> DI4
Jog1 --> DI1
Jog2 --> DI2
Ext Fault --> DI 3
Main Cont Ack --> DI4
Fix speed1 --> DI1
Ext Fault --> DI 3
Main Cont Ack --> DI4
Fix speed1 --> DI1
Ext Fault --> DI 3
Ext Alarm --> DI4
Jog1 --> DI1
Jog2 --> DI2
Ext Fault --> DI 3
Ext Alarm --> DI4
Jog1 --> DI1
Jog2 --> DI2
Direction --> DI 3
SpC - KP, KI --> DI4
Control select --> DI2
Reference select --> DI2
Direction select --> DI 3
Motor pot up --> DI1
Motor pot down --> DI2
Direction select --> DI 3
Reference select --> DI4
Direction select --> DI 1
Motor pot up --> DI2
Motor pot down --> DI3
Motor pot minimum --> DI4
OFF2 (coast stop) --> DI1
Torque select --> DI2
Ext Fault --> DI 3
Comment DI5 --> ESTOP
Hardware I/O control x
Hardware I/O control x
Hardware I/O control x
Hardware I/O control x
Hardware I/O control
+ Torque limit
Hardware I/O control
select gain
Hardware I/O control
or field bus control
Hardware I/O control
Reference hardware or Motor
potentiometer
Hardware I/O control
Reference Motor potentiometer
Hardware I/O control
Speed control or Torque
reference
DI6 --> Reset
x
x
x
x
x
x
Enabling a macro
Use the
[DCS550Wizard] 2. Macro assistant of DriveWindow Light or
Parameter browser, either
through the control panel,
DriveWindow, or DriveWindow
Light.
Use the following parameters:
ApplMacro (99.08) =
Macro selection
Applrestore (99.07) =
YES = execute selection
MacroSel (8.10) =
double check
NOTE
Functions and inputs defined by
macro can be changed later on
without restrictions.
NOTE
Macro diagrams see page 91 ...
Page 15
Notes For North American Installations
1. EMC conformity is not usually required in North America.
In most cases, the section “Notes on EMC” can be bypassed.
In this manual, you will see references to DIN, EN and VDE
standards. These are European standards and, generally, do
not apply to North America. It is, however, the responsibility of
the user to determine which standards need to be followed.
2. If using a DC contactor, you must connect an auxiliary
contact to a digital input of your choice and set para. Main-
ContAck accordingly. Set the following parameters:
MainContAck (10.21) = DI-1 (or any input you
choose for the DC cont.
auxiliary contact)
DO8BitNo (14.16) = 10
MainContCtrlMode (21.16)= DCcontact (3)
Set these parameters AFTER macros are loaded but BEFORE
the drive is commissioned.
Digital output 8 (DO-8) must be used to turn the DC contactor on and off.
DC contactor US:
DC contactor US K1.1 is a special designed contactor with 2x
NO contacts for C1 and D1 connection and 1x NC contact for
connection of Dynamic Brake resistor RB.
The contactor should be controlled by signal 6.03 Bit 10.
The acknowledge can be connected to parameter:
10.21 MainContAck
10.23 DCBreakAck
3. If using Dynamic Braking, the drive allows you to select
the stopping method under three different situations. Parameters 21.02, 21.03 and 21.04 select the stopping method for
loss of the OnOff, run command (StartStop, Jog1, Jog2, etc.),
and E-Stop input, respectively.
Each can be set to:
• RampStop • TorqueLimit
• CoastStop • DynBraking
In order to command the drive to perform a DB stop, one or
more of these parameters must be set to DynBraking. Most
users will want the drive to ramp stop when OnOff or a run
command (StartStop, Jog1, Jog2, etc.) input is cleared, and
dynamically brake when the E-Stop input is cleared. In that
case, use the following settings:
• Off1Mode (21.02) = RampStop
• StopMode (21.03) = RampStop
• E StopMode (21.04) = DynBraking
However, any case is allowed and the final decision is left to
the user.
Other parameters control stops during faults.
See:
LocalLossCtrl (30.27) ComLossCtrl (30.28)
FaultStopMode (30.30) SpeedFbFltMode (30.36)
If using EMF feedback with dynamic braking, set:
• DynBrakeDly (50.11) = t
Where: t = the time (sec) it normally takes the motor to
stop during dynamic braking
english
Overview of the Installation and Commissioning Process
Step 1:
Check converter for damage. Contact ABB Technical Support
if damage is found. In North America, call 1-800-435-7365
(1-800-HELP-365)
Step 2:
Select supporting hardware for the converter:
For specific recommendations for fuses, reactors, and contactors, see the DCS550 Manual or technical catalog.
Circuit breaker or disconnect:
Current rating = IDC * 0.816 * 1.25 (min)
= IDC * 0.816 * 2.50 (max)
Where: IDC = nominal DC motor current
Fuses:
AC Line Fuses: To properly protect the converter, semiconductor fuses on the incoming AC power line are required
in all cases.
DC Output Fuses: Fuses between the motor and the converter are required for all regenerative (4-Q) converters.
This is to protect the motor and converter if a commutation
fault should occur. NOTE: DC output fuses are the same type
and size as AC line fuses.
Line reactor:
All thyristor-based dc converters cause notching in the AC
line due to motor commutation. A properly sized line reactor
will mitigate the effect on the line. Unless the converter uses
a dedicated isolation transformer, each converter requires its
own line reactor.
AC or DC contactor:
A contactor is required to safely disconnect the motor from
the incoming power when the converter is off. The contactor can be installed between the line and the converter (an
AC contactor) or between the converter and the motor (a DC
contactor). Do not use both.
IMPORTANT: Other equipment may be necessary depending on application and local codes.
3ADW000395R0100 DCS550 Quick guide edisf a
15
153ADW000395R0100 DCS550 Quick guide edisf a
Page 16

Step 3:
Mount and wire the converter and supporting hardware inside
an industrial enclosure with adequate cooling (DCS550 modules have rating of NEMA type OPEN).
The following control and signal wiring is required:
− If using an AC contactor, we recommend wiring an auxiliary
contact to the digital input you have designated as Main-
ContAck (10.21) or Start/Stop (10.16).
− If using a DC contactor, you must wire an auxiliary contact
from the contactor to the digital input you have designated
as MainContAck (10.21).
− Wire 115 or 230 VAC 1-phase power to terminal block 99 for
converter control power.
− Wire 1-phase power to converter for cooling fans. See
table and wiring diagrams in this manual.
• F1 – F3 frames: 115/230 VAC selectable.
Fan terminal X52 is on top of the converter.
• F4 frame: use 230 VAC.
Fan terminal X52 is on top of the converter.
− Wire tachometer or encoder to terminal block X1 (tacho) or
X3 (encoder).
− Wire analog inputs (e.g., speed reference) and outputs
(e.g., meters for motor voltage, current) to terminal block
X1 and/or X2.
− Wire high speed serial interface if needed. (Requires optional fieldbus interface board.)
− The DCS550 allows you to choose the usage of each digital and analog input and output. The converter has factory
default settings which can be changed by loading a macro,
but some designations are universal. They include:
• Digital input 5: Estop
• Digital input 6: Fault reset
• Digital input 7: On/Off (maintained) or On-Start
(pulsed)
• *Digital input 8: Start/Stop (maintained) or
Off-Stop (pulsed)
• Digital output 8: Main Contactor On
(3 Amps max. at 115 – 230 VAC)
*except Hand/Auto macro
− Other signals may be required depending on your application (e.g., motor fan acknowledge input, Off2 input, fan-on
output, brake output).
− You will select the macro and / or choose the configuration
for digital and analog inputs and outputs in step 2 of the
commissioning process, or by updating group 10 and 14
parameters.
− Check all wire terminations (with continuity tester) before
proceeding to the next step.
Step 4:
Connect the drive system to incoming power and the motor to
the converter (both field and armature) as well as accessory
equipment (motor fan, thermal switch, brake, etc.).
− See hardware manual for typical cable size and tightening
torque recommendations.
− IMPORTANT: Be sure all safety equipment is properly
sized for your application
Step 5:
Apply control power to the converter.
− IMPORTANT: See section “Safety and Operating Instructions” in this manual before proceeding.
− Apply power to terminal block 99 and X52. The keypad
should light up and show the menu screen. The converter
fans should start to run (if converter has fans).
Step 6:
Commission the converter using DriveWindow Light
(preferred) or the control panel.
− IMPORTANT: See safety alerts and general instructions
in the section “Commissioning” before proceeding.
− Install the DCS550 PC tools on your computer. Instructions are in this manual. Use DriveWindow Light to commission your converter.
− If no PC is available, commission your drive using the control panel as follows:
• On the control panel, press the softkey to select
MENU.
• Using the down arrow, select ASSISTANTS.
Then press ENTER.
• Starting with “name plate data,” press SEL.
Change the value with the arrow keys.
Then press SAVE.
• Repeat above with other parameters.
Follow directions on the screen.
Configuring and Displaying analog and digital I/O
HINT: To see if the drive is responding to an “on” or “run” command, view signal 8.08.
Control Panel:
− Digital Status: View signal 8.05 (DI’s) or 8.06 (DO’s). Display is in hexadecimal.
− Configure digital inputs with Group 10.
− Analog Status: View signal 5.03 (AI1) or 5.11 (AO1). Display is in Volts.
− Configure analog speed ref. with Group 11.
DriveWindow Light:
− Connect to the DCS550 and go on line by clicking on File,
then New Online Drive.
− Click on Wizard, at left side of the screen.
− Click on Advanced.
− Check the box for “I/O assistant,” then click on Next.
− Click on “edit parameters” in the appropriate section (analog or digital inputs or outputs).
16 3ADW000395R0100 DCS550 Quick guide edisf a16 3ADW000395R0100 DCS550 Quick guide edisf a
Page 17

Safety and operating instructions
for drive converters DCS / DCF / DCR
(in conformity with the low-voltage directive 73/23/EEC)
english
1. General
In operation, drive converters, depending on their degree of
protection, may have live, uninsulated, and possibly also moving or rotating parts, as well as hot surfaces.
In case of inadmissible removal of the required covers, of
improper use, wrong installation or maloperation, there is the
danger of serious personal injury and damage to property.
For further information, see documentation.
All operations serving transport, installation and commissioning as well as maintenance are to be carried out by skilled
technical personnel (Observe IEC 364 or CENELEC HD 384
or DIN VDE 0100 and IEC 664 or DIN/VDE 0110 and national
accident prevention rules!).
For the purposes of these basic safety instructions, “skilled
technical personnel” means persons who are familiar with the
installation, mounting, commissioning and operation of the
product and have the qualifications needed for the performance of their functions.
2. Intended use
Drive converters are components designed for inclusion in
electrical installations or machinery and are to be mounted in
a cubicle or finger protected area.
In case of installation in machinery, commissioning of the drive
converter (i.e. the starting of normal operation) is prohibited
until the machinery has been proved to conform to the provisions of the directive 89/392/EEC (Machinery Safety Directive
- MSD). Account is to be taken of EN 60204.
Commissioning (i.e. the starting of normal opertion) is admissible only where conformity with the EMC directive (89/336/
EEC) has been established.
The drive converters meet the requirements of the low-voltage
directive 73/23/EEC. They are subject to the harmonized
standards of the series prEN 50178/DIN VDE 0160 in conjunction with EN 60439-1/ VDE 0660, part 500, and EN
60146/ VDE 0558.
The technical data as well as information concerning the supply conditions shall be taken from the rating plate and from
the documentation and shall be strictly observed.
3. Transport, storage
The instructions for transport, storage and proper use shall be
complied with.
4. Installation
The installation and cooling of the appliances shall be in accordance with the specifications in the pertinent documentation.
The drive converters shall be protected against excessive
strains. In particular, no components must be bent or isolating
distances altered in the course of transportation or handling.
No contact shall be made with electronic components and
contacts.
Drive converters contain electrostatic sensitive components
which are liable to damage through improper use. Electric
components must not be mechanically damaged or destroyed
(potential health risks).
5. Electrical connection
When working on live drive converters, the applicable national
accident prevention rules (e.g. VBG 4) must be complied with.
The electrical installation shall be carried out in accordance
with the relevant requirements (e.g. cross-sectional areas of
conductors, fusing, PE connection). For further information,
see documentation.
Instructions for the installation in accordance with EMC
requirements, like screening, earthing, location of filters and
wiring, are contained in the drive converter documentation.
They must always be complied with, also for drive converters
bearing a CE marking. Observance of the limit values required
by EMC law is the responsibility of the manufacturer of the
installation or machine.
6. Operation
Installations which include drive converters shall be equipped
with additional control and protective devices in accordance
with the relevant applicable safety requirements, e.g. Act
respecting technical equipment, accident prevention rules etc.
Changes to the drive converters by means of the operating
software are admissible.
After disconnection of the drive converter from the voltage
supply, live appliance parts and power terminals must not be
touched immediately because of possibly energized capacitors. In this respect, the corresponding signs and markings on
the drive converter must be respected.
During operation, all covers and doors shall be kept closed.
7. Maintenance and servicing
The manufacturer’s documentation shall be followed.
The climatic conditions shall be in conformity with prEN 50178.
Keep safety instructions in a safe place!
3ADW000395R0100 DCS550 Quick guide edisf a
17
173ADW000395R0100 DCS550 Quick guide edisf a
Page 18
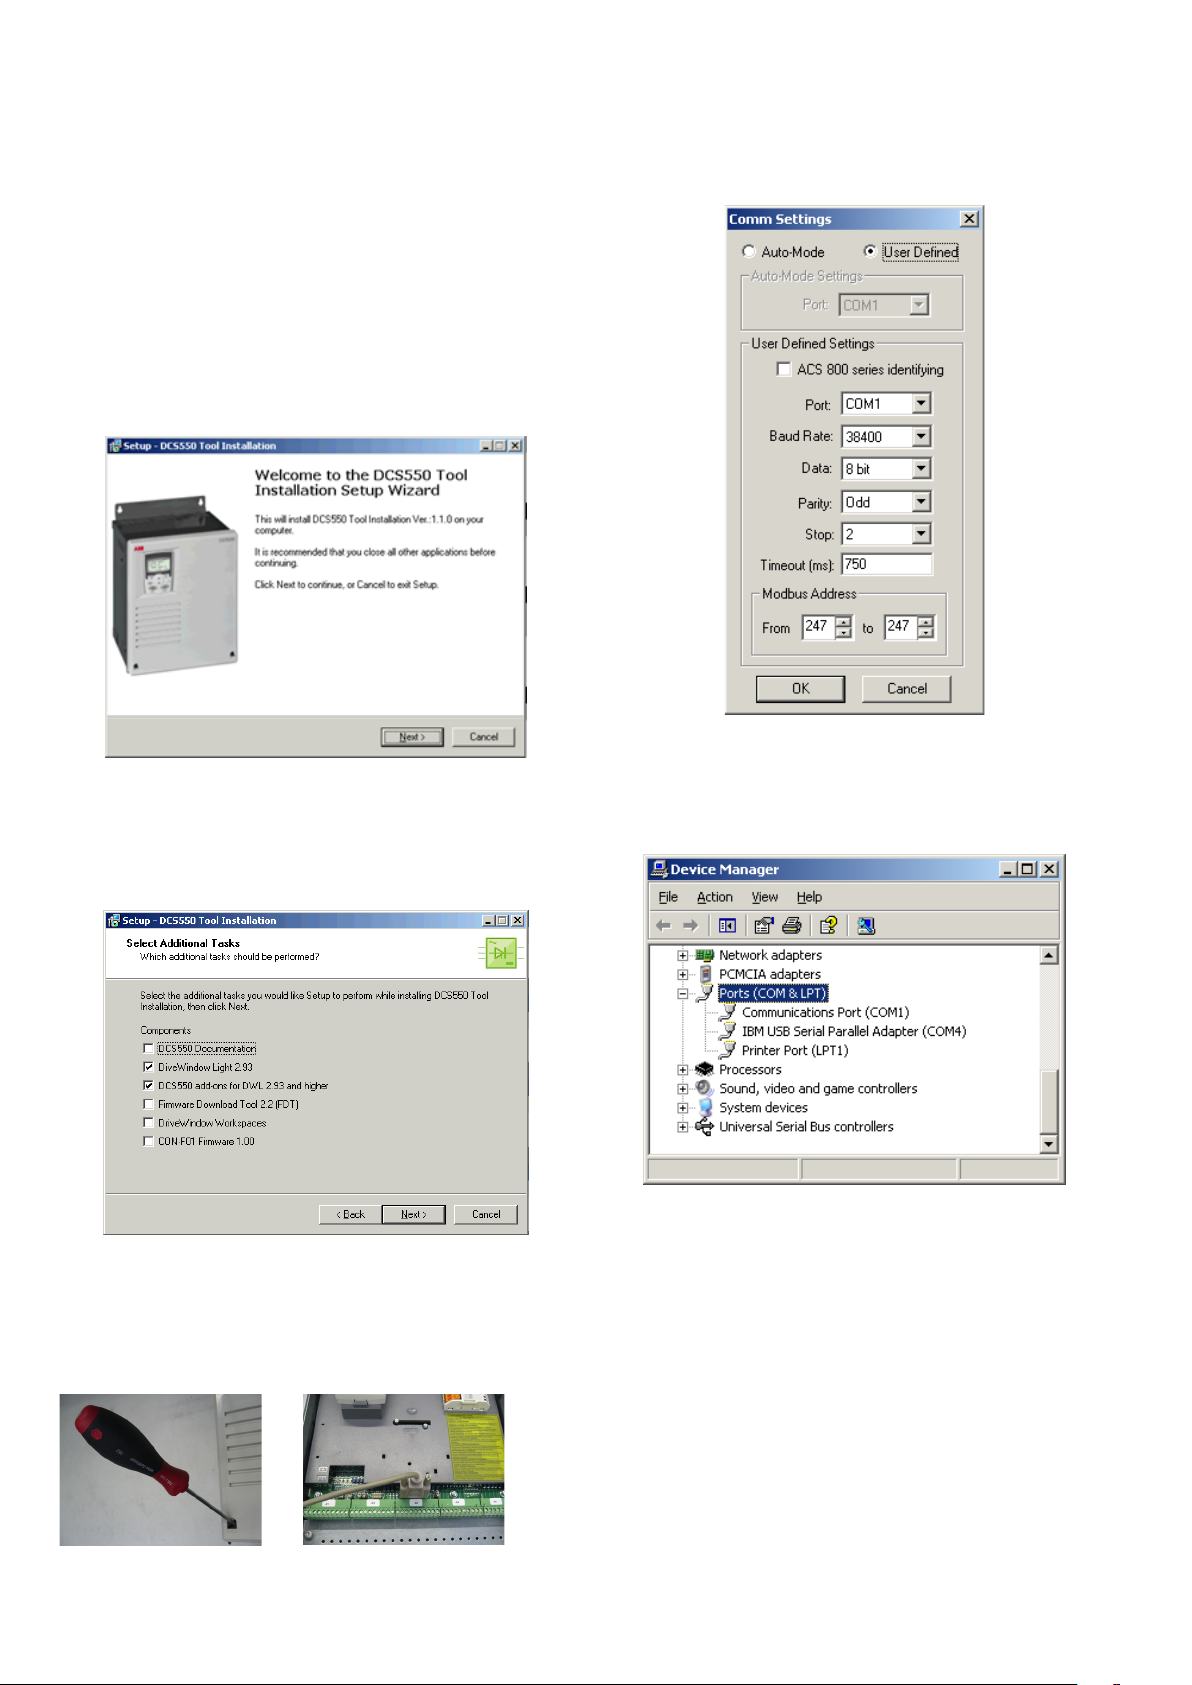
Installing the DCS550 PC tools on Your computer
After inserting the DCS550 CD all programs and documentation necessary to work with the DCS550 will be automatically
installed.
This includes:
1. DriveWindow Light for parameterization, commissioning
and service
2. Hitachi FDT 2.2 for firmware download
3. Installation CD of DCS550 Drive for e.g. DWL Wizard,
ABB documents
Attention:
If You do not want to install a certain program just skip it by
using Cancel at the beginning of the program’s wizard.
− Start DriveWindow Light PC tool
− Check the communication setting of your COM port
If the installation routine does not start automatically:
− Go to Start/Run and browse for setup.exe on the CD.
Now start the installation by confirming with OK
− Compact installation for DriveWindow Light + DCS550
add ons is reccomended
Steps to connect Drive to PC
− The documentation can be found under
C:\ABB\DCS550\Docu
− Remove design cover from the converter module
If You use ExpressCard to COM port interface or PCMCIA /
COM port double check the active COM enabled
Start => Settings => Control Panel => System => Hardware
=> Device Manager
− COM address of USB interface can change after the next
boot procedure or after disconnecting and reconnecting of
the USB interface.
Note:
ExpressCard / PCMCIA to COM port provide a stable and
faster drive interface.
Remove the DCS550 Control Panel
if present. Depress the locks to
remove the cover
Connect drive (X34) to your
PC COM port
18 3ADW000395R0100 DCS550 Quick guide edisf a18 3ADW000395R0100 DCS550 Quick guide edisf a
Utilize DriveWindow Light or DCS550 Panel Wizard continue
with chapter Commissioning in this manual.
Page 19
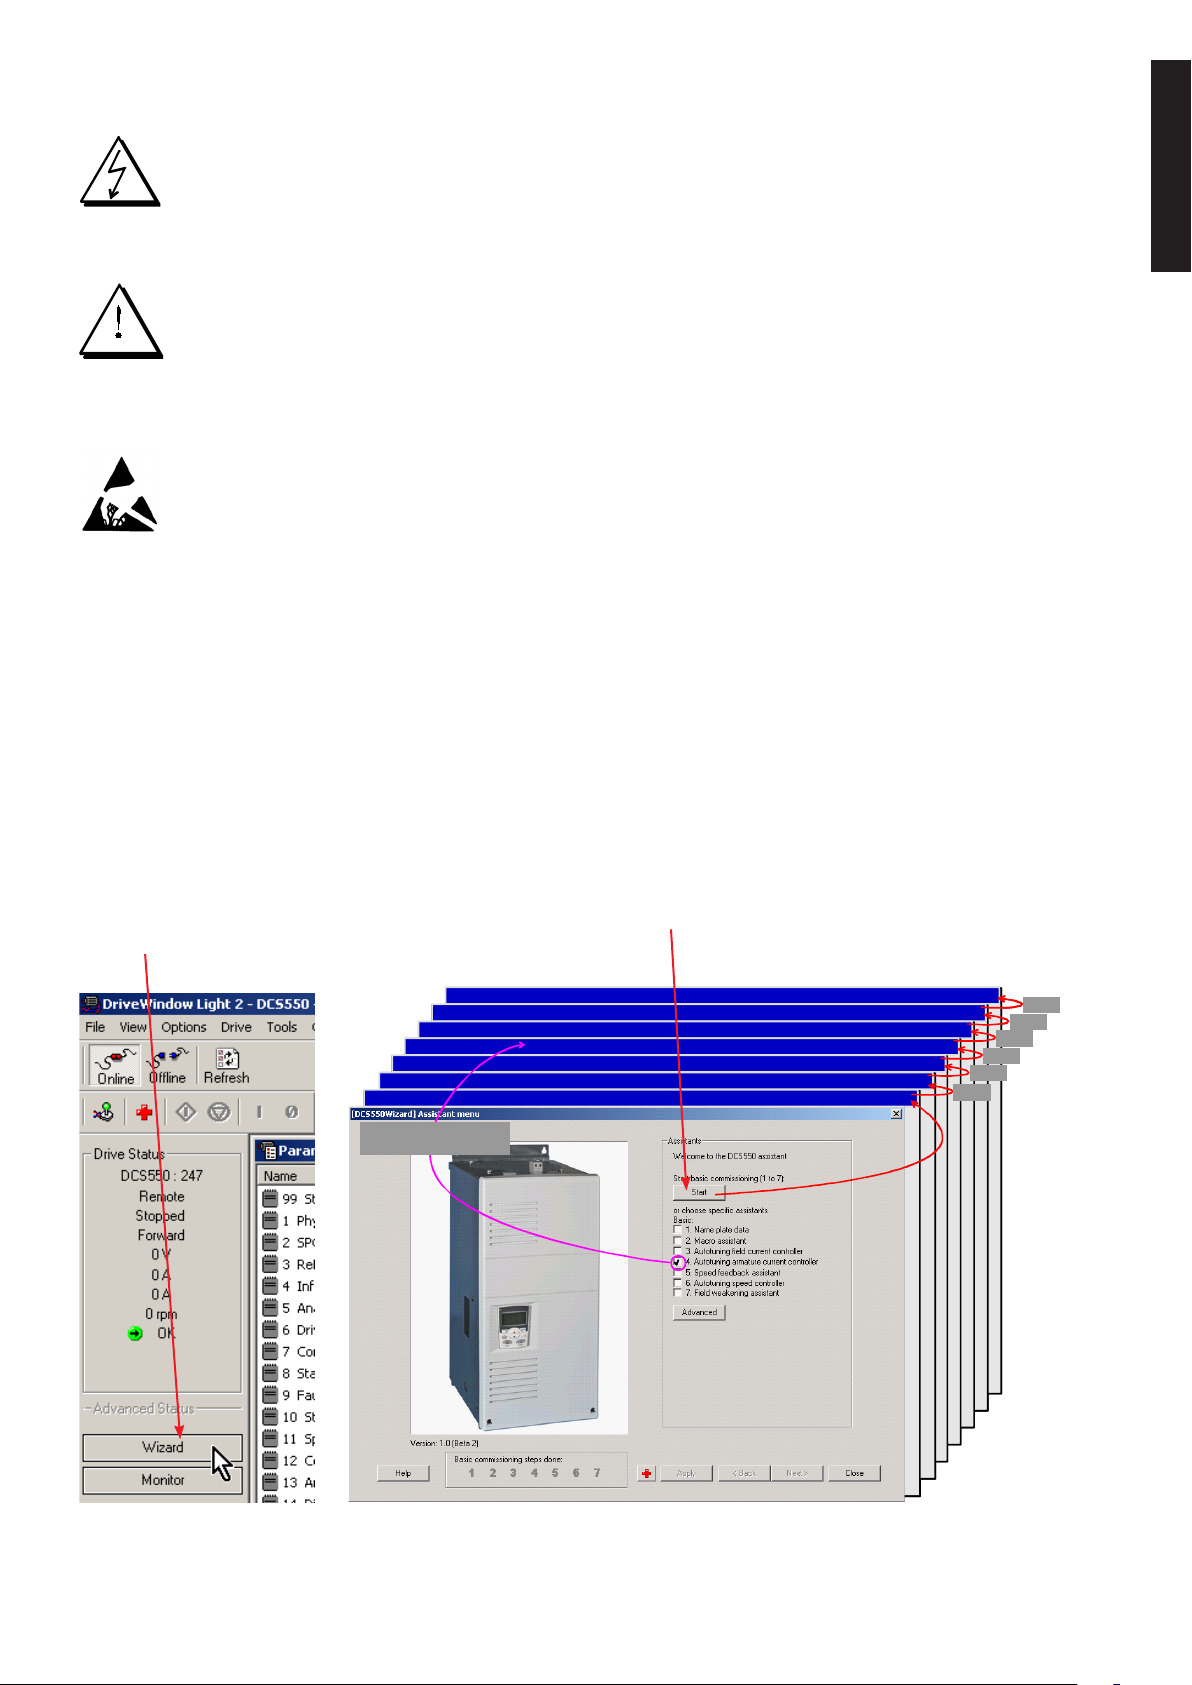
Commissioning
7. Field weakening assistant
6. Autotuning speed controller
5. Speed feedback assistant
4. Autotuning armature current controller
3. Autotuning field current controller
2. Macro assistant
1. Name plate data
Next
Next
Next
Next
Next
Next
Select specific
assistant & press Next
7. Field weakening assistant
6. Autotuning speed controller
5. Speed feedback assistant
4. Autotuning armature current controller
3. Autotuning field current controller
2. Macro assistant
1. Name plate data
Next
Next
Next
Next
Next
Next
Select specific
assistant & press Next
Danger! High voltage: this symbol warns of high
voltages which may result in injuries to persons
and/or damage to equipment. Where appropriate,
the text printed adjacent to this symbol describes
how risk of this kind may be avoided
General warning: this symbol warns of non-electrical risks and dangers which may result in
serious or even fatal injuries to persons and/or
damage to equipment. Where appropriate, the text
printed adjacent to this symbol describes how risk
of this kind may be avoided.
Warning of electrostatic discharge: this symbol
warns you against electrostatic discharges which
may damage to unit. Where appropriate, the text
printed adjacent to this symbol describes how risk
of this kind may be avoided.
NEC motor overload protection
The DCS550 provides a solid-state motor overload protection
in accordance with the NEC. The overload protection (e.g.
protection level in percent of full-load motor current) can be
adjusted by parameters in group 31 and group 99
The instructions can be found in chapter Motor thermal model
of the DCS550 Manual.
General instructions
− This short commissioning refers to chapter Connection
examples of this publication.
− Safety and operating instructions - chapter of this publica-
tion.
− Recommendations for motor and field voltages see Techni-
cal catalog.
− In accordance with DIN 57 100 Part 727 / VDE 0100 Part
727, precautions must be taken to enable the drive to be
shut down, e.g. in the event of danger. The unit’s digital
inputs or the control panel are not sufficient as the sole
measure for this purpose!
Preparations
− Check unit for any damage!
− Install unit and wire it up
− Supply voltage level / Rated value correct for electronics
and fan?
− Supply voltage level / Rated value correct for armaturecircuit converter?
− Supply voltage level / Rated value correct for field supply?
− Wiring / cross-sections, etc. correct?
− EMERGENCY STOP functioning properly?
− COAST STOP functioning properly?
english
Commissioning DriveWindow Light
Start the wizard in
DriveWindow Light
For basic commissioning press the Start button or select a specific assistant:
For more information about the wizard, parameters faults and alarms press the Help button!
3ADW000395R0100 DCS550 Quick guide edisf a
19
193ADW000395R0100 DCS550 Quick guide edisf a
Page 20
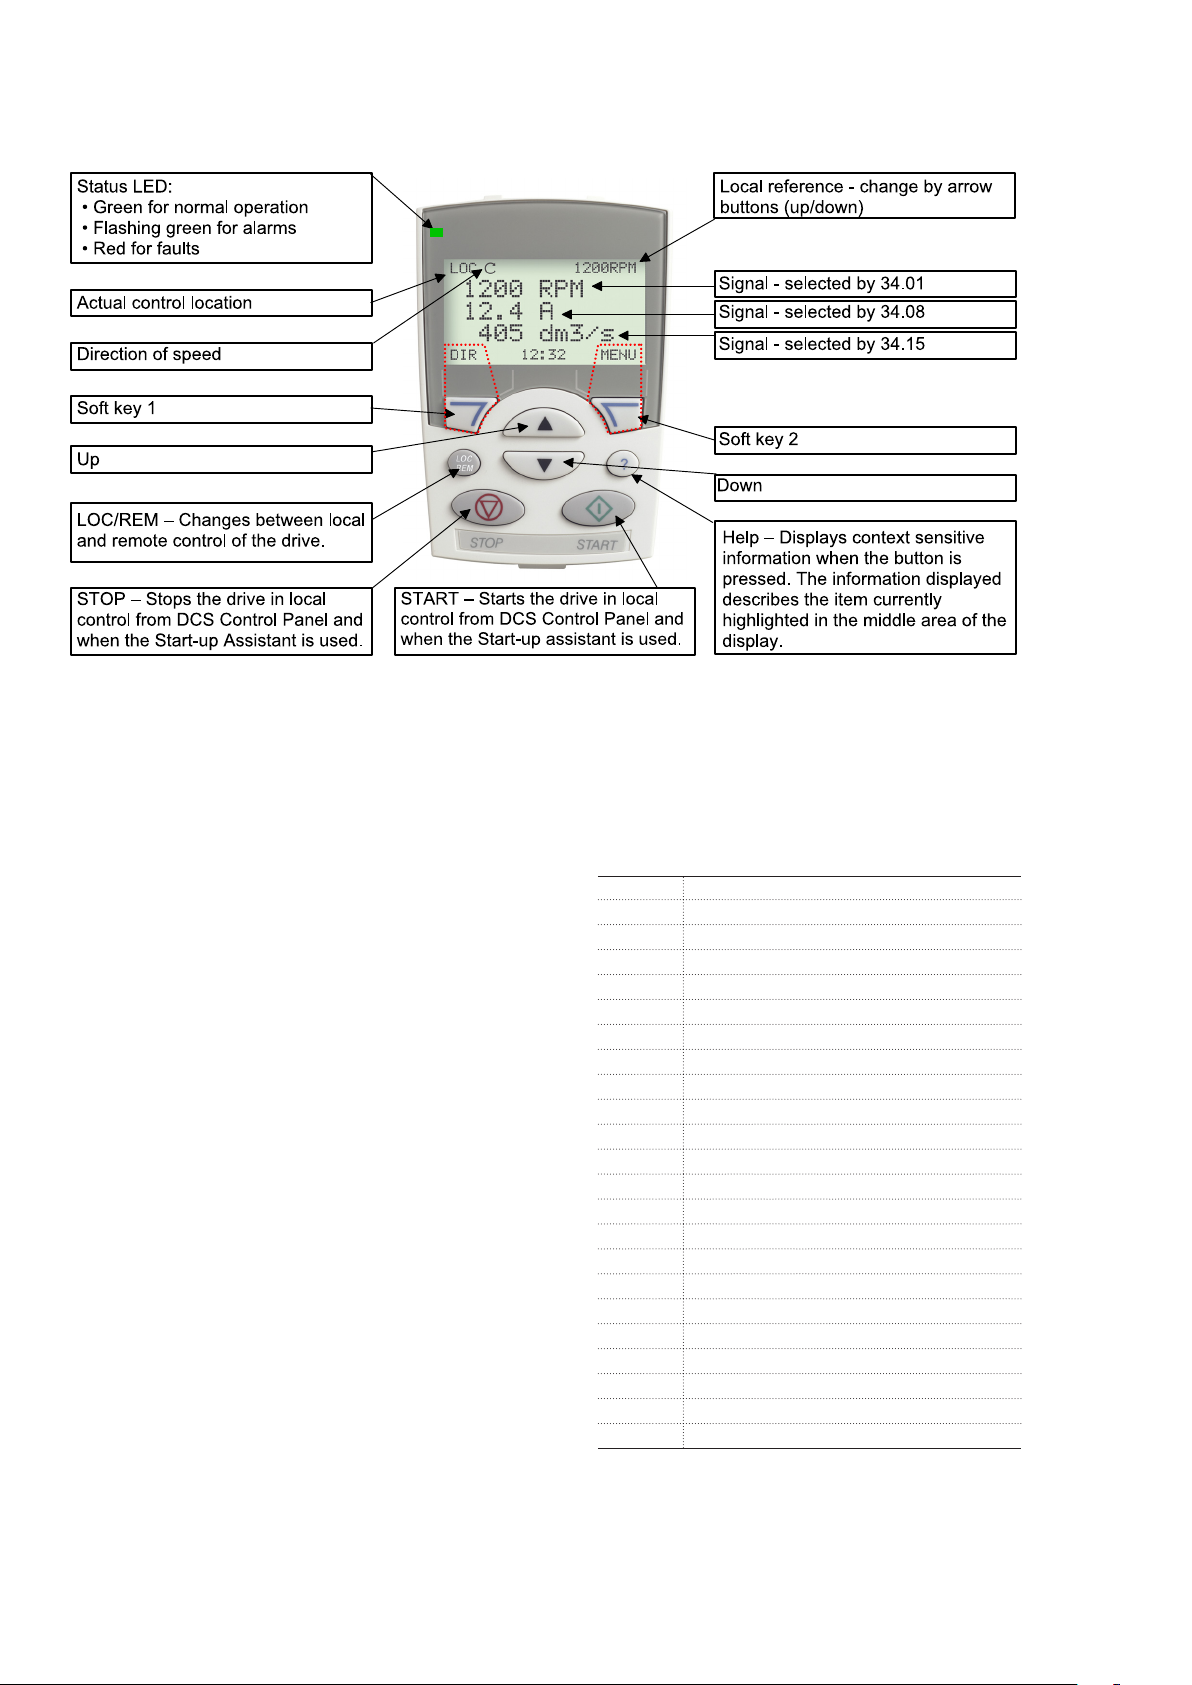
DCS550 Control Panel
DCS800 QG pan ov_c.dsf
The following table summarizes the button functions and displays of the DCS550 Control Panel
With USISel (16.09) it is possible to limit the amount of displayed parameters!
General display features
Parameters entered by assistant
Following modes are available in the MAIN MENU:
1. Parameters mode
2. Start-up assistants mode
a. Name plate data
b. Macro assistant
c. Autotuning field current controller
d. Autotuning armature current controller
e. Speed feedback assistant
(Tacho fine tuning not available)
f. Autotuning speed controller
g. Field weakening assistant
(only used when maximum speed is higher than base
speed)
3. Macros mode (currently not used)
4. Changed parameters mode (compare to default and
display changed parameters)
5. Fault logger mode (Display fault history)
6. Clock set mode
7. Parameter backup mode
• copy active parameter set from the drive into the
DCS550 Control Panel (only in local mode)
• copy parameter set from DCS550 Control Panel into
the drive (only in local mode)
8. I/O settings mode (currently not used)
99.02 Motor 1 nominal Voltage
99.03 Motor 1 nominal current
99.04 Motor 1 base speed
20.01 Motor 1 minimum speed
20.02 Motor 1 maximum speed
99.11 Motor 1 nominal field current
30.09 Armature over current level
30.16 Motor 1 over speed
99.10 Nominal mains voltage
99.12 Motor 1 used fex type
20.05 Torque maximum
20.06 Torque minimum
20.12 Motor 1 current limit bridge 1
20.13 Motor 1 current limit bridge 2
50.04 Motor 1 encoder pulse number, if selected
50.02 Motor 1 encoder measured mode, if selected
50.13 Motor 1 tacho volt, only DWL
50.12 Motor 1 tacho adapt, only DWL
20.03 Zero speed limit
22.01 Acceleration time 1
22.02 Deceleration time 1
30.12 Motor 1 field minimum trip
44.01 Field control mode
20 3ADW000395R0100 DCS550 Quick guide edisf a20 3ADW000395R0100 DCS550 Quick guide edisf a
Page 21
deutsch
Standard Features
− kompakt
− Höchste Leistungsfähigkeit
− Einfachste Bedienung
− Komfortable Assistenten, z. B. zur Inbetriebnahme oder Fehlersuche
3ADW000395R0100 DCS550 Quick guide edisf a
21
213ADW000395R0100 DCS550 Quick guide edisf a
Page 22

DCS550 Gleichstromantriebe
Technische Daten
Nennanschlusssp 230...525 V,
Frequenz 50 bis 60 Hz +/–5
Elektronikspg. 115...230 V,
–15 % / +10 %, 1~
DC Ausgangsstrom
Überlastbarkeit
Umgebungsgrenzwerte
Umgebungstemp. 0° ... +40° C
40° ... 50°C
Lagertemperatur –40° ... +55° C
Transporttemp. –40° ... +70° C
Relative Luftfeucht. 5 ... 95 %, nicht
(max. 50 % zw.
Verschmutzungsgrad
Schutzgrad IP 00
Betriebshöhe bis 1.000 m üNN
Über 1.000 m üNN
+/–10 %, 3~
Hz
20...1.000 A
200 %
Stromreduktion
kondensierend
0°...5° C)
Klasse 2
Nennstrom
Stromreduktion
Ein-/ Ausgänge
Digitale Eingänge: 8 Standard,
bis 14 optional
Digitale Ausgänge: 5 Standard,
bis 9 optional
Analoge Eingänge : 5 Standard
+/–10 V; 0/2…10 V, up
to 8 optional +/ 20 mA;
0/4…20 mA
Analog outputs: 3 standard (1x
I
) +/-10 V; 0/2…10 V, up to 7
act
optional –20 mA; 0/4…20 mA
PC-Tools
DriveWindow Light: kostenlos
mit jedem Antrieb, Standard
RS232 Verbindung
Zulassungen
(in Vorbereitung 12/2011)
Adaptive Programmierung
fertige antriebsspezifische Blöcke,
darunter
• Freier Prozessregler (PI-Regler)
• Ein/Ausgänge
Mit Bedien-Panel oder PC-Tool,
ohne zusätzliche Hardware
Drehzahlrückführung
EMK
Analoger Tachometer
Inkrementalgeber
Kommunikation
Verfügbare serielle Schnittstellen
• Ethernet • Profibus
• CANopen • DeviceNet
• ControlNet • EtherCat
• Modbus • ProfiNet
Industrial IT© enabled
Schutzfunktionen
• Überlast • Überdrehzahl •
Motor blockiert • Motorüberstrom
• Motorüberspannung
• Feldüberstrom •
Feldüberspannung •
Mindestfeldstrom • Drehzahl Null
• Ankerstromwelligkeit • Netz
Über- und Unterspannung
Nennstrom, Abmessungen
Bau-
größe
F1 20 25 12 370 x 270 x 208 14.56 x 10.65 x 8.20
45 50
65 75
90 100
F2 135 150 18 370 x 270 x 264 14.56 x 10.65 x 10.40
270 300
F3 315 350 25 459 x 270 x 310 18.07 x 10,65 x 12,25
405 450
470 520
F4 610 680 35 644 x 270 x 345 25.35 x 10.65 x 13.60
740 820
900 1000
2-Q
Dauerstrom
DCS550-S01
IDC[A] IDC[A] 230 400 525 [ADC] h x b x t [mm] h x b x t [inch]
180 200
225 250
4-Q
Dauerstrom
DCS550-S02
Versorgungs
spannung
[V
]
AC
max.
Feldstrom
intern
Abmessungens
22 3ADW000395R0100 DCS550 Quick guide edisf a22 3ADW000395R0100 DCS550 Quick guide edisf a
Page 23

Kurzanweisung CD und Dokumentationsübersicht
©
2
0
1
1
A
B
B
A
u
t
o
m
a
t
i
o
n
P
r
o
d
u
t
G
m
b
H
-
A
l
l
R
i
g
h
t
R
e
e
r
e
d
3ADW 000 377 R0201 / April 2011
System configuration
WINDOWS 98, NT, 2000, XP
Acrobat Reader 4.0 or higher
Internet Explorer 5.0 or higher
I
f
t
h
e
C
D
R
O
M
w
o
n
’
t
s
t
a
r
t
a
u
t
o
m
a
t
i
c
a
l
l
y
p
l
e
a
s
e
e
x
e
c
u
t
e
S
T
A
R
T
.
B
A
T
System confirmation
Win2000, WinXP
Before installation of PC tools
remove previous version by
CONTROL PANEL of your
PC
Read more details in
Quick Guide 3ADW000191
Content
This CD ROM provides
information about DCS550 and
contains PC tools:
DWL 2.93 for DC drives
+Commissioning Wizard 1.0
+DWL AP 2.2
FDT 2.2 Firmware
download kit
+ workspace
Firmware 1.1
DCS550
Ver.: 1.10
System confirmation
Win7, Win2000, WinXP
Before installation of PC tools
remove previous version by
CONTROL PANEL of your PC
Wir freuen uns, dass Sie einen ABB DC-Stromrichter erworben haben und bedanken uns für das Vertrauen, welches Sie
unseren Produkten entgegengebracht haben.
Damit Sie auch weiterhin mit unserem Produkt zufrieden sind,
haben wir diese Broschüre für Sie zusammengestellt. Sie soll
hauptsächlich dazu dienen, Ihnen einen kurzen Überblick über
das Produkt, EMV Hinweise, typische Anwendungen, Inbetriebnahme und Fehlersuche zu verschaffen.
Weitere Informationen zum Produkt finden Sie auf der beiliegenden CD-ROM. Die CD-ROM ist Teil der Lieferung und hat
folgende Bestandteile:
Technischer Katalog (3ADW000378)
Umfassende Information zur Planung kompletter DC-Stromrichter.
Handbuch (3ADW000379)
Detailinformation mit allen wichtigen Angaben zu den Einzelkomponenten, wie z.B. Modulabmaße, Elektronikkarten,
Lüfter und Zusatzkomponenten.
Informationen zur mechanischen und elektrischen Installation
sind ebenfalls enthalten.
Detailinformation mit allen wichtigen Angaben zur Firmware
und Einstellungen der Parameter. Dieses Handbuch enthält
alle notwendigen Informationen zur Inbetriebnahme.
Außerdem sind sowohl alle Fehler- und Alarmmeldungen aufgelistet als auch Informationen zur Fehlersuche.
Service Handbuch (3ADW000399)
Information zur Wartung und Reparatur der Stromrichter.
Weitere Informationen über Applikationen und technisches
Zubehör (z.B. Hardwareerweiterungen oder Feldbusadapter)
werden in separaten Handbüchern behandelt.
Siehe Tabelle DCS550 Manuals.
Systemvoraussetzungen für die Nutzung der CD ROM
c
− Betriebssystem
WINDOWS 7, 2000, XP
s
s
s
v
− ACROBAT READER
Falls die CD ROM nicht automatisch startet, klicken Sie bitte
doppelt auf Setup.exe.
Weitere Unterstützung
Wir bieten Ihnen darüber hinaus weitere Unterstützung an,
denn nur wenn Sie als Kunde mit uns und unseren Produkten
zufrieden sind, können auch wir zufrieden sein.
Internet
Auf der ABB Homepage unter
www.abb.com/dc
finden Sie viele Informationen zu
− DC Produkten
− Service
− neueste Updates
− Anwendersoftware
− Downloads etc.
Bitte zögern Sie nicht uns dort zu besuchen.
Kontakte
Benötigen Sie weitere Informationen, sprechen Sie bitte Ihr
nächstgelegenes ABB Drives Büro an oder schreiben Sie
eine E-Mail an:
DC-Drives@de.abb.com
deutsch
Geben Sie bitte Ihren Namen, Ihre Firmenadresse und Telefonnummer an und wir werden Ihnen umgehend den für Sie
zuständigen Ansprechpartner mitteilen.
3ADW000395R0100 DCS550 Quick guide edisf a
23
233ADW000395R0100 DCS550 Quick guide edisf a
Page 24
EMV Filter
Netzfilter
Stromrichter
Netzdrossel
Versorgungstransformator für
ein Wohngebiet
(Nennleistung
normalerweise≤ 1,2 MVA)
Geerdetes öffentliches
400 V-Netz mit NullLeiter
Mittelspannungsnetz
Geerdeter
Sternpunkt
Zu anderen Lasten, z.B. Antriebssystemen
Ein Trenntransformator
mit geerdetem Schirm
und geerdetem Eisenkern
macht das Netzfilter und
die Netzdrossel
überflüssig.
Betrieb am
öffentlichen Nieder-
spannungsnetz zu-
sammen mit anderen
Lasten aller Art.
Stromrichter
Wohngebiet
Zu anderen Lasten, die gegen die von Stromrichtern verursachten Netzstörungen
zu schützen sind (HF-Störungen und Kommutierungs
einbrüche)
alternativ
Netzdrossel
Geerdetes öffentliches
400 V-Netz mit NullLeiter
Versorgungstransf. für
ein Industriegebiet
(Nennleist. normalerweise≤ 1,2 MVA)
Geerdeter
Sternpunkt
Geerdetes öffentliches
400 V-Netz mit NullLeiter
Mittelspannungsnetz
alternativ
Netzdrossel +
Y-Kondensator
Leichtindustrie
Netzdrossel
Zu anderen Lasten, z.B. Antriebssystemen
Zu anderen Lasten, die gegen die von Stromrichtern verursachten Netzstörungen
zu schützen sind (HF-Störungen und Kommutierungs
einbrüche)
Zu anderen Lasten, z.B. Antriebssystemen
Wohngebiet
Ein Trenntransformator
mit geerdetem Schirm
und geerdetem Eisenkern
macht das Netzfilter und
die Netzdrossel
überflüssig.
Betrieb am
öffentlichen Nieder-
spannungsnetz zu-
sammen mit anderen
Lasten aller Art.
Betrieb am öffentlichen
Nieder-spannungsnetz zu-
sammen mit anderen
Lasten aller Art.
Kommutierungseibrüche < 20%
Weitere Informationen
hierzu siehe:
Technical Guide Kapitel:
EMC Compliant Installation
and Configuration for a
Power Drive System
Nachfolgend wird die Auswahl der elektrischen Komponenten entsprechend der
EMV-Richtlinie beschrieben.
Ziel der EMV-Richtlinie ist es, eine elektromagnetische Verträglichkeit mit anderen
Produkten und Systemen herzustellen. Die
Richtlinie stellt sicher, dass die von dem
Produkt abgestrahlten Emissionen so gering sind, dass sie die Störfestigkeit eines
anderen Produkts nicht beeinträchtigen.
Im Zusammenhang mit der EMV-Richtlinie
sind zwei Aspekte zu berücksichtigen:
Die EMV-Richtlinie verlangt, dass die EMV
bereits bei der Produktentwicklung berücksichtigt werden muss; jedoch kann die EMV nicht
mit eingeplant werden, sie kann nur quantitativ
gemessen werden.
Hinweis zur EMV
Das richtige Vorgehen liegt sowohl in der
Verantwortung der Stromrichterlieferanten wie
auch des Maschinen- oder Anlagenbauers
entsprechend ihrem Anteil an den elektrischen
Einrichtungen.
− die Störfestigkeit des Produkts
− die tatsächlichen Emissionen des
Produkts
Erste Umgebung (Wohngebiete mit Leichtindustrie) mit PDS Kategorie C2 Zweite Umgebung (Industrie) mit den PDS-Kategorien C3, C4
Nicht möglich, da Kategorie C1 (Vertriebskanäle für Produkte mit allgemeiner Erhältlichkeit) entfällt Entfäll
Erfüllt Erfüllt
Entfällt
Erfüllt Erfüllt
Stromrichter
Netzfilter
Stromrichter
Netzfilter
Stromrichter
Stromrichter
24 3ADW000395R0100 DCS550 Quick guide edisf a24 3ADW000395R0100 DCS550 Quick guide edisf a
Page 25
Um bei Maschinen und Anlagen die
Legende
ungeschirmtes Kabel mit
Einschränkung
abgeschirmtes Kabel
I
DC
< 100 A
I
DC
< 100 A
I
DC
>100 A
Netzdrossel
Netzfilter
Stromrichter
Versorgungstransf. für
ein Industriegebiet
(Nennleist. normalerweise≤ 1,2 MVA)
Geerdeter
Sternpunkt
Geerdetes 400 V-Netz mit
Null-Leiter; 3~ ≤ 400 A
Stromrichter
Mittelspannungsnetz
Zu anderen Lasten, z.B. Antriebssystemen
Netzdrossel +
Y-Kondensator
Industriegebiet
Betrieb am Niederspannungsnetz zusammen
mit anderen Lasten aller Art außer einige Arten
von em
pfindlichen Kommuni
kationsmitteln.
alternativ
alternativ
Kommutierungseibrüche < 40%
emv_clssif_c.dsf
Stromrichtertransformator
fallbezogene EMV-Analyse
Mittelspannungsnetz
Industriegebiet
Stromrichter
Stromrichtertransformator
mit geerdeter
Schirmwicklung
Netzdrossel
Stromrichter
I > 400 A
und/oder
U > 500 V
Betrieb mit separatem Stromrichter-transforma
tor. Wenn es an
dersel
ben Sekundärwicklung andere Lasten gibt, so müssen
diese die vom Stromrichter verursach
ten Kommutierungs
lücken
vertragen. In einigen Fällen sind Kommutierungsdrosseln
erforderlich.
Zu anderen Lasten, z.B. Antriebssystemen
Schutzvorgaben des deutschen EMVGesetzes (EMVG) erfüllen zu können,
müssen folgende EMV-Normen eingehalten werden:
Produktnorm EN 61800-3
EMC-Norm für Stromrichtersysteme
(PowerDriveSystem), Störfestigkeit und
Abstrahlungen in Wohn-, Gewerbegebieten mit Leichtindustrie und Industrieanlagen.
Diese Norm innerhalb der EU zur
Einhaltung der EMV-Anforderungen für
Maschinen und Anlagen erfüllt werden!
Normen für Störabstrahlungen:
EN 61000-6-3 Die spezielle Basisnorm für Abstrahlungen in der Leichtindustrie
kann mit speziellen Einrichtungen (Netzfiltern, geschirmten Kabeln)
im unteren Leistungsbereich erfüllt werden *(EN 50081-1).
EN 61000-6-4 Spezielle Basisnorm für Abstrahlungen in der Industrie
*(EN 50081-2)
Normen für Störfestigkeit::
EN 61000-6-1 Spezielle Basisnorm für Störfestigkeit in Wohngebieten
*(EN 50082-1)
EN 61000-6-2 Spezielle Basisnorm für Störfestigkeit in Industrieanlagen.
Wenn diese Norm erfüllt ist, ist auch automatisch die Norm
EN 61000-6-1 erfüllt *(EN 50082-2).
* Die alten Normen sind in Klammer n angegeben.
Standards
EN 61800-3
EN 61000-6/3
deutsch
PDS Kategorie C3
Auf Kundenwunsch Erfüllt
PDS Kategorie C4
EN 61000-6/3
EN 61000-6-2
EN 61000-6-1
Klassifizierung
In der folgenden Übersicht
werden die Maßnahmen dargestellt, die zur Einhaltung der
Produktnorm erforderlich sind.
EN 61800-3.
Bei der DCS550-Serie werden
die Grenzwerte für Störabstrahlungen eingehalten, wenn
die angegebenen Maßnahmen durchgeführt werden.
PDS der Kategorie C2 (früher
eingeschränkte Erhältlichkeit
in der Ersten Umgebung) ist
ausschließlich für die Installation und Inbetriebnahme durch
Fachpersonal (Person oder
Organisation mit dem erforderlichen Sachverstand bzw.
Inbetriebnahme des PDS einschließlich EMV-Maßnahmen)
vorgesehen.
Bei Stromrichtern ohne Zusatzkomponenten sind folgende
Warnhinweise zu beachten:
Es handelt sich um ein Produkt
der Kategorie C2 gemäß IEC
61800-3:2004. In Wohngebieten kann dieses Produkt
Funkstörungen verursachen.
In diesem Fall sind zusätzliche
Maßnahmen erforderlich.
Die Feldversorgung wird in dieser Übersicht nicht dargestellt.
Für Feldstromkabel gelten
dieselben Regeln wie für die
Ankerstromkreis.
3ADW000395R0100 DCS550 Quick guide edisf a
25
253ADW000395R0100 DCS550 Quick guide edisf a
Page 26
±90...±270 V
±
30...±90 V
±
8...±30 V
AI4
GND
GND
Power
Sense 0 V
Sense 5 V
AI3
AI1
I-act
GND
+10V
GND
-10V
DI1
DI3
DI4
DO4
DO1
3
4
5
6
9
X4:1
3
4
10
4
1
2
3
6
5
10
8
9
10
5
2
6
8
10
8
X1:1
X2:1
X3:1
X5:
SDCS-CON-F
B22_001_0_a.dsf
+
-
S2
3
4
250
S3
3
4
250
ATACH
+
-
+
-
+
-
+
-
GND
10
+
-
+
-
+
-
5V
S4
11
12
24V
K1
X96:1
t
230V
E
SDCS-PIN-F
1
3
4
6
S1
S1
1
3
S4
2
121
100nF
4
6
S4
5
121
100nF
7S48
121
100nF
10k
10k
10k
9
ChA
ChB
ChZ
ChA
ChB
ChZ
Firmware
Digitaler und analoger E/A-Anschluss von SDCS-CON-F
Auflösung
[bit]
15 + Vorzeichen
Ein-/Ausgangs-
werte
Hardware
±90...270 V
±30...90 V
Skalierung
durch
①
Firmware
Gleich-
takt-
bereiche
±15 V
Anmerkungen
±8...30 V
15 + Vorzeichen
15 + Vorzeichen
15 + Vorzeichen
15 + Vorzeichen
11 + Vorzeichen
11 + Vorzeichen
Impulsgeberversorgung Anmerkungen
24 V
Eingangswert
0...7.3 V
7.5...50 V
-10...0...+10 V Firmware ±15 V
-10...0...+10 V Firmware ±15 V
-10...0...+10 V Firmware ±15 V
-10...0...+10 V Firmware ±15V
+10 V ≤ 5 mA
-10 V ≤ 5 mA
-10...0...+10 V Firmware ≤ 5 mA
-10...0...+10 V Firmware ≤ 5 mA
-10...0...+10 V Firmware+
Hardware
Eingänge nicht potentialgetrennt
Impedanz = 120 W, falls gewählt
max. Frequenz ≤ 300 kHz
5 V
≤ 250 mA
≤ 250 mA
Leitungen für GND und Einspeisung
zur Korrektur von Spannungsschwankungen (nur bei Verwendung eines
5 V Impulsgebers)
Signaldefin-
Anmerkungen
ition durch
Firmware
-> “0“ Status
-> “1“ Status
Spannung
≤ 5 mA
für ext. Verwendung z.B. Poti
8 V -> min von
325% von [99.03],
oder 230% von
[4.05]
]
26 3ADW000395R0100 DCS550 Quick guide edisf a26 3ADW000395R0100 DCS550 Quick guide edisf a
Ausgangswert
50 * mA
22 V bei Null-
Last
Signaldefin-
ition durch
Firmware
Anmerkungen
Stromgrenzwert für alle 7
Ausgänge = 160 mA
Keine Gegenspannungen verwenden!
* kurzschlussfest
① Verstärkung kann in 15 Schritten zwischen 1 und 4 über Softwareparameter
geändert werden
Page 27
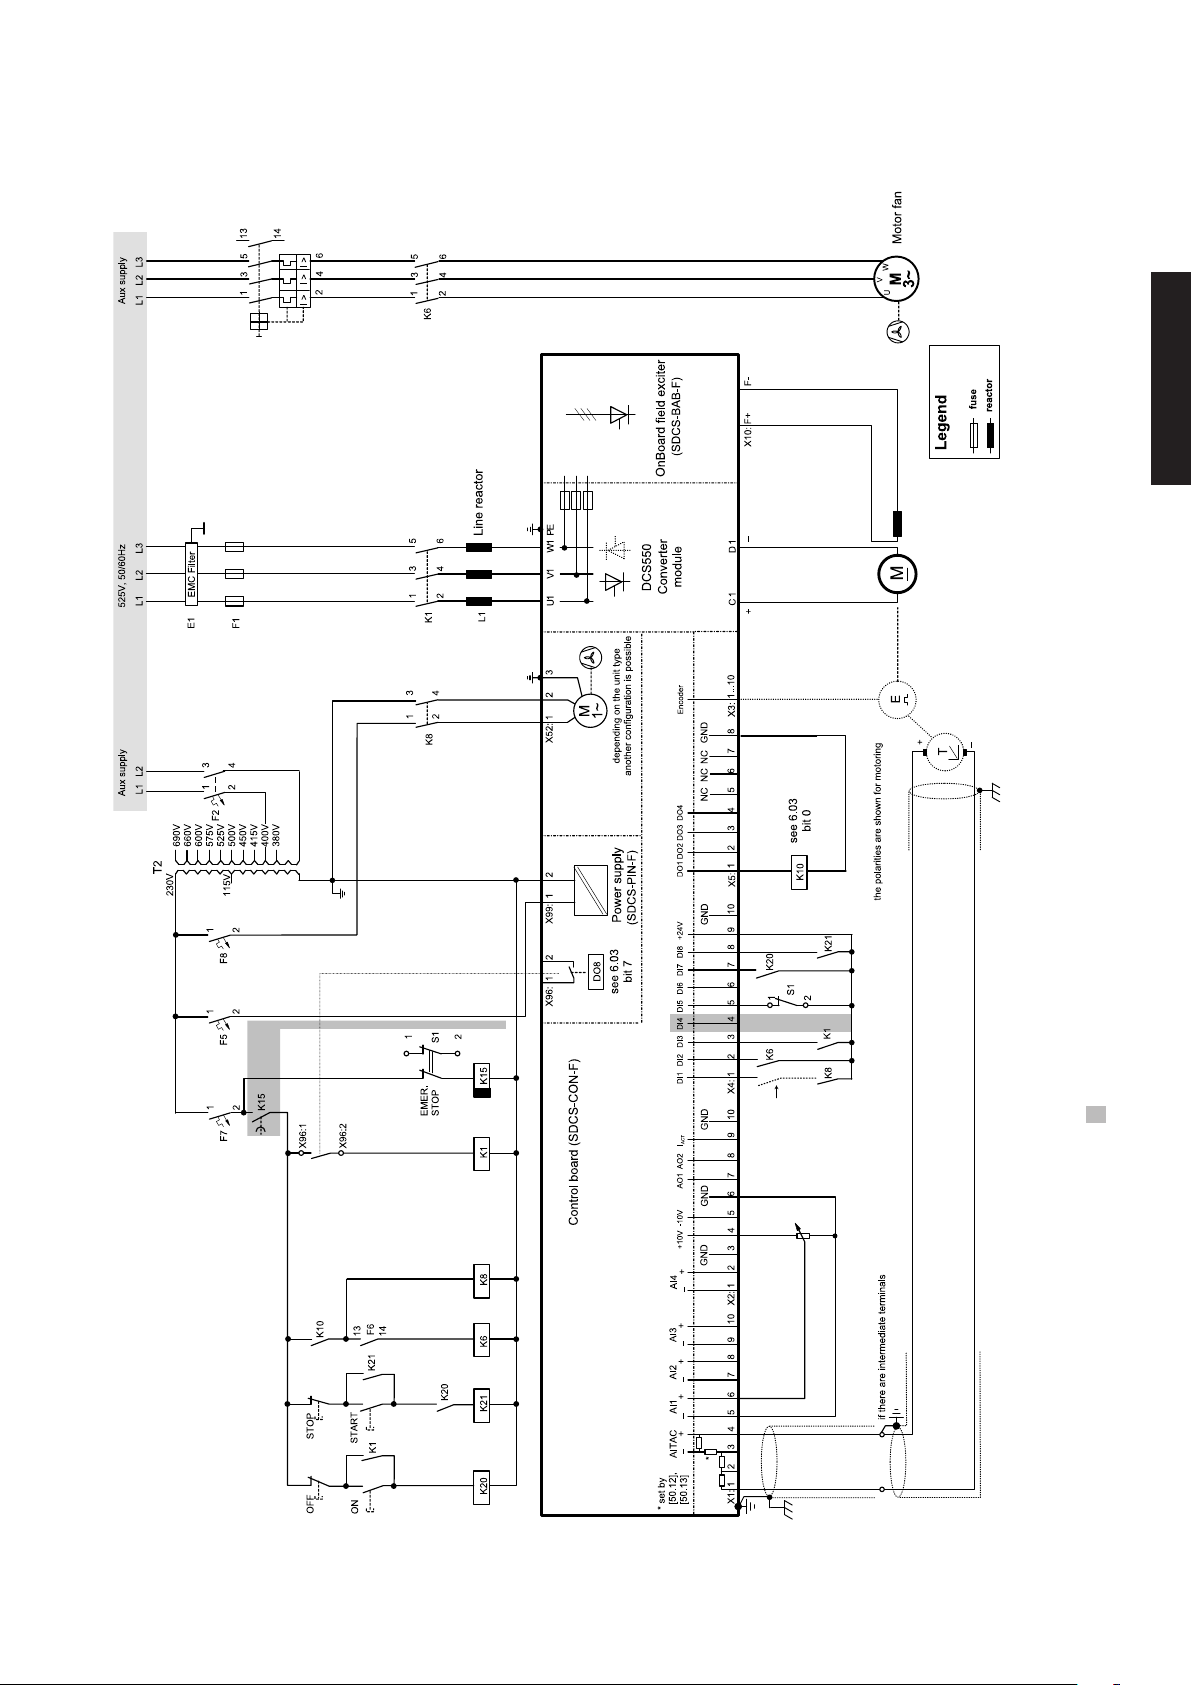
F6
DCS550_ans_1_c.dsf
Anschlussbeispiel
Stromrichter F1...F4 mit ‘On Board‘ Felderreger
Die Verdrahtung des Stromrichters entpricht dem Macro FACTORY (default)
deutsch
3ADW000395R0100 DCS550 Quick guide edisf a
weitere Informationen finden Sie auf der folgenden Seite
27
273ADW000395R0100 DCS550 Quick guide edisf a
Page 28
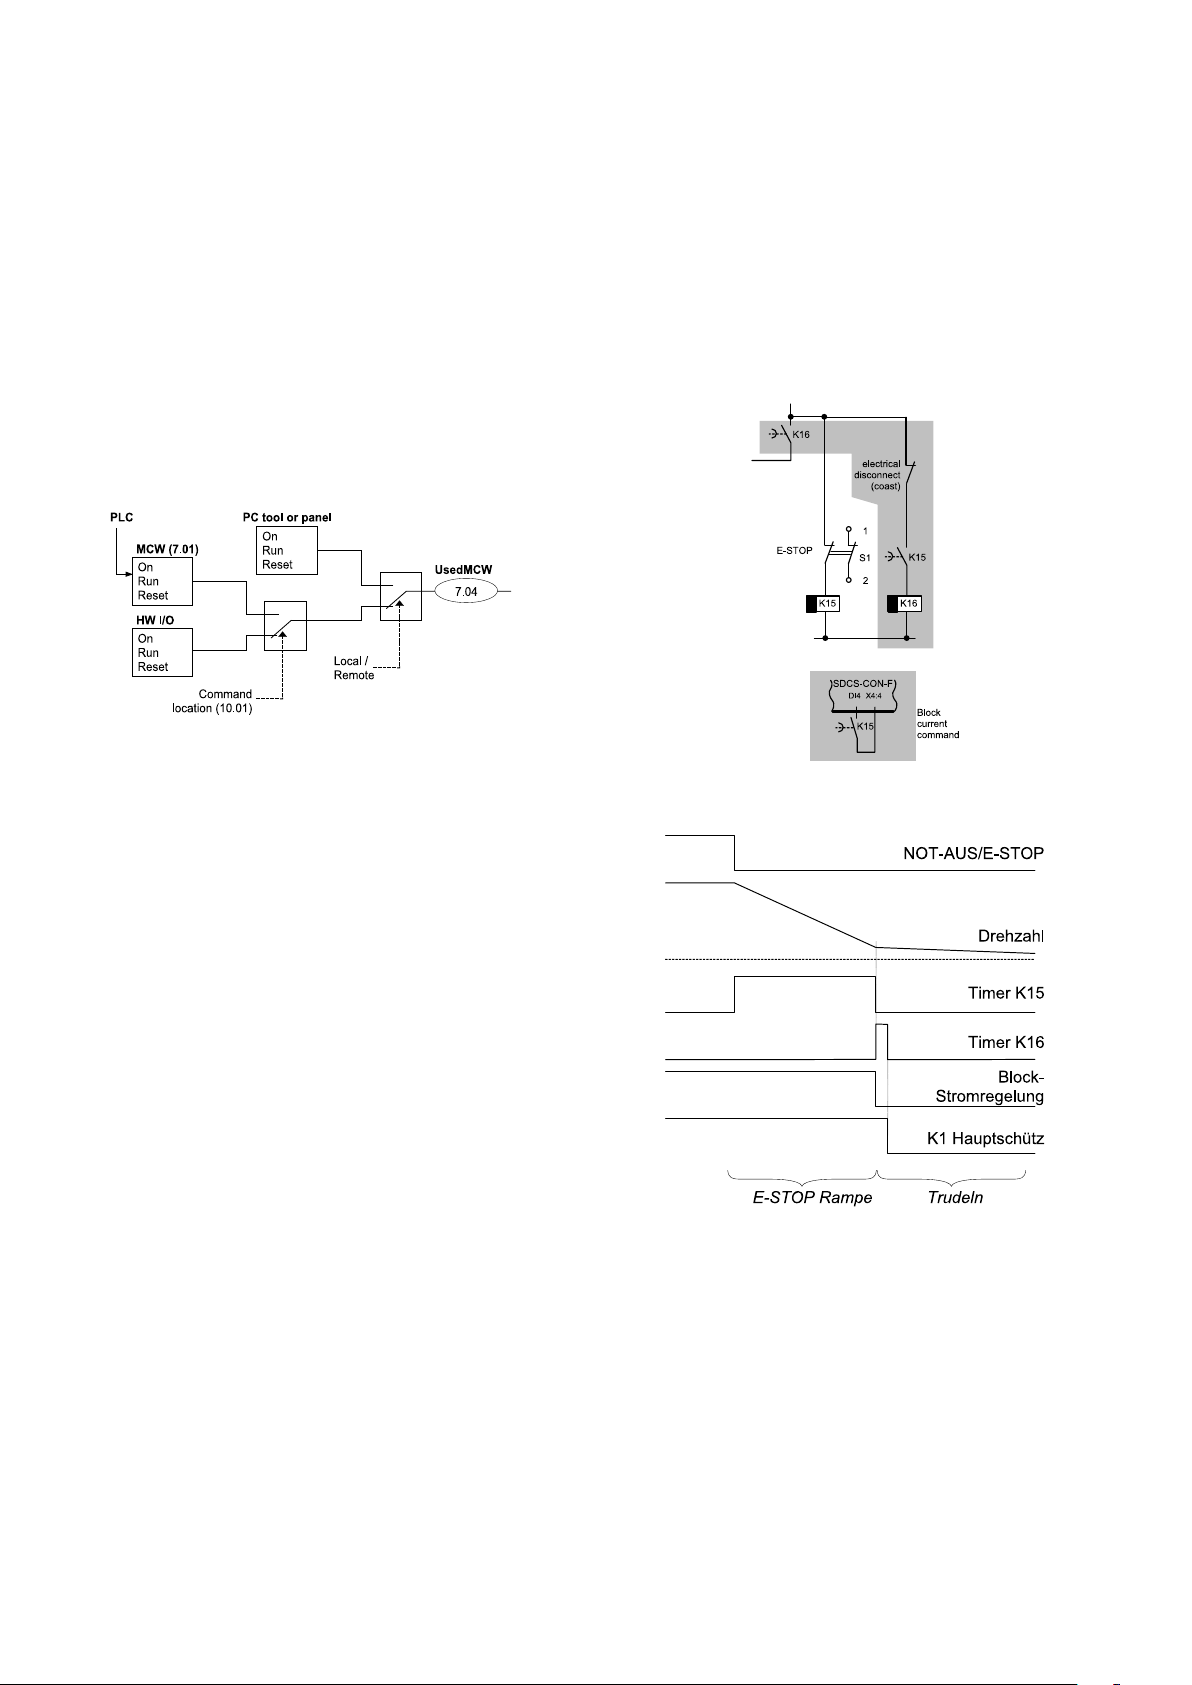
START, STOP und NOT-AUS-Steuerung
gen_ctrl_cmd_c.dsf
Anschl_special_b.dsf
Stop-Mode_b.dsf
Die Relaislogik kann in drei Teile untergliedert werden:
a: Ausgabe des EIN/AUS- und START/STOPP-Befehls:
Die mit K20 und K21 dargestellten Befehle (Steuerung über
Hardware-Klemmen) können z.B. mit einer SPS erzeugt werden und entweder über Relais mit galvanischer Trennung oder
direkt über 24V-Signale an die Anschlüsse des Stromrichters
übertragen werden.
Festverdrahtete Signale sind nicht notwendig.
Diese Befehle können auch über die serielle Kommunikation
übertragen werden. Eine kombinierte Lösung ist ebenfalls
möglich, indem für das eine oder andere Signal unterschiedliche Optionen gewählt werden (siehe Parametergruppe 11).
Wenn NOT-AUS (Not-Halt) gedrückt wird, wird die Meldung
über Digitaleingang DI5 an den Stromrichter gesendet. Bei
Rampenstopp oder max. Drehmoment verzögert der Stromrichter den Motor und öffnet dann das Hauptschütz.
Wenn der Stromrichter die Funktion nicht innerhalb der mit
Timer K15 eingestellten Zeit ausgeführt hat, muss der Stromrichter den Befehl zum Abschalten des Stroms über K16 erhalten. Nach Ablauf der mit Timer K16 eingestellten Zeit wird
das Hauptschütz unabhängig vom Status des Stromrichters
geöffnet.
b: Ausgabe von Steuer- und Überwachungssignalen:
Das Hauptschütz K1 für den Ankerstromkreis wird über einen
Relaisausgang (DO 8) auf der SDCS-PIN-F gesteuert, der
Status der Lüfter kann über die Lüfterrückmeldesignale überwacht werden: MotFanAck (10.06).
c: OFF2, OFF3 Stoppfunction:
Neben EIN/AUS und START/STOPP verfügt der Stromrichter
auch über zwei zusätzliche Stoppfunktionen OFF2 und OFF3
gemäß Profibus-Standard. OFF3 ist eine skalierbare Stoppfunktion (Rampenstopp, Stopp max. Drehmoment, dynamische Bremsung…) für Stoppkategorie 1. Diese Funktion muss
unverzögert auf den NOT-AUS- (Not-Halt-) Taster angeschlossen werden. Bei Stopp über Rampe muss das Zeitrelais K
15 auf eine längere Zeit als EStopRamp (22.04) eingestellt
werden. Bei COAST öffnet der Stromrichter das Hauptschütz
sofort.
OFF2 schaltet den DC-Strom so schnell wie möglich ab und
bereitet den Stromrichter auf das Öffnen des Hauptschützes
oder den Abfall der Netzspannung vor. Bei Normallast eines
DC-Motors beträgt die Zeit zum Abschalten des DC-Stroms
weniger als 20 ms. Diese Funktion sollte für alle Signale und
Schutzfunktionen zum Öffnen des Hauptschützes benutzt
werden. Diese Funktion ist wichtig für 4- Quadranten-Antriebe. Das Hauptschütz darf nicht während der Energie-Rückspeisung ins Netz geöffnet werden.
Reaktion bei Not-Aus/E-STOP
Die korrekte Sequenz ist
1. den Rückspeisestrom abschalten
2. das Hauptschütz öffnen
28 3ADW000395R0100 DCS550 Quick guide edisf a28 3ADW000395R0100 DCS550 Quick guide edisf a
Page 29
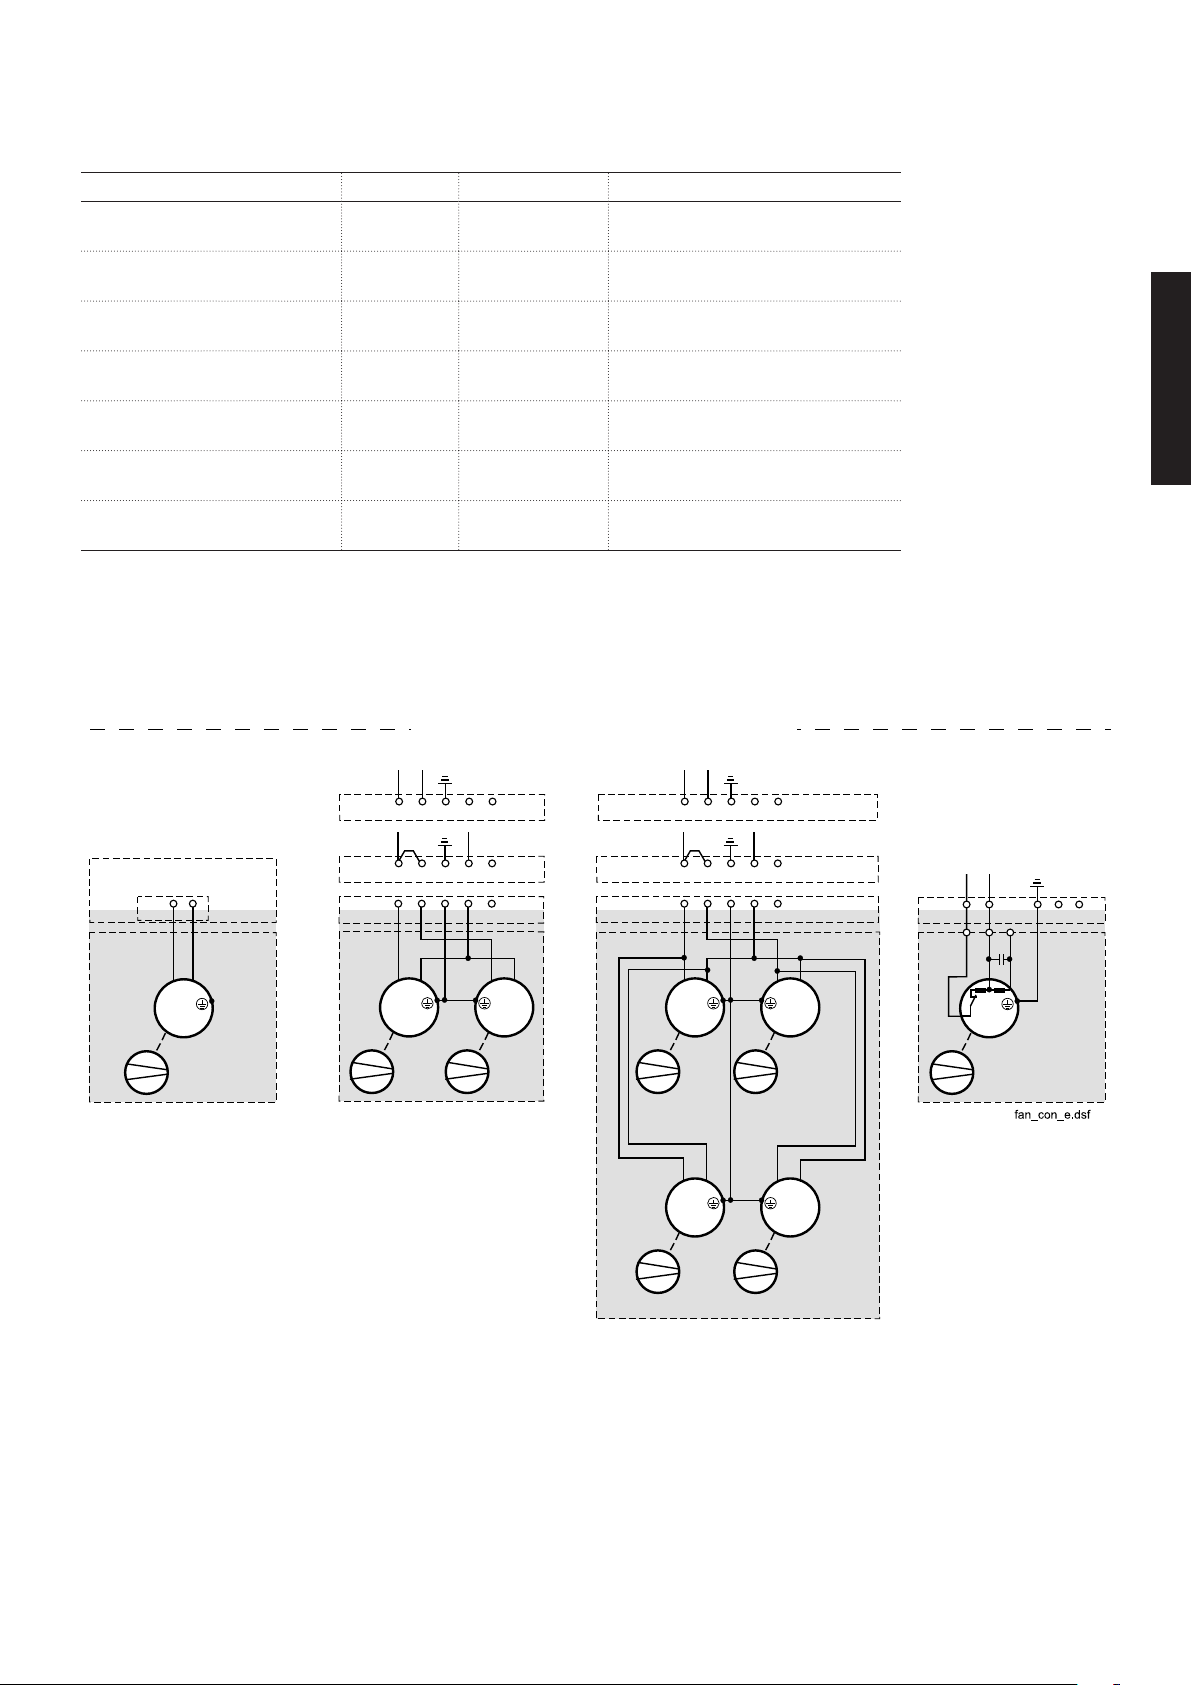
Lüfterkühlung
1 2 3
X52:
4 5
L
N
230 V
AC
1 2 3
X52:
4 5
L
N
115 V
AC
M
~
1 2 3
X52:
M
~
4 5
M55 M56
M
~
1 2 3
X52:
M
~
4 5
M55 M56
M
~
M
~
M57 M58
M55
M
~
1 2 3 4 5
X52:
L
N
L
N
1 2 3
X52:
4 5
L
N
230 V
AC
1 2 3
X52:
4 5
L
N
115 V
AC
ϑ
only 230 V
AC
M55
M
~
X19:
SDCS-PIN-F
Terminals are located on top of the converter housing
Lüfterzuordnung für DCS550
Stromrichtertyp Model Konfiguration Lüfterspannung
DCS550-S01-0020, ...,
DCS550-S02-0025
DCS550-S01-0045, ...,
DCS550-S02-0100
DCS550-S01-0135, ...,
DCS550-S02-0300
DCS550-S01-0315, ...,
DCS550-S02-0450
DCS550-S01-0470, ...,
DCS550-S02-0520
DCS550-S01-0610, ...,
DCS550-S02-0820
DCS550-S01-0900, ...,
DCS550-S02-1000
F1 - kein Lüfter
F1 1 1 x 3110KL-05W... (intern 24 V
F2 2 2 x 4715MS (115 / 230 V
F3 2 2 x 4715MS (115 / 230 V
F3 3 2 x 4715MS (115 / 230 V
2 x 3115FS (115 / 230 V
F4 4 1 x W2E200 (230 V
F4 4 1 x W2E250 (230 V
)
DC
)
AC
)
AC
)
AC
)
AC
)
AC
)
AC
deutsch
Lüfteranschluss für DCS550
Ansc hlüsse obe n auf dem Stro mrichterge häuse
Konf iguration 1
F1
Konf iguration 2
F2, F3
Konf iguration 3
F3
3ADW000395R0100 DCS550 Quick guide edisf a
Konf iguration 4
F4
29
293ADW000395R0100 DCS550 Quick guide edisf a
Page 30

Klemmen- und Steckeranordnung des Stromrichters
X2X1 X3 X4 X5
1 1 1 1 1
S5
15
6 9
S3
S2
S4
1
2
1
2
1
2
1
2
D2100
1
D2001
D2002
D1000
1 30
1
2
1
2
S1
1
42
1
2
3
10
11
12
1
82
1
42
1
2
3
7
8
9
DCS550 terminal alloc_c.dsf
1 2 3 4 5 6 7 8 9 10 1 2 3 4 5 6 7 8 9 10 1 2 3 4 5 6 7 8 9 10 1 2 3 4 5 6 7 8 9 10 1 2 3 4 5 6 7 8
Macro finder
Macro name
Haupt-
schützr
ON / OFF
Start/Stop
Standard
AC Static
2-wire DC cont. US
DC Static
3-wire DC cont. US
DC Pulse
3-wire Standard
AC Pulse
Torque limit
AC Static
Manual / Const
AC Pulse
Hand / Auto
Hand / Mot Pot
Motor Pot
AC Static
AC Pulse
AC Static
Torque Ctrl
AC Static
30 3ADW000395R0100 DCS550 Quick guide edisf a30 3ADW000395R0100 DCS550 Quick guide edisf a
DI Funktion
Jog1 --> DI1
Jog2 --> DI2
Ext Fault --> DI 3
Ext Alarm --> DI4
Jog1 --> DI1
Jog2 --> DI2
Ext Fault --> DI 3
Main Cont Ack --> DI4
Fix speed1 --> DI1
Ext Fault --> DI 3
Main Cont Ack --> DI4
Fix speed1 --> DI1
Ext Fault --> DI 3
Ext Alarm --> DI4
Jog1 --> DI1
Jog2 --> DI2
Ext Fault --> DI 3
Ext Alarm --> DI4
Jog1 --> DI1
Jog2 --> DI2
Direction --> DI 3
SpC - KP, KI --> DI4
Control select --> DI2
Reference select --> DI2
Direction select --> DI 3
Motor pot up --> DI1
Motor pot down --> DI2
Direction select --> DI 3
Reference select --> DI4
Direction select --> DI 1
Motor pot up --> DI2
Motor pot down --> DI3
Motor pot minimum --> DI4
OFF2 (coast stop) --> DI1
Torque select --> DI2
Ext Fault --> DI 3
Kommentar DI5 --> ESTOP
Hardware I/O Steuerung x
Hardware I/O Steuerung x
Hardware I/O Steuerung x
Hardware I/O Steuerung x
Hardware I/O Steuerung
+ Torque limit
Hardware I/O Steuerungl
Verstärkung auswählen
Hardware I/O Steuerung
oder Feldbussteuerung
Hardware I/O Steuerungl
Sollwert durch Hardware oder
Motorpotentiometer
Hardware I/O Steuerungl
Sollwert durch Motor poten-
tiometer
Hardware I/O Steuerung
Drehzahlregelungl oder Mo-
mentensollwert
DI6 --> Reset
x
x
x
x
x
x
Macro auswählen
benutze den
[DCS550Wizard] 2. Macro
assistant im DriveWindow Light
oder
Parameter Menue, der Steuertafel, oder von DriveWindow,
oder DriveWindow Light
Benutze folgende Parameter:
ApplMacro (99.08) =
Macroauswahl
Applrestore (99.07) =
YES = aktivieren
MacroSel (8.10) =
Überprüfung
ANMERKUNG
Funktionen und Eingänge, die
durch das Macro bestimmt werden,
können später ohne Einschränkung
geändert werden
ANMERKUNG
Macro diagram siehe Seite 91 ..
Page 31

Sicherheits- und Anwendungshinweise
für Antriebsstromrichter DCS / DCF / DCR
(gemäß: Niederspannungsrichtlinie 73/23/EWG))
1. Allgemein
Während des Betriebes können Antriebsstromrichter ihrer
Schutzart entsprechend spannungsführende, blanke, gegebenenfalls auch bewegliche oder rotierende Teile, sowie heiße
Oberflächen besitzen.
Bei unzulässigem Entfernen der erforderlichen Abdeckung,
bei unsachgemäßem Einsatz, bei falscher Installation oder
Bedie nung, besteht die Gefahr von schweren Personen- oder
Sachschäden.
Weitere Informationen sind der Dokumentation zu entnehmen.
Alle Arbeiten zum Transport, zur Installation und Inbetriebnahme sowie zur Instandhaltung sind von qualifiziertem Fachpersonal auszuführen (IEC 364 bzw. CENELEC HD 384 oder
DIN VDE 0100 und IEC 664 oder DIN VDE 0110 und nationale
Unfallverhütungsvorschriften beachten).
Qualifiziertes Fachpersonal im Sinne dieser grundsätzlichen
Sicherheitshinweise sind Personen, die mit Aufstellung, Montage, Inbetriebsetzung und Betrieb des Produktes vertraut
sind und über die ihrer Tätigkeit entsprechenden Qualifikationen verfügen.
2. Bestimmungsgemäße Verwendung
Antriebsstromrichter sind Komponenten, die zum Einbau
in elektrische Anlagen oder Maschinen bestimmt sind und
werden in einen Schaltschrank oder einen berührungssicheren
Bereich eingebaut.
Bei Einbau in Maschinen ist die Inbetriebnahme der An triebsstromrichter (d.h. die Aufnahme des bestimmungsgemä ßen
Betriebes) solange untersagt, bis festgestellt wurde, dass die
Maschine den Bestimmungen der EG-Richtlinie 89/392/EWG
(Maschinenrichtlinie) entspricht; EN 60204 ist zu beachten.
Die Inbetriebnahme (d.h. die Aufnahme des bestimmungsgemäßen Betriebes) ist nur bei Einhaltung der EMV-Richtlinie
(89/336/EWG) erlaubt.
Die Antriebsstromrichter erfüllen die Anforderungen der Niederspannungsrichtlinie 73/23/EWG. Die harmonisierten Normen der Reihe prEN 50178/DIN VDE 0160 in Verbindung mit
EN 60439-1/ VDE 0660 Teil 500 und EN 60146/ VDE 0558
werden für die Antriebsstromrichter angewendet.
Die technischen Daten sowie die Angaben zu Anschluss bedingungen sind dem Leistungsschild und der Dokumen tation
zu entnehmen und unbedingt einzuhalten.
3. Transport, Einlagerung
Die Hinweise für Transport, Lagerung und sachgemäße Handhabung sind zu beachten.
Klimatische Bedingungen sind entsprechend prEN 50178 einzuhalten.
4. Aufstellung
Die Aufstellung und Kühlung der Geräte muss entsprechend
den Vorschriften der zugehörigen Dokumentation erfolgen.
Die Antriebsstromrichter sind vor unzulässiger Beanspruchung zu schützen. Insbesondere dürfen bei Transport und
Handha bung keine Bauelemente verbogen und/oder Isolationsab stände verändert werden. Die Berührung elektronischer
Bau elemente und Kontakte ist zu vermeiden.
Antriebsstromrichter enthalten elektrostatisch gefährdete
Bauelemente, die leicht durch unsachgemäße Behandlung
beschädigt werden können. Elektrische Komponenten dürfen
nicht mechanisch beschädigt oder zerstört werden (unter
Umständen Gesundheitsgefährdung!).
5. Elektrischer Anschluss
Bei Arbeiten an unter Spannung stehenden Antriebsstrom richtern sind die geltenden nationalen Unfallverhütungsvor schriften (z.B. VBG 4) zu beachten.
Die elektrische Installation ist nach den einschlägigen Vorschriften durchzuführen (z.B. Leitungsquerschnitte, Absicherungen, Schutzleiteranbindung). Darüberhinausgehende
Hin weise sind in der Dokumentation enthalten.
Hinweise für die EMV-gerechte Installation — wie Schirmung,
Erdung, Anordnung von Filtern und Verlegung der Leitungen befinden sich in der Dokumentation der Antriebsstromrichter.
Diese Hinweise sind auch bei CE-gekennzeichneten Antriebsstromrichtern stets zu beachten. Die Einhaltung der durch
die EMV-Gesetzgebung geforderten Grenzwerte liegt in der
Verantwortung des Herstellers der Anlage oder Maschine.
6. Betrieb
Anlagen, in die Antriebsstromrichter eingebaut sind, müssen
ggf. mit zusätzlichen Überwachungs- und Schutzeinrichtungen gemäß den jeweils gültigen Sicherheitsbestimmungen,
z.B. Gesetz über technische Arbeitsmittel, Unfallverhütungsvor schriften usw. ausgerüstet werden. Veränderungen der
An triebsstromrichter mit der Bediensoftware sind gestattet.
Nach dem Trennen der Antriebsstromrichter von der Versorgungsspannung dürfen spannungsführende Geräteteile und
Leistungsanschlüsse wegen möglicherweise aufgeladener
Kondensatoren nicht sofort berührt werden. Hierzu sind die
entsprechenden Hinweisschilder auf dem Antriebsstromrich ter
zu beachten.
Während des Betriebes sind alle Abdeckungen und Türen
geschlossen zu halten.
7. Wartung und Instandhaltung
Die Dokumentation des Herstellers ist zu beachten.
Diese Sicherheitshinweise sind aufzubewahren!
deutsch
3ADW000395R0100 DCS550 Quick guide edisf a
31
313ADW000395R0100 DCS550 Quick guide edisf a
Page 32

Installation der DCS550 Programme auf dem PC
Nachdem die DCS550 CD eingelegt wurde, werden alle Programme und Dokumente, die nötig sind um mit den DCS550
zu arbeiten, automatisch installiert.
1. DriveWindow Light zu Parametrisierung, Inbetriebnahme
und Service
2. Hitachi FDT 2.2 zum Laden der Firmware
3. DCS550 Komponenten z.B. DWL Assistent,
ABB Dokumente
Attention:
Falls ein Programm nicht installiert werden soll, einfach die
dazugehörige Installationsroutine mit Hilfe von Abbrechen
überspringen.
− DriveWindow Light starten
− Die Kommunikationseinstellungen des COM Ports überprüfen
Falls die Installation nicht automatisch startet:
− Start drücken, dann Ausführen und Durchsuchen der CD
nach setup.exe. Danach die Installation mit OK starten
− Eine Kurzinstallation mit Auswahl von DriveWindow Light +
DCS550 add ons wird empfohlen
Verbindung zum Antrieb herstellen
− Die Dokumentation kann unter C:\ABB\DCS550\Docu
gefunden werden
− Den Gerätedeckel vom Stromrichtermodul entfernen
Falls ein ExpressCard / COM oder PCMCIA / COM Adapter
benutzt wird bitte die Einstellungen des COM Ports überprüfen
Start => Einstellungen => Systemsteuerung => System =>
Hardware => Geräte-Manager
− Die COM Adresse des USB Adapters kann sich nach dem
nächsten Booten oder bei erneutem Anschluss ändern.
Hinweis:
ExpressCard / PCMCIA / COM Adapter stellen eine sicherere
und schnellerere Verbindung zum Antrieb her.
Haken mit einem Schraubendreher
herunterdrücken
−
Geräteanschluss (X34) mit seriellem
Port des PC‘s verbinden
32 3ADW000395R0100 DCS550 Quick guide edisf a32 3ADW000395R0100 DCS550 Quick guide edisf a
Um DriveWindow Light oder den DCS550 Steuertafelassistenten zu benutzen mit Kapitel Inbetriebnahme fortfahren.
Page 33

Inbetriebnahme
7. Field weakening assistant
6. Autotuning speed controller
5. Speed feedback assistant
4. Autotuning armature current controller
3. Autotuning field current controller
2. Macro assistant
1. Name plate data
Next
Next
Next
Next
Next
Next
Select specific
assistant & press Next
7. Field weakening assistant
6. Autotuning speed controller
5. Speed feedback assistant
4. Autotuning armature current controller
3. Autotuning field current controller
2. Macro assistant
1. Name plate data
Next
Next
Next
Next
Next
Next
Select specific
assistant & press Next
Vorsicht! Hochspannung: Dieses Symbol warnt
vor hohen Spannungen, die eine Verletzungsgefahr
darstellen und/oder Schäden an der Anlage
verursachen können. Neben dem Symbol werden
ggf. geeignete Vorsichtsmaßnahmen zur Vermeidung dieser Gefahren beschrieben.
Allgemeine Warnung: Dieses Symbol warnt vor
nicht elektrischen Gefahren, die zu schweren oder
sogar tödlichen Verletzungen von Personen und/
oder Schäden an Geräten führen können. Der Text
neben diesem Symbol beschreibt ggf. Möglichkeiten zur Vermeidung dieser Gefahr.
Warnung vor elektrostatischer Entladung:
Dieses Symbol warnt vor elektrostatischen
Entladungen, die zu Schäden an Geräten führen
können. Neben dem Symbol werden ggf. geeignete Vorsichtsmaßnahmen zur Vermeidung dieser
Gefahren beschrieben.
NEC Motorüberlastschutz
Der DCS550 stellt einen elektronischen Motorüberlastschutz
in Übereinstimmung mit NEC bereit. Der Überlastschutz (z.B.
Schutzschwelle in Prozent vom Volllaststrom des Motors)
kann mit Parametern in den Gruppen 31 und 99 eingestellt
werden.
Die Anweisungen können dem Kapitel Thermisches Motormo-
dell im DCS550 Handbuch entnommen werden.
Allgemeine Hinweise
− Diese Kurzinbetriebnahme bezieht sich auf Kapitel Anschlussbeispiele dieser Druckschrift.
− Sicherheits- und Anwendungshinweise - Kapitel dieser
Druckschrift.
− Empfehlungen von Motor- und Feldspannungen siehe
Technischer Katalog.
− Gemäß DIN 57100 Teil 727 / VDE 0100 Teil 727 sind Vorkehrungen zu treffen um den Antrieb z.B. im Gefahrenfalle
still setzen zu können. Die digitalen Eingänge des Gerätes
oder die Steuertafel reichen dazu als alleinige Maßnahme
nicht aus!
Vorbereitende Arbeiten
− Gerät auf eventuelle Schäden überprüfen!
− Gerät montieren und verdrahten
− Versorgungsspannung / Nennspannung für Elektronik und
Lüfter korrekt?
− Versorgungsspannung / Nennspannung für Ankerstromrichter korrekt?
− Versorgungsspannung / Nennspannung für Feldversorgung
korrekt?
− Verdrahtung / Querschnitte, etc korrekt?
− NOT-HALT funktionstüchtig?
− NOT-AUS funktionstüchtig?
deutsch
Inbetriebnahme mit DriveWindow Light
Aufrufen der Assistenten in
DriveWindow Light:
Um die Basisinbetriebnahme aufzurufen auf Start drücken oder gezielt einen Assistenten aufrufen: Einen Assistenten auswählen & auf Weiter drücken
Um zusätzliche Informationen über die Assistenten, Parameter, Fehler und Alarme zu erhalten
auf Hilfe drücken!
3ADW000395R0100 DCS550 Quick guide edisf a
33
333ADW000395R0100 DCS550 Quick guide edisf a
Page 34

DCS550 Steuertafel
DCS800 QG pan ov_c.dsf
In der folgenden Abbildung sind die Tastenfunktionen und Anzeigen der DCS550-Steuertafel dargestellt.
Mit USISel (16.09) ist es möglich die Menge der Parameter, die angezeigt werden, zu reduzieren.
Allgemeine Displayfunktionen
Parameter, die über den Assistenten eingegeben werden
Folgende Modi sind im HAUPMENÜ vorhanden:
1. Modus Parameter
2. Modus Inbetriebnahme-Assistenten
a. Typenschild Daten
b. Makro Assistent
c. Selbsteinstellung Feldstromregler
d. Selbsteinstellung Ankerstromregler
e. Drehzahlrückführungs-Assistent
(Der Tachofeinabgleich ist nicht vorhanden)
f. Selbsteinstellung Drehzahlregler
g. Feldschwächungs-Assistent
(wird nur verwendet, wenn die Maximaldrehzahl
höher ist als die Grunddrehzahl)
3. Modus Makros (wird derzeit nicht verwendet)
4. Modus geänderte Parameter (Auflistung aller Parameter,
deren Grundeinstellung geändert wurde)
5. Modus Fehlerspeicher (Fehlerprotokoll anzeigen)
6. Modus Uhreinstellung
7. Parametersicherung
• kopiert den aktuellen Parametersatz vom Antrieb in die
DCS550-Steuertafel (nur im Lokalbetrieb)
• kopiert den Parametersatz von der DCS550-Steuertafel
in den Antrieb (nur im Lokalbetrieb)
8. Modus E/A-Einstellungen (wird derzeit nicht verwendet)
99.02 Motor 1 Nennspannung
99.03 Motor 1 Nennstrom
99.04 Motor 1 Nenndrehzahl
20.01 Motor 1 Minimaldrehzahl
20.02 Motor 1 Maximaldrehzahl
99.11 Motor 1 Feldnennstrom
30.09 Ankerüberstromschwelle
30.16 Motor 1 Überdrehzahl
99.10 Netznennspannung
99.12 Motor 1 verwendeter Feldstellertyp
20.05 maximales Drehmoment
20.06 minimales Drehmoment
20.12 Motor 1 Strombegrenzung Brücke 1
20.13 Motor 1 Strombegrenzung Brücke 2
50.04 Motor 1 Impulszahl Impulsgeber 1, wenn
ausgewählt
50.02 Motor 1 Impulsgeber 1 Messmodus, wenn
ausgewählt
50.13 Motor 1 Tachospannung bei 1000 U/min, nur
DWL
50.12 Motor 1 Tachoabgleich, nur DWL
20.03 Schwelle Nulldrehzah
22.01 Beschleunigungszeit 1
22.02 Verzögerungszeit 1
30.12 Motor 1 Feldsteller Unterstrom
44.01 Wahlschalter Steuermodus Feld
34 3ADW000395R0100 DCS550 Quick guide edisf a34 3ADW000395R0100 DCS550 Quick guide edisf a
Page 35

italiano
Caratteristiche Standard
− Compatto
− Per alta potenza
− Semplice da usare
− Assistente comodo, es. per autotaratura e messa in servizio
3ADW000395R0100 DCS550 Quick guide edisf a
35
353ADW000395R0100 DCS550 Quick guide edisf a
Page 36

DCS550 DC Drives
Dati tecnici
Tensione di alim. 230...525 V,
principale: +/–10 %,
trifase
Frequenza nominale: 50...60 Hz,
+/–5 Hz
Alimentazione per 115...230 V,
l’elettronica: –15 % / +10 %, 1~
Valori di corrente in CC: 20...1000 A
Capacità di sovraccarico: 200 %
Condizioni ambientali
Temperatura 0° ... +40° C
ambiente: 40° ... 50°C con
Temp. magazzin.: –40° ... +55° C
Temp. di trasporto: –40° ... +70° C
Temp. di trasporto: 5 ... 95 %, senza
Grado d’ inquinamento: Classe 2
Classe di protezione: IP 00
Altitudine < 1000 m s.l.m.:
riduzione
condensa (max.
50 % fra 0°...5° C)
alla corrente nominale
> 1000 m s.l.m.
con riduzione
I/O
Ingessi digitali: 8 standard, fino a
14 opzionali
Uscite digitali: 5 standard, fino a
9 opzionali
Ingressi analogici: 4 standard
+/–10 V; 0/2…10 V, fino a 8 opzionali +/ 20 mA; 0/4…20 mA
Uscite analogiche: 3 standard
(1x I
) +/-10 V; 0/2…10 V, fino a 7
act
opzionali –20 mA; 0/4…20 mA
PC-Tools
DriveWindow Light: gratuito
con ogni convertitore, connessione al PC Standard RS232
Approvazioni
(in preparazione 12/2011)
Programmazione adattiva
Blocchi funzione pre-definiti, es.
• Regolatore processo libero (Regolatore PI )
• I/O e funzioni digitali
con pannello di controllo o PC
Tool, senza hardware addizionale
Retroazione di Velocità
EMF
Tachimetrica analogica
Encoder
Comunicazione
Comunicazione seriale
• Ethernet • Profibus
• CANopen • DeviceNet
• ControlNet • EtherCat
• Modbus • ProfiNet
Autorizzato Industrial IT©
Funzioni di protezione
Errore di retroazione velocità
• Sovratemperatura •
Sovraccarico • Sovravelocità •
Stallo motore • Sovracorrente
motore • Sovratensione motore
• Sovracorrente di campo •
Sovratensione di campo • Minima
corrente di campo • Velocità zero
• Ripple corrente armatura •
Sovra- e sottotensione rete
Correnti nominali, Dimensioni
Taglia
unità
F1 20 25 12 370 x 270 x 208 14.56 x 10.65 x 8.20
45 50
65 75
90 100
F2 135 150 18 370 x 270 x 264 14.56 x 10.65 x 10.40
270 300
F3 315 350 25 459 x 270 x 310 18.07 x 10,65 x 12,25
405 450
470 520
F4 610 680 35 644 x 270 x 345 25.35 x 10.65 x 13.60
740 820
900 1000
2-Q corrente
nominale
DCS550-S01
IDC[A] IDC[A] 230 400 525 [ADC] h x w x d [mm] h x w x d [inch]
180 200
225 250
4-Q corrente
nominale
DCS550-S02
Tensione di rete
[V
]
AC
Corrente
max. cam-
po internol
Dimensioni
36 3ADW000395R0100 DCS550 Quick guide edisf a36 3ADW000395R0100 DCS550 Quick guide edisf a
Page 37

Brevi istruzioni per CD ed informazioni generali sui documenti
©
2
0
1
1
A
B
B
A
u
t
o
m
a
t
i
o
n
P
r
o
d
u
t
G
m
b
H
-
A
l
l
R
i
g
h
t
R
e
e
r
e
d
3ADW 000 377 R0201 / April 2011
System configuration
WINDOWS 98, NT, 2000, XP
Acrobat Reader 4.0 or higher
Internet Explorer 5.0 or higher
I
f
t
h
e
C
D
R
O
M
w
o
n
’
t
s
t
a
r
t
a
u
t
o
m
a
t
i
c
a
l
l
y
p
l
e
a
s
e
e
x
e
c
u
t
e
S
T
A
R
T
.
B
A
T
System confirmation
Win2000, WinXP
Before installation of PC tools
remove previous version by
CONTROL PANEL of your
PC
Read more details in
Quick Guide 3ADW000191
Content
This CD ROM provides
information about DCS550 and
contains PC tools:
DWL 2.93 for DC drives
+Commissioning Wizard 1.0
+DWL AP 2.2
FDT 2.2 Firmware
download kit
+ workspace
Firmware 1.1
DCS550
Ver.: 1.10
System confirmation
Win7, Win2000, WinXP
Before installation of PC tools
remove previous version by
CONTROL PANEL of your PC
La ringraziamo per l’acquisto di un convertitore di potenza
per azionamenti in cc ABB e per la fiducia accordata ai nostri
prodotti.
Per garantire la sua completa soddisfazione nei nostri prodotti, abbiamo redatto la presente brochure, con l’intento
di presentare in sintesi, i principali dati del prodotto, alcune
note sulle EMC, impieghi tipici, messa in servizio e guida alla
risoluzione dei guasti.
Qualora desideri ulteriori informazioni sul prodotto, oltre alla
presente documentazione troverà un CD-ROM. Il CD-ROM
è parte integrante di questo documento e contiene quanto
segue:
Catalogo tecnico (3ADW000378)
Informazioni complete sulla struttura del sistema del convertitore di potenza in generale.
Manuale (3ADW000379)
Informazioni dettagliate complete di tutti i particolari sui singoli
componenti, quali dimensioni moduli, schede elettroniche,
ventilatori e componenti ausiliari.
Sono anche incluse informazioni sull’installazione meccanica
ed elettrica.
Informazioni dettagliate di tutti gli argomenti riguardanti il software e l’impostazione dei parametri. Il manuale include tutte
le informazioni relative a messa in servizio e manutenzione
dell’intero azionamento, in forma dettagliata.
Manuale di manutenzione (3ADW000399)
Informazioni sulla manutenzione e riparazione dei convertitori.
Inoltre, diverse informazioni sulle applicazioni e accessori
tecnici (ad esempio estensioni hardware e interfacce fieldbus)
descritte da manuali separati, vedi tabella DCS550 manuals.
Requisiti di sistema per l’utilizzo del CD-ROM
c
− Sistema operativo
WINDOWS 7, 2000, XP
s
s
s
v
− ACROBAT READER
Se il CD ROM non si avvia automaticamente, fare doppio clic su
Setup.exe.
Ulteriore supporto
Restiamo inoltre a Sua completa disposizione con un servizio
di assistenza volto a garantire la soddisfazione del cliente – da
sempre una nostra priorità assoluta.
Internet
Nella homepage di ABB all’indirizzo
www.abb.com/dc
troverete una serie di informazioni relativamente a
− prodotti in c.c.
− assistenza
− ultimi aggiornamenti
− strumenti
− download, ecc
La invitiamo a visitare il nostro sito Web.
Contatti
Per ulteriori informazioni potrà rivolgersi alla sede ABB Drives
locale oppure inviare una e-mail all’indirizzo:
DC-Drives@de.abb.com
italiano
indicando nome, società, indirizzo e numero di telefono. Sarà
nostra premura comunicarle tempestivamente la persona di
riferimento che potrà contattare.
3ADW000395R0100 DCS550 Quick guide edisf a
37
373ADW000395R0100 DCS550 Quick guide edisf a
Page 38

Note sulla EMC
Filtro di rete
Convertitore
Reattanza
di
linea
Trasformatore di alimentazione per
area residenziale (valore nominale
di tensione ≤ 1,2 MVA)
Rete a media tensione
Verso altri carichi, ad esempio azionamenti
Funzionante con rete
pubblica a bassa
tensione insieme ad
altri carichi
eterogenei..
Verso altri carichi che devono essere protetti dai disturbi di sistema determinati dai
convertitori (interferenze alle alte frequenze e interruzioni di commutazione)
Convertitore
Funzionante con rete
pubblica a bassa
tensione insieme ad
altri carichi
eterogenei..
alternativa
Reattanza di linea
+
condensatore Y
Rete a media tensione
Verso altri carichi, ad esempio azionamenti
alternativa
Convertitore Convertitore
Reattanza
di
linea
Filtro di rete
Trasformatore di alimentazione per
area residenziale (valore nominale
di tensione ≤ 1,2 MVA)
Filtro di rete
Reattanza
di
linea
Convertitore Convertitore
Funzionante con rete
pubblica a bassa
tensione insieme ad
altri carichi
eterogenei..
Commutaion notches < 20%
Troverai ulteriori informazioni
nella pubblicazione:
Technical Guide chapter:
EMC Compliant Installation
and Configuration for a
Power Drive System
Il seguente paragrafo descrive la selezione
di componenti elettrici in conformità alla
normativa EMC.
Lo scopo di tale normativa, consiste
nell‘assicurare la compatibilità elettromagnetica con altri prodotti e sistemi.
Tale normativa è volta a garantire che le
La nornativa EMC prevede che gli aspetti relativi
alla compatibilità elettromagnetica siano valutati
già nella fase di sviluppo del prodotto; tuttavia non è possibile predeterminare il grado di
compatibilità elettromagnetica di un prodotto,
poiché esso può essere misurato solo quantita-
tivamente.
emissioni dal prodotto in esame siano al di
sotto del livello che potrebbe danneggiare
l‘immunità all‘interferenza di altri prodotti.
Nell‘ambito della normativa EMC vanno
considerati due aspetti:
− l‘immunità alle interferenze del prodotto
− le effettive emissioni del prodotto
Primo ambiente (area residenziale con industria leggera) con PDS categoria C2 Secondo ambiente (industria) con PDS categoria C3, C4
Non applicabile, poiché sono esclusi i canali commerciali generali di ottenibilità Non applicabile
conforme conforme
Non applicabile
conforme conforme
Nota relativa alla conformità elettromagnetica
La procedura di conformità è responsabilità con-
giunta del fornitore del convertitore e del produt-
tore della macchina o sistema che lo utilizza, in
base alla rispettiva responsabilità nell’espansione
delle apparecchiature elettriche considerate.
38 3ADW000395R0100 DCS550 Quick guide edisf a38 3ADW000395R0100 DCS550 Quick guide edisf a
Page 39

Per assicurare la conformità agli obiettivi
emv_clssif_c.dsf
Trasformatore
del convertitore
Analisi EMC in base al caso
alternativa
Trasformatore del
convertitore con
anello ferri
tico con
messa a terra
(e scher
matura
con messa a
terra se
necessario)
alternativa
I > 400 A
e/o
U > 500 V
Funzionamento con trasformatore del convertitore di potenza
separato. In presenza di altri carichi in corrispondenza dello
stesso avvolgimento del secondario, essi devono poter far
fronte alle interruzioni di comunicazione determinate dal
convertitore di potenza. In alcuni casi sono richieste reattanze di
commutazione.
Verso altri carichi, ad esempio azionamenti
Rete a media tensione
Convertitore Convertitore
Reattanza
di
linea
Legenda
Cavo non schermato con limitazione
Cavo schermato
I
DC
< 100 A
I
DC
< 100 A
I
DC
>100 A
Trasformatore di
alimentazione per area
residenziale (valore
nominale di tensione
≤
1.2 MVA)
Rete a 400 V con
conduttore di neutro e
messa a terra; 3~ ≤ 400 A
Funzionante con rete a bassa tensione insieme
ad altri carichi eterogenei, ad eccezione di
alcune tipologie di dispositivi di comunicazione
sensibili.
Rete a media tensione
alternativa
alternativa
Convertitore Convertitore
Reattanza
di
linea
Reattanza di linea
+
condensatore Y
Filtro di rete
Commutation notches < 40%
di protezione della legge tedesca sulla
compatibilità elettromagnetica (EMVG)
in sistemi e macchine, devono essere
rispettate le seguenti norme sulla compatibilità elettromagnetica:
Norma di prodotto EN 61800-3
Norma EMC per azionamenti (PowerDri-
veSystem), immunità alle interferenze ed
emissioni in aree residenziali, zone industriali con insediamenti di industria leggera
e presso stabilimenti industriali.
La norma va rispettata nell‘ambito dell‘UE
per rispondere ai requisiti di compatibilità
elettromagnetica di sistemi e macchine!
Per quanto riguarda le interferenze emesse, sono applicabili le seguenti norme:
EN 61000-6-3 Norma specifica di base per emissioni nell‘ambito dell‘industria
leggera che può essere rispettata con dispositivi speciali (filtri di
rete, cavi di potenza schermati) nelle gamme di potenza inferiori
*(EN 50081-1).
EN 61000-6-4 Norma speciale di base per le emissioni in ambito industriale
*(EN 50081-2)
Per l’immunita alle interferenze, sono applicabii le seguenti norme:
EN 61000-6-1 Norma specifica di base per l’immunità alle interferenze in
aree residenziali *(EN 50082-1)
EN 61000-6-2 Norma specifica di base per l’immunità alle interferenze in ambito
industriale. Se si ottempera a questa norma, la norma
EN 61000-6-1 viene automaticamente rispettata *(EN 50082-2).)
* Gli standard generici sono messi tra parentesi.
Norme
EN 61800-3
EN 61000-6/3
presso il cliente
conforme
EN 61000-6/3
EN 61000-6-2
EN 61000-6-1
italiano
PDS categoria C3
PDS categoria C4
Classificazione
La seguente panoramica utilizza la terminologia e indica gli
interventi richiesti in conformità
alla Norma di prodotto
EN 61800-3.
Per i convertitori DCS550, i
valori limite per le interferenze
emesse sono rispettati purché
vengano eseguiti gli interventi indicati. PDS di categoria
C2 (in passato distribuzione
ristretta inprimo ambiente) è
intesa per essere installata ed
avviata solo da un professionista (presona od organizzazione
con le necessarie competenze
nell’installazione e/o avviamento di PDS incluso gli aspetti
relativi alle EMC).
Per i convertitori di potenza
privi di componenti aggiuntivi, è applicabile la seguente
avvertenza:
Questo è un prodotto di categoria C2 ai sensi delle IEC
61800-3:2004. Il prodotto può
causare interferenze radio in
aree residenziali; in tal caso
possono essere richiesti accorgimenti supplementari.
Questo schema riassuntivo
non illustra l‘alimentazione di
campo. Per quanto riguarda
i cavi di corrente di campo,
si applicano le stesse norme
che si utilizzano per i cavi del
circuito dell‘indotto.
3ADW000395R0100 DCS550 Quick guide edisf a
39
393ADW000395R0100 DCS550 Quick guide edisf a
Page 40

±90...±270 V
±
30...±90 V
±
8...±30 V
AI4
GND
GND
Power
Sense 0 V
Sense 5 V
AI3
AI1
I-act
GND
+10V
GND
-10V
DI1
DI3
DI4
DO4
DO1
3
4
5
6
9
X4:1
3
4
10
4
1
2
3
6
5
10
8
9
10
5
2
6
8
10
8
X1:1
X2:1
X3:1
X5:
SDCS-CON-F
B22_001_0_a.dsf
+
-
S2
3
4
250
S3
3
4
250
ATACH
+
-
+
-
+
-
+
-
GND
10
+
-
+
-
+
-
5V
S4
11
12
24V
K1
X96:1
t
230V
E
SDCS-PIN-F
1
3
4
6
S1
S1
1
3
S4
2
121
100nF
4
6
S4
5
121
100nF
7S48
121
100nF
10k
10k
10k
9
ChA
ChB
ChZ
ChA
ChB
ChZ
Firmware
Assegnazioni funzioni standard per I morsetti
Risoluzione
[bit]
Valori Input/
Output
Regolabile
da
Scala Note
Hardware
15 + sign ±90...270 V
±30...90 V
①
Firmware
±15 V
±8...30 V
15 + sign -10...0...+10 V Firmware ±15 V
15 + sign -10...0...+10 V Firmware ±15 V
15 + sign -10...0...+10 V Firmware ±15 V
15 + sign -10...0...+10 V Firmware ±15V
Potenza
+10 V ≤ 5 mA
-10 V ≤ 5 mA
for ext. use
e.g. refer. pot.
11 + sign -10...0...+10 V Firmware ≤ 5 mA
11 + sign -10...0...+10 V Firmware ≤ 5 mA
-10...0...+10 V Firmware+
≤ 5 mA
Hardware
Alimentazione encoder Note
8 V -> min. of
325% of [99.03] or
230% of [4.05]
Ingressi non isolati
5 V
24 V
Valore d’ingresso
0...7.3 V
7.5...50 V
≤ 250 mA
≤ 250 mA
Segnale definite da
Firmware
Valore
d’uscita
Segnale definite da
Impedenza = 120 W, se selezionato
Frequenza max. ≤ 300 kHz
Rilevare le linee GND e alimentazione
per correggere la cadute di tensione
sul cavo (solo se si utilizza
l’encoder da 5V)
Note
-> “0“ status
-> “1“ status
Note
40 3ADW000395R0100 DCS550 Quick guide edisf a40 3ADW000395R0100 DCS550 Quick guide edisf a
50 * mA
22 V at no
load
Firmware
Corrente limite per tutte le 7
uscite = 160 mA
Non applicare nessuna tensione
inversa!
* protetto al cortocircuito
① il guadagno piò essere modificato in 15 gradini tra 1 e 4 per mezzo
di parametro software
Page 41

F6
DCS550_ans_1_c.dsf
Esempio di collegamento
Configurazione dell‘azionamento convertitori F1 … F4 con eccitatrice di campo interna
Selezione dei terminali secondo la macro FACTORY (default)
italiano
3ADW000395R0100 DCS550 Quick guide edisf a
per ulteriori informazioni vedi pagina seguente
41
413ADW000395R0100 DCS550 Quick guide edisf a
Page 42

Controllo di START, STOP e E-STOP
gen_ctrl_cmd_c.dsf
Anschl_special_b.dsf
La logica a relè può essere divisa in tre parti:
a: Generazione del comandi di ON/OFF e START/STOP:
I comandi rappresentati da K20 e K21 (relè di interfaccia blocco) possono essere generati da un PLC e trasferiti ai morsetti
del convertitore mediante relè con isolamento galvanico o
direttamente tramite segnali a 24V. Non è necessario utilizzare segnali cablati. Questi comandi possono essere trasferiti
anche mediante collegamento seriale. E’ possibile anche una
soluzione mista selezionando differenti possibilità per l’uno o
l’altro segnale (vedi gruppo parametri 11).
In caso di selezione di E-STOP, l’informazione è trasferita al
convertitore tramite l’ingresso digitale 5. In caso di (arresto
con funzione di rampa o in limitazione di corrente) il convertitore decelererà il motore e poi aprirà il contattore principale.
Se il convertitore non riesce ad arrestare l’azionamento entro
il limite temporale impostato da K15, deve dare il comando di
azzeramento della corrente tramite K16. Dopo che il tempo
impostato per K16 è trascorso il contattore principale viene
aperto indipendentemente dallo stato del drive.
b: Generazione di segnali di controllo e monitoraggio:
Il contattore di potenza K1 per il circuito d’indotto è controllato da un contatto a secco (DO8) montato sulla SDCS-PIN-F,
lo stato dei ventilatori può essere monitorato per mezzo dei
segnali di riconoscimento ventilatori: MotFanAck (10.06).
c: Modalità di arresto OFF2, OFF3:
In aggiunta a ON/OFF e START/STOP l’azionamento è equipaggiato con due funzioni di stop aggiuntive: OFF2 e OFF3 in
accordo allo standard Profibus. OFF3 è una funzione di stop
selezionablile (arresto in rampa, in limitazione di corrente, in
frenatura dinamica….) per garantire un arresto in categoria 1.
Questa funzione dovrebbe essere collegata al pulsante
E-STOP con nessun tempo di ritardo. In caso di scelta di
arresto in rampa il relè temporizzato K15 deve essere tarato
con un tempo più lungo di EStopRamp (22.04). Per la scelta
COAST l’azionamento apre il contattore principale immediatamente.
OFF2 riduce la corrente a zero il più rapidamente possibile e
predispone il drive per aprire il contattore principale o togliere
l’alimentazione principale. Per un motore CC il tempo di azzeramento della corrente CC è inferiore a 20 ms. Questa funzione dovrebbe essere collegata a tutti i segnali e funzioni di
sicurezza che aprono in contattore principale. Questa funzione è importante per gli azionamenti a 4-quadranti. Non aprire
il contattore principale durante la fase di corrente rigenerativa.
E-STOP
speed
Timer K15
Timer K16
Block current control
K1 main contactor
E-Stop ramp Coast
Stop-Mode_a.dsf
E-Stop reaction
La sequenza corretta è
1. Azzerare la corrente rigenerativa
2. Poi aprire il contattore principale
42 3ADW000395R0100 DCS550 Quick guide edisf a42 3ADW000395R0100 DCS550 Quick guide edisf a
Page 43

Ventole di raffreddamento
1 2 3
X52:
4 5
L
N
230 V
AC
1 2 3
X52:
4 5
L
N
115 V
AC
M
~
1 2 3
X52:
M
~
4 5
M55 M56
M
~
1 2 3
X52:
M
~
4 5
M55 M56
M
~
M
~
M57 M58
M55
M
~
1 2 3 4 5
X52:
L
N
L
N
1 2 3
X52:
4 5
L
N
230 V
AC
1 2 3
X52:
4 5
L
N
115 V
AC
ϑ
only 230 V
AC
M55
M
~
X19:
SDCS-PIN-F
Terminals are located on top of the converter housing
Tipi di ventole per i DCS550
Unità DCS Modello Configurazione Ventole
DCS550-S01-0020, ...,
DCS550-S02-0025
DCS550-S01-0045, ...,
DCS550-S02-0100
DCS550-S01-0135, ...,
DCS550-S02-0300
DCS550-S01-0315, ...,
DCS550-S02-0450
DCS550-S01-0470, ...,
DCS550-S02-0520
DCS550-S01-0610, ...,
DCS550-S02-0820
DCS550-S01-0900, ...,
DCS550-S02-1000
F1 - no fan
F1 1 1 x 3110KL-05W... (internal 24 V
F2 2 2 x 4715MS (115 / 230 V
F3 2 2 x 4715MS (115 / 230 V
F3 3 2 x 4715MS (115 / 230 V
2 x 3115FS (115 / 230 V
F4 4 1 x W2E200 (230 V
F4 4 1 x W2E250 (230 V
)
DC
)
AC
)
AC
)
AC
)
AC
)
AC
)
AC
italiano
Collegamento delle ventole per i DCS550
Mors etti in ci ma all’inv olucro del con vertitore
Conf igurazione 1
F1
Conf igurazione 2
F2, F3
Conf igurazione 3
F3
3ADW000395R0100 DCS550 Quick guide edisf a
Conf igurazione 4
F4
43
433ADW000395R0100 DCS550 Quick guide edisf a
Page 44

Posizioni terminali sul convertitore
X2X1 X3 X4 X5
1 1 1 1 1
S5
15
6 9
S3
S2
S4
1
2
1
2
1
2
1
2
D2100
1
D2001
D2002
D1000
1 30
1
2
1
2
S1
1
42
1
2
3
10
11
12
1
82
1
42
1
2
3
7
8
9
DCS550 terminal alloc_c.dsf
1 2 3 4 5 6 7 8 9 10 1 2 3 4 5 6 7 8 9 10 1 2 3 4 5 6 7 8 9 10 1 2 3 4 5 6 7 8 9 10 1 2 3 4 5 6 7 8
Macro finder
Macro name
Main
Contactor
ON / OFF
Start/Stop
Standard
AC Static
2-wire DC cont. US
DC Static
3-wire DC cont. US
DC Pulse
3-wire Standard
AC Pulse
Torque limit
AC Static
Manual / Const
AC Pulse
Hand / Auto
Hand / Mot Pot
Motor Pot
AC Static
AC Pulse
AC Static
Torque Ctrl
AC Static
44 3ADW000395R0100 DCS550 Quick guide edisf a44 3ADW000395R0100 DCS550 Quick guide edisf a
DI function
Jog1 --> DI1
Jog2 --> DI2
Ext Fault --> DI 3
Ext Alarm --> DI4
Jog1 --> DI1
Jog2 --> DI2
Ext Fault --> DI 3
Main Cont Ack --> DI4
Fix speed1 --> DI1
Ext Fault --> DI 3
Main Cont Ack --> DI4
Fix speed1 --> DI1
Ext Fault --> DI 3
Ext Alarm --> DI4
Jog1 --> DI1
Jog2 --> DI2
Ext Fault --> DI 3
Ext Alarm --> DI4
Jog1 --> DI1
Jog2 --> DI2
Direction --> DI 3
SpC - KP, KI --> DI4
Control select --> DI2
Reference select --> DI2
Direction select --> DI 3
Motor pot up --> DI1
Motor pot down --> DI2
Direction select --> DI 3
Reference select --> DI4
Direction select --> DI 1
Motor pot up --> DI2
Motor pot down --> DI3
Motor pot minimum --> DI4
OFF2 (coast stop) --> DI1
Torque select --> DI2
Ext Fault --> DI 3
Comment DI5 --> ESTOP
Hardware I/O control x
Hardware I/O control x
Hardware I/O control x
Hardware I/O control x
Hardware I/O control
+ Torque limit
Hardware I/O control
select gain
Hardware I/O control
or field bus control
Hardware I/O control
Reference hardware or Motor
potentiometer
Hardware I/O control
Reference Motor potentiometer
Hardware I/O control
Speed control or Torque
reference
DI6 --> Reset
x
x
x
x
x
x
Abilitare una macro
Usare il di
[DCS550Wizard] 2. Macro assistant di DriveWindow Light o
Usare il browser parametro, o
tramite il pannello di controllo,
DriveWindow, o DriveWindow
Light.
usa i seguenti parametri:
ApplMacro (99.08) =
macro sceglire
Applrestore (99.07) =
YES = eseguire il comando
MacroSel (8.10) =
eseguire il comando
Nota:
Funzioni ed ingressi definiti dalla
macro possono essere cambiati piu
avanti senza restrizioni
Nota:
Schema macro vedi pagina 91 ...
Page 45

Istruzioni per la sicurezza
per convertitori in c.c. DCS / DCF / DCR
(secondo: Direttiva Bassa Tensione 73/23/CEE)
1. Prescrizioni generali
Convertitori in c.c. relativo al loro grado di protezione possono
avere durante il funzionamento parti sotto tensione non isolati,
parti mobili o rotanti e superfici con temperature elevati.
Nei casi di rimozione non ammessa di parti dell’ involucro
necessari per la protezione, di utilizzo improprio e installazione
e/o impiego non corretto sussiste grave pericolo per persone
o cose.
Ulteriori informazioni sono contenute nei rispettivi manuali.
Tutti i lavori di trasporto, installazione, messa in funzione e
manutenzione devono essere eseguiti da personale qualificato ed autorizzato (osservare le norme IEC 364, CENELEC
HD 384 o DIN VDE 0100 e IEC 664 o DIN VDE 0110 e norme
antiinfortunistiche nazionali).
Negli avvisi di sicurezza come personale qualificato, si intendono tecnici specializzati all’ installazione, il montaggio,
la messa in funzione ed il funzionamento del apparato, con
specifiche conoscenze e qualifiche.
2. Uso appropriato
I convertitori in c.c. sono componenti destinati ad essere
incorporati in impianti o macchine e devono essere installati in
armadio o in una postazione dove sia impossibile il contatto.
Se il convertitore viene integrato in una macchina, questo non
potrà essere messo in servizio affinchè la macchina stessa
non risponderà ai requisiti della Direttiva 89/392/CEE (Direttiva
Macchine); La norma EN 60204 deve essere rispettata
La messa in servizio è concessa solo se la Direttiva EMC
(89/336/CEE) viene rispettata.
I convertitori in c.c. sono conformi alle esigenze della Direttiva
Bassa Tensione 73/23/CEE. Per i convertitori in c.c. vengono
applicate le norme armonizzate della serie prEN 50178/DIN
VDE 0160 in combinazione con le norme EN 60439-1/DIN
VDE 0660 parte 500 e EN 60146/DIN VDE 0558.
Dati tecnici e indicazioni per l’ allacciamento sono riportati sia
sulla targa d’ identificazione che nella documentazione tecnica e devono essere rispettati in ogni caso.
4. Montaggio
Per il montaggio ed il raffreddamento degli apparecchi devono
essere rispettate le prescrizioni contenute nella documentazione.
I convertitori in c.c. devono essere protetti da condizioni di
lavoro inamissibili. Durante il trasporto e la manipolazione si
deve fare particolare attenzione a non piegare componenti e/o
a modificare distanze d’ isolamento. Evitare il contatto con
altri componenti elettronici o contatti elettrici.
I convertitori in c.c. contengono componenti elettronici sensibili a scariche elettrostatiche, che possono essere danneggiati
facilmente se maneggiati in modo non corretto. Componenti
elettrici non devono essere danneggiati o distrutti meccanicamente. (eventualmente potrebbe sussistere pericolo per la
salute!).
5. Collegamento elettrico
In caso di lavori sul convertitore di frequenza sotto tensione
devono essere osservate le norme antiinfortrunistiche nazionali in vigore.
L’ installazione elettrica deve essere eseguita secondo le norme vigenti (p.es. sezione cavi, dispositivi di protezione contro
sovvracorrenti, collegamento circuito di protezione equipotenziale). Ulteriori avvisi cono contenuti nella documentazione.
Indicazioni per eventuali accorgimenti antidisturbo - come
schermatura, messa a terra, disposizione di filtri e posa di
condutture - sono contenuti nella documentazione tecnica.
Queste indicazioni devono essere osservate anche in caso di
convertitori muniti di marchio CE. L’ adempimento dei limiti
richiesti dalla legislazione EMC è di reponsabilità del costruttore dell’ impianto o della macchina.
6. Funzionamento
Impianti dotati di convertitori in c.c. devono essere equipaggiati eventualmente con impianti di sorveglianza o protezione
aggiuntivi conformi alle vigenti norme di sicurezza.
Sono ammesse modifiche ai convertitori in c.c. tramite il software di gestione.
Dopo aver staccato il convertitore dalla rete di alimentazione
non si devono toccare subito parti sotto tensione e morsetti
di collegamento a causa di condensatori ancora carichi. A
questo proposito devono essere osservati i relativi indicazioni
di avvertimento presenti sul involucro del convertitore.
italiano
3. Trasporto, Immagazzinamento
Gli avvisi per il trasporto, l’ immagazinamento e la manipolazione devono essere osservati scrupolosamente.
Le condizioni climatiche secondo prEN 50178 devono essere
rispettate.
Durante il funzionamento coperchi e porte del involucro devono rimanere chiusi.
7. Manutenzione
Le prescrizioni del costruttore devono essere rispettati.
Questi avvisi di sicurezza devono essere conservati!
45
3ADW000395R0100 DCS550 Quick guide edisf a
453ADW000395R0100 DCS550 Quick guide edisf a
Page 46

Installa i DCS550 PC tools sul Tuo computer
Dopo aver inserito il DCS550 CD tutti i programmi e la documentazione necessaria per lavorare con il DCS550 saranno
automaticamente installati.
Questo include:
1. DriveWindow Light per parametrizzazione, messa in
servizio e service
2. Hitachi FDT 2.2 per caricamento firmware
3. Installazione CD del DCS550 Drive per es. DWL Wizard,
documentazione ABB
Attenzione:
Se non vuoi installare un certo programma devi solamente
saltarlo usando Cancel all’inzio del programma wizard.
− Dai lo start al PC tool DriveWindow Light
− Controlla il set di comunicazione della tua COM port
Se l’installazione non parte automaticamente:
− Vai a Start/Run cerca sul CD setup.exe. Ora fai
partire l’installazione confermando con OK
− Si consiglia l’installazione compatta per DriveWindow
Light + DCS550 add ons
Steps per collegare il Drive al PC
− La documentazione puo essere trovata in
C:\ABB\DCS550\Docu
− La documentazione puo essere trovata in
Se usi l’adattatore ExpressCard a COM port controlla la COM
port attiva abilitata dalla USB
Start=> Setting => Control Panel => System => Hardware =>
Device manager.
− L’indirizzo COM dell’intefaccia USB può cambiare dopo
la prossima procedura di boot o dopo aver scollegato e
ricollegato l’interfaccia USB.
Nota:
ExpressCard / PCMCIA to COM port provide a stable and
faster drive interface.
Rimuovi il Pannello di Controllo
Del DCS550, se presente. Premere
I blocchi per rimuovere il coperchio
Collega il drive (X34) alla
COM port del tuo PC
46 3ADW000395R0100 DCS550 Quick guide edisf a46 3ADW000395R0100 DCS550 Quick guide edisf a
L’utilizzo del DriveWindow Light o del DCS550 Panel Wizard
continua col capitolo Messa in Servizio in questo manuale.
Page 47

Messa in servizio
7. Field weakening assistant
6. Autotuning speed controller
5. Speed feedback assistant
4. Autotuning armature current controller
3. Autotuning field current controller
2. Macro assistant
1. Name plate data
Next
Next
Next
Next
Next
Next
Select specific
assistant & press Next
7. Field weakening assistant
6. Autotuning speed controller
5. Speed feedback assistant
4. Autotuning armature current controller
3. Autotuning field current controller
2. Macro assistant
1. Name plate data
Next
Next
Next
Next
Next
Next
Select specific
assistant & press Next
Pericolo! Alta tensione: questo simbolo indica la
presenza di alta tensione che può provocare
lesioni alle persone e/o Danni alle apparecchiature.
Il testo accanto al simbolo illustra eventuali
provvedimenti per evitare tale pericolo.
Avvertenza generale: questo simbolo indica un
pericolo, non connesso all’elettricità, che può
provocare lesioni gravi o mortali alle persone e/o
danni alle apparecchiature. Il testo accanto al
simbolo illustra eventuali provvedimenti per evitare
tale pericolo.
Avvertenza – scarica elettrostatica: questo
simbolo indica la presenza di scariche elettrostatiche che possono provocare danni alle apparecchiature. Il testo accanto al simbolo illustra
eventuali provvedimenti per evitare tale pericolo.
NEC protezione sovraccarico motore
Il DCS550 fornisce una protezione sovraccarico motore alla
stato solido in accordo con il NEC. La protezione di sovraccarico (ad esempio un livello di protezione in percentuale della
corrente di pieno carico del motore) può essere tarata dai
parametri del gruppo 31 e gruppo 99.
Le istruzioni si trovano ne capitolo Motor thermal model del
DCS550 Manual.
Istruzioni generali
− Questa breve routine di messa in servizio si riferisce allo
schema di collegamento contenuto nel Capitolo di questa
pubblicazione.
− Istruzioni per la sicurezza e il funzionamento – il capitolo di
questa pubblicazione.
− Raccomandazioni per tensioni di campo e motore – si veda
il Catalogo tecnico.
− In conformità alle norme DIN57 100 Parte 727 / VDE 0100
Parte 727, occorre prendere precauzioni per consentire lo
spegnimento dell’azionamento in caso di pericolo. A tal fine
non sono sufficienti gli imput digitali dell’unità o il pannello
di controllo!
Operazioni preliminari
− Controllare l’integrità dell’unità!
− Installare l’unità ed eseguire il cablaggio
− Controllare che il valore nominale e il livello della tensione di alimentazione siano corretti per sistemi elettronici e
ventilazione
− Controllare che il valore nominale e il livello della tensione di
alimentazione siano corretti per il convertitore d’armatura.
− Controllare che il valore nominale e il livello della tensione di
alimentazione siano corretti per l’alimentatore di campo
− Controllare che cablaggio / sezioni, ecc. siano corretti
− EMERGENCY STOP funziona correttamente ?
− COAST STOP funziona correttamente ?
italiano
Commissioning DriveWindow Light
Attiva il wizard nel
DriveWindow Light
Per la messa in servizio base premere il pulsante Start o scegli l’assistente specifico:
Per maggiori informazioni sul wizard, parametri, guasti e allarmi premere il pulsante Help!
3ADW000395R0100 DCS550 Quick guide edisf a
47
473ADW000395R0100 DCS550 Quick guide edisf a
Page 48

DCS550 Pannello di controllo
DCS800 QG pan ov_c.dsf
La seguente tabella elenca le funzioni dei pulsanti e le visualizzazioni del DCS550 Control Panel.
Con USISel (16.09) è possibile limitare il quantitativo di parametri visualizzati!
Caratteristiche generali del display
Parameters entered by assistant
Le seguenti modalità sono disponibili nel MAIN MENU:
1. Modalità parametri
2. Modalità Start-up assistant
a. Dati di targa
b. Assistente macro
c. Autotaratura regolatore corrente di campo
d. Autotaratura corrente d’armatura
e. Assistente retroazione di velocità
(Taratura fine della tachimetrica non è disponibile)
f. Autotaratura regolatore di velocità
g. Assistente indebolimento di campo
(usato solamente quando la vel.max. è maggiore
della vel. base))
3. Modalità macro (attualmente non usata)
4. Modalità parametri modificati (confronta con quelli di
default e visualizza quelli modificati
5. Modalità registro guasti (Visualizza storia del guasto)
6. Modalità impostazione orologio
7. Modalità backup parametri
• Copia il set parametri attivi dal drive al DCS550
Control Panel (solo in modo locale)
• Copia il set parametri dal DCS550 Control Panel al drive
(solo in modo locale)
8. Modalità impostazione I/O (attualmente non usato)
99.02 Motor 1 nominal Voltage
99.03 Motor 1 nominal current
99.04 Motor 1 base speed
20.01 Motor 1 minimum speed
20.02 Motor 1 maximum speed
99.11 Motor 1 nominal field current
30.09 Armature over current level
30.16 Motor 1 over speed
99.10 Nominal mains voltage
99.12 Motor 1 used fex type
20.05 Torque maximum
20.06 Torque minimum
20.12 Motor 1 current limit bridge 1
20.13 Motor 1 current limit bridge 2
50.04 Motor 1 encoder pulse number, if selected
50.02 Motor 1 encoder measured mode, if selected
50.13 Motor 1 tacho volt, only DWL
50.12 Motor 1 tacho adapt, only DWL
20.03 Zero speed limit
22.01 Acceleration time 1
22.02 Deceleration time 1
30.12 Motor 1 field minimum trip
44.01 Field control mode
48 3ADW000395R0100 DCS550 Quick guide edisf a48 3ADW000395R0100 DCS550 Quick guide edisf a
Page 49

Características de serie
− compacto
− alta capacidad de potencia
− operación simples
− asistentes confortables, p. ej. puesta en funcionamiento y ajuste automático
español
3ADW000395R0100 DCS550 Quick guide edisf a
49
493ADW000395R0100 DCS550 Quick guide edisf a
Page 50

Convertidores de CC DCS550
Datos técnicos
Tensión aliment. de red
230...525 V,
+/–10 %, 3~
Frecuencia 50...60 Hz,
+/–5 Hz
Aliment. comp. electrónicos
115...230 V,
–15 % / +10 %, 1~
Salida de Corriente CC 20...1,000 A
Capacidad de sobrecarga 200 %
Condiciones ambientales
Temp. ambiente 0° ... +40° C
40° ... 50°C con
reducción
Temp. de almacenamiento
–40° ... +55° C
Temp. de transporte –40° ... +70° C
Humedad relativa 5 ... 95 %, sin
condensación
(máx. 50 % entre
0°...5° C)
Grado de contaminación Clase 2
Clase de protección IP 00
Altitud < 1,000 m sobre
el nivel del mar:
corriente nominal
> 1.000 m sobre el
nivel del mar: con
reducción
E/S
Entradas digitales: 8 estándar,
hasta 14 opcionales
Salidas digitales : 5 estándar,
hasta 9 opcionales
Entradas analógicas: 4
estándar +/–10 V; 0/2…10 V,
hasta 8 opcionales +/ 20 mA;
0/4…20 mA
Salidas analógicas: 3 estándar (1x Iact) +/-10 V; 0/2…10 V,
hasta 7 opcionales –20 mA;
0/4…20 mA
Herramientas para PC
DriveWindow Light: se
incluye gratuitamente con cada
convertidor, conexión PC RS232
estándar
Homologaciones
(en la preparación 12/2011)
Programación adaptativa
bloques de funciones predefinidos
específicos del convertidor, p. ej.
• Regulador de proceso gratuito
(regulador PI
• Operaciones digitales y de E/S
Con panel de control o
herramienta de PC sin
necesidad de hardware adicional
Realimentación de velocidad
EMF
Tacómetro analógico
Generador de pulsos
Comunicación
Comunicación en serie
• Ethernet • Profibus
• CANopen • DeviceNet
• ControlNet • EtherCat
• Modbus • ProfiNet
Industrial IT© enabled
Protecciones
Monitorización de realimentación
de velocidad • Temperatura •
Sobrecarga • Velocidad excesiva
• Bloqueo del motor • Sobre
corriente del motor • Sobretensión
del motor • Sobre corriente de
campo • Sobretensión de campo
• Corriente de campo mínima
• Velocidad cero • Rizado de
corriente inducida • Sobretensión
y subtensión de red
Especificaciones de corriente, dimensiones
Tamaño
unidad
F1 20 25 12 370 x 270 x 208 14.56 x 10.65 x 8.20
45 50
65 75
90 100
F2 135 150 18 370 x 270 x 264 14.56 x 10.65 x 10.40
270 300
F3 315 350 25 459 x 270 x 310 18.07 x 10,65 x 12,25
405 450
470 520
F4 610 680 35 644 x 270 x 345 25.35 x 10.65 x 13.60
740 820
900 1000
2-Q
Corriente
nomina
DCS550-S01
IDC[A] IDC[A] 230 400 525 [ADC] al. x an. x pr. [mm] al. x an. x pr. [inch]
180 200
225 250
4-Q
Corriente
nominal
DCS550-S02
Tensión de ali-
mentación
[V
]
AC
Corrien-
te máx.
excitación
interna
Dimensiones
50 3ADW000395R0100 DCS550 Quick guide edisf a50 3ADW000395R0100 DCS550 Quick guide edisf a
Page 51

Instrucciones para el CD y de la documentación
©
2
0
1
1
A
B
B
A
u
t
o
m
a
t
i
o
n
P
r
o
d
u
t
G
m
b
H
-
A
l
l
R
i
g
h
t
R
e
e
r
e
d
3ADW 000 377 R0201 / April 2011
System configuration
WINDOWS 98, NT, 2000, XP
Acrobat Reader 4.0 or higher
Internet Explorer 5.0 or higher
I
f
t
h
e
C
D
R
O
M
w
o
n
’
t
s
t
a
r
t
a
u
t
o
m
a
t
i
c
a
l
l
y
p
l
e
a
s
e
e
x
e
c
u
t
e
S
T
A
R
T
.
B
A
T
System confirmation
Win2000, WinXP
Before installation of PC tools
remove previous version by
CONTROL PANEL of your
PC
Read more details in
Quick Guide 3ADW000191
Content
This CD ROM provides
information about DCS550 and
contains PC tools:
DWL 2.93 for DC drives
+Commissioning Wizard 1.0
+DWL AP 2.2
FDT 2.2 Firmware
download kit
+ workspace
Firmware 1.1
DCS550
Ver.: 1.10
System confirmation
Win7, Win2000, WinXP
Before installation of PC tools
remove previous version by
CONTROL PANEL of your PC
Le agradecemos la compra del convertidor de potencia
de CC y la confianza que deposita en nuestros productos.
Este folleto ha sido elaborado para garantizar su satisfacción continua con nuestro producto. El propósito de éste
es proporcionarle una visión general de los datos clave del
producto, las notas sobre EMC, las aplicaciones habituales, la
puesta en marcha y la solución de problemas.
Si necesita más información acerca del producto, ofrecemos
un CD-ROM que se suministre con el producto. El CD-ROM
forma parte de esta documentación y su contenido es el
siguiente:
Catálogo técnico (3ADW000378)
Información exhaustiva para ingenieros de sistemas de convertidores de CC completos.
Manual (3ADW000379)
Información detallada, con todas las particularidades relevantes de los componentes individuales, como dimensiones del
módulo, placas de componentes electrónicos, ventiladores y
componentes auxiliares.
También se incluye información relativa a la instalación mecánica y eléctrica.
Información detallada que contiene todos los temas importantes acerca del firmware y el ajuste de parámetros. El manual
incluye información detallada para la puesta en marcha y el
mantenimiento del convertidor en su totalidad.
Asimismo, el manual incluye los códigos de fallo y alarmas e
información para la solución de problemas.
Requisitos del sistema para usar el CD-ROM
c
− Sistema operativo
WINDOWS 7, 2000, XP
s
s
s
v
− ACROBAT READER
Si el CD-ROM no se inicia automáticamente, haga doble clic
sobre el archivo Setup.exe.
Asistencia adicional
Además le ofrecemos asistencia adicional, puesto que sólo
nos consideramos satisfechos si usted, como cliente, también
lo está con nosotros y nuestros productos.
Internet
En la página principal de ABB en
www.abb.com/dc
encontrará abundante información acerca de:
− productos de CC
− asistencia técnica
− las últimas actualizaciones
− herramientas
− descargas, etc.
No dude en visitar nuestra página.
español
Manual de servicio (3ADW000399)
Información para el mantenimiento y reparación de los convertidores.
La información adicional acerca de aplicaciones y acceso-
rios técnicos (p. ej. ampliación de hardware o interfases de
bus de campo) se describe en manuales distintos.
Véase la tabla DCS550 manuals.
Contacto
Si necesita cualquier información adicional, póngase en
contacto con su oficina ABB Drives más cercana o envíe un
correo electrónico a:
DC-Drives@de.abb.com
Facilítenos su nombre, la dirección de su empresa y número
de teléfono. Le pondremos en contacto con nuestro especialista de forma inmediata.
3ADW000395R0100 DCS550 Quick guide edisf a
51
513ADW000395R0100 DCS550 Quick guide edisf a
Page 52

Notas acerca de la EMC
Filtro de red
Convertidor
React. de linea
≤
1,2 MVA)
Red de media tensión
Para otras cargas, p.ej. sistemas de accionamiento
Funcionamiento en
red pública de baja
tensión con otras
cargas de cualquier
tipo
Para otras cargas que deben protegerse de las perturbaciones causadas por
convertidores (interferencias RF e interrupciones de conmutación)
Convertidor
alternativo
React. de linea+
capacidor Y
Funcionamiento en red
pública de baja tensión
con otras cargas de
cualquier tipo
industria ligera
Convertidor Convertidor
alternativo
Red de media tensión
≤
1,2 MVA)
Para otras cargas, p.ej. sistemas de accionamiento
Convertidor Convertidor
Funcionamiento en
red pública de baja
tensión con otras
cargas de cualquier
tipo
Para otras cargas, p.ej. sistemas de accionamiento
Para otras cargas que deben protegerse de las perturbaciones causadas por
convertidores (interferencias RF e interrupciones de conmutación)
escalones de conmutación < 20%
Filtro de red
React. de linea
Filtro de red
React. de linea
Encontrará información adicional en la publicación:
Guía técnica, capítulo:
Instalación y configuración
de un sistema de
convertidor que cumpla la
Directiva EMC
Los siguientes párrafos describen la
selección de los componentes eléctricos
conforme a las directrices de compatibilidad electromagnética (EMC).
El objetivo de las directrices EMC es, conseguir compatibilidad electromagnética con
otros productos y sistemas. Las directrices
aseguran que las emisiones del producto
en cuestión sean lo suficientemente débiles
como para no dificultar la inmunidad a
interferencias de otro producto.
Dentro del contexto de las directrices EMC
Las directrices EMC esperan que durante el
desarrollo de un producto se tengan en cuenta
las recomendaciones para EMC; sin embargo,
la EMC no puede diseñarse, sólo puede medirse cuantitativamente.
Nota sobre la conformidad EMC
El procedimiento de conformidad es responsabilidad tanto del proveedor del convertidor de
potencia como del fabricante de la máquina o
sistema implicado, en proporción a su parte en
la ampliación del equipo eléctrico en cuestión.
deben tenerse presentes dos aspectos:
− la inmunidad a interferencias del producto
− las emisiones reales del producto
Primer entorno (áreas residenciales con industria ligera) con categoría PDS C2 Segundo entorno (industria) con categorías PDS C3, C4
No aplicable, ya que la categoría C1 (canal de ventas de distribución general) queda excluida No aplicable
conforme conforme
No aplicable
conforme conforme
52 3ADW000395R0100 DCS550 Quick guide edisf a52 3ADW000395R0100 DCS550 Quick guide edisf a
Page 53

Para la conformidad con los objetivos
emv_clssif_c.dsf
Transformador
Convertidor
Análisis EMC según el caso
Transformador convertidor
con núcleo de
hierro
a tierra
(y si es
necesario con
apantallamiento a tierra)
I > 400 A
y/o
U > 500 V
Funcionamiento con transformador convertidor por separado.
Cuando en el mismo bobinado secundario existen otras cargas,
éstas deberán soportar las pausas en la conmutación
provocadas por el convertidor. En algunos casos serán
Red de media tensión
Convertidor Convertidor
alternativo
alternativo
Para otras cargas, p.ej. sistemas de accionamiento
React. de linea
Leyendas
Cable no apantallado con
restricciones
Cable apantallado
I
DC
< 100 A
I
DC
< 100 A
I
DC
>100 A
Red de 400 V con puesta a
tierra y conductor neutro;
3~≤ 400 A
Operation at low-voltage network together with
Red de media tensión
≤
1,2 MVA)
Para otras cargas, p.ej. sistemas de accionamiento
alternativo
alternativo
Convertidor Convertidor
escalones de conmutación < 40%
React. de linea React. de linea
Filtro de red
Convertidor
React. de linea+
capacidor Y
de protección del acta alemana de EMC
(EMVG) en máquinas y sistemas, deben
cumplirse las siguientes normas EMC:
Norma de producto EN 61800-3
EMC para sistemas de convertidores
(PowerDriveSystem), inmunidad a interferencias y emisiones en áreas residenciales, zonas empresariales con industria ligera y en instalaciones industriales.
Esta norma debe cumplirse en la UE
para satisfacer los requisitos EMC de
sistemas y de máquinas
Para la emisión de interferencias se aplica lo siguiente:
EN 61000-6-3 Norma básica especializada para emisiones en la industria ligera
que puede cumplirse con características especiales (filtros de red,
cables de potencia apantallados) en las especificaciones
nominales más bajas *(EN 50081-1).
EN 61000-6-4 Norma básica especializada para emisiones en la industria
*(EN 50081-2)
Para la inmunidad frente a interferencias se aplica lo siguiente:
EN 61000-6-1 Norma básica especializada para la inmunidad frente a
interferencias en áreas residenciales *(EN 50082-1)
EN 61000-6-2 Norma básica especializada para la inmunidad frente a i
nterferencias en la industria. Si se cumple esta norma, también
se cumple automáticamente la norma EN 61000-6-1
*(EN 50082-2)
* Las normas genéricas se muestran entre paréntesis
Normas
EN 61800-3
EN 61000-6/3
Categoría PDS C3
a petición del cliente
Categoría PDS C4
conforme
EN 61000-6/3
EN 61000-6-2
EN 61000-6-1
Clas ificación
La siguiente descripción general
utiliza la terminología e indica las
acciones necesarias conforme a la
norma de producto EN 61800-3 .
Para la serie DCS550 se cumplen
los valores límite de emisión de
interferencias, a condición de que se
realicen las medidas indicadas. Los
PDS de categoría C2 (antes distribución restringida en primer entorno)
están pensados para ser instalados y
puestos en funcionamiento sólo por
un profesional (persona u organización con los conocimientos necesarios sobre la instalación y/o puesta en
funcionamiento de PDS, incluidos los
aspectos relativos a la EMC).
La advertencia siguiente es aplicable
para convertidores de potencia sin
componentes adicionales:
Este producto es de categoría C2
conforme a la norma IEC 618003:2004. Este producto puede causar
interferencias de radiofrecuencia en
un entorno doméstico o residencial,
en cuyo caso puede ser necesario
tomar acciones correctoras suplementarias.
español
3ADW000395R0100 DCS550 Quick guide edisf a
53
533ADW000395R0100 DCS550 Quick guide edisf a
Page 54

±90...±270 V
±
30...±90 V
±
8...±30 V
AI4
GND
GND
Power
Sense 0 V
Sense 5 V
AI3
AI1
I-act
GND
+10V
GND
-10V
DI1
DI3
DI4
DO4
DO1
3
4
5
6
9
X4:1
3
4
10
4
1
2
3
6
5
10
8
9
10
5
2
6
8
10
8
X1:1
X2:1
X3:1
X5:
SDCS-CON-F
B22_001_0_a.dsf
+
-
S2
3
4
250
S3
3
4
250
ATACH
+
-
+
-
+
-
+
-
GND
10
+
-
+
-
+
-
5V
S4
11
12
24V
K1
X96:1
t
230V
E
SDCS-PIN-F
1
3
4
6
S1
S1
1
3
S4
2
121
100nF
4
6
S4
5
121
100nF
7S48
121
100nF
10k
10k
10k
9
ChA
ChB
ChZ
ChA
ChB
ChZ
Firmware
Alimentac. del generador de pulsos
Asignaciones de funciones estándar para los terminales
Resolución
[bits]
15 + señal ±90...270 V
Valores de
entrada/salida
Hardware
±30...90 V
Escalado
mediante
①
Firmware
Rango de
modo
común
±15 V
Comentarios
±8...30 V
15 + señal -10...0...+10 V Firmware ±15 V
15 + señal -10...0...+10 V Firmware ±15 V
15 + señal -10...0...+10 V Firmware ±15 V
15 + señal -10...0...+10 V Firmware ±15V
Potencia
+10 V ≤ 5 mA
-10 V ≤ 5 mA
para uso ext.
p. ej. pot. de
ref..
11 más sig. -10...0...+10 V Firmware ≤ 5 mA
11 más sig. -10...0...+10 V Firmware ≤ 5 mA
-10...0...+10 V Firmware+
≤ 5 mA
Hardware
Comentarios
8 V -> min. de
325% of [99.03] o
230% de [4.05]
Entradas no aisladas
5 V
24 V
Valor de entrada
0...7.3 V
7.5...50 V
≤ 250 mA
≤ 250 mA
Señal
definida
mediante
Firmware
Valor de salida
Señal
definida
mediante
Impedancia = 120 W,si se selecciona
frecuencia máx. ≤ 300 kHz
Líneas de detección de tierra y
alimentación para corregir caídas de
tensión en el cable
(sólo si se emplea el generador
de pulsos de 5 V)
Comentarios
-> “0“ estado
-> “1“ estado
Comentarios
54 3ADW000395R0100 DCS550 Quick guide edisf a54 3ADW000395R0100 DCS550 Quick guide edisf a
50 * mA
22 V sin carga
Firmware
Límite de corriente para las 7
salidas = 160 mA
No aplique tensiones
inversas!
* protección contra cortocircuitos
① la ganancia puede modificarse en 15 pasos entre 1 y 4 mediante
parámetros de software
Page 55

F6
DCS550_ans_1_c.dsf
Ejemplo de conexión
Configuración de los convertidores F1...F4 utilizando un excitador de campo‚ incorporado‘
Selección del terminal según la macro de fábrica (FACTORY) (por defecto)
español
3ADW000395R0100 DCS550 Quick guide edisf a
para más información véase la página siguiente
55
553ADW000395R0100 DCS550 Quick guide edisf a
Page 56

Control de marcha, paro y paro de emergencia (E-STOP)
gen_ctrl_cmd_c.dsf
Anschl_special_b.dsf
Stop-Mode_b.dsf
La lógica de relé puede dividirse en tres partes:
a: Generación de las órdenes ON/OFF (activado/desactivado)
y START/STOP (marcha/paro):
Los comandos representados por K20 y K21 (relé de interfaz
de bloqueo) pueden generarse, p. ej., mediante un PLC y
transferirse a los terminales del convertidor ya sea a través de
relés, utilizando aislamiento galvánico o directamente a través
de señales de 24 V.
Estas órdenes también se pueden transferir mediante comunicación serial. Incluso puede optarse por una solución mixta
mediante la selección de posibilidades distintas para cada
señal (véase el grupo de parámetros 11).
En caso de que se pulse el botón de paro de emergencia, la
información se transfiere al convertidor a través de la entrada digital 5. En caso de selección de paro por rampa o par
máximo, el convertidor desacelera el motor y luego abre el
contactor principal.
Si el convertidor no ha terminado la función dentro del ajuste
de tiempo del temporizador K15, el convertidor debe recibir la
orden de desconectar la corriente a través del K16. Una vez
transcurrido el tiempo ajustado en K16, el contactor principal
se abre independientemente del estado del convertidor.
b: Generación de las señales de control y supervisión:
El contactor principal K1 para el circuito del inducido está
controlado por un contacto seco (SD 8) situado en el SDCSPIN-F. El estado de los ventiladores y el Klixon de los ventiladores se pueden supervisar mediante señales de confirmación del ventilador: MotFanAck (10.06).
c: Función de paro OFF2, OFF3:
Además de las funciones ON/OFF y START/STOP el convertidor dispone de dos funciones de paro adicionales, OFF2
y OFF3, de acuerdo con la norma Profibus. OFF3 es una
función de paro escalable (paro por rampa, paro por par
máximo, freno dinámico, etc.) para la categoría de paro 1.
Esta función debe conectarse al botón de paro de emergencia (E-STOP) sin ninguna demora. En caso de una selección
de paro por rampa, el relé temporizador K15 debe ajustarse
a un tiempo superior al del parámetro EStopRamp (22.04).
Para la selección de paro libre (COAST), el convertidor abre el
contactor inmediatamente.
OFF2 desconecta la corriente de CC lo mas rápidamente
posible y prepara el convertidor para la apertura del contactor
principal o para disminuir la alimentación de red. Para una
carga normal del motor de CC el tiempo de desconexión de la
corriente de CC está por debajo de 20 ms. Esta función debe
conectarse a todas las señales y funciones de seguridad que
abran el contactor principal. Esta función es importante para
convertidores de 4 cuadrantes. No abra el contactor principal
durante la corriente regenerativa.
Reacción a una parada de emergencia
La secuencia correcta es:
1. desconectar la corriente regenerativa
2. abrir el contactor principal
56 3ADW000395R0100 DCS550 Quick guide edisf a56 3ADW000395R0100 DCS550 Quick guide edisf a
Page 57

Conexión de alimentación del ventilador
1 2 3
X52:
4 5
L
N
230 V
AC
1 2 3
X52:
4 5
L
N
115 V
AC
M
~
1 2 3
X52:
M
~
4 5
M55 M56
M
~
1 2 3
X52:
M
~
4 5
M55 M56
M
~
M
~
M57 M58
M55
M
~
1 2 3 4 5
X52:
L
N
L
N
1 2 3
X52:
4 5
L
N
230 V
AC
1 2 3
X52:
4 5
L
N
115 V
AC
ϑ
only 230 V
AC
M55
M
~
X19:
SDCS-PIN-F
Terminals are located on top of the converter housing
Asignación de ventiladores para DCS550
Tipo de convertidor Modelo Configuración Tensión del ventilado
DCS550-S01-0020, ...,
DCS550-S02-0025
DCS550-S01-0045, ...,
DCS550-S02-0100
DCS550-S01-0135, ...,
DCS550-S02-0300
DCS550-S01-0315, ...,
DCS550-S02-0450
DCS550-S01-0470, ...,
DCS550-S02-0520
DCS550-S01-0610, ...,
DCS550-S02-0820
DCS550-S01-0900, ...,
DCS550-S02-1000
F1 - sin ventilador
F1 1 1 x 3110KL-05W... (internal 24 V
F2 2 2 x 4715MS (115 / 230 V
F3 2 2 x 4715MS (115 / 230 V
F3 3 2 x 4715MS (115 / 230 V
2 x 3115FS (115 / 230 V
F4 4 1 x W2E200 (230 V
F4 4 1 x W2E250 (230 V
)
DC
)
AC
)
AC
)
AC
)
AC
)
AC
)
AC
Conexión del ventilador para DCS550
Terminales en la part e superior de la carcasa del conve rtidor
español
Conf iguración 1
F1
Conf iguración 2
F2, F3
Conf iguración 3
F3
3ADW000395R0100 DCS550 Quick guide edisf a
Conf iguración 4
F4
57
573ADW000395R0100 DCS550 Quick guide edisf a
Page 58

Ubicación de los terminales en el convertidor
X2X1 X3 X4 X5
1 1 1 1 1
S5
15
6 9
S3
S2
S4
1
2
1
2
1
2
1
2
D2100
1
D2001
D2002
D1000
1 30
1
2
1
2
S1
1
42
1
2
3
10
11
12
1
82
1
42
1
2
3
7
8
9
DCS550 terminal alloc_c.dsf
1 2 3 4 5 6 7 8 9 10 1 2 3 4 5 6 7 8 9 10 1 2 3 4 5 6 7 8 9 10 1 2 3 4 5 6 7 8 9 10 1 2 3 4 5 6 7 8
Macro finder
Macro name
Main
Contactor
ON / OFF
Start/Stop
Standard
AC Static
2-wire DC cont. US
DC Static
3-wire DC cont. US
DC Pulse
3-wire Standard
AC Pulse
Torque limit
AC Static
Manual / Const
AC Pulse
Hand / Auto
Hand / Mot Pot
Motor Pot
AC Static
AC Pulse
AC Static
Torque Ctrl
AC Static
58 3ADW000395R0100 DCS550 Quick guide edisf a58 3ADW000395R0100 DCS550 Quick guide edisf a
DI function
Jog1 --> DI1
Jog2 --> DI2
Ext Fault --> DI 3
Ext Alarm --> DI4
Jog1 --> DI1
Jog2 --> DI2
Ext Fault --> DI 3
Main Cont Ack --> DI4
Fix speed1 --> DI1
Ext Fault --> DI 3
Main Cont Ack --> DI4
Fix speed1 --> DI1
Ext Fault --> DI 3
Ext Alarm --> DI4
Jog1 --> DI1
Jog2 --> DI2
Ext Fault --> DI 3
Ext Alarm --> DI4
Jog1 --> DI1
Jog2 --> DI2
Direction --> DI 3
SpC - KP, KI --> DI4
Control select --> DI2
Reference select --> DI2
Direction select --> DI 3
Motor pot up --> DI1
Motor pot down --> DI2
Direction select --> DI 3
Reference select --> DI4
Direction select --> DI 1
Motor pot up --> DI2
Motor pot down --> DI3
Motor pot minimum --> DI4
OFF2 (coast stop) --> DI1
Torque select --> DI2
Ext Fault --> DI 3
Comment DI5 --> ESTOP
Hardware I/O control x
Hardware I/O control x
Hardware I/O control x
Hardware I/O control x
Hardware I/O control
+ Torque limit
Hardware I/O control
select gain
Hardware I/O control
or field bus control
Hardware I/O control
Reference hardware or Motor
potentiometer
Hardware I/O control
Reference Motor potentiometer
Hardware I/O control
Speed control or Torque
reference
DI6 --> Reset
x
x
x
x
x
x
Habilitar un macro
Use el
[DCS550Wizard] 2. Macro assistant of DriveWindow Light ò
Para utilizar el navegador de
parámetros, ya sea a través del
panel de control, DriveWindow,
o DriveWindow Light.
Utilice los siguientes parámetros:
ApplMacro (99.08) =
seleccionar
Applrestore (99.07) =
YES = ejecutar el comando
MacroSel (8.10) =
observando
Nota
Las funciones y las entradas definidos por la macro se pueden cambiar más tarde sin restricciones
Nota
Para el diagrama del macro consulte
la página 91 ...
Page 59

Instrucciones de seguridad
para convertidores de accionamiento DCS / DCF / DCR
(según: directriz de baja tensión 73/23/CEE)
1. General
Durante el servicio los convertidores de accionamiento pueden - según su tipo de protección - tener partes conduciendo
corrientes, desnudos y dado el caso también partes móviles y
rotantes, asi como superficies calientes.
Al quitar inadmisiblemente el cubrimiento necesario, aplicación inadecuada, falso montaje o manejo hay el peligro de
graves daños personales y materiales.
Otras informaciones son indicadas en la documentación.
Todos los trabajos para el transporte, la conexión, la puesta
en funcionamiento y el mantenimiento deben ser ejecutados
por el responsable personal cualificado (observar IEC 364
resp. CENELEC HD 384 o DIN VDE 0100 y IEC 664 o DIN
VDE 0110 y las instrucciones nacionales para la prevención
de accidentes).
Personal cualificado para los efectos de estas instrucciones
de seguridad fundamentales son personas que son familiarizados con la instalación, el montaje, la puesta en funcionamiento y el servicio del producto y que tienen las respectivas
cualificaciones para su trabajo.
2. Aplicación de conformidad con las instrucciones
Convertidores de accionamiento son componentes destinados para el montaje en instalaciones eléctricas o máquinas
y se montan en un armario o en una zona protegida contra
contactos.
Al instalarlos en máquinas la puesta en funcionamiento de
los convertidores de accionamiento (es decir el arranque del
servicio normal) es prohibida hasta que la conformidad de la
máquina con la directriz de la CE 89/392/CEE (directriz de
máquinas) hizo constado; observar EN 60204.
La puesta en funcionamiento (es decir el arranque del servicio
normal) se permite solamente si la directriz de CEE (89/336/
CEE) es observada.
Los convertidores de accionamiento responden a las especificaciones de la directriz de baja tensión 73/23/CEE. Las
normas harmonizadas de la serie prEN 50178/DIN VDE 0160
junto con la EN 60439-1/VDE 0660 Parte 500 y EN 60146/
VDE 0558 se aplican a los convertidores de accionamiento.
Los datos técnicos asi como las instrucciones para la conexión se indican sobre la placa de carácteristicas y en la
documentación y deben ser observados estrictamente.
4. Instalación
La instalación y la refrigeración de los aparatos han de ser
ejecutadas según las especificaciones de la documentación
correspondiente.
Los convertidores de accionamiento deben ser protegidos
contra cargas inadmisibles. En particular no se admiten componentes deformados y/o distancias de aislamiento modificadas resultando del transporte y del manejo. No tocar los
componentes electrónicos y los contactos.
Los convertidores de accionamiento contienen componentes
electrostáticamente sensitivos, que pueden ser dañados por
un manejo inadecuado. Componentes eléctricos no deben
ser dañados y deteriorados mecánicamente (posiblemente
perjudicial a la salud!).
5. Conexión electrica
Para trabajos a los convertidores de accionamiento bajo tensión se deben observar las vigentes instrucciones nacionales
para la prevención de accidentes (p.e. VBG 4).
La instalación eléctrica debe ser ejecutada según las instrucciones correspondientes (p.e. secciones transversales de las
líneas, fusibles, conexión del conductor de protección). Otras
informaciones son indicadas en la documentación.
Instrucciones para la instalación conforme a las especificaciones CEM - como pantalla, puesta a tierra, colocación de
filtros y cableado - son indicadas en la documentación del
convertidor de accionamiento. También para los convertidores
de accionamiento con una identificación CE estas instrucciones siempre han de ser observadas. El fabricante de la
instalación o máquina es responsable para la observación de
los valores límites fijados por la ley de CEM.
6. Funcionamiento
En caso de necesidad las instalaciones que tienen convertidores de accionamiento han de ser provistas de dispositivos
de vigilanica y de protección adicionales según las directrices
en razón de la seguridad, por ejemplo la ley sobre equipos
técnicos, instrucciones para la prevención de accidentes etc.
No se permiten modificaciones de los convertidores de accionamiento mediante del software de control.
Despúes de haber desconectado los convertidores de accionamiento de la tensión de alimentación no tocar inmediatamente los partes de aparatos bajo tensión y los cables de
potencia a causa de condensadores posiblemente cargados.
Observar las respectivas placas indicadoras y identificaciones
sobre el convertidor de accionamiento.
Durante el servicio todos los cubrimientos y las puertas han
de quedarse cerrados.
español
3. Transporte, almacenamiento
Las instrucciones para el transporte, el almacenamiento y el
manejo adecuado deben ser observadas.
Las condiciones climáticas deben responder a la prEN 50178
7. Mantenimiento y conservación
Observar la documentación del fabricante.
Quédese Vd. estas instrucciones de seguridad!
3ADW000395R0100 DCS550 Quick guide edisf a
59
593ADW000395R0100 DCS550 Quick guide edisf a
Page 60

Cómo instalar las herramientas para PC del DCS550
Una vez insertado el CD del DCS550, todos los programas y
documentación necesarios para trabajar con el convertidor se
instalan automáticamente. Esto incluye:
1. DriveWindow Light para la parametrización, puesta en
funcionamiento y servicio
2. Hitachi FDT 2.2 para la descarga del firmware
3. CD de instalación del convertidor DCS550, p. ej. el
asistente DWL y documentos de ABB
Atención:
Si no desea instalar un programa en concreto, simplemente
ignórelo mediante la opción cancelar (Cancel) al inicio del
asistente del programa.
− Inicie la herramienta de PC DriveWindow Light
− Compruebe los ajustes de comunicación para el puerto
COM
Si la instalación rutinaria no se inicia automáticamente:
− Vaya a Start/Run y busque el archivo setup.exe en el CD.
Ahora inicie la instalación tras confirmar con OK
− Se recomienda la instalación compacta para DriveWindow
Light + DCS550 add ons
Pasos para la conexión del convertidor a un ordenador
− La documentación se encuentra en
C:\ABB\DCS550\Docu
− Retire la cubierta de diseño del módulo del convertidor
Si utiliza conexión ExpressCard para la interfaz del puerto
COM o adaptadores PCMCIA / COM compruebe bien el COM
activo habilitado
Start => Settings => Control Panel => System => Hardware
=> Device Manager
− La dirección COM de la interfaz USB puede cambiar
después del siguiente proceso de arranque o después de
desconectar y volver a conectar la interfaz USB.
Nota:
El ExpressCard / PCMCIA en el puerto COM proporciona una
interfaz del convertidor más estable y rápida.
Retire el panel de control del
DCS550 si está colocado. Libere
los bloqueos para retirar la cubierta
Conecte el convertidor (X34) al
puerto COM de su PC
60 3ADW000395R0100 DCS550 Quick guide edisf a60 3ADW000395R0100 DCS550 Quick guide edisf a
Utilice DriveWindow Light o el Panel Wizard del DCS550 y
continúe con el capítulo Puesta en funcionamiento del manual.
Page 61

Puesta en funcionamiento
7. Field weakening assistant
6. Autotuning speed controller
5. Speed feedback assistant
4. Autotuning armature current controller
3. Autotuning field current controller
2. Macro assistant
1. Name plate data
Next
Next
Next
Next
Next
Next
Select specific
assistant & press Next
7. Field weakening assistant
6. Autotuning speed controller
5. Speed feedback assistant
4. Autotuning armature current controller
3. Autotuning field current controller
2. Macro assistant
1. Name plate data
Next
Next
Next
Next
Next
Next
Select specific
assistant & press Next
¡Peligro! Alta tensión: este símbolo previene de
altas tensiones que pueden causar lesiones físicas
y/o daños al equipo. Cuando procede, el texto
impreso al lado de este símbolo describe cómo
prevenir este tipo de riesgo.
Advertencia general: este símbolo previene de
riesgos y peligros no relacionados con la electricidad que pueden causar lesiones físicas graves o
incluso la muerte y/o daños al equipo. Cuando
procede, el texto impreso al lado de este símbolo
describe cómo prevenir este tipo de riesgo.
Advertencia sobre descargas electrostáticas:
este símbolo previene de descargas electrostáticas que podrían dañar la unidad. Cuando procede, el texto impreso al lado de este símbolo
describe cómo prevenir este tipo de riesgo.
Protección NEC contra sobrecarga del motor
El convertidor DCS550 proporciona una sólida protección
contra sobrecarga del motor de confor-midad con el Código
Eléctrico Nacional de EE.UU (NEC). La protección contra sobrecarga (p. ej. nivel de protección en porcentaje de corriente
a plena carga del motor) puede ajustarse mediante los grupos
de parámetros 31 y 99. Las instrucciones se encuentran en el
capítulo Modelo térmico del motor del manual del DCS550.
Puesta en funcionamiento de DriveWindow Light
Instrucciones generales
− Esta puesta en funcionamiento corta hace referencia al
Capítulo Ejemplos de conexión de esta publicación.
− Instrucciones de seguridad (capítulo de esta publicación).
− Recomendación para tensiones del motor y de campo
(véase Catálogo técnico).
− Conforme a la DIN 57 100 Parte 727 / VDE 0100 Parte
727, deben adoptarse precauciones que permitan apagar
el convertidor, p. ej., en caso de peligro. Las entradas digitales de la unidad o el panel de control no son suficientes
como única medida para dicho propósito.
Preparativos
− Compruebe si existen daños en la unidad
− Instale la unidad y efectúe las conexiones eléctricas
− Compruebe que el nivel de tensión de alimentación / el
valor nominal son correctos para el equipo electrónico y el
ventilador
− Compruebe que el valor nominal / nivel de tensión de
alimentación son correctos para el convertidor de circuito
del inducido
− Compruebe que el valor nominal / nivel de tensión de alimentación son correctos para la alimentación de campo
− Compruebe que las conexiones eléctricas / secciones
transversales, etc. son correctas
− Compruebe que el PARO DE EMERGENCIA funciona
correctamente
− Compruebe que el PARO LIBRE funciona correctamente
español
nicie el asistente en
DriveWindow Light
Para una puesta en funcionamiento básica pulse el botón de inicio (Start) o seleccione un
asistente concreto:
Para obtener más información acerca del asistente, parámetros y alarmas pulse el botón de
ayuda (Help)
3ADW000395R0100 DCS550 Quick guide edisf a
61
613ADW000395R0100 DCS550 Quick guide edisf a
Page 62

Panel de control del DCS550
DCS800 QG pan ov_c.dsf
La siguiente tabla resume las funciones de los botones y la muestra del Panel de Control del DCS550.
Con USISel (16.09) puede limitarse la cantidad de parámetros visualizados
Características generales de la pantalla
Parámetros introducidos por el asistente
Los modos disponibles en el menú principal (MAIN MENU)
son los siguientes:
1. Modo de parámetros
2. Modo de asistente de puesta en marcha
a. Datos de la placa de características
b. Asistente de macros
c. Autoajuste del regulador de corriente de campo
d. Autoajuste del regulador de corriente del inducido
e. Asistente de velocidad de realimentación(ajuste de
precisión del tacómetro no disponible)
f. Autoajuste del regulador de velocidad
g. Asistente de debilitamiento de campo
(sólo se utiliza cuando la velocidad máxima es
superior a la básica)
3. Modo de macros (actualmente no se usa)
4. Modo de parámetros modificados (compara los valores
99.02 Tensión nominal del motor 1
99.03 Corriente nominal del motor 1
99.04 Velocidad básica del motor 1
20.01 Velocidad mínima del motor 1
20.02 Velocidad máxima del motor 1
99.11 Corriente de campo nominal del motor 1
30.09 Nivel de sobre corriente del inducido
30.16 Velocidad excesiva del motor 1
99.10 Tensión de red nominal
99.12 Excitación de campo utilizada en motor 1
20.05 Par máximo
20.06 Par mínimo
20.12 Puente 1 de límite de corriente del motor 1
20.13 Puente 2 de límite de corriente del motor 1
50.04 Número de pulsos del generador del motor 1,
por defecto y muestra los parámetros modificados)
5. Modo del registrador de fallos (muestra el historial de
50.02 Modo de generador de pulsos medido del
fallos)
6. Modo de ajuste del reloj
7. Modo de copia de seguridad de parámetros
• copia el conjunto de parámetros activos del convertidor
al panel de control del DCS550 (sólo en modo local)
• copia el conjunto de parámetros del panel de control
del DCS550 al convertidor (sólo en modo local)
8. Modo de ajustes de E/S (actualmente no se usa)
50.13 Tensión del tacómetro del motor 1, sólo DWL
50.12 Adapt. del tacómetro del motor 1, sólo DWL
20.03 Límite de velocidad cero
22.01 Tiempo de aceleración 1
22.02 Tiempo de deceleración 1
30.12 Disparo mínimo de campo del motor 1
44.01 Modo de control de campo
si se selecciona
motor 1, si se selecciona
62 3ADW000395R0100 DCS550 Quick guide edisf a62 3ADW000395R0100 DCS550 Quick guide edisf a
Page 63

La performance en standard
− Compacité
− Puissance
− Simplicité
− Convivialité (autocalibrage des régulateurs et assistants de mise en service)
français
633ADW000395R0100 DCS550 Quick guide edisf a 633ADW000395R0100 DCS550 Quick guide edisf a
Page 64

Variateurs à courant continu DCS550
Caractéristiques
techniques
Tension réseau 230 à 525 V,
+/–10 %, 3~
Fréquence 50 à 60 Hz,
+/–5 Hz
Alimentation
électronique 115 à 230 V,
–15 % / +10 %, 1~
Courant sortie CC 20 à 1000 A
Capacité
de surcharge 200 %
Contraintes d’environnement
Tempér. ambiante 0 à +40 °C
40 à 50 °C avec
déclassement
Tempér. stockage –40 à +55 °C
Tempér. transport –40 à +70 °C
Humidité relative 5 à 95 % sans
condensation
(50 % maxi entre 0
et 5 °C)
Degré de pollution Classe 2
Degré de protection IP 00
Altitude < 1000 m sans
réduction du
courant nominal
> 1000 m avec
réduction du
courant
Entrées/sorties
Entrées logiques :
extensible jusqu’à 14 (bloc optionnel)
Sorties logiques :
extensible jusqu’à 9 (bloc optionnel)
Entrées analogiques :
standard +/–10 V; 0/2…10 V,
extensible jusqu’à 8 (bloc optionnel)
+/ 20 mA; 0/4…20 mA
Sorties analogiques :
en standard (1x I
0/2…10 V, extensible jusqu’à
7 (bloc optionnel) –20 mA;
0/4…20 mA
8 en standard,
5 en standard,
4 en
3
) +/-10 V;
réel
Outils logiciels PC
DriveWindow Light: fourni
gratuitement avec chaque
convertisseur, liaison RS232/PC
standard,
Marquages
(en préparation 12/2011)
Programmation adaptative
Blocs fonctions spécifiques
variateur. Ex.,
• Régulateur PI intégré (process)
• Configuration personnalisée des
E/S
Avec micro-console ou outil
logiciel PC, sans aucun
équipement supplémentaire
Mesure vitesse
EMF
Dynamo tachymétrique
Codeur
Communication
Liaison série
• Ethernet • Profibus
• CANopen • DeviceNet
• ControlNet • EtherCat
• Modbus • ProfiNet
Compatibilité Industrial IT©
Protections
Surveillance retour vitesse
• Température • Surcharge •
Survitesse • Moteur bloqué •
Surintensité moteur • Surtension
moteur • Surintensité excitation •
Surtension excitation • Courant
d‘excitation mini• Vitesse nulle
• Ondulation courant induit •
Surtension et sous-tension réseau
Valeurs nominales, dimensions
Taille 2Q
Courant nom.
DCS550-S01
IDC[A] IDC[A] 230 400 525 [ADC] h x l x p [mm] h x l x p [pouce]
F1 20 25 12 370 x 270 x 208 14.56 x 10.65 x 8.20
45 50
65 75
90 100
F2 135 150 18 370 x 270 x 264 14.56 x 10.65 x 10.40
180 200
225 250
270 300
F3 315 350 25 459 x 270 x 310 18.07 x 10,65 x 12,25
405 450
470 520
F4 610 680 35 644 x 270 x 345 25.35 x 10.65 x 13.60
740 820
900 1000
4Q
Courant nom.
DCS550-S02
Tension réseau
[V
]
AC
Courant
maxi excit.
interne
Dimensions
64 3ADW000395R0100 DCS550 Quick guide edisf a64 3ADW000395R0100 DCS550 Quick guide edisf a
Page 65

Documentation technique
©
2
0
1
1
A
B
B
A
u
t
o
m
a
t
i
o
n
P
r
o
d
u
t
G
m
b
H
-
A
l
l
R
i
g
h
t
R
e
e
r
e
d
3ADW 000 377 R0201 / April 2011
System configuration
WINDOWS 98, NT, 2000, XP
Acrobat Reader 4.0 or higher
Internet Explorer 5.0 or higher
I
f
t
h
e
C
D
R
O
M
w
o
n
’
t
s
t
a
r
t
a
u
t
o
m
a
t
i
c
a
l
l
y
p
l
e
a
s
e
e
x
e
c
u
t
e
S
T
A
R
T
.
B
A
T
System confirmation
Win2000, WinXP
Before installation of PC tools
remove previous version by
CONTROL PANEL of your
PC
Read more details in
Quick Guide 3ADW000191
Content
This CD ROM provides
information about DCS550 and
contains PC tools:
DWL 2.93 for DC drives
+Commissioning Wizard 1.0
+DWL AP 2.2
FDT 2.2 Firmware
download kit
+ workspace
Firmware 1.1
DCS550
Ver.: 1.10
System confirmation
Win7, Win2000, WinXP
Before installation of PC tools
remove previous version by
CONTROL PANEL of your PC
Vous avez acheté un variateur à courant continu ABB ; nous
vous remercions de votre confiance et mettons tout en œuvre
pour vous satisfaire.
Ce mémento a été rédigé pour vous aider à tirer le meilleur de
notre produit. Il présente de manière succincte les caractéristiques clés du variateur, les règles de CEM, les applications
types, la procédure de mise en route et de localisation des
défauts.
Pour une information détaillée, un CD-ROM accompagne ce
mémento. Il contient les documentations du variateur.
Catalogue technique (3ADW000378)
Contient toute l’information indispensable pour choisir vos
systèmes d’entraînement à courant continu.
Manuel d’installation (3ADW000379)
Détaille toutes les spécifications du variateur et de ses
composants (dimensions des modules, cartes électroniques,
ventilateurs, auxiliaires).
Décrit les procédures de montage et de raccordement des
appareils.
Détaille toutes les fonctions et tous les paramètres des variateurs avec leurs réglages, ainsi que les procédures de mise en
route et de maintenance.
Il décrit également la procédure de localisation des défauts
avec les codes d’alarme et de défaut.
Manuel de maintenance (3ADW000399)
Information sur l’entretien et la réparation des convertisseurs
Vous trouverez des informations complémentaires sur des
applications et des options (ex., cartes d’extension ou interfaces bus de terrain) dans d’autres manuels. Voir le tableau
DCS550 manuals.
Configuration requise pour lire le CD-ROM
− Système d’exploitaiton
WINDOWS 7, 2000, XP
− ACROBAT READER
c
Si le CD-ROM ne démarre pas
s
s
s
v
automatiquement, double cliquez sur Setup.exe.
Informations en ligne
Pour une satisfaction totale,
vous trouverez des informations
complémentaires sur nos domaines d‘activités et nos produits
en vous connectant sur notre site Internet à l’adresse suivante:
www.abb.com/dc
Vous y trouverez de nombreuses informations sur
− es produits courant continu
− les services
− les dernières mises à jour
− les outils logiciels
− les documents à télécharger, etc.
N’hésitez pas à vous connecter.
Contacts
Pour toute information complémentaire, contactez nos
équipes ABB Drives ou envoyez un e-mail à:
DC-Drives@de.abb.com
en précisant votre nom, les coordonnées de votre entreprise
et votre numéro de téléphone. Nous vous mettrons immédiatement en contact avec notre spécialiste.
français
3ADW000395R0100 DCS550 Quick guide edisf a
65
653ADW000395R0100 DCS550 Quick guide edisf a
Page 66

Compatibilité électromagnétique (CEM)
M
M
Mains filter
Converter
Line reactor
Supply transformer for a residential
area (rating normally
≤
1,2 MVA)
Earthed public 400-V
network with neutral
conductor
Medium-voltage network
Earthed
neutral
To other loads, e.g. drive systems
An isolating transformer
with an earthed screen
and earthed iron core
renders mains filter and
line reactor superfluous.
Operation at public
low-voltage network
together with other
loads of all kinds.
Residential area
To other loads which have to be protected from the system disturbances caused by
power converters (HF interference and commutation notches)
Converter
MM
MM
MM
alternative
alternative
Line reactor +
Y-capacitor
Medium-voltage network
Supply transformer for a residential
area (rating normally
≤
1.2 MVA)
Earthed
neutral
Earthed public 400-V
network with neutral
conductor
To other loads, e.g. drive systems
Mains filter
Line reactor
Converter Converter
Mains filter
Line reactor
Converter Converter
An isolating transformer
with an earthed screen
and earthed iron core
renders mains filter and
line reactor superfluous.
Operation at public
low-voltage network
together with other
loads of all kinds.
To other loads, e.g. drive systems
To other loads which have to be protected from the system disturbances caused by
power converters (HF interference and commutation notches)
Earthed public 400-V
network with neutral
conductor
Operation at public
low-voltage network
together with other
loads of all kinds.
Light industry
Residential area
Commutaion notches < 20%
Pour en savoir plus, cf. document:
Nous décrivons ci-après le mode de sélection des composants conformément
aux normes de CEM.
Technical Guide, chapitre :
EMC Compliant Installation
and Configuration for a
Power Drive System
L’objectif de la CEM est, d’assurer la
compatibilité électromagnétique du
variateur avec les autres produits et
systèmes de son environnement. Elle
vise à garantir un niveau d’émissions
minimal de chaque produit pour éviter
qu’il ne perturbe un autre produit de son
environnement.
Pour la CEM d’un produit, deux aspects
sont à prendre en compte:
− l’immunité aux perturbations du produit
− le niveau d’émissions effectif du produit
Premier environnement (zone résidentielle avec industrie légère) avec entraînement de puissance de catégorie C2 Deuxième environnement (industriel) avec entraînement de puissance de catégories C3, C4
Ne s‘applique pas car la catégorie C1 en est exclue (distribution non restreinte Non applicable
Conformité Conformité
Non applicable
Conformité Conformité
Les normes CEM supposent que le
comportement CEM d’un produit est pris
en compte au stade de son développement. Or la CEM n’étant pas une qualité
intrinsèque, elle ne peut être mesurée que
quantitativement.
Remarque sur la conformité CEM
La procédure de conformité relève de la
double responsabilité du fournisseur du
convertisseur de puissance et du constructeur de la machine ou du système dans
lequel il s’intégrera, ce en fonction de la
part des travaux qui leur incombe pour
l’équipement électrique.
Zone résidentielle
Neutre à la
terre
Filtre réseau
Self réseau
Convertisseur Convertisseur
Réseau moyenne tension
Transformateur d’alimentation d’une
zone résidentielle (puissance assignée
normale ≤ 1,2 MVA)
Réseau public 400 V à la terre
avec conducteur neutre
Vers autres charges, ex., systèmes d’entraînement
Industrie légère
Filtre réseau
Self réseau +
condensateur Y
Convertisseur Convertisseur
Self réseau
Réseau moyenne tension
Réseau public
400 V à la terre avec
conducteur neutre
Transformateur d’alimentation
d’une zone résidentielle (puissance
assignée normale ≤ 1,2 MVA)
Vers autres charges, ex., systèmes d’entraînement
Neutre à la terre
Filtre réseau
Self réseau
Convertisseur
Zone résidentielle
Réseau public
400 V à la terre avec
conducteur neutre
Convertisseur
tation)
Encoches de commutation < 20 %
Vers autres charges, ex., systèmes d’entraînement
66 3ADW000395R0100 DCS550 Quick guide edisf a66 3ADW000395R0100 DCS550 Quick guide edisf a
Alimentation par
le réseau public
BT alimentant
également d’autres
charges de tous
types
Un transformateur
d’isolement avec blindage et noyau de fer à
la terre évite le montage
d’un filtre réseau et
d’une self réseau
Vers autres charges qui doivent être protégées de la pollution du réseau par les
convertisseurs de puissance (perturbations HF et encoches de commutation)
autre solution
Alimentation par le
réseau public BT
alimentant également
d’autres charges de
tous types
autre solution
Alimentation par
le réseau public
BT alimentant
également d’autres
charges de tous
types
Vers autres charges qui doivent être protégées de la pollution du réseau par
Un transformateur
d’isolement avec blindage et noyau de fer à
la terre évite le montage
d’un filtre réseau et
d’une self réseau
les convertisseurs de puissance (perturbations HF et encoches de commu-
Page 67

Pour obtenir la protection CEM des
MMMM
emv_clssif_b.dsf
Converter
transformer
Case-referenced EMC analysis
alternative
Converter
transformer
with earthed
iron core
(and earthed
screen where
appropriate)
alternative
I > 400 A
and/or
U > 500 V
Operation with separate power converter transformer. If there
are other loads at the same secondary winding, these must be
able to cope with the commutation gaps caused by the power
converter. In some cases, commutating reactors will be
required.
To other loads, e.g. drive systems
Converter Converter
Line reactor
Medium-voltage network
Industrial
zone
Légende
Câble non blindé avec restriction
Câble blindé
MM
MM
MM
I
DC
< 100 A
I
DC
< 100 A
I
DC
>100 A
Supply transformer for a
residential area (rating
normally
≤
1.2 MVA)
Earthed 400-V network
with neutral conductor
;
3~
≤
400 A
Operation at low-voltage network together with
other loads of all kinds, apart from some kinds
of sensitive communication equipment.
To other loads, e.g. drive systems
Line reactor +
Y-capacitor
Line reactor
Converter Converter
Mains filter
Earthed
neutral
Medium-voltage network
Industrial zone
alternative
alternative
Line reactor
Converter
alternative
Commutation notches < 40%
systèmes et machines, les exigences
des normes CEM suivantes doivent être
satisfaites:
Norme de CEM pour les entraînements
de puissance PDS (PowerDriveSystem),
prescriptions d’immunité et d’émissions
en environnements avec industrie légère
et implantations industrielles.
Les exigences de cette norme doivent
être respectées pour une installation
conforme CEM des machines et sites
industriels au sein de l’UE.
Pour les limites d’émissions, les normes suivantes s’appliquent:
EN 61000-6-3 Norme générique Emissions, environnement d’industrie légère,
exigences respectées avec des dispositifs spéciaux (filtres réseau,
câbles de puissance blindés) pour les faibles puissances.
EN 61000-6-4 Norme générique Emissions, environnement industriel
*(EN 50081-2)
Pour les limites d’immunité, les normes suivantes s’appliquen:
EN 61000-6-1 Norme générique Immunité, residential areas *(EN 50082-1)
EN 61000-6-2 Norme générique Immunité, environnement industriel. Si les
exigences de cette norme sont satisfaites, alors celles de la
norme EN 61000-6-1 sont automatiquement satisfaites. *
(EN 50082-2)
* Les normes génériques sont indiqués entre parenthèses
Normes
EN 61800-3
EN 61000-6/3
Entraînement de catégorie C3 Entraînement de catégorie C4
Réseau moyenne tension
Transformateur d’alimenta-
Zone industrielle
Neutre à
la terre
Self réseau +
condensateur Y
Convertisseur
Alimentation par le réseau public BT alimen-
tant également d’autres charges de tous
types, à l’exception de certains moyens de
communication sensibles
tion d’une zone résidentielle
(puissance assignée normale
≤ 1,2 MVA)
Réseau 400 V à la terre
avec conducteur neutre;
Filtre réseau
Self réseau
Convertisseur
Encoches de commutation < 20 %
Self réseau
Convertisseur
Vers autres charges, ex., systèmes d’entraînement
Sur demande client Conformité
Réseau moyenne tension
Analyse CEM de cas
Convertisseur
autre solution
Transformateurconvertisseur
avec noyau de
fer à la terre
(et blindage
à la terre si
présent)
I > 400 A
et/ou
U> 500 V
Self réseau
Convertisseur
autre solution
3ADW000395R0100 DCS550 Quick guide edisf a
Zone
industrielle
Transformateur-
convertisseur
Alimentation par tansformateur séparé du convertisseur.
Si d’autres charges sont raccordées sur l’enroulement
secondaire, elles doivent offrir une bonne tenue aux encoches de commutation provoquées par le convertisseur.
Dans certains cas, des selfs réseau sont nécessaires.
EN 61000-6/3
EN 61000-6-2
EN 61000-6-1
Classification
Nous définissons ci-après la
terminologie et les mesures à
mettre en œuvre pour la conformité à la norme de produit EN
61800-3.
Pour la série DCS550, les limites
d’émissions sont respectées
pour autant que les mesures
spécifiées sont mises en œuvre.
Un entraînement de puissance
de catégorie C2 (anciennement
en distribution restreinte pour
premier environnement) est destiné à être installé et mis en ser-
français
vice uniquement par un professionnel (personne ou organisme
qui dispose des compétences
techniques requises pour l’installation et/ou la mise en service
des entraînements de puissance,
y compris les aspects CEM).
Convertisseur de puissance
sans composants supplémentaires : Il s’agit d’un produit
de catégorie C2 au titre de la
Vers autres charges, ex., systèmes d’entraînement
norme CEI 61800-3:2004. En
environnement domestique/résidentiel, il peut être à l’origine de
perturbations HF, auquel cas des
mesures appropriées d’atténuation doivent être prises.
L’excitation n’est pas illustrée
dans les schémas. Les règles
pour les câbles d’excitation sont
les mêmes que celles pour les
câbles d’induit.
67
673ADW000395R0100 DCS550 Quick guide edisf a
Page 68

±90...±270 V
±
30...±90 V
±
8...±30 V
AI4
GND
GND
Power
Sense 0 V
Sense 5 V
AI3
AI1
I-act
GND
+10V
GND
-10V
DI1
DI3
DI4
DO4
DO1
3
4
5
6
9
X4:1
3
4
10
4
1
2
3
6
5
10
8
9
10
5
2
6
8
10
8
X1:1
X2:1
X3:1
X5:
SDCS-CON-F
B22_001_0_a.dsf
+
-
S2
3
4
250
S3
3
4
250
ATACH
+
-
+
-
+
-
+
-
GND
10
+
-
+
-
+
-
5V
S4
11
12
24V
K1
X96:1
t
230V
E
SDCS-PIN-F
1
3
4
6
S1
S1
1
3
S4
2
121
100nF
4
6
S4
5
121
100nF
7S48
121
100nF
10k
10k
10k
9
ChA
ChB
ChZ
ChA
ChB
ChZ
Firmware
Raccordement standard des signaux d’E/S
Résolution
[bit]
15 + sign ±90...270 V
Valeur des
entrées/
sorties
±30...90 V
Réglage
par
①
Paramètre
Plage de
mode
commun
±15 V
Remarques
±8...30 V
15 + sign -10...0...+10 V Paramètre ±15 V
15 + sign -10...0...+10 V Paramètre ±15 V
15 + sign -10...0...+10 V Paramètre ±15 V
15 + sign -10...0...+10 V Paramètre ±15V
Puissance
+10 V ≤ 5 mA
-10 V ≤ 5 mA
11 + sign -10...0...+10 V Paramètre ≤ 5 mA
11 + sign -10...0...+10 V Paramètre ≤ 5 mA
-10...0...+10 V Paramètre
≤ 5 mA
+ cavalier
Alimentation codeur Remarques
Pour utilisation
externe ; ex.,
potentiomètre
de référence
8 V -> min. de
325% de [99.03] ou
230% de [4.05]
Entrées non isolées
5 V
24 V
Valeur
d‘entrée
0...7.3 V
7.5...50 V
≤ 250 mA
≤ 250 mA
Signal
défini par
Paramétrage
Valeur de
sortie
Signal
défini par
Impédance = 120 W, si sélectionnée
Fréquence maxi ≤ 300 kHz
Lignes de détection pour GND et alim.
pour corriger les chutes de tension
dans le câble (uniq. si codeur
5 V utilisé)
Remarques
-> état «0»
->état «1»
Remarques
68 3ADW000395R0100 DCS550 Quick guide edisf a68 3ADW000395R0100 DCS550 Quick guide edisf a
50 * mA
22 V à vide
Firmware
Limite de courant pour la totalité
des 7 sorties = 160 mA
Ne pas appliquer de tensions inverses!
* Protégée des courts-circuits
① Paramétrage du gain en 15 pas entre 1 et 4
Page 69

F6
DCS550_ans_1_c.dsf
Exemple de schéma de câblage
Configuration d’un variateur de taille F1 à F4 avec excitation intégrée
Préréglage des paramètres du macroprogramme USINE
français
3ADW000395R0100 DCS550 Quick guide edisf a
Pour des détails, cf. page suivante
69
693ADW000395R0100 DCS550 Quick guide edisf a
Page 70

Signaux de commande DEMARRAGE, ARRET et ARRET
gen_ctrl_cmd_c.dsf
Anschl_special_b.dsf
Stop-Mode_b.dsf
Rampe Arrêt Urgence
Roue libre
Contacteur princ. K1
Cde blocage courant
Arrêt d
urgence
URGENCE
La logique de commande peut être divisée en trois parties:
a: Génération des signaux ENC/DECL et DEMAR/ARRET:
ces signaux de commande représentés par les relais à
verrouillage K20 et K21 peuvent, par exemple, provenir d’un
automate (API) et être transmis sur les bornes du convertisseur soit par des relais à isolation galvanique soit directement
en utilisant des signaux 24 V.
Ces signaux peuvent également être transmis sur liaison série.
Même une solution mixte peut être réalisée, en utilisant une
option pour un signal et une autre pour un autre signal (cf.
groupe de paramètres 11).
Si le bouton d’arrêt d’urgence (E-STOP) est activé, l’information est transmise au convertisseur via l’entrée logique DI5. Si
un arrêt sur rampe ou par la limite de couple est sélectionné,
le variateur décélérera le moteur et le contacteur principal
s’ouvrira.
Si le variateur ne peut arrêter complètement le moteur au
cours de la tempo spécifiée pour K15, il doit envoyer le signal
de coupure du courant via K16. Après écoulement de la
tempo de K16, le contacteur principal s’ouvre quel que soit
l’état du variateur.
b: Génération des signaux de commande et de surveillance:
Le contacteur principal K1 de l’alimentation (puissance du variateur) est commandé par un contact sec (DO 8) de la carte
SDCS-PIN-F. L’état des ventilateurs et de leurs sondes klixon
peut être surveillé avec les signaux d’acquit du ventilateur :
AcqVentilMoteur (10.06).
c: Arrêts OFF2 (ArrUrg/RoueLibre), OFF3 (Arrêt Urgence):
Outre les types d‘arrêt ENC/DECL et DEMAR/ARRET, le variateur offre deux types d’arrêt supplémentaires, OFF2 et OFF3,
conformes Profibus. OFF3 est un type d’arrêt paramétrable
(sur rampe, limite couple, freinage dynamique, …) pour réaliser un arrêt de catégorie 1. Cette fonction doit être raccordée
au bouton d’arrêt d’urgence (E-STOP) sans temporisation.
Si un arrêt sur rampe est sélectionné, le relais temporisé K15
doit être réglé sur un délai plus long que RampArretUrgenc
(22.04). Si un arrêt en roue libre est sélectionné, le variateur
ouvre immédiatement le contacteur principal.
Le réglage OFF2 coupe le courant continu le plus vite possible et prépare le variateur à l’ouverture du contacteur principal ou à la coupure de la tension réseau. Pour une charge
moteur CC normale, le temps de coupure du courant continu
est inférieur à 20 ms. Ce type d’arrêt, important pour les variateurs 4Q, doit être raccordé à tous les signaux et fonctions
de sécurité avec ouverture du contacteur principal. Ne pas
ouvrir le contacteur principal pendant le fonctionnement en
mode régénératif.
Type d’arrêt
Séquence d’arrêt d’urgence (E-Stop)
Séquence correcte
1. coupure du courant régénératif, puis
2. ouverture du contacteur principal
70 3ADW000395R0100 DCS550 Quick guide edisf a70 3ADW000395R0100 DCS550 Quick guide edisf a
Page 71

Câblage du ventilateur
1 2 3
X52:
4 5
L
N
230 V
AC
1 2 3
X52:
4 5
L
N
115 V
AC
M
~
1 2 3
X52:
M
~
4 5
M55 M56
M
~
1 2 3
X52:
M
~
4 5
M55 M56
M
~
M
~
M57 M58
M55
M
~
1 2 3 4 5
X52:
L
N
L
N
1 2 3
X52:
4 5
L
N
230 V
AC
1 2 3
X52:
4 5
L
N
115 V
AC
ϑ
only 230 V
AC
M55
M
~
X19:
SDCS-PIN-F
Configuration 4
F4
Configuration 3
F3
Configuration 2
F2, F3
Configuration 1
F1
Terminals are located on top of the converter housing
Type de ventilateur DCS550
Type de convertisseur Taille Configuration Tension ventilateur
DCS550-S01-0020, ...,
DCS550-S02-0025
DCS550-S01-0045, ...,
DCS550-S02-0100
DCS550-S01-0135, ...,
DCS550-S02-0300
DCS550-S01-0315, ...,
DCS550-S02-0450
DCS550-S01-0470, ...,
DCS550-S02-0520
DCS550-S01-0610, ...,
DCS550-S02-0820
DCS550-S01-0900, ...,
DCS550-S02-1000
F1 - sans ventilateur
F1 1 1 x 3110KL-05W... (internal 24 V
F2 2 2 x 4715MS (115 / 230 V
F3 2 2 x 4715MS (115 / 230 V
F3 3 2 x 4715MS (115 / 230 V
2 x 3115FS (115 / 230 V
F4 4 1 x W2E200 (230 V
F4 4 1 x W2E250 (230 V
)
DC
)
AC
)
AC
)
AC
)
AC
)
AC
)
AC
Raccordement du ventilateur du DCS550
Bornier sur le dessus du convertisseur
français
3ADW000395R0100 DCS550 Quick guide edisf a
71
713ADW000395R0100 DCS550 Quick guide edisf a
Page 72

Emplacement des bornes sur le convertisseur
X2X1 X3 X4 X5
1 1 1 1 1
S5
15
6 9
S3
S2
S4
1
2
1
2
1
2
1
2
D2100
1
D2001
D2002
D1000
1 30
1
2
1
2
S1
1
42
1
2
3
10
11
12
1
82
1
42
1
2
3
7
8
9
DCS550 terminal alloc_c.dsf
1 2 3 4 5 6 7 8 9 10 1 2 3 4 5 6 7 8 9 10 1 2 3 4 5 6 7 8 9 10 1 2 3 4 5 6 7 8 9 10 1 2 3 4 5 6 7 8
Macro finder
Macro name
Main
Contactor
ON / OFF
Start/Stop
Standard
AC Static
2-wire DC cont. US
DC Static
3-wire DC cont. US
DC Pulse
3-wire Standard
AC Pulse
Torque limit
AC Static
Manual / Const
AC Pulse
Hand / Auto
Hand / Mot Pot
Motor Pot
AC Static
AC Pulse
AC Static
Torque Ctrl
AC Static
72 3ADW000395R0100 DCS550 Quick guide edisf a72 3ADW000395R0100 DCS550 Quick guide edisf a
DI function
Jog1 --> DI1
Jog2 --> DI2
Ext Fault --> DI 3
Ext Alarm --> DI4
Jog1 --> DI1
Jog2 --> DI2
Ext Fault --> DI 3
Main Cont Ack --> DI4
Fix speed1 --> DI1
Ext Fault --> DI 3
Main Cont Ack --> DI4
Fix speed1 --> DI1
Ext Fault --> DI 3
Ext Alarm --> DI4
Jog1 --> DI1
Jog2 --> DI2
Ext Fault --> DI 3
Ext Alarm --> DI4
Jog1 --> DI1
Jog2 --> DI2
Direction --> DI 3
SpC - KP, KI --> DI4
Control select --> DI2
Reference select --> DI2
Direction select --> DI 3
Motor pot up --> DI1
Motor pot down --> DI2
Direction select --> DI 3
Reference select --> DI4
Direction select --> DI 1
Motor pot up --> DI2
Motor pot down --> DI3
Motor pot minimum --> DI4
OFF2 (coast stop) --> DI1
Torque select --> DI2
Ext Fault --> DI 3
Comment DI5 --> ESTOP
Hardware I/O control x
Hardware I/O control x
Hardware I/O control x
Hardware I/O control x
Hardware I/O control
+ Torque limit
Hardware I/O control
select gain
Hardware I/O control
or field bus control
Hardware I/O control
Reference hardware or Motor
potentiometer
Hardware I/O control
Reference Motor potentiometer
Hardware I/O control
Speed control or Torque
reference
DI6 --> Reset
x
x
x
x
x
x
Faire une macro
Utiliser
[DCS550Wizard] 2. Macro
assistant des DriveWindow
Light ou
Utiliser le lecteur des paramètres, Utiliser le lecteur des
paramètres.
utiliser les paramètres suivants:
ApplMacro (99.08) =
sélectionner la macro
Applrestore (99.07) =
YES = éxécuter la commande
MacroSel (8.10) =
observant macro
Note
Fonctions et entrées définies par
une macro peuvent être changées
plus tard sans restrictions.
Note
Macro diagramme voir page 91 ...
Page 73

Consignes de sécurité et d’exploitation
pour les convertisseurs DCS / DCF / DCR
(conformes à la directive Basse Tension 73/23/CEE)
1. Généralités
Selon leur degré de protection, les convertisseurs en fonctionnement peuvent comporter des parties nues sous tension
ainsi que des pièces en mouvement ou en rotation, et des
surfaces chaudes.
L’ouverture interdite des protections, son utilisation contraire à
la destination finale, son installation incorrecte ou bien un dysfonctionnement sont susceptibles d’entraîner des blessures
graves et des dégâts matériels.
Pour en savoir plus, consultez la documentation.
Le transport, l’installation, la mise en service et la maintenance doivent être réalisés par un personnel qualifié (respect
des normes CEI 364 ou CENELEC HD 384, ou DIN VDE 100
et CEI 664 ou DIN/VDE 0110, et des règles nationales de
prévention des accidents).
«Personnel qualifié» désigne les personnes au fait des procédures d’installation, de montage, de mise en service et d’exploitation du produit, et possédant les qualifications requises
pour remplir leur mission.
2. Utilisation conforme à la destination
Les convertisseurs sont des composants destinés à être
intégrés dans des installations ou machines électriques et
doivent être montés en armoire ou être protégés des contacts
de toucher.
En cas d’incorporation à une machine, leur mise en service
(mise en exploitation normale) est interdite tant que la conformité de la machine aux exigences de la Directive Machines
89/392/CEE n’est vérifiée ; la norme EN 60024 doit être
respectée.
De même, la mise en service ne peut être réalisée que si les
exigences de la Directive CEM (89/336/CEE) sont respectées.
Les convertisseurs satisfont les exigences de la Directive
Basse Tension 73/23/CEE. Ils sont soumis aux exigences des
normes harmonisées de la série prEN 50178/DIN VDE 0160
de même qu’à celles des normes EN 60439-1/ VDE 0660,
partie 500 et EN 0146/ VDE 0558.
Les caractéristiques techniques et valeurs portées sur la
plaque signalétique et celles figurant dans la documentation
doivent rigoureusement être respectées.
3. Transport, stockage
Les consignes de transport, de stockage et d’utilisation doivent être respectées.
4. Installation
L’installation et le refroidissement des appareils doivent
respecter les consignes de la documentation fournie avec le
produit.
Les convertisseurs ne doivent être soumis à aucune
contrainte excessive. En particuier, pendant le transport et la
manutention, aucune pièce ne doit être déformée et les distances d’isolement doivent être respectées. Ne pas toucher
les composants électroniques et les pièces nues.
Les convertisseurs contiennent des composants sensibles
aux décharges électrostatiques susceptibles d’être endommagées en cas de manipulation incorrecte. Le matériel
électrique ne doit pas être endommagé ni détruit (danger pour
la santé !).
5. Raccordements électriques
En cas d’intervention sur des convertisseurs sous tension, la
réglementation en vigueur doit être respectée (ex., VBG 4).
L’installation électrique doit être conforme aux règles (ex.,
section des conducteurs, protection par fusibles, mise à la
terre). Pour en savoir plus, cf. documentation.
Les consignes d’installation pour une conformité CEM (blindage, mise à la terre, emplacement des filtres et câblage)
figurent dans la documentation qui accompagne les convertisseurs. Elles doivent être respectées dans tous les cas,
même lorsque le convertisseur porte le marquage CE. Le respect des valeurs limites imposées par la réglementation CEM
relève de la responsabilité de l’installateur ou du constructeur
de la machine.
6. Exploitation
Les installations avec convertisseurs doivent comporter des
dispositifs supplémentaires de protection et de surveillance
prévus par la réglementation en vigueur sur la sécurité (équipements de protection, prévention des accidents, etc). La
configuration et les fonctionnalités des convertisseurs peuvent
être modifiées par logiciel.
Après sectionnement de la tension réseau, ne pas toucher
immédiatement les parties actives et les bornes de puissance
du variateur car des condensateurs peuvent encore être chargés. Respectez les consignes et mises en garde figurant sur
les convertisseurs.
En cours d’exploitaiton, les portes, capots et autres protections doivent être fermés.
7. Entretien et maintenance
Consultez et respectez la documentation du constructeur.
français
Les contraintes d’environnement au titre de la norme prEN
50178 doivent être respectées.
CONSERVER CES CONSIGNES DE SECURITE EN LIEU
SUR!
3ADW000395R0100 DCS550 Quick guide edisf a
73
733ADW000395R0100 DCS550 Quick guide edisf a
Page 74

Installation des outils logiciels du DCS550 sur votre PC
Après insertion du CD-ROM du DCS550, tous les programmes et documents requis pour travailler sur le DCS550
sont automatiquement installés.
1. DriveWindow Light pour le paramétrage, la mise en service
et la maintenance
2. Hitachi FDT 2.2 pour le chargement du logiciel (firmware)
3. CD d’installation du variateur DCS550 (ex., assistant DWL,
documents ABB)
Attention:
Si vous ne désirez pas installer un programme donné, cliquez
sur Annuler (Cancel) au début de l’assistant du programme
concerné
− Démarrez le programme DriveWindow Light
− Vérifiez les réglages de communication du port COM du PC
Si l’installation n’est pas lancée automatiquement:
− Sélectionnez Démarrer/Exécuter et recherchez setup.exe
sur le CD. Lancez l’installation en cliquant sur OK
− Nous conseillons l’installation compacte de DriveWindow
Light + DCS550 add ons
Raccordement du variateur au PC
− La documentation se trouve sous
C:\ABB\DCS550\Docu
− Retirez le capot avant du module convertisseur
Si vous utilisez une interface ExpressCard-port COM ou des
adaptateurs PCMCIA / COM, revérifiez les réglages du port
COM
Démarrer => Paramètres => Panneau de configuration =>
Système => Matériel => Gestionnaire de périphériques
L’adresse du port COM attribuée pour l’interface USB peut
changer après l’initialisation du PC ou après déconnexion/
connexion de l’interface USB.
N.B.:
Le port ExpressCard / PCMCIA - COM constitue une interface
stable et à haut débit avec le variateur.
Retirez la micro-console du
DCS550 est insérée. Libérez les
clips pour retirer le capot
Raccordez le variateur via le
connecteur (X34) au port COM
du PC
74 3ADW000395R0100 DCS550 Quick guide edisf a74 3ADW000395R0100 DCS550 Quick guide edisf a
Si vous utilisez DriveWindow Light ou l’assistant de la microconsole du DCS550, continuez au chapitre Mise en service de
ce document.
Page 75

Mise en service
7. Field weakening assistant
6. Autotuning speed controller
5. Speed feedback assistant
4. Autotuning armature current controller
3. Autotuning field current controller
2. Macro assistant
1. Name plate data
Next
Next
Next
Next
Next
Next
Select specific
assistant & press Next
7. Field weakening assistant
6. Autotuning speed controller
5. Speed feedback assistant
4. Autotuning armature current controller
3. Autotuning field current controller
2. Macro assistant
1. Name plate data
Next
Next
Next
Next
Next
Next
Select specific
assistant & press Next
Danger ! Haute tension: des tensions élevées
peuvent provoquer des blessures graves et/ou
endommager le matériel. Le texte qui se rapporte
à ce symbole décrit la manière de se prémunir de
ce danger.
Mise en garde générale: ce symbole met en
garde contre des risques ou un danger d’origine
non électrique susceptible d’entraîner des blessures graves, voire mortelles, et/ou des dégâts
matériels. Le texte qui se rapporte à ce symbole
décrit la manière de se prémunir de ce danger.
Risque de décharges électrostatiques: ce
symbole attire votre attention sur les risques de
décharges électrostatiques pouvant endommager
l’appareil. Le texte qui se rapporte à ce symbole
décrit la manière de se prémunir de ce danger.
Protection contre les surcharges moteur selon NEC
Le DCS550 intègre une protection électronique contre les surcharges moteur conforme NEC. Cette protection (ex., niveau
de protection en % du courant moteur à pleine charge) peut
être réglée avec les paramètres des groupes 31 et 99.
La procédure est décrite au paragraphe Modèle thermique du
moteur du Manuel d’installation du DCS550.
Généralités
− Ce démarrage rapide se réfère au Chapitre Exemple de
schéma de câblage de ce mémento.
− Consignes de sécurité et d’exploitation - cf. Chapitre de ce
mémento.
− Conseils pour les tensions moteur et d’excitation, cf. Cata-
logue technique.
− Conformément à DIN 57 100 Partie 727 / VDE 0100 Partie
727, des mesures doivent être prises pour arrêter le variateur en cas de danger, par exemple. En effet, les entrées
logiques ou la micro-console du variateur ne suffisent pas
à cette fin!
Etapes préalables
− Vérifiez l’état du variateur (aucun dommage !)
− Installez et câblez le variateur
− Alimentation de l’électronique et du ventilateur : vérifiez les
niveaux de tension et les valeurs nominales
− Convertisseur d’induit : vérifiez les niveaux de tension et les
valeurs nominales
− Excitation : vérifiez les niveaux de tension et les valeurs
nominales
− Vérifiez, le câblage, la section des câbles, etc.
− Vérifiez le fonctionnement de l’ARRET D’URGENCE
− Vérifiez le fonctionnement de l’ARRET EN ROUE LIBRE
Mise en service de DriveWindow Light
Démarrez l’assistant (wizard)
dans DriveWindow Light
Pour une mise en service de base, enfoncez le bouton Start ou sélectionnez un assistant
spécifique:
français
Pour en savoir plus sur l’assistant de mise en service, les paramètres, les défauts et les
alarmes, cliquez sur le bouton Help!
3ADW000395R0100 DCS550 Quick guide edisf a
75
753ADW000395R0100 DCS550 Quick guide edisf a
Page 76

Micro-console DCS550
DCS800 QG pan ov_c.dsf
Description succincte des touches fonctionnelles et de l’affichage de la micro-console du DCS550.
LED d’état :
• verte allumée : fonctionnement normal
• verte clignotante : alarme
• rouge : défaut
Mode de commande
Référence locale - modification avec
touches à flèche (haut/bas)
Signal - sélectionné avec param. 34.01
Signal - sélectionné avec param. 34.08
Sens de rotation
Touche multifonction 1
Déplacement vers le haut
LOC/REM : permutation entre commande en mode Local et Externe
STOP - arrêt du variateur en mode
Local avec la micro-console DCS et
lorsque l’assistant de mise en service
est utilisé
START - démarrage du variateur en
mode Local avec la micro-console
DCS et lorsque l’assistant de mise en
service est utilisé
Signal - sélectionné avec param. 34.15
Touche multifonction 2
Déplacement vers le bas
Aide - affichage d’information contextuelle en enfonçant cette touche
(description du contenu mis en évidence
de la zone centrale de l’affichage)
Le paramètre ListeParamètres (16.09) sert à limiter le nombre de paramètres affichés!
Fonctions d’affichage
Paramètres réglés par l’assistant
Modes accessibles dans le MENU PRINCIPAL:
1. Mode Paramètres
2. Mode Assistants de mise en service
a. Données de la plaque signalétique
b. Assistant macroprogrammes
c. Autocalibrage régulateur de courant d’excitation
d. Autocalibrage régulateur de courant d’induit
e. Assistant mesure vitesse
(Réglage de précision tachy en préparation)
f. Autocalibrage régulateur de vitesse
g. Assistant défluxage
(uniquement utilisé lorsque la vitesse maxi est
supérieure à la vitesse de base)
3. Mode Macroprogrammes (en préparation)
4. Mode Paramètres modifiés (comparaison des
préréglages usine et affichage des paramètres modifiés)
5. Mode Pile défauts (historique des défauts)
6. Mode Réglage horloge
7. Mode Sauvegarde des paramètres
• copie des paramétrages du variateur dans la micro-
console DCS550 (uniquement en mode Local)
• copie des paramétrages de la micro-console DCS550
dans le variateur (uniquement en mode Local)
8. Mode Configuration E/S (en préparation)
99.02 Tension nominale moteur 1
99.03 Courant nominal moteur 1
99.04 Vitesse de base moteur 1
20.01 Vitesse mini moteur 1
20.02 Vitesse maxi moteur 1
99.11 Courant excitation nominal moteur 1
30.09 Niveau surintensité induit
30.16 Survitesse moteur 1
99.10 Tension nominale réseau
99.12 Type excitation utilisée moteur 1
20.05 Couple maxi
20.06 Couple mini
20.12 Limite courant pont 1 moteur 1
20.13 Limite courant pont 2 moteur 1
50.04 Nombre impulsions codeur moteur 1, si sélectionné
50.02 Mode mesure codeur moteur 1, si sélectionné
50.13 Tension tachy moteur 1, DWL uniq.
50.12 Réglage tachy moteur 1, DWL uniq.
20.03 Limite vitesse nulle
22.01 Temps accélération 1
22.02 Temps décélération 1
30.12 Défaut excitation mini moteur 1
44.01 Mode régulation excitation
76 3ADW000395R0100 DCS550 Quick guide edisf a76 3ADW000395R0100 DCS550 Quick guide edisf a
Page 77

Dimensions, drilling patterns and weights — Abmessungen,
Bohrbild und Gewichte — Dimensioni, schemi di foratura e pesi
— Dimensiones, patrones de taladrado y pesos — Dimensions,
perçages et poids
Module F1
DCS550-S01-0020
DCS550-S01-0045
DCS550-S01-0065
DCS550-S01-0090
DCS550-S02-0025
DCS550-S02-0050
DCS550-S02-0075
DCS550-S02-0100
Module F2
DCS550-S01-0135
DCS550-S01-0180
DCS550-S01-0225
DCS550-S01-0270
DCS550-S02-0150
DCS550-S02-0200
DCS550-S02-0250
DCS550-S02-0300
Module F3
DCS550-S01-0315
DCS550-S01-0405
DCS550-S01-0470
Dimensions in mm
Maße in mm
Dimensioni in mm
Dimensiones en mm
Dimensions en mm
Air direction
1
Luftrichtung
Direzione aria
Dirección del aire
Sens de circulation de l‘air
DCS550-S02-0350
DCS550-S02-0450
DCS550-S02-0520
1
3ADW000395R0100 DCS550 Quick guide edisf a
77
Page 78

Module F4
DCS550-S01-0610
DCS550-S01-0740
DCS550-S01-0900
DCS550-S02-0680
DCS550-S02-0820
DCS550-S02-1000
Weight appr. 38 kg
Air direction
1
Luftrichtung
Direzione aria
Dirección del aire
Sens de circulation de l‘air
78 3ADW000395R0100 DCS550 Quick guide edisf a
1
Page 79

Top view air outlet / air duct — Draufsicht Luftaustritt / Luftschacht — Vista dall‘alto uscita aria / condotto di aria — Vista en
planta salida de aire / conductos de aire — Vue de dessus sortie d‘air / conduits d‘air
3ADW000395R0100 DCS550 Quick guide edisf a
79
Page 80

Texte dans la DCS550
Texto en el DCS550 Panel,
FR
Description
DriveWindow
Microconsole,
DriveWindow Light et
AuxUnderVolt
Défaut tension auxiliaire
ArmOverCur
Surintensité,
ArmOvrCurLev (30.09)
ArmOverVolt
Surtension d’induit (circuit c.c.),
ArmOvrVoltLev (30.08)
ConvOverTemp
Echauffement anormal du pont de
puissance, MaxBridgeTemp (4.17)
M1OverTemp
Moteur 1 echauffement anormal,
M1FaultLimTemp (31.07)
M1OverLoad
Moteur 1 surcharge,
M1FaultLimLoad (31.04)
I/OBoardLoss
SP
Definición
DriveWindow
DriveWindow Light y
AuxUnderVolt
Fallo de tensión auxiliar
(Subtensión auxil.)
ArmOverCur
Sobrecorriente (Sobrecorriente),
ArmOvrCurLev (30.09)
ArmOverVolt
Sobretensión de inducido (circuito
de C.C.), ArmOvrVoltLev (30.08)
ConvOverTemp
Sobretemperatura en la sección
de potencia, MaxBridgeTemp (4.17)
M1OverTemp
Motor 1 sobretemperatura,
M1FaultLimTemp (31.07)
M1OverLoad
Motor 1 sobrecarga,
M1FaultLimLoad (31.04)
IT
MainsLowVolt
Sous-tension réseau (c.a.) ,
UnetMin1 (30.22)
MainsOvrVolt
Surtension réseau (c.a.), > 1.3 *
NomMainsVolt (99.10)
MainsNotSync
Défaut de synchronisation (c.a.),
DevLimPLL (97.13)
M1FexOverCur
Moteur 1 Surintensité EXCITATION,
M1FldOvrCurLev (30.13)
ArmCurRipple
Ondulation courant d’induit,
CurRippleSel (30.18)
Tarjetas E/S no encontradas o
faltan, comprobar parámetros gr.
94 y 98.
MainsLowVolt
Tensión Baja de red (C.A.),
UnetMin1 (30.22)
MainsOvrVolt
Sobretensión de red (C.A.), > 1.3 *
NomMainsVolt (99.10)
MainsNotSync
Fallo de sincronización (C.A.),
DevLimPLL (97.13)
M1FexOverCur
Motor 1 Sobrecorriente de la
EXCITACIÓN,
M1FldOvrCurLev (30.13)
ArmCurRipple
Rizado de la corriente (corriente)
del inducido, CurRippleSel (30.18)
Descrizione
DriveWindow
DriveWindow Light e
Testo DCS550 Pannello,
AuxUnderVolt
Guasto tensione ausiliaria
ArmOverCur
Sovracorrente,
ArmOvrCurLev (30.09)
ArmOverVolt
Sovratensione d’indotto (circuito
in c.c.), ArmOvrVoltLev (30.08)
ConvOverTemp
Sovratemperatura sezione di
potenza, MaxBridgeTemp (4.17)
M1OverTemp
Motore 1 sovratemperatura,
M1FaultLimTemp (31.07)
M1OverLoad
Motore 1 sovraccarico,
M1FaultLimLoad (31.04)
I/OBoardLoss I/OBoardLoss
D
DriveWindow
Beschreibung
DriveWindow Light und
Text in DCS550 Panel,
AuxUnderVolt
Hilfs-Unterspannung, Klemme X99
auf SDCS-PIN-F und SDCS-POW-F
ArmOverCur
Überstrom Anker,
ArmOvrCurLev (30.09)
ArmOverVolt
Überspannung Gleichstromkreis
(DC), ArmOvrVoltLev (30.08)
ConvOverTemp
Übertemperatur Stromrichter,
MaxBridgeTemp (4.17)
M1OverTemp
Motor 1 gemessene
Übertemperatur,
M1FaultLimTemp (31.07)
M1OverLoad
Motor 1 berechnete Überlast,
M1FaultLimLoad (31.04)
I/OBoardLoss
EN
Definition
DriveWindow
MainsLowVolt
Minima tensione di alimentazione
di rete (c.a.), UnetMin1 (30.22)
MainsOvrVolt
Sovratensione alimentazione di
rete (c.a.), > 1.3 *
NomMainsVolt (99.10)
MainsNotSync
Guasto di sincronizzazione (c.a.),
DevLimPLL (97.13)
M1FexOverCur
Motore 1 Sovracorrente
ECCITATRICE DI CAMPO,
M1FldOvrCurLev (30.13)
ArmCurRipple
Ondulazione della corrente
d’indotto, CurRippleSel (30.18)
E/A-Karte nicht gefunden oder
fehlerhaft, s. Gruppe 94 und 98
MainsLowVolt
Netz-Unterspannung (AC),
UnetMin1 (30.22)
MainsOvrVolt
Netz-Überspannung (AC), > 1.3 *
NomMainsVolt (99.10)
MainsNotSync
Netz nicht synchronisiert (AC),
DevLimPLL (97.13)
M1FexOverCur
Motor 1 Überstrom
Feldversorgung, M1FldOvrCurLev
(30.13)
ArmCurRipple
Welligkeit Ankerstrom,
CurRippleSel (30.18)
DriveWindow Light and
Text on DCS550 Panel,
AuxUnderVolt
Auxiliary undervoltage, terminal
X99 on SDCS-PIN-F and SDCS-
POW-F
Armature overcurrent,
ArmOvrCurLev (30.09)
Armature overvoltage (DC),
Fault Word
Fault list — Fehlerliste — Errore di lista — Lista de errores — Liste des erreurs
LED
F501 9.01 Bit 0
F502 9.01 Bit 1 ArmOverCur
F503 9.01 Bit 2 ArmOverVolt
80 3ADW000395R0100 DCS550 Quick guide edisf a80 3ADW000395R0100 DCS550 Quick guide edisf a
Converter overtemperature,
MaxBridgeTemp (4.17)
ArmOvrVoltLev (30.08)
F504 9.01 Bit 3 ConvOverTemp
Motor measured overtemperature,
M1FaultLimTemp (31.07)
F506 9.01 Bit 5 M1OverTemp
F507 9.01 Bit 6 M1OverLoad
I/O board not found or faulty, see
groups 94 and 98
Mains low (under-) voltage (AC),
UnetMin1 (30.22)
Mains overvoltage (AC), > 1.3 *
NomMainsVolt (99.10)
Mains not in synchronism (AC),
DevLimPLL (97.13)
Field exciter overcurrent,
M1FldOvrCurLev (30.13)
Armature current ripple,
Motor calculated overload,
M1FaultLimLoad (31.04)
F508 9.01 Bit 7 I/OBoardLoss
F512 9.01 Bit 11 MainsLowVolt
F513 9.01 Bit 12 MainsOvrVolt
F514 9.01 Bit 13 MainsNotSync
F515 9.01 Bit 14 M1FexOverCur
CurRippleSel (30.18)
F517 9.02 Bit 0 ArmCurRipple
Page 81

Texte dans la DCS550
Texto en el DCS550 Panel,
FR
Description
DriveWindow
Microconsole,
DriveWindow Light et
SpeedFb
Défaut retour vitesse (mesure),
M1SpeedFbSel (50.03)
ExtFanAck
Absence de signal retour du
VENTILA TEUR du moteur,
MotFanAck (10.06)
MainContAck
Absence de signal retour du
contacteur principal,
MainContAck (10.21)
TypeCode
Erreur d’identification du type de
variateur,
TypeCode (97.01)
ExternalDI
Défaut extérieur à l’entrée digitale,
ExtFaultSel (30.31)
FieldBusCom
Défaut communication avec bus de
terrain, ComLossCtrl (30.28),
TimeOut (30.35)
MotorStalled
Moteur (Rotor) bloqué,
StallTime (30.01)
MotOverSpeed
Survitesse moteur,
M1OvrSpeed (30.16)
COM8Faulty
Défaut de la carte SDCS-COM-8,
SysComBoard (98.16)
M1FexLowCur
Moteur 1 Surintensité EXCITATION,
M1FldMinTrip (30.12)
LocalCmdLoss
Défaut communication avec la
micro - console (X33), DriveWindow
(CH3) ou DriveWindow Light (X34),
LocalLossCtrl (30.27)
HwFailure
Défaut circuits, Diagnosis (9.11)
FwFailure
Défaut programme, Diagnosis (9.11)
SP
Definición
DriveWindow
DriveWindow Light y
SpeedFb
Fallo en la lectura de la velocidad,
M1SpeedFbSel (50.03)
ExtFanAck
Sin reconocimiento del
VENTILADOR del motor,
MotFanAck (10.06)
MainContAck
Falta reconocimiento contactor
principal,
MainContAck (10.21)
TypeCode
Fallo de identificación de
Convertidor (Codificación de tipo),
TypeCode (97.01)
ExternalDI
Fallo externo en la entrada digital,
ExtFaultSel (30.31)
FieldBusCom
Fallo de comunicación con el bus
de campo, ComLossCtrl (30.28),
TimeOut (30.35)
MotorStalled
Motor bloqueado,
StallTime (30.01)
MotOverSpeed
Sobrevelocidad del motor,
M1OvrSpeed (30.16)
COM8Faulty
Fallo de tarjeta SDCS-COM-8 o no
encontrada, SysComBoard (98.16)
M1FexLowCur
Motor 1 Sobrecorriente de la
EXCITACIÓN,
M1FldMinTrip (30.12)
LocalCmdLoss
Fallo de comunicación con el
Panel (X33), DriveWindow (CH3)
o DriveWindow Light (X34),
LocalLossCtrl (30.27)
HwFailure
Fallo hardware, Diagnosis (9.11)
FwFailure
Fallo software, Diagnosis (9.11)
IT
Descrizione
DriveWindow
DriveWindow Light e
Testo DCS550 Pannello,
SpeedFb
Retroazione (misura) di velocità,
M1SpeedFbSel (50.03)
ExtFanAck
Nessuna conferma dal
VENTILATORE del motore,
MotFanAck (10.06)
MainContAck
Manca conferma dal contattore
principale,
MainContAck (10.21)
TypeCode
Guasto di codifica tipo
(convertitore) ,
TypeCode (97.01)
ExternalDI
Guasto esterno su ingresso
digitale, ExtFaultSel (30.31)
FieldBusCom
Guasto comunicazione con bus
di campo, ComLossCtrl (30.28),
TimeOut (30.35)
MotorStalled
Motore in stallo,
StallTime (30.01)
MotOverSpeed
Sovravelocità motore,
M1OvrSpeed (30.16)
COM8Faulty
Guasto scheda SDCS-COM-8,
SysComBoard (98.16)
M1FexLowCur
Motore 1 Sovracorrente
ECCITATRICE DI CAMPO,
M1FldMinTrip (30.12)
LocalCmdLoss
Guasto comunicazione con
panello (X33), DriveWindow
(CH3) o DriveWindow Light (X34),
LocalLossCtrl (30.27)
HwFailure
Guasto hardware, Diagnosis (9.11)
FwFailure
Guasto software, Diagnosis (9.11)
D
DriveWindow
Beschreibung
DriveWindow Light und
Text in DCS550 Panel,
SpeedFb
Ausgewählter Motor,
Drehzahlrückmeldung,
M1SpeedFbSel (50.03)
ExtFanAck
Rückmeldung externer Lüfter fehlt,
MotFanAck (10.06)
MainContAck
Rückmeldung Hauptschütz fehlt,
MainContAck (10.21)
TypeCode
Fehlanpassung Stromrichtertyp,
TypeCode (97.01)
ExternalDI
Externer Fehler an binärem
Eingang, ExtFaultSel (30.31)
FieldBusCom
Kommunikationsfehler Feldbus,
ComLossCtrl (30.28),
TimeOut (30.35)
MotorStalled
Motor blockiert,
StallTime (30.01)
MotOverSpeed
Überdrehzahl Motor,
M1OvrSpeed (30.16)
COM8Faulty
SDCS-COM-8 fehlerhaft oder nicht
gefunden, SysComBoard (98.16)
M1FexLowCur
Motor 1 Unterstrom
Feldversorgung,
M1FldMinTrip (30.12)
LocalCmdLoss
Kommunikationsfehler mit
Panel (X33), DriveWindow (CH3)
oder DriveWindow Light (X34),
LocalLossCtrl (30.27)
HwFailure
Hardwarefehler, Diagnosis (9.11)
FwFailure
Firmwarefehler, Diagnosis (9.11)
Text on DCS550 Panel,
EN
Definition
DriveWindow
DriveWindow Light and
External fan acknowledge
missing,
Speed feedback,
M1SpeedFbSel (50.03)
MotFanAck (10.06)
Main contactor acknowledge
missing,
MainContAck (10.21)
Type code mismatch,
TypeCode (97.01)
External fault via binary input,
ExtFaultSel (30.31)
Fieldbus communication loss,
Motor stalled,
StallTime (30.01)
Motor overspeed,
ComLossCtrl (30.28),
TimeOut (30.35)
M1OvrSpeed (30.16)
SDCS-COM-8 faulty or not found,
SysComBoard (98.16)
Motor 1 field exciter low current,
Local command loss,
M1FldMinTrip (30.12)
LocalLossCtrl (30.27)
Hardware failure, Diagnosis (9.11)
Firmware failure, Diagnosis (9.11)
Faults & Alarms / Diagnosis
Fault Word
LED
F522 9.02 Bit 5 SpeedFb
F523 9.02 Bit 6 ExtFanAck
F524 9.02 Bit 7 MainContAck
F525 9.02 Bit 8 TypeCode
F526 9.02 Bit 9 ExternalDI
F528 9.02 Bit 11 FieldBusCom
F531 9.02 Bit 14 MotorStalled
F532 9.02 Bit 15 MotOverSpeed
F540 9.03 Bit 7 COM8Faulty
F541 9.03 Bit 8 M1FexLowCur
3ADW000395R0100 DCS550 Quick guide edisf a
F546 9.03 Bit 13 LocalCmdLoss
F547 9.03 Bit 14 HwFailure
F548 9.03 Bit 15 FwFailure
81
813ADW000395R0100 DCS550 Quick guide edisf a
Page 82

Texte dans la DCS550
Texto en el DCS550 Panel,
FR
Description
DriveWindow
Microconsole,
DriveWindow Light et
ParComp
Diagnosis (9.11)
ParMemRead
AIRange
AI Mon4mA (30.29)
TachPolarity
SP
Definición
DriveWindow
DriveWindow Light y
ParComp
Compatibilidad de parametros_,
Diagnosis (9.11)
Lectura de parémetros de la
Memory Card
AIRange
Rango de la entrada analógica,
AI Mon4mA (30.29)
IT
TachoRange
Polaridad de la señal de taco
incorrecta_
Rango de la taco erroneo en los
ReversalTime
ZeroCurTimeOut (97.19)
APFault1
APFault1,
APFault2
APFault2,
APFault3
APFault3,
APFault4
APFault4,
APFault5
APFault5,
terminales X3:1 a X3:4 de la SDCS-
CON-F
ReversalTime
ZeroCurTimeOut (97.19)
APFault1
APFault1,
APFault2
APFault2,
APFault3
APFault3,
APFault4
APFault4,
APFault5
APFault5,
Descrizione
DriveWindow
DriveWindow Light e
Testo DCS550 Pannello,
ParComp
Diagnosis (9.11)
ParMemRead ParMemRead
AIRange AI Mon4mA (30.29)
D
DriveWindow
Beschreibung
DriveWindow Light und
Text in DCS550 Panel,
ParComp
Parameter Kompatibilität,
Diagnosis (9.11)
ParMemRead
Lesen Parameter Memory Card
AIRange
EN
Definition
DriveWindow
TachPolarity TachPolarity
Unterschreitung
Analogeingangsbereich,
AI Mon4mA (30.29)
TachPolarity
TachoRange TachoRange
Ausgewählter Motor,
Tachopolarität, analoger Tacho
verpolt
TachoRange
Ausgewählter Motor,
ReversalTime
ZeroCurTimeOut (97.19)
APFault1
APFault1,
APFault2
APFault2,
APFault3
APFault3,
APFault4
APFault4,
APFault5
APFault5,
Überschreitung Tachobereich,
Klemmen X3:1 bis X3:4 auf SDCS-
CON
ReversalTime
Brückenwechselzeit
ZeroCurTimeOut (97.19)
APFault1
APFault1,
Benutzerdefinierter AP-Fehler
APFault2
APFault2,
APFault3
APFault3,
APFault4
APFault4,
APFault5
APFault5,
DriveWindow Light and
Text on DCS550 Panel,
Parameter Compatibility, Diagnosis
(9.11)
Parameter Memory Card read
Analog input range,
Fault Word
LED
F549 9.04 Bit 0 ParComp
F550 9.04 Bit 1 ParMemRead
F551 9.04 Bit 2 AIRange
Tacho polarity, polarity of analog
AI Mon4mA (30.29)
F553 9.04 Bit 4 TachPolarity
82 3ADW000395R0100 DCS550 Quick guide edisf a82 3ADW000395R0100 DCS550 Quick guide edisf a
Reversal time,
tacho signal incorrect
Tacho range, terminals X3:1 to X3:4
on SDCS-CON
F554 9.04 Bit 5 TachoRange
ZeroCurTimeOut (97.19)
APFault1,
User defined fault by AP
APFault2,
User defined fault by AP
APFault3,
User defined fault by AP
APFault4,
User defined fault by AP
APFault5,
User defined fault by AP
F557 9.04 Bit 8 ReversalTime
F601 9.04 Bit 11 APFault1
F602 9.04 Bit 12 APFault2
F603 9.04 Bit 13 APFault3
F604 9.04 Bit 14 APFault4
F605 9.04 Bit 15 APFault5
Page 83

FR
Description
DriveWindow
Microconsole,
DriveWindow Light et
Texte dans la DCS550
Off2ViaDI Off2 (10.08)
SP
Definición
DriveWindow
DriveWindow Light y
Texto en el DCS550 Panel,
DriveWindow
DriveWindow Light e
Testo DCS550 Pannello,
Off2ViaDI
IT
Descrizione
Off2ViaDI Off2 (10.08)
Off3ViaDI
Configuración Entradas Digitales
(Emergency Off / Coast stop),
Off2 (10.08)
Off3ViaDI
Configuración Entradas Digitales
Off3ViaDI
E Stop (10.09)
DCBreakAck
DCBreakAck (10.23)
(E- stop), E Stop (10.09)
DCBreakAck
Interruptor CC no reconocido,
DCBreakAck (10.23)
E Stop (10.09)
DCBreakAck
DCBreakAck (10.23)
ConvOverTemp
Echauffement anormal du pont de
puissance, MaxBridgeTemp (4.17),
ConvFanAck (10.20)
DynBrakeAck
DynBrakeAck (10.22)
ConvOverTemp
Sobretemperatura en la sección
de potencia, MaxBridgeTemp
(4.17), ConvFanAck (10.20)
DynBrakeAck
Falta configurar freno dinámico
via Entradas Digitales,
ConvOverTemp
Sovratemperatura sezione di
potenza, MaxBridgeTemp (4.17),
ConvFanAck (10.20)
DynBrakeAck
DynBrakeAck (10.22)
M1OverTemp
DynBrakeAck (10.22)
M1OverTemp
M1OverTemp
Moteur 1 echauffement anormal,
M1AlarmLimTemp (31.06)
Motor 1 sobretemperatura,
M1AlarmLimTemp (31.06)
Motore 1 sovratemperatura,
M1AlarmLimTemp (31.06)
M1OverLoad
Moteur 1 surcharge,
M1AlarmLimLoad (31.04)
MainsLowVolt
Sous-tension réseau (AC),
M1OverLoad
Motor 1 sobrecarga,
M1AlarmLimLoad (31.04)
MainsLowVolt
Bajatension de red (C.A.),
M1OverLoad
Motore 1 sovraccarico,
M1AlarmLimLoad (31.04)
MainsLowVolt
Minima tensione di alimentazione
UnetMin1 (30.22)
COM8Com
Ch0ComLossCtrl (70.05),
Ch2ComLossCtrl (70.15)
UnetMin1 (30.22)
COM8Com
Pérdida comunicación en el lazo
SDCS COM-8, PLC y Maestro
Esclavo ,
Ch0ComLossCtrl (70.05),
di rete (c.a.), UnetMin1 (30.22)
COM8Com
Ch0ComLossCtrl (70.05),
Ch2ComLossCtrl (70.15)
ArmCurDev
Écart de courant d’induit,
MotCur (1.06), CurRefUsed (3.12)
TachoRange
Ch2ComLossCtrl (70.15)
ArmCurDev
Desviación corriente del inducido,
MotCur (1.06), CurRefUsed (3.12)
Rango de la taco erroneo en los
terminales X3:1 a X3:4 de la SDCS-
CON-F
ArmCurDev
Deviazione corrente d’indotto,
MotCur (1.06), CurRefUsed (3.12)
TachoRange TachoRange
DE
DriveWindow
Beschreibung
DriveWindow Light und
Text in DCS550 Panel,
EN
Definition
DriveWindow
DriveWindow Light and
Text on DCS550 panel,
Alarm Word
LED
Alarm list — Alarmliste — Allarme di lista — Lista de alarmas — Liste des alarmes
Off2ViaDI
Off2 (Notaus / Austrudeln) ist am
einem binären Eingang aktiv,
Off2 (10.08)
Off3ViaDI
Off3 (Nothalt) ist am einem binären
Off2 (Emergency Off / Coast stop)
pending via binary input,
Off2 (10.08)
Off3 (E-stop) pending via digital
A101 9.06 Bit 0 Off2ViaDI
A102 9.06 Bit 1 Off3ViaDI
Eingang aktiv, E Stop (10.09)
DCBreakAck
Ausgewählter Motor, Rückmeldung
Gleichstromschnellschalter fehlt,
DCBreakAck (10.23)
input, E Stop (10.09)
DC-Breaker acknowledge missing,
DCBreakAck (10.23)
A103 9.06 Bit 2 DCBreakAck
ConvOverTemp
Übertemperatur Stromrichter,
MaxBridgeTemp (4.17), ConvFanAck
(10.20)
DynBrakeAck
Ausgewählter Motor,
Converter overtemperature,
MaxBridgeTemp (4.17), ConvFanAck
(10.20)
Dynamic braking is still pending,
A104 9.06 Bit 3 ConvOverTemp
A105 9.06 Bit 4 DynBrakeAck
Wiederstandsbremsung ist am
einem digitalen Eingang aktiv,
DynBrakeAck (10.22)
M1OverTemp
Motor 1 gemessene
Übertemperatur,
M1AlarmLimTemp (31.06)
M1OverLoad
Motor 1 berechnete Überlast,
DynBrakeAck (10.22)
Motor measured overtemperature,
M1AlarmLimTemp (31.06)
A106 9.06 Bit 5 M1OverTemp
A107 9.06 Bit 6 M1OverLoad
Motor calculated overload,
M1AlarmLimLoad (31.04)
MainsLowVolt
Netz-Unterspannung (AC),
UnetMin1 (30.22)
COM8Com
Kommunikation zwischen SDCS-
M1AlarmLimLoad (31.04)
Mains low (under-) voltage (AC),
UnetMin1 (30.22)
SDCS-COM-8 com. loss,
A111 9.06 Bit 10 MainsLowVolt
A113 9.06 Bit 12 COM8Com
COM-8 und übergeordneter
Steuerung bzw. Master-Follower
Verbindung, Ch0ComLossCtrl (70.05),
Ch0ComLossCtrl (70.05),
Ch2ComLossCtrl (70.15)
Ch2ComLossCtrl (70.15)
ArmCurDev
Ankerstrom-Abweichung,
MotCur (1.06), CurRefUsed (3.12)
TachoRange
Ausgewählter Motor,
Überschreitung Tachobereich,
Klemmen X3:1 bis X3:4 on SDCS-
CON-F
Armature current deviation,
MotCur (1.06), CurRefUsed (3.12)
Tacho range,
terminals X3:1 to X3:4 on SDCS-
CON-F
A114 9.06 Bit 13 ArmCurDev
A115 9.06 Bit 14 TachoRange
Faults & Alarms / Diagnosis
3ADW000395R0100 DCS550 Quick guide edisf a
83
833ADW000395R0100 DCS550 Quick guide edisf a
Page 84

FR
Description
DriveWindow
Microconsole,
DriveWindow Light et
Texte dans la DCS550
ArmCurRipple
Ondulation courant d’induit
Défaut d’allumage thyristor(s),
CurRippleSel (30.18)
AutotuneFail
SP
Definición
DriveWindow
DriveWindow Light y
Texto en el DCS550 Panel,
ArmCurRipple
Rizado de la corriente de inducido
1 ó varios tiristores no conducen,
CurRippleSel (30.18)
AutotuneFail
IT
Diagnosis (9.11)
FaultSuppres
FaultMask (30.25)
Fallo durante el Autotuning,
Diagnosis (9.11)
FaultSuppres
Fallo eliminado,
FaultMask (30.25)
SpeedScale
Étalonnement de vitesse hors de
l’étendue permise,
Diagnosis (9.11)
SpeedFb
SpeedScale
Escalado interno de revoluciones
fuera del rango permitido,
Diagnosis (9.11)
SpeedFb
Défaut retour vitesse (mesure),
M1SpeedFbSel (50.03)
ExternalDI
Alarme extérieur à l’entrée digitale,
ExtAlarmSel (30.32)
AIRange
AI Mon4mA (30.29)
Fallo de realimentación
(medición) de velocidad,
M1SpeedFbSel (50.03)
ExternalDI
Alarma externo en la entrada
digital, ExtAlarmSel (30.32)
AIRange
Rango de la entraga analógica,
AI Mon4mA (30.29)
FieldBusCom
Défaut communication avec bus de
terrain, ComLossCtrl (30.28),
TimeOut (30.35)
ParRestored
FieldBusCom
Pérdida de comunicación con
el bus de campo, ComLossCtrl
(30.28), TimeOut (30.35)
ParRestored
Récupération des paramétrages
LocalCmdLoss
Défaut communication avec la micro -
console (X33), DriveWindow (CH3) ou
Parámetro restaurado
LocalCmdLoss
Fallo de comunicación con el
Panel (X33), DriveWindow (CH3)
DriveWindow Light (X34),
LocalLossCtrl (30.27)
o DriveWindow Light (X34),
LocalLossCtrl (30.27)
ParAdded
Paramètres ajoutés,
Diagnosis (9.11)
ParConf lict
ParAdded
Parámetros añadidos,
Diagnosis (9.11)
ParConf lict
Diagnosis (9.11)
RetainInv
Conflicto en la configuración de
los parámetros, Diagnosis (9.11)
Datos inválidos
Descrizione
DriveWindow
DriveWindow Light e
Testo DCS550 Pannello,
ArmCurRipple
Ondulazione della corrente
d’indotto
Uno o più tiristori non conducono
DE
DriveWindow
Beschreibung
DriveWindow Light und
Text in DCS550 Panel,
ArmCurRipple
Welligkeit Ankerstrom
Ein oder mehrere Thyristor(en)
führen wahrscheinlich keinen Strom,
EN
Definition
DriveWindow
corrente, CurRippleSel (30.18)
AutotuneFail
Diagnosis (9.11)
FaultSuppres
FaultMask (30.25)
CurRippleSel (30.18)
AutotuneFail
Selbsteinstellung abgebrochen,
Diagnosis (9.11)
FaultSuppres
Fehler unterdrückt,
FaultMask (30.25)
SpeedScale
Fattore di scala vel. fuori range,
Diagnosis (9.11)
SpeedFb
Retroazione (misura) di velocità,
M1SpeedFbSel (50.03)
ExternalDI
Allarme esterno su ingresso
digitale, ExtAlarmSel (30.32)
AIRange
SpeedScale
Drehzahlnormierung außerhalb des
erlaubten Bereiches,
Diagnosis (9.11)
SpeedFb
Ausgewählter Motor,
Drehzahlrückmeldung,
M1SpeedFbSel (50.03)
ExternalDI
Externer Alarm am binären
Eingang, ExtAlarmSel (30.32)
AIRange
Unterschreitung
AI Mon4mA (30.29)
FieldBusCom
Guasto comunicazione con bus
di campo, ComLossCtrl (30.28),
Analogeingangsbereich, AI
Mon4mA (30.29)
FieldBusCom
Kommunikationsfehler Feldbus,
ComLossCtrl (30.28),
TimeOut (30.35)
ParRestored
Ripristino parametri
LocalCmdLoss
Guasto comunicazione con
TimeOut (30.35)
ParRestored
Parameter wiederhergestellt
(zurückgespeichert)
LocalCmdLoss
Kommunikationsfehler mit
panello (X33), DriveWindow
Panel (X33), DriveWindow (CH3)
(CH3) o DriveWindow Light (X34),
LocalLossCtrl (30.27)
oder DriveWindow Light (X34),
LocalLossCtrl (30.27)
ParAdded
Aggiunta parametri,
Diagnosis (9.11)
ParConf lict
ParAdded
Parameter hinzugeführt,
Diagnosis (9.11)
ParConf lict
Diagnosis (9.11)
RetainInv RetainInv
Konflikt Parametereinstellung,
Diagnosis (9.11)
RetainInv
Retaindaten ungültig,
Backupdaten wurden geladen
DriveWindow Light and
Text on DCS550 panel,
Armature current ripple
One or several thyristors may carry
no current,
CurRippleSel (30.18)
Autotuning failed,
Diagnosis (9.11)
Fault suppressed,
FaultMask (30.25)
Alarm Word
LED
A117 9.07 Bit 0 ArmCurRipple
A121 9.07 Bit 4 AutotuneFail
A123 9.07 Bit 6 FaultSuppres
A124 9.07 Bit 7 SpeedScale
84 3ADW000395R0100 DCS550 Quick guide edisf a84 3ADW000395R0100 DCS550 Quick guide edisf a
Speed scaling out of range,
Diagnosis (9.11)
Speed feedback,
A125 9.07 Bit 8 SpeedFb
M1SpeedFbSel (50.03)
External alarm via binary input,
ExtAlarmSel (30.32)
Analog input range,
AI Mon4mA (30.29)
A126 9.07 Bit 9 ExternalDI
A127 9.07 Bit 10 AIRange
Fieldbus communication loss,
ComLossCtrl (30.28),
TimeOut (30.35)
A128 9.07 Bit 11 FieldBusCom
A129 9.07 Bit 12 ParRestored
Parameter restored
Local command loss,
LocalLossCtrl (30.27)
A130 9.07 Bit 13 LocalCmdLoss
Parameter added,
Diagnosis (9.11)
A131 9.07 Bit 14 ParAdded
A132 9.07 Bit 15 ParConf lict
Parameter settings conflict,
Diagnosis (9.11)
Retain data invalid,
backup data loaded
A133 9.08 Bit 0 RetainInv
Page 85

FR
Description
DriveWindow
Microconsole,
DriveWindow Light et
Texte dans la DCS550
ParComp
Diagnosis (9.11)
ParUpDwnLoad
SP
Definición
DriveWindow
DriveWindow Light y
Texto en el DCS550 Panel,
ParComp
IT
Compatibilidad de parámetros,
Diagnosis (9.11)
_Fallo durante la Carga/Descarga
de parámetros
NoAPTaskTime
TimeLevSel (83.04)
SpeedNotZero
ZeroSpeedLim (20.03)
Off2FieldBus
MainCtrlWord (7.01)
NoAPTaskTime
Programar tiempo de tarea en el
Programa Adaptativo,
TimeLevSel (83.04)
SpeedNotZero
Velocidad diferente a cero,
ZeroSpeedLim (20.03)
Off2FieldBus
Off2 Configuración Bus de Campo
(Emergency Off / Coast stop),
MainCtrlWord (7.01)
Off3FieldBus
MainCtrlWord (7.01)
IllgFieldBus
Off3FieldBus
Off3 Configuración Bus de Campo
(E- stop),
MainCtrlWord (7.01)
Configuración illegal del bus de
COM8FwVer
campo
COM8FwVer
Conflicto con la versión de
FirmwareVer (4.01),
Com8SwVersion (4.11)
firmware SDCS-COM-8,
FirmwareVer (4.01),
Com8SwVersion (4.11)
Descrizione
DriveWindow
DriveWindow Light e
Testo DCS550 Pannello,
ParComp
Diagnosis (9.11)
ParUpDwnLoad ParUpDwnLoad
DE
DriveWindow
Beschreibung
DriveWindow Light und
Text in DCS550 Panel,
ParComp
Parameter Kompatibilität,
Diagnosis (9.11)
ParUpDwnLoad
EN
Definition
DriveWindow
DriveWindow Light and
Text on DCS550 panel,
Parameter Compatibility,
Diagnosis (9.11)
NoAPTaskTime
Parameter Up / Download
gescheitert, nochmals versuchen
NoAPTaskTime
Adaptive Program Taskzeit nicht
gesetzt,
Parameter up / download failed,
try again
Adaptive Program task time not
set,
TimeLevSel (83.04)
SpeedNotZero
ZeroSpeedLim (20.03)
Off2FieldBus
TimeLevSel (83.04)
SpeedNotZero
Drehzahl ist ungleich Null,
ZeroSpeedLim (20.03)
Off2FieldBus
TimeLevSel (83.04)
Speed not zero,
ZeroSpeedLim (20.03)
MainCtrlWord (7.01)
Off3FieldBus
MainCtrlWord (7.01)
Off2 (Notaus / Austrudeln) ist am
MainCtrlWord (7.01) aktiv
Off3FieldBus
Off3 (Nothalt) ist am
MainCtrlWord (7.01) aktiv
Off2 (Emergency Off / Coast stop)
pending via
MainCtrlWord (7.01)
Off3 (E-stop) pending via
MainCtrlWord (7.01)
IllgFieldBus IllgFieldBus
COM8FwVer
FirmwareVer (4.01),
IllgFieldBus
Illegale Feldbuseinstellung,
s. Gruppe 51
COM8FwVer
SDCS-COM-8 Konflikt
Firmwareversion,
Illegal fieldbus settings,
see group 51
SDCS-COM-8 firmware version
conflict,
Com8SwVersion (4.11)
2xx <alarm name> 2xx <alarm name> 2xx <alarm name>
301 APAlarm1 301 APAlarm1 301 APAlarm1
302 APAlarm2 302 APAlarm2 302 APAlarm2
FirmwareVer (4.01),
Com8SwVersion (4.11)
2xx <alarm name>
Weggehender Systemalarm
301 APAlarm1
Benutzerdefinierter AP-Alarm
302 APAlarm2
FirmwareVer (4.01),
Com8SwVersion (4.11)
Disappearing system alarm
User defined alarm by AP
303 APAlarm3 303 APAlarm3 303 APAlarm3
304 APAlarm4 304 APAlarm4 304 APAlarm4
Benutzerdefinierter AP-Alarm
303 APAlarm3
Benutzerdefinierter AP-Alarm
304 APAlarm4
Benutzerdefinierter AP-Alarm
User defined alarm by AP
User defined alarm by AP
User defined alarm by AP
305 APAlarm5 305 APAlarm5 305 APAlarm5
4xx UserAlarmxx 4xx UserAlarmxx 4xx UserAlarmxx
305 APAlarm5
Benutzerdefinierter AP-Alarm
4xx UserAlarmxx
Weggehender Benutzeralarm
User defined alarm by AP
Disappearing user alarm
Faults & Alarms / Diagnosis
Alarm Word
LED
A134 9.08 Bit 1 ParComp
A135 9.08 Bit 2 ParUpDwnLoad
A136 9.08 Bit 3 NoAPTaskTime
A137 9.08 Bit 4 SpeedNotZero
A138 9.08 Bit 5 Off2FieldBus
A139 9.08 Bit 6 Off3FieldBus
A140 9.08 Bit 7 IllgFieldBus
A141 9.08 Bit 8 COM8FwVer
3ADW000395R0100 DCS550 Quick guide edisf a
A2xx 2xx <alarm name>
A301 9.08 Bit 11 301 APAlarm1
A302 9.08 Bit 12 302 APAlarm2
A303 9.08 Bit 13 303 APAlarm3
A304 9.08 Bit 14 304 APAlarm4
A305 9.08 Bit 15 305 APAlarm5
A4xx 4xx UserAlarmxx
85
853ADW000395R0100 DCS550 Quick guide edisf a
Page 86

FR
Description
Diagnosis messages
image flash des paramètres trop petite
SP
Definición
Diagnosis messages
la imagen Flash de los parámetros es
IT
Descrizione
pour tous les paramètres
demasiado pequeña para todos los parámetros
interruption non-initialisée
inicializada
échec autocalibrage en raison d’un défaut
ou de la disparition de la commande
autoajuste cancelado por fallo o al
cancelar el comando Run [UsedMCW
Marche [MCPUtilisé (7.04) bit 3]
expiration du délai d’autocalibrage, la
commande Marche [MCPUtilisé (7.04)
bit 3] n’a pas été donnée à temps.
moteur encore en rotation, aucune
(7.04), bit 3]
final de espera de autoajuste, no se ha
ajustado el tiempo del comando RUN
[UsedMCW (7.04), bit 3]
el motor continúa girando y no hay
indication de vitesse nulle
indicación de velocidad cero
ouverture du circuit de mesure de la
tension d’induit (ex., pas connecté) ou
interrompu. Vérifier également les limites
de courant et de couple
circuito de medición de la tensión de
inducido abierto (no conectado) o
interrumpido; compruebe también los
límites de corriente y par
erreur connexion circuit d’induit et/ou
circuit de mesure de la tension d’induit
aucune charge connectée au circuit
d’induit
erreur réglage courant d’induit nominal ;
courant d’induit M1MotNomCur (99.03)
réglé sur zéro
le courant d’excitation ne diminue pas à
la mise hors tension de l’excitation
conexión incorrecta del circuito de
inducido o el circuito de medición de la
tensión de inducido
no hay ninguna carga conectada al
circuito de inducido
ajuste incorrecto de la corriente de
inducido nominal; la corriente de inducido
M1MotNomCur (99.03) se ajusta a cero
la corriente de campo no disminuye al
desconectar la excitación
Diagnosis messages
parameter flash image troppo piccola
DE
Beschreibung
Diagnosemeldungen
Parameter-Flash-Image ist für alle
EN
Definition
Diagnosis messages
per tutti i parametri
tentativo di scrittura illecito o parametro
protetto alla scrittura
Parameter zu klein
illegaler Schreibversuch auf einen
geschützten Parameter
è avvenuto un interrupt non inizializzato se ha producido una interrupción no
Unterbrechung aufgetreten
autotaratura bloccata da un guasto o
dalla rimozione del commando RUN
[UsedMCW (7.04) bit 3]
Selbsteinstellung durch Fehler oder
Wegnahme des Run-Befehls [UsedMCW
(7.04) Bit 3] abgebrochen
tempo di autotaratura scaduto,
commando di RUN non è attivato in
tempo [UsedMCW (7.04) bit 3]
indicazione di velocità zero
Selbsteinstellung Zeitüberschreitung,
Run-Befehl [UsedMCW (7.04) Bit 3]
wurde nicht rechtzeitig gesetzt
Motor dreht, keine Nulldrehzahlanzeige il motore sta ancora girando, nessuna
circuito di misura della tensione
d’armatura aperto (es. non collegato)
o interrotto, controllare anche i limiti di
corrente e di coppia
collegamento errato del circuito
d’armatura e/o del circuito di misura
Ankerspannungsmesskreis offen
(z.B. nicht angeschlossen) oder
unterbrochen, auch die Strom- und
Drehmomentgrenzen prüfen
Ankerstromkreis und/oder
Ankerspannungsmesskreis falsch
impostazione non valida della corrente
nominale d’armatura; corrente armatura
della tensione d’armatura
nessun carico collegato al circuito
angeschlossen
M1MotNom (99,03) è impostata a zero
d’armatura
angeschlossen
La corrente di campo non diminuisce
ungültige Einstellung des
Nennankerstroms; Ankerstrom
M1MotNomCur (99.03) ist auf Null eingestellt
Feldstrom verringert sich nicht, wenn die
quando l’eccitazione viene disattivata
Erregung ausgeschaltet ist
no message keine Meldung nessun messaggio no hay ningún mensaje aucun message
Firmware Firmware Firmware: Firmware Programme
default setting of parameters wrong die Grundeinstellung der Parameter ist falsch Impostazione errata dei parametri di default ajuste por defecto de parámetros incorrecto erreur préréglage paramètres2parameter flash image too small for all
parameters
reserved reserviert riservato reservado réservé4illegal write attempt on a write-protected
parameter
9.11
Signal
0
1
Diagnosis messages — Diagnosemeldungen — Messaggi di diagnostica — Mensajes de
diagnóstico — Messages de diagnostic
3
86 3ADW000395R0100 DCS550 Quick guide edisf a86 3ADW000395R0100 DCS550 Quick guide edisf a
reserved reserviert riservato reservado réservé6wrong type code falscher Typeschlüssel tipo codice errato tipo de código incorrecto code type erroné
an un-initialized interrupted has occurred es ist eine nicht initialisierte
reserved reserviert riservato reservado réservé10wrong parameter value falscher Parameterwert valore parametro errato valor de parámetro incorrecto erreur valeur paramètre
5
7
8, 9
Autotuning Selbsteinstellung Autotaratura: Autoajuste Autocalibrage11autotuning aborted by fault or removing
the Run command [UsedMCW (7.04)
bit 3]
autotuning timeout, RUN command
[UsedMCW (7.04) bit 3] is not set in time
motor is still turning, no speed zero
indication
field current not zero Feldstrom nicht Null corrente di campo non a zero la corriente de campo no es cero courant d’excitation non nul15armature current not zero Ankerstrom nicht Null corrente d’armatura non a zero la corriente de inducido no es cero courant d’induit non nul16armature voltage measurement circuit
12
13
14
open (e.g. not connected) or interrupted,
check also current and torque limits
armature circuit and/or armature voltage
measurement circuit wrongly connected
no load connected to armature circuit keine Last an den Ankerstromkreis
invalid nominal armature current setting;
armature current M1MotNomCur (99.03)
17
18
19
is set to zero
field current does not decrease when the
excitation is switched off
20
Page 87

FR
Description
Diagnosis messages
le courant réel d’excitation n’atteint pas
la référence du courant d’excitation,
aucune résistance d’excitation détectée;
ouverture circuit d’excitation (ex., pas
connecté) ou interrompu
pas d’écriture de paramètres de
SP
Definición
Diagnosis messages
la corriente actual del campo no alcanza
la referencia de corriente de campo;
no se detecta resistencia de
campo; circuito de campo abierto
(desconectado) o interrumpido
no se ha escrito ningún parámetro de
IT
Descrizione
commande du régulateur de vitesse
tachymétrique
calibrage régulateur de vitesse
impossible en raison des limites de
vitesse
calibrage régulateur de vitesse
impossible en raison des limites de
tension
défluxage interdit, cf.
SélMesureVitesseM1 (50.03) et
ModeRégulExcitat (44.01)
control del regulador de velocidad
ajuste del tacómetro incorrecto o fallido erreur de réglage ou défaut dynamo
no es posible ajustar el regulador de
velocidad debido a la limitación de
velocidad
no es posible ajustar el regulador de
velocidad debido a la limitación de
tensión
no es posible el debilitamiento del
campo; véase M1SpeedFbSel (50.03) y
FldCtrlMode (44.01)
aucune excitation sélectionné, voir
M1UsedFexType (99.12)
chargement en lecture ou écriture micro-
console DCS550 non démarré
chargement en lecture ou écriture micro-
console DCS550 non effectué à temps
erreur du total de contrôle chargement
en lecture ou écriture micro-console
sin excitador campo seleccionado,
consulte M1UsedFexType (99.12)
no se ha iniciado la carga o descarga
desde el panel de control del DCS550
los datos del panel de control del DCS550
no se han cargado o descargado a tiempo
fallo de la suma de comprobación de la
carga o descarga en el panel de control
DCS550
erreur du logiciel chargement en lecture
ou écriture micro-console DCS550
échec vérification chargement en lecture
ou écriture micro-console DCS550
del DCS550
fallo del software de carga o descarga
en el panel de control del DCS550
fallo de la verificación de la carga o descarga
en el panel de control del DCS550
effacement)
programmation)
Diagnosis messages
la corrente di campo reale non arriva al
valore di riferimento dato;
nessun rilevamento della resistenza di
campo: circuito di campo aperto (es. non
collegato) oppure interrotto
DE
Beschreibung
Diagnosemeldungen
der Feldstromistwert erreicht nicht den
Feldstromsollwert;
keine Erkennung des Feldwiderstands;
Feldstromkreis offen (z.B. nicht
angeschlossen) bzw. unterbrochen
EN
Definition
Diagnosis messages
nessuna scrittura dei parametri di
controllo del regolatore di velocità
Adattamento tacho difettoso o non OK
o la tensione della tacho è troppo alta
durante l’autotaratura
non è possible la taratura del regolatore
di velocità a causa del limite di velocità
non è possible la taratura del regolatore
di velocità a causa del limite di tensione
die Parameter des Drehzahlreglers
werden nicht geschrieben
Tachoeinstellung falsch oder nicht in
Ordnung
die Abstimmung des Drehzahlreglers ist
aufgrund der Drehzahlbegrenzung nicht
möglich
die Abstimmung des Drehzahlreglers
ist aufgrund der Spannungsbegrenzung
nicht möglich
Indebolimento campo non permesso,
vedi M1SpeedFbSel (50.03) e
FldCtrlMode (44.01)
Feldschwächung nicht zulässig, siehe
M1SpeedFbSel (50.03) und
FldCtrlMode (44.01)
no eccitatrice di campo selezionata,
vedere M1UsedFexType (99.12)
werden wegen zu enger Strombegrenzung
M1UsedFexType (99.12)
kein Feld Erreger gewählt, siehe
Die Lückgrenze konnte nicht ermittelt
DCS550 Control Panel up- o download
DCS550-Steuertafel Hoch- oder
non partito
DCS550 Control Panel dati up- o
downloaded non in tempo
DCS550 Control Panel up- o download
controllo di parità difettoso
DCS550 Control Panel up- o download
software difettoso
Runterlesen nicht gestartet
DCS550-Steuertafel Daten werden nicht
rechtzeitig Hoch- oder Runtergelesen
Hoch- oder Runterlesen der DCS550-
Steuertafel Prüfsummenfehler
Hoch- oder Runterlesen der DCS550-
Steuertafel Software fehlerhaft
DCS550 Control Panel up- or download
verifica fallita
Hoch- oder Runterlesen der DCS550-
Steuertafel Verifizierung misslungen
beschrieben
Stecker X12 auf der SDCS-CON-F
und Stecker X12 auf der SDCS-PIN-F
überprüfen
Faults & Alarms / Diagnosis
field current actual doesn‘t reach field
current reference;
no detection of field resistance;
field circuit open (e.g. not connected)
respectively interrupted
no writing of control parameters of speed
controller
tacho adjustment faulty or not OK or
9.11
Signal
21
22
23
the tacho voltage is too high during
autotuning
tuning of speed controller not possible
due to speed limitation
24
tuning of speed controller not possible
due to voltage limitation
field weakening not allowed, see
25
26
M1SpeedFbSel (50.03) and
FldCtrlMode (44.01)
discontinuous current limit could not be
determined due to low current limitation
reserved reserviert riservato reservado réservé29no field exciter selected, see
M1UsedFexType (99.12)
reserved reserviert riservato reservado réservé31DCS550 Control Panel up- or download
27
28
30
not started
DCS550 Control Panel data not up- or
downloaded in time
reserved reserviert riservato reservado réservé34DCS550 Control Panel up -or download
checksum faulty
32
33
3ADW000395R0100 DCS550 Quick guide edisf a
DCS550 Control Panel up- or download
software faulty
DCS550 Control Panel up- or download
35
36
verification failed
reserved reserviert riservato reservado reservé41the flash is written to cyclic by AP der Flashspeicher wird zyklisch von AP
37...40
reserved reserviert riservato reservado reservé
Hardware Hardware Hardware: Hardware Matériel50parameter flash faulty (erase) Parameter Flash fehlerhaft (löschen) flash parametri difettosa (cancellata) parámetro FLASH incorrecto (borrar) Flash paramètres déféctueuse (en
42...49
parameter flash faulty (program) Parameter Flash fehlerhaft (Programm) flash parametri difettosa (programma) parámetro FLASH incorrecto (programa) Flash paramètres défectueuse (en
check connector X12 on SDCS-CON-F
and connector X12 and X22 on SDCS-
PIN-F
reserved reserviert riservato reservado réservé
51
52
53...69
87
873ADW000395R0100 DCS550 Quick guide edisf a
Page 88

FR
Description
Diagnosis messages
A132 ConflitParam (alarme de conflit
de réglages de paramètres):
incohérence paramètres de flux de
SP
Definición
Diagnosis messages
A132 ParConflict (conflicto en el ajuste
de los parámetros de alarma):
parámetros de linealización de flujo
IT
Descrizione
linéarisation
contradictorios
desbordamiento de parámetros valeur paramètres hors limites
la vitesse n’atteint pas la consigne
(régulation FEM)
le moteur n’accélère pas ou erreur
polarité dynamo tachymétrique (dynamo
tachymétrique/codeur)
charge insuffisante (inertie trop faible)
pour détecter les paramètres du
régulateur de vitesse
la velocidad no alcanza el punto de
consigna (control EMF)
el motor no acelera o la polaridad del
tacómetro es incorrecta (tacómetro/
generador de pulsos)
no hay suficiente carga (inercia
demasiado baja) para la detección de los
parámetros del regulador de velocidad
Diagnosis messages
A132 ParConflict (conflitto
impostazione parametro allarme):
parametri di linearizzazione flusso non
DE
Beschreibung
Diagnosemeldungen
Konflikt):
A132 ParConflict (Alarm Parameter-
Parameter für die Flusslinearisierung
EN
Definition
Diagnosis messages
coerenti
Parameterüberlauf Dati armatura non coerenti [es.
nicht konsistent
TypeCode (97.01) = Nessuno e S
ConvScaleVolt (97.03) non è impostato
correttamente o ConvNomVolt (4.04) = 0]
la velocità non raggiunge il setpoint
(controllo EMF)
Il motore non sta accelerando o la
polarità tacho è sbagliata (tacho/
encoder)
Carico non sufficiente (inerzia troppo
bassa) per rilevare I parametri del
Drehzahl erreicht nicht den Sollwert
(EMK-Regelung)
Motor beschleunigt nicht oder falsche
Tachopolarität (Tacho / Impulsgeber)
unzureichende Last (Trägheitsmoment
zu gering) für die Erkennung der
regolatore di velocità
Drehzahlreglerparameter
Antrieb nicht in Drehzahlregelung, siehe
TorqSel (26.01) und
TorqMuxMode (26.04)
Wicklereinstellung: das gemessene
Drehmoment ist nicht konstant
A132 ParConflict (alarm parameter
reserved reserviert riservato reservado réservé71flux linearization parameters not
consistent
reserved reserviert riservato reservado réservé73armature data not consistent [e.g.
TypeCode (97.01) = None and S
ConvScaleVolt (97.03) is not set properly
or ConvNomVolt (4.04) = 0]
reserved reserviert riservato reservado réservé77encoder 1 parameters for not consistent Parameter für Impulsgeber nicht stimmig
reserved reserviert riservato reservado réservé
Autotuning Selbsteinstellung Autotaratura: Autoajuste Autocalibrage80speed does not reach setpoint (EMF
78...79
9.11
Signal
setting conflict):
70
72
74...76
88 3ADW000395R0100 DCS550 Quick guide edisf a88 3ADW000395R0100 DCS550 Quick guide edisf a
control)
motor is not accelerating or wrong tacho
polarity (tacho / encoder)
not enough load (too low inertia) for the
detection of speed controller parameters
81
82
drive not in speed control mode, see
TorqSel (26.01) and
TorqMuxMode (26.04)
winder tunings: measured torque is not
constant
reserved reserviert riservato reservado réservé
83
84
85...89
Thyristor diagnosis Thyristordiagnose Diagnosi Thyristor Diagnóstico del tiristor Diagnostic des thyristors90shortcut caused by V1 Kurzschluss verursacht durch V1 cortocircuito causato da V1 cortocircuito causado por V1 court-circuit provoqué par V191shortcut caused by V2 Kurzschluss verursacht durch V2 cortocircuito causato da V2 cortocircuito causado por V2 court-circuit provoqué par V292shortcut caused by V3 Kurzschluss verursacht durch V3 cortocircuito causato da V3 cortocircuito causado por V3 court-circuit provoqué par V393shortcut caused by V4 Kurzschluss verursacht durch V4 cortocircuito causato da V4 cortocircuito causado por V4 court-circuit provoqué par V494shortcut caused by V5 Kurzschluss verursacht durch V5 cortocircuito causato da V5 cortocircuito causado por V5 court-circuit provoqué par V595shortcut caused by V6 Kurzschluss verursacht durch V6 cortocircuito causato da V6 cortocircuito causado por V6 court-circuit provoqué par V696thyristor block test failed Thyristorblockiertest misslungen test blocco thyristor fallito prueba del bloque de tiristores fallida défaut test bloc thyristors97shortcut caused by V15 or V22 Kurzschluss verursacht durch V15 o. V22 cor tocircuito causato da V15 o V22 cortocircuito causado por V15 o V22 court-circuit provoqué par V15 ou V2298shortcut caused by V16 or V23 Kurzschluss verursacht durch V15 o. V23 cor tocircuito causato da V16 o V23 cortocircuito causado por V15 o V23 court-circuit provoqué par V16 ou V2399shortcut caused by V11 or V24 Kurzschluss verursacht durch V15 o. V24 cor tocircuito causato da V11 o V24 cortocircuito causado por V15 o V24 court-circuit provoqué par V11 ou V24
shortcut caused by V12 or V25 Kurzschluss verursacht durch V15 o. V25 cor tocircuito causato da V12 o V25 cortocircuito causado por V15 o V25 court-circuit provoqué par V12 ou V25
100
shortcut caused by V13 or V26 Kurzschluss verursacht durch V15 o. V26 cor tocircuito causato da V13 o V26 cortocircuito causado por V15 o V26 court-circuit provoqué par V13 ou V26
101
shortcut caused by V14 or V21 Kurzschluss verursacht durch V15 o. V21 cor tocircuito causato da V14 o V21 cortocircuito causado por V15 o V21 court-circuit provoqué par V14 ou V21
102
motor connected to ground Motor an Masse kurzgeschlossen motore collegato a terra motor conectado a tierra moteur raccordé à la terre
armature winding is not connected Ankerwicklung ist nicht angeschlossen avvolgimento d’armatura non collegato el bobinado de inducido no está conectado enroulement d’induit non raccordé
reserved reserviert riservato reservado réservé
AI monitoring AI Überwachung controllo AI Monitorización de EA Surveillance Entrée analogique (EA)
AI1 below 4 mA AI1 unter 4 mA AI1 inferiore a 4 mA EA1 inferior a 4 mA EA1 inférieure à 4 mA
AI2 below 4 mA AI2 unter 4 mA AI2 inferiore a 4 mA EA2 inferior a 4 mA EA2 inférieure à 4 mA
103
104
105...120
121
122
AI3 below 4 mA AI3 unter 4 mA AI3 inferiore a 4 mA EA3 inferior a 4 mA EA3 inférieure à 4 mA
123
AI4 below 4 mA AI4 unter 4 mA AI4 inferiore a 4 mA EA4 inferior a 4 mA EA4 inférieure à 4 mA
124
Page 89

FR
Description
Diagnosis messages
SP
Definición
Diagnosis messages
IT
Descrizione
coupleur réseau absent cf.
ModuleCommunic (98.02)
RAIO-xx absent dans support pour
option de la SDCS-CON-F, cf. groupe 98
módulo de bus de campo ausente;
véase CommModule (98.02)
RAIO-xx ausente en la ranura de
módulos opcionales de SDCS-CON-F;
véase el grupo 98
RDIO-xx absent dans support pour
option de la SDCS-CON-F, cf. groupe 98
RDIO-xx ausente en la ranura de
módulos opcionales de SDCS-CON-F;
A134 CompatibPara (alarme conflit
compatibilité paramètres):
le paramètre à l’origine du conflit est
véase el grupo 98
A134 ParComp (conflicto de compa-
tibilidad de los parámetros de alarma):
el parámetro que presenta el conflicto
identifié par les 4 derniers chiffres.
de compatibilidad puede identificarse
mediante sus últiimas cuatro cifras
commande d’impulsions éventuellement
inversées
es posible que los canales del pulso de
activación no sean los correctos
Diagnosis messages
DE
Beschreibung
Diagnosemeldungen
EN
Definition
Diagnosis messages
modulo fieldbus mancante vedere
CommModule (98.02)
RAIO-xx mancante nello slot sulla
SDCS-CON-F vedi gruppo 98
RDIO-xx mancante nello slot sulla
SDCS-CON-F vedi gruppo 98
Feldbusmodul fehlt siehe CommModule
(98.02)
RAIO-xx in Optionssteckplatz auf SDCS-
CON-F fehlt, siehe Gruppe 98
RAIO-xx in Optionssteckplatz auf SDCS-
CON-F fehlt, siehe Gruppe 98
A134 ParComp (allarme per conflitto di
compatibilità parametro)
Il parametro con conflitto di compatibilità
può essere identificato per mezzo degli
ultimi 4 digits
A134 ParComp (Alarm Parameter-
Kompatibilität):
der Parameter mit dem
Kompatibilitätskonflikt kann anhand der
letzten vier Ziffern ermittelt werden
zyklisch
der nicht zyklische Parameter, welcher
von einem Pointerparameter [z.B.
DsetXVal1 (90.01)] beschrieben wird,
kann an den letzten 4 Ziffern erkannt
werden
possibilità che siano scambiati i canali
che danno l’impulso di trigger
der schreibgeschützte Parameter,
welcher von einem Pointerparameter
[z.B. DsetXVal1 (90.01)] oder AP
beschrieben wird, kann an den letzten 4
Ziffern erkannt werden
eventuell sind die Zündimpulskanäle
vertauscht
Faults & Alarms / Diagnosis
9.11
Signal
AI5 below 4 mA AI5 unter 4 mA AI5 inferiore a 4 mA EA5 inferior a 4 mA EA5 inférieure à 4 mA
125
AI6 below 4 mA AI6 unter 4 mA AI6 inferiore a 4 mA EA6 inferior a 4 mA EA6 inférieure à 4 mA
126
AITAC below 4 mA AITAC unter 4 mA AITAC inferiore a 4 mA AITAC inferior a 4 mA EATachy inférieure à 4 mA
reserved reserviert riservato reservado réservé
Option modules Optionsmodule Moduli opzionali: Módulos opcionales Modules optionnels
fieldbus module missing see
CommModule (98.02)
127
128...149
150
reserved reserviert riservato reservado réservé
RAIO-xx in option slot on SDCS-CON-F
missing see group 98
reserved reserviert riservato reservado réservé
RDIO-xx in option slot on SDCS-CON-F
missing see group 98
reserved reserviert riservato reservado réservé
A134 ParComp (alarm parameter
compatibility conflict):
the parameter with the compatibility
conflict can be identified by means of the
151...154
155
156
157
158...164
10000…
19999
last 4 digits
ParNoCyc (notice parameter not cyclic): ParNoCyc (Hinweis Parameter ist nicht
the not cyclic parameter which is
20000…
being written to by means of a pointer
parameter [e.g. DsetXVal1 (90.01)] can
be identified by means of the last 4 digits
F548 FwFailure (fault firmware failure):
the read only parameter which is
being written to by means of a pointer
29999
20000…
29999
3ADW000395R0100 DCS550 Quick guide edisf a
parameter [e.g. DsetXVal1 (90.01)] or
AP can be identified by means of the last
4 digits
Thyristor diagnosis Thyristordiagnose Diagnosi Thyristor Diagnóstico del tiristor Diagnostic thyristors
possibly trigger pulse channels are
mixed up
30000
V1 or V11 not conducting V1 oder V11 leitet nicht V1 o V11 non sta conducendo V1 o V11 han cesado de conducir V1 ou V11 non conducteur
V2 or V12 not conducting V2 oder V12 leitet nicht V2 o V12 non sta conducendo V2 o V12 han cesado de conducir V2 ou V12 non conducteur
V3 or V13 not conducting V3 oder V13 leitet nicht V3 o V13 non sta conducendo V3 o V13 han cesado de conducir V3 ou V13 non conducteur
V4 or V14 not conducting V4 oder V14 leitet nicht V4 o V14 non sta conducendo V4 o V14 han cesado de conducir V4 ou V14 non conducteur
V5 or V15 not conducting V5 oder V15 leitet nicht V5 o V15 non sta conducendo V5 o V15 han cesado de conducir V5 ou V15 non conducteur
V6 or V16 not conducting V6 oder V16 leitet nicht V6 o V16 non sta conducendo V6 o V16 han cesado de conducir V6 ou V16 non conducteur
31xdd
32xdd
33xdd
34xdd
35xdd
36xdd
89
893ADW000395R0100 DCS550 Quick guide edisf a
Page 90

FR
Description
Diagnosis messages
x = 0 : seul un thyristor du pont 1 n’est
pas conducteur (par ex., 320dd = V2 ou
V12 non conducteur)
x = 1 … 6 : un second thyristor du
pont 1 n’est pas conducteur (par ex.,
SP
Definición
Diagnosis messages
x = 0: solamente un tiristor del puente
1 ha cesado de conducir (p. ej. 320dd
significa que V2 o V12 han dejado de
conducir)
x = 1 … 6: adicionalmente, un segundo
IT
Descrizione
325dd = V2 et V5 ou V12 et V15 non
conducteurs)
dd = sans importance, ces chiffres ne
contiennent aucune information sur les
thyristors du premier pont.
Exemple :
36030= V16 (pont 1) et V23 (pont 2) non
conducteurs
tiristor del puente 1 ha cesado de
conducir (p. ej. 325dd significa que V2
y V5 o bien V12 y V15 han dejado de
conducir)
dd = carecen de importancia.
Estos números no aportan ninguna
información sobre los tiristores del
primer puente.
Ejemplo:
36030: significa que V16, en el puente 1,
y V23, en el puente 2, ya no conducen
y = 0 : seul un thyristor du pont 2 n’est
pas conducteur (par ex., 3dd0020 = V22
non conducteur)
y = 1 … 6 : un second thyristor du pont
2 n’est pas conducteur (par ex., 3dd25 =
V22 et V25 non conducteurs)
dd = sans importance, ces chiffres ne
contiennent aucune information sur les
y = 0: solamente un tiristor del puente 2
ha cesado de conducir (p. ej. 3dd0020
significa que V22 ha dejado de conducir)
y = 1 … 6: adicionalmente, un segundo
tiristor del puente 2 ha cesado de
conducir (p. ej. 3dd25 significa que V22 y
V25 han dejado de conducir)
dd = carecen de importancia.
thyristors du second pont.
Exemple :
36030= V16 (pont 1) et V23 (pont 2) non
conducteurs
Estos números no aportan ninguna
información sobre los tiristores del
segundo puente.
A124 ErrFormatVit (alarme échelle de
vitesse):
Ejemplo:
36030: significa que V16, en el puente 1,
y V23, en el puente 2, ya no conducen
A124 SpeedScale (alarma del escalado
de velocidad):
le paramètre à l’origine du conflit est
identifié par les 4 derniers chiffres.
F549 CompatibPara (défaut conflit
compatibilité paramètres):
le paramètre à l’origine du conflit est
identifié par les 4 derniers chiffres.
el parámetro que presenta el conflicto
de escalado de velocidad puede
identificarse mediante sus últiimas
cuatro cifras
F549 ParComp (fallo de conflicto de
compatibilidad de parámetros):
el parámetro que presenta el conflicto
de compatibilidad puede identificarse
mediante sus últimas cuatro cifras
Diagnosis messages
x = 0: un solo thyristor nel ponte 1 non
conduce (es. 320dd significa che V2 o
rispettivamente V12 non conduce)
x = 1 … 6: in aggiunta un secondo
DE
Beschreibung
Diagnosemeldungen
x = 0: nur ein einzelner Thyristor
in Brücke 1 leitet nicht (z.B. 320dd
bedeutet, dass V2 bzw. V12 nicht leiten)
x = 1 … 6: darüber hinaus leitet ein
zweiter Thyristor in Brücke 1 nicht (z.B.
EN
Definition
Diagnosis messages
thyristor nel ponte 1 non conduce
(es. 325dd significa che V2 e V5
o rispettivamente V12 e V15 non
conducono)
dd = non considerare, i numeri di questi
digits non portano alcuna informazione
circa i thyristors del primo ponte.
esempio: 36030: significa V16 nel ponte
1 e V23 nel ponte 2 non conducono
325dd bedeutet, dass V2 und V5 bzw.
V12 und V15 nicht leiten)
dd = don’t care, diese Ziffern enthalten
keine Informationen über die Thyristoren
der ersten Brücke.
Beispiel:
36030: bedeutet, dass V16 in Brücke 1
und V23 in Brücke 2 nicht leiten
y = 0: un solo thyristor nel ponte 2 non
conduce (es. 3dd0020 significa che V22
non conduce)
y = 1…6: in aggiunta un secondo
thyristor nel ponte 2 non conduce (es.
3dd25 significa che V22 e V25 non
conducono)
y = 0: nur ein einzelner Thyristor in
Brücke 2 leitet nicht (z.B. 3dd0020
bedeutet, dass V22 nicht leitet)
y = 1 … 6: darüber hinaus leitet ein
zweiter Thyristor in Brücke 2 nicht (z.B.
3dd25 bedeutet, dass V22 und V25 nicht
leiten)
dd = don’t care, diese Ziffern enthalten
dd = non considerare, i numeri di questi
digits non portano alcuna informazione
circa i thyristors del secondo ponte.
keine Informationen über die Thyristoren
der ersten Brücke.
Beispiel:
esempio: 36030: significa V16 nel ponte
1 e V23 nel ponte 2 non conducono
A124 SpeedScale (allarme scalatura
velocità):
Il parametro con conflitto scalatura
velocità può essere identificato per
mezzo degli ultimi 4 digits
F549 ParComp (guasto per
36030: bedeutet, dass V16 in Brücke 1
und V23 in Brücke 2 nicht leiten
A124 SpeedScale (Alarm
Drehzahlnormierung):
der Parameter mit dem Konflikt in der
Drehzahlnormierung kann anhand der
letzten vier Ziffern ermittelt werden
F549 ParComp (Fehler Parameter
incompatibilità parametro):
il parametro con conflitti di compatibilità
può essere identificato per mezzo degli
ultimi 4 digit
Kompatibilität):
der Parameter mit dem
Kompatibilitätskonflikt kann anhand der
letzten vier Ziffern ermittelt werden
x = 0: only a single thyristor in bridge 1
is not conducting (e.g. 320dd means V2
respectively V12 is not conducting)
x = 1 … 6: additionally a second thyristor
in bridge 1 is no conducting (e.g. 325dd
means V2 and V5 respectively V12 and
V15 are not conducting)
dd = don’t care, the numbers of this
digits do not carry any information about
the thyristors of the first bridge.
Example: 36030: means V16 in bridge 1
and V23 in bridge 2 are not conducting
9.11
Signal
90 3ADW000395R0100 DCS550 Quick guide edisf a90 3ADW000395R0100 DCS550 Quick guide edisf a
V21 not conducting V21 leitet nicht V21 non sta conducendo V21 ha cesado de conducir V21 non conducteur
V22 not conducting V22 leitet nicht V22 non sta conducendo V22 ha cesado de conducir V22 non conducteur
V23 not conducting V23 leitet nicht V23 non sta conducendo V23 ha cesado de conducir V23 non conducteur
V24 not conducting V24 leitet nicht V24 non sta conducendo V24 ha cesado de conducir V24 non conducteur
V25 not conducting V25 leitet nicht V25 non sta conducendo V25 ha cesado de conducir V25 non conducteur
V26 not conducting V26 leitet nicht V26 non sta conducendo V26 ha cesado de conducir V26 non conducteur
y = 0: only a single thyristor in bridge 2
3dd1y
3dd2y
3dd3y
3dd4y
3dd5y
3dd6y
is not conducting (e.g. 3dd0020 means
V22 is not conducting)
y = 1 … 6: additionally a second thyristor
in bridge 2 is no conducting (e.g. 3dd25
means V22 and V25 are not conducting)
dd = don’t care, the numbers of this
digits do not carry any information about
the thyristors of the second bridge.
Example: 36030: means V16 in bridge 1
and V23 in bridge 2 are not conducting
A124 SpeedScale (alarm speed
scaling):
the parameter with the speed scaling
conflict can be identified by means of the
last 4 digits
F549 ParComp (fault parameter
compatibility conflict):
the parameter with the compatibility
40000 …
49999
50000 …
conflict can be identified by means of the
last 4 digits
59999
Page 91

Macro & Firmware structure – Makro & Firmware Struktur –
DCS550_macros_b.dsf
α
≥
Struttura macro & firmware – Estructura del macro & firmware –
Structure du logiciel macro & système
3ADW000395R0100 DCS550 Quick guide edisf a
91
913ADW000395R0100 DCS550 Quick guide edisf a
Macros & Firmware
Page 92

DCS550_macros_b.dsf
α
≥
92 3ADW000395R0100 DCS550 Quick guide edisf a92 3ADW000395R0100 DCS550 Quick guide edisf a
Page 93

DCS550_macros_b.dsf
α
≥
3ADW000395R0100 DCS550 Quick guide edisf a
93
933ADW000395R0100 DCS550 Quick guide edisf a
Macros & Firmware
Page 94

DCS550_macros_b.dsf
α
≥
94 3ADW000395R0100 DCS550 Quick guide edisf a94 3ADW000395R0100 DCS550 Quick guide edisf a
Page 95

DCS550_macros_b.dsf
α
≥
3ADW000395R0100 DCS550 Quick guide edisf a
95
953ADW000395R0100 DCS550 Quick guide edisf a
Macros & Firmware
Page 96

DCS550_macros_b.dsf
α
≥
96 3ADW000395R0100 DCS550 Quick guide edisf a96 3ADW000395R0100 DCS550 Quick guide edisf a
Page 97

DCS550_macros_b.dsf
α
≥
3ADW000395R0100 DCS550 Quick guide edisf a
97
973ADW000395R0100 DCS550 Quick guide edisf a
Macros & Firmware
Page 98

DCS550_macros_b.dsf
α
≥
98 3ADW000395R0100 DCS550 Quick guide edisf a98 3ADW000395R0100 DCS550 Quick guide edisf a
Page 99

DCS550_macros_b.dsf
α
≥
3ADW000395R0100 DCS550 Quick guide edisf a
99
993ADW000395R0100 DCS550 Quick guide edisf a
Macros & Firmware
Page 100

DCS550_macros_b.dsf
α
≥
100 3ADW000395R0100 DCS550 Quick guide edisf a100 3ADW000395R0100 DCS550 Quick guide edisf a
 Loading...