

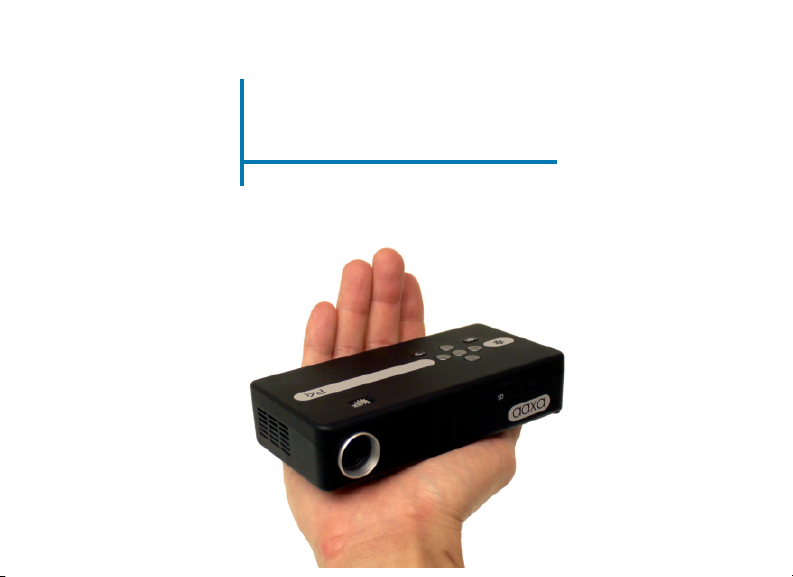
User Guide
aaxa
TECHNOLOGIES
P4 Wi-Fi
Pico Projector

Caution!
WARNING: Please use this product as instructed. Misuse may cause
injury or death.
DO NOT use while driving
DO NOT expose to water or wet
surfaces. Electric shock may occur
DO NOT expose the LED to your
eyes or the eyes of others
DO NOT block or restrict airow
from ventilation holes as this may
cause the projector to overheat
Keep the projector, battery, or
charger away from any heat sources
Caution for Battery Use
• Do not pierce or puncture the battery
with sharp objects
• Do not heat the product or expose it to
high temperature.
• Do not wet it or place it in any liquid
Caution for Earphone (Earplug) Use
• Prolonged use at high volume may
impair your hearing.
• High volume during walking or driving
may cause distractions and result in
injury or death
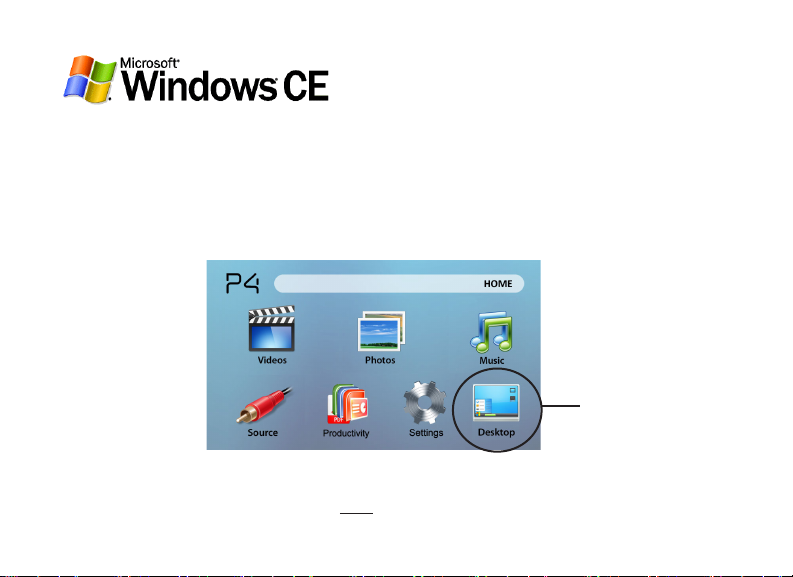
The AAXA P4 Wi-Fi runs the Windows CE operating system. All Standard Functions can be found on the
Home Screen and can be manipulated with the keypad on the projector. Because we dislike locked devices, rather than locking the Windows CE Desktop we have decided to leave this function unlocked. This
allows users to enjoy the full capabilities of the Windows CE operating system. However if you choose to
access the desktop, please make sure you know what you are doing. It is very easy to damage or corrupt
the projector or the operating system through the Windows Desktop. AAXA does not support 3rd party
applications and any adjustments to the desktop. You are on your own here – please access the Windows
Desktop at your own risk.
Windows CE Desktop
Notice: Accessing the desktop allows the user to manipulate the le system including installation of applica-
tions and manipulation of the OS control panel. Improper use can result in corruption and/or damage to the
Operating System. AAXA Technologies does NOT provide technical support for Operating System issues.
ACCESS AT YOUR OWN RISK! Use of desktop requires a mouse and keyboard. Please visit our webpage
for more information

Table of Contents
Chapter 1: P4 Wi-Fi at a glance
2
Main Unit Front/Back
2
Remote & Keypad
3
Accessories
4
Chapter 2: Getting Started
5
Powering On / FF
5
Focus Adjustment / Throw
6
Distance
External Inputs /Input Sources
7
Connecting to a Computer
8
Connecting to Composite Video
10
Connecting to Speaker or
12
Headphones
13
Connecting to Mouse/Keyboard
15
Connecting to Wi-Fi
16
Connecting to Wi-Fi Manually
17
Computer Data Transfer
19
Saving to USB/SD card
20
Connecting a Micro SD Card
21
Connecting to a USB drive
22
Chapter 3: Menu Screens
22
Main menu
23
Video Player Menu
25
Photo Viewer Menu
27
Music Player Menu
29
Productivity Menu
31
Windows CE Desktop
32
Setup Menu
33
Chapter 4: Technical Details
33
Troubleshooting
35
Wi-Fi Troubleshooting
36
Specications
1
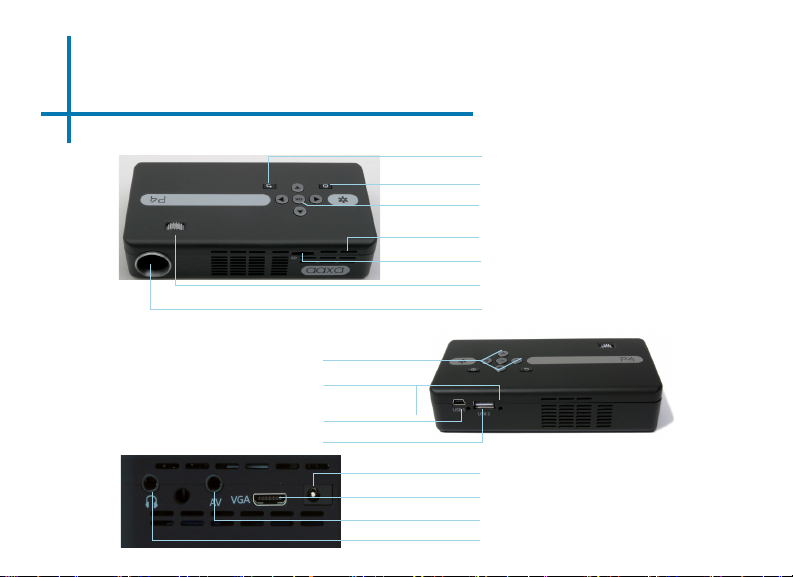
P4 Wi-Fi at a Glance
Chapter 1
Main Unit Front/Back/Side
Directional Pad
Charge Indicator
Mini USB Port
Full USB Port
Back Button
Power Button
Conrm Selection
Reset Hole
Micro SD Card Port
Focus Adjustment
Projection Lens
Power Input
VGA Input
A/V Input
Headphone
2
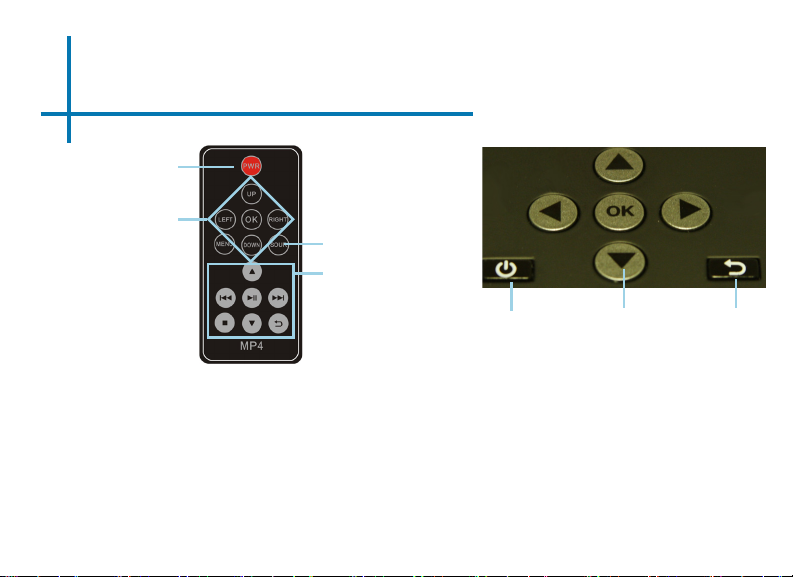
Remote & Keypad
Power On/Off
Main Menu Navigation
Both the keypad and remote can be used to navigate through the menus. The Main Menu
Navigation on the remote functions exactly the same as the directional pad on the P4 Wi-Fi
unit.
NOTICE: Pressing power on the remote will only put the projector in STANDBY
mode. Please press the power button on the projector if you want to turn it off.
Select Source
Media Player Menu
Navigation
Power Exit/BackDirection Pad
3
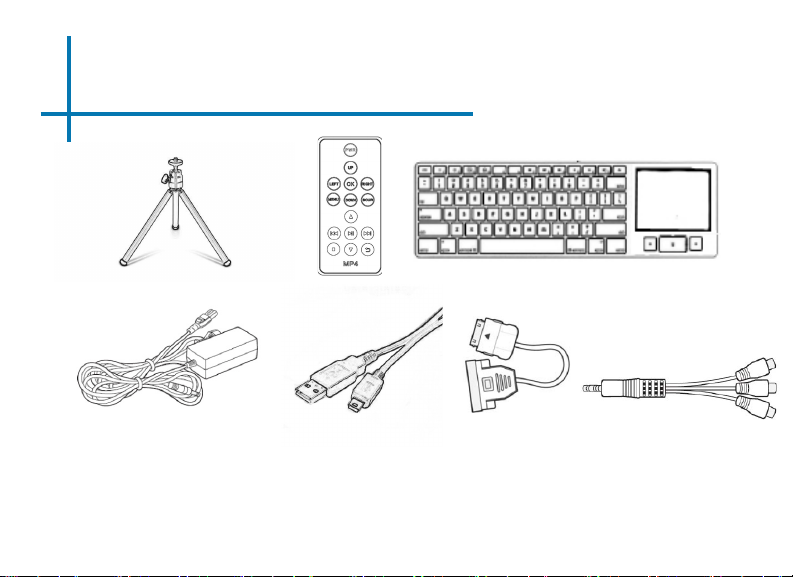
Accessories
Tripod
Power Adapter VGA Cable A/V Cable
*Under various circumstances, the actual accessories may be different from
those shown in the pictures above.
Remote
Mini USB to
USB Adapter
Keyboard/Mouse
4

Getting Started
Chapter 2
Powering ON the projector
1. Connect the power cord to the P4 Wi-Fi.
2. Connect the wall plug into the wall power source.
3. Press POWER button and hold for 2-3 seconds to switch on or switch off
the power
• The LED turns red while charging.
• The LED turns green when charging is nished.
• 4 hours of charge time is required to reach a full charge.
Powering OFF the projector
1. Press and hold the power button for 3 seconds.
2. The optical engine should power off and the fan should stop spinning.
• Note. Pressing the power button on the remote puts the projector in
standby mode. It will NOT turn off the projector.
Note: The P4 Wi-Fi Projector battery does not charge when it is in operation.
5

Focus Adjusment / Throw Distance
Focus Adjustment
1. Spin the focus wheel left of right until the image becomes
clear.
2. The recommended focus distance for this projector is 12” to
innity.
Throw Distance Chart
Distance inch (“)
12
18
24
30
36
74
84
96
Throw Ratio 1.9
*minimum throw distance: 10 inches
Diagonal Inch (“)
6.3
9.5
12.6
15.8
18.9
38.9
44.2
50.5
DIAGONAL SCREEN SIZE
16:9 Aspect Ratio
6
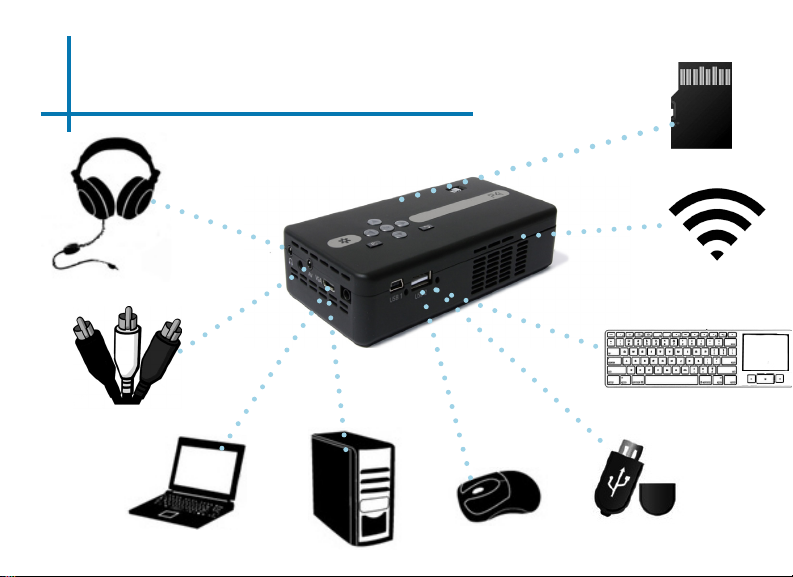
External Inputs/Outputs
Micro SD Card
Headphone/speaker
Composite Cable
Laptop
Desktop
Mouse
802.11
Wi-Fi
Keyboard
USB Stick
7
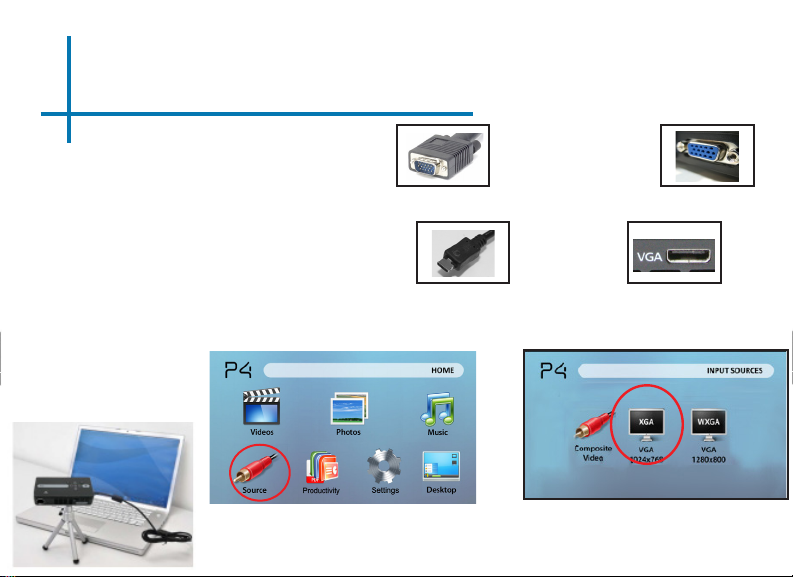
Connecting to a Computer
Step 1:
Connect the large end of the
Step 2:
Connect the small end of the
Step 3:
In the Main Menu
Select “Source”
VGA Cord
VGA Cord
to your computer’s
VGA Adapter
to your P4’s
VGA Adapter
Then
Change resolution
8
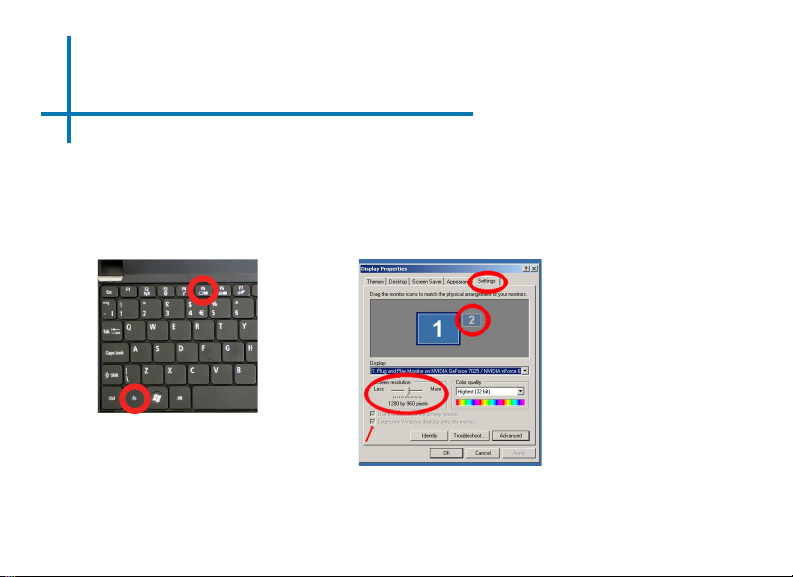
Connecting to a Computer Cont.
Step 4:
Enabling VGA output on your Computer – To enable VGA output on your computer most
computers require “turning on” the video output feature. Each computer is different.
Please consult your owner’s manual for instructions to enable VGA output. Below are
standard instructions for a Windows XP computer – not all systems are the same.
Step 5:
Press function & “F5” to instruct
the computer to enable multiple
displays.
You can also press Windows+P to
toggle through display settings.
*NOTE: different operating systems may differ
Step 6:
1. Right click on computer desktop and select “Properties”
2. Display Properties window
will pop up
3. Click on the “Settings” Tab
4. If a secondary monitor is
grayed out, click on it and
check “Extend my Windows
Desktop onto this monitor”
5. If the image is blurry or the
text is not legible, adjust
the screen resolution. We
recommend 800x600 or
1024x768.
9

Connecting to Composite Video
Step 1:
Connect one end of the
Step 2:
Connect opposite end of
to your P4’s
Composite Cord
to your devices
Composite Cord
A/V Adapter
Composite Cord
10

Connecting to Composite Video Cont.
Step 3:
In the Main Menu
Then
Select “Source”
Step 4:
Turn on your multimedia device.
Connectivity with multimedia devices
The P4 Wi-Fi can connect to many media devices including: iPod, iPhone, iPad,
VHS players, DVD players, smart phones, cameras, video game consoles and
other peripherals with ease.
*Apps on smart phones require video out capabilities to be displayed with the P4.
Choose Composite Video
11

Connecting Speakers/Headphones
Step 1:
Connect your speaker
or headphones
Step 2:
Ensure the power and volume on your
speaker or headphones is turned on
Step 3:
Place headphones/earphones in/over ears
3.5 mm cord
Caution for Earphone (Earplug) Use
• Prolonged use at high volume may impair
to your P4’s
your hearing.
Speaker Adapter
12

Connecting Keyboard/Mouse
Step 1:
Remove the USB Adapter
from the back of your Keyboard /mouse combo
Step 2:
Connect your keyboard/mouse combo’s
USB Adapter
Step 3:
Move the ON/Off Switch on the side of the combo.
Step 4:
Press the “red” button to sync the wireless usb adapter to the keyboard.
to your P4’s
USB Input
Mouse Touchpad
Left Click
Right Click
13

Connecting Keyboard/Mouse
The Keyboard/Mouse that is included helps give you full functionality of the P4 Wi-Fi.
A USB mouse can be used to select most options on the P4 Wi-Fi.
• To move the cursor, place 1 nger on the pad located on the right and move your nger
in the direction you wish to move the mouse.
• Hover over your selection and click the left mouse button.
• A keyboard can be used in the “desktop” feature.
Please refer to the “Desktop section of the manual for a more detailed explanation.
Wireless Signal
14

Connecting to Wi-Fi
Upon start up you will be presented with a screen that will list your available
discovered networks. You will be prompted to choose a preferred network.
Step 1:
Find your preferred network and double click it with your keyboard.
Step 2:
Click on “Connect”
Step 3:
The following screen will prompt
you to enter your network key
information
Untick the automatic retrieval
box and enter your key
You should now be connected to your
wireless network!
15

Manually Connecting to Wi-Fi
There is also the option to connect to an access point
manually if you aready know the congration such
as IP, subnet mask, and default gateway. You will need
to enter windows by clicking Desktop fro the home menu
Step 1:
Enter Windows CE by clicking Desktop from
the home menu
Step 2:
Navigate to settings and then you should be
able to click on your network card to bring up
a manual connection prompt.
16

Computer Data Transfer Only
Step 1:
Connect small end of the
USB Adapter
Step 2:
to your P4’s
Micro USB Input
Connect opposite end of
to your computer’s
USB Adapter USB Port
Connecting your P4 Wi-Fi to your computer for
data transfer allows you to add les to store onto
the onboard memory. This will allow you to play
les with your P4 Wi-Fi as a standalone device.
17

Computer Data Transfer Only
Step 3:
Turn On the P4 Wi-Fi and open the
NAND hardrive
Step 4:
Place les in appropriate folders
“Open to view les”
that autoplays.
OR
Video les go here
Music les go here
Note. If your computer fails to detect the projector, check to make sure the cable is securely inserted on both sides. If you’re still unable to view the folder, please consult with
your operating system’s owner manual.
Image les go here
18

How to Save Files to your Sd or USB
In order to correctly display your media les SD or USB, the les must be placed in the
correct folder.
Step 1:
Create folders “movie”, “music”, and
“picture” in all lowercase.
To do this, right click on your mouse
on an empty space in your SD or
USB’s main folder.
Step 2:
Place les in appropriate folders
Video les go here
Music les go here
Image les go here
19

Micro SD Card
How to insert your Micro SD Card
• Slide in your SD card into the SD card slot on the front of the P4. (as shown in
picture)
• Gently slide the SD card until it *clicks* into place.
How to access your Micro SD Card
• Once your SD card has been inserted,
you can navigate through the main
menu to select what you want to view
under each sub menu.(Videos, Photo,
Music)
• After selecting SD card mode you
should now be able to access the data
on the SD device through the onboard
media player.
*Review the Specication
section of this manual to read
about the supported le
formats.
20

USB OTG(On-the-Go)
How to insert your USB Drive
• Slide your USB Drive into USB slot. (as shown in picture)
• Gently slide the drive until it cannot go in any further.
How to access your USB Drive
• Once your USB Drive has been
inserted, you can navigate through the
main menu to select what you want to
view under each sub menu.(Videos,
Photo, Music)
• After selecting USB Drive Mode you
should now be able to access the data
on the USB drive through the onboard
media player.
*Review the Specication
section of this manual to read
about the supported le
formats.
21

Menu Screens
Chapter 3
Main Menu
The P4 Wi-Fi features a built in PMP (Portable Media Player) function.
This function allows the projector to play videos, pictures, music les, and text. To access
the main menu simply turn on the projector.
• Scroll Left/Right by pressing the rewind/fast foward buttons
• To select a submenu, highlight the desired submenu and press the Play/Pause
button located in the middle of the keypad or remote.
• To go back to the previous page while in a submenu, press the back on the far
right just underneath the directional keypad.
22

Video Player Menu
Opening a le:
• Choose “Open File” option
• Select device le is stored on
• Select le from list
Rewind / Back
Pause
Play/Stop
Fast-Foward / Next
Open File
Volume Down
Volume Up
23

Video Player Menu
Playing Videos
To play/pause a video, press the play button in the middle of the keypad or remote
control
To rewind, press and hold the left arrow button
To fast-forward, press and hold the right arrow button
To jump forward to the next vide, press the right arrow button
To jump back to a prior video, press the left arrow button
To a djust the volume, press the vol+ (on the remote) to increase and vol- (on the
remote) to decrease the volume
Note: If the video is large, please allow the projector a moment to process the le.
If after a few minutes the projector does not play a video, it means the le is not
compatible.
*Review Specication section of this manual for supported video formats.
24

Photo Menu
Close Menu
Previous
Next
Run Slideshow
-1 sec to slideshow
+1 sec to slideshow
Open File
Opening a le:
• Choose “Open File” option
• Select device le is stored on
• Select le from list
25

Photo Menu
Viewing Pictures
The P4 Wi-Fi Pico Projector allows you to view pictures individually or in a slide-
show. To view individual photos, select the le you want to view in the le menu
for the particular storage device on which the image le is stored. You can press
the left and right arrow buttons on the touch pad or remote to ip through the
pictures you have in the present folder.
Viewing Pictures in a Slideshow
To view your pictures in a slideshow, select a le and press Play when the picture
appears.
*Review Specication section of this manual for supported picture formats.
26

Music Player Menu
Opening a le:
• Choose “Open File” option
• Select device le is stored on
• Select le from list
Previous
Play
Stop
Next
Open File
Repeat
Shufe
Playlist
Volume up
Volume down
27

Music Player Menu
Listening to music
To play/pause a song, press the play button in the middle of the keypad or remote
control
To rewind, press and hold the left arrow button
To fast-forward, press and hold the right arrow button
To jump forward to the next vide, press the right arrow button
To jump back to a prior video, press the left arrow button
To a djust the volume, press the vol+ ( on the remote) to increase and vol- ( on
the remote) to decrease the volume
*Review Specication section of this manual for supported video formats.
28

Productivity Menu
From this menu you are able to access the Windows Microsoft Suite that is embedded into the
P4 Wi-Fi. You can access and edit various les as
long as they are available through SD, USB, or
the onboard memory.
Word Editor
Excel Editor
Powerpoint Editor
PDF Viewer
29

Softmaker Serial
Softmaker is an embedded software that allows the P4 Wi-Fi to become a
stand alone editor for on-the-go changes to your presentations.
You can nd your Softmaker Serial number on the back of this manual.
Entering the Softmaker Serial will register the devices software to you and allow you
to access the software features past the 30-Day trial.
Upon start up the software prompts for your user information. This information is to
embed into documents and is not neccessary or part of registration.
30

The Windows CE Desktop allows users to
load, install, and manipulate any third party
applications that are supported by Windows
CE including word processing, spreadsheets,
games, and other applications.
A Keyboard and Mouse is
REQUIRED to use the Windows CE Desktop
NOTE: To Exit Desktop mode, double click the button located on the desktop!
Technical Support for the Desktop is not available. Please direct any questions to aaxatech.
forumotion.com and we will do our best to assist you.
31

Setup Menu
The Settings Menu can be accessed by selecting “Settings”on the main menu
Sound & Display
Volume Settings
• Allows the raising or lowering of volume
Picture Adjustment
• Brightness, backlight and color temperature options
IMAGE FLIP
• Flips image upside down (for rear projection)
Date and Time
• Adjust Date and Time
Language & Keyboard
There are 4 menus in the settings menu
• The projector allows you to choose from different
languages
• To choose the language of your choice, highlight
the language you want and press play.
Disk Usage
• Displays total memory used on the P4’s onboard
memory as well as an SD card if inserted
32

Technical Details
Chapter 4
Troubleshooting
IMAGE IS BLURRED
Possible Causes Solution
The Projector is not in focus Adjust the focus with the focus adjustment dial
until the image comes into focus
The Projector is offset from plane / angle of
operation
No Sync, No Signal
1. Be sure to setup the computer to enable a video signal output. On
some laptops this is done by pressing and holding Function F5 key. If
using the P4 Wi-Fi as an external monitor on Windows based systems,
this can be done by selecting “extend my desktop to this monitor”.
The native resolution of the p4 projector is 858x480 and accepts up
to 1024x768. Depending on the video driver different resolutions may
need to be selected for proper output.
Move the projector so that it is both 180 degrees
and on an evern plane with the screen.
33

Technical Details
Troubleshooting
THE PROJECTOR DOES NOT TURN ON
Possible Causes Solution
There is no power Check to ensure the power outlet or battery
The power button was not held long enough To power on the projector, the power button
NO PICTURE / FILE NOT SUPPORTED
Possible Causes Solution
The video source is not properly connected or
selected
source is good. check the power adapter to
ensure a proper connection with the wall outlet
as well as the proejctor. Conrm that the unit is
charged and has enough power
needs to be depressed for a full 3 seconds. try
holding the power button until the optical engine
turns on
Check the video source signal to ensure that it
is properly connected. Select the current input
source by choosing the input desired from the
main menu
Incorrect le extension / Video is encoded with
incorrect codec
Please refer to “Specications” page to see which
le types and codex are supported. Verify that
the le was encoded properly.
34

Technical Details
Troubleshooting Wi-Fi
Wi-Fi Does Not Connect
Possible Causes Solution
Router is not assigning proper authentication Check to see that your routers are on. Many times
Router is not accepting encryption key Ensure that you are entering the proper authen-
Cannot access network card
Possible Causes Solution
Start-up network prompt The network card is accessible only through Win-
when devices need to connect a router reset
might be needed. Pull the power cord on your
router and try reconnecting when the router has
stabilized
tication key with the proper encryption settings.
Remember to take into account capital letters
and numbers.
dows CE mode. Upon entering Windows CE mode
navigate towards the bottom left of the screen
where you will see a network icon in the icon tray.
Network icon tray is unresponsive If the network icon in the icon tray becomes
unresponsive reboot the device after saving any
open documents.
35

Specications
Brightness
Native Resolution
Maximum Resolution
Contrast Ratio
Projectoin Lens:
Image Size:
Lamp:
Video in:
Wireless:
Audio Output:
SD Card
USB:
Dimensions
Weight
Supported File Formats
100 Lumens
WVGA(858x480)
WXGA(1280x800)
2000:1
Manual Focus
10~80 inches
20,000 hour RGB Triple LEDs
Composite A/V
VGA(mini-VGA)
802.11 b/g
1.0 W stereo speakers
3.5 mm audio jack
SD-HC Card Slot
(32GB maximum)
USB OTG (On-the-Go)
(Memory Sticks)
USB Data Transfer
172x71x31mm
0.5 lbs
AVI, MPG. MP3,
36

Please direct all customer service inquiries to:
AAXA Technologies, Inc.
103A East Alton
Santa Ana, CA 92707
(714) 957-1999
info@aaxatech.com
 Loading...