

Page 1
Page 2
Table of Contents
.............
..
.
....
.
..
..........1
...........
..............
............
...............................................
3
O
O
.......................
........................
.......4
n
..
..
....
..
..
.
..
.5
t / Throw Dist
ance
..............
.....
....
......
..............
6
dapte
r
..
.....
.6................
.
..
..............................
..
.
..................
.
.
............................
..
7
te
m
A
AV In
In
t
................................................
..
.....
......................
............
...8
S
D Ca
rd...............................................................
..
.
........
..
..
........
.
....9-1-1
U
S
at
a ....
......
.....
..................
..
..
............
..
..
......
..........
..
..............
..
S
..........
..
.
.................................................
..
..
....
.........
.
Trblb
eshooting
..
.......
.....
..
................
......
......
.
.........
....
...............
p
ec
i
cations
......
........................
..
..........
.
....
..
.....
..
......
..
Table of Contents......................................................................................................1
Warnings ......................................................................................................................2
Accessories ..................................................................................................................3
General Operation
Turning the Projector On/O ..........................................................4
....
..................
Projector Description .........................................................................5
Focus Adjustment / Throw Distance ............................................6
Tripod Adapter .......................................................................................6
Input / Output ............................................................................................................7
Menu System
AV Input .....................................................................................................8
SD Card .......................................................................................................9-14
USB Data ...................................................................................................15
Settings ......................................................................................................16-17
Troubleshooting .......................................................................................................18
Specications .............................................................................................................19
B D
ettings
............................
..............................
..............................................
1
Page 3
P1 Jr. Pico Projector
OS po
p
ojector with
media
or wit
itbut-
in
media player ca
p
b
e
C
ombine
d
w
wi
th i
t
ts
1
hour internal b
at
te
ryry
t
t
m
en
t device!
I tt
his
al you will nd
in
stctct
io
be used in dark a
a
reas only –
e e litit
a
reas is not reco
enende
Plele
ase
e this pro
du
ctct aa
s instructed to
et t
an
y
y
in
ju
ju
ju
o not
operate t
he
p
rojectcor i i
n moist
or
w wetet
AvAvoiod exextrem
vi
ronments. Expo
s
re
to
wa
wa
ter ma
y
y
may da
da
u
e electrical shock.
utioion thium
Batt
er
y
y
ononarard.d.
not d
ispose
of im
pr
r
erly o
r exexpose
reme hea
t.
Congratulations on purchasing the world’s smallest LCOS pico projector with media player!
The P1 Jr. pico projector features a bright 11 lumen projector with built-in media player capable of
projecting videos, pictures, and media of up to 50”*. Combined with its 1 hour internal battery the P1 Jr.
pico projector is the ultimate portable entertainment device! In this manual you will nd instructions on
how to use your P1 Jr. pico projector.
* Notice: The P1 Jr is designed to be used in dark areas only – use in lit areas is not recommended.
Warning: Please use this product as instructed to prevent any injuries.
Do not operate the projector in moist or wet Avoid extreme temperatures as this
environments. Exposure to water may may damage the projector.
cause electrical shock.
Caution Lithium Ion Battery onboard. Avoid using the projector if damaged.
Do not dispose of improperly or expose Taking apart the projector is not
to extreme heat. recommended and will void the
warranty.
2
Page 4
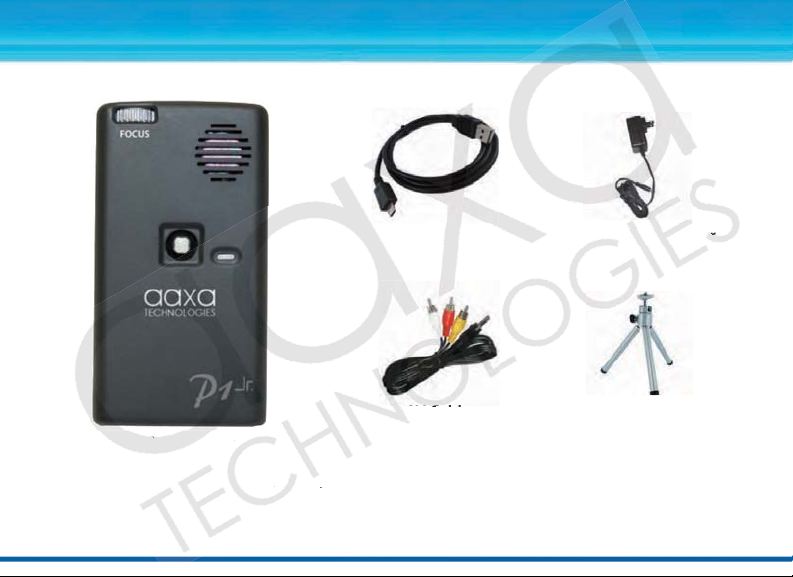
Package Contents
Jr. P
ro
je
or
Ad
apap
teteChCh
arger
r
AV Cab
NoN
te
P1 Jr. Projector
B be AC
USB Cable AC Adapter/Charger
AV Cable Adjustable Tripod
ct
* Note: Actual accessories may appear dierent from those
shown above.
3
Page 5
General Operation
t
nt
o
the
is
f
ly
c
haed b
b
efore use.
h
ours.
To
charge
th
th
e
p
pr
ojector:
a
da
pter
t
t
o
th
th
e projector
er a adadpt t
o
the wall outlet
in
g
O the
Project
or
ld
t
p
o
er button for
secocnds til the
op
tical
en
gi
ne
s o.
Turning On the Projector
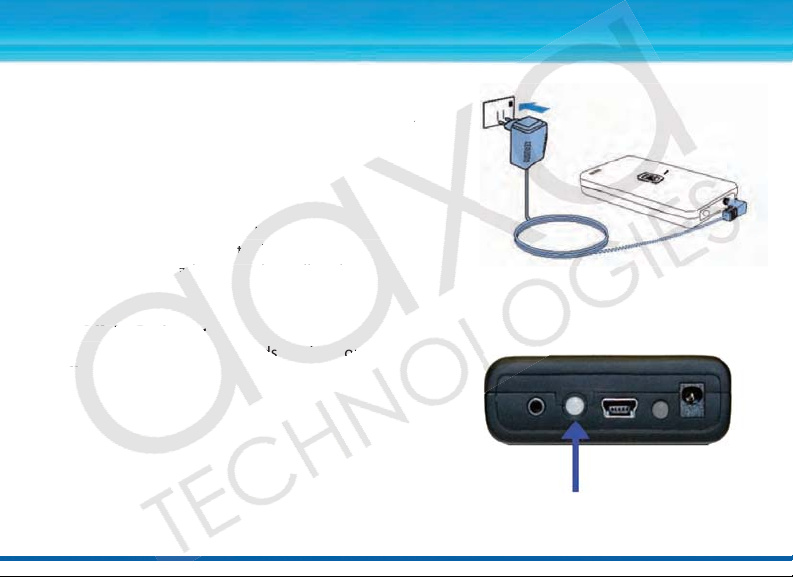
Press and hold the power button for 3 seconds to turn the
projector on. The welcome screen should appear while the
projector is loading and will automatically load into the
onboard media player.
Note: Please make sure the P1 Jr is fully charged before use.
Charge time can be up to 3-4 hours. To charge the projector:
1. Attach the power adapter to the projector
2. Attach the power adapter to the wall outlet
Turning O the Projector
Hold the power button for 3 seconds until the optical engine
turns o.
4
Page 6
General Operation
from tht
e
hi
ng o
s
tr
ucti
g
t
he
e.
cted
im
ag
g
e
is not
in focus,
move eth
ring
left o
r
ri
t to bri
t
image iofo
cu
s.
A
A
le
ar
pic
ture c
an be acheiv
ed at
a distc of 10” - 90“.
Plele
ase
e pge 6 for focus a
t
t
hrow
ds
tances.
c
e
th
e
jo
ysys
ti
ti
ck
to naviga
te
t t
h
hr
ghgh
e eac
h me
.
ThTh
e jo
ys
ti behaves
rently
i
i
n each subme
. The
di
ag
ag
m
bebe
w
depi
cttthe ua
ua
ge
e
in t
e
rest of the manua t
de
d
scribe the fun
ctioio
na
lity of the
jo
ysys
ti
ti
e
(E
(
SC
)
cenaraios, t
e
ap
ap
e
buttttonon
e
exixits f fm
ththe e
cu
rr
l
me
nu. Pl
se s
ee
e e
ac
h menu sec
ti
t
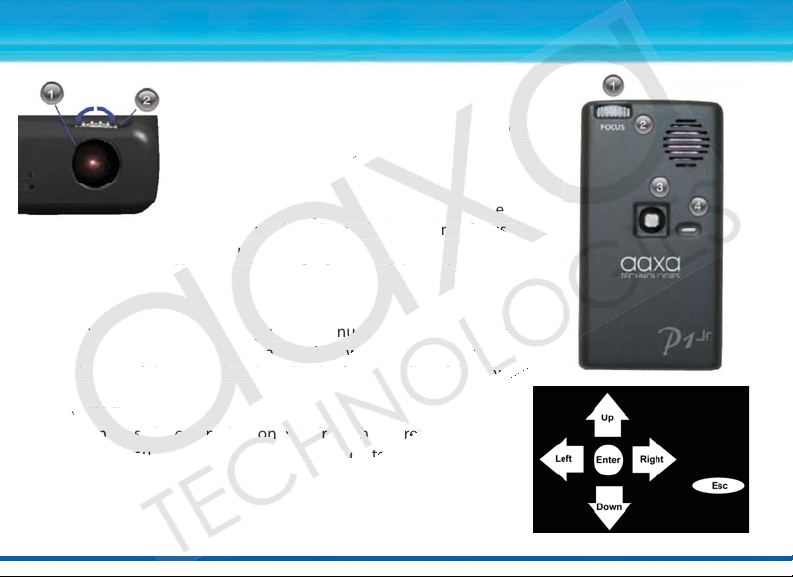
1. Projection lens
The projection lens emits the image from the
projector. Make sure there is nothing obstructing the
lens to obtain a clear image.
2. Focus adjustment
If the projected image is not in focus, move the ring
to the left or right to bring the image into focus. A
clear picture can be acheived at a distance of 10” - 90“.
Please see page 6 for focus and throw distances.
3. Joystick
Use the joystick to navigate through each menu. The joystick behaves
dierently in each submenu. The diagram below depicts the language
used in the rest of the manual to describe the functionality of the joystick.
4. Escape (ESC)
In most scenarios, the escape button exits from the current menu to
the top level menu. Please see each menu section to learn more about
this button.
5
Page 7

General Operation
Tr
ipp
odo Adadpter
s
t
to
the boottom
m
th
e
projector
as s sownwn t to ththe ft
.
nrm t
at tthe
trtr
is se
cu
fastened beforore turnrnin
g g
oj
e
.
ng the wheel
l
oc
at t
oj
o
ectois
c
ap
ap
ab
l o
f
e
right.
Focus Adjustment / Throw Distance
The focus can be adjusted by turning the wheel located at
the front of the projector. The projector is capable of the
distances specied on the right.
Tripod Adapter
Insert the tripod to the bottom of
n
the projector as shown to the left.
Conrm that the tripod is securely
fastened before turning on the
projector.
tripod
tor
ated
the
of
6
Page 8

Inputs / Outputs
/o th
e
ojecto
r,
3
second
s.
ort t
The MiMinin US
p
p
ort is designed for
datat
inp from
B OTG Gdedeviv P Ple
escrtiion on
gege
1
4 tot leae
rn more.
oj
ec
to
r Power
J a
a
cc
ep
ts
t 100
-24040
V
50-6
0h
z poweatat 2000mm
a.
a.
a.
d
on
the back of the p
r
je
e
ct
c
or. The P1 Jr. ca
n bebe o o
perate
dd du
ri
1. A/V Port – The P1 Jr. can project
video from standard composite
video sources. A resolution of
720x480 can be supported. Please
see page (8) for more information
about AV Input Devices.
2. Power Button - To turn on/o the projector,
press this button for 3 seconds.
3. Mini USB Port – The Mini USB port is designed for data input from USB OTG devices. Please see the USB
Data description on page 14 to learn more.
4. Projector Power – The P1 Jr. accepts 100-240V 50-60hz power at 2000ma. The charge receptacle is
found on the back of the projector. The P1 Jr. can be operated during charging.
5. SD Card – The P1 Jr. can accept up to
8GB SD Cards. For accepted le formats
please see the specications page (19) for
additional information.
7
Page 9

Menu System
abe t
he
P
1 Jr. to
disis
pl
ay
ected to t t
he AV port. In
t
eith N
N
TSC
o
P
AL of up to
o esotio
on
.
ect an
A/V cabab
le,
sertr
t
3.5mm por
ti
onon
nt
o 3.5-2..
5m
m adapte
r.
P
ace t tt
in to th
e
A/
V
p
ort o t
h
he
projector and
the o ther e end
to
ernl
devi
ceernl
device.
The AAXA P1 Jr. pico projector features an onboard
media player complete with onboard menu system.
The onboard menu system allows the user to select
from dierent video inputs as well as video and
picture playback.
AV (Audio / Video) Input
Selecting the AV input will enable the P1 Jr. to display
video from a device connected to the AV port. Input
resolution can be either NTSC or PAL of up to
720x480 video resolution.
a. To connect an A/V cable, insert the 3.5mm portion
into 3.5-2.5mm adapter. Place that in to the A/V
port of the projector and the other end to
external device.
8
Page 10

Menu System
reen w
w
ill ap
p
pe
a
and the proje
ctoro
w
s
pr
operly set
u
p
to oput video.
te (includuded), i
iPod/
iP
hone, HTC
Se
Se
ries, Noki
a
a
SeSe
es, DVD
),
N
teteo Wi
i (comom
popos
si
te only),
Micrcosoft XbXb
ox
(
co
mp
ososite o
ly
y
).
Y
ou m
ay
y
puchase the
c
ble necec
ssary to connect
y
ouou
r extealal
AAXA
er. Pl
easese see
e
your
de
vi
ce’s
i
nstrtrtiti
on manual
fo
for re
en
su
re
y
ouou
device has v
ideoe oo
utput
c
p
bilities. For ex
ample some celell
ph
ph
on
on
oput
t
feate blocked.
in
g
the e
SD Card in
pu
t
topens ssusu
bmen
to
a
ow y
ou
u t to seele
lect t t t
ypype e
ofof d d
d
ss.
Th
e
submenu includ
e accesto: Vi
dedeosos
,
ot
os, Musianand
d Fis.s P
lele
ion o
p
age 10 to see th
e
nu
items.
ta
the e
USB ta
i
np
wil
l
lo
lowththe e ususere t
t
ac
ce
Da
ta section
on
agge
15 fo
r aadditional
tu
p opti
on a owows th
Menu System
AV (Audio / Video) Input (cont’d)
b. Click on the “AV input” icon in the main menu. A blue screen will appear and the projector will be ready
to accept an A/V signal.
c. Turn on the external device and make sure it is properly set up to output video.
d. Possible A/V sources: Standard Composite (included), iPod/iPhone, HTC Series, Nokia Series, DVD Player
(non Bluray / HD), Cable Box (non HD), Nintendo Wii (composite only), Microsoft Xbox (composite only),
Sony Playstation (composite only). You may purchase the cable necessary to connect your external
device from AAXA or your AAXA dealer. Please see your device’s instruction manual for more
information. Please ensure your device has video output capabilities. For example some cell phones
have the video output feature blocked.
SD Card
Selecting the SD Card input opens a submenu to allow you to select the type of data you would like to
access. The submenu includes access to: Videos, Photos, Music and Files. Please see the SD Card Memory
section on page 10 to see the menu items.
USB Data
Selecting the USB Data input will allow the user to access data on their USB OTG (On-The-Go) device. Please
see the USB Data section on page 15 for additional information.
Setup
Selecting the Setup option allows the user to change various settings on the P1 Jr. Please see the Settings
9
Page 11

SD Card Memory
on th
e
cards
nuu f
rom
th
e
in menu.
s
to a
cc
eses
s
related data o
nthh
e SD c
d
To access data from the SD Card slot:
a. Insert the SD Card as shown. The gold connectors on the
card should face down. Maximum of 8GB SDHC cards
are supported.
b. Access the SD Card Memory menu from the main menu.
c. Select one of the icons to access related data on the SD card.
10
Page 12

SD Card Memory
k
up
and
,
click thth
e
eo for
ma
ts, pl
easese
s
page.
yb
ack,
t
j
j
oy
stick contro
lss a re
:
Conon
trol
:
R
R
ft
st-Fowarard/Rewnd
:
U
SpSp
eeds of 2x
2, 4x
4
y
at
ed, ,cle thro
ro
sp
sp
eeee
ds
yb
ac
k
te
r
pe
,
,
ththe
jojo
ys
ti
ckck
toto operate t fol
wi
ng
ng
c conontrtr
olols:s:
Previ
ou
t
2. Rewin
d
6. S
to
Play
y
/ /
usus
e e 7. R
epep
ea
Fast-FoFoarard 8.
B
Videos
Selecting the video menu brings up the video
selection submenu seen on the right. To
navigate to a video, press the joystick up and
down. To select and play a video, click the
joystick. For compatible video formats, please
see the specications page.
During playback, the joystick controls are:
Volume Control: Right/Left
Fast-Foward/Rewind: Up/Down
Speeds of 2x, 4x, 8x, 16x, 32x; to play at
normal spe
normal speed, cycle through all speeds
pen Video P
Open Video Playback Menu: Enter
top:
ca
Stop: Escape
,
ht/Le
p/Down
,
x, 32x; to pla
nu:
h all
ter the menu isopened
After the menu is opened, use the joystick
to operate the following controls:
1. Previous 5. Next
2. Rewind 6. Stop
3. Play / Pause 7. Repeat / Shue / Cycle
4. Fast-Forward 8. Brightness / Contrast
lo
s 5. Nex
use
11
Page 13

SD Card Memory
e.
h
e
r
ht).
d in t
th
e Sleshow
pagege
can b
e cust
om
iz
.
s
deshow
, joystick contr
ols s
ar
e:
ous/Nexe
t:
f
us
e:
Eere tthe slide
clcic
ng
tthe
j
oy
st
stick tot bri
ng
enu Selec
b
y
y
cl
ic o o
joysys
ti
kck
oww Controlol
:
Enter
(low)
tick t
o
e crorols oncnc
thte
nu hass b
een
op
op
eneneded.
Previ
ou
m
Play /
Pa
usus
e
6. R
ep
eaeat /
Sh
Next
7
7
. BrBr
igig
ht
to
Photos
Photos will initially be seen in thumbnail mode.
Selecting a photo will begin displaying the
pictures in slideshow mode (bottom right).
The slideshow can be customized in the
Settings Menu. Please see the Slideshow page
to see what settings can be customized.
During the slideshow, joystick controls are:
Previous/Next: Left/Right
Pause: Enter the slideshow submenu by clicking
on the joystick to bring up the submenu. Select
ay / pause
play / pause by clicking on the joystick.
pen Slidesh
Open Slideshow Controls: Enter (below)
it: ca
Exit: Escape
t/ight
show submenu by
up the subm
n the
s
ki
t
.
e the joys
Use the joystick to operate the controls once
the menu has been opened.
1. Previous 5. Zoom
2. Play / Pause 6. Repeat / Shue / Cycle
3. Next 7. Brightness / Contrast
4. Stop
operate th
5. Zoo
e
12
Page 14

T
SD Card Memory
pear.
yi
ng.
to nav
ig
ig
e
a
s
ong, p
re
ss ent
er
).
yback, j
o
st
ic
k controls a
re::
Conon
trol
:
f
t
evvio/N/N
ex
t ng:
U
s Cont
ntronunu
:
E
e
ve conotrs s
on
lly
a
pp
pp
whethe
conntl lnu i i
s
s
s
e the joysti
t to ope
ate the
co
ntls ooe e
thnunu
nu
1
evev
ious 4
4
. .St
opop
2 2
.
xt
5. R
R
ep
ea
e
t 1
/
/
/
3
l
ay
/
P P
e
Music
To listen to music on the P1 Jr., select the Music
icon. A list of available music les will appear.
Click on the desired song to begin playing.
Move the joystick up and down to navigate
between songs. To select a song, press enter
(click on the joystick).
During playback, joystick controls are:
Volume Control: Left/Right
Previous/Next Song: Up/Down
Opens Control Menu: Enter
op/Exit:
Stop/Exit: Escape
*Note: The above controls only apply when the control menu is not open.
Use the joystick to operate the controls once the menu has been opened.
1. Previous 4. Stop
2. Next 5. Repeat 1 / Repeat All / Shue
3. Play / Pause
.
. P
/Righ
p/Down
nter
aus
13
Page 15

SD Card MemorySD Card Memory
n
on
o enter
gh
t
he l l
is
t,
joyst
ick. T
T
o de
te
e list
b
y
y
clicki
ng
on the
l
give y y
ouou t
he o
ion to
delete.
e
l
e pr
o
er
ties, select t
a
nd
ap
pea on the right.
SD Card Memory
Files
The le menu allows for browsing and deletion
of the les currently on the SD card. Click on
the Files icon from the main menu to enter
the submenu. To navigate through the list,
press up and down on the joystick. To delete
a le, select it from the list by clicking on the
joystick. This will give you the option to delete.
To view the le properties, select the le and
it will appear on the right.
14
Page 16

USB Data Display
)
en
abled
device (such
d
evev
icicee
ta sstoto
red
o tt
he USB OTG ena
bedd
d
plug
yo
uru U dev
e to t
he b back
k
of the P
Jr
( (
sh
sh
own
B Data fro
r
m th
e mamain m m
enu and
the dadata will
ap
ap
pe
ar.
Yo
u u oulll
yo
ur
devic
e.
ea
r, t
ry
r
r
necting the vce. If ttdoes not resol
ve
t t iss
ue
,
,
chch
ececk k
wiwth
h
r too c c
onrtat the device is
a USB OTG
d
evice.
The P1 Jr has the ability to read data from a USB OTG (On-The-Go) enabled device (such devices include cell
phones, ash drives, etc). This allows the user to view the data stored on the USB OTG enabled device from
the P1 Jr.
To access the data on your USB OTG device, plug your USB device to the back of the P1 Jr (shown below).
Once the connection is made, select USB Data from the main menu and the data will appear. You should
now be able to access the data on your device.
If the data does not appear, try reconnecting the device. If that does not resolve the issue, check with your
device manufacturer to conrm that the device is a USB OTG device.
15
Page 17

Settings Menu
e user t t
o
displa
y
y
de o
f
w
sect
ion to
see
g
the se
tt
gs.
ed lan
a
gu
a
e
include: Englis
Frenn
ch, Geana, tiai
n, Spani
sh
ys
to
ne
–
T
ys
toto
sseteti
c
er
er
se s
e tt
he Keystone se
ctionon t followi
ng
page
toto see h h t this
aaecc
t
-
SSelece
ting this will d
is
ay gg
eneral i
ororma
mtion aut t t
he p p
p
ectit ts
wi rr
estore t thehe
p pjeje
ctctoror to th
te fa
The Settings menu can be accessed through the main
menu by selecting the Setup icon. This submenu allows
the user to customize the P1 Jr.
Slideshow – The slideshow setting allows the user to
change the speed, transition style, and display mode of
the slideshow. Please see the slideshow section to see
more details about changing the settings.
Language – Supported languages include: English,
French, German, Italian, Spanish
P1 Jr.’s ke
Keystone – The P1 Jr.’s keystone settings can be changed here.
Please see the Keystone section on the following page to see how this aects the image.
About - Selecting this will display general information about the projector.
Reset - Selecting this will restore the projector to the factory defaults.
s can
nged h
e.
16
Page 18

Settings Menu
d.
each
pi
mp
mp
res or enlage the
on
of thth
e
projec
to
P
ictut
res
w
hen co
mp
ressed or enlaed.
y
pi
ct
ct
ures
i
th
eir actual resol
ution.
ys
to
ne
e
P1 J
’s
k
k
eystone settin
gs
w il
ill only a aect verer
ti
cal ke
ys
to. ThTh m means o
e my
be adjusted. Press t
e
j
oystick left or right to cha
ng
e eth
e
Slideshow
Slide show speed – Controls how long each picture is viewed.
Intervals range from 3 seconds - 5 minutes.
Transition - Controls the transition between each picture.
Display mode - “Fit to screen” will compres or enlarge the
picture to the native resolution of the projector. Pictures
may become distorted when compressed or enlarged.
“Normal” will display pictures in their actual resolution.
Keystone
The P1 Jr.’s keystone settings will only aect vertical keystone. This means only the top and bottom of the
image may be adjusted. Press the joystick left or right to change the keystone.
17
Page 19

Troubleshooting
Cau
ses
ecto not
in focu
s st
s
hed when con
ed
o an ext
erna
l de
vice
.
erly
con
con
nect
ed
r s
se
lect
ed
e extetens
ion
/ Vi
deo
is e
codecodedd withnco
rect cod
ec
E IS
BLU
RREEDtion
ccc
k th
e viee
deo
sour
ce signal to ensure
tha
it
is p
rope
ope
rly
rly
conn
ecte
e
cche c
orre
ct
t i
t inn
nput
sou
by cby cby c
ing ing ing
ing
th
th
inpu
t de
sire
d fr
fr
fr
o
ens
ure
the
po
r ou
t
o
battery source is good.
Che
Che
k th
e
e
ter
to ensur
e a
er c
onnctt
n with the wall outl
et aaaas we
ll all a
s ths ths th
e
n
rm trmrm
hat the
un
is
s
fully ch
arg
rg
d
d has enough
pow
er.
To p
ower
on
on
on
on
the the
pro
pro
proj
e
r, the p
ower
but b b b
ton
need
s to
be
depr
esse
d fo
r a
full
ll
hol
ding
din
din
the
pow
po
po
p
n un
til
the
opti
cal
engi
ne t
urns
urns
on.
on.
on.
on.
easee
efer
to “Spe
cic
c
atio
ns”
p
to
see
w
h l
e ty
e ty
e ty
e ty
orted. Verif
y th
at t
t t
t t
he hhhle w
as
ed pedededrop
rop
tititi
Adju
st t
st t
he f
e f
e f
ocusooo witth th
h t
h t
h t
e fofofo
fo
Veri
Veri
Veri
V
fy t
he o
he o
he o
utpu
tse
Troubleshooting
THE PROJECTOR DOES NOT TURN ON
Possible Causes
There is no power
The power button was not held long enough
NO PICTURE / FILE NOT SUPPORTED
Possible Causes
The video source is not properly connected or selected
Incorrect le extension / Video is ecoded with incorrect codec
IMAGE IS BLURRED
Possible Causes
The projector is not in focus
Image appears stretched when connected to an external device.
Solution
Check to ensure the power outlet or battery source is good. Check the power
adapter to ensure a proper connection with the wall outlet as well as the Projector.
Conrm that the unit is fully charged and has enough power.
To power on the projector, the power button needs to be depressed for a full 3
nds. Try
seconds. Try holding the power button until the optical engine turns on.
Solution
Check the video source signal to ensure that it is properly connected.
Select the correct input source by choosing the input desired from the main menu.
Please refer to “Specications” page to see which le types and codecs are
supported. Verify that the le was encoded properly.
Solution
Adjust the focus with the focus adjustment dial until the image comes into focus.
Verify the output setting on the device is congured to 4:3 aspect ratio.
er butto
18
Page 20

Specications
L
s
Onnar
d
1w M
o
sp
eaker
E
gl
ish, French, Gern,
Ita
lian, Spanish
Control: 4
:3
:
1
56*20m
ight:
1
26
g
wer Co
s
umption:
5V
5, 200000, 6 WaWa
tts
r Sup
ly:
AC
C
100~240V(Free
Voltl
ag
g
e)
5
5
0H0H
z/
60
nc
n
: CE, UL
UTPUTS
Cmpositie A/A/V V
V
MiMini U USBSB P P
S
S
DH
ORTFORMATS
Vo: A
V
; MP4; MPG; 3GP; R
M
R R
V
V
OB
O
T
V
o Co
:
vX; XV
iD; MPMP
-2;
MPEE
E
R
V
(8
(8
/9
/1
dio
Fi
lele
s:
M
M
P3
d
AA MPE
;
;
MPMP
4;
4;
J J
PG
PROJECTION SYSTEM
Projection Lens: Manual Focus
Projection Image: 10 ~ 50 inches
Lamp: Single Chip White LED
15,000 Hours
GENERAL SPECIFICATIONS
Audio Output: Onboard 1w Mono speaker
Supported Languages: English, French, German,
Italian, Spanish
Aspect Ratio Control: 4:3
Dimensions: 105*56*20mm
Weight: 126g
Power Consumption: 5V, 2000mA, 6 Watts
Power Supply: AC100~240V(Free Voltage)
50Hz/60Hz
Conformances: CE, UL
INPUTS / OUTPUTS
Video In: Composite A/V (2.5mm Jack)
USB: Mini USB Port
SD Card: SDHC (8GB maximum)
SUPPORTED FORMATS
Video: AVI; MP4; MPG; 3GP; RMVB; RM;
VOB; DAT
Video Codecs: DivX; XViD; MPEG-2; MPEG-4;
RV (8/9/10)
Audio Files: MP3
io Codecs:
Audio Codecs: AAC; MPEG2; MPEG4;
ages
Images: JPG
; DA
19
 Loading...