

Page 1
Page 2

Table of Contents
Table of Contents 1
Warnings 2
Overview 3
Remote Control Functions 4
Packing List 5
General Operation 6
Startup and control
Shutdown
Positioning / Throw Distance / Focus 7
Connecting to A/V Source 8
Connecting to Computer (USB – VGA Input) 8-9
Using Onboard Media Player 10
Accessing SD Card 10
Accessing Flash Memory 10
Loading les onto ash memory 11
Listening to music / viewing pictures 11
Watching ideos / viewing les 12
USB On-The-Go & Data Transfer 13
Settings 14
Trouble Shooting 15
Specications 16-17
1
Page 3
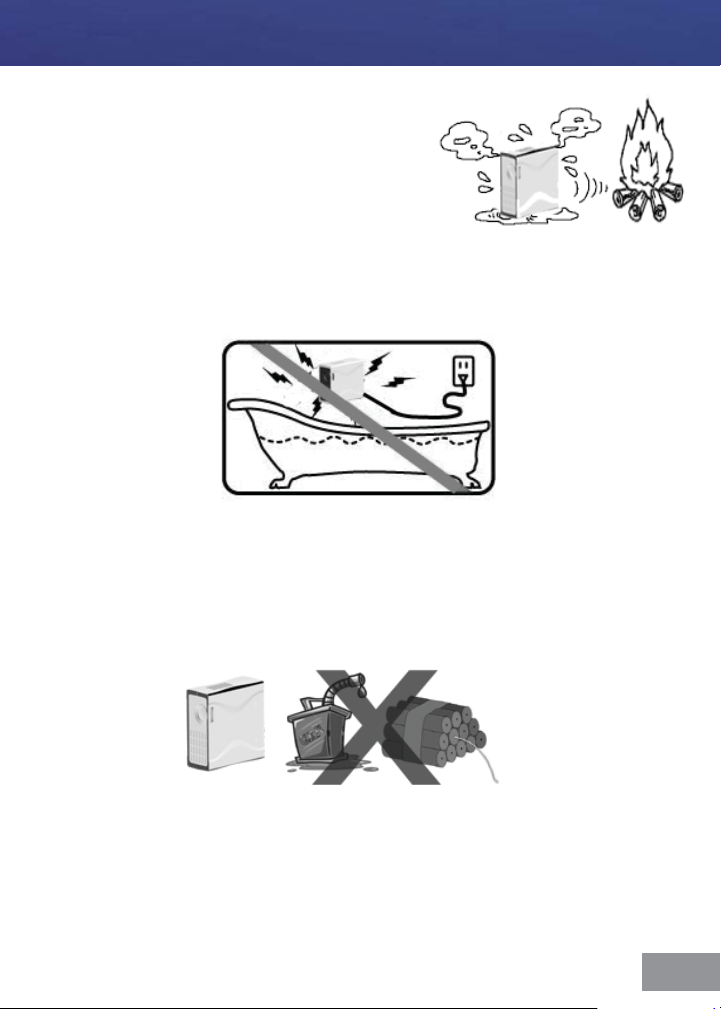
Warnings
*Do not operate the Projector in direct sunlight
or near heat sources such as heaters, res, and
stoves as this may cause a re hazard.
*Do not operate the projector close to sources
of steam or oil such as a humidier as this
may cause electric shock.
*Do not operate the projector near water such as by the sink or bathtub as
this may cause electric shock.
*Do not block or restrict airow from ventilation holes as this may cause the
projector to overheat.
*Do not place inammable materials beside the projector as this may cause a
re hazard.
*Do not drop the projector or allow heavy impacts or shock as this will
damage the projector.
2
Page 4
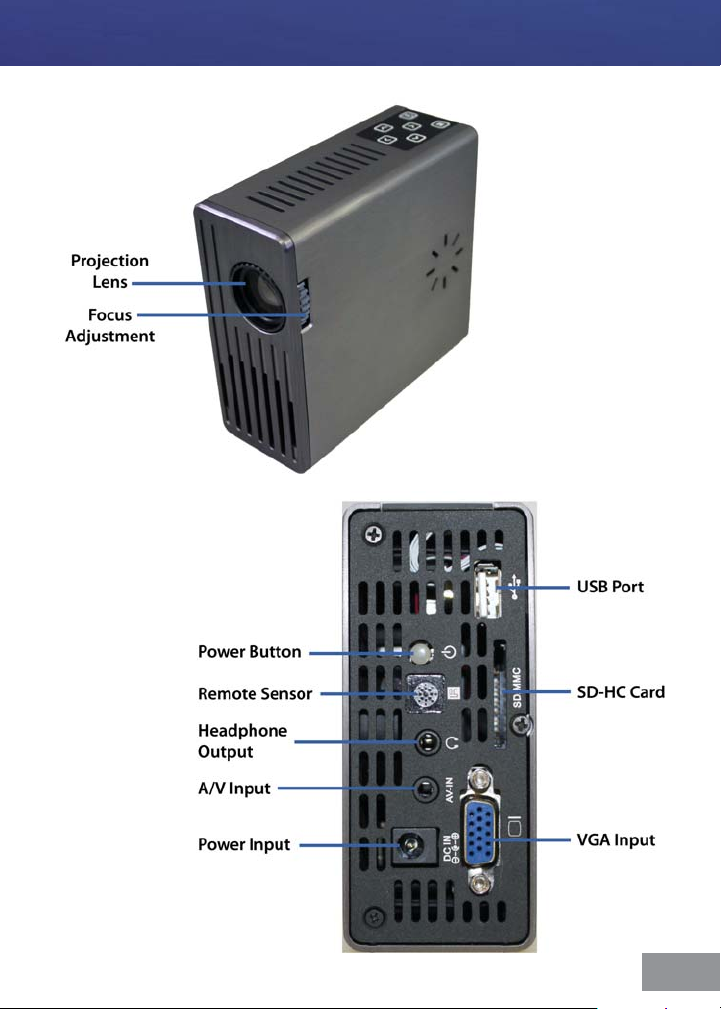
Overview
3
Page 5
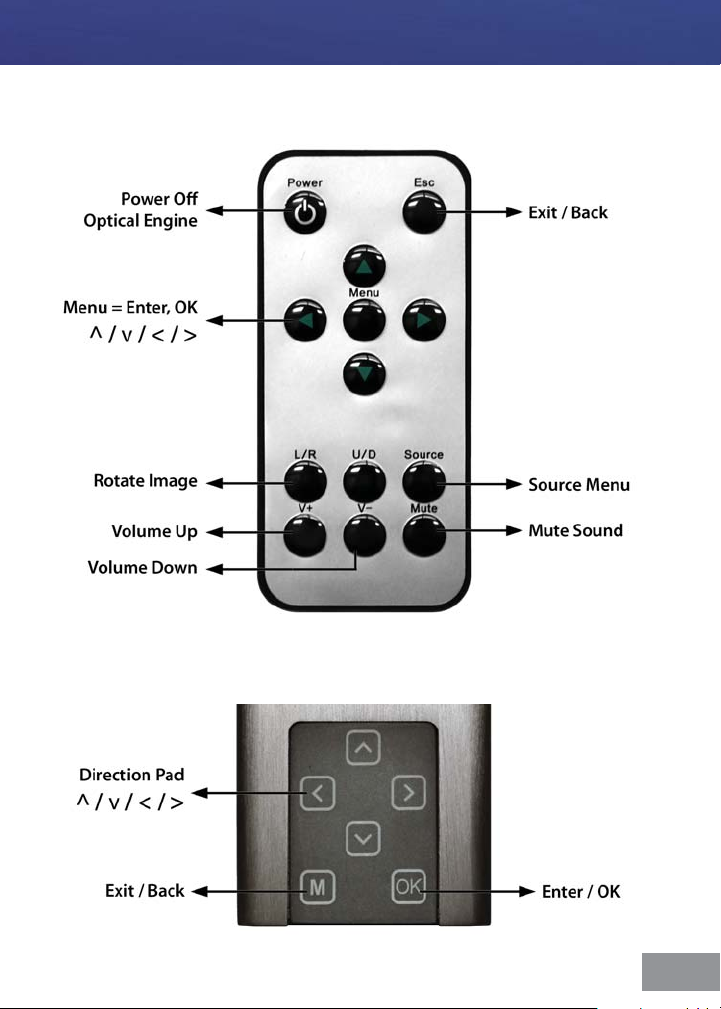
Remote Control & Keypad Functions
Remote Control
Keypad
4
Page 6
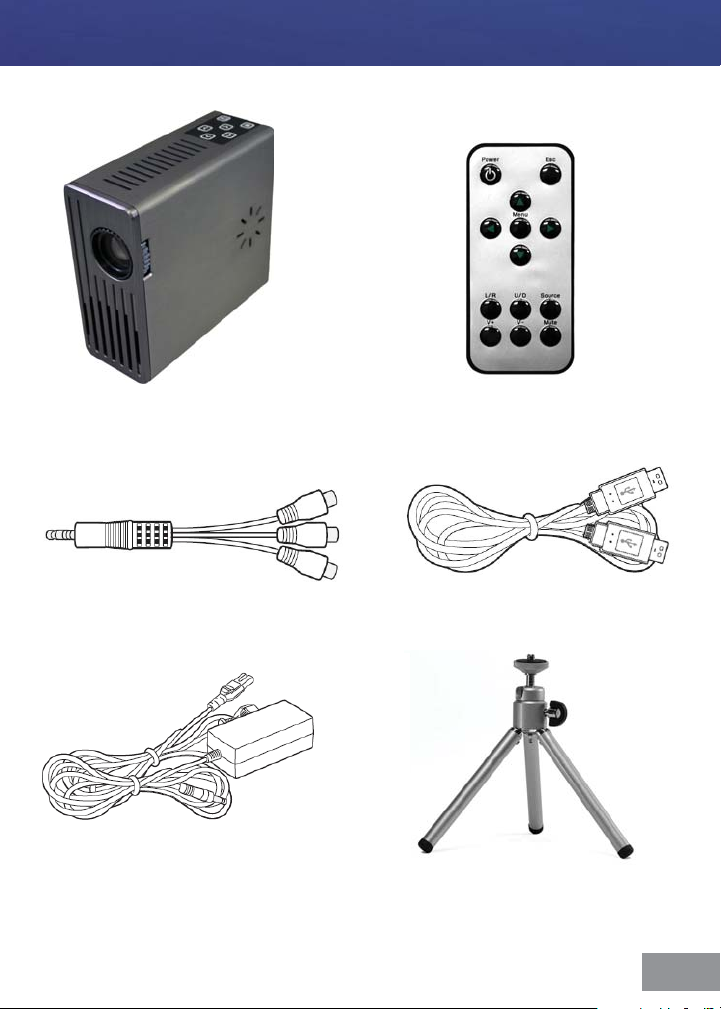
Packing List
Projector Remote Control
A/V Cable USB Cable
Power Cord Tripod
5
Page 7
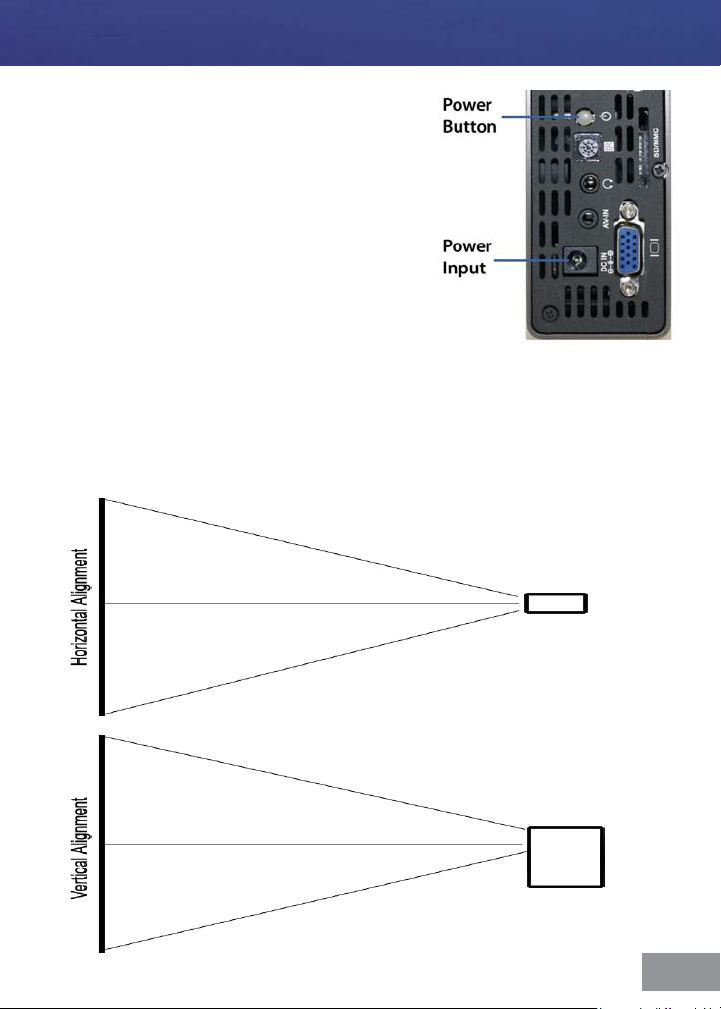
General Operation
Startup and Shutdown – To startup, connect
the power supply or external battery to the
rear power receptacle. Press and hold the
power button for 3 seconds until the welcome
logo appears. To shutdown hold the power
button for 3 seconds until optical engine
turns o.
Positioning – Position the projector at an even
plane and a right angle to the desired image.
If the projector is not at a right angle or on an
even plane the projected image will appear
distorted.
6
Page 8

General Operation
Focus Adjustment / Throw Distance – The
focus can be adjusted by turning the wheel
located at the front of the projector. The
projector is capable of the following throw
and focus distances:
Diagonal
size
(inch) (mm) (mm) (mm) (mm)
Diagonal
size
30 762 457 610 1250
40 1016 610 813 1666
50 1270 762 1016 2083
60 1524 914 1219 2499
70 1778 1067 1422 2916
80 2032 1219 1626 3332
90 2286 1372 1829 3749
100 2540 1524 2032 4166
VerƟcal
size
Horizontal
size
Throw
distance
7
Page 9
General Operation
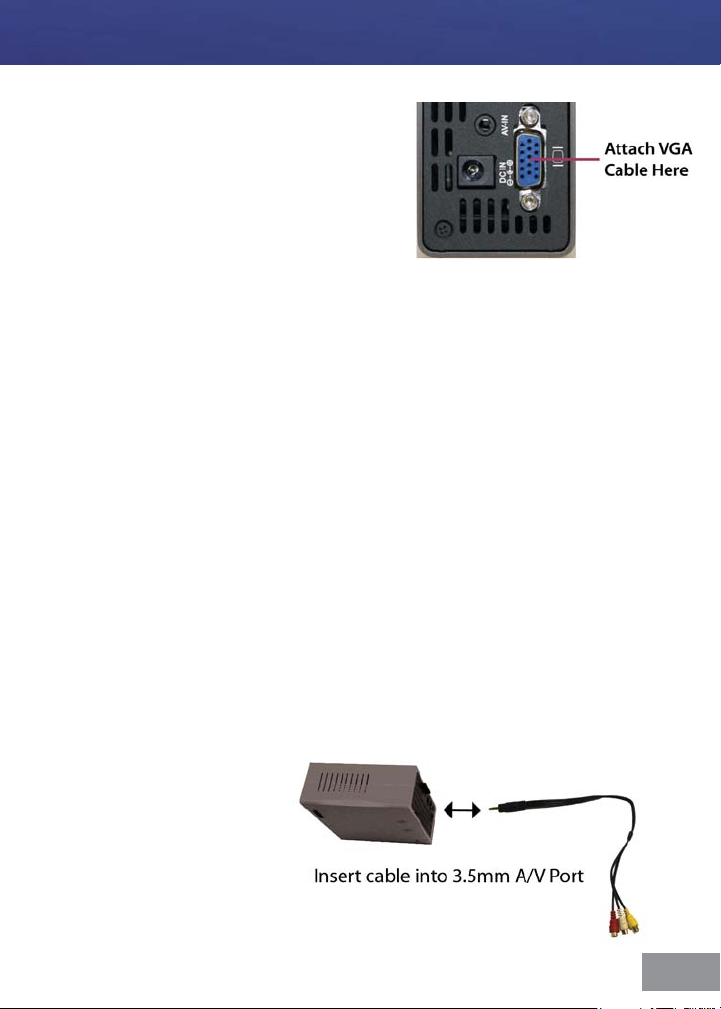
Connecting to a VGA / Computer input
The projector can accept a 15-pin RGB input
source from a laptop’s external monitor port
or graphics card. This source is connected
through the 15-pin “VGA” port on the back
of the projector.
To connect a VGA cable, plug the VGA cable into
the back of the projector. Then select the “VGA PC” option in the Main Menu.
This will enable the projector to receive VGA signals.
Important: Be sure to setup the computer to enable video signal output. If
using the M1 as an external monitor on Windows based systems, this can be
done by selecting “extend my desktop to this monitor.” Note: Each computer
system is dierent – please check with your owner’s manual for how to
properly output video signals. Some Apple computers may require a DVI to
VGA adapter.
Accepted Display Resolutions:
800x600 (native / optimal)
1024x720
1280x800
Connecting an Audio/Video input source - The Projector can accept dierent A/V (Audio/Video) sources through the A/V port. These sources are
connected through a 3.5mm A/V cable.
Max Supported Resolutions:
NTSC: 720x480
PAL: 720x576
8
Page 10

General Operation
To connect an A/V cable insert the 3.5mm portion into the A/V
port of the projector. Then click on either the “A/V input” icon
in the main menu, or press “source” on the remote control and
select “A/V input”. A blue screen will appear and the Projector
will be ready to accept an A/V signal.
Possible A/V sources: Composite (included), Iphone / Ipod (optional), Zune
(optional), Playstation Portable (optional), and others. Please check
www.aaxatech.com or your AAXA dealer for optional A/V cables.
USB Data Access and Transfers
The M1 projector includes 1GB of onboard memory for
storage and can function as a USB Host device. For
instructions on how to access the onboard memory and
connect USB devices to the projector, please refer to the
USB On-The-Go & Data Transfer instructions on page 13.
9
Page 11
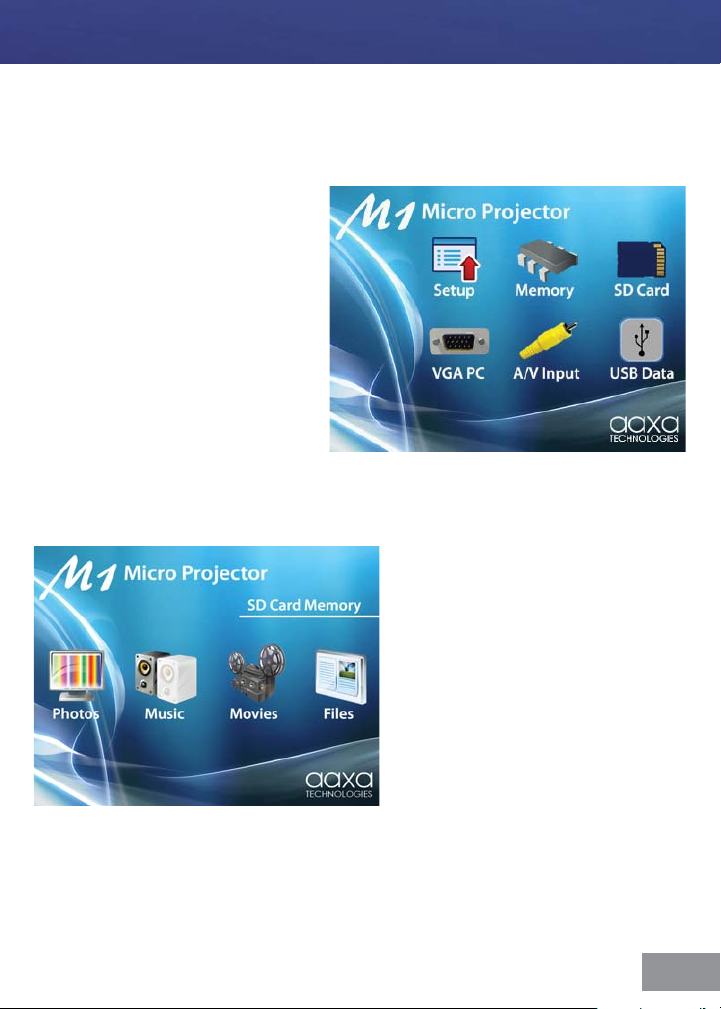
Onboard Media Player
The Onboard Media Player (OMP) plays and supports the following les: Mpeg
4, Mpeg 3, AVI, Jpeg, TXT, Real Media (RMV / RM). For supported video formats
please see the “specications” section in this manual.
Pictures and videos can be
accessed via an SD memory card,
USB storage device, or directly
from the ash memory.
To access les stored on the SD
memory card rst insert the SD
memory card in the SD card slot
located on the back of the
projector.
Power on the projector
and select “SD Card”. The SD Card
submenu will appear.
10
Page 12

Onboard Media Player
Viewing Photos – To view photos click
on the “Photos” icon submenu. This
will display all photos available on the
SD Card. Select and click on a photo to
display photos in the slideshow mode.
While in slideshow mode you can scroll
through slides by pressing the left or
right buttons on the remote control.
By pressing the menu button on the
remote control you will bring up the
control menu. Control menu functions
include: Previous picture,
Pause / Play, Next Picture, Stop / Exit, Zoom,
Rotate, and Image Adjustment.
Image Adjustment
The Image adjustment menu allows the
adjustment of Brightness, Contrast, and
Color. The adjustment is on a scale of
1-10 and can be adjusted both through the
adjustment menu or directly through the
settings menu under LCD Adjustment.
Listening to Music – To listen to music
click on the “Music” icon in the
submenu. Select the music le from
the list. To adjust volume use the
volume buttons. To skip to another
track press the right or left buttons
on the remote control, or access the
control menu by pressing the “menu”
button on the remote control.
The Control Menu functions include:
Previous Track, Next Track, Pause / Play, Stop / Exit.
11
Page 13

Onboard Media Player
Playing Videos – To play videos click
on the “Video” icon in the submenu.
Select a video le from the list. If the
video is large please allow a few
moments for the projector to process
the le. If after a few minutes the
projector does not recover from
highlighting or trying to play a video,
the video is not compatible. Remove
any non-compatible videos from the
video from the SD Card. When playing
the video you can select the previous or next video by pressing the left or right
buttons on the remote control. Volume is controlled by the “V+” and “V-“
buttons. The video control menu can be accessed by pressing the “menu”
button. The Video control menu allows the selection of: previous or next
video, fast forward or rewind (4x, 8x, 16x), Play / Pause, Stop / Exit, and
Image Adjustment.
File Menu – The le menu allows deletion or copying of les to the onboard
memory. To enter the le menu click on the “File” icon in the submenu. Select
a le from the list. To delete the le select “delete”. To copy the le to the
onboard memory select “copy”.
12
Page 14

USB On-The-Go & Data Transfer
USB On-The-Go
The M1 Ultimate has the ability to
read data from a USB storage device
(such as memory sticks, cell phones
USB hard drives, etc). This allows the
user to view the data stored on the
USB storage device through the
onboard media player.
To access data on your USB storage
device, plug your USB device into
the USB slot on the back of the M1.
Once the connection is made, select USB Mode from the main menu and the
USB Host icon in the USB menu data will be available. After selecting USB Host
you should now be able to access the data on the USB device through the
onboard media player. If the data does not appear, check the formating of the
le system on the USB device and also conrm that the device is compatible
with a USB On-The-Go host device.
USB Data Transfer
The M1 projector includes 1GB of onboard memory for
storage. To access this memory connect a USB cable to
the back of the projector and a computer. Then select
USB Mode in the main menu and USB Device in the
USB menu.
The computer should auto-detect the connected projector and its onboard
memory as a “ash drive.” Double-click the drive to open the drive contents
and manipulate as a standard USB ash drive.
NOTE: If the computer fails to detect the ash drive, check to make sure the
projector is in USB-Data mode and do a search for new devices. If still unable to
nd the drive, please consult with your operating system’s owner manual
regarding detecting ash drives.
13
Page 15
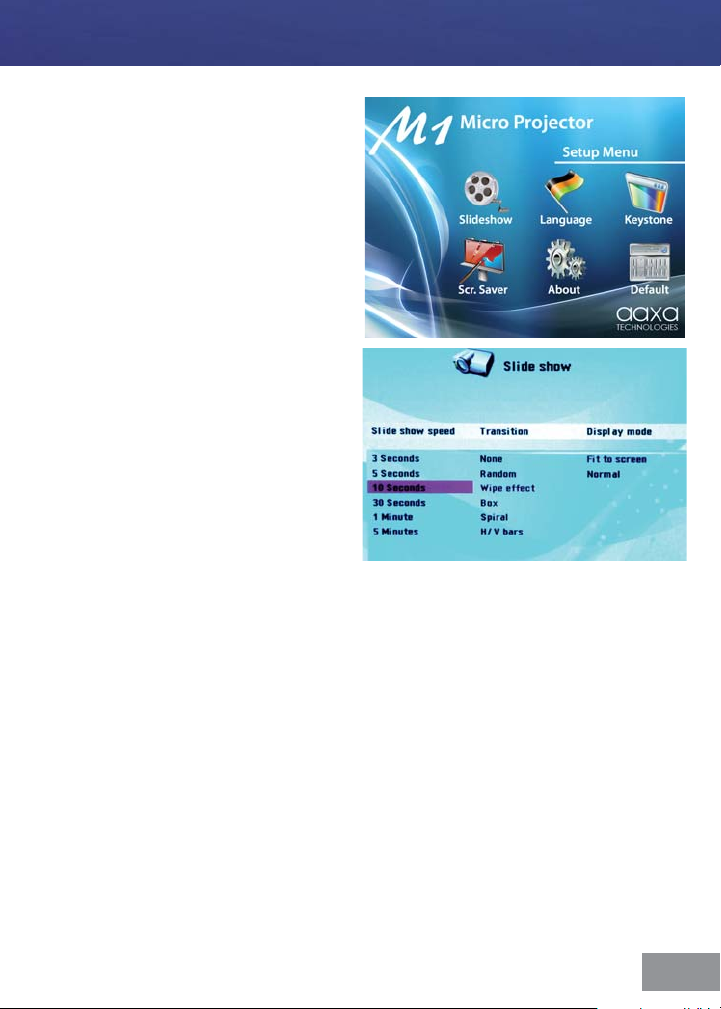
Settings Menu
The Settings Menu can be accessed by
clicking on the “Settings” icon in the
main menu.
Slide Show Settings – The slide show
settings allows the user to change the
speed, transition style, and display
mode of the slide show. “Fit to screen”
or “actual size” can also be selected.
When “t to screen” is selected, le
sizes will be compressed or enlarged
to the native resolution of the
projector which is 800x600. Pictures
may become distorted when
compressed or enlarged. “Actual size”
will display pictures in their actual
resolution. For example a 400x300
picture will occupy approximately
25% of the area of an 800x600 picture.
Keystone Adjustment – The Keystone feature allows the user to adjust the
image when the projector is not placed perpendicular to the horizontal
centerline of the screen (angled up or down) which skews the output image,
thereby making it trapezoidal. Only vertical keystone is available at this time.
Use the “Left” and “Right” arrows on the remote to adjust the screen.
NOTE: This is a software function and does not change the optical image.
Screen Saver – The screen saver setting allows adjustment of the screen saver
background. Choices include a moving logo or the slide show.
About – Projector information
Default – Reset to default settings
14
Page 16
Troubleshooting
THE PROJECTOR DOES NOT TURN ON
Possible Causes Solution
There is no power Check to ensure the power outlet or battery source is good. Check
The projector is in the shut-down cooling cycle Wait until the projector has fully cooled to restart
NO PICTURE
The video source is not properly connected Check the video source signal to ensure that it is properly
The correct input source has not been selected Select the correct input source by pressing the Source key on the
IMAGE IS BLURRED
The Projector is not in focus
The Projector is oset from plane / angle of
operation
Possible Causes Solution
Possible Causes Solution
SD CARD IS NOT RECOGNIZED
Possible Causes Solution
SD Card is not inserted properly Re-insert SD Card
SD Card is damaged Replace SD Card
REMOTE CONTROL DOES NOT WORK
Possible Causes Solution
The remote control battery is dead Replace the battery with comparable CR2025 battery
the power adapter to ensure a proper connection with the wall
outlet as well as the projector.
connected
remote.
Adjust the focus with the focus adjustment dial until the image
comes into focus
Move the projector so that it is at both 180 degrees and on an
even plane with the screen. Please see Page 9
15
Page 17

Specifications
PROJECTION SYSTEM
Native Resolution: SVGA (800x600)
Brightness: 75 ANSI-Lumens
Contrast Ratio: 1000:1
Noise: <20 dBA
Projection Lens: Manual Focus
Projection Image: Available Size 9 ~ 100 inch
Lamp: Single Chip White LED
15,000 Hours
Projection Angle: 33.6
Keystone Correction: Digital Adjustment (Vertical)
GENERAL SPECIFICATIONS
Audio Output: Onboard 1W speaker
Speaker/headphone jack
Color: Brushed Gray Aluminum
Supported Languages: English, French, Spanish, German,
Italian
Aspect Ratio Control: 4:3
Dimensions: 112*105*46mm
Weight: 1.0 lb
Power Consumption: 12V - 19V, 30 Watts
Power Supply: AC100~240V(Free Voltage),
50Hz/60Hz
Supported Formats: (See Below)
Conformances: CE, UL
INPUTS / OUTPUTS
Video In: Composite A/V (3.5mm Jack)
PC / Laptop: 15 pin VGA (up to 1280x960)
Audio Out: 3.5mm Speaker/Headphone Jack
USB: USB On-The-Go (Memory Sticks)
USB Data Transfer
Control System: Infrared Remote Control
Top Illuminated Keypad
16
Page 18

Specifications
STORAGE CAPACITY Built in 1Gb ash memory
SD/TF card reader
SUPPORTED FORMATS AVI, RMVB, RM, DAT, MPG, MPEG
CODECS SUPPORTED *RV: RealVideo-3, RealVideo-4
*MPEG2/1
*MP3:
*RA: Cooker/AAC
*LC AAC,HE AAC,MP2,PCM,AC3
*AVI (MJPEG + MP3/LC AAC/HE
AAC/MP2/PCM/AC3)
*RMVB/RM (RV + RA) Max. bit-rate: 2 Mbps
*DAT(MPEG1+AC3/MP2)
*MPG/MPEG(MPEG2/1+AC3/MP2)
Max. bit-rate: 4 Mbps
MAXIMUM RESOLUTIONS *AVI
720*480@30fps, Max. bit-rate 2 Mbps
1280*720@30fps, Max. bit-rate 4 Mbps
*RMVB/RM
720*480@30fps, Max. bit-rate 500 Kbps
1280*720@30fps, Max. bit-rate 800 Kbps
*DAT, MPG/MPEG
720*480@30fps
17
 Loading...