

User Guide
aaxa
TECHNOLOGIES
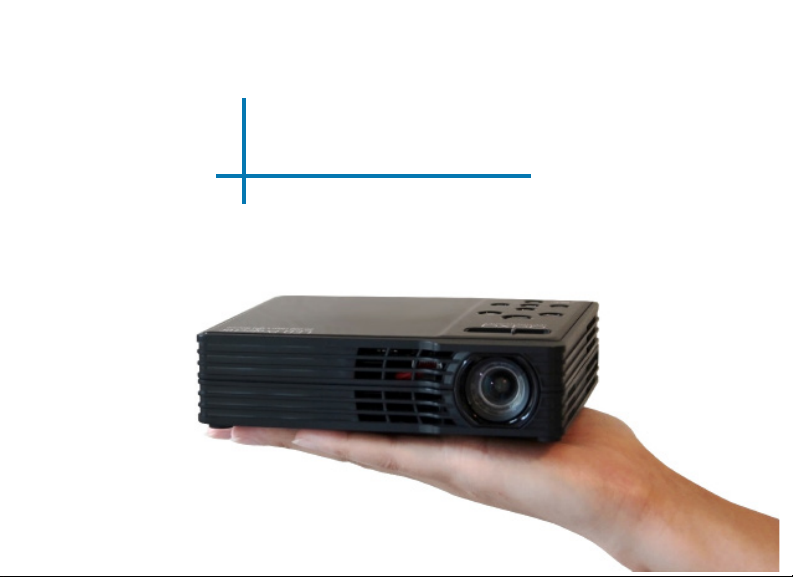
LED Showtime 3D

Caution!
WARNING: Please use this product as instructed. Misuse may cause
injury or death.
DO NOT use while driving
DO NOT expose to water or wet
surfaces. Electric shock may occur.
DO NOT expose the projected LED
image to your eyes or the eyes of
others
DO NOT block or restrict airow
from ventilation holes as this may
cause the projector to overheat
Keep the projector, or charger away
from any heat sources
Caution for Headphones Use
• Prolonged use at high volume may
impair your hearing.
• High volume during walking or driving
may cause distractions and result in
injury or death

Table of Contents
Chapter 1: Showtime at a Glance
1
Main Unit Front/Back
2
Remote & Keypad
3
Accessories
4
Chapter 2: Getting Started
Powering On / OFF
5
Focus Adjustment / Throw
6
Distance
Connecting to a Computer VGA
7
Connecting to a Computer HDMI
9
Connecting to Composite Video
10
Connecting to HDMI Video
12
Connecting to HDMI 3D Video
13
Connecting to External Sound
14
Connecting to a USB Host
15
Chapter 3: Menu Screens
17
Onboard Player Main Menu
18
Video Player Menu
Video FAQ
20
Photo Viewer Menu
21
Photo FAQ
23
Music Player Menu
24
Music FAQ
26
Ebook Viewer Menu
28
Setup Menu Screens
29
Keystone Adjustments
32
Chapter 4: 3D Setup Guide
Required Hardware
37
Installing Graphics Card
39
Technical Details
40
1
Showtime at a Glance
Chapter 1
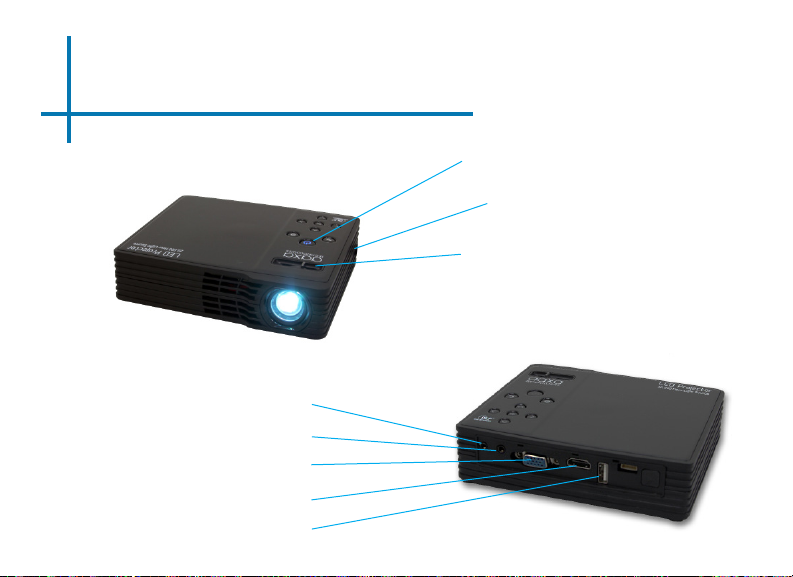
Main Unit Front/Back
Headphone Out
AV Input
VGA Port
HDMI
USB Port
Power Button
AC Power Input
Focus Adjustment
2
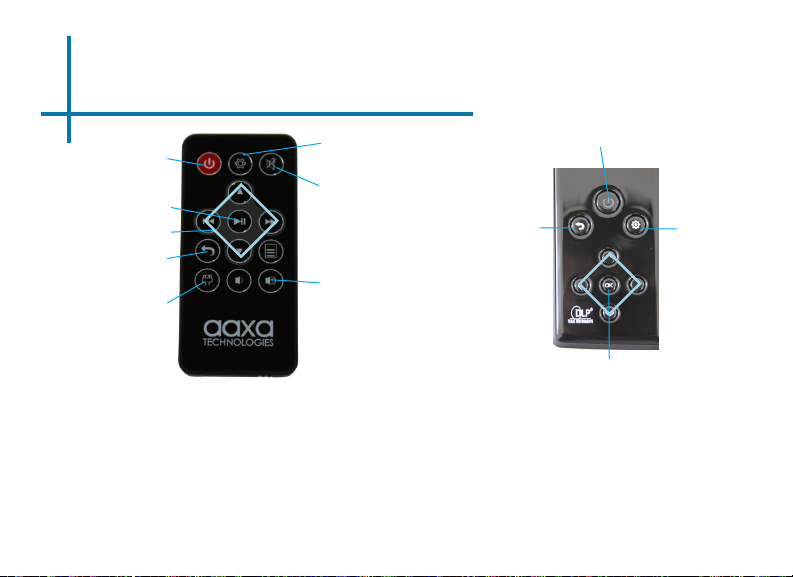
Remote & Keypad
Power On/Off
Playback Menu
Navigation
Exit / Back
Source
Both the keypad and remote can be used to navigate through the menus. The Main Menu
Navigation on the remote functions exactly the same as the directional pad on the LED Showtime 3D unit.
Setting
Mute
Exit/Back
Volume Control
Power Button
Directional Pad
Settings
3
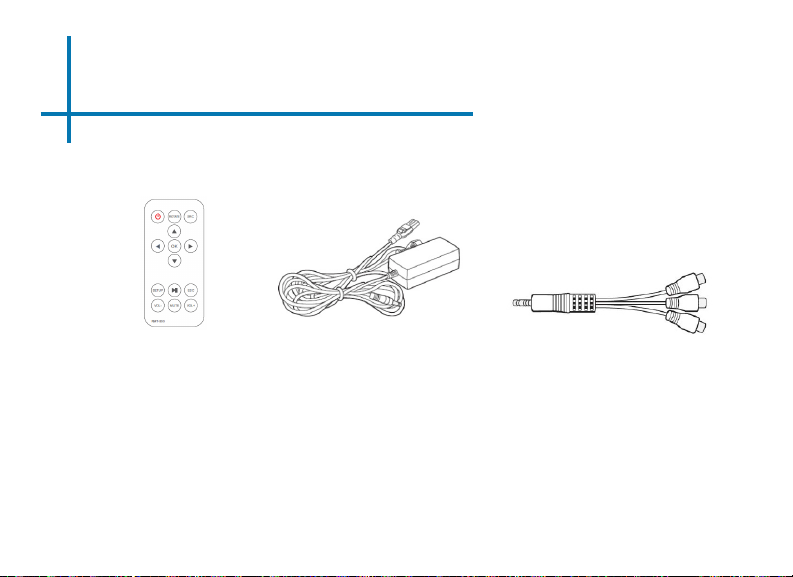
Accessories
Remote Power Adapter A/V Cable
*Under various circumstances, the actual accessories may be different from
those shown in the pictures above.
4
Getting Started
Chapter 2
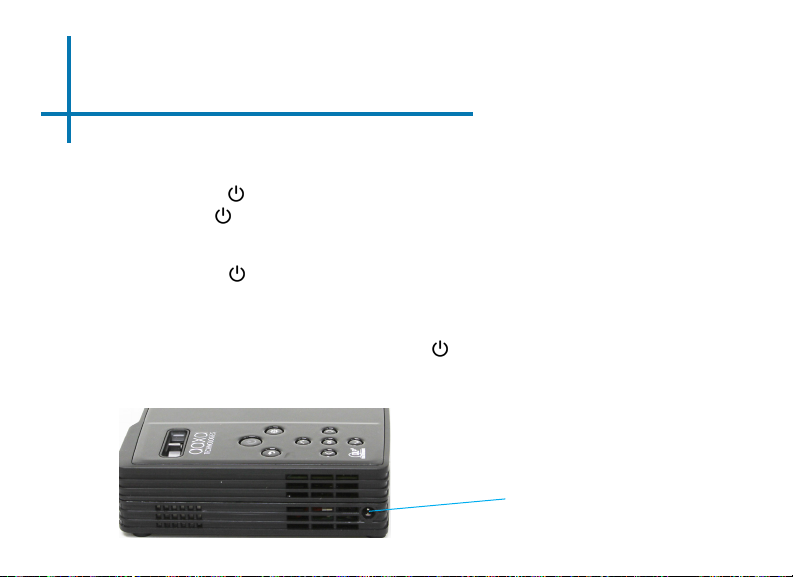
Powering ON the projector
1. Connect the power cord to the LED Showtime 3D.
2. Connect the wall plug into the wall power source.
3. Press the button on the top of the projector or remote control to start the projector. The button’s LED light will light blue when the projector is on.
Powering OFF the projector
1. Press the button on the keypad or remote to put the projector in “Stand by mode”.
The optical engine should power off and the fan should stop spinning. The projector
can be turned on using the remote control. “Stand by mode” consumes a little bit of
power
2. To fully turn off the projector, press the button on top of the projector until the
power light turns red. Disconnect the power adapter from the power socket to fully
turn off the projector.
Power Socket
5
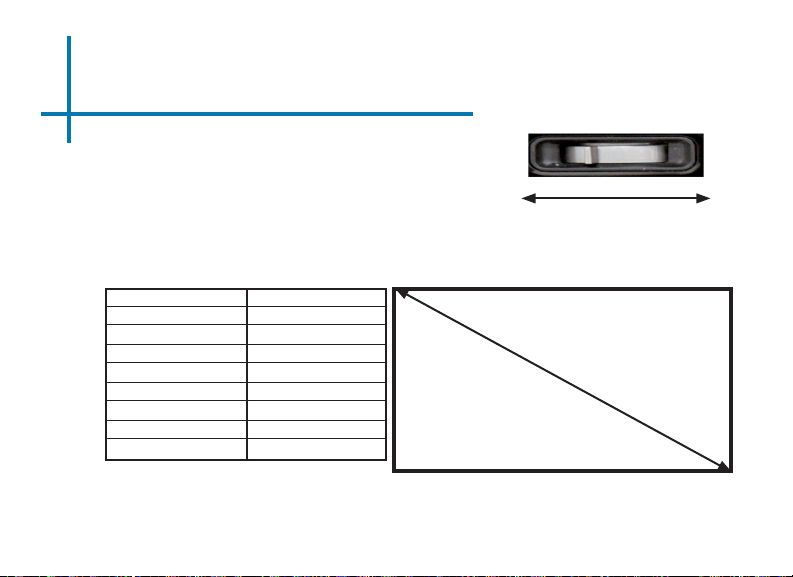
Focus Adjustment / Throw Distance
Focus Adjustment
• Move the focus knob left or right until
the image becomes clear.
Throw Distance Chart
Distance inch (“)
20
30
40
50
60
70
80
90
Throw Ratio 1.22
*minimum throw distance: 21 inches
Diagonal Inch (“)
19
28
38
47
56
66
75
85
DIAGONAL SCREEN SIZE
16:9 Aspect Ratio
6
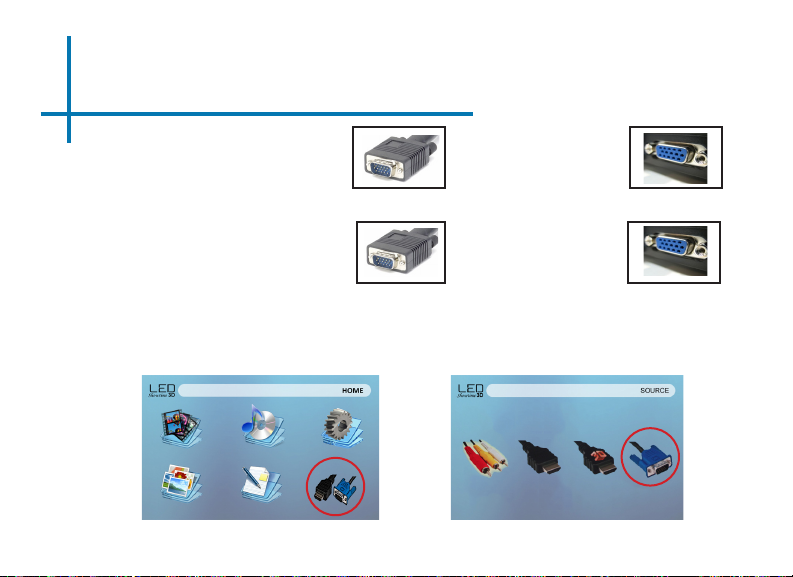
Connecting to a Computer via VGA
Step 1:
Connect the end of the
VGA Cord
Step 2:
Connect the end of the
VGA Cord
Step 3:
In the Main Menu
to your computer’s
VGA Adapter
to your LED
Showtime 3D’s
VGA Adapter
Select “VGA” icon Select “INPUT” icon
7
Connecting to a Computer Cont.
Step 4:
Enabling VGA or HDMI output on your Computer – To enable VGA or HDMI output on your
computer most computers require “turning on” the video output feature. Each computer is different.
Please consult your owner’s manual for instructions to enable VGA or HDMI output. Below are
standard instructions for a Windows 7 computer – not all systems are the same.
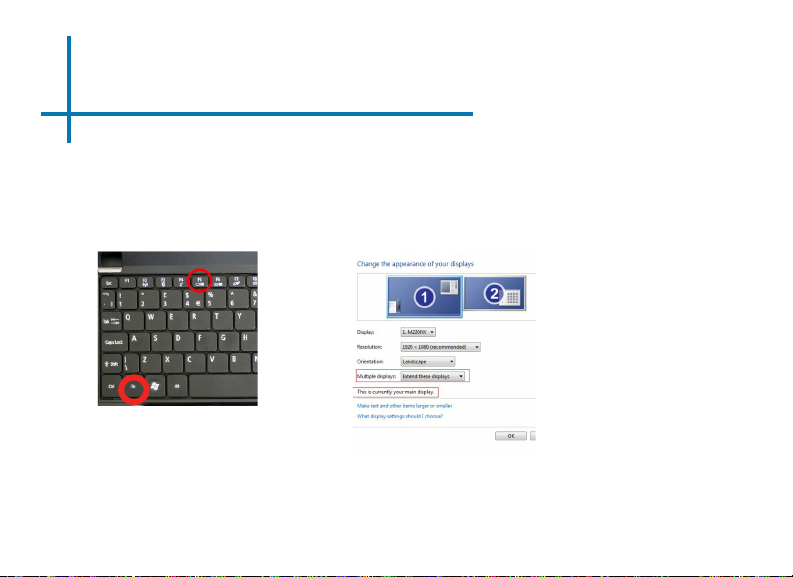
Step 5:
Press function & “F5” to instruct
the computer to enable multiple
displays.
You can also press Windows+P to
toggle through display settings.
*NOTE: different operating systems may differ
Step 6:
1. Right click on computer
desktop and select “Screen
Resolution”
2. Display Screen Resolution
window will pop up
3. The secondary monitor (2) is
the projector’s display.
4. If the image is blurry or the
text is not legible, adjust
the screen resolution. We
recommend 1280x800.
8
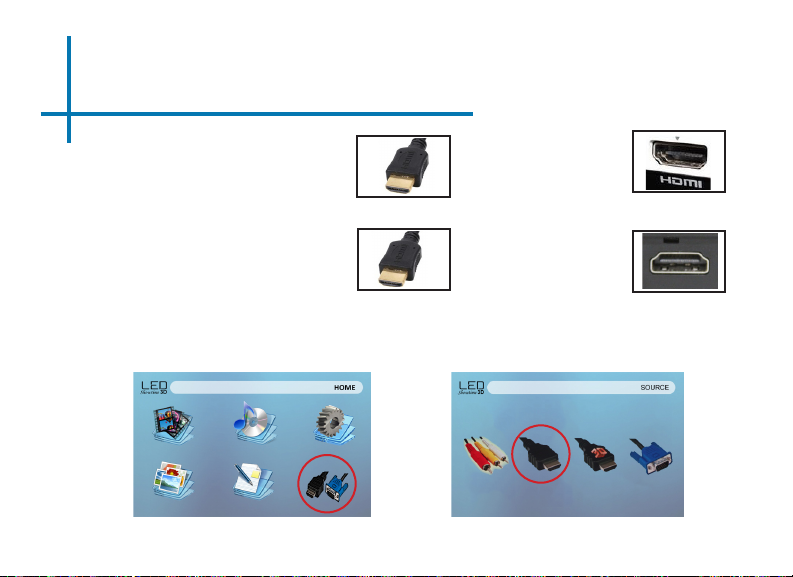
Connecting to a Computer via HDMI
Step 1:
Connect one end of the
Step 2:
Connect one end of the
Step 3:
In the Main Menu
Select “INPUT” icon
HDMI Cord
HDMI Cord
to your computer’s
HDMI Adapter
to your LED
Showtime 3D’s
HDMI Adapter
Select “HDMI” icon
9
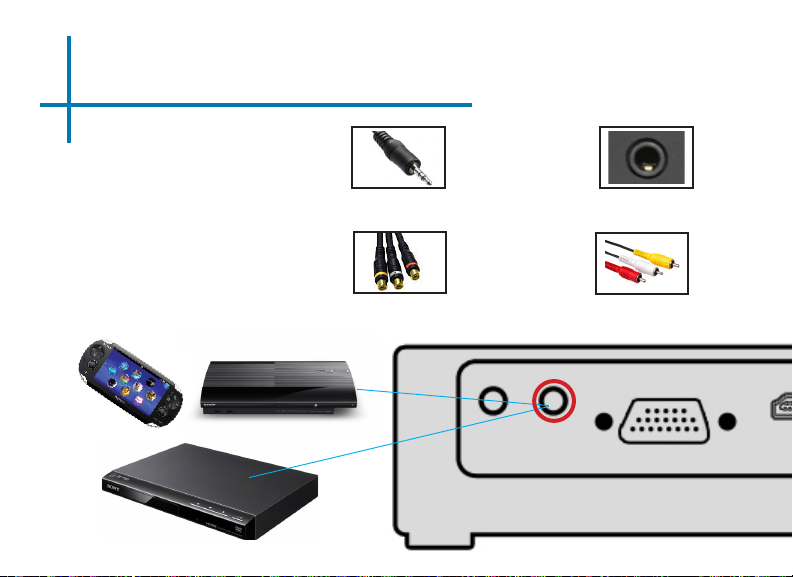
Connecting to Composite Video
Step 1:
to your LED
Connect one end of the
Composite Cord A/V Adapter
Step 2:
Showtime 3D’s
Connect opposite end of
Composite Cord
to your devices
Composite Cord
10
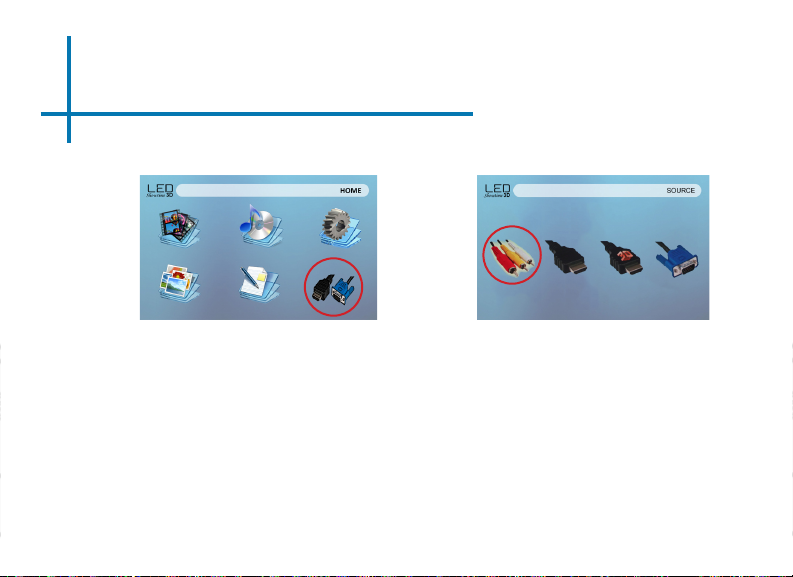
Connecting to Composite Video Cont.
Step 3:
In the Main Menu
Select “INPUT” icon
Step 4:
Turn on your multimedia device.
Connectivity with multimedia devices
The LED Showtime 3D can connect to many media devices including: iPod,
iPhone, iPad, VHS players, DVD players, smart phones, cameras, video game
consoles and other peripherals with ease.
*Apps on smart phones require video out capabilities to be displayed with the LED
Showtime 3D using the AAXA A/V iPod Cable.
Select “AV” icon
11
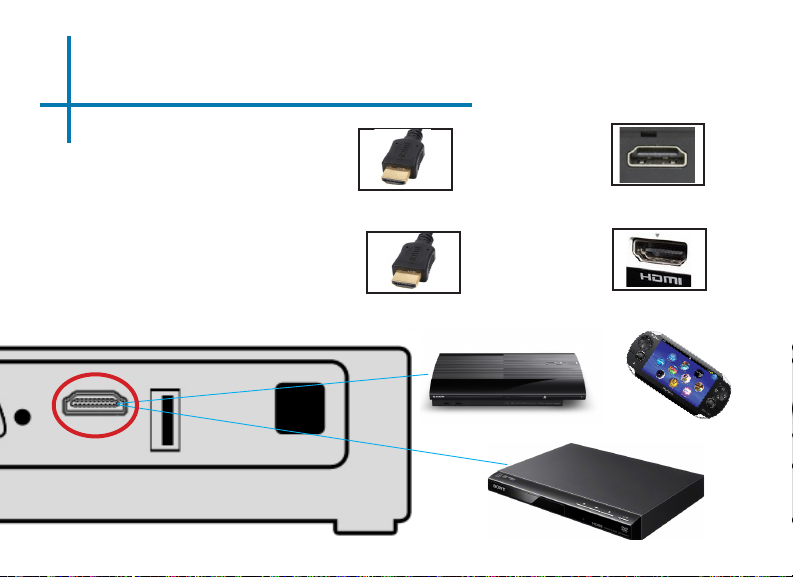
Connecting to HDMI Video
Step 1:
to your LED
Connect one end of the
HDMI
Step 2:
Showtime 3D’s
HDMI Adapter
Connect one end of the
HDMI
to your devices
HDMI Adapter
12

Connecting to HDMI Video Cont.
Step 3:
In the Main Menu
Select “INPUT” icon Select “HDMI” icon
Step 4:
Turn on your multimedia device. If avaiable select 1280x720 or 1920x1080
Connectivity with multimedia devices
The LED Showtime 3D can connect to many media devices including: iPod,
iPhone, iPad, VHS players, DVD players, smart phones, cameras, video game
consoles and other peripherals with ease.
*Additionally, with AAXA’s MHL HDMI Cable, Samsung Galaxy S3 and Galaxy
Note 2 smartphones can be connected via HDMI for perfect mirroring.
13

Connecting Speakers/Headphones
Step 1:
Step 2:
Step 3:
Connect your speakers/headphones
to
the projector’s speaker adapter.
3.5 mm cord Speaker Adapter
Ensure the power and volume on your
speaker or headphones is turned on
Place the headphones on and enjoy!
*CAUTION for headphone use
• Prolonged use at high volume may impair
hearing
14

USB Host
How to insert your USB Drive
• Slide your USB Drive into USB port
of the LED Showtime. (as shown in
picture)
• Gently slide the drive until it cannot go
in any further
How to access your USB Drive
• Once your USB Drive has been inserted, you can navigate to any media
content in the main menu.
• After selecting the media content,
choose the USB selection.
• You can now access the data on your
USB drive through the onboard media
player
*Review the Specication
section of this manual to read
about the supported le
formats.
15

USB Host Cont.
Media Player menu
• In the Media Player selection you can
choose from Videos, Audio, Pictures,
and Ebooks.
• Select the appropriate menu for the type
of le you wish to view.
File Menu System
• The LED Showtime 3D will show all
folders and les you have on your USB
Drive.
• Use the directional buttons to navigate
to different folders or les.
16

Chapter 3
Onboard Player Main Menu
Main Menu
The LED Showtime 3D features a built in PMP (Portable Media Player) function.
This function allows the projector to play videos, pictures, music les, and text. To access
the main menu simply turn on the projector.
• Scroll Left/Right by pressing the left and right directional buttons
• To select a submenu, highlight the desired submenu and press the button
located in the middle of the keypad or remote.
• To go back to the previous page while in a submenu, press the back on the bottom
left of the onboard buttons on the device.
17

Video Player Menu
Opening a le:
• Select the video option
from the main menu.
• Select the hardware
media the le is stored
on
• Choose which le you
wish to play.
Select the “video” icon
The LED Showtime 3D will show all folders and les you have on your USB.
Use the directional buttons to navigate to different folders or les.
Previewing Files:
• Press the directional keys to highlight the item of interest
• Wait 2-3 seconds until a preview and info screen of the video shows on the
lower right of the screen
18

Video Player Menu
Playing Videos
To use the video controls, rst press “down” on the top of the device to bring up
the video player menu.Then press left and right to select the option you want.
Move selection left / Rewind video
(when video menu is closed)
Move selection right / Fastforward
video (when video menu closed)
Conrm selection
Rewind
Play
Video
Video
Fastforward
Video
Previous
• To open the video player menu,
press on the projector.
• To close the video player menu,
hit on the projector.
Stop
video
Next
Video
Video
Aspect
19

Video Playback FAQ
How do I loop a video?
1. Choose USB for playback
2. Navigate the folders until you
reach the le you wish to play.
3. Highlight the le you want to
play, then conrm the selection.
4. Press the button to open
video player menu.
5. Move selection on video player
menu to “repeat”, and select
the option until “Repeat 1”
shows up on the top right.
6. The video will now loop after
playback is nished.
How do I preview a video?
1. Choose the “video” option from the
main menu
2. Navigate using either remote or
onboard buttons to the le you wish to
preview.
3. Highlight the le. *Do not select the
le, just highlight it.
4. Wait for 3-4 seconds.
5. A preview screen will pop up on the
lower right for the video.
20

Photo Menu
Opening a le:
• Select the photo option
from the main menu.
• Select the hardware media
the le is stored on
• Choose which le you wish
to play.
Select the “photo” icon
The LED Showtime 3D will show all folders and les you have on your USB
Use the directional buttons to navigate to different folders or les.
Previewing Files:
• Press the directional keys to highlight the item of interest
• Wait 2-3 seconds and a preview of the picture will show on the screen
21

Photo Menu
Viewing Pictures
To use the photo controls, use the directional keys to highlight the option you wish
to choose.
Move selection left / Previous photo
(when menu is closed)
Move selection right / Next
photo (when photo menu is closed)
Conrm selection
Start
Slideshow
Previous
Photo
Next Photo
• To open the photo player menu,
press on the projector.
• To close the photo player menu,
press on projector.
Stop
Slideshow Repeat
Photo
Stop
Music
Rotate
Image
22

Photo Slideshow FAQ
How do I play a slideshow?
1. Choose USB for playback
2. Navigate to the folder that
contains the pictures you wish
to see in the slideshow
3. Conrm selection of the rst
picture.
4. Press “play” in the photo menu
5. Slideshow will now play.
6. NOTE: Selecting “Repeat A”
from the photo slideshow menu
will loop slideshow.
How do I manually control the
slideshow?
1. After selecting the photo you wish to
be displayed, you can press “play” to
start the slideshow (as outlined in the
previous FAQ).
2. Open the photo slideshow menu by
pressing on the projector.
3. To manually control the slideshow,
you must stop the slideshow with the
button.
4. You may use either the controls on
your remote or on top of the projector
itself to ip through the pictures in the
current playlist.
23

Music Player Menu
Opening a le:
• Select the audio option
from the main menu.
• Select the hardware themedia is stored on
• Choose which le you
wish to play.
Select the “Audio” icon
The LED Showtime 3D will show all folders and les you have on your USB. Use
the directional buttons to navigate to different folders or les.
Previewing Files:
• Press the directional keys to highlight the item of interest
• Wait 2-3 seconds and a preview of the audio will show on the screen
24

Music Player Menu
Listening to Audio
To use the audio controls, use the directional keys to highlight the option you wish
to choose.
Move selection left / Previous song
(when menu is closed)
Move selection right / Next song
(when menu is closed)
Conrm selection
Play /
Pause
Rewind
Fastforward
Previous
Track
• To open the music menu, press
on the projector.
• To close the music menu, press
on the projector.
Stop
Next
Track
Playback
Repeat
Track
25

Music Playback FAQ
How do I loop a song?
1. Choose USB for playback
2. Navigate the folders until you
reach the le you wish to play.
3. Highlight the le you want to
play, then conrm the selection.
4. Open the Music playback
menu by pressing the button
5. Move selection on music player
menu to and press OK
until “Repeat 1” appears on the
top right of screen.
6. The song will now loop after
playback is stopped.
How do I create a song playlist?
1. Insert your media device (USB) into
computer.
2. Make a new folder on media device
(folder name will be the name of the
playlist).
3. Transfer songs from computer to the
new folder, name accordingly.
4. Remove media device from computer
and insert into projector.
5. Navigate to Audio section, then
choose appropriate media device.
6. Navigate to your playlist folder.
7. Start at rst song.
8. Playback will follow each successive
song on the list.
*To create a special order for the list, add nu-
merical numbering to the beginning of each le.
26

EBook Viewer Menu
Opening a le:
• Choose “Open File” option
• Select the device which the le is
stored on
• Select le from list
The LED Showtime 3D will show all folders and les you have on your USB. Use the directional buttons to navigate to different folders or les.
Viewing text les
The LED Showtime 3D Micro Projector allows you to view text les. Select the le you
want to view in the le menu for the particular storage device on which the le is stored.
You can press the left and right arrow buttons on the directional pad or remote to ip
through the pages you have in the present folder.
*Review Specication section of this manual for supported ebook formats.
27

Ebook Viewer Menu
Reading text les
To use the Ebook controls, press on the projector to open the Ebook Viewer
menu, then use the directional keys to highlight the option you wish to choose.
Previous
Text
Move selection left
Move selection right
Conrm selection
Next
Page
Previous
File
• To open the Ebook menu, press
on the projector.
• To close the Ebook menu, press
on projector.
Next
File
Stop
Ebook
Stop
Music
28

Setup Menu
The Settings Menu can be accessed by selecting “Settings” on the main menu.
Within the settings menu there are
four more submenus that allow you
to customize your LED Showtime
3D to the settings you want.
Picture
• Picture Mode
• Color Temperature
• Keystone
• Projection
• Aspect Ratio
Sound
• Sound Mode
• Balance
• Surround Sound
Time
• Clock
• Off Time
• On Time
• Sleep Timer
Option
• OSD Language
• Restore Factory
Default
• OSD Duration
• Soft Version
29

Picture Settings
Choose a Picture Setting:
From the picture setting menu, click to
congure pictures settings:
Picture Mode
• Changes the picture mode to different
settings depending on your choosing.
Color Mode
• Adjusts the color temperature
Keystone
• Change from auto keystone alignment to
manual.
Projection
• Change the projector to rear projection
mode
Aspect Ratio
• Changes the aspect ratio of the picture -
16:9*, 4:3
PC Setup
• Adjusts the position of computer’s
desktop screen
*Caution: Some pictures may be cut off
when aspect ratio is set incorrectly
30

Boost Brightness Mode
Boosted Brightness
The LED Showtime 3D has the capability
to boost its brightness by drawing more
power from the engine. This setting can
be found in the Picture Settings - Picture
Mode option in the Settings menu.
Choosing this mode will cause the fans to
spin faster, causing a louder fan noise.
Caution!
Prolonged use of the “Boost”
picture mode will cause expedited wear for the internals of
the projector. It is NOT recommended that the projector be
left in this mode for an extensive amount of time.
31

Keystone Adjustments
What is Keystoning?
“Keystoning” occurs when a
projector is aligned non-perpendicularly to a screen, or
when the projection screen
has an angled surface. The
image that results from one
of these misalignments will
look trapezoidal rather than
square.
Auto / Manual Keystone Adjustment
The LED Showtime 3D has the ability to
autocorrect any vertical Keystone effect.
This setting is on by default. To change it to
manual adjustment, go into Picture Settings,
and change the Keystone option from Auto
to Manual. The Keystone correction can be
controlled by the remote supplied with your
LED Showtime 3D.
32

Sound Settings
Choose a Sound Setting:
From the setting menu, click to
switch to sound setting. From the sound
setting, click to congure sound
settings:
Sound Mode
• Change the sound mode depending
on what is currently playing.
Balance
• Adjusts the balance of the sound,
from left to right.
Surround Sound
• Adjusts the surround sound
capabilities of the projector.
33

Time Settings
Adjusting the Time:
From the setting menu, click to
switch to time. From the time menu,
click to congure time:
Clock
• Adjust the time/date.
Off Time
• Sets a time for auto turn off of
projector
On Time
• Sets a time for the projector
to auto turn on (requires LED
Showtime to be plugged in).
Sleep Timer
• Sets a timer until the projector to
go into sleep mode
34

Option Settings
Choose a Option Setting:
From the setting menu, click to
switch to option setting. From the
option menu, click to congure:
OSD Language
• Changes the language of the
device.
Restore Factory Default
• Restores the projector to factory
settings.
OSD Duration
• Allows the projector to set a
duration for the selected OSD
language.
35

3D Setup Guide
How Stereoscopic 3D Works
Stereoscopy is a digital technique for allowing our brain to see stereopsis (3D
images) by tricking it. This technique is done is by presenting each eye with a
different image. The left eye is presented a picture that shows the left perspective. Similarly, the right eye is presented with an image of the right perspective. In this way, each eye is presented with a different image independently
and our brain puts them together resulting in the perception of depth. In 3D
projection this is accomplished by rapidly alternating between the left and right
images while at the same time 3D glasses “blink” to allow the corresponding
eye to see the correct image at the correct time. The equipment required to
make stereoscopic 3D possible is a high frequency projector like the AAXA
LED Showtime 3D, a 3D Graphics card like the Nvidia Geforce series, and active shutter glasses such as the NVIDIA 3D Vision Kit glasses.
Chapter 4
36

Required Hardware for 3D Playback
List of NVIDIA’s 3D
support video cards:
• GeForce GTX 590
• GeForce GTX 580
• GeForce GTX 570
• GeForce GTX 560 Ti
• GeForce GTX 560
• GeForce GTX 550 Ti
• GeForce GTX 480
NVIDIA 3D Vision Glasses Kit
These glasses work by alternately
darkening each lens in sync with
the projector’s refresh rate (120
Hz) and is held in sync through an
infrared transmitter (connected to the
computers USB port). Meanwhile, the
screen displays different perspectives
for each eye, creating a 3D universe.
37

LED Showtime 3D Quick Guide
Setting up your 3D equipment
• Install the 3D ready NVIDIA graphics card into your PC
• Connect the IR Transmitter to your PC
• Congure your Graphics Card 3D Vision Software*
• Put on your 3D Vision Active glasses
• Load your 3D content onto your computer
• Enjoy your media in perfect 3D!
*For a tutorial on how to congure your 3D
Vision software, please visit:
http://www.aaxatech.com/support/
faq/3Dfaq.php
38

Installing your 3D Graphics Card
Installing your Graphics Card into your PC
1. Remove any power connectors from the old graphics card. Also remove the screws that attach the
connector bracket to the case. Lift the lever on your
motherboard, then rmly pull out your old graphics
card.
2. Install the new graphics board, rst making sure that
no small wires are overhanging the PCI Express slot.
If the card seems difcult to push down, check to see
whether the connector bracket is sliding in properly.
3. Double-check to conrm that the graphics card’s
power connectors are in place. Additionally, verify
that no small wires or cables will interfere with any of
the cooling fans.
4. Power up the PC. If you hear any rattling, it indicates
that something is rubbing against the fans; power
down and check to make sure that no fans have
become blocked.
5. Once the system is powered up and running normally, install the latest drivers for the graphics card.
39

Technical Details
Troubleshooting
IMAGE IS BLURRED
Possible Causes Solution
The Projector is not in focus Adjust the focus with the focus adjustment dial
until the image comes into focus
The Projector is offset from plane / angle of
operation
No Sync, No Signal
1. Be sure to setup the computer to enable a video signal output. On some
laptops this is done by pressing and holding Function F5 key. If using the
LED Showtime 3D as an external monitor on Windows based systems, this
can be done by selecting “extend my desktop to this monitor”. The native
resolution of the LED Showtime 3D projector is 1280x800. Depending on
the video driver different resolutions may need to be selected for proper
output.
Move the projector so that it is both 180 degrees
and on an evern plane with the screen.
40

Technical Details
Troubleshooting
THE PROJECTOR DOES NOT TURN ON
Possible Causes Solution
There is no power Check to ensure the power outlet is good. Then
check the power adapter to ensure a proper connection with the wall outlet as well as the projec-
tor. Conrm that the unit is securely plugged in.
The power button was not held long enough To power on the projector, the power button
needs to be depressed for a full 3 seconds. try
holding the power button until the optical engine
turns on
NO PICTURE / FILE NOT SUPPORTED
Possible Causes Solution
The video source is not properly connected or
selected
Incorrect le extension / Video is encoded with
incorrect codec
Check the video source signal to ensure that it
is properly connected. Select the current input
source by choosing the input desired from the
main menu
Please refer to “Specications” page to see which
le types and codex are supported. Verify that
the le was encoded properly.
41

Specications
Lumens
Native Resolution
Maximum Resolution
Contrast Ratio
Projectoin Lens:
Image Size:
Lamp:
Video in:
Audio Output:
USB:
Dimensions
Weight
Supported File Formats
450 Lumens
1280x800(WXGA)
1920x1080(1080P)
2000:1
Manual Focus
10~160 inches
Triple RGB LEDs with Vibrant Color
Technology Life 20,000hrs
Composite A/V
VGA
HDMI
2.0 W stereo speakers (x2)
3.5 mm audio jack
(32GB maximum)
USB Host
(Memory Sticks)
5.9”x5.2”x1.4”
1.5 lbs
AVI, MPG, MP4, MP3,
FLV, RMVB, RM, JPG
42

Please direct all customer service inquiries to:
AAXA Technologies, Inc.
1541 Parkway Loop
Tustin, CA 92780
(714) 957-1999
info@aaxatech.com
 Loading...