

Page 1
安 全 警 告
Caution安全警告
㆗文
1. 為確保安全,在安裝前,請先詳細閱讀本安裝說明書並遵守內容,妥善保存本安裝說
明書於安全的㆞方,以便㈰後參考。
2. 因錯誤的安裝及操作方法所造成的設備毀損及㆟員傷害,本製造商將完全不承擔所衍
生的相關法律責任。
3. 本壁掛架之設計為容易安裝及拆卸,若因㆟為或㆝然災害:如㆞震、颱風…等,所造成
之設備損毀及㆟員傷害,本製造商將完全不承擔所衍生的相關法律問題。
4. 安裝面板顯示器壁掛架需由專業㆟員執行安裝。
5. 無論安裝或移除本產品,㉃少需由2㆟執行,以避免沈重的物品掉落造成㆟員傷害或
物品損毀。
6. 安裝前請先確認壁掛處周圍的環境:
避免安裝在溫度或濕度過高及任何會碰觸到㈬的㆞方。
請勿安裝於空調設備的出入口附近及避免大量灰塵及油煙處。
只能安裝於垂直的牆面,避免傾斜的牆面。
請勿安裝於振動及撞擊處。
請勿安裝於強光直射,強光會對使用者於觀看面板顯示器時造成眼睛疲㈸。
7. 安裝時請於面板顯示器周圍預留足夠的空間,以確保空氣的流通。
8. 為了安全及防止意外發生,安裝前,需檢查牆面的結構及選擇耐久性高的㊜當位置。
9. 牆面需能支撐面板顯示器及壁掛架總重量4倍以㆖,且需確保㈲足夠的強度能承受㆞震
及其它外力的振動。
10. 請勿㉂行變更任何零件,勿使用已破損的零件,若㈲任何問題請與你的經銷商聯絡。
11. 鎖緊螺絲(切勿以過大的扭力鎖付螺絲,以免造成螺絲斷裂或螺牙的損害)。
12. 本壁掛架所能支撐面板顯示器的重量60Kg.(135lbs.)以㆘。
13. ㈰後移除面板顯示器及壁掛架時,會在牆面留㆘螺絲孔及螺栓,且因長期使用會在牆
㆖留㆘污漬。
14. 因牆壁種類及壁掛安裝施工品質非本製造商所能控制,本產品所保固範圍只限壁掛架
本體,本產品保固期限5年。
15. 若㈲任何條文爭議,請以英文說明書為主。
1. To ensure safety, please read this manual carefully before installation and follow the
instructions herein. Store this manual in a secure place for future reference.
2. The manufacturer shall not be legally responsible for any equipment damage or
personal injury caused by incorrect installation or operation other than that covered
in this manual.
3. The wall mount is designed for easy installation and removal. The manufacturer shall
not be liable for damage to equipment or personnel injuries arising out of human
factors or acts of God, such as earthquake or typhoon.
4. It is recommended that the Wall mount bracket be installed by qualified personnel only.
5. At least two persons are needed to install or remove the product to avoid hazard of
falling objects.
6. Please carefully inspect the area where the wall mount is to be installed:
Avoid places that are subject to high temperatures, humidity, or contact with water.
Do not install the product near air conditioning vents or areas with excess dust and
fumes.
Only install on vertical walls and avoid slanted surfaces.
Do not install in places subject to any shock or vibration.
Do not install in places subject to direct exposure to bright light, at it may cause eye
fatigue when viewing the display panel.
7. Maintain sufficient space around the display to ensure adequate ventilation.
8. To ensure safe installation, first check the structure of the wall and select a secure
mounting location.
9. The wall should be strong enough to sustain a weight of at least four times of the
display and Wall mount bracket combined. The mounting location must be able to
withstand earthquake or other strong shock.
10. Do not modify any accessories or use broken parts. Contact your dealer with any
questions.
11. Tighten all screws (do not exert excessive force to avoid breaking the screw or
damaging its thread).
12. The maximum display weight the Wall mount bracket can support is below
60Kg.(135lbs.).
13. Drill holes and bolts will be left in the wall once the display and Wall mount bracket
are removed. Stains may occur after extended use.
14. Since the manufacturer has no way to control the wall type and installation of wall
mount, the warranty of the product shall only cover the body of the wall mount. The
warranty period of the product is 5 years.
15. Please consult the English language manual for any dispute on conditions.
ENG
1 2
Page 2
安裝時具備工具
設置に必要な工具
注 意
注 意
日本語
日本語
1. 安全にご使用いただく為に、設置前に本マニュアルに記載された手順をよくご確認くだ
さい。本マニュアルはいつでも参照できるように大切に保管してください。
2. 不適切な取り付け/取り扱いにより発生した設備の損害及び人員の傷害に対しては、
当社は一切の法的責任を負いません。
3. 本壁掛けブラケットは取り付け及び取り外しが容易に出来るよう設計されております。
人為的或は地震・台風などの自然災害によって発生した設備の損害及び人員の傷害
に対しては、当社は一切の法的責任を負いません。
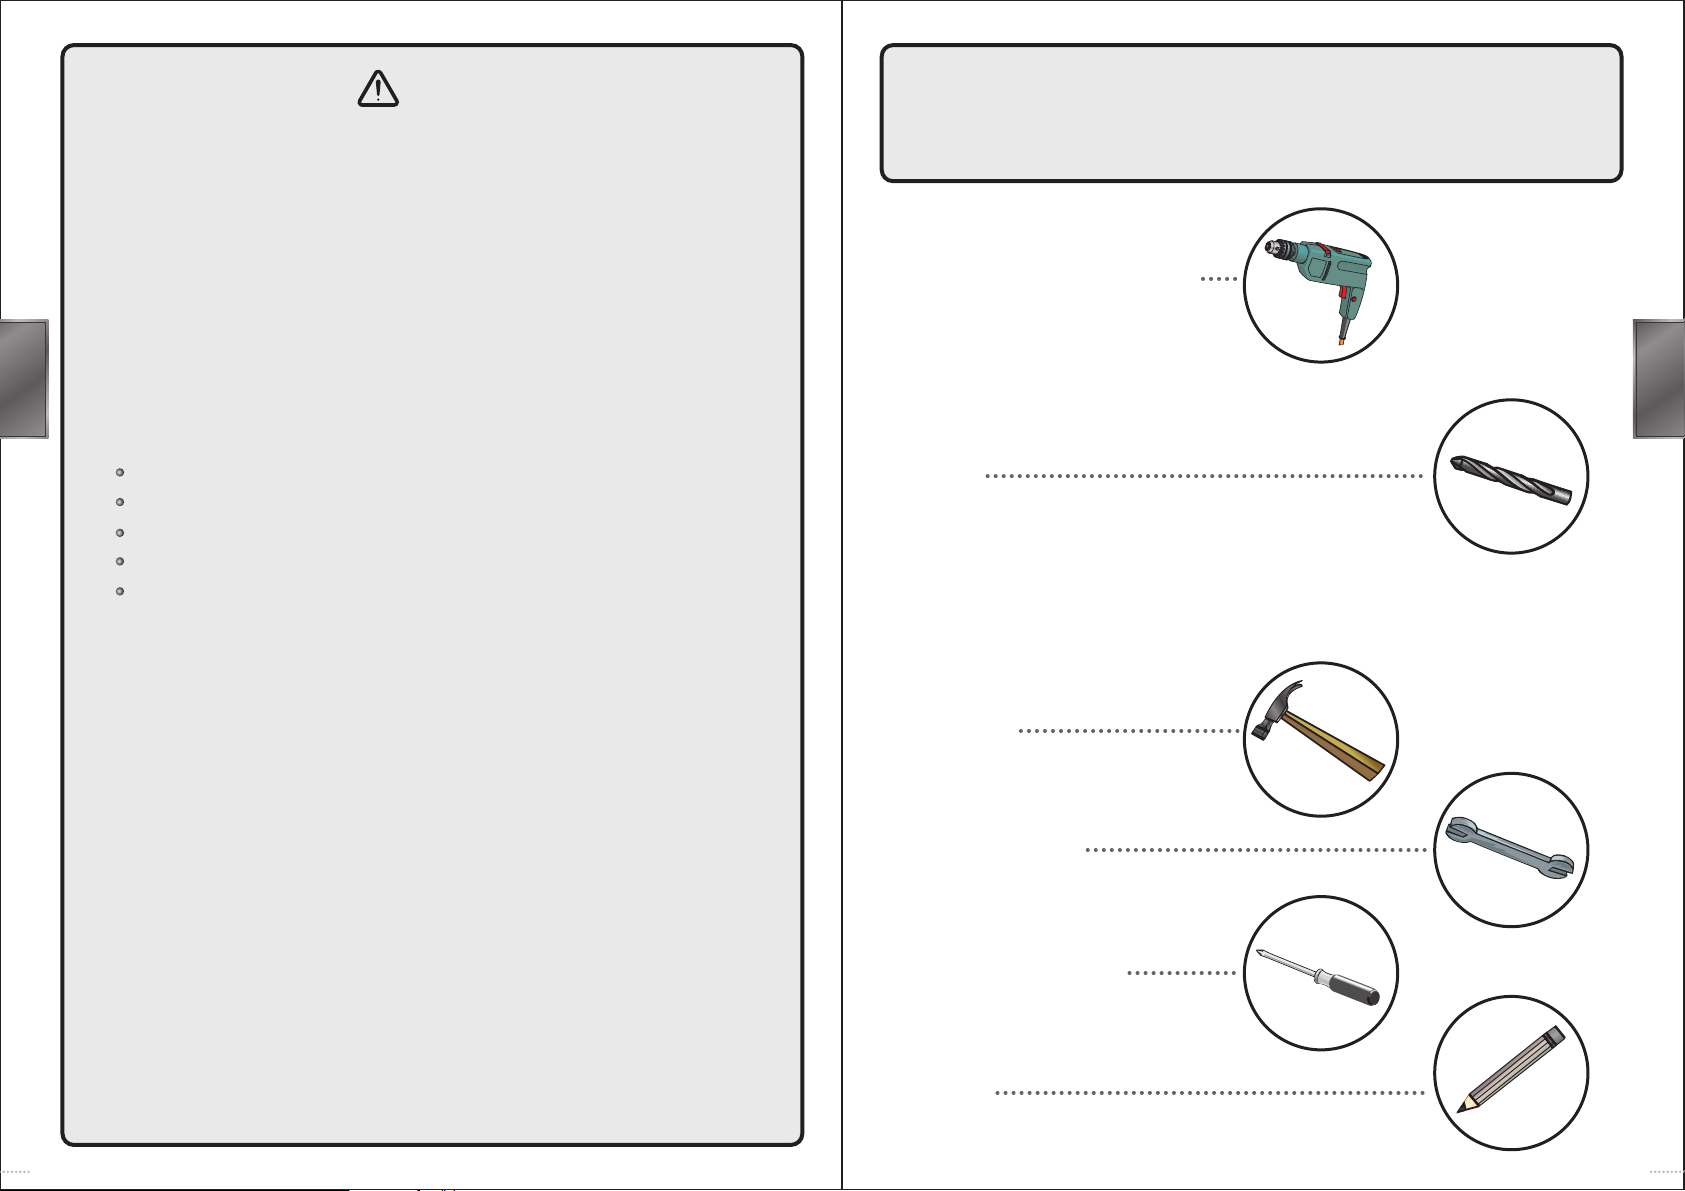
安裝時具備工具
Tools Required for Installation
設置に必要な工具
1. 電鑽
Power drill or masonry drill
電気ドリル
日本語
4. デイスプレイパネル壁掛けブラケット取り付けは必ず専門の業者に依頼してください。
5. 重い物品の落下による人員或は物品の損傷を避ける為、本製品の取り付け/取り外し
は少なくとも二人で行うことが必要です。
6. 取り付け前に壁掛けケ所の周囲環境を先ず確認ください:
高温、多湿、又は水のかかる場所を避ける。
エアコンの通気口付近、又は埃や油煙のある場所を避ける。
垂直な場所にのみ取り付けし、傾斜面への取り付けは避ける。
振動及び衝撃を受ける場所には取り付けない。
強い光が直射する場所には取り付けない。強い光は使用者がデイスプレイパネルを
観る時に目の疲労を起こします。
7. 通気を良くする為にパネルディスプレイ周辺は充分なスペースを確保してください。
8. 安全を確保し、いかなる事故も避ける為、取り付け部の壁内部構造を確認し、耐久性
のじゅうぶんな場所に取り付ける。
9. 壁面はデイスプレイパネル及び壁掛けブラケットの総重量の4倍以上を支持でき、且つ
地震及び外部からの振動に耐える強度を確保することが必要です。
10. ご自分で部品を変更したり破損した部品を使用しないでください。問題が有る時は、お
買い求めになった販売店に問合せください。
11. ネジを締め付けてください(ネジの破断やネジ山の損害を生じない為に、過大なトルクで
ネジを締め付けないでください。
12. 本壁掛けブラケットが支持できるパネルディスプレイの重量は60Kg.(135lbs.)以下です。
13. デイスプレイパネル及び壁掛けブラケットを取り外した後には、壁面にネジ及びボルト
が残ることがあります。また、長期使用後には壁面にシミが残る場合があります。
14. 壁の種類及び壁掛け取付け施工の品質は当社の責任範囲ではないので、本製品の
保証範囲は壁掛けブラケット本体に限り、本製品の保証期限は5年とします。
15. 各項目文章に問題がある時は、英文説明を参照ください。
2. 鑽頭:
如果是磚塊牆或水泥牆,須使用10mm的鑽頭
如果是木頭牆,須使用4.5mm的鑽頭
Drill:
25/64" (10mm) drill bit (for masonry wall)
3/16" (4.5mm) drill bit (for wood stud wall
ドリル:
レンガ壁或はセメント壁は10mmのドリルを使用のこと
木板壁は4.5mmのドリルを使用のこと
3. 鎯頭
Hammer
ハンマー
4. 板手:8 mm
Wrench: 8 mm
レンチ: 8 mm
5. 十字型螺絲起子
Phillips screw driver
プラスドライバー
6. 鉛筆
Pencil
鉛筆
㆗文
ENG
日本語
3 4
Page 3
日本語
日本語
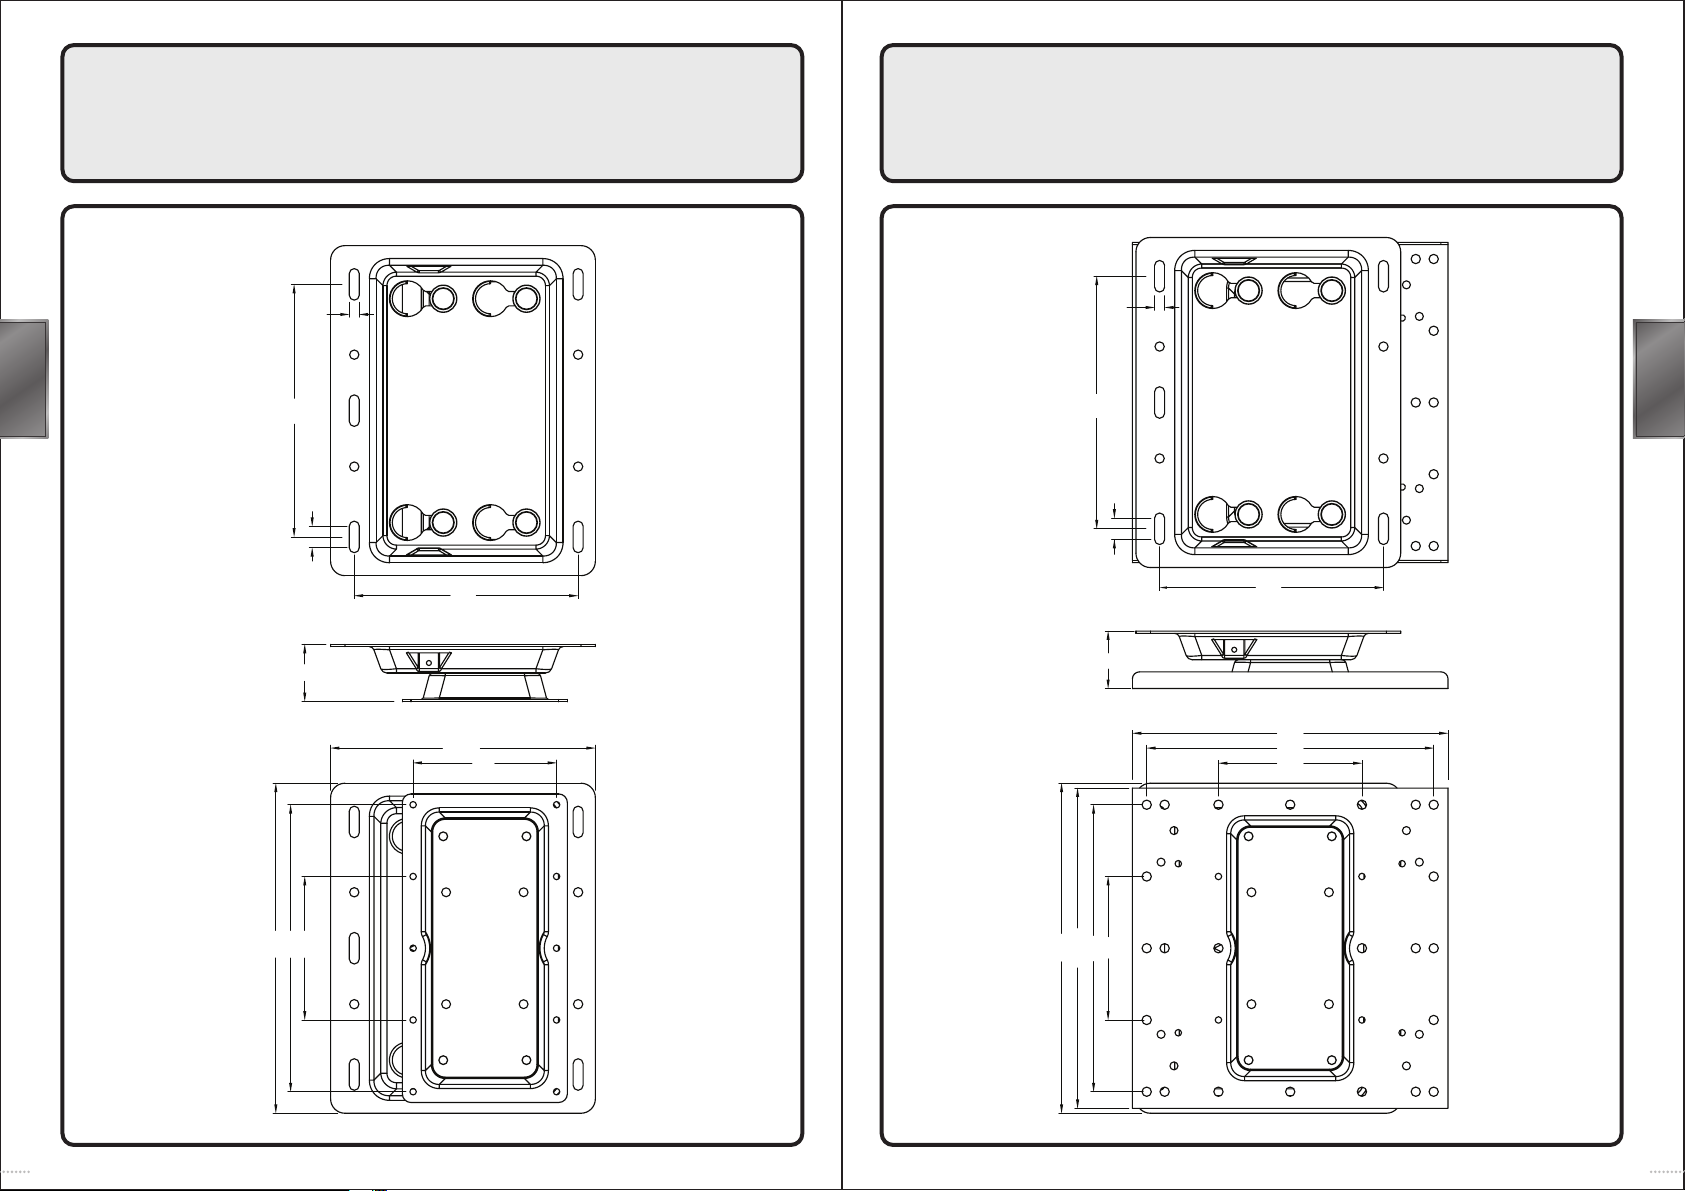
外觀尺寸圖
單位:公厘
外観および寸法(単位:ミリメートル)
L2010 外觀尺寸圖
外觀尺寸圖
單位:公厘
外観および寸法(単位:ミリメートル)
(單位:公厘
)
L2020 外觀尺寸圖
(單位:公厘
)
L2010 Outside Dimensions (mm)
L2010 外観および寸法(単位:ミリメートル)
㆗文
ENG
日本語
7
176
15
40
156
L2020 Outside Dimensions (mm)
L2020 外観および寸法(単位:ミリメートル)
7
176
15
156
40
㆗文
ENG
日本語
184.5
100
230
200
100
5 6
230
223.2
200
100
220
200
100
Page 4

包裝零件
包裝零件
同梱部品及びアクセサリ
安裝步驟及方式
取付けステップ及び方式
壁掛けブラケット本体を壁に固定します
注意:
日本語
日本語
安裝步驟及方式
Enclosed Parts
同梱部品及びアクセサリ
A
㆗文
ENG
日本語
Wall mount bracket
B
Plastic Plug
C
--- 1 pcs
--- 5 pcs
D
E
F
or
Display bracket
--- 1 pcs
or
Screw for display housing
or
Installation Process
取付けステップ及び方式
將壁掛架本體固定於牆㆖
Fix the Wall mount bracket to the wal
1
壁掛けブラケット本体を壁に固定します
安裝前請先了解您要安裝位置的牆壁種類: 磚塊牆、㈬泥牆或㈭頭牆。
1-1
㊟意:如果安裝在磚塊牆時,不可將螺絲(C)鎖固於磚堆與磚堆之間的間隙。
如果安裝在㈭頭牆時,不可將螺絲(C)鎖固於裝飾的柱子或石膏板㆖。
決定您要在牆壁㆖的安裝位置,將壁掛架本體(A)靠著牆壁,使用㈬平儀校正
1-2
㈬平,然後使用鉛筆在壁掛架本體㆖的橢圓孔作記號。
Identify the wall type before installation: masonry wall, cement wall or stud
1-1
wall.
Note: For installation onto a masonry wall, avoid applying the lag bolt (C) at the gap
between bricks.
For installation on a stud wall, avoid applying the lag bolt (C) to a decorative
column or a gypsum board.
1-2
Identify the installation position, lean the Wall mount bracket (A) to the wall
and level it with a leveling device; mark, with a pencil, the oval holes of the
Wall mount bracket to the wall.
㆗文
ENG
日本語
Warning
Lag Bolt
由於面板顯示器後殼壁掛螺絲孔規格不同,安裝前必須先確認本配件包所附的螺絲(E)
規格及長度,是否㊜用你所要安裝的面板顯示器,若㈲問題請與你的經銷商聯絡。
Various displays have different screw hole specifications. Please check that the
Screws (E) fits the specifications for the display to be mounted. Please contact your
dealer with any questions.
パネルディスプレイ背面ケースの壁掛けネジの規格は不同ですので、取付け前に必ず本部
品梱包に入っているネジ(E)規格及び長さが取付けるパネルディスプレイに適用するか否か
を確認してください。問題が有る時は、お買い求めになった販売店に問合せください。
--- 5 pcs
Plastic Washer
1-1
取付け前に取付け位置の壁の種類をチェックしてください:レンガ壁・セメント壁或
は木板壁。
注意:
レンガ壁に取付ける時は、ネジ(C)をレンガとレンガの間の間隙に固定しないでください。
木板壁に取付ける時は、ネジ(C)を飾りのある柱或は石膏板上に固定しないでください。
壁の取付け位置を決定した時は、壁掛けブラケット本体(A)を壁に寄り掛け、水平
1-2
儀を使用して水平を校正した後、鉛筆を使用して壁掛けブラケット本体上の楕円孔
に記号を付します。
87
Page 5

㆗文
日本語
日本語
注意:
ENG
日本語
使用電鑽及鑽頭在作記號的牆壁鑽孔。
1-3
㊟意:如果是磚塊牆或㈬泥牆,鑽孔的孔徑為10mm深55mm。
如果是㈭頭牆,鑽孔的孔徑為4.5mm深55mm。
Drill a hole at the marked position with an electric drill and drilling bit.
Note: For a brick-piled masonry wall or cement wall, holes of 10mm diameter and
55mm depth shall be made.
For a stud wall, holes of 4.5mm diameter and 55mm depth shall be made.
電気ドリルとドリルを使用して記号を付した壁に孔をあけます。
注意:
レンガ壁或はセメント壁の時は、あける孔は直径10mm 深さ55mm。
木板壁の時は、あける孔は直径4.5mm深さ55mm。
55
55
Ø10
1-4
如果是磚塊牆或㈬泥牆時,使用榔頭將塑膠扣件(B)敲入牆壁的孔內,然後使
用螺絲(C)將壁掛本體(A)固定於牆㆖。
For a brick-piled masonry wall or cement wall, drive the Plastic Plugs (B) into
the holes with a hammer, then fix the Wall mount bracket (A) onto the wall
with Lag Bolts (C).
レン`ガ壁或はセメント壁の時は、ハンマーを使用してプラスチック止め具(B)を壁の
孔の中に打ち込んだ後に、ネジ(C)を使用して壁掛け本体(A)を壁に固定します。
B
㆗文
ENG
日本語
Masonry walls or Cement walls
Ø4.5
C
Stud walls
Masonry walls or Cement walls
109
Page 6

如果是㈭頭牆,直接使用螺絲(C)將壁掛本體(A)固定於牆㆖。
テレビディスプレイブラケットをディスプレイパネル背面ケースに固定します
日本語
日本語
1-5
For a stud wall, directly fix the Wall mount bracket (A) to the wall with Lag
Bolts (C).
將電視支架鎖緊於面板顯示器後殼
Mount Display brackets to the back of the display
2
テレビディスプレイブラケットをディスプレイパネル背面ケースに固定します
㆗文
ENG
日本語
木板壁の時は、直接ネジ(C)を使用して壁掛け本体(A)を壁に固定します。
Std construction 2"*4" stud / 1/2" wallboard
C
Stud walls
將面板顯示器朝㆘,放置於受保護的表面,使用螺絲(E)將電視支架(D)鎖緊於面板
顯示器後殼。
Place the display face down on a covered surface. Mount Display bracket (D) to
the back of the display with the Screws (E).
パネルディスプレイを下に向け保護された表面に置き、ネジ(E)を使用し、テレビブラケッ
ト(D)をディスプレイパネル背面ケースに締付けてください。
E
D
F
D
E
F
㆗文
ENG
日本語
Warning
安裝在㈭質的牆面時,須將壁掛本體鎖固於支撐牆面的柱子㆖,不要安裝在裝飾的柱
子或石膏板。
安裝在㈭質的牆面時,須㊟意牆面是否㈲足夠的強度支撐面板顯示器及壁掛架總重量4
倍以㆖。
When installing onto a wooden stud wall, fix the Wall mount bracket to a stud
supporting the wall; prevent installing onto a decorative post or gypsum panel.
When installing onto a wooden stud wall, make sure that the wall has the sufficient
strength to support a load of 4 times the total weight of the display and the mounting
brackets.
木質の壁面に取付ける時は、壁掛け本体を支持壁面の柱に固定します。飾りのある柱或
は石膏板に取付けることは禁止します。
木質の壁面に取付ける時は、パネルデイスプレイ及び壁掛けブラケットの総重量の4倍以
上を支持するに充分な強度を壁面が具えているか否かに注意してください。
㊟意事㊠:因㈲些面板顯示器後殼在掛架螺絲孔處不平或鎖電視支架(D)的螺絲(E)
太長,須在面板顯示器後殼與電視支架(D)之間安裝塑膠墊片(F) 。
Note: Plastic Washers (F) may have to be used between the back of display
and the Display brackets (D) if the area on the back of display where
the screws are inserted is uneven or if the Display brackets (D) of
Screws (E) are too long。
注意事項:一部のディスプレイパネル背面ケースの壁掛けブラケットネジ孔のケ所が平
らでないこと或はテレビブラケット(D)のネジ(E)が長すぎることが有ります。
その場合はディスプレイパネル背面ケースとテレビブラケット(D)の間にプラ
スチックワッシャー(F) を使用してください。
1211
Page 7

ブラケット本体安全ボルトの締め付け
裝置面板顯示器㉃牆㆖的掛架本體
デイスプレイパネルを壁の上の壁掛けブラケットに設置します
日本語
日本語
鎖緊安全裝置的螺絲
㆗文
ENG
日本語
Install the Display onto the Wall mount bracket
3
デイスプレイパネルを壁の上の壁掛けブラケットに設置します
抬起已經裝置電視支架的面板顯示器,往壁掛架本體(A)圓孔內並緩慢的往㆘放置並
確認卡勾已經勾住壁掛架本體(A) ,即完成安裝。
Hold up the display installed with the Display Bracket, with the holes on the Wall
Mount Bracket (A) and slowly push it down, ensure the hook attaches onto the
Wall Mount Bracket (A), and the installation is complete.
テレビブラケットを装備したパネルデイスプレイを持上げ、壁掛けブラケット本体(A)上
にゆっくり下げて置きます。この時フックが壁掛けブラケット本体(A)にフックされている
ことを確認します。
Screws for fixing the Safety Device
4
ブラケット本体安全ボルトの締め付け
使用螺絲(E)鎖緊壁掛架本體((A)的㊧㊨側螺絲孔,即完成安裝。
Use screws (E) to tighten the Wall Mount Bracket (A) by its left/right side screw
holes. The installation is complete.
ネジ(E)を使用して壁掛けブラケット本体(A)の左右側のネジ孔に締め付け取付けを完成
します。
E
㆗文
ENG
日本語
13
14
 Loading...