

Page 1

SD-10 Powered Subwoofer
Owner s Information'
Page 2
SD-10 Powered Subwoofer Information
Important Instructions
1. Read your owner's manual carefully before using the product. Retain this
manual for future reference.
2. The subwoofer should be placed at a ventilated, dry and cool location, away
from any heat sources such as radiators or amplifiers. Do not obstruct the
subwoofer amplifier from ventilation. It is necessary that air can flow around
the finned heat sink on the rear panel of the amplifier.
3. Do not use the subwoofer near water or expose them to rain or moisture.
4. Always unplug the power cord first when making connections. Switch power on
only after you check and make sure all connections are made correctly.
5. Unplug the power cord from the outlet when you are not going to use the
subwoofer for a long period of time.
6. To clean, unplug the power cord from the outlet first. Use a damp cloth only to
wipe dust of the surface. Do not use any liquid cleaners.
7. Do not put coffee cups or other objects on top of the cabinet. They can be
shaken off when the subwoofer is in operation as it can produce a lot of
vibration.
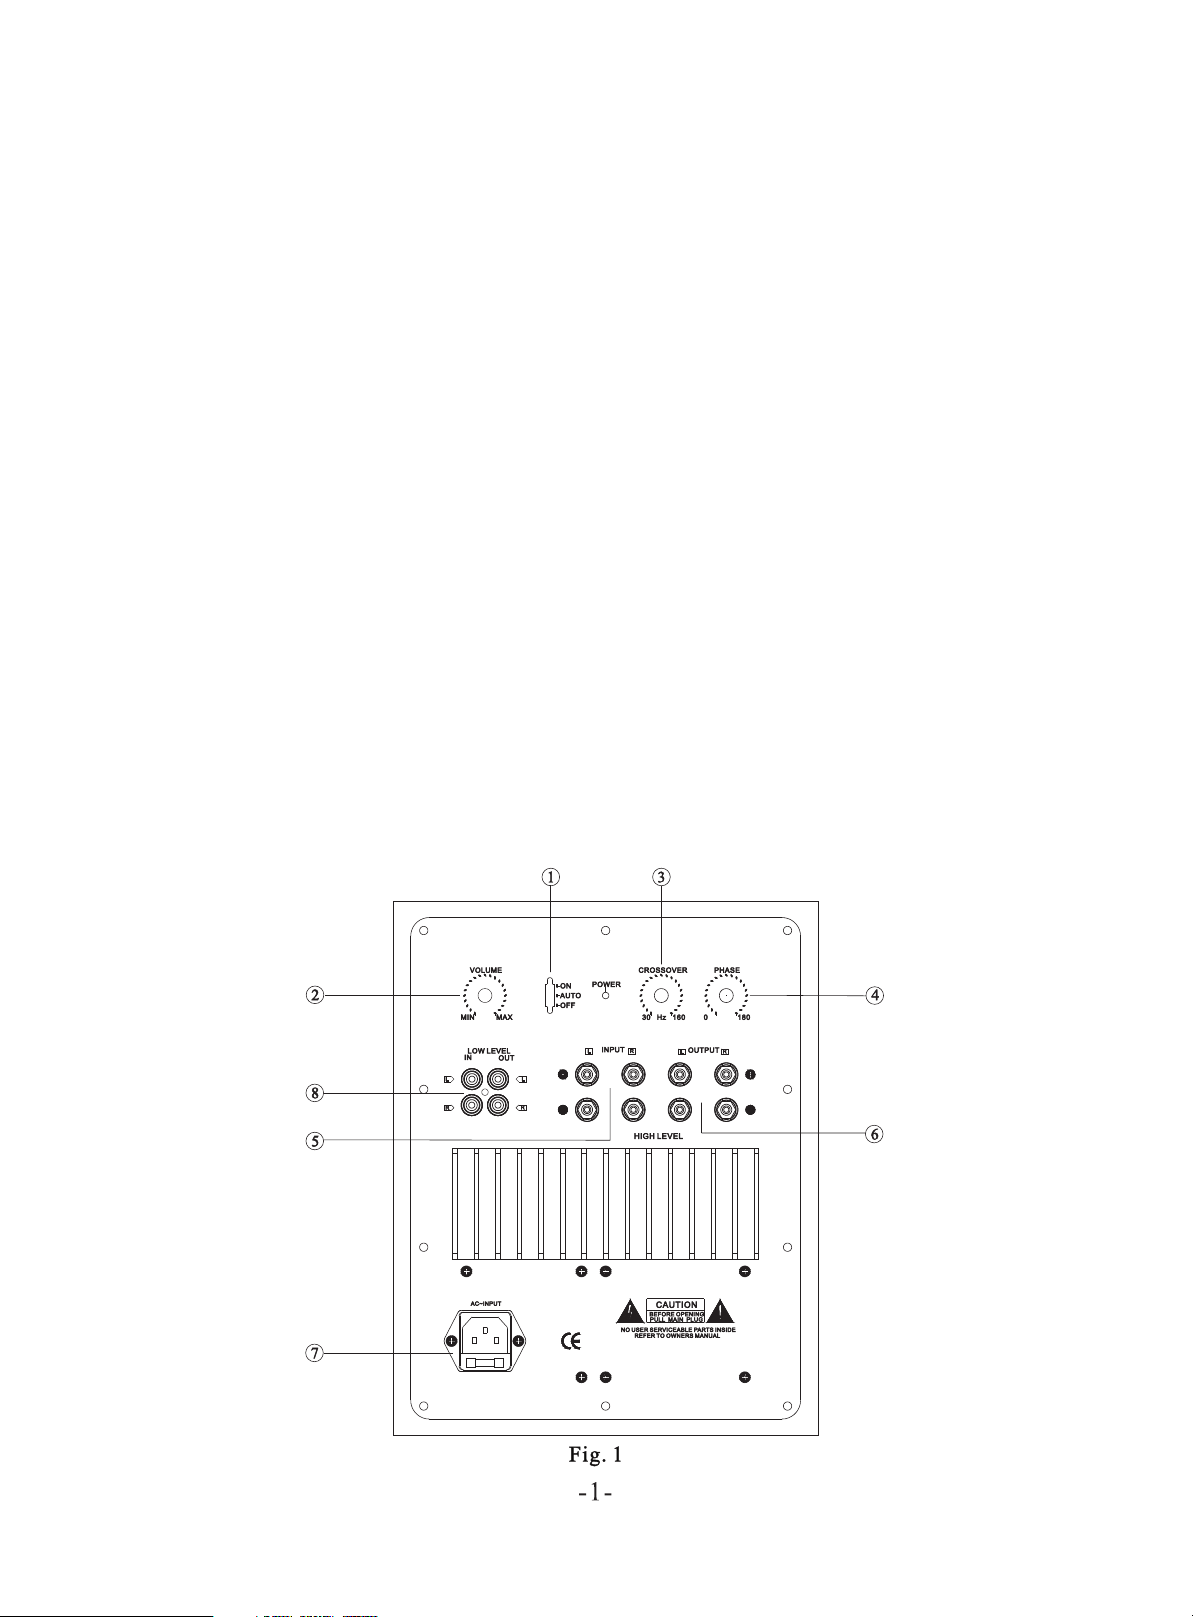
Functions and Connections
Please refer to Fig.1 for functions on the amplifier.
Page 3

Power switch on/off
Upper position: Power on
Lower position: Power off
Middle position: Auto on at this position the subwoofer amplifier is in a stand
by mode, awaiting an input signal. When there is no signal, the amplifier is
shut down. As soon as the signal appears, the amplifier switches on. If signal is
absent, the amplifier will shut down automatically after a pre-determined
period of time.
Volume Control
Use this control to balance the level of the woofer with the level of your main
speakers.
Crossover frequency control
If you are using small loudspeakers (4” to 6” woofers) in your main system,
you will need to set the crossover frequency at a high position (100 to 160 Hz).
If your main speakers have larger woofers (8” and above) you will need to set
the crossover frequency to much lower position (40 to 80 Hz). Generally, the
larger the speaker, the greater the low frequency output will be. If the
frequency control is set too high, the bass will appear “boomy” due to outputs
of subwoofer and main speakers overlapping each other. If it is set too low, the
bass will be ill defined and the subwoofer will sound detached from the rest of
the system.
Phase Control
Use this control to determine the best possible bass performance of your
system. There can be interference between your main speakers and subwoofer
at the frequency where they cross over due to placement, room acoustics and
type of main speakers used. By carefully positioning the subwoofer in the room
in combination with the level and crossover control, you should be able to get a
seamless transition between your main speakers and subwoofer. Start with the
full anticlockwise 0 position. This means that the subwoofer will push out
positive pressure wave corresponding to a positive electrical input. The 180
full clockwise position inverts this so the subwoofer will put out a negative
pressure wave. You can use this position if you are unable to get a good
integration between the subwoofer and main speakers.
Page 4

High Level Inputs L&R
These inputs should be connected to the left and right speaker terminals of your
amplifier/receiver, if you intend to connect the subwoofer using this option
instead of the low-level RCA input connections.
6 High Level Output L&R
You could connect your main speakers from the subwoofer amplifier instead of
the main amplifier/receiver. Use this option if you are connecting the
subwoofer up via the High Level Input.
CAUTION! Do not use both low level and high level connection methods
simultaneously. This may cause damage to the subwoofer and your
amplifier/receiver.
7 Power input socket and Fuse
For continued protection, replace only with same type fuse.
8 Low level Input and Output
Connect this to the pre-amp output of your amplifier/receiver. If you do not
have a pre-amp output or a power amplifier input, you can connect up the
subwoofer using the Low Level Input/Output utilizing a tape input/output
amplifier/receiver. Connect the tape output to the Low Level Input on the
subwoofer, then connect the tape input to the Low Level Output on the
subwoofer. To switch the subwoofer into the circuit, switch the tape monitor
input on your amplifier/receiver.
Use this in conjunction with your receiver amplifier. Connect this output to the
power amplifier input of your amplifier/receiver.
Connection
Please see diagrams below for different method of connecting the subwoofer to
your main amplifier/receiver. It may be possible to use alternative connecting
methods. Please refer to the owner's manual of your amplifier/receiver or seek
professional advice from your retailer or installer.
CAUTION! Before switching power on, please make sure all connections are
made properly, i.e., positive to positive, negative to negative.
Page 5

Page 6

Connection method 3:
Connecting subwoofer from speaker outputs of receiver (see Fig. 4)
Placement of Subwoofer
The subwoofer can be placed virtually anywhere in your room without affecting
the stereo image of your main speakers. Placing the unit in a corner of the room
will yield the greatest bass output but may not provide the best sound, as this
position will cause maximum room mode resonance. You can start with this
position and then move the subwoofer to different areas until you find the sound
satisfactory. The best method is to try different positions. Keep a clearance of
100mm/4” from the wall or furniture to provide best performance.
Page 7

Page 8

 Loading...