

Page 1
Quick Start Guide(RFKBSTX-8)
Getting Ready
1. Turn off the power of your computer.
2. Remove the existing keyboard (and mouse for the A4Tech® Wireless
Desktop).
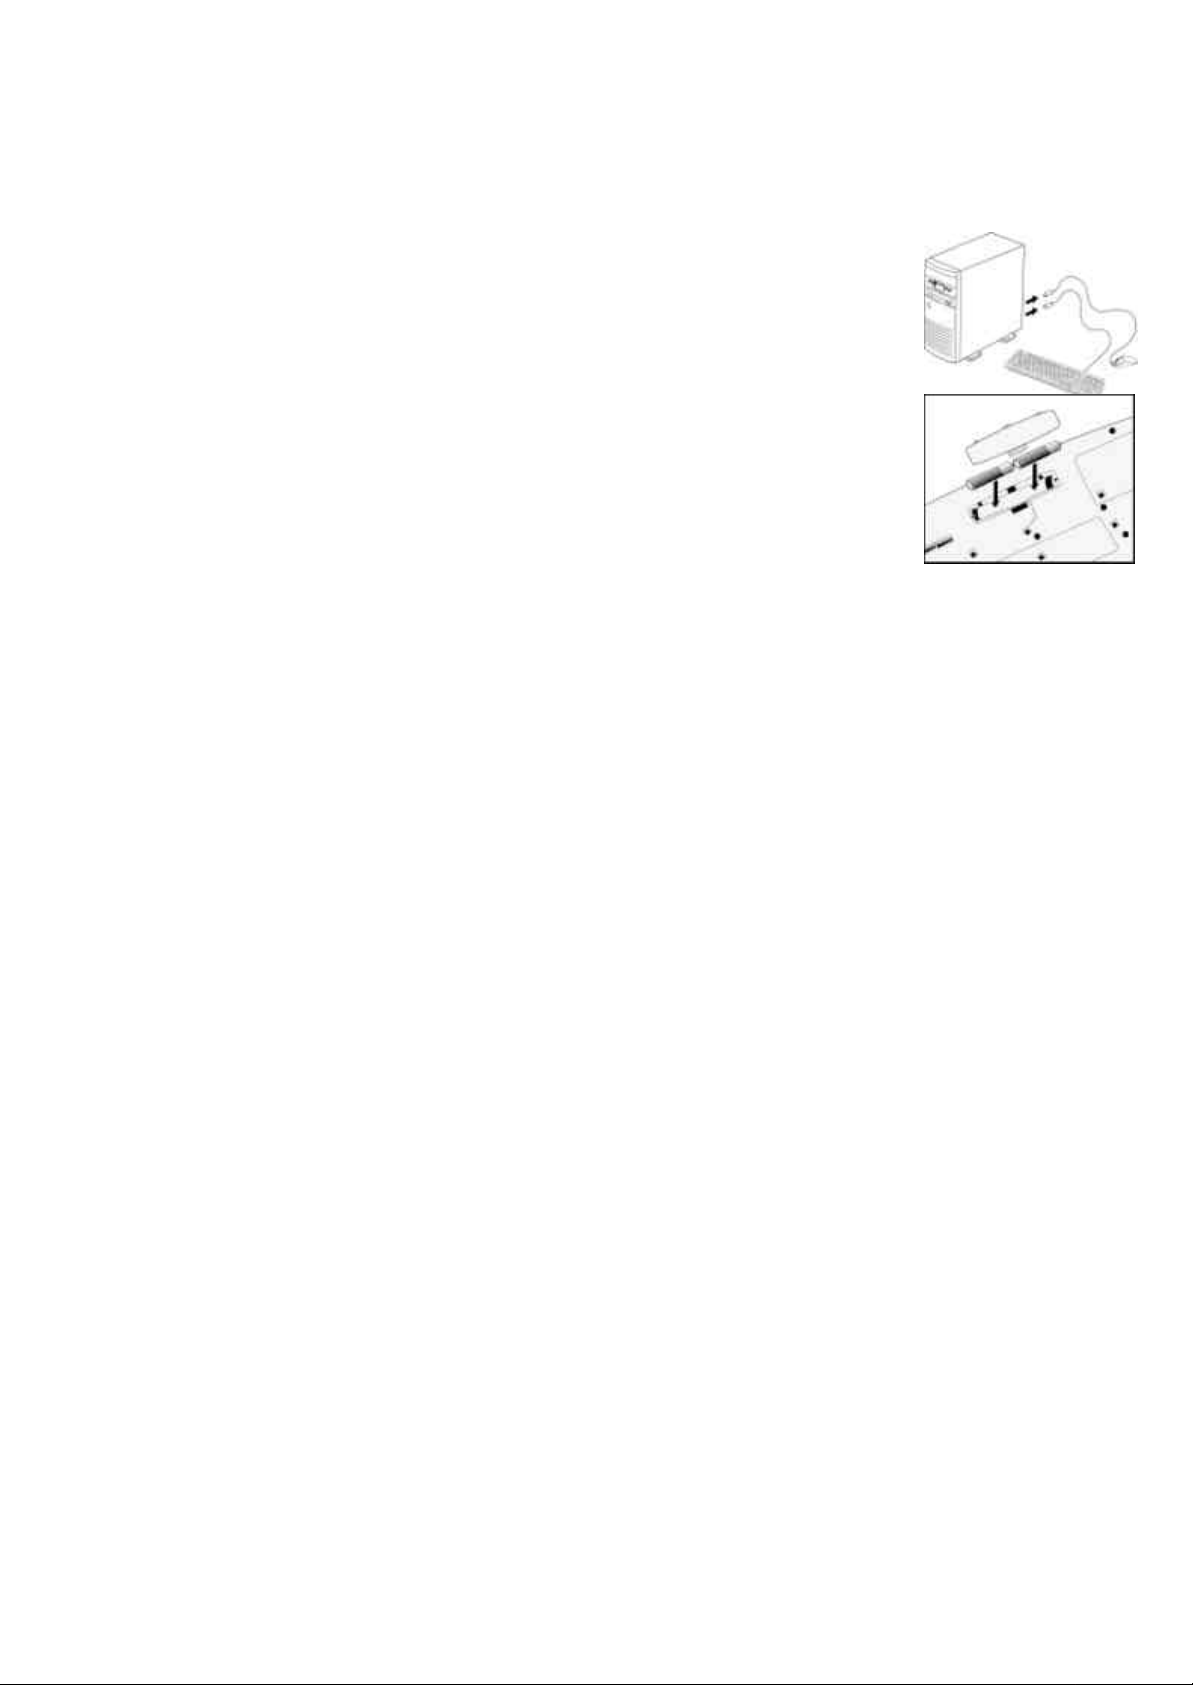
3. Install the AA alkaline batteries in the Wireless keyboard. Remove the battery
compartment cover on the bottom of the keyboard by squeezing the cover in
from the tab to release it.
4. Install the AAA alkaline batteries in the Wireless mouse (for the A4Tech Wireless
Desktop).
(a) Remove the battery compartment cover on the bottom of the mouse by
pressing down on the tab. Insert the batteries as shown in side the battery
compartment. Replace the cover.
(b) Or press the up cover and move backward as shown here, and by sliding the cover off. Insert the
batteries as shown inside the battery compartment. Replace the cover.
Page 2
Setting Up the Keyboard or Wireless Desktop
1. Make sure that your computer is turned off.
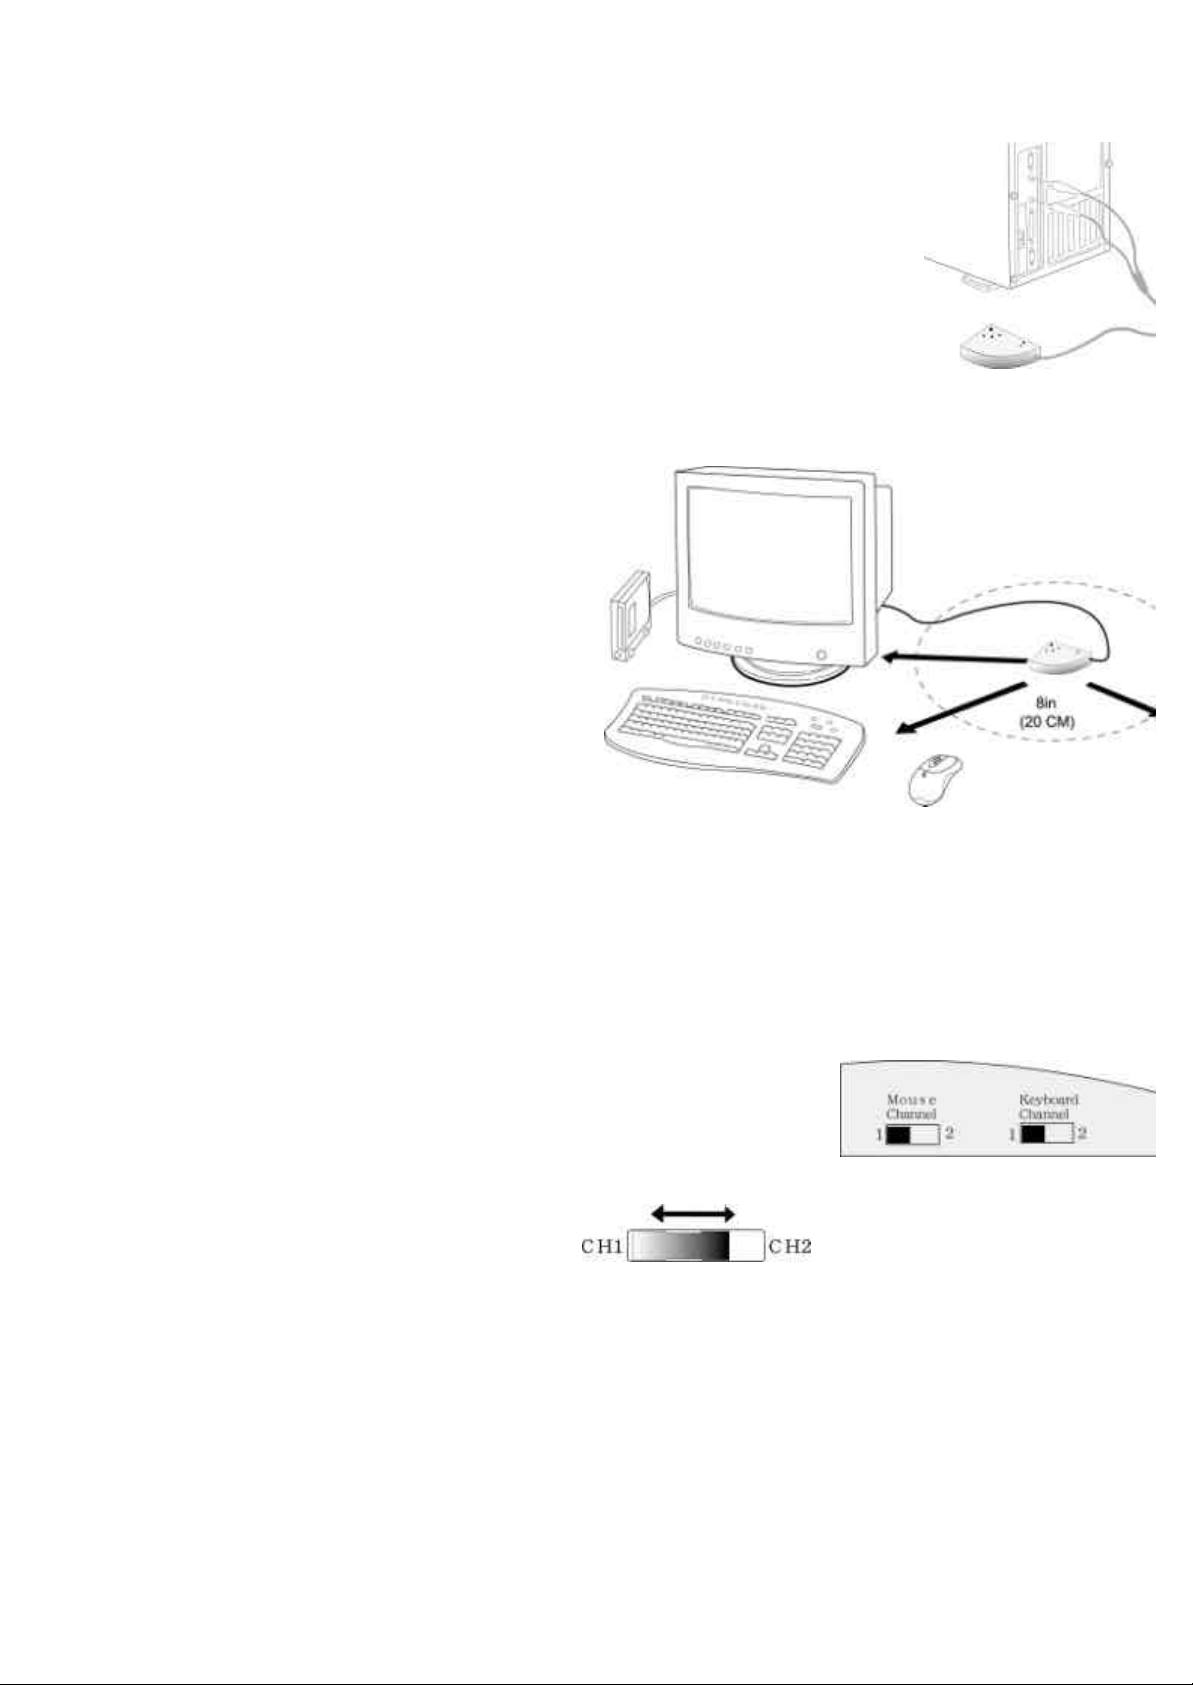
2. Connecting the Receiver’s Keyboard Cable:
(a) When connecting to an IBM AT keyboard port, use the 5-pin DIN
connector already attached to the keyboard cable.
(b) When connecting to a PS/2-style, 6-pin DIN keyboard port, remove
the AT adapter.
(c) Connect the receiver’s purple keyboard cable to the computer’s keyboard port.
3. Connecting the Receiver’s Mouse Cable (Wireless Desktop): Connect the receiver’s green
mouse cable to the computer’s PS/2
mouse port
4. Place the receiver eight inches (20
centimeters) from any
electromechanical device.
Installing the Mouse Software-iWheelWorks
and Keyboard software-iKeyWorksOffice
Before you can take advantage of the many
features your mouse and keyboard offers, you
must install the driver. The driver is in the
installation diskette that came packaged with your mouse and keyboard
Windows 95/98/Me/2000/NT4.0 installation
Insert the installation diskette into your floppy disk drive.
Click the Start button and then click Run.
In the Run dialog window, type A:\setup, where “A” is the letter of your floppy disk drive.
Click OK and follow the instructions on your screen to complete the installation.
Selecting the Frequency Channel
The Wireless keyboard and Mouse operates on two frequency channels.
To prevent interference when using two RF Mice in close proximity a
different frequency channel should be used for each mouse. Refer to the
following to change the frequency channel for your keyboard and mouse:
Set the frequency channel on the receiver to 1 or 2. Set the frequency
channel on the keyboard and mouse to 1 or 2.
The Wireless keyboard and mouse ID code
Each keyboard and mouse is assigned a unique ID code at manufacture, so the receiver only picks up
the signal from your mouse and prevents other Wireless keyboard or mouse radio signals from operating
on your computer. This feature can also be disabled, allowing other Wireless pointing devices to operate
your computer.
Page 3

Connecting the Wireless Mouse ID Code
When the driver installation is finished your computer reboots and the Wireless
Mouse window (shown on the right) appears.
CONNECT ID: Move the Wireless Mouse for a few seconds to establish a
connection, then click Connect ID. The unique ID code of your mouse is
recognized and another RF pointing device will not function on your computer.
Exit: Click Exit if no other RF pointing devices are within 3 meters range or if
you want other RF pointing devices to be able to access your computer.
Page 4

Changing the Wireless Mouse ID Code
You can use a new Wireless Mouse on your computer without changing the Radio receiver; you just
need to change the ID code. Refer to the following:
1. Press [Shift + Alt + F11] or [Shift + Alt + F12] to call up the Wireless Mouse ID Code window.
2. Move the Wireless Mouse for a few seconds to establish a connection, then click Connect ID.
3. The new ID code is connected and the Wireless Mouse window
closes.
4. Click Exit to close the Wireless Mouse ID code window.
Connecting the Wireless Keyboard ID Code
Manually establish communication between the receiver and keyboard.
(a) Press any key from the keyboard
(b) Press the ID Connect button on the receiver the green LED light
will show you the keyboard ID be connect. If the green LED light is
off then keyboard ID is disconnect.
Page 5

Using the iKeyWorksOffice Software
To launch the iKeyWorksOfficeTM software, double-click the iKeyWorksOffice icon on the
Windows Taskbar.
This iKeyWorksOffice software, brings you closer and keeps you in better touch with your desktop
world. Set up and organize your keyboard in your way. Using the Hotkeys and the iKeyWorksOffice
software, customize your keyboard so you can be at your Internet home page, or favorite chat room,
and run your e-mail application with the push of a button. The Hot Keys are divided into two groups,
as defined by their functions.
Hotkeys Setting Options
Setting On-Screen
System default function
Customize hotkey
Show the On-Screen display
MS Office hotkey group
Access customize function
Hot Keys to default function
Page 6

Using the 12 Hot Keys
Launches an e-mail application
There are 12 programmable Hot keys, which you must setup the iKeyWorksOffice software
before using.
Hot
Keys
My Home key: Accesses your home web page for
favorite internet address
E-mail key: Launches an e-mail application E-mail key:
Favorite key: Starts an application, accesses a web site
and web sites
Search key: Displays a menu of internet search
engines
Previous Track Key: Plays the previous track. Next Doc.: Open next document
Next Track key: Plays the next track. Previous Doc.: Open Previous Document
Play/Pause key: Plays or pauses the CD/DVD. Excel: Access Microsoft Excel application
Stop key: Stops play. Open document: Access my documents
Volume Up key: Increase sound volume. Zoom In: To magnify the view of a
Volume Down key: Decreases sound volume. Zoom Out: To demagnify the view of a
Mute key: Dramatically reduces the sound volume. My Document: Access the My Document
Suspend key: Access the Windows Shut Down dialog
box, where you can put your system on stand-by or
shut down windows.
Default Functions Microsoft Office program functions
Word: Access Microsoft word application
+ Font Size: Increase font size.
- Font Size: Decrease font size.
document.
document.
function
Office Tools: Show the Office tools
Page 7

Customize your Hot Keys
You can define the hotkey as Shell Execution, Keystrokes, Office shortcut and Generic Command
to meet your personal needs.
Select command type
Customize your Hotkeys
Type the name of file, folder…
Shell execution
Keystrokes
Office shortcut
Generic Command
Disable the Hot key
Browse File
Browse Folder
My favorite
Email address book
Show the name of the hot key
Page 8

Using the Mouse
With the iWheelWorks software, you have all the advantages of the Microsoft IntelliMouse wheel, and
but you can also scroll in Windows 95/98/Me/2000/NT.
Your mouse has a wheel; the wheel functions as both a wheel and a button. Simply click the wheel as
you would a programmable standard Third button.
Scrolling and Zooming with the Mouse
Task What is it? How to do it?
Wheel Scroll Use wheel Scroll for precise up and
down movement.
Zoom Use Zoom to either magnify or
demagnify the view of a document in
an application that supports it.
AutoScroll Use AutoScroll in Windows
95/98/Me/2000/NT and Microsoft
Office97/2000 compatible
applications to scroll through large
documents.
AutoScroll allows you scroll a
document automatically without
having to move the mouse
continuously.
Mouse Properties Settings
From the Mouse Properties window you can customize many settings for your mouse including button
assignments, scroll wheels and cursor movement. To open the Mouse Properties window double-click
on the mouse icon in the system tray. The Mouse Properties window has six tabs that are described
below.
Buttons Tab
Button Assignments: Click the down arrow to select the preferred function for each button.
Double Click Speed: Increase the speed for executing a double-click.
Button Configuration: Configure your mouse for left- or right-hand use. The default setting for
buttons 1 and 2 will be reversed.
Pointers Tab
The Pointers tab lets you change the way the cursor appears. Click the down arrow under Scheme and
choose the setting you want. The available pointers for each scheme are shown in the pane below. You
can browse to additional pointers, then create your own scheme using the Save As button.
Motion Tab
Pointer Speed: Lets you adjust how fast the cursor moves on the screen.
Snap to Button: Check this box to automatically have the cursor move to the default button in each new
dialog box or window.
Sonar: When this box is checked, pressing and releasing the [Ctrl] key will highlight the cursor.
Trails: Check this box when you want your cursor to display pointer trails. This option is useful when
using an LCD display that can make the cursor difficult to see.
Settings Tab
Command List: Shows all the available commands (including User-defined Command Menus) that you
can assign to either the NetJump or LuckyJump grids.
NetJump (top grid): The NetJump grid groups commonly used Web-browsing commands. To change a
command, select a new one from the Command List and click on the icon in the grid that you want to
To scroll up, move the wheel forward; to scroll
down, move the wheel back.
Place the cursor in an application that is Microsoft
Office 97/2000 compatible. Press and hold the Ctrl
key on the keyboard, then to zoom in, move the
wheel forward; to zoom out, move the wheel
backwards.
Assign AutoScroll to a button on the mouse if it is
not already assigned.
Place the cursor in an application, Press the mouse
button assigned to AutoScroll. The AutoScroll icon
appears.
Move the mouse once in the direction you want to
scroll. The farther you move the pointer from the
starting point, the faster the scrolling.
To stop AutoScroll, press any mouse button.
Page 9

change.
LuckyJump (bottom grid): The LuckyJump grid groups all-purpose commands. To change a command,
select a new one from the Command List and click on the icon in the grid that you want to change.
Wheel: Check the Reverse scrolling direction box to change the scrolling direction when you turn the
scroll wheel. Select the Scroll or Scroll one “page” per scroll unit radio button to set the scrolling speed
to suit your work habits.
Executing Net Jump Commands
NetJump combines commonly used tasks for Web browsing into one convenient grid and puts them
right under the cursor. To use NetJump, open the Mouse Properties window and select the Buttons
tab. Assign NetJump in the drop-down menu of the button you want. Click OK to close the Mouse
Properties window. Now click the assigned button to open the NetJump grid and execute your
command. (See the Settings Tab section above for instructions on customizing NetJump.)
Executing LuckyJump Commands
LuckyJump combines commonly used tasks for Windows environments into one convenient grid and
puts them right under the cursor. To use LuckyJump, open the Mouse Properties window and select
the Buttons tab. Assign LuckyJump in the drop-down menu of the button you want. Click OK to
close the Mouse Properties window. Now click the assigned button to open the LuckyJump grid and
execute your command.
Page 10

FCC Statement
This device complies with part 15 of the FCC Rules. Operation is subject to the following two
condition.(1).this device may not cause harmful interference. (2).this device must accept any
interference received, including interference that may cause undesired operation
Warning:
Note: This equipment has been tested and found to comply with the limits for digital device, pursuant
to Part 15 of FCC Rules. These limits are designed to provide reasonable protection against harmful
interference in a residential installation. This equipment generates, used and can radiate radio
frequency energy and, if not installed and used in accordance with the instructions, may cause harmful
interference in to radiate communications. However, there is no guarantee that interference will not
occur in a particular installation. If this equipment does cause harmful interference to radio or
television reception, which can be determined by turning the equipment off and on, the user is
encouraged to try to correct the interference by one or more of the following measures:
l Reorient or relocate the receiving antenna
l Increase the separation between the equipment and receiver.
l Connect the equipment into an outlet on a circuit different form that to which the receiver in
connected.
l Consult the dealer or an experienced radio/TV technician for help.
Note: The manufacturer is not responsible for any radio or TV interference caused by unauthorized
modification to this equipment. Such modification could void the user ’s authority to operate the equipment.
 Loading...