

Page 1

MeetingMan
Wireless Mouse
User Manual
Model: G10-810L,G10-810
www.a4tech.com
Page 2

THIS DEVICE COMPLIES WITH PART 15 OF THE FCC RULES. OPERATION IS SUBJECT TO THE FOLLOWING TWO CONDITIONS: (1) THIS DEVICE
MAY NOT CAUSE HARMFUL INTERFERENCE AND (2) THIS DEVICE MUST ACCEPT ANY INTERFERENCE RECEIVED, INCLUDING I NTERFERENCE
THAT MAY CAUSE UNDESIRED OPERATION.
Federal Communications Commission Requirements
The equipment has been tested and found to comply with the limits for Class B Digital Device, pursuant to part 15 of the FCC Rules. These limits are designed to
provide reasonable protection against harmful interference in a residential installation. This equipment generates uses and can radiate radio frequency energy
and, if not installed and used in accordance with the instruction, may cause harmful interference to radio communication. However, there is no guarantee that
interference will not occur in a particular installation. If this equipment does cause harmful interference to radio or television reception, which can be determined
by turning the equipment off and on, the user is encouraged to try to correct the interference by one or more of the following measures:
●Reorient of relocate the receiving antenna.
●Increase the separation between the equipment and receiver.
●Connect the equipment into an outlet on a circuit different from that to which the receiver is connected.
●Consult the dealer or an experienced radio/TV technician for help.
THE CHANGES OR MODIFICATIONS NOT EXPRESSLY APPROVED BY THE PARTY RESPONSIBLE FOR COMPLIANCE COULD VOID THE USER'S
AUTHORITY TO OPERATE THE EQUIPMENT.
This device complies with Part 15 of the FCC Rules. Operation is subject to the following two conditions:
(1) This device may not cause harmful interference, and receiver.
(2) This device must accept any interference received, including interference that may cause undesired operation.
FCC Radiation Exposure Statement
The equipment complies with FCC radiation exposure limits set forth for uncontrolled equipment and meets the FCC radio frequency (RF) Exposure Guidelines in
Supplement C to OET65. The equipment has very low levels of RF energy that it is deemed to comply without testing of specific absorption ratio (SAR).
- 1 -
Page 3

1. Hardware Installation
1). Connect the 10-Link receiver
Take out the 10-Link receiver from bottom of the mouse and connect it to your computer or
Notebook.
Notes:
1. If you are using the receiver in a long range meeting room or there is strong wireless
conflicts nearby, adopting the receiver with a USB extension cable to keep it away from the
computer or any interfering sources.
2. Connect receiver on the same side with the mouse, it may avoid potential wireless
conflicts from the notebook computer.
2). Insert the batteries
Push down the mouse cover to open the battery cover and insert the supplied batteries.
Please make sure the positive (+) and negative (-) ends of the battery match the polarity
indicators inside the battery compartment.
3). Turn on your Mouse
Push the power switch to ON position and turn on your mouse. >>Then LED light at the
bottom of the mouse is on immediately.
- 2 -
Page 4

2. Software Installation(Note: The software is applicable to Windows 2000/ XP/ 2003/ Vista/ Windows 7)
The G10 MeetingMan offers 2 flexible ways to install the driver, Normal Installation and Mobile Execution. The MeetingMan
main program has a special feature that it can be executed directly without the need to install the software to Windows
system. This is convenient when you are using a public computer and installing mouse driver to the system is prohibited or
restricted. In such circumstances, you do not need to install the mouse driver, but just run the MeetingMan's main
- 3 -
Page 5

program directly from your storage device, e.g., a memory stick.
Normal Installation
1). Uninstall any mouse software on your system.
2). Insert enclosed CD to start installation and follow the on-screen instructions to finish the
software installation. You may manually double click the “auto-run" program if execution
does not automatically start.
3). The shortcut icon "
" will appear on your desktop screen, and then you have successfully
installed the software. (Otherwise, installation is failed and you have to remove the software
and re-install.)
To remove the driver, follow the steps:
Go to START>> PROGRAMS >>A4TECH Software >> "G10 MeetingMan" >> "Uninstall G10
MeetingMan, see figure on the right.
Mobile Execution:
You may copy and store the Mobile Edition files to your storage device, e.g., a memory stick,
and plug it into any public systems to execute the Mobile Edition directly without installation.
Or, you may copy all the files to the system, and then run the Mobile Edition main program
directly. This is convenient when you are using a public computer in the school or net bar,
where installation any new program is prohibited or restricted.
Usage:
1). Copy all the files in the folder “G10" to your memory stick, and if needed, copy the files
to the public system.
2). Double-click the icon to run Mobile Edition.exe
Mobile Edition.exe
- 4 -
Page 6
⑨
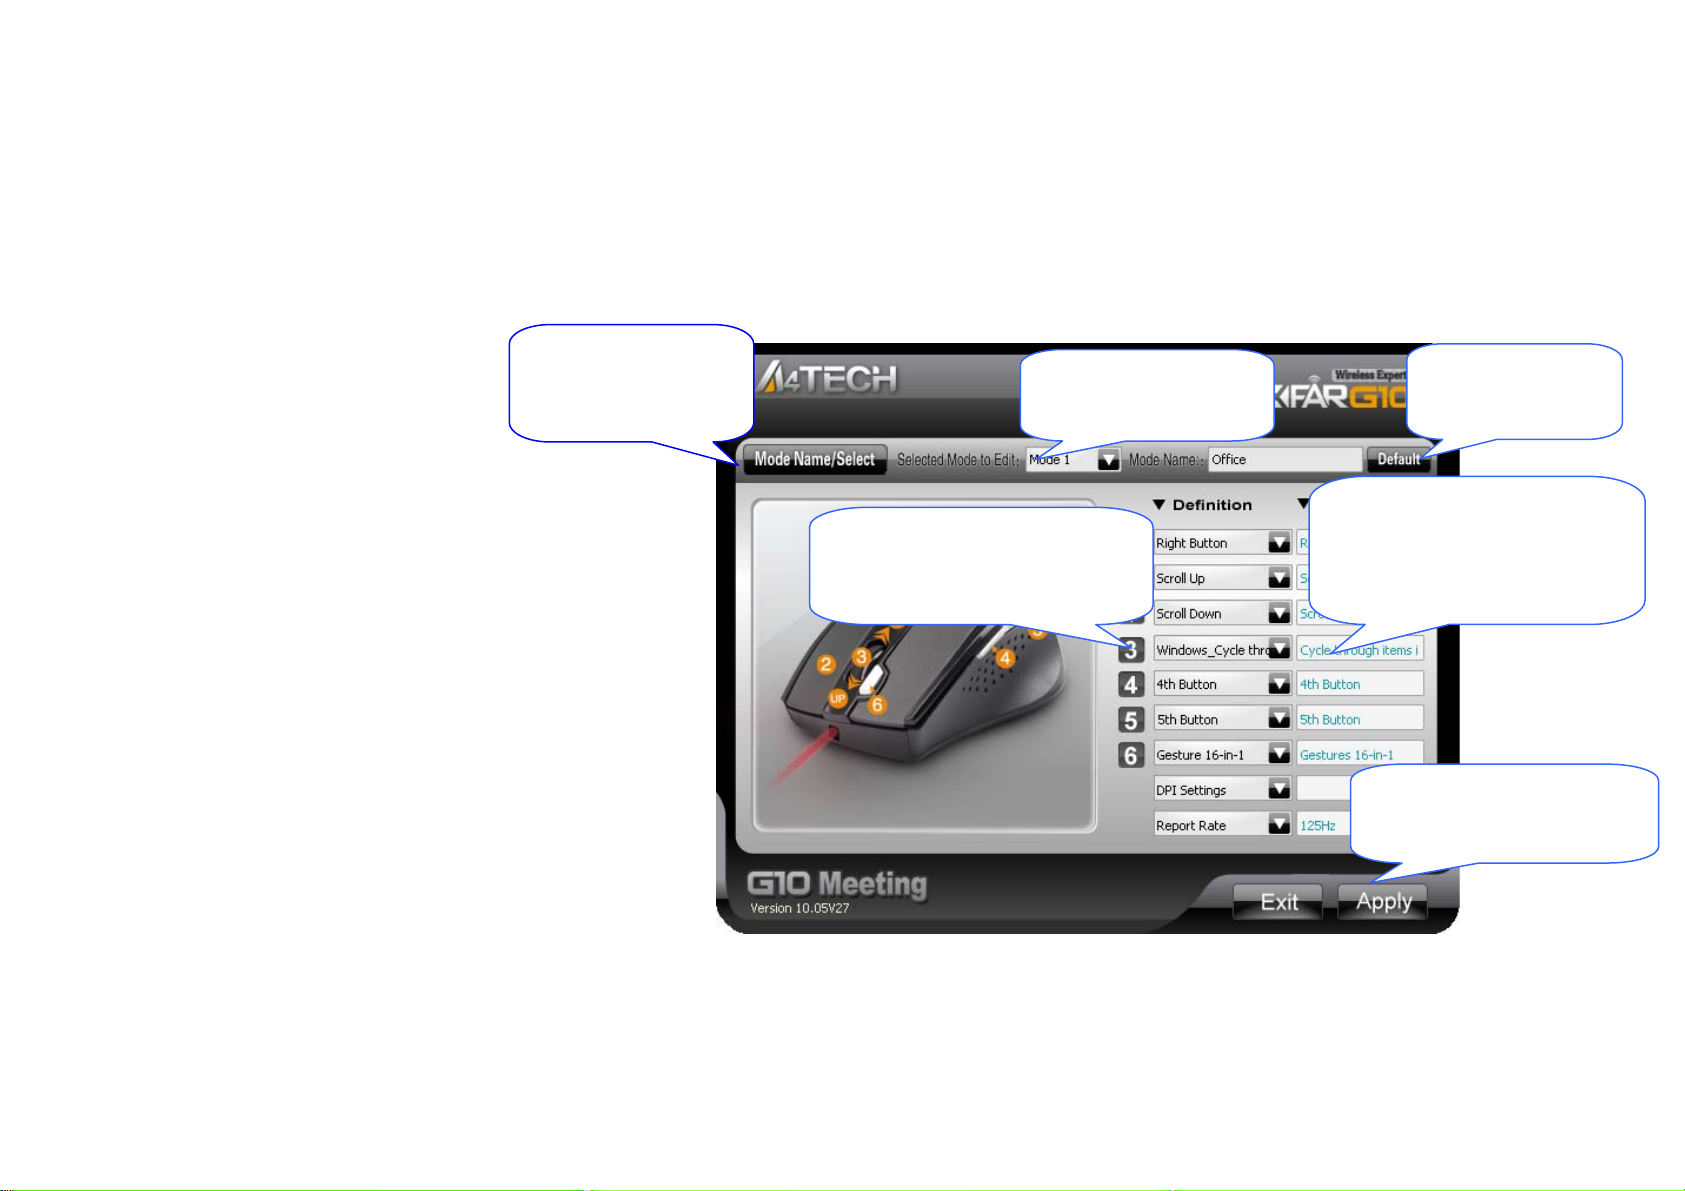
3. The G10 MeetingMan Main Menu:
Mode Name/Select:
Name a new mode or
select modes to use.
①
②
Mode Number:
Select a mode
number to edit.
Default:
Resume to default
settings.
④
③
Description of Reminder:
Mouse Button Definition:
Display current mouse button
settings or setup new settings
to mouse buttons.
⑤
⑦
⑧
- 5 -
Enter short description here
for each button setting, which
will be displayed later as the
reminder on the screen.
⑥
Save new settings to
receiver and apply the new
settings immediately.
Page 7

Main Menu of G10 MeetingMan
(1) Knowing the G10 MeetingMan Software
The basic principles
and design concepts of
G10 MeetingMan
Functions Descriptions Figures
Before you are getting started to use this product, it is vital to understand the basic principles
and design concepts of MeetingMan.
For each of MeetingMan’s script file, it will contain 5 different working modes, and each
working mode can setup 7 buttons on the mouse with various functionalities. Those preset
modes can be accessed by pressing the “mode-shift” button, and each button’s functionality
can be activated by clicking the appropriate mouse button according to various applications.
Thus, it turns a simple mouse into a very unique and powerful tool with individual’s innovation.
For instance, there are 5 preset working modes available for Office, TutorPen Meeting, Open
file, LaserPointer Meeting and Gaming respectively, and after the MeetingMan software being
installed, those 5 working modes can be shifted using a “mode-shift” button and make your
jobs well done effortlessly!
- 6 -
Page 8

. Mode Name/Select
Click on “Mode Name/Select” on the Main Menu, the mode setup
screen will pop up as shown on the right.
You may tick off the modes you would not need temporarily from
bottom to top order, or tick the mode you need from top to bottom
order.
You may enter a new mode name on the blank, or edit existing mode
names.
. Selected Mode to
Edit
③. Mode Name
It displays the current mode number in editing. You may select other
mode numbers if needed.
There are 5 modes you can select to edit; with each mode you can
define a number of new button settings. Remember to click “Apply” on
the main menu to save the new settings to the receiver before taking
effect.
The current mode name in editing. You may edit the mode name as
described in the “1.Mode Name/Select” section.
- 7 -
Page 9

④. Default
Click the "Default" a reminder will pop up as shown on the right. Click
"OK" will resume all the buttons to the original settings, or click
"Cancel" to exit the screen without any change.
- 8 -
Page 10
Functionality Listing of Mouse Buttons in Each Working Mode
Mouse Button Diagram
Mode 1 Mode 2 Mode 3 Mode 4 Mode 3
Mouse Button
2 Right Button From Current Slide
3 Windows Switch Start or Exit Slide
4 4th Button Page Up Open Text File &
5 5th Button Page Down Open
6 16-in-1 TutorPen Memo LaserPointer(By
UP Scroll Up Scroll Up Scroll Up Scroll Up Scroll Up
DN Scroll Down Scroll Down Scroll Down Scroll Down Scroll Down
DPI 1000DPI 1000DPI 1000DPI 1000DPI 1000DPI
Office TutorPen Meeting Open file LaserPointer
Right Button From current
or Exit Slide
Open PPT File &
Show
Spreadsheet
File & Example
Example
Example
Meeting
Right Button
slide or Exit Slide
Start or Exit Slide
Show
Page Up 4th Button
Page Down 5
Model)
Middle Button
Gaming
th
Button
3X Fire
- 9 -
Page 11
Report Rate 125Hz(8ms) 125Hz(8ms) 125Hz(8ms) 125Hz 250Hz
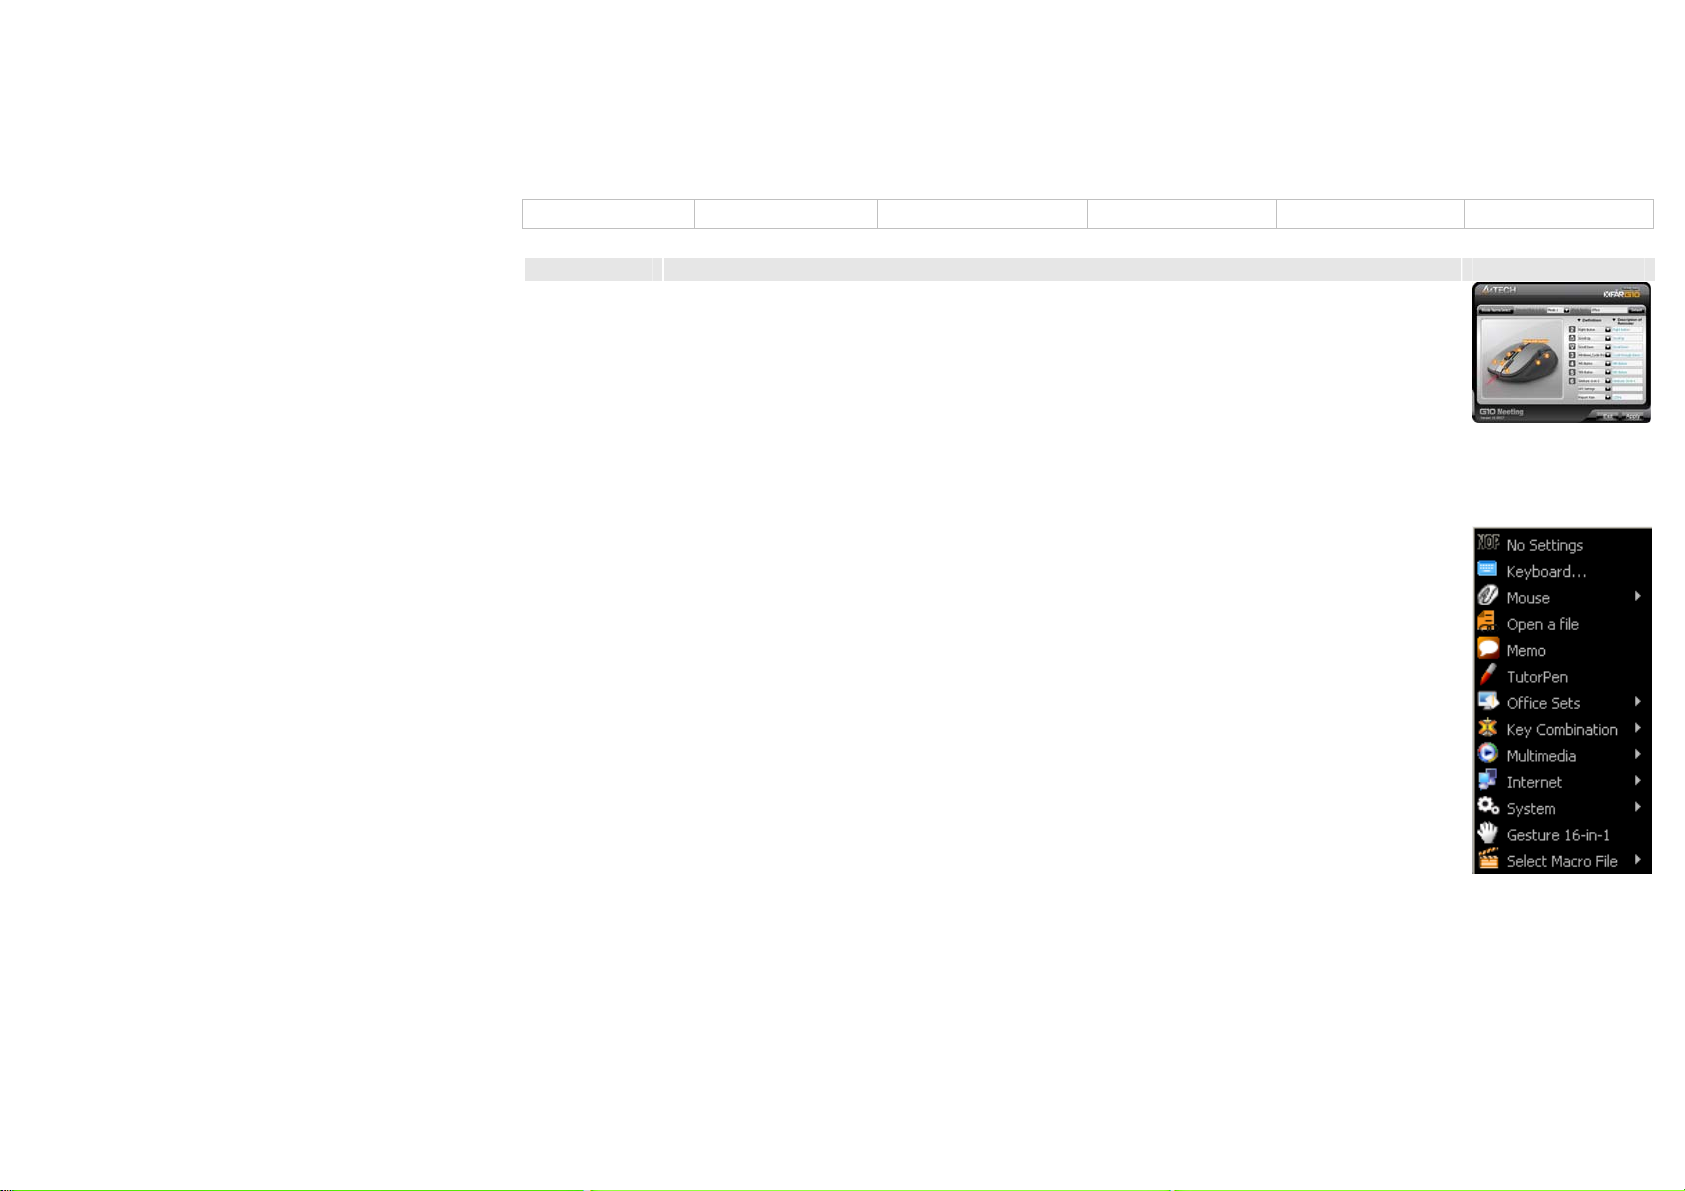
(2) Button Settings and Relevant Functions
Functions Descriptions Figures
Button
Settings
Click any “button definition area” on the main menu; you will see the function listing
as shown on the right. According to your preference, you may select one of them as
the button setting. You also can enter a short description on the “Description of
reminder” area, which will be displayed on the screen when it is activated as the
reminder.
No Setting There is no button setting being defined.
Keyboard You may setup the mouse button to simulate a keyboard's
Mouse Except mouse left button, you may setup any of mouse buttons to
Open a File
keystroke, or a key combination with "Win", "Ctrl", "Shift" and "Alt",
then followed with any keystroke on the keyboard, and then assign it
to the designated mouse button.
be one of "mouse left button, mouse right button, mouse middle
button, mouse 4th button, mouse 5th button, wheel up and wheel
down".
One click to open a program file or a document. You may setup any
of mouse buttons of 2, 3, 4, 5, 6, wheel up(UP) and wheel down(DN)
with “Open a File” function.
Usage:
1). Select “Open a file” from the pull-down button menu as figure 1
shows.
2). A screen of file listings will pop up as figure 2 shows.
3) Select one of the files that you would open it with the associated
button and click “Open”.
4) Now you can see the file you selected has been assigned to the
button.
Figure 1
- 10 -
Page 12

Memo
5) Click “Apply” to save the new button setting.
Example:
While in the session of a meeting or teaching, it is embarrassing to
keep others waiting due to searching for a document, or look up for
a program or a shortcut. With “Open a File” function, you may have
better way to resolve this issue. By setting up each button in
association to the document, program or shortcut, all you need to do
is to shift to the mode and click each mouse button to open all the
files instantly. You may also open an on-line reminder to check each
mouse button association details.
See below “Memo” section in more details.
One click to open the Memo screen and list out all the current button
settings as the reminder. You may setup any of mouse buttons of 2,
3, 4, 5, 6, wheel up(UP) and wheel down(DN) with “Memo” function.
Usage:
1). Select “Memo” from the pull-down button menu of G10
MeetingMan main menu as figure 3 shows.
2). Click “Apply” to save button setting.
Example:
This function is useful during the session of a meeting or teaching,
when you are not very sure which button is associated with the
function you need.
Click the “Memo” button will bring the “Memo” screen as figure 4
shows. Now you can check each button setting and activate them
immediately.
For instance, the teacher can open all the handout documents in
seconds by clicking the button in association with the mouse
buttons.
The Memo function is available for mouse button 2, 3, 4, 5, 6, Wheel
- 11 -
Figure 2
Figure 3
Figure 4
Page 13

Office Sets
Key
Combination
Multimedia Quick access to Multimedia commands, such as: Media Player
Internet Quick access to usually used Internet commands, such as:
System Quick access to Windows commands, such as: Open Calculator,
Gesture
16-in-1
LaserPointer
(By Model)
up(UP) and Wheel down (DN).
You may setup any one of Office command sets such as: “Zoom In,
Zoom Out, Paste Text, Double Click and Treble Click”to the mouse
buttons.
Zoom In/Out:One click to perform zoom in or zoom out function,
applicable to CAD, ACDSee, Windows or text editing programs.
Paste Text:One click to perform “Select, Copy & Paste” texts, it
turns office jobs can never be so simple.
Quick access to Office commands of key combinations, such as:
Cut, Copy, Paste, Delete, Search, Select All, Redo, Undo, New File,
Open File, Save File, Print…etc.
(Open), Previous, Next, Stop, Play/Pause, Mute, Volume+,
Volume-…et c.
Backward, Forward, Stop, Refresh, Search, My Favorite, Web
Browser, E-mail...etc.
Open My Computer, Sleep, Power Off...etc.
This 16-in-1 mouse utility offers 16 directions to draw the lines with
the mouse and the preset commands will be executed immediately.
Note that this gesture function is only available for mouse button
and . See more details on the Gesture 16-in-1 section.
The LaserPointer is only available by models, if your model does not
have LaserPointer, please use TutorPen instead. (Note that the
LaserPointer switch will still in working even when the computer is
power off, remember to switch off the mouse power on your long
journey)
- 12 -
Page 14

TutorPen This TutorPen function is available for mouse button 2,3,4,5, and 6.
Usage:
Press "Mode Shift " button to switch to Mode 2, then press and hold
the mouse 6th button to draw lines. You can double-click on the
same button to erase lines you just drew, triple-click on the same
button will erase all lines on the screen. You can set line width and
color by left-clicking the mouse on "
the system tray and select "TutorPen Settings" as shown.
Red color will be used as default if you are using the TutorPen
alone, and Red, Blue, Green, Orange and Purple colors will be used
in the order for multiple users.
Unlike laser pointer’s light point, which is difficult to trace, the
TutorPen offers a handy tool to remark key points and catches more
attention. And with individual line color and width, it makes
identification within the attendees can never be so clear.
Select Macro
File
There are many useful macro functions you may choose from,
including commands for PowerPoint(PPT) / Media Center
Edition(MCE) / Gaming(CS) ...etc. They are backward compatible
with X7 Oscar file format, and can be downloaded from the website:
http://www.x7.cn.
" at the right-down corner of
- 13 -
Page 15

⑥
Description
of Reminder
DPI Setting
.
Click the Description of Reminder area on the main menu, a reminder screen will
appear as shown on the right. Enter the reminder description, which will be
displayed on the right-down corner of your screen as the key setting reminder.
Customizable and independent 2,000 DPI resolution for each X and Y axes.
G10 MeetingMan offers customizable and independent resolution for each X and Y
axes that best suits various LCD resolutions, in particular, it is crucial for some game
plays.
- 14 -
Page 16

Report Rate Mouse Report Rate is the term that how many times the mouse sends data to the
computer in one second. For instance, "Report Rate 500Hz" means "the mouse
sends 500 times of data to the computer in one second". The G10 MeetingMan
offers 3 report rates, e.g., 125Hz, 250Hz and 500Hz respectively. The higher times
stands for the smoother the cursor movement and precise click response, especially
suitable for game play, which requires high speed and quick response. (For a
conventional mouse, the report rate is 125Hz). For the 5 working modes that
MeetingMan offers, the report rates are preset according to various applications, as
shown below:
Mode No. Report Rate Power
Consumption
Mode 1: Office 125 Hz Low Presentation
Mode 2: TutorPen
Meeting
Mode 3: Open File 125 Hz Low Meeting/Teachin
Mode 4: LaserPointer
Meeting
Mode 5: Gaming 250 Hz High Game Plays
G10 MeetingMan is A4Tech’s latest innovation. According to various applications,
the bandwidth is divided into 3 report rate levels:
1X bandwidth: USB report rate is 125Hz, suitable for office and general users,
power consumption is the lowest.
2X bandwidth: USB report rate is 250Hz, suitable for CAD users, power
consumption is normal.
4X bandwidth: USB report rate is 500Hz, suitable for heavy-duty game players,
power consumption is high.
Apply There is 48K on-board memory in the receiver of G10 MeetingMan; click “Apply” will
download the new settings to receiver before it is taking effect.
125 Hz Low Meeting/Teachin
125 Hz Low Presentation
Applications
g
g
- 15 -
Page 17

(3) Gesture 16-in-1
On the button definition area of Main menu, click “ ” of button or , you will see the
“Gesture 16-in-1” on the function listing as shown on the right.
Select “Gesture 16-in-1 Setting” from the listing; the setup screen will pop up as shown on the
right.
The “Gesture 16-in-1” offers customizable 16 functions in 1 click with gesture button. You may
setup 16 most-frequently-used commands to the Gesture buttons or from 6 categories,
more than 30 commands, including Keyboard, Mouse, Hyperlink, Office, Text, Multimedia,
Internet and Key Setting Reminder. Using the mouse to draw the lines as any of 16 preset
directions, the corresponding command will be executed immediately. It adds powerful and
handy tools in Windows operation, and increases your working efficiency dramatically.
- 16 -
Page 18

Usage:
Press and hold the gesture button to draw any of 16 lines and directions as shown on the right,
then release the button. The corresponding commands will be executed immediately, including
Keyboard, Mouse, Hyperlink, Office, Text, Multimedia, Internet and Key Setting Reminder,
which can be preset and store to your receiver memory.
Example 1:
Diagrams of 16 mouse
gestures
Using
as “Zoom In” command by default, when you are viewing a picture with ACDSee, or browsing a PPT file in the
Office, or Reading a PDF file…etc, just pressing the “Gesture Button” and draw the line as shown below, then release the
button, the picture or the document will be zoomed in immediately.
a. Start: Press the "Gesture Button"
b. Track of the drawing line: Draw the line as the
arrow direction.
c. End: Release the "Gesture Button"
d. Then the picture has been zoomed in.
Example 2:
See the contrast in EXCEL after drawing the line.
Now let's take "
1. Select "
2. Click "
3. Click “
" as example to show you how to use these functions:
" icon to represent "Zoom In" as shown:
" to close the setup screen.
” to save to receiver’s memory.
4. Draw the line in Excel.
- 17 -
Page 19

Original After drawing the line, the column has been enlarged
4. Draw the line in Windows Picture and Fax Viewer.
Original After drawing the line, the column has been enlarged
- 18 -
Page 20

(4) Task Listing of G10 MeetingMan
There are 2 ways will display the working mode number when it is shifted:
Display 1: When the mode is shifted, the memo screen will be displayed on the screen center to
remind current mode number information as shown on the right.
Display 2: Meanwhile, the small MeetingMan icon on the system tray will shift with mode
numbers
Meeting” as shown on the right.
. For example, implies current working mode is in “Mode 2, TutorPen
Left or Right click on the icon " " at the right-down corner of your system tray, you will see “G10
MeetingMan Task Listing” pops up as shown on the right.
Following will brief each task and its functionality.
1. Auto Launch on Boot:
If this task is selected, the G10 MeetingMan will be auto-executed when the system boots up.
- 19 -
Page 21

2. Mouse-Control Panel:
Select “Mouse-Control Panel” will open “Mouse Properties” setup screen of your Windows
system, e.g., you may setup mouse pointers and other often -used mouse settings.
3. 4-way Wheel:
A. The 4-way Wheel is the latest scrolling technology. It splits working screen into 2 areas, A and
B as shown on the right. Depending on cursor position, the wheel will perform vertical or
horizontal scrolling. For instance, when the cursor locates within A area, the wheel will perform
vertical scrolling, and when the cursor locates within B area, the wheel will perform horizontal
scrolling. It saves tremendous works instead of pulling the scrollbars, especially when working
with Excel spreadsheet.
B. In practice, you may click and move the Red split icon to change the ratio of A and B areas.
You may perform Vertical and Horizontal scrolling by just moving the cursor in and out of A or B
areas, which saves a lot of efforts than pulling Windows’ scrollbars!
Note: If the option of "Normal Wheel" is selected, the wheel will perform as a normal mouse
wheel, and “4-way Wheel” function won't be launched.
4. Function/Key Reminder:
You may setup “Function/Key Reminder” as shown on the right. The small “Radar” is the icon you
may click and move to the position you wish to display the reminder screen.
- 20 -
Page 22

5. Power Management:
Click the icon" "at the right-down corner of your system tray and select "Power Management" to
define wake-up modes and sleeping time. According to the stand-by status, the intelligent
power-saving management supports "Slight, Little, Middle & Deep" 4 working modes. User may
define the time interval to enter into the Deep Sleeping Mode, and 6 seconds enter into Deep
Sleeping Mode after the PC is power off.
Note: Regardless the mouse in Deep Sleeping Mode, the laser pointer will remain in "working".
Always switch off the mouse power when in the long journey to avoid laser pointer’s light being
turned on incidentally.
Note:
Light color mouse pads can save more power than deep color ones. 500Hz full speed in the
gaming mode will consume much more power. Rechargeable batteries are recommended for
intensive mouse users, and always turn-off the mouse power when long time not use.
Move to Wake Up:
This is convenient to awake the mouse, and it consumes 0.35mA current when in stand-by
status.
Click to Wake Up:
This requires a click to awake the mouse, yet it consumes as less as 0.03mA current in stand-by
status.
Check Battery power:
Click "Check Power" in "power-saving management" to check the battery power status.
Low Battery Inform:
When the mouse power is low, Low Battery Inform page will pop up at the right corner of your
screen to remind you to replace the batteries in time.
- 21 -
Page 23

Special Note:
The laser pointer on your mouse requires higher power to function, if supplied voltage under 1.1
volts and the remaining power is less than 25%, it will not work properly. Replace with new
batteries if needed.
6. Wireless Working Range Setting:
You may setup wireless working ranging within 15~20 meters; the farther range needs to
consume more power, and remember to resume to shorter range after the meeting.
In the circumstances that there is wireless conflict nearby or the meeting room is the huge one,
adopting a USB extension cable for the receiver will improve and secure better communication
quality. Refer to next page for more details.
7. TutorPen Setting:
Depending on requirements, TutorPen supports 3 line styles of Bold, Normal and Fine. It remarks
key points in the session of a meeting or teaching, and makes presentation easier to understand.
See more details on below “Setting up 5-color TutorPen” section.
- 22 -
Page 24

8. RF Channel Setting:
Auto Channel Hopping:
This is the G10 MeetingMan default setting. Applicable to single-alone user, or when there is no
wireless interference nearby.
Channel-lock:
If more than one set of wireless Mice&KBs are used in the same site, you may
perform ”Channel-lock” to assign exclusive channel for each device so as to avoid “Auto Channel
Hopping” wireless conflicts and get “Zero-lag” better performance.
Detect Receiving Signal Level:
Moving the mouse, the indicator will display current signal level. The less level value means the
better receiving signal, value under 120 means the devices are working in good condition. The
value may increase when working in a long range venue, or there is strong interference. Try
different allocation of mouse and receiver till the best improvement is secured.
- 23 -
Page 25

9. Wireless Signal Monitoring:
Search and Keep away from Wireless Conflicts:
If wireless mouse is not working smoothly due to wireless conflicts, use wireless signal monitoring to
monitor and improve the signal level and get best improvements.
Detect Receiving Signal Level:
Moving the mouse, the indicator will display current signal level. The less level value means the better
receiving signal, e.g., value under 120 means the devices are working in good condition. The value may
increase when working in a long range venue, or there is strong interference. Try different allocation of
mouse and receiver till the best improvement is secured.
Suggest Improvements:
1. Use a USB extension cable for the receiver and keep it away from the computer or any interfering
sources. It is highly recommended to use it for the long range meeting venue or when there is strong
wireless conflict nearby.
2. Plug receiver on the same side with the mouse, it may avoid potential wireless conflicts from the
notebook computer.
10. 10-Link Meeting Technology:
Select “10-Link Meeting Technology” from the task listing will bring up the setup screen as shown
on the right.
Effective Meeting:
10-Link Receiver is designed with memory, The “New Mice/KBs ID Pairing” program allows to link
up to 5 sets of Mice&KBs to operate on the same computer with defined name. The “10-Link
Meeting Management” program provides the best sharing of meeting to consolidate all member
intelligences.
- 24 -
Page 26

Portability:
The 10-Link Receiver is capable of linking 5 sets of Mice&KBs, you may leave 10-Link receiver
installed on your notebook and use any paired A4Tech G10 products at home or in the office with
the same receiver.
Note:
The 10-Link receiver is made in Blue color for better identification. The Black color receiver is a
conventional receiver and will not support all the advanced features of 10-Link receiver. One
computer only requires one 10-Link receiver, if more than one 10-Link receiver is used, a
reminder screen will remind you to remove extra ones)
New Mice/KBs ID Pairing:
Click “New Mice/KBs ID Pairing” will start to add new mice and keyboards. The 10-Link,
Blue-shelled receiver may works with up to 5 sets of mice and keyboards simultaneously. With
each attendant a mouse in hand, it increases meeting efficiency and assures fruitful meeting
results. See more details on below “New IDs for Mice/KBs” and “How to Add a New Device Using
New Mice/KBs ID Pairing” sections.
- 25 -
Page 27

10-Link Meeting Management:
In this section, you will be able to manage the 10-Link Meeting for each linked mouse and
keyboard. Click “10-Link Meeting Management” will bring the management screen as shown on
the right.
Management of Linked Mice and Keyboards:
From the screen, you may see the listing of linked mice and keyboards with their IDs and
Names. You may tick or tick off the box to “Enable” or “Disable” the devices, or “Delete” them
forever.
Display Options:
There are 3 display options you can choose how you would like to display the names. They are
“Display with names”, “Display with color labels” and “None” to display.
- 26 -
Page 28

1. New IDs for Mice/KBs:
After the pairing process is completed, you may give a new ID for the mouse or keyboard, which
will be displayed on the screen right under the cursor position for easier identification. Or,
“Unnamed” will be used if you leave it blank. You may choose to display “Names” or “Color
Labels” as the display options.
In order to manage all the mice/KBs in good manners during the meeting, “Priority” will be used
for the most-recently-used mouse. Others have to wait until the mouse priority is released and
“Next Please” or a light-blue square label appears, before they can continue the session.
After the meeting is finished, un-tick to disable the mouse and keyboard that will not use, and you
can tick to enable and add them without the need to perform “New Mice/KBs ID Pairing” again. If
the mouse or keyboard is no longer needed, you may “Delete” them forever.
Note:
If the “Priority” is released, but there is no “Next Please”, none the green square label appears,
there maybe one of the mice is sending out the signal to the receiver due to the desktop is not
smooth, move it to a smooth place will get improvements.
It is recommended to use one mouse for mode and setting management in the meeting, and
explain details to other members will ensure fruitful meeting results.
- 27 -
Page 29

2. Setting up 5-color TutorPen:
Press "Mode Shift” button to switch to Mode 2, then press and hold the mouse 6th button to draw
lines. You can double-click on the same button to erase lines you just drew, triple-click on the
same button will erase all lines on the screen. You can set line width and color by left-clicking the
mouse on "
Red color will be used as default if you are using the TutorPen alone, and Red, Blue, Green,
Orange and Purple colors will be used in the order for multiple users.
Unlike the laser pointer’s light point is difficult to trace, the TutorPen offers 5 different line colors
for each member to draw lines on the screen, it is easier to differentiate from each other and
increases meeting efficiency dramatically. (Users may setup the line widths and colors according
to their preference)
Special Note:
Each mouse and keyboard of G10 MeetingMan will have an exclusive ID code by default in the
factory. Such ID code is derived randomly from 262,144 combinations. However, in case the ID
codes duplicates, please send back the products for maintenance.
" at the right-down corner of the system tray and select "TutorPen Settings".
- 28 -
Page 30

How to Add a New Device Using “New Mice/KBs ID Pairing”
Step 1.
1. Select “10-Link Meeting Technology” from the G10 MeetingMan Task Listing, the main screen
of “10-Link Meeting Management” will pop up as shown on the right. (For better operation, you
may need another mouse to perform ID pairing before the wireless mouse is applicable).
2. Click
button to start adding the new mouse or keyboard.
Step 2.
Follow on-screen instructions to perform “ID Pairing” as shown on the right, click “Next” to
continue.
Step 3.
1. Press any key to wake up the mouse before “ID pairing” is performed.
2. Locate the power switch (Normally you can find it on the mouse bottom side).
3. Make sure the power switch is in OFF position and then switch it to ON position within 30
seconds. (If power switch is in ON position, switch it to OFF and back to ON position within 30
seconds).
4. After above procedure is completed, the mouse will start to perform pairing procedure with the
receiver; wait for seconds, the next screen will pop up as shown after ID pairing is completed.
Step 1
Step 2
Step 3
- 29 -
Page 31

Step 4.
After ID pairing is completed, move the mouse and reply YES if mouse moves fine, then click NEXT. In
case the ID pairing fails, click “BACK” to repeat steps 2,3 and perform the ID pairing procedure again.
Step 5.
After above ID pairing is completed, you may give a new name to the mouse according to your
preference or just leave it blank to finish the ID pairing.
1.Click “OK” to complete the ID pairing.
2.If you need to perform another ID pairing for the new devices, click “New Mice/KBs ID Pairing”
again and repeat above steps 2, 3, 4 to perform another ID pairing.
After you have finished adding all the new mice and keyboards, click “10-Link Meeting
Management” to manage the multiple mice and keyboards.
Step 4
Step 5
11. Open G10 MeetingMan:
Select “Open G10 MeetingMan” will open the main menu of G10 MeetingMan.
- 30 -
Page 32

12. Exit:
Exit G10 MeetingMan software.
(5) Innovative GlassRun Technology (Low Power Consumption, High Performance Optical Engine)
The “GlassRun” is the new technology that it collects all the diffusion light and improves
image quality. It saves 30% power consumption than a conventional mouse and works even
on slightly dusty glass.
Note:
In case the cursor movement is not smooth when working on the extremely clean glass, put
on some handprints will get immediate improvements.
(6) AirPad
The illustration on the right shows the correct way to use this innovative AirPad.
This unique mouse pad is made in consideration that you can use the mouse precisely as on
the desktop while walking around in the meeting or teaching. You can hold and fix the mouse
pad ergonomically with your left hand while using your right hand to maneuver the mouse
freely. It resolves the needs for a precision pointing device for the meeting and teaching.
Notice
- 31 -
Page 33

To ensure that your mouse sends and receives perfectly, please read below instructions for your reference:
1. Avoid Channel Confliction from Auto Channel Hopping
1). Left-click on the icon "
your system tray and select "RF Channel Setting".
" at the right-down corner of
2). Select "Channel-lock" to define a private channel to
secure better wireless communication quality.
2. Avoid Interference from iron panel of PC.
Please plug the 10-Link receiver into to avoid wireless signal shielding instead of placing at 、 or .
USB Ports
3. Use USB extension cable to position the 10-Link receiver at a far location to prevent electromagnetism interference from
devices
- 32 -
Page 34

4. Avoid using the wireless mouse on a metal surface. Metals such as iron, aluminum, or copper shield the radio frequency
transmission and slow down the mouse’s response time or cause the mouse to fail temporarily.
5. The radio frequency is 2.4GHz, it is safe for our bodies, but please be cautious in using cardiac pacemaker or other body
auxiliary instruments.
Troubleshooting
If the mouse is not working:
1. Make sure the mouse power is on.
2. Check battery and battery installation.
3. Check receiver installation.
4. Try another USB port.
Product Support
Need help with technical support? Please go to: http://www.a4tech.com/ennew/support.asp and our support team will
respond within 72 hours.
**All pictures and description mentioned above is for reference only and is subject to change without notice.
- 33 -
 Loading...