

Page 1
User Manual
53633
AIR BRUSH
KIT
www.909.com
Read all safety warnings and all instructions
thoroughly before operating this product.
909 53633 Air Brush IM ED1.indd 1 22/02/2017 2:18 PM
Page 2

909 53633 Air Brush IM ED1.indd 2 22/02/2017 2:18 PM
Page 3

Contents
Pack contents / parts 2
Description of symbols 3
General safety warnings 4
Safety Instructions for Air Brush Compressors 7
Safety Instructions for Air Brush Guns 8
Using an Extension Hose 9
Parts List 10
Getting Started – Air Compressor 12
Setting the Outlet Pressure 13
Preparing the Air Brush Gun for use 14
Preparation - Mixing and Thinning paint 14
Recommended Types of Paints to Use 14
Preparing the Air brush gun 15
Operating the Air Brush Gun 16
Paint Flow Adjustment Screw 17
Tips for Operation 18
Cleaning the Air brush gun 19
Cleaning / Replacing the Air Intake Filter 20
Draining the Water Trap 22
Cleaning the Compressor 23
Maintenance 23
Storage 24
Environmental protection 24
Service Support 25
Accessories 25
Troubleshooting 26
Specications 27
909 53633 Air Brush IM ED1.indd 3 22/02/2017 2:18 PM
Page 4

Pack contents / parts
Description of symbols
The rating plate on your compressor may show symbols. These represent
important information about the product or instructions on its use.
Conforms to relevant standards for electrical safety
and electromagnetic compatibility.
Wear breathing protection.
Wear eye protection.
Read the instruction manual.
Hearing protection must be worn.
Risk of high temperature.
Do not open cock before air hose is attached.
Caution, risk of electrical shock.
Electrical waste products should not be
disposed of with household waste
Congratulations on the purchase of your 909 Air Brush Kit.
When you open your packaging, rst remove all items and check there
are no parts damaged or missing. If you nd anything wrong, do not
operate the product until the parts have been replaced or the fault has
been rectied. Failure to do so could result in serious personal injury.
Intended use of the Air Brush Kit
NOTE: This product is for private domestic DIY use only.
It is not suitable for commercial, industrial or trade use.
This Air Brush Kit is ideal for intricate painting and craft tasks including
modelling, gurines, murals, automotive touch ups, cake decorating,
nail art and various hobby arts.
Contents of carton
1 x 150W Air Compressor
1 x Air Brush Gun
1 x 1.8m Braided Air Hose
1 x 5cc Metal cup
1 x Spanner
1 x Instruction manual
1 x 20cc Glass jar
2
909 53633 Air Brush IM ED1.indd 4 22/02/2017 2:18 PM
Page 5

Description of symbols
The rating plate on your compressor may show symbols. These represent
important information about the product or instructions on its use.
Conforms to relevant standards for electrical safety
and electromagnetic compatibility.
Wear breathing protection.
Wear eye protection.
Read the instruction manual.
Hearing protection must be worn.
Risk of high temperature.
Do not open cock before air hose is attached.
Caution, risk of electrical shock.
Electrical waste products should not be
disposed of with household waste
3
909 53633 Air Brush IM ED1.indd 5 22/02/2017 2:18 PM
Page 6

General safety warnings
d. Do not abuse the cord. Never use the cord for carrying, pulling or
unplugging the power tool. Keep cord away from heat, oil, sharp edges or
moving parts. Replace damaged cords immediately.
Damaged or entangled cords increase the risk of electric shock.
e. When operating a power tool outdoors, use an extension cord suitable
for outdoor use. Use of a cord suitable for outdoor reduces the risk
of electric shock.
f. To reduce the risk of electric shock, the manufacturer recommends the
use of a residual current of 30mA or less at all times.
3. Personal safety
a. Stay alert, watch what you are doing and use common sense when
operating a power tool. Do not use a power tool while you are tired or
under the inuence of drugs, alcohol or medication. A moment of
inattention while operating power tools may result in serious
personal injury.
b. Use personal protective equipment. Always wear eye protection.
Protective equipment such as dust mask, non-skid safety shoes, hard hat,
or hearing protection will reduce personal injures.
c. Prevent unintentional starting. Ensure the switch is in the “o”
position before connecting to power source and/or battery pack,
picking up or carrying the tool. Carrying power tools with your nger on the
switch or energising power tools that have the switch on
invites accidents.
d. Remove any adjusting key or wrench before turning the power tool
on. A wrench or key left attached to a rotating part of the power tool may
result in personal injury.
e. Do not overreach. Keep proper footing and balance at all times.
This enables better control of the power tool in unexpected situations.
f. Dress properly. Do not wear loose clothing or jewellery. Keep your hair,
clothing and gloves away from moving parts. Loose clothes, jewellery or
long hair can be caught in moving parts.
g. If devices are provided for the connection of dust extraction and
collection facilities, ensure these are connected and properly used.
Use of dust collection can reduce dust-related hazards.
WARNING! Read all safety warnings and all instructions.
Failure to follow the warnings and instructions may result
in electric shock, re and/or serious injury.
The word power tool used in the following warnings and
throughout this manual refers to both electrical power tools
and also petrol driven power tools.
This unit may not be used by people (including children) with reduced
physical, sensory or mental capacities, with a lack of experience and without
the appropriate knowledge, unless they are supervised by someone who is
responsible for their safety or have been instructed by such a person with
regard to how the unit is to be operated. Children should be supervised to
ensure that they do not play with the device.
Save all warnings and instructions for future reference
1. Work area safety
a. Keep work area clean and well lit. Cluttered or dark areas invite
accidents. Rags, cloths, cord, string and similar items should never be left
around the work area.
b. Do not operate power tools in explosive environments, such as in the
presence of ammable liquids, gases, or dust. Power tools
create sparks, which may ignite the dust or fumes.
c. Keep children and bystanders away while operating a power tool.
Distractions can cause the operator to lose control.
2. Electrical safety
a. Power tool plugs must match the outlet. Never modify the plug in any
way. Do not use any adapter plugs with grounded power tools.
Unmodied plugs and matching outlets will reduce risk of electric shock.
b. Avoid body contact with grounded surfaces such as pipes, radiators,
ranges and refrigerators. There is increased risk of electric shock if your
body is grounded.
c. Do not expose power tools to rain or wet conditions. Water entering
a power tool will increase the risk of electric shock.
4
909 53633 Air Brush IM ED1.indd 6 22/02/2017 2:18 PM
Page 7

d. Do not abuse the cord. Never use the cord for carrying, pulling or
unplugging the power tool. Keep cord away from heat, oil, sharp edges or
moving parts. Replace damaged cords immediately.
Damaged or entangled cords increase the risk of electric shock.
e. When operating a power tool outdoors, use an extension cord suitable
for outdoor use. Use of a cord suitable for outdoor reduces the risk
of electric shock.
f. To reduce the risk of electric shock, the manufacturer recommends the
use of a residual current of 30mA or less at all times.
3. Personal safety
a. Stay alert, watch what you are doing and use common sense when
operating a power tool. Do not use a power tool while you are tired or
under the inuence of drugs, alcohol or medication. A moment of
inattention while operating power tools may result in serious
personal injury.
b. Use personal protective equipment. Always wear eye protection.
Protective equipment such as dust mask, non-skid safety shoes, hard hat,
or hearing protection will reduce personal injures.
c. Prevent unintentional starting. Ensure the switch is in the “o”
position before connecting to power source and/or battery pack,
picking up or carrying the tool. Carrying power tools with your nger on the
switch or energising power tools that have the switch on
invites accidents.
d. Remove any adjusting key or wrench before turning the power tool
on. A wrench or key left attached to a rotating part of the power tool may
result in personal injury.
e. Do not overreach. Keep proper footing and balance at all times.
This enables better control of the power tool in unexpected situations.
f. Dress properly. Do not wear loose clothing or jewellery. Keep your hair,
clothing and gloves away from moving parts. Loose clothes, jewellery or
long hair can be caught in moving parts.
g. If devices are provided for the connection of dust extraction and
collection facilities, ensure these are connected and properly used.
Use of dust collection can reduce dust-related hazards.
5
909 53633 Air Brush IM ED1.indd 7 22/02/2017 2:18 PM
Page 8

General safety warnings
i) Children should be supervised to ensure that they do not play with
the appliance.
5. Service
a. Have your power tool serviced by a qualied repair person using only
identical replacement parts. This will ensure that the safety of the
power tool is maintained.
Safety Instructions for Air Brush Compressors
This appliance is not intended for use by young or inrm persons unless
supervised by a responsible person to ensure that they can use the
appliance safely. Young children should be supervision to ensure that
they do not play with play with the appliance.
This compressor is rated at 150W S3 20%.
WARNING: Please ensure that you read, understand and apply all
the SAFETY WARNINGS in this user guide.
WARNING: Wear protective breathing equipment Paint mist and
solvent vapors are damaging to health. Always wear protective
breathing equipment and only work in well ventilated rooms or
using supplementary ventilating equipment. It is advisable to wear
protective clothing, a safety mask, safety glasses, ear protection
and gloves.
If the supply cord is damaged, it must be replaced by the
manufacturer, its service agent or similarly qualied persons
in order to avoid a hazard.
4. Power tool use and care
a. Do not force the power tools. Use the correct power tool for your
application. The correct power tool will do the job better and safer at
the rate for which it was designed.
b. Do not use the power tool if the switch does not turn it “on” and
“o”. Any power tool that cannot be controlled with the switch is
dangerous and must be repaired.
c. Disconnect the plug from the power source and/or the battery
pack from the power tool before making any adjustments,
changing accessories, or storing power tools. Such preventive
safety measures reduce the risk of starting the power tool accidentally.
d. Store idle power tools out of the reach of children and do not
allow persons unfamiliar with the power tool or these instructions
to operate the power tool. Power tools are dangerous in the hands
of untrained users.
e. Maintain power tools with care. Check for misalignment or binding
of moving parts, breakage of parts and any other condition that may
aect the power tool’s operation. If damaged, have the power tool
repaired before use. Many accidents are caused by poorly maintained
power tools.
f. Keep cutting tools sharp and clean. Properly maintained cutting
tools with sharp cutting edges are less likely to bind and are easier
to control.
g. Use the power tool, accessories and tool bits etc. in accordance
with these instructions, taking into account the working
conditions and the work to be performed. Use of the power tool for
operations dierent from those intended could result in a hazardous
situation.
h. This appliance is not intended for use by persons (including
children) with reduced physical, sensory or mental capabilities,
or lack of experience and knowledge, unless they have been given
supervision or instruction concerning use of the appliance by a person
responsible for their safety.
6
909 53633 Air Brush IM ED1.indd 8 22/02/2017 2:18 PM
Page 9

i) Children should be supervised to ensure that they do not play with
the appliance.
5. Service
a. Have your power tool serviced by a qualied repair person using only
identical replacement parts. This will ensure that the safety of the
power tool is maintained.
Safety Instructions for Air Brush Compressors
This appliance is not intended for use by young or inrm persons unless
supervised by a responsible person to ensure that they can use the
appliance safely. Young children should be supervision to ensure that
they do not play with play with the appliance.
This compressor is rated at 150W S3 20%.
WARNING: Please ensure that you read, understand and apply all
the SAFETY WARNINGS in this user guide.
WARNING: Wear protective breathing equipment Paint mist and
solvent vapors are damaging to health. Always wear protective
breathing equipment and only work in well ventilated rooms or
using supplementary ventilating equipment. It is advisable to wear
protective clothing, a safety mask, safety glasses, ear protection
and gloves.
If the supply cord is damaged, it must be replaced by the
manufacturer, its service agent or similarly qualied persons
in order to avoid a hazard.
7
909 53633 Air Brush IM ED1.indd 9 22/02/2017 2:18 PM
Page 10

Caution: Danger of injury!
• Never point the spray stream towards human beings or animals.
• Do not make any alterations to this Compressor. Only use the adaptors
supplied with this product.
• Use this product only in accordance with operation instructions included
in this manual.
• DO NOT cover the compressor while it is in use and always keep it
well-ventilated.
• DO NOT exceed the maximum indicated pressure of any accessory or
attachment.
• DO NOT leave a running compressor unattended. Do not leave a
compressor plugged into the power supply unattended. ALWAYS,
turn o the mains supply switch and remove the plug before leaving
the compressor. Keep out of reach of children.
• DO NOT use any cords or hoses to move the compressor.
• DO NOT use the compressor if it is damaged or faulty, DO NOT operate it
until it has been repaired by a qualifed technician.
• If the compressor overloads or overheats, turn the power OFF and wait
until it cools before resuming any work.
• Keep ammable sprays and liquids away from the compressor. Do not
allow the Compressor to become wet.
• Keep the compressor clean and dry and free from moisture.
• If the Compressor is making abnormal sounds or its temperature if
quite high, turn o the power straight away and let it cool for at least 10
minutes before trying again. Improper use may result in damage of the
Compressor.
• Do not bend or pinch the air hose while the Compressor is in use.
Safety Instructions for Air Brush Guns
WARNING!
This appliance is not intended for use by persons
(including children)
with reduced physical, sensory or mental capabilities, or lack of experience
and knowledge, unless they have been given supervision or instruction
concerning use of the appliance by a person responsible for their safety.
8
909 53633 Air Brush IM ED1.indd 10 22/02/2017 2:18 PM
Page 11

Using an Extension Hose
Always use an approved extension hose suitable for the air input of this
tool. Before use, inspect the hose for signs of damage, wear and ageing.
Replace the extension hose if damaged or defective.
When using a hose on a reel, always unwind the lead completely.
NEVER under any circumstances aim the nozzle at another person
or animal.
• In the event of an injury occurring, seek medical advice immediately.
• The airbrush must not be used for spraying ammable paints and solvents
with a ash point of less than 21ºC.
• Always ensure there is adequate ventilation when spraying.
• Eye protection is recommended to keep hazardous vapours and liquids
out of eyes.
• Always wear a face mask when spraying.
• Always read the paint manufacturers thinning instructions before using.
• Always keep the spray nozzle in place during use. Never allow the spray to
come in direct contact with the skin.
• Never immerse the airbrush in liquid.
• The airbrush must not be cleaned by using ammable liquids with a ash
point of less than 21ºC.
NEVER spray near a naked ame, including an appliance pilot light.
NEVER smoke whilst spraying.
NEVER allow children to operate or play with the airbrush.
• Before cleaning, always disconnect the appliance from the air supply.
• Always disconnect from air supply when relling the paint pot.
• After every use ensure you clean your airbrush thoroughly.
NEVER use the airbrush outside when it is raining.
9
909 53633 Air Brush IM ED1.indd 11 22/02/2017 2:18 PM
Page 12
Air Brush Kit
AFTER SALES SUPPORT
e-mail: [email protected]
1800 909 909
MODEL: №. TG212 • 53633
(toll free)
AFTER SALES SUPPORT
(toll free)
Air Brush Kit
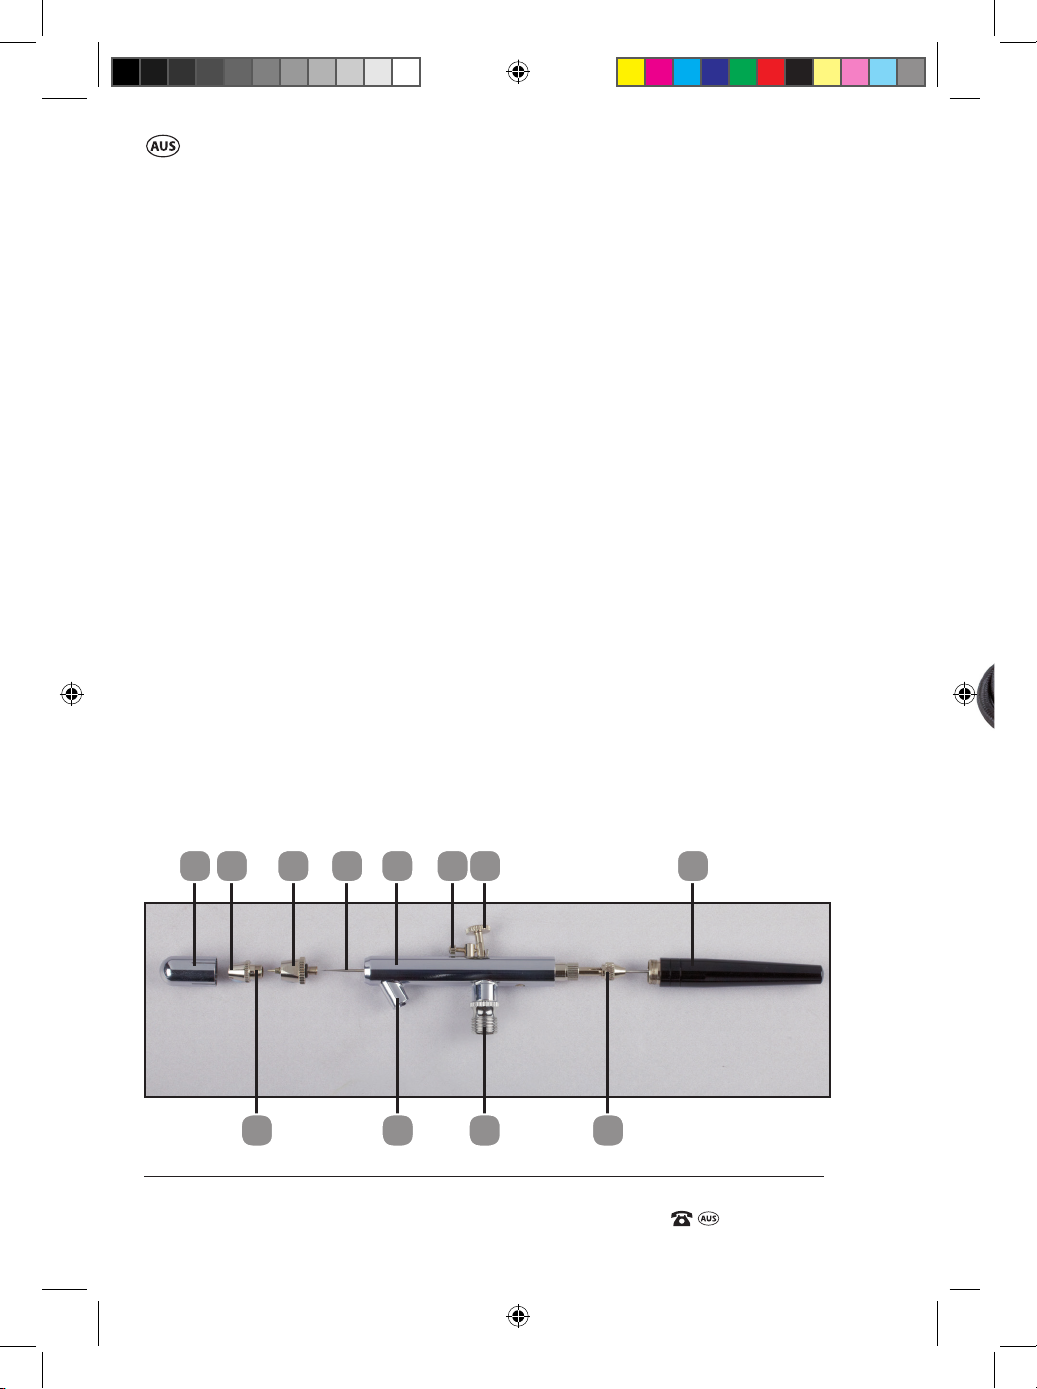
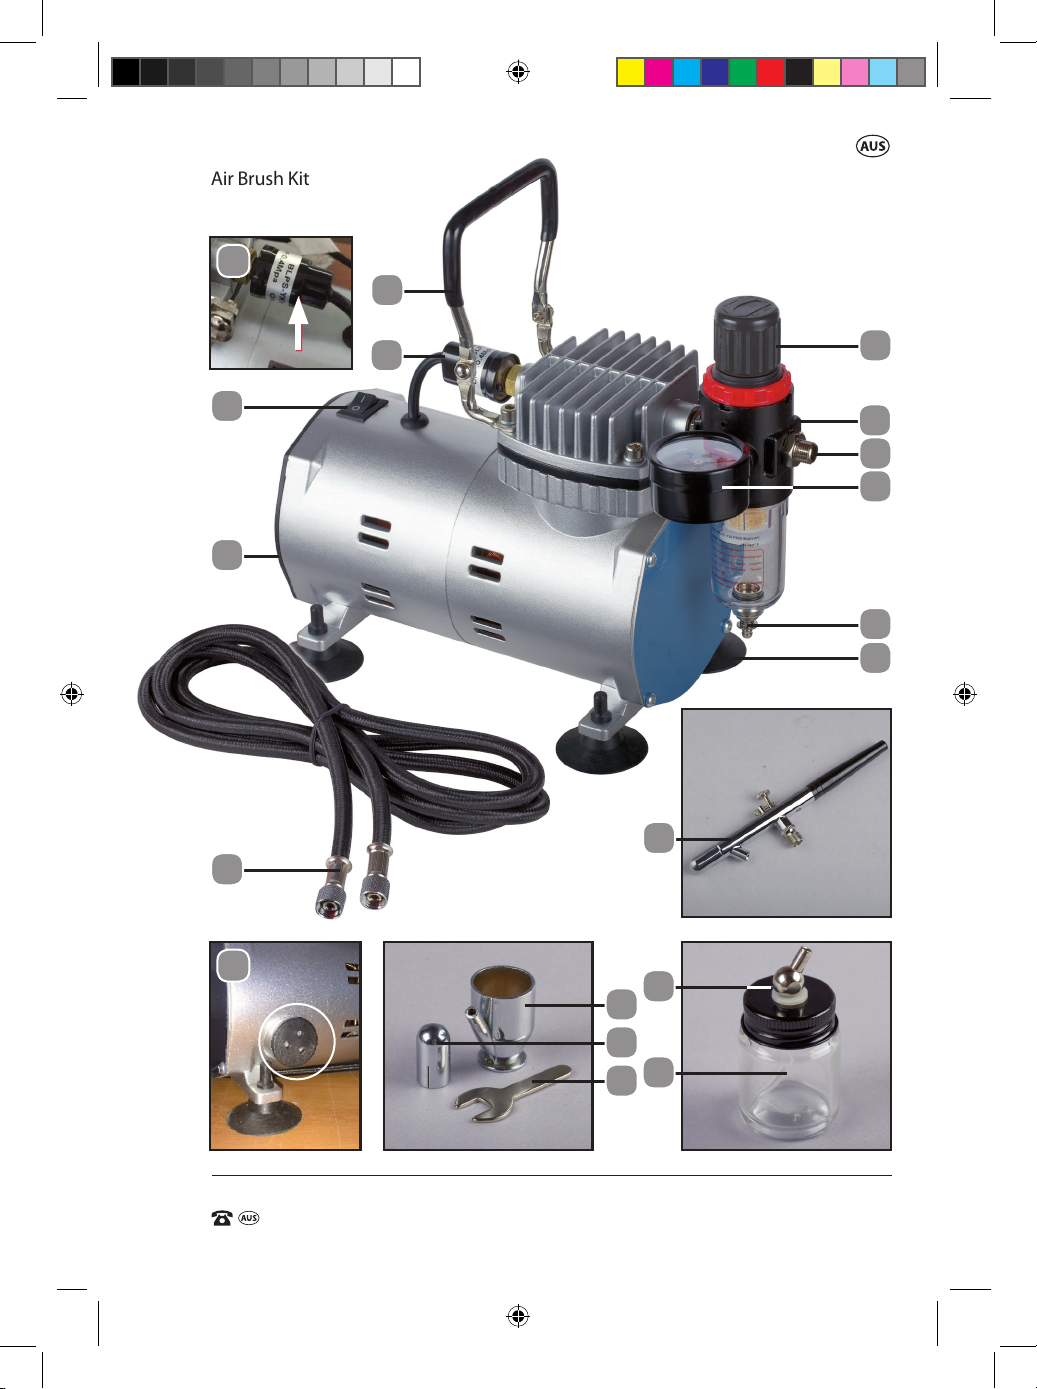
Parts List
1. On/O switch
2. Power cord (not visible)
3. 4 x feet
4. Carry handle
5. Air pressure adjustment knob
6. Pressure gauge
7. 1/8” BSP braided air hose
female air outlet tting/
connection (hose to
compressor)
8. Air inlet lter
9. Drain / release valve
10. 1.8m Braided air hose
11. Spanner
12. 20cc Glass paint jar
13. 20cc Glass jar vent hole
14. 5cc Metal paint cup
15. Air Brush Gun
16 . Protective cap
17. Paint outlet
18. Air cap
19. Air cap body & nozzle
20. Needle
21. Paint inlet connection
22. Paint ow adjustment screw
23. Trigger
24. 1/8” BSP braided air hose
female air inlet tting/
connection
(hose to air brush gun)
25. Needle chuck
26. Needle cover / handle
27. Cylinder body
28. Pressure switch
29. Air outlet regulator
16
17 19 20 27 22 23 26
18 24 2521
10
909 53633 Air Brush IM ED1.indd 10 22/02/2017 2:19 PM
Page 13
AFTER SALES SUPPORT
(toll free)
Air Brush Kit
e-mail: [email protected]1800 909 909
MODEL: №. TG212 • 53633
28
4
1
2
10
28
5
29
7
6
9
3
15
8
13
14
16
12
11
11
909 53633 Air Brush IM ED1.indd 11 22/02/2017 2:19 PM
Page 14

Air Brush Kit
AFTER SALES SUPPORT
e-mail: [email protected]
1800 909 909
MODEL: №. TG212 • 53633
(toll free)
AFTER SALES SUPPORT
(toll free)
Air Brush Kit
Getting Started – Air Compressor
NOTE: Before operating, make sure the Air Compressor is in a well ventilated
area. On a level surface. Well away from ammable objects. Never paint in
an area without proper ventilation or near potential ignition sources.
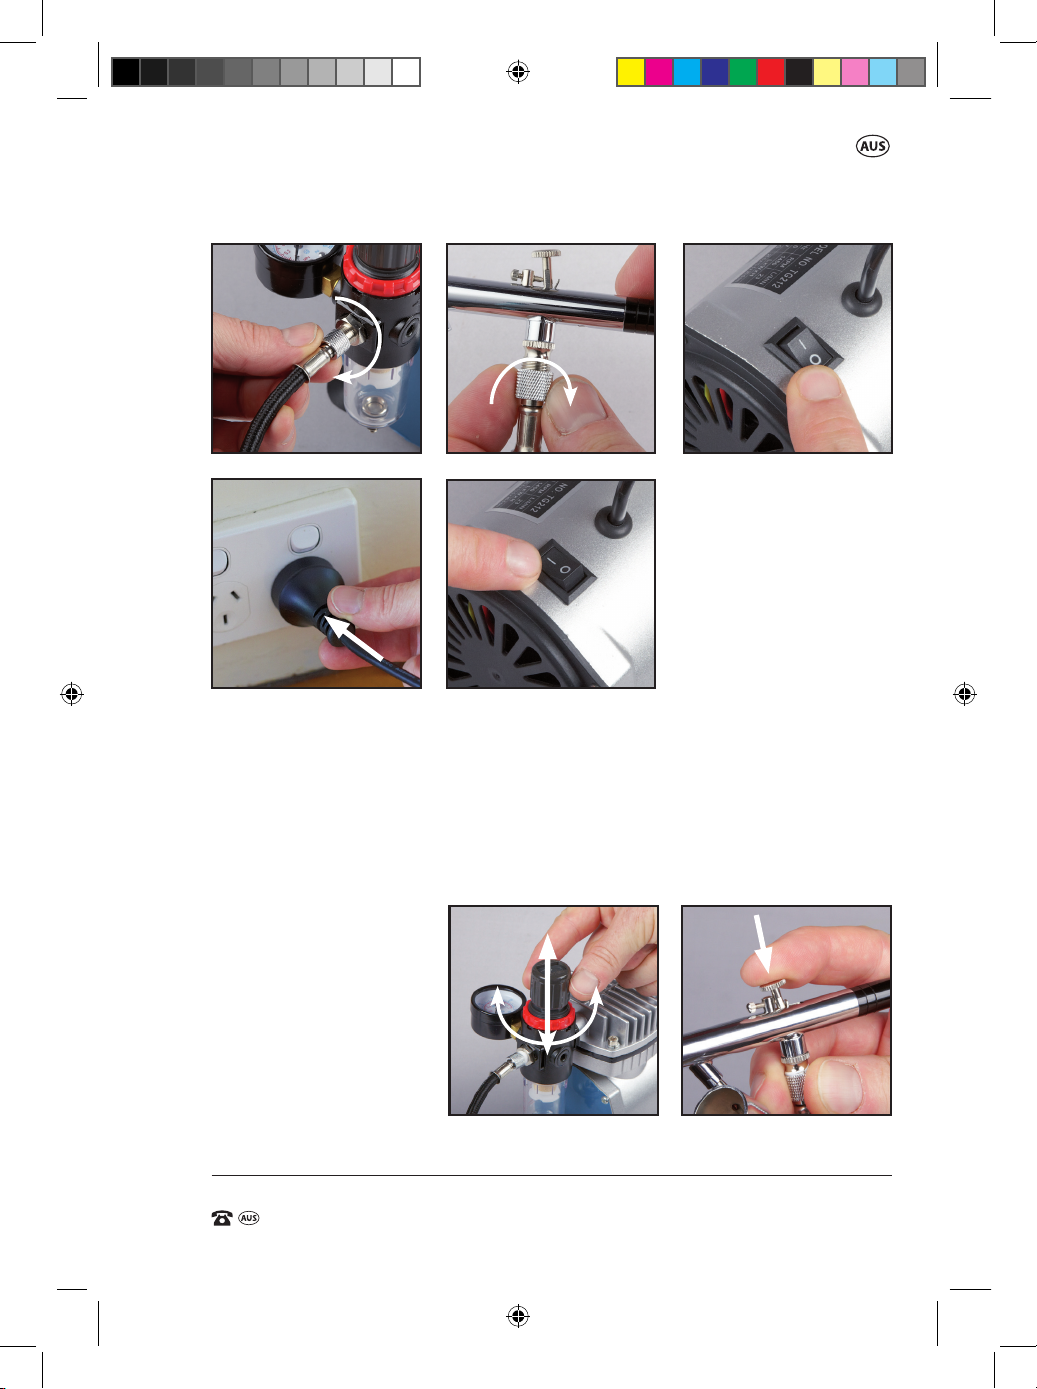
1. The ttings on each end of the braided hose (10) are the same. Connect
one of these ttings to the air outlet tting (7) connection on the
compressor. Align the threads and tighten the tting in a clockwise
direction nger tight till rm (Fig A).
2. Connect the remaining tting on the braided hose (7) to the air brush
inlet tting (24). Align the thread and screw in a clockwise direction nger
tight until rm (Fig B).
3. Make sure the on/o switch (1) is in the OFF, as indicated by an “O”
on the on/o switch (Fig C).
4. Plug the power cord (2) into a mains socket (Fig D).
5. Turn the on/o switch (1) on the compressor to the ON position as
indicated by an “I” on the on/o switch (Fig E)
NOTE: The compressor automatically runs when the pressure at the
pressure switch falls below 43.5 PSI.
When the pressure at the pressure switch reaches 57 PSI the compressor
will stop.
6. The outlet pressure is controlled by the air outlet regulator (29) which can
be adjusted up or down, from zero PSI to Max 57 PSI, depending on the
operators requirement. The pressure gauge is an indication of the outlet
pressure, and should be read with air owing through the air brush to
indicate a true reading (Fig F).
12
909 53633 Air Brush IM ED1.indd 12 22/02/2017 2:19 PM
Page 15
AFTER SALES SUPPORT
(toll free)
Air Brush Kit
e-mail: [email protected]1800 909 909
MODEL: №. TG212 • 53633
C.B.A.
TIGHTEN
TIGHTEN
D.
E.
“I” = ON
“O” = OFF
Setting the Outlet Pressure
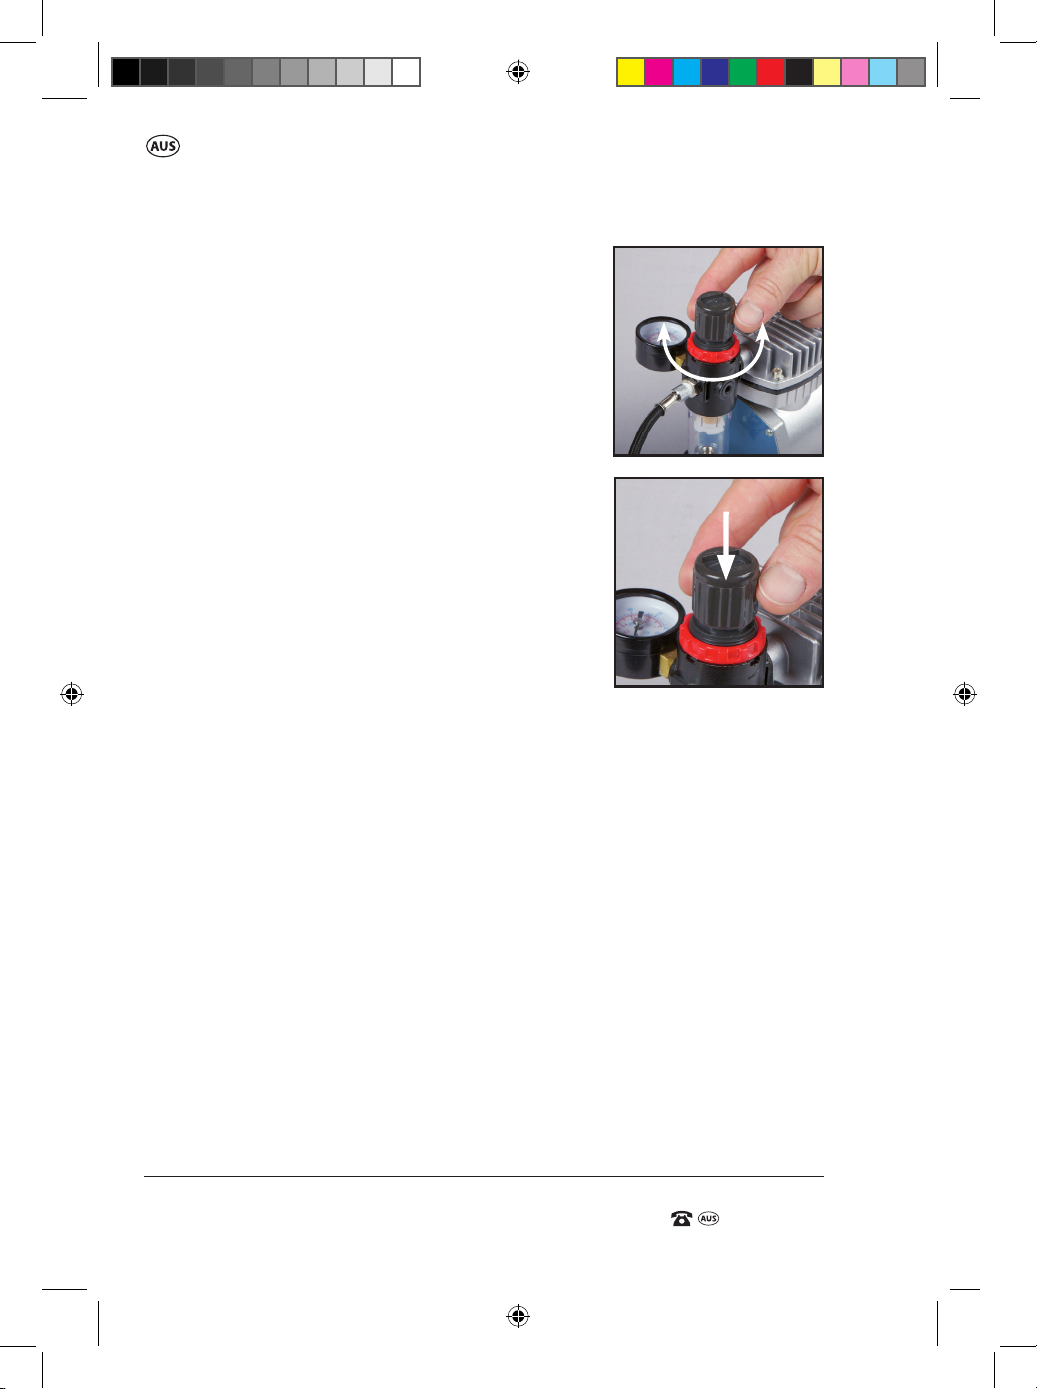
1. After the compressor has been set up with the braided hose (7), air brush
gun (15) and connected to the mains supply, turn on the compressor
by pressing the section marked “I” on the On/o switch (1) (Fig E). The
compressor will start and run for a short period of time. i.e 3-5 seconds.
2. Lift the air pressure adjustment knob (5) on the air outlet regulator (29)
upward (Fig F).
3. Depress the trigger
(23) on the air brush
gun (15), but do
NOT pull backward
to engage the paint
discharge (Fig G).
F.
INCREASE DECREASE
UNLOCK
LOCK
G.
13
909 53633 Air Brush IM ED1.indd 13 22/02/2017 2:19 PM
Page 16
Air Brush Kit
AFTER SALES SUPPORT
e-mail: [email protected]
1800 909 909
MODEL: №. TG212 • 53633
(toll free)
AFTER SALES SUPPORT
(toll free)
Air Brush Kit
4. With the trigger (23) depressed, and watching
the outlet pressure gauge (6), rotate the air
pressure adjustment knob (5) clockwise to
H.
INCREASE DECREASE
increase the pressure and anti clockwise to
decrease the pressure (Fig H).
NOTE: The maximum outlet pressure on the
pressure gauge (6) while air is owing will only
be a MAX of 25-30PSI.
NOTE: The pressure gauge (6) will not read
correctly if air is not owing through the air
I.
LOCK
outlet regulator (29).
5. When the desired pressure is achieved, push the
air pressure adjustment knob (5) downward to
lock the adjustment (Fig I).
Preparing the Air Brush Gun for use
Preparation - Mixing and Thinning paint
IMPORTANT: The air brush gun cannot be used with materials containing
abrasive substances, glazes, caustic or alkaline substances.
NOTE: For the best results, surface preparation and paint thinning are the
two most important areas. Ensure all surfaces are free of dust, dirt and
grease when undertaking this task.
NOTE: Follow the manufacturers guide for thinning and mixing ratios which
should be labelled on the paint container. Paint thinning is very much trial
and error and testing prior to air brushing the nal component is important
to get both the thinning of the paint and the pressure correct for job to be
performed.
Recommended Types of Paints to Use
• We recommend water based paints when used for make-up and
tattooing. Water based paints are easy to work with as they are less
permanent than other types of paint and water can be used for cleaning.
These paints can be purchased at hobby stores or online.
14
909 53633 Air Brush IM ED1.indd 14 22/02/2017 2:19 PM
Page 17
AFTER SALES SUPPORT
(toll free)
Air Brush Kit
e-mail: [email protected]1800 909 909
MODEL: №. TG212 • 53633
• Acrylic paints cannot be dissolved in water and therefore should only be
used for more permanent applications and when the user is familiar with
the Air Brush Kit.
NOTE: Care must be taken when using acrylic paints, as solvents will be
required for cleaning.
Preparing the Air Brush Gun
This air brush kit contains 2 x paint vessels for use with the air brush gun
(15), and is tted with a general purpose nozzle of 0.35mm.
a) 20cc Glass paint jar (12)
b) 5cc Metal paint cup (14)
Installing the 20cc Glass jar (12):
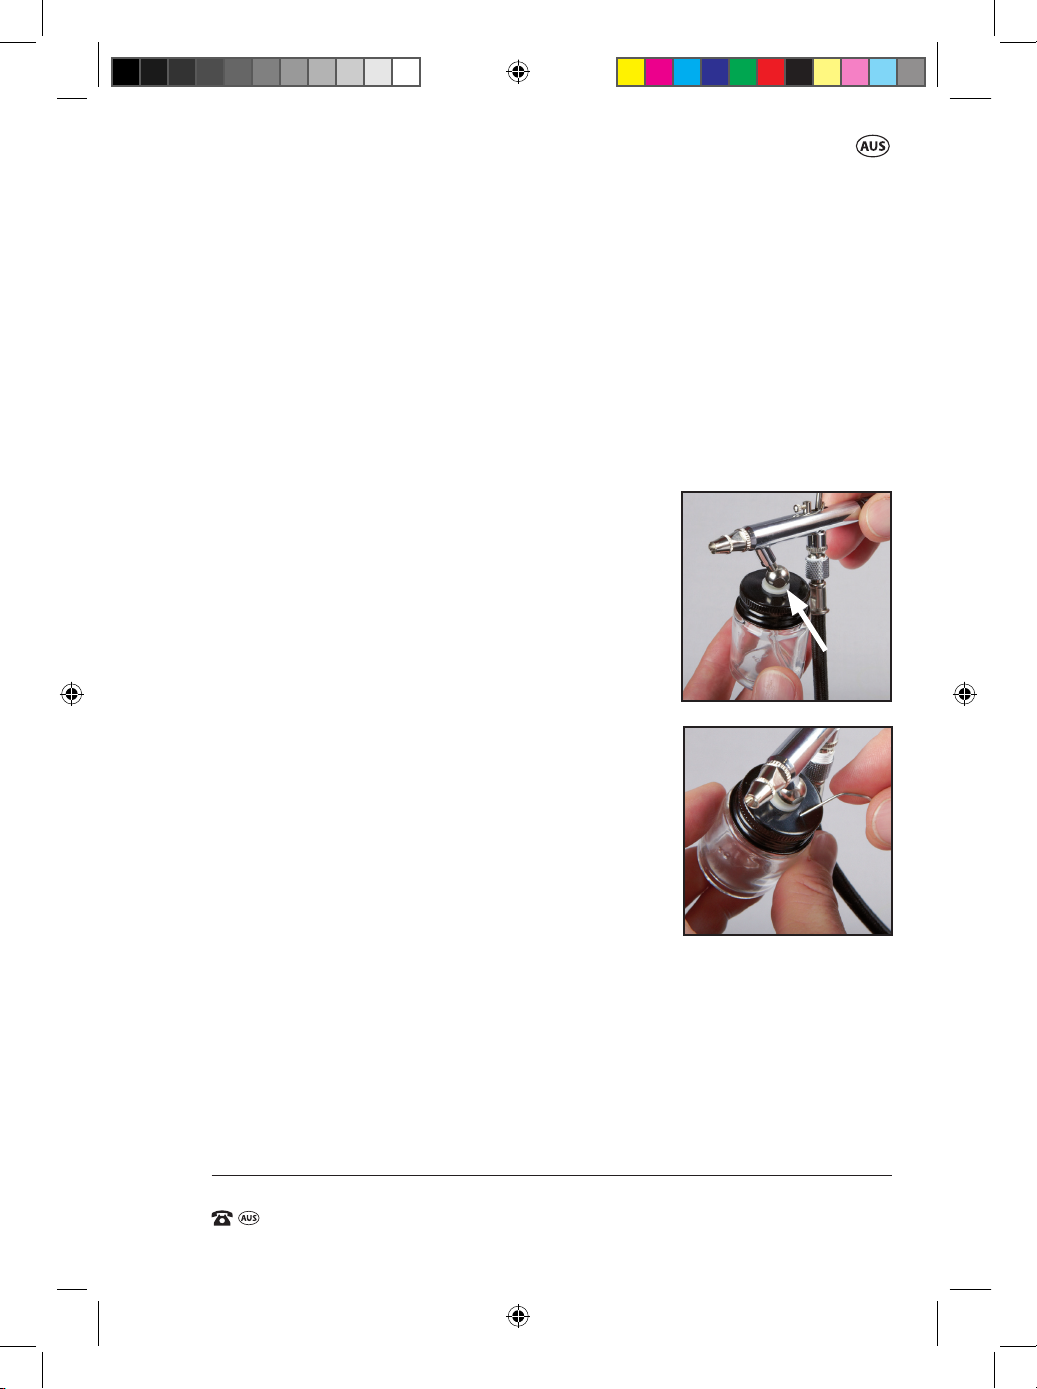
1. When using the 20cc glass paint jar (12), push
it up into the paint inlet connection (21) tightly
until it is secure (Fig J). The glass paint jar is held
in position by pressure / friction.
NOTE: The 20cc glass paint jar (12) has a vent
hole (13) to allow air to enter the glass jar which
enables uid to ow into the air brush gun.
Ensure it is clean and not blocked (Fig K).
2. Open the lid of the glass paint jar and ll with
the selected paint after thinning appropriately
according to the paint manufacturer guidelines.
Be careful not to overll.
J.
K.
Installing the 5CC metal paint cup (14):
1. When using the 5cc metal paint cup (14), push it up into the paint inlet
connection (24) tightly until it is secure (Fig L). The 5cc metal paint cup
(14) is held in position by pressure / friction.
2. Fill the metal cup (10) with the selected paint after thinning appropriately
according to the paint manufacturer guidelines. Be careful not to overll.
NOTE: The 5cc metal paint cup (14) has no top so care must be taken not
to spill the paint from the metal cup both during use and also lling.
15
909 53633 Air Brush IM ED1.indd 15 22/02/2017 2:19 PM
Page 18
Air Brush Kit
AFTER SALES SUPPORT
e-mail: [email protected]
1800 909 909
MODEL: №. TG212 • 53633
(toll free)
AFTER SALES SUPPORT
(toll free)
Air Brush Kit
The angle of the metal cup is adjustable by turning the metal cup where
the cup joins to the air brush to the right or to the left, or left central.
The best position of the cup will depend on the angle of the air brush
during use. i.e If the air brush is in use pointing downward, the metal cup
is probably best to be rotated to the right or left as far as possible.
If the air brush is in use in the upward direction the metal cup is probably
better more towards the front.
If the air brush is in use in a horizontal position the metal cup is probably
best to be rotated to the right or left as far as possible.
Operating the Air Brush Gun
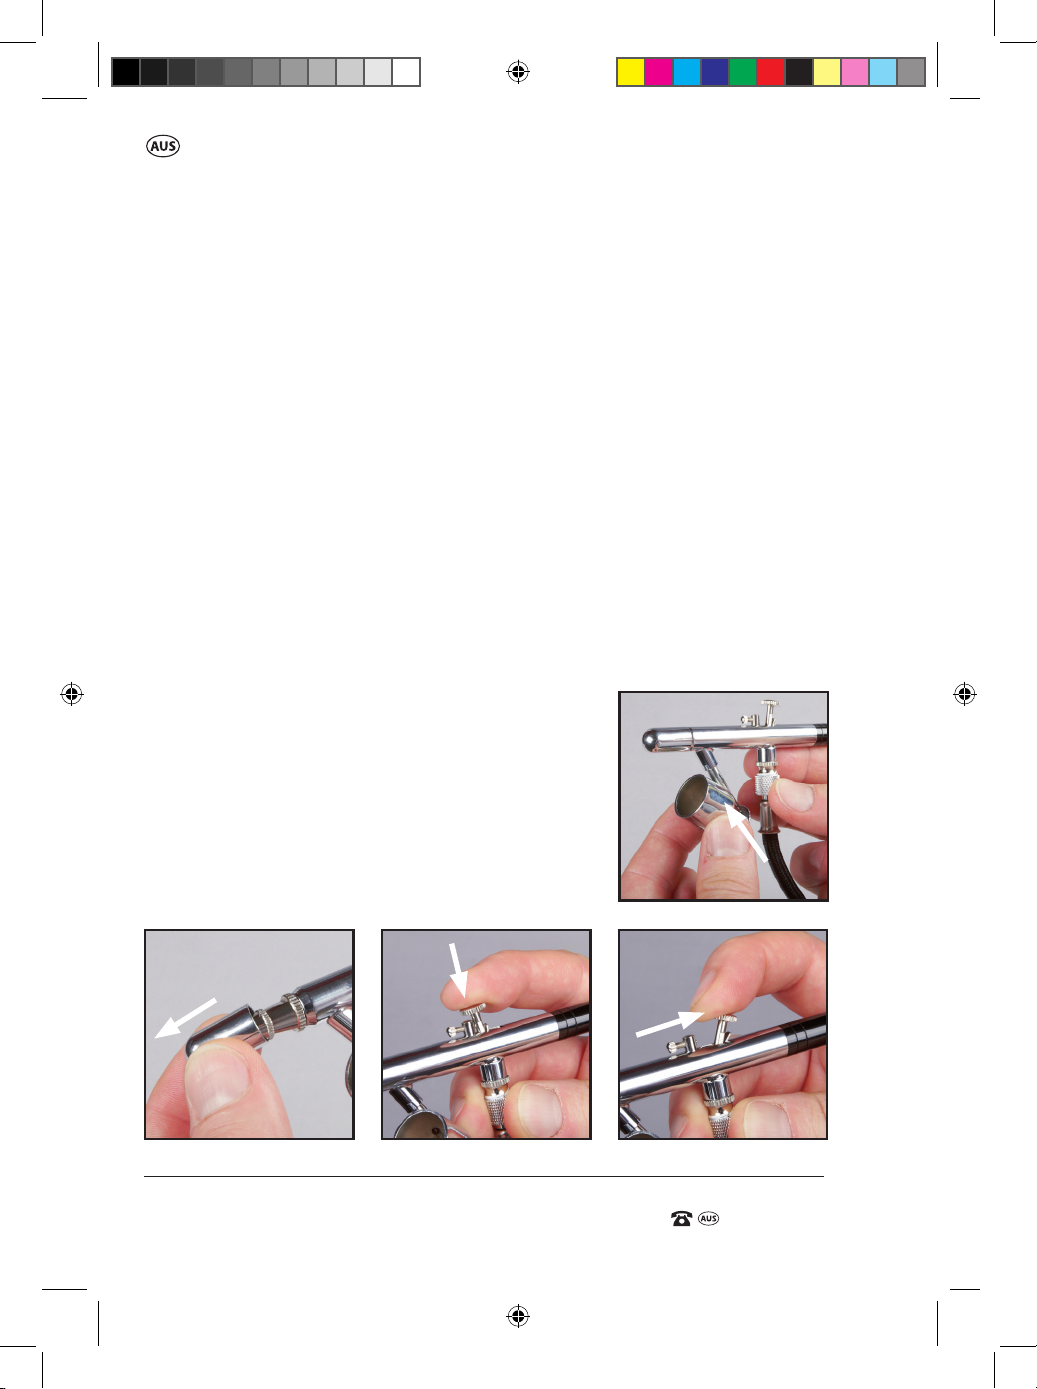
1. Remove the protective cap (16) from the air brush gun (Fig M).
2. Turn the on/o switch (1) on the compressor to the ON position as
indicated by an “I” (refer previous Fig E), ensuring the pressure gauge
regulator (6) has been set to the desired pressure level.
3. By pressing down on the trigger (23), air will start to ow through the
paint outlet (17) (Fig N). By pulling the trigger
(23) backwards (Fig O), the paint will atomise
and will start to come through the paint outlet
(17).
NOTE: The size of the spray pattern is in
accordance with the distance between the
work surface and the nozzle of the air
brush gun.
L.
N.M. O.
16
909 53633 Air Brush IM ED1.indd 16 22/02/2017 2:19 PM
Page 19
AFTER SALES SUPPORT
(toll free)
Air Brush Kit
e-mail: [email protected]1800 909 909
MODEL: №. TG212 • 53633
4. For an extra ne spray hold the air brush closer to the work surface (Fig P).
5. When you are nished painting, gently release pressure on the trigger
(23) to stop the paint/air ow (Fig Q).
6. When you have
nished your painting
P.
Q.
task, turn the
compressor to the OFF
position as indicated
by the “O” on the on/
o switch (1) (refer
previous Fig E).
Paint Flow Adjustment Screw
The air brush is tted with a paint ow adjustment screw (22). This screw
acts as a type of rest for the trigger (23) in operation and can assist is
providing a steady and equal amount of paint through the nozzle.
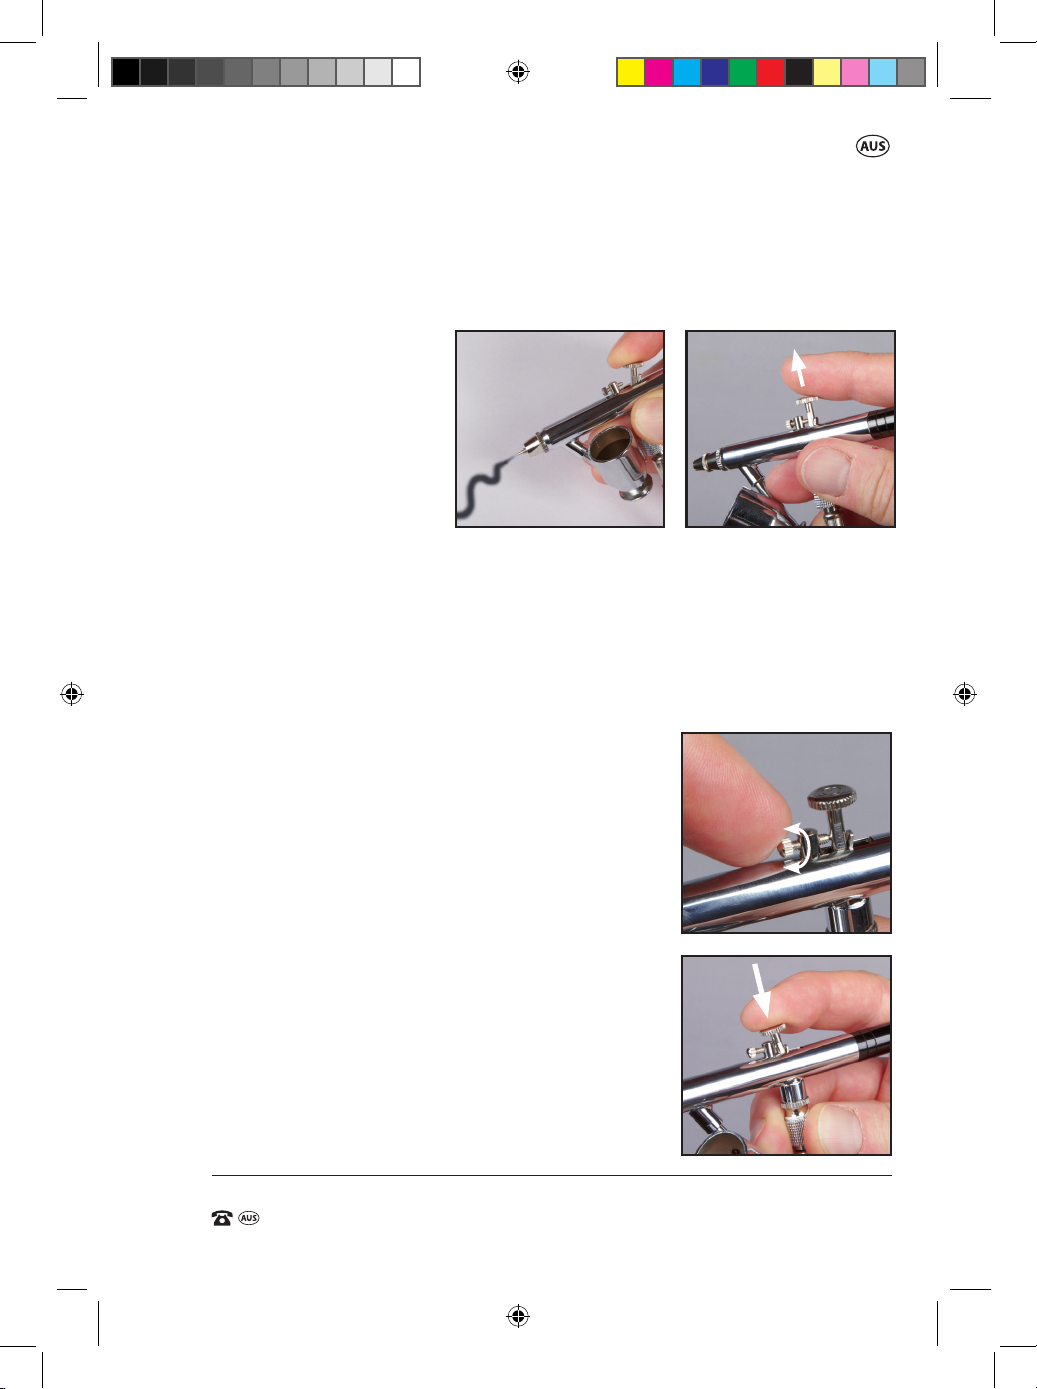
1. To set the paint ow adjustment screw (22), turn it until the threaded
section of the paint ow adjustment screw (22) makes contact with the
trigger (23) (Fig R). As you continue to turn the
adjustment screw (22), the trigger (23) is now
also moving into the area of distributing paint.
The further the adjustment screw (22) is turned,
the more paint can pass through the nozzle.
NOTE: The paint will not ow until the trigger
(23) is pressed downward.
2. To start the paint ow, you only need to depress
the trigger(23) for the air to start and the paint
will also pass through the nozzle. This setting
is the minimum paint ow and is used as a rest
for the trigger (23) to supply a more even paint
ow. Paint ow can be quickly increased by
pulling the trigger (23) backward, and then can
be brought back to the rest for the low level
consistent paint ow (Fig S).
R.
S.
17
909 53633 Air Brush IM ED1.indd 17 22/02/2017 2:19 PM
Page 20
Air Brush Kit
AFTER SALES SUPPORT
e-mail: [email protected]
1800 909 909
MODEL: №. TG212 • 53633
(toll free)
AFTER SALES SUPPORT
(toll free)
Air Brush Kit
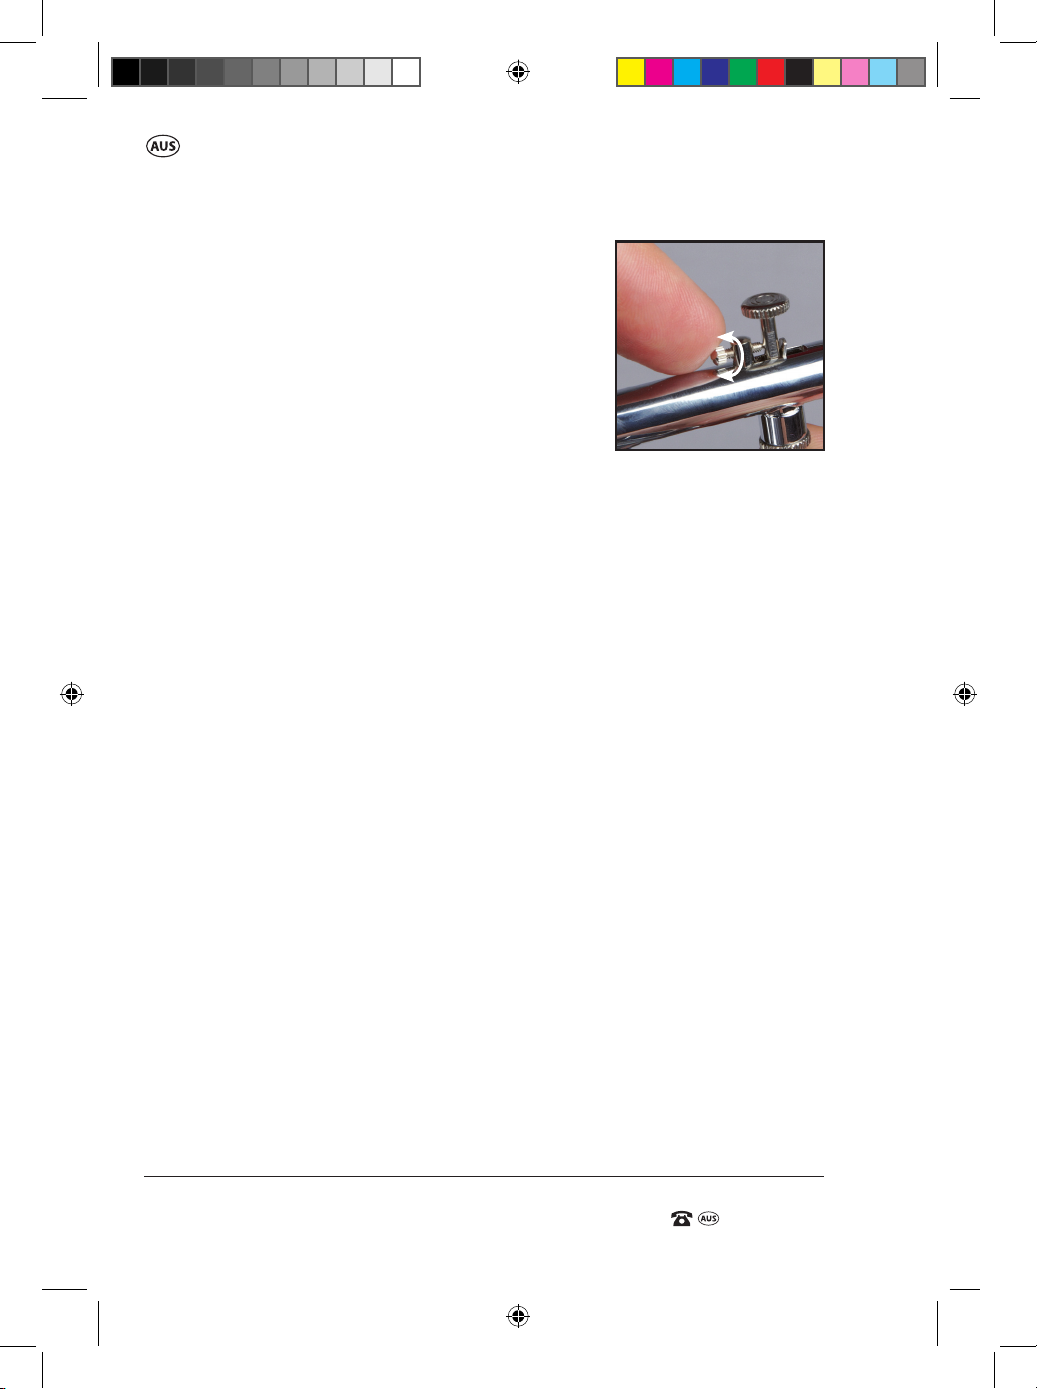
3. To increase the paint ow rest, turn in a
T.
clockwise direction. To decrease the paint
ow rest, turn in a anti clockwise direction.
To remove the contact between the rest and
DECREASE
the trigger, turn in an anticlockwise direction
until the paint ow adjustment screw (22) is
INCREASE
not touching the trigger at all (Fig T).
Tips for Operation
• Before beginning your rst project, it’s important to learn how to
operate and control your air brush gun (15). For your initial practice and
experimentation with the equipment, we recommend using water instead
of the paint in the glass paint jar (12) / metal paint cup (14) until you
become more familiar with its use.
• Important: If air does not pass through the hose to the airbrush, check
there are no kinks or restrictions along the hose length. If the machine has
been used before there may be a dried build up of the colour liquid in the
air brush causing a blockage.
• Before you spray directly onto your work piece, it’s a good idea to practice
on paper rst or something similar to what you will be painting with a
similar surface.
• To begin spraying, hold the air brush in your hand like a pen with either
your index nger or thumb resting on the air brush trigger (23) which is
found directly behind the paint cup/glass jar (14/12). Push the air brush
trigger (23) downward to start the air owing and then by gently pulling
pulling back the trigger (23), the paint will be expelled from the air brush.
The more the trigger (23) is pulled back, the more paint you will see on the
work piece you’re working on.
• Practice regulating the ow by working the trigger (23) and varying the
distance between the spray and the work piece until you’re condent
controlling the air brush. It is suggested to start by doing simple, wavy
lines by holding the air brush close to the paper and barely pulling back on
the trigger (23). This will create a ner line.
18
909 53633 Air Brush IM ED1.indd 18 22/02/2017 2:19 PM
Page 21
AFTER SALES SUPPORT
(toll free)
Air Brush Kit
e-mail: [email protected]1800 909 909
MODEL: №. TG212 • 53633
• Allow colour to dry until there is no shine and don’t be tempted to touch
the sprayed area as this will smudge the sprayed area.
• Always clean the air brush gun after each use to ensure paints do not dry.
Cleaning the Air Brush Gun
Solvents for Cleaning
Clean the air brush gun as per the solvents in the chart below:
Paint Used Solvent Needed for Cleaning
Laquer Laquer Thinner
Acrylic Based Paint Water
Oil Based Enamels Paint Thinner
The air brush gun is a precision instrument and to work eectively, careful
maintenance is essential.
It’s important to clean the air brush gun as soon as you have nished
spraying as some paints used with the equipment will dry very quickly. It is
also recommended to clean the air brush gun in-between use of dierent
colours which can be done with water or solvents.
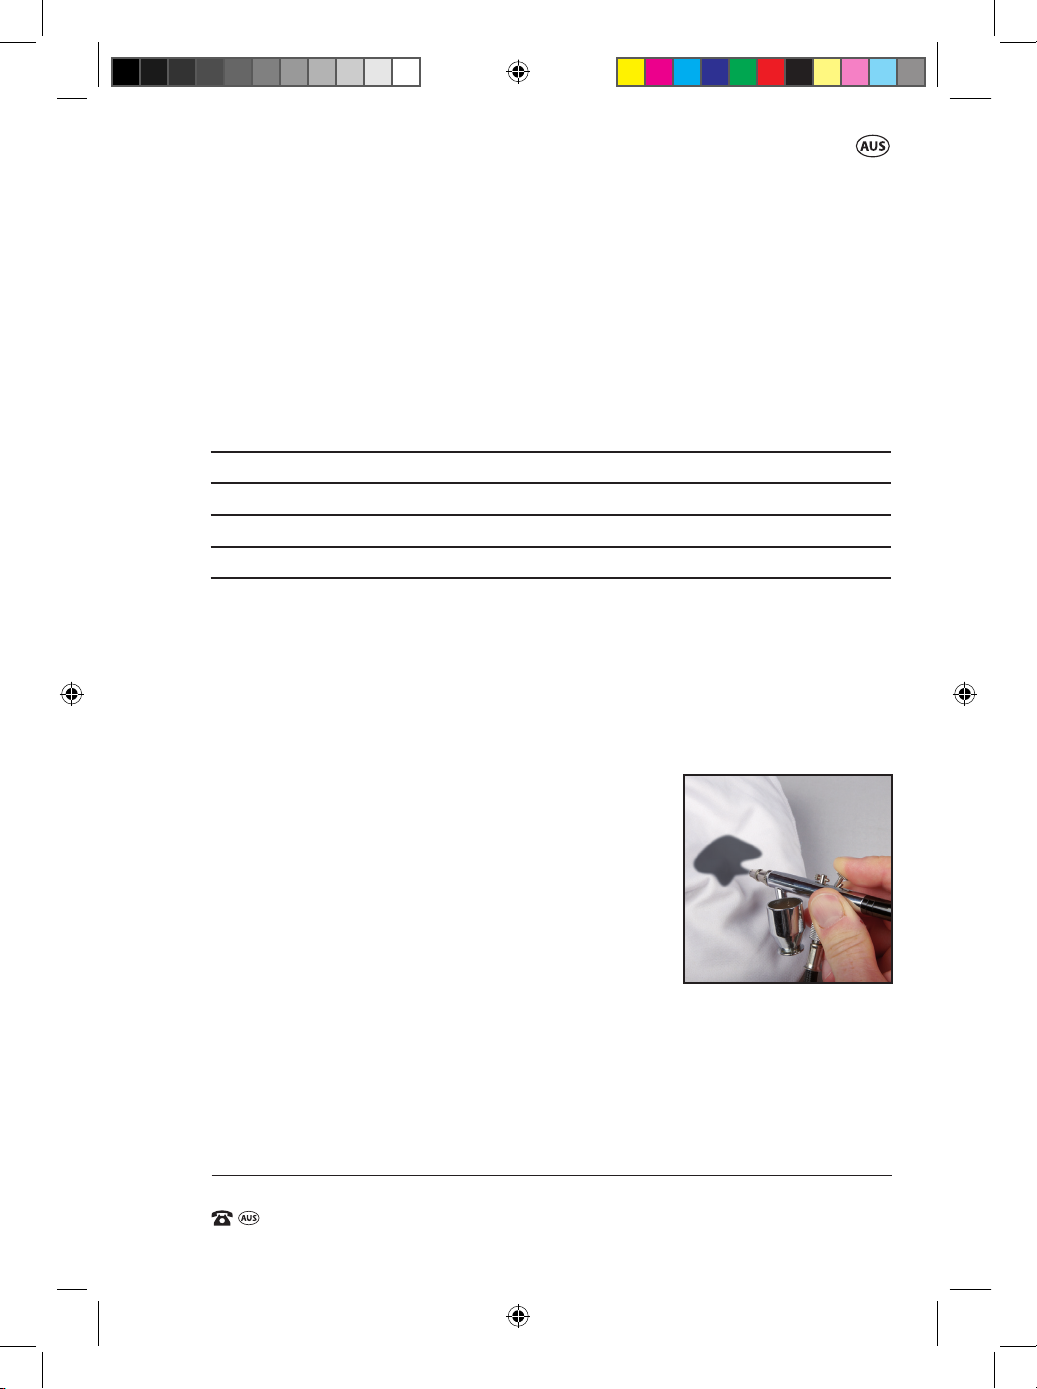
1. Remove all remaining paint from the glass jar/
metal cup (12/14) by depressing the air brush
trigger (23) and expelling the remaining paint
into an old cloth or strong paper towel (Fig U).
NOTE: DO NOT empty down the sink – it’s
important to use a cloth or paper towel to
absorb the colour.
2. Following the safety instructions applicable
to the chosen cleaning solvent, and wearing
the appropriate personal protective clothing according to the cleaning
solvent, half ll the air brush glass jar/ metal cup (12/14) with the cleaning
solvent.
NOTE: Using a cleaning solvent OR water is dependent upon the type of
paint you are using. Refer to the chart above.
U.
19
909 53633 Air Brush IM ED1.indd 19 22/02/2017 2:19 PM
Page 22

Air Brush Kit
AFTER SALES SUPPORT
e-mail: [email protected]
1800 909 909
MODEL: №. TG212 • 53633
(toll free)
AFTER SALES SUPPORT
(toll free)
Air Brush Kit
3. Using a small artist’s bristle brush/ or a make up
brush, gently clean the interior of the glass jar/
V.
metal cup (12/14) (Fig V).
IMPORTANT: DO NOT use cotton buds or similar
items as small bres can be deposited and cause
a blockage in the air brush nozzle.
4. Carefully spray the cleaning solvent through the
air brush into an old cloth or strong paper towel.
NOTE: To minimize airborne particles in the
atmosphere use additional cloths or paper towels.
5. Wipe away any traces of the air brush cleaning solvent from the exterior of
the air brush gun body. Cleaning should continue until there is no paint
visible in the glass jar/ metal cup (12/14) or on the cloth or paper towel.
CAUTION: The air brush needle (20) is extremely sharp and should be
handled with care to prevent injury.
6. Replace the needle cover (26) ensuring the tting is screwed on nger
tight.
7. Flush water through the airbrush to remove any airbrush cleaner residue.
Cleaning / Replacing the Air Intake Filter
The function of the compressor is to draw ambient air from the
atmosphere into the compressor where it is compressed and then
discharged from the outlet of the compressor.
The air as it enters the compressor is ltered to prevent dirt entering the
compressor to assist in the life of the compressor, and also to ensure a
clean air ow ready for use.
WARNING: Ensure the compressor is turned o and unplugged from the
mains power before undertaking this task.
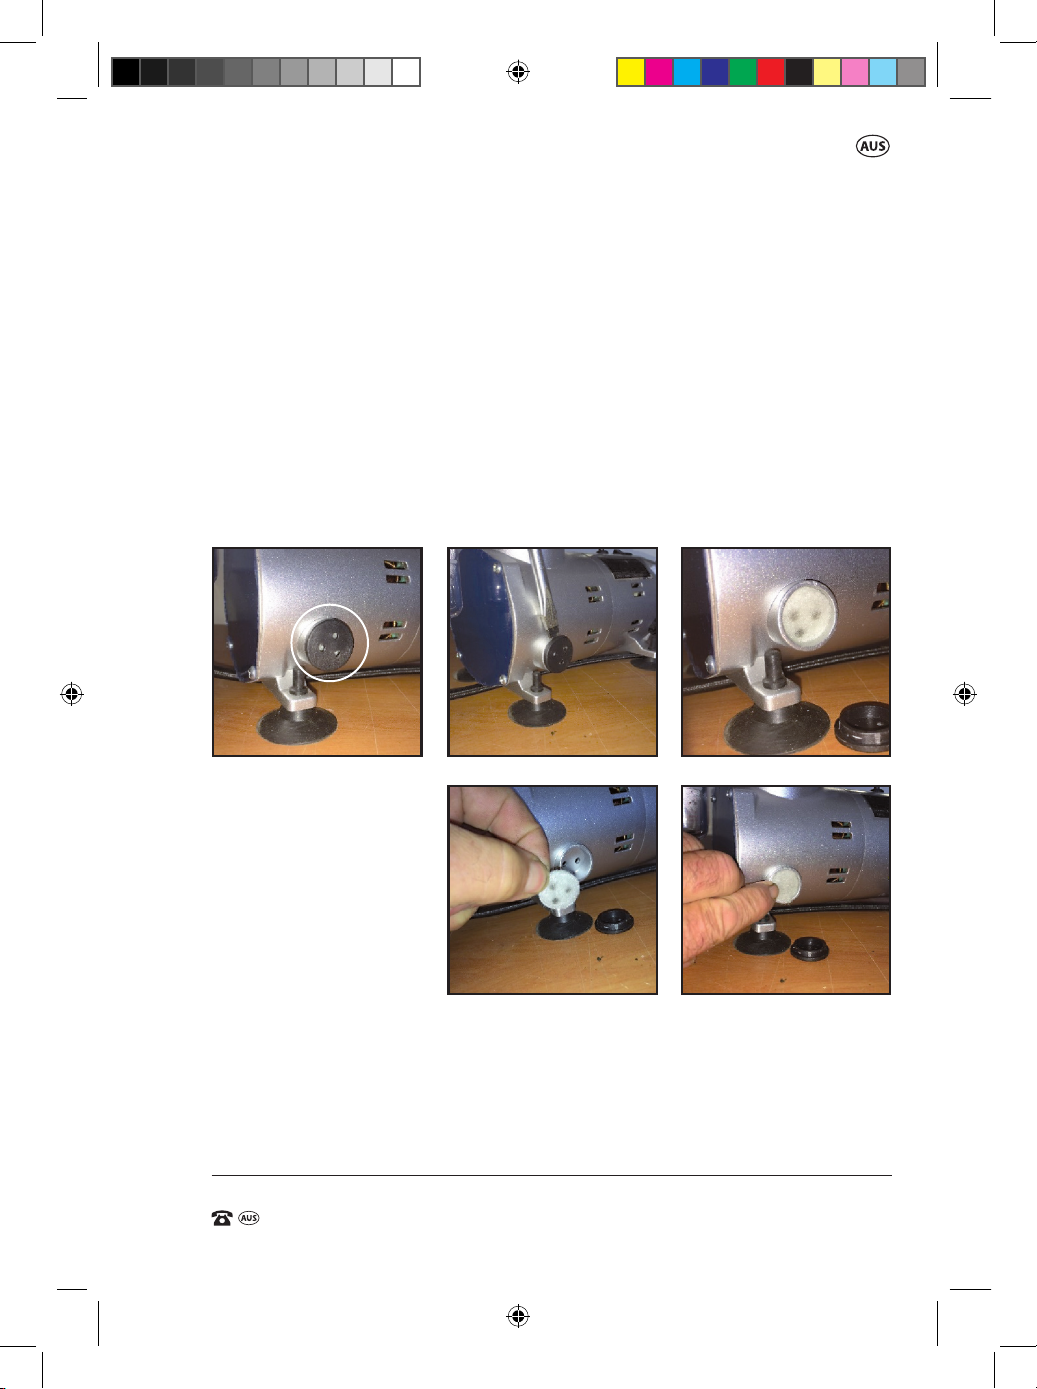
1. The air inlet lter (8) is located on the side of the housing of the
compressor (Fig W). The black cap is a push t and can be easily prised o
with a at blade screw driver (Fig X).
2. After removing the cover, the small air lter will be exposed (Fig Y).
Remove the air lter (Fig Z).
20
909 53633 Air Brush IM ED1.indd 20 22/02/2017 2:19 PM
Page 23
AFTER SALES SUPPORT
(toll free)
Air Brush Kit
e-mail: [email protected]1800 909 909
MODEL: №. TG212 • 53633
3. The air lter can be washed in warm soapy water. Do not use solvents.
Finish o with running warm water and then allow to completely dry.
4. If the lter is damaged or clogged with dirt etc, the lter should be
replaced.
5. Replace the cleaned or new lter into the housing of the compressor
(Fig AA), and press t the air inlet lter cover back into the compressor
housing over the air lter.
WARNING: DO NOT operate the compressor without a lter in place.
NOTE: Replacement air lters are available for purchase by calling us on
1800 909 909 or emailing [email protected]
W.
X.
Z.
Y.
AA.
21
909 53633 Air Brush IM ED1.indd 21 22/02/2017 2:19 PM
Page 24
Air Brush Kit
AFTER SALES SUPPORT
e-mail: [email protected]
1800 909 909
MODEL: №. TG212 • 53633
(toll free)
AFTER SALES SUPPORT
(toll free)
Air Brush Kit
Draining the Water Trap
During the normal compressor operation, moisture in the air is also
compressed and then trapped in the clear plastic reservoir directly below
the outlet regulator. The water trap is a means to assist in the separation of
the air and water so excess water is restricted from spraying out with the air
and in turn onto the job being painted.
The amount of water collected in the water trap will depend on the
humidity of the air and the duration the compressor is operating.
It is suggested to check the reservoir every time the compressor is started
and if water has pooled in the base of the reservoir, drain the reservoir.
The collection of water in the reservoir is a normal activity of a compressor.
To drain the water trap, follow these steps:
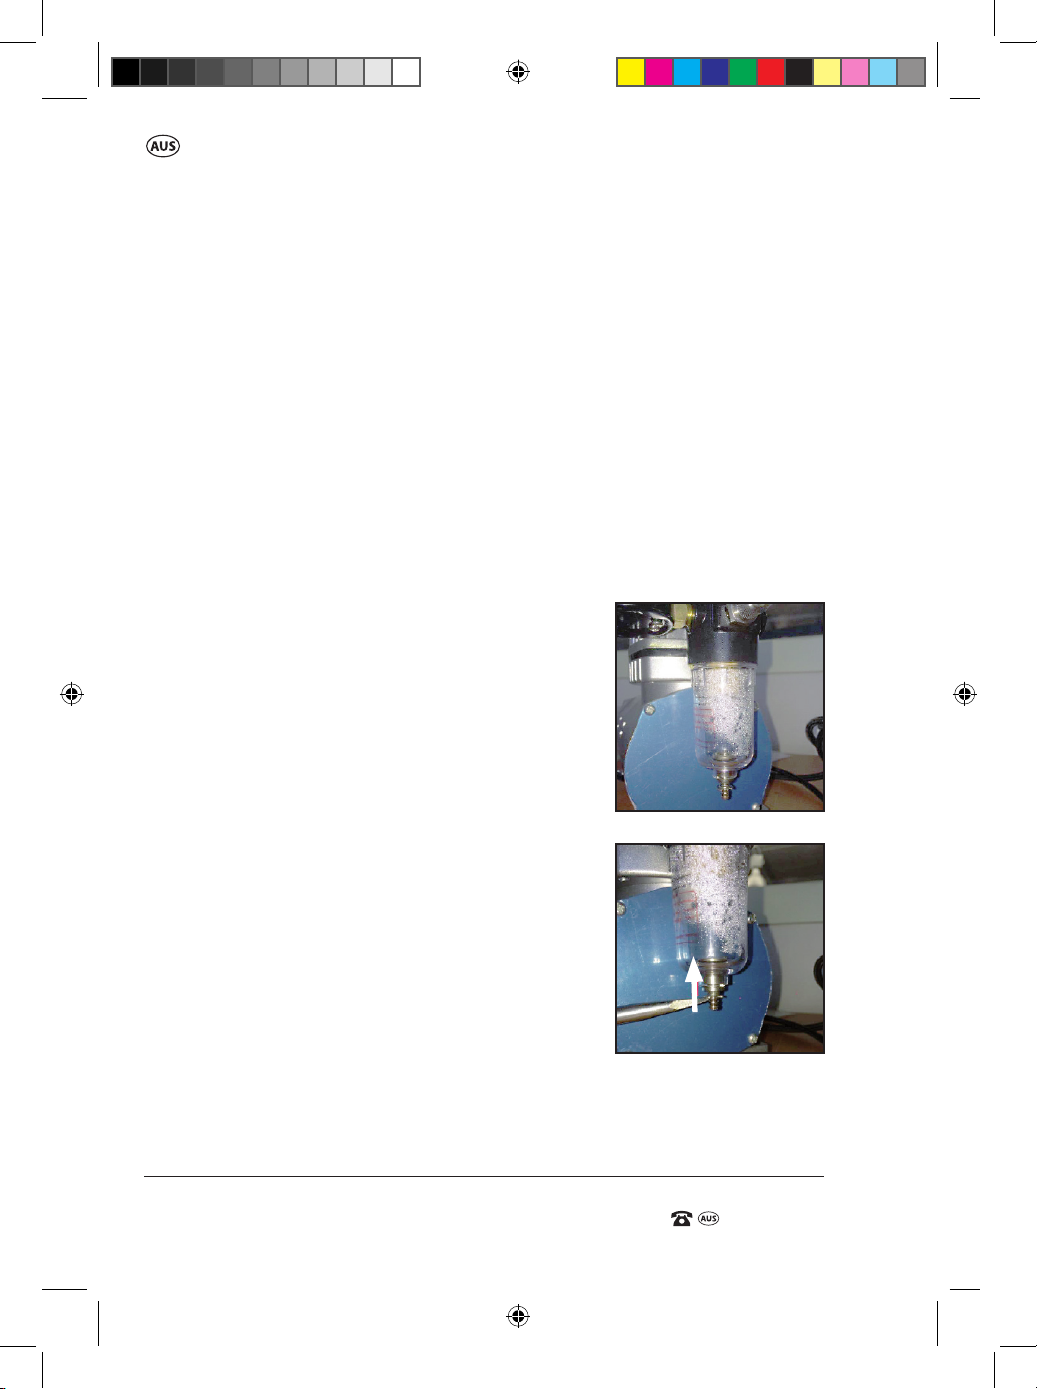
1. Check the water level in the reservoir (Fig AB)
and if there is ANY pooling of water in the
bottom of the reservoir, depress the drain
release valve (9) at the base of the reservoir (Fig
AC). A at bladed screw driver is suitable for this
application. The small valve can be lifted by the
small clip on the valve.
NOTE: Water will drip from the tube outlet of
the valve so ensure there is a small container
under the valve to collect the water.
2. If the water does not drip freely from the valve
and still remains in the reservoir, you can turn on
the compressor for a couple of seconds and then
turn the compressor o.
3. Re open the drain valve on the reservoir as
above, BUT NOTE, the water will spurt a little
from the outlet tube.
4. When you release the drain release valve (9),
the valve will automatically close.
5. Ensure to clean up any excess water discharged
from the drain release valve (9).
AB.
AC.
22
909 53633 Air Brush IM ED1.indd 22 22/02/2017 2:19 PM
Page 25

AFTER SALES SUPPORT
(toll free)
Air Brush Kit
e-mail: [email protected]1800 909 909
MODEL: №. TG212 • 53633
Cleaning the Compressor
WARNING: Ensure the compressor is turned o and unplugged from the
mains power before undertaking this task
1. To clean the casing of the compressor, carefully wipe the surface with
a soft cloth, dampened with a little water or a cloth dipped in water or
neutral detergent.
WARNING: Never immerse the unit in water or any other liquid, and DO
NOT use abrasive cleaners, steel wool or abrasive materials or cleansers.
2. Release excessive air from the braided air hose (10) and drain all
remaining water out of the air outlet tting/connection (7) from the
compressor.
3. Disconnect the air brush gun (15) from the braided air hose (10).
4. Periodically check all parts before reassembly.
Maintenance
WARNING! It is dangerous to use the compressor if it is damaged.
If the compressor is damaged, behaving abnormally or making strange
noises, call our Customer Service on 1800 909 909, or email [email protected]
for advice on repair before resuming normal operations.
Maintenance and servicing of your air brush/compressor should only be
performed by one of our qualied Service Agents or a qualied technician.
Always ensure the on/o switch (1) is in the OFF position, as indicated by
an “O” on the on/o switch (1), and the compressor is unplugged from the
mains power before carrying out any maintenance or cleaning procedures.
Failure to do so may result in serious injury.
Maintain your compressor with care. Keep it clean for better and safer
performance. Follow instructions for lubricating and changing accessories.
Inspect cords and air hoses periodically and, if damaged, have them repaired
by an authorised technician/ Service Agent.
23
909 53633 Air Brush IM ED1.indd 23 22/02/2017 2:19 PM
Page 26
Air Brush Kit
AFTER SALES SUPPORT
e-mail: [email protected]
1800 909 909
MODEL: №. TG212 • 53633
(toll free)
AFTER SALES SUPPORT
(toll free)
Air Brush Kit
The carry handle (4) must be kept clean, dry and free from oil and grease at
all times.
Drain the air compressor water trap daily. DO NOT allow moisture to build
up inside the water trap.
Storage
Store the air brush gun and the compressor with the power cable loosely
coiled.
Never wrap it tightly around the air brush and compressor as this can cause
damage to the cord.
Environmental protection
Recycle unwanted materials instead of disposing of them as waste.
All tools, hoses and packaging should be sorted, taken to the local
recycling centre and disposed of in an Environmentally safe way.
24
909 53633 Air Brush IM ED1.indd 24 22/02/2017 2:19 PM
Page 27
AFTER SALES SUPPORT
(toll free)
Air Brush Kit
e-mail: [email protected]1800 909 909
MODEL: №. TG212 • 53633
Service Support
If you have any issues with the operation of your product, please take it with
a copy of your receipt to one of our National Service Agents for repair. You
can also nd our most updated listing by visiting powertoolsupport.com, and
clicking on the Service Agent link. Alternately call us on our Customer Support
line, 1800 909 909, for advice or support.
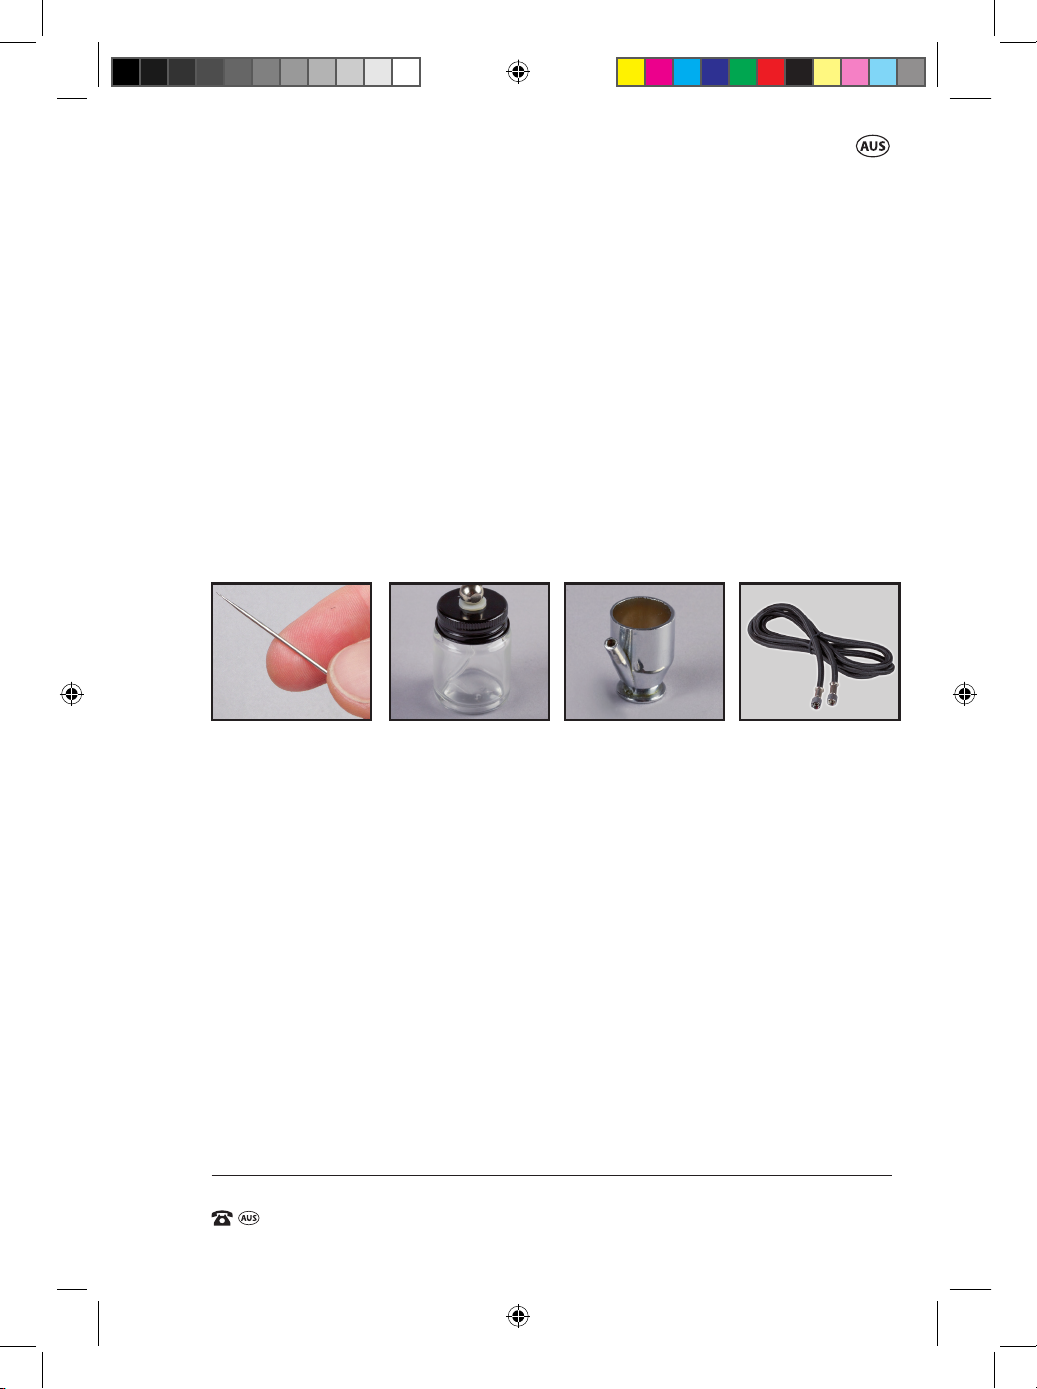
Accessories
When servicing, use only identical replacement parts. Use of any other parts will
void the warranty. Only use accessories intended for use with this tool.
Should you nd the following accessories are worn or past their user life,
replacements can be purchased online via our website
www.extrabattery.com.au
1. Replacement
Needle
(53633-ND)
2. Replacement
20cc Glass Paint
Jar (53633-GJ)
3. Replacement
5cc Metal Cup
(53633-MC)
4. Replacement
1.8m Braided Air
Hose (53633-AH)
If you have any queries regarding these accessories, please call us on our
Customer Support Line - 1800 909 909.
25
909 53633 Air Brush IM ED1.indd 25 22/02/2017 2:19 PM
Page 28
Air Brush Kit
AFTER SALES SUPPORT
e-mail: [email protected]
1800 909 909
MODEL: №. TG212 • 53633
(toll free)
AFTER SALES SUPPORT
(toll free)
Air Brush Kit
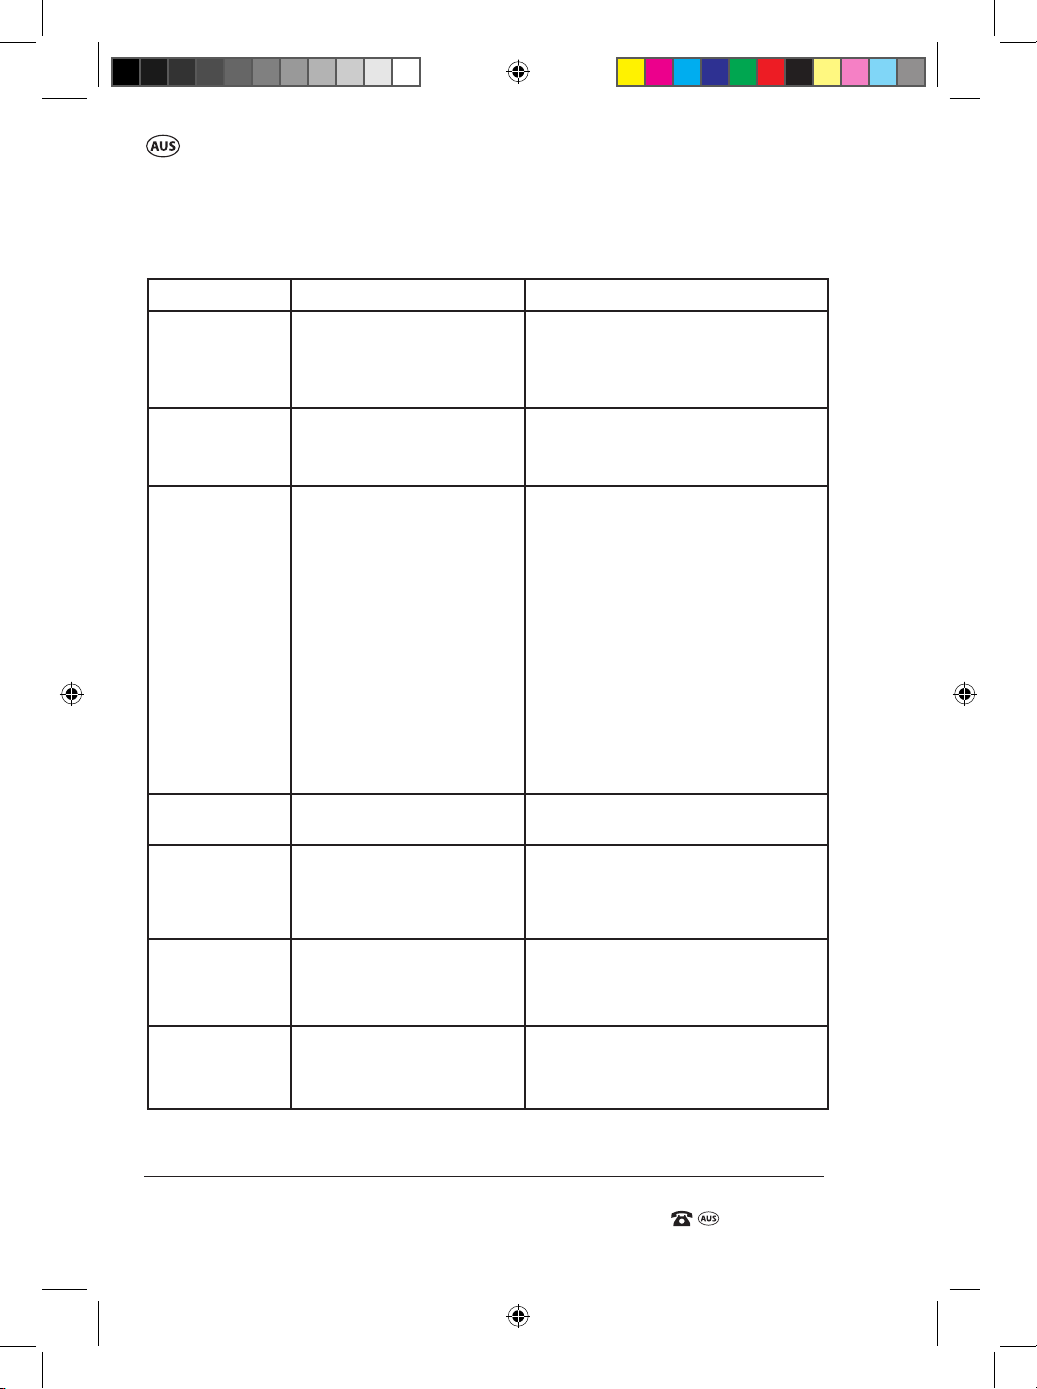
Troubleshooting
Problem
Insucient
pressure.
Knocks while
compressor is
loading.
Motor does
not work
Motor makes
strange noises
Motor running but
no air pressure
Spray pattern poor Airbrush paint outlet nozzle is
Suddenly stops
working
Possible Cause Solution
Damaged braided air hose (10).
Loose air connections.
Loose cylinder body (27) cover
screws.
Defective connection rod
bearings.
Defective wrist pins and
wrist pin bearing.
Damaged power cord.
Defective electrical wiring.
No electrical power.
Power switch is defective.
Motor is too hot.
Check the regulator has not
been adjusted too low.
Pressure is at the shut off
pressure.
Loose or damaged bearings.
Loose connection rod screws.
Check the air intake lter (9).
If motor is operating continually
with no pressure and air intake
is clear.
dirty or blocked.
Loose air connections.
Paint is too thick.
Bad valve.
Loose or damaged bearings.
Replace the braided air hose (10).
Check and tighten loose
air connections.
Tighten cylinder body (27) cover screws.
Take the compressor to one of our
qualied Service Agents for review / repair.
Take the compressor to one of our
qualied Service Agents for review / repair.
Take the compressor to one of our
qualied Service Agents or a qualied
technician for review / repair.
Take the compressor to one of our
qualied Service Agents for review / repair.
Plug the power cord (2) into a working
220 volt mains power socket.
Take the compressor to one of our qualied
Service Agents for review / repair.
Turn O the compressor at the mains
switch, remove the plug and Allow the
motor to cool for 15 minutes.
Adjust the regulator 3 turns in a clockwise
direction to increase pressure and depress
the air brush trigger.
Release air pressure by operating the
air brush.
Take the compressor to one of our qualied
Service Agents for review / repair.
Ensure the lter is not blocked or the holes
in the air lter cover are not blocked.
Take compressor to service agent
for review.
Replace or clean the paint outlet nozzle.
Check and tighten any loose air
connections.
Mix appropriate thinner into the paint.
Take the compressor to one of our qualied
Service Agents for review / repair.
Plug compressor into alternate electical
power source.
For all other issues, please contact Customer Service on 1800 909 909
or email [email protected]
26
909 53633 Air Brush IM ED1.indd 26 22/02/2017 2:19 PM
Page 29

AFTER SALES SUPPORT
(toll free)
Air Brush Kit
e-mail: [email protected]1800 909 909
MODEL: №. TG212 • 53633
Specications
Compressor:
Voltage: 220-240V ~ 50Hz
Compressor Type: Single Cylinder Piston compressor
Power: 150W S3 20%
Speed: 1450 minAir output per min/litres: 23 l/min.
Max Allowable Working
Pressure.: 4 Bar
Power Cord length: 1.5m + - 100mm
Weight: 3.5kg
Product Dimensions: 255mm (L) x 135mm (W) x 205mm (H)
Braided Air Hose
Connections: 1/8’’BSP female
Length: 1.8m
Diameter: 7 x 4mm
Air Brush Gun
Feed Type: Siphon
Nozzle Diameter: 0.35mm
Working Pressure: 15-50 PSI
Control: Double action
This product complies with: EMC:
EN 55014-1: 2006 + A1:2009+A2:2011
EN 55014-2 :1997/A1:2001/A2:2008
EN 61000-3-2: 2014
EN 61000-3-3 :2013
1
Safety: EN 1012-1:2010;
IEC 60335-1:2010/A1:2013
AS/NZS 60335.1:2011
27
909 53633 Air Brush IM ED1.indd 27 22/02/2017 2:19 PM
Page 30

P: 1800 909 909 E: [email protected] W: www.909.com
909 53633 Air Brush IM ED1.indd 28 22/02/2017 2:19 PM
 Loading...