

Page 1

User Manual
43671
26cc 2-Stroke
Petrol Hedge
Trimmer
www.909.com
Read all safety warnings and all instructions
thoroughly before operating this product.
43671 909 IM ed1.indd 1 8/02/2017 2:58 PM
Page 2

43671 909 IM ed1.indd 2 8/02/2017 2:58 PM
Page 3

Contents
Pack Contents / Parts 02
Intended use of the 26cc Hedge Trimmer 02
Description of symbols 03
General Safety Warning 04
Additional safety rules for Petrol Hedge Trimmers 06
Parts List 08
Unpacking / Assembly / Removing / Replacing the cover 09
Fuelling 10
Mixing Fuel 10
Recommended Fuels 10
Filling the tank 11
Starting a Cold Engine 12
Stopping the Engine 14
Operation of the Throttle Trigger 14
Starting a Warm Engine 14
The Operation of the Rotary Handle 15
Use of the Petrol Hedge Trimmer 15
Using the Hedge Trimmer with the Trimmer on its side 17
Trimming instructions 18
Blade Maintenance 19
Blade Lubrication 20
Greasing 20
Air Filter 20
Carburettor Adjustment 21
Spark Plug 21
Storage and Maintenance after use 22
Removing a unit from storage 23
Service Support 23
Accessories 23
Environmental protection 24
Troubleshooting 26
Specications 27
43671 909 IM ed1.indd 3 8/02/2017 2:58 PM
Page 4

Pack contents / parts
Description of symbols
The instruction manual, rating plate, or on the product itself, may show
these symbols. These represent important information about the product or
instructions on its use.
Conforms to relevant standards for electromagnetic compatibility.
Wear hearing protection. Wear eye protection. Wear breathing protection.
Wear safety footwear.
Wear safety gloves.
Warning.
Read these instructions for use carefully.
Choke: Start position (choke closed).
Choke: Run position (choke open).
Use at a distance of at least 15m from other people.
Thrown objects and rotating line can cause severe injury. Do not operate
the unit without the safety guard in place. Keep away from rotating cutter.
Keep hands away from moving parts.
Explosive material.
Extremely hot surface. Do not touch a hot muer, gear box or cylinder, you
may get burned. These parts get extremely hot from operation and remain hot
for a short time after the unit is turned o.
Noise label rating 84dBA (taken at 7.5 metres)
You must wear ear protection at all times.
Keep out of the rain/wet.
NOISE dB
A
84
Congratulations on the purchase of your 909 26cc 2-Stroke Petrol Hedge
Trimmer. When you open your packaging, rst remove all items and check
there are no parts damaged or missing. If you nd anything wrong, do not
operate the product until the parts have been replaced or the fault has
been rectied. Failure to do so could result in serious personal injury.
IMPORTANT INFORMATION.
NOTE: This is a 26cc 2-Stroke Petrol Hedge Trimmer and requires
pre-mixing fuel with 2-stroke oil BEFORE starting. Fresh unleaded fuel
must be used in this unit. Do NOT use Ethanol based fuels.
NOTE: First time users or inexperienced operators pay particular
attention to the operation of the Hedge Trimmer, including details of
starting and stopping and correct use of the Hedge trimmer on pages
14-16, as well as the maintenance instructions on pages 21-25.
Intended use of the 26cc 2-Stroke Petrol Hedge Trimmer
NOTE: This product is for private domestic DIY use only.
It is not suitable for commercial or trade use.
This Hedge Trimmer has been designed for trimming,
shaping, and pruning hedges, shrubs and trees.
Contents of carton
1 x 26cc 2 Stroke Hedge Trimmer
1 x Tube Spanner / Screw driver
1 x Blade Cover
1 x Instruction Manual
1 x Mixing Bottle with
40:1 markings
2
43671 909 IM ed1.indd 4 8/02/2017 2:58 PM
Page 5

Description of symbols
The instruction manual, rating plate, or on the product itself, may show
these symbols. These represent important information about the product or
instructions on its use.
Conforms to relevant standards for electromagnetic compatibility.
Wear hearing protection. Wear eye protection. Wear breathing protection.
Wear safety footwear.
Wear safety gloves.
Warning.
Read these instructions for use carefully.
Choke: Start position (choke closed).
Choke: Run position (choke open).
Use at a distance of at least 15m from other people.
Thrown objects and rotating line can cause severe injury. Do not operate
the unit without the safety guard in place. Keep away from rotating cutter.
Keep hands away from moving parts.
Explosive material.
Extremely hot surface. Do not touch a hot muer, gear box or cylinder, you
may get burned. These parts get extremely hot from operation and remain hot
for a short time after the unit is turned o.
Noise label rating 84dBA (taken at 7.5 metres)
84
A
NOISE dB
You must wear ear protection at all times.
Keep out of the rain/wet.
3
43671 909 IM ed1.indd 5 8/02/2017 2:58 PM
Page 6

General safety warnings
• Remove any adjusting key or wrench before turning the tool on. A wrench
or a key that is left attached to a rotating part of the power tool may result in
personal injury,
• Do not overreach. Keep proper footing and balance at all times. This enables
better control of the power tool in unexpected situations.
• Dress properly. Do not wear loose clothing or jewellery. Keep your hair, clothing
and gloves away from moving parts. Loose clothes, jewellery or long hair can be
caught in moving parts.
• If devices are provided for the connection of dust extraction and collection
facilities ensure that these are connected and properly used. Use of these
devices can reduce dust-related hazards.
Power tool use and care
• Do not force the power tool. Use the correct power tool for your application.
The correct power tool will do the job better and safer at the rate for which it
was designed.
• Do not use the power tool if the switch does not turn it on and o. Any power
tool that cannot be controlled with the switch is dangerous and must be
repaired.
• Turn tool o completely before making any adjustments, changing accessories,
or storing power tools. Such preventive safety measures reduce the risk of
starting the power tool accidentally.
• Store idle power tools out of the reach of children and do not allow persons
unfamiliar with the power tool or these instructions to operate the power tool.
Power tools are dangerous in the hands of untrained users.
• Maintain power tools. Check for misalignment or binding of moving parts,
breakage of parts and any other condition that may aect the power tool’s
operation. If damaged, have the power tool repaired before use. Many accidents
are caused by poorly maintained power tools.
• Keep cutting tools sharp and clean. Properly maintained cutting tools with
sharp cutting edges are less likely to bind and are easier to control.
• Use the power tool, accessories and tool bits etc., in accordance with these
instructions and in the manner intended for the particular type of power tool,
taking into account the working conditions and the work to be performed.
Use of the power tool for operations dierent from intended could result in a
hazardous situation.
Service
• Have your power tool serviced by a qualied repair personnel using only
identical replacement parts. This will ensure that the safety of the power
tool is maintained.
Safety instructions
WARNING Read and understand all instructions. Failure to follow all
instructions listed below may result in electric shock, re and/or serious
injury. The term “power tool” in all of the warnings below refers to your
mains-operated (corded) power tool, battery-operated (cordless) power tool,
or petrol operated power tool.
This unit may not be used by people (including children) with reduced
physical, sensory or mental capacities, with a lack of experience and without
the appropriate knowledge, unless they are supervised by someone who is
responsible for their safety or have been instructed by such a person with regard to
how the unit is to be operated. Children should be supervised to ensure that they
do not play with the device.
Non-skilled persons and rst time users should read and understand the full
instruction manual before proceeding with use of the product or recommended
maintenance tasks.
Save these instructions
Work area
• Keep work area clean and well lit. Cluttered and dark areas invite accidents.
• Do not operate power tools in explosive atmospheres, such as in the presence
of ammable liquids, gases, or dust. Power tools create sparks which may ignite
the dust or fumes.
• Keep children and bystanders away while operating a power tool. Distractions
can cause you to lose control.
Personal safety
• Stay alert, watch what you are doing and use common sense when operating a
power tool. Do not use a power tool while you are tired or under the inuence
of drugs, alcohol, or medication. A moment of inattention while operating
power tools may result in serious personal injury.
• Use safety equipment. Always wear eye protection. Safety equipment such as
a dust mask, non-skid safety shoes, hard hat, or hearing protection used for
4
43671 909 IM ed1.indd 6 8/02/2017 2:58 PM
appropriate conditions will reduce personal injuries.
Page 7

• Remove any adjusting key or wrench before turning the tool on. A wrench
or a key that is left attached to a rotating part of the power tool may result in
personal injury,
• Do not overreach. Keep proper footing and balance at all times. This enables
better control of the power tool in unexpected situations.
• Dress properly. Do not wear loose clothing or jewellery. Keep your hair, clothing
and gloves away from moving parts. Loose clothes, jewellery or long hair can be
caught in moving parts.
• If devices are provided for the connection of dust extraction and collection
facilities ensure that these are connected and properly used. Use of these
devices can reduce dust-related hazards.
Power tool use and care
• Do not force the power tool. Use the correct power tool for your application.
The correct power tool will do the job better and safer at the rate for which it
was designed.
• Do not use the power tool if the switch does not turn it on and o. Any power
tool that cannot be controlled with the switch is dangerous and must be
repaired.
• Turn tool o completely before making any adjustments, changing accessories,
or storing power tools. Such preventive safety measures reduce the risk of
starting the power tool accidentally.
• Store idle power tools out of the reach of children and do not allow persons
unfamiliar with the power tool or these instructions to operate the power tool.
Power tools are dangerous in the hands of untrained users.
• Maintain power tools. Check for misalignment or binding of moving parts,
breakage of parts and any other condition that may aect the power tool’s
operation. If damaged, have the power tool repaired before use. Many accidents
are caused by poorly maintained power tools.
• Keep cutting tools sharp and clean. Properly maintained cutting tools with
sharp cutting edges are less likely to bind and are easier to control.
• Use the power tool, accessories and tool bits etc., in accordance with these
instructions and in the manner intended for the particular type of power tool,
taking into account the working conditions and the work to be performed.
Use of the power tool for operations dierent from intended could result in a
hazardous situation.
Service
• Have your power tool serviced by a qualied repair personnel using only
identical replacement parts. This will ensure that the safety of the power
tool is maintained.
43671 909 IM ed1.indd 7 8/02/2017 2:58 PM
5
Page 8

Additional safety rules for
Petrol Hedge Trimmers
• Do not operate in a hazardous location. Such areas include where there is a risk
of explosion of petrol fumes, leaking gas or explosive dust.
• Do not operate in a conned area. Exhaust gases, smoke or fumes could reach
dangerous concentrations.
• Do not operate the hedge trimmer where power lines can cause a risk.
Be aware of overhead power lines.
• Protect your tool. This hedge trimmer is NOT WEATHERPROOF and should not
be exposed to direct sunlight, high ambient temperature and damp, wet or
high humidity conditions.
• Do not smoke while refuelling. This is potentially dangerous as it may ignite the
fuel and cause an explosion.
• Take care not to spill fuel. When refuelling the hedge trimmer ensure that the
motor has been switched o. Prevent the spilling of fuel as this may also ignite
with the hot motor. Never refuel whilst the engine is running.
• Be careful where you store the hedge trimmer. Store the hedge trimmer in a
dry area away from ammable liquids.
• Keep your distance. The hedge trimmer emits exhaust fumes. Ensure
bystanders keep a safe distance.
• Ensure you use oil-mix fuel. Ensure that you mix 40 parts unleaded fuel to 1
part 2-stroke oil. If not, the engine will overheat and cause damage to your
hedge trimmer.
• Never ll fuel tank indoors. Never ll fuel tank when engine is running or hot.
Do not smoke when lling fuel tank.
• Use only for pruning. This product is designed only for use in trimming leaves
and small branches. It must never be used for any other purpose as doing so
could result in unforeseen accidents and injuries.
• Keep hands and ngers well away from the blade.
• Wear work gloves, eye protection, ear protection, solid shoes and trousers
when using this hedge trimmer.
• Always grasp both handles when operating the unit.
6
43671 909 IM ed1.indd 8 8/02/2017 2:58 PM
Page 9

• Ensure the hedge trimmer is switched o and is cool before cleaning and
maintenance.
• If you are interrupted when operating the trimmer, switch o before looking up.
• Never allow untrained users or children to use the trimmer.
• Use good quality air cooled 2-stroke engine oil.
• Wear goggles
• Wear earmus
• Wear a breathing mask
• Keep all parts of your body away from the cutting blade. Do Not remove cut
material or hold material to be cut when blades are moving. Make sure the
switch is o and the motor is NOT running when clearing jammed material.
A moment of inattention while operating the hedge trimmer may result in
serious personal injury.
• Carry the hedge trimmer by the handle with the cutter blade and motor
stopped. When transporting or storing the hedge trimmer, always t the
cutter device cover. Proper handling of the hedge trimmer will reduce possible
personal injury from the cutter blade.
• Prior to cutting with the hedge trimmer, always check the area to be cut for
hidden objects. Be observant for fencing wire, Garden stakes, or electrical cables.
Ensure to remove any of these objects prior to starting.
• Do not use the hedge trimmer in poor weather conditions.
• Do not use the hedge trimmer in poor light.
• Always use both hands when operating the hedge trimmer, one on the rear
handle and the other on the front handle.
7
7
43671 909 IM ed1.indd 9 8/02/2017 2:58 PM
Page 10
26cc 2-Stroke Petrol Hedge Trimmer
AFTER SALES SUPPORT
e-mail: [email protected]
1800 909 909
MODEL: №. 43671 • HTKS26
(toll free)
AFTER SALES SUPPORT
(toll free)
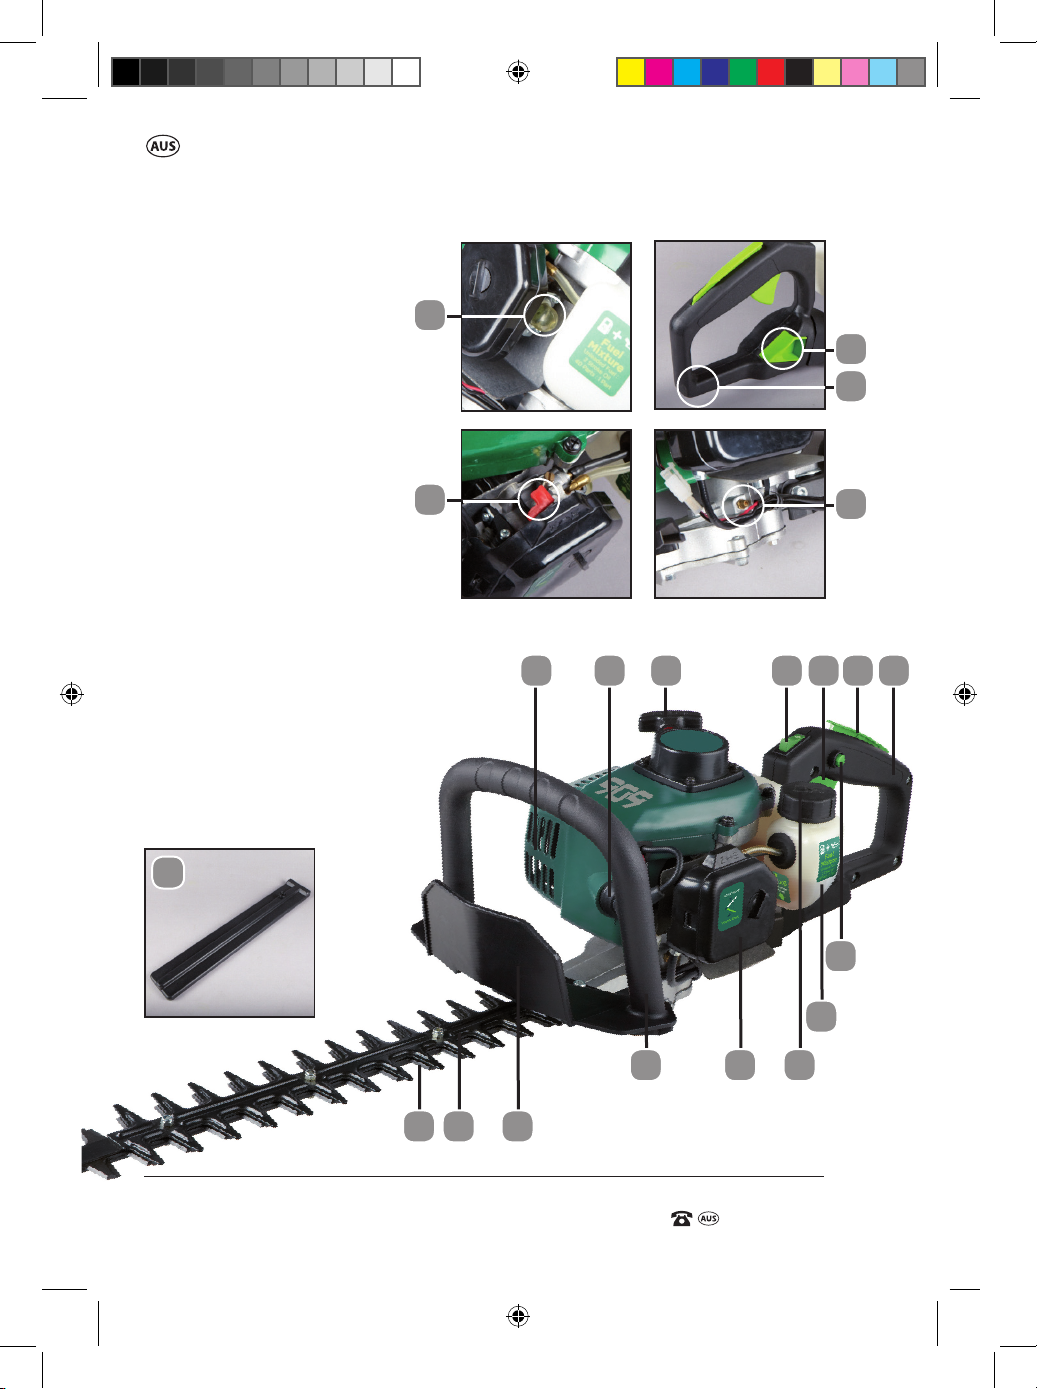
26cc 2-Stroke Petrol Hedge Trimmer
Parts List
Parts List
1. Blades
2. Blunt plate
3. Protective guard
4. Silencer cover
5. Spark plug cover
6. Spark plug (not shown)
7. Front handle
8. Recoil starter
9. Air lter cover
10. On/O switch
11. Throttle trigger
12. Fuel tank
13. Fuel cap
14. Safety lever
15. Rear handle
16. Throttle start button
17. Primer bulb
18.Choke lever (red)
19. Rotating handle lock lever
20. Rotating handle
21. Grease nipple
22. Blade cover
17
18
4 5 8 10 11 14 15
19
20
21
22
16
12
1397
321
8
43671 909 IM ed1.indd 8 8/02/2017 2:58 PM
Page 11
AFTER SALES SUPPORT
(toll free)
e-mail: [email protected]1800 909 909
26cc 2-Stroke Petrol Hedge Trimmer
MODEL: №. 43671 HTKS26
15
Getting Started
Unpacking
Due to modern mass production techniques, it is unlikely that your petrol
hedge trimmer is faulty or that a part is missing. If you nd anything wrong,
do not operate the tool until the parts have been replaced or the fault has
been rectied.
Failure to do so could result in serious personal injury.
Assembly
This hedge trimmer does not require any pre-assembly before use, however
the hedge trimmer is required to be lled with 500ml of Unleaded petrol:
2-Stroke oil (40:1) before operation.
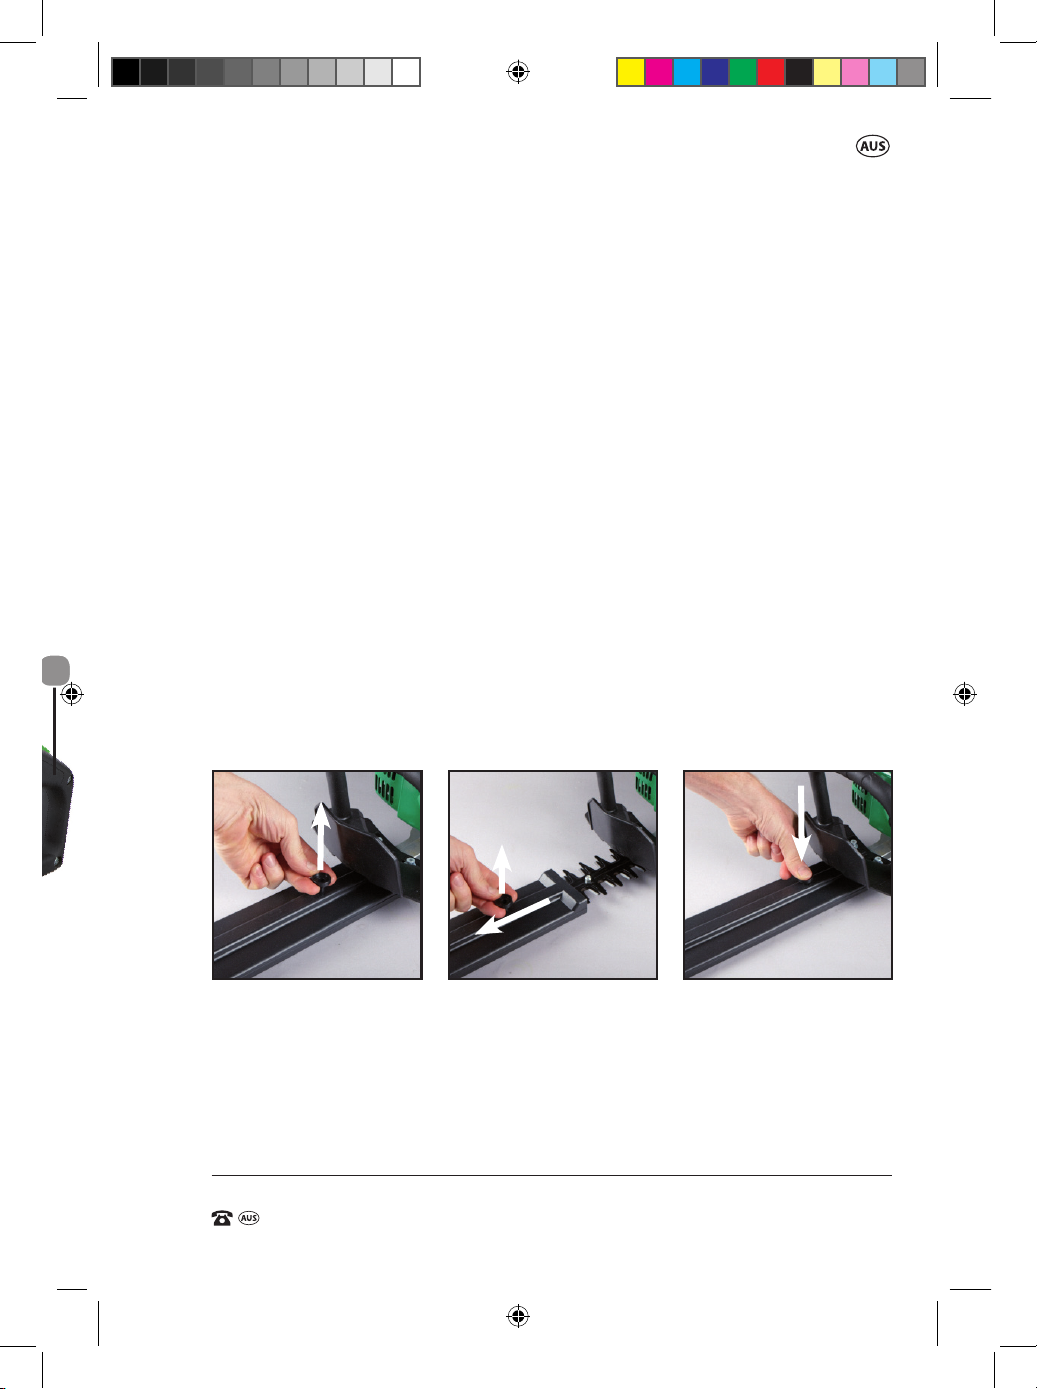
Removing / Replacing the cover
1. To remove the blade cover (22) lift the locking knob and slide the cover
o the blades (1). (Fig. A)
2. To replace the blade cover (22), ensure the locking knob is lifted and slide
the blade cover (22) full onto the blade (1). (Fig. B)
3. To lock secure the blade cover (22) on the blades (1), depress the locking
knob. (Fig. C)
A. B. C.
9
43671 909 IM ed1.indd 9 8/02/2017 2:58 PM
Page 12
26cc 2-Stroke Petrol Hedge Trimmer
AFTER SALES SUPPORT
e-mail: [email protected]
1800 909 909
MODEL: №. 43671 • HTKS26
(toll free)
AFTER SALES SUPPORT
(toll free)
26cc 2-Stroke Petrol Hedge Trimmer
Fuel and Lubrication
Fuelling
Use fresh unleaded fuel mixed with 2-stroke air-cooled engine oil (40:1) for best
results. Use mixing ratios in Section Fuel Mixing Table below.
WARNING. Never use straight fuel in your unit. This will cause permanent
engine damage and void the manufacturer’s warranty for that product.
Never use a fuel mixture that has been stored for over 30 days.
WARNING. 2-stroke lubricant must be a premium grade oil for 2-stroke
air cooled engines mixed at a 40:1 ratio. It is recommended NOT to
use pre mixed fuels from service stations as these are often for water
cooled 2 stroke engines. If insucient lubrication is the cause of engine
damage, it voids the manufacturer’s engine warranty.
Mixing Fuel
MOTOR FUEL: MIX AT 40:1 ONLY
Note. The mixing bottle provided is NOT for the storage of fuel. This container
is solely for mixing of fuel only. Ensure to keep this container in a safe storage
location, empty of fuel and out of reach of children.
WARNING. Lack of lubrication voids engine warranty.
Fuel and oil must be mixed at 40:1.
Fuel and Lubrication Symbols
Fuel Mixing Table
Mixing procedure:
40 parts fuel to 1 part oil
Fuel 1 Litre to 25ml of 2 stroke oil
- 5 Litres to 125ml of 2 stroke oil
Recommended Fuels
Only use fresh unleaded fuel with this hedge
trimmer fuel mix. Do Not use Ethanol based fuels.
Note. Dispose of used motor oil in a manner that is
compatible with the environment.
We suggest you take it in a sealed container to your local service station for
reclamation. Do not throw it in the trash or pour it into the earth.
WARNING. If fuel is spilt during the fueling process, ensure to move the
hedge trimmer away from the spillage area and do not start the hedge
trimmer near this area.
40:1
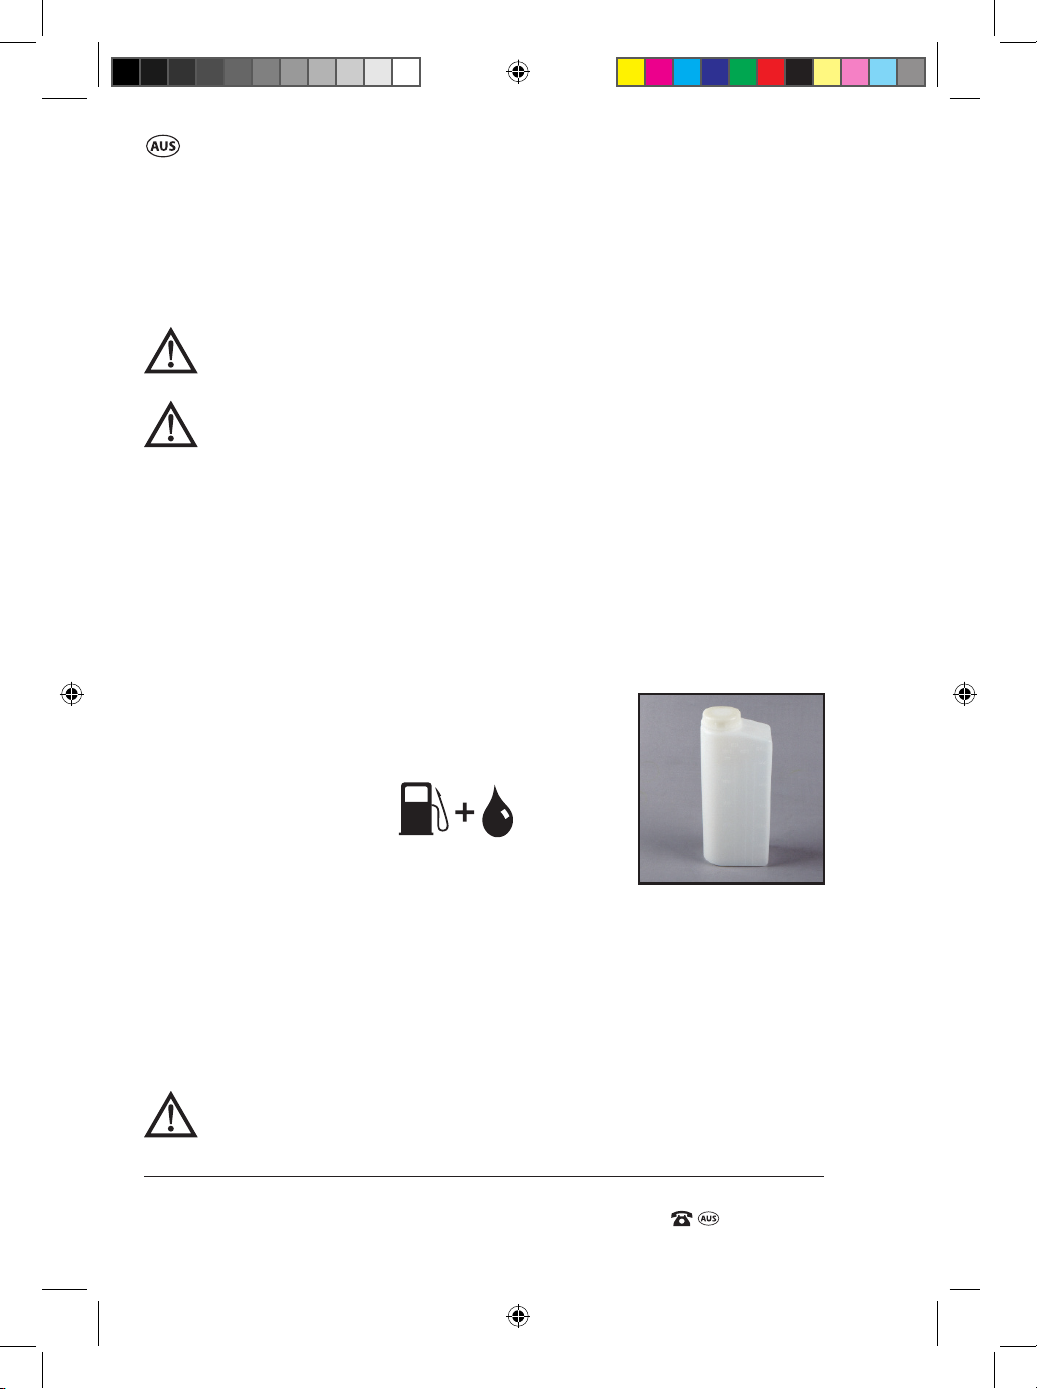
Fill the fuel mixing bottle with
unleaded fuel to
the 500 petrol mark,
top up to the 40.1
mark with 2-stroke oil.
10
43671 909 IM ed1.indd 10 8/02/2017 2:58 PM
Page 13

AFTER SALES SUPPORT
(toll free)
e-mail: [email protected]1800 909 909
26cc 2-Stroke Petrol Hedge Trimmer
MODEL: №. 43671 HTKS26
Fuel and Lubrication
Filling the tank
WARNING. Always shut o the engine before fuelling. Never add
fuel to a machine with a running or hot engine. Move at least 9 m
(30 ft.) away from the refuelling site before starting engine. Do not
smoke when refuelling or operating the hedge trimmer.
Note. It is normal for smoke to be emitted from a new engine during and
after rst use.
1. Place the hedge trimmer upright on the ground or on a sturdy bench and
wipe any debris from around the fuel cap.
2. Unscrew the fuel tank cap and pour the mixture into the tank with the aid
of a funnel.
3. Be careful not to spill any mixture. If this happens, wipe the spill with a
clean rag.
4. Start the engine at least nine metres (30ft) away from the area where the
fuel tank has been lled up in order to avoid any risk of re.
• Always use extreme care when handling fuel! Fuel is highly ammable.
• Never attempt to fuel the hedge trimmer if the fuel system components
are damaged or are leaking.
• Never attempt the refuel the engine while it is running or still warm, allow
it to cool before fuelling.
• Never smoke or light any res near the hedge trimmer or fuels.
• Always transport and store fuels in an approved container.
• Never place ammable material close to the engine muer.
• Never operate the hedge trimmer unless it is properly assembled and in
good working condition.
• Do not use fuel which contains ethanol or methanol as it may damage
the fuel lines and other engine parts.
• Mix only enough fuel for your immediate needs. Do not store
pre-mixed fuel.
• Always replace and securely tighten the fuel cap after refuelling.
11
43671 909 IM ed1.indd 11 8/02/2017 2:58 PM
Page 14
26cc 2-Stroke Petrol Hedge Trimmer
AFTER SALES SUPPORT
e-mail: [email protected]
1800 909 909
MODEL: №. 43671 • HTKS26
(toll free)
AFTER SALES SUPPORT
(toll free)
26cc 2-Stroke Petrol Hedge Trimmer
Operating Instructions
Starting A Cold Engine
CAUTION. Ensure the blade cover (22) is
removed before attempting to start the hedge
trimmer.
Note. Ensure the hedge trimmer has been
lled with the relevant fuel:oil 40:1 mixture
before proceeding with operation of the hedge
trimmer.
1. Place the hedge trimmer on a rm at surface.
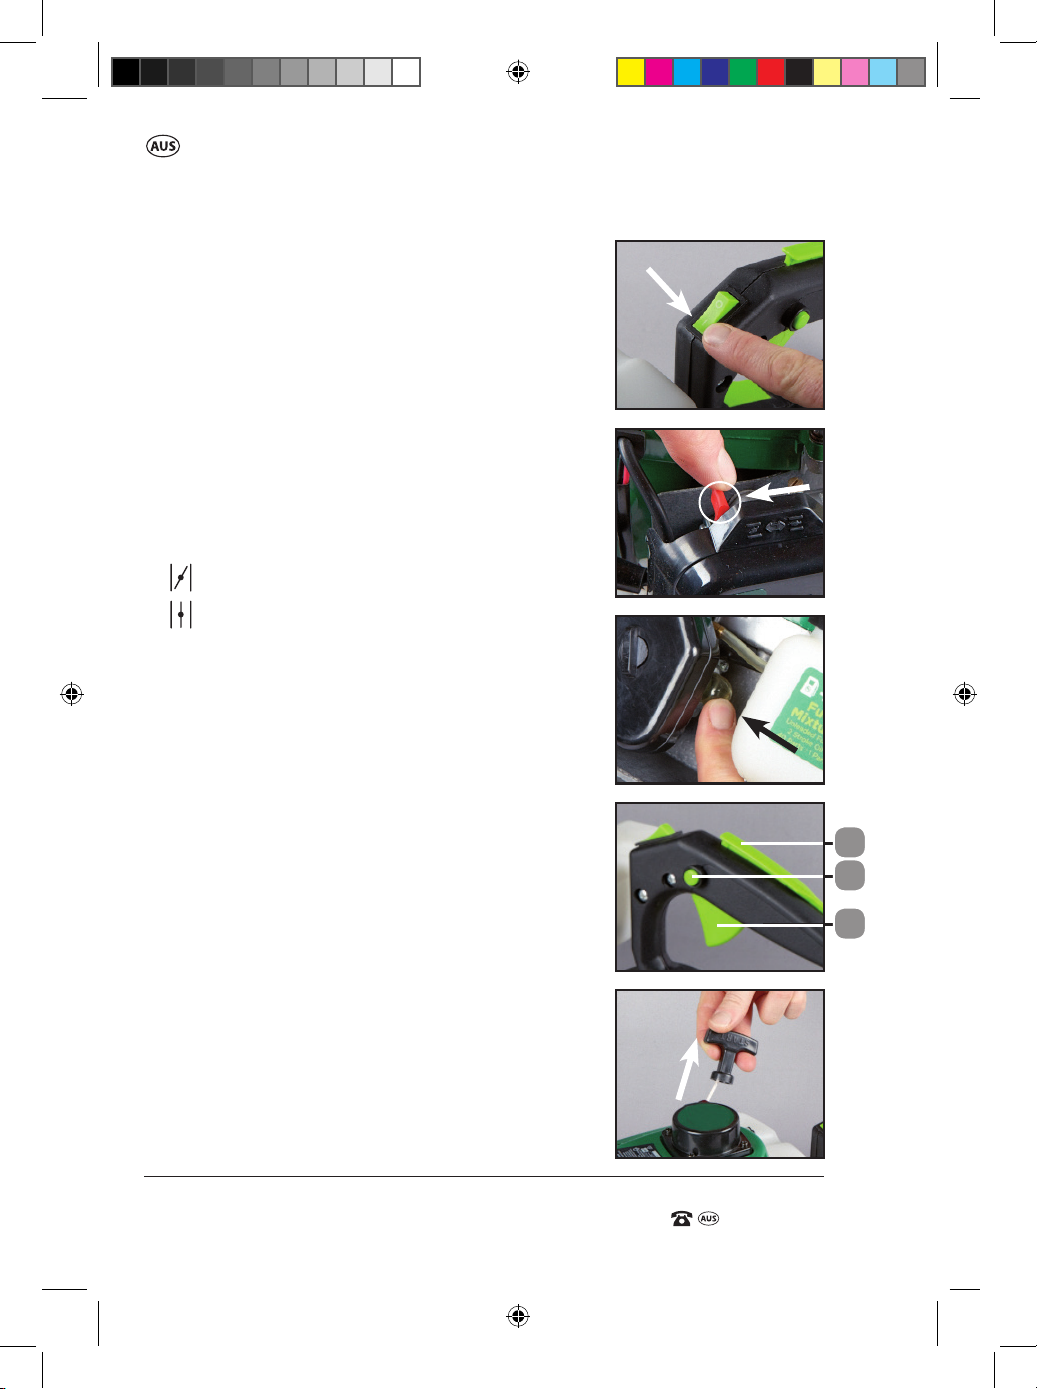
2. Move the on/o Switch (10) to the run position
marked with an “I”. (Fig 1)
3. Your unit is designed with a 2 position choke:
Full Choke and
No Choke.
Move the red choke lever (18) to the Full Choke
position (Fig 2).
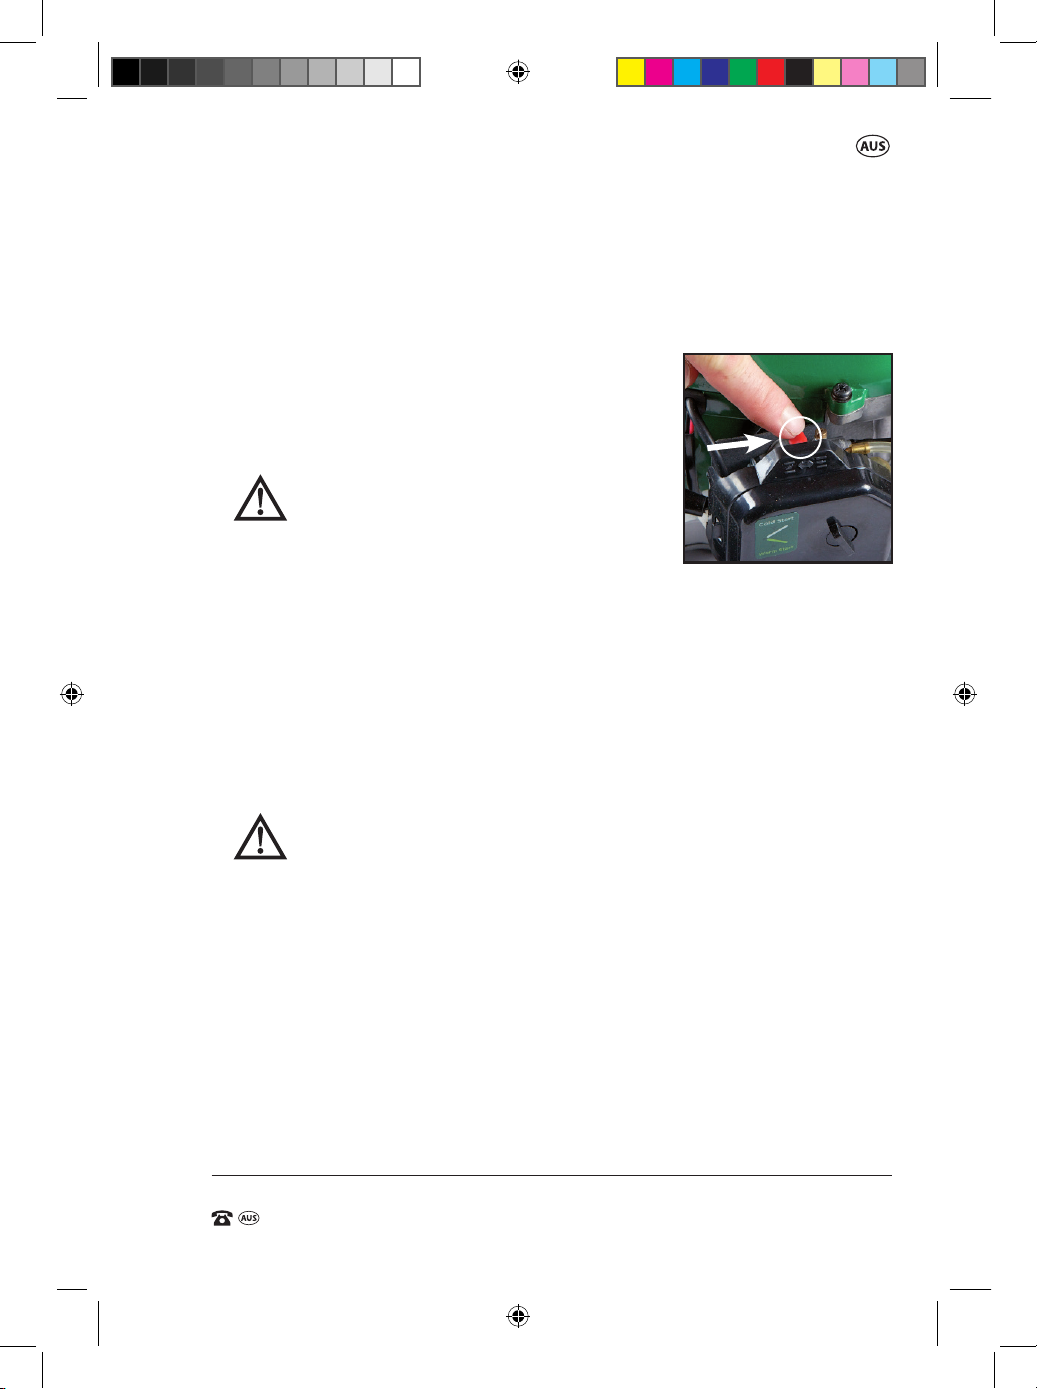
4. Prime the carburettor by pressing the primer
bulb (17) 5-10 times or until there are no air
bubbles visible in the fuel discharge line. (Fig 3).
5. Set the throttle trigger (11) to the “START
POSITION”. Grip the rear handle (15) of the
hedge trimmer and at the same time press down
the safety lever (14). Squeeze FULLY the throttle
Trigger (11) and hold in the full on position.
Depress the throttle start button (16) on the
side of the handle. Whilst holding the throttle
start button (16) depressed, slowly release the
throttle trigger (11). The throttle trigger (11) will
engage on the throttle start button (16), locking
the throttle trigger (11) in a part on condition.
The throttle trigger (11), the safety lever (14)
and the throttle start button (16) can now be
released.
1.
2.
3.
4.
14
16
11
4a.
12
43671 909 IM ed1.indd 12 8/02/2017 2:58 PM
Page 15
AFTER SALES SUPPORT
(toll free)
e-mail: [email protected]1800 909 909
26cc 2-Stroke Petrol Hedge Trimmer
MODEL: №. 43671 HTKS26
Operating Instructions
6. Pull the recoil starter (8) out a short way until resistance is felt
(approximately pull: 4” / 10cm) (Fig 4a). A smooth rapid pull is required for
a strong spark. Pull the recoil starter (8) briskly 4 times.
7. Once the engine starts allow to run for 10 seconds.
Note. If the engine starts at all and then stops,
even for 1 sec, move the choke lever (18) to the
4b.
mid way position between the full choke and no
choke position and pull the recoil starter (8) to re
start.
WARNING. On start up the oscillating
blades may be operational due to the
setting of the starting throttle. Be well
aware of this condition
8. Move the red choke lever (18) to the no choke position (Fig 4b) and allow
to run for a further 10 sec.
9. After the motor is operating and partly warmed after point 8 above, grip
the rear handle (15) of the hedge trimmer and at the same time press
down the safety lever (14). Squeeze slightly the throttle trigger (11) and
then release the trigger.
This will disengage the starting trigger lock and allow the motor to idle
correctly and disengage the oscillating blades.
10. If the engine fails to start, repeat steps 1 through 8.
WARNING. On start up the oscillating blades may be operational
due to the setting of the starting throttle. Be well aware of this
condition.
Note. If the engine fails to start after repeated attempts,
refer to Troubleshooting section.
Note. Always pull the recoil starter (8) straight out. Pulling the recoil
starter (8) at an angle will cause it to rub against the eyelet. This friction
will cause the cord to fray and wear more quickly. Do not pull the end
of the cord, this can damage the recoil starter (8). Always hold the recoil
starter (8) handle when the cord retracts. Never allow the cord to snap
back from the extended position. This could cause the cord to snag or fray
and also damage the recoil starter (8) assembly.
13
43671 909 IM ed1.indd 13 8/02/2017 2:58 PM
Page 16

26cc 2-Stroke Petrol Hedge Trimmer
AFTER SALES SUPPORT
e-mail: [email protected]
1800 909 909
MODEL: №. 43671 • HTKS26
(toll free)
AFTER SALES SUPPORT
(toll free)
26cc 2-Stroke Petrol Hedge Trimmer
Operating Instructions
Stopping the Engine
Emergency Stopping Procedure
When it is completely necessary to stop the engine immediately, PRESS the
on/o switch (10) to the OFF position (position “O”) until the engine stops.
Normal Stopping Method
For normal stopping, release the throttle trigger (11) and allow the engine
to return to its idle speed. Press the on/o switch (10) to the OFF position,
marked with an “O”, until the engine stops completely.
Operation of the Throttle Trigger
The operation of the hedge trimmer is fully controlled from the rear
handle (15).
The throttle trigger (11) fully controls the hedge trimmer as follows.
1. With the motor running and the throttle trigger (11) not being pressed
or locked in for starting, the speed of the motor is at idle and at idle, the
blades are NOT engaged.
2. To engage the blades (1), the motor needs to accelerate.
To increase the speed of the motor, press the safety lever (14) down rst
and then squeeze the throttle trigger (11). The further you squeeze the
throttle trigger (11), the faster the motor will run. During the increase in
motor speed, the blades (1) will engage.
3. To slow the hedge trimmer, release the throttle trigger (11) to obtain
the desired speed. To return the motor to the idle speed and completely
disengage the blades (1), release the throttle trigger (11) completely.
4. Note, Before you can operate the throttle trigger (11), you MUST depress
the safety lever (14)
Starting a Warm Engine
(Engine has been stopped for no more than 15-20 minutes)
1. Move the on/o switch (10) to the run position and pull the recoil starter
(8) cord again. The engine should start with one or two pulls. If the engine
fails to start after 6 pulls, repeat steps 2 through 9 of the “Starting a Cold
Engine” instructions.
14
43671 909 IM ed1.indd 14 8/02/2017 2:58 PM
Page 17
AFTER SALES SUPPORT
(toll free)
e-mail: [email protected]1800 909 909
26cc 2-Stroke Petrol Hedge Trimmer
MODEL: №. 43671 HTKS26
Operating Instructions
The Operation of the Rear Rotating Handle
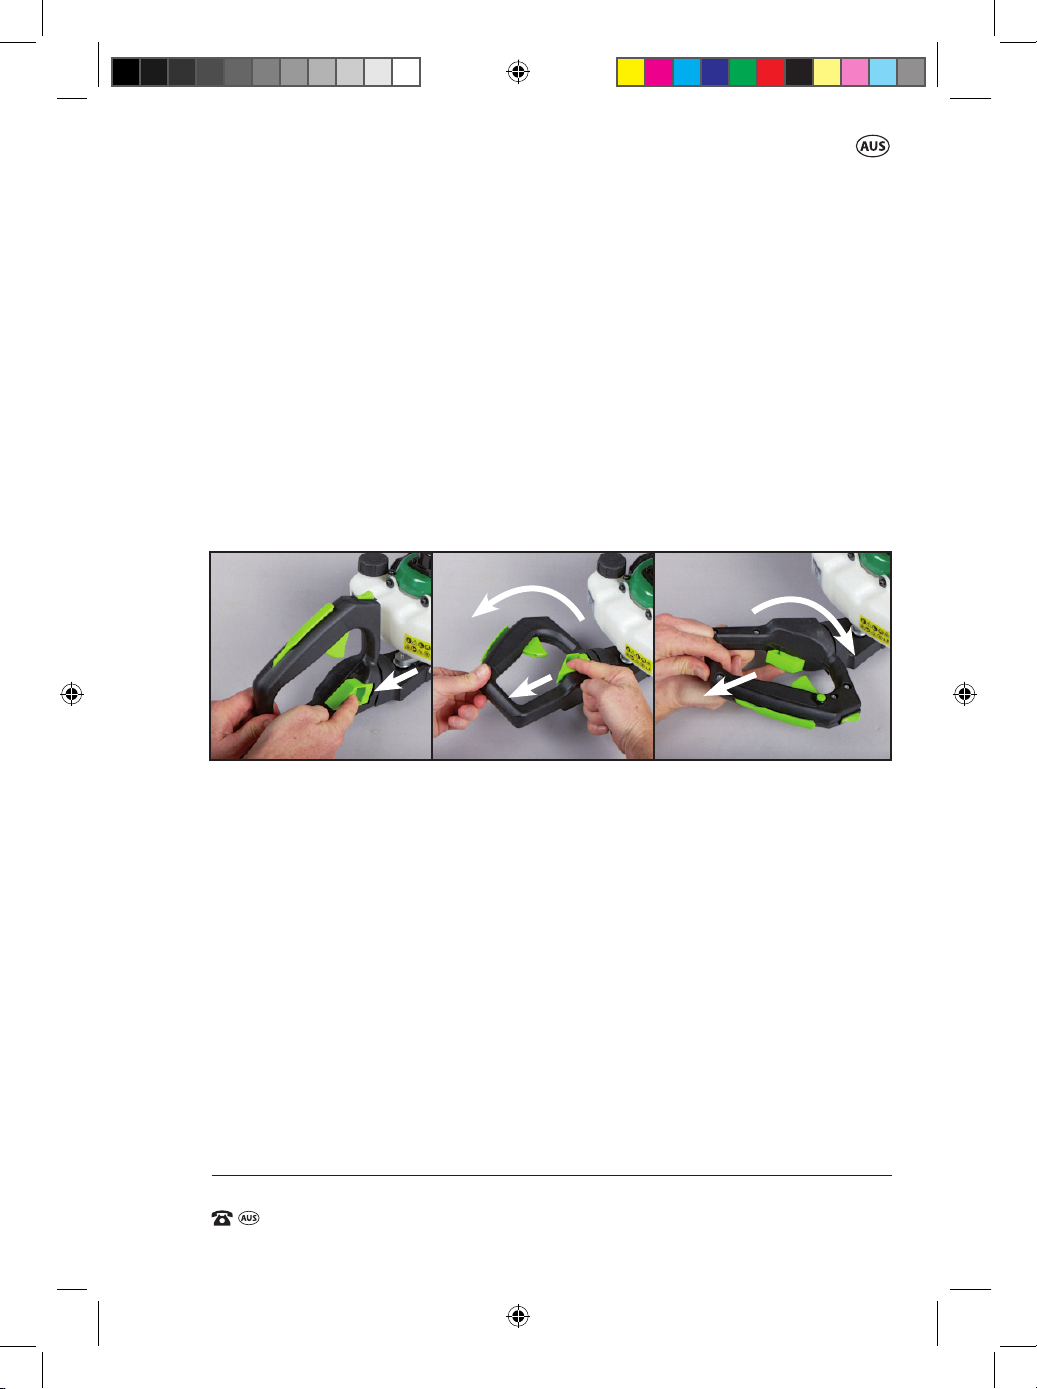
1. The rotating handle (20) can turn left or right up to 90°.
2. The rotating handle (20) can only be adjusted when the machine is
running at idling speed or in the o position however, it is recommended
to adjust the rotating handle (20) while the hedge trimmer is o.
3. Slightly pull out the rotating handle lock lever (19), turn slightly, then
release, and continue to turn the rotating handle (20) in your desired
direction until the rotating handle lock lever (19) snaps back into position
at the +- 90 Degree point.
Note: The hedge trimmer can only be used in the 3 preset positions of
the rear handle.
Use of the Petrol Hedge Trimmer
• Use safety equipment. Always wear eye protection. Safety equipment
such as a dust mask, non-skid safety shoes, hard hat, or hearing
protection used for appropriate conditions will reduce personal injuries.
• This product requires the use of two hands to ensure safe operation.
Rotate the rotating handle (20) to the most comfortable operating
position.
• If unfamiliar with trimming techniques, practice the procedures with the
engine in the “OFF” position.
• Always clear your work area of debris such as cans, bottles, rocks, etc.
Striking objects can cause serious injury to the operator or bystanders
and also damage equipment. If an object is accidentally hit, immediately
turn o the engine and examine the equipment. Never operate the unit
with damaged or defective parts.
15
43671 909 IM ed1.indd 15 8/02/2017 2:58 PM
Page 18

26cc 2-Stroke Petrol Hedge Trimmer
AFTER SALES SUPPORT
e-mail: [email protected]
1800 909 909
MODEL: №. 43671 • HTKS26
(toll free)
AFTER SALES SUPPORT
(toll free)
26cc 2-Stroke Petrol Hedge Trimmer
Operating Instructions
• Do not operate the hedge trimmer with other people or animals in the
immediate vicinity.
• If you are operating it on a slope, stand below the cutting attachment. Do
not operate on a slope or hill if there is the slightest chance of slipping or
losing your footing.
• Do not use this equipment for purposes other than trimming shrubs,
hedges, or bushes.
• Never operate the hedge trimmer without a properly functioning muer
and spark plug cover installed.
• Ensure that the blade cover is removed before starting the hedge trimmer.
• Never operate the hedge trimmer unless it is properly assembled and in
good working condition.
• Start the engine only when you are close to the working area.
• Always trim or cut at high engine speeds. Do not run the engine slowly at
the start or during trimming operations.
• Place yourself in a well-balanced position, stable on both feet.
• Avoid cutting thick branches (larger than 24mm), as this will damage the
blades and shorten the life of the drive system.
• Always keep your body to the carburettor side of your trimmer, never on
the muer side.
• Maintain a steady, even posture while operating. Do not over-reach.
• If the blades jam when operating, switch the engine o and clear any
obstruction.
WARNING.
Wear gloves whenever touching the blades.
• If the blades connect with a hard object during operation stop the engine
and check the blade for damage.
• Never work towards people or solid objects such as walls, trees or
vehicles etc.
• Always release the throttle trigger and allow the engine to return to idle
speed when not cutting.
• DO NOT jam the controls in the on/fast condition. Operate the controls by
hand only.
• Always check the product to be trimmed and do not cut close to fencing
wire, or services but not limited to electricity, gas pipes etc. ALWAYS
check rst.
16
43671 909 IM ed1.indd 16 8/02/2017 2:58 PM
Page 19

AFTER SALES SUPPORT
(toll free)
e-mail: [email protected]1800 909 909
26cc 2-Stroke Petrol Hedge Trimmer
MODEL: №. 43671 HTKS26
Operating Instructions
• Always use the trimmer in a supply of fresh air. Do Not use in conned or
enclosed areas.
• If the hedge trimmer is making unusual sounds or vibrations, turn the unit
o immediately; do not under any conditions leave the hedge trimmer
operating and unattended. Disconnect the spark plug and inspect for
damage or any loose parts.
Also reference the troubleshooting chart or take it to an authorised
service agent.
Using the Hedge Trimmer with the Trimmer on its side.
Often, when either of the rotating handle (20) positions, i.e 90° to the left or
the right is selected, the hedge trimmer will be orientated with the blade (1)
in a vertical position. Please note the following tips.
1. Practice a little with the new orientation of the tool. The balance and feel
is slightly dierent than in the horizontal position.
2. FILL the fuel tank fully when the tool is positioned with the blades (1)
vertical. The fuel pick up tube will not reach the bottom of the tank with
these orientations.
3. Ensure the handle lock is fully engaged.
Note. All protective devices of the machine as well as protective
equipment must be maintained in good operating condition during the
period of use.
Petrol hedge trimmers transmit vibrations to the operator during use.
These vibrations can generate increased fatigue. For this reason, we
recommend taking regular breaks during work. We also recommend
taking a break after a few hours of work to rest the engine. If abnormal
noise or vibration occurs during operation, turn the hedge trimmer o
immediately and have the problem corrected.
17
43671 909 IM ed1.indd 17 8/02/2017 2:58 PM
Page 20
26cc 2-Stroke Petrol Hedge Trimmer
AFTER SALES SUPPORT
e-mail: [email protected]
1800 909 909
MODEL: №. 43671 • HTKS26
(toll free)
AFTER SALES SUPPORT
(toll free)
26cc 2-Stroke Petrol Hedge Trimmer
Operating Instructions
Trimming Instructions
Before operating your unit, review ALL SAFETY PRECAUTIONS in this
manual.
1. WORKING POSITION. Maintain proper footing
and balance and do not overreach. Wear safety
goggles, ear mus, non-skid footwear and
rubber gloves when trimming. Hold the hedge
trimmer rmly in both hands and turn the hedge
trimmer ON. Always hold the hedge trimmer, as
shown in the illustrations, with one hand on the
rear handle and one hand on the front handle
(7). NEVER hold the hedge trimmer by the
protective guard (3).
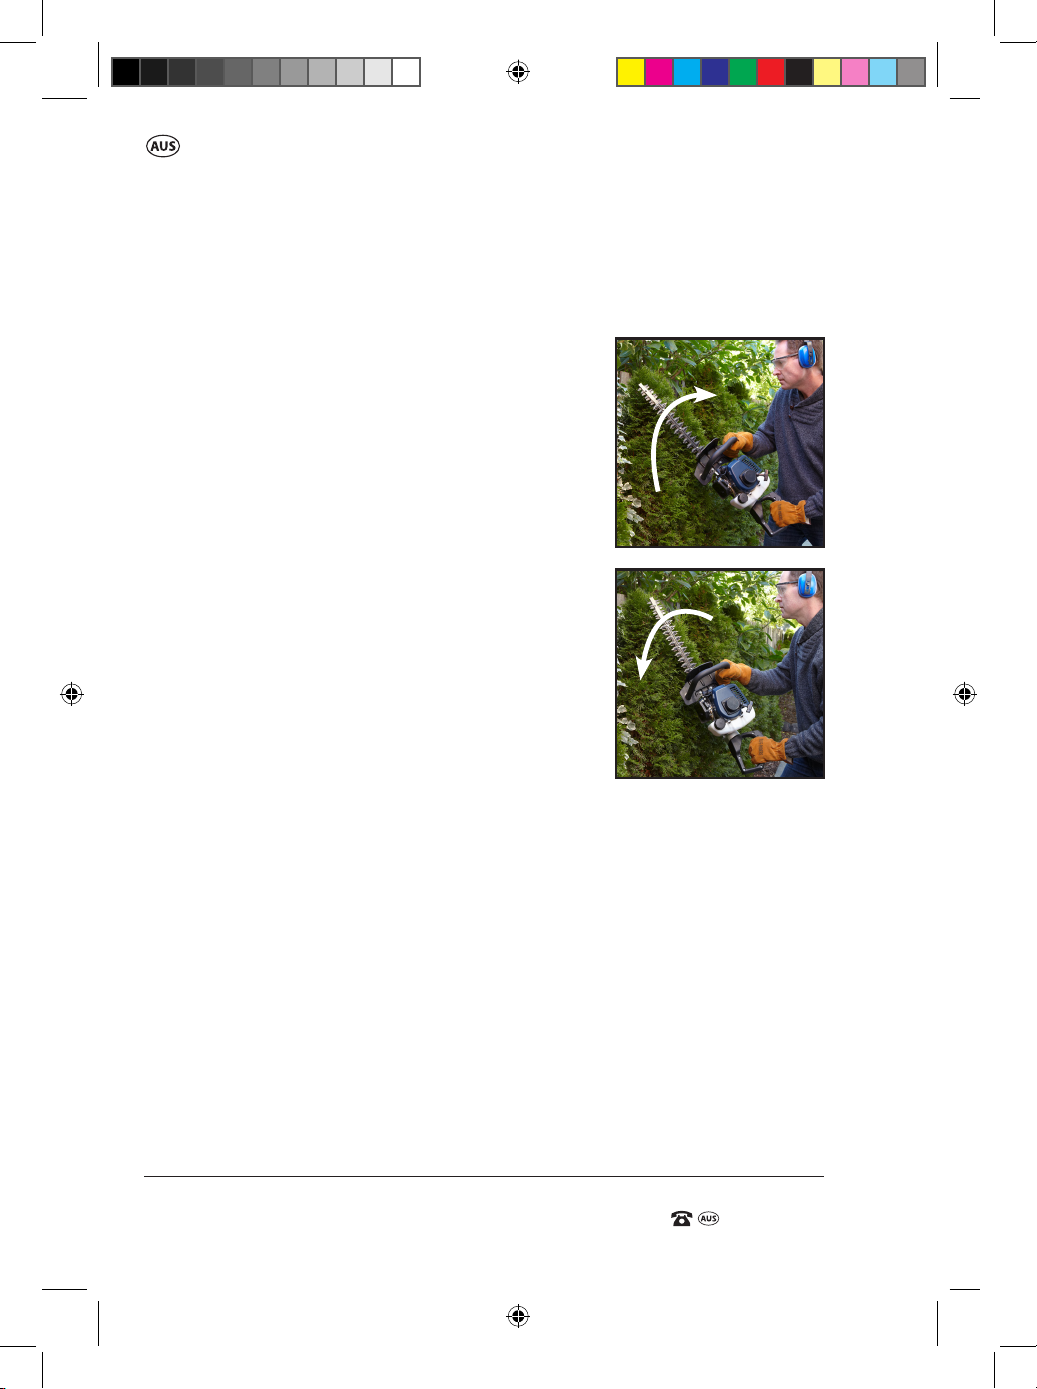
2. TRIMMING NEW GROWTH. A wide, sweeping
motion, feeding the blade teeth through the
twigs is most eective.
A slight downward tilt of the blades (1), in the
direction of motion gives the best cutting.
(Fig 5A)
3. LEVEL HEDGES. To obtain level hedges, a piece
of string can be stretched along the length of the hedge as a guide.
CAUTION: Do not use the hedge trimmer for cutting stems greater than
24mm. Use the hedge trimmer only for cutting normal shrubbery found
around houses and buildings.
4. SIDE-TRIMMING HEDGES. Hold the trimmer as shown and begin at the
bottom and sweep up. (Fig 5B)
5a.
5b.
18
43671 909 IM ed1.indd 18 8/02/2017 2:58 PM
Page 21

AFTER SALES SUPPORT
(toll free)
e-mail: [email protected]1800 909 909
26cc 2-Stroke Petrol Hedge Trimmer
MODEL: №. 43671 HTKS26
Blade Maintenance
WARNING: Ensure the engine is switched o before undertaking all
maintenance work / tasks.
Your hedge trimmer should be stopped and oiled occasionally during use.
1. The cutting blades (1) are made from high quality, hardened steel and
with normal usage, they will not require resharpening. However, if you
accidentally hit a wire fence, stones, glass or other hard objects, you may put
a nick in the blades (1).
There is no need to remove this nick as long as it does not interfere with
the movement of the blade. If it does interfere, stop the engine and use a
sharpening stone to remove the nick.
2. If you drop the hedge trimmer, carefully inspect it for damage. If the
blades/s (1) is bent, the housing cracked, or handles broken or if you see any
other condition that may aect the hedge trimmer’s operation contact an
authorised service centre for repairs before using again.
3. Fertilisers and other garden chemicals contain agents greatly accelerate
the corrosion of metals. Do not store the hedge trimmer on or adjacent to
fertilisers or chemicals.
4. With the unit stopped, use only mild soap and a damp cloth to clean the
outside of the hedge trimmer. Never let any liquid get inside the tool; never
immerse any part of the hedge trimmer into a liquid.
Maintenance
19
43671 909 IM ed1.indd 19 8/02/2017 2:58 PM
Page 22
26cc 2-Stroke Petrol Hedge Trimmer
AFTER SALES SUPPORT
e-mail: [email protected]
1800 909 909
MODEL: №. 43671 • HTKS26
(toll free)
AFTER SALES SUPPORT
(toll free)
26cc 2-Stroke Petrol Hedge Trimmer
Maintenance
Blade Lubrication
6a.
WARNING: Before lubricating, be sure your
hedge trimmer is switched o and blades
(1) have come to a complete stop.
For easier operation and longer blade life,
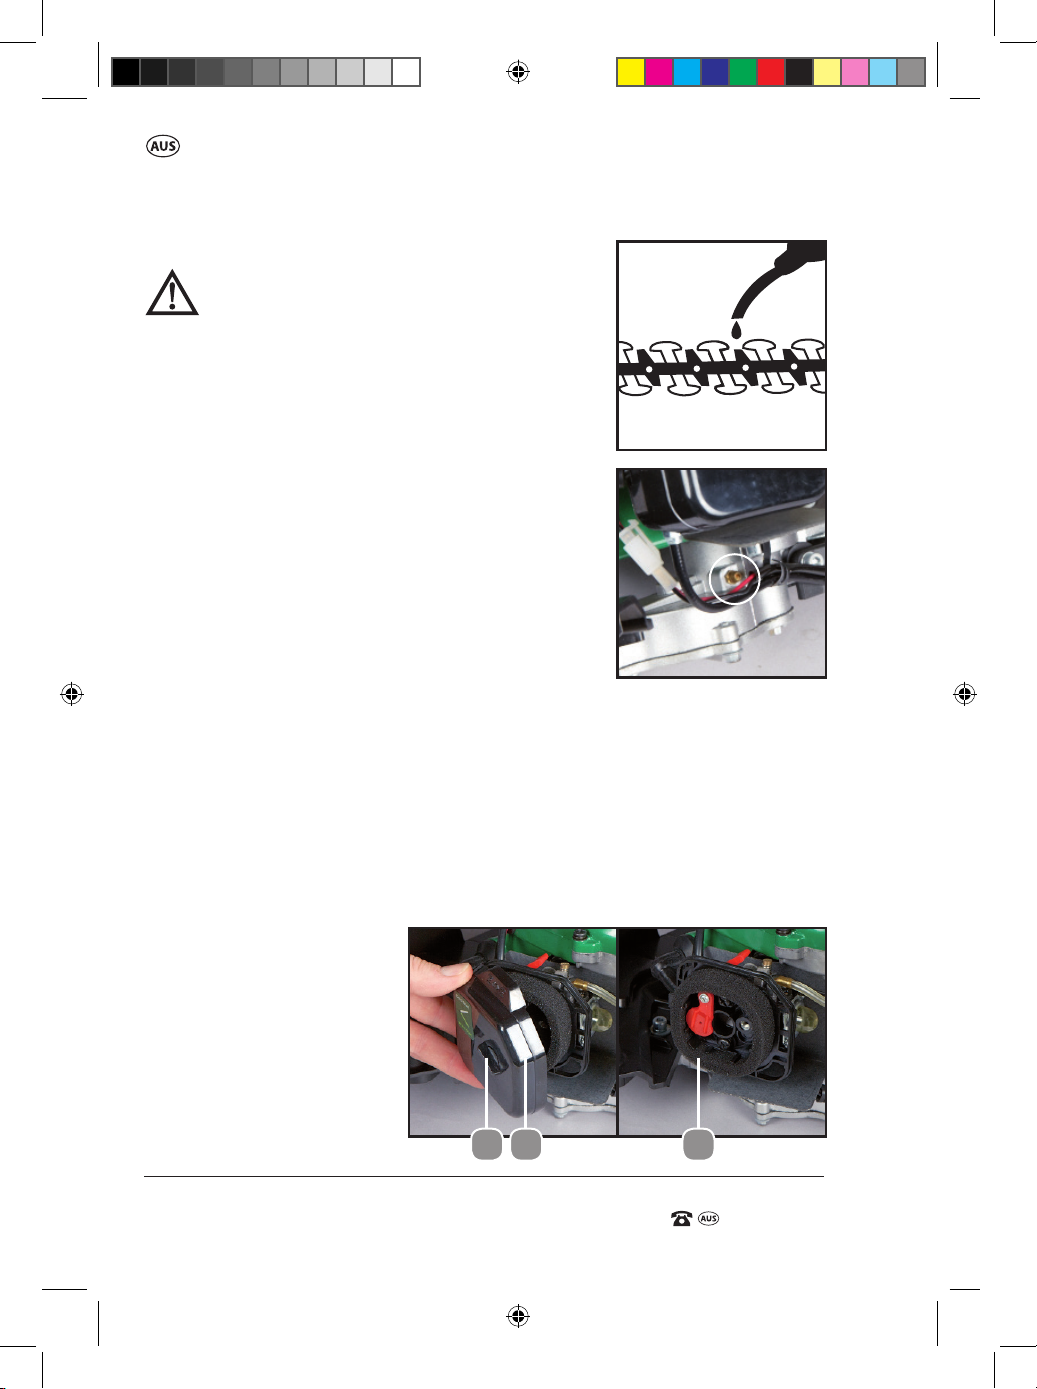
lubricate the blade before and after each use.
Apply light machine oil along the edge of the
blades/s (1) bar (Fig 6A).
Greasing
6b.
The engine requires re-greasing after approximately
every 25 hours of operation.
• Apply lithium grease into the gearbox through the
grease tting after 25 hours running (Fig 6B) (A).
Air Filter
CAUTION: NEVER operate this unit without the air
lter as dust and dirt will be sucked into the engine
and damage it. Accumulated dust in the air lter will reduce engine eciency,
increase fuel consumption and allow abrasive particles to pass into the engine.
Remove the air lter as often as necessary and maintain a clean condition of the
lter and cylinder ns.
To Clean the Air Filter:
1. Loosen knob (A) holding the air lter cover (9) in place, remove cover (B)
and lift out the lter (C) (Fig 7).
2. Wash the lter in soap and water.
DO NOT USE PETROL!
3. Air dry the lter.
4. Reinstall the air lter and
close the air lter cover (9).
Note. Replace lter if
frayed, torn, damaged
or unable to be cleaned.
20
43671 909 IM ed1.indd 20 8/02/2017 2:58 PM
7.
A CB
Page 23

AFTER SALES SUPPORT
(toll free)
e-mail: [email protected]1800 909 909
26cc 2-Stroke Petrol Hedge Trimmer
MODEL: №. 43671 HTKS26
Maintenance
Carburettor Adjustment
The carburettor is pre-set at the factory for optimum performance.
If further adjustments are necessary take your unit to a qualied service dealer.
Spark Plug
Starting failure is often caused by a fouled spark plug.
Periodically clean the spark plug and replace with a
new one if necessary.
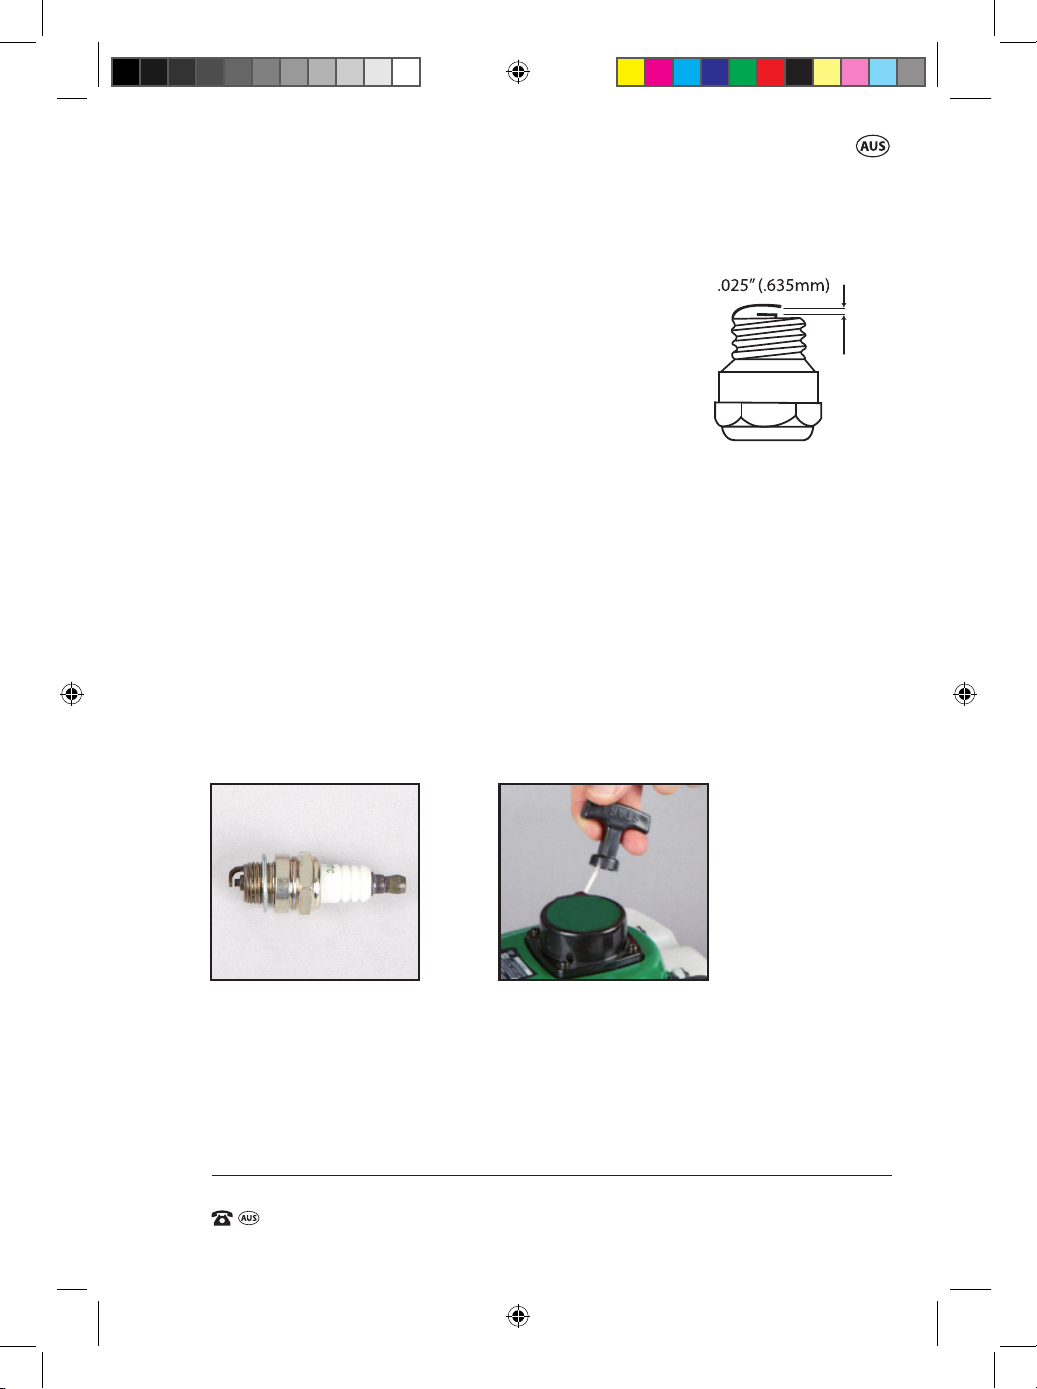
Note. Spark plug gap = .025 in. (.635mm) (Fig 8).
1. Remove the spark plug cover (5).
2. Use the supplied tube spanner / screwdriver to
remove the spark plug (6), by turning it counter-clockwise.
(Torque to 130 inch pounds (15 Nm)
3. Clean and adjust the spark plug gap to 0.6 - 0.7mm. Replace any
damaged or visibly worn plug with a new spark plug - model NGK
BPMR7A or CHAMPION CJ7Y.
4. Install the spark plug (6) nger tight, then tighten with the supplied tube
spanner / screwdriver. Do not over-tighten.
Note. If your spark plug becomes worn, replacements are available for
purchase.
Please refer to page 22 for further detail.
21
43671 909 IM ed1.indd 21 8/02/2017 2:58 PM
Page 24

26cc 2-Stroke Petrol Hedge Trimmer
AFTER SALES SUPPORT
e-mail: [email protected]
1800 909 909
MODEL: №. 43671 • HTKS26
(toll free)
AFTER SALES SUPPORT
(toll free)
26cc 2-Stroke Petrol Hedge Trimmer
Storage
Storage and Maintenance after use
1. Perform all the general maintenance recommended in the Maintenance
Section of your Instruction Manual.
2. Clean the outside surfaces of the hedge trimmer.
3. Check the fuel system for any leaks.
4. Drain the fuel from the fuel tank (12). Note. Do not discard unwanted fuel
with household waste. It must be taken to an authorised repository site.
Note. Draining the fuel tank should be done outdoors.
5. After the fuel is drained, start the engine.
6. Run the engine at idle until the unit stops. This will clear the carburettor
of fuel.
7. Allow the engine to cool (approx. 5 minutes).
8. Using the supplied tube spanner / screwdriver, remove the spark plug (6).
9. Pour 1 teaspoon of clean 2-stroke oil into the combustion chamber. Pull
the recoil starter (8) slowly several times to coat the internal components.
Replace spark plug (6).
10. Store the unit in a cool, dry place away from any source of ignition such as
an oil burner, water heater, etc.
11. If disposing of the unit, recycle the unwanted materials instead of disposing
of them as waste. All tools, hoses and packaging should be sorted, taken to
the local recycling centre and disposed of in an environmentally safe way.
12. Check the operation of the On/O controls prior to use or during
maintenance check. (refer to service centre if not operating correctly)
13. Check the condition of the blade for sharpness, cutting edge damage and
binding/ jamming of the blades prior to use or during maintenance check.
14. Check the clutch operation. With motor at idle, blades must not operate
and should only engage when motor is accelerated and stop when the
motor is slowed to idle prior to use or during maintenance check.
22
43671 909 IM ed1.indd 22 8/02/2017 2:58 PM
Page 25
AFTER SALES SUPPORT
(toll free)
e-mail: [email protected]1800 909 909
26cc 2-Stroke Petrol Hedge Trimmer
MODEL: №. 43671 HTKS26
Removing a unit from storage
1. Remove spark plug (6).
2. Pull the recoil starter (8) briskly to clear excess oil
from the combustion chamber.
3. Clean and gap the spark plug (6) or install a new
spark plug with the proper gap. (Fig 9)
4. Prepare the unit for operation.
5. Fill the fuel tank (12) with the proper fuel / oil mixture.
See Fuel and Lubrication Section.
Service Support
If you have any issues with the operation of your product, please take it with a
copy of your receipt to one of our National Service Agents for repair.
You can nd our most updated listing by visiting powertoolsupport.com, and
clicking on the Service Agent link.
Accessories
Should you nd the spark plug becomes worn or past its user life, replacements
can be purchased online via our website www.extrabattery.com.au
Storage
2. Replacement Spark Plug 2. Replacement Recoil Starter (43671-RS)
(Torch L7RTC)
If you have any queries regarding accessories, please call us on our
Customer Support Line - 1800 909 909.
23
43671 909 IM ed1.indd 23 8/02/2017 2:58 PM
Page 26

26cc 2-Stroke Petrol Hedge Trimmer
AFTER SALES SUPPORT
e-mail: [email protected]
1800 909 909
MODEL: №. 43671 • HTKS26
(toll free)
AFTER SALES SUPPORT
(toll free)
26cc 2-Stroke Petrol Hedge Trimmer
Warranty / Service
Environmental protection
Recycle unwanted materials instead of disposing of them as waste.
All tools, hoses and packaging should be sorted, taken to the local
recycling centre and disposed of in an environmentally safe way.
Dispose of used motor oil in a manner that is compatible with the environment.
We suggest you take it in a sealed container to your local service station for
reclamation. Do not throw it in the trash or pour it into the earth.
24
43671 909 IM ed1.indd 24 8/02/2017 2:58 PM
Page 27

AFTER SALES SUPPORT
(toll free)
e-mail: [email protected]1800 909 909
26cc 2-Stroke Petrol Hedge Trimmer
MODEL: №. 43671 HTKS26
This page is blank
Warranty / Service
25
43671 909 IM ed1.indd 25 8/02/2017 2:58 PM
Page 28
26cc 2-Stroke Petrol Hedge Trimmer
AFTER SALES SUPPORT
e-mail: [email protected]
1800 909 909
MODEL: №. 43671 • HTKS26
(toll free)
AFTER SALES SUPPORT
(toll free)
26cc 2-Stroke Petrol Hedge Trimmer
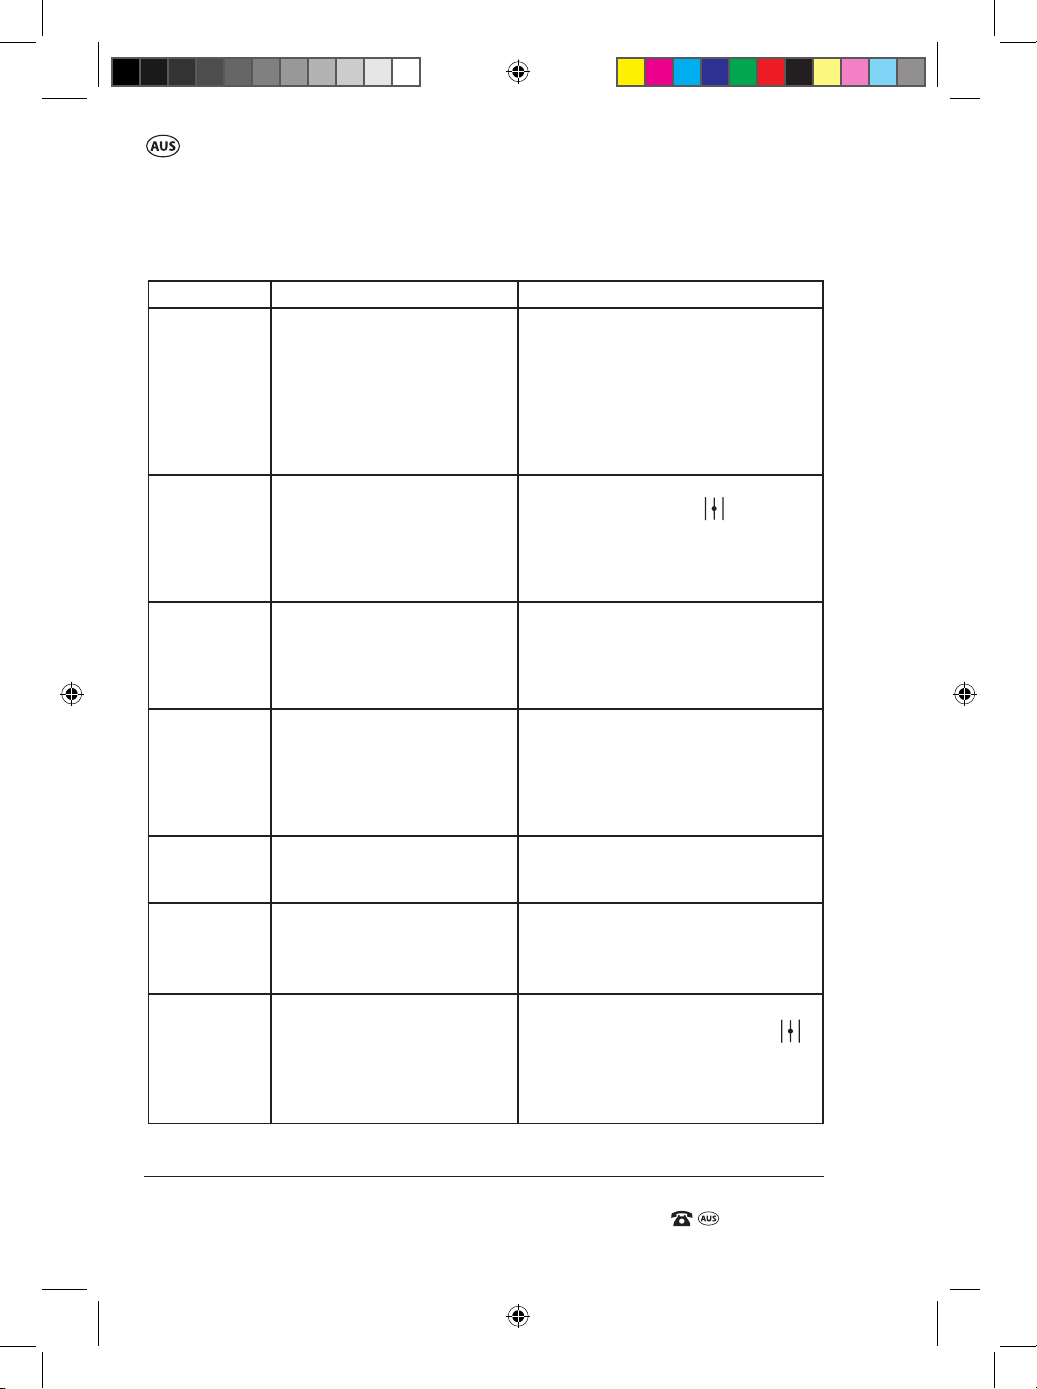
Troubleshooting
Problem Possible Cause Solution
Unit won’t
start or starts
but will not
run.
• Incorrect starting
procedures.
• Incorrect carburettor
mixture adjustment setting.
• Fouled spark plug (6).
• Empty fuel tank (12).
• Primer bulb was not pressed
enough.
• Follow instructions in the user
manual.
• Have carburettor adjusted by an
Authorised Service Centre.
• Clean/gap or replace plug.
•
Fill fuel tank with properly mixed fuel.
• Press primer bulb (17) fully and slowly
10 times.
Unit starts,
but engine has
low power.
•
Incorrect choke lever (18) position.
• Dirty spark arrester.
• Incorrect carburettor
mixture adjustment setting.
•
Move to RUN position:
• Replace spark arrester cover.
• Have carburettor adjusted by an
Authorised Service Centre.
Engine
splutters.
• Incorrect carburettor
mixture adjustment setting.
• Old or improperly mixed
fuel.
• Have carburettor adjusted by an
Authorised Service Centre.
• Drain fuel tank (12)/add fresh fuel
mixture.
N o power
under load.
• Incorrect carburettor
mixture adjustment setting.
• O
ld or improperly mixed
fuel.
• Dirty spark plug (6).
• Air filter is blocked.
• Air filter is blocked.
• Fuel filter is blocked.
• Dirty air filter. • Remove, clean and reinstall filter.
• Replace the Fuel filter.
• Replace or clean air filter.
• Replace or clean air filter.
• Have carburettor adjusted by an
Authorised Service Centre.
• Drain fuel tank (12) /add fresh fuel
mixture.
• Clean/gap or replace plug.
Runs
erratically.
•
Incorrectly gapped spark plug (6).
• Dirty spark arrester.
• Dirty air filter. • Clean or replace air filter.
• Clean/gap or replace plug.
• Clean or replace spark arrestor.
Smokes
Motor keeps
stopping when
using the hedge
trimmer on
its side.
excessively.
• Incorrect carburettor
• Choke lever (18) not in the
open or run position
• Check the position of the red choke
lever (18). Ensure the lever (18)
is in the full run position.
• Fuel tank (12) needs to be close to a full
tank when running the hedge trimmer
on its side. Fill fuel tank (12) with fuel.
• Low fuel level
mixture adjustment setting.
• Incorrect fuel mixture.
• Have carburettor adjusted by an
Authorised Se
rvice Centre.
• Use properly mixed fuel
(40:1 mixture).
Troubleshooting
For other issues not covered in this chart, please call Customer Service on 1800 909 909.
26
43671 909 IM ed1.indd 26 8/02/2017 2:58 PM
Page 29

AFTER SALES SUPPORT
(toll free)
e-mail: [email protected]1800 909 909
26cc 2-Stroke Petrol Hedge Trimmer
MODEL: №. 43671 HTKS26
Specications
Engine: 26cc, 2 stroke
Idling Engine speed: 3000min-
Full Engine speed: 9000min-
Blade cutting length: 510mm
Bar length: 633mm
Maximum Cutting capacity Ø : 24mm
Fuel tank capacity: 500ml
Fuel type: Unleaded petrol
Fuel mixture: Unleaded petrol: 2-Stroke oil (40:1)
Spark Plug: Torch L7RTC
Equivalent spark plugs: NGK BPMR7A CHAMPION RCJ6Y
Net Weight: 5.5kg
Noise label rating: 84dBA (taken at 7.5 metres)
You must wear ear protection at all times.
1
1
Specications
A-weighted sound pressure
level LpA eq: 101.28 dB(A)
A-weighted sound power
level LwA eq: 109.61 dB(A)
Uncertainty (K): 3 dB(A)
Hand Vibration Calculated
Equivalent Value: Front Handle 10.677m/s2
Rear Handle 6.186 m/s2
Uncertainty (K): 1.5 m/s2
Product Dimensions: 96cm x 24cm x 21cm +/- 10% (L x W x H)
This product complies with: Safety EN 10517:2009 + A1
EMC EN55012:2007+A1,
EN61000-6-3:2007, EN61000-6-1:2007
27
43671 909 IM ed1.indd 27 8/02/2017 2:58 PM
Page 30

26cc 2-Stroke Petrol Hedge Trimmer
AFTER SALES SUPPORT
e-mail: [email protected]
1800 909 909
MODEL: №. 43671 • HTKS26
(toll free)
AFTER SALES SUPPORT
(toll free)
26cc 2-Stroke Petrol Hedge Trimmer
This page is blank
28
43671 909 IM ed1.indd 28 8/02/2017 2:58 PM
Page 31

AFTER SALES SUPPORT
(toll free)
e-mail: [email protected]1800 909 909
26cc 2-Stroke Petrol Hedge Trimmer
MODEL: №. 43671 HTKS26
This page is blank
29
43671 909 IM ed1.indd 29 8/02/2017 2:58 PM
Page 32

 Loading...