

Page 1

® ProxyBlocker
USER
GUIDE
Model: ProxyBlocker
Release 2.1.00 • Manual Version 1.01
Page 2

ii 8E6 TECHNOLOGIES, PROXYBLOCKER USER GUIDE
Page 3

8E6 PROXYBLOCKER USER GUIDE
© 2008 8e6 Technologies
All rights reserved.
Version 1.01, published July 2008
To be used with the ProxyBlocker Authentication User Guide
version 1.01 for software release 2.1.00
Printed in the United States of America
This document may not, in whole or in part, be copied, photocopied, reproduced, translated, or reduced to any electronic
medium or machine readable form without prior written consent from 8e6 Technologies.
Every effort has been made to ensure the accuracy of this
document. However, 8e6 Technologies makes no warranties
with respect to this documentation and disclaims any implied
warranties of merchantability and fitness for a particular purpose. 8e6 Technologies shall not be liable for any error or for
incidental or consequential damages in connection with the
furnishing, performance, or use of this manual or the examples herein. Due to future enhancements and modifications of
this product, the information described in this documentation
is subject to change without notice.
The latest version of this document can be obtained from
http://www.8e6.com/docs/pba_ug.pdf.
Trademarks
Other product names mentioned in this manual may be trademarks or registered trademarks of their respective companies
and are the sole property of their respective manufacturers.
Part# PBA2.0-UG_v1.01-0807
8E6 TECHNOLOGIES, PROXYBLOCKER USER GUIDE iii
Page 4

iv 8E6 TECHNOLOGIES, PROXYBLOCKER USER GUIDE
Page 5

CONTENTS
INTRODUCTORY SECTION ...............................................1
8e6 ProxyBlocker ........................................................................1
About this User Guide ................................................................1
How to Use this User Guide .......................................................3
Conventions ...................................................................................... 3
Terminology ...................................................................................... 4
Overview ......................................................................................9
Environment Requirements .....................................................10
Workstation Requirements ..............................................................10
Network Requirements .................................................................... 10
Chapter 1: Filtering Operations ...............................................11
Invisible Mode ................................................................................. 11
Global Group ............................................................................ 13
Static Filtering Profiles ..............................................................16
Master IP Group Filtering Profile......................................... 16
IP Sub-Group Filtering Profile .............................................16
Individual IP Member Filtering Profile ................................. 16
Global Filtering Profile.........................................................17
Override Account Profile ..................................................... 17
Time Profile ......................................................................... 17
Lock Profile ......................................................................... 17
8e6 Supplied Categories..................................................... 19
Custom Categories .............................................................19
Rules ........................................................................................ 20
Minimum Filtering Level ............................................................ 20
Filter Settings ............................................................................21
Filtering Rules ................................................................................. 22
Filtering Levels Applied ............................................................22
Chapter 2: Logging and Blocking ............................................25
Web Access Logging ......................................................................25
How IM and P2P Blocking Works .............................................26
8E6 TECHNOLOGIES, PROXYBLOCKER USER GUIDE v
Page 6

CONTENTS
IM Blocking.......................................................................... 26
Setting up IM and P2P .............................................................. 27
Block IM, P2P for All Users ................................................. 28
Block IM for All Users ................................................... 28
Block Specified Entities from Using IM, P2P.......................29
Block IM for a Specific Entity ........................................29
Chapter 3: Getting Started .......................................................31
Initial Setup ..................................................................................... 31
Using the Administrator Console ..................................................... 31
Log On ...................................................................................... 31
Access Main Sections ......................................................... 36
Access Help Topics ......................................................38
Screen and Window Navigation ..........................................40
Navigation Path ............................................................ 46
Select Multiple Items..................................................... 47
Copy and Paste Text .................................................... 47
Calculate IP Ranges without Overlaps .........................48
Log Off ...................................................................................... 49
GLOBAL ADMINISTRATOR SECTION ..............................50
Introduction ...............................................................................50
Chapter 1: System screen ........................................................51
Local Filtering......................................................................55
Disable Local Filtering Options .....................................55
Enable Local Filtering Options...................................... 55
Enable HTTP Packet Splitting Detection ......................56
Disable HTTP Packet Splitting Detection ..................... 56
Service Control.................................................................... 58
Enable Pattern Blocking ............................................... 58
Disable Pattern Blocking...............................................59
Option 2 ........................................................................66
Shut Down the Server ......................................................... 68
Add an NTP Server.......................................................76
Remove an NTP Server................................................76
Remove a Router ................................................................ 80
Administrator window ............................................................... 81
View Administrator Accounts ..............................................82
Add an Administrator Account............................................. 82
vi 8E6 TECHNOLOGIES, PROXYBLOCKER USER GUIDE
Page 7

Delete an Administrator Account......................................... 83
View Account Status..................................................... 90
View Locked IP Address, Unlock IP Address......................91
View Locked IPs ...........................................................91
Unlock an IP Address ................................................... 91
Command Selections .......................................................... 96
Ping............................................................................... 96
Trace Route .................................................................. 96
Process list ...................................................................96
NIC configuration .......................................................... 97
Active connections........................................................ 97
Routing table................................................................. 97
CPU usage ...................................................................98
System performance..................................................... 98
Recent logins ................................................................ 98
df(disk usage) ...............................................................99
dmesg(print kernel ring buffer)...................................... 99
Active Profile Lookup window .................................................105
Admin Audit Trail window ....................................................... 109
Admin Audit Trail...............................................................109
FTP the Log on Demand ............................................ 110
View the Log of Administrator Changes ..................... 111
Modify Alert Settings ......................................................... 115
Disable the Alert Feature ..................................................115
Enter, Edit SMTP Server Settings.....................................116
Verify SMTP Settings ........................................................ 117
Undo an Applied Software Update.................................... 123
View Log Contents ............................................................ 124
Download the Log....................................................... 125
Save, Print the Log File Contents ...............................129
Specify the Listening Device ............................................. 131
Specify the Block Page Delivery ....................................... 132
Apply Settings ................................................................... 133
Use Proxy Port 80 ............................................................. 135
NIC Mode window .................................................................. 137
Backup/Restore window ......................................................... 140
Backup Procedures...........................................................141
Upload a File to the Server......................................... 145
Restore Configurations to the Server ......................... 146
View Backup and Restoration Details ...............................147
Reset window .........................................................................148
CONTENTS
8E6 TECHNOLOGIES, PROXYBLOCKER USER GUIDE vii
Page 8

CONTENTS
Reset All Server Settings ..................................................148
SNMP window ........................................................................149
Specify Monitoring Settings............................................... 150
Set up Community Token for Public Access...............150
Create, Build the Access Control List ......................... 150
Maintain the Access Control List ................................ 150
Hardware Failure Detection window .......................................151
X Strikes Blocking window ...................................................... 153
Configuration.....................................................................154
Set up Blocking Criteria .............................................. 154
Reset All Workstations................................................155
Lock Page...................................................................155
Overblocking or Underblocking...................................156
Set up Email Alert Criteria .......................................... 158
Set up Email Alert Recipients ..................................... 159
Logon Accounts ................................................................160
Set up Users Authorized to Unlock Workstations ....... 160
Deactivate an Authorized Logon Account................... 161
Delete a Logon Account ............................................. 161
Categories.........................................................................162
Set up Categories to Receive Strikes or No Strikes ... 162
Go to X Strikes Unlock Workstation GUI........................... 163
Re-login window .........................................................163
Unlock a Workstation.................................................. 164
Remove an Email Address from the Alert List ............ 165
Close the Pop-up Window .......................................... 165
Warn Option Setting window .................................................. 166
Specify the Interval for Re-displaying the Warn page ....... 167
Block Page Customization window ......................................... 175
Add, Edit Entries ...............................................................176
Edit Entries........................................................................185
Quota Notice Page Customization window .............................189
Add, Edit Entries ...............................................................190
Quota Setting window ............................................................. 193
Reset Quotas .................................................................... 194
Reset Quotas Now...................................................... 194
Set up a Schedule to Automatically Reset Quotas.....195
Delete a Quota Reset Time from the Schedule .......... 195
Quota Block page.............................................................. 197
Chapter 2: Group screen ........................................................199
viii 8E6 TECHNOLOGIES, PROXYBLOCKER USER GUIDE
Page 9

Remove a Segment from the Network ..............................212
Add a Rule ........................................................................214
Modify a Rule .................................................................... 216
Copy a Rule ...................................................................... 216
Remove a Rule .................................................................217
Create, Edit a List of Selected Categories.................. 219
Create, Edit a List of Service Ports............................. 222
Default Redirect URL ........................................................ 223
Create, Edit the Redirect URL .................................... 223
Filter Options..................................................................... 224
Create, Edit the Filter Options .................................... 224
Add an Override Account .................................................. 229
Filter Options ..............................................................234
Change the Password ................................................ 237
Modify an Override Account ....................................... 237
Minimum Filtering Level window ............................................. 238
Minimum Filtering Categories ........................................... 238
Create, Edit a List of Service Ports............................. 241
Minimum Filtering Bypass Options.................................... 242
Refresh All Main Branches................................................ 244
Add a Master IP Group .....................................................246
Refresh ................................................................................... 247
Refresh IP Groups ............................................................247
CONTENTS
Chapter 3: Library screen .......................................................248
Set a Time for Updates to be Retrieved............................ 251
Select the Log Level.......................................................... 252
Select Additional Languages............................................. 255
View the Library Update Process...................................... 257
Download the Log....................................................... 258
View the Contents of the Log......................................259
Save, Print the Log File Contents ...............................262
View the Emergency Software Update Process ............... 263
Library Lookup window ...........................................................265
Perform a URL Check................................................. 266
Submit an Email to the Administrator ......................... 267
Perform a Search Engine Keyword Check ................. 268
Remove a Search Engine Keyword............................ 268
Reload the Library.............................................................268
Category Weight System window ........................................... 269
Method for Weighting Library Categories..........................270
8E6 TECHNOLOGIES, PROXYBLOCKER USER GUIDE ix
Page 10

CONTENTS
NNTP Newsgroup window ...................................................... 272
Add a Newsgroup to the Library........................................ 272
View Library Details ..........................................................276
Add a URL to the Library Category.............................279
Reload the Library ...................................................... 281
View a List of URL Keywords............................................283
Add or Remove URL Keywords ........................................ 283
Add a URL Keyword to the Library Category.............. 283
Remove a URL Keyword from the Library .................. 283
Upload a List of URL Keyword Additions....................284
Reload the Library.............................................................285
View a List of Search Engine Keywords ........................... 287
Add or Remove Search Engine Keywords ........................287
Add a Search Engine Keyword to the Library............. 287
Upload a List of Search Engine Keywords........................ 288
Upload a List of Search Engine Keyword Additions ... 288
Reload the Library.............................................................289
Chapter 4: Reporting screen .................................................. 290
Report Configuration window .................................................291
Specify the Reporting Device............................................291
8e6 Enterprise Reporter....................................................292
Edit ER Server Information .........................................292
Execute Log Transfer Now ......................................... 293
View Transfer Activity to the ER ................................. 293
Other Device ..................................................................... 294
Enter or Edit Server Information ................................. 294
View Transfer Activity to the Reporting Device........... 296
Real Time Probe window ........................................................ 297
Enable Real Time Probes........................................... 298
Set up Real Time Probes............................................298
Exclude an IP Address from Real Time Probing ........298
Report Recipients.............................................................. 299
Specify Email File Criteria........................................... 299
Set up Email Addresses to Receive Reports..............300
Remove Email Addresses .......................................... 300
Set up Users Authorized to Create Probes.................301
Deactivate an Authorized Logon Account................... 302
Delete a Logon Account ............................................. 302
Re-login window .........................................................303
Create a Real Time Probe..........................................304
x 8E6 TECHNOLOGIES, PROXYBLOCKER USER GUIDE
Page 11

GROUP ADMINISTRATOR SECTION .............................311
Introduction .............................................................................311
Chapter 1: Group screen ........................................................312
IP ...................................................................................................313
Refresh ................................................................................... 313
Refresh the Master IP Group, Member .............................313
Change the Group Administrator Password...................... 315
Add the IP Address of the Member ................................... 316
Remove a Member from the Group .................................. 317
Add an Override Account .................................................. 319
Category Profile .......................................................... 320
Edit an Override Account ..................................................326
Change the Password ................................................ 326
Modify an Override Account ....................................... 326
Delete an Override Account .............................................. 327
Category Profile ................................................................ 328
Create, Edit a List of Selected Categories.................. 329
Redirect URL..................................................................... 331
Create, Edit the Redirect URL .................................... 331
Filter Options..................................................................... 332
Create, Edit the Filter Options .................................... 332
ByPass URL frame............................................................ 336
Apply Settings ................................................................... 336
Add a Time Profile............................................................. 337
Delete a Time Profile......................................................... 348
Add an IP Sub Group ........................................................ 352
Add Individual IP ..................................................................... 353
Add an Individual IP Member ............................................ 353
Delete Group .......................................................................... 354
Delete a Master IP Group Profile ...................................... 354
Paste a Copied IP Sub Group........................................... 355
View IP Sub-Group Details ...............................................357
Members window ....................................................................359
Sub Group Profile window ...................................................... 360
Time Profile window ............................................................... 361
Delete Sub Group ................................................................... 361
Delete an IP Sub-Group....................................................361
Copy an IP Sub-Group......................................................362
Enter the IP Address of the Member................................. 364
CONTENTS
8E6 TECHNOLOGIES, PROXYBLOCKER USER GUIDE xi
Page 12

CONTENTS
Exception URL window ........................................................... 365
Time Profile window ............................................................... 365
Delete Individual IP ................................................................. 366
Delete an Individual IP Member ........................................ 366
Chapter 2: Library screen .......................................................367
Library Lookup window ...........................................................368
View, Edit Library Details .................................................. 372
URLs window .......................................................................... 373
Add a URL to the Library Category.............................375
Upload a Master List of URLs..................................... 378
Upload a Master List of Wildcard URLs...................... 380
Reload the Library.............................................................382
View a List of URL Keywords............................................384
Add or Remove URL Keywords ........................................ 384
Add a URL Keyword to the Library Category.............. 384
Remove a URL Keyword from the Library .................. 384
Reload the Library.............................................................385
View a List of Search Engine Keywords ........................... 387
Add or Remove Search Engine Keywords ........................387
Add a Search Engine Keyword to the Library............. 387
Upload a Master List of Search Engine Keywords............388
Reload the Library.............................................................388
Delete a Custom Category................................................389
TECHNICAL SUPPORT / PRODUCT WARRANTIES .........390
Technical Support ...................................................................390
Hours ............................................................................................. 390
Contact Information .......................................................................390
Domestic (United States) ........................................................ 390
International ............................................................................ 390
E-Mail ..................................................................................... 390
Office Locations and Phone Numbers .................................... 391
8e6 Corporate Headquarters (USA)..................................391
8e6 Taiwan........................................................................ 391
Product Warranties .................................................................393
Standard Warranty ........................................................................ 393
Extended Technical Support and Service .....................................395
xii 8E6 TECHNOLOGIES, PROXYBLOCKER USER GUIDE
Page 13

APPENDICES SECTION ...............................................396
Appendix A ..............................................................................396
Filtering Profile Format and Rules .................................................396
Appendix B ..............................................................................400
Traveler Log Messages ................................................................. 400
Startup, Finish ................................................................... 401
Command Executed More than Once............................... 401
System Command Execution............................................ 401
Temp Files ........................................................................ 401
Library Update Process..................................................... 403
Printstack Trace ................................................................ 403
Summary Messages .........................................................405
All Library Updates (includes all other msgs.) ........................ 406
IM and P2P Pattern File Update ....................................... 406
Newsgroup Library Update (News) ...................................406
Patch Update .......................................................................... 407
Emergency Update .................................................................407
Appendix C ..............................................................................408
Create a Custom Block Page ........................................................ 408
Part I: Modify the ProxyBlocker ..............................................408
1. Enable block page redirection....................................... 408
Option 1: Modify the back end ....................................408
2. Exclude filtering <server for block page> IP..................409
Part II: Customize the Block Page ..........................................410
1. Set up a Web server .....................................................410
2. Create a customized block page................................... 410
Show 8e6’s information in the block page (optional) .. 410
Customized block page examples.............................. 411
Part III: Restart the ProxyBlocker ........................................... 411
HTML ................................................................................ 412
Embed data in query string......................................... 414
Use Java Script to post form data...............................415
CONTENTS
Appendix D ..............................................................................423
Override Pop-up Blockers ............................................................. 423
Yahoo! Toolbar Pop-up Blocker .................................................... 424
If Pop-up Blocking is Enabled ................................................. 424
Add Override Account to the White List .................................. 424
8E6 TECHNOLOGIES, PROXYBLOCKER USER GUIDE xiii
Page 14

CONTENTS
If Pop-up Blocking is Enabled ................................................. 426
Add Override Account to the White List .................................. 426
If Pop-up Blocking is Enabled ................................................. 427
Temporarily Disable Pop-up Blocking .....................................427
Add Override Account to the White List .................................. 428
Set up Pop-up Blocking .......................................................... 429
Use the Internet Options dialog box.................................. 429
Temporarily Disable Pop-up Blocking .....................................430
Use the IE Toolbar ............................................................ 431
Set up the Information Bar.......................................... 432
Access your Override Account ................................... 432
Appendix E ..............................................................................434
Configure ProxyBlocker for ER Reporting .....................................434
Entries in the ProxyBlocker Admin console ............................ 434
Appendix F ...............................................................................437
RAID Maintenance ........................................................................ 437
Part 1: Hardware Components ............................................... 437
Part 2: Server Interface ..........................................................438
LED indicators in SL units ................................................. 438
Hard drive failure...............................................................442
Step 1: Review the notification email.......................... 442
Step 5: Contact Technical Support ............................. 445
Power supply failure..........................................................445
Step 1: Identify the failed power supply ......................445
Step 2: Unplug the power cord ................................... 445
Step 4: Contact Technical Support ............................. 446
Identify a fan failure .................................................... 447
Appendix H ..............................................................................448
Glossary ........................................................................................ 448
INDEX .......................................................................455
xiv 8E6 TECHNOLOGIES, PROXYBLOCKER USER GUIDE
Page 15

INTRODUCTORY SECTION 8E6 PROXYBLOCKER
INTRODUCTORY SECTION
8e6 ProxyBlocker
8e6 Technologies’ 8e6 ProxyBlocker offers a solution for
organizations using an Internet filtering product other than
8e6’s R3000 Enterprise Filter. 8e6 ProxyBlocker tracks
each user’s online activity of Web-based proxies and anonymizers, and can be configured to block specific Web sites
or service ports, thereby protecting your organization
against lost productivity, network bandwidth issues, and
possible legal problems that can result from the misuse of
Internet resources.
About this User Guide
The 8e6 ProxyBlocker User Guide primarily addresses the
network administrator designated to configure and manage
the 8e6 ProxyBlocker server on the network. This administrator is referred to as the “global administrator” throughout
this user guide. In part, this user guide also addresses
administrators who manage user groups on the network.
These administrators are referred to as “group administrators” throughout this user guide. Additional information is
provided for administrators of networks that use 8e6 ProxyBlocker with 8e6’s Enterprise Reporter (ER) for both filtering
and reporting.
See the 8e6 ProxyBlocker Authentication User Guide at
http://www.8e6.com/docs/pba_auth_ug.pdf for information on authentication.
This user guide is organized into the following sections:
• Introductory Section - This section is comprised of an
overview on filtering, Web access logging, and instant
messaging and peer-to-peer blocking. This section also
8E6 TECHNOLOGIES, PROXYBLOCKER USER GUIDE 1
Page 16

INTRODUCTORY SECTION ABOUT THIS USER GUIDE
provides information on how to use this user guide to
help you configure the ProxyBlocker.
• Global Administrator Section - This section includes
information for the global administrator—who has all
rights and permissions on the ProxyBlocker box—to
create group administrator accounts, and to configure
the ProxyBlocker for use on the network.
• Group Administrator Section - This section includes
information for administrators authorized by the global
administrator to manage profiles of designated groups
and their associated users on the 8e6 ProxyBlocker.
Group administrators also have rights to access certain
library category functions.
• Technical Support / Product Warranties Section -
This section contains information on technical support
and product warranties
• Appendices - Appendix A includes formats and rules
used in the filtering profile file. Appendix B provides a list
of messages that display when 8e6’s executable
program “Traveler” is launched and attempts to download updates to the ProxyBlocker server. Appendix C
includes information on creating a customized block
page. Appendix D provides tips on how to override pop-
up windows with pop-up blocker software installed.
Appendix E includes information on configuring the ProxyBlocker to work with 8e6’s Enterprise Reporter (ER)
application. Appendix F includes information about RAID
maintenance and troubleshooting on a ProxyBlocker
“SL” server. Appendix G features a glossary of technical
terminology used in this user guide.
• Index - This section includes an index of subjects and
the first page numbers where they appear in this user
guide.
2 8E6 TECHNOLOGIES, PROXYBLOCKER USER GUIDE
Page 17

INTRODUCTORY SECTION HOW TO USE THIS USER GUIDE
How to Use this User Guide
Conventions
The following icons are used throughout this user guide:
NOTE: The “note” icon is followed by italicized text providing
additional information about the current subject.
TIP: The “tip” icon is followed by italicized text giving you hints on
how to execute a task more efficiently.
WARNING: The “warning” icon is followed by italicized text
cautioning you about making entries in the application, executing
certain processes or procedures, or the outcome of specified
actions.
8E6 TECHNOLOGIES, PROXYBLOCKER USER GUIDE 3
Page 18
INTRODUCTORY SECTION HOW TO USE THIS USER GUIDE
Terminology
The following terms are used throughout this user guide.
Sample images (not to scale) are included for each item.
• alert box - a message box
that opens in response to
an entry you made in a
dialog box, window, or
screen. This box often
contains a button (usually
labeled “OK”) for you to click in order to confirm or
execute a command.
• button - an object in a dialog box,
window, or screen that can be clicked
with your mouse to execute a command.
• checkbox - a small square in a dialog
box, window, or screen used for indicating whether or not you wish to select an option. This
object allows you to toggle between two choices. By
clicking in this box, a check mark or an “X” is placed, indicating that you selected the option. When this box is not
checked, the option is not selected.
• dialog box - a box that
opens in response to a
command made in a
window or screen, and
requires your input. You
must choose an option by
clicking a button (such as “Yes” or “No”, or “Next” or
“Cancel”) to execute your command. As dictated by this
box, you also might need to make one or more entries or
selections prior to clicking a button.
• field - an area in a dialog box,
window, or screen that either
accommodates your data
4 8E6 TECHNOLOGIES, PROXYBLOCKER USER GUIDE
Page 19

INTRODUCTORY SECTION HOW TO USE THIS USER GUIDE
entry, or displays pertinent information. A text box is a
type of field.
• frame - a boxed-in area in a dialog
box, window, or screen that
includes a group of objects such as
fields, text boxes, list boxes,
buttons, radio buttons, checkboxes, and/or tables. Objects within a frame belong to a
specific function or group. A frame often is labeled to indicate its function or purpose.
• grid - an area in
a frame that
displays rows
and columns of
data, as a result of various processes. This data can be
reorganized in the Administrator console, by changing
the order of the columns.
• list box - an area in a dialog box,
window, or screen that accommodates and/or displays entries of
items that can be added or removed.
• navigation panel - the panel that
displays at the left of a screen. This
panel can contain links that can be
clicked to open windows or dialog boxes
at the right of the screen. One or more
tree lists also can display in this panel.
When an item in the tree list is clicked,
the tree list opens to reveal items that
can be selected.
8E6 TECHNOLOGIES, PROXYBLOCKER USER GUIDE 5
Page 20

INTRODUCTORY SECTION HOW TO USE THIS USER GUIDE
• pop-up box or pop-up
window - a box or window
that opens after you click a
button in a dialog box,
window, or screen. This box
or window may display
information, or may require
you to make one or more entries. Unlike a dialog box,
you do not need to choose between options.
• pull-down menu - a field in a
dialog box, window, or screen
that contains a down-arrow to the right. When you click
the arrow, a menu of items displays from which you make
a selection.
• radio button - a small, circular object
in a dialog box, window, or screen
used for selecting an option. This object allows you to
toggle between two choices. By clicking a radio button, a
dot is placed in the circle, indicating that you selected the
option. When the circle is empty, the option is not
selected.
• screen - a main
object of an application that
displays across
your monitor. A
screen can
contain panels,
windows, frames,
fields, tables, text
boxes, list boxes,
icons, buttons,
and radio buttons.
6 8E6 TECHNOLOGIES, PROXYBLOCKER USER GUIDE
Page 21

INTRODUCTORY SECTION HOW TO USE THIS USER GUIDE
• sub-topic - a subset
of a main topic that
displays as a menu
item for the topic. The
menu of sub-topics
opens when a pertinent topic link in the left panel—the navigation panel—of
a screen is clicked. If a sub-topic is selected, the window
for that sub-topic displays in the right panel of the screen,
or a pop-up window or an alert box opens, as appropriate.
• text box - an area in a dialog box, window, or screen that
accommodates your data entry. A text box is a type of
field. (See “field”.)
• topic - a topic
displays as a
link in the left
panel—the
navigation
panel—of a
screen. By
clicking the link
for a topic, the
window for that
topic displays in
the right panel of the screen, or a menu of sub-topics
opens.
8E6 TECHNOLOGIES, PROXYBLOCKER USER GUIDE 7
Page 22

INTRODUCTORY SECTION HOW TO USE THIS USER GUIDE
• tree - a tree displays in the navigation panel of a screen, and is
comprised of a hierarchical list of
items. An entity associated with a
branch of the tree is preceded by a
plus (+) sign when the branch is
collapsed. By double-clicking the
item, a minus (-) sign replaces the
plus sign, and any entity within that
branch of the tree displays. An item
in the tree is selected by clicking it.
• window - a window
displays on a screen,
and can contain
frames, fields, text
boxes, list boxes,
buttons, checkboxes,
and radio buttons. A
window for a topic or
sub-topic displays in
the right panel of the
screen. Other types
of windows include pop-up windows, login windows, or
ones from the system such as the Save As or Choose file
windows.
8 8E6 TECHNOLOGIES, PROXYBLOCKER USER GUIDE
Page 23

Overview
The ProxyBlocker’s Administrator console is used by the
global administrator—and group administrator, as
required—to configure the ProxyBlocker server to perform
the following basic functions:
• filter URLs (Web addresses) on the Internet
• log traffic on the Internet
and, if applicable for your organization:
• block instant messaging and peer-to-peer services
• authenticate users via the existing authentication system
on the network
NOTE: See the 8e6 ProxyBlocker Authentication User Guide at
http://www.8e6.com/docs/pba_auth_ug.pdf for information on
setting up and using authentication.
To help you become familiar with the ProxyBlocker and how
it functions on the network, Chapter 1 of this section of the
User Guide provides an overview on filtering. Chapter 2
gives insight into Web site access logging, and instant
messaging and peer-to-peer setup procedures. Chapter 3
includes details on getting started, with log in and log out
procedures, and tips on navigating the Administrator
console.
INTRODUCTORY SECTION OVERVIEW
8E6 TECHNOLOGIES, PROXYBLOCKER USER GUIDE 9
Page 24

INTRODUCTORY SECTION ENVIRONMENT REQUIREMENTS
Environment Requirements
Workstation Requirements
Minimum system requirements for the administrator include
the following:
• Windows 2000 or later operating system (not compatible
with Windows server 2003) running Internet Explorer (IE)
6.0 or later (Windows Vista running IE7)
• Macintosh OS X Version 10.5 running Safari 2.0, Firefox
2.0
• JavaScript enabled
• Java Virtual Machine
• Java Plug-in (use the version specified for the ProxyBlocker software version)
NOTE: 8e6 ProxyBlocker administrators must be set up with software installation privileges in order to install Java used for
accessing the interface.
Network Requirements
• High speed connection from the ProxyBlocker server to
the client workstations
• HTTPS connection to 8e6’s software update server
• Internet connectivity for downloading Java virtual
machine, if not already installed
10 8E6 TECHNOLOGIES, PROXYBLOC KER USER GUIDE
Page 25

INTRODUCTORY SECTION CHAPTER 1: FILTERING OPERATIONS
Chapter 1: Filtering Operations
Invisible Mode
The ProxyBlocker is set up in the invisible mode, indicating
that the unit will filter all connections on the Ethernet
between client PCs and the Internet, without stopping each
IP packet on the same Ethernet segment. The unit will only
intercept a session if an inappropriate request was
submitted by a client. In this scenario, the ProxyBlocker
returns a message to the client and server to deny the
request, and a block page displays to deny the client access
to the site or service.
Figure 1:1-1 depicts the invisible mode that removes the
ProxyBlocker from any inclusion in the network connection
path.
8E6 TECHNOLOGIES, PROXYBLOCKER USER GUIDE 11
Page 26

INTRODUCTORY SECTION CHAPTER 1: FILTERING OPERATIONS
Fig. 1:1-1 Pass-by filtering diagram
When users (Client PCs) make Internet requests, the traffic
flows (1) through the network path without interruption. The
ProxyBlocker captures the request as the user’s request (2)
leaves the network. The ProxyBlocker then determines the
action (3) to either block or pass the request. If the ProxyBlocker determines to block the user’s request, a block
message (4) is sent to the user plus a terminate message
(4) is sent to the Internet server.
In the invisible mode, the ProxyBlocker performs as a standalone server that can be connected to any network environment.
12 8E6 TECHNOLOGIES, PROXYBLOC KER USER GUIDE
Page 27

Group Types
After the operational filtering mode is configured on the
ProxyBlocker, the group type(s) that will be used on the
ProxyBlocker must be set up so that filtering can take place.
In the Group section of the Administrator console, group
types are structured in a tree format in the navigation panel.
The global administrator can access the Global Group and
IP groups in the tree. The group administrator can only
access the designated IP group to be maintained.
NOTE: If authentication is enabled, the global administrator can
also access the NT and LDAP branches of the tree.
Global Group
The first group that must be set up is the global group,
represented in the tree structure by the global icon .
The filtering profile created for the global group represents
the default profile to be used by all groups that do not have
a filtering profile, and all users who do not belong to a group.
INTRODUCTORY SECTION CHAPTER 1: FILTERING OPERATIONS
8E6 TECHNOLOGIES, PROXYBLOCKER USER GUIDE 13
Page 28

INTRODUCTORY SECTION CHAPTER 1: FILTERING OPERATIONS
IP Groups
The IP group type is represented in the tree by the IP icon
. A master IP group is comprised of sub-group members
and/or individual IP members .
The global administrator adds master IP groups, adds and
maintains override accounts at the global level, and establishes and maintains the minimum filtering level.
The group administrator of a master IP group adds subgroup and individual IP members, override account, time
profiles and exception URLs, and maintains filtering profiles
of all members in the master IP group.
Fig. 1:1-2 IP diagram with a sample master IP group and its members
14 8E6 TECHNOLOGIES, PROXYBLOC KER USER GUIDE
Page 29

INTRODUCTORY SECTION CHAPTER 1: FILTERING OPERATIONS
Filtering Profile Types
A filtering profile is used by all users who are set up to be
filtered on the network. This profile consists of rules that
dictate whether a user has access to a specified Web site or
service on the Internet.
The following types of filtering profiles can be created,
based on the set up in the tree menu of the Group section of
the console:
Global Group
• global filtering profile - the default filtering profile positioned at the base of the hierarchical tree structure, used
by end users who do not belong to a group.
IP group (master group)
• master group filtering profile - used by end users who
belong to the master group.
• master time profile - used by master group users at a
specified time.
IP group member
• sub-group filtering profile - used by a sub-group
member.
• individual filtering profile - used by an individual IP
group member.
• time profile - used by a sub-group/individual IP group
member at a specified time.
Other filtering profiles
• authentication profile - used by NT and/or LDAP group
members.
NOTE: For information about authentication filtering profiles, see
the 8e6 ProxyBlocker Authentication User Guide.
8E6 TECHNOLOGIES, PROXYBLOCKER USER GUIDE 15
Page 30

INTRODUCTORY SECTION CHAPTER 1: FILTERING OPERATIONS
• override account profile - set up in either the global
group section or the master group section of the console.
• lock profile - set up under X Strikes Blocking in the Filter
Options section of the profile.
Static Filtering Profiles
Static filtering profiles are based on fixed IP addresses and
include profiles for master IP groups and their members.
Master IP Group Filtering Profile
The master IP group filtering profile is created by the global
administrator and is maintained by the group administrator.
This filtering profile is used by members of the group—
including sub-group and individual IP group members—and
is customized to allow/deny users access to URLs, or warn
users about accessing specified URLs, to redirect users to
another URL instead of having a block page display, and to
specify usage of appropriate filter options.
IP Sub-Group Filtering Profile
An IP sub-group filtering profile is created by the group
administrator. This filtering profile applies to end users in an
IP sub-group and is customized for sub-group members.
Individual IP Member Filtering Profile
An individual IP member filtering profile is created by the
group administrator.This filtering profile applies to a specified end user in a master IP group.
16 8E6 TECHNOLOGIES, PROXYBLOC KER USER GUIDE
Page 31

INTRODUCTORY SECTION CHAPTER 1: FILTERING OPERATIONS
Active Filtering Profiles
Active filtering profiles include the global group profile, override account profile, time profile, and lock profile.
NOTE: For information about authentication filtering profiles, see
the 8e6 ProxyBlocker Authentication User Guide.
Global Filtering Profile
The global filtering profile is created by the global administrator. This profile is used as the default filtering profile. The
global filtering profile consists of a customized profile that
contains a list of library categories to block, open, add to a
white list, or assign a warn setting, and service ports that are
configured to be blocked. A URL can be specified for use
instead of the standard block page when users attempt to
access material set up to be blocked. Various filter options
can be enabled.
Override Account Profile
If any user needs access to a specified URL that is set up to
be blocked, the global administrator or group administrator
can create an override account for that user. This account
grants the user access to areas set up to be blocked on the
Internet.
Time Profile
A time profile is a customized filtering profile set up to be
effective at a specified time period for designated users.
Lock Profile
This filtering profile blocks the end user from Internet access
for a set period of time, if the end user’s profile has the X
Strikes Blocking filter option enabled and he/she has
received the maximum number of strikes for inappropriate
Internet usage.
8E6 TECHNOLOGIES, PROXYBLOCKER USER GUIDE 17
Page 32

INTRODUCTORY SECTION CHAPTER 1: FILTERING OPERATIONS
Filtering Profile Components
Filtering profiles are comprised of the following components:
• library categories - used when creating a rule, minimum
filtering level, or filtering profile for the global group or any
entity
• service ports - used when setting up filter segments on
the network, creating the global group (default) filtering
profile, or establishing the minimum filtering level
• rules - specify which library categories should be
blocked, left open (a set number of minutes in which that
category remains open can be defined), assigned a warn
setting, or white listed
• filter options - specify which features will be enabled: X
Strikes Blocking, Google/Yahoo!/Ask.com/AOL Safe
Search Enforcement, Search Engine Keyword Filter
Control, URL Keyword Filter Control
• minimum filtering level - takes precedence over
filtering profiles of entities who are using a filtering profile
other than the global (default) filtering profile
• filter settings - used by service ports, filtering profiles,
rules, and the minimum filtering level to indicate whether
users should be granted or denied access to specified
Internet content
18 8E6 TECHNOLOGIES, PROXYBLOC KER USER GUIDE
Page 33

INTRODUCTORY SECTION CHAPTER 1: FILTERING OPERATIONS
Library Categories
A library category contains a list of Web site addresses and
keywords for search engines and URLs that have been set
up to be blocked or white listed. Library categories are used
when creating a rule, the minimum filtering level, or a
filtering profile.
8e6 Supplied Categories
8e6 furnishes a collection of library categories, grouped
under the heading “Category Groups” (excluding the
“Custom Categories” group). Updates to these categories
are provided by 8e6 on an ongoing basis, and administrators also can add or delete individual URLs within a specified library category.
Custom Categories
Custom library categories can be added by either global or
group administrators. As with 8e6 supplied categories, additions and deletions can be made within a custom category.
However, unlike 8e6 supplied categories, a custom category can be deleted.
NOTE: 8e6 cannot provide updates to custom categories. Maintaining the list of URLs and keywords is the responsibility of the
global or group administrator.
8E6 TECHNOLOGIES, PROXYBLOCKER USER GUIDE 19
Page 34

INTRODUCTORY SECTION CHAPTER 1: FILTERING OPERATIONS
Service Ports
Service ports are used when setting up filter segments on
the network (the range of IP addresses/netmasks to be
detected by the ProxyBlocker), the global (default) filtering
profile, and the minimum filtering level.
When setting up the range of IP addresses/netmasks to be
detected, service ports can be set up to be open (ignored).
When creating the global filtering profile and the minimum
filtering level, service ports can be set up to be blocked or
filtered.
Examples of service ports that can be set up include File
Transfer Protocol (FTP), Hyper Text Transfer Protocol
(HTTP), Network News Transfer Protocol (NNTP), Secured
HTTP Transmission (HTTPS), and Secure Shell (SSH).
Rules
A rule is comprised of library categories to block, leave
open, assign a warn setting, or include in a white list.
Access to an open library category can be restricted to a set
number of minutes. Each rule that is created by the global
administrator is assigned a number. A rule is selected when
creating a filtering profile for an entity.
Minimum Filtering Level
The minimum filtering level consists of library categories set
up at the global level to be blocked or opened, and service
ports set up to be blocked or filtered. If the minimum filtering
level is created, it applies to all users in IP groups, and takes
precedence over filtering settings made for group and user
filtering profiles.
The minimum filtering level does not apply to any user who
does not belong to a group, and to groups that do not have
a filtering profile established.
20 8E6 TECHNOLOGIES, PROXYBLOC KER USER GUIDE
Page 35

INTRODUCTORY SECTION CHAPTER 1: FILTERING OPERATIONS
NOTE: If the minimum filtering level is not set up, global (default)
filtering settings will apply instead.
If an override account is established at the IP group level for
a member of a master IP group, filtering settings made for
that end user will override the minimum filtering level if the
global administrator sets the option to allow the minimum
filtering level to be bypassed. An override account established at the global group level will automatically bypass the
minimum filtering level.
Filter Settings
Categories and service ports use the following settings to
specify how filtering will be executed:
• block - if a category or a service port is given a block
setting, users will be denied access to the URL set up as
“blocked”
• open - if a category or the filter segment detected on the
network is given an open (pass) setting, users will be
allowed access to the URL set up as “opened”
NOTE: Using the quota feature, access to an open category can
be restricted to a defined number of minutes.
• always allowed - if a category is given an always
allowed setting, the category is included in the user’s
white list and takes precedence over blocked categories
• warn - If a category is given a warn setting, a warning
page displays for the end user to warn him/her that
accessing the intended URL may be against established
policies and to proceed at his/her own risk
• filter - if a service port is given a filter setting, that port will
use filter settings created for library categories (block or
open settings) to determine whether users should be
denied or allowed access to that port
8E6 TECHNOLOGIES, PROXYBLOCKER USER GUIDE 21
Page 36

INTRODUCTORY SECTION CHAPTER 1: FILTERING OPERATIONS
• ignore - if the filter segment detected on the network has
a service port set up to be ignored, that service port will
be bypassed
Filtering Rules
Filtering Levels Applied
1. The global (default) filtering profile applies to any user
who does not belong to a master IP group.
2. If the minimum filtering level is defined, it applies to all
master IP groups and members assigned filtering
profiles. The minimum filtering level combines with the
user’s profile to guarantee that categories blocked in the
minimum filtering level are blocked in the user’s profile.
3. For master IP group members:
a. A master IP group filtering profile takes precedence
over the global profile.
b. A master IP group time profile takes precedence over
the master IP group profile.
4. For IP sub-group members:
a. An IP sub-group filtering profile takes precedence over
the master IP group’s time profile.
b. An IP sub-group time profile takes precedence over
the IP sub-group profile.
5. For individual IP members:
a. An individual IP member filtering profile takes prece-
dence over the IP sub-group’s time profile.
b. An individual IP member time profile takes precedence
over the individual IP member profile.
6. An authentication (NT/LDAP) profile takes precedence
over an individual IP member’s time profile.
22 8E6 TECHNOLOGIES, PROXYBLOC KER USER GUIDE
Page 37

INTRODUCTORY SECTION CHAPTER 1: FILTERING OPERATIONS
7. An override account profile takes precedence over an
authentication profile. This account may override the
minimum filtering level—if the override account was set
up in the master IP group tree, and the global administrator allows override accounts to bypass the minimum
filtering level, or if the override account was set up in the
global group tree.
NOTE: An override account set up in the master group section of
the console takes precedence over an override account set up in
the global group section of the console.
8. A lock profile takes precedence over all filtering profiles.
This profile is set up under Filter Options, by enabling the
X Strikes Blocking feature.
8E6 TECHNOLOGIES, PROXYBLOCKER USER GUIDE 23
Page 38

INTRODUCTORY SECTION CHAPTER 1: FILTERING OPERATIONS
Fig. 1:1-3 Sample filtering hierarchy diagram
24 8E6 TECHNOLOGIES, PROXYBLOC KER USER GUIDE
Page 39

INTRODUCTORY SECTION CHAPTER 2: LOGGING AND BLOCKING
Chapter 2: Logging and Blocking
Web Access Logging
One of the primary functions of the ProxyBlocker is to log
the activity of users on the Internet. Information captured in
the log can be transferred to a reporting appliance, to be
viewed on a PC monitor or output to a printer.
8e6 recommends using the Enterprise Reporter (ER) for
generating reports. When the ER server is connected to the
ProxyBlocker server, log files from the ProxyBlocker are
transferred to the ER server where they are “normalized”
and then inserted into a MySQL database. The ER client
reporting application accesses that database to generate
queries and reports.
NOTE: See Appendix E: Configuring the ProxyBlocker for ER
Reporting for information on configuring the ProxyBlocker and
ER.
8E6 TECHNOLOGIES, PROXYBLOCKER USER GUIDE 25
Page 40

INTRODUCTORY SECTION CHAPTER 2: LOGGING AND BLOCKING
Instant Messaging, Peer-to-Peer Blocking
The ProxyBlocker has options for blocking and/or logging
the use of Instant Messaging and Peer-to-Peer services,
and makes use of Intelligent Footprint Technology (IFT) for
greatly increasing management and control of these
popular—yet potentially harmful—applications. This section
explains how to set up and use IM and P2P.
How IM and P2P Blocking Works
IM Blocking
Instant Messaging (IM) involves direct connections between
workstations either locally or across the Internet. Using this
feature of the ProxyBlocker, groups and/or individual client
machines can be set up to block the use of IM services
specified in the library category.
When the IM module is loaded on the server, the ProxyBlocker compares packets on the network with IM libraries
stored on the ProxyBlocker server. If a match is found, the
ProxyBlocker checks the user’s profile to see whether the
user’s connection to the IM service should be blocked, and
then performs the appropriate action.
WARNING: The following items are known issues pertaining to
the IM module:
• IM can only block by destination IP address if network traffic is
being tunneled, sent through a Virtual Private Network (VPN),
or encrypted.
• IM will not be blocked if a client-side VPN is set up to proxy
traffic through a remote IP address outside the connection
protected by the ProxyBlocker.
• Some versions of the AOL client create a network interface that
send a network connection through a UDP proxy server, which
prevents blocking IM.
26 8E6 TECHNOLOGIES, PROXYBLOC KER USER GUIDE
Page 41

INTRODUCTORY SECTION CHAPTER 2: LOGGING AND BLOCKING
P2P Blocking
Peer-to-Peer (P2P) involves communication between
computing devices—desktops, servers, and other smart
devices—that are linked directly to each other. Using this
feature of the ProxyBlocker, groups and/or individual client
machines can be set up to block the use of P2P services
specified in the library category.
When the P2P module is loaded on the server, the ProxyBlocker compares packets on the network with the P2P
library stored on the ProxyBlocker server. If a match is
found, the ProxyBlocker checks the user’s profile to see
whether the user’s connection to the P2P service should be
blocked, and then performs the appropriate action.
Setting up IM and P2P
IM and P2P are set up in the System and Library sections of
the Administrator console.
1. In the System section, activate Pattern Blocking in the
Filter window.
2. In the Library section, note the services set up to be
blocked, as defined at: http://www.8e6.com/pbahelp/
files/1system_im_block.html.
NOTE: Please contact an 8e6 technical support representative or
a solutions engineer if access is needed to one or more P2P
services blocked by 8e6's supplied library category for P2P.
3. In the Manual Update to 8e6 Supplied Categories
window (accessible via Library > Updates > Manual
Update), IM pattern files can be updated on demand.
8E6 TECHNOLOGIES, PROXYBLOCKER USER GUIDE 27
Page 42

INTRODUCTORY SECTION CHAPTER 2: LOGGING AND BLOCKING
Using IM and P2P
To solely log IM and/or P2P user activity, the Pattern
Blocking setting needs to be enabled in the Filter window.
To additionally block specified groups and/or users from
using components and features of IM and/or P2P, settings
need to be made in the Group section of the Administrator
console.
If applying 8e6’s supplied IM and/or P2P library category to
an entity’s profile, all IM and/or P2P services included in that
category will be blocked.
NOTE: If IM and/or P2P was set up to be blocked while a user’s
IM and/or P2P session was in progress, the user will not be
blocked from using that service until he/she logs off the server
and back on again.
Block IM, P2P for All Users
Block IM for All Users
To block IM for all users on the network:
• the Pattern Blocking option in the Filter window must be
activated
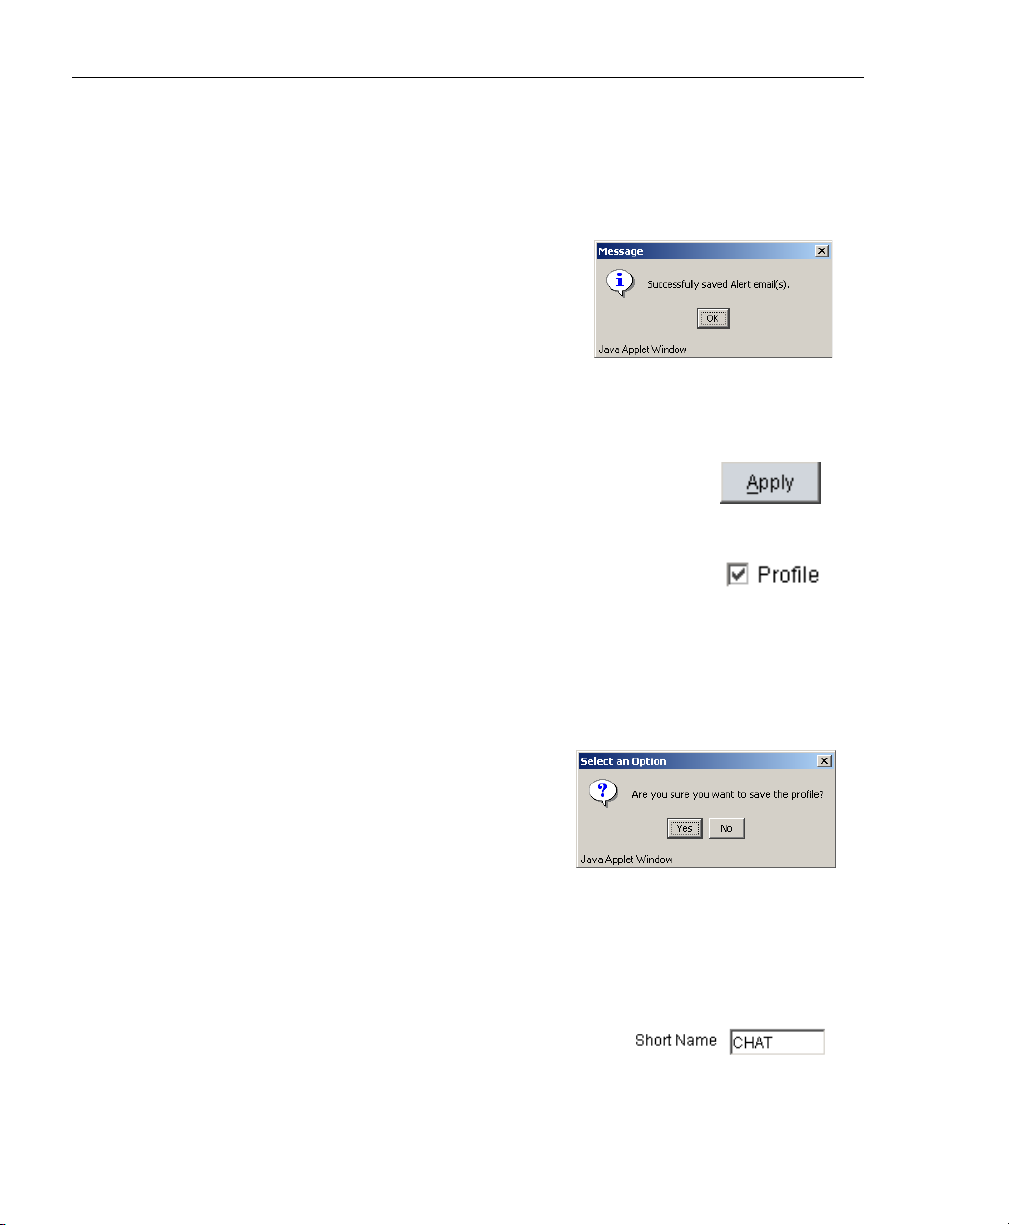
• the global filtering profile must have both CHAT and
specified individual Instant Messaging library categories
(such as IMGEN, IMGCHAT, IMGTALK, ICQAIM,
IMMSN, IMMYSP, and/or IMYAHOO) set up to be
blocked
• the minimum filtering level profile must have both CHAT
and specified individual Instant Messaging library categories set up to be blocked.
28 8E6 TECHNOLOGIES, PROXYBLOC KER USER GUIDE
Page 43

INTRODUCTORY SECTION CHAPTER 2: LOGGING AND BLOCKING
Block P2P for All Users
To block P2P for all users on the network:
• the Pattern Blocking option in the Filter window must be
activated
• the global filtering profile must have the PR2PR library
category set up to be blocked
• the minimum filtering level profile must have the PR2PR
library category set up to be blocked.
Block Specified Entities from Using IM, P2P
Block IM for a Specific Entity
To block IM for a specified group or user:
• the Pattern Blocking option in the Filter window must be
activated
• the CHAT and specified individual Instant Messaging
library categories must both be set up to be blocked for
that entity
• the global filtering profile should not have IM blocked,
unless blocking all IM traffic with the Range to Detect
feature is desired
• the minimum filtering level profile should not have IM
blocked, unless blocking all IM traffic with the Range to
Detect feature is desired.
8E6 TECHNOLOGIES, PROXYBLOCKER USER GUIDE 29
Page 44

INTRODUCTORY SECTION CHAPTER 2: LOGGING AND BLOCKING
Block P2P for a Specific Entity
To block P2P for a specified group or user:
• the Pattern Blocking option in the Filter window must be
activated
• the PR2PR library category must be set up to be blocked
for that entity
• the global filtering profile should not have P2P blocked,
unless blocking all P2P traffic with the Range to Detect
feature is desired
• the minimum filtering level profile should not have P2P
blocked, unless blocking all P2P traffic with the Range to
Detect feature is desired.
30 8E6 TECHNOLOGIES, PROXYBLOC KER USER GUIDE
Page 45

INTRODUCTORY SECTION CHAPTER 3: GETTING STARTED
Chapter 3: Getting Started
Initial Setup
To initially set up your ProxyBlocker server, follow the
instructions in the Quick Start Guide, the booklet packaged
with your ProxyBlocker unit. This guide explains how to
perform the initial configuration of the server so that it can
be accessed via an IP address on your network.
NOTE: If you do not have the ProxyBlocker Quick Start Guide,
contact 8e6 Technologies immediately to have a copy sent to
you.
Using the Administrator Console
Log On
1. Launch a browser window supported by the ProxyBlocker.
2. In the address line of the browser window, type in the
ProxyBlocker server’s IP address appended by the
following port number:
• “:88” for an HTTP address
• “:1443” for an HTTPS address
For example, if your IP address is 210.10.131.34, type in
http://210.10.131.34:88 or https://210.10.131.34:1443.
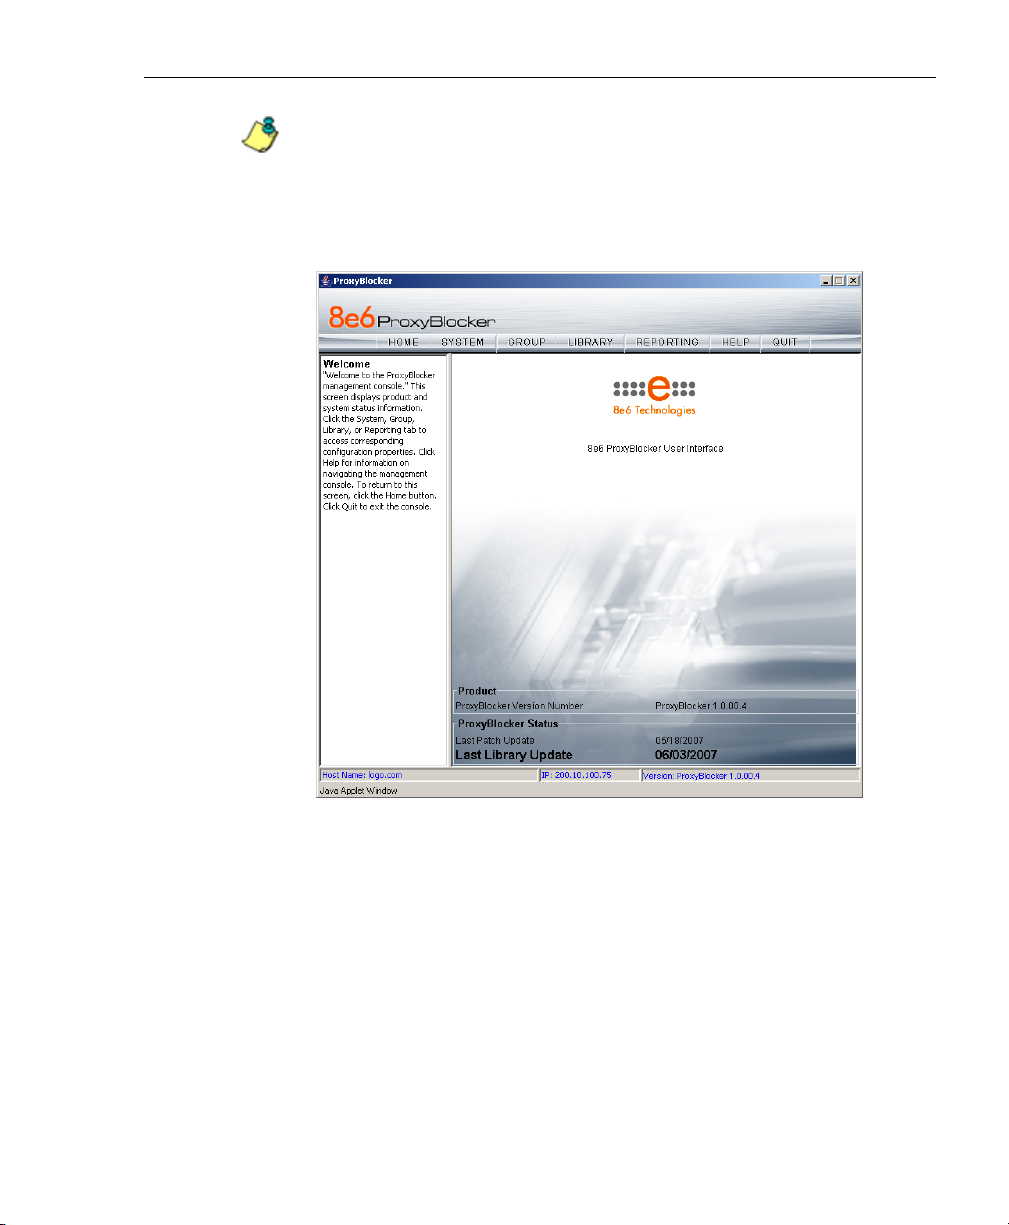
3. Click Go to open the ProxyBlocker Introductory Window:
8E6 TECHNOLOGIES, PROXYBLOCKER USER GUIDE 31
Page 46

INTRODUCTORY SECTION CHAPTER 3: GETTING STARTED
Fig. 1:3-1 ProxyBlocker Introductory Window
NOTE: The ProxyBlocker Introductory Window must be left open
throughout your session. This window displays minimized when
the Login dialog box opens.
4. When the Login dialog box opens, enter your Username
and Password:
Fig. 1:3-2 Login dialog box
TIP: The default Username is admin and the Password is user3.
To change this username and password, go to the Administrator
window (see the Administrator window of the System screen in
the Global Administrator Section) and create a global administrator account.
32 8E6 TECHNOLOGIES, PROXYBLOC KER USER GUIDE
Page 47
INTRODUCTORY SECTION CHAPTER 3: GETTING STARTED
NOTE: See Chapter 1: System screen in the Global Administrator
Section for information on logging into the ProxyBlocker interface
if your password has expired.
5. Click OK to close the login dialog box and to access the
welcome screen of the Administrator console:
Fig. 1:3-3 Welcome screen
On this screen, the ProxyBlocker Version Number
displays in the Product frame, and dates for the Last
Patch Update and Last Library Update display in the
ProxyBlocker Status frame.
The following information displays at the bottom of the
Administrator console: Host Name, LAN IP address used
for sending block pages, and software Version number.
8E6 TECHNOLOGIES, PROXYBLOCKER USER GUIDE 33
Page 48

INTRODUCTORY SECTION CHAPTER 3: GETTING STARTED
Last Library Update message
If it has been more than seven days since the ProxyBlocker
last received updates to library categories, upon logging into
the Administrator console a pop-up dialog box opens and
displays the following message: ”Libraries were last
updated more than 7 days ago. Do you want to update your
libraries now?” Click either Yes or No to perform the
following actions:
• Yes - clicking this button closes the dialog box and opens
an alert box indicating that it will take a few minutes to
perform the library update. Click OK to close the alert box
and to execute the command to update the libraries.
After the libraries are updated, today’s date will appear
as the Last Library Update on the welcome screen.
NOTE: Refer to the Library screen’s Manual Update to 8e6
Supplied Categories window—in the Global Group Section—for
information about updating library categories on demand.
• No - clicking this button closes the dialog box and
displays the welcome screen with the Last Library
Update and the following message below in orange
colored text: “Libraries were last updated 7 days ago.
Please use the Weekly Update option”:
34 8E6 TECHNOLOGIES, PROXYBLOC KER USER GUIDE
Page 49

INTRODUCTORY SECTION CHAPTER 3: GETTING STARTED
Fig. 1:3-4 Welcome screen
, Last Library Update text
Click the checkbox “Do not show “Old Library Warning”
dialog box in future” to disable the Last Library Update
message pop-up box. After the libraries are updated, the
welcome screen will appear as in Fig. 1:3:3 with today’s
date as the Last Library Update in black text.
8E6 TECHNOLOGIES, PROXYBLOCKER USER GUIDE 35
Page 50

INTRODUCTORY SECTION CHAPTER 3: GETTING STARTED
Navigation Tips
Access Main Sections
The Administrator console is organized into six sections,
each accessible by clicking the corresponding button in the
navigational bar at the top of the screen:
• Home - clicking this button displays the welcome screen
of the Administrator console.
• System - clicking this button displays the main screen for
the System section. This section is comprised of
windows used by the global administrator for configuring
and maintaining the server to authenticate users, and to
filter or block specified Internet content for each user
based on the applied filtering profile.
• Group - clicking this button displays the main screen for
the Group section. Windows in the Group section are
used for creating and managing master IP groups, subgroups, and individual IP filtering profiles, or for setting
up NT/LDAP domains, groups, and individual users, and
their filtering profiles.
• Library - clicking this button displays the main screen for
the Library section. Library section windows are used for
adding and maintaining library categories. Library categories are used when creating or modifying a filtering
profile.
• Reporting - clicking this button displays the main screen
for the Reporting section. The Reporting section contains
windows used for configuring reports on users’ Internet
activities.
36 8E6 TECHNOLOGIES, PROXYBLOC KER USER GUIDE
Page 51
INTRODUCTORY SECTION CHAPTER 3: GETTING STARTED
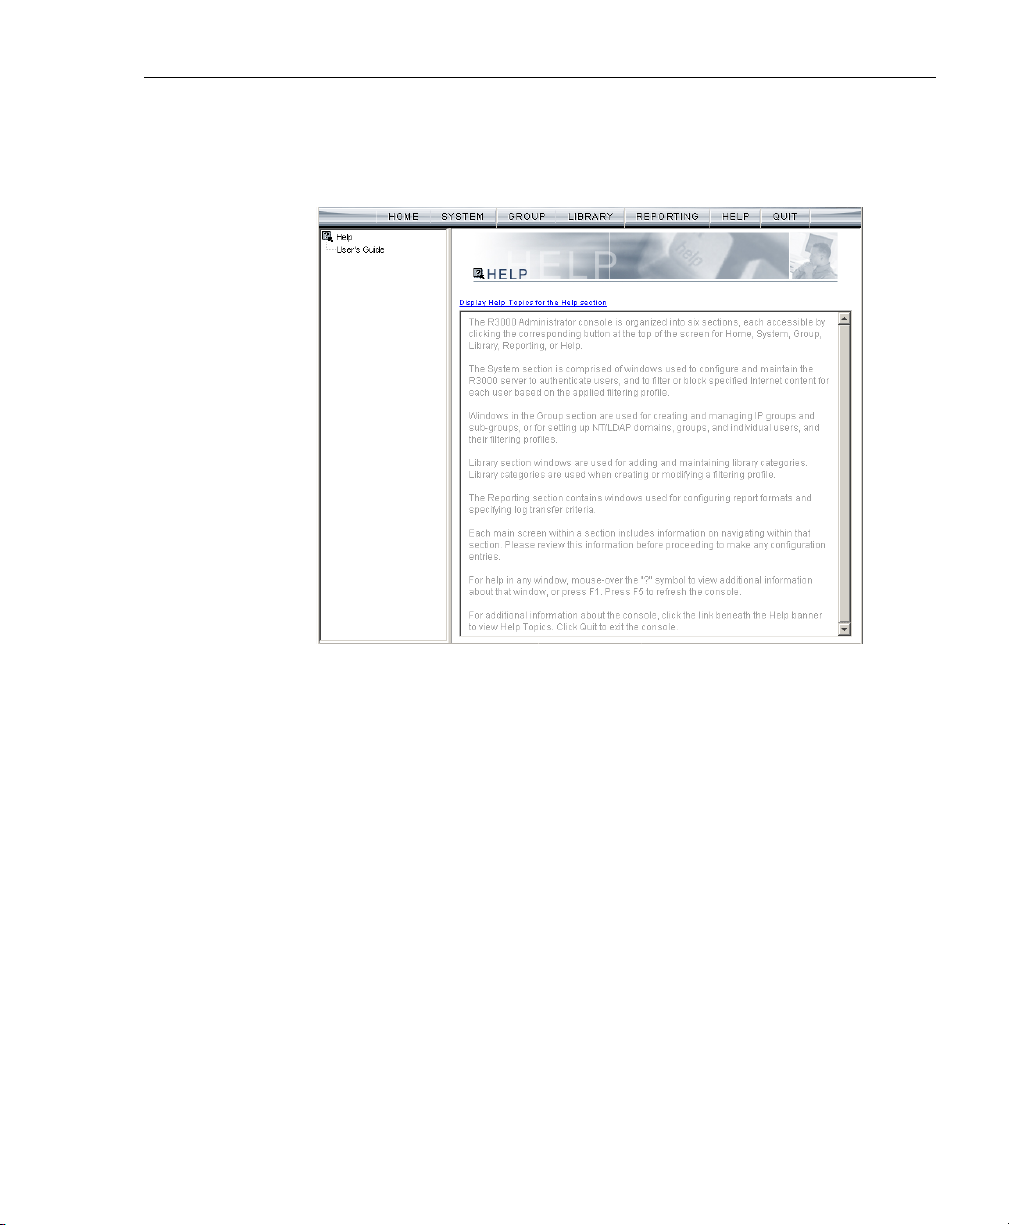
• Help - clicking this button displays the Help screen. This
screen includes navigational tips and a link to the PDF
copy of this User Guide:
Fig. 1:3-5 Help screen
8E6 TECHNOLOGIES, PROXYBLOCKER USER GUIDE 37
Page 52

INTRODUCTORY SECTION CHAPTER 3: GETTING STARTED
Help Features
Help features provide information about how to use
windows in the Administrator console. Such features
include help topics and tooltips.
Access Help Topics
Each of the main section screens contains a link beneath
the banner. When that link is clicked, a separate browser
window opens with Help Topics for that section:
Fig. 1:3-6 Help Topics window
1. Click a link to go to a specified topic.
2. To view Help Topics for another section, click the tab for
that section: System, Group, Library, Reporting, or Help.
3. Click Close Window to close the Help Topics window.
38 8E6 TECHNOLOGIES, PROXYBLOC KER USER GUIDE
Page 53

INTRODUCTORY SECTION CHAPTER 3: GETTING STARTED
Tooltips
In any window that features the icon, additional information
about that window can be obtained by hovering over that
icon with your mouse, or by pressing the F1 key on your
keyboard.
• Hover Display
The yellow tooltip box displays when you hover over the
icon with your mouse:
Fig. 1:3-7 Tooltip mouseover effect
To close the tooltip box, move the mouse away from the
icon.
8E6 TECHNOLOGIES, PROXYBLOCKER USER GUIDE 39
Page 54

INTRODUCTORY SECTION CHAPTER 3: GETTING STARTED
• Help pop-up box
The Help pop-up box opens when you press the F1 key
on your keyboard:
Fig. 1:3-8 Help pop-up box
Click OK to close the pop-up box.
Screen and Window Navigation
All screens are divided into two panels: a navigation panel to
the left, and a window in the panel to the right. Windows
display in response to a selection made in the navigation
panel.
In the Administrator console, screens and windows use
different navigation formats, based on the contents of a
given screen or window. Screens can contain topic links and
sub-topic menus, and/or tree lists with topics and sub-topic
menus. Windows can contain tabs that function as subwindows.
40 8E6 TECHNOLOGIES, PROXYBLOC KER USER GUIDE
Page 55

INTRODUCTORY SECTION CHAPTER 3: GETTING STARTED
Topic Links
In System, Library, and Reporting screens, the navigation
panel contains topic links. By clicking a topic link, the
window for that topic displays in the right panel:
Fig. 1:3-9 Selected topic and its corresponding window
8E6 TECHNOLOGIES, PROXYBLOCKER USER GUIDE 41
Page 56

INTRODUCTORY SECTION CHAPTER 3: GETTING STARTED
Select Sub-topics
Some topics in System and Library screens consist of more
than one window. For these topics, clicking a topic link
opens a menu of sub-topics:
Fig. 1:3-10 Sub-topics menu
When a sub-topic from this menu is selected, the window for
that sub-topic displays in the right panel of the screen.
42 8E6 TECHNOLOGIES, PROXYBLOC KER USER GUIDE
Page 57

INTRODUCTORY SECTION CHAPTER 3: GETTING STARTED
Navigate a Tree List
Tree lists are included in the navigation panel of Group and
Library screens.
Fig. 1:3-11 Tree menu
A tree is comprised of a hierarchical list of items. An entity
associated with a branch of the tree is preceded by a plus
(+) sign, when that branch of the tree is collapsed.
By double-clicking the entity, a minus (-) sign replaces the
plus sign, and all branches within that branch of the tree
display.
An item in the tree is selected by clicking it.
8E6 TECHNOLOGIES, PROXYBLOCKER USER GUIDE 43
Page 58

INTRODUCTORY SECTION CHAPTER 3: GETTING STARTED
Tree List Topics and Sub-topics
Group and Library tree lists possess a menu of topics and
sub-topics.
Topics in the tree list display by default when the tree is
opened. Examples of tree list topics are circled in Fig. 1:4-
12.
When a tree list topic is selected and clicked, a menu of subtopics opens:
Fig. 1:3-12 Tree list topics and sub-topics
Clicking a sub-topic displays the corresponding window in
the right panel, or opens a pop-up window or alert box, as
appropriate.
44 8E6 TECHNOLOGIES, PROXYBLOC KER USER GUIDE
Page 59

INTRODUCTORY SECTION CHAPTER 3: GETTING STARTED
Navigate a Window with Tabs
In each section of the console, there are windows with tabs.
When selecting a window with tabs from the navigation
panel, the main tab for that window displays. Entries made
in a tab must be saved on that tab, if the tab includes the
Apply button.
NOTE: In the Time Profile and Override Account pop-up
windows, entries are saved at the bottom of the window.
Fig. 1:3-13 Window with tabs
8E6 TECHNOLOGIES, PROXYBLOCKER USER GUIDE 45
Page 60

INTRODUCTORY SECTION CHAPTER 3: GETTING STARTED
Console Tips and Shortcuts
The following list of tips and shortcuts is provided to help
you use windows in the Administrator console with greater
efficiency.
Navigation Path
The navigation path displays at the top of each window:
Fig. 1:3-14 Navigation path
This path reminds you of your location in the console. The
entire path shows the screen name, followed by the topic
name, and sub-topic name if applicable.
46 8E6 TECHNOLOGIES, PROXYBLOC KER USER GUIDE
Page 61

INTRODUCTORY SECTION CHAPTER 3: GETTING STARTED
Refresh the Console
Press F5 on your keyboard to refresh the Administrator
console. This feature is useful in the event that more than
one browser window is open simultaneously for the same
ProxyBlocker server.
Select Multiple Items
When moving several items from one list box to another, or
when deleting several items, the Ctrl and Shift keys can be
used to expedite this task.
• Ctrl Key
To select multiple items from a list box, click each item
while pressing the Ctrl key on your keyboard.
• Shift Key
To select a block of items from a list box, click the first
item, and then press the Shift key on your keyboard while
clicking the last item.
Once the group of items is selected, click the appropriate
button to perform the action on the items.
Copy and Paste Text
To save time when making duplicate data entries, text previously keyed into the GUI can be copied and pasted into
other fields without needing to key in the same text again.
• Copy command
Copy text by using the cursor to highlight text, and then
pressing the Ctrl and C keys on the keyboard.
• Paste command
Text that was just copied from a field can be pasted into
another field that is either blank or populated with text.
8E6 TECHNOLOGIES, PROXYBLOCKER USER GUIDE 47
Page 62

INTRODUCTORY SECTION CHAPTER 3: GETTING STARTED
• To paste text into an empty field, place the cursor in the
field and then press the Ctrl and V keys.
• To copy over existing text, highlight text currently in the
field and then press the Ctrl and V keys.
Calculate IP Ranges without Overlaps
The Calculator button displays on windows in which IP
ranges are entered. These windows include: Block Page
Route Table window from the System section, and Range to
Detect and Members windows from the Group section.
Fig. 1:3-15 IP Calculator pop-up window
This window is used to view and/or calculate the minimum
and maximum range for an IP address.
1. Click Calculator to open the IP Calculator pop-up
window.
• If the IP address field in the window on the console is
already populated, note the IP Calculator pop-up
window displays the IP address, default Netmask in
both the Dotted Decimals Notation (e.g.
“255.255.255.248”) and CIDR Notation (e.g. “29”)
format, Min Host, and Max Host IP addresses.
48 8E6 TECHNOLOGIES, PROXYBLOC KER USER GUIDE
Page 63

INTRODUCTORY SECTION CHAPTER 3: GETTING STARTED
• If the IP address field in the window on the console is
empty, in this pop-up window enter the IP address,
specify the Dotted Decimals Notation Netmask, and
then click Calculate to display the Min Host and Max
Host IP addresses.
TIP: If necessary, make a different IP address entry and Netmask
selection, and then click Calculate to display different Min Host
and Max Host results.
2. After making a note of the information in this pop-up
window, click Close to close the IP Calculator.
Log Off
To log off the Administrator console:
1. Click the Quit button in the navigational panel at the top
of the screen. This action opens the Quit dialog box:
Fig. 1:3-16 Quit dialog box
2. Click Yes to close the Administrator console.
3. Click the “X” in the upper right corner of the ProxyBlocker
Introductory Window to close it.
WARNING: If you need to turn off the server, see the ShutDown
window of the System screen in the Global Administrator Section.
8E6 TECHNOLOGIES, PROXYBLOCKER USER GUIDE 49
Page 64

GLOBAL ADMINISTRATOR SECTION INTRODUCTION
GLOBAL ADMINISTRATOR SECTION
Introduction
The Global Administrator Section of this user guide is
comprised of four chapters, based on the layout of the
Administrator console. This section is used by the authorized global administrator of the ProxyBlocker for configuring and maintaining the ProxyBlocker server.
The global administrator is responsible for integrating the
server into the existing network, and providing the server a
high-speed connection to remote client workstations and to
a reporting application, if pertinent. To attain this objective,
the global administrator performs the following tasks:
• provides a suitable environment for the server, including:
• Hypertext Transfer Protocol over Secure Socket Layer
(HTTPS) link to the current logging device
• power connection protected by an Uninterruptible
Power Supply (UPS)
• high speed access to the server by authorized client
workstations
• adds group administrators
• sets up administrators for receiving automatic alerts
• updates the server with software supplied by 8e6
• analyzes server statistics
• utilizes diagnostics for monitoring the server status to
ensure optimum functioning of the server
• configures the server for authenticating users
• adds and maintains filtering categories
• adds and maintains filtering profiles of entities
50 8E6 TECHNOLOGIES, PROXYBLOC KER USER GUIDE
Page 65

GLOBAL ADMINISTRATOR SECTION CHAPTER 1: SYSTEM SCREEN
Chapter 1: System screen
The System screen is comprised of windows used for
configuring and maintaining the server to authenticate
users, and to filter, log, or block specified Internet content for
each user based on an applied filtering profile.
Fig. 2:1-1 System screen
A list of main topics displays in the navigation panel at the
left of the screen. Main topics in this section include the
following: Control settings, Network settings, Administrator
account information, Secure Logon, Diagnostics, Alert
contacts, Patch, operation Mode, Authentication settings
(see the 8e6 ProxyBlocker Authentication User Guide for
information about this topic), NIC Mode, Backup/Restore
operations, Reset settings, SNMP, Hardware Failure Detection, X Strikes Blocking, Warn Option Setting, Customization, and Quota Setting.
8E6 TECHNOLOGIES, PROXYBLOCKER USER GUIDE 51
Page 66

GLOBAL ADMINISTRATOR SECTION CHAPTER 1: SYSTEM SCREEN
Click your selection to choose a main topic from this list, or
to view a menu of sub-topics, if applicable. When a topic or
sub-topic is selected, the designated window for that topic
or sub-topic displays in the right panel.
52 8E6 TECHNOLOGIES, PROXYBLOC KER USER GUIDE
Page 67

Control
Control includes options for controlling basic ProxyBlocker
server functions. Click the Control link to view a menu of
sub-topics: Filter, Block Page Authentication, ShutDown,
and Reboot.
GLOBAL ADMINISTRATOR SECTION CHAPTER 1: SYSTEM SCREEN
Fig. 2:1-2 System screen, Control menu
8E6 TECHNOLOGIES, PROXYBLOCKER USER GUIDE 53
Page 68

GLOBAL ADMINISTRATOR SECTION CHAPTER 1: SYSTEM SCREEN
Filter window
The Filter window displays when Filter is selected from the
Control menu. This window is used for specifying network
filtering preferences on this server.
Fig. 2:1-3 Filter window
Local Filtering is used for specifying whether this server
being configured will filter traffic on the network. If enabling
the HTTP Filtering feature that automatically detects a split
packet, HTTP headers less than or equal to the number of
bytes specified will be inspected. HTTPS Filtering lets you
set the level of filtering for HTTPS sites on ProxyBlockers
set up in the Stand Alone or Source mode. In the Service
Control frame, enabling Pattern Blocking will log IM and
P2P end user activity, and block end users from using
clients such as Google Web Accelerator and proxy patterns
that bypass filtering (see http://www.8e6.com/pbahelp/
54 8E6 TECHNOLOGIES, PROXYBLOC KER USER GUIDE
Page 69

GLOBAL ADMINISTRATOR SECTION CHAPTER 1: SYSTEM SCREEN
files/1system_proxy_block .html for a list of proxy pattern
types set up to be blocked).
TIP: See the Introductory Section for overviews on IM and P2P
(Chapter 2: Logging and Blocking).
Local Filtering
In the Local Filtering frame, indicate the function of this
server being configured, in regards to filtering the network.
The default setting has Local Filtering “On” and VLAN
Detection “Off”.
Disable Local Filtering Options
If you have multiple ProxyBlocker servers on the network,
you may wish to disable local filtering on the source server
and use the server primarily for authenticating users who
log on the network. This frees up resources on the server.
To disable Local Filtering and/or VLAN Detection, click
the “Off” radio button(s).
Enable Local Filtering Options
To enable Local Filtering, click “On”. The server will filter
the specified Range to Detect on the network.
To enable the detection of VLAN traffic on the network, at
VLAN Detection, click “On”.
NOTE: After making all entries in this window, click Apply.
8E6 TECHNOLOGIES, PROXYBLOCKER USER GUIDE 55
Page 70

GLOBAL ADMINISTRATOR SECTION CHAPTER 1: SYSTEM SCREEN
HTTP Filtering
In the HTTP Filtering frame, enable or disable the feature
that automatically detects a split HTTP packet.
Enable HTTP Packet Splitting Detection
By default, the feature that automatically detects a split
HTTP packet is disabled.
1. Click “On” to enable HTTP Packet Splitting Detection;
this action displays a field below the radio buttons.
2. In the Inspect HTTP headers that are less than or
equal to ___ Bytes field, by default 48 displays for the
number of bytes. This entry can be modified to specify a
different number of bytes for HTTP header inspection.
Disable HTTP Packet Splitting Detection
To disable automatic detection of a split HTTP packet, click
“Off.” This action removes the field below the radio buttons.
NOTE: After making all entries in this window, click Apply.
56 8E6 TECHNOLOGIES, PROXYBLOC KER USER GUIDE
Page 71

GLOBAL ADMINISTRATOR SECTION CHAPTER 1: SYSTEM SCREEN
HTTPS Filtering
Specify your preference for filtering HTTPS sites in the
HTTPS Filtering frame. Select from the following settings for
the HTTPS Filtering Level:
• “None” - if you do not want the ProxyBlocker to filter
HTTPS sites
• “Low” - if you want the ProxyBlocker to filter HTTPS sites
without having the ProxyBlocker communicate with IP
addresses or hostnames of HTTPS servers
• “Medium” - if you want the ProxyBlocker to communicate
with HTTPS servers in order to get the URL from the
certificate for URL validation only (this is the default
setting)
If "Medium" is selected, by default the option is enabled
for forwarding the DNS lookup in order to validate the
hostname in the certificate
• “High” - if you want the ProxyBlocker to communicate
with HTTPS servers to obtain the certificate with a very
strict validation of the return URL
If "High" is selected, by default the option is enabled for a
library lookup to overrule the DNS validation of the hostname in the certificate.
WARNING: If using the “High” setting, end users may be blocked
from accessing acceptable Web sites if the host names of these
sites do not match their generated certificates. To allow users
access to acceptable HTTPS sites, the IP addresses and corresponding URLs of these sites should be included in a custom
library category that is allowed to pass. (See the Custom Categories sub-section in Chapter 3: Library screen for information on
maintaining the ALLOW and PASS custom library categories.
See Global Group Profile window and Minimum Filtering Level
window in Chapter 2: Group screen from the Global Administrator
Section for information on allowing a library category to pass.)
8E6 TECHNOLOGIES, PROXYBLOCKER USER GUIDE 57
Page 72

GLOBAL ADMINISTRATOR SECTION CHAPTER 1: SYSTEM SCREEN
NOTE: After making all entries in this window, click Apply.
Service Control
In the Service Control frame, indicate whether or not Pattern
Blocking with be enabled or disabled.
Enable Pattern Blocking
By default, Pattern Blocking is disabled. Click “On” to block
the usage of clients such as Google Web Accelerator and
various proxy pattern types on end user workstations that
bypass filtering, and to log IM and P2P activity of end users
once IM and P2P pattern files are downloaded on demand
via the Manual Update to 8e6 Supplied Categories window.
NOTE: See http://www.8e6.com/pbahelp/files/
1system_proxy_block.html for a list of proxy pattern types that
are set up to be blocked.
TIPS: To block specified users from accessing proxy patterns, the
8e6 supplied “PROXY” library category (Web-based Proxies/
Anonymizers) must be applied to the group or user's filtering
profile. Or, to block all users from accessing these proxy patterns,
the global filtering profile and minimum filtering level must have
the “PROXY” library category set up to be blocked.
To block specified users from accessing IM services, specified
Instant Messaging 8e6 supplied library categories (such as
“IMGEN”, “IMGCHAT”, “IMGTALK”, “ICQAIM”, “IMMSN”,
“IMMYSP”, and/or “IMYAHOO”) must be applied to the group or
user's filtering profile. Or, to block all users from accessing IM
services, the global filtering profile and minimum filtering level
must have appropriate Instant Messaging library categories set
up to be blocked.
Additionally, to block specified users from accessing P2P
services, the 8e6 supplied “PR2PR” library category must be
applied to the group or user’s filtering profile. Or, to block all users
from accessing P2P services, the global filtering profile and
minimum filtering level must have the “PR2PR” library category
set up to be blocked.
58 8E6 TECHNOLOGIES, PROXYBLOC KER USER GUIDE
Page 73

GLOBAL ADMINISTRATOR SECTION CHAPTER 1: SYSTEM SCREEN
Disable Pattern Blocking
Click “Off” to disable Pattern Blocking.
NOTE: After making all entries in this window, click Apply.
8E6 TECHNOLOGIES, PROXYBLOCKER USER GUIDE 59
Page 74

GLOBAL ADMINISTRATOR SECTION CHAPTER 1: SYSTEM SCREEN
Block Page Authentication window
The Block Page Authentication window displays when Block
Page Authentication is selected from the Control menu. This
feature is used for entering criteria the ProxyBlocker server
will use when validating a user’s account. Information
entered/selected in this window is used by the block page
that displays when an end user attempts to access a site or
service that is set up to be blocked.
Fig. 2:1-4 Block Page Authentication window
NOTE: See the Block Page Customization window and Common
Customization window in this chapter for information on customizing the 8e6 block page. See Appendix C: Create a Custom
Block Page for information on creating a customized block page
using your own design.
60 8E6 TECHNOLOGIES, PROXYBLOC KER USER GUIDE
Page 75

GLOBAL ADMINISTRATOR SECTION CHAPTER 1: SYSTEM SCREEN
Enter, Edit Block Page Options
NOTE: If you are not using authentication, and/or if your users do
not have override accounts set up, you do not need to select any
option at the Re-authentication Options field.
1. In the Re-authentication Options field of the Details
frame, all block page options are selected by default,
except for Web-based Authentication. Choose from the
following options by clicking your selection:
• Web-based Authentication - select this option if
using Web authentication with time-based profiles or
persistent login connections for NT or LDAP authentication methods.
• Re-authentication - select this option for the re-
authentication option. The user can restore his/her
profile and NET USE connection by clicking an icon in
a window to run a NET USE script.
• Override Account - select this option if any user has
an Override Account, allowing him/her to access URLs
set up to be blocked at the global or IP group level.
NOTE: Details about the Web-based Authentication option can
be found in the 8e6 ProxyBlocker Authentication User Guide.
TIP: Multiple options can be selected by clicking each option
while pressing the Ctrl key on your keyboard.
NOTE: For more information about the Override Account option,
see information on the following windows in this user guide:
• Global Administrator Section: Override Account window and
Bypass Option window for the global group
• Group Administrator Section: Override Account window for IP
groups, and Exception URL window for IP groups.
8E6 TECHNOLOGIES, PROXYBLOCKER USER GUIDE 61
Page 76

GLOBAL ADMINISTRATOR SECTION CHAPTER 1: SYSTEM SCREEN
2. If the Re-authentication option was selected, in the
Logon Script Path field, \\PDCSHARE\scripts displays
by default. In this field, enter the path of the logon script
that the ProxyBlocker will use when re-authenticating
users on the network, in the event that a user's machine
loses its connection with the server, or if the server is
rebooted. This format requires the entry of two backslashes, the authentication server’s computer name (or
computer IP address) in capital letters, a backslash, and
name of the share path.
3. Click Apply to apply your settings.
62 8E6 TECHNOLOGIES, PROXYBLOC KER USER GUIDE
Page 77

GLOBAL ADMINISTRATOR SECTION CHAPTER 1: SYSTEM SCREEN
Block page
When a user attempts to access Internet content set up to
be blocked, the block page displays on the user’s screen:
Fig. 2:1-5 Sample Block Page
By default, the following data displays in the User/Machine
frame of the block page:
• User/Machine field - The username displays for the NT/
LDAP user. This field is blank for the IP group user.
• IP field - The user’s IP address displays.
• Category field - The name of the library category that
blocked the user’s access to the URL displays. If the
content the user attempted to access is blocked by an
Exception URL, “Exception” displays instead of the
library category name.
8E6 TECHNOLOGIES, PROXYBLOCKER USER GUIDE 63
Page 78

GLOBAL ADMINISTRATOR SECTION CHAPTER 1: SYSTEM SCREEN
• Blocked URL field - The URL the user attempted to
access displays.
By default, the following standard links are included in the
block page:
• HELP - Clicking this link takes the user to 8e6’s Technical
Support page that explains why access to the site or
service may have been denied.
• 8e6 Technologies - Clicking this link takes the user to
8e6’s Web site.
By default, these links are included in the block page under
the following conditions:
• For further options, click here
. - This phrase and link is
included if any option was selected at the Re-authentication Options field. Clicking this link takes the user to the
Options window, described in the Options page subsection that follows.
• To submit this blocked site for review, click here
This phrase and link is included if an email address was
entered in the Submission Email Address field in the
Common Customization window. Clicking this link
launches the user’s default email client. In the composition window, the email address from the Submission
Email Address field populates the “To” field. The user’s
message is submitted to the global administrator.
. -
64 8E6 TECHNOLOGIES, PROXYBLOC KER USER GUIDE
Page 79

GLOBAL ADMINISTRATOR SECTION CHAPTER 1: SYSTEM SCREEN
Options page
The Options page displays when the user clicks the
following link in the block page: For further options, click
here.
Fig. 2:1-6 Options page
The following items previously described for the Block page
display in the upper half of the Options page:
• HELP link
• User/Machine frame contents
The frame beneath the User/Machine frame includes information for options (1, 2, and/or 3) based on settings made in
this window and the Common Customization window.
8E6 TECHNOLOGIES, PROXYBLOCKER USER GUIDE 65
Page 80

GLOBAL ADMINISTRATOR SECTION CHAPTER 1: SYSTEM SCREEN
NOTE: Information about Option 1 is included in the 8e6 ProxyBlocker Authentication User Guide.
Option 2
The following phrase/link displays, based on options
selected at the Re-authentication Options field:
• Re-start your system and re-login - This phrase
displays for Option 2, whether or not either of the other
Re-authentication Options (Re-authentication, or Webbased Authentication) was selected. If the user believes
he/she was incorrectly blocked from a specified site or
service, he/she should re-start his/her machine and log
back in.
• Try re-authenticating your user profile
- This link
displays if “Re-authentication” was selected at the Reauthentication Options field, and an entry was made in
the Logon Script Path field. When the user clicks this link,
a window opens:
Fig. 2:1-7 Re-authentication option
The user should click the logon.bat icon to run a script that
will re-authenticate his/her profile on the network.
66 8E6 TECHNOLOGIES, PROXYBLOC KER USER GUIDE
Page 81

GLOBAL ADMINISTRATOR SECTION CHAPTER 1: SYSTEM SCREEN
Option 3
Option 3 is included in the Options page, if “Override
Account” was selected at the Re-authentication Options
field.
This option is used by any user who has an override
account set up for him/her by the global group administrator
or the group administrator. An override account allows the
user to access Internet content blocked at the global or IP
group level.
The user should enter his/her Username and Password,
and then click Override to open the Profile Control pop-up
window:
Fig. 2:1-8 Profile Control pop-up window
This pop-up window must be left open throughout the user’s
session in order for the user to be able to access blocked
Internet content.
NOTES: See Profile Control window for information on customizing the content in the Profile Control pop-up window. See
Appendix D: Override Pop-up Blockers for information on how a
user with an override account can authenticate if a pop-up
blocker is installed on his/her workstation.
8E6 TECHNOLOGIES, PROXYBLOCKER USER GUIDE 67
Page 82

GLOBAL ADMINISTRATOR SECTION CHAPTER 1: SYSTEM SCREEN
ShutDown window
The ShutDown window displays when ShutDown is
selected from the Control menu. This window is used for
powering off the server.
Fig. 2:1-9 ShutDown window
Shut Down the Server
In the ShutDown frame, click ShutDown to power off the
server. To restart the server, the ProxyBlocker console
needs to be re-accessed.
68 8E6 TECHNOLOGIES, PROXYBLOC KER USER GUIDE
Page 83

GLOBAL ADMINISTRATOR SECTION CHAPTER 1: SYSTEM SCREEN
Reboot window
The Reboot window displays when Reboot is selected from
the Control menu. This window is used for reconnecting the
server on the network.
Fig. 2:1-10 Reboot window
8E6 TECHNOLOGIES, PROXYBLOCKER USER GUIDE 69
Page 84

GLOBAL ADMINISTRATOR SECTION CHAPTER 1: SYSTEM SCREEN
Reboot the Server
1. In the Reboot frame, click Reboot to open the Reboot
ProxyBlocker Enterprise Filter dialog box:
Fig. 2:1-11 Reboot ProxyBlocker dialog box
2. Click Yes to close the dialog box and to launch the
Server Status message box, informing you that the
server is now disconnected:
Fig. 2:1-12 Server Status: disconnect message
When the Server Status box closes, the ProxyBlocker
status message box opens and informs you that the
server is rebooting itself, and how much time has
elapsed since this process began:
Fig. 2:1-13 ProxyBlocker status message box
70 8E6 TECHNOLOGIES, PROXYBLOC KER USER GUIDE
Page 85

GLOBAL ADMINISTRATOR SECTION CHAPTER 1: SYSTEM SCREEN
After the server is rebooted, the ProxyBlocker status
message box closes, and the ProxyBlocker ready alert
box opens:
Fig. 2:1-14 ProxyBlocker ready alert box
The Server connected alert box also opens, informing
you that the server is connected, and that you must
restart the server:
Fig. 2:1-15 Server connected alert box
3. Click OK to close the ProxyBlocker ready alert box.
4. Click OK to close the Server connected alert box.
5. You must now re-access the ProxyBlocker console.
8E6 TECHNOLOGIES, PROXYBLOCKER USER GUIDE 71
Page 86

GLOBAL ADMINISTRATOR SECTION CHAPTER 1: SYSTEM SCREEN
Network
Network includes options for configuring the ProxyBlocker
server on the network. Click the Network link to view a menu
of sub-topics: LAN Settings, NTP Servers, Regional Setting,
and Block Page Route Table.
Fig. 2:1-16 System screen, Network menu
72 8E6 TECHNOLOGIES, PROXYBLOC KER USER GUIDE
Page 87

GLOBAL ADMINISTRATOR SECTION CHAPTER 1: SYSTEM SCREEN
LAN Settings window
The LAN Settings window displays when LAN Settings is
selected from the Network menu. This window is used for
configuring network connection settings for the ProxyBlocker.
Fig. 2:1-17 LAN Settings window
8E6 TECHNOLOGIES, PROXYBLOCKER USER GUIDE 73
Page 88

GLOBAL ADMINISTRATOR SECTION CHAPTER 1: SYSTEM SCREEN
Specify LAN Settings
1. In the Host Name field, enter up to 50 alphanumeric
characters for the name of the host for this server, such
as pba.LOGO.com.
2. Specify the following information, as necessary:
• In the LAN1 IP field of the IP/Mask Setting frame, the
default LAN 1 IP address is 1.2.3.3. Enter the IP
address and select the corresponding subnet mask of
the LAN1 network interface card to be used on the
network.
• In the LAN2 IP field, the default LAN 2 IP address is
1.2.3.4. Enter the IP address and select the corresponding subnet mask of the LAN2 network interface
card to be used on the network.
TIP: Be sure to place the LAN1 and LAN2 IP addresses in
different subnets.
• In the Primary IP field of the DNS frame, the default IP
address is 4.2.2.1. Enter the IP address of the first
DNS server to be used for resolving the IP address of
the authentication server with the machine name of
that server.
• In the Secondary IP field of the DNS frame, the default
IP address is 4.2.2.2. Enter the IP address of the
second DNS server to be used for resolving the IP
address of the authentication server with the machine
name of that server.
• In the Gateway IP field of the Gateway frame, the
default IP address is 1.2.3.1. Enter the IP address of
the default router to be used for the entire network
segment.
3. Click Apply to apply your settings.
NOTE: Whenever modifications are made in this window, the
server must be restarted in order for the changes to take effect.
74 8E6 TECHNOLOGIES, PROXYBLOC KER USER GUIDE
Page 89

GLOBAL ADMINISTRATOR SECTION CHAPTER 1: SYSTEM SCREEN
NTP Servers window
The NTP Servers window displays when NTP Servers is
selected from the Network menu. This window is used for
specifying IP addresses of servers running Network Time
Protocol (NTP) software. NTP is a time synchronization
system for computer clocks throughout the Internet. The
ProxyBlocker will use the actual time from a clock at a specified IP address.
NOTE: The System Time displays beneath the Details frame,
using the YYYY/MM/DD HH:MM:SS Coordinated Universal Time
(UTC) format for the current time zone.
Fig. 2:1-18 NTP Servers window
8E6 TECHNOLOGIES, PROXYBLOCKER USER GUIDE 75
Page 90

GLOBAL ADMINISTRATOR SECTION CHAPTER 1: SYSTEM SCREEN
Specify Network Time Protocol Servers
In the Details frame, three NTP server IP addresses display
by default in the Servers list box. These IP addresses are:
128.59.35.142, 142.3.100.15, and 129.132.98.11.
NOTE: Any IP address following the first entry in the Servers list
box is only used in the event that the ProxyBlocker cannot access
the primary time NTP server specified. IP addresses are used in
the order in which they display in the list box.
Add an NTP Server
To add an NTP server:
1. Enter the IP address in the NTP Server field.
2. Click Add to include this IP address in the Servers list
box.
3. Click Apply to apply your settings.
Remove an NTP Server
To remove an NTP server:
1. Select the IP address from the Servers list box.
2. Click Delete.
3. Click Apply to apply your settings.
WARNING: If using the ProxyBlocker with the 8e6 Technologies
Enterprise Reporter unit, be sure the ER unit is connected to the
same NTP servers as the ProxyBlocker.
76 8E6 TECHNOLOGIES, PROXYBLOC KER USER GUIDE
Page 91

GLOBAL ADMINISTRATOR SECTION CHAPTER 1: SYSTEM SCREEN
Regional Setting window
The Regional Setting window displays when Regional
Setting is selected from the Network menu. This window is
used for specifying the time zone to be used by the ProxyBlocker and the language set type, if necessary.
Fig. 2:1-19 Regional Setting window
8E6 TECHNOLOGIES, PROXYBLOCKER USER GUIDE 77
Page 92

GLOBAL ADMINISTRATOR SECTION CHAPTER 1: SYSTEM SCREEN
Specify the Time Zone, Language Set
In the Details frame, the Region “US” and the Location
“Pacific” display by default. To change these settings:
1. At the Region pull-down menu, select your country from
the available choices.
2. At the Location pull-down menu, select the time zone for
the specified region.
If necessary, select a language set from the Language
pull-down menu to specify that you wish to display that
text in the console.
3. Click Apply to apply your settings, and to reboot the
ProxyBlocker.
WARNING: If using the ProxyBlocker with an 8e6 Technologies
Enterprise Reporter unit, be sure each ProxyBlocker used by the
ER is set up in the same time zone as the ER. These “like”
settings ensure consistency when tracking the logging times of all
users on the network.
78 8E6 TECHNOLOGIES, PROXYBLOC KER USER GUIDE
Page 93

GLOBAL ADMINISTRATOR SECTION CHAPTER 1: SYSTEM SCREEN
Block Page Route Table window
The Block Page Route Table window displays when Block
Page Route Table is selected from the Network menu. This
window is used for building and maintaining a list of destination based routers the server will use for communicating
with other segments of the network. You need to set up a
route table only if your local network is interconnected with
another network, and if users’ client machines are not being
served block pages when appropriate.
Fig. 2:1-20 Block Page Route Table window
NOTE: See the Block Page Authentication window for information
on setting up block pages.
8E6 TECHNOLOGIES, PROXYBLOCKER USER GUIDE 79
Page 94

GLOBAL ADMINISTRATOR SECTION CHAPTER 1: SYSTEM SCREEN
Add a Router
In the Route Table frame:
1. Enter the IP address.
2. Select the network subnet Mask from the pull-down
menu.
3. In the Gateway field, enter the IP address of the portal to
which packets will be transferred to and from the Internet.
TIP: Click Calculator to open the IP Calculator pop-up window.
Use this calculator to calculate IP ranges without any overlaps.
4. Click Add to include your entries in the IP/Mask list box.
NOTE: Follow steps 1-4 for each router you wish to include in the
routing table.
Remove a Router
To remove one or more routers from the IP/Mask list box:
1. Select the router(s) from the list box.
2. Click Delete.
80 8E6 TECHNOLOGIES, PROXYBLOC KER USER GUIDE
Page 95

GLOBAL ADMINISTRATOR SECTION CHAPTER 1: SYSTEM SCREEN
Administrator
Administrator window
The Administrator window displays when Administrator is
selected from the navigation panel. This window is used for
adding and maintaining global administrator (Admin) and
group administrator (Sub Admin) accounts. A Sub Admin
manages NT or LDAP entities and their filtering profiles.
NOTE: See the Group Details window in Chapter 1: Group
screen of the Group Administrator Section for information on
setting up and maintaining accounts for IP group administrators.
See the 8e6 ProxyBlocker Authentication User Guide for more
information on setting up and maintaining NT and LDAP Sub
Admin group administrator accounts.
Fig. 2:1-21 Administrator window
8E6 TECHNOLOGIES, PROXYBLOCKER USER GUIDE 81
Page 96

GLOBAL ADMINISTRATOR SECTION CHAPTER 1: SYSTEM SCREEN
TIP: The default Username is admin and the Password is user3.
8e6 recommends that you retain this default account and password in the event that the ProxyBlocker unit cannot be accessed.
An authorized 8e6 Technologies technical representative may
need to use this username and password when troubleshooting
the unit.
WARNING: Always be sure that at least one account is listed in
this window at all times.
View Administrator Accounts
The Current User list box includes the Account Name and
corresponding account Type (“Admin” or “Sub Admin”) for
each active global administrator or NT/LDAP group administrator previously set up in this window.
Add an Administrator Account
To add a global or NT/LDAP group administrator account:
1. In the Account Details frame, enter the username in the
Username field.
2. In the Password field, enter eight to 20 characters—
including at least one alpha character, one numeric character, and one special character. The password is case
sensitive.
3. Make the same entry again in the Confirm Password
field.
4. Select “Admin” or “Sub Admin” from the Type pull-down
menu.
5. Click Add to include the username and account type in
the Current User list box.
82 8E6 TECHNOLOGIES, PROXYBLOC KER USER GUIDE
Page 97

GLOBAL ADMINISTRATOR SECTION CHAPTER 1: SYSTEM SCREEN
Edit an Administrator Account
To change an administrator’s password and/or account
type:
1. Select the username from the Current User list box; this
action populates the Account Details frame with data.
2. In the Password field, enter eight to 20 characters for a
new password—including at least one alpha character,
one numeric character, and one special character. The
password is case sensitive.
3. Enter the same new password again in the Confirm
Password field.
If the administrator’s account type needs to be changed,
select the appropriate account type from the Type pulldown menu (“Admin” for global administrator or “Sub
Admin” for NT/LDAP group administrator).
4. Click Modify to apply your settings.
NOTE: A username cannot be modified, but can be deleted and
added again.
Delete an Administrator Account
To delete an administrator account:
1. Select the username from the Current User list box.
2. Click Delete to remove the account.
8E6 TECHNOLOGIES, PROXYBLOCKER USER GUIDE 83
Page 98

GLOBAL ADMINISTRATOR SECTION CHAPTER 1: SYSTEM SCREEN
Secure Logon
Secure Logon includes options for setting user passwords
to expire after a designated number of days, and/or locking
out users from the ProxyBlocker after unsuccessfully
attempting to log in for the specified number of attempts
within the defined timespan. Click the Secure Logon link to
view a menu of sub-topics: Logon Settings, and Logon
Management.
Fig. 2:1-22 System screen, Secure Logon window
84 8E6 TECHNOLOGIES, PROXYBLOC KER USER GUIDE
Page 99

GLOBAL ADMINISTRATOR SECTION CHAPTER 1: SYSTEM SCREEN
Logon Settings window
The Logon Settings window displays when Logon Settings
is selected from the Secure Logon menu. This window is
used for enabling the password expiration feature that lets
you define the number of days a password will be valid
before a new password must be used. This window also lets
you enable the feature for locking out a user from the interface by username and/or IP address if an incorrect password is entered for a specified number of times within a
defined timespan.
NOTE: This window displays only on servers set up in the Standalone or Source mode.
Fig. 2:1-23 Logon Settings window
8E6 TECHNOLOGIES, PROXYBLOCKER USER GUIDE 85
Page 100

GLOBAL ADMINISTRATOR SECTION CHAPTER 1: SYSTEM SCREEN
Enable, Disable Password Expiration
In the Logon Expiration frame, at the Number of days prior
to expiration [1-365] field, specify the number of days
logon passwords will be effective by doing one of the
following:
• select from available choices (1, 30, 90, 365, Never
Expired)
• make an entry for the number of days until passwords
expire.
NOTE: If a user’s password has expired, when he/she enters his/
her username and password in the Login dialog box and clicks
OK, a different login dialog box opens:
Fig. 2:1-24 New password entry
This dialog box displays his/her Username and prompts him/her
to enter a new password in the Password and Confirm Password
fields. Upon clicking OK, the ProxyBlocker interface opens.
86 8E6 TECHNOLOGIES, PROXYBLOC KER USER GUIDE
 Loading...