

Page 1

® Enterprise Reporter
USER
GUIDE
Administrator Console
Model: ER
Release 5.0.00 • Manual Version 1.01
Page 2

II 8E6 TECHNOLOGIES, ENTERPRISE REPORTER ADMINISTRATOR USER GUIDE
Page 3

8E6 ENTERPRISE R EPORTER A DMINISTRATOR
U
SER GUIDE
© 2008 8e6 Technologies
All rights reserved.
828 W. Taft Ave., Orange, CA 92865, USA
Version 1.01, published January 2009 for software release
5.0.00
Printed in the United States of America
This document may not, in whole or in part, be copied, photocopied, reproduced, translated, or reduced to any electronic
medium or machine readable form without prior written consent from 8e6 Technologies.
Every effort has been made to ensure the accuracy of this
document. However, 8e6 Technologies makes no warranties
with respect to this documentation and disclaims any implied
warranties of merchantability and fitness for a particular purpose. 8e6 Technologies shall not be liable for any error or for
incidental or consequential damages in connection with the
furnishing, performance, or use of this manual or the examples herein. Due to future enhancements and modifications of
this product, the information described in this documentation
is subject to change without notice.
The latest version of this document can be obtained from
http://www.8e6.com/docs/er5server.pdf.
Trademarks
Other product names mentioned in this manual may be trademarks or registered trademarks of their respective companies
and are the sole property of their respective manufacturers.
Part# ER5-SUG_v1.01-0901
8E6 TECHNOLOGIES, ENTERPRISE REPORTER ADMINISTRATOR USER GUIDE iii
Page 4

IV 8E6 TECHNOLOGIES, ENTERPRISE REPORTER ADMINISTRATOR USER GUIDE
Page 5

CONTENTS
E
NTERPRISE REPORTER OVERVIEW
Operations ...................................................................................1
How to Use this User Guide ....................................................... 2
Organization ...................................................................................... 2
Conventions ...................................................................................... 3
Terminology ...................................................................................... 4
A
DMINISTRATOR SECTION
Introduction .................................................................................8
Components and Environment ................................................10
Components .................................................................................... 10
Hardware .................................................................................. 10
Software ................................................................................... 10
Environment .................................................................................... 11
Workstation Requirements ....................................................... 11
Network Requirements ............................................................. 11
Chapter 1: Accessing the Server ............................................. 12
Preliminary Network Settings .......................................................... 12
Procedures for Accessing the Server .............................................. 12
Procedures for Logging On, Off the Server ..................................... 13
Log On ...................................................................................... 13
Logging on the First Time .................................................. 15
Specify the Server’s function ........................................ 15
Set up an Administrator Login ID ........................................ 16
Log Off ...................................................................................... 18
................................... 1
................................................. 8
Chapter 2: Configuring the ER Server ....................................19
Administrator Console ..................................................................... 19
Network Menu .......................................................................... 20
Box Mode screen ............................................................... 21
Live Mode ..................................................................... 21
Archive Mode................................................................ 21
Change the Box Mode .................................................. 22
8E6 TECHNOLOGIES, ENTERPRISE REPORTER ADMINISTRATOR USER GUIDE v
Page 6

CONTENTS
Add/Edit/Delete Administrators screen .............................. 23
View a List of Administrators ........................................ 24
Add an Administrator .................................................... 24
Edit an Administrator’s Login ID ................................... 24
Delete an Administrator ................................................ 25
Locked-out Accounts and IPs screen ................................. 26
View Locked Accounts, IP addresses........................... 27
Unlock Accounts, IP addresses .................................... 27
Network Settings screen ..................................................... 28
Set up/Edit IP Addresses.............................................. 29
Routing Table screen ......................................................... 30
View a List of Routers................................................... 30
Add a Router................................................................. 31
Delete a Router............................................................. 31
Regional Setting screen ..................................................... 32
Specify the Time Zone.................................................. 33
Specify the Language Set............................................. 33
Specify Network Time Protocol Servers ....................... 33
Update the Time on the Server..................................... 34
Network Diagnostics screen ............................................... 35
Ping............................................................................... 36
Trace Route .................................................................. 37
SNMP screen ..................................................................... 39
Enable SNMP ............................................................... 40
Set up Community Token for Public Access................. 40
Create, Build the Access Control List ........................... 40
Maintain the Access Control List .................................. 40
Server Menu . ............................................................................ 41
Backup screen ................................................................... 42
Backup and Recovery Procedures ............................... 42
Set up/Edit External Backup FTP Password ................ 44
Execute a Manual Backup ............................................ 44
Perform a Remote Backup ........................................... 45
Perform a Restoration to the ER Server ....................... 46
Self Monitoring screen ....................................................... 47
View a List of Contact E-Mail Addresses...................... 48
Set up and Activate Self-Monitoring ............................. 48
Remove Recipient from E-mail Notification List............ 48
Deactivate Self-Monitoring............................................ 48
SMTP Server Setting screen .............................................. 49
Enter, Edit SMTP Server Settings ................................ 49
vi 8E6 TECHNOLOGIES, ENTERPRISE REPORTER ADMINISTRATOR USER GUIDE
Page 7

Verify SMTP Settings.................................................... 50
Server Status screen........................................................... 51
View the Status of the Server ....................................... 52
Secure Access screen ....................................................... 53
Activate a Port to Access the Server ............................ 54
Terminate a Port Connection........................................ 55
Terminate All Port Connections .................................... 55
Software Update screen ..................................................... 56
View Installed Software Updates .................................. 57
Uninstall the Most Recently Applied Software Update . 57
View Available Software Updates................................. 57
Install a Software Update.............................................. 58
Software Update Setting screen ......................................... 61
Specify Proxy Settings.................................................. 62
Save Settings................................................................ 62
Shut Down screen .............................................................. 63
Server Action Selections............................................... 63
Perform a Server Action ............................................... 64
NIC Mode screen ................................................................ 65
View the NIC Negotiation.............................................. 66
Modify the NIC Mode Setting........................................ 66
Web Client Server Management screen ............................. 67
Restart the Web Client Server ...................................... 68
Enable/Disable Web Client Server Access................... 68
Enable/Disable the Web Client Scheduler.................... 68
Hardware Failure Detection screen .................................... 69
View the Status of the Hard Drives............................... 69
Consolidated ER: Consolidated Mode Setting screen ....... 71
View Remote ER Settings ............................................ 71
Add a Remote ER......................................................... 72
View Current Statistics for a Remote ER...................... 72
Edit Settings for a Remote ER...................................... 73
Remove a Remote ER from the Consolidated ER........ 73
Database Menu . ....................................................................... 74
User Name Identification screen ......................................... 74
View the User Name Identification screen.................... 77
Set up a Customized Label for Unidentified Machines. 77
Configure the Server to Log User Activity..................... 77
Deactivate User Name Identification ............................ 78
Username Display Setting screen ...................................... 79
View the Current Username Display Setting ................ 80
CONTENTS
8E6 TECHNOLOGIES, ENTERPRISE REPORTER ADMINISTRATOR USER GUIDE vii
Page 8

CONTENTS
Modify the Username Display Setting........................... 80
Page View Elapsed Time screen ....................................... 82
Establish the Unit of Elapsed Time for Page Views...... 82
Elapsed Time Rules...................................................... 83
Page Definition screen ....................................................... 84
View the Current Page Types....................................... 84
Remove a Page Type ................................................... 85
Add a Page Type .......................................................... 85
Tools screen ....................................................................... 86
View Diagnostic Reports............................................... 87
View Database Status Logs.......................................... 87
Expiration screen ............................................................... 90
Expiration Screen Terminology..................................... 91
Expiration Rules............................................................ 92
View Data Storage Statistics ........................................ 93
Change Data Storage Settings ..................................... 97
NAS Status screen ............................................................. 99
View NAS Status Information ..................................... 100
Optional Features screen.................................................. 100
Enable Search String Reporting ................................. 102
Enable Block Request Count...................................... 102
Enable Wall Clock Time.............................................. 102
Enable Page and/or Object Count .............................. 103
Enable, Configure Password Security Option............. 104
User Group Import screen ................................................ 106
Import User Groups .................................................... 107
T
ECHNICAL SUPPORT
/ P
RODUCT WARRANTIES
Technical Support ...................................................................108
Hours ............................................................................................. 108
Contact Information ....................................................................... 108
Domestic (United States) ........................................................ 108
International ............................................................................ 108
E-Mail ..................................................................................... 108
Office Locations and Phone Numbers .................................... 109
8e6 Corporate Headquarters (USA).................................. 109
8e6 Taiwan........................................................................ 109
Support Procedures ...................................................................... 110
Product Warranties ................................................................. 111
viii 8E6 TECHNOLOGIES, ENTERPRISE REPORTER ADMINISTRATOR USER GUIDE
............. 108
Page 9

Standard Warranty ........................................................................ 111
Technical Support and Service ..................................................... 112
Extended Warranty (optional) ....................................................... 113
Extended Technical Support and Service ..................................... 113
A
PPENDICES SECTION
................................................... 114
Appendix A ..............................................................................114
Evaluation Mode ........................................................................... 114
Administrator Console ............................................................ 114
Use the Server in the Evaluation Mode ............................ 116
Expiration screen ........................................................ 116
Change the Evaluation Mode............................................ 117
Activation Page........................................................... 118
Appendix B ..............................................................................120
Disable Pop-up Blocking Software ................................................ 120
Yahoo! Toolbar Pop-up Blocker .................................................... 120
Add the Client to the White List .............................................. 120
Google Toolbar Pop-up Blocker .................................................... 122
Add the Client to the White List .............................................. 122
AdwareSafe Pop-up Blocker ......................................................... 123
Disable Pop-up Blocking ........................................................ 123
Windows XP SP2 Pop-up Blocker ................................................ 124
Set up Pop-up Blocking .......................................................... 124
Use the Internet Options dialog box.................................. 124
Use the IE Toolbar ........................................................... 125
Add the Client to the White List . ............................................. 126
Use the IE Toolbar ............................................................ 126
Use the Information Bar ................................................... 127
Set up the Information Bar.......................................... 127
Access the Client ........................................................ 127
CONTENTS
Appendix C ..............................................................................129
RAID Maintenance ........................................................................ 129
Part 1: Hardware Components ............................................... 129
Part 2: Server Interface . ......................................................... 130
LED indicators in SL and HL units .................................... 130
Front control panels on H, SL, and HL units ....................132
Rear panels on H and HL units ........................................ 134
Part 3: Troubleshooting . ......................................................... 135
8E6 TECHNOLOGIES, ENTERPRISE REPORTER ADMINISTRATOR USER GUIDE ix
Page 10

CONTENTS
I
NDEX
Hard drive failure............................................................... 135
Step 1: Review the notification email.......................... 135
Step 2: Verify the failed drive in the Admin console ... 136
Step 3: Replace the failed hard drive.......................... 137
Step 4: Rebuild the hard drive .................................... 138
Step 5: Contact Technical Support ............................. 138
Power supply failure.......................................................... 138
Step 1: Identify the failed power supply ...................... 138
Step 2: Unplug the power cord ................................... 138
Step 3: Replace the failed power supply .................... 139
Step 4: Contact Technical Support ............................. 139
Fan failure ........................................................................ 140
Identify a fan failure .................................................... 140
........................................................................... 141
x 8E6 TECHNOLOGIES, ENTERPRISE REPORTER ADMINISTRATOR USER GUIDE
Page 11

ENTERPRISE REPORTER OVERVIEW OPERATIONS
ENTERPRISE REPORTER OVERVIEW
Though many companies have Internet filtering solutions to
prevent employees from accessing inappropriate, non-work
related Web sites, simply blocking these sites is not enough.
Administrators want the ability to know who is accessing
which site, the duration of each site visit, and the frequency
of these visits. This data can help administrators identify
abusers, develop policies, and target sites to be filtered, in
order to maximize bandwidth utilization and productivity.
The Enterprise Reporter (ER) from 8e6 Technologies is
designed to readily obtain this information, giving the user
the ability to interrogate massive datasets through flexible
drill-down technology, until the desired view is obtained.
This “view” can then be memorized and saved to a userdefined report menu for repetitive, scheduled execution and
distribution.
Operations
In simplified terms, the ER operates as follows: the ER
Server accepts log files (text files containing Web access
data) from a source device such as the 8e6 R3000 Enterprise Filter. 8e6’s proprietary programs “normalize” the
transferred data and insert them into a MySQL database.
The ER Client reporting application accesses this database
to generate a virtually unlimited number of queries and
reports.
8E6 TECHNOLOGIES, ENTERPRISE REPORTER ADMINISTRATOR USER GUIDE 1
Page 12

ENTERPRISE REPORTER OVERVIEW HOW TO USE THIS USER GUIDE
How to Use this User Guide
Organization
This User Guide is organized into the following sections:
• Overview - This section provides information on how to
use this user guide to help you configure the ER Server.
• Administrator Section - Refer to this section for information on configuring and maintaining the ER Server via
the Administrator console application.
• Tech Support / Product Warranties Section - This
section contains information on technical support and
product warranties.
• Appendices Section - Appendix A provides information
on how to use the ER Server in the evaluation mode, and
how to switch to the activated mode. Appendix B
explains how to disable many types of pop-up blocking
software. Appendix C includes information about RAID
maintenance and troubleshooting on an ER “H”, “SL”, or
“HL” server.
• Index - This section includes an index of topics and the
first page numbers where they appear in this user guide.
2 8E6 TECHNOLOGIES, ENTERPRISE REPORTER ADMINISTRATOR USER GUIDE
Page 13

Conventions
The following icons are used throughout this user guide:
NOTE: The “note” icon is followed by italicized text providing
additional information about the current topic.
TIP: The “tip” icon is followed by italicized text giving you hints on
how to execute a task more efficiently.
WARNING: The “warning” icon is followed by italicized text
cautioning you about making entries in the application, executing
certain processes or procedures, or the outcome of specified
actions.
IMPORTANT: The "important" icon is followed by italicized text
informing you about important information or procedures to follow
to ensure maximum uptime on the ER Server.
ENTERPRISE REPORTER OVERVIEW HOW TO USE THIS USER GUIDE
8E6 TECHNOLOGIES, ENTERPRISE REPORTER ADMINISTRATOR USER GUIDE 3
Page 14

ENTERPRISE REPORTER OVERVIEW HOW TO USE THIS USER GUIDE
Terminology
The following terms are used throughout this user guide.
Sample images (not to scale) are included for each item.
• alert box - a message box
that opens in response to an
entry you made in a dialog
box, window, or screen. This
box often contains a button
(usually labeled “OK”) for you
to click in order to confirm or execute a command.
• button - an object in a dialog box, window, or
screen that can be clicked with your mouse
to execute a command.
• checkbox - a small square in a dialog
box, window, or screen used for indicating whether or not you wish to
select an option. This object allows you to toggle
between two choices. By clicking in this box, a check
mark or an “X” is placed, indicating that you selected the
option. When this box is not checked, the option is not
selected.
• dialog box - a box that
opens in response to a
command made in a
window or screen, and
requires your input. You
must choose an option
clicking a button
by
(such as “Yes” or “No”,
or “Next” or “Cancel”) to
execute your command.
As dictated by this box,
you also might need to
make one or more
entries or selections prior to clicking a button.
4 8E6 TECHNOLOGIES, ENTERPRISE REPORTER ADMINISTRATOR USER GUIDE
Page 15

ENTERPRISE REPORTER OVERVIEW HOW TO USE THIS USER GUIDE
• field - an area in a
dialog box, window,
or screen that either
accommodates
your data entry, or
displays pertinent
information. A text
box is a type of field.
• frame - a boxed-in area in a dialog
box, window, or screen that includes a
group of objects such as fields, text
boxes, list boxes, buttons, radio
buttons, and/or tables. Objects within
a frame belong to a specific function or
group. A frame often is labeled to indicate its function or purpose.
• list box - an area in a dialog box, window,
or screen that accommodates and/or
displays entries of items that can be added
or removed.
• pop-up box or pop-up
window - a box or window
that opens after you click a
button in a dialog box,
window, or screen. This box
or window may display information, or may require you to
make one or more entries. Unlike a dialog box, you do
not need to choose between options.
• pull-down menu - a field in a
dialog box, window, or screen
that contains a down arrow to the
right. When you click the arrow, a menu of items displays
from which you make a selection.
8E6 TECHNOLOGIES, ENTERPRISE REPORTER ADMINISTRATOR USER GUIDE 5
Page 16

ENTERPRISE REPORTER OVERVIEW HOW TO USE THIS USER GUIDE
• radio button - a small, circular
object in a dialog box, window, or
screen used for selecting an option.
This object allows you to toggle between two choices. By
clicking a radio button, a dot is placed in the circle, indicating that you selected the option. When the circle is
empty, the option is not selected.
• screen - a
main object
of an application that
displays
across your
monitor. A
screen can
contain
windows,
frames,
fields, tables,
text boxes,
list boxes, buttons, and radio buttons.
• table - an area in a
window or screen
that contains items
previously entered
or selected.
• text box - an area in a dialog
box, window, or screen that
accommodates your data
entry. A text box is a type of field.
6 8E6 TECHNOLOGIES, ENTERPRISE REPORTER ADMINISTRATOR USER GUIDE
Page 17

ENTERPRISE REPORTER OVERVIEW HOW TO USE THIS USER GUIDE
• window - displays on a screen,
and can contain frames, fields,
text boxes, list boxes, buttons,
and radio buttons. Types of
windows include ones from the
system such as the Save As
window, pop-up windows, or
login windows.
8E6 TECHNOLOGIES, ENTERPRISE REPORTER ADMINISTRATOR USER GUIDE 7
Page 18

ADMINISTRATOR SECTION INTRODUCTION
ADMINISTRATOR SECTION
Introduction
The authorized administrator of the ER Server is responsible for integrating the Server into the existing network, and
providing the Server a high speed connection to the designated logging device(s) and remote Client workstations. To
attain this objective, the administrator performs the following
tasks:
• executes Quick Start procedures defined in the ER Quick
Start Guide booklet packaged with the ER Server
• provides a suitable environment for the Server, including:
• high speed, HTTPS link to the current logging device
• power connection protected by an Uninterruptible
Power Supply (UPS)
• high speed access to the Server by authorized Client
workstations
• adds new administrators
• sets up administrators for receiving automatic alerts
• updates the Server with software updates supplied by
8e6
• analyzes Server statistics
• utilizes diagnostics for monitoring the Server status to
ensure optimum functioning of the Server
• establishes and implements backup and restoration
procedures for the Server
Instructions on configuring and maintaining the ER Server
are documented in this section.
8 8E6 TECHNOLOGIES, ENTERPRISE REPORTER ADMINISTRATOR USER GUIDE
Page 19

ADMINISTRATOR SECTION INTRODUCTION
NOTES: This user guide is accessible via the Help link beneath
the banner in any screen in the Administrator console.
Information about the ER Client can be found in the ER Web
Client User Guide that can be obtained from http://
www.8e6.com/docs/er5_wclient.pdf.
8E6 TECHNOLOGIES, ENTERPRISE REPORTER ADMINISTRATOR USER GUIDE 9
Page 20

ADMINISTRATOR SECTION COMPONENTS AND ENVIRONMENT
Components and Environment
Components
Hardware
• High performance server
• One or more high-capacity hard drives
• Optional: One or more attached “NAS” storage devices
(e.g. Ethernet connected SCSI connected “SAN”)
Software
• Linux OS
• Administrator Graphical User Interface (GUI) console
utilized by an authorized administrator to configure and
maintain the ER Server
• MySQL database
• 8e6 Technologies proprietary Client application
employed by report users for generating “views” and
reports
10 8E6 TECHNOLOGIES, ENTERPRISE REPORTER ADMINISTRATOR USER GUIDE
Page 21

ADMINISTRATOR SECTION COMPONENTS AND ENVIRONMENT
Environment
Workstation Requirements
• Windows 2000, NT 4.0, or XP operating system
• Internet Explorer (IE) Version 6.0 or later
• Pop-up blocking software, if installed, must be disabled
• Session cookies from the ER Server must be allowed in
order for the Administrator console to function properly
NOTE: Information about disabling pop-up blocking software can
be found in Appendix B: Disable Pop-up Blocking Software.
Network Requirements
• High speed connection from the ER Server to the Web
access logging device(s)
• High speed connection from the ER Server to the Client
workstation(s)
8E6 TECHNOLOGIES, ENTERPRISE REPORTER ADMINISTRATOR USER GUIDE 11
Page 22

ADMINISTRATOR SECTION CHAPTER 1: ACCESSING THE SERVER
Chapter 1: Accessing the Server
Preliminary Network Settings
To initially set up your ER Server, follow the instructions in
the ER Quick Start Guide booklet packaged with your ER
unit. This guide explains how to perform the initial configuration of the Server so that it can be accessed via an IP
address on your network.
NOTE: If you do not have the ER Administrator Quick Start
Guide, contact 8e6 Technologies immediately to have a copy
sent to you.
WARNING: In order to prevent data from being lost or corrupted
while the Server is running, the Server should be connected to a
UPS or other battery backup system.
Procedures for Accessing the Server
WARNING: Once you turn on the Server, DO NOT interrupt the
initial boot-up process. This process may take from five to 10
minutes per drive. If the process is interrupted, damage to key
files may occur.
When the Server is fully booted, any workstation on the
network that can access the Server’s IP address (set up
during Quick Start procedures) will be able to communicate
with the Server via the Internet.
1. Launch Internet Explorer (IE).
2. In the address line of the IE browser window, type in the
Server’s IP address appended by the following port
number:
• “:88” for an HTTP address
• “:8843” for an HTTPS address
12 8E6 TECHNOLOGIES, ENTERPRISE REPORTER ADMINISTRATOR USER GUIDE
Page 23

ADMINISTRATOR SECTION CHAPTER 1: ACCESSING THE SERVER
For example, if your IP address is 1.2.3.4, type in http://
1.2.3.4:88 or https://1.2.3.4:8843.
3. Click Go to open the login screen of the Administrator
console application (see Fig. 1:1-1).
Procedures for Logging On, Off the Server
Log On
Fig. 1:1-1 Login screen
1. In the login screen, type in the generic User Name
admin, and Password reporter, if you have not yet set
up your own user name and password. Otherwise, enter
your personal User Name and Password.
2. Click Login to go to the main screen of the Administrator
console.
8E6 TECHNOLOGIES, ENTERPRISE REPORTER ADMINISTRATOR USER GUIDE 13
Page 24

ADMINISTRATOR SECTION CHAPTER 1: ACCESSING THE SERVER
NOTES: When logging on the Server for the first time, the ER
Status pop-up box opens, and the main screen displays with a
message, as shown in the example in Logging on the First Time.
Follow the directions in this sub-section before proceeding.
(Refer to Appendix A: Evaluation Mode for information on using
the ER Server in the evaluation mode, or for changing the Server
from this mode to the activated mode.)
If you are logging on during a subsequent session, the main
screen displays as in Fig. 1:2-1. If you have not set up your own
user name and password, see Set up an Administrator Login ID.
If using a consolidated ER server, some screens in the Administrator console differ; there are a few unique screens, and some
screens are not included. The Consolidated Mode icon displays
at the top of each screen, above the Help link:
A consolidated ER Server (CER) is used in environments with
multiple ER Servers, and acts as the source for consolidating
records from all remote ER Servers added in the Administrator
console. See the ER Web Client User Guide for information on
using the Web Client with a CER Server.
14 8E6 TECHNOLOGIES, ENTERPRISE REPORTER ADMINISTRATOR USER GUIDE
Page 25

ADMINISTRATOR SECTION CHAPTER 1: ACCESSING THE SERVER
Logging on the First Time
If you are logging on the Administrator console for the first
time, the main screen displays with a message that asks
you to specify the Server’s function:
Fig. 1:1-2 Administrator console, main screen, first-time access
Specify the Server’s function
1. Click the appropriate radio button to specify the function
of the Server:
• choose Live if you wish the Server to function in the
“live” mode, receiving and processing real time data
from the Web access logging device.
• choose Archive if you wish the Server to function in
the “archive” mode, solely as a receptacle for historical, archived files. In this mode, “old” files placed on
the Server can be viewed using the Client reporting
application.
8E6 TECHNOLOGIES, ENTERPRISE REPORTER ADMINISTRATOR USER GUIDE 15
Page 26

ADMINISTRATOR SECTION CHAPTER 1: ACCESSING THE SERVER
2. Click Apply to confirm your selection. The mode you
specify will immediately be in effect.
TIP: After choosing the function for the ER Server box on the
main screen, if you have not previously set up your own user
name and password, you should do so before entering any
Server settings.
Set up an Administrator Login ID
NOTE: If you have already set up your user name and password,
you can skip this section.
1. At the Network pull-down menu, choose Administrators
to display the Add/Edit/Delete Administrators screen
where you will set up your user name and password:
Fig. 1:1-3 Add/Edit/Delete Administrators screen
2. Select New Administrators from the pull-down menu.
16 8E6 TECHNOLOGIES, ENTERPRISE REPORTER ADMINISTRATOR USER GUIDE
Page 27

ADMINISTRATOR SECTION CHAPTER 1: ACCESSING THE SERVER
3. In the User Name field, enter up to 20 characters—this
may include upper- and/or lowercase alphanumeric characters, and special characters.
4. In the Password field, enter eight to 20 characters—
including at least one alpha character, one numeric character, and one special character. The password is case
sensitive.
5. In the Confirm Password field, re-enter the password in
the exact format used at the Password field.
6. Click the Save button.
8E6 TECHNOLOGIES, ENTERPRISE REPORTER ADMINISTRATOR USER GUIDE 17
Page 28

ADMINISTRATOR SECTION CHAPTER 1: ACCESSING THE SERVER
Log Off
To log off the Administrator console, click the Logout link
beneath the banner in any screen to display the log out
screen:
Fig. 1:1-4 Logout screen
Click the “X” in the upper right corner of the browser window
to close the window. Exiting the Administrator console will
log you off the Server, but will not turn off the Server.
WARNING: If you need to turn off the Server, follow the shut
down procedures outlined in the Shut Down screen sub-section
under the Server Menu section in Chapter 2. Failure to properly
shut down the Server can result in data being lost or corrupted.
18 8E6 TECHNOLOGIES, ENTERPRISE REPORTER ADMINISTRATOR USER GUIDE
Page 29

ADMINISTRATOR SECTION CHAPTER 2: CONFIGURING THE ER SERVER
Chapter 2: Configuring the ER Server
Administrator Console
After logging on the Server, the main screen of the Administrator console displays in your Web browser:
Fig. 1:2-1 Administrator console, main screen
The Administrator console is used for configuring and maintaining the ER Server. Settings made in the Administrator
console affect the Client reporting application. On the main
screen of the Administrator console, there are three menus:
Network, Server, and Database. Each menu contains
options from which you make selections to access screens
used for configuring your Server.
8E6 TECHNOLOGIES, ENTERPRISE REPORTER ADMINISTRATOR USER GUIDE 19
Page 30

ADMINISTRATOR SECTION CHAPTER 2: CONFIGURING THE ER SERVER
NOTE: The mode of the Server displays on the main screen.
More information about the “live” and “archive” Server box modes
can be found in the Box Mode sub-section under the Network
Menu section in this chapter.
TIP: When making a complete configuration of the Server, 8e6
Technologies recommends you navigate from left to right
(Network to Server to Database) in choosing your menu options.
Network Menu
The Network pull-down menu includes options for setting up
and maintaining components to be used on the Server’s
network. These options are: Box Mode, Administrators,
Lockouts, Network Setting, Routing Table, Regional Setting,
Diagnostics, and SNMP.
Fig. 1:2-2 Network menu, main screen
20 8E6 TECHNOLOGIES, ENTERPRISE REPORTER ADMINISTRATOR USER GUIDE
Page 31

ADMINISTRATOR SECTION CHAPTER 2: CONFIGURING THE ER SERVER
Box Mode screen
The Box Mode screen displays by default when you first log
on the Server, or when the Box Mode option is selected from
the Network menu. (See Figs. 1:2-1 and 1:2-2.) The box
mode indicates whether the Server box is functioning in the
“live” mode, or in the “archive” mode. When the box mode
displays on the screen, you can view the current mode set
for the Server, and can change this setting, if necessary.
NOTE: When accessing the Box Mode screen for the first time,
the ER Status pop-up box opens to inform you that the ER unit is
currently in the evaluation mode. To continue using the box in the
evaluation mode, click the “X” in the upper right corner to close
the pop-up box. (Refer to Appendix A: Evaluation Mode for information on using the Server in the evaluation mode, or for
changing from this mode to the activated mode.)
Live Mode
Once your Server is configured and the Server box is set in
the “live” mode, it will receive and process real time data
from the Web access logging device. The Client reporting
application can then be used to capture data and create
views.
Archive Mode
In the “archive” mode, the Server box solely functions as a
receptacle in which historical, archived files are placed. In
this mode, “old” files placed on the Server can be viewed
using the Client reporting application.
8E6 TECHNOLOGIES, ENTERPRISE REPORTER ADMINISTRATOR USER GUIDE 21
Page 32

ADMINISTRATOR SECTION CHAPTER 2: CONFIGURING THE ER SERVER
Change the Box Mode
1. Click the Change Mode button to display the two box
mode options on the screen:
Fig. 1:2-3 Change Box Mode
2. Click the radio button corresponding to Live or Archive
to specify the mode in which the Server should function.
3. Click the Apply button to confirm your selection. The
“new” mode will be in effect after the Server is restarted.
NOTE: After applying the box mode setting, you must restart the
Server by selecting the Restart Hardware option on the Shut
Down screen. (See the Shut Down sub-section under the Server
menu section in this chapter.)
22 8E6 TECHNOLOGIES, ENTERPRISE REPORTER ADMINISTRATOR USER GUIDE
Page 33

ADMINISTRATOR SECTION CHAPTER 2: CONFIGURING THE ER SERVER
Add/Edit/Delete Administrators screen
The Add/Edit/Delete Administrators screen displays when
the Administrators option is selected from the Network
menu. This screen is used for viewing, adding, editing, and
deleting the login ID of personnel authorized to configure
the Server. For security purposes, administrators should be
the first users set up on the Server.
Fig. 1:2-4 Add/Edit/Delete Administrators screen
TIP: 8e6 recommends adding an alternate login ID prior to editing
or deleting the default login ID. By doing so, if one login ID fails,
you have another you can use.
8E6 TECHNOLOGIES, ENTERPRISE REPORTER ADMINISTRATOR USER GUIDE 23
Page 34

ADMINISTRATOR SECTION CHAPTER 2: CONFIGURING THE ER SERVER
View a List of Administrators
To view a list of administrator user names, click the down
arrow at the New Administrator field. If no administrator
has yet been assigned to the Server, no selections display
except for the default “admin” user name.
Add an Administrator
1. Select New Administrator from the pull-down menu.
2. In the User Name field, enter up to 20 characters—this
may include upper- and/or lowercase alphanumeric characters, and special characters.
3. In the Password field, enter eight to 20 characters—
including at least one alpha character, one numeric character, and one special character. The password is case
sensitive.
4. In the Confirm Password field, re-enter the password in
the exact format used in the Password field.
5. Click the Save button to add the administrator to the
choices in the pull-down menu.
Edit an Administrator’s Login ID
1. Select the administrator’s user name from the pull-down
menu.
2. Edit either of the following fields:
• User Name
• Password (if this field is edited, the Confirm Password
field must be edited in tandem)
3. Click the Save button.
24 8E6 TECHNOLOGIES, ENTERPRISE REPORTER ADMINISTRATOR USER GUIDE
Page 35

ADMINISTRATOR SECTION CHAPTER 2: CONFIGURING THE ER SERVER
Delete an Administrator
1. Select the administrator’s user name from the pull-down
menu.
2. After the administrator’s login ID information populates
the fields, click the Delete button to remove the administrator’s user name from the choices in the pull-down
menu.
8E6 TECHNOLOGIES, ENTERPRISE REPORTER ADMINISTRATOR USER GUIDE 25
Page 36
ADMINISTRATOR SECTION CHAPTER 2: CONFIGURING THE ER SERVER
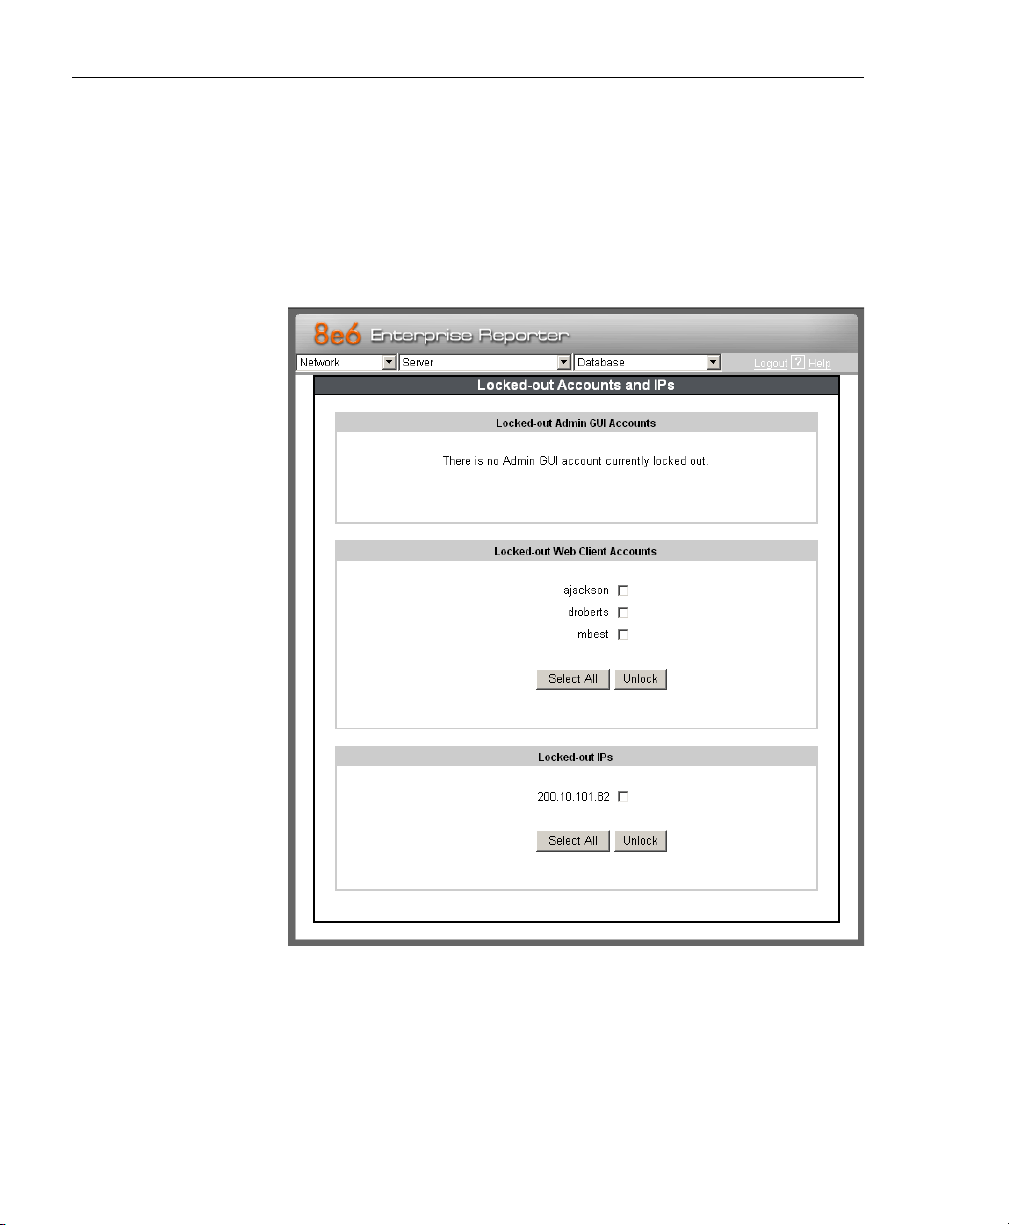
Locked-out Accounts and IPs screen
The Locked-out Accounts and IPs screen displays when the
Lockouts option is selected from the Network menu. This
screen is used for unlocking accounts or IP addresses of
administrators and sub-administrators that are currently
locked out of the Administrator console or Web Client.
Fig. 1:2-5 Locked-out Accounts and IPs screen
26 8E6 TECHNOLOGIES, ENTERPRISE REPORTER ADMINISTRATOR USER GUIDE
Page 37

ADMINISTRATOR SECTION CHAPTER 2: CONFIGURING THE ER SERVER
NOTE: An account or IP address becomes locked if the Password Security Options feature is enabled in the Optional Features
screen, and a user is unable to log into the Administrator console
or Web Client due to a password expiration, or having met the
specified number of failed password attempts within the designated timespan.
View Locked Accounts, IP addresses
The frames in this screen display the following messages if
there are no users currently locked out:
• Locked-out Admin GUI Accounts - There is no Admin
GUI account currently locked out.
• Locked-out Web Client Accounts - There is no Web
client account currently locked out.
• Locked-out IPs - There is no IP currently locked out.
If there are any locked accounts/IP addresses in a frame,
each locked username/IP address displays on a separate
line followed by a checkbox. The Select All and Unlock
buttons display at the bottom of the frame.
Unlock Accounts, IP addresses
To unlock an account/IP address in a frame:
1. Click the checkbox corresponding to the username/IP
address.
TIP: To unlock all accounts/IPs in a frame, click Select All to
populate all checkboxes in the frame with check marks.
2. Click Unlock to unlock the specified accounts/IPs, and to
display the message screen showing one of the following
pertinent messages for each unlocked account/IP:
• Admin account: ‘xxx’ has been successfully unlocked.
• Web client account: ‘xxx’ has been successfully
unlocked.
8E6 TECHNOLOGIES, ENTERPRISE REPORTER ADMINISTRATOR USER GUIDE 27
Page 38

ADMINISTRATOR SECTION CHAPTER 2: CONFIGURING THE ER SERVER
• IP: ‘x.x.x.x’ has been successfully unlocked.
NOTE: In the text above, ‘xxx’ and ‘x.x.x.x’ represents the
unlocked username/IP address.
3. Click OK to return to the Locked-out Accounts and IPs
screen that no longer shows the accounts/IPs that have
been unlocked.
Network Settings screen
The Network Settings screen displays when the Network
Setting option is selected from the Network menu. This
screen is used for setting up IP addresses so the Server can
communicate with your system.
Fig. 1:2-6 Network Settings screen
28 8E6 TECHNOLOGIES, ENTERPRISE REPORTER ADMINISTRATOR USER GUIDE
Page 39

ADMINISTRATOR SECTION CHAPTER 2: CONFIGURING THE ER SERVER
Set up/Edit IP Addresses
TIP: In order for the Server to effectively communicate with your
system, be sure all fields contain accurate information before
saving your settings.
1. Enter or edit an IP address in each appropriate field:
• In the Host Name field, enter the address or URL that
will be used for accessing the Administrator console.
This entry should include the full, qualified domain
name, and the “host” name for the box (i.e.
reporter.myserver.com).
• In the LAN 1 IP field, enter the IP address of the ER
Server on your Local Area Network (LAN 1).
• In the Netmask field, enter the netmask that will define
the traffic designated for the LAN.
• In the Gateway IP field, enter the IP address for the
default router that will be the main gateway for the
entire network segment.
• In the First DNS IP field, enter the IP address of the
primary Domain Name System (name server). The
Server box will use this IP address to identify other IP
addresses on the system, including its own IP address.
• In the Second DNS IP field, enter the IP address of the
fallback DNS.
2. Be sure each IP address is correct, and then click Save.
NOTE: After appropriate entries have been made in these fields
and saved, you must restart the Server to activate the IPs. To
restart the Server, select the Restart Hardware option on the
Shut Down screen. (See the Shut Down sub-section under the
Server menu section in this chapter.)
8E6 TECHNOLOGIES, ENTERPRISE REPORTER ADMINISTRATOR USER GUIDE 29
Page 40

ADMINISTRATOR SECTION CHAPTER 2: CONFIGURING THE ER SERVER
Routing Table screen
The Routing Table screen displays when the Routing Table
option is selected from the Network menu. This screen is
used for viewing, building, and maintaining a list of routers—
network destination and gateway IP addresses—the Server
will use for communicating with other segments of the
network. You will only need to set up a routing table if your
local network is interconnected with another network.
Fig. 1:2-7 Routing Table screen
View a List of Routers
Each router that was configured in the routing table displays
as a separate row in the table. The IP address and subnet
mask to receive data packets display in the Destination
column, and the IP address of the portal that will transfer
data packets to and from the Internet displays in the
Gateway column.
30 8E6 TECHNOLOGIES, ENTERPRISE REPORTER ADMINISTRATOR USER GUIDE
Page 41

ADMINISTRATOR SECTION CHAPTER 2: CONFIGURING THE ER SERVER
Add a Router
1. In the Destination field, enter the IP address of the
network to which data packets will be forwarded.
2. At the Network Mask pull-down menu, specify the
number (1-32) of the subnet mask that will be used for
grouping IP addresses on the same local network.
3. In the Gateway field, enter the IP address of the portal to
which data packets will be transferred to and from the
Internet.
4. Click the Add button to include your entry in the table. If
you have another router to add, follow steps 1-4.
5. Click the Back button on the confirmation screen to
return to the Routing Table screen.
Delete a Router
1. Click in the Delete checkbox of the row corresponding to
the router you wish to remove from the routing table.
2. Click the Delete button.
3. Click the Back button on the confirmation screen to
return to the Routing Table screen.
8E6 TECHNOLOGIES, ENTERPRISE REPORTER ADMINISTRATOR USER GUIDE 31
Page 42

ADMINISTRATOR SECTION CHAPTER 2: CONFIGURING THE ER SERVER
Regional Setting screen
The Regional Setting screen displays when the Regional
Setting option is selected from the Network menu. This
screen is used for specifying the time zone and network
time to be used by the Server when generating reports via
the Client application, and setting the language set type to
be displayed in the Administrator console, if necessary.
Fig. 1:2-8 Regional Setting screen
32 8E6 TECHNOLOGIES, ENTERPRISE REPORTER ADMINISTRATOR USER GUIDE
Page 43

ADMINISTRATOR SECTION CHAPTER 2: CONFIGURING THE ER SERVER
Specify the Time Zone
1. At the Region pull-down menu, select your country from
the available choices.
2. At the Location pull-down menu, select the time zone for
the specified region.
3. Click Save to apply your settings, and to restart the Web
Client Server.
WARNING: The time zone set for the ER should be the same one
set for each Web access logging device to be used by the ER.
These “like” settings ensure consistency when tracking the
logging times of all users on the network.
Specify the Language Set
1. If necessary, select a language set from the Language
pull-down menu to specify that you wish to display that
text in the console.
2. Click Save to apply your settings, and to restart the Web
Client Server.
Specify Network Time Protocol Servers
IP addresses of servers running Network Time Protocol
(NTP) software are entered in the Server fields, and the
Current ER server system time (day, date, HH:MM:SS time
format, and year) displays below. NTP is a time synchronization system for computer clocks throughout the Internet.
Your ER Server will use the actual time from clocks at the IP
addresses you’ve specified.
For the Enter local network time protocol (NTP) server
fields, by default, the following IP addresses display in these
three fields: 128.59.35.142, 142.3.100.15, and
129.132.98.11. If you wish to use different NTP servers,
follow these steps:
8E6 TECHNOLOGIES, ENTERPRISE REPORTER ADMINISTRATOR USER GUIDE 33
Page 44

ADMINISTRATOR SECTION CHAPTER 2: CONFIGURING THE ER SERVER
1. Enter or edit an IP address in each appropriate field:
• In the Server 1 field, enter the IP address of the
primary NTP server to be used for clock settings on
your Server.
• In the Server 2 field, enter the IP address of the
secondary NTP server. The time from this server will
be used by your Server if the IP address for the
primary server fails to be accessed by your Server.
• In the Server 3 field, enter the IP address of the tertiary
NTP server. The time from this server will be used by
your Server if the IP addresses for the primary and
secondary servers fail to be accessed by your Server.
2. Click the Save button to save your entries.
NOTE: When you click the Save button, the IP addresses you
entered are saved, but the time on your Server will not be
synchronized with the NTP servers until you click the NTP
Update button.
Update the Time on the Server
After you have saved the IP addresses of NTP servers you
wish your Server to access, click the NTP Update button to
synchronize the clock on your Server with the NTP server
clocks.
34 8E6 TECHNOLOGIES, ENTERPRISE REPORTER ADMINISTRATOR USER GUIDE
Page 45

ADMINISTRATOR SECTION CHAPTER 2: CONFIGURING THE ER SERVER
Network Diagnostics screen
The Network Diagnostics screen displays when the Diagnostics option is selected from the Network menu. This
screen is used to help you identify and resolve problems
with your network configuration, using the ping and trace
route utility tools.
Fig. 1:2-9 Network Diagnostics screen, Ping entry
8E6 TECHNOLOGIES, ENTERPRISE REPORTER ADMINISTRATOR USER GUIDE 35
Page 46

ADMINISTRATOR SECTION CHAPTER 2: CONFIGURING THE ER SERVER
Ping
The ping utility is used for verifying whether the Server can
communicate with a machine at a given IP address within
the network, and the speed of the network connection.
1. In the Ping frame, enter the IP address or host name of
the specific Internet address to be contacted (pinged).
2. Click the Ping button to display the results found by the
Server, as shown on the sample screen:
Fig. 1:2-10 Ping results
As indicated by the results for the sample entry, the
Server at 206.255.20.29 was not able to communicate
with the machine at the IP address 200.10.101.67. The
statistics show that three (3) data packets were transmitted by the Server, but zero (0) packets were received
by the designated machine, for a total of three (3) errors
and a 100 percent packet loss.
36 8E6 TECHNOLOGIES, ENTERPRISE REPORTER ADMINISTRATOR USER GUIDE
Page 47

ADMINISTRATOR SECTION CHAPTER 2: CONFIGURING THE ER SERVER
TIP: If the machine cannot be contacted, be sure the ping feature
on that machine is turned on.
NOTE: To ping another IP address, click the Back button in your
browser window, then click the Clear button in the Ping frame,
and follow the procedures documented in this sub-section.
Trace Route
If the ping utility was not able to help you diagnose the
problem with your network configuration, you should use the
trace route utility. This diagnostic tool records each “hop”
(trip from one router to another) the data packet made, identifying the IP addresses of gateway computers where the
packet stopped en route to its final destination, and the
length of time of each hop.
NOTE: The trace route utility can be used after your routing table
has been set up. To set up a routing table, see the Routing Table
screen sub-section under the Network menu in this chapter.
1. In the Trace Route frame, enter the IP address or host
name of the specific Internet address to be validated.
2. Click the Trace button to display the results found by the
Server, as shown on the sample screen:
8E6 TECHNOLOGIES, ENTERPRISE REPORTER ADMINISTRATOR USER GUIDE 37
Page 48

ADMINISTRATOR SECTION CHAPTER 2: CONFIGURING THE ER SERVER
Fig. 1:2-11 Trace Route results
As indicated by the results for the sample entry, the
packet made 30 hops. For each line in the report, the hop
number displays, followed by the IP address or host
name; the IP address in parentheses; and the maximum,
minimum, and average response time in milliseconds.
TIP: To “trace” another IP address, click the Back button in your
browser window, then click the Clear button in the Trace Route
frame, and follow the procedures documented in this subsection.
38 8E6 TECHNOLOGIES, ENTERPRISE REPORTER ADMINISTRATOR USER GUIDE
Page 49

ADMINISTRATOR SECTION CHAPTER 2: CONFIGURING THE ER SERVER
SNMP screen
The SNMP screen displays when the SNMP option is
selected from the Network menu. This feature lets the global
administrator use a third party Simple Network Management Protocol (SNMP) product for monitoring and
managing the working status of the ER's Internet reporting
on a network.
Fig. 1:2-12 SNMP screen
The following aspects of the ER are monitored by SNMP:
data traffic sent/received by a NIC, CPU load average at a
given time interval, amount of free disk space for each disk
partition, time elapse since the box was last rebooted, and
the amount of memory currently in usage.
8E6 TECHNOLOGIES, ENTERPRISE REPORTER ADMINISTRATOR USER GUIDE 39
Page 50

ADMINISTRATOR SECTION CHAPTER 2: CONFIGURING THE ER SERVER
Enable SNMP
The Monitoring mode is “Off” by default. To enable SNMP,
click Enable in the Monitoring Mode frame. As a result, all
elements in this window become activated.
Set up Community Token for Public Access
Enter the password to be used as the Community token
for public access. This is the password that the manage-
ment console would use when requesting access.
Create, Build the Access Control List
1. In the Enter new IP to add field, enter the IP address of
an interface from/to which the SNMP should receive/
send data.
2. Click Add to include the entry in the Access control list
box.
Repeat steps 1 and 2 for each IP address to be included
in the list.
3. After all entries are made, click Save.
Maintain the Access Control List
1. To remove one or more IP addresses from the list, select
each IP address from the Access control list, using the
Ctrl key for multiple selections.
2. Click Delete.
3. Click Save.
40 8E6 TECHNOLOGIES, ENTERPRISE REPORTER ADMINISTRATOR USER GUIDE
Page 51
ADMINISTRATOR SECTION CHAPTER 2: CONFIGURING THE ER SERVER
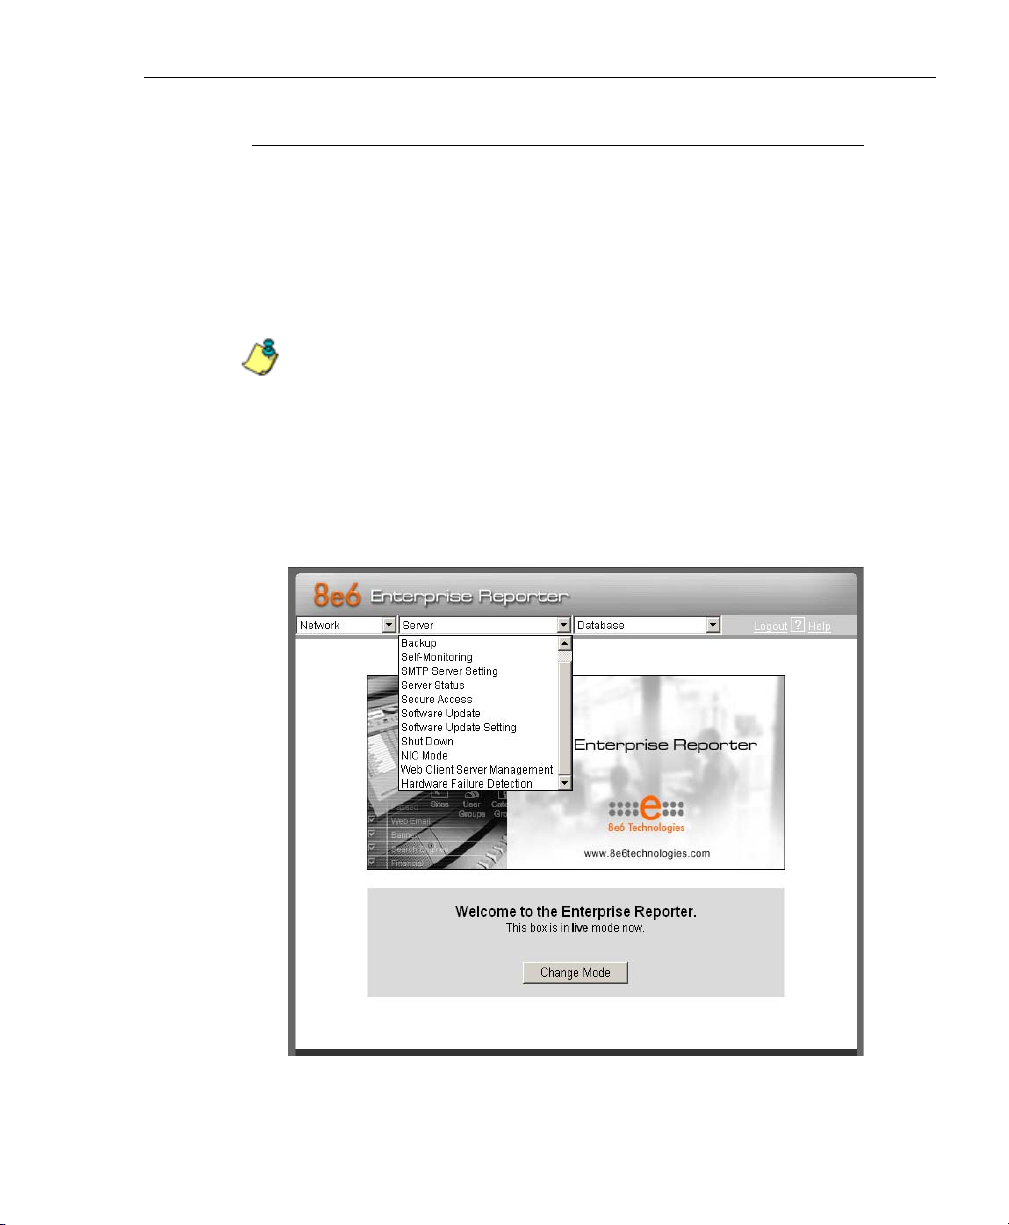
Server Menu
The Server pull-down menu includes options for setting up
processes for maintaining the Server. These options are:
Backup, Self-Monitoring, SMTP Server Setting, Server
Status, Secure Access, Software Update, Software Update
Setting, Shut Down, NIC Mode, Web Client Server Management, and Hardware Failure Detection.
NOTES: The Software Update Setting option is only available if
the R3000 unit is set up in the Stand Alone mode. See the
Synchronization sub-section in the R3000 User Guide for more
information about setup modes.
An additional option for Consolidated Mode Setting is available
on a consolidated ER Server (CER). See Consolidated ER:
Consolidated Mode Setting screen for details on how to configure
this option.
Fig. 1:2-13 Server menu, main screen
8E6 TECHNOLOGIES, ENTERPRISE REPORTER ADMINISTRATOR USER GUIDE 41
Page 52

ADMINISTRATOR SECTION CHAPTER 2: CONFIGURING THE ER SERVER
Backup screen
The Backup screen displays when the Backup option is
selected from the Server menu. This screen is used for
setting up the password for the remote server’s FTP
account, for executing an immediate backup on the ER
Server, and for performing a restoration to the database
from the previous backup run.
Fig. 1:2-14 Backup screen
Backup and Recovery Procedures
IMPORTANT: 8e6 recommends establishing backup and
recovery procedures when you first begin using the ER Server.
Please follow the advice in this section to ensure your ER Server
is properly maintained in the event that data is lost and back up
procedures need to be performed to recover data.
42 8E6 TECHNOLOGIES, ENTERPRISE REPORTER ADMINISTRATOR USER GUIDE
Page 53

ADMINISTRATOR SECTION CHAPTER 2: CONFIGURING THE ER SERVER
Although automatic backups to a local ER hard drive are
scheduled nightly by default, it is important that the ER
administrator implements a backup policy to ensure data
integrity and continuity in the event of any possible failure
scenario. This policy should include frequent, remote
backups, such that raw logs and ER database files are available for restoration without relying on the ER’s hard drives.
In general, recovery plans involve (i) restoring the most
recent backup of the database, and (ii) restoring raw logs to
fill in the gap between the most recent backup of the database, and the current date and time.
Some scenarios and action plans to consider include the
following:
• The ER database becomes corrupted - Correct the
root problem. Restore the database from the most recent
ER backup, and reprocess raw logs up to the current
date and time.
• The data drive fails - Replace the data drive. Restore
the database from the ER backup drive, and reprocess
raw logs up to the current date and time.
• The backup drive fails - Replace the backup drive, and
perform a manual backup.
• Both data and backup drives are damaged - Restore
the database from the most recent remote backup, and
reprocess raw logs up to the current date and time.
As you can see, it is critical that raw logs are available to
bridge the gap between the last database backup and the
present time, and more frequent backups (local and remote)
result in less “catch-up” time required for reprocessing raw
logs.
8E6 TECHNOLOGIES, ENTERPRISE REPORTER ADMINISTRATOR USER GUIDE 43
Page 54

ADMINISTRATOR SECTION CHAPTER 2: CONFIGURING THE ER SERVER
Set up/Edit External Backup FTP Password
In order to back up the ER Server’s database to a remote
server, an FTP account must be established for the remote
server.
NOTE: In the External Backup FTP Account frame, the login
name that will be used to access the remote server displays in
the Username field. This field cannot be edited.
1. In the Password field, enter up to eight characters for the
password. The entry in this field is alphanumeric and
case sensitive.
2. In the Confirm Password field, re-enter the password in
the exact format used in the Password field.
3. Click the Apply button to save your entries. The updated
Account ID will be activated after two minutes.
Execute a Manual Backup
In addition to performing on demand backups in preparation
for a disaster recovery, you may wish to execute a manual
backup under the following circumstances:
• Power outage - If there is a power outage at your facility
and your system uses a backup battery, you might want
to back up data before the battery fails.
• Rolling blackout - If your facility is subjected to rolling
blackouts, and a blackout is scheduled during the time of
your daily backup, you should back up your data before
the blackout period, when the ER Server will be down.
• Expiration about to occur - If a data expiration is about
to occur, you might want to back up your data before
losing the oldest data on the ER Server, prior to the daily
backup process.
WARNING: If corrupted data is detected on the ER Server, do not
backup your data, as you may back up and eventually restore a
corrupted database.
44 8E6 TECHNOLOGIES, ENTERPRISE REPORTER ADMINISTRATOR USER GUIDE
Page 55

ADMINISTRATOR SECTION CHAPTER 2: CONFIGURING THE ER SERVER
When performing a manual backup, the ER’s database is
immediately saved to the internal backup drive. From the
remote server, the backup database can be retrieved via
FTP, and then stored off site.
TIP: 8e6 recommends executing an on demand backup during
the lightest period of system usage, so the Server will perform at
maximum capacity.
1. Click the Manual Backup button in the Internal Backup/
Restore Action frame to specify that you wish to back up
live data to the ER Server’s internal backup drive.
2. On the Confirm Backup/Restore screen, click the Yes
button to back up the database tables and indexes.
WARNING: 8e6 recommends that you do not perform other functions on the ER Server until the backup is complete. The time it
will take to complete the backup depends on the size of all tables
being saved.
Perform a Remote Backup
After executing the manual backup, a remote backup can be
performed on your remote server.
NOTE: Before beginning this FTP process, be sure you have
enough space on the remote server for storing backup data. The
required space can be upwards of 200 gigabytes.
1. Log in to your FTP account.
2. Use FTP to download the ER Server’s backup database
to the remote server. When you are in the /backup/database/ directory, be sure to get all the *.data files to
include in your backup. You can then go to the archive
directory to get all the raw logs to include in your backup.
3. Store this backup data in a safe place off the remote
server. If this backup database needs to be restored, it
can be uploaded to the ER Server via FTP. (See Perform
a Restoration to the Server.)
8E6 TECHNOLOGIES, ENTERPRISE REPORTER ADMINISTRATOR USER GUIDE 45
Page 56

ADMINISTRATOR SECTION CHAPTER 2: CONFIGURING THE ER SERVER
Perform a Restoration to the ER Server
There are two parts in performing a restoration of data to
your ER Server. Part one requires data to be loaded on the
remote server and then FTPed to the ER Server. Part two
requires the FTPed data to be restored on the ER Server.
NOTE: Before restoring backup data to the ER Server, be sure
you have enough space on the ER Server. Data that is restored
to the ER Server will automatically include indexes.
Perform these steps on the remote server:
1. Load the backup data on your remote server.
2. Log in to your FTP account.
3. FTP the backup data to the ER Server’s internal backup
drive.
On the ER Server’s Backup screen:
1. Click the Manual Restore button in the Internal Backup/
Restore Action frame to specify that you wish to overwrite data on the live ER Server with data from the
previous, internal backup run.
2. On the Confirm Backup/Restore screen, click the Yes
button to restore database tables and indexes to the ER
Server.
NOTE: The amount of time it will take to restore data to the ER
Server depends on the combined size of all database tables
being restored. 8e6 recommends that you do not perform other
functions on the ER Server until the restoration is complete.
46 8E6 TECHNOLOGIES, ENTERPRISE REPORTER ADMINISTRATOR USER GUIDE
Page 57

ADMINISTRATOR SECTION CHAPTER 2: CONFIGURING THE ER SERVER
Self Monitoring screen
The Self Monitoring screen displays when the Self-Monitoring option is selected from the Server menu. This screen
is used for setting up and maintaining e-mail addresses of
contacts who will receive automated notifications if problems occur with the network. Possible alerts include situations in which a daemon stops running, software fails to run,
corrupted files are detected, or a power outage occurs.
Fig. 1:2-15 Self Monitoring screen
As the administrator of the Server, you have the option to
either activate or deactivate this feature. When the selfmonitoring feature is activated, an automated e-mail
message is dispatched to designated recipients if the Server
identifies a failed process during its hourly check for new
data.
8E6 TECHNOLOGIES, ENTERPRISE REPORTER ADMINISTRATOR USER GUIDE 47
Page 58

ADMINISTRATOR SECTION CHAPTER 2: CONFIGURING THE ER SERVER
View a List of Contact E-Mail Addresses
If this feature is currently activated, the e-mail address of the
Master Administrator displays on this screen, along with any
other contacts set up as Choice one - four.
Set up and Activate Self-Monitoring
1. Click the radio button corresponding to YES.
2. Enter the Master Administrator’s E-Mail Address.
3. In the Send e-mail to e-mail address fields, enter at
least one e-mail address of a person authorized to
receive automated notifications. This can be the same
address entered in the previous field. Entries in the three
remaining fields are optional.
4. If e-mail addresses were entered in any of the four
optional e-mail address fields, click in the Choice one Choice four checkboxes corresponding to the e-mail
address(es).
5. Click the Save button to activate self-monitoring.
Remove Recipient from E-mail Notification List
1. To stop sending emergency notifications to an e-mail
address set up in the list, remove the check mark from
the checkbox corresponding to the appropriate e-mail
address.
2. Click the Save button to remove the recipient’s name
from the e-mail list. The Master Administrator and any
remaining e-mail addresses in the list will continue
receiving notifications.
Deactivate Self-Monitoring
1. Click the radio button corresponding to NO.
2. Click the Save button to deactivate self-monitoring.
48 8E6 TECHNOLOGIES, ENTERPRISE REPORTER ADMINISTRATOR USER GUIDE
Page 59

ADMINISTRATOR SECTION CHAPTER 2: CONFIGURING THE ER SERVER
SMTP Server Setting screen
The SMTP Server Setting screen is used for entering
settings for the Simple Mail Transfer Protocol that will be
used for sending email alert messages to specified administrators.
Fig. 1:2-16 SMTP Server Setting screen
Enter, Edit SMTP Server Settings
1. Enter the SMTP Server name, for example:
mail.logo.com.
2. By default, the SMTP Port number used for sending
email is 25. This should be changed if the sending mail
connection fails.
8E6 TECHNOLOGIES, ENTERPRISE REPORTER ADMINISTRATOR USER GUIDE 49
Page 60

ADMINISTRATOR SECTION CHAPTER 2: CONFIGURING THE ER SERVER
3. By default, the Email queue size is 50. This can be
changed to specify the maximum number of requests
that can be placed into the queue awaiting an available
outbound connection.
4. In the From Email Address field, enter the email
address of the server that will be sending alert email
messages to designated administrators.
5. By default, Authentication is disabled. Click “Enable” if
a username and password are required for logging into
the SMTP server. This action activates the fields below.
Make the following entries:
a. Enter the Username.
b. Enter the Password and make the same entry in the
Confirm Password field.
6. Click Apply to apply your settings.
Verify SMTP Settings
To verify that email messages can be sent to a specified
address:
1. Click Test Settings to open the pop-up box:
Fig. 1:2-17 SMTP Email Test box
2. Enter the email address in the pop-up box.
50 8E6 TECHNOLOGIES, ENTERPRISE REPORTER ADMINISTRATOR USER GUIDE
Page 61

ADMINISTRATOR SECTION CHAPTER 2: CONFIGURING THE ER SERVER
3. Click OK to close the pop-up box and to process your
request. If all SMTP settings are accepted, the test email
should be received at the specified address.
Server Status screen
The Server Status screen displays when the Server Status
option is selected from the Server menu. This screen, which
automatically refreshes itself every 10 seconds, displays the
statuses of processes currently running on the Server, and
provides information on the amount of space and memory
used by each process.
Fig. 1:2-18 Server Status screen
8E6 TECHNOLOGIES, ENTERPRISE REPORTER ADMINISTRATOR USER GUIDE 51
Page 62

ADMINISTRATOR SECTION CHAPTER 2: CONFIGURING THE ER SERVER
View the Status of the Server
The Product Version number of the software displays at the
top of the screen, along with the date that software version
was implemented. Status information displays in the
following sections of this screen:
• CPU Utilization - includes CPU process data and information on the status of the top command
• Disk drives status - provides data on the status of each
drive of the operating system
• NETSTAT - displays the status of a local IP address
52 8E6 TECHNOLOGIES, ENTERPRISE REPORTER ADMINISTRATOR USER GUIDE
Page 63
ADMINISTRATOR SECTION CHAPTER 2: CONFIGURING THE ER SERVER
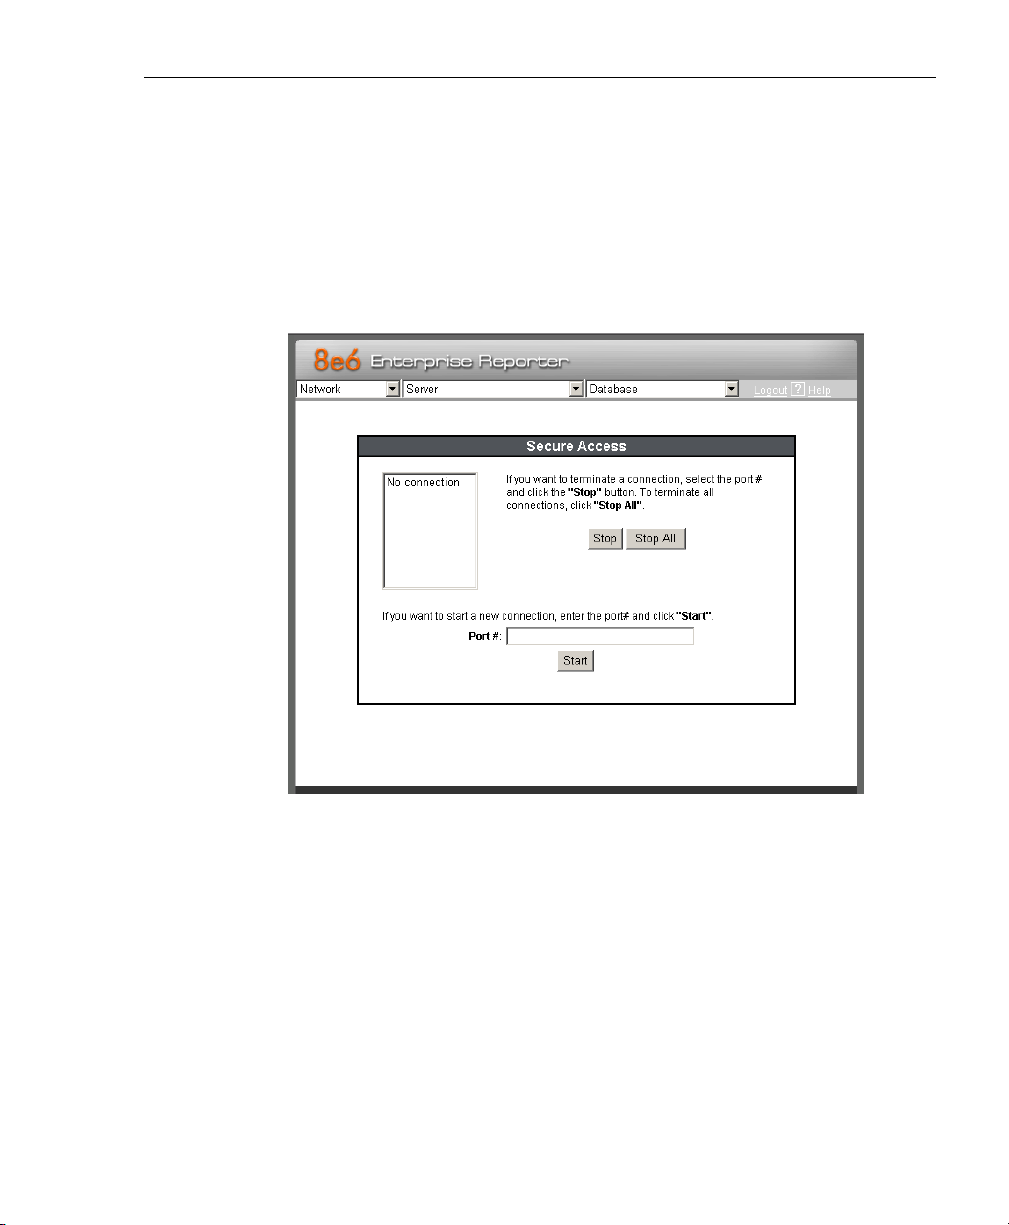
Secure Access screen
The Secure Access screen displays when the Secure
Access option is selected from the Server menu. This
screen is primarily used by 8e6 technical support representatives to perform maintenance on your Server, if your
system is behind a firewall that denies access to your
Server.
Fig. 1:2-19 Secure Access screen
8E6 TECHNOLOGIES, ENTERPRISE REPORTER ADMINISTRATOR USER GUIDE 53
Page 64

ADMINISTRATOR SECTION CHAPTER 2: CONFIGURING THE ER SERVER
Activate a Port to Access the Server
1. After the administrator at the customer’s site authorizes
you to use a designated port to access their Server, enter
that number at the Port # field.
2. Click the Start button to activate the port. This action
enters the port number in the list box above, replacing
the text: “No connection”.
Fig. 1:2-20 Port entries
54 8E6 TECHNOLOGIES, ENTERPRISE REPORTER ADMINISTRATOR USER GUIDE
Page 65

ADMINISTRATOR SECTION CHAPTER 2: CONFIGURING THE ER SERVER
Terminate a Port Connection
1. After maintenance has been performed on the
customer’s Server, select the active port number from
the list box by clicking on it.
2. Click the Stop button to terminate the port connection.
This action removes the port number from the list box.
Terminate All Port Connections
If more than one port is currently active on the customer’s
Server and you need to terminate all port connections, click
the Stop All button. This action removes all port numbers
from the list box.
8E6 TECHNOLOGIES, ENTERPRISE REPORTER ADMINISTRATOR USER GUIDE 55
Page 66

ADMINISTRATOR SECTION CHAPTER 2: CONFIGURING THE ER SERVER
Software Update screen
The Software Update screen displays when the Software
Update option is selected from the Server menu. This
screen is used for updating the Server with software
updates supplied by 8e6, and for viewing a list of software
updates that are available and/or previously installed on the
Server.
Fig. 1:2-21 Software Update screen
56 8E6 TECHNOLOGIES, ENTERPRISE REPORTER ADMINISTRATOR USER GUIDE
Page 67

ADMINISTRATOR SECTION CHAPTER 2: CONFIGURING THE ER SERVER
View Installed Software Updates
Any software update previously installed on the Server
displays in the ER Patch History frame. For each installed
software update, the Date installed (YYYY/MM/DD), and
software update Name and Description display.
Uninstall the Most Recently Applied Software Update
In the ER Patch History frame, the most recently applied
software update can be unapplied by clicking Undo. This
action removes the software update from the Server.
View Available Software Updates
Any software update available for installing on the ER
Server displays in the ER Patch Updates frame. The
following information is included for each software update:
Date the software update was made available (YYYY/MM/
DD), software update Name, and Description (software
version number, and Prerequisite software version for
installing the software update). The Apply Now and
README buttons display beneath the software update
name. (See Install a Software Update for information about
these buttons.)
8E6 TECHNOLOGIES, ENTERPRISE REPORTER ADMINISTRATOR USER GUIDE 57
Page 68

ADMINISTRATOR SECTION CHAPTER 2: CONFIGURING THE ER SERVER
Install a Software Update
WARNING: Before installing a software update, you must shut off
the Server’s software by selecting the Shutdown Software
option on the Shut Down screen. (See the Shut Down subsection under the Server menu section in this chapter.) All software updates must be installed in numerical order on your
Server.
NOTES: Be sure to terminate all reports that are currently running
or are scheduled to run before applying a software update, and
that port 8084 is open on your network.
In the ER Patch Updates frame, two buttons are available:
README and Apply Now.
README:
1. Click README to open a pop-up box containing information about the software release:
Fig. 1:2-22 Software update box
2. After reading the contents of the software release, click
Close to close the pop-up box.
58 8E6 TECHNOLOGIES, ENTERPRISE REPORTER ADMINISTRATOR USER GUIDE
Page 69

ADMINISTRATOR SECTION CHAPTER 2: CONFIGURING THE ER SERVER
Apply Now:
1. Click Apply Now to open a dialog box containing information about the software release:
Fig. 1:2-23 Software update dialog box
2. Click Yes to open the EULA dialog box:
Fig. 1:2-24 EULA dialog box
8E6 TECHNOLOGIES, ENTERPRISE REPORTER ADMINISTRATOR USER GUIDE 59
Page 70

ADMINISTRATOR SECTION CHAPTER 2: CONFIGURING THE ER SERVER
3. After reading the contents of the End User License
Agreement, click Yes if you agree to its terms. This action
closes the EULA dialog box and begins the software
update application process.
4. To determine whether the software update has been
successfully applied, click the hyperlink (“here”) beneath
the ER Patch History frame in the Software Update
screen to open the Patch Log window:
Fig. 1:2-25 Patch Log window
5. After viewing the contents of this window, click Close to
close this window.
6. After the software update has been successfully applied,
refresh the Software Update screen by selecting Software Update from the Server pull-down menu. The software update details should display in the ER Patch
History frame.
60 8E6 TECHNOLOGIES, ENTERPRISE REPORTER ADMINISTRATOR USER GUIDE
Page 71

ADMINISTRATOR SECTION CHAPTER 2: CONFIGURING THE ER SERVER
NOTE: After installing the software update, if a message displays
that informs you to reboot the Server, you should select the
Restart Software option on the Shut Down screen.
Software Update Setting screen
The Software Update Setting screen displays when the
Software Update Setting option is selected from the Server
menu. This screen is used for configuring the ER Server to
receive software updates.
NOTE: This screen is only available if the R3000 unit is set up in
the Stand Alone mode. See the Synchronization sub-section in
the R3000 User Guide for more information about setup modes.
Fig. 1:2-26 Software Update Setting screen
8E6 TECHNOLOGIES, ENTERPRISE REPORTER ADMINISTRATOR USER GUIDE 61
Page 72

ADMINISTRATOR SECTION CHAPTER 2: CONFIGURING THE ER SERVER
Specify Proxy Settings
1. In the Proxy Setting frame, by default “Disable” is
selected. Click “Enable” if the server is in a proxy server
environment.
2. In the Proxy Server field, enter the host name of the
proxy server.
3. In the Proxy Port field, enter the port number of the
proxy server.
4. In the Username field, enter the username for the proxy
account.
5. Enter the same password in the Password and Confirm
Password fields.
Save Settings
Click Save to save your settings.
62 8E6 TECHNOLOGIES, ENTERPRISE REPORTER ADMINISTRATOR USER GUIDE
Page 73

ADMINISTRATOR SECTION CHAPTER 2: CONFIGURING THE ER SERVER
Shut Down screen
The Shut Down screen displays when the Shut Down option
is selected from the Server menu. This screen is used to
restart or shut down the Server’s software or hardware.
Fig. 1:2-27 Shut Down screen
Server Action Selections
• Restart the Server’s Hardware - The Restart Hardware
option should be selected if the Server box needs to be
rebooted—for example, when applying certain hardware
configurations. You will need to use this option if the box
mode has been changed or after an IP address has been
entered in the Network Settings screen. During the Hardware Restart process, files normally FTPed to the Server
are routed to a problem directory in the logging device.
8E6 TECHNOLOGIES, ENTERPRISE REPORTER ADMINISTRATOR USER GUIDE 63
Page 74

ADMINISTRATOR SECTION CHAPTER 2: CONFIGURING THE ER SERVER
When the Server is running again, these files are FTPed
to the Server.
• Shut Down the Server’s Hardware - The Shutdown
Hardware option should only be selected if the Server’s
hardware must be completely shut down—for example, if
the Server box will be physically relocated. When this
option is selected, the Server box shuts off, and files
normally FTPed to the Server will be routed to a problem
directory in the logging device. When the Server is
rebooted, these files will be FTPed to the Server.
• Restart the Server’s Software - The Restart Software
option should be selected if daemons fail to run and/or
the database needs to be started again. When this option
is selected, the MySQL database is rebooted.
• Shut Down the Server’s Software - The Shutdown
Software option should be selected if a software update
needs to be installed on the Server. When the Shutdown
Software option is selected, the MySQL database shuts
off and no files are FTPed to the Server.
Perform a Server Action
1. Click the radio button corresponding to the Server Action
you wish to execute.
2. Click the Apply button to display the warning screen.
3. To proceed with your selection, click the Restart or Shut-
down button on the warning screen. To change your
selection, click the Back button of the browser window to
return to the Shut Down screen.
NOTE: When the Restart Software or Hardware option is
selected, the Server will take five to 10 minutes to reboot. After
this time, you can go to another screen or log off.
64 8E6 TECHNOLOGIES, ENTERPRISE REPORTER ADMINISTRATOR USER GUIDE
Page 75

ADMINISTRATOR SECTION CHAPTER 2: CONFIGURING THE ER SERVER
NIC Mode screen
The NIC Mode screen displays when the NIC Mode option
is selected from the Server menu. This screen lets you
specify the speed for the ER’s Network Interface Card
settings so that the ER can communicate with the network
switch or hub.
Fig. 1:2-28 NIC Mode screen
By default the NIC mode for LAN1 and LAN2 is set to “Auto”.
The auto-negotiation setting indicates that both connected
devices will negotiate the fastest possible commonly shared
speed.
NOTE: The options available in this window depend on the hardware components installed for the ER unit.
8E6 TECHNOLOGIES, ENTERPRISE REPORTER ADMINISTRATOR USER GUIDE 65
Page 76

ADMINISTRATOR SECTION CHAPTER 2: CONFIGURING THE ER SERVER
View the NIC Negotiation
To verify or correct the negotiation for a NIC, click View NIC
Negotiation to open a window containing results from the
mii-tool and the ethtool about the status of the NIC mode(s):
Fig. 1:2-29 NIC Negotiation window
Mii-tool checks or sets the status of a network interface's
Media Independent Interface (MII) unit. Ethtool is a diagnostic and tuning tool that examines and tunes the NIC.
Modify the NIC Mode Setting
WARNING: If changing the NIC mode, be sure the hub/switch to
which the ER is connected will support the selected NIC mode.
An incorrect setting may prevent you from accessing the ER
console.
To modify the NIC setting, in the LAN1 or LAN2 frame:
1. Click the radio button for the available option you wish to
select: 10baseT-Full Duplex, 10baseT-Half Duplex,
100baseT- Full Duplex, 100baseT-Half Duplex, or
1000baseT-Full Duplex, if available on your ER Server.
2. Click Apply to activate the new NIC mode setting.
66 8E6 TECHNOLOGIES, ENTERPRISE REPORTER ADMINISTRATOR USER GUIDE
Page 77

ADMINISTRATOR SECTION CHAPTER 2: CONFIGURING THE ER SERVER
NOTE: The status (Up or Down) of the Interface displays to the
right of the LAN1 and LAN2 labels. For an Interface with an “Up”
status, the Link status (Up or Down) displays to the right of the
Interface status.
Web Client Server Management screen
The Web Client Server Management screen displays when
the Web Client Server Management option is selected from
the Server menu. This screen is used for enabling specified
Web Client Server features.
Fig. 1:2-30 Web Client Server Management screen
8E6 TECHNOLOGIES, ENTERPRISE REPORTER ADMINISTRATOR USER GUIDE 67
Page 78

ADMINISTRATOR SECTION CHAPTER 2: CONFIGURING THE ER SERVER
Restart the Web Client Server
In the Restart Web Client Server frame, click Restart to
restart the Web Client server. As a result of this action, a
screen displays with the following message: “The Web
Client Server will restart in a few minutes.” Click OK to
return to the Web Client Server Management screen.
Enable/Disable Web Client Server Access
1. In the Enable/Disable HTTP/HTTPS access to Web
Client Server frame, click the checkbox(es) corresponding to the option(s) for logging into the Web Client:
• “HTTP” - Choose this option to let users log into the
Web Client using an HTTP IP address
• “HTTPS” - Choose this option to let users log into the
Web Client using an HTTPS IP address
NOTE: Remove the check mark to disable a selection.
2. Click Apply.
Enable/Disable the Web Client Scheduler
1. In the Enable/Disable Web Client Schedule frame, click
the appropriate radio button to specify whether or not to
automatically run scheduled Web Client reports:
• “ON” - Choose this option to let the Web Client auto-
matically run scheduled reports.
WARNING: Do not select this option if using the Access Client to
run scheduled reports; duplicate reports will be generated.
• “OFF” - Choose this option to use the Access Client for
running scheduled reports, or if you do not want the
Web Client to run scheduled reports.
2. Click Apply.
3. Click Restart to restart the Web Client Server.
68 8E6 TECHNOLOGIES, ENTERPRISE REPORTER ADMINISTRATOR USER GUIDE
Page 79

ADMINISTRATOR SECTION CHAPTER 2: CONFIGURING THE ER SERVER
Hardware Failure Detection screen
If using an ERH, HL, or SL unit, the Hardware Failure Detection screen displays when the Hardware Failure Detection
option is selected from the Server menu. This screen is
used for showing the status of each drive on the RAID
server.
Fig. 1:2-31 Hardware Failure Detection screen
View the Status of the Hard Drives
The current RAID Array Status displays for the four hard
drives (HD 1, HD 2, HD 3, HD 4). If all hard drives are functioning without failure, the text “OK” displays for each corresponding drive number listed at the right of the screen, and
no other text displays.
8E6 TECHNOLOGIES, ENTERPRISE REPORTER ADMINISTRATOR USER GUIDE 69
Page 80

ADMINISTRATOR SECTION CHAPTER 2: CONFIGURING THE ER SERVER
If any of the hard drives has failed, the message “FAIL”
displays for the corresponding drive number listed at the
right of the screen, and instructions for replacing the hard
drive display below:
1. Identify the failed drive based on the information
provided on the GUI.
2. Replace the failed drive with your spare replacement
drive.
3. Click on the “Rebuild” button on the GUI.
4. To return a failed drive to 8e6 or to order additional
replacement drives, please call 8e6 Technical Support.
NOTE: For information on troubleshooting RAID, refer to
Appendix C: RAID Maintenance.
70 8E6 TECHNOLOGIES, ENTERPRISE REPORTER ADMINISTRATOR USER GUIDE
Page 81

ADMINISTRATOR SECTION CHAPTER 2: CONFIGURING THE ER SERVER
Consolidated ER: Consolidated Mode Setting screen
If using a consolidated ER (CER), the Consolidated Mode
Setting screen displays when Consolidated Mode Setting is
selected from the Server menu. This screen is used for
adding, modifying, or removing information about an ER unit
on the network designated to be a remote ER to this CER.
Fig. 1:2-32 Consolidated Mode Setting screen
View Remote ER Settings
The following information displays in the Current ER boxes
list box for each remote ER previously added in this screen:
Name given to the remote ER, and its IP address and Port
number.
8E6 TECHNOLOGIES, ENTERPRISE REPORTER ADMINISTRATOR USER GUIDE 71
Page 82

ADMINISTRATOR SECTION CHAPTER 2: CONFIGURING THE ER SERVER
Add a Remote ER
1. By default “Add new ER” is selected in the Current ER
boxes list box. If this choice is not selected, make this
selection.
2. Type in a Name for this remote ER Server.
3. Enter the IP Address of the remote ER.
4. In the Port field, by default, 3306 displays. If necessary,
this number can be changed.
5. Click Add to include this information for the remote ER in
the Current ER boxes list box.
NOTE: Data from the newly-added remote ER Server will be
available to this consolidated ER (CER) after the first rollup.
Thereafter, automatic rollups occur every four hours, but the
current day’s data will not be included. However, in the Web
Client,a rollup of category groups and/or user groups can be
performed on demand. See the ER Web Client User Guide for
information on performing rollups on demand.
View Current Statistics for a Remote ER
1. Select the remote ER from the Current ER boxes list box.
2. Click Display Status to open the ER Status pop-up box:
Fig. 1:2-33 ER Status pop-up window
72 8E6 TECHNOLOGIES, ENTERPRISE REPORTER ADMINISTRATOR USER GUIDE
Page 83

ADMINISTRATOR SECTION CHAPTER 2: CONFIGURING THE ER SERVER
The following information displays in this pop-up box:
Name of ER; IP Address; Live-data-scope range (using
the YYYY-MM-DD HH:MM:SS - YYYY-MM-DD
HH:MM:SS format), and Most recent rollup date (using
the YYYY-MM-DD HH:MM:SS format).
3. Click OK to close the pop-up box.
Edit Settings for a Remote ER
1. Select the remote ER from the Current ER boxes list box
to display the remote ER’s Name, IP Address, and Port
number in the fields below.
2. Edit any of these fields.
3. Click Modify to save your settings.
Remove a Remote ER from the Consolidated ER
1. Select the remote ER from the Current ER boxes list box
to display the remote ER’s Name, IP Address, and Port
number in the fields below.
2. Click Remove to remove that ER from the list box.
8E6 TECHNOLOGIES, ENTERPRISE REPORTER ADMINISTRATOR USER GUIDE 73
Page 84

ADMINISTRATOR SECTION CHAPTER 2: CONFIGURING THE ER SERVER
Database Menu
The Database pull-down menu includes options for configuring the database. These options are: IP.ID, Username
Display Setting, Elapsed Time, Page Definition, Tools, Expiration, NAS Status, Optional Features, and User Group
Import.
NOTE: On a consolidated ER (CER), only the following options
are available: Tools, Expiration, NAS Status, Optional Features,
and User Group Import. Some of these screens differ on the
CER.
Fig. 1:2-34 Database menu, main screen
User Name Identification screen
The User Name Identification screen displays when the
IP.ID option is selected from the Database menu. This
screen is used for configuring the Server to identify users
74 8E6 TECHNOLOGIES, ENTERPRISE REPORTER ADMINISTRATOR USER GUIDE
Page 85

ADMINISTRATOR SECTION CHAPTER 2: CONFIGURING THE ER SERVER
based on the IP addresses of their machines, their usernames, and/or their machine names. Information set up on
this screen is used by the Client when logging a user’s
Internet activity.
NOTE: This option is not available in a consolidated ER.
Fig. 1:2-35 User Name Identification screen with IP.ID activated
8E6 TECHNOLOGIES, ENTERPRISE REPORTER ADMINISTRATOR USER GUIDE 75
Page 86

ADMINISTRATOR SECTION CHAPTER 2: CONFIGURING THE ER SERVER
As the administrator of the Server, you have the option to
either enable or disable this feature for logging users’ activities by usernames, machine names, and/or IP addresses of
machines.
WARNINGS
The ER will generate NetBIOS requests outside the network if
IP.ID is activated and if no segment settings have been specified
in the configuration of the Web access logging device—causing it
to log external traffic. To resolve this issue, the Web access
logging device should be modified to log activity only within the
network. If a firewall is used, it should be set up to prevent
logging NetBIOS requests outside the network.
NOTE: Depending on the type of Web access logging device you
are using, there may not be a configuration parameter for
segment settings.
Be sure the time zone specified for the ER is the same for each
Web access logging device the ER uses. Failure in executing this
setup will cause inconsistencies when users’ logging times are
reported, especially if IP.ID is activated. If multiple Web access
logging devices are used, be sure to identify the subnets
assigned to each of these devices, as users cannot be tracked
solely by IP address.
If using IP.ID, note that user login times are established for set
periods of 15 minutes, and if more than one user logs onto the
same machine during that time period, the activity on that
machine will be identified with the first user who logged onto that
machine. For example, the first user logs on a machine for three
minutes and then logs off. The second user logs on the same
machine for 11 minutes and then logs off. The first user logs back
on that machine for 16 minutes. All 30 minutes are logged as the
first user’s activity.
76 8E6 TECHNOLOGIES, ENTERPRISE REPORTER ADMINISTRATOR USER GUIDE
Page 87

ADMINISTRATOR SECTION CHAPTER 2: CONFIGURING THE ER SERVER
View the User Name Identification screen
There are two frames on this screen: one used for customizing the label that displays in Client reports for unidentified
machines, and the other used for specifying username identification (IP.ID) criteria. These frames will be populated if
entries were previously made in them.
Set up a Customized Label for Unidentified Machines
The Text Label frame is used for creating a customized label
to display in reports generated by the Client. This label will
replace the default “IP Only” label that is used for identifying
any machine that is not assigned to a specific user.
1. Click in the checkbox to indicate that you wish to create a
customized text label for unidentified user machines.
2. In the Replace the default “IP Only” label with this
label field, enter up to 14 characters of text for the label.
3. Click Save to save your entries.
Configure the Server to Log User Activity
1. In the IP.ID (Microsoft Username Lookup) section of the
screen, click the radio button corresponding to Enable.
This action opens an alert box informing you that if usernames are enabled, these usernames will overwrite
those that are being imported from the shadow log.
2. Click OK to close the alert box, and to activate the IP.ID
and Static IP assignment checkboxes.
3. Select one or both of the following options by clicking in
the designated checkbox(es):
• IP.ID - this option logs a user’s activity by username
(login ID).
8E6 TECHNOLOGIES, ENTERPRISE REPORTER ADMINISTRATOR USER GUIDE 77
Page 88

ADMINISTRATOR SECTION CHAPTER 2: CONFIGURING THE ER SERVER
• Static IP assignment - this option logs a user’s
activity by the IP address of the machine used. When
selecting this option, the Update button becomes activated.
a. Click the Update button to automatically generate
a table of static IP addresses and machine names.
After this table is created, the message screen
displays to confirm the successful execution of this
task.
b. Click the Back button to return to the User Name
Identification screen.
4. In the IP/Machine/Username to ignore list boxes, enter
all IP addresses, machine names, and/or usernames the
Server should disregard when identifying users. Each
entry should be made in a separate row.
5. After making all necessary entries on this screen, click
the Save button.
NOTE: After saving your entries, the IP.ID frame becomes
disabled. To make modifications in this frame, you must follow all
steps in this sub-section.
Deactivate User Name Identification
1. Click the radio button corresponding to Disable.
2. Click the Save button.
78 8E6 TECHNOLOGIES, ENTERPRISE REPORTER ADMINISTRATOR USER GUIDE
Page 89

ADMINISTRATOR SECTION CHAPTER 2: CONFIGURING THE ER SERVER
Username Display Setting screen
This Username Display Setting screen displays when the
Username Display Setting option is selected from the Database menu. This screen is used for configuring the username format imported from raw logs and customizing the
username format that displays in reports.
NOTE: This option is not available in a consolidated ER.
Fig. 1:2-36 Username Display Setting screen
8E6 TECHNOLOGIES, ENTERPRISE REPORTER ADMINISTRATOR USER GUIDE 79
Page 90

ADMINISTRATOR SECTION CHAPTER 2: CONFIGURING THE ER SERVER
View the Current Username Display Setting
In the Current Username Display Setting frame, the current
username format displays—if previously entered in the
Display username field and saved on this screen.
Modify the Username Display Setting
In the Modify Username Display Setting frame, make selections from list boxes and apply results for the new username
format to be displayed in the report.
1. By default, the following choices display in the Available
Fields list box: Domain Name, Organization Name,
Department Name, User Name. Make a selection from
this list for the first field displayed in your server console
and raw logs that you wish to include in the username
format in the report.
2. Click Add to include this selection in the Raw Log Fields
list box below.
NOTE: Follow steps 1 and 2 for each consecutive field to be
added to the Raw Log Fields list box.
TIP: Click the Reset button on this screen at any time to revert to
the default settings.
WARNING: It is important to select the correct fields from this list,
in the order in which they appear in your server console. For
example, if the username format on the console is Domain
Name\Department Name\User Name, and only User Name and
Department Name are selected from the Available Fields list
box—in that order—the report will display information in the
wrong order. In this example, if the Domain Name is LOGO, the
Department Name is Admin, and the User Name is JSmith, the
report will show JSmith\Admin, instead of LOGO\Admin\JSmith.
3. In the Raw Log Fields list box, select the first field to be
displayed in the username format on the report.
80 8E6 TECHNOLOGIES, ENTERPRISE REPORTER ADMINISTRATOR USER GUIDE
Page 91

ADMINISTRATOR SECTION CHAPTER 2: CONFIGURING THE ER SERVER
4. Click Add to include your selection in the Display username field below.
NOTE: Follow steps 3 and 4 for each field to be added to the
Display username field below. Each additional selection added to
the display name is preceded by a backslash ( \ ).
5. Click Apply to save your entries and to display the new
username format in the Current Username Display
Setting frame.
NOTE: Changes made to username display settings in this
screen will not be effective until the next day’s reports are generated.
WARNING: After modifying a username format, be sure to import
users and groups using the User Group Import screen. See the
User Group Import screen for information on importing user
groups.
8E6 TECHNOLOGIES, ENTERPRISE REPORTER ADMINISTRATOR USER GUIDE 81
Page 92

ADMINISTRATOR SECTION CHAPTER 2: CONFIGURING THE ER SERVER
Page View Elapsed Time screen
The Page View Elapsed Time screen displays when the
Elapsed Time option is selected from the Database menu.
This screen is used for establishing the value—amount of
time—that will be used when tracking the length of a user’s
stay at a given Web site, and the number of times the user
accesses that site.
NOTE: This option is not available in a consolidated ER.
Fig. 1:2-37 Page View Elapsed Time screen
Establish the Unit of Elapsed Time for Page Views
1. In the Elapse Time field, enter the number of seconds
that will be used as the value when tracking a user’s visit
to a Web site.
2. Click the Save button.
82 8E6 TECHNOLOGIES, ENTERPRISE REPORTER ADMINISTRATOR USER GUIDE
Page 93

ADMINISTRATOR SECTION CHAPTER 2: CONFIGURING THE ER SERVER
Elapsed Time Rules
Each time a user on the network accesses a Web site, this
activity is logged as one or more visit(s) to that site. The
amount of time a user spends on that site and the number of
times he/she accesses that site is tracked according to the
following rules:
• A user will be logged as having visited a Web site one
time if the amount of time spent on any pages at that site
is equivalent to the value entered at the Elapse Time
field, or less than that value.
For example, if the value entered at the Elapse Time field
is 10 seconds, and if the user is at a site between one to
10 seconds—on the same page or on any other page
within the same site—the user’s activity will be tracked
as one visit to that Web site.
• Each time the user exceeds the value entered at the
Elapse Time field, the user will be tracked as having
visited the site an additional time.
For example, if the value entered at the Elapse Time field
is 10 seconds and the user remains at a Web site for 12
seconds, two visits to that site will be logged for him/her.
• Each session at a Web site is tracked as one or more
visit(s), depending on the duration of the session. A
session is defined as a user’s activity at a site that begins
when the user accesses the site and ends when the user
exits the site.
For example, if the value entered at the Elapse Time field
is 10 seconds and the user spends five seconds on a
Web site, then exits, then returns to the same site for
another 15 seconds, the user will have two sessions or
three visits to that site logged for him/her (5 seconds = 1
visit, 15 seconds = 2 visits, for a total of 3 visits).
8E6 TECHNOLOGIES, ENTERPRISE REPORTER ADMINISTRATOR USER GUIDE 83
Page 94
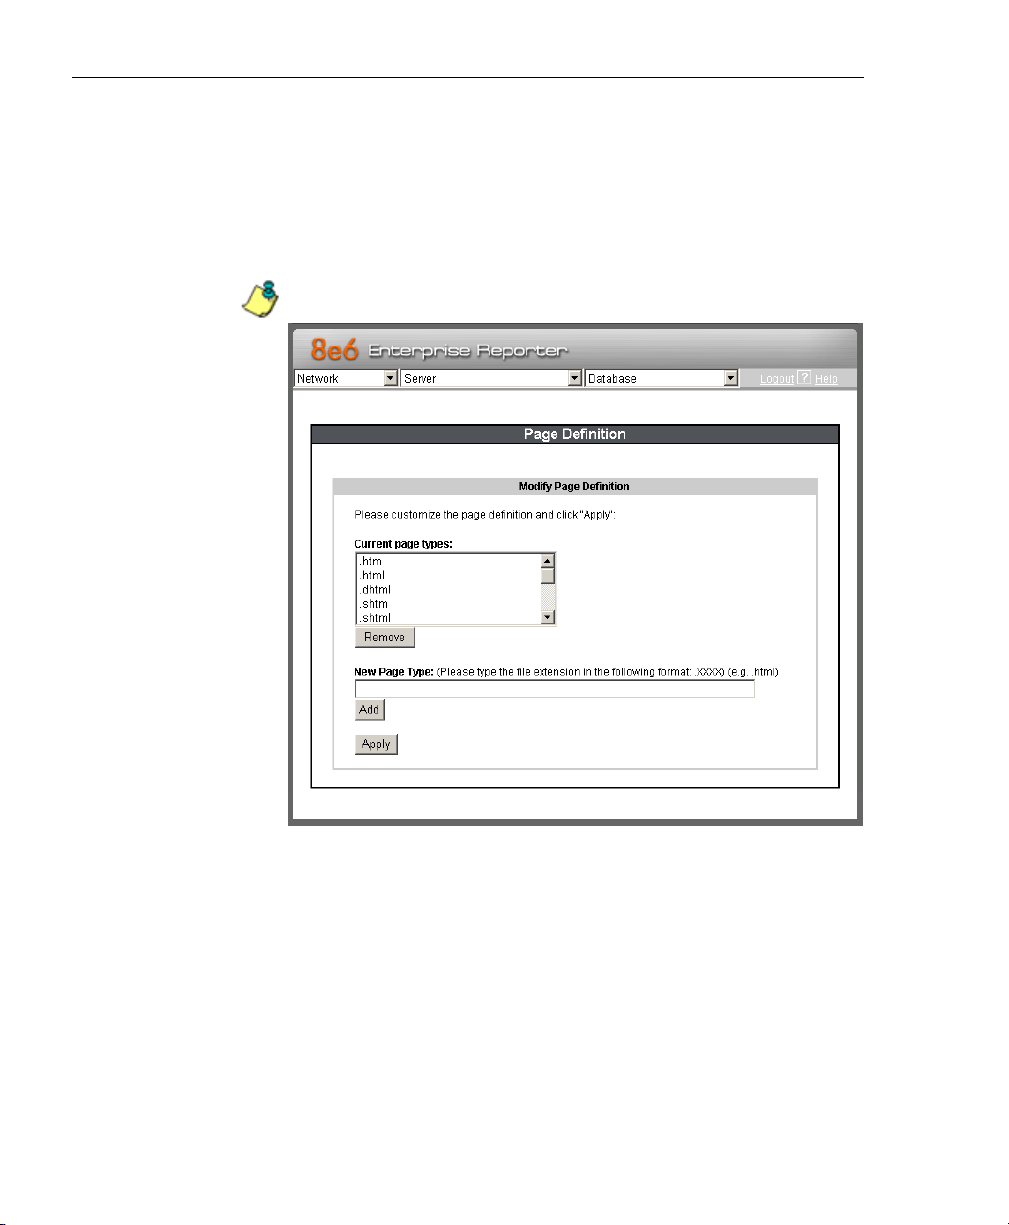
ADMINISTRATOR SECTION CHAPTER 2: CONFIGURING THE ER SERVER
Page Definition screen
The Page Definition screen displays when the Page Definition option is selected from the Database menu. This screen
is used for specifying the types of pages to be included in
the detail report for Page searches.
NOTE: This option is not available in a consolidated ER.
Fig. 1:2-38 Page Definition screen
View the Current Page Types
The Current page types list box contains the extensions of
page types to be included in the detail report.
84 8E6 TECHNOLOGIES, ENTERPRISE REPORTER ADMINISTRATOR USER GUIDE
Page 95

ADMINISTRATOR SECTION CHAPTER 2: CONFIGURING THE ER SERVER
Remove a Page Type
To remove a page type from the detail report:
1. Select the page extension from the Current page types
list box.
2. Click Remove.
3. Click Apply.
Add a Page Type
To add a page type in the detail report:
1. Enter the New Page Type extension.
2. Click Add to include the extension in the Current page
types list box.
3. Click Apply.
8E6 TECHNOLOGIES, ENTERPRISE REPORTER ADMINISTRATOR USER GUIDE 85
Page 96

ADMINISTRATOR SECTION CHAPTER 2: CONFIGURING THE ER SERVER
Tools screen
The Tools screen displays when the Tools option is selected
from the Database menu. This screen is used for viewing
reports and logs to help you troubleshoot problems with the
Client application.
Fig. 1:2-39 Tools screen
The following options are available on this screen:
• View Diagnostic Reports
• View Database Status Logs
86 8E6 TECHNOLOGIES, ENTERPRISE REPORTER ADMINISTRATOR USER GUIDE
Page 97

ADMINISTRATOR SECTION CHAPTER 2: CONFIGURING THE ER SERVER
View Diagnostic Reports
1. Choose a report from the pull-down menu (Table Status,
Process List, Full Process List, Tables, or Daily
Summary).
2. Click the View button to view the selected diagnostic
report in a pop-up window:
• Table Status - This report contains a list of Client table
names, and columns of statistics on each table, such
as type, size, number of rows, and time created and
updated.
• Process List - This report shows a list of current SQL
queries in the database, in an abbreviated format.
• Full Process List - This report shows a list of current
SQL queries in the database, in the full format that
includes all columns of data.
• Tables - This report contains a list of the names of
tables currently in the database.
• Daily Summary - This report shows the date range of
summary tables currently in the database.
3. Click the “X” in the upper right corner of the pop-up
window to close the window.
View Database Status Logs
1. Choose a database status log from the pull-down menu.
2. Click the View button to view the selected database
status log in a pop-up window:
• db Active - This log indicates when client tables were
last updated with hits_objects and hits_pages.
• db Backup - This log provides information about the
MySQL backup/restore operation.
• db Control - This log shows a list of actions performed
by the ER process when processing log files.
8E6 TECHNOLOGIES, ENTERPRISE REPORTER ADMINISTRATOR USER GUIDE 87
Page 98

ADMINISTRATOR SECTION CHAPTER 2: CONFIGURING THE ER SERVER
• db Expiration - This log includes information about
expiring data on the Server.
• db Expire Summary - This log provides a list of data
expiration from summary tables.
• db Identify - This log provides information about the
Server’s action of obtaining user/machine names from
name log files and populating the database with these
names.
• db Ipgroups - This log lists individual and group IP
records that were added to—and deleted from—the
client group lookup table.
• db Logloader - This log provides information about
log file parsing and the number of valid and invalid
records that are processed.
• db Nbtlookup - This log provides a list of user/
machine IP addresses from the NetBIOS lookup.
• db Split - This log contains information pertaining to
the formation of the hits_objects/hits_pages tables.
• db Staticip - This log provides information about
settings on the server for the static IP assignment
option.
• db Summary - This log shows a summarization of
activities from the dbsummary database tool.
• db Support - This log includes a list of temporary
tables that were created for the formation of the hits
tables.
• db Tool - This log shows information about system
checks performed on disk usage, free memory,
unprocessed files, and daemons.
• db Traffic - This log provides information about the
daily traffic table.
• File Watch Log - This log shows a list of records that
were imported from one machine to another.
88 8E6 TECHNOLOGIES, ENTERPRISE REPORTER ADMINISTRATOR USER GUIDE
Page 99

ADMINISTRATOR SECTION CHAPTER 2: CONFIGURING THE ER SERVER
• Patch Log - This log gives information about applied
software updates.
• MYSQL Log - This log provides information pertaining
to the MySQL server.
• Error Entry - R2k - This log displays a list of R2000
query errors.
• Error Entry - R3k - This log displays a list of R3000
query errors.
3. Click the “X” in the upper right corner of the pop-up
window to close the window.
8E6 TECHNOLOGIES, ENTERPRISE REPORTER ADMINISTRATOR USER GUIDE 89
Page 100

ADMINISTRATOR SECTION CHAPTER 2: CONFIGURING THE ER SERVER
Expiration screen
The Expiration screen displays when the Expiration option
is selected from the Database menu. This screen shows
statistics on the amount of data currently stored on the
Server box, and provides an estimated date when that data
will expire. By reviewing the current database disk space
utilization and the average number of daily hits on your
Server, adjustments can be made to the number of weeks of
live and archive data you wish to store in the future before
that data expires.
Fig. 1:2-40 Expiration screen
90 8E6 TECHNOLOGIES, ENTERPRISE REPORTER ADMINISTRATOR USER GUIDE
 Loading...