

Page 1

Home-Security-Rover HSR-1
mit HD-Video, weltweit fernsteuerbar
Bedienungsanleitung
PX-3799 -675
DE
Page 2

DE
INHALTSVERZEICHNIS
Ihr neuer Home-Security-Rover ..............4
Lieferumfang ................................................... 5
Optionales Zubehör ......................................5
ge Hinweise zu Beginn..................6
Wichti
Sicherheitshinweise ...................................... 6
Wichtige Hinweise zur Entsorgung ......... 8
Konformitätserklärung ................................ 9
Produktdetails ........................................10
Inbetriebnahme .....................................13
Inhaltsverzeichnis
Akku auaden ............................................... 13
pp installieren ............................................. 14
A
Verwendun
g ...........................................15
Externer Zugri auf Rover.........................18
Geräte-Passwort ändern ........................... 21
Fernsteuerun
2
g ...............................................23
Page 3

Einstellungen ................................................. 26
Foto ................................................................... 36
Video ................................................................. 36
Gerät hinzufügen .........................................36
Gerät entfernen ............................................ 37
Problemlösun
Datenschutz ............................................42
Technische Daten ...................................43
GPL-Lizenztext .......................................45
gen...................................38
DE
Informationen und Antworten auf häuge
Fragen (FAQs) zu vielen unserer Produkte
sowie ggfs. aktualisierte Handbücher nden
Sie auf der Internetseite:
www.7links.me
Geben Sie dort im Suchfeld die
Artikelnummer oder den Artikelnamen ein.
Inhaltsverzeichnis
3
Page 4

DE
IHR NEUER HOMESECURITYROVER
Sehr geehrte Kundin, sehr geehrter Kunde,
Vielen Dank für den Kauf dieses HomeSecurity-Rovers. Ihr kleiner Helfer ist
mit einer HD-Überwachungskamera,
LED-Beleuchtung, einem schwenkbaren
Kamerakopf, einer Gegensprechfunktion
und zwei Kettenantrieben ausgestattet.
Steuern Sie ihn per Smartphone oder
Tablet-PC und sehen Sie per Live-Bild, was
bei Ihnen zuhause gerade los ist.
Ihr neuer Home-Security-Rover
4
Page 5

Lieferumfang
• Home-Security-Rover
• Ladestation
• Micro-USB-Ladekabel
• Bedienungsanleitung
Zusätzlich benötigt: WLAN Router,
Internetverbindung, Smartphone mit
Android ab Version 4.1 oder OS ab Version 8
Optionales Zubehör
PX-4919: Reisefreundliches USB-Netzteil,
1000 mA, 5 V
DE
Ihr neuer Home-Security-Rover
5
Page 6

DE
WICHTIGE HINWEISE ZU BEGINN
Sicherheitshinweise
• Diese Bedienungsanleitung dient dazu,
Sie mit der Funktionsweise dieses
Produktes vertraut zu machen. Bewahren
Sie diese Anleitung daher gut auf, damit
Sie jederzeit darauf zugreifen können.
• Ein Umbauen oder Verändern des Produktes beeinträchtigt die Produktsicherheit.
Achtung Verletzungsgefahr!
• Önen Sie das Produkt niemals eigenmächtig. Führen Sie Reparaturen nie selbst aus!
Wichtige Hinweise zu Beginn
• Behandeln Sie das Produkt sorgfältig. Es
kann durch Stöße, Schläge oder Fall aus
bereits geringer Höhe beschädigt werden.
• Halten Sie das Produkt fern von
6
Feuchtigkeit und extremer Hitze.
Page 7

• Tauchen Sie das Produkt niemals in
Wasser oder andere Flüssigkeiten.
• Dieses Produkt ist kein Spielzeug, halten
Sie es fern von Kinderhänden.
• Verwenden Sie das Produkt nicht in
feuchten Umgebungen wie Badewanne,
Waschbecken, Waschmaschine oder
feuchten Kellerräumen.
• Nur zur Verwendung in Innenräumen!
• Setzen Sie das Produkt nicht direkter
Sonneinstrahlung aus, um ein Überhitzen
zu vermeiden.
• Halten Sie das Produkt fern von Herd,
Ofen, Heizung, Mikrowelle, SoundSystemen und TV-Geräten.
• Verwenden Sie nur das mitgelieferte oder
empfohlene Zubehör.
• Verwenden Sie beim Auaden keine
DE
Wichtige Hinweise zu Beginn
7
Page 8

DE
Verlängerungskabel.
• Technische Änderungen und Irrtümer
vorbehalten.
Wichtige Hinweise zur Entsorgung
Dieses Elektrogerät gehört NICHT in den
Hausmüll. Für die fachgerechte Entsorgung
wenden Sie sich bitte an die öentlichen
Sammelstellen in Ihrer Gemeinde.
Einzelheiten zum Standort einer solchen
Sammelstelle und über ggf. vorhandene
Mengenbeschränkungen pro Tag / Monat /
Jahr entnehmen Sie bitte den Informationen
Wichtige Hinweise zu Beginn
der jeweiligen Gemeinde.
8
Page 9

Konformitätserklärung
Hiermit erklärt PEARL.GmbH, dass sich das
Produkt PX-3799-675 in Übereinstimmung
mit der RoHS Richtlinie 2011/65/EU, der EMVRichtlinie 2014/30/EU und der FunkanlagenRichtlinie 2014/53/EU bendet.
Qualitätsmanagement
Dipl. Ing. (FH) Andreas Kurtasz
DE
Die ausführliche Konformitätserklärung
nden Sie unter www.pearl.de/
support. Geben Sie dort im Suchfeld die
Artikelnummer PX-3799 ein.
Wichtige Hinweise zu Beginn
9
Page 10

DE
PRODUKTDETAILS
Home-Security-Rover
Produktdetails
10
Page 11
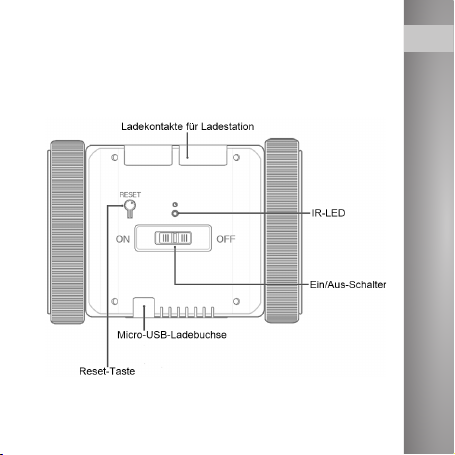
Mobilkörper (Unterseite)
DE
Produktdetails
11
Page 12

DE
Produktdetails
12
Kamerakopf
Page 13

INBETRIEBNAHME
Akku auaden
Laden Sie den Home-Security-Rover vor dem
ersten Gebrauch vollständig auf.
Sie können den Rover entweder direkt oder
über die Ladestation auaden.
• Nehmen Sie das Ladekabel und stecken
Sie den Micro-USB-Stecker in die
Micro-USB-Ladebuchse des Rovers.
Verbinden Sie den USB-Stecker mit einem
geeigneten 5-V-Netzteil (z. B. PX-4919).
• Oder schließen Sie das Ladekabel an die
Ladestation an und verbinden Sie es mit
einem geeigneten 5-V-Netzteil. Setzen Sie
den Rover so auf die Ladestation, dass die
Ladekontakte richtig auiegen.
DE
Inbetriebnahme
13
Page 14
DE
Schließen Sie das Netzteil dann an die
Stromversorgung an. Die Lade-LED leuchtet
während des Ladevorgangs und erlischt,
wenn der Rover vollständig geladen ist.
App installieren
Zum Betrieb benötigen Sie eine App, die
eine Verbindung zwischen Ihrem Rover
und Ihrem Mobilgerät herstellen kann.
Wir empfehlen hierzu die kostenlose App
Appbot Link 2 bzw. Appbot Link. Suchen Sie
Inbetriebnahme
diese im Google Play Store (Android) oder
App-Store (iOS) und installieren Sie sie auf
Ihrem Mobilgerät.
HINWEIS:
Geben Sie als Suchbegri "appbot"
14
ein.
Page 15
VERWENDUNG
HINWEIS:
Apps werden ständig weiterentwickelt
und verbessert. Es kann daher
vorkommen, dass die Beschreibung
der App in dieser
Bedienungsanleitung nicht mehr der
aktuellsten App-Version entspricht.
DE
1. Önen Sie die App Appbot Link.
2. Entscheiden Sie, ob Sie der App erlauben
möchten Ihnen Mitteilungen zu senden
und tippen Sie auf das entsprechende
Feld.
Verwendung
15
Page 16
DE
HINWEIS:
Wenn Sie den Bewegungsalarm
nutzen möchten, sollten Sie die
Mitteilungen der App zulassen.
3. Tippen Sie auf Next und folgen Sie den
Anweisungen auf dem Bildschirm.
4. Schieben Sie den Ein/Aus-Schalter auf
ON. Zwei LED-Streifen auf der Oberseite
des Mobilkörpers leuchten rot, der Kopf
des Rovers bewegt sich und eine Ansage
Verwendung
erklingt. Sobald die LED-Streifen blau
leuchten ist der Rover einsatzbereit.
5. Tippen Sie auf Next und befolgen Sie die
Anweisungen auf dem Bildschirm.
6. Drücken Sie die Home-Taste Ihres
Smartphones
7. Rufen Sie die WLAN-Einstellungen Ihres
16
Page 17

Smartphones auf.
8. Wählen Sie dort APPBOT aus und stellen
Sie eine Verbindung her.
HINWEIS:
Das WLAN-Passwort lautet: link 2014.
9. Önen Sie erneut die App Appbot Link.
10. Tippen Sie auf Next.
11. Wählen Sie Ihr WLAN-Netzwerk aus,
indem Sie darauf tippen und geben Sie
Ihren Netzwerkschlüssel (Passwort) ein.
Bestätigen Sie mit ok.
12. Tippen Sie unterhalb der Liste auf OK, die
Verbindung mit Ihrem Rover wird über
Ihr WLAN-Netzwerk hergestellt. Dies
kann einen kurzen Augenblick dauern.
DE
Verwendung
17
Page 18

DE
Wenn der Rover erfolgreich bei der App
angemeldet wurde, erklingt eine Ansage.
13. Geben Sie das Geräte-Passwort Ihres
Rovers ein und tippen Sie auf OK.
HINWEIS:
Das Standard Geräte-Passwort
lautet: 1234.
14. Die App greift nun auf den Rover zu.
Sobald die Verbindung steht, erklingt
Verwendung
eine Ansage und ein Live-Bild der Kamera
erscheint auf dem Bildschirm.
Externer Zugri auf Rover
Nach der Ersteinrichtung bedarf es für
den externen Zugri auf den Rover keiner
weiteren Einrichtungen.
18
Page 19
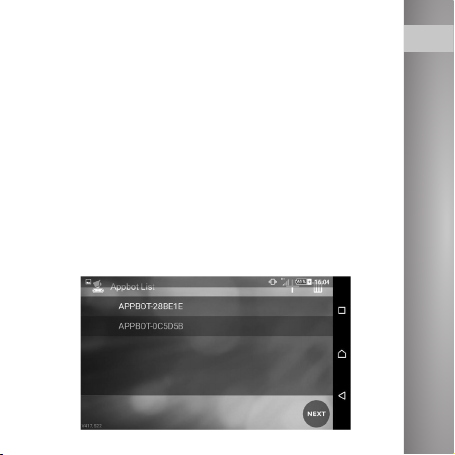
Haben Sie den Rover erfolgreich
eingerichtet, so ist dieser bei der nächsten
Verbindung aus einer Geräte-Liste
auswählbar.
1. Für den externen Zugri schalten Sie
Ihre mobilen Daten (SIM-Karte) für die
INternetnutzung ein oder wählen Sie
sich in einen anderen WLAN-Hotspot mit
Internetverbindung ein.
2. Wählen Sie nun in der App den gewünschten
Rover aus der Geräte-Liste aus.
DE
Verwendung
19
Page 20

DE
3. Tippen Sie auf Next. Geben Sie das
Gerätepasswort ein.
4. Die Verbindung wird gestartet.
Verwendung
20
Page 21

5. Bei erfolgreicher Verbindung wird das
Live-Bild angezeigt.
HINWEIS:
Je nach Netzempfang bzw.
Internetgeschwindigkeit kann die
Steuerung des Rovers verzögert oder
stockend sein. Stellen Sie in diesem
Fall die Bildqualität auf Lowein.
Geräte-Passwort ändern
DE
Verwendung
21
Page 22

DE
1. Tippen Sie im Hauptbildschirm oben
rechts auf .
Verwendung
2. Tippen Sie in der eingeblendeten linken
Seitenleiste auf .
3. Geben Sie das neue Passwort ein und
tippen Sie auf ok.
22
Page 23

HINWEIS:
Aus Sicherheitsgründen sollte Ihr
Passwort aus einer Mischung von
Groß- und Kleinbuchstaben, Zahlen
und Sonderzeichen bestehen.
4. Sie erhalten die Nachricht, dass das
Passwort erfolgreich geändert wurde.
Tippen Sie im Meldefenster auf ok.
DE
Fernsteuerung
Die Fernsteuerung wird auf dem
Hauptbildschirm als kreisförmiger Cursor
eingeblendet.
Verwendung
23
Page 24

DE
Tippen Sie auf den inneren Kreis und ziehen
Verwendung
Sie ihn in die gewünschte Richtung, um den
Rover zu bewegen.
HINWEIS:
Die Richtungspfeile geben die
Richtung aus Sicht des Rovers an.
24
Page 25

• Mit dem linken Kreis steuern Sie den
Kamerakopf des Rovers. Ziehen Sie den
inneren Kreis nach oben, um den Kopf
zu heben, und nach unten, um ihn zu
senken.
• Mit dem rechten Kreis steuern Sie den
Mobilkörper des Rovers. Ziehen Sie den
inneren Kreis nach oben, um den Rover
nach vorne zu bewegen, und nach unten,
um ihn nach hinten zu bewegen. Ziehen
Sie den inneren Kreis nach links oder
rechts, um den Rover in diese Richtung zu
drehen.
HINWEIS:
Geschwindigkeit und
Kontrollreaktion können je nach
Empfang stark variieren.
DE
Verwendung
25
Page 26

DE
Einstellungen
Tippen Sie im Hauptbildschirm oben rechts
auf , um die Seitenleisten einzublenden.
Verwendung
26
Page 27

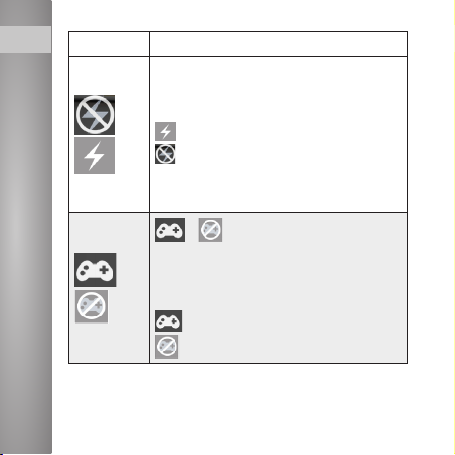
Symbol Bedeutung
Tippen Sie hierauf, um die Bildschirmqualität einzustellen.
: niedrige Qualität, schnelle
Bildübertragung
: hohe Qualität, langsame
Bildübertragung
Tippen Sie hierauf, um Informationen über die App aufzurufen.
DE
Verwendung
27
Page 28

DE
Symbol Bedeutung
Verwendung
28
Tippen Sie hierauf, um die
Gesichtserkennungsfunktion
ein- oder auszuschalten. Sobald
der Rover ein Gesicht erkannt
hat, folgt er ihm.
: ein
: aus
HINWEIS:
Der Rover kann Gesichter
erkennen, er kann sie aber nicht
unterscheiden.
Die Genaui
gkeit und Schnelligkeit der Gesichtserkennung ist
abhängig von Verbindung und
Reichweite.
Page 29

Symbol Bedeutung
Tippen Sie hierauf, um das Passwort Ihres Rovers zu ändern.
Tippen Sie hierauf, um den
Bewegungs-Alarm ein- oder auszuschalten.
: ein
: aus
Sobald der Rover eine Bewegung wahrnimmt, erhalten Sie
eine Alarm-Mitteilung.
HINWEIS:
Sie müssen der A
Installation das Senden von Mitteilungen erlaubt haben, um diese
Funktion nutzen zu können.
DE
Verwendung
pp während der
29
Page 30
DE
Symbol Bedeutung
Verwendung
30
Tippen Sie hierauf, um die weiße
LED des Rovers ein- oder auszuschalten.
: ein
: aus
So behalten Sie selbst im Dunkeln den Überblick.
/ Tippen Sie hierauf, um
die auf dem Bildschirm eingeblendete Fernsteuerung einoder auszuschalten.
: ein
: aus
Page 31
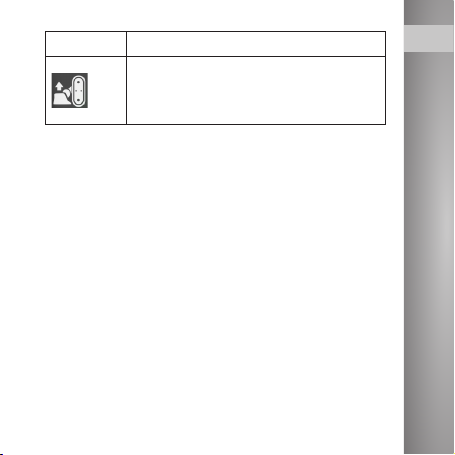
Symbol Bedeutung
Tippen Sie hierauf, um den Rover wieder aufzurichten, wenn
er nach hinten umgekippt ist.
DE
Verwendung
31
Page 32

DE
Symbol Bedeutung
Verwendung
32
Tippen Sie hierauf, um die
Audio-Funktion des Rovers einoder auszuschalten.
: ein
: aus
Bei eingeschalteter AudioFunktion erscheint
Bildschirm. Sie empfangen
nun die Audio-Aufnahmen des
Rovers.
Tippen Sie auf
und halten Sie
das Symbol gedrückt, um LiveTonaufnahmen vom Mikrofon
Ihres Smartphones auf dem
Rover abzuspielen.
auf dem
Page 33
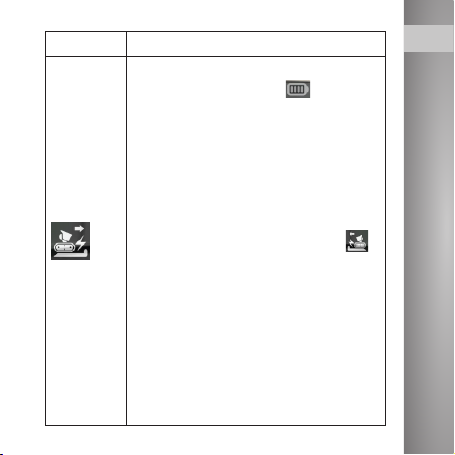
Symbol Bedeutung
Beachten Sie die Akku-Anzeige
im Hauptbildschirm . Wenn
der Akku wieder aufgeladen
werden muss, können Sie dies
über die automatische Ladefunktion tun.
Bringen Sie den Rover bis auf
weniger als 1 m an die Ladestati-
on heran und tippen Sie auf
Der Rover dockt an der Ladestation an.
HINWEIS:
Der Rover muss mit der Kamera
auf die Ladestaion zei
er die Lichtsignale der Ladestation
empfangen kann.
DE
.
Verwendung
gen, damit
33
Page 34

DE
Symbol Bedeutung
Verwendung
34
Tippen Sie auf , um den Ladevorgang abzubrechen.
Tippen Sie auf
, wenn der
Rover den Ladevorgang beenden und von der Ladestation
herunterfahren soll.
HINWEIS:
Um die fern
gesteuerte Ladefunktion
nutzen zu können, muss die Ladestation über das Ladekabel an die
Stromversorgung angeschlossen
und auf einer für den Rover erreichbaren Stelle platziert sein.
Page 35
Symbol Bedeutung
Tippen Sie hierauf, um die von
dieser App auf Ihrem Smartphone gespeicherten Bilder und
Videos aufzurufen.
HINWEIS:
Erhöhen Sie bei dunkleren
Lichtverhältnissen die Bildqualität.
Beachten Sie dabei, dass je nach
Internet- / Routergeschwindigkeit und
Empfangssignal die Steuerung des
Rovers stockend verlaufen kann.
DE
Verwendung
35
Page 36

DE
Foto
Tippen Sie im Hauptbildschirm auf , um
eine Momentaufnahme zu machen. Das Bild
wird auf Ihrem Smartphone gespeichert.
Video
Tippen Sie im Hauptbildschirm auf , um
eine Videoaufnahme zu starten. Tippen
Sie auf , um die Aufnahme zu beenden.
Die Videodatei wird auf Ihrem Smartphone
gespeichert.
Verwendung
Gerät hinzufügen
Tippen Sie auf der Startseite der App auf
, um diesen oder einen weiteren Rover zu
registrieren. Folgen Sie den Anweisungen
auf dem Bildschirm.
36
Page 37

Gerät entfernen
Tippen Sie auf der Startseite der App auf
den Rover, den Sie entfernen möchten und
tippen Sie dann auf
Tippen Sie unten auf OK, um den Rover zu
entfernen (Android) oder noch einmal auf
den zu entfernenden Rover (iOS).
DE
Verwendung
37
Page 38

DE
PROBLEMLÖSUNGEN
Problem Lösung
Der Rover lässt sich
nicht einschalten.
Der Rover kann im
WLAN-Netzwerk
nicht gefunden
Problemlösungen
werden.
Obwohl der Rover
mit einem Netzwerk verbunden ist,
hat er keine Internetverbindung.
38
Laden Sie den Rover
vollständig, mindestens aber 30 Minuten auf und schalten
Sie ihn dann ein.
Starten Sie den
Rover neu und versuchen Sie es erneut.
Stellen Sie sicher, dass
Ihr WLAN-Router mit
dem Internet verbunden ist und versuchen
Sie es erneut.
Page 39

Problem Lösung
Kein Ton trotz
aktivierter AudioFunktion.
Regulieren Sie die
Ton-Lautstärke über
die Lautstärke-Tasten
Ihres Smartphones.
Dies kann an einer
Netzwerkverzöge-
Das Live-Bild der
Kamera verschwindet gelegentlich.
rung liegen. Stellen
Sie sicher, dass der
Rover in seiner Umgebung Zugri auf
ein starkes WLANNetz hat.
DE
Problemlösungen
39
Page 40

DE
40
Problem Lösung
Nach der Registrierung ist keine
Verbindung mit
dem Smartphone
mehr möglich.
Rover fährt nach
Auswahl nicht auf
Problemlösungen
die Ladestation /
Drehung der Ladestation per App
nicht möglich.
Stellen Sie sicher,
dass der WLANRouter eingeschaltet
und mit dem Internet verbunden ist.
Das Empfangssignal
zu Ihrem Rover ist
nicht ausreichend
oder Ihre Verbindung ist nicht in
Ordnung. Schließen
Sie ggf. die App und
starten Sie diese
neu, um sich mit
dem Rover neu zu
verbinden.
Page 41

Problem Lösung
Stellen Sie sicher,
dass Ihr Router
nicht überlastet
und der Empfang
Steuerung reagiert
verzögert/stockend.
ausreichend ist.
Für den externen
Zugri werden volle
Signalstärke und
eine schnelle Router-
oder Internetverbin-
dung vorausgesetzt.
DE
Problemlösungen
41
Page 42
DE
DATENSCHUTZ
Bevor Sie das Gerät an Dritte weitergeben,
zur Reparatur schicken oder zurückgeben,
beachten Sie bitte folgende Punkte:
• Löschen Sie alle Daten.
• Setzen Sie das Gerät auf
Werkseinstellungen zurück.
• Entfernen Sie das Gerät aus der App.
Eine Erklärung, weshalb bestimmte
Datenschutz
Personendaten zur Registrierung bzw.
bestimmte Freigaben zur Verwendung
benötigt werden, erhalten Sie in der App.
42
Page 43

TECHNISCHE DATEN
DE
Eingangsleistung
Ausgangsleistung
Rover 5 V DC, 1000 mA
Ladestation
Ladestation
5 V DC, 1000 mA
5 V DC, 1000 mA
Li-Po-Akku 120 0 mA h
Frequenz 2,4 GHz
WLAN-Standards 802.11b/g/n
Datenübertragungsrate 150 Mbit/s
Systemvoraussetzungen der App
Android ab
Version 4.1
iOS ab Version 8
Technische Daten
43
Page 44

DE
44
Max. Foto-/
Videoauösung
Laufzeit ca. 2 Stunden
Betriebstemperatur 0 – 50 °C
Maße
Rover 110 × 90 × 110 mm
Ladestation 145 × 25 × 152 mm
Gewicht 93 g
Technische Daten
960 × 720 Pixel
Page 45

GPLLIZENZTEXT
Dieses Produkt enthält Software, welche
ganz oder teilweise als freie Software den
Lizenzbedingungen der GNU General
Public License, Version 2 (GPL) unterliegt.
Den Quellcode der Software erhalten Sie unter
http://www.pearl.de/support/ unter dortiger
Eingabe der Artikelnummer; wir senden Ihnen auf
Anforderung (gerne unter unter opensource@ pearl.
de) den SourceCode auch auf einem handelsüblichen
Datenträger, dessen Herstellungskosten wir im
Gegenzug geltend machen; den vollständigen Lizenztext
ersehen Sie nachfolgend. Näheres, insbesondere auch
dazu, warum es keine ozielle deutsche Übersetzung
der Lizenzbedingungen gibt, erfahren Sie unter
http://www.gnu.org/licenses/gpl-2.0.html.
Da es sich um freie Soft ware handelt, schließen die
Entwickler dieser Software die Haftung,
soweit gesetzlich zulässig, aus.
Bitte beachten Sie, dass die Gewährleistung für die
DE
GPL-Lizenztext
45
Page 46

Hardware davon natürlich nicht betroen ist und in
DE
vollem Umfang besteht.
Weitere Fragen beantworten wir Ihnen gerne unter
[email protected].
GNU GENERAL PUBLIC LICENSE
Version 2, June 1991
Copyright (C) 1989, 1991 Free Sof tware Foundation, Inc.
51 Franklin Street, Fifth Floor, Boston, MA 02110-1301,
USA
GPL-Lizenztext
Everyone is permit ted to copy and distribute verbatim
copies of this license document,
but changing it is not allowed.
Preamble
The licenses for most software are designed to take away
your freedom to share and change
46
Page 47

it. By contrast, the GNU General Public License is
intended to guarantee your freedom to share and
change free software to make sure the software is free
for all its users. This G eneral Public License applies to
most of the Free Software Foundation‘s software and
to any other program whose authors commit to using
it. (Some other Free Software Foundation software
is covered by the GNU Lesser General Public License
instead.) You can apply it to your programs, too.
When we speak of free software, we are referring to
freedom, not price. Our General Public
Licenses are designed to make sure that you have the
freedom to distribute copies of free
software (and charge for this ser vice if you wish), that you
receive source code or can get it if you want it, that you
can change the soft ware or use pieces of it in new free
programs; and that you know you can do these things.
To protect your rights, we need to make restrictions that
forbid anyone to deny you these rights or to ask you
to surrender the rights. These restrictions translate to
certain responsibilities for you if you distribute copies of
DE
GPL-Lizenztext
47
Page 48

the software, or if you modif y it.
DE
For example, if you distribute copies of such a program,
whether gratis or for a fee, you must give the recipients
all the rights that you have. You must make sure that
they, too, receive or can get the source code. And you
must show them these terms so they know their rights.
We protect your rights with two steps: (1) copyright the
software, and (2) oer you this license which gives you
legal permission to copy, distribute and / or modif y the
software. Also, for each author‘s protection and ours, we
want to make certain that everyone understands that
there is no warranty for this free software. If the software
is modied by someone else and passed on, we want
its recipients to know that what they have is not the
GPL-Lizenztext
original, so that any problems introduced by others will
not reec t on the original author’s reputations.
Finally, any free program is threatened constantly
by software patents. We wish to avoid the danger
that redistributors of a free program will individually
obtain patent licenses, in eect making the program
proprietary. To prevent this, we have made it clear that
48
Page 49

any patent must b e licensed for everyone‘s free use or
not licensed at all.
The precise terms and conditions for copying,
distribution and modication follow.
TERMS AND CONDITIONS FOR COPYING,
DISTRIBUTION AND MODIFICATION
1. This License applies to any program or other work
which contains a notice placed by the copyright holder
saying it may be distributed under the terms of this
General Public License. The „Program“, below, refers to
any such program or work, and a „work based on the
Program“ means either the Program or any derivative
work under copyright law: that is to say, a work
containing the Program or a portion of it, either verbatim
or with modications and/or translated into another
language. (Hereinafter, translation is included without
limitation in the term „modication“.) Each licensee
is addressed as „you“. Activities other than copying,
distribution and modication are not covered by this
License; they are outside its scope. The act of running
DE
GPL-Lizenztext
49
Page 50

the Program is not restricted, and the output from the
DE
Program is covered only if its contents constitute a work
based on the Program (independent of having been
made by running the Program). Whether that is true
depends on what the Program does.
2. You may copy and distribute verbatim copies of the
Program‘s source code as you receive it, in any medium,
provided that you conspicuously and appropriately
publish on each copy an appropriate copyright notice
and disclaimer of warranty; keep intact all the notices
that refer to this License and to the absence of any
warranty; and give any other recipients of the Program a
copy of this License along with the Program.
GPL-Lizenztext
You may charge a fee for the physical act of transferring
a copy, and you may at your option oer warranty
protection in exchange for a fee.
3. You may modify your copy or copies of the Program
or any portion of it, thus forming a work based on the
Program, and copy and distribute such modications or
work under the terms of Section 1 above, provided that
50
Page 51

you also meet all of these conditions:
I. You must cause the modied les to carry prominent
notices stating that you changed the les and the date of
any change.
II. You must cause any work that you distribute or
publish, that in whole or in part contains or is derived
from the Program or any par t thereof, to be licensed as a
whole at no charge to all third parties under the terms of
this License.
III. If the modied program normally reads commands
interactively when run, you must cause it, when started
running for such interac tive use in the most ordinary
way, to print or display an announcement including an
appropriate copyright notice and a notice that there is
no warrant y (or else, saying that you provide a warranty)
and that users may redistribute the program under these
conditions, and telling the user how to view a copy of
this License. (E xception: if the Program itself is interactive
but does not normally print such an announcement, your
work based on the Program is not required to print an
announcement.)
DE
GPL-Lizenztext
51
Page 52
These requirements apply to the modied work as
DE
a whole. If identiable sections of that work are not
derived from the Program, and can be reasonably
considered independent and separate works in
themselves, then this License, and its terms, do not apply
to those sec tions when you distribute them as separate
works. But when you distribute the same sections as part
of a whole which is a work based on the Program, the
distribution of the whole must be on the terms of this
License, whose permissions for other licensees extend
to the entire whole, and thus to each and ever y part
regardless of who wrote it.
Thus, it is not the intent of this section to claim rights
or contest your rights to work written entirely by you;
GPL-Lizenztext
rather, the intent is to exercise the right to control the
distribution of derivative or collective works based on
the Program.
In addition, mere aggregation of another work not based
on the Program with the Program (or with a work based
on the Program) on a volume of a storage or distribution
medium does not bring the other work under the scope
52
Page 53

of this License.
4. You may copy and distribute the Program (or a
work based on it, under Section 2) in object code or
executable form under the terms of Sections 1 and 2
above provided that you also do one of the following:
I. Accompany it with the complete corresponding
machine-readable source code, which must be
distributed under the terms of Sections 1 and 2 above on
a medium customarily used for software interchange; or,
II. Accompany it with a writ ten oer, valid for at least
three years, to give any third party, for a charge no
more than your cost of physically per forming source
distribution, a complete machinereadable copy of the
corresponding source code, to be distributed under
the terms of Sections 1 and 2 above on a medium
customarily used for software interchange; or,
III. Accompany it with the information you received as
to the oer to distribute corresponding source code.
(This alternative is allowed only for noncommercial
distribution and only if you received the program in
object code or executable form with such an oer, in
accord with Subsection b above.)
DE
GPL-Lizenztext
53
Page 54

DE
The source code for a work means the preferred form
of the work for making modications to it. For an
executable work, complete source code means all
the source code for all modules it contains, plus any
associated interface denition les, plus the scripts used
to control compilation and installation of the executable.
However, as a special exception, the source code
distributed need not include any thing that is normally
distributed (in either source or binary form) with the
major components (compiler, kernel, and so on) of the
operating system on which the executable runs, unless
that component itself accompanies the executable.
If distribution of executable or object code is made by
oering access to copy from a designated place, then
GPL-Lizenztext
oering equivalent access to copy the source code from
the same place counts as distribution of the source code,
even though third parties are not compelled to copy the
source along with the object code.
5. You may not copy, modify, sublicense, or distribute
the Program except as expressly provided under
this License. Any attempt otherwise to copy, modify,
54
Page 55

sublicense or distribute the Program is void, and will
automatically terminate your rights under this License.
However, parties who have received copies, or rights,
from you under this License will not have their licenses
terminated so long as such parties remain in full
compliance.
6. You are not required to accept this License, since
you have not signed it. However, nothing else grants you
permission to modif y or distribute the Program or its
derivative works. These actions are prohibited by law if
you do not accept this License. Therefore, by modif ying
or distributing the Program (or any work based on the
Program), you indicate your acceptance of this License
to do so, and all its terms and conditions for copying,
distributing or modifying the Program or works based on
it.
7. Each time you redistribute the Program (or any work
based on the Program), the recipient automatically
receives a license from the original licensor to copy,
distribute or modif y the Program subject to these
terms and conditions. You may not impose any further
DE
GPL-Lizenztext
55
Page 56

restrictions on the recipients‘ exercise of the rights
DE
granted herein. You are not responsible for enforcing
compliance by third parties to this License.
8. If, as a consequence of a court judgment or
allegation of patent infringement or for any other reason
(not limited to patent issues), conditions are imposed on
you (whether by court order, agreement or otherwise)
that contradict the conditions of this License, they do
not excuse you from the conditions of this License. If
you cannot distribute so as to satisfy simultaneously
your obligations under this License and any other
pertinent obligations, then as a consequence you may
not distribute the Program at all. For example, if a patent
license would not permit royalty-free redistribution of
GPL-Lizenztext
the Program by all those who receive copies directly
or indirec tly through you, then the only way you could
satisfy both it and this License would be to refrain
entirely from distribution of the Program.
If any portion of this section is held invalid or
unenforceable under any particular circumstance,
the balance of the section is intended to apply and
56
Page 57

the section as a whole is intended to apply in other
circumstances.
It is not the purpose of this section to induce you to
infringe any patents or other property right claims or
to contest validity of any such claims; this section has
the sole purpose of protecting the integrity of the free
software distribution system, which is implemented
by public license practices. Many people have made
generous contributions to the wide range of sof tware
distributed through that system in reliance on consistent
application of that system; it is up to the author/donor
to decide if he or she is willing to distribute software
through any other system and a licensee cannot impose
that choice.
This section is intended to make thoroughly clear what is
believed to be a consequence of the rest of this License.
9. If the distribution and/or use of the Program is
restricted in certain countries either by patents or by
copyrighted interfaces, the original copyright holder
who places the Program under this License may add an
DE
GPL-Lizenztext
57
Page 58

explicit geographical distribution limitation excluding
DE
those countries, so that distribution is permitted only in
or among countries not thus excluded. In such case, this
License incorporates the limitation as if writ ten in the
body of this License.
10. The Free Soft ware Foundation may publish revised
and/or new versions of the General Public License from
time to time. Such new versions will be similar in spirit to
the present version, but may dier in detail to address
new problems or concerns.
Each version is given a distinguishing version number. If
the Program species a version number of this License
which applies to it and „any later version“, you have the
GPL-Lizenztext
option of following the terms and conditions either of
that version or of any later version published by the Free
Software Foundation. If the Program does not specify
a version number of this License, you may choose any
version ever published by the Free Sof tware Foundation.
11. If you wish to incorporate parts of the Program into
other free programs whose distribution conditions are
58
Page 59

dierent, write to the author to ask for permission. For
software which is copyrighted by the Free Sof tware
Foundation, write to the Free Software Foundation; we
sometimes make exceptions for this. Our decision will be
guided by the two goals of preserving the free status of
all derivatives of our free software and of promoting the
sharing and reuse of software generally.
NO WARRANTY
12. BECAUSE THE PROGRAM IS LICENSED FREE OF
CHARGE, THERE IS NO WARRANTY FOR THE PROGRAM,
TO THE EXTENT PERMITTED BY APPLICABLE LAW.
EXCEPT WHEN OTHERWISE STATED IN WRITING THE
COPYRIGHT HOLDERS AND/OR OTHER PARTIES PROVIDE
THE PROGR AM „AS IS“ WITHOUT WARRANTY OF ANY
KIND, EITHER EXPRESSED OR IMPLIED, INCLUDING,
BUT NOT LIMITED TO, THE IMPLIED WARRANTIES OF
MERCHANTABILIT Y AND FITNESS FOR A PARTICULAR
PURPOSE. THE ENTIRE RISK AS TO THE QUALITY AND
PERFORMANCE OF THE PROGRAM IS WITH YOU. SHOULD
THE PROGR AM PROVE DEFECTIVE, YOU ASSUME
THE COST OF ALL NECESSARY SERVICING, REPAIR OR
DE
GPL-Lizenztext
59
Page 60

CORRECTION.
DE
13. IN NO EVENT UNLESS REQUIRED BY APPLICABLE
LAW OR AGREED TO IN WRITING WILL ANY COPYRIGHT
HOLDER, OR ANY OTHER PART Y WHO MAY MODIFY AND/
OR REDISTRIBUTE THE PROGRAM AS PERMITTED ABOVE,
BE LIABLE TO YOU FOR DAMAGES, INCLUDING ANY
GENERAL, SPECIAL, INCIDENTAL OR CONSEQUENTIAL
DAMAGES ARISING OUT OF THE USE OR INABILITY TO
USE THE PROGRAM (INCLUDING BUT NOT LIMITED TO
LOSS OF DATA OR DATA BEING RENDERED INACCURATE
OR LOSSES SUSTAINED BY YOU OR THIRD PARTIES OR
A FAILURE OF THE PROGRAM TO OPERATE WITH ANY
OTHER PROGR AMS), EVEN IF SUCH HOLDER OR OTHER
PARTY HAS BEEN ADVISED OF THE POSSIBILIT Y OF SUCH
GPL-Lizenztext
DAMAGES.
END OF TERMS AND CONDITIONS
How to Apply These Terms to Your New Programs
If you develop a new program, and you want it to be of
the greatest possible use to the public, the best way to
achieve this is to make it free software which ever yone
60
Page 61

can redistribute and change under these terms.
To do so, attach the following notices to the program. It
is safest to at tach them to the start of each source le to
most eectively convey the exclusion of warranty; and
each le should have at least the „copyright“ line and a
pointer to where the full notice is found.
one line to give the program‘s name and an
idea of what it does.
Copyright (C) yyyy name of author
This program is free software; you can redistribute it and/
or modif y it under the terms of the GNU General Public
License as published by the Free Soft ware Foundation;
either version 2 of the License, or (at your option) any
later version.
This program is distributed in the hope that it will be
useful, but WITHOUT ANY WARRANTY; without even the
implied warranty of MERCHANTABILITY or FITNESS FOR
A PARTICULAR PURPOSE. See the GNU General Public
License for more details.
DE
GPL-Lizenztext
61
Page 62

DE
You should have received a copy of the GNU General
Public License along with this program; if not, write to
the Free Software Foundation, Inc., 51 Franklin Street,
Fifth Floor, Boston, MA 02110-1301, USA.
Also add information on how to contact you by
electronic and paper mail.
If the program is interac tive, make it output a shor t
notice like this when it starts in an interactive mode:
Gnomovision version 69, Copyright (C) year name of
author
Gnomovision comes with ABSOLUTELY NO WARRANTY;
GPL-Lizenztext
for details type `show w ‘. This is free software, and you
are welcome to redistribute it under certain conditions;
type `show c‘ for details.
The hypothetical commands `show w‘ and `show c‘
should show the appropriate parts of the General Public
License. Of course, the commands you use may be called
something other than `show w ‘ and `show c‘; they could
62
Page 63

even be mouse-clicks or menu items - whatever suits
your program.
You should also get your employer (if you work as a
programmer) or your school, if any, to sign a „copyright
disclaimer“ for the program, if necessar y. Here is a
sample; alter the names:
Yoyodyne, Inc., hereby disclaims all copyright interest
in the program `Gnomovision‘ (which makes passes at
compilers) written by James Hacker.
signature of Ty Coon, 1 April 1989
Ty Coon, President of Vice
This General Public License does not permit
incorporating your program into proprietary programs.
If your program is a subroutine library, you may consider
it more useful to permit linking proprietary applications
with the library. If this is what you want to do, use
the GNU Lesser General Public License instead of this
License.
DE
GPL-Lizenztext
63
Page 64

www.pearl.de
Kundenserv ice: 07631 / 360 - 350
Importiert von:
PEARL.GmbH | PEARL-Straße 1–3 | D-79426 Buggingen
© REV5 / 25. 07. 2018 – EB/MB//BS//MF
Page 65
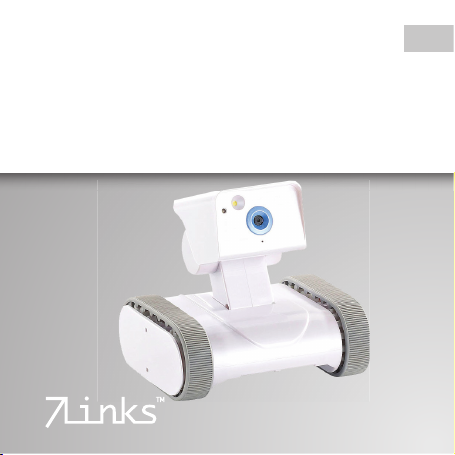
HSR-1
Robot de télésurveillance
avec vidéo HD, pilotable à distance
Mode d'emploi
DE
PX-3799 -675
Page 66

FR
INHALTSVERZEICHNIS / SOMMAIRE
Votre nouveau robot de télésurveillance 4
Contenu ............................................................. 4
Accessoire en option..................................... 5
Consignes préalables ...............................5
Consignes de sécurité .................................. 5
Consignes importantes pour le traitement
des déchets ....................................................10
Déclaration de conformité ........................ 10
Description du produit ...........................12
Mise en marche .......................................14
Chargement de la batterie ........................14
Inhaltsverzeichnis / Sommaire
Installer l'application ................................... 16
Utilisation ................................................17
Modier le mot de passe appareil ..........20
Télécommande .............................................22
2
Page 67

Réglages .......................................................... 24
Photo ................................................................ 32
Vidéo ................................................................. 32
Ajouter un appareil ...................................... 33
Supprimer un appareil ..............................33
Dépannage ..............................................34
Protection des données .........................37
Caractéristiques techniques ..................39
Contrat de licence logiciel libre ............ 40
FR
Inhaltsverzeichnis / Sommaire
3
Page 68

FR
VOTRE NOUVEAU ROBOT DE
TÉLÉSURVEILLANCE
Chère cliente, cher client,
Nous vous remercions d'avoir choisi ce
robot de télésurveillance. An d’utiliser au
mieux votre nouveau produit, veuillez lire
attentivement ce mode d'emploi et respecter
les consignes et astuces suivantes.
Contenu
• Robot de surveillance
• Station de chargement
• Câble de chargement Micro-USB
• Mode d'emploi
Votre nouveau robot de télésurveillance
Accessoires requis (non fournis)
• Routeur wi avec connexion Internet
• Smartphone avec Android à partir de 4.1
4
Page 69

ou iOS partir de 8.
Accessoire en option
PX4919: Adaptateur secteur USB compact,
1000 mA, 5 V
CONSIGNES PRÉALABLES
Consignes de sécurité
• Ce mode d'emploi vous permet de vous
familiariser avec le fonctionnement du
produit. Conservez-le précieusement an
de pouvoir le consulter en cas de besoin.
• Pour connaître les conditions de garantie,
veuillez contacter votre revendeur.
Veuillez également tenir compte des
conditions générales de vente!
• Veillez à utiliser le produit uniquement
comme indiqué dans la notice. Une
FR
Consignes préalables
5
Page 70

FR
mauvaise utilisation peut endommager le
produit ou son environnement.
• Le démontage ou la modication du
produit aecte sa sécurité. Attention,
risque de blessure!
• N'ouvrez jamais l'appareil. Ne tentez
jamais de réparer vous-même le produit!
• Manipulez le produit avec précaution. Un
coup, un choc, ou une chute, même de
faible hauteur, peut l'endommager.
• N'exposez pas le produit à l'humidité ni à
une chaleur extrême.
Consignes préalables
• Ne plongez jamais le produit dans l'eau
ni dans aucun autre liquide. N'utilisez
pas le produit dans des environnements
humides comme une salle de bains,
buanderie ou cave.Conçu pour un usage
en intérieur uniquement!
6
Page 71

• Ce produit n'est pas un jouet.
Maintenez-le hors de la portée des
enfants.
• Cet appareil n'est pas conçu pour être
utilisé par des personnes (y compris les
enfants) dont les capacités physiques,
sensorielles ou mentales sont réduites,
ou des personnes dénuées d'expérience
ou de connaissance, sauf si elles ont
pu bénécier, par l'intermédiaire d'une
personne responsable de leur sécurité,
d'une surveillance ou d'instructions
préalables concernant l'utilisation de
l'appareil.
• Respectez la législation locale concernant
les libertés individuelles et le droit à
l'image. La législation française interdit
de lmer, enregistrer ou photographier
FR
Consignes préalables
7
Page 72

FR
des personnes à leur insu. Elle requiert
également l'autorisation des personnes
concernées avant toute utilisation et/ou
diusion d'enregistrements audio, photo
ou vidéo. Avant d'installer une caméra
de surveillance (notamment une caméra
discrète) à votre domicile, si des salariés
y travaillent, la loi française actuelle vous
oblige à faire une déclaration à la CNIL et
à en informer le(s) salarié(s) par écrit. Vous
trouverez des informations plus détaillées
sur le site de la CNIL (www.cnil.fr).
Consignes préalables
• Ne regardez jamais directement le rayon
lumineux de la lampe. Ne pointez pas la
lampe directement dans les yeux d'une
personne ou un animal.
• N’exposez pas le produit au rayonnement
direct du soleil, an d'éviter une
8
Page 73

surchaue.
• Maintenez le produit à distance des
plaques de cuisson, fours, appareils de
chauage, micro-ondes, systèmes audio
et téléviseurs.
• Utilisez uniquement les accessoires
fournis ou recommandés.
• Pour le chargement, n'utilisez pas de
câble de rallonge.
• Aucune garantie ne pourra être appliquée
en cas de mauvaise utilisation.
• Le fabricant décline toute responsabilité
en cas de dégâts matériels ou dommages
(physiques ou moraux) dus à une
mauvaise utilisation et/ou au non-respect
des consignes de sécurité.
• Sous réserve de modication et d'erreur!
FR
Consignes préalables
9
Page 74

Consignes importantes pour le traitement
FR
des déchets
Cet appareil électronique ne doit PAS être
jeté dans la poubelle de déchets ménagers.
Pour l'enlèvement approprié des déchets,
veuillez vous adresser aux points de
ramassage publics de votre municipalité.
Les détails concernant l'emplacement d'un
tel point de ramassage et les éventuelles
restrictions de quantité existantes par jour/
mois/année, ainsi que sur des frais éventuels
de collecte, sont disponibles dans votre
Consignes préalables
municipalité.
Déclaration de conformité
La société PEARL.GmbH déclare ce
produit PX-3799 conforme aux directives
2011/65/UE, 2014/30/UE et 2014/53/UE
10
Page 75
actuelles du Parlement Européen.
Service Qualité
Dipl.-Ing. (FH) Andreas Kurtasz
La déclaration de conformité
complète du produit est disponible
en téléchargement à l'adresse
https://www.pearl.fr/support/notices ou sur
simple demande par courriel à [email protected].
FR
Consignes préalables
11
Page 76

FR
DESCRIPTION DU PRODUIT
Robot de surveillance
LED de
chargement
Description du produit
12
Tête avec
caméra
Partie mobile
Page 77
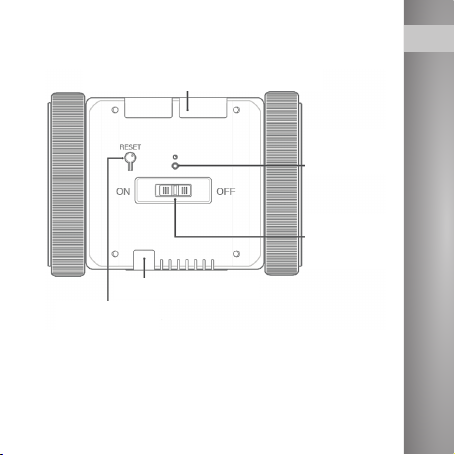
Partie mobile (face inférieure)
Contacts de chargement pour la
station de chargement
Port de chargement
Bouton de
réinitialisation
FR
LED
infrarouge
Commutateur Marche/
Arrêt
Description du produit
13
Page 78
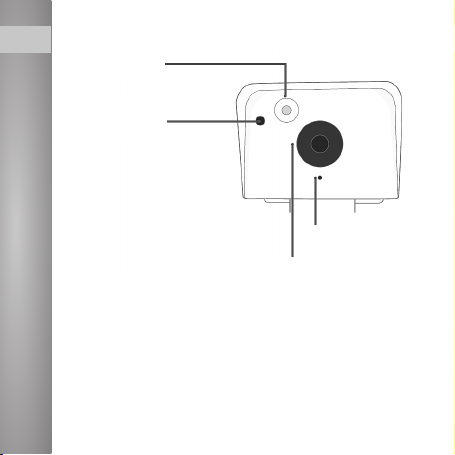
Tête avec caméra
FR
LED blanche
LED
infrarouge
Mise en marche
Caméra
MISE EN MARCHE
Chargement de la batterie
Avant la première utilisation, chargez
complètement le robot de télésurveillance.
Vous pouvez charger le robot soit
14
Micro
Page 79

directement, soit par le biais de la station de
chargement.
• Branchez le connecteur du câble microUSB du câble de chargement dans le
port de chargement micro-USB du
robot. Raccordez le connecteur USB à
un adaptateur secteur 5 V adapté (par
exemple réf. PX4919).
• Vous pouvez également brancher le
câble de chargement à la station de
chargement, puis le raccorder à un
adaptateur secteur 5 V adapté. Placez
le robot sur la station de chargement
de manière à ce que les contacts de
chargement soient bien en contact.
• Branchez l'adaptateur secteur à
l'alimentation électrique. Le témoin de
chargement brille pendant le processus
FR
Mise en marche
15
Page 80

FR
de chargement et s'éteint lorsque le robot
est complètement rechargé.
Installer l'application
L'utilisation du produit requiert une
application capable d'établir une connexion
entre votre appareil connecté et votre
appareil mobile. Nous recommandons
l'application gratuite Appbot Link 2 ou
Appbot Link. Recherchez cette dernière dans
Google Play Store (Android) ou dans l'App
Store (iOS) et installez-la sur votre appareil
Mise en marche
mobile.
NOTE:
Saisissez "appbot" et lancez la
recherche.
16
Page 81
UTILISATION
L'application est continuellement améliorée.
Par conséquent, il est possible que la
description de l'application de ce mode
d'emploi ne corresponde pas à la version de
l'application la plus récente.
1. Ouvrez l'application Appbot Link.
2. Décidez si vous autorisez l'application
à vous envoyer des notications, et
appuyez sur le champ correspondant.
NOTE:
Si vous souhaitez utiliser l'alerte de
détection de mouvement, vous devez
autoriser les notications de
l'application.
FR
Utilisation
17
Page 82

3. Appuyez sur Next et suivez les
FR
instructions achées à l'écran.
4. Placez le commutateur marche/arrêt sur
ON. Deux bandes à LED brillent en rouge
sur le dessus de la partie mobile, la tête du
robot se déplace et une annonce sonore
retentit. Dès que les bandes à LED brillent
en bleu, le robot est prêt à fonctionner.
5. Appuyez sur Next et suivez les
instructions achées à l'écran.
6. Appuyez sur la touche Home de votre
Utilisation
smartphone.
7. Sur votre smartphone, ouvrez les réglages
wi.
8. À cet endroit, sélectionnez APPBOT et
établissez la connexion.
18
Page 83

NOTE:
Le mot de passe wi est link2014.
9. Ouvrez une nouvelle fois l'application
Appbot Link.
10. Appuyez sur Next.
11. Sélectionnez votre réseau wi en
appuyant dessus, et saisissez votre clé
réseau (mot de passe). Conrmez avec OK.
12. Sous la liste, appuyez sur OK. La
connexion avec votre robot via votre
réseau wi est alors établie. Cela peut
durer un court moment. Si le robot est
correctement connecté avec l'application,
une annonce sonore retentit.
13. Saisissez le mot de passe appareil de votre
robot puis appuyez sur OK.
FR
Utilisation
19
Page 84

FR
NOTE:
Le mot de passe appareil standard
est : 1234
14. L'application a maintenant accès au robot.
que la connexion est établie, une
Dès
annonce sonore retentit et les images en
direct de la caméra a
pparaissent à l'écran.
Modi er le mot de passe appareil
1. Sur l'écran
Utilisation
principal, appuyez en haut à
droit sur .
20
Page 85
FR
2. Dans la barre latérale sur la gauche de
l'écran, appuyez sur .
3. Saisissez le nouveau mot de passe puis
appuyez sur OK.
NOTE:
Pour des raisons de sécurité, votre
mot de passe doit comporter des
majuscules, des minuscules, des
Utilisation
21
Page 86

FR
chires et des caractères spéciaux.
4. Vous recevez un message vous signalant
que le mot de passe a bien été modié.
Dans la fenêtre de dialogue, appuyez sur
OK.
Télécommande
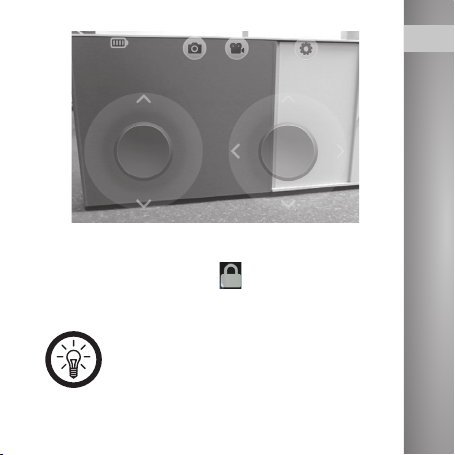
La télécommande apparaît sur l'écran
principal sous forme de curseur circulaire.
Utilisation
22
Page 87

Appuyez sur le cercle intérieur, et faites-le
tourner dans la direction souhaitée pour
déplacer le robot.
NOTE:
Les èches de direction indiquent la
direction du point de vue du robot.
• Le cercle gauche vous permet de
commander la tête comportant la caméra.
Déplacez le cercle intérieur vers le haut
pour que la tête se relève. Déplacez-le
vers le bas pour que la tête s'abaisse.
• Le cercle droit vous permet de
commander la partie mobile du robot.
Déplacez le cercle intérieur vers le haut
pour déplacer le robot vers l'avant.
Déplacez-le vers le bas pour déplacer le
robot vers l'arrière.
FR
Utilisation
23
Page 88

• Déplacez le cercle intérieur vers la gauche
FR
ou vers la droite pour faire tourner le
robot vers la gauche ou vers la droite.
NOTE:
La vitesse et les réactions peuvent
varier fortement selon la réception.
Réglages
Sur l'écran principal, appuyez en haut à
droite sur a n de masquer la barre
Utilisation
latérale.
24
Page 89

Symboles Sign i c a t i o n
Appuyez ici pour régler la qualité
de l'a chage.
: qualité faible, transmission
rapide des images
: qualité élevée, transmission
lente des images
Appuyez ici pour obtenir des
informations sur l'application.
FR
Utilisation
25
Page 90

FR
Symboles Sign i c a t i o n
Utilisation
26
Appuyez ici pour activer ou
désactiver la fonction Détection
des visages. Dès que le robot
détecte un visage, il le suit.
: activée
: désactivée
Le robot peut détecter
les visages, mais sans les
di érencier. La précision et la
vitesse de la détection de visage
dépendent de la portée et de la
connexion.
Appuyez ici pour modi er le mot
de passe de votre robot.
Page 91

Symboles Sign i c a t i o n
Appuyez ici pour activer ou
désactiver l'alerte en cas de
détection d'un mouvement.
: activée
: désactivée
Dès que le robot détecte un
mouvement, vous recevez un
message d'alerte. Pour pouvoir
utiliser cette fonction, vous
devez avoir, lors de l'installation,
autorisé l'application à vous
envoyer des noti cations.
FR
Utilisation
27
Page 92
FR
Symboles Sign i c a t i o n
Utilisation
28
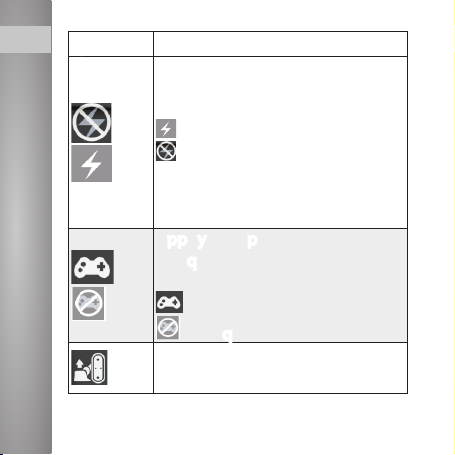
Appuyez ici pour allumer ou
éteindre la LED blanche du
robot.
: allumée
: éteinte
Cela vous permet de continuer à
voir ce qu'il se passe dans votre
habitation, même la nuit.
Appuyez ici pour a cher ou
masquer la télécommande sur
l'écran.
: a chée
: masquée
Appuyez ici pour relever le robot
s'il a basculé en arrière.
Page 93

Symboles Sign i c a t i o n
Appuyez ici pour activer ou
désactiver la fonction Audio du
robot.
: activée
: désactivée
Lorsque la fonction Audio est
activée,
Vous recevez maintenant un
enregistrement audio du robot.
A
ppuyez sur et maintenez
le symbole appuyé pour que le
son capté par le micro de votre
smartphone soit di usé en
direct par le robot.
FR
apparaît à l'écran.
Utilisation
29
Page 94

FR
Symboles Sign i c a t i o n
Utilisation
30
Surveillez la batterie sur l'écran
principal . Lorsque la batterie
doit être rechargée, vous
pouvez utiliser la fonction de
chargement automatique. Pour
cela, déplacez le robot pour
qu'il se trouve à moins d'1m
de la station de chargement.
A
ppuyez ensuite sur
. Le
robot rejoint alors la station de
chargement. La caméra du robot
doit être orientée en direction
de la station de chargement, de
manière à ce que le robot puisse
recevoir le signal lumineux de la
station de chargement.
Page 95

Symboles Sign i c a t i o n
Appuyez sur pour interrompre
le processus de chargement.
ppuyez sur lorsque le robot
A
doit mettre n au processus
de chargement et quitter la
station. Pour utiliser la fonction
Chargement piloté, il faut que la
station de chargement se trouve
à un emplacement accessible
pour le robot, et qu'elle soit
branchée à l'alimentation
électrique par câble de
chargement.
Appuyez ici pour accéder aux
photos et vidéos enregistrées
sur votre smartphone par cette
application.
FR
Utilisation
31
Page 96

FR
NOTE:
Si les conditions lumineuses sont
faibles, augmentez la qualité de
l'image. Veuillez noter que, selon la
vitesse du routeur et/ou de la
connexion Internet, le contrôle du
robot peut être saccadé.
Photo
Sur l'écran principal, appuyez sur pour
Utilisation
faire une capture instantanée. L'image est
enregistrée sur votre smartphone.
Vidéo
Sur l'écran principal, appuyez sur pour
lancer un enregistrement vidéo. Appuyez sur
pour arrêter l'enregistrement. Le chier
32
Page 97

vidéo est enregistré sur votre smartphone.
Ajouter un appareil
Sur la page d'accueil de l'application,
appuyez sur pour enregistrer ce robot
ou bien un autre. Suivez les instructions
a chées à l'écran.
Supprimer un appareil
Sur la page d'accueil de l'application,
appuyez sur le robot que vous souhaitez
supprimer puis sur .
Appuyez en bas sur OK a n de supprimer le
robot (sous Android), ou bien encore une fois
sur le robot à supprimer (sous iOS).
FR
Utilisation
33
Page 98

FR
DÉPANNAGE
34
Problème
Le robot ne
s'allume pas.
Le robot n'est pas
Dépannage
détecté dans le
réseau wi.
Solution(s)
proposée(s)
Rechargez le robot
complètement
pendant au moins
30min, puis allumezle.
Redémarrez le robot,
puis essayez de
nouveau.
Page 99

Le robot est
connecté au
réseau mais
n'accède
pourtant pas à
Internet.
Pas de son, alors
que la fonction
Audio est
activée.
L'im a ge
transmise en
direct par la
caméra disparaît
parfois.
Assurez-vous que
votre routeur wi est
connecté à Internet, et
essayez de nouveau.
Réglez le volume
sonore à l'aide des
touches de volume de
votre smartphone.
Ceci peut être dû à un
ralentissement sur le
réseau. Assurez-vous
que le robot, là où il
se trouve, a accès à un
réseau wi puissant.
FR
Dépannage
35
Page 100

FR
36
Après
l'enregistrement,
la connexion
avec le
smartphone n'est
plus possible.
Le robot ne
va pas vers
la station de
Dépannage
chargement. /
La rotation de
la station de
chargement n'est
pas possible via
l'application.
Assurez-vous que
votre routeur wi est
allumé et connecté à
Internet.
Le signal reçu par
votre robot n'est pas
susant, ou votre
connexion rencontre
des problèmes. Le
cas échéant, fermez
l'application et
redémarrez-la pour
vous connecter à
nouveau avec le robot.
 Loading...