

GM100N

FCC RF Exposure Information and Statement
The SAR limit of USA (FCC) is 1.6 W/kg averaged over one gram of tissue.
Device types TV9 (FCC ID: YKMGM100N) has also been tested against this
SAR limit. The highest SAR value reported under this standard during product
certification for use at the ear is 0.859W/kg and when properly worn on the body
is 0.485W/kg. This device was tested for typical body-worn operations with the
back of the handset kept 1.5cm from the body. To maintain compliance with FCC
RF exposure requirements, use accessories that maintain a 1.5cm separation
distance between the user's body and the back of the handset. The use of belt
clips, holsters and similar accessories should not contain metallic components
in its assembly. The use of accessories that do not satisfy these requirements
may not comply with FCC RF exposure requirements, and should be avoided.
This device complies with part 15 of the FCC rules. Operation is subject to the
following two conditions: (1) this device may not cause harmful interference,
and (2) this device must accept any interference received, including
interference that may cause undesired operation.
NOTE: The manufacturer is not responsible for any radio or TV interference
caused by unauthorized modifications to this equipment. Such modifications
could void the user’s authority to operate the equipment.
NOTE: This equipment has been tested and found to comply with the limits for
a Class B digital device, pursuant to part 15 of the FCC Rules. These limits
are designed to provide reasonable protection against harmful interference in
a residential installation. This equipment generates uses and can radiate
radio frequency energy and, if not installed and used in accordance with the
instructions, may cause harmful interference to radio communications.
However, there is no guarantee that interference will not occur in a particular
installation.
If this equipment does cause harmful interference to radio or television
reception, which can be determined by turning the equipment off and on, the
user is encouraged to try to correct the interference by one or more of the
following measures:
- Reorient or relocate the receiving antenna.
- Increase the separation between the equipment and receiver.
-Connect the equipment into an outlet on a circuit different from that to which
the receiver is connected.
-Consult the dealer or an experienced radio/TV technician for help.

Chapter
Chapter
Chapter
Chapter 1
1
1
1
1.1
Getting
1.1
Getting
Getting to
1.1
1.1 Getting
1.2
Installing
1.2
Installing
Installing the
1.2
1.2 Installing
1.1
0
1.1
0
1.1
1.10
0 When
Your
to
Know
to
Know
Know Your
to Know
the
SIM
the
SIM
SIM Card,
the SIM
When
When
When Connecting
Connecting
Connecting
Connecting Your
Touch
Your
Touch
Touch Phone
Your Touch
Card,
Card,
Card, Battery,
1.6
1.6
1.6
1.6 Navigating
Getting
Getting
Getting
Getting Started
Phone
Phone
Phone and
Battery,
Battery,
Battery, and
1.4
1.4
1.4
1.4 Using
Navigating
Navigating
Navigating On
Your
Your
Your Device
and
and
and Storage
1.3
Charging
1.3
Charging
1.3
1.3 Charging
Charging the
Using
Using
Using the
Device
Device
Device to
Accessories
and
Accessories
and
and Accessories
Accessories
Storage
Storage
Storage Card
the
Strap
the
Strap
the Strap
Strap Holder
1.5
1.5
1.5
1.5 Starting
On
Your
On
Your
Your Device
On Your
1.7
Home
1.7
Home
1.7
1.7 Home
Home Screen
1.8
1.8
1.8
1.8 Status
1.9
1.9
1.9
1.9 Start
to
a
to
a
to a
a Computer
Started
Started
Started
Card
Card
Card
the
battery
the
battery
the battery
battery
Holder
Holder
Holder
Starting
Starting
Starting Up
Status
Status
Status Icons
Start
Start
Start Menu
Computer
Computer
Computer
Up
Up
Up
Device
Device
Device
Screen
Screen
Screen
Icons
Icons
Icons
Menu
Menu
Menu
1.1
Getting
1.1
Getting
Getting to
1.1
1.1 Getting
Top
panel
Top
panel
Top
Top panel
panel
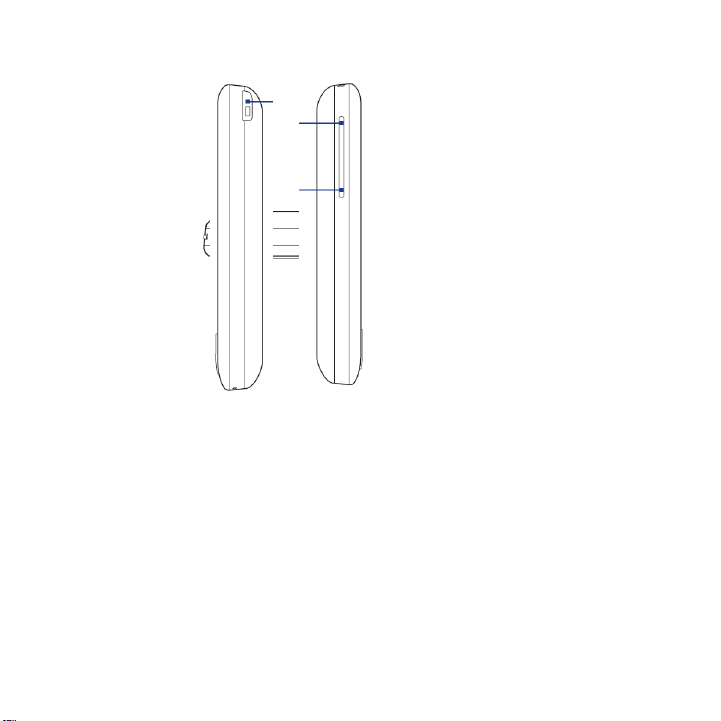
POWER
POWER
POWER
POWER
Press to turn off the display temporarily. To turn off the power, press and hold
for about 5 seconds. For more information, see"Starting Up"in this chapter.
Left
panel
Left
panel
Left
Left panel
panel
VOLUME
VOLUME
VOLUME
VOLUME UP
During a call or
when playing
music, press here to
increase the volume.
VOLUME
VOLUME
VOLUME
VOLUME DOWN
During a call or when
playing music, press
here to lower the
volume.
to
Know
to
Know
Know Your
to Know
UP
UP
UP
DOWN
DOWN
DOWN
Your
Touch
Your
Touch
Touch Phone
Your Touch
Phone
Phone
Phone and
Right
Right
Right
Right panel
and
and
and Accessories
panel
panel
panel
Accessories
Accessories
Accessories
Stylus
Stylus
Stylus
Stylus
(See"Stylus"in this
chapter for details.)
Front
panel
Front
panel
panel
Front
Front panel
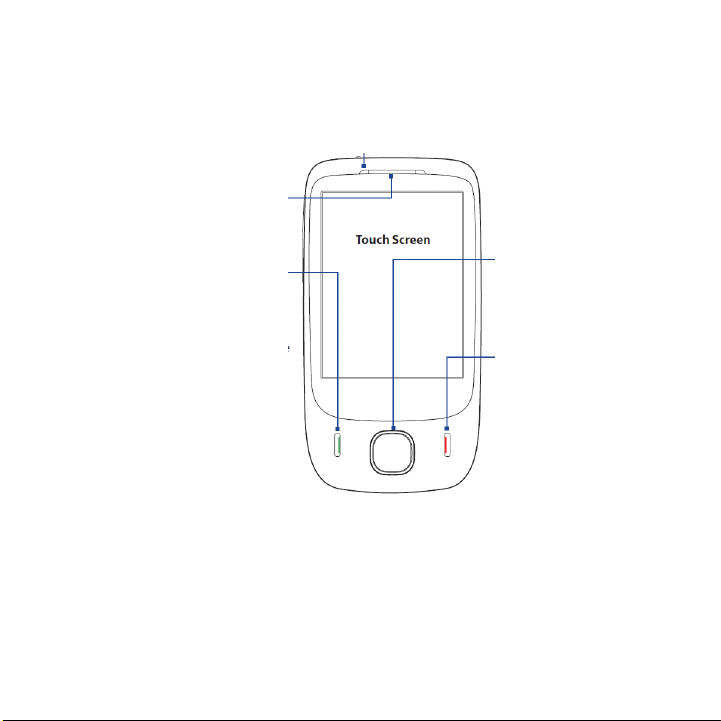
Notification
Notification
Notification
Notification LED
* See description below.
Earpiece
Earpiece
Earpiece
Earpiece
Listen to a phone call from
here.
TALK/SEND
TALK/SEND
TALK/SEND
TALK/SEND
•
•
•
•
Press to answer an
incoming call or dial a
number.
•
•
•
•
During a call, press
and hold to toggle the
speakerphone on and off.
•
•
•
•
Press and hold to use Voice
Commander. (See Chapter
12 for details.)
* Left LED shows:
•
Flashing green light when there are new SMS, MMS or e-mail messages, missed calls, or
reminders.
•
Solid green light when the device is connected to the power adapter or a computer and the
battery is fully charged.
•
Solid amber light when the battery is being charged.
•
Flashing amber light when the remaining battery level reaches below 10%.
LED
LED
LED
Touch
Screen
Touch
Screen
Touch
Touch Screen
Screen
4-WAY
4-WAY
4-WAY
4-WAY NAVIGATION
CONTROL
CONTROL
CONTROL
CONTROL with
button
button
button
button
Press this multi-directional
control up, down, left, or
right to move through
menus and program
instructions; carry out the
selection by pressing the
center button.
END
END
END
END
•
•
•
•
Press to end a call or
return to the Home
screen.
•
•
•
•
Press and hold to lock
the device.
(To customize the
End key, tap Start
Settings
Settings
Settings
Settings >
>
>
tab >
> Buttons
Key
Key
Key
Key tab.
NAVIGATION
NAVIGATION
NAVIGATION
with
ENTER
with
ENTER
with ENTER
ENTER
Start
Start
Start >
>
Personal
>
Personal
> Personal
Personal
Buttons
>
Buttons
>
Buttons >
> End
End
End
End
>
>
>
Back
panel
Back
panel
Back
Back panel
panel
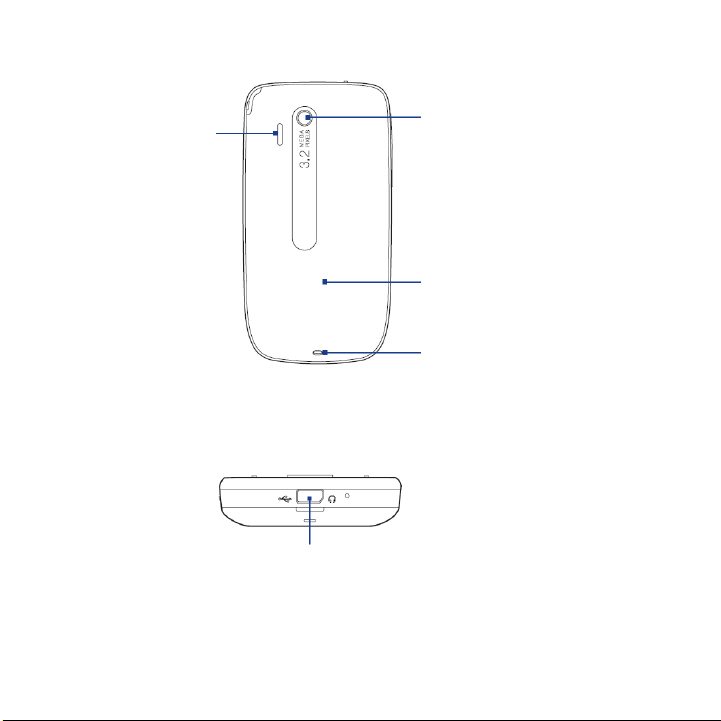
Speaker
Speaker
Speaker
Speaker
3.2
Megapixel
3.2
Megapixel
3.2
3.2 Megapixel
Megapixel Camera
See "Taking Photos and
Videos"in Chapter 11
for details.
Back
Back
Back
Back Cover
Strap
Strap
Strap
Strap Holder
See"Using the Strap Holder"
in this chapter for details.
Cover
Cover
Cover
Holder
Holder
Holder
Camera
Camera
Camera
Bottom
Bottom
Bottom
Bottom panel
panel
panel
panel
Sync
Connector/Earphone
Sync
Connector/Earphone
Sync
Sync Connector/Earphone
Connector/Earphone Jack
•
•
•
•
Connect the supplied USB cable to synchronize information
or plug in the power adapter to recharge the battery.
•
•
•
•
Connect the supplied USB stereo headset for hands-free
conversation or for listening to audio media.
Jack
Jack
Jack

Accessories
Accessories
Accessories
Accessories
The product package includes the following items and accessories:
Battery
•
•
•
•
Power adapter
•
•
•
•
Screen protector
•
•
•
•
Stereo headset
•
•
•
•
USB sync cable
•
•
•
•
Quick Start Guide
•
•
•
•
•
•
•
•
and
Card,
the
1.2
Installing
1.2
Installing
Installing the
1.2
1.2 Installing
You need to remove the back cover before you can install the SIM card, battery and
storage card on your device. Also, make sure to always turn off the power before
installing or replacing the SIM card and battery.
SIM
the
SIM
SIM Card,
the SIM
Battery,
Card,
Battery,
Battery, and
Card, Battery,
Storage
and
Storage
Storage Card
and Storage
Card
Card
Card
To
remove
To
To
To remove
To
To
To
To replace
the
remove
the
remove the
the back
1.
1.
1.
1.
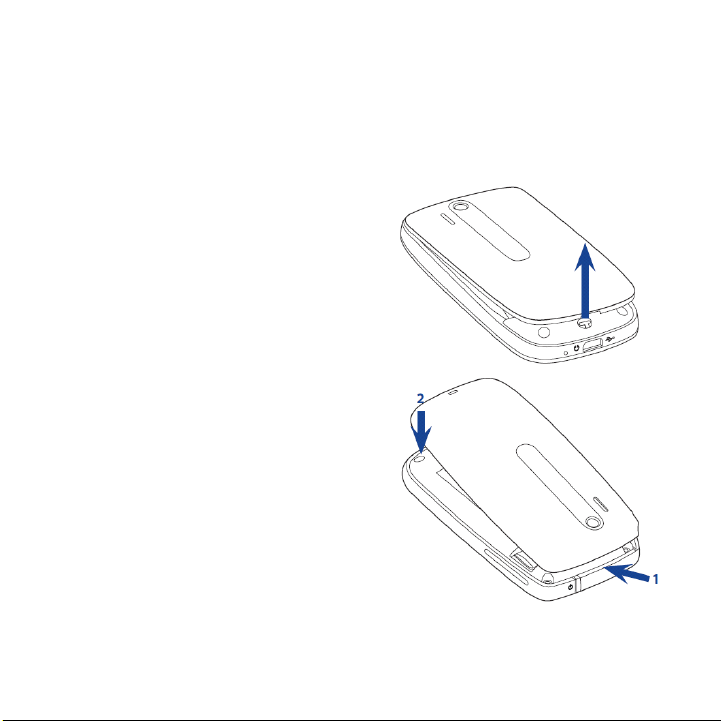
Make sure your device is turned off.
2.
2.
2.
2. Hold the device securely with the
front facing down.
3.
3.
3.
3. With your thumb or finger, lift up
the bottom of the back cover.
replace
the
replace
the
replace the
the back
1.
1.
Secure the top part of the back
1.
1.
cover first by aligning into the two
openings located on the topmost
part of the back of the device.
2.
2.
2.
2. Press the bottom part of the back
cover down to lock the cover into
place. You will hear a click when the
back cover is locked in place.
cover
back
cover
back
back cover
cover
cover
back
cover
back
back cover
cover
2
2
2
2
1
1
1
1
SIM
card
SIM
card
SIM
SIM card
card
The SIM card contains your phone number, service details, and phonebook/
message memory. Your device supports both 1.8V and 3V SIM cards.
Some legacy SIM cards may not function with your device. You should consult with
Note
Note
Note
Note
your service provider for a replacement SIM card. There may be fees for this service.
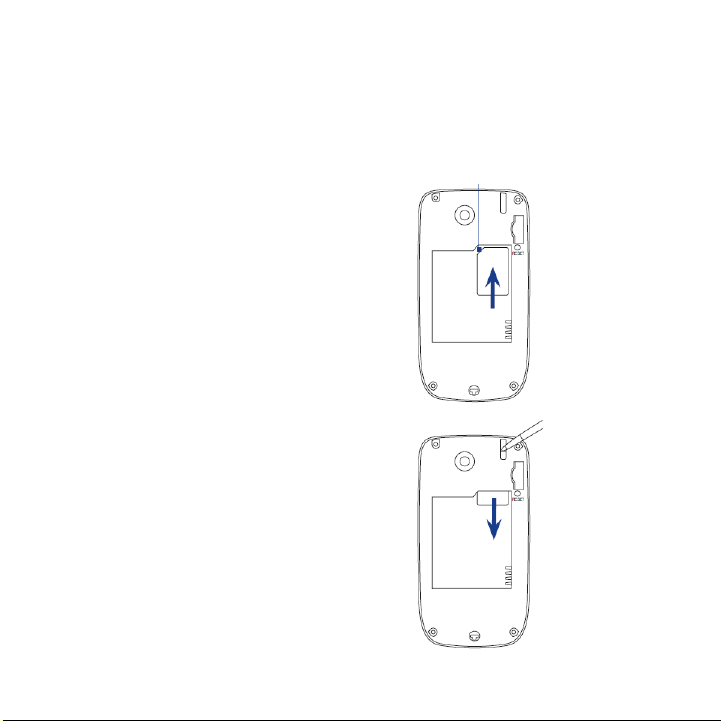
Cut-off corner
To
install
To
install
To
To install
install the
1.
1.
1.
1.
Make sure your device is turned off.
2.
2.
2.
2. Locate the SIM card slot, then
insert the SIM card with its gold
contacts facing down and its cutoff corner facing in the card slot.
3.
3.
3.
3. Slide the SIM card completely into
the slot.
To
remove
To
remove
To
To remove
remove the
1.
1.
Remove the battery if it is installed.
1.
1.
2.
2.
2.
2. From the opening near the top
of the device, push the SIM card
partially out with the stylus.
3.
3.
3.
3. Slide the SIM card out the rest of
the way from the SIM card slot with
your thumb or finger.
the
SIM
the
SIM
SIM card
the SIM
the
the
the SIM
card
card
card
card
SIM
card
SIM
SIM card
card

Battery
Battery
Battery
Battery
Your device comes with a rechargeable Lithium-ion battery and is designed to use
only manufacturer-specified original batteries and accessories. Battery performance
depends on many factors, including network configuration, signal strength, the
features or settings used, the temperature of the environment and the way in which
you operate your device, and more.
Battery life estimates (approximations):
365
Standby time: Up to 365
•
•
•
•
Talk time: Up to 400
•
•
•
•
Battery life is subject to network and phone usage.
Note
Note
Note
Note
Warning!
Warning!
Warning!
Warning!
To reduce risk of fire or burns:
365
365 hours for GSM
400
400
400 minutes for GSM
• Do not attempt to open, disassemble, or service the battery pack.
•
Do not crush, puncture, short external contacts, or dispose of in fire or
water.
•
Do not expose to temperatures above 60oC (140oF).
• Replace only with the battery pack designated for this product.
•
Recycle or dispose of used battery as stipulated by local regulations.
To
install
the
To
install
To
To install
install the
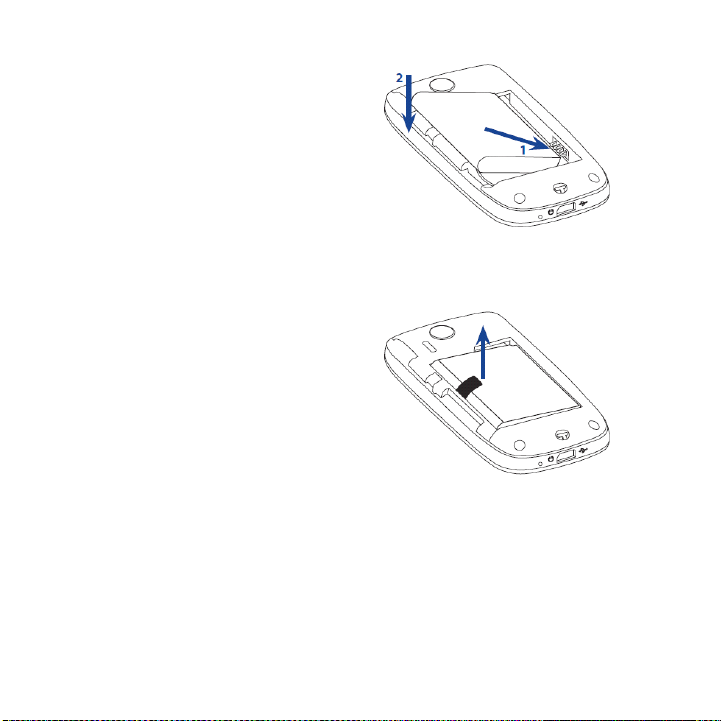
1.
1.
1.
1.
battery
the
battery
battery
the battery
Align the battery's exposed
copper contacts with the battery
connectors inside the battery
compartment.
2.
2.
2.
2. Insert the contacts side of the
battery first and then gently push
the battery into place.
3.
3.
3.
3. Replace the back cover.
To
remove
the
To
remove
To
To remove
remove the
1.
1.
1.
1.
battery
the
battery
battery
the battery
Make sure your device is turned
off.
2.
2.
2.
2. Remove the back cover.
3.
3.
3.
3. Pull the ribbon strip upward to
release the battery.
2
2
2
2
1
1
1
1
Storage
Storage
Storage
Storage card
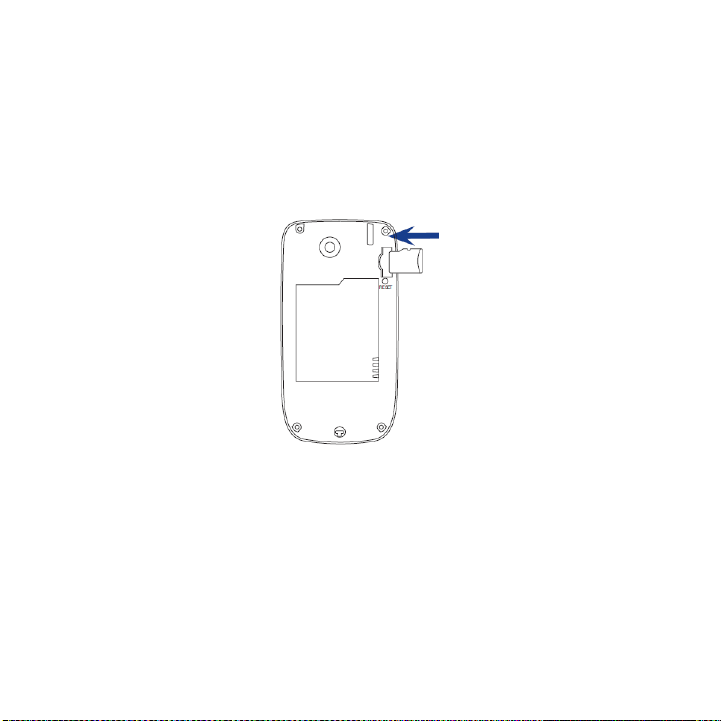
To have additional storage for your images, videos, music, and files, you can
purchase a microSD™card and install it into the your device.
To
To
To
To install
Note
Note
Note
Note
card
card
card
install
a
microSD
install
a
microSD
microSD card
install a
a microSD
1.
1.
1.
1.
Remove the back cover,
2.
2.
2.
2. Insert the microSD card into the slot with its gold contacts facing down until
it clicks into place.
To remove the microSD card, press it to eject it from the slot.
card
card
card

the
1.3
Charging
1.3
Charging
Charging the
1.3
1.3 Charging
New batteries are shipped partially charged. Before you start using your device, it is
recommended that you install and charge the battery. Some batteries perform best
after several full charge/discharge cycles.
To
charge
To
charge
To
To charge
charge the
1.
1.
1.
1.
Connect the USB connector of the
AC adapter to the sync connector
on your device.
2.
2.
2.
2. Plug in the AC adapter to an
electrical outlet to start charging
the battery.
Note
Note
Note
Note
Only the AC adapter and USB sync cable provided with your device must be used to
charge the device.
As the battery is being charged while the power is on, a charging icon appears
in the title bar of the Home screen. After the battery has been fully charged, a full
battery icon appears in the title bar of the Home screen.
Depending on the battery charging status, a green or amber light also illuminates
on the LED above the touch screen. See"Front panel"earlier in this chapter for
details.
Warning!
Warning!
Warning!
Warning!
battery
the
battery
battery
the battery
the
battery
the
battery
battery
the battery
•
•
•
•
Do not remove the battery from the device while you are charging it using
the AC or car adapter.
•
•
•
•
As a safety precaution, the battery stops charging when it overheats.
1.5
Starting
1.5
Starting
1.5
1.5 Starting
Starting Up
After installing your SIM card and battery and charging the battery, you can now
1.7
Home
1.7
Home
Home Screen
1.7
1.7 Home
power on and start using your device.
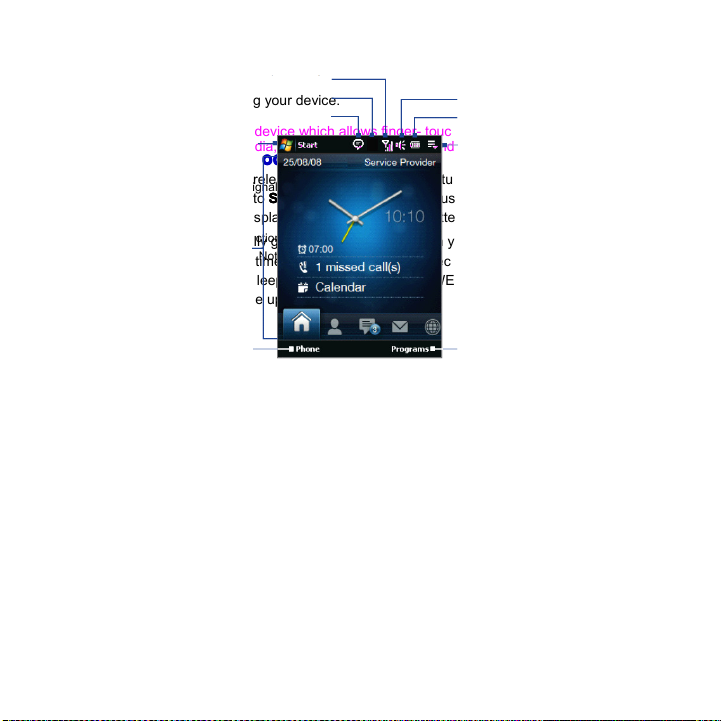
The main screen of the device which allows finger- touch access to program, calendar,
contacts, phone, Windows Media, setting, e-mail, Internet, and more.
Switch
Switch
Switch
Switch to
Press and immediately release the POWER button to turn off the display temporarily
and switch your device to Sleep
power state while the display is off in order to save battery power.
Your device automatically goes into Sleep mode when you leave the device idle
after a certain period of time. You will still be able to receive messages and calls
while your device is in Sleep mode. Pressing the POWER button again or incoming
calls/messages will wake up your device.
Up
Up
Up
Screen
Screen
Screen
to
Sleep
to
Sleep
to Sleep
Sleep mode
Connection status
Start menu
mode
when
mode
when
mode when
when not
Signal strength
Sleep
mode
Sleep
mode
Sleep mode
mode. Sleep mode suspends your device to a low
Notification
not
in
not
in
not in
in use
use
use
use
Adjust volume
Battery status
Quick menu
Navigation Control
On the home screen and in many programs on your device, you can use the Navigation
Control to move through menus and instructions. Press the control up, down, left, and right
to move around the screen. When an item has been selected on the screen, press the ENTER
button (the center button) to confirm your selection.
TouchFLO
Home screen
Open the Phone screen
(See Chapter 2 for details)
Programs
Programs
Go to the Programs
Programs tab to
access favorite programs
1.8
Status
1.8
Status
Status Icons
1.8
1.8 Status
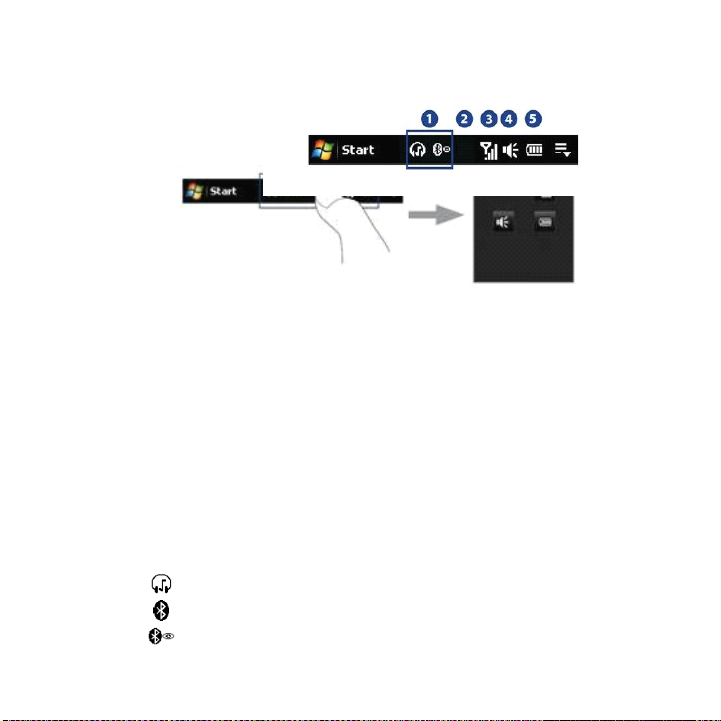
When you touch or tap the icon area of the title bar, the System Status screen opens
and displays larger status icons so you can touch them with your finger more easily
and accurately.
Tip
Tip
Tip
Tip
The following are some of the status icons that you may see on the device.
Icons
Icons
Icons
The System Status screen can be disabled in TouchFLO settings. See"Settings on your
Device"in Chapter 13 for details.
1
1
1
1
Icon
Icon
Icon
Icon Description
Bluetooth stereo headset connected
Bluetooth on
Bluetooth visible mode on
1
1
1
1 2
Description
Description
Description
2
2
2 3
3
3
3 4
4
4
4 5
5
5
5

Icon
Icon
Icon
Icon Description
Connection Setup
Multiple notifications; tap the icon to view all
New text messages; SMS notification of voice mail
Sending MMS
Receiving MMS
MMS sent
Cannot send MMS
New incoming MMS
New Windows Live™message
Missed call
Speakerphone on
Roaming
Alarm
Other wireless network(s) detected
Wired headset connected
Description
Description
Description

Description
Description
Description
Description
GPRS available
EDGE available
3
3
3
3
Icon
Icon
Icon Description
Icon
Description
Description
Description
Connected to a
wireless network
Connection is active
Connection is not
active
Synchronization in
progress
Icon
Icon
Icon
Icon Description
GPRS connecting
GPRS in use
EDGE connecting
EDGE in use
Maximum signal strength
No signal
Description
Description
Description

Icon
Icon
Icon
Icon Description
Phone is turned off
No phone service
Searching for phone service
Voice call in progress
Call on hold
Calls are forwarded
Dialing while no SIM card is inserted
No SIM card inserted
4
4
4
4
Description
Description
Description
Icon
Icon
Icon
Icon Description
Vibrate mode
Sound on
Sound off
5
5
5
5
Icon
Icon
Icon
Icon Description
Battery charging
Battery full
Battery low
Description
Description
Description
Description
Description
Description
1.9
1.9
1.9
1.9 Start
Menu
Start
Menu
Start
Start Menu
Menu
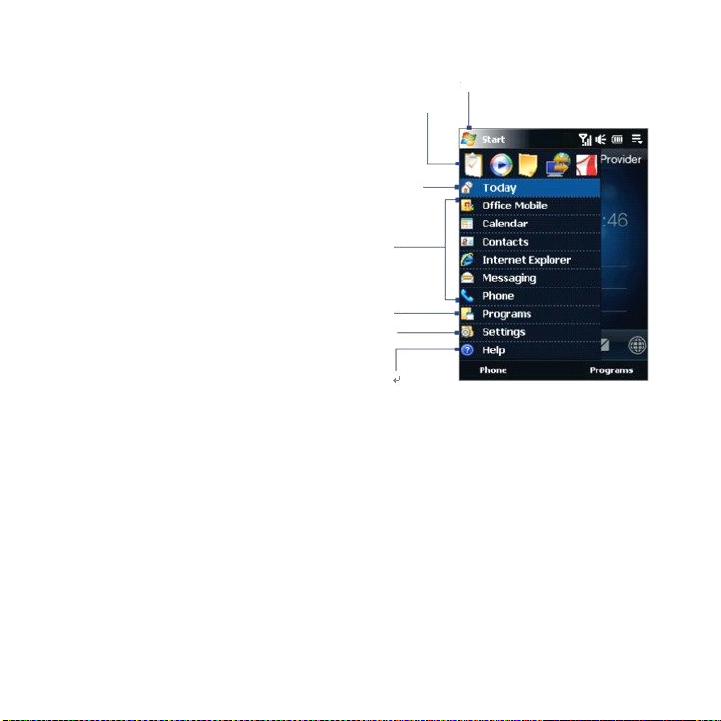
The Start menu, which can be opened from the top left corner of the screen, gives
you access to all the programs and settings of your Windows Mobile-powered
device. Touch or tap to select an item on the Start menu.
Open the Start menu.
Open a recently-used program.
Quick men
Access more programs.
View and change settings.
View Help information for the
current screen.
1.1
0
When
1.1
0
When
1.1
1.10
0 When
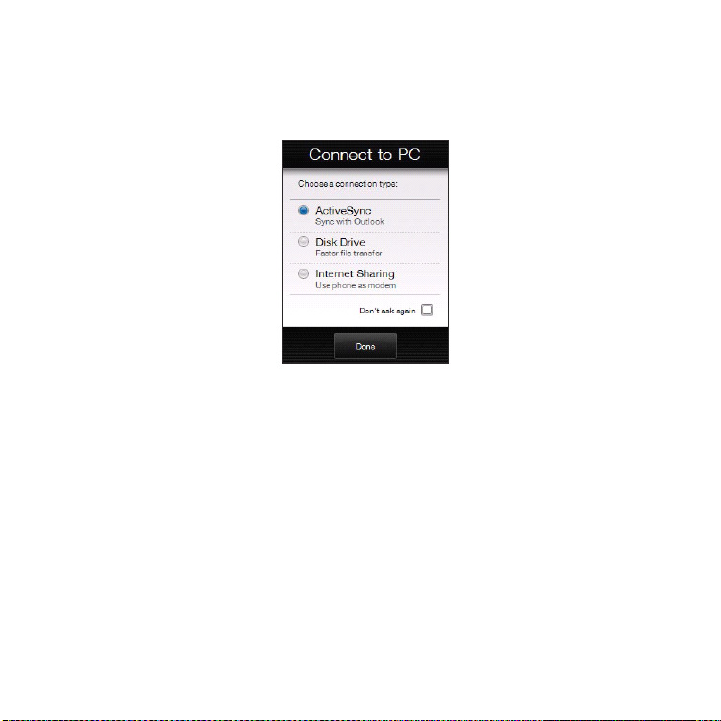
When Connecting
Whenever you connect your device to the computer with the USB cable, the
Connect to PC screen will be displayed and will prompt you to choose the type of
USB connection:
ActiveSync
ActiveSync
ActiveSync
ActiveSync
Connecting
Connecting
Connecting Your
Select this mode when you need to do the following:
Synchronize Outlook e-mail messages, contacts, calendar appointments,
•
files, and other data between your device and your computer.
Have read and write access to the whole device.
•
Your
Device
Your
Device
Your Device
Device to
to
a
Computer
to
a
Computer
to a
a Computer
Computer


Chapter
Chapter
Chapter
Chapter 2
2
2
2
2
.2
Setting
2
.2
Setting
2
2.2
.2 Setting
Setting Up
2
.3
Setting
2
.3
Setting
2
2.3
.3 Setting
Setting Up
Synchronizing
Synchronizing
Synchronizing
Synchronizing Information
With
With
With
With Your
2
.1
2
.1
.1 About
2
2.1
Up
Windows
Up
Windows
Up Windows
Windows Mobile
Up
ActiveSync
Up
ActiveSync
Up ActiveSync
ActiveSync®
Synchronizing
2
.4
Synchronizing
2
.4
.4 Synchronizing
Synchronizing With
2
2.4
Synchronizing
2
.5
Synchronizing
2
.5
.5 Synchronizing
Synchronizing via
2
2.5
Synchronizing
2
.6
Synchronizing
2
.6
.6 Synchronizing
Synchronizing Music
2
2.6
Information
Information
Information
Your
Your
Your Computer
About
About
About Synchronization
Mobile
Mobile
Mobile®
With
With
With Your
Computer
Computer
Computer
Synchronization
Synchronization
Synchronization
®
Device
®
Device
® Device
Device Center
on
Windows
on
Windows
on
on Windows
Windows Vista
®
on
Windows
®
on
Windows
® on
on Windows
Windows XP
Your
Your
Your Computer
via
via
via Bluetooth
Music
Music
Music and
Center
Center
Center
Computer
Computer
Computer
Bluetooth
Bluetooth
Bluetooth
and
and
and Video
Vista
Vista
Vista®
XP
XP
XP®
Video
Video
Video
®
®
®
®
®
®

About
2
.1
About
2
.1
.1 About
About Synchronization
2
2.1
You can take information from your computer wherever you go by synchronizing
them to your device. The following types of information can be synchronized
between your computer and your device:
Before you can synchronize, you need to install and set up first the synchronization
software on your computer. For more information, see"Setting Up Windows Mobile
Device Center on Windows Vista®"and"Setting Up ActiveSync® on Windows XP®"in
this chapter.
Note
Note
Note
Note
Ways
Ways
Ways
Ways to
After you have installed the synchronization software on your computer, connect
and synchronize your device with your computer by:
Synchronization
Synchronization
Synchronization
Microsoft
Microsoft
Microsoft
Microsoft® Office
•
•
•
•
mail, contacts, calendar, tasks, and notes
Notes
Notes
Notes
Notes, which are created using Microsoft
•
•
•
•
Media
Media
Media
Media, such as pictures, music, and video
•
•
•
•
Favorites
Favorites
Favorites
Favorites, which are the bookmarked links to your favorite web sites
•
•
•
•
Files
Files
Files
Files, such as documents and other files
•
•
•
•
to
to
to synchronize
Using the supplied USB sync cable.
•
•
•
•
Upon connecting the sync cable to your device and your computer, the
synchronization process automatically starts.
Using Bluetooth.
•
•
•
•
You must first set up a Bluetooth partnership between your device and your
computer before you can synchronize information between them using
Office
Outlook
Office
Outlook
Office Outlook
Outlook® information
ActiveSync or Windows Mobile Device Center only synchronises data on your
computer and device. If you have installed a storage card and you want to back up
files from the storage card, use Windows Explorer on your computer to copy files from
the storage card to your computer.
synchronize
synchronize
synchronize
information
information
information, which include Office Outlook e-
OneNote
Microsoft
Microsoft
Microsoft®
®
Office
®
Office
Office OneNote
® Office
OneNote
OneNote®
®
®
® 2007
2007
2007
2007

Bluetooth. For more information about setting up a Bluetooth partnership,
see Chapter 9. For information about synchronizing through Bluetooth, see
"Synchronizing via Bluetooth"later in this chapter.
Try to synchronize regularly in order to keep information up-to-date in both your
device and your computer.
Notes
Notes
Notes
Notes
•
•
•
• You can also synchronize Outlook e-mail, contacts, calendar, and tasks on your
device with the Exchange Server at your work. For more information about setting
up your device to synchronize with the Exchange Server, see Chapter 7.
•
•
•
•
If you are sending your device for repair or performing a hard reset, data from your
device will be lost. It is recommended that you sync your device to your computer
to back up your files. To back up files from the storage card to your computer, use
Windows Explorer to copy files from the storage card to the computer.
2
.2
Setting
2
.2
Setting
2
2.2
.2 Setting
Setting Up
Windows
Windows
Windows
Windows Vista
Microsoft
Microsoft
Microsoft
Microsoft Windows
ActiveSync® on Windows Vista®.
Note
Note
Note
Note
Set
Set
Set
Set up
When you connect your device to your computer and start Windows Mobile Device
Center for the first time, you are asked to create a Windows Mobile partnership with
your device. To create a partnership:
1.
1.
1.
1. Connect your device to your computer. Windows Mobile Device Center
2.
2.
2.
2. On the license agreement screen, click Accept
Up
Windows
Up
Windows
Up Windows
Windows Mobile
®
Vista
®
Vista
Vista®
®
Windows
Windows
Windows Mobile
Some versions of Windows Vista® come with Windows Mobile Device Center already
installed. If Windows Mobile Device Center is not available on your Windows Vista®,
you can install it from the Getting Started Disc that came with your device.
up
synchronization
up
synchronization
up synchronization
synchronization in
configures itself, then opens.
Mobile
Mobile
Mobile® Device
Mobile
Mobile
Mobile®
Device
Device
Device Center
in
Windows
in
Windows
in Windows
Windows Mobile
®
Device
®
Device
® Device
Device Center
Center
Center
Center is the replacement for Microsoft®
Mobile
Mobile
Mobile Device
Accept
Accept
Accept.
Device
Device
Device Center
Center
Center
Center on
on
on
on
Center
Center
Center

3.
3.
3.
3. On the Windows Mobile Device Center's Home screen, click Set
device
device
device
device.
Set
Set
Set up
up
your
up
your
up your
your
Note
Note
Note
Note Choose Connect
4.
4.
4.
4.
Select the items you want to synchronize, then click Next
5.
5.
5.
5. Enter a device name, then click Set
Connect
without
setting
up
your
Connect
without
Connect without
media files, check for updates, and explore your device but not synchronize
Outlook information.
setting
without setting
setting up
Set
Set
Set Up
device
up
your
device
up your
your device
device if you only want to transfer
Next
Next
Next.
Up
Up
Up.
When you finish the setup wizard, Windows Mobile Device Center synchronizes
your device automatically. Notice that Outlook e-mails and other information
appear on your device after synchronization.
Use
Windows
Use
Windows
Use
Use Windows
Windows Mobile
To open Windows Mobile Device Center, click Start
Mobile
Device
Mobile
Device
Mobile
Mobile Device
Device Center
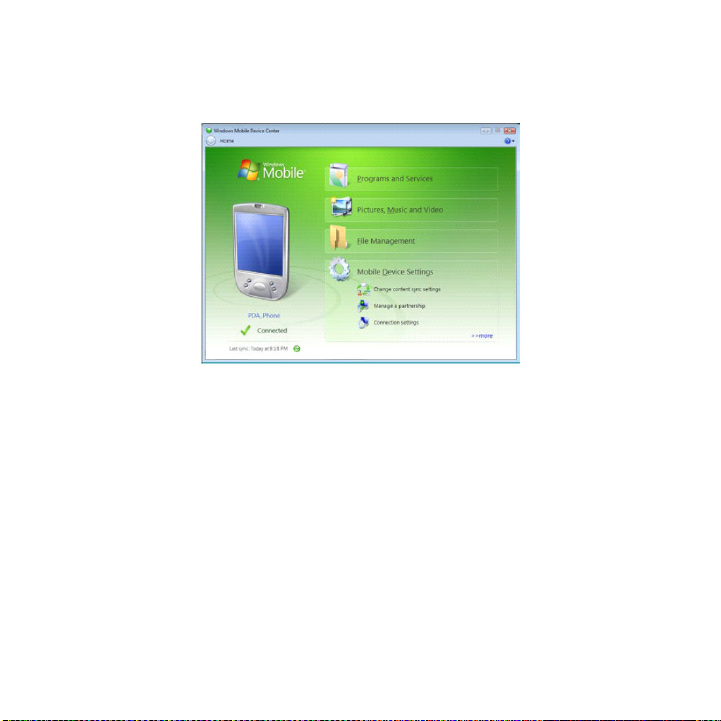
On Windows Mobile Device Center, you can do the following:
Click Mobile
•
•
•
•
When you click Pictures,
•
•
•
•
are
are
are
are available
from your device to the Photo Gallery on your computer.
Click Pictures,
•
•
•
•
Windows
Windows
Windows
Windows Media
Media® Player. For more information, see"Using Windows Media® Player
Mobile"in Chapter 11.
Click File
•
•
•
•
documents and files on your device.
See Windows Mobile Device Center Help for more information.
Note
Note
Note
Note
Mobile
Mobile
Mobile Device
Center
Center
Center on your Windows Vista computer.
Mobile
Device
Mobile
Device
Mobile Device
Device Settings
available
available
available for
Pictures,
Pictures,
Pictures, Music
Media
Media
Media Player
File
Management
File
Management
File Management
Management >
Device
Device
Device Center
Settings
Settings
Settings to change synchronization settings.
Pictures,
Pictures,
Pictures, Music
for
import
for
import
import, a wizard guides you to tag and transfer photos
for import
Music
and
Music
and
Music and
and Video
Player
Player
Player to synchronize music and video files using Windows
Music
Music
Music and
Video
Video
Video >
>
Browse
>
Browse
Browse the
> Browse
Center
Center
Center
and
and
and Video
>
Add
>
Add
> Add
Add media
the
the
the contents
Start
>
Start
Start >
>
Video
>
Video
Video >
> XX
media
media
media to
contents
contents
contents of
All
Programs
>
All
Programs
Programs >
> All
All Programs
XX
new
pictures/video
XX
new
pictures/video
pictures/video clips
XX new
new pictures/video
your
device
to
your
device
to
to your
your device
device from
device
of
your
device
of
your
your device
device to view
of your
>
Windows
>
Windows
> Windows
Windows
clips
clips
clips
from
from
from

XP
on
Setting
2
.3
Setting
2
.3
.3 Setting
Setting Up
2
2.3
The Getting Started disc that comes with your device contains Microsoft ActiveSync
4.5 or later. Follow the steps in this section to install and set up ActiveSync on
Windows XP or other compatible Windows systems.
Note
Note
Note
Note
Install
Install
Install
Install ActiveSync
1.
1.
Place the Getting Started disc to the disc drive of your computer.
1.
1.
2.
2.
2.
2. Click Setup
3.
3.
3.
3. Select the ActiveSync
4.
4.
4.
4. Read the license terms, then click Accept
5.
5.
5.
5. When installation is completed, click Done
6.
6.
6.
6. On the Getting Started with Windows Mobile screen, click Close
Set
up
Set
up
Set
Set up
up synchronization
1.
1.
1.
1.
Connect your device to your computer. The Synchronization Setup Wizard
automatically starts and guides you to create a synchronization partnership.
Click Next
2.
2.
2.
2. To synchronize your device with your computer, clear the Synchronize
directly
directly
directly
directly with
Next
Next
Next
Next.
3.
3.
3.
3. Select the information types that you want to synchronize, then click Next
4.
4.
4.
4. Select or clear the Allow
your preference.
5.
5.
5.
5. Click Finish
ActiveSync
Up
ActiveSync
Up
Up ActiveSync
ActiveSync®
For a list of compatible Windows systems, go to
http://www.microsoft.com/windowsmobile/activesync/activesync45.mspx.
ActiveSync
ActiveSync
ActiveSync
Setup
and
Setup
Setup and
synchronization
synchronization
synchronization in
Next
Next
Next to proceed.
Finish
Finish
Finish.
Installation
and
Installation
and Installation
Installation.
ActiveSync
ActiveSync
ActiveSync check box, then click Install
in
in
in ActiveSync
with
with
with a
running
a
server
running
a
server
server running
running Microsoft
a server
Allow
Allow
Allow wireless
wireless
wireless
wireless data
Windows
®
on
Windows
®
Windows XP
® on
on Windows
Accept
Accept
Accept.
Done
Done
Done.
ActiveSync
ActiveSync
ActiveSync
Microsoft
Microsoft
Microsoft Exchange
Exchange
Exchange
Exchange check box, then click
data
connections
data
connections
connections check box according to
data connections
Install
Install
Install.
®
XP
®
®
XP®
Close
Close
Close.
Synchronize
Synchronize
Synchronize
Next
Next
Next.
When you finish the wizard, ActiveSync synchronizes your device automatically.
Notice that Outlook e-mails and other information appear on your device after
synchronization.
Your
Synchronizing
2
.4
Synchronizing
2
.4
.4 Synchronizing
Synchronizing With
2
2.4
Connect and synchronize your device with your computer using the USB cable or
Bluetooth connection.
Start
and
Start
Start
Start and
You can manually synchronize either from your device or computer.
From
From
From
From your
stop
and
stop
and stop
stop synchronization
your
device
your
device
your device
device
With
With
With Your
synchronization
synchronization
synchronization
Computer
Your
Computer
Computer
Your Computer
Settings
On the TouchFLO Home screen, slide to the Settings
•
•
•
•
Data
Data
Data
Data; or
Start
>
Programs
Start
>
Tap Start
•
•
•
•
before it completes, tap Stop
Tip
Tip
Tip
Tip
From
Windows
From
Windows
From
From Windows
Windows Mobile
1.
1.
1.
1. Click Start
2.
2.
2.
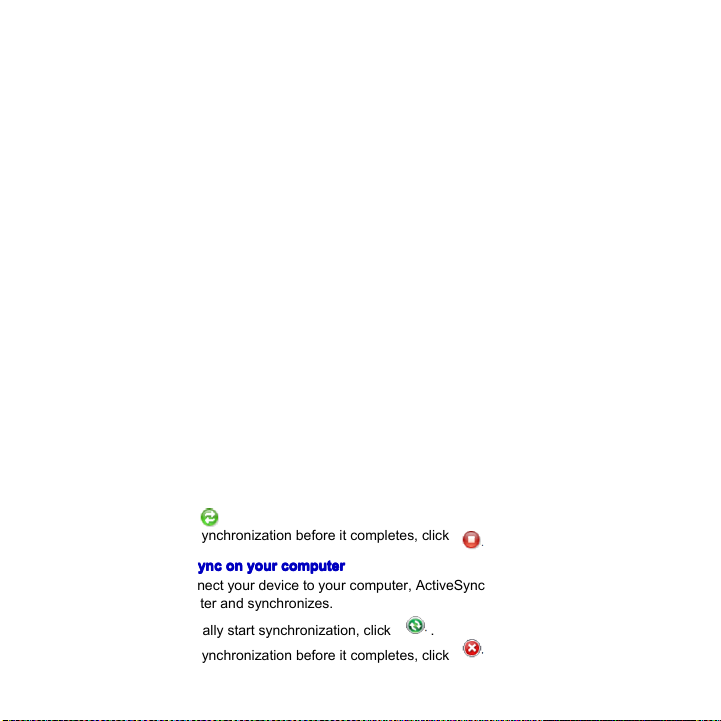
2. Click at the lower left of the Windows Mobile Device Center.
To end synchronization before it completes, click
From
ActiveSync
From
ActiveSync
From
From ActiveSync
ActiveSync on
When you connect your device to your computer, ActiveSync automatically opens
on your computer and synchronizes.
To manually start synchronization, click .
•
•
•
•
To end synchronization before it completes, click .
•
•
•
•
Programs
Start >
> Programs
Programs >
To delete a partnership with one computer completely, disconnect your device
from that computer first. In ActiveSync on your device, tap Menu
computer name, then tap Delete
Mobile
Mobile
Mobile Device
>
All
Start
>
All
Start
Start >
> All
All Programs
on
on
on your
ActiveSync
>
ActiveSync
>
> ActiveSync
ActiveSync, then tap Sync
Stop
Stop
Stop.
Delete
Delete
Delete.
Center
Device
Center
Device
Device Center
Center
Programs
Programs
Programs >
your
your
your computer
>
>
> Windows
computer
computer
computer
Windows
Windows
Windows Mobile
Settings
Settings tab and then touch Sync
Sync
Sync
Sync. To end synchronization
Menu
>
Options
Menu
>
Options
Menu >
> Options
Options, tap the
Mobile
Device
Mobile
Mobile Device
Center
Device
Center
Center.
Device Center
.
Sync
Sync
Sync

Change
Change
Change
Change which
You can change the information types and the amount of information to
synchronize for each type either on your device or your computer. Follow the steps
below to change synchronization settings on your device.
Note
Note
Note
Note
Notes
Notes
Notes
Notes
which
information
which
information
which information
information is
Before changing synchronization settings on your device, disconnect it from your
computer.
1.
1.
In ActiveSync on your device, tap Menu
1.
1.
2.
2.
2.
2. Select the check box for any items you want to synchronize. If you cannot
select a check box, you might have to clear the check box for the same
information type elsewhere in the list.
3.
3.
3.
3. To change synchronization settings for an information type, for instance, E-
mail
mail
mail
mail, select it and tap Settings
You can then set the download size limit, specify the time period of
information to download, and more.
•
•
•
•
Some information types such as Favorites, Files and Media cannot be selected in
ActiveSync Options on your device. You can only select or clear these items from
your computer's Windows Mobile Device Center or ActiveSync.
•
•
•
•
A computer can have sync partnerships with many different Windows Mobile
powered devices, but a device can have sync partnerships with at most two
computers. To ensure that your device will synchronize properly with both
computers, set up the second computer using the same synchronization settings
you used on the first computer.
•
•
•
•
Outlook e-mail can be synchronized with only one computer.
is
is
is synchronized
Settings
Settings
Settings.
synchronized
synchronized
synchronized
Menu
>
Options
Menu
>
Options
Menu >
> Options
Options.
E-
E-
E-

Troubleshoot
Troubleshoot
Troubleshoot
Troubleshoot sync
In some cases, when the computer connects to the Internet or a local network, it
may disconnect the connection with your device in favor of the Internet or network
connection.
If this happens, tap Start
Enable
advanced
Enable
advanced
Enable
Enable advanced
advanced network
utilize a serial USB connection with your device.
sync
connection
sync
connection
sync connection
connection problem
Start
>
Settings
Start
>
Settings
Start >
> Settings
Settings >
network
functionality
network
functionality
functionality check box. This makes your computer
network functionality
problem
problem
problem
Connections
>
Connections
>
> Connections
Connections tab >
>
USB
>
USB
> USB
USB to
to
to
to PC
PC
PC
PC, then clear the
Synchronizing
2
.5
Synchronizing
2
.5
.5 Synchronizing
Synchronizing via
2
2.5
You can connect and synchronize your device with the computer using Bluetooth.
Note
Note
Note
Note
To connect and synchronize your device with a computer via Bluetooth, your
computer must have a built-in Bluetooth or installed with a Bluetooth adapter or
dongle.
To
synchronize
To
synchronize
To
To synchronize
synchronize with
1.
1.
1.
1.
Set up Windows Mobile Device Center or ActiveSync on your computer to
synchronize through Bluetooth. See the program's Help for instructions.
2.
2.
2.
2. Make sure that Bluetooth on both your device and the computer are turned
on and set to visible mode. See"Bluetooth Modes"in Chapter 9 for details.
If this is the first time you have connected to this computer via Bluetooth,
you must first complete the Bluetooth wizard on your device and set
up a Bluetooth partnership between your device and the computer. For
more information about creating a Bluetooth partnership, see"Bluetooth
Partnerships"in Chapter 9.
3.
3.
3.
3. On your device, tap Start
4.
4.
4.
4. Tap Menu
Note
Note
Note
Note To conserve battery power, turn off Bluetooth when not in use.
Menu
Menu
Menu >
with
with
with a
>
>
> Connect
Bluetooth
via
Bluetooth
via
via Bluetooth
Bluetooth
computer
a
computer
a
a computer
computer via
Start
>
Start
>
Start >
> Programs
Connect
Connect
Connect via
Bluetooth
via
Bluetooth
via
via Bluetooth
Bluetooth.
via
Bluetooth
via
Bluetooth
via Bluetooth
Bluetooth
Programs
Programs
Programs >
ActiveSync
>
ActiveSync
>
> ActiveSync
ActiveSync.
 Loading...