

Page 1

Installation Guide
3ware® Sidecar Kit
with the 9650SE-4LPME
Desktop Storage Solution
for Mac OS X
PN 720-0166-00
March 2007
Page 2

Copyright
©2004-2007 Applied Micro Circuits Corporation (AMCC). All
rights reserved. This publication may be copied or reproduced for
reference purposes only. All other purposes require the express
written consent of AMCC, 215 Moffett Park Drive, Sunnyvale, CA
94089. AMCC shall not be responsible or liable for, and shall be
held harmless against, any and all damages, claims, and/or disputes
that arise from the copying or reproduction of this publication.
Trademarks
3ware®, Escalade®, 3DM®, and TwinStor® are all registered
trademarks of AMCC. The 3ware logo, 3BM, Multi-Lane,
StorSave, StorSwitch, StreamFusion, and R5 Fusion are all
trademarks of AMCC. Apple®, the Apple logo, Mac®, and Power
Mac® are trademarks of Apple Computer Inc., registered in the
United States and/or other countries. Safari is a trademark of Apple
Computer, Inc. PowerPC and the PowerPC logo are trademarks of
International Business Machines Corporation. Linux® is a
registered trademark of Linus Torvalds in the United States, other
countries, or both. Windows® is a registered trademark of
Microsoft Corporation in the United States and other countries.
Firefox® is a registered trademark of the Mozilla Foundation. PCI
Express® is a registered trademark of PCI-SIG®. All other
trademarks herein are property of their respective owners.
Disclaimer
While every attempt is made to make this document as accurate as
possible, AMCC assumes no responsibility for errors or omissions
in this document, nor does AMCC make any commitment to update
the information contained herein.
Page 3

Table of Contents
About this Guide . . . . . . . . . . . . . . . . . . . . . . . . . . . . . . . . . . . . . . iv
Chapter 1. Introducing the 3ware Sidecar Kit . . . . . . . . . . . . . . . 1
Contents of the 3ware Sidecar Kit. . . . . . . . . . . . . . . . . . . . . . . . . . . . . . . . 1
Drive Requirements. . . . . . . . . . . . . . . . . . . . . . . . . . . . . . . . . . . . . . . . . . . 2
Equipment and Cables . . . . . . . . . . . . . . . . . . . . . . . . . . . . . . . . . . . . . . . . 2
Safety Information . . . . . . . . . . . . . . . . . . . . . . . . . . . . . . . . . . . . . . . . . . . . 4
Renseignements relatifs à la sécurité . . . . . . . . . . . . . . . . . . . . . . . . . . . . . 4
Chapter 2. Setting Up Your 3ware Sidecar . . . . . . . . . . . . . . . . . 12
Tools You Need . . . . . . . . . . . . . . . . . . . . . . . . . . . . . . . . . . . . . . . . . . . . . 12
Before You Start. . . . . . . . . . . . . . . . . . . . . . . . . . . . . . . . . . . . . . . . . . . . . 12
Step 1. Install the 3ware Driver and Software . . . . . . . . . . . . . . . . . . . . . . 13
Step 2. Install the 9650SE-4LPME RAID Controller in your computer. . . . 14
Step 3. Install the Drives in the 3ware Sidecar . . . . . . . . . . . . . . . . . . . . . 15
Step 4. Connect the Cables. . . . . . . . . . . . . . . . . . . . . . . . . . . . . . . . . . . . 18
Step 5. Set the Computer and 3ware Sidecar in their Locations. . . . . . . . 20
Step 6. Connect Power to the 3ware Sidecar and Computer . . . . . . . . . . 20
Chapter 3. First-Time RAID Configuration . . . . . . . . . . . . . . . . .21
Starting 3DM 2 and Logging In . . . . . . . . . . . . . . . . . . . . . . . . . . . . . . . . . 23
Creating a Unit. . . . . . . . . . . . . . . . . . . . . . . . . . . . . . . . . . . . . . . . . . . . . . 24
Initializing (Formatting) Your New Unit. . . . . . . . . . . . . . . . . . . . . . . . . . . . 26
Specifying a Hot Spare . . . . . . . . . . . . . . . . . . . . . . . . . . . . . . . . . . . . . . . 31
Chapter 4. Day-to-Day Use of the 3ware Sidecar . . . . . . . . . . . .32
Turning On Your Sidecar . . . . . . . . . . . . . . . . . . . . . . . . . . . . . . . . . . . . . . 32
Unmounting a Unit on Your Computer. . . . . . . . . . . . . . . . . . . . . . . . . . . . 32
Replacing a Drive. . . . . . . . . . . . . . . . . . . . . . . . . . . . . . . . . . . . . . . . . . . . 33
What the 3ware Sidecar LEDs Tell You. . . . . . . . . . . . . . . . . . . . . . . . . . . 35
Chapter 5. Installing the Battery Backup Unit . . . . . . . . . . . . . .36
Tools and equipment required . . . . . . . . . . . . . . . . . . . . . . . . . . . . . . . . . . 37
Installation Overview . . . . . . . . . . . . . . . . . . . . . . . . . . . . . . . . . . . . . . . . . 37
Installation Instructions . . . . . . . . . . . . . . . . . . . . . . . . . . . . . . . . . . . . . . . 38
Replacing the Battery . . . . . . . . . . . . . . . . . . . . . . . . . . . . . . . . . . . . . . . . 42
Appendix: Technical Support . . . . . . . . . . . . . . . . . . . . . . . . . . .45
Sales and ordering information . . . . . . . . . . . . . . . . . . . . . . . . . . . . . . . . . 45
Feedback on this manual. . . . . . . . . . . . . . . . . . . . . . . . . . . . . . . . . . . . . . 45
www.3ware.com iii
Page 4
About this Guide
Congratulations on your purchase of the 3ware® Sidecar Kit with
9650SE-4LPME! This guide describes how to set up the 3ware
RAID controller and 3ware Sidecar enclosure for use with your
Apple® Mac Pro or Power Mac® G5 (Power PC™-based).
Chapter Description
1. Getting Started Overview of the 3ware Sidecar Kit and important
safety factors to keep in mind during installation
2. Setting Up Your
3ware Sidecar
3. First-Time RAID
Configuration
4. Day-to-Day Use of
the 3ware Sidecar
5. Installing the
Battery Backup Unit
How to install and setup up your 3ware RAID
controller and 3ware Sidecar
How to create a RAID unit
How to unmount a unit
How to replace a drive
What the LED colors mean on your 3ware Sidecar.
How to install a 3ware Battery Backup Unit (BBU)
on your 3ware RAID controller.
The following additional documentation is available for your 3ware
RAID controller on the CD that came with your controller . It is also
available through the 3ware website:
3ware Serial ATA RAID Controller User Guide for Mac OS X
3ware Serial ATA RAID Controller CLI Guide
Online help is available from 3DM 2 (3ware Disk Manager).
Comprehensive online documentation is available in the 3ware
HTML Bookshelf in the AMCC Documentation folder.
Additional support information is available in the 3ware
Knowledgebase, at this website:
http://www.3ware.com/KB
iv 3ware Sidecar Kit with 9650SE-4LPME: Install Guide for Mac OS X
Page 5

Chapter 1. Introducing the 3ware Sidecar Kit
The 3ware® 9650SE-4LPME RAID controller and 3ware® Sidecar
enclosure provide you with a desktop storage solution for your
Mac
Pro or Power Mac® G5 (PowerPC®-based) with PCI
Express® that includes:
The 3ware Sidecar, a 4-bay SATA enclosure capable of
multiple terabytes of desktop storage (Hard drives are not
included.)
True hardware RAID protection for all your valuable data
RAID levels 0, 1, 5, 10, Hot Spare, and Single Disk
StorSwitch™ non-blocking switch fabric for maximum
controller throughput
StreamFusion™ optimizes RAID 5 disk accesses to maximize
application performance under heavy loads
StorSave Battery Backup Unit (BBU) with write journaling to
optimize data protection and performance (BBU must be
purchased separately)
Status indication LEDs on the 3ware Sidecar
Note: The 9650SE-4LPME can also be used in a PC running
Microsoft Windows®, Linux®, or FreeBSD. Information about
installation in these systems is provided in a separate installation
document, available from the 3ware website
(http://www.3ware.com/support/userdocs.asp).
Contents of the 3ware Sidecar Kit
3ware 9650SE-4LPME RAID controller
3ware Sidecar 4-drive enclosure (RDE-400-XSATA)
www.3ware.com 1
Page 6
Chapter 1. Introducing the 3ware Sidecar Kit
This document, 3ware Sidecar Kit with 9650SE-4LPME:
Install Guide for Mac OS X
3ware CD-ROM with driver, software, and additional
documentation
Multi-lane™ SFF-8088 SATA II (Serial AT A) cable. This cable
supports up to four serial ATA drives in the 3ware Sidecar
enclosure.
Cable for Chassis Control Port (CMP)
16 drive mounting screws (4 per drive tray)
Drive Requirements
Drives used in the 3ware Sidecar must meet SATA-1 (1.5 Gb/s) or
SATA-2 (3.0 Gb/s) standards. A list of tested drives is available at
http://www.3ware.com/products/sys_compatibility.asp
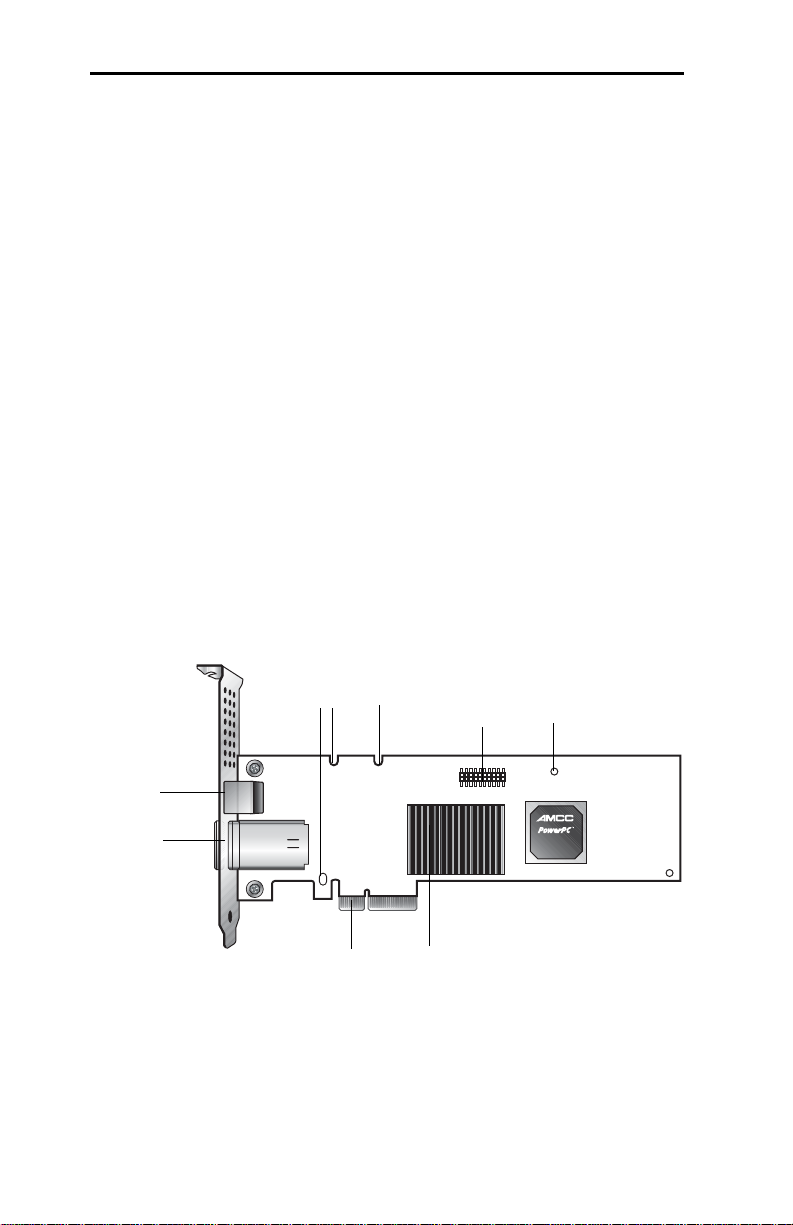
Equipment and Cables
Figure 1. 4-Port 3ware 9650SE-4LPME Serial ATA RAID Controller
Slots for battery holder
Chassis
Control
Connector
Multi-lane
SATA
Connector
PCI Express
2 3ware Sidecar Kit with 9650SE-4LPME: Install Guide for Mac OS X
Heat Sink
BBU connector and
hole for post
Page 7

Figure 2. 3ware Sidecar Enclosure
Front View Rear View
Port/
Drive #
3
2
1
0
Equipment and Cables
Drive Trays
For Power Cable
Fan
On/Off
Alarm
Switch
Reset
Multi-lane SATA ConnectorChassis Control Connector
Note: The Alarm Reset feature is not implemented in the
3ware Sidecar 1.2 release.
Figure 3. SFF-8088 Multi-lane SATA II and Chassis Control Cables
SFF-8088 Multi-lane SATA II Cable Chassis Control Cable
The Multi-lane SATA II Cable (SFF-8088 mini-SAS) has multi-
lane connectors on each end. One end connects to the port access
www.3ware.com 3
Page 8

Chapter 1. Introducing the 3ware Sidecar Kit
cover on the end of the 3ware RAID controller, and the other
connects to the 3ware Sidecar.
The Chassis Control Cable connec ts the 3w a re RA ID con troller
to the 3ware Sidecar to provide drive status information.
Important: You should only use AMCC/3ware certified cables
with your 3ware RAID controller. Using an incorrect cable can
result in drives that are not detected. The appropriate cables are
included in your 3ware Sidecar kit. If you must replace a cable,
see the list of available cables and associated part numbers at
http://3ware.com/products/cables.asp.
Safety Information
This information applies to Model 9650SE-4LPME controller card
and the 3ware Sidecar enclosure. To reduce the risk of bodily
injury, electrical shock, fire, and equipment damage, read this
information and observe all warnings and precautions in this guide
before installing or maintaining your computer.
The Model 9650SE-4LPME controller card and the 3ware Sidecar
enclosure should be installed by technically qualified persons. If
you are uncomfortable opening a computer system and conforming
to standard ESD practices, you should have a computer technician
perform the installation.
You must adhere to the guidelines in this guide and the assembly
instructions in your service manuals to ensure and maintain
compliance with existing product certifications and approvals. Use
only the described, regulated components specified in this guide.
Use of other products/components will void the regulatory
approvals of the product, and may result in noncompliance with
product regulations in the region(s) in which the product is sold.
Renseignements relatifs à la sécurité
Ces renseignements s'appliquent à la carte de contrôleur modèle
9650SE-4LPME et au boîtier 3ware Sidecar. Pour réduire le risque
4 3ware Sidecar Kit with 9650SE-4LPME: Install Guide for Mac OS X
Page 9

Renseignements relatifs à la sécurité
de blessure, d'électrocution, d'incendie et de dégâts matériels, lisez
ces informations et suivez toutes les mises en garde et précautions
qui figurent dans ce guide avant d'installer ou de réparer votre
ordinateur.
La carte de contrôleur modèle 9650SE-4LPME et le boîtier 3ware
Sidecar doivent être installés par un personnel qualifié. Si ouvrir un
ordinateur et suivre les pratiques PES normales vous semble
difficile, demandez à un technicien en informatique de vous
installer la carte.
Vous devez respecter les consignes de ce guide et les instructions
d'assemblage figurant dans vos manuels de maintenance pour
assurer la conformité avec les certifications et homologations de
produit existantes. Utilisez exclusivement les composants certifiés
qui sont décrits dans ce guide. L'utilisation d'autres produits ou
composants annulera les homologations réglementaires du produit
et peut aboutir à une violation des réglementations applicables dans
la région dans laquelle le produit est vendu.
Site Selection
The product is designed to operate as a peripheral to a computer
system.The environment that is provided for the system must be:
Clean, dry, and free of airborne particles (other than normal
room dust).
Well-ventilated and away from sources of heat including direct
sunlight and radiators.
Away from sources of vibration or physical shock.
Isolated from strong electromagnetic fields produced by
electrical devices.
In regions that are susceptible to electrical storms, we
recommend you plug your system into a surge suppressor or
UPS (uninterruptible power supply). During an electrical
storm, we recommend disconnecting all phone, network, and
power cables.
Provided with a properly grounded wall outlet.
www.3ware.com 5
Page 10
Chapter 1. Introducing the 3ware Sidecar Kit
Provided with a product main power disconnect or sufficient
space to access the power supply cord(s), because they serve as
the product's main power disconnect.
Fourni avec une prise murale correctement mise à la terre.
Fourni avec un sectionneur central ou un espace suffisant pour
accéder au(x) câble(s) d'alimentation parce qu'ils servent de
sectionneur central au produit.
Power and Electrical Warnings for the 3ware Sidecar
Power Off Before Working on System
Before working on a system that has a standby/off
switch, turn off the power by pressing the power
Warning
Warnung
Attention
switch to standby and unplug the power cord.
Vor der Arbeit an einem System mit einem Standby-/
Ausschalter schalten Sie den Netzstrom aus, indem
Sie den Netzschalter auf Standby stellen und das
Netzkabel abziehen.
Aucune pièce se trouvant à l'intérieur ne peut être
réparée ou remplacée par l'utilisateur. Ne pa s ouvrir.
Avant d'utiliser un système équipé d'un commutateur
« Standby/Off » (pause/arrêt), coupez l'alimentation
en plaçant le commutateur sur la position Standby et
débranchez le cordon d'alimentation.
Power Supply Disconnection Warning
Before working on a chassis or working near power
supplies, unplug the power cord on AC units;
Warning
Warnung
6 3ware Sidecar Kit with 9650SE-4LPME: Install Guide for Mac OS X
disconnect the power at the circuit breaker on DC
units.
Vor der Arbeit an einem Chassis oder Arbeit in der
Nähe von Stromversorgungen, das Netzkabel an
Wechselstromeinheiten abziehen. Bei
Gleichstromeinheiten den Strom am Trennschalter
abschalten.
Page 11

Renseignements relatifs à la sécurité
Power Supply Disconnection Warning
Avant de travailler sur un châssis ou à proximité
d'une alimentation électrique, débrancher le cordon
Attention
CAUTION
d'alimentation des un i té s en courant alternatif ;
couper l'alimentation des unités en courant continu
au niveau du disjoncteur.
The power supply in this product contains no user-serviceable parts.
Do not open the power supply. Hazardous voltage, current and
energy levels are present inside the power supply. Return to
manufacturer for servicing.
To avoid risk of electric shock, turn off the server and disconnect
the power cord, telecommunications systems, networks, and
modems attached to the computer system before opening it.
ATTENTION
Le bloc d'alimentation de ce produit ne contient pas de pièce
réparable par l'utilisateur. N'ouvrez pas le bloc d'alimentation. Des
tensions et courants dangereux sont présents à l'intérieur de celui-ci.
Pour toute réparation, retournez-le au fabricant.
Afin d'éviter les risques d'électrocution, mettez le serveur hors
tension et, avant d'ouvrir l'ordinateur, déconnectez le câble
d'alimentation, les systèmes de télécommunication, le réseau et les
modems qui lui sont connectés.
Power Cord Warnings for the 3ware Sidecar
An AC power cord was supplied with your product. This is the only
power cord recommended for use with this product. Contact the
manufacturer for a replacement if this cord becomes lost or
damaged.
www.3ware.com 7
Page 12

Chapter 1. Introducing the 3ware Sidecar Kit
CAUTION
To avoid electrical shock or fire, follow these precautions with
regard to the power cord:
Do not attempt to modify or use the AC power cord if it is not
the exact type required to fit into the grounded electrical outlets
The power supply cord(s) is/are the main disconnect device to
AC power. The socket outlet(s) must be near the equipment and
readily accessible for disconnection.
The power supply cord(s) must be plugged into socket-outlet(s)
that is /are provided with a suitable earth ground.
Do not use adapter plugs that bypass the grounding feature, or
remove the grounding feature from the plug or adapter.
If you must use an extension cable or plug strip, ensure the
extension cable or plug strip is connected to properly grounded
wall outlet and the total load does not exceed the ampere rating
of the extension cable or plug strip.
Avertissements concernant le câble d'alimentation du 3ware Sidecar
Votre produit vous a été fourni avec un câble d'alimentation c.a.
C'est le seul câble recommandé pour ce produit. Si vous le perdez
ou s'il s'endommage au point d'être irréparable, prenez contact avec
le fabricant ; il vous le remplacera.
ATTENTION
Afin d'éviter tout risque d'électrocution ou d'incendie, vérifiez que
le(s) câble(s) d'alimentation utilisé(s) avec le produit respecte(nt)
les consignes suivantes :
N'essayez pas de modifier ou d'utiliser le câble c.a. s'il n'est pas
exactement le type recommandé pour s'adapter aux prises avec
borne de terre.
Le ou les câbles d'alimentation sont les sectionneurs principaux
de l'alimentation c.a. Les extrémités femelles doivent être à
8 3ware Sidecar Kit with 9650SE-4LPME: Install Guide for Mac OS X
Page 13
Renseignements relatifs à la sécurité
proximité de l'appareil et doivent être facilement accessibles
pour la déconnexion.
Le ou les câbles d'alimentation doivent être branchés dans une
prise munie d'une borne de terre adéquate.
N'utilisez pas d'adaptateur de prise contournant la borne de
terre et ne retirez la borne de terre ni de la fiche, ni de
l'adaptateur.
Si vous avez besoin d'une rallonge ou d'une multiprise, assurez-
vous que ce dispositif soit connecté à une prise murale avec
borne de terre et que la charge totale ne dépasse pas ses
capacités nominales d'ampérage.
System Access Warnings
No User-Serviceable Parts in the 3ware Sidecar
No user-serviceable parts inside. Do not open.
Warning
Warnung
Attention
Im Inneren befinden sich keine vom Benutzer zu
wartenden Teile. Nicht öffnen.
Aucune pièce se trouvant à l'intérieur ne peut être
réparée ou remplacée par l'utilisateur. Ne pa s ouvrir.
Personal Safety When Installing the 9650SE4LPME Controller in Your Computer
Warning! High voltages may be found inside computer
equipment.
Before installing any of the hardware in this package or
removing the protective covers of any computer equipment, turn
off power switches and disconnect power cords. Do not
reconnect the power cords until the hardware is installed and the
system cover is closed.
www.3ware.com 9
Page 14
Chapter 1. Introducing the 3ware Sidecar Kit
Caution. Avoid contact with the heat sink on the 3ware RAID
controller if the Mac Pro or Power Mac G5 is on, as the heat sink
will be very hot. The heat sink will be safe to touch after the
system is powered down and the cover has been removed for a
few minutes.
Protecting Equipment and Data
Heat Sink Warning. Do not replace the factory-in stalled heat
sink shipped with the 3ware 9650SE-4LPME RAID controller.
Replacing the heat sink will alter thermal characteristics and
cooling requirements and may cause the controller to fail.
Replacing the factory-installed heat sink will void the warranty.
Back up your data! Creating or deleting disk arrays destroys
existing files on the member drives. If your drives contain
valuable data, back them up and save the data elsewhere
before attaching the drives to the controller.
ESD (Electrostatic Discharge) Precautions
To avoid damaging computer components and accessories when
installing or removing the 3ware RAID controller, follow standard
electrostatic discharge (ESD) precautions:
When your computer case is open and its internal parts are
exposed, do not touch any internal part unnecessarily.
Always wear a grounded strap or work on an ESD-protective
mat.
Do not remove the 3ware RAID controller from its protective
bag until you are properly grounded.
Handle the 3ware RAID controller by its edges or by the black
rail and metal bracket at its two ends.
Do not touch any pin, contact, lead or component on the 3ware
RAID controller.
10 3ware Sidecar Kit with 9650SE-4LPME: Install Guide for Mac OS X
Page 15

Renseignements relatifs à la sécurité
Things to Watch Out For During Installation
Be careful when installing the 3ware RAID controller into your
system. Excessive force can damage the board or your system.
Be sure to follow the installation instructions in “Chapter 2. Setting
Up Your 3ware Sidecar” on page 12.
Other Safety Factors
The user guide for your Mac Pro or Power Mac G5 contains
additional safety information about working inside your computer.
Be sure to follow the information provided in that manual.
Autres facteurs affectant la sécurité
Le Guide de l'utilisateur du Power Mac G5 ou du Mac Pro contient
des informations complémentaires relatives à la sécurité pour tout
travail à effectuer à l’intérieur de l’ordinateur. Respectez bien les
consignes fournies dans ce manuel.
www.3ware.com 11
Page 16

Chapter 2. Setting Up Your 3ware Sidecar
Tools You Need
You will need the following tools during installation:
An ESD grounding strap or mat
A Phillips screwdriver (if you have a model that uses screw
fasteners)
Before You Start
1 Be sure to read “Safety Information” on page 4 in Chapter 1.
2 Locate the user guide that came with your Mac Pro or Power
Mac G5. If you cannot locate the hardcopy, you can download a
copy from the Apple website.
3 Make sure your Mac Pro or Power Mac G5 has the following
software:
Macintosh OS 10.4.6 or later
Java 1.5 or later (JS2E) (Available from the Apple update
site or on the 3ware CD in the 3rd Party directory.)
4 Make sure you have a user name that has administrative
privileges, and that you know the associated admin password.
5 If you have a Battery Backup Unit (BBU), install it on the
controller before proceeding. For details, see
Installing the Battery Backup Unit” on page 36.
6 SATA-2 hard drives are sometimes shipped from the
manufacturer with the transfer rate set to 1.5Gbps. If this is the
case for your drives, you may need to remove a jumper or run a
12 3ware Sidecar Kit with 9650SE-4LPME: Install Guide for Mac OS X
“Chapter 5.
Page 17

Step 1. Install the 3ware Driver and Software
software utility to change the transfer rate to 3.0Gbps,. Please
check with your hard drive manufacturers documentation or
website on how to set the transfer rate to 3.0Gbps.
Step 1. Install the 3ware Driver and
Software
Note: If you prefer , you can install the 3ware driver and software at
the end of the setup process instead of at the beginning. Installing
it first requires one less restart of your Power Mac G5.
1 With your computer on, insert the 3ware CD that came in your
3ware Sidecar Kit.
2 When the CD window opens, double-click on the file
StartInstallMac to launch the installer.
When prompted, enter your user name and password and click
OK to start the installer. (The user name you enter must have
administrative privileges.)
3 Follow the on-screen directions to install the 3ware driver,
3ware management utilities, and documentation.
Tip: All of the 3DM-related settings you specify during
installation can be changed later through 3DM 2, on the 3DM
Settings page. If you are unsure what options to select, you do
not need to set them now .
Important: It is a good idea to turn on
the feature that sends you an email in the event of an error.
www.3ware.com 13
Page 18

Chapter 2. Setting Up Your 3ware Sidecar
4 If necessary, download the user guide for your Mac Pro or
Power Mac G5 from the Apple site and print out the chapter
“Working Inside Your Computer.” This chapter includes
important information about opening and updating your
computer. The section “PCI Express Cards” provides detailed
information relevant to installing your 3ware RAID controller.
5 Shut down your computer and disconnect the power cable.
Step 2. Install the 9650SE-4LPME RAID Controller in your computer
The 3ware 9650SE-4LPME RAID controller is a 4-lane (x4) PCI
Express card. It can be installed in any of the available x4 or x8 PCI
Express slots in your computer. (The x16 slot is normally used for
your graphics card.)
1 Follow the instructions in the user guide for your Mac Pro or
Power Mac G5 for opening your computer and installing a PCI
Express card.
Tips: For easiest installation of the 3ware RAID controller, lay
the computer on its side.
Note: If there is an extra open slot, install the controller next to it to
provide additional ventilation for the controller.
Important: If you are installing a 9650SE-4LPME with a BBU, it is
important to install it away from components that generate the most
heat in the system, such as the graphics card. In addition, to allow for
better cooling, it is best not to install a 9650SE-4LPME with a BBU
directly between two other PCIe add-in cards. If you are installing
two 9650SE-4LPMEs with BBUs in the same system, do not install
them next to each other.
Note: You do not need to remove the fan assembly in the Power
Mac G5 in order to install the 3ware 9650SE-4LPME RAID controller
card.
2 Close the case and reconnect the power cables.
14 3ware Sidecar Kit with 9650SE-4LPME: Install Guide for Mac OS X
Page 19

Step 3. Install the Drives in the 3ware Sidecar
Step 3. Install the Drives in the 3ware
Sidecar
1 Pull the handle out to unlatch the first drive tray in which you
will install a drive.
Figure 4. Drive tray handle un latched
2 Slide the drive tray out to remove it.
3 Set the drive face down on a static-free surface.
4 Place the drive tray on top of the drive, aligning the screw
holes.
The edge of the drive that has the SATA connectors will be at
the end of the tray that does not have the latch.
Be sure to align the screw holes.
www.3ware.com 15
Page 20

Chapter 2. Setting Up Your 3ware Sidecar
5 Mount the drive using 4 of the screws provided.
Figure 5. Mounting screws connect drive tray to drive
Figure 6. Upside-down view of the drive installed in tray
Insert four (4)
flat-head
mounting
screws
16 3ware Sidecar Kit with 9650SE-4LPME: Install Guide for Mac OS X
Page 21

Step 3. Install the Drives in the 3ware Sidecar
6 Replace the tray in the 3ware Sidecar enclosure.
Make sure the arm is extended all the way and slide the tray in
until it clicks; then flip the drive tray arm to latch it.
Figure 7. Sliding drive tray back into the 3war e Sidecar
Note: Make sure to insert the tray with the drive facing down, the
latch to the right of the 3ware Sidecar, and the LEDs to the left.
You will know the tray is inserted correctly because it will latch
securely.
If you insert the tray with the drive facing up, it will not latch securely;
the tray will slide in, but will not click into place.
7 Repeat steps 1 through 6 for the remaining drives.
www.3ware.com 17
Page 22

Chapter 2. Setting Up Your 3ware Sidecar
Step 4. Connect the Cables
T wo cables are used to connect the 3ware Sidecar to your computer:
the Multi-lane SATA II cable, and the chassis control cable.
Figure 8. Ports on the Installed 3ware RAID Controller and the 3ware
Sidecar
Back of Computer
Multi-lane SATA
Connector
Chassis Control
Connector
Back of Sidecar
Chassis Control
Connector
Multi-lane SATA
Connector
1 Connect the Multi-lane SATA II (Serial ATA) cable.
On the back of your computer, connect one end of the Multilane SATA cable to the RAID controller port.
When the cable is inserted correctly, you will feel it click into
place.
Connect the other end to the port on the 3ware Sidecar.
Note: For both cables, the correct cable orientation is reversed on
the 3ware RAID controller from the orientation used on the 3ware
Sidecar. The illustrations on the next page show the correct
orientation.
2 Connect the Chassis Control cable.
On the back of your computer, connect one end of the Chassis
Control cable to the round port on the RAID controller.
Connect the other end to the port on the 3ware Sidecar.
18 3ware Sidecar Kit with 9650SE-4LPME: Install Guide for Mac OS X
Page 23

Step 4. Connect the Cables
The ends of the cable are keyed to help insure correct insertion.
Figure 9. Cables Connected to the Installed RAID Controller, and
to the 3ware Sidecar
Back of Computer
Back of Sidecar
Note: If you need to remove the Multi-lane SATA Cable, pull out
gently on the blue tab to release the latch; then pull out the connector.
www.3ware.com 19
Page 24

Chapter 2. Setting Up Your 3ware Sidecar
Step 5. Set the Computer and 3ware Sidecar in their Locations
Position the computer and the 3ware Sidecar so that the cables are
out of harms way. If desired, set the 3ware Sidecar on top of the
computer.
Figure 10. 3ware Sidecar Set On Top of Power Mac G5
Step 6. Connect Power to the 3ware Sidecar and Computer
1 Connect the appropriate power cables to both the 3ware Sidecar
and computer.
2 Turn on the power to the 3ware Sidecar.
Note: When you turn on power to the 3ware Sidecar before tur nin g
on your computer, the drives attached to the 3ware RAID controller
will be recognized. If you turn on your computer first, you may need to
use 3DM to rescan the controller.
3 Turn on the power to the computer.
20 3ware Sidecar Kit with 9650SE-4LPME: Install Guide for Mac OS X
Page 25

Chapter 3. First-Time RAID Configuration
Your choice of which type of RAID unit (array) to create depends
on your needs. You may wish to maximize speed of access, total
amount of storage, or redundant protection of data. Each type of
RAID unit offers a different blend of these characteristics.
The following table provides a brief summary of RAID type
characteristics. For a more in-depth explanation of RAID
characteristics, concepts, and terminology see “Understanding
RAID Concepts and Levels” in the 3ware Serial ATA RAID
Controller User Guide or in the online help for 3DM 2.
Tip: The terms fault tolerance and redundant protection mean that,
in the event a drive fails, your data is still accessible because there
is another copy of it.
Table 1: RAID Configuration Types
Raid Type Description
RAID 0 Striped unit. Provides improved performance, but no fault
tolerance.
RAID 1 Mirrored unit. Provides fault tolerance and a read speed
advantage over non-RAID disks.
RAID 5 Combines striping with parity. Provides improved
performance, fault tolerance, and high storage efficiency.
RAID 10 A combination of striped and mirrored units for fault
tolerance and high performance.
Single Disk Not a RAID type, but supported as a configuration.
Provides for maximum disk capacity with no redundancy.
www.3ware.com 21
Page 26

Chapter 3. First-Time RAID Configuration
You can create one or more units, depending on the number of
drives you have installed.
Table 2: Possible Configurations Based on # of Drives
# Drives Possible RAID Configurations
1 Single drive or hot spare
2 RAID 0 or RAID 1
3RAID 0
RAID 1 with hot spare
RAID 5
4 RAID 5 or RAID 5 with hot spare
RAID 10
Combination of RAID 0, RAID 1, single disk
Note: For most efficient use of drive capacity, it is advisable
(though not required) to use drives with identical capacity. For
more information, see the discussion “Using Drive Capacity
Efficiently” in 3ware Serial ATA RAID Controller User Guide.
22 3ware Sidecar Kit with 9650SE-4LPME: Install Guide for Mac OS X
Page 27

Starting 3DM 2 and Logging In
Starting 3DM 2 and Logging In
There are two parts to 3DM 2: a process that runs in the background
on your computer, and a web-based application that you use to
manage your 3ware RAID controller.
Normally 3DM 2 is installed at the same time you install the driver
for your 3ware RAID controller. Once 3DM 2 has been installed,
the background process automatically starts each time you start
your computer.
If you have not yet installed 3DM 2, do so now. For details, see
“Step 1. Install the 3ware Driver and Software” on page 13.
To start the 3DM 2 web application and log in
1 You can start the 3DM 2 web application in one of the
following ways:
In the Finder, choose Applications > AMCC and then
double-click
Your browser will open and go to the URL for 3DM 2.
Connect to 3DM2.webarchive
Or
Open your browser and enter the URL for 3DM 2:
https://localhost:888/
(If you changed the listening port during installation,
change the number in the URL above.)
2 When your browser displays a security certificate message,
Continue.
click
www.3ware.com 23
Page 28

Chapter 3. First-Time RAID Configuration
3 At the 3DM 2 Login page, select Administrator in the Login
field.
4 Enter the default password 3ware and click Login. (You can
change the password later on the 3DM 2 Settings screen.)
Figure 11. 3DM 2 Login Screen
Creating a Unit
Depending on the number of drives you have installed in your
3ware Sidecar, you can create one or more RAID units.
To create a unit
1 From the Management menu, choose Maintenance.
Figure 12. Management > Maintenance menu
2 On the Maintenance page, select the drives you want to include
in your RAID unit and click
Create Unit.
Depending on the type of RAID unit you will create, you may
not have to use all of the drives. For example, if you are
creating a RAID 1 or a RAID 5, you might want to leave one
drive as a spare, to be used in the event of a drive failure.
24 3ware Sidecar Kit with 9650SE-4LPME: Install Guide for Mac OS X
Page 29

Creating a Unit
Figure 13. Management > Maintenance menu
a) Select the drives you want to include.
b) Click Create Unit.
3 In the pop-up window that appears after you click Create Unit,
choose the type of RAID unit you want to create.
Figure 14. Selecting RAID type when creating a unit
4 Optional: In the Name box, enter a name for the unit (up to 21
characters, including dashes and underscores).
5 Optional: If appropriate, change the stripe size. 64KB works
well for most applications.
Stripe size is not applicable for RAID 1, because it is a mirrored
unit without striping.
6 Make any desired changes to the policies shown: Write Cache,
Auto Verify, Continue on Source Error During Rebuild, and the
StorSave Profile.
www.3ware.com 25
Page 30

Chapter 3. First-Time RAID Configuration
Tip: If you are not familiar with these options, you can leave
the default settings for now and change them later, if desired.
Detailed information about each of these options is available in
the online Help for 3DM 2 and in the User Guide.
7 Click OK to create the unit.
Note: If you enabled the Write Cache policy, and do not have a
BBU installed, a message will warn you that you could lose data
in the event of a power failure.
Enabling write cache will improve write performance greatly, but
you are at risk of losing data if a power failure occurs when data
is still in the cache. You may want to obtain a UPS to safeguard
against power loss.
Initializing (Formatting) Your New Unit
When you create a unit through 3DM 2, the Mac OS X recognizes
that a new disk is available, and displays a message asking what
you want to do, like the one in
appear, start the Macintosh Disk Utility manually from the Finder
and skip to step 2.)
Figure 15. (If this message does not
Note: “Initialization” of the unit by the Mac OS X is different from
“initialization” of a unit by 3ware. Initialization under your
operating system will format your disk, erasing any existing data
in the process. Initialization under 3ware does not erase data; it
puts redundant data on the drives of redundant units into a
known state so that data can be recovered in the event of a disk
failure. For more information, see “About Initialization” in the
3ware Serial ATA RAID Controller User Guide for Mac OS X.
26 3ware Sidecar Kit with 9650SE-4LPME: Install Guide for Mac OS X
Page 31

Initializing (Formatting) Your New Unit
1 In the Mac OS message, click Initialize.
Figure 15. Disk Insertion Message from the Mac OS
2 When the Macintosh Disk Utility window opens, find and
select the drive that represents your RAID unit.
Figure 16. Macintosh Disk Utility Window with New RAID Unit
www.3ware.com 27
Page 32

Chapter 3. First-Time RAID Configuration
3 In the Disk Utility Window, select the Partition tab.
Figure 17. Macintosh Disk Utility Window, Partition Tab
4 In the Volume Scheme column, click Current to show the drop-
down menu and select the number of partitions that you want
your RAID unit to have.
Tip: If you only want one volume, select 1 Partition. (Each
partition will appear as a separate drive on your computer.)
Figure 18. Selecting the Number of Volumes in Disk Utility
28 3ware Sidecar Kit with 9650SE-4LPME: Install Guide for Mac OS X
Page 33

Initializing (Formatting) Your New Unit
5 On the right, specify a volume name and then click Partition.
It is a good idea to use a unique name, although Mac OS X will
allow you to give the same name to more than one partition.
If you have questions about what Format to select, see the
Apple documentation.
Figure 19. Defining the Volume in the Macintosh Disk Utility
a) Enter a
unique
name
b) Click
Partition
6 When a message asks you to confirm you want to partition the
disk, click
Figure 20. Confirmation Message to Create the Partition
www.3ware.com 29
Partition.
Page 34

Chapter 3. First-Time RAID Configuration
You will see a series of messages appear toward the bottom of
the Disk Utility window as the RAID unit is first partitioned
and then formatted. This may take a couple of minutes,
depending on the size of the drives in your RAID unit.
Figure 21. Macintosh Disk Utility Showing Partitioning Progress
Messages
appear here
as the unit is
formatted.
When the partitioning is complete, icons for each new volume
appear on your desktop. They are now ready for use.
You can now close the Macintosh Disk Utility window. Your
RAID unit is ready for use.
30 3ware Sidecar Kit with 9650SE-4LPME: Install Guide for Mac OS X
Page 35

Specifying a Hot Spare
Specifying a Hot Spare
If you have a remaining available drive, you can designate it as a
hot spare. If a hot spare is specified and a redundant unit degrades,
the hot spare will automatically replace the failed drive.
Tip: You can also enable Auto Rebuild, which will attempt to use
other available drives to rebuild the unit, if a hot spare is not
available. For more information, see the online Help for 3DM or the
User Guide.
Note: In order to replace a failed drive in a degraded unit, a hot
spare drive must have the same or larger storage capacity than
the failed drive.
To specify a hot spare
1 On the Maintenance page in 3DM 2, select a drive in the Available
Drives list and click Create Unit.
2 As the Type, select Spare Disk.
3 Optional: Enter a name for the spare.
4 Click OK.
Note: Because the spare is not available for use as another
drive, the Mac OS does not prompt you to initialize it.
www.3ware.com 31
Page 36

Chapter 4. Day-to-Day Use of the 3ware Sidecar
This chapter describes a few key points you should know related to
your day-to-day use of your 3ware RAID controller and 3ware
Sidecar.
Detailed information about working with your 3ware RAID
controller and units created on the drives in your 3ware Sidecar is
available in the online Help for 3DM 2 and in the 3ware Serial A TA
RAID Controller User Guide for Mac OS X.
Turning On Your Sidecar
It is a good idea to turn on your 3ware Sidecar before turning on
your computer. This will insure that the computer recognizes the
units and drives in the 3ware Sidecar. If you turn on the computer
before turning on the 3ware Sidecar, you may need to use 3DM to
rescan the controller.
Unmounting a Unit on Your Computer
Before you perform an operation such as removing or deleting a
unit using 3DM, you will need to unmount the unit. This notifies
the Macintosh OS, so that it does not try to send or retrieve any data
from the unit.
32 3ware Sidecar Kit with 9650SE-4LPME: Install Guide for Mac OS X
Page 37

Replacing a Drive
To unmount the unit, do one of the following
On your desktop, select the icon for the unit and drag the unit
icon to the Trash.
OR
Launch the Macintosh Disk Utility , select the unit, and click the
Unmount button on the toolbar
If you physically remove a unit without unmounting it, you will
receive an event notification from the 3ware software. (You can see
this notification on the 3DM Alarms page.)
Replacing a Drive
Depending on your reason for replacing the drive, you may want to
inform the 3ware RAID controller that you will be removing it
through 3DM, on the Management > Maintenance page. For
more information, see the online Help for 3DM or the 3ware Serial
ATA RAID Controller User Guide for Mac OS X.
Warning: Physically removing a drive from a non-redundant
unit can cause data loss and can cause the system to hang.
1 Unmount the unit as described on the previous page and
remove the unit in 3DM2 as described above.
2 On the 3ware Sidecar, pull the handle out to unlatch the drive
tray from the 3ware Sidecar.
3 After unlatching the tray, allow 10 seconds before pulling the
tray out of the unit. This allows the drive to properly spin/shut
down before transport.
4 Slide the drive tray out.
5 Set the drive tray on a static-free surface.
6 Remove the screws that hold the drive tray to the drive and set
them aside.
www.3ware.com 33
Page 38

Chapter 4. Day-to-Day Use of the 3ware Sidecar
Figure 22. Remove mounting screws
Remove four
(4) flat-head
mounting
screws
7 Replace the existing drive with the new drive.
8 Mount the new drive using the screws you just removed.
9 Replace the tray in the 3ware Sidecar enclosure. (For more
details, see
Figure 7 on page 17.)
10 In 3DM2, on the Maintenance page, click Rescan.
11 If the unit is degraded, you can start a rebuild with this drive.
For more information, see the online Help for 3DM2 or the
User Guide.
34 3ware Sidecar Kit with 9650SE-4LPME: Install Guide for Mac OS X
Page 39

What the 3ware Sidecar LEDs Tell You
What the 3ware Sidecar LEDs Tell You
The LEDs next to each drive in the 3ware Sidecar provide status
information about your drives.
Table 3: Meaning of LED Colors and Behavior
Color Drive Status
Solid
green
Blinking
green
Black
Solid
Amber
Blinking
amber
Solid red
Blinking
red
OK
Identify. This occurs when you have used the Identify
command in 3DM or the 3ware CLI to locate a particular
drive or unit.
No drive
Hot spare
Rebuilding. The drive in this slot is part of a RAID unit
that is currently rebuilding. You can continue to use the
unit. For more information, see the discussion of
Rebuilding in the online Help for 3DM or the User Guide.
Drive fault. This drive has failed. You should replace it
and rebuild the unit.
Predicted drive fault. 3ware software predicts that this
drive will fail soon. You may want to replace it.
www.3ware.com 35
Page 40

Chapter 5. Installing the Battery Backup Unit
The Battery Backup Unit (BBU) is an add-on that can be attached
to a 3ware 9650SE-4LPME RAID controller to supply power to the
memory module from an attached battery pack in the event of a
system power loss. This allows the controller to use write-caching
for optimal performance and not be exposed to data loss in the
event of a system power failure. When fully charged, the battery
preserves the contents of the controller cache memory for a limited
period of time (up to 72 hours). When power is restored, cached
data is flushed to disks.
Caution: Both the 3ware RAID controller and the BBU are
sensitive electronic equipment and can be damaged through
electrostatic discharge. When installing the BBU on the
controller, be sure you are grounded. Use a grounding strap, or
work on an ESD-protective mat.
Do not remove the 3ware controller or BBU from their
protective bags until you are properly grounded.
Handle the 3ware RAID controller by its edges or by the
metal bracket at its end.
Do not touch any pin, contact, lead, or component on the
3ware RAID controller.
Important: It is recommended that a 9650SE-4LPME with a
BBU be installed in a slot with good airflow, away from
components that generate the most heat in the system, such as
the graphics card. In addition, to allow for better cooling, it is
best not to install a 9650SE-4LPME with a BBU directly
between two other PCIe add-in cards. If you are installing two
9650SE-4LPMEs with BBUs in the same system, do not install
them next to each other.
Note: The battery will drain if it is plugged into the BBU and
there is no power to the unit. Wait to plug the battery into the
BBU until the system is ready for use.
36 3ware Sidecar Kit with 9650SE-4LPME: Install Guide for Mac OS X
Page 41

Tools and equipment required
Tools and equipment required
Slot-head screwdriver
Grounding strap
Battery Backup Unit (BBU) and battery
3ware 9650SE-4LPME series controller
Installation Overview
The Battery Backup Unit (BBU) is comprised of two pieces: the
battery module and the BBU control module.
These pieces attach to the controller at the points illustrated in
Figures
a Clips on the battery module match to slots on the controller.
b Connector on the BBU mates to receptacle on the controller.
c P ost on the BBU mates to post hole on the controller.
23 and 24:
Figure 23. Points of connection on the BBU
a) Clips
b) BBU connector
c) Post
www.3ware.com 37
Page 42

Chapter 5. Installing the Battery Backup Unit
Figure 24. Points of connection on the controller
b) BBU receptacle
c) Hole for posta) Slots for the clips
Installation Instructions
1 Remove the screw head from the plastic post on the BBU
control module and set it aside (you will reattach it soon.)
Figure 25. Removing the head from the plastic post
2 Position the BBU control module above the controller and align
the BBU control module and the controller, making sure to:
Mate the connector on the BBU control module with the
receptacle on the controller.
Match the plastic post on the BBU with the hole on the
controller. (Figure 26)
38 3ware Sidecar Kit with 9650SE-4LPME: Install Guide for Mac OS X
Page 43

Installation Instructions
Figure 26. BBU control module ready to connect to the
controller
3 Press down gently until the BBU is seated.
Figure 27. BBU control module connected to the controller
4 Turn the controller over, insert the plastic screw head that you
removed in step 1 into the plastic post, and tighten it gently but
firmly. (Do not over-tighten!)
Warning! To avoid possible damage to the controller and
the motherboard, make sure the module is connected in the
proper orientation, and that the plastic post is attached.
When the plastic post and the connector are attached
correctly, the module is in the correct orientation.
www.3ware.com 39
Page 44

Chapter 5. Installing the Battery Backup Unit
5 Hook the clips on the top of the battery module over the slots
on the top edge of the controller.
Figure 28. Clips on the battery module hook over slots on the
Figure 29. Attaching the battery module to the controller
top edge of the controller
40 3ware Sidecar Kit with 9650SE-4LPME: Install Guide for Mac OS X
Page 45

Installation Instructions
6 Press down gently on the top of the battery unit so that the
battery holder flexes slightly and the clip snaps into place in the
lower hole.
Figure 30. Pressing down so that the bottom clip can be inserted
7 Insert the battery power connector into the power receptacle on
the BBU.
Note: The battery will drain if it is plugged in and there is no
power to the unit. If the system will not be used right away,
wait to do this step until the system is ready for use.
Figure 31. Battery power connector inserted in power receptacle
The controller is now ready to install in your system.
www.3ware.com 41
Page 46

Chapter 5. Installing the Battery Backup Unit
Replacing the Battery
The Battery Backup Unit (BBU) control module will last for many
years. The battery module has an expected life span of one to two
years depending on usage.
You can check the current status of the battery, and test it. For
details, see instructions in 3ware Serial ATA RAID Controller User
Guide.
Caution: There is a risk of explosion if the battery is replaced
by an incorrect type. To obtain a replacement battery module,
contact AMCC.
For proper battery disposal resources, contact RBRC, the
Rechargeable Battery Recycling Corporation (www.rbrc.com).
Vorsicht: Es entsteht Explosionsgefahr bei Auswechslung der
Baterie mit einer des falschen Typs. Um eine Ersatzbaterie zu
erhalten, wenden Sie sich an die AMCC.
Um Ressourcen zur korrekten Entsorgung der Baterie in
Erfahrung zu bringen, wenden Sie sich an die RBRC (the
Rechargeable Battery Recycling Corporation) (www.rbrc.com).
Attention: Il y a un risque d'explosion si la batterie est
remplacée par un type incorrect. Pour obtenir un module de
batterie de rechange, entrez en contact avec AMCC.
Pour recycler les batteries, entrez en contact avec RBRC:
Société de recyclage des piles rechargeables (www.rbrc.com).
To replace the battery
1 Make sure the system is powered down, that you are grounded,
and follow all appropriate safety procedures.
2 Remove the 3ware RAID controller from your system.
3 Press down on the top of the battery module to free the clip on
the bottom of the module.
42 3ware Sidecar Kit with 9650SE-4LPME: Install Guide for Mac OS X
Page 47

Replacing the Battery
4 While pressing down on the top of the battery module, lift out
the bottom of the battery module slightly.
5 Once the bottom of the module is free, slide the module up to
release the clips on the top.
Figure 32. Removing the battery module
a) Push the battery
module down gently.
b) Lift out the bottom
of the battery module
to release the clip in
the bottom hole.
c) Lift up to remove
the clips on the top
Bottom clip
edge.
6 Disconnect the battery power cable from the BBU.
T o do so, p ress down on the lever -like clip on the battery power
connector and slide it out of the slot.
(If desired, you can remove the BBU control module to
facilitate disconnecting the power cable.)
www.3ware.com 43
Page 48

Chapter 5. Installing the Battery Backup Unit
Figure 33 shows how removing the connector looks if you
remove the BBU control module from the controller.
Figure 33. Removing the power cable from the BBU module
Press down on the
lever-like clip and pull
the connector out.
7 If you removed the BBU control module in step 6, reattach it
now.
8 Insert the new battery module and cable it up.
9 Reinstall the 3ware RAID controller, close up your system, and
restart it.
10 Run a battery test to compute the estimated battery capacity of
this new battery.
You can run the battery test from the BBU page of 3DM 2, or
by using the 3ware CLI. For detailed instructions, see the 3ware
Serial ATA RAID Controller User Guide for Mac OS X and the
3ware Serial ATA RAID Controller CLI Guide.
44 3ware Sidecar Kit with 9650SE-4LPME: Install Guide for Mac OS X
Page 49

Appendix: Technical Support
For support, troubleshooting tips, frequently asked questions,
software releases, and compatibility information related to 3ware
RAID controllers, refer to:
3ware support page at:
http://www.3ware.com/support/
3ware knowledgebase:
http://www.3ware.com/KB/kb.asp
3ware software downloads:
http://www.3ware.com/support/download.asp
3ware documentation:
http://www.3ware.com/support/userdocs.asp
3ware Compatibility Lists:
http://www.3ware.com/products/sys_compatibility.asp
For specific answers to questions or to give feedback about the
product, visit our Web site at http://www.3ware.com/support and
log in. AMCC also offers toll-free 1 (800) 840-6055 or
(408) 542-8800 direct phone support during normal business
1
hours.
Sales and ordering information
For sales information, send an electronic mail message to
3wareSales@amcc.com.
Feedback on this manual
Your feedback is welcome. If anything in the guide seems unclear
please let us know by using the email form at
www.3ware.com/support.
www.3ware.com 45
http://
Page 50

 Loading...