

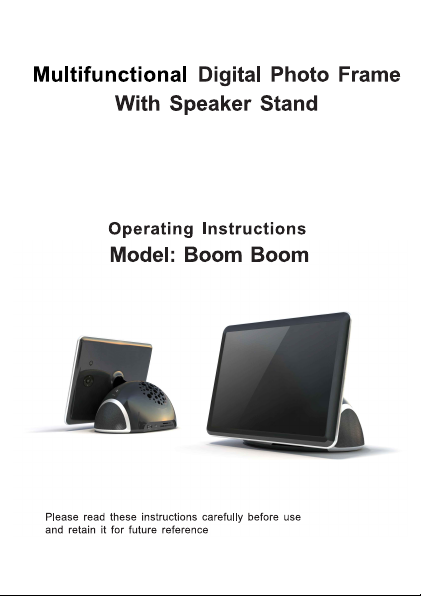
123

FEATURES
Thank you for purchasing this Multifunctional Digital
Frame will bring more happiness to your colorful life.
1. Playing photos by slide show with music background.
2. Playing Music
3. Playing Movies
4. Calendar function
5. Files management
6. 2.1 channel stereo Speaker stand (can be used as
using supplied audio cable).
7. Other memory storage compatibility (connecting to
8. Memory cards compatibility
9. PC Sync Display Function
10. Deluxe easy-to-use remote control included.
TECHNICAL SPECIFICATIONS
Screen size: 8 inches 800*600 4:3 ratio
Speaker Output: 8W (2W*2+4W)RMS
Supported file format: JPEG/BMP/JPEG Progressive/
Acceptable photo cards: MS, MS Pro, MMC, SD, XD
USB ports: USB 1.1 and USB 2.0
Internal memory storage: 1GB
Power supply: AC 110V-240V~60/50Hz (DC 9V2A)
Max power consumption: 15 W
Dimensions (with frame): 260(L) x 230(W) x 244(H) mm
Weight: 1016 g
CHECKING ACCESSORIES
After unpacking, make sure the following accessories
are supplied with your unit. If you find something missing
or broken, contact the local dealer in your area.
1. Digital photo frame with speaker stand
. AC adaptor
2
3. Remote control
4. USB cable
5. 1 set of audio cable with 3.5mm plug
6. Installation CD
7. Operating Instructions
Photo Frame. This deluxe Multifunctional Digital Photo
speaker of other Audio device connected to the set
the set using supplied USB cable).
EXIF/MP3/WMA/AAC/WAV/M-Jpeg/Mpeg4/H.264(D1)

LOCATION OF CONTROLS
Screen
Front view of screen
1.LCD screen
2.Remote sensor
Speaker stand
1
2
Rear view of screen
1.ESC button-Press to
return to upper menu.
2.Menu button-Press to
show the edit menu.
3.Up button- For menu
selection and raising
the volume.
4.Left button-For menu selection.
5.Dow n button- For menu selec tion and redu cing the volu me.
6.Right button-For menu selection.
7.Enter/play button- Press to confirm the selection.
Speaker stand
1
2 2 2
1.Power button-pres s to sw itch the set on or off.
2.Bulit-i n speakers - For au dio out put.
3.Aux in jack-C onnecting to the compon ent audio out put.
4.DC in jack-Connecting to the attached AC/DC adaptor.
5.USB port-Connecting to other storage using USB cable.
6.Mini USB jack-Connecting to PC using USB cable.
7.SD/MMC/MS card slot-For inserting memory cards.
1
2
3
4
5
3 4 5 6 7
7
6
4

Remote control
1. IR diode - Sends single
to the set.
2. Power ON/OFF button Switch set on or off .
3. Calendar button-Press to
enter calendar mode.
4. Mute button-Press to turn
off the volume. Press
again to restore.
5. Volume + and UP button
6. Left button
7. Enter/Play button-Enter
or play your selection.
8. Right button
9. Volume - anddown button
10. Home button-Return to home menu.
11. ESC-Return to the upper menu.
12. Music-Press to enter music mode.
13. Photo-Press to enter photo mode.
14. Music repeat play button.
15. AUX-Press to select audio source .
16. Menu-Press to show edit menu.
17. Video-Press to enter video mode
18. Music shuffle play button.
REMOTE CONTROL OPERATION
To use the remote control for the first time, please pull out
Replacing the remote control battery
Open the battery door as per illustration 1 and insert
marking as per illustration 2.
battery wit h
PLUS i n up
position
illustration 1
2
3
1 4
5
6
7
9
10
ESC
11
12
PHOTO
13
4
1
15
8
MENU
16
•
17
AUX
18
the tab on the remote control .
one CR2025 size battery (3V) into i t according to the +
illustration 2
5

OPERATION
Preparation
For the first time you use this digital photo frame, you
internal memory or insert a card with music, photo files
1. Connect your set to AC power using the attached AC
2. Press the POWER button on the speaker to turn on
3. Connect the s et and your c ompute by USB cord.
4. Store some pict ure, music, video f iles you like into
5. You can also insert the card into the card slot if you
Begin to use
Complete above steps, right
picture will show on the screen,
and you are ready to enjoy this
multifunctional digital photo
frame. You can adjust to your
favorite watching angle by press
or pull the screen.
The home menu includes 7 selections, you can select
press ENTER/PLAY button to confirm or directly press
dar) on the remote control to complete your operation.
button to return to home menu directly. Press up and
Playing phot os
1. Viewing the thumbnails
Enter the photo menu. T he thumbnails of first 12 pho-
buttons to select the photo. Press ENTER/PLAY button
need to store some files (music, photo, video) into the
into the card slot.
adaptor.
the set.
the internal me mory.
want to play the files on your card.
the functions by pressing left or right buttons, then
the function buttons (PHOTO, MUSIC,
Press ESC button to return to upper menu. Press home
down buttons to adjust the volume during play.
tos show on the screen. You can press left and right
to s tart the slide show play.
Thumbnail Thumbnail menu
In thumbnail screen, you can press MENU button on the
and ENTER/PLAY buttons to edit the photos.
Delete: Delete selected photo.
Rotate: Rotate selected photo.
Photo effect: A djust the hue o f the photo.
Select: S elect the photos you like to play, press enter
again to abstain the selection.
2. Slide show playing
During pictures play by slide show, the music you
up or down button to adjust the volume, press ENTER/
remote to show the edit menus, then use left and right
Copy: Copy selected photo to the memory storage you like.
stored in the memory will play together. You can press
PLAY button to pause or return the play.
6
VIDEO, Calen-

During play,press MENU button
to showslide show menu.Press
direction andEnter/play buttons
to adjust the screen’ s hue,
brightness, contrast,slide show
speed, slideshow display mode,
full screen or normal screen,
background music on or off.
Playing Music
Enter the music menu. Select the music you want t o
start to play by left or right button, press the ENTER /
PLAY button to play or pause the playback.
Press up or down button t o
adjust the volume.
Press Repeatbutton to play the
music repeatedly.
Press shuffle button to playt he
music in random order.
Press menu to switchto Playing
list, music detail or lyric mode
(only when lyric file exists).
Playing Movie
Enter the movie menu. Select the movie you want to
play b y left o r right button, press the ENTER/PL AY
button to play. Press up or down button to adjust the
volume.
File Management
Enter the file menu. The detail of the files in the current
source shows on the screen. You can press left or right
button to select the file, press MENU button to toggle
from COPY, DELETE, or return to the file, press EN -
TER/PLAY button to confirm.
Slideshow menu
Playing list
Now Playing
Lyric
7

Source (Selecting the play source, internal memory
set by USB cable)
When your set has several file sources. You need to
storage, memory card, or device connected to the set
Enter the Source screen, and
select the source you want to
play by direction buttons,
press ENTER/PLAY button to
confirm. Then, when you us e
the Photo, Music, or Video
function, all the files are from
the storage you selected.
Viewing Clock and Calendar (you should set the
correct date in advance. Please see next section)
Enter the calendar screen. Date and time show on the
screen. Green frame highlight intraday date. The photos play on the left small windowas slide show. You can
press the left or right button to check the date on the
previous or next month. Press ENTER button to toggl e
from calendar and clock.
Changing Setting
Enter the setting screen. Press
up or down button t o select the
item you want t o set. Press
ENTER/PLAY button to confirm.
Press ESC to returnto upper selection.
A. Date and Time
Setting the calendar date and clock.
B. General setting
Setting the smart energy, brightness, language, default
and software updatin g.
y function:
For smart energ
When you select OFF, this unit willoperate at full power
When you select Scheduler 50% o r Scheduler 100%, it
during nighttime (21:00~7:00), and will resume normal
When you select Save 20% or Save 50%, it will operate
C. Audio setting
Setting the music playing mode, shuffle o n or off.
D. Informatio n
Show this set’ s version, memory total storage and
storage, memory card, or device connected to the
choose one source you like to play (internal memory
by the USB cable).
mode, can ’t save power.
will automatically work as power saving 50% or 100%
power mode during daytime (7:00 ~21:00).
at that indicated power consumption rate in the full day.
Repeat one music, repeat all music or n o repeat.
free storage.
8

PC Sync Display Function
We have a PC sync display software in the driver disc
You can install the software to your computer as the
computer may remind you to restart the computer, do
computer by USB cable, run the software, below soft-
of this set. File name: EZ display.
way you install any software. After installation, the
as the instruction. Then connect the DPF set and your
ware surface will show on you computer.
Click DISPLAY DEVICE, the display on your computer
function, two people can watch photos or movies on
come out from the DPF set.
sion Display to adjust the display of the DPF screen.
pear from the DPF screen, the DPF set will restore to a
Trouble shooting
In case you meet some problems when you use this set,
assistance or return the set.
Symptom
No power.
The set
doesn’t work.
The remote
control does
not work.
Your set dies or
goes back to its
welcomescreen.
It can’ t be
detected when
connect the set
to PC.
Select the selections under Mirror Display and Exten-
Remedy
1. Please only use the attached AC
adaptor firmly plugged into the power
3. Please remember to press the power
4. One of the safety mechanisms may
set from power outlet and plug it again.
1. Verify that there are correct files i n
inserted a memory card or other
Only JPEG/BMP/JPEG Progressive/
Mpeg4/H.264(D1) files can be played.
2. Enter to Source menu to select source.
1. The distance istoo long or the angle
2. The battery of the remote control is
3. The remote sensor is perturbed by
This may be caused by an electrostatic
from the power and reconnect it.
1. Please turn on the set when connect
and your PC. 3. Please try to plug the
USB port of your PC.
will also show on the screen of DPF set. Using this
your computer and DPF set together. But no sound
Select STORAGE DEVICE, computer screen will disap-
removable device for you to transfer files.
please readbelow informations before you callfor technical
adaptor. 2. Please check if the A C
outlet. Make sureyour out let has power.
button on the speaker to turn on the set.
be operating. In this event, unplug the
the internal storage or you have
component device into the proper slot.
EXIF/MP3/WMA/AAC/WAV/M-Jpeg/
exceeds 30 degrees.
no power.
another luminous source
environment. Please disconnect the set
it to PC. 2. Please reconnect the set
big plug of the USB cable to another
9

Regulation & Compliance
Federal Communications Commission (FCC) Notice
This device complies with Part 15 of the FCC Rules.
This device may not cause harmful interference, and (2)
cluding interference that may cause undesirable operation.
Warning:
Changes or modifications to this unit not expressly
void the users authority to operate the equipment.
NOTE: This equipment has been tested and found t o
to Part 15 of the FCC Rules. These limits are designed to
in a residential installation. This equipment generates, uses,
and used in accordance with the instructions, may cause
there is no guarantee that interference will not occur in a
interference to radio or television reception, which can be
is encouraged to try to correct the interference by one or
or relocate the receiving antenna.
- Reorient
- Increase the separation between the equipment and
- Connect the equipment into an outlet on a circuit different
- Consult the dealer or an experienced radio/TV technician
Limited Warranty
Please read this Limited Warranty carefully. The limited
of your new digital picture frame, when purchased in
retailer and used for non-commercial purposes. We
material defects for a period of 90 days from the date
for warranty claims.
1.Please maintain the Warranty Statement in a safe
the original box in the event you need to make a
claim in best done in the original box or an alternative
contact our Customer Service team about the
2.GiiNii Customer Service and Technical Support: 1-
3
.Parts and Labor Coverage. During the first 90 days
at its option, at no charge if the product is found to be
GiiNii will provide a new product of similar or greater
replacement parts at its sole discretion. Replacement
replacement or repair of other parts of the product.
product back to GiiNii, at their cost. Pending review
of the product, that shipping cost will be refunded to the
contact Customer Service and receive a Return
made without a Return Authorization Code. After the
responsibility of the owner.
4.Excluded Items Not Covered by the Warranty:
a Cosmetic damage or damages due to accident,
b Commercial use of the product;
c Damage due to improper operation, improper
d Customer inability to read, understand
the provided
Operation is subject to the following two conditions: (1)
This device must accept any interference received, in-
approved by the party responsible for compliance could
comply with the limits for a Class B digital device, pursuant
provide reasonable protection against harmful interference
and can radiate radio frequency energy and, if not installed
harmful interference to radio communications. However,
particular installation. If this equipment does cause harmful
determined by turning the equipment off and on, the user
more of the following measures:
receiver.
from that to which the receiver is connected.
for help.
warranty set forth below is given by GiiNii, the maker
the United States of America through an authorized
warranty this product against manufacturing and
of purchase. Do not return your product to the retailer
place along with your dated sales receipt. Please retain
warranty claim. Returning your product for a warranty
package that ensure its safe return to GiiNii. Please
appropriate return-shipping package.
866-909-3550. Or, on line at: www.giinii.com.
of ownership, GiiNii will repair or replace the product,
defective due to material or manufacturing defects.
value at its discretion. Or, provide new or rebuilt
or repair of one part of the product does not constitute
The customer bears the responsibility to ship the
customer. To make a warranty claim, you must first
Authorization Code. No repairs or replacements can be
first 90 days of ownership, repair costs are the
misuse, abuse or negligence;
maintenance, improper power supply;
instructions on how to properly use the product;
10

e Modifications of any part of the product in any way;
repair of the product;
g Damage resulting from acts of nature or God.
To make a Warranty Claim please have the following
a Your original dated proof of purchase from an
b Your original package that your product was sold in.
original purchase receipt. If you do not have the
Service team to determine the best way to return
damages incurred during return shipping; insurance
c Please provide written statement (typed or printed
defective. On this document, you will need to include
Service, as well as your Name, return address, and
should be insured and sent via Registered Mail with
Warranty Disclaimers
GiiNii and its parent company, affiliates or subsidiaries
damages for breach of any expressed or implied
prohibited by applicable law, any implied warranty of
this product is limited in duration to the duration of
by state; this warranty gives you specific legal rights
Replacement Parts
If you need a replacement part for your GiiNii Digital
customerservice@giinii.com.
f Damage resulting from unauthorized attempted
items:
authorized retailer in the United States;
Your warranty claim will not be honored without the
original package, please consult with our Customer
your product to us. GiiNii cannot be responsible for
is highly recommended.
in block letters) that describes why your product is
the Return Authorization Code provided by Customer
a daytime phone number. Return shipments to GiiNii
proof of delivery.
shall not be liable for any incidental or consequential
warranty on this product. Except to the extent
merchantability or fitness for a particular purpose on
this warranty. Application of this warranty may vary
and you may have others based on the state you live in.
Picture Frame, call us at 1-866-909-3550 or write to us at:
Changes or modifications to this unit not expressly
approved by GiiNii voids this warranty and may result
in personal injury and/or property.
Warning
11
 Loading...