


Table of Content
CHAPTER 1
Introduction
Specification
CHAPTER 2
Installing The Monitor
Control Function
CHAPTER 3
Adjusting The Monitor
OSD Scre
Adjustment Icon __________________________ 12
APPENDIX
Signal Connector Pin-out
Q & A
__________________________________
____________________________
_____________________
________________________
_____________________ 11
en _____________________________ 11
__________________ 16
1
9
7
17

15 LCD mo nito r ____________________________________
CHAPTER 1
I
NTRODUCTION
BEFORE INSTALLING YO
READ THIS MANUAL CO
PAY ATTENTION to all WARNING and CAUTIONS
DO NOT use computer components not recommend by the
manufacture
Do not attempt to service the monitor your self. If a problem occurs,
contact the manufacture's authorized service center
ABOUT YOUR M
This monitor is a microprocessor-controlled, color monitor that uses a
TFT LCD panel. The monitor conforms to EPA Energy Star and
VESA DPMS (Display Power Management Signaling) power
management standards.
RGB MODE
This monitor is equipped with a microprocessor that identifies your
computer 's video mode and allows user to adjust the setting.
ONITOR
UR MONITOR
VER TO COVER.
1
_____________________________________ 15 LCD monitor
FACTORY-PRESET MODES
Table 1 shows standard video mode setting that has been
pre-adjusted at the factory for accurate video display. These setting
are stor
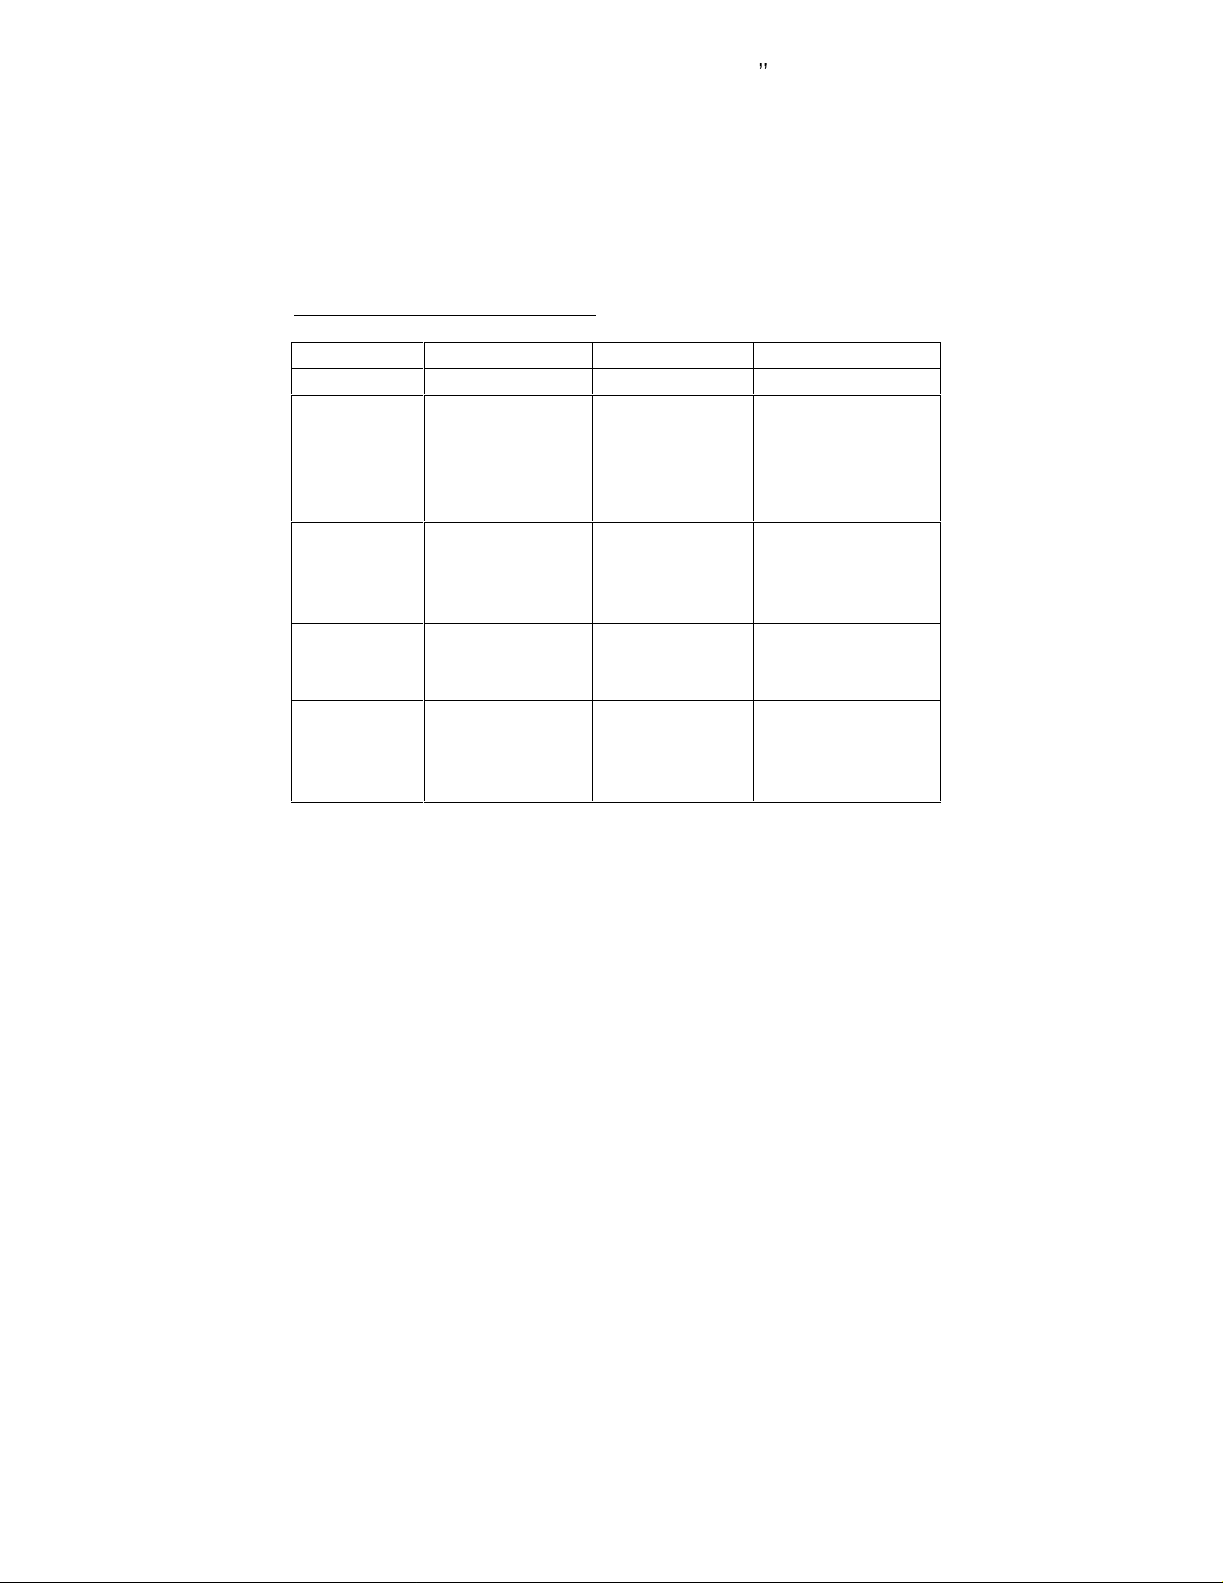
Table 1. Factory-Preset Modes
Mode
NEC
VGA
SVGA
XGA
Macintosh 640x480
ed in the monitor's memory
Resolution
640x400
640x350
720x400
640x480
640x480
640x480
800x600
800x600
800x600
800x600
1024x768
1024x768
1024x768
832x624
1024x768
1024x768
H-
Freq.(KHz)
24.83
31.47
31.47
31.47
37.86
37.5
35.16
37.88
48.08
46.87
48.36
56.47
60
35
49.7
48.78
60.241
V-
Freq(Hz)
56.4
70
70
60
72
75
56.3
60.3
72.2
75
60
70
75
66.7
74.55
60
74.927
2

15 LCD mo nito r ____________________________________
S
PECIFICATIONS
15 LCD Monitor
Overall Dimension (HxWxD): 356 x 37
Shipping Weight (G/W):
Effective Display area (H/V): 304.1 x 228.1 mm
Display colors:
Scan Frequencies:
Horizontal
Vertical
Viewing Angle:
Number of Pixels:
Pixel pitch:
Picture Tube:
Power:
V
RGB Signals:
Display Data Channel:
Input
Consumption
ideo Connector:
Video
Sync
Compatibility
4.5Kg
16.7M (dithering) colors
31.47K to 60KHz
60Hz to 75Hz
120 /100
1024x768 pixels
0.297x0.297 mm
15" TFT LCD panel
110~240VAC (auto-sensing)
Frequency: 48-62Hz
35Watts maximum (on)
1 Watts (Power saving off mode)
15pin Mini D-sub (Standard)
Analog RGB 0.7Vp-p/75
Separate
VESA DDC 1/2B
5 x 118 mm
(Horizontal & Vert
ical)
Operations:
3

_____________________________________ 15 LCD monitor
User Controls
On Screen Display
Adjustment
Control Type:
Compatibility:
Environm
Operating Temp
Storage Temp.
Operating Humidity
Storage Humidity
Agency Approval
EMI
Emi
Energy Saving
Safety
ental Limits:
ssions
H-
-4
On/Off Power button
Select down,
Increment
Auto Adjustment button
Contrast, Brightness
Color temperature
Multi-language
Digital
IBM and compatible, Apple
Macintosh, NEC
32 to 113
10 to 85% without Condensation
10 to 95% without Condensation
FCC-B and CE
MPR-II
EPA energy star, VESA DPMS
UL, TUV
& Decrement
position, V-position
F ( 0
to 45
to 140
F ( -20 to 60
C )
C )
4

15 LCD mo nito r ____________________________________
PRECAUTIONS
HANDLING
The monitor must be treated with caution and not be exposed
to impact and shock. The monitor is made of fragile glass panel.
Do not expose to sharp
Never touch the display area or rub on it with a hard, stiff object
or tools because the panel is easily scratched, even your
monitor is protected with one glass filter.
Every effort has been made to protect the panel, however the
monitor is an ex
CLEANING
The display area is highly prone to scratching. Do not use
ketone type material (ex. Acetone), Ethyl alcohol, toluene, ethyl
acid or Methyl chloride to clear the panel. It might permanently
damage the panel.
The desirabl
Hexane.
shock.
tremely fragile product.
e cleaners are water, IPA (Iso Prophyl Alcohol) or
Don t let water or oil penetrate the monitor. If the droplets are
kept for a long time, Staining and discoloration may occur.
Keep food particles and fingerprints away from the display area.
STORAGE
Do not store the monitor in temperature higher than 35 degree
Celsius or humidity higher than 70% and no condensation.
5

_____________________________________ 15 LCD monitor
Store in dark places away from sunlight and ultra violet (UV)
radiation.
6

15 LCD mo nito r ____________________________________
CHAPTER 2
P
RODUCT PACKAGE
Open the shipping carton an
are missing or damaged, contact your dealer immediately.
The package should include the following items
Analog Color TFT LCD Monitor
Accessory Box:
1. VGA cable x 1
2. AC to DC adapter x 1
3. Power Cord x 1
4.
User s manual x 1
INSTALLING THE MONITOR
The monitor is equipped with an auto sensing power supply for
voltage ranges from 110~240VAC, 60/50Hz. Confirm the line
voltage designation on the rear panel of the monitor.
d check the contents. If any items
7

_____________________________________ 15 LCD monitor
FOLLOW THESE STEPS T
O INSTALL THE MONITO
1. Before you connect the cables, make sure that the monitor
and the system unit power switches are OFF
2. Please follow the following drawing to remove the plastic
back over in order to connect the signal cable and power
cable
3. Plug one end of the 15pin signal cable to the monitor and
the other end to the video signal connector at the rear of the
system. Tighten the two screws on the cable connector on
both ends, otherwise the screen will be abnormal and LED
light is yellow color, not the normal green color.
4.
Connect the powe
adapter
5.
Connect the power cord on the AC outlet, see the below
1 2
r to the monitor through the AC/DC
R
3
5
4
8
Auto Menu Select
-
+
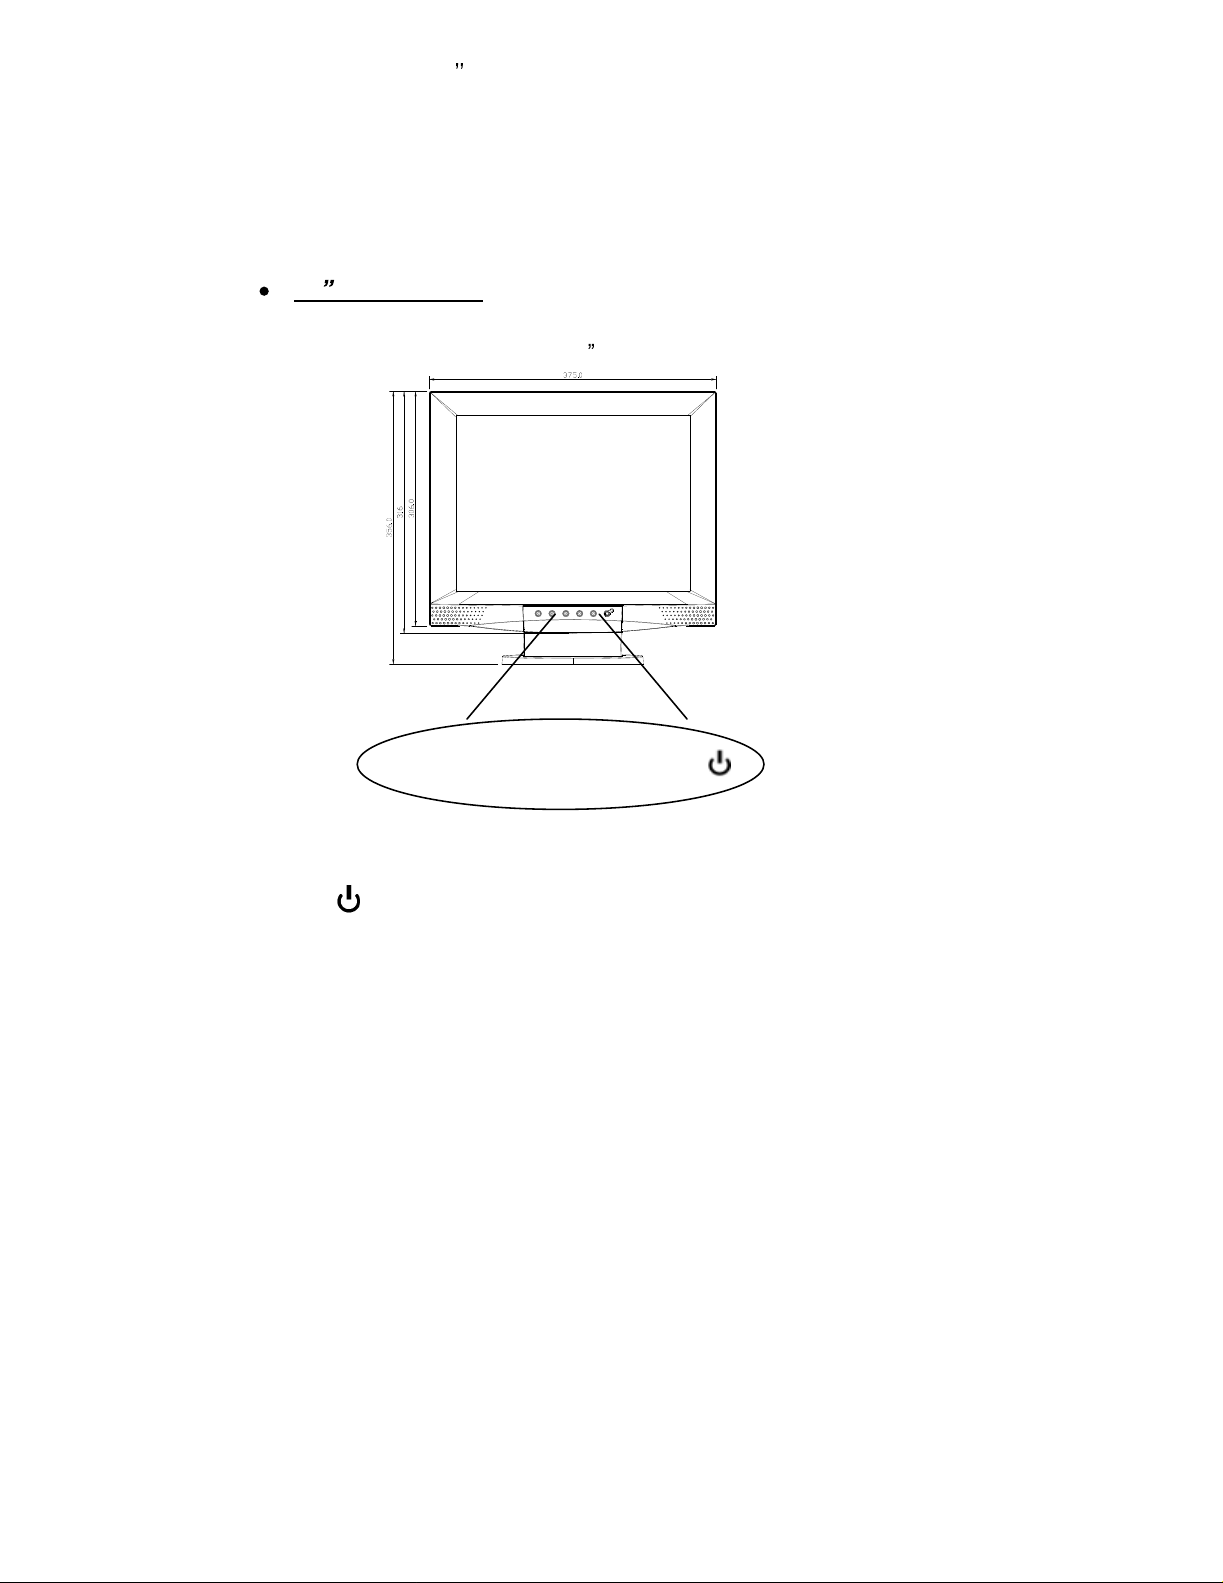
15.1/ 14.1/ 13.3 LCD mo nitor _________________________
CONTROL FUNCTIONS
The Monitor control functions are located on the lower center of the
front view side. They are shown in the figure below and described
in the following paragraphs.
15 LCD Monitor
The outlook of 15 LCD front side
The control key description
1.
2.
-
&
+
3. Select
4. Menu
5.
Auto
:
Power switch
:
decrement & increment / Volume control
:
down key
:
activate the on screen display screen
adjustment
9

_____________________________________ 15 LCD monitor
The control key description
1.
: Power switch
Use the power switch to turn ON or OFF power. We
recommend turning your system power on first, then the
LCD monitor
2.
& +
: decrement & increment
The two keys are defined to decrement or increment the
values of each selected items.
3. Select
This key is used to select the wanted adjustment item. It
always move down to the next item
4. Menu
Press the Menu ke
screen. It is a toggle key. Press twice to turn off the on
screen display screen. After 30 sec idle time, the OSD
screen will automatically turn off.
5.
Auto adjustment
Pressing this key to get the better visual perfo
: down key
y to activate the on screen display
rmance.
10

language
DOS TXT / GFX off
VERSION XGADFB11
15 LCD mo nito r ____________________________________
CHAPTER 3
ADJUSTING THE MONITOR
The LCD monitor is designed to work with a range of compatible
video adapters on the market. Due to the possible deviations
between these video adapters, you may make some adjustment
to fit the monitor for ada
pter used.
ADJUSTMENT PROCEDURE
1. First, you must activate the OSD screen through pressing the
MENU key, the screen will show in the center of screen as
below:
Note
already done this procedure and only ex
the setting.
: In the last paragraph, we will assume that you had
1024X768 75HZ / 60KHZ
AUTO ADJUSTMENT
OSD SCREEN
plain how to change
menu
menu
menu
user
100
-
5130
11

_____________________________________ 15 LCD monitor
2. Use the Selection key to select the required adjustment item
down.
3.
Use the & +
key to do the desired function or go into the
second menu item to do the fur
ther change.
AUTO-ADJUSTMENT
WE STRONGLY RECOMMEND THAT YOU USE THIS
ITEM TO GET THE OPTI
Use the Selection key to select auto-adjustment , then press
or + to get the optimized quality.
RGB
ADJUSTMENT
Use the Select key to select the
screen will display as below
1024x768 75Hz/60KHZ
Auto-
Balance
CONTRAST
RED
GREEN
BLUE
BALANCE
RED
GREEN
BLUE
MIZED VISUAL QUALITY.
icon, then press
20
18
19
49
50
26
or
+ , the
VERSION XGADFB11-
5130
12

15 LCD mo nito r ____________________________________
Adjust the contrast value
Use the Select key to select the CONTRAST item, then
press - & +
adjust R,G,B simultaneous or separate R,G,B value.
can use this item to change the RGB purity.)
Color Balance
Use the Select key to select the balance item, then press
- & +
to get the best color balance effect or separate set the
RGB color value.
RGB intensity)
The easy way to adjust the contrast and color balance setting is
to use the auto-balance item.
GEOMETRY ADJUSTMENT
Use the Select key to select the
th
e screen will display as below
1024x768 75Hz/60KHZ
PHASE
to get the best contrast op
(You can use this items to
timization. You can
(you
change
icon, then press
223
24
1056
25
- & +
the
, then
VERSION XGADFB11-
If you want to go back to the previous OSD menu screen,
pressing MENU key then you will see the OSD screen as
previous page 11.
13
5130

_____________________________________ 15 LCD monitor
VERTICAL & HORIZONTA
1. Use the Select key to move to the ICON, then press
to move the whole screen l
2. Use the Select key to move to the ICON, then press
to move the whole screen down or up to the center position.
ADJUST THE VIEWING S
Use the Select key to move to the
- & + to get the larger viewing size.
PHASE ADJUSTMENT
Adjust phase tracking of display signal to reduce the display
flicker. The invalid phase tracking will cause unstable and
flicking display.
Use the Select key to move to the P
+
to get better image quality.
L POSITION ADJUSTMENT
eft or right to the center position.
CREEN SIZE
icon , then press
hase item, then press
- & +
- & +
- &
MULILANGUAGE
We can support five OSD languages for customer selection.
1024x768 75Hz/60KHZ
English
German
French
Italian
Spanish
VERSION : XGADFB11-5130
14

15 LCD mo nito r ____________________________________
DOS Tx
Now, you can select the display mode as 640x400 (called
graphic mode), or 720x400 (called text mode).
Color Temperature
We provide three
the other is 9300. Use the Select key to move to the
temperature
setting. When user set at 6500 or 9300, then the user can
change
BRIGHTNESS Adjustment
Use the Select key to select the item, press
brightness value.
UNDERSTAND THE DISPLAY RESOLUTION SETTIN
To understand your display mode setting.
In the OSD screen, you will see the Horizontal
Vertical frequency (VF), display resolution (MODE) and the
monitor Firmware version (ROM LEVEL). It is automatically
detected by the monitor user can not change this setting.
t/GFX
, then press
the
modes
value.
, one is user mode, one is 6500 and
& +
to
select
the
color temperature
& +
to change the
frequency (HF),
color
t
G
APPENDIX
SIGNAL CONNECTOR PIN-OUT
15

_____________________________________ 15 LCD monitor
POWER CONNECTOR
Pin 1
Pin 2
+12V output
RGB SIGNAL CON
Pin 1
Analog Red Input
Pin 2
Analog Green Input
Pin 3
Analog Blue Input
Pin 4
Ground
Pin 5
Digital Ground
Pin 6
Analog Red Ground
Pin 7
Analog Green Ground
Pin 8
Analog Blue Gro
Pin 9
NC
Pin 10
Sync Ground
Pin 11
Ground
Pin 12
SDA ( DDC Data)
Pin 13
H. Sync
Ground
NECTOR
und
Pin 14
V. Sync
Pin 15
SCL ( DDC CLK )
Q & A
Q1. When your adapter refresh rate setting is 85Hz or
above, the LCD can t display anything, what action
s
hould be taken to make LCD monitor display
correctly?
1.
Restart computer and enter
Safe Mode .
16

15 LCD mo nito r ____________________________________
2.
Enter
3. Select
Adapter .
4.
Change
Optimized
5. Restart computer.
Q2. When pressing the auto-adjustment function, the
screen still can t get the best visual image. What will
you to recover this problem?
My Computer
Display .
Setting
Refresh Rate
,
and select
Advanced
to
OK
Control Panel
Default or
Close .
Please enter the OSD menu to manual adjust the phase and
clock setting, the detail ad
manual Chapter 3.
justment procedure, please see the
17
 Loading...