


Content
Installing The Monitor............................................................................................... 1
Operating Instructions............................................................................................... 2
Safety Precautions..................................................................................................... 3
Care and Maintenanc
Control Functions....................................................................................................... 5
Adjustment Procedure................................................…….................................. 6
Auto-Adjustment................................................................................................... 6
RGB Adjustment.......................................................……................................... 6
Contrast Value Adjustment.......................................……..................................... 7
Color Balance.......................................................................…..............................7
Geometry Adjustment.....................................................……............................. 7
Vertical & Horizontal Position Adjustment...........................…........................... 7
Viewer Screen Size Adjustment................................................…….................... 7
Phase Adjustment............................................................................…….............. 8
Multilanguage Support............................................................................……...... 8
DOS Txt/GFX............................................................................................……… 8
Color Temperature.....................................................................................……... 8
Brightness Adjustment.............................................................…..................…... 8
Audio Volume Control (Optional).................................................................…... 8
Mute On/Off (Optional)................................................................................…... 8
Understanding the Display Resolution Setting...................................................... 8
e.............................................................................................. 4
General Specifications..............................................................................…............... 9
General Performance...............................................................................…..............10
0
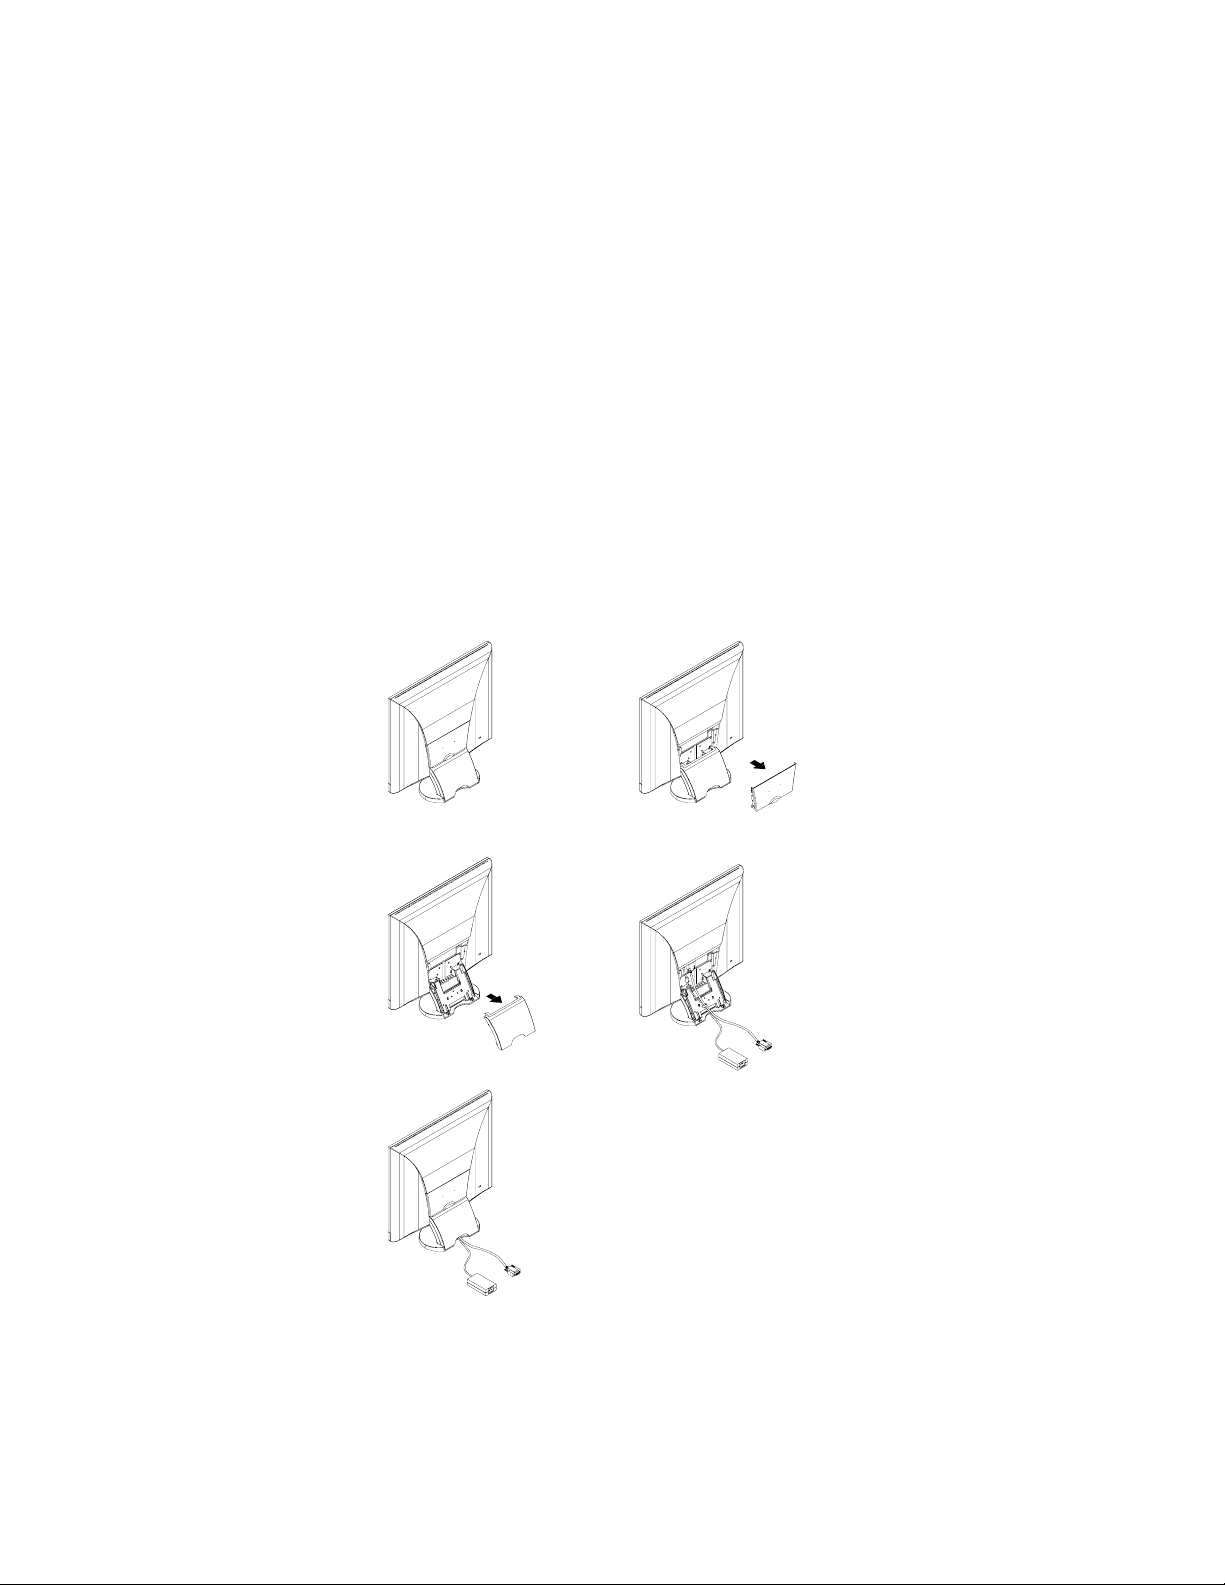
Installing The Monitor
FOLLOW THESE STEPS TO INSTALL THE MONITOR
1. Before you connect the cables, make sure that the monitor and the system unit power
switches are OFF.
2. Please follow the following drawing to remove the plastic back over in order to connect the
signal cable and power cable.
3. Plug one end of the 15pin signal cable to the monitor and the other end to the video signal
connector at the rear of the system. Tighten the two screws on the cable connector on both
ends, otherwise the screen will be abnormal and LED light is yellow color, not the normal
green color.
4. Connect the power to the monitor through the AC/DC adapter.
5. Connect the power cord on the AC outlet, see the below.
12
3
5
4
1

Operation Instructions
Thank you for purchasing this monitor, a high-resolution multi-scan color monitor. Please
read this guide thoroughly before installation.
FCC RADIO FREQUENCY INTERFERENCE STATEMENT WARNING:
(FOR FCC CERTIFIED MODELS)
This monitor has been tested and found compliant with the limits for a Class B digital
device, pursuant to part 15 of the FCC Rules. These limits are designed to provide
proper protection against harmful interference to a residential installation. This
monitor generates, uses, and can radiate radio frequency energy. Harmful interference
to radio communication may result if it ’s not properly installed and used. However,
there is no guarantee that interference will not occur in a particular installation. If this
monitor does cause serious interference to radio or television reception, resetting the
monitor may determine it. Moreover, users are encouraged to correct interference by
doing one or more of the following:
•Reorient or relocate the receiving antenna.
•Move the monitor and the receiver further away from each other.
•Connect the monitor into an outlet on a circuit different from that to which the receiver is
connected.
•Consult your local dealer or an qualified technician.
FCC Warning:
To assure a continued FCC compliance, a user must use a grounded power supply cord and the provided
shielded video interface cable with bonded ferrite cores. Also, any unauthorized changes or modifications
to this monitor would void the user ’s authority to operate this device.
Note: If necessary, shielded interface cables and the A.C. power cord must be used to meet the emission
level limits.
EMI Certification
The Class B digital apparatus meets all requirements of the Canadian Interference-Causing Equipment
Regulation.Cet appareil numerique de class B respecte toutes les exigences du Reglement sur Ic materiel
brouilleur du Canada.
2

Safety Precautions
This monitor is manufactured and tested on the ground principle that a user ’s safety comes
first. However, improper use or installation may not only damage the monitor but also
endanger the user. As a safety precaution, go over the following WARNINGS carefully before
installation, and keep this guide handy.
WARNINGS:
This monitor should be operated only at the correct power sources indicated on the label
at the rear end of the monitor. If you are unsure of the power supply in your residence,
consult your local dealer or power company.
Do not try to repair the monitor yourself as it contains no user-serviceable parts. The
monitor should only be repaired by a qualified technician.
Do not remove the monitor cabinet. There are high-voltage parts inside that may cause
electric shock to human bodies, even when the power cord is disconnected.
Stop using the monitor if the cabinet is damaged. Have it checked by a service technician.
Put your monitor only in a clean, dry environment. Unplug the monitor immediately if it
gets wet, and consult your service technician.
Always unplug the monitor before cleaning it. Clean the cabinet with a clean, dry cloth.
Apply non-ammonia-based cleaner onto the cloth, not directly onto the glass screen.
Keep the monitor away from magnetic objects, motors, TV sets, and transformers.
Do not place heavy objects on the cable or power cord.
For PLUG CABLE EQUIPMENT, the socket outlet should be installed near the
equipment and should be easily accessible.
3

Care and Maintenance
Care
Avoid exposing your monitor directly to sunlight or other heat sources. Place your
monitor away from the sun to reduce glare.
Put your monitor in a well-ventilated area. Do not place anything heavy on top of your
monitor.
Make certain that your monitor is installed in a clean and moisture-free area.
Keep your monitor away from magnets, motors, transformers, speakers, and TV sets.
Safety Tips
If smoke, abnormal noise or odor comes out of your monitor, switch off the power
immediately and call your service center.
Never remove the rear cover of your monitor cabinet. The display unit inside contains
high-voltage parts and may cause electric shock to human bodies.
Never try to repair the monitor yourself. Always call your service center or a qualified
technician to fix it.
Note: This user ’s manual contains graphics and information that is for reference purpose
only and is subject to change without notice.
4
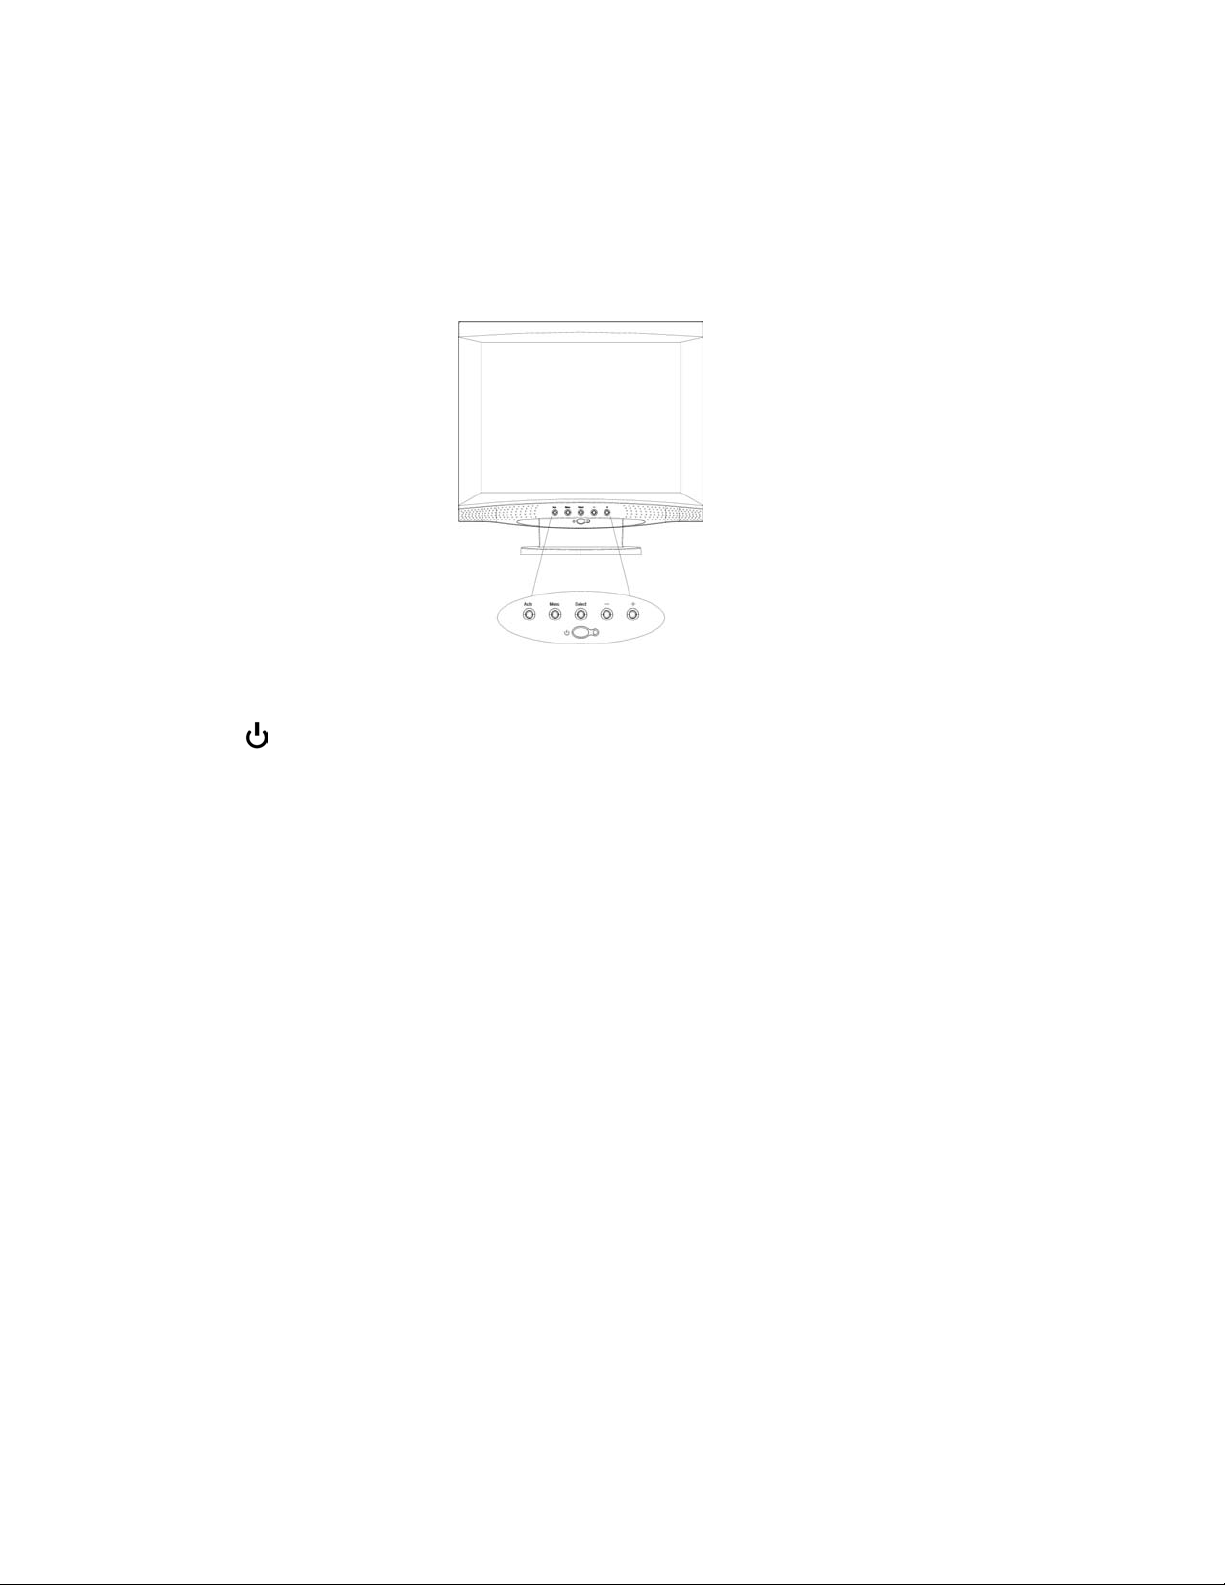
Control Functions
The Monitor control functions are located on the lower center portion of the front panel. These are
shown in the figure below and described in the following paragraphs.
1. : Power switch
Use the power switch to turn power ON or OFF. We recommend turning your system power
on first, then the LCD monitor
2. -&+ : Decrement & Increment/Volume Control Keys
The two keys have two functions, controlled by the MENU key. When activating OSD
screen, the two keys are defined to decrement or increment the values of each selected items.
When de-activation OSD screen, these two keys are used to change the speaker volume
value.
3. Selection: down key
This key is used to select the wanted adjustment item. It always move down to the next
item.
4. Menu
Press the Menu key to activate the on-screen display. This is a toggle key, so press twice to
turn off the on-screen display. After 30 seconds of idle time, the OSD screen will
automatically turn off.
5. Auto adjustment
Press this key to get better visual performance.
5

Adjustment Procedure
1. Press the Menu key to activate the OSD screen. The screen below will appear.
Perform the procedure above whenever you need to change a setting. For the
Note:
succeeding sections, this step will not be included, and users will be presumed to have
performed the procedure.
OSD SCREEN
2. Use the selection key to move to the desired item.
3. Use the -&+ key to carry out the desired function or to go to the second menu item and
perform further changes.
1024X768 75HZ / 60KHZ
AUTO ADJUSTMENT
menu
menu
Language menu
DOS TXT/GFX off
user
100
VERSION XGA-D9G81-5505
Auto-Adjustment
We strongly recommend that you use this item to get the optimized visual quality.
Use the selection key to select auto-adjustment, then press -or+ to get the optimized quality.
RGB Adjustment
Use the selection key to select the icon, then press -or+. The screen below will appear.
1024x768 75Hz/60KHZ
Auto-Balance
CONTRAST
RED 20
GREEN 18
BLUE 19
BALANCE
RED 49
GREEN 50
BLUE 26
VERSION XGA-D9G81-5505
6

Phase Adjustment
You can adjust phase tracking of the display signal to reduce display flicker. And invalid
phase tracking will cause unstable and flicking display. Use the selection key to move the
Phase item, then press -&+ to get better image quality.
Color Balance
Use the selection key to select the COLOR BALANCE field, then press -&+ to get the best
color balance effect or to separately set the RGB color values. You can also use this field to
change intensity of the RGB levels.
The easiest way to adjust the contrast and color balance setting is to use
auto-balance.
Geometry Adjustment
Use the selection key to select the icon, then press -&+. The screen below will appear.
1024x768 75Hz/60KHZ
223
24
1056
PHASE 25
VERSION XGA-D9G81-5505
If you need to go back to the previous OSD menu screen, press the MENU key.
Vertical & Horizontal Position Adjustment
1. Use the selection key to move to the icon, then press -&+ to move the whole screen left
or right to the center position.
2. Use the selection key to move to the icon, then press -&+ to move the whole screen
down or up to the center position.
Viewing Screen Size Adjustment
Use the selection key to move to theicon, then press -&+ to get the larger viewing size.
7

Phase Adjustment
You can adjust phase tracking of the display signal to reduce display flicker. An invalid
phase tracking will cause unstable and flicking display. Use the selection key to move to the
Phase item , then press -&+ to get better image quality.
Multilanguage support
You can select five OSD languages for your convenience.
1024x768 75Hz/60KHZ
English
German
French
Italian
Spanish
VERSION XGA-D9G81-5505
DOS Txt/GFX
You can select display mode as 640x400 (graphic mode) or 720x400 (text mode).
Color Temperature
Three modes are provided: User Mode, 6500, and 9300. Use the selection key to
select the Color Temperature field, then press -&+ to select the color temperature
setting.
Brightness Adjustment
Use the selection key to select the Brightness field, then press -&+ to change the brightness
value.
Understanding the Display Resolution Setting
In the OSD screen, you will see the Horizontal frequency (HF), Vertical frequency (VF),
display resolution (MODE) and the monitor Firmware version (ROM VERSION). These
values are automatically detected by the monitor, and the settings cannot be changed by the
user.
8

General Specifications
LCD type 15.0" XGA Color TFT
Input Signal Analog (0.7Vp-p/75 ohm positive)
Screen area 304.1mm x 228.1mm
Dot Pitch 0.297 mm
Scanning frequency (H) 31.46 KHz-60 KHz , (V) 60 Hz-75 Hz
Resolution 1024 x 768
Refresh Rate 80 MHz (maximum)
Display Color 16.2M colors (dithering)
Luminance 250cd/ (Typ.)
Contrast Ratio 300:1 (Typ.)
Response Time 30ms
View Angle Horizontal: 170, Vertical: 170
Control Type OSD
Plug & Play VESA DDC2B
Audio Not available
Dimension (mm)
Panel (H x W)
Overall (H x W x D)
304.128 x 228.96 mm / 11.97 x 9.0 inches
357.5 x 375 x 118.3mm / 14.07 x 14.76 x 4.66 inches
Net weight 5.0 kg / 11 pounds
Tilt Up 15 /Down 5
AC Input AC 110 V ~240V (48-62Hz)
Power Management VESA DPMS
Power Consumption 30W
Regulatory Compliance FCC, CE, BSMI, Energy Star
Ambient Temperature 0°~45° (operating), -20°~60° (storage)
32°~113° (operating), -4°~140° (storage)
Humidity (Relative) 10~ 85% non-condensing (operating)
10 ~95% non-condensing (storage)
9

General Performance
Preset timing is shown as follows:
Resolution H/V Frequency CLK count of H period
640x480 60Hz/31.47KHz 800
640x480 72Hz/37.86KHz 832
640x480 75Hz/37.5KHz 840
800x600 56.3Hz/35.16KHz 1024
800x600 60.3Hz/37.88KHz 1056
800x600 72.2Hz/48/08KHz 1040
800x600 75Hz/46.87KHz 1056
1024x768 60Hz/48.36KHz 1344
1024x768 70Hz/56.47KHz 1328
1024x768 75Hz/60KHz 1312
720x400 70Hz/31.47KHz 900
640x350 70Hz/31.47Khz 800
640x400 70Hz/31.47KHz 800
1024x768 74.9Hz/60.2KHz 1328
10
 Loading...