

Cube®
3rd Generation
Personal 3D Printer
User Guide
Original Instructions

TABLE OF CONTENTS
1
INTRODUCTION .......................................................................................1
COPYRIGHT INFORMATION ............................................................................1
FCC NOTICE ........................................................................................1
KCC ..............................................................................................1
COMPLIANCE ......................................................................................1
WARRANTY .......................................................................................2
LIMITATION OF LIABILITY ............................................................................2
IMPORTANT SAFETY INFORMATION .....................................................................3
2
Safety Symbols and Definitions ........................................................................3
Safety Guidelines ....................................................................................3
3
CUBE 3D PRINTER FEATURES ..........................................................................4
Cube 3D Printer Features ..............................................................................4
Cube 3D Printer Properties ............................................................................4
AT A GLANCE ........................................................................................5
4
SPECIFICATIONS AND REQUIREMENTS ..................................................................6
5
Weight .............................................................................................6
Software ............................................................................................6
OpenGL Version .....................................................................................6
Windows Requirements ...............................................................................6
MAC OS X Requirements ..............................................................................6
Android ............................................................................................6
iOS ................................................................................................6
Wireless Options .....................................................................................6
USB Mass Storage Device .............................................................................6
Electrical Requirements ...............................................................................6
Material Storage .....................................................................................6
Dimensions .........................................................................................7
Operating Environment ...............................................................................7
6
UNPACKING AND SETTING UP YOUR CUBE ...............................................................8
Contents ............................................................................................8
Unpacking and Installing your Cube .....................................................................8
Initial Setup of the Cube ..............................................................................12
Menu Overview .....................................................................................23
Touchscreen Display ................................................................................23
Print / Setup .......................................................................................23
Navigation ........................................................................................23
Materials .........................................................................................23
Print Plate Calibration ...............................................................................23
Printer Calibration ..................................................................................24
Print Jet Calibration .................................................................................24
Network ..........................................................................................24

System 1 .........................................................................................24
System 2 .........................................................................................24
System 3 .........................................................................................25
Installing A Material Cartridge .........................................................................26
PRINTING YOUR CREATION ...........................................................................28
7
Printing Procedure ..................................................................................28
FINISHING YOUR CREATION ...........................................................................32
8
Removing your Creation from the Print Pad .............................................................32
Removing Rafts ....................................................................................32
Removing Sidewalks ................................................................................33
Removing Supports .................................................................................33
CUBIFY SOFTWARE ..................................................................................34
9
Cubify Software Installation ...........................................................................34
Installing Cubify Software for Windows ..................................................................34
Installing Cubify Software For Apple OS X ...............................................................36
Installing Cubify for Android ...........................................................................37
Installing Cubify for iOS ..............................................................................39
Cubify Software Overview ............................................................................40
Account Settings ...................................................................................41
Design Feed Tab ...................................................................................42
Shop Tab .........................................................................................43
My Shelf Tab ......................................................................................46
Print Tab ...........................................................................................48
Print Settings ......................................................................................49
Printer ...........................................................................................54
Connecting Cubify To Your Printer ......................................................................56
Sidewalks ........................................................................................69
Supports .........................................................................................69
Printing A Model Via Wireless Connection ...............................................................70
Printing From A Desktop Application ....................................................................70
Printing From A Mobile Application .....................................................................73
Saving A Model to A Mass Storage Device ...............................................................77
Desktop Application .................................................................................77
10
OPERATION PROCEDURES ............................................................................79
Applying Cube Glue .................................................................................79
Replacing A Material Cartridge ........................................................................80
Setting Up a Wireless Connection ......................................................................82
Setting Up A Wi-Fi Connection ........................................................................82
Connect To An Ad Hoc Network .......................................................................84
11
CUBE MAINTENANCE .................................................................................86
General Cleaning. . . . . . . . . . . . . . . . . . . . . . . . . . . . . . . . . . . . . . . . . . . . . . . . . . . . . . . . . . . . . . . . . . . . . . . . . . . . . . . . . . . . 86
Removing Waste from the Jet Wiper Purge Bins ..........................................................86
Replacing the Jet Wipers .............................................................................87
Procedure ........................................................................................87

Print Pad Calibration .................................................................................89
Auto Level ........................................................................................89
Gap Verification ....................................................................................92
Manual Gap Adjustment .............................................................................93
Print Pad Maintenance ...............................................................................94
Clean The Print Pad ................................................................................94
Printer Calibration ...................................................................................95
Test Print .........................................................................................103
Cube Name .......................................................................................104
Recovering the Cartridge ............................................................................105
Updating the Cube Firmware .........................................................................108
Updating Firmware Using Wi-Fi .......................................................................108
Updating Firmware Using USB .......................................................................111
Repacking the Printer ...............................................................................113
Contacting Support .................................................................................115
12
CUBIFY SUSTAINABILITY PROGRAM ...................................................................116
1
INTRODUCTION
Thank you for purchasing the Cube® 3D Printer. This printer is portable with a plug and print design that enables everybody in the family
to express their creativity like never before. With multiple material colors to choose from and two types of materials, enjoy the freedom
to print in your true colors or mix it up. With its ready-to-print technology, the Cube provides a new dimension to your imagination and
helps you share your creations with others in the Cubify community at Cubify.com.
At Cubify.com you can:
• Upload your creations
• Purchase creations
• Get your creations 3D printed and shipped to you
• Engage with other creative partners
• Buy the Cube 3D Printer, print cartridges, and supplies
COPYRIGHT INFORMATION
©2015 by 3D Systems, Inc. All rights reserved. This document is subject to change without notice. This document is copyrighted and contains
proprietary information that is the property of 3D Systems, Inc. The 3D Systems logo, 3D Systems, Cube and Cubify are registered trademarks
of 3D Systems, Inc. Use of the Cubify.com website constitutes acceptance of its Terms of Service and Privacy Policy.
FCC NOTICE
This equipment has been tested and found to comply with the limits for a Class B digital device, pursuant to part 15 of the FCC Rules.
These limits are designed to provide reasonable protection against harmful interference in a residential installation. This equipment
generates, uses and can radiate radio frequency energy and, if not installed and used in accordance with the instructions, may cause
harmful interference to radio communications. However, there is no guarantee that interference will not occur in a particular installation.
If this equipment does cause harmful interference to radio or television reception, which can be determined by turning the equipment off
and on, the user is encouraged to try to correct the interference by one or more of the following measures:
—Reorient or relocate the receiving antenna.
—Increase the separation between the equipment and receiver.
—Connect the equipment into an outlet on a circuit different from that to which the receiver is connected.
—Consult the dealer or an experienced radio/TV technician for help.
NOTE: Changes or modications to this equipment not specically approved by 3D Systems may void the user’s
authority to operate this equipment.
KCC
이 기기는 가정용(B급) 전자파적합기기로서 주 로 가정에서 사용하는 것을 목적으로 하며, 모 든 지역에서 사용할 수 있습니다.
This equipment is home use (Class B) electromagnetic wave suitability equipment and to be used mainly at home and it can be used in
all areas.
COMPLIANCE
This equipment conforms with International Electric Committee (IEC) 60950-1 and meets the requirements of the applicable EC
directives.
CAN ICES-3 (B)/NMB-3(B)
This device complies with Industry Canada license-exempt RSS standard(s). Operation is subject to the following two conditions:
(1) this device may not cause interference, and (2) this device must accept any interference, including interference that may cause
undesired operation of the device.
Le présent appareil est conforme aux CNR d’Industrie Canada applicables aux appareils radio exempts de licence. L’exploitation est
autorisée aux deux conditions suivantes: (1) l’appareil ne doit pas produire de brouillage, et (2) l’utilisateur de l’appareil doit accepter
tout brouillage radioélectrique subi, même si le brouillage est susceptible d’en compromettre le fonctionnement.
13D Systems, Inc.

WARRANTY
3D Systems warrants that the Cube 3D Printer will be free from defects in materials and workmanship, during the applicable warranty
period, when used under the normal conditions described in the documentation provided to you, including this user guide. 3D Systems
will promptly repair or replace the Cube 3D Printer, if required, to make it free of defects during the warranty period. This warranty
excludes (i) normal consumable or expendable parts (such as Material Cartridges, Print Pads, and Cube Glue), (ii) repairs required
during the warranty period because of abnormal use or conditions (such as riots, oods, misuse, neglect or improper service by
anyone except 3D Systems or its authorized service provider), and (iii) repairs required during the warranty period because of the
use of non-integrated, non-approved or non-licensed materials in the Cube 3D Printer. The warranty period for the Cube 3D Printer is
ninety (90) days and shall start on the date your Cube 3D printer is activated. For consumers who are covered by consumer protection
laws or regulations in their country of residence, the benets conferred by our ninety (90) day warranty are in addition to, and operate
concurrently with, all rights and remedies conveyed by such consumers protection laws and regulations, including but not limited to
these additional rights.
THIS WARRANTY IS THE ONLY WARRANTY PROVIDED FOR THE CUBE 3D PRINTER. TO THE MAXIMUM EXTENT PERMITTED
BY LAW, 3D SYSTEMS EXPRESSLY DISCLAIMS ALL OTHER WARRANTIES FOR THE CUBE 3D PRINTER AND EACH OF ITS
COMPONENTS, WHETHER THOSE WARRANTIES ARE EXPRESS, IMPLIED OR STATUTORY INCLUDING WARRANTIES OF
MERCHANTABILITY AND FITNESS FOR INTENDED OR PARTICULAR PURPOSES.
LIMITATION OF LIABILITY
3D SYSTEMS WILL NOT BE RESPONSIBLE FOR CONSEQUENTIAL, EXEMPLARY OR INCIDENTAL DAMAGES (SUCH AS
LOSS OF PROFIT OR EMPLOYEE’S TIME) REGARDLESS OF THE REASON. IN NO EVENT SHALL THE LIABILITY AND/OR
OBLIGATIONS OF 3D SYSTEMS ARISING OUT OF THE PURCHASE, LEASE, LICENSE AND/OR USE OF THE EQUIPMENT BY
YOU OR OTHERS EXCEED THE PURCHASE PRICE OF THE CUBE 3D PRINTER.
Warranty Hotline from the Americas
888-598-1440 inside the US and
+1 678-338-3480 outside the US
weekdays during normal business hours
or by email at cubifysupport@cubify.
com.
Warranty Hotline from Europe
+44 1442 279 839 (UK) or
+49 6151 357 499 (DE) weekdays during
normal business hours or by email at
cubifysupport@cubify.com.
Warranty Hotline from Europe
+44 1442 279 839 (UK) or
+49 6151 357 499 (DE) weekdays
during normal business hours or by
email at cubifysupport@cubify.com.
23D Systems, Inc.

2
IMPORTANT SAFETY INFORMATION
SAFETY SYMBOLS AND DEFINITIONS
HOT SURFACE HAZARD: A HOT SURFACE IS ACCESSIBLE IN THE VICINITY OF THIS SIGN OR AT THE PRINT
JET. AVOID CONTACT WITH THESE AREAS. HOT SURFACES CAN CAUSE SEVERE BURNS.
Caution: Indicates something may happen that could cause loss of data, damage to equipment, or could cause
personal injury.
Caution: Indicates a pinch point hazard that could cause personal injury.
SHOCK WARNING: INDICATES A POTENTIAL SHOCK HAZARD.
SAFETY GUIDELINES
• Follow all safety rules in this section and observe all cautions and warnings in this guide.
• DO NOT modify any safety features or make modications to the Cube. Doing so is prohibited and voids the manufacturer’s war-
ranty.
• Use of print materials, or 3D prints other than 3D Systems’ print materials and genuine 3D Systems’ components may void the
warranty.
• Adult supervision is required; observe children closely and intervene as necessary to prevent potential safety problems and ensure
the Cube’s appropriate use. Ensure small 3D prints are not accessible to young children. These 3D prints are potential choking
hazards for young children.
• DO NOT change a material cartridge during printing; doing so may damage the Cube.
HOT SURFACE HAZARD: DO NOT TOUCH THE PRINT JETS DURING SETUP AND OPERATION. THE PRINT JETS
BECOME VERY HOT.
Caution: DO NOT disconnect the CUBE from utility power while the print jets are hot. Wait until the print jet’s
amber light turns off before disconnecting from utility power as this may damage the print jet.
Caution: Read and follow all instructions prior to setting up the printer.
SHOCK WARNING: DUE TO RISK OF SHOCK, AVOID CONTACT WITH ALL INTERNAL ELECTRONIC
COMPONENTS.
WARNING: THE CUBE SHOULD ONLY BE SERVICED BY AUTHORIZED SERVICE TECHNICIANS. PRIOR TO ANY
PART REPLACEMENT PROCEDURE, THE PRINTER MUST BE POWERED OFF AND DISCONNECTED FROM
UTILITY POWER.
WARNING: HAZARDOUS MOVING PARTS. KEEP FINGERS AND OTHER BODY PARTS AWAY.
To ensure safety, please exercise caution when operating your Cube. Read and follow all safety precautions as outlined in this user
guide. Be careful when operating your Cube 3D Printer to ensure proper printing and be mindful of and avoid hot surfaces.
33D Systems, Inc.

CUBE 3D PRINTER FEATURES
3
The print jets heat print materials and produce thin, owing streams of melted plastic creating layers that adhere to the print pad. After
each layer is produced, the print pad lowers so that a new layer can be drawn on top of the last. This process continues until the last
layer on top of the creation has been printed.
CUBE 3D PRINTER FEATURES
• Material cartridge
• 25 free 3D print creations
• USB inlet port and Wi-Fi connectivity
CUBE 3D PRINTER PROPERTIES
Technology: Plastic Jet Printing (PJP)
Print Jets: Up to two (2) jets*
Maximum Creation Size: 6” x 6” x 6” (152.40 mm x 152.40 mm x 152.40 mm)
Material: Tough recyclable plastic
Layer Thickness: .070 mm (70 microns) | .200 mm (200 microns)
Supports: Fully automated; easy to peel off
Cartridge: 1 cartridge prints 13-to-14 mid-size creations. Up to two (2) cartridge capacity.*
Material Colors: Visit www.cubify.com for a listing of color choices.
*The number of jets and cartridge capacity depends on the printer model and conguration.
43D Systems, Inc.
AT A GLANCE
A
B
C
D
E
F
G
H
I
J
K
4
B
F G
A
B
C C
J
D
H
H I
K
E
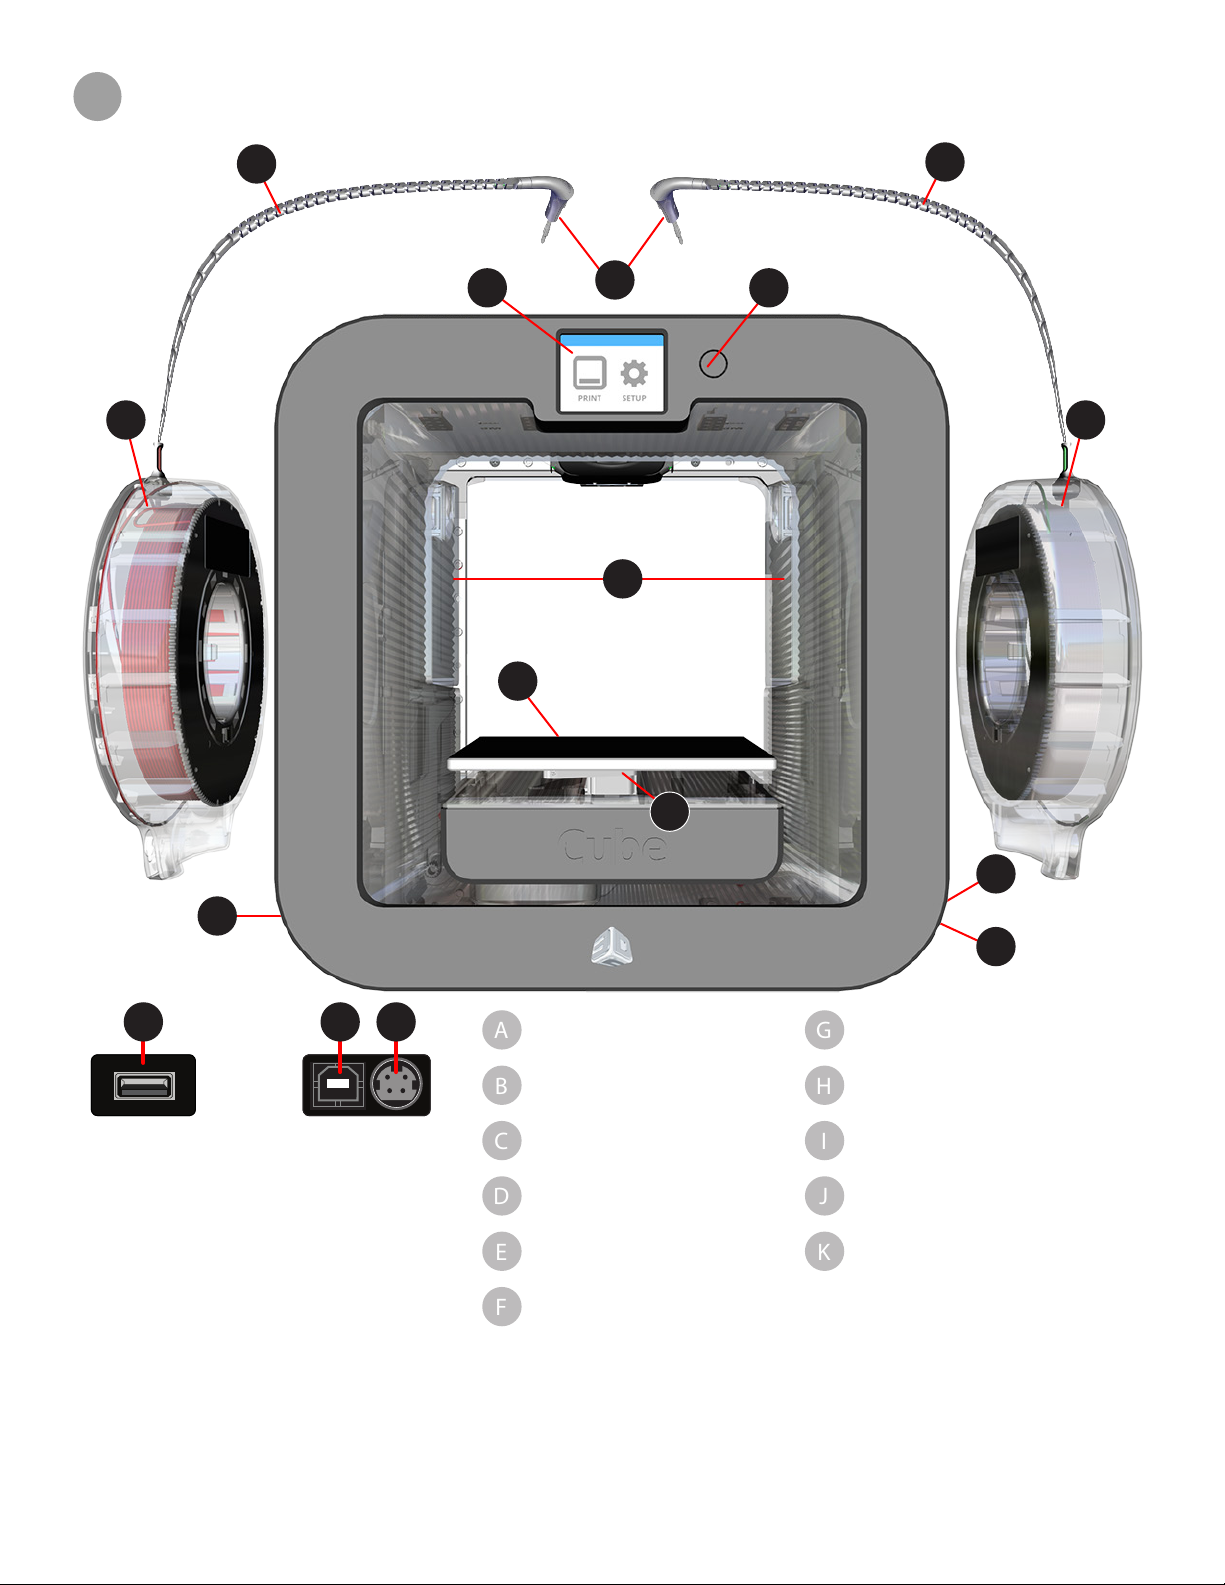
Print Jets
Print Jet Tubes
Material Cartridges
Print Pad
Print Platform
Touchscreen Display
I
L
On / Off Button
USB Inlet Port
(Mass Storage Device)
Power Inlet
Purge Bins
USB B Port
(for future use)
53D Systems, Inc.

SPECIFICATIONS AND REQUIREMENTS
5
WEIGHT
Maximum Cube Weight (with cartridges): 17 lbs. (7.7 kg)
Maximum Box Weight: 23 lbs. (10.43 kg)
SOFTWARE
Complimentary Cubify software for Windows and Mac OS X as well as iOS and Android mobile applications. These applications
generate .cube3 le for printing on your printer.
OPENGL VERSION
• OpenGLES 2.0+ on mobile platforms
• Open GL 3.0+ on Windows and Mac (using 3.2 library of GLU)
WINDOWS REQUIREMENTS
• Cubify software runs on 32- and 64-bit operating systems
• Windows 7, 8 and 8.1
• Minimum screen resolution: 1024 x 768
• Windows is required for Ad Hoc Wi-Fi print job submission.
MAC OS X REQUIREMENTS
• OS X 10.8 and 10.9
• Minimum screen resolution: 1400 x 900
ANDROID
• 4.0 ICS (tablets supported)
IOS
• 6.0+ (iPhone4 and newer)
• Minimum screen resolution: iPhone4
WIRELESS OPTIONS
• 802.11b/g with WPS Infrastructure
• Ad Hoc mode
USB MASS STORAGE DEVICE
• USB mass storage device (supplied with the printer) to transfer print les to the printer using the USB inlet port.
ELECTRICAL REQUIREMENTS
Outlet Requirements 100 - 240 Volts, at 50/60 Hz
Electrical Rating: 24V DC, 5 amp.
MATERIAL STORAGE
All polymers degrade with time. The following conditions ensure the material remains high quality:
• Do not unpack cartridges from the foil until the material is needed.
• Store at room temperature: 16-29° C (60 - 85° F)
• Non-condensing relative humidity: 5% - 25%
63D Systems, Inc.
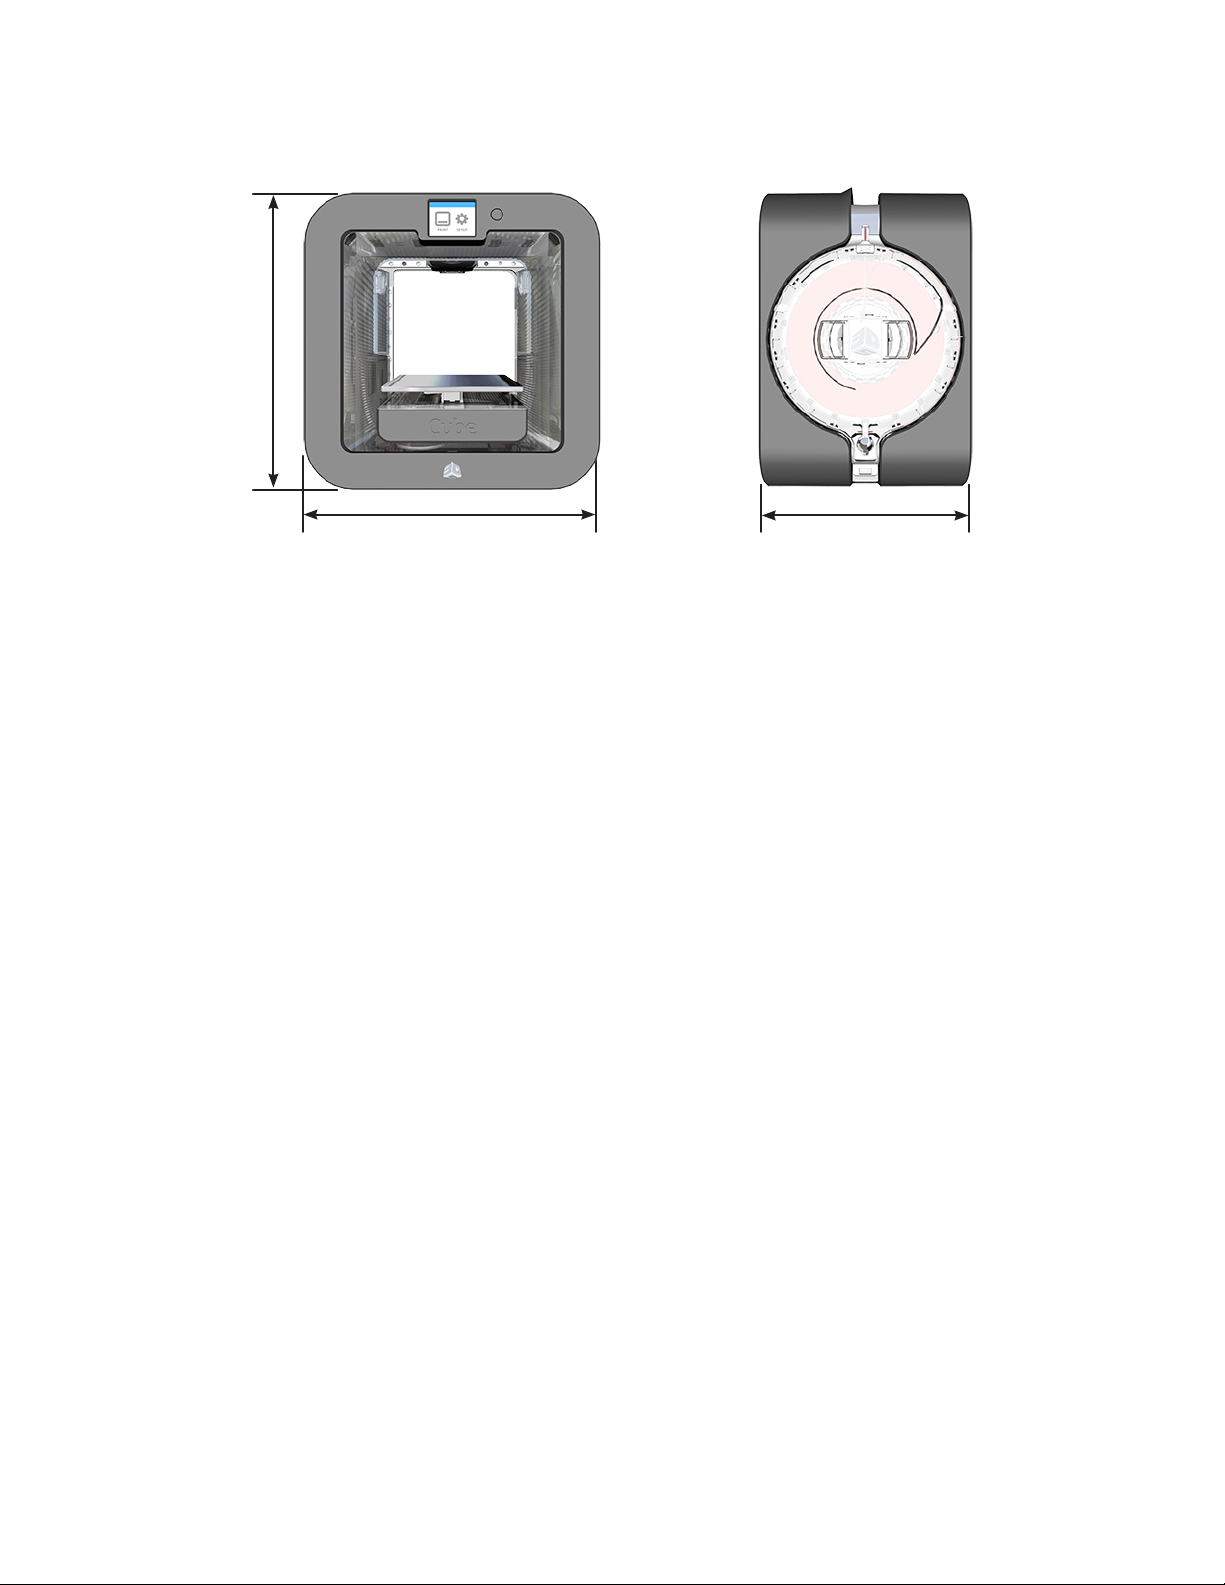
DIMENSIONS
13.3”H x 13.3”W x 11” D / 33.5 x 33.8 x 28 cm
Front View Side View
13.3” (33.5 cm)
13.3” (33.5 cm)
OPERATING ENVIRONMENT
• Room Temperature: 16˚ - 29˚C (60˚ - 85˚F)
• Non-Condensing Relative Humidity: 30% - 60%
11” (28 cm)
73D Systems, Inc.
6
UNPACKING AND SETTING UP YOUR CUBE
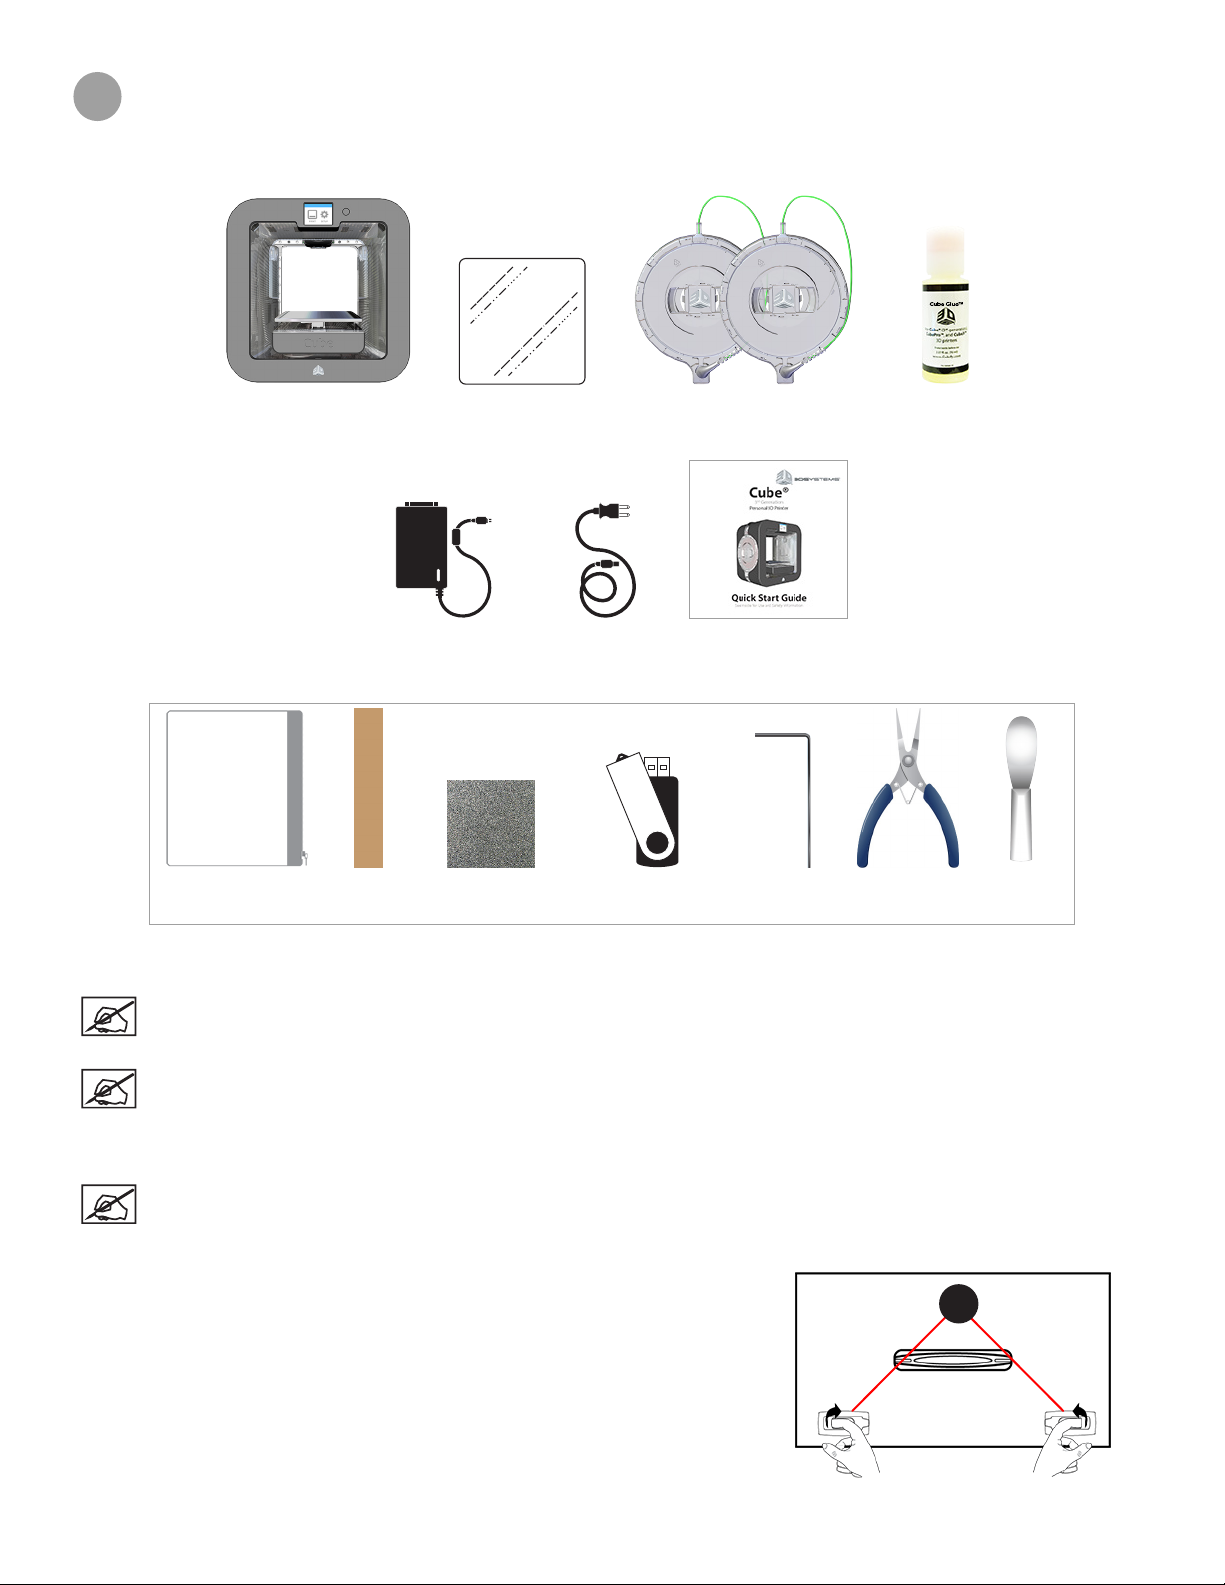
CONTENTS
Removable
Print Pad
Power Supply Power Cord Quick Start Guide
Casing and Contents
Casing
*Depending on the Cube model and conguration, up to two cartridges may be included. Not every printer will be packaged with two
cartridges.
Gap Gauge Sandpaper
USB Mass Storage
Device
Cartridges*Cube Cube Glue
cubify.com
1.5 mm Allen
Wrench
Pliers
Scraper
NOTE: The sandpaper should only be used for lightly sanding the print pad when prompted by the touchscreen
display. It should not be used for sanding parts. For more information, refer to the section titled Print Pad
Maintenance.
NOTE: The actual appearance of the contents may differ from the illustrations.
UNPACKING AND INSTALLING YOUR CUBE
NOTE: Keep all packing materials for future transport. Transporting a printer that is not packaged properly may
damage the printer and void the manufacturer’s warranty.
1. Pull the clips (A) and remove them from the top of the printer box.
83D Systems, Inc.
A
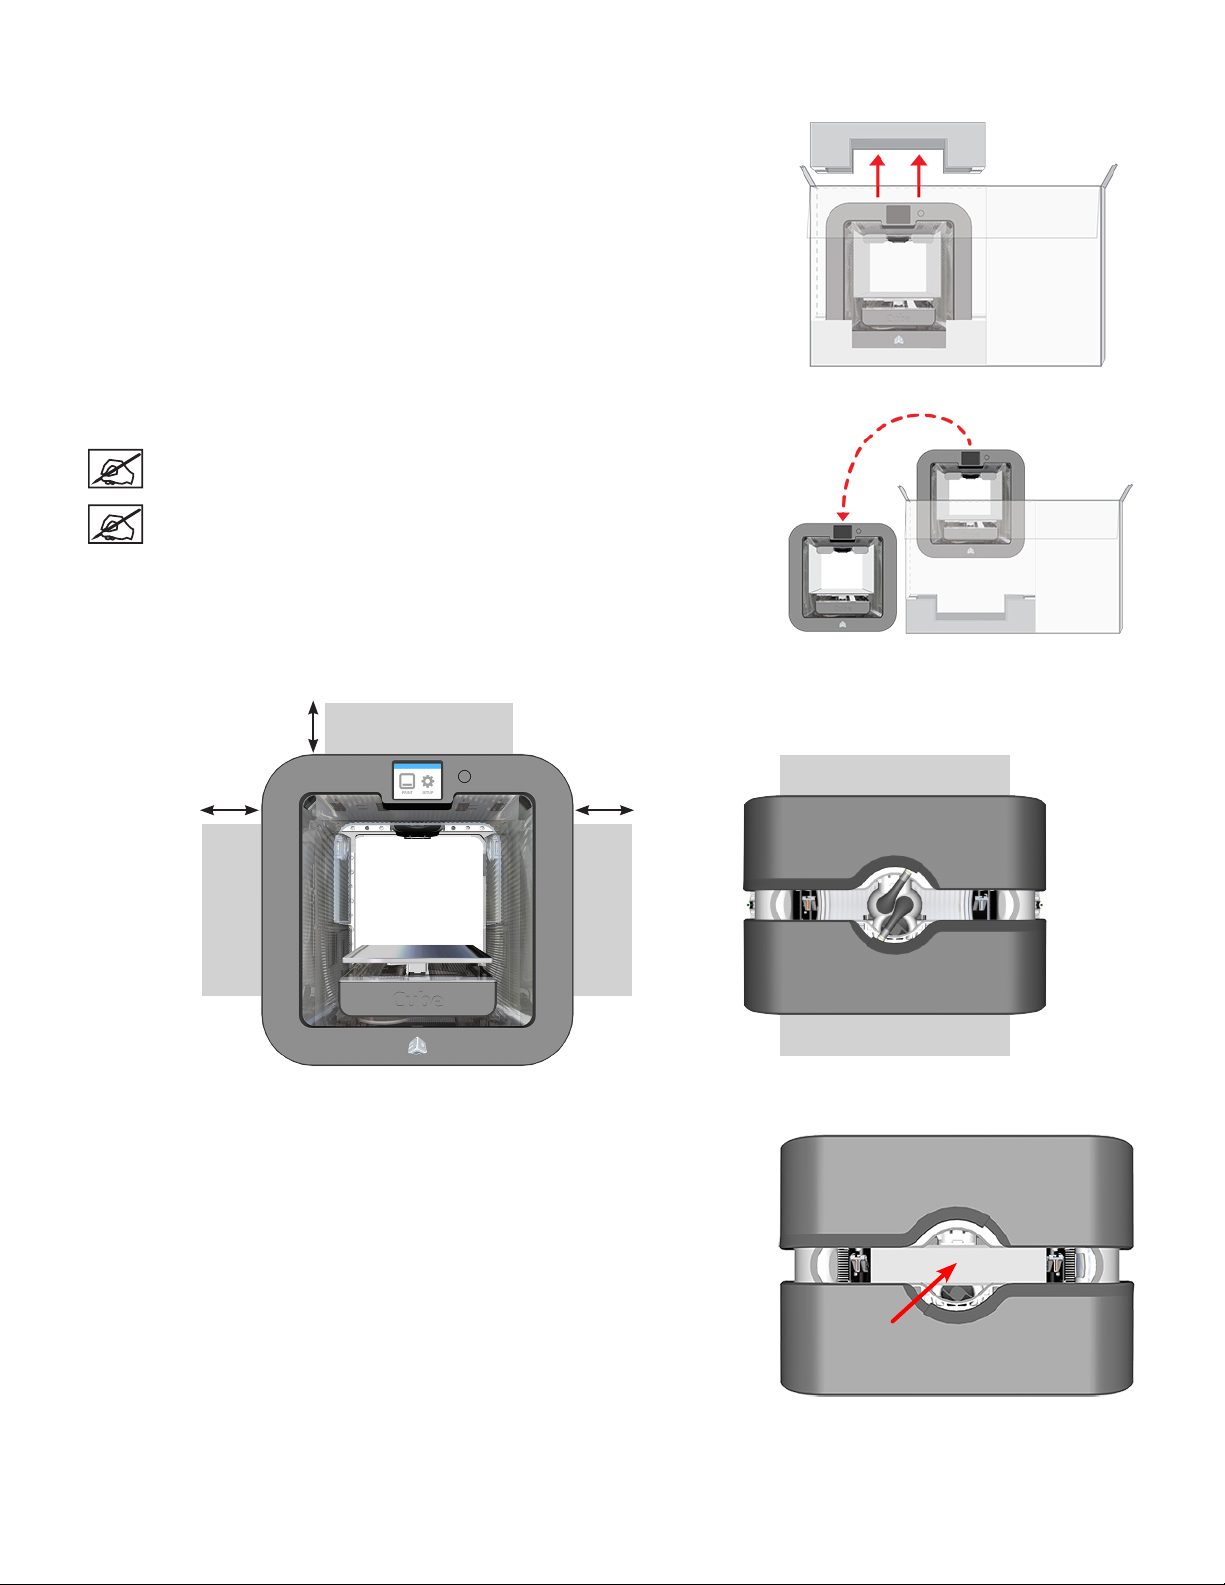
4. Open the box.
5. Remove the upper foam support.
6. Remove the printer from the box and remove the protective bag from the printer.
Place the printer on a solid, level base where you intend to use it.
NOTE: When installing the printer there must be a minimum of 8”
(203 mm) of space on top and on either side of the printer.
NOTE: There must be a minimum of 4” (102 mm) space in front of
and behind the printer.
Front View Top View
8” (203 mm)
Hand Clearance Around the Printer Build Plate Travel Area
7. Remove the top insert.
8” (203 mm)
4” (102 mm)
Back
8” (203 mm)
Front
4” (102 mm)
93D Systems, Inc.
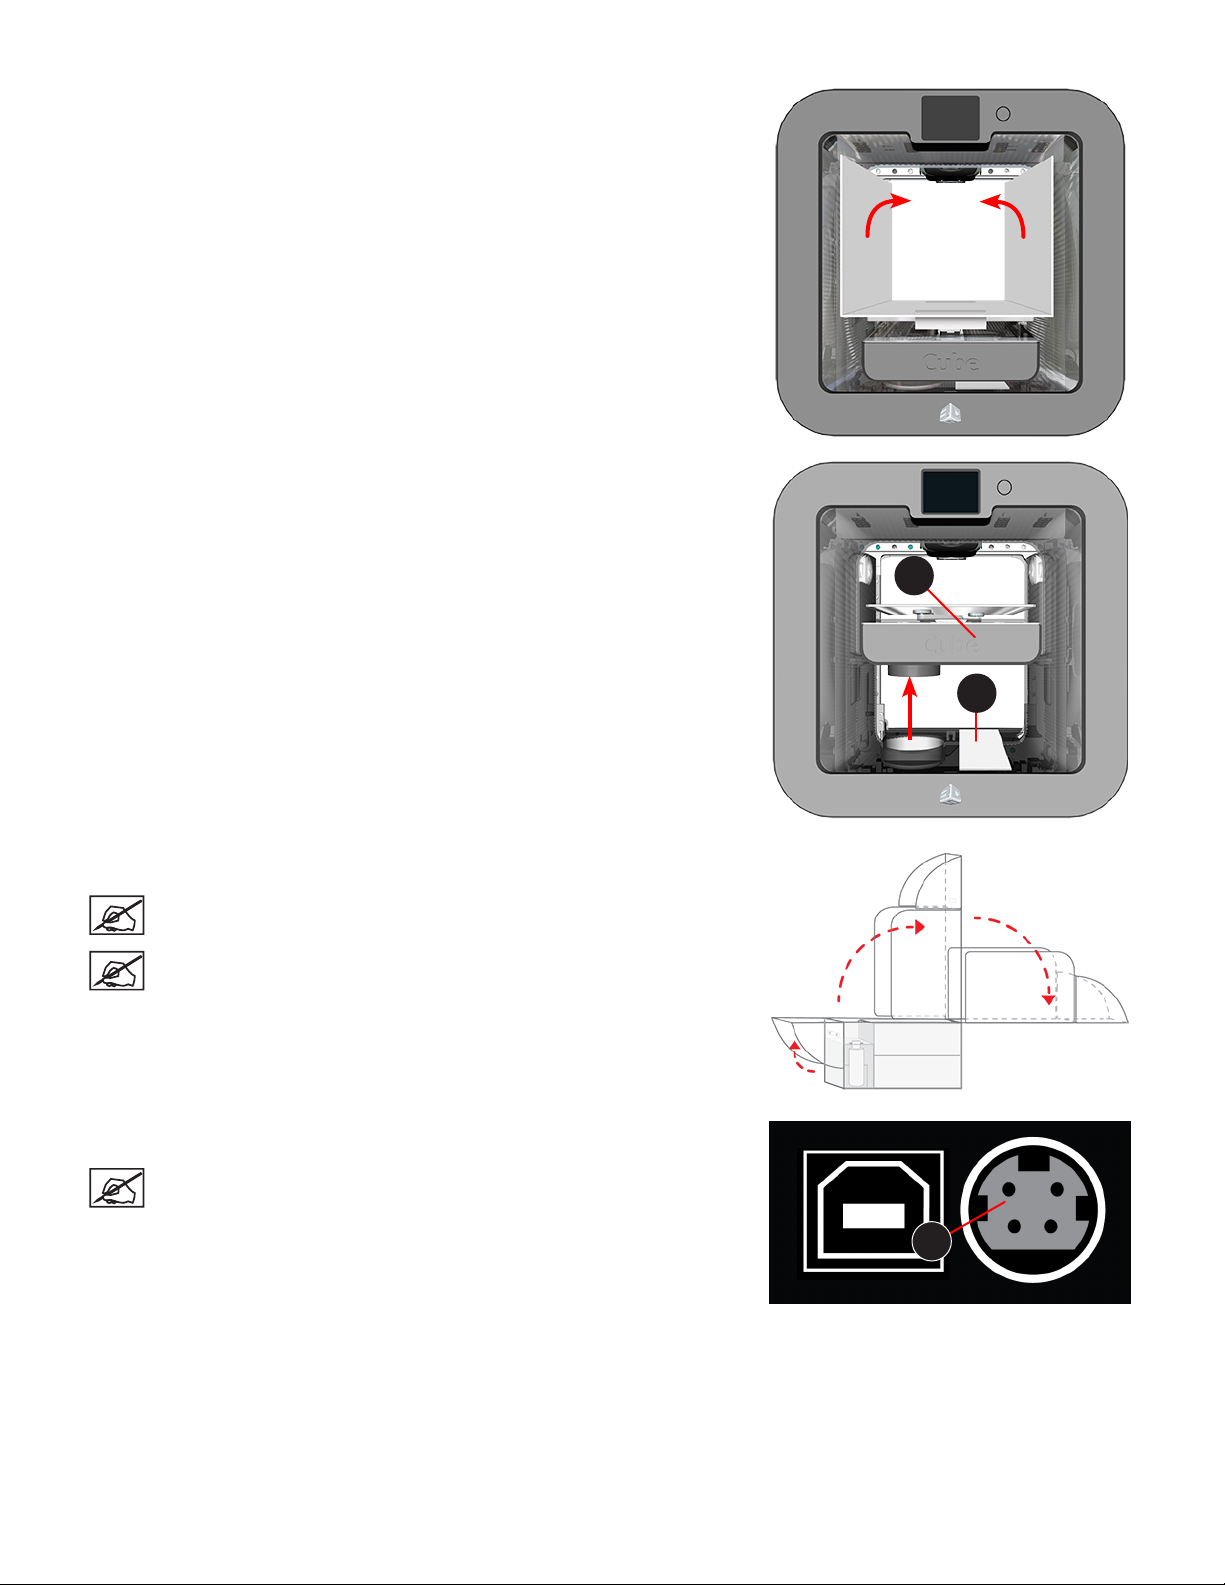
4. Fold the sides inward and remove the lower insert from the printer.
5. Manually raise the print platform (A) and remove the spacer (B) from the printer.
A
6. Open the accessories box and unpack the material cartridge(s)*, the USB mass
storage device, the power supply and cord, and the bottle of Cube Glue.
NOTE: Keep all packing materials for future repacking.
NOTE: *Depending on your conguration, you may receive 1 or 2
cartridges with your printer.
7. Connect the power supply cable to the power inlet port (A) on the printer.
NOTE: Ensure the connection is secure. The cable should lock in
place. To remove the cable, pull back on the outer cable end and
carefully pull it out from the printer.
B
A
103D Systems, Inc.
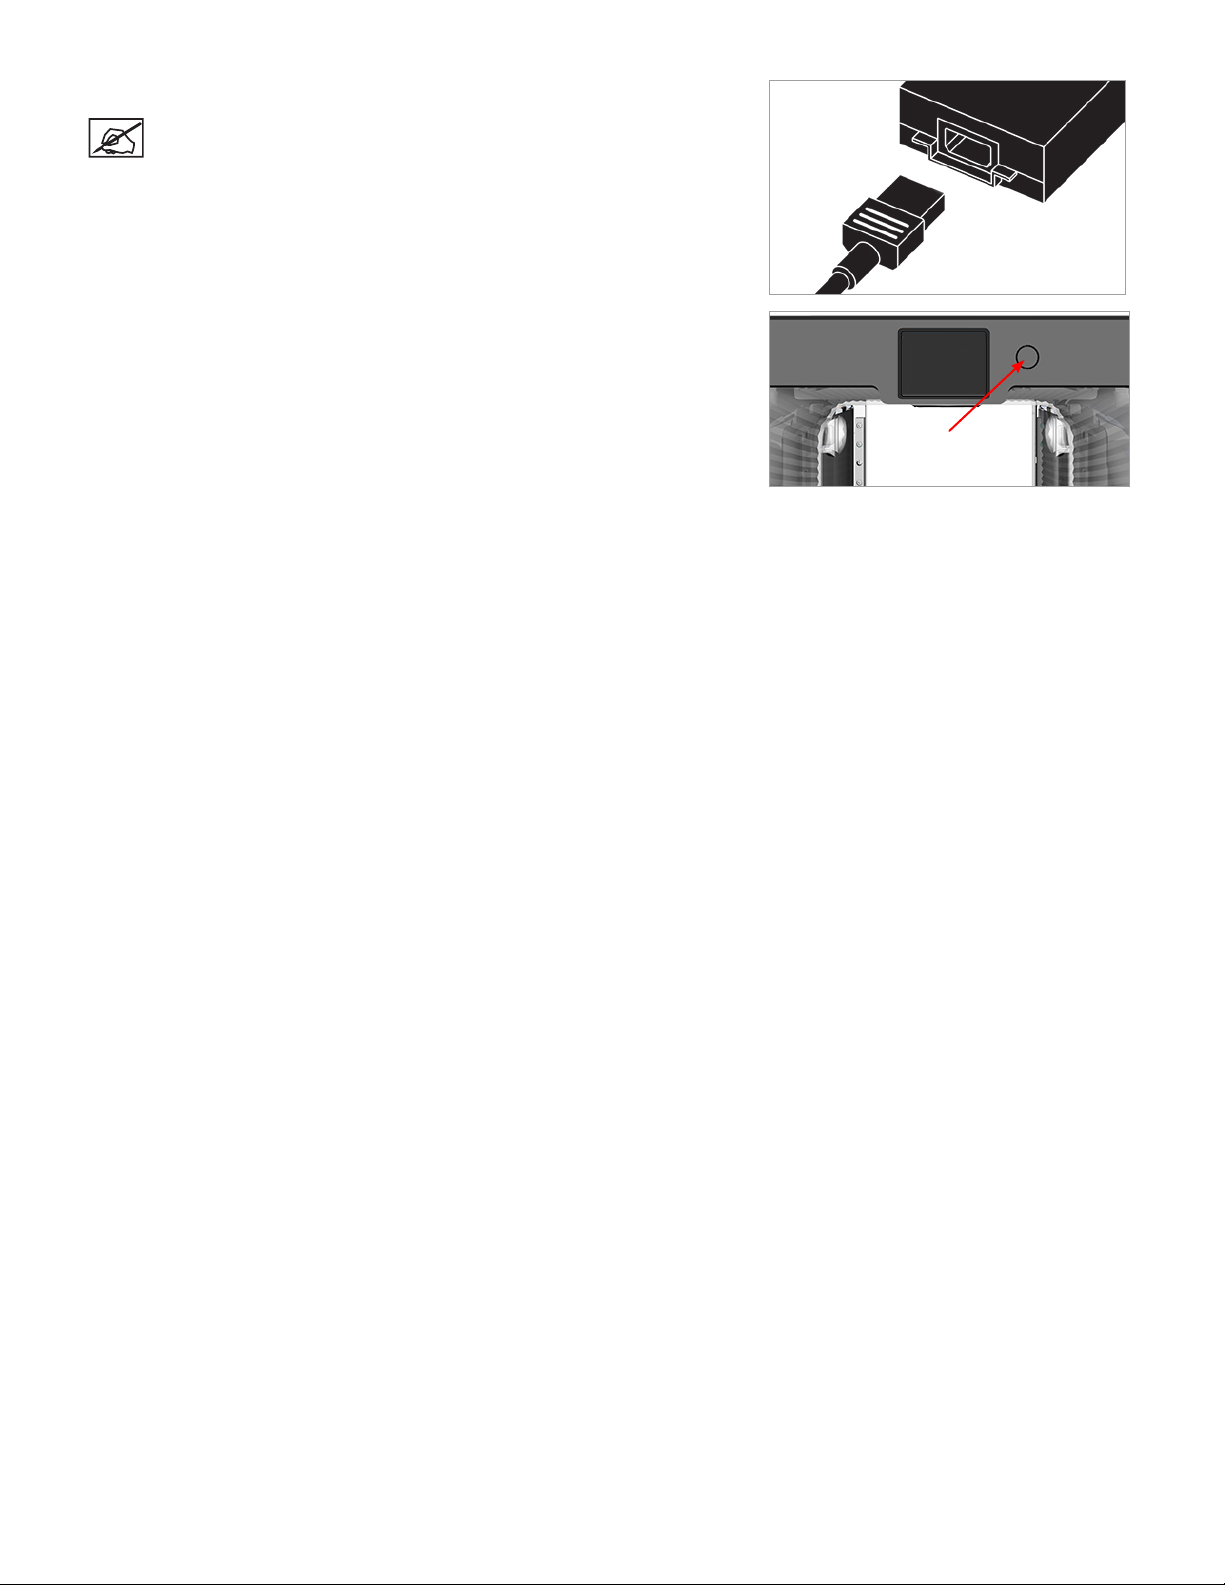
4. Connect the power cord to utility power and to the power supply.
NOTE: Ensure the connection is secure.
5. Power on the printer by pressing the button next to the touchscreen display.
113D Systems, Inc.
INITIAL SETUP OF THE CUBE
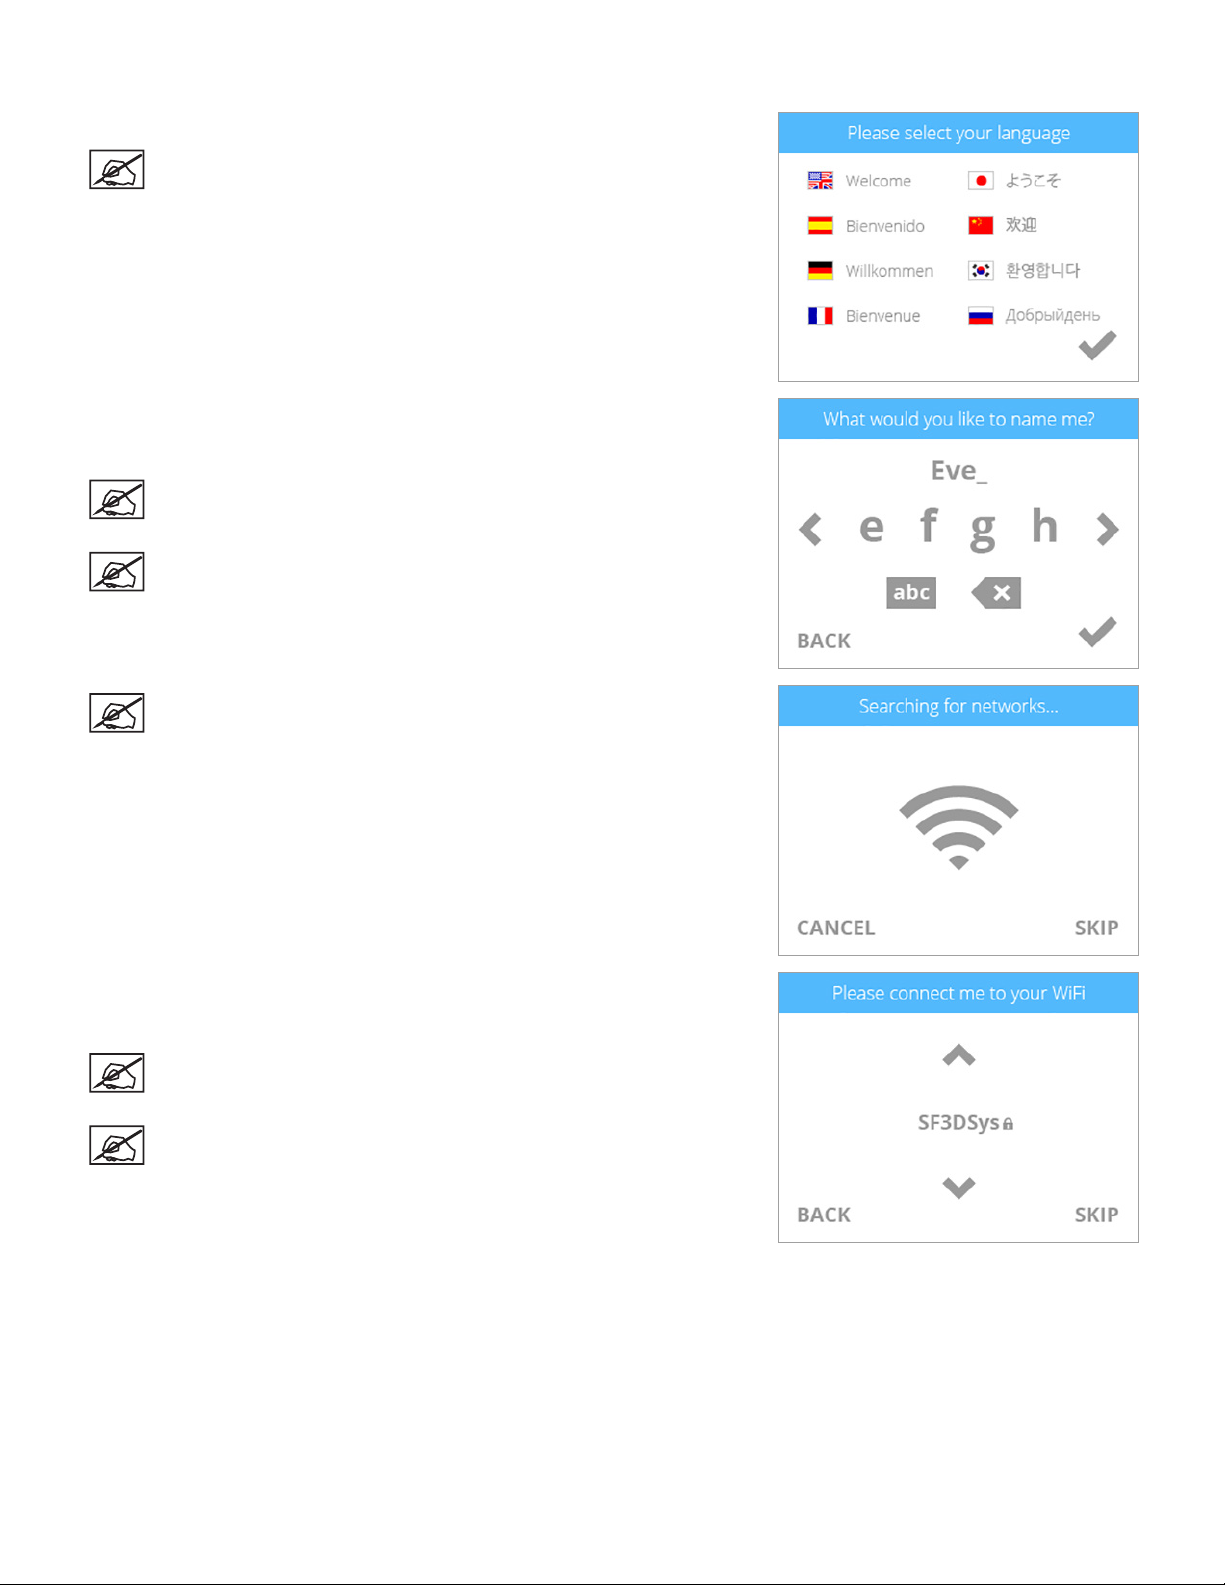
1. Select your language. Select the checkmark to continue.
NOTE: The selected language will be indicated.
2. Enter a name for your printer. Scroll through the characters by pressing the
arrow symbols on each side of the screen. Select the characters to spell the
name. Select the checkmark to conrm your choice.
NOTE: You can change the name of your printer at any time.
Navigate to the System 1 screen, select CUBE NAME and follow the
instructions on the touchscreen display.
NOTE: Selecting the abc button toggles between lowercase letters,
uppercase letters and numerals.
NOTE: The printer will search for area wireless networks.
3. Connect the printer to a wireless network. Use the up or down arrows to scroll to
your network choice. Select the desired network name. Select SKIP to bypass
this step.
NOTE: You can connect to a wireless network at any time. Navigate
to the Network screen, select WIFI and follow the prompts on the
touchscreen display.
NOTE: The printer can also connect to an ad hoc network, a
decentralized network that wirelessly connects a local computer
to the printer directly. The computer must have a wireless adapter
congured for ad hoc mode. The adapter must use the same SSID as
is found in the printer. Connecting to an ad hoc network is discussed
further in the section titled Setting Up an Ad Hoc Network.
123D Systems, Inc.
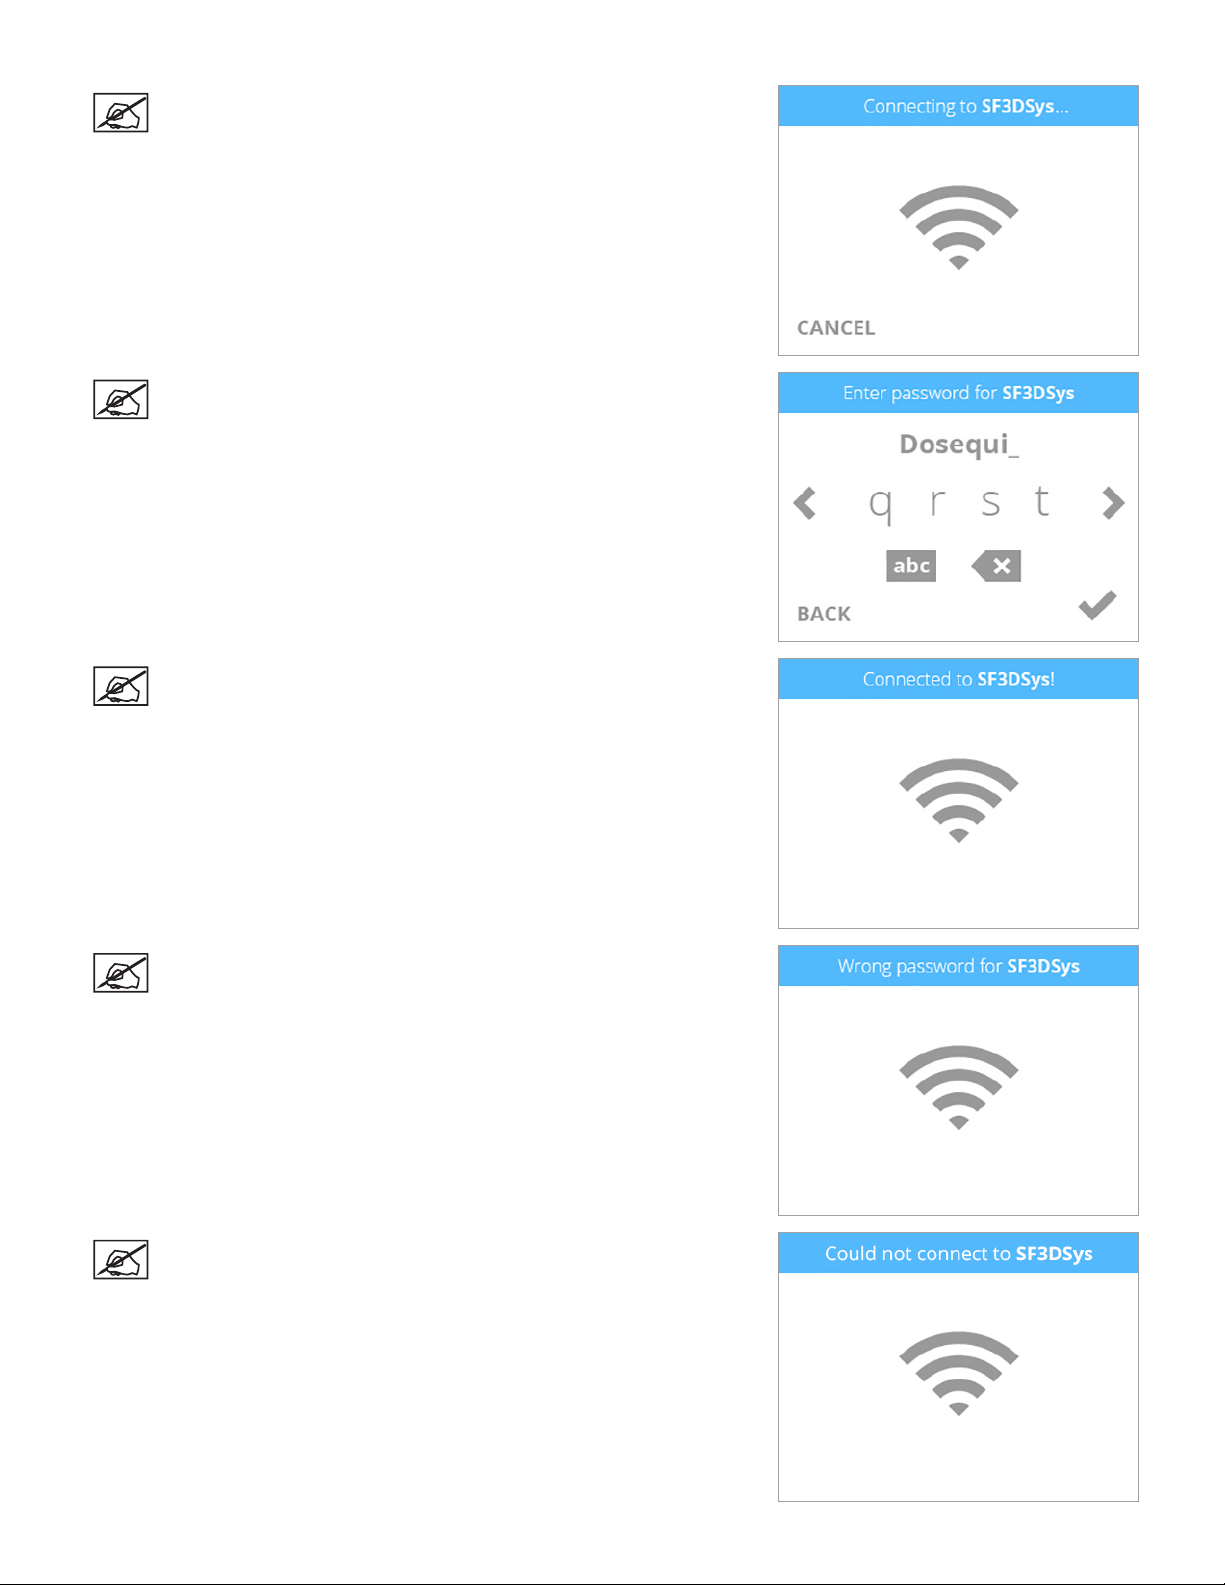
NOTE: The printer will attempt to connect to your network.
NOTE: If the network is password protected, your printer will
rst prompt you to enter the password. Once entered, select the
checkmark to continue.
NOTE: The display will indicate when the network connection has
been made.
NOTE: If the wrong password was entered, you will be asked to
enter the password again after a few seconds.
NOTE: If the printer can not connect to a network, you will be asked
to select another network after a few seconds.
133D Systems, Inc.
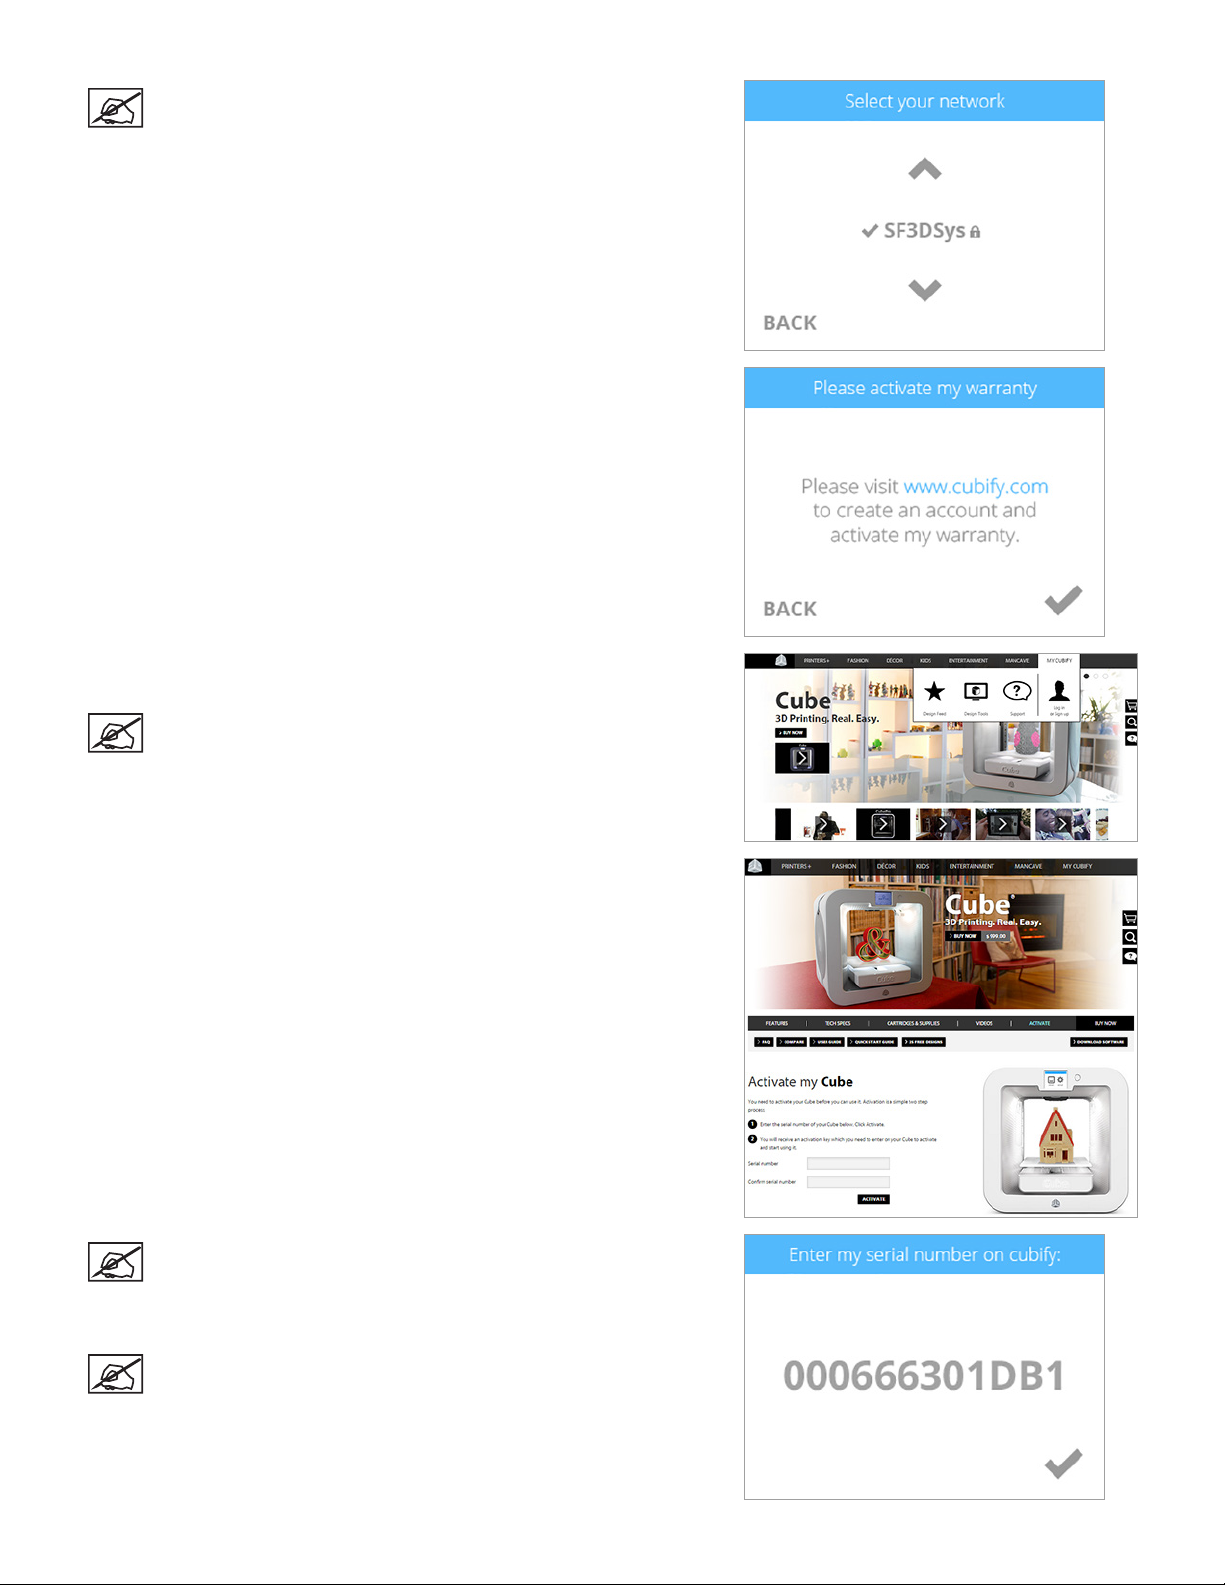
NOTE: Connection to a network is conrmed by a checkmark to
the left of the network name. If the network is secure, a lock icon
will appear to the right of the network name.
4. Select the checkmark to continue to the registration and warranty activation
process.
5. Log in to Cubify.com. Go to www.cubify.com, select My Cubify and log in
to your account.
NOTE: You must be logged in to www.cubify.com to activate
your printer. If you have not activated an account, select SIGN
UP and enter the appropriate information.
6. Go to www.cubify.com/activate.
NOTE: The serial number for your printer will appear on the
printer’s touchscreen display. Take note of the serial number.
You will need it to activate your printer.
7. Select the checkmark to continue.
NOTE: This illustration provides an example of a serial number.
Do not use this number to activate your printer.
143D Systems, Inc.
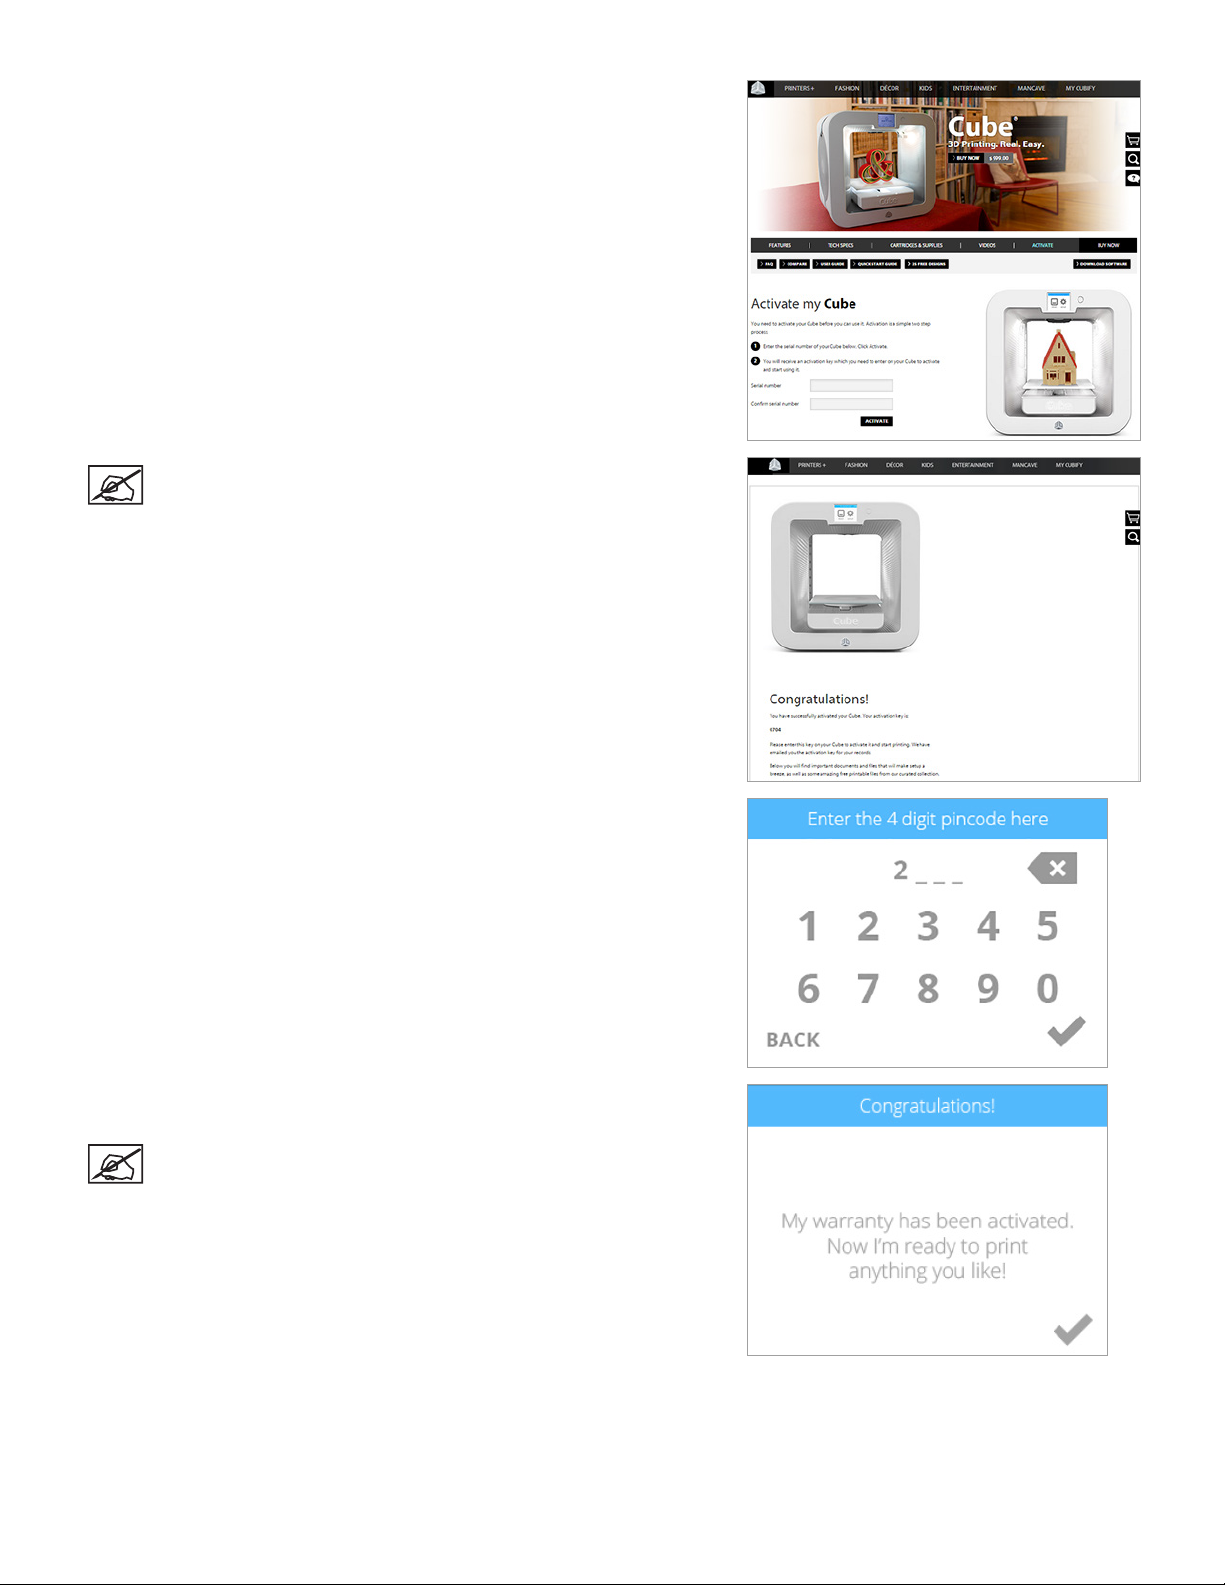
4. Enter your serial number twice and select Activate.
NOTE: Your 4-digit activation code will appear. Make note of
the activation code. You will need to enter it into the printer’s
touchscreen display to activate the printer.
5. Enter the 4-digit activation code into the printer and select the checkmark
to continue.
6. Select the checkmark to complete the registration and warranty activation
process.
NOTE: It is very important to calibrate your printer.
153D Systems, Inc.
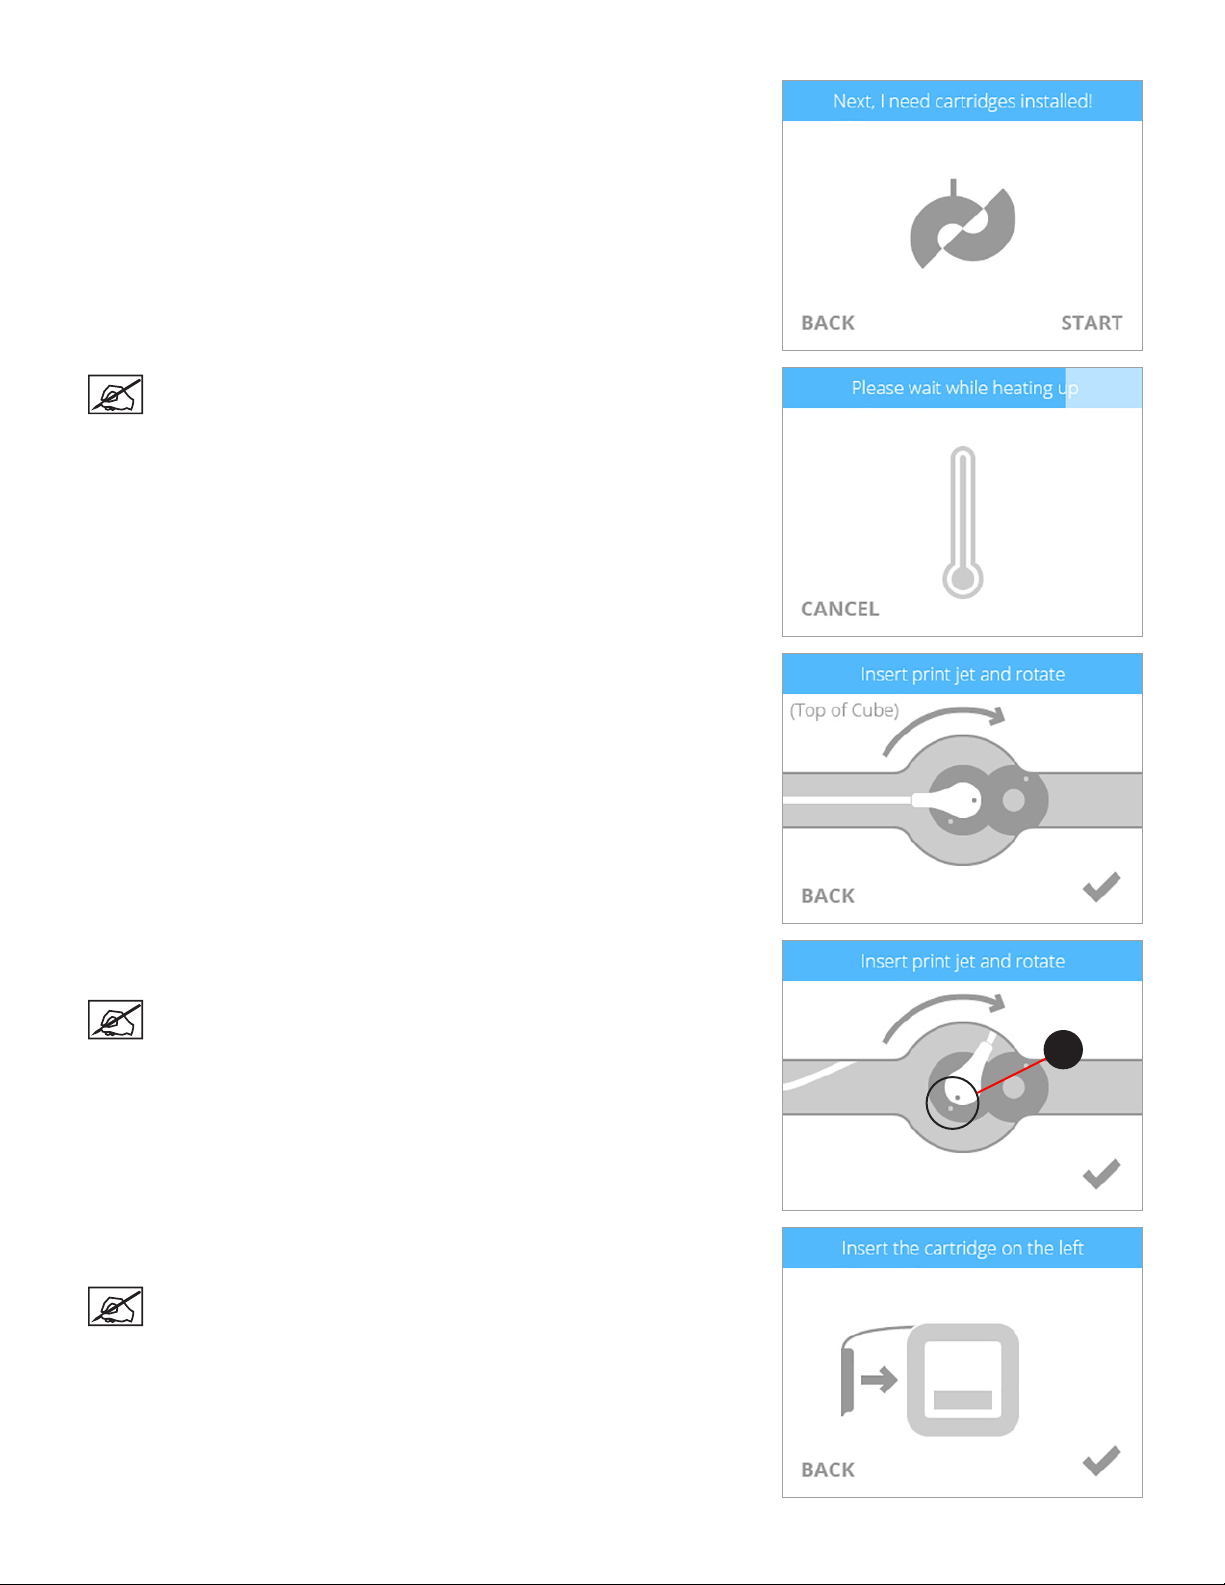
4. Before installing cartridges, select the cartridge icon or select START to begin the
process of installing your print cartridge.
NOTE: The printer will begin to heat. Wait until the printer has
nished heating and then follow the user prompts in the touchscreen
menu.
5. Insert the print jet (from the cartridge that will be mounted on the left side of the
printer) into the left print jet opening on top of the printer.
6. Rotate the print jet clockwise until the dots (A) align. Select the checkmark to
continue
NOTE: As you rotate the print jet, ensure the print jet tube is tucked
under the top of the printer cover.
7. Mount the cartridge on the left side of the printer and select the checkmark to
continue.
NOTE: It may become necessary to slightly rotate the cartridge to
seat it properly.
A
163D Systems, Inc.

NOTE: The print jet will begin to heat. Once the print jet has reached
the proper temperature, the printer will prime melted material into
the refuse bin.
4. The left cartridge has been installed. Select the checkmark to continue.
NOTE: The printer will begin to heat. Wait until the printer
has nished heating and then follow the user prompts in the
touchscreen menu.
5. Insert the print jet (from the cartridge that will be mounted on the right side of the
printer) into the right print jet opening on top of the printer.
6. Rotate the print jet clockwise until the dots align. Select the checkmark to
continue.
NOTE: As you rotate the print jet, ensure the print jet tube is tucked
under the top of the printer cover.
A
173D Systems, Inc.
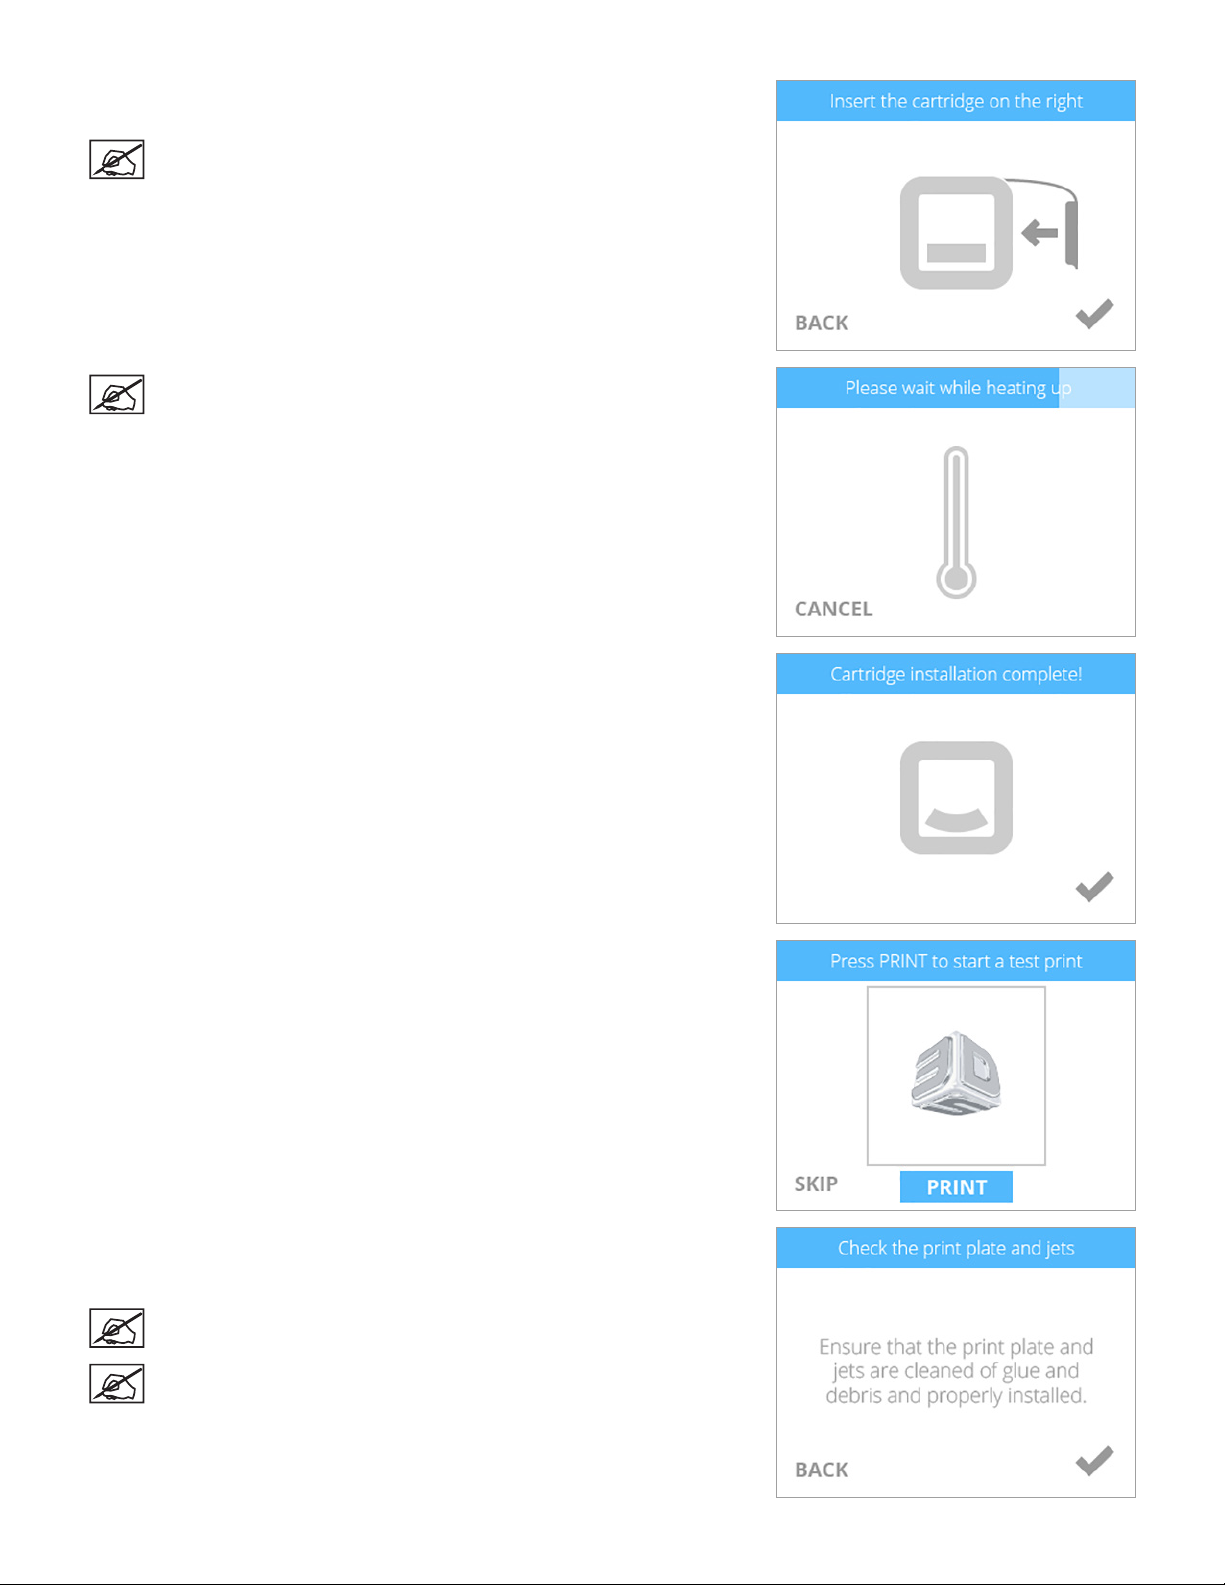
4. Mount the cartridge on the right side of the printer and select the checkmark to
continue.
NOTE: It may become necessary to slightly rotate the cartridge to
seat it properly.
NOTE: The print jet will begin to heat. Once the print jet has reached
the proper temperature, the printer will prime melted material into
the refuse bin.
5. The right cartridge has been installed. Select the checkmark to continue.
6. Select PRINT.
7. It is recommended that Auto Level is performed prior to the rst print. Ensure
the print pad is clean and installed properly and then select the checkmark to
continue to Auto Level.
NOTE: Auto Level should be performed when the printer is
positioned away from bright lights or direct sunlight.
NOTE: When installed properly, the print pad magnetically attaches
to the adjustment knobs.
183D Systems, Inc.
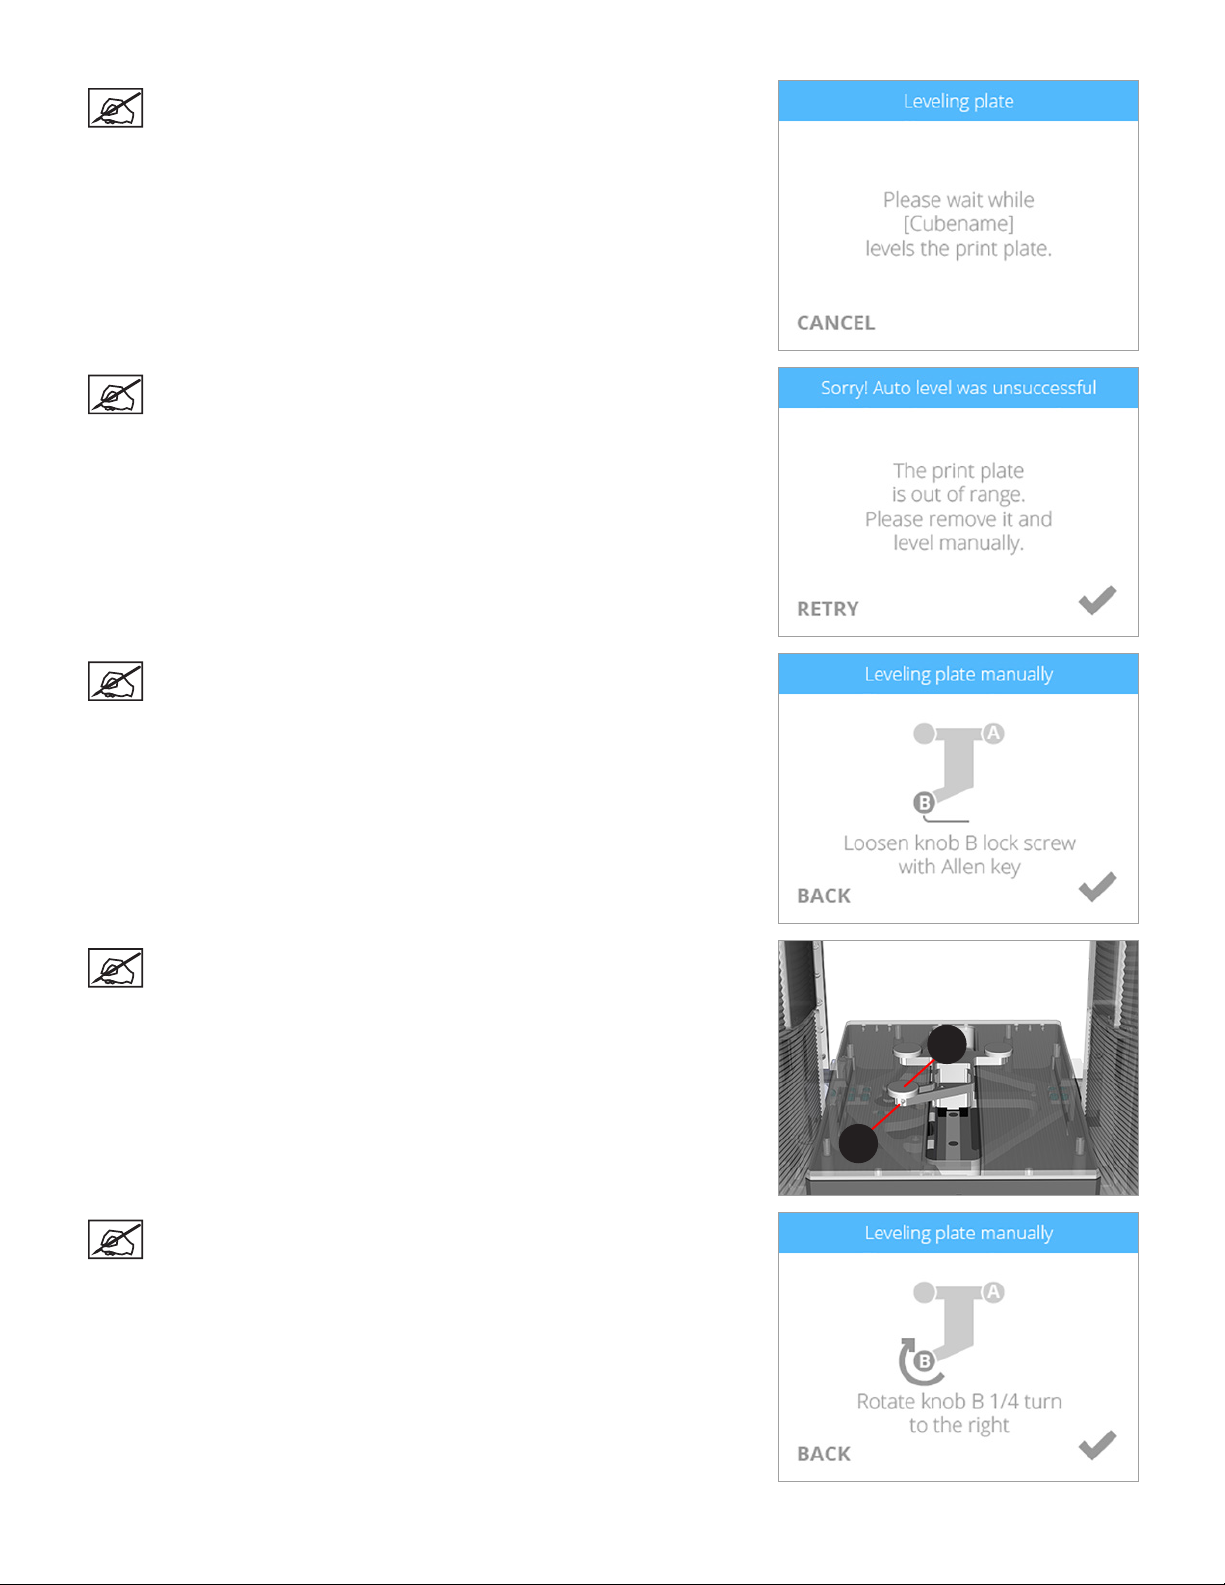
NOTE: The printer will begin the Auto Level procedure. This may
take a few minutes.
NOTE: If the print pad is not level, remove the print pad and select
the checkmark to continue. The print pad is magnetically attached to
the adjustment knobs. To remove it, lift up the front of the print pad
and pull it out of the printer.
NOTE: Follow the instructions on the touchscreen display. Use the
included 1.5 mm Allen wrench to loosen the lock screws securing
the adjustment knobs to the bracket before turning the knobs. Select
the checkmark to continue.
NOTE: The lock screw (1) is located just below the adjustment knob
(2). The lock screw for adjustment knob B can be accessed from the
front of the printer. The lock screw for adjustment knob A can be
accessed from behind the printer.
NOTE: Follow the instructions on the touchscreen display. Once the
adjustments have been made, select the checkmark to continue.
193D Systems, Inc.
2
1

NOTE: When prompted, tighten the lock screw enough to ensure
the adjustment knob does not easily turn. Select the checkmark to
perform Auto Level again.
Caution: Do not over-tighten the lock screw. This can damage the
adjustment knob and void the manufacturer’s warranty.
4. Select the checkmark to continue.
5. Install the print pad and select the checkmark to perform Auto Gap.
NOTE: To install the print pad, place it on top of the adjustment
knobs. When the print pad is centered properly, magnets will secure
the print pad to the adjustment knobs.
NOTE: The printer will perform an automated gap measurement.
6. Select the checkmark to continue.
NOTE: The value presented on the touchscreen display is the
absolute print pad position. Note and refer to this value when
performing the Manual Level procedure. Your number may differ
from the illustration.
203D Systems, Inc.
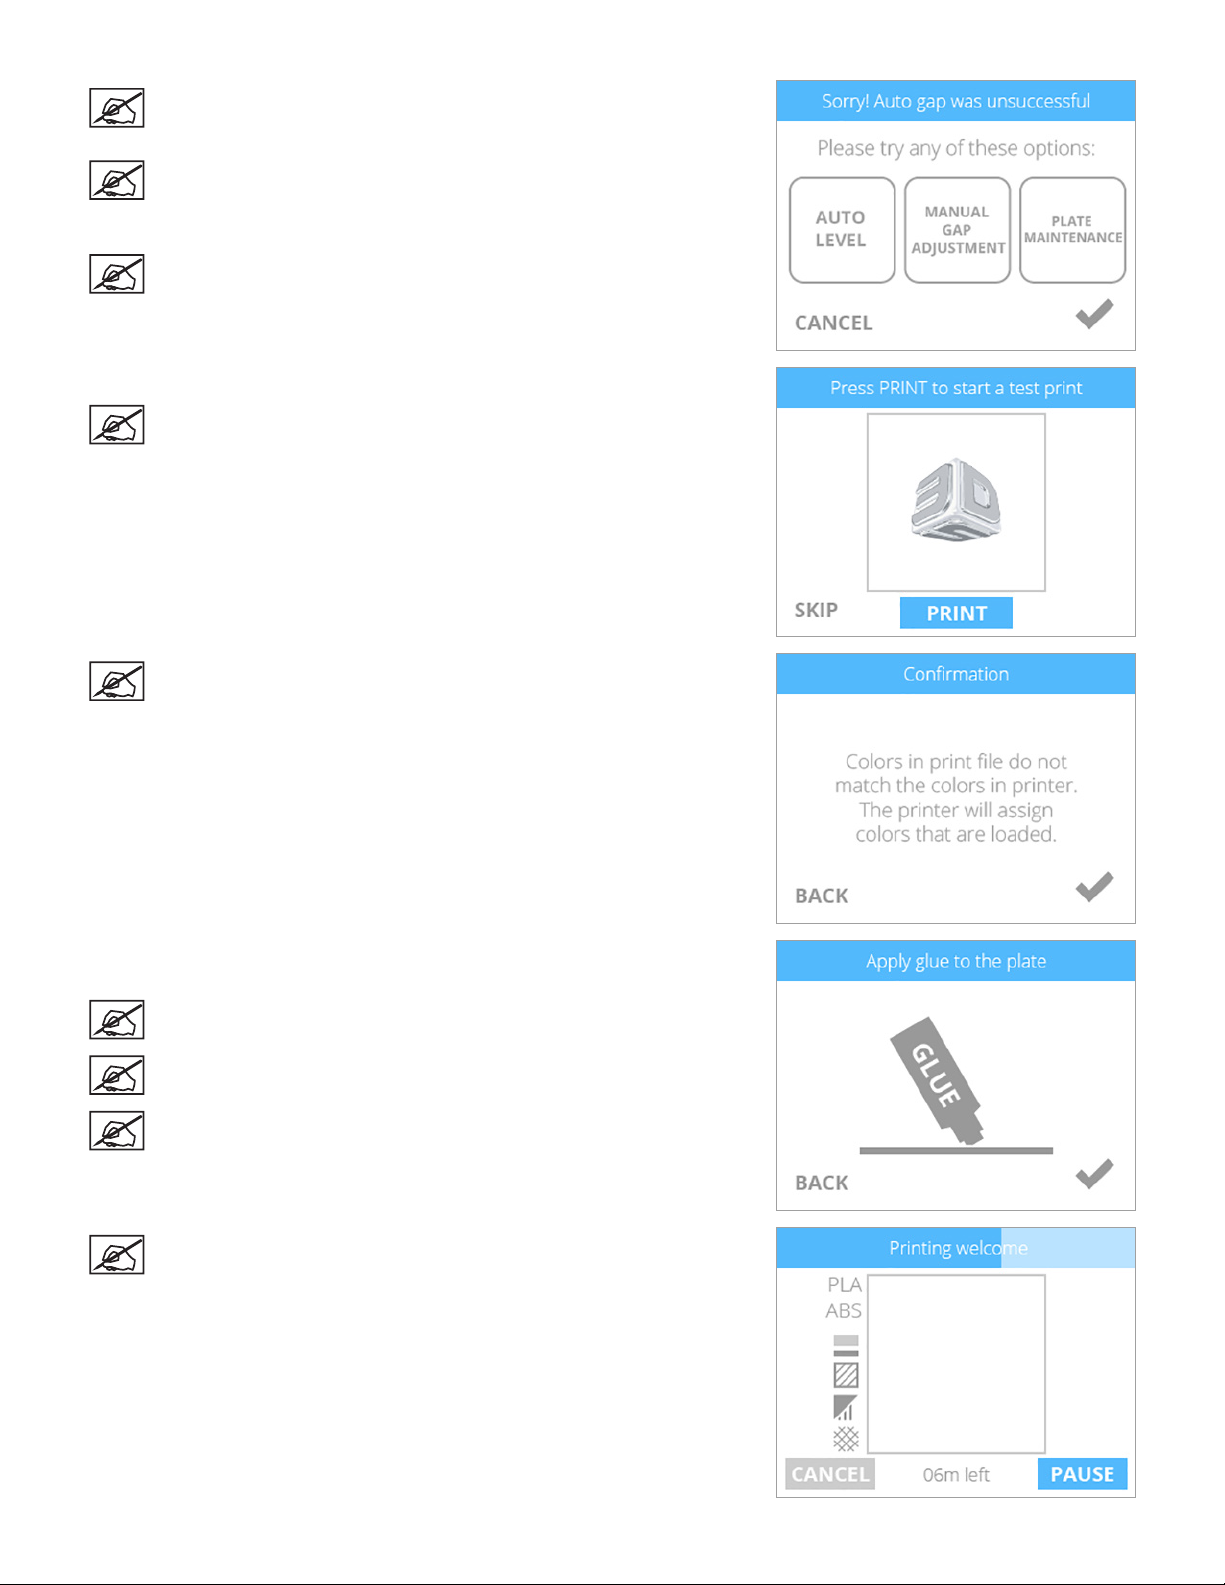
NOTE: If Auto Gap is not successful, it is recommended that you
perform Auto Level and Auto Gap again. Select AUTO LEVEL to
continue.
NOTE: If Auto Gap is not successful the second time, select PLATE
MAINTENANCE. For more information, refer to the section titled
Print Pad Maintenance. Once the Plate Maintenance procedure has
been performed, perform Auto Level and Auto Gap.
NOTE: If Auto Gap is still not successful, select MANUAL GAP
ADJUSTMENT. Refer to the section titled Manual Gap Adjustment for
more information. Once the Manual Gap Adjustment procedure has
been performed, note the nal reading for future reference.
4. Select PRINT.
NOTE: The printer will continue the process of printing the welcome
message test print. Select SKIP to bypass this test print. You can
print this test print at any time. Navigate to the System 1 screen and
select TEST PRINT. Follow the prompts in the touchscreen display.
NOTE: If the color built into the test print does not match a color
of one of the installed print cartridges, the printer will assign an
installed cartridge color to the test print. Select the checkmark to
continue.
5. Gently squeeze the bottle and apply two thin layers of Cube Glue to the print
pad. Select the checkmark to continue.
NOTE: For more information about applying glue to the print pad,
refer to the section titled Applying Cube Glue.
NOTE: Apply enough glue to cover a square area of 5” (15 cm).
NOTE: For best results, allow the glue to dry prior to printing.
NOTE: The printer will begin to heat and then begin printing the
welcome message test print.
213D Systems, Inc.
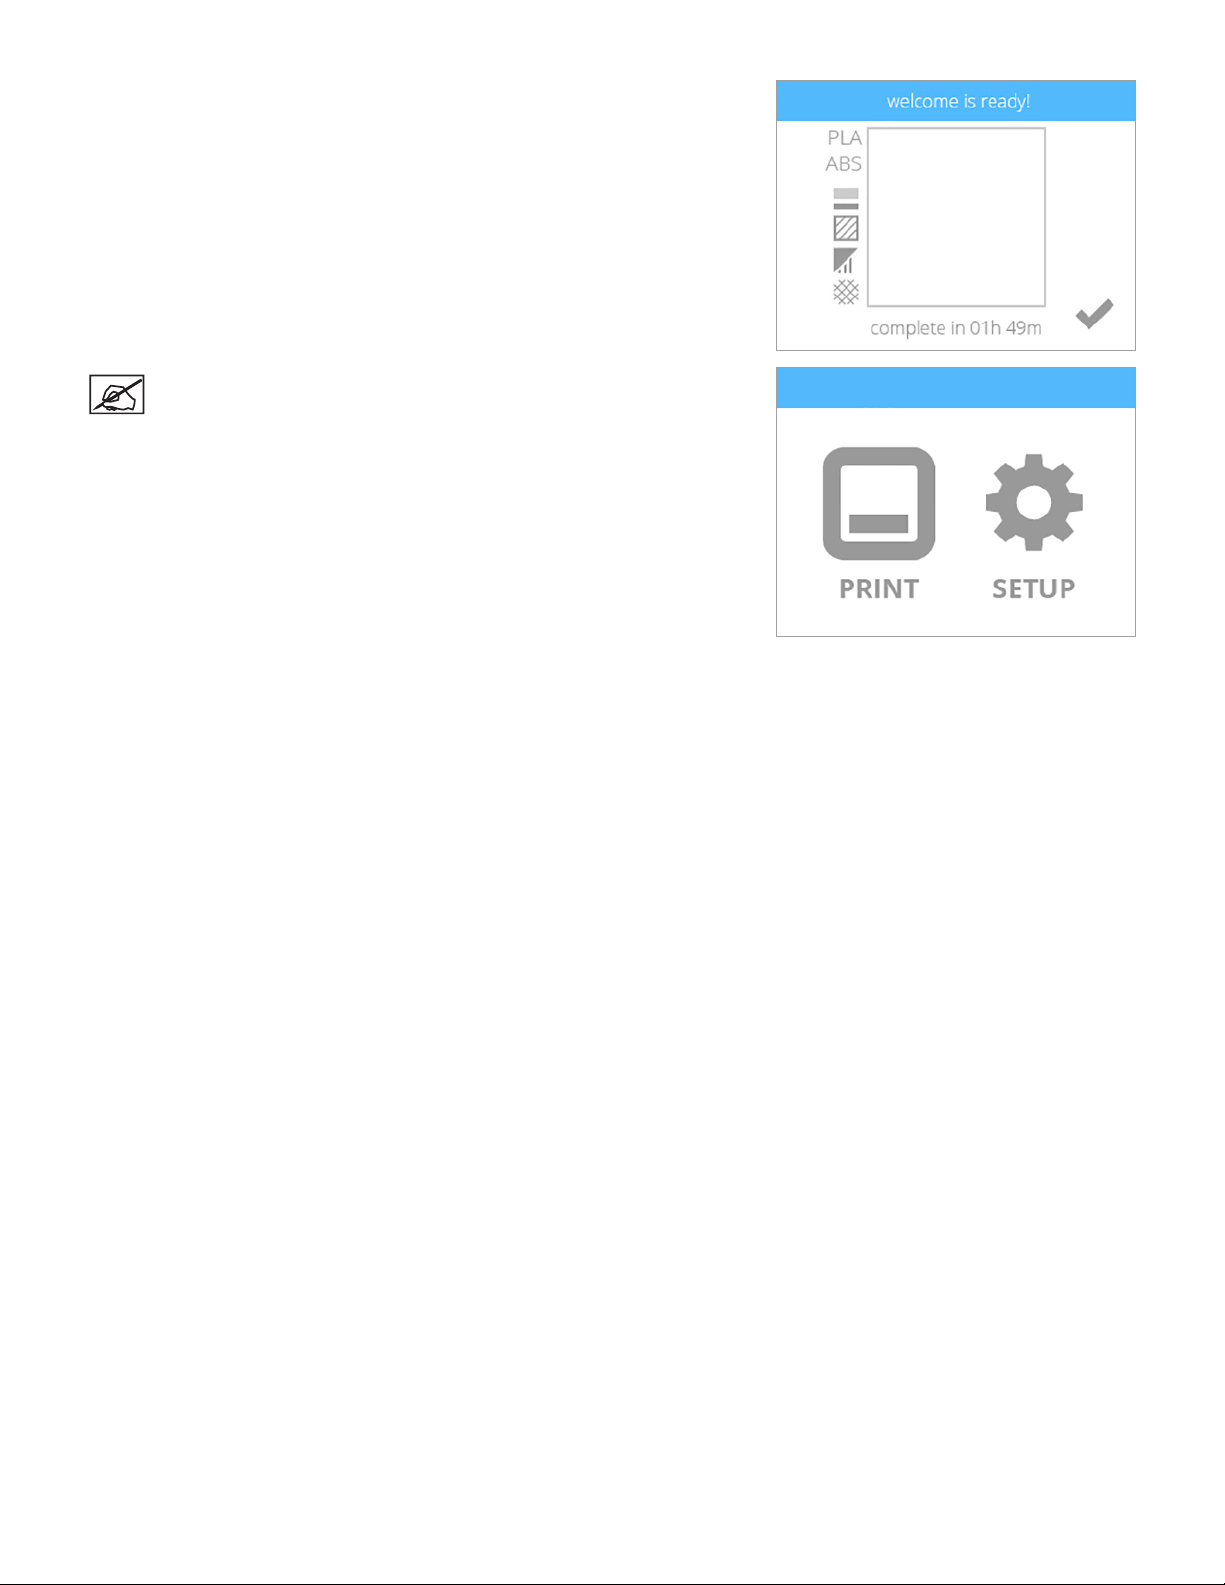
4. Select the checkmark to go to the main menu.
NOTE: You may also press and release the button next to the
touchscreen display to return to the main menu.
223D Systems, Inc.
MENU OVERVIEW
Touchscreen Display
After powering on the printer, touch the display to start.
CAUTION: When navigating the touchscreen display, use only
light nger pressure to make selections. Using anything sharp will
damage the touchscreen display and will void the manufacturer’s
warranty.
NOTE: You may press and release the button next to the
touchscreen display to return to the PRINT / SETUP menu.
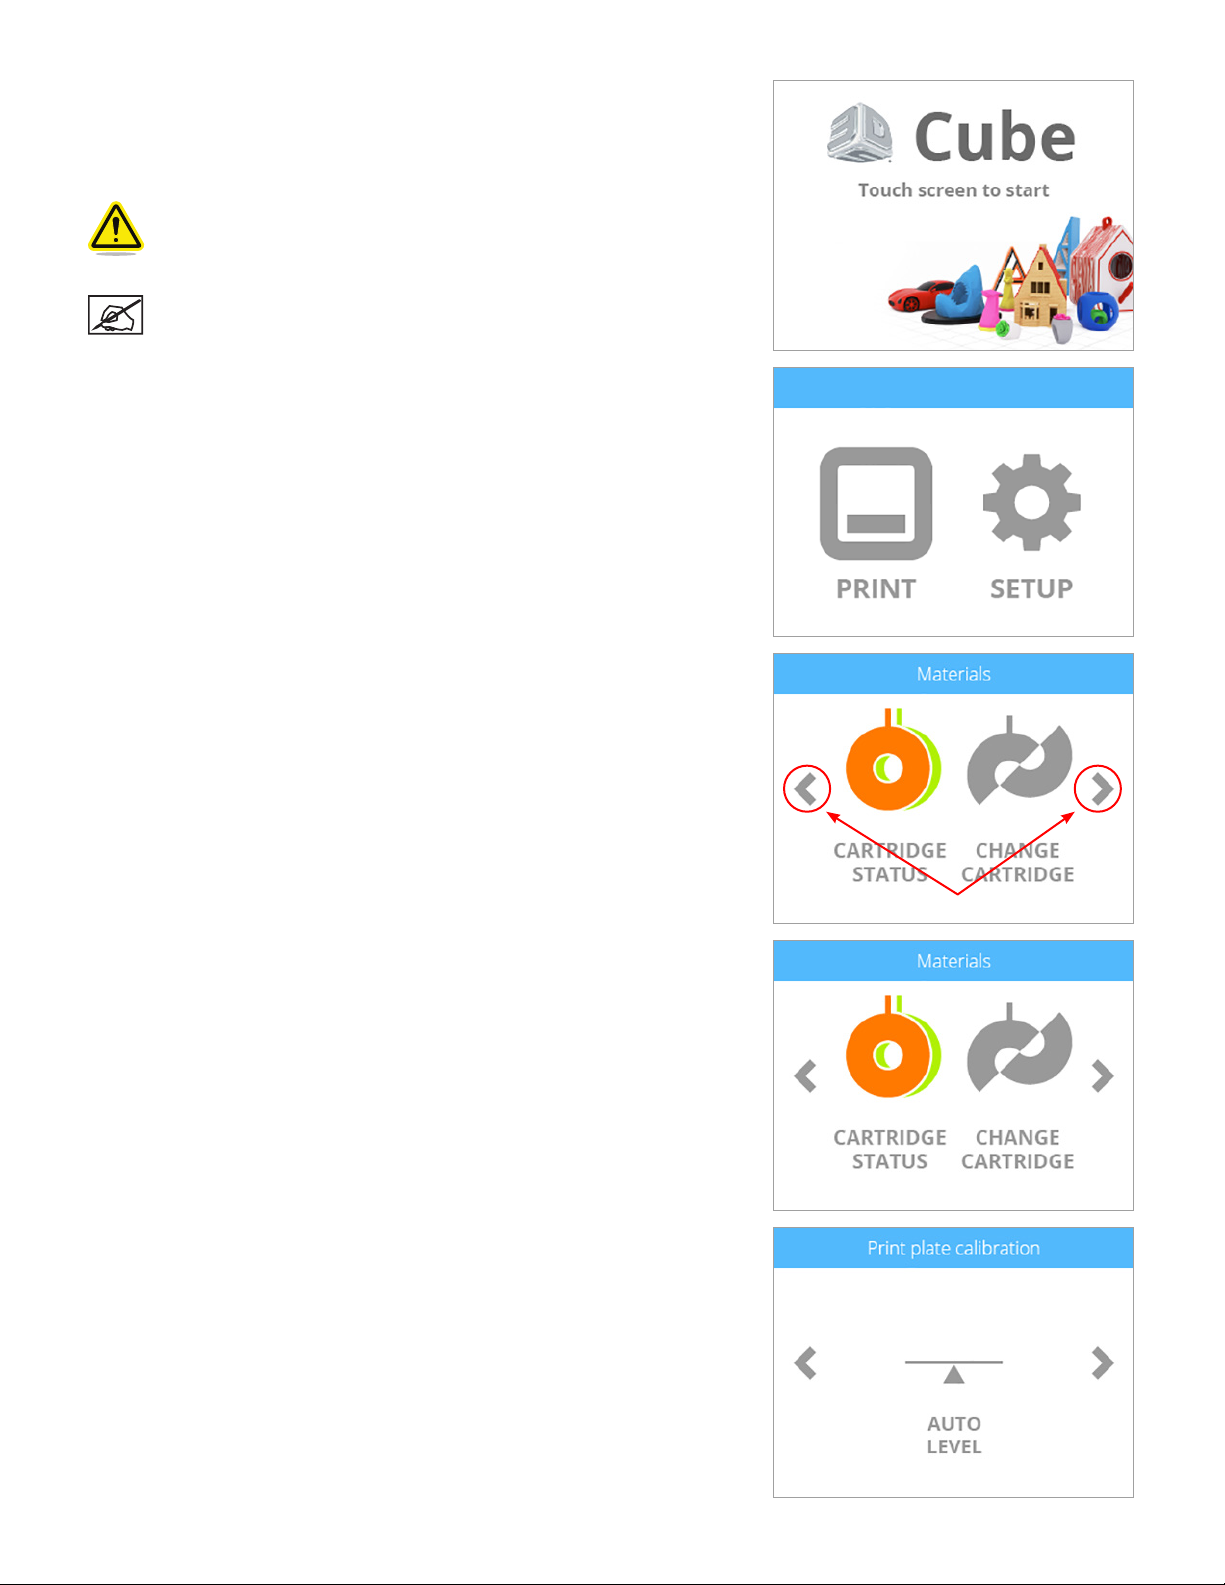
Print / Setup
PRINT
PRINT allows the user to print a creation stored either on a USB mass storage
device or directly from Cubify software. You can invent your own creation using
Cubify Invent software available at www.Cubify.com.
SETUP
SETUP allows the user to congure the printer, connect to a wireless or ad hoc
network, connect to a Bluetooth device, install cartridges, and view the printer status.
Navigation
Navigation between screens is performed by pressing the right or left arrows.
Materials
CARTRIDGE STATUS
CARTRIDGE STATUS allows you to view the type and color of the material that is
installed. It also displays the estimated amount of material left in the cartridge.
CHANGE CARTRIDGE
Selecting CHANGE CARTRIDGE allows you to install cartridges in empty bays or
replace installed cartridges.
Print Plate Calibration
AUTO LEVEL
AUTO LEVEL is an automated procedure that measures the level of the print pad. If
the print pad is found to be out of specication, the touchscreen will prompt the user
to use the adjustment screws to level the print pad.
AUTO GAP
Following AUTO LEVEL, AUTO GAP is an automated procedure that measures the
distance between the print pad and the print jets. If the gap is out of specication, the
user can perform the Manual Gap procedure.
233D Systems, Inc.
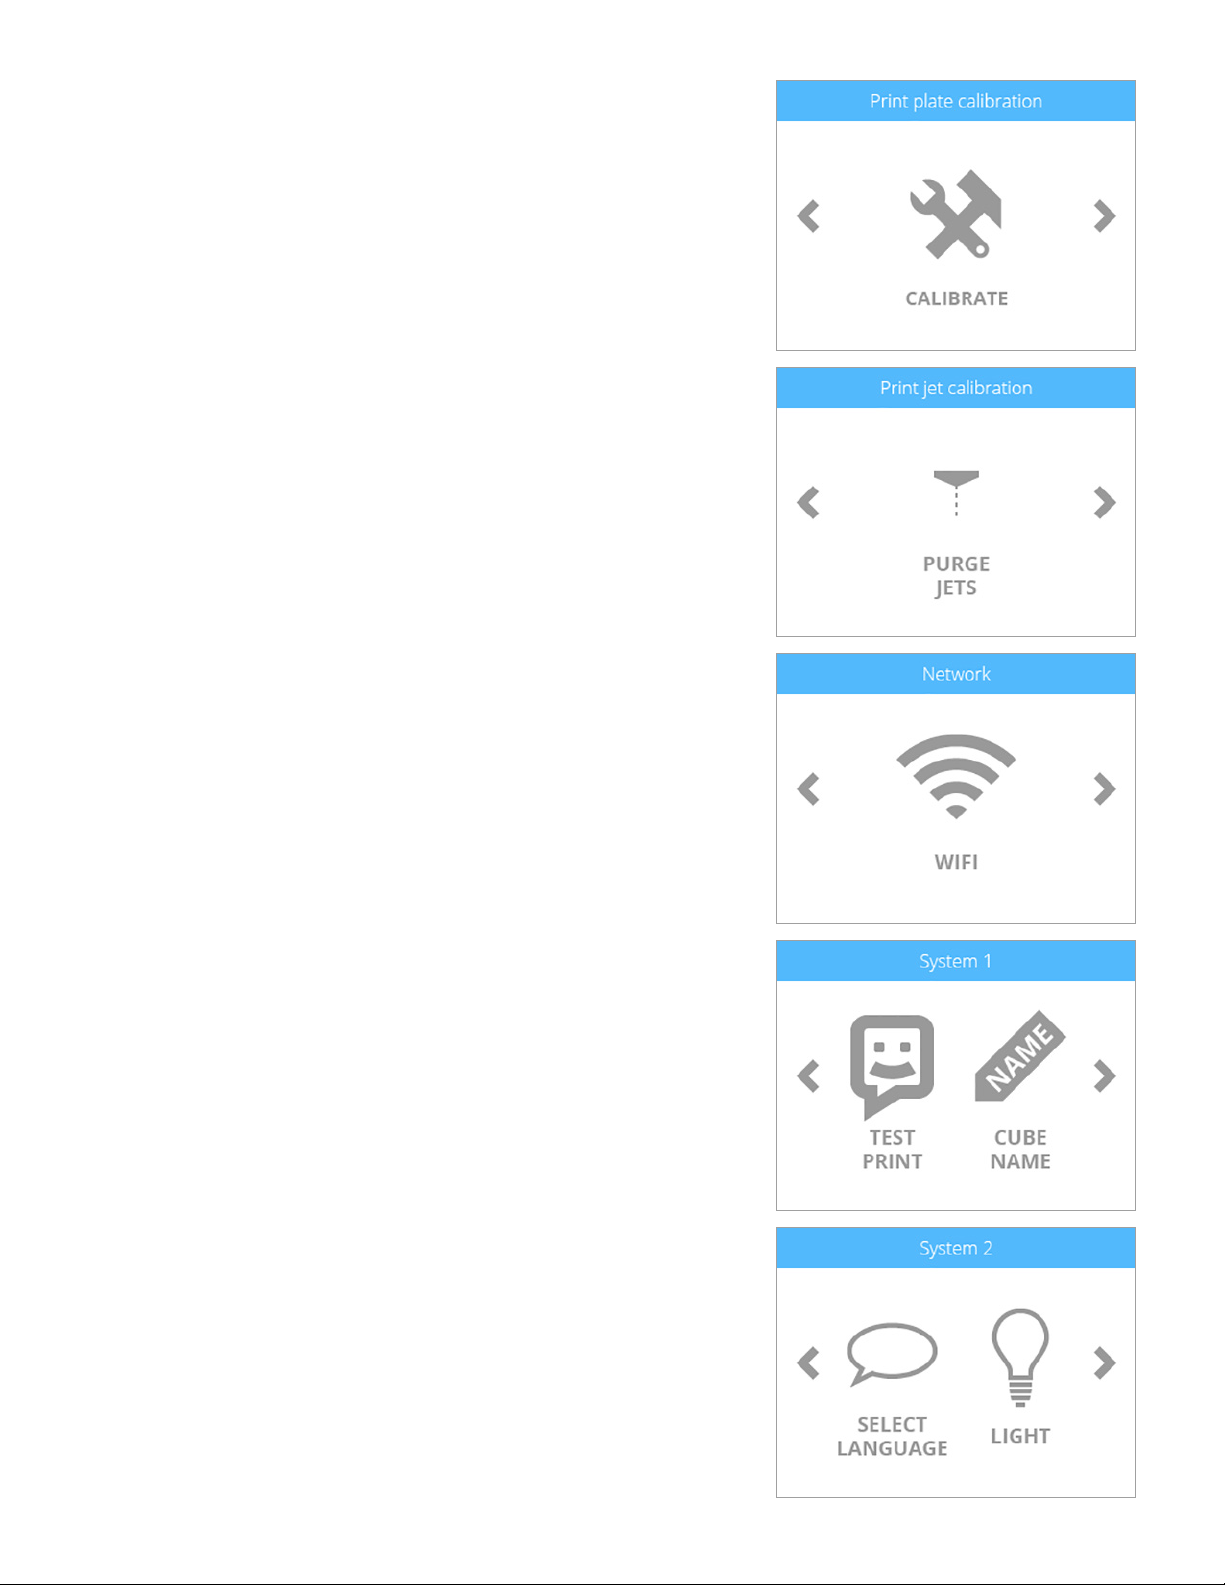
Printer Calibration
CALIBRATE
CALIBRATE is a utility that allows you to nely tune your gap settings. When Level
Gap, Auto Gap and Manual Gap have been successful but the bottom layer of your
print appears stringy and not tightly fused together, your printer should be calibrated.
Print Jet Calibration
PURGE JETS
PURGE JETS is a utility that enables you to test the extrusion functionality and can
assist in unblocking print jets.
Network
WIFI
The Network screen provides a utility to connect the printer to a wireless network.
Wireless connections include:
• Wi-Fi
• Ad Hoc
System 1
TEST PRINT
TEST PRINT is a feature that allows you to perform a test print which is saved in the
printer. This Test Print is the same Welcome Message test print that is printed when
rst setting up and activating your printer.
CUBE NAME
CUBE NAME is a utility that allows you to change the name of your printer.
System 2
SELECT LANGUAGE
SELECT LANGUAGE allows you to localize the printer to your language.
LIGHT
The LIGHT icon allows you to turn on or off the system LEDs.
243D Systems, Inc.

System 3
FIRMWARE
Selecting FIRMWARE allows you to update the printer rmware either with a le
downloaded to a USB mass storage device or by wireless connection.
INFO
By selecting INFO, the printer will display the printer status.
253D Systems, Inc.
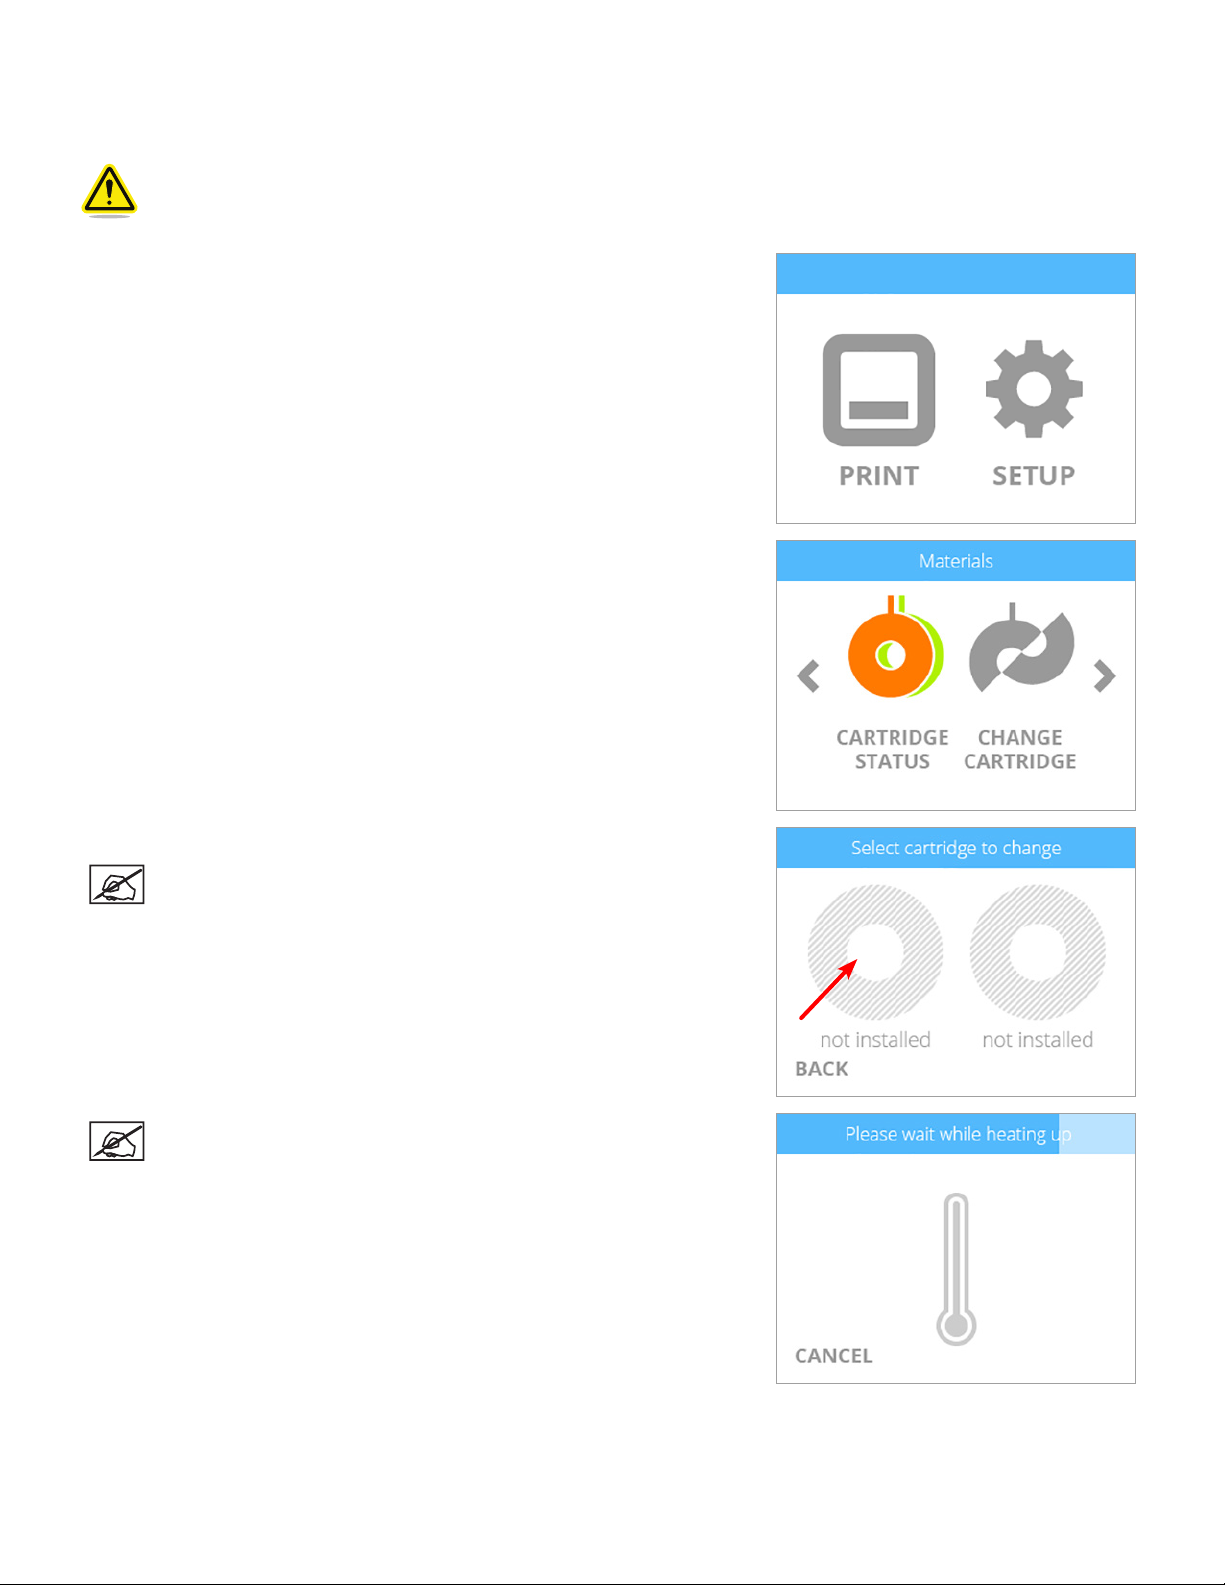
INSTALLING A MATERIAL CARTRIDGE
Before the printer will print a creation, at least one cartridge must be installed. If you try to print a creation and no cartridges have been
installed, the display will prompt you to install a cartridge.
Caution: Material cartridges should only be installed by performing the following procedure. Installing the
cartridge without following the prompts from the printer menu can damage the printer and print jets and void the
manufacturer’s warranty.
1. To install a cartridge, select SETUP.
2. Select CHANGE CARTRIDGE.
3. Select the left cartridge.
NOTE: This procedure demonstrates replacing the left material
cartridge. Follow the same concept to replace the right material
cartridge if applicable.
NOTE: The printer will begin to heat. Wait for the printer to heat and
then follow the user prompts in the touchscreen menu.
263D Systems, Inc.

4. Insert the print jet (from the cartridge that will be mounted on the left side of the
printer) into the left print jet opening on top of the printer.
5. Rotate the print jet clockwise until the dots (A) align. Select the checkmark to
continue.
NOTE: As you rotate the print jet, ensure the print jet tube is tucked
under the top of the printer cover.
6. Mount the cartridge on the left side of the printer. Select the checkmark to
continue.
A
NOTE: It may become necessary to rotate the cartridge to seat it
properly.
NOTE: The print jet will begin to heat. Once the print jet has reached
the operating temperature, the printer will prime melted material into
the refuse bin.
7. The left cartridge has been installed. Select the checkmark to complete the
procedure.
NOTE: Once the cartridge has been installed, allow the print jet to
cool down before continuing.
273D Systems, Inc.

PRINTING YOUR CREATION
7
There are many 3D creations available at www.cubify.com. In addition, you can create your own with Cubify Invent and Cubify Sculpt
software available at www.cubify.com. The printer can only print .cube3 les. Other le formats like .stl must be processed through
Cubify software before they can be printed.
For more information about converting other 3D les to .cube3 print les, refer to the section titled Cubify Software.
PRINTING PROCEDURE
The following procedure illustrates how to print a creation.
Caution: Ensure the print pad is clean before printing.
NOTE: For best results, perform the Auto Level and Auto Gap procedures before your rst print.
NOTE: After every 10 prints, the printer will prompt you to perform the Auto Level and Auto Gap procedures.
1. After powering on your printer, press the touchscreen to begin.
2. Select PRINT.
NOTE: If the le is saved on a USB mass storage device, insert the
device into the USB inlet port on the printer.
NOTE: You may also send the le from Cubify software to the
printer using a wireless connection. Wireless transfer of print les
usually takes more time than USB mass storage device transfer.
3. Using the arrows, navigate to the le name of your creation. Select PRINT.
NOTE: The le name will appear at the top of the display.
283D Systems, Inc.

NOTE: If the print le requires PLA material and ABS material is
installed, the printer will prompt you to change the cartridge(s).
Select CHANGE CARTRIDGE and refer to the section titled Replacing
A Material Cartridge for instructions about replacing a cartridge.
NOTE: If the print le requires ABS material and PLA material is
installed, the printer will prompt you to change the cartridge(s).
Select CHANGE CARTRIDGE and refer to the section titled Replacing
A Material Cartridge for instructions about replacing a cartridge.
NOTE: If there is not enough material to complete the print but you
want to use up the remaining material, select the checkmark to
continue printing.
NOTE: If the le was built with color(s) that are not installed, the
printer will assign a color from one of the installed cartridges that
match the material type. Select the checkmark to continue.
4. Apply two thin layers of Cube Glue to the center of the print pad. Select the
checkmark to continue.
NOTE: Ensure that the area where glue is applied is larger than the
dimensions of the base of your creation.
NOTE: For best results, allow the glue to dry before printing.
293D Systems, Inc.

NOTE: The printer will load the print le.
NOTE: The estimated time to completion is noted at the bottom of
the screen.
NOTE: The blue bar at the top is also a progress indicator that shows
the status of the loading process.
NOTE: The print jets will begin to heat.
CAUTION: Do not touch the print jets until they have cooled to room
temperature.
NOTE: The estimated time to completion is noted at the bottom of
the screen.
NOTE: The blue bar is a progress indicator that shows the status of
the print jet heating process.
NOTE: The blue bar is a progress indicator that illustrates the status
of the print.
NOTE: Select PAUSE to temporarily stop printing. Select CANCEL if
you wish to cancel the print job.
NOTE: Press the time at the bottom of the screen to view the
percentage of completion. Press it again to view how many layers
have been printed. After a few seconds, the default time will appear
again.
NOTE: If you selected CANCEL to cancel the print, select CANCEL
again to conrm your decision. Otherwise, select RESUME to
continue printing.
4. Once the printer has nished printing, select the checkmark to continue.
303D Systems, Inc.

NOTE: Once the print has completed, the print jets will begin to cool.
CAUTION: Do not touch the print jets until they have cooled to room
temperature.
4. Refer to the section titled Finishing Your Creation for information about
removing your creation from the print pad, cleaning the print pad and cleaning
the part.
313D Systems, Inc.

FINISHING YOUR CREATION
8
REMOVING YOUR CREATION FROM THE PRINT PAD
CAUTION: Before attempting to remove your creation from the print pad, ensure that the printer has nished
printing. Once printing has completed, the print platform and print pad will move to the bottom of the printer.
1. Grasp the front of the print pad, lift upward and remove it from the print platform.
2. Submerge the print pad and the base of the part in warm water for ten (10) minutes.
NOTE: If the part does not release from the print pad easily, allow the part to soak longer.
NOTE: IF you can not submerge the print pad in warm water, run hot water over the base of the part for ten (10)
minutes. If the part still does not release easily from the print pad after ten (10) minutes, continue to run hot
water over the part.
3. Using a rounded scraper, gently release your creation from the print pad.
CAUTION: Always move the scraper away from the body. The scraper
can cause injury if not used correctly.
NOTE: The appearance of your scraper may differ from the
illustration.
CAUTION: Exercise caution when using a tool to remove a part so
the print pad is not damaged or gouged.
4. Rinse your creation under hot water to ensure all of the glue has been removed.
5. Rinse the print pad under water to clean off any remaining glue.
6. Dry the print pad completely before reinstalling it into the printer.
CAUTION: Failure to completely dry the print pad before reinstalling it into the printer can damage sensitive
electrical components and void the manufacturer’s warranty.
Removing Rafts
A raft is the at support structure that is attached to the base of your creation if you enabled that option when generating the .cube3 le.
Although it is recommended that parts are generated and printed without rafts, some larger, more complicated parts may require one.
ABS Raft / PLA Part • ABS rafts can be peeled away from PLA parts.
PLA Raft / ABS Part • PLA rafts can be pulled from ABS parts
ABS Raft / ABS Part • Use pliers to pull away as much of the raft as possible. Then use a rough-grade sandpaper to remove
the remaining raft material, followed by a ne-grade wet and dry sandpaper to achieve a smoother
nish.
PLA Raft / PLA Part • Use pliers to pull away as much of the raft as possible. Then use a rough-grade sandpaper to remove
the remaining raft material, followed by a ne-grade wet and dry sandpaper to achieve a smoother
nish.
323D Systems, Inc.

Removing Sidewalks
A sidewalk (A) is a mesh boundary that prints around the outside diameter fo the part. Its main purpose is to reduce the tendency of
warping especailly when printing at parts with ABS material. They are not recommended for parts that have ne details.
Sidewalks are designed to easily break away from a part once it has been removed from the print pad.
A
Removing Supports
Supports are used when printing creations that need a supporting structure to print properly.
When using PLA or ABS as a support material, peel the supports away from the part. Then, using wire cutters, cut away the support
structure from your creation. Once the supports have been cut away, use ne-grade sandpaper (not included) to nish smoothing the
part.
When using Innity Rinse-Away™ support material, run warm water over the part until the part can be removed from the print pad.
Submerge the part in warm water until the supports begin to soften. Pull the supports away from the part using pliers (supplied).
With most of the support material removed, use a blunt-edged pick or toothbrush to remove residual support material from holes and
crevices. To remove support material from moving parts or areas that are difcult to reach, it is recommended that the part is allowed to
soak in water for several hours. Then, rinse the part under running warm water to ensure all supports have been removed.
333D Systems, Inc.

9
CUBIFY SOFTWARE
Cubify software is an easy-to-use tool that simplies the printing process. Software for Windows or OS X is available after login to your
www.cubify.com account. The iOS mobile application is available from the App Store and the Android mobile application is available
from the Google Play Store.
CUBIFY SOFTWARE INSTALLATION
Installing Cubify Software for Windows
NOTE: Windows computers can only communicate with printers that are connected to the same wireless network.
1. Go to www.cubify.com and log in with your username and password.
2. Go to www.cubify.com/en/cube/activate. Select WINDOWS.
3. Navigate to the Downloads folder. Double-click the Cube installation le and
select Run.
NOTE: The Cubify InstallShield Wizard will begin to install.
343D Systems, Inc.

4. Select Next to continue.
5. To install the software, you must accept the terms in the license agreement.
Select the checkbox and then select Next to continue.
NOTE: By selecting the checkbox, you agree to the license terms and
conditions.
6. Enter a User Name and Organization in the provided elds. Select Next to
continue.
7. Select Next to install the application in the listed location or select Change and
browse to a different location.
8. Select Install to continue.
353D Systems, Inc.

NOTE: Please wait while Cubify installs.
4. Select Finish.
Installing Cubify Software For Apple OS X
NOTE: Apple OS X computers can only communicate with printers that are connected to the same wireless
network.
1. Go to www.cubify.com and log in with your username and password.
2. Go to www.cubify.com/en/cube/activate. Select MAC.
3. Double-click the Cube software .dmg installer le.
363D Systems, Inc.

4. Drag the Cubify icon into the Applications folder.
NOTE: If the Drag to Install window did not open, locate the Cubify
driver in your device panel. Select Cubify to download the software.
NOTE: Safari users will not have to unzip the .dmg le; it unzips as it
downloads.
NOTE: Cubify can be opened by navigating to the Applications page
and double-clicking the Cubify icon.
Installing Cubify for Android
NOTE: Android devices can only communicate with printers that are connected to the same wireless network.
1. Open the Play Store from your Android browser.
2. Select the Search icon.
373D Systems, Inc.

4. Enter Cubify in the search box.
5. Select the Cubify application and install it.
383D Systems, Inc.

Installing Cubify for iOS
NOTE: iOS devices can only communicate with printers that are connected to the same wireless network.
1. Locate the Cubify application from the App Store and select it.
2. Download the application to your iOS device.
393D Systems, Inc.

CUBIFY SOFTWARE OVERVIEW
A
B
C
D
E
F
G
H
Cubify at www.cubify.com is the central hub for all things possible with the 3D printed lifestyle. Cubify offers everything from co-creation
with favorite brands, a curated shopping experience centered around personalized fashion, décor, toys and more.
Cubify is an application for the Cube that can connect to your www.cubify.com account. Users can nd free creations or purchase other
creations from a large number of available 3D models. Cubify imports 3D content les (such as .stl and .ply) and prepares them for
printing with your printer.
Cubify is available for Windows® and OS X® operating systems as well as Android® and iOS® mobile platforms. Desktop applications
have more features than mobile applications but each version provides a robust channel to the 3D printing lifestyle. The following
overview illustrates the desktop applications and some features may not be available on mobile platforms.
B C D EA
Tool Ribbon
My Shelf
Design Feed
Shop
Tools used to access the print les
from www.cubify.com.
Your purchases or downloads can
be stored on the Shelf. You can
also store custom congurations of
your creations.
The location to select free or for
purchase print creation les.
Purchase models or create your
own custom model from online
Cubify applications.
F
You may connect to your printer on
your wireless network and transfer
print les wirelessly or you can use
Print
Search Search for creations.
Cart Review items stored in your cart.
the printer ofine and transfer print
les using the USB mass storage
device. You may also specify the
colors and materials to be used for
printing.
G H
Manage your account settings,
Account
Information
order cartridges, access the help
menu and review the Terms of
Service and Privacy Policy.
403D Systems, Inc.

Account Settings
A
B
C
D
E
F
G
H
A
B
C
D
E
F
G
H
Logout Select Logout to log out of the application.
My Account
Order Cartridges
Privacy Policy Read the Privacy Policy
Terms of Service Read the Terms of Service
App Settings
Help Application documentation
About View the software version number
Your account page on Cubify.com where you can nd
information about your orders
Order cartridges from Cubify.com through the Cubify
application.
Select your unit of measure to either inches or
millimeters.
413D Systems, Inc.

Design Feed Tab
A
B
Design Feed is a resource to connect you with some of the most creative items available for the 3D printing lifestyle.
B
A
Filter Narrow the choices to your preferences.
Selection
NOTE: Selecting the creation (B) in the illustration above brings you to the page where you can save it to the Shelf.
For some creations, you may select the option to have Cubify print it for you. For more information, please visit
www.cubify.com.
NOTE: Some models can be purchased. To purchase a creation, select the option to add to the cart. When ready,
you can nish the transaction and download the model to your Shelf.
Select an item to learn more about it and
to download it.
423D Systems, Inc.

Shop Tab
A
B
The store is organized into several categories. Select a category from the Shop menu to view the available sub-categories. This allows
for quicker access to your favorite design types and products.
A
B
Category Dropdown Select a category from a dropdown list.
Featured List Select a category from a list.
433D Systems, Inc.

Select the category dropdown list to narrow your search. Categories are divided into product types and collections.
After selecting a category, you can select a collection or a type.
443D Systems, Inc.

Select a creation from a collection.
After selecting a creation, you can nd more information about the item, purchase it, print it (free les only) or add it to your shelf. Some
models have multiple views. Select the navigation arrows (A)* to see other views.
A
*Not an available feature for mobile applications.
453D Systems, Inc.

My Shelf Tab
A
B
C
D
E
F
G
My Shelf is your personal storage place on Cubify.com where you can manage your creations.
A
C
B
E
D
F
G
Sort the items in My Shelf by Name or Date. You may
FILTER
ADD* You can add items to your shelf.
also lter your items by le type. 3D les include .STL
les. Print les are .cube3 les, optimized and ready to
print.
SYNC
EKOCYCLE Icon
Item Selection You can select an item to print.
Cube File
Cube Icon This Cube icon represents a print-ready Cube le.
*Not an available feature for mobile applications.
You can refresh your items in MY SHELF with your latest
purchases or additions.
The EKOCYCLE icon indicates a print-ready
EKOCYCLE Cube le.
The Cube icon indicates an optimized .cube3 printable
le.
463D Systems, Inc.

Item Selection
A
B
C
D
E
F
A B C D
E
F
INFORMATION*
EXPORT* Export the item to your device storage
DESELECT* Deselect a selected item
DELETE* Delete a selected item from My Shelf
Print Now
Selected
*Not an available feature for mobile applications.
Select the information button to view information about
the selected item.
Select Print Now to prepare the selected item for
printing.
The checkmark indicates that the item has been
selected.
473D Systems, Inc.

PRINT TAB
A
B
C
D
E
F
G
H
I
J
K
L
M
N
O
P
Q
R
S
T
U
A B C D E F G H I J K L M N
O
P
S
T
R
ADD
REMOVE
UNDO* Undo your last action
REDO* Redo your last action
MOVE* Move the model on the print pad
ROTATE* Rotate the model on the print pad
SCALE* Scale the model
CENTER* Center the model on the print pad
RESET* Reset
PRINT
SETTINGS
IN* Zoom in on a model
Add a creation to the print pad from
MY SHELF or from a le location.
Select and remove a creation from
the print pad.
Change the print settings
QQ
U
OUT* Zoom out on a model
VIEW Change the view of the model
PRINTER
Printer Name
Help
Cartridges
Print Pad
SUPPORTS
SIDEWALKS
PRINT
Locate and connect to your printer
on your wireless network.
The name of the printer connected
to your network. The printer
is considered ofine if it is not
connected to a wireless network.
Find help for navigating the print tab
in the application.
Change the cartridge colors and
material type of a non-networked
printer
A representation of the printer’s
print pad
Turn on or turn off supports for your
print le.
Turn on or turn off sidewalks in your
print le.
Transfer the print le to the printer
using the wireless connection to
your network.
*Not an available feature for mobile applications.
483D Systems, Inc.

Print Settings
Print Settings allow you to set the parameters of your print and build them into your print le. There are four (4) different options for
setting the print parameters.
A
B
C
Presets
Layers
Density
Fill Pattern
D
• Draft A print that does not require strength or ne details.
• Standard A strong print that does not require ne details.
• Premium A strong print that requires ne details.
• Custom Allows you to set the layer thickness, density, and ll pattern. You may also enable or disable
supports and rafts.
• 0.070 mm High quality prints
• 0.200 mm Shorter print time
• Hollow Short print times and low material use
• Strong Stronger prints
• Almost Solid High material use and almost solid prints
• Honeycomb Used for strong prints
• Diamonds For general printing
• Lines Shorter print time
493D Systems, Inc.

Print Settings - Custom
Select Custom to view the current print settings. You can personalize the settings by selecting a category and then selecting the arrows
to expand your options.
Layers: • 0.070 mm
• 0.200 mm
Density: • Hollow
• Strong
• Almost Solid
Fill Pattern: • Honeycomb
• Diamonds
• Lines
503D Systems, Inc.

Print Settings - Draft
Select Draft for prints that do not require strength or ne detail.
Layers: 0.200 mm
Density: Hollow
Fill Pattern: Lines
513D Systems, Inc.

Print Settings - Standard
Select Standard for strong prints that do not require ne detail.
Layers: 0.200 mm
Density: Strong
Fill Pattern: Diamonds
523D Systems, Inc.

Print Settings - Premium
Select Premium for prints that require strength and ne detail.
Layers: 0.070 mm
Density: Strong
Fill Pattern: Diamonds
533D Systems, Inc.

Printer
A
B
C
D
E
The PRINTER utility (F) enables you to nd and connect to your printer on your wireless network.
A
B
C
D
F
E
Available Printers Select a printer on your wireless network.
Ofine Cube
Ofine EKOCYCLE Cube
Find Cubes on Network Refresh the list of printers on your network.
Add Cube Manually
Select Ofine Cube if you intend to use a printer that is not
connected to your network.
Select Ofine EKOCYCLE Cube if you intend to use an
EKOCYCLE Cube printer that is not connected to your network.
Manually add a printer to your network by entering an IP
address.
543D Systems, Inc.

Information
Select Information (A) to view the printer status.
A
553D Systems, Inc.

Connecting Cubify To Your Printer
Your printer must be connected to the same wireless network as your computer or mobile device to transfer print les wirelessly or to
view the printer properties.
A
B
C
D
1. Select PRINTER (A).
2. Select the printer on your network (B).
If you would rather print from a non-network printer, select Ofine Cube (C).
NOTE: If your printer is not listed, select Refresh (D) and then select your printer from the list. You can also
manually connect to the printer by entering its IP address and selecting ADD (E).
E
563D Systems, Inc.

Add
To add a model to the print pad, select the ADD* button. Selecting From My Shelf will take you to the MY SHELF tab. Selecting From
File will allow you to browse to the le on your computer where you can drag and drop the le directly to the print pad.
*Not an available feature for mobile applications.
573D Systems, Inc.

Remove
To remove the model from the print pad, select the Remove* button. Select Yes to conrm your decision. You can nd the model again
by selecting My Shelf.
*Not an available feature for mobile applications.
583D Systems, Inc.

Color The Model
Changing the color of the model is easy. Select the color wheel and drag the color to the part you want to color. For models with
multiple parts, select and drag a color to the part of the model you want to color.
For mobile applications, press and hold the color wheel and then drag it to the part you want to color. For models with multiple parts,
press, hold and drag the color wheel to the part of the model you want to color.
593D Systems, Inc.

Move Tool
The Move tool* provides a way to change the position of the model on the print pad. This is especially helpful when printing more than
one model at the same time.
To move the model, select the model and then select the Move tool. Freely move the model by selecting it and then dragging it across
the print pad. You can also select an arrow on the Free Move section of the Move toolbar. Precision movements can be made by
entering a value in the Exact Move eld, selecting the X-axis or Y-axis, and selecting Move.
When nished, close the Move toolbar and select the Move button to deselect it.
*Not an available feature for mobile applications.
603D Systems, Inc.

Rotate Tool
To rotate the model on the print pad, select the part and then select the Rotate tool*. To use the Free rotate option, select the X-axis,
Y-axis, or Z-axis and then select either the right or left arrow. You can also rotate the model by selecting an axis and entering a value in
the Exact Rotate eld. Select Rotate to rotate the model to the specied amount.
When nished, close the Rotate tool and select the Rotate button to deselect it.
*Not an available feature for mobile applications.
613D Systems, Inc.

Scale Tool
The Scale tool* provides a way to increase or decrease the size of the model on the print pad. Select the model and select the Scale
tool. For free scale, select the up arrow to increase the size or the down arrow to decrease the size. You can also enter a percentage
value in the Exact Scale eld and select Scale. Entering 50 will reduce the model to half of the current size. Entering 200 will double the
size of the model. The value 100 will have no effect.
When nished, close the Scale tool and select the Scale button to deselect it.
*Not an available feature for mobile applications.
623D Systems, Inc.

Center Model Tool
Select the model and then select the CENTER* button to center the model on the print pad.
*Not an available feature for mobile applications.
633D Systems, Inc.

Reset Tool
The Reset Tool enables you to revert any changes back to default. If the model has been moved, rotated, scaled or centered, select the
model and then select RESET to revert it back to its original state. Select Yes to conrm your decision to reset the model.
643D Systems, Inc.

Zoom In
Zoom in on a model by selecting it and then selecting IN. ZOOM IN does not affect the size of the model but brings it closer for better
viewing.
653D Systems, Inc.

Zoom Out
Zoom out on a model by selecting it and then selecting OUT. ZOOM OUT does not affect the size of the model but pushes the print pad
away for another perspective.
663D Systems, Inc.

Center Model Tool
Select the model and then select the Center* button to center the model on the print pad.
*Not an available feature for mobile applications.
673D Systems, Inc.

Change Views
Select Change Views and then select the camera viewing angle.
683D Systems, Inc.

Sidewalks
Sidewalks (A) are mesh boundaries that print around the outside diameter of a part. Its main purpose is to reduce the tendency of
warping especially when printing at parts with ABS material. They should not be used for parts that have ne details.
A
Supports
Supports are used when printing creations that need a supporting structure to print properly. These parts may have overhangs, cavities
or other openings that will not print correctly without a supporting structure.
693D Systems, Inc.

PRINTING A MODEL VIA WIRELESS CONNECTION
Printing From A Desktop Application
NOTE: To print a le, ensure the software application and the printer are connected through a wireless network.
NOTE: Transferring the print le over a wireless network may take more time than transferring a print le from a
USB mass storage device.
The Cubify application includes useful tools to place a creation in the optimum position for printing. The model can be moved or rotated
using a mouse.
Zoom In/Out: Rotate the mouse wheel in either direction
Move the Stage: Press and hold the mouse wheel and drag the mouse
Rotate the Stage: Right-click and drag the mouse to rotate the stage
1. Select an item from My Shelf and select Print Now.
2. Drag a color wheel to the model to color the part.
3. Scale and position the model and select Print.
NOTE: Cubify will generate a print le.
703D Systems, Inc.

NOTE: Cubify will transfer the le to the printer.
4. Apply two thin layers of Cube Glue to the print pad and select OK.
5. Select PRINT on the printer’s touchscreen display.
6. Select the checkmark to continue.
NOTE: For best results, allow the glue to dry before printing.
NOTE: To ensure proper adhesion, the glue area should be
larger than the base of your printed creation.
713D Systems, Inc.

NOTE: The print jets will heat to operating temperature.
NOTE: The printer will begin to print.
4. When the printer has nished printing, select the checkmark to continue.
NOTE: Follow the steps in the section titled Finishing Your Creation.
723D Systems, Inc.

Printing From A Mobile Application
Both Android and iOS are similar in function but the layout may have some differences.
NOTE: To print a le, ensure the mobile device and the printer are connected on the same wireless network.
NOTE: Transferring a print le over a wireless network may take more time than transferring a print le from a
USB mass storage device.
The model view can be changed by using the following gestures:
Zoom Out:
Zoom In:
Rotate the Print Pad:
Move Model:
733D Systems, Inc.

1. Select an item from My Shelf.
2. Select Print Now.
743D Systems, Inc.

4. Press, hold and drag a color wheel to the model to change the color.
5. Select Print.
NOTE: The printer will generate a .cube3 le and then transfer it to
the printer over the wireless network.
6. Select PRINT on the printer’s touchscreen display.
753D Systems, Inc.

4. Apply two thin layers of Cube Glue to the print pad. Select the checkmark to
continue.
NOTE: For best results, allow the glue to dry before printing.
NOTE: To ensure proper adhesion, the glue area should be larger
than the base of your printed creation.
NOTE: The print jets will heat to operating temperature.
NOTE: The printer will begin to print.
5. When the printer has nished printing, select the checkmark to go to the main
menu.
NOTE: Follow the steps in the section titled Finishing Your Creation.
763D Systems, Inc.

SAVING A MODEL TO A MASS STORAGE DEVICE
Desktop Application
For printers not connected to a wireless network, you can save Cubify models to a USB mass storage device and then transfer the print
les by inserting the device into the USB port on the printer.
Pan/Zoom: Rotate the mouse wheel in either direction
Move the Stage: Press and hold the mouse wheel and drag the mouse
Rotate the Stage: Right-click and drag the mouse to rotate the stage
1. Select an item from My Shelf and select Print Now.
2. Select a color wheel to set a color for your model.
3. Select a color and then select Set to continue.
NOTE: For a list of available colors and material types,
please visit www.cubify.com.
4. Color, scale and position the model on the print pad.
773D Systems, Inc.

4. Select File.
NOTE: Selecting My Shelf will save the print le to My Shelf.
The original 3D le will remain there as well.
NOTE: Cubify will generate a print le.
5. Once the le has been generated, browse to the USB mass storage
device and select Save.
6. Select OK.
7. Refer to the section titled Printing Your Creation for information about
printing from a USB mass storage device.
783D Systems, Inc.

10
OPERATION PROCEDURES
APPLYING CUBE GLUE
Cube Glue contains water-soluble glue that adheres the part to the print pad. It is important that glue is applied to the print pad before
starting any print to ensure that the creation does not move during the printing process.
Cube Glue contains a foam applicator under the cap. It is recommended that the bottle is turned upside-down with the cap on to allow
the glue to settle into the applicator before applying.
For best results, apply two thin layers of glue to the print pad using slow circular motions when prompted by the touchscreen display.
Apply the glue in an overlapping pattern. The coverage dimensions should be larger than the footprint of the creation you are printing.
Layer 1
Apply a thin layer of glue to the print pad following the illustration below:
Layer 2
Apply a second thin layer of glue to the print pad following the illustration below:
NOTE: For best results, allow the glue to dry before printing.
793D Systems, Inc.

REPLACING A MATERIAL CARTRIDGE
Caution: Material cartridges should only be replaced by performing the following procedure. Replacing the
cartridge without using the printer menu can damage the printer and print jets and void the manufacturer’s
warranty.
1. Select SETUP.
2. Select CHANGE CARTRIDGE.
3. Select the material cartridge to change.
NOTE: This procedure illustrates changing the right cartridge. The
same concept applies to the left side.
NOTE: The print jet will begin to heat.
803D Systems, Inc.

4. When prompted, remove the right side cartridge. Select the checkmark to
continue.
NOTE: Press the two cartridge tabs inward to release the cartridge
from the printer.
CAUTION: The cartridge must be removed rst before proceeding.
Attempting to remove the print jet before being prompted to do so
will damage the cartridge.
5. Rotate the cartridge print jet counter-clockwise and remove the print jet from the
printer. Select the checkmark to continue.
6. Insert the cartridge print jet from the replacement cartridge into the print jet
opening on top of the printer.
7. Rotate the cable clockwise until the dots (A) align. Select the checkmark to
continue.
NOTE: As the print jet is rotating, ensure the print jet tube is tucked
under the top of the printer cover.
Mount the new cartridge to the right side of the printer. Select the checkmark to
continue.
NOTE: Ensure the print jet tube is tucked under the top of the printer
cover.
A
813D Systems, Inc.

NOTE: The print jet will begin to heat. Once the print jet has
reached the proper temperature, the printer will prime melted
material into the refuse bin.
Select the checkmark to complete the procedure.
SETTING UP A WIRELESS CONNECTION
Wireless connections can be made with a Wi-Fi network or an ad hoc network.
Setting Up A Wi-Fi Connection
1. Select SETUP.
2. Navigate to the Network screen and select WIFI.
823D Systems, Inc.

4. Select WIFI
NOTE: The printer will search for area networks.
5. Using the up or down arrows, browse to your network name and select it.
NOTE: Connection to a network is conrmed by a checkmark to the
left of the network name. If the network is secured, a lock icon will
appear to the right of the network name.
NOTE: If your network requires a password, use the navigation
arrows to browse to the characters that make up your password and
select them. Select the checkmark to continue.
NOTE: The printer will attempt to connect to the network.
833D Systems, Inc.

NOTE: If the printer could not connect to the network, you will be
directed to enter the passcode again.
NOTE: If the printer could not connect to the network, you will be
prompted to connect to a different network.
NOTE: The printer will indicate that it has successfully connected to
a network.
Connect To An Ad Hoc Network
An ad hoc network is a temporary yet direct connection between a computer or device and the printer. It does not connect through a
router or base station and the data transfer rates are slower than the transfer rate of a standard wireless network. The computer or
device you wish to connect ad hoc to the printer must have an ad hoc adapter installed. An ad hoc network is deleted when the user
has disconnected from it or is out of range of other devices on the network unless it has been made a permanent network.
1. Select SETUP.
843D Systems, Inc.

4. Select WIFI.
5. Select ADHOC.
6. Select the On/Off button to turn on the Ad Hoc connection.
7. Select the checkmark to exit the utility.
8. In Windows®, select Start > Control Panel.
9. Type network in the search box.
10. Select Network and Sharing Center.
11. Select Set up a new connection or network.
12. Select Set up a wireless ad hoc (computer-to-computer) network.
13. Select Next.
14. Follow the steps in the wizard.
853D Systems, Inc.

11
A
B
C
CUBE MAINTENANCE
GENERAL CLEANING
Waste material from the printing process can accumulate inside the printer. Using a slightly damp, lint-free cloth, wipe the interior of the
Cube, including the print pad and anywhere else you might nd pieces of plastic waste material. Print material can also collect around
the belt area on the left side of the printer. This area should be checked periodically and any print material found should be removed.
REMOVING WASTE FROM THE JET WIPER PURGE BINS
In addition to having scrapers to clean the print jet nozzles, the jet wiper assemblies are also purge bins collecting print material that
has been primed from the print jets. As the purge bin assemblies ll, they will need to be emptied regularly.
A B
Left Purge Bin
Assembly
Using the handle, pull the purge bin assembly inward at the top and then upward to free the bottom tab from the slot.
NOTE: Note the tab at the bottom of the purge bin. This tab is designed to t into a slot for proper installation.
CAUTION: When removing or installing the purge bin assemblies, be careful not to damage the bottom tabs.
Ensure the purge bin assemblies are installed properly before using the printer.
863D Systems, Inc.
C
Handle
Jet wiper
Purge bin tab

REPLACING THE JET WIPERS
After a predetermined number of print jet cycles over the jet wipers the display will prompt the user to replace the wipers before printing
another creation.
NOTE: When the left jet wiper has reached the end of its useful life,
the printer will prompt you to replace it. Select the checkmark to
continue.
NOTE: When the right jet wiper has reached the end of its useful
life, the printer will prompt you to replace it. Select the checkmark to
continue.
NOTE: If you have replaced the jet wiper, select the checkmark to
reset the printer count. Press SKIP to be reminded later.
Procedure
1. Remove the purge bin assemblies from the printer.
873D Systems, Inc.

4. Pull the jet wiper (A) upward.
A
5. Install the new jet wiper onto the purge bin and reinstall the purge bin assembly
into the printer.
NOTE: Ensure the jet wiper is fully seated before reinstalling the
purge bin assembly.
6. Select the checkmark to conrm the replacement of the jet wiper.
883D Systems, Inc.
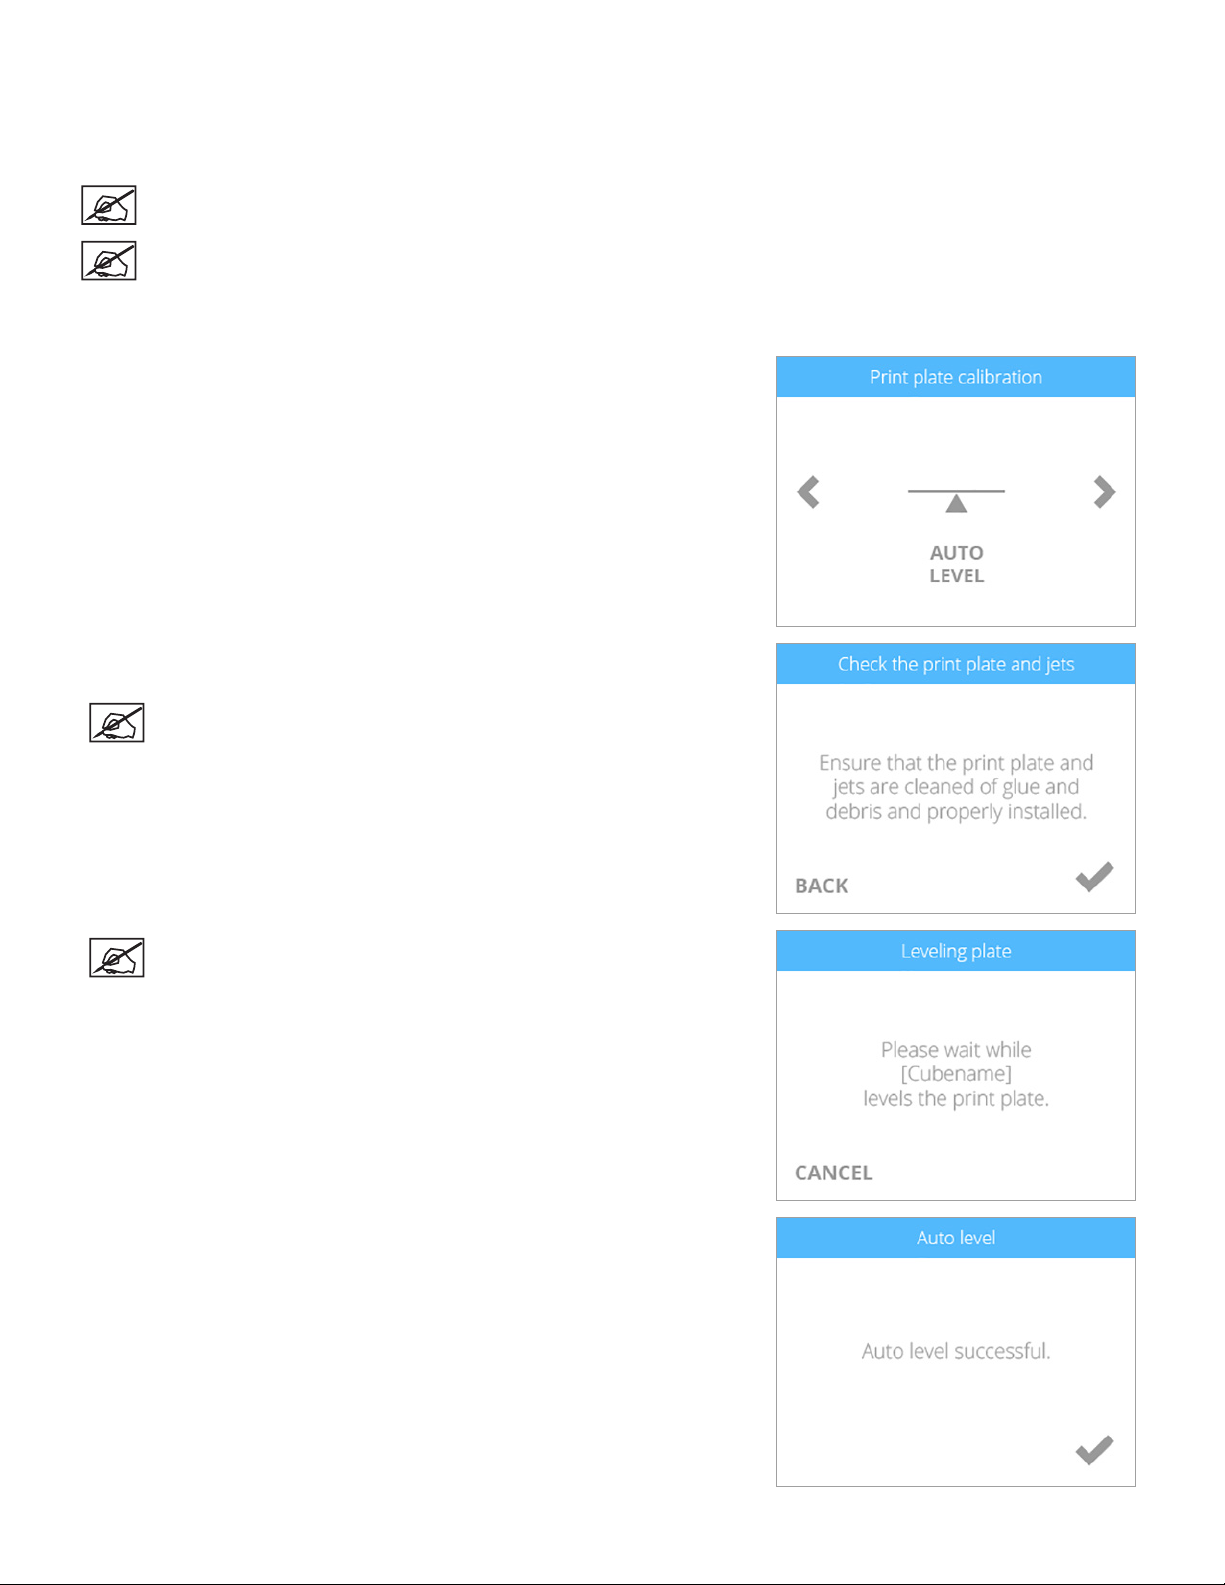
PRINT PAD CALIBRATION
Print pad calibration is performed at the factory but should be performed routinely to ensure quality printing. The printer may
occasionally prompt you to perform the Auto Level and Auto Gap procedures. If your creations are not printing as expected, check the
level of the print pad. Once Auto Level has been performed, perform the Auto Gap procedure.
NOTE: Auto Level should always be performed before the Auto Gap procedure.
NOTE: Auto Level should be performed when the printer is positioned away from bright lights or direct sunlight.
Auto Level
1. Navigate to the Print Plate Calibration screen and select AUTO LEVEL.
2. Clean the print pad thoroughly removing all glue and debris. Select the
checkmark to continue.
NOTE: The surface of the print pad must be completely clean.
NOTE: The Auto Level procedure will begin.
3. Once the Auto Level procedure has completed, select the checkmark to verify
the Z-Gap (Step 8). If the print pad is out of range, continue with the procedure.
893D Systems, Inc.

NOTE: If the print pad is out of range, you will need to perform a
manual adjustment.
4. Remove the print pad and select the checkmark to continue.
NOTE: To remove it, lift up the front of the print pad and pull it out of
the printer. The print pad is magnetically attached to the adjustment
knobs.
5. When prompted, loosen the lock screw that is indicated on the touchscreen
display. Select the checkmark to continue.
NOTE: Use a 1.5 mm Allen wrench that is included with the printer.
NOTE: The lock screw (1) is located just below the adjustment knob
(2). The lock screw for adjustment knob B can be accessed from the
front of the printer. The lock screw for adjustment knob A can be
accessed from behind the printer.
2
6. Follow the instructions on the touchscreen display. Once the adjustments have
been made, select the checkmark to continue.
7. When prompted, tighten the lock screw enough to ensure the adjustment knob
does not easily turn. Select the checkmark to continue.
Caution: Do not over-tighten the lock screw. This can damage the
adjustment knob and void the manufacturer’s warranty.
1
903D Systems, Inc.

4. Reinstall the print pad and select the checkmark to perform the Auto Level
procedure again.
NOTE: Select SKIP to bypass the Auto Level procedure. It is
recommended that Auto Level procedure is performed again.
5. Once Auto Level is successful, the printer will being checking the Z-gap.
NOTE: The printer will perform an automated gap measurement. This
may take a few minutes.
6. Select the checkmark to continue.
NOTE: If Auto Gap is not successful, it is recommended that you
perform Auto Level and Auto Gap again. Select AUTO LEVEL to
continue.
NOTE: If Auto Gap is not successful the second time, select PLATE
MAINTENANCE. For more information, refer to the section titled
Print Pad Maintenance. Once the Plate Maintenance procedure has
been performed, perform Auto Level and Auto Gap.
NOTE: If Auto Gap is still not successful, select MANUAL GAP
ADJUSTMENT. Refer to the section titled Manual Gap Adjustment for
more information. Once the Manual Gap Adjustment procedure has
been performed, note the nal reading for future reference.
913D Systems, Inc.

Gap Verication
Print a test print from the System 1 menu. Once you have removed it from the print pad, visually inspect the rst (bottom) layer of the
print and verify the quality. Turn the print upside down and inspect the printing grain. When the gap is optimal, the bottom of the print
should appear smooth and the lines should be very light and fused together.
Correct Gap
The gap is correct when the bottom of the print appears smooth and the lines are tightly fused together.
Gap Is Too Large
If the lines are more prominent (see the illustration below) and not tightly fused, the gap is too large. Auto Level and Auto Gap should
be performed.
When the gap is too large, the rst layer may begin to fray when removing the print from the print pad.
Gap Is Too Narrow
When the gap is too narrow, the part may be very difcult to remove from the print pad. In addition, the bottom layers may break off
from the rest of the part while removing it. The bottom of the rst layer will appear very smooth and shiny with almost no visible lines.
NOTE: If the bottom of the part appears shiny, make sure all glue has been removed and then reinspect it.
Caution: Damage to the print pad can occur if the gap is too narrow.
923D Systems, Inc.

Manual Gap Adjustment
If Auto Gap is unsuccessful, you may perform a manual gap adjustment to ensure the rst layer of the part prints properly.
NOTE: The print pad must be clean and free from glue and print material.
NOTE: Ensure the print jet nozzles are clean and free from print material. This can usually be accomplished by
pulling out the print material with your ngers.
Caution: Ensure the print jet nozzles are at room temperature before attempting to clean them.
1. Select MANUAL GAP ADJUSTMENT.
2. Place the gap gauge on top of the print pad under the left print jet. Select the
checkmark to continue.
NOTE: Ensure the left cartridge is installed before performing this
procedure.
NOTE: The Gap Gauge is a thin polyester strip approximately 8.5”
(216 mm) long and 1.5” (38 mm) wide.
3. Gently slide the gap gauge back and forth between the print pad and the left
print jet. Using the arrows, raise or lower the print pad until you feel a slight
resistance on the gauge. Select the checkmark when you feel the proper
resistance.
Caution: Exercise caution to prevent the print jet from pressing into
the print pad. Once you feel a slight resistance in the Gap Gauge
as it moves between the print pad and the left print jet, the gap is
correct.
933D Systems, Inc.

PRINT PAD MAINTENANCE
Auto Level and Auto Gap can be affected by residual glue or print material adhered to the print pad. The procedures can also be
affected by a print pad that is too shiny.
1. If Auto Gap is unsuccessful after two consecutive attempts, select PLATE
MAINTENANCE.
2. Using the ne-grit sandpaper included with the printer, buff the print pad.
NOTE: Refer to the section titled Clean The Print Pad for specic
instructions.
NOTE: Ensure the print pad is clean and dry before installing it in
the printer.
3. Select the checkmark to continue.
4. Perform the Auto Level and Auto Gap procedures.
Clean The Print Pad
1. Remove the print pad from the printer.
2. Wash all glue and print material from the print pad with warm tap water. If necessary, scrub the print pad with a soft brush.
3. Dry the print pad thoroughly.
4. If residual material is still adhered to the print pad, gently use the scraper to remove it.
5. If portions of the print pad appear shiny, buff the surface (with very light pressure on the included sandpaper) left-to-right in .5”
(12.7 mm) swirling motions until the entire print pad has been treated.
NOTE: It is most important to lightly sand all shiny areas of the print pad so the print pad surface appears matte
in texture.
6. Clean and dry the print pad thoroughly.
7. Reinstall the print pad.
8. Perform the Auto Level and Auto Gap procedures.
943D Systems, Inc.

PRINTER CALIBRATION
Printer Calibration is originally performed by the manufacturer. When Level Gap, Auto Gap and Manual Gap have been successful but
the bottom layer of your print appears stringy and not tightly fused together, your printer should be calibrated.
NOTE: Auto Level should always be performed before the Auto Gap procedure.
1. Navigate to the Printer Calibration screen and select CALIBRATE.
2. Select Auto Cal.
NOTE: The printer will maneuver the print pad to center it and then
position it under the print jet nozzles.
3. Lower the value on your display by 1.00 using the down arrow.
NOTE: The value displayed may be different from the illustration.
Referring to this illustration, your target value would be close to
-4.76. If the value displayed is 6.23, your target value would be close
to 5.23. The nal adjustment value should be close to the target
value but does not need to be exact.
4. Insert the gap gauge between the print pad (A) and the left print jet nozzle (B).
NOTE: The left print jet is print jet 1.
A
B
953D Systems, Inc.

4. Using the up arrow, slowly raise the print pad one press at a time. While the print
pad is being raised, slide the gap gauge back and forth under the left print jet.
Once you feel a slight resistance on the gap gauge, remove the gap gauge from
the print pad.
5. Press the white space to the right of CAL 2:.
NOTE: This illustration shows the target area where you need to
press.
NOTE: The printer will begin the calibration.
6. Record the value for CAL 1:.
NOTE: This value will need to be used again in this procedure.
NOTE: The printer will display a value for CAL 2:.
7. Select the checkmark to save the values.
8. Navigate to the Printer Calibration screen and select CALIBRATE.
9. Select Auto Gap.
963D Systems, Inc.
 Loading...