

Page 1
+
X8
Operation Manual
IMPORTANT
Read before
flying!
Page 2
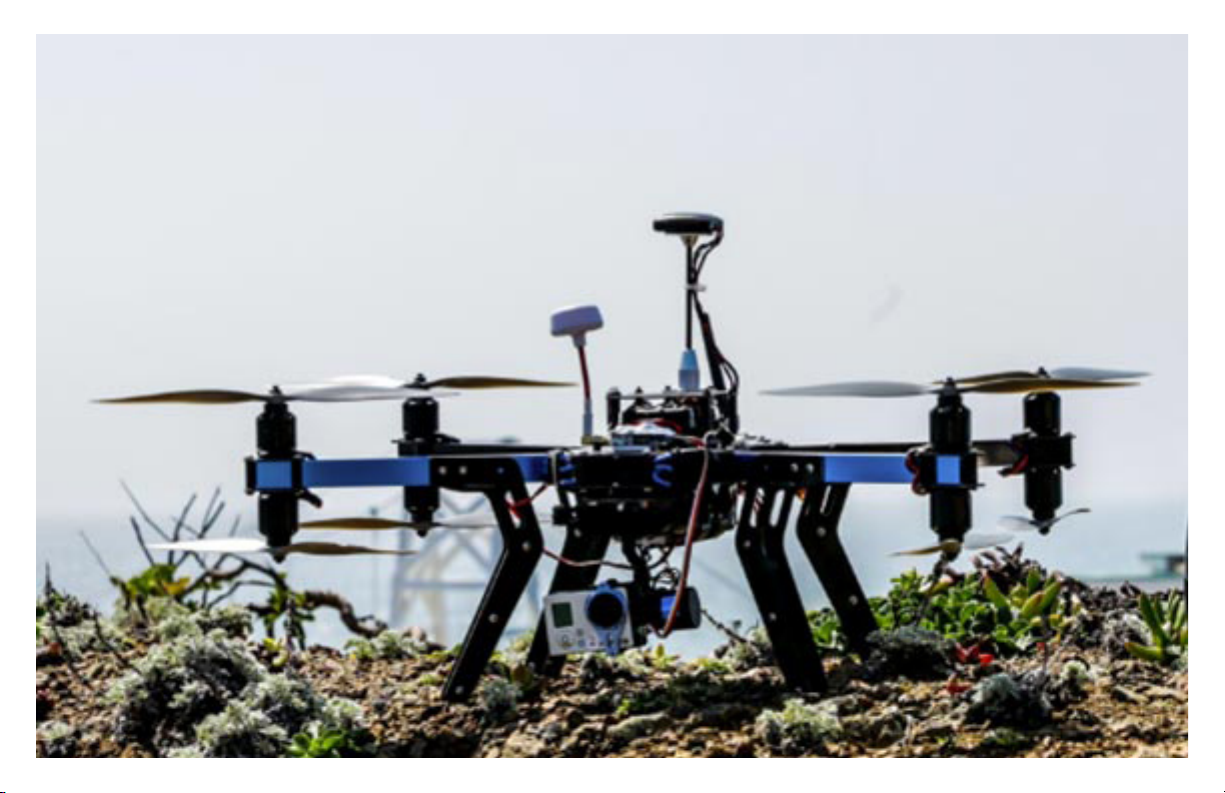
Meet the X8
Thank you for purchasing an X8+!
The X8 is a powerful octocopter platform for aerial video.
Review this manual in its entirety before your first flight.
Additional instructions can be found in the X8 information
portal at 3DR.com/X8/info.
Happy flying!
+
Page 3

Contents
Parts 2
Setup 4
Assembly 4
Ground Station 5
Power Management 7
Charging 8
Safety 8
Controller Battery 9
Powering the X8 10
Connecting to a Ground Station 11
Flight Basics 12
Safety 12
Operating Limits 13
Controls 14
Modes 17
Return to Launch 19
Failsafes 20
Status Indicators 22
Flight Procedures 24
Takeoff 24
Landing 26
Monitoring 27
Missions 28
Planning 29
Saving 30
Initiating 31
Ending 31
Appendix 32
Troubleshooting 32
Maintenance 32
Specs 33
Resources 34
Page 4
Parts
Choose a clear launch
point, and face the X8
away from you.
Place the X8 at
launch point.
Go outside to
an open area!
See the Operation
Manual for complete
instructions.
X8
+
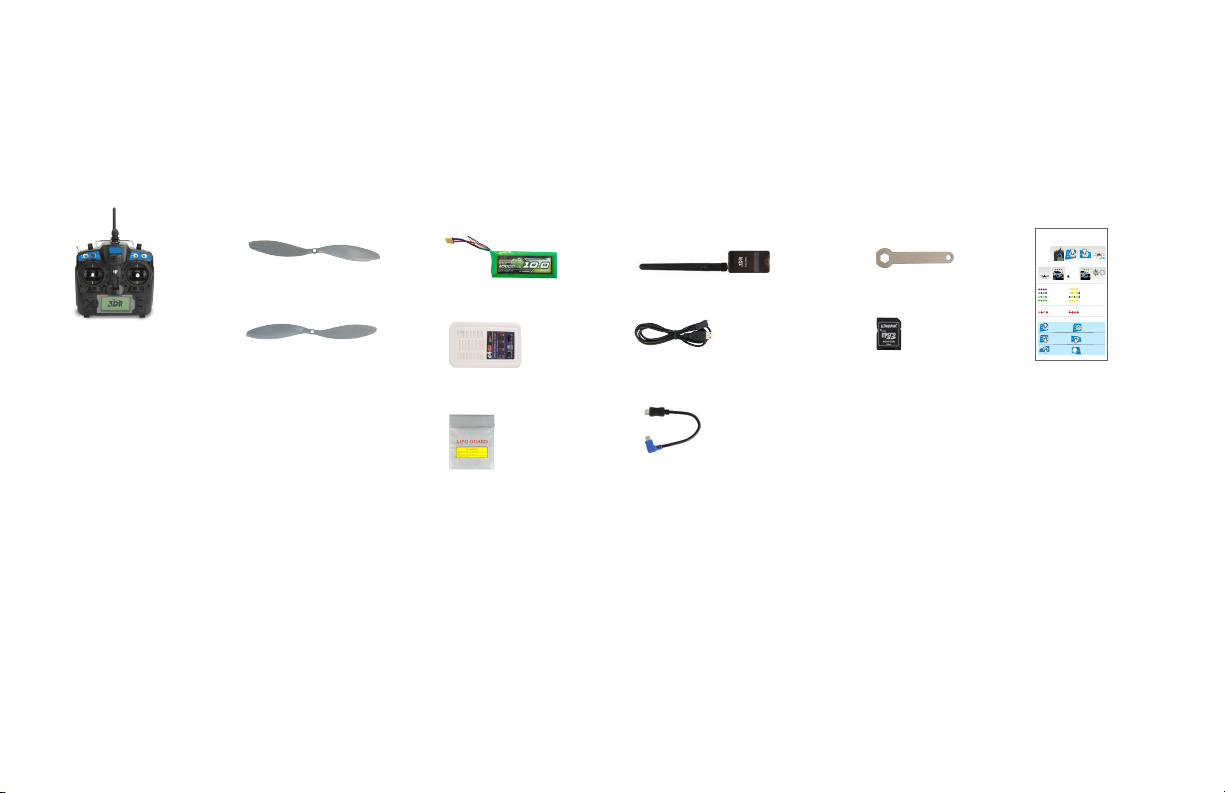
RC Controller Battery Kit Tool KitPropellers Flight Checklist
SF propellers (4)
SFP propellers (4)
Flight battery
Charger and accessories
Ground Station Radio
Radio
USB adapter
Propeller wrench
Pixhawk micro-SD card
adapter
Flight Checklist
Connect
Power on controller;
2
charged battery.
1
set to STD and RTL OFF.
Hold the X8 still
and level while
powering on.
Press and hold safety
Arm
Check
button until solid red.
4
5
3
6
motors.
LED.
The motors are
now active.
!
Hold left stick down-
Stand back!
right until motors spin.
LED
Loss of RC signal, automatic landing
Initializing, hold the X8 level
Low battery, automatic landing
Acquiring GPS, please wait
Loss of GPS signal, switch to manual
Autopilot ready, GPS locked
Armed
Pre-arm safety check failure
Safety Button
Motors inactive, safe to
Motors active, deactivate before
handle
handling (see reverse)
Flight Modes
Standard position
Loiter mode
LTR
(altitude hold mode)
STD
fly manually
hover
Return to launch
Auto mode
RTL
AUTO
land at the launch point
fly a mission
Land
Control gimbal
CH7
TILT
land at the current position
tilt the camera down and up
©2014 3D Robotics. vA. DCT0005 All rights reserved.
Android adapter
Guard bag
2
Page 5
X8
+
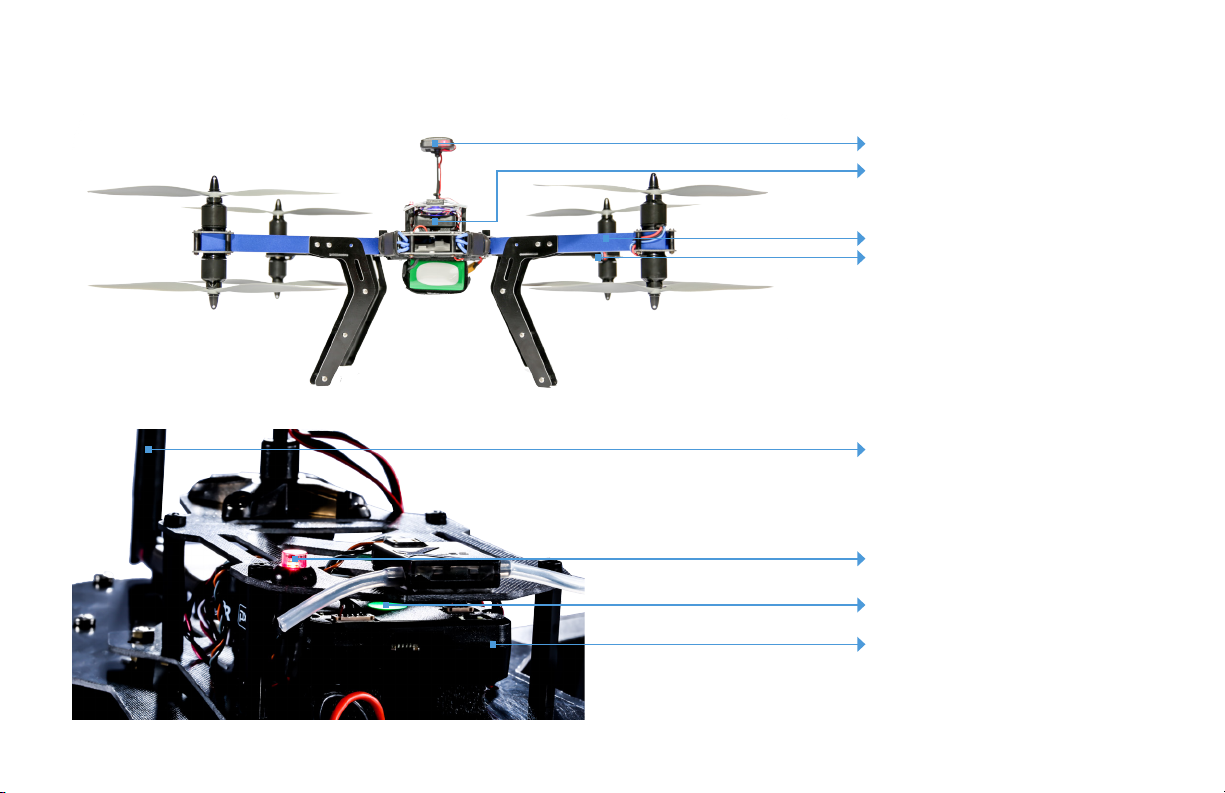
GPS mast
Pixhawk autopilot
Front arms (blue)
Rear arms (black)
Antenna
Safety button
Status LED
Micro-USB port (not pictured, side
of Pixhawk)
3
Page 6
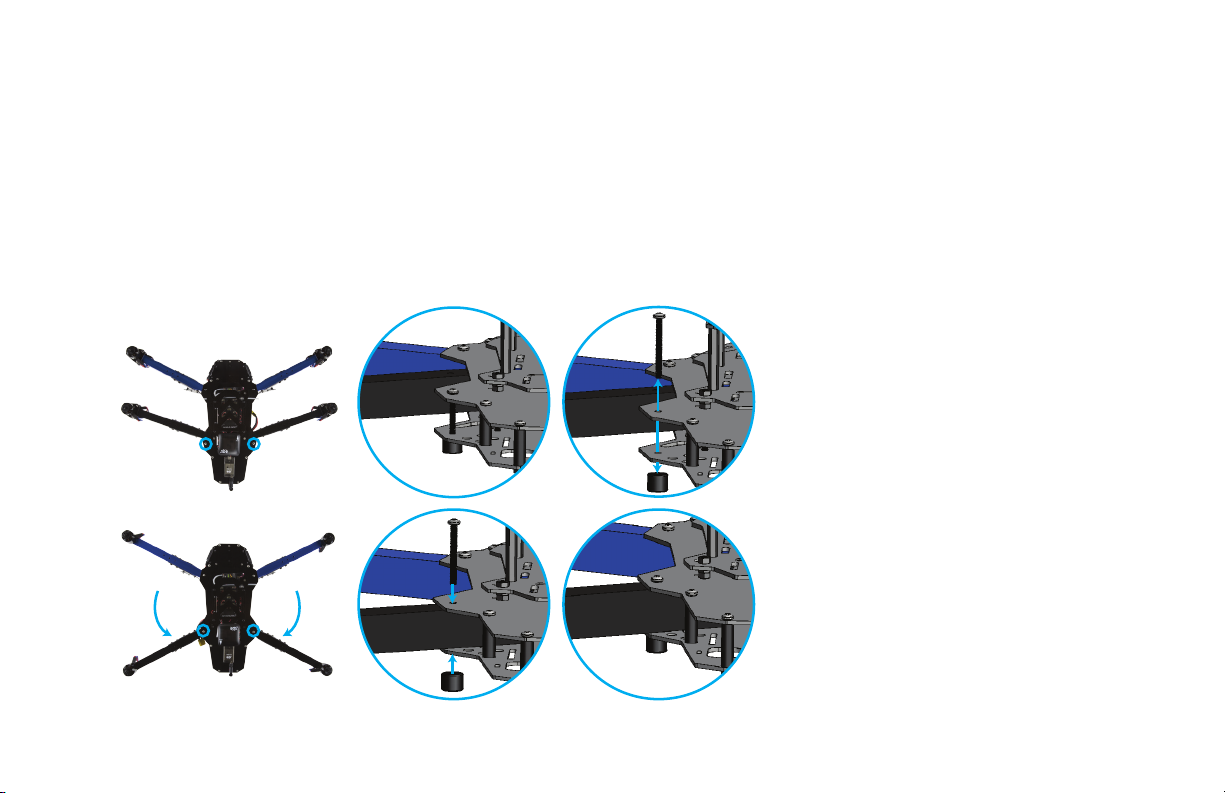
Setup: Assembly
The X8 arrives in travel configuration. Complete
these steps to prepare the X8 for flight.
1 Unfold Arms
Remove the bolts and thumbnuts near the two folded black arms (1).
Unfold the black arms, re-insert the bolts, and secure with the thumbnuts (2).
1
2
X8 Assembly: Unfold Arms
4
Page 7
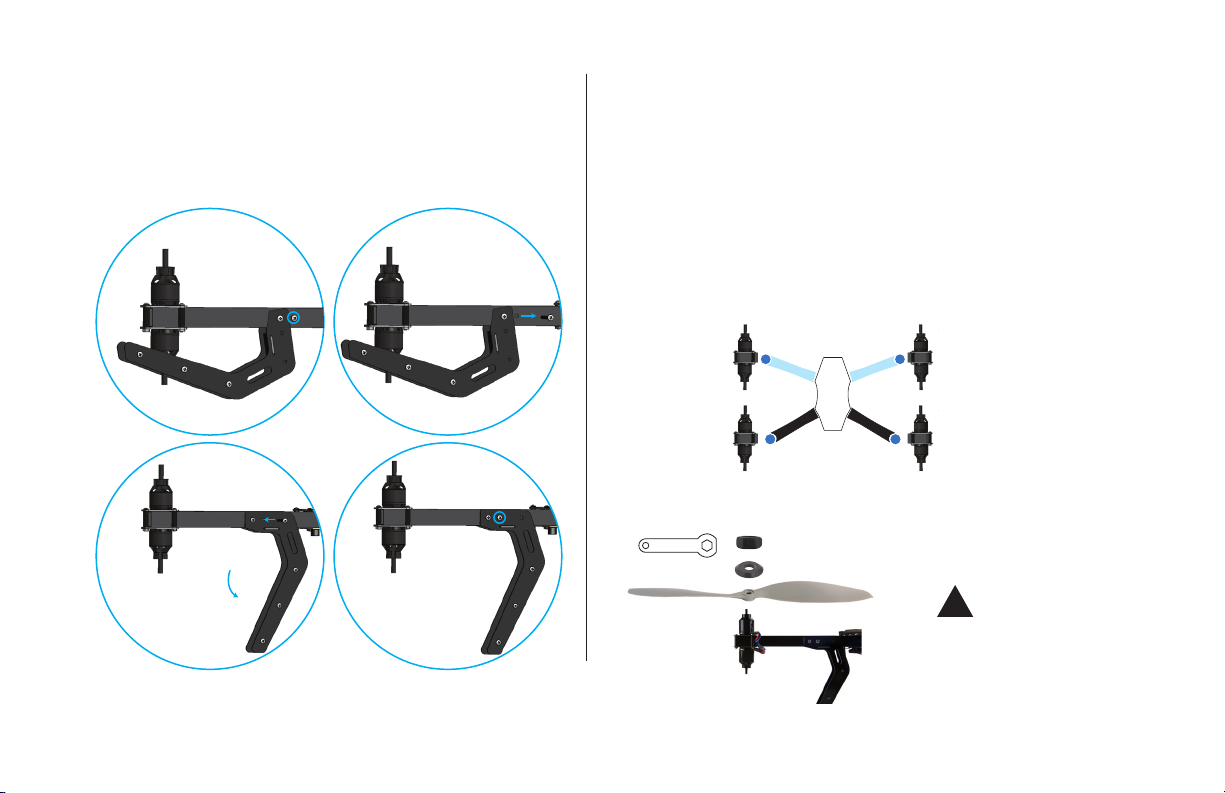
2 Unfold Legs
Remove the bolts and nuts to the inside of the folded legs (1),
unfold the legs, re-insert the bolts, and secure with the nuts (2).
1
3 Attach Propellers
The X8 uses SF and SFP propellers. Labels are found on the individual
propeller packages and on the propellers themselves. The diagram
below shows which motors require SF or SFP propellers. Accurate
assembly of SF and SFP propellers is critical for the X8 to fly correctly.
To attach each propeller, remove the nut and washer from the motor,
and add the correct type of propeller with the writing on the propeller facing
the sky. (This is a tight fit; apply pressure and twist the propeller onto the
motor.) Replace the washer over the propeller, and use the propeller
wrench to tighten the nut on top.
top motor: SFP
top motor: SF
bottom motor: SF
top motor: SF
bottom motor: SFP
X8 Propeller Order
bottom motor: SFP
top motor: SFP
bottom motor: SF
2
!
Ensure that the writing on all
propellers faces the sky.
X8 Assembly: Unfold Legs
X8 Propeller Assembly
5
Page 8

Ground Station
A ground station is a laptop or tablet running an ArduPilot-compatible mission control application.
In the field, a ground station helps you monitor the X8 during flight, plan missions, and troubleshoot issues. We recommend using a ground station at all times with the X8.
To set up a ground station, choose a platform below and visit 3DR.com/download_software to install
the application.
DroidPlanner 2
Android
Important Note About Vehicle Setup in Mission Planner and APM Planner:
Your X8 has been pre-configured at the factory and is ready to fly. Re-performing the
calibrations on the Initial Setup screen, including the mandatory hardware configurations
and setup wizard, can adversely affect the performance of your aircraft.
iOS? There are currently no ground station applications available for iOS.
Mission Planner
Windows
APM Planner
OS X
6
Page 9
Power Management
The X8 is powered by a rechargeable lithium polymer (LiPo) battery. When fully
charged, the battery provides up to 15 minutes of flight time depending on payload,
environmental conditions, and flying style. Flying with a gimbal, GoPro, and FPV
system can reduce flight time by up to 5 minutes. Flying aggressively or in high winds
can affect power consumption and reduce flight time. Monitor power consumption
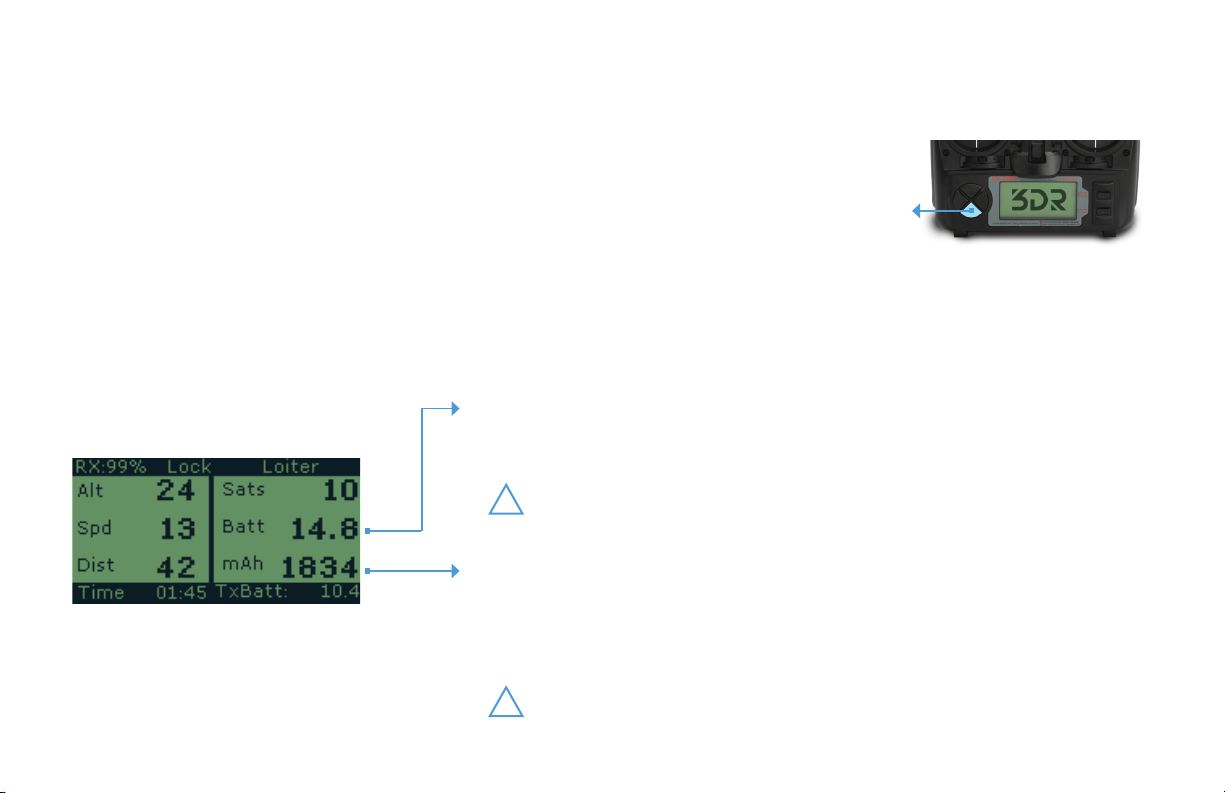
using the flight data display on the controller (press and hold the DN button).
When the battery reaches the low voltage limit, the X8 initiates a low battery failsafe
and lands automatically at the current position. (See page 20 for more information
about failsafes.) To avoid a low battery failsafe, regularly check the controller’s flight
data display to monitor battery voltage, and end your flight before the battery reaches
the low voltage limit.
flight battery level
Full battery: 16.8 V
Low battery limit: 14 V
End your flight at 14.1 V.
!
flight battery mAh consumed since armed
Press and hold the DN
button to view flight data.
Controller
Controller Flight Data Display: Screen 1
Another way to monitor power consumption is by using milliamp-hours (mAh).
Monitor the mAh on the controller, and ensure that consumption does not
exceed 8,000 mAh (80% of the battery’s available capacity). Exceeding 8,000
mAh can render the battery permanently unusable.
Do not exceed 8,000 mAh for a fully charged X8+ battery.
!
7
Page 10
Charging
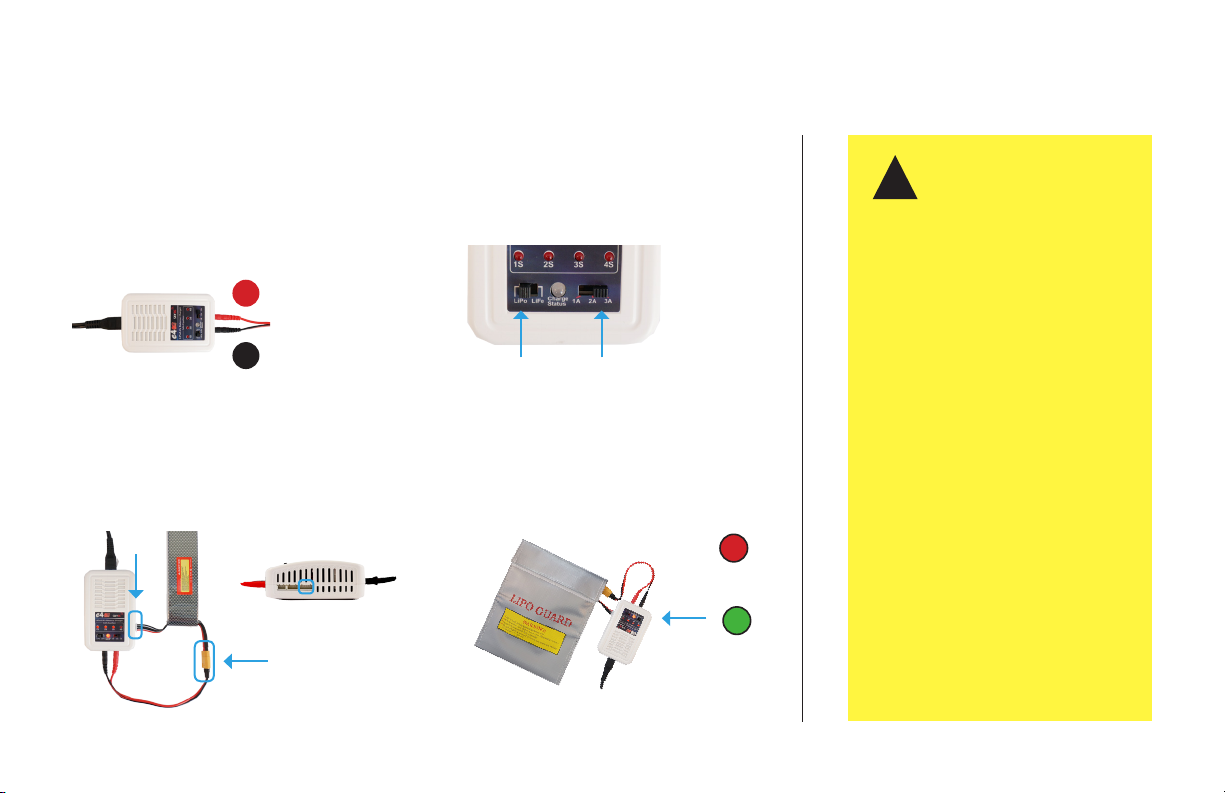
Charge the battery before your first flight!
Safety
1
Connect the charger to the power adapter cable
and plug the adapter cable into a wall outlet.
Connect the red cable to the + port and the black
cable to the - port.
+
–
Charger with power cable and
split-wire charging cable
3
Connect the battery’s white connector to the
charger’s 4S port, and join the two yellow
connectors together.
4S
Flight battery charging wiring
2
Set the charger to LiPo and 3A.
LiPo 3A
Charger settings
4
Secure the battery inside the guard bag,
and charge until the status indicator
displays green.
Charging
Charging in process
Complete
!
Flying with a low battery is a safety
risk and can render the battery
permanently unusable. Always fly
with a fully charged battery.
Charge the battery using a designated
LiPo balance charger only. Always
monitor the battery while charging.
Protect the battery from extreme
heat, extreme cold, puncturing, and
flammable surfaces. Always transport,
charge, and store the battery in the
guard bag.
Inspect the battery for damage before
and after flying. If you observe any
swelling of the package or the battery
ceases to function, do not use the
battery. Do not dispose of the battery
in the trash; dispose of the battery at
local battery recycling center. In the
US and Canada, visit call2recycle.org
to find a location.
8
Page 11
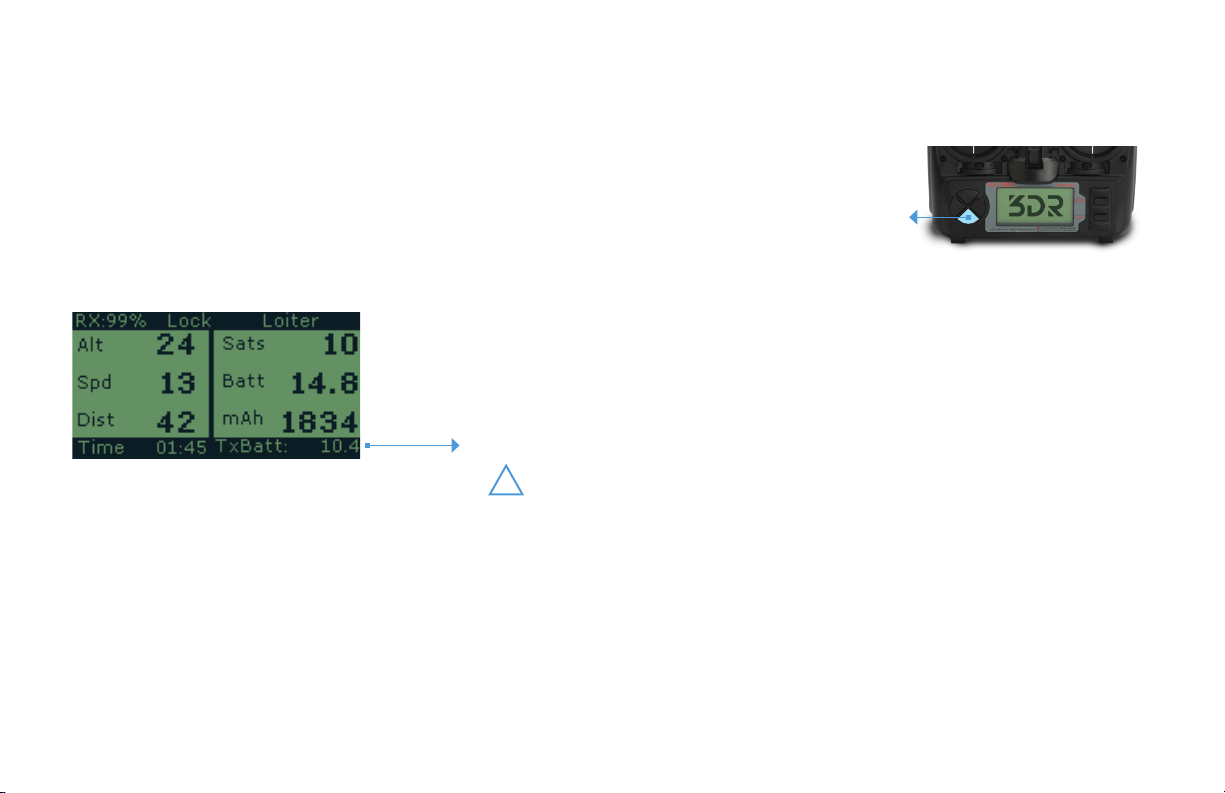
Controller Battery
The controller is powered by 8 AA batteries (included). The controller’s
flight data display allows you to monitor the voltage of the controller.
When fully charged, the controller displays 12 V; when completely out
of charge, the controller displays 9 V. Replace the batteries when the
controller displays 9.1 V.
controller battery level (9-12 V)
Press and hold the DN
button to view flight data.
Controller
Controller Flight Data Display: Screen 1
Replace controller batteries at 9.1 V.
!
9
Page 12
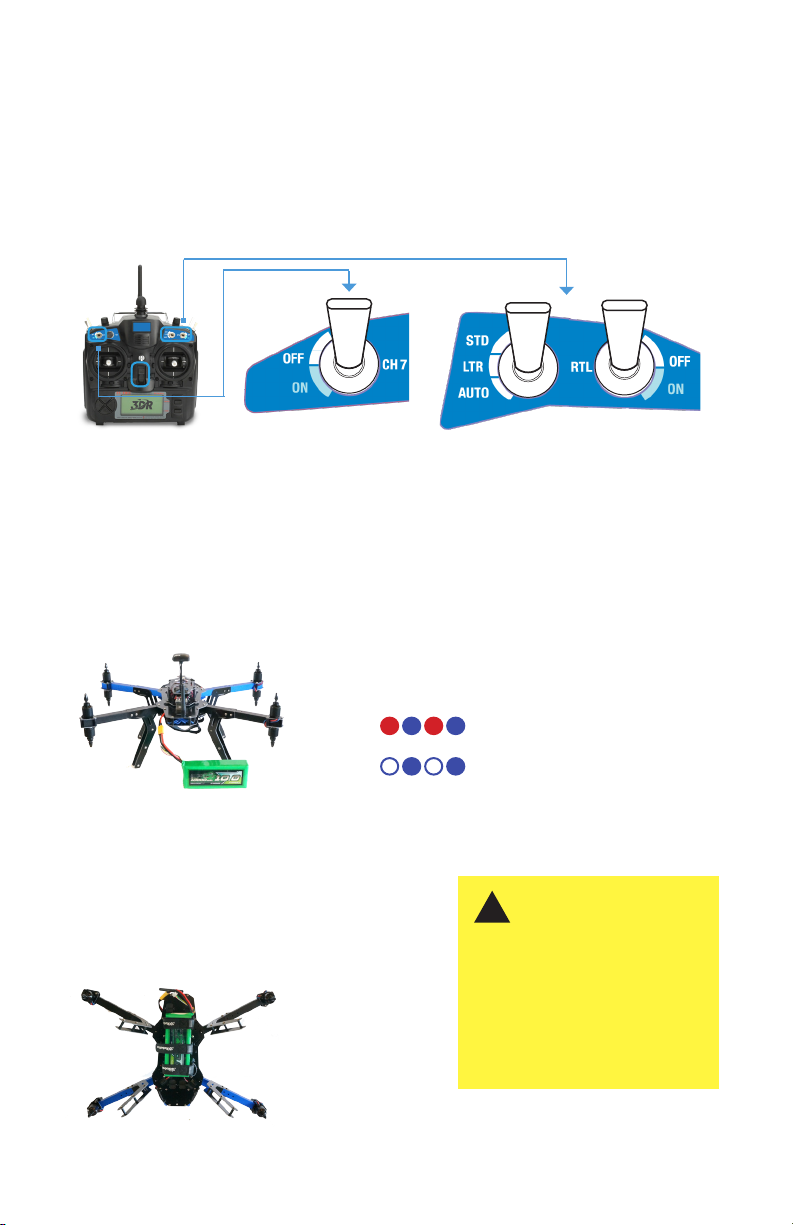
Powering the X8
Follow these steps to power the X8.
1
Turn on the controller. Ensure that the switches
are set to CH 7 OFF, STD, and RTL OFF.
RC controller
CH 7 switch
Mode switch
2
To power on the X8, join the yellow connector on the battery with
the yellow connector on the X8. Keep the X8 still and level while
it powers on and initializes the sensors. When the status LED
displays blinking blue, the sensors have completed initialization and
you can move the X8.
Status LED indicators:
Initializing, keep still and level
Initializing complete
X8: Connect battery, keep level while initializing
3
When the initialization process is complete, turn over
the X8 and secure the battery to the underside of the
vehicle using the velcro straps.
!
It is important to establish
communication before powering
on the X8. Always turn on the
controller before connecting the
battery. When powering off the
X8, disconnect the battery before
turning off the controller.
RTL switch
X8: Secure battery
10
Page 13
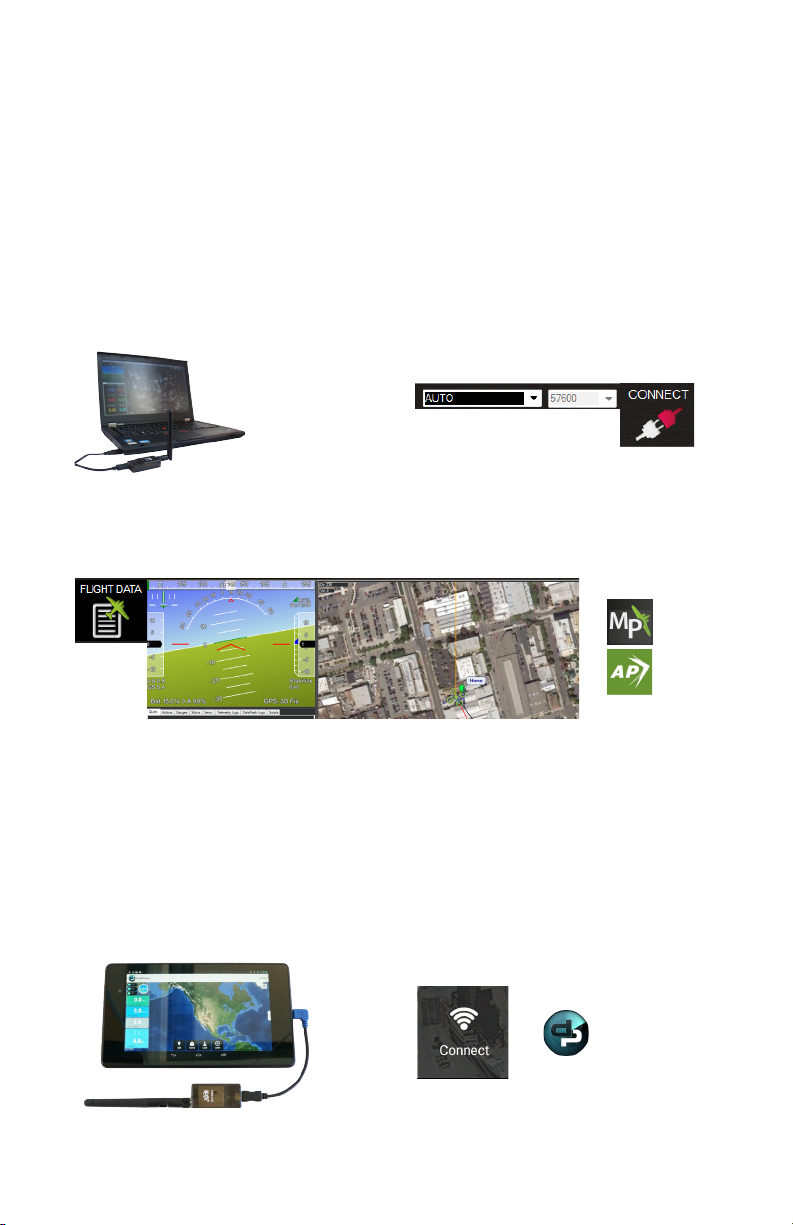
Connecting to a Ground Station
To connect the X8 to a ground station, connect the ground station radio to
your laptop or tablet and power the X8.
Laptop (Mission Planner/APM Planner)
1
Connect the ground station radio to your
laptop using the USB adapter. Open
Mission Planner or APM Planner.
Ground station laptop with radio connected
3
Select Flight Data to view live data from the X8.
Mission Planner Flight Data tab: connected to aircraft
Tablet (DroidPlanner)
2
Select AUTO and 57600, then select CONNECT.
(When connecting directly to Pixhawk’s
micro-USB port, set the rate to 115200.)
Mission Planner Connect tool (top-right corner)
1
Connect the blue end of the Android adapter
2
Select Connect.
to your device and the black end to the radio.
Ground station tablet with radio connected DroidPlanner: Connect icon
11
Page 14
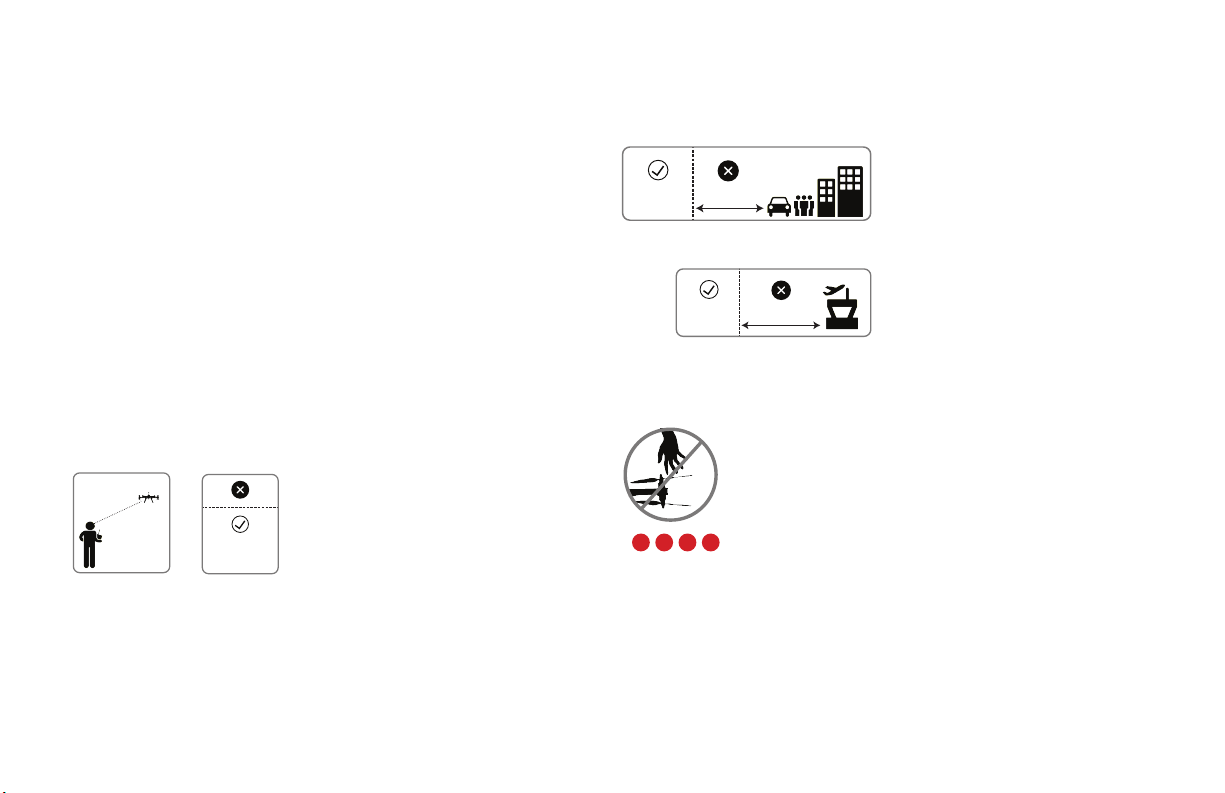
Flight Basics: Safety
visual line
of sight
400 ft
(120 m)
5 miles (8 km)
400 ft
(120 m)
To ensure safe and successful flying, always fly in accordance
with your location regulations and these best operating practices.
Before you fly, determine the boundaries of your safe flying area.
If the X8 moves outside the designated area or exhibits instability
in flight, switch to standard mode and land the X8 manually.
The X8 cannot avoid obstacles on its own, including during
missions. As the operator, it’s your responsibility to recognize and
avoid obstructions while flying. Always be ready to regain manual
control of the X8 in the event of an unsafe situation.
Location
visual line
of sight
Always fly below 400 ft (120 m) and within your
visual line of sight. Don’t let the X8 get too far
400 ft
(120 m)
away from you; make sure you can always see its
orientation. Don’t fly in low light, high winds, rain, or
other conditions that might impede visibility.
Propellers
Always fly at least 100 feet (30 m)
away from people, vehicles, and
100 ft (30 m)
buildings. Make the safety of people
and property your first priority!
Always fly at least 5 miles (8 km)
away from airports and other areas
5 miles (8 km)
where pilots operate manned aircraft.
Spinning propellers can cause serious injury. The safety
button indicates the status of the motors to help you
prevent hazardous contact with the X8’s high-speed
propellers.
• When the X8 is powered on, the safety
button blinks red, indicating that the
motors are inactive and the propellers are
safe to handle.
• When you’re ready to fly, press and hold the
safety button until it shows solid red. This
indicates that the motors are active and the
propellers can spin if armed. To make the
propellers safe to handle again, press and
hold the safety button until it blinks red.
12
Page 15

Operating Limits
Always fly within the X8’s operating limits.
X8+ Operating Limits
Maximum altitude* 100 m (328 ft)
Range* 300 m (984 ft) from launch point
GPS lock GPS lock required at all times
Maximum estimated flight time 15 min
Payload capacity 800 g (1.7 lbs)
*While geofence enabled (default)
13
Page 16
Left Stick
Left Stick
Left Stick
Controls
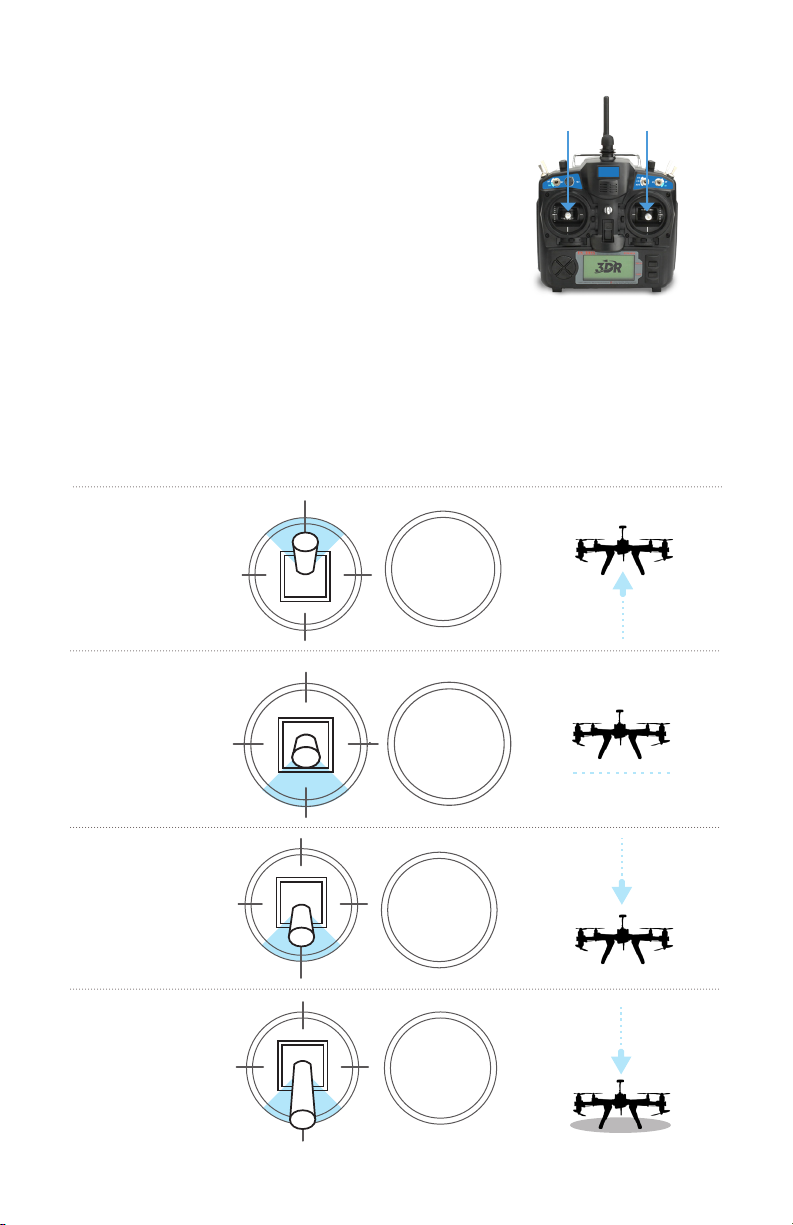
Maneuver the X8 in flight using the
controller’s two joysticks.
Throttle
Move the left stick vertically to control altitude.
left stick
To take off and to
gain altitude, push the
throttle stick slightly
above center position.
left stick:
throttle
& yaw
right stick:
pitch
& roll
Set the throttle stick
to center to maintain
the current altitude.
Move the throttle
stick below center to
decrease altitude.
Set the throttle stick
fully down to land
once the X8 is a few
inches above the
ground.
14
Page 17
Left
Back
Forward
Right
Left
Back
Forward
Right
Left Stick
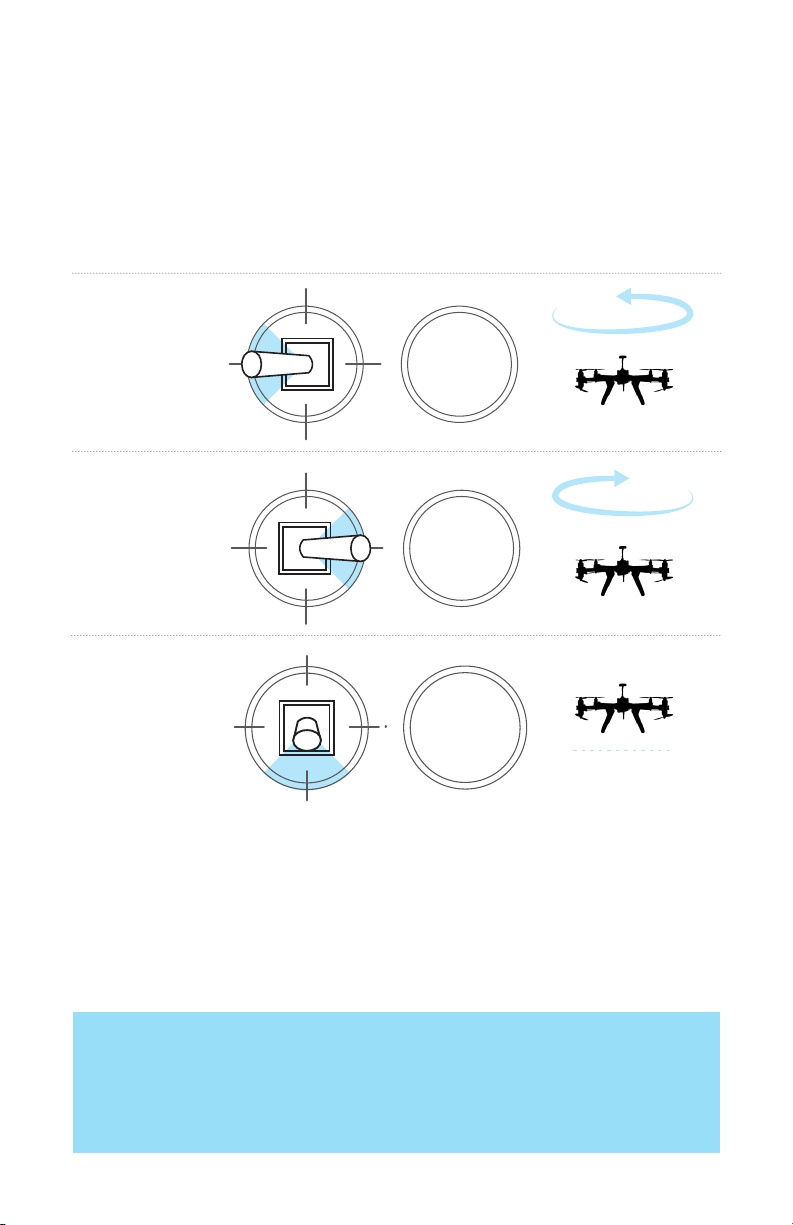
Yaw
Move the left stick horizontally to rotate the X8 and change orientation.
For a slow rotation, move the stick slightly away from the center
in either direction. Moving the stick farther from the center creates
a faster rotation.
left stick
Move the stick to
the left to rotate
counterclockwise.
Move the stick
to the right to
rotate clockwise.
Release the stick to
stop rotating and
maintain the current
orientation.
Flight Tip
When adjusting orientation, move the left stick horizontally without changing its
vertical position.
15
Page 18
Forward
Back
Forward
Left
Back
Forward
Left
Back
Forward
Right
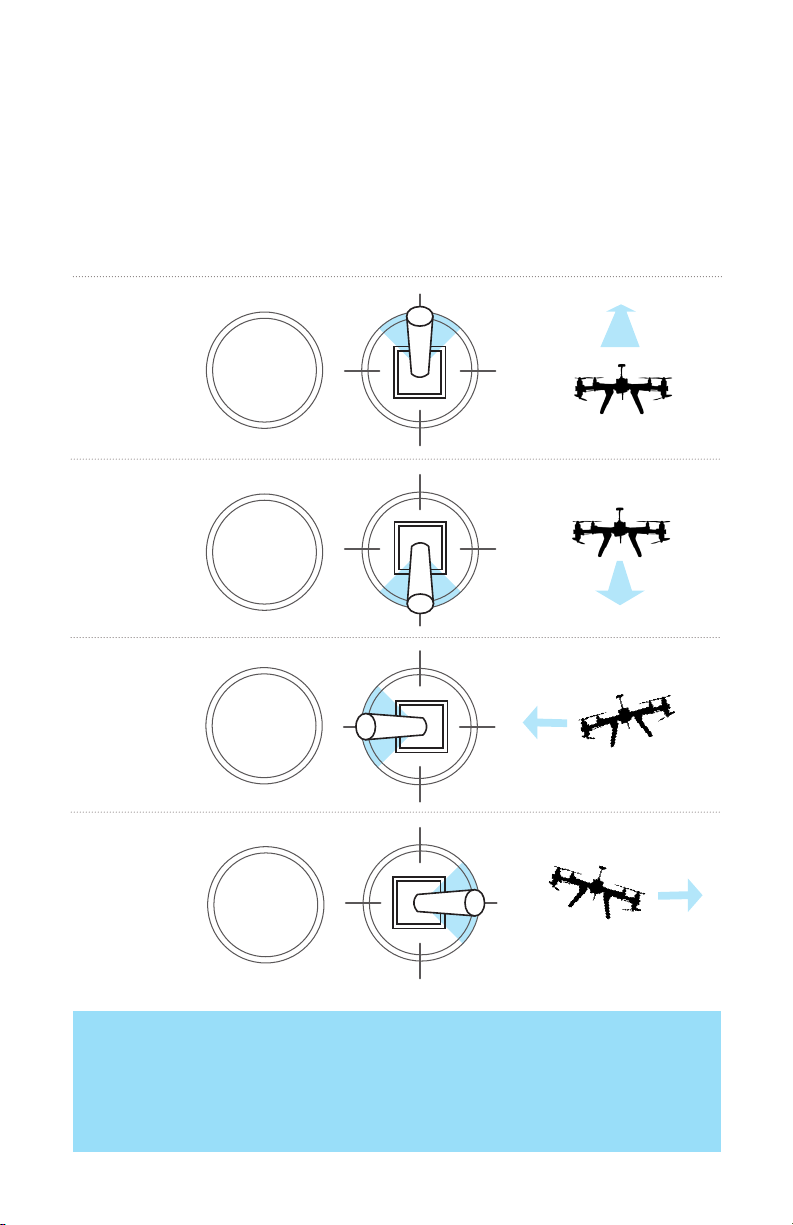
Pitch and Roll
The right stick allows you to control the X8’s position in the air. Move the right stick to tell the
X8 to move in that direction: forward (toward the blue arms), back (toward the black arms),
left (toward the left arms), or right (towards the right arms). How far you move the stick from
the center before releasing it tells the X8 how fast to move.
right stick
Move the right
stick forward
to fly forward.
Move the right
stick back to fly
backward.
Move the right
stick left to fly
left.
Move the right
stick right to fly
right.
Flight Tip
The X8 moves according to its orientation. The blue arms face forward, and the black
arms face backward. Before using the right stick, use yaw to keep the X8 facing in
outward orientation so that the black arms face towards you and the blue arms and face
away from you.
16
Page 19
Modes
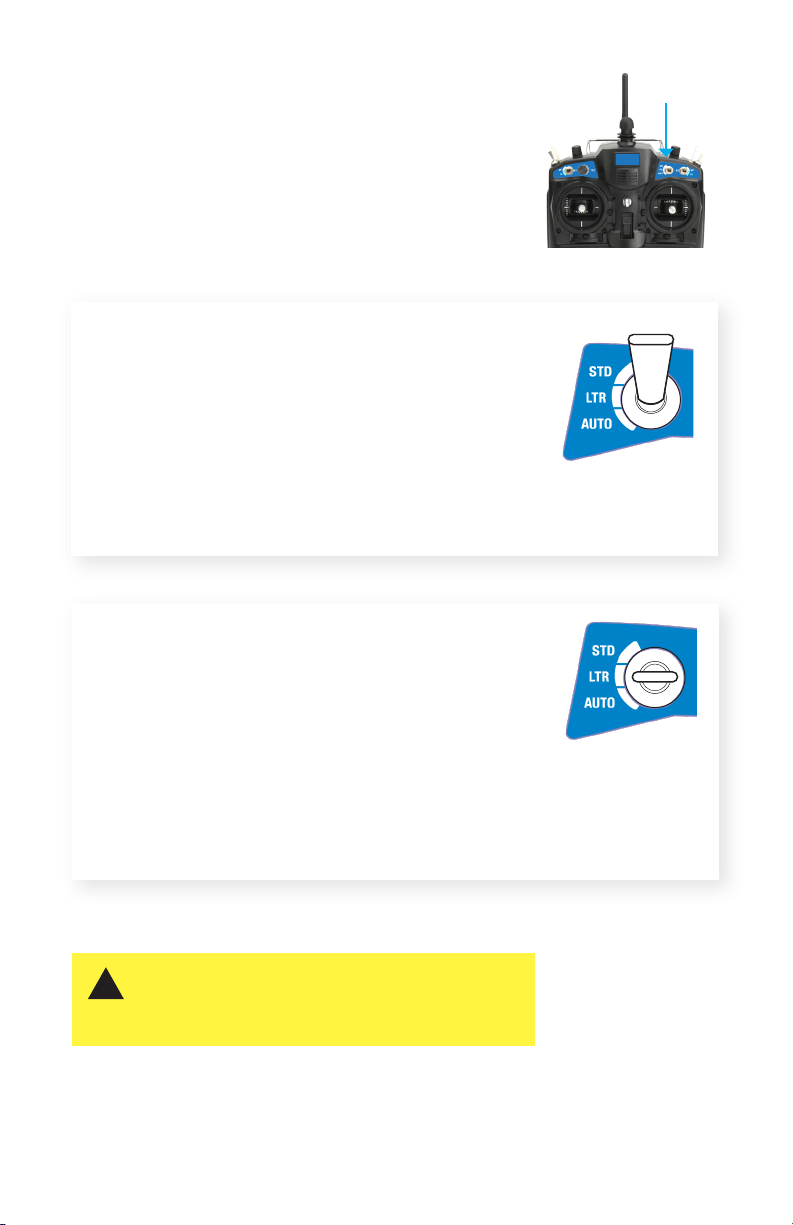
The X8 includes three flight modes: manual flight
(STD-altitude hold), hover mode (LTR-loiter), and
mission flight (AUTO). Use the switch on the
right side of the controller to select a flight mode.
Standard (altitude hold mode)
STD
fly manually
Start your flight in standard to select altitude hold mode,
and fly manually using the controller.
Loiter mode
LTR
mode switch
hover
Select loiter to hover in place automatically. Use the controller
to adjust the X8’s position then release the sticks to hold
that position. Loiter is a great way for beginners to learn how to fly!
If you’re new to flying, start your first flight in loiter instead of standard.
To avoid sudden changes in altitude, set the throttle
!
stick to center position before switching modes,
including in the event of a GPS failsafe. See page 20
for more information about failsafes.
17
Page 20
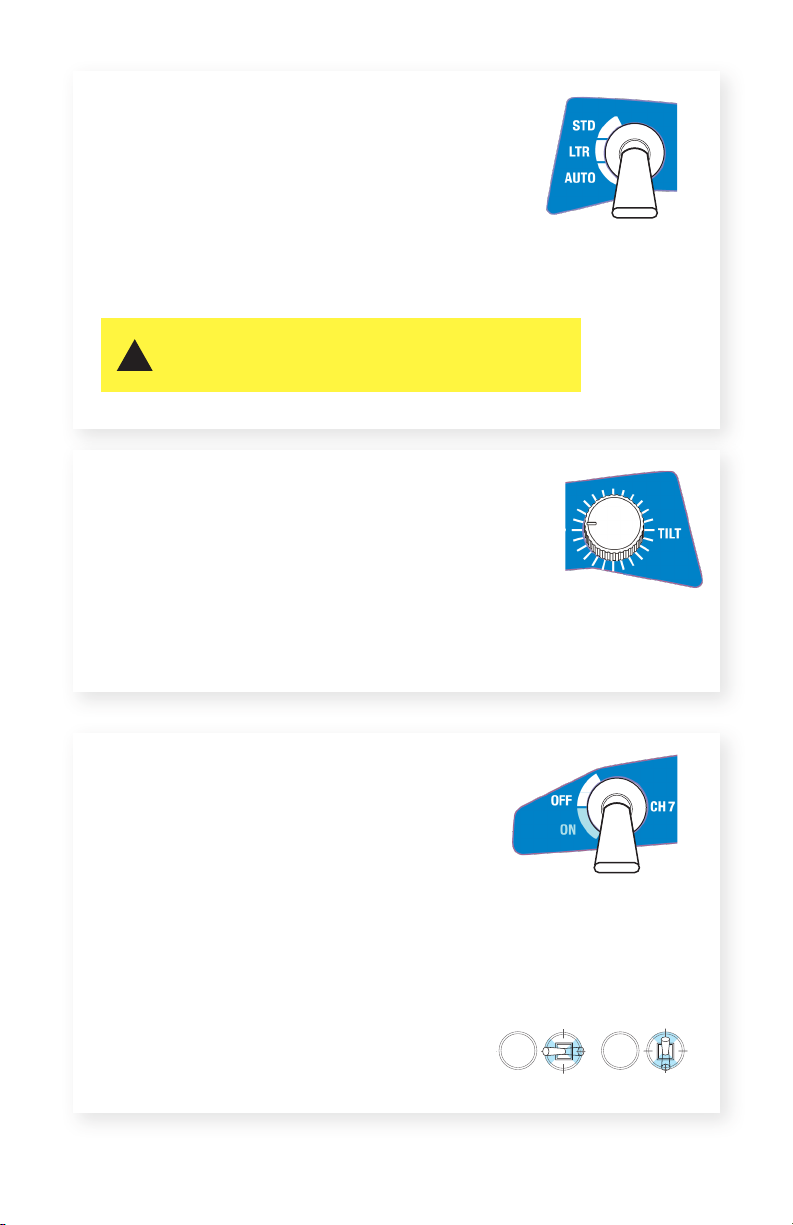
Auto mode
AUTO
fly a mission
Select auto mode to fly an autonomous mission. The X8
automatically flies the series of waypoints saved to the autopilot.
See the Missions section on page 28 for instructions on planning and flying missions.
Do not activate auto mode unless you have saved
!
a mission to the X8 using a ground station application.
Gimbal control
TILT
tilt the camera up and down
Connect a Tarot Gimbal (sold separately), and use the TILT knob to control the
angle of the camera in flight. Visit 3DR.com/X8/info for instructions.
Land
CH 7
land at the current position
Set the CH 7 switch to ON to end your flight and land at the current position.
Once you activate land, set the throttle stick fully down, and the X8
automatically disarms after landing. The X8 does not disarm automatically
unless the throttle stick is set fully down.
Reposition during landing: During landing, use the right
stick on the controller to adjust the X8’s position.
18
Page 21
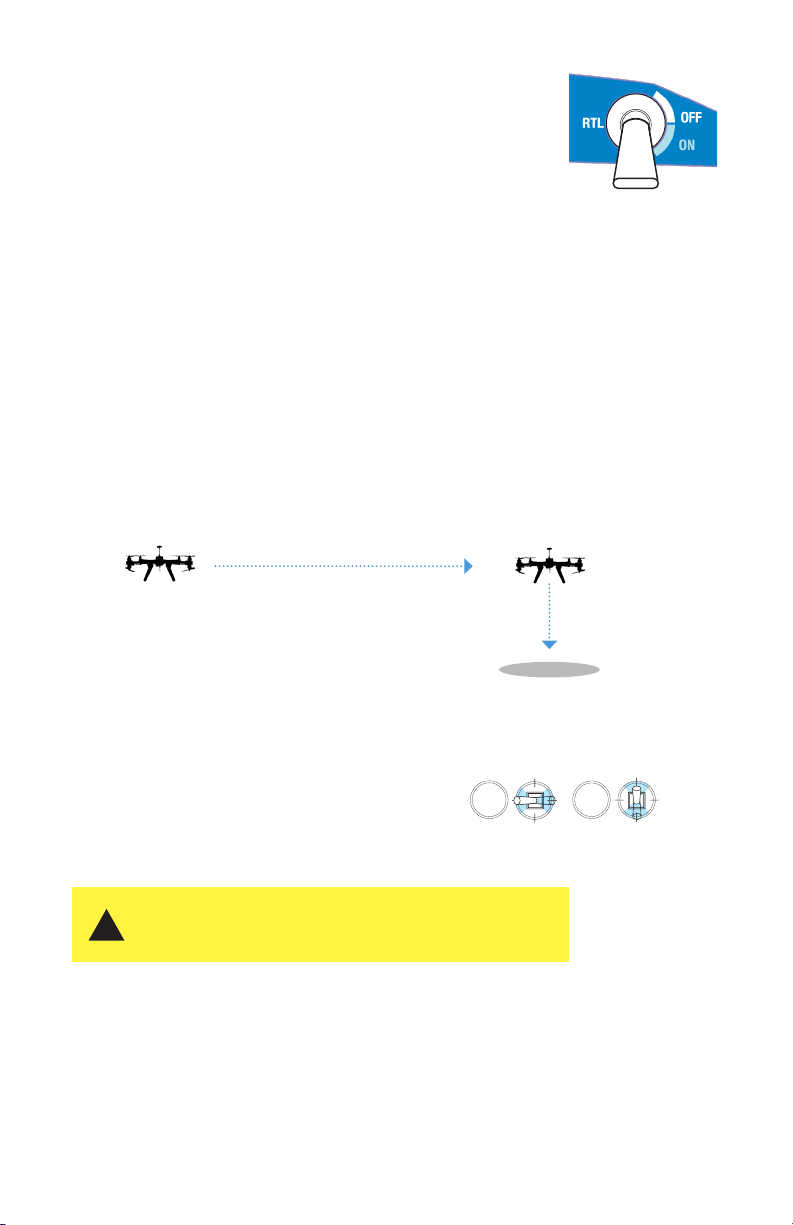
Return to Launch
land at the launch point
Set the RTL switch to ON to end your flight and return the X8 to
the launch point automatically. Once you activate RTL, set the
throttle stick fully down, and the X8 automatically disarms after
landing. The X8 does not disarm automatically unless the throttle
stick is set fully down.
When commanded to RTL, the X8:
1 Achieves minimum altitude of 15 m (50 ft) or maintains current altitude
if above 15 m.
2 Moves to launch point and loiters for 5 seconds.
3 Lands at launch point. Wait for a few seconds until the X8 disarms
automatically.
15 meters1
Reposition during landing: During landing, use the right
stick on the controller to adjust the X8’s position.
RTL returns the X8 to the location where it was armed.
!
Always arm the X8 at a safe, unobstructed launch point.
23hover 5 seconds
launch point
19
Page 22
Failsafes
400 ft
(120 m)
The X8 is programmed with a set of failsafe behaviors to prevent a crash in
the event of a loss of one of the data or communication channels required for
flight. Although certain failsafes have assigned LED indicators and tones, it is
unlikely that you will be able to see these at a distance. Monitor the ground
station for failsafe indications. If a failsafe is triggered, the assigned behavior
activates. To override the failsafe behavior, use the controller to switch to
standard mode and regain manual control.
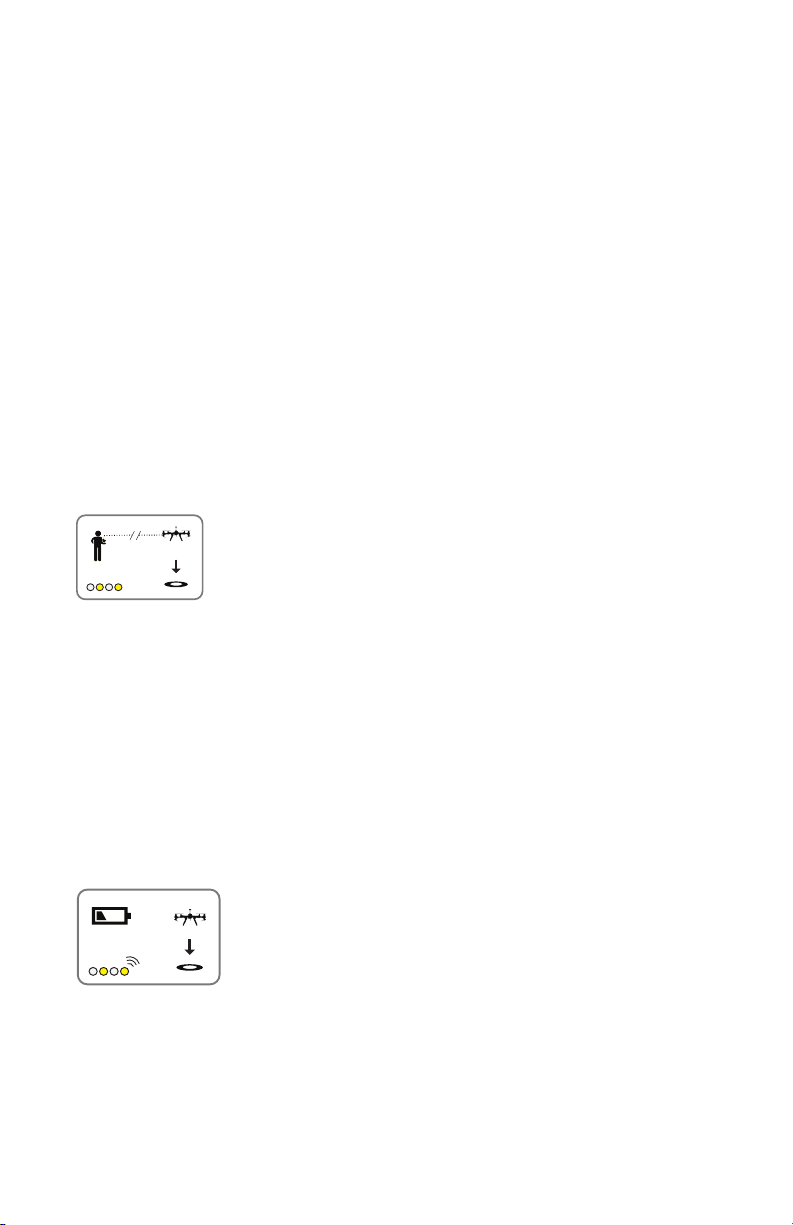
RC Controller Signal Failsafe
Physical obstructions and interference from nearby wireless signals can affect
the X8’s connection with the controller.
If the X8 loses contact with the controller, it returns to the launch point and lands
automatically, indicated by a blinking yellow status LED.
Low Battery Failsafe
Environmental conditions, payload, and flying style can affect power
consumption. Use the controller’s flight data display to monitor the
voltage of the battery during flight.
If the battery reaches 14 V, the X8 lands automatically at the current
position, indicated by a blinking yellow status LED and a quick
repeating tone.
20
Page 23
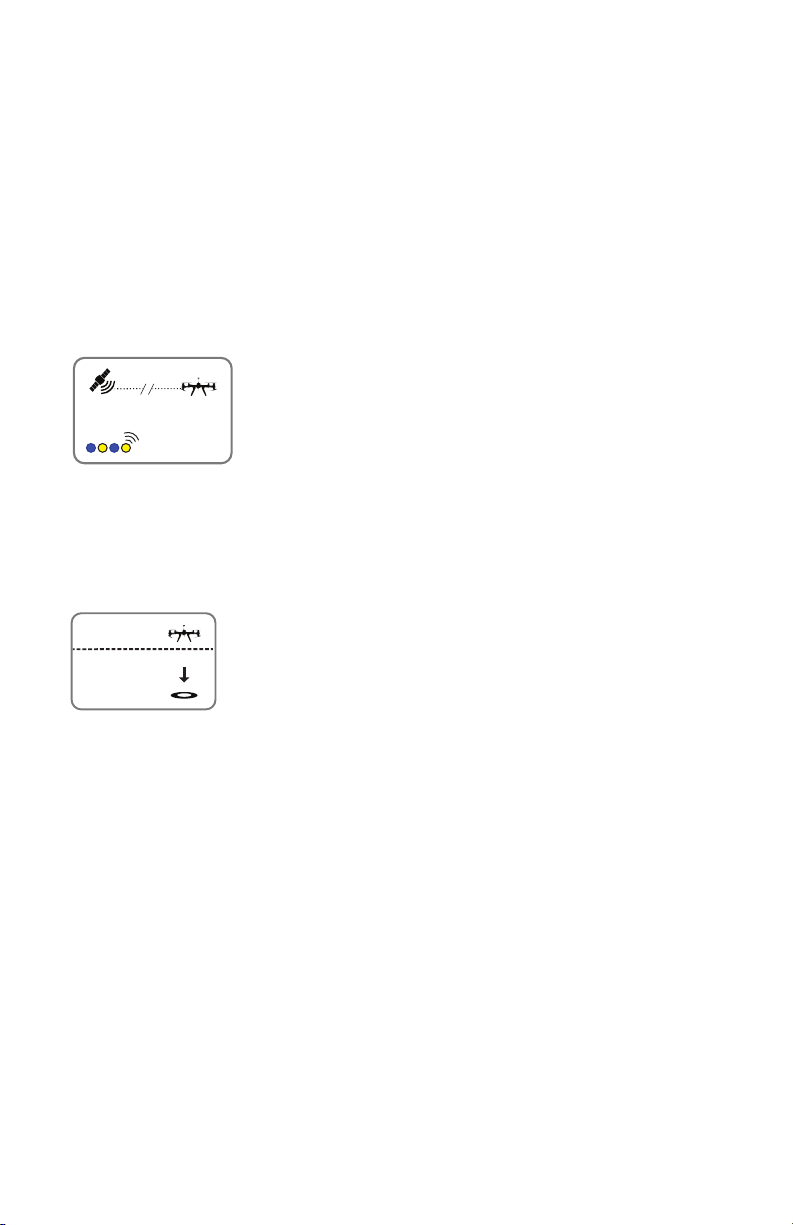
GPS Failsafe
The X8 requires GPS lock before takeoff. Enclosed areas, physical
obstructions, and lack of available satellites can affect GPS strength. If
the X8 loses GPS lock in flight, it triggers a GPS failsafe—indicated by
a blinking blue and yellow LED with a high-high-high-low tone—and
automatically switch to manual control (standard - altitude hold mode).
Always be prepared to regain manual control at any time while flying and
choose an unobstructed flying area to improve GPS signal strength. When
flying a mission, we recommended changing the GPS failsafe behavior to
land. (Visit 3DR.com/X8/info for more information about configuring the
GPS failsafe.)
manual
control
Altitude Failsafe
The X8 has a 100 m (328 ft) altitude geofence enabled by default. If the
geofence is breached, the X8 automatically switches to RTL.
100 m
400 ft
(328 ft)
(120 m)
Range Failsafe
The X8 has a 300 m (984 ft) horizontal geofence enabled by
default. If the X8 travels farther than 300 m from the launch point,
it automatically returns to the launch point and lands. If you plan to
fly a mission that exceeds this range, you will need to disable the
horizontal geofence. (Visit 3DR.com/X8/info for instructions.) The
range failsafe is disabled in the event of a GPS failsafe.
21
Page 24
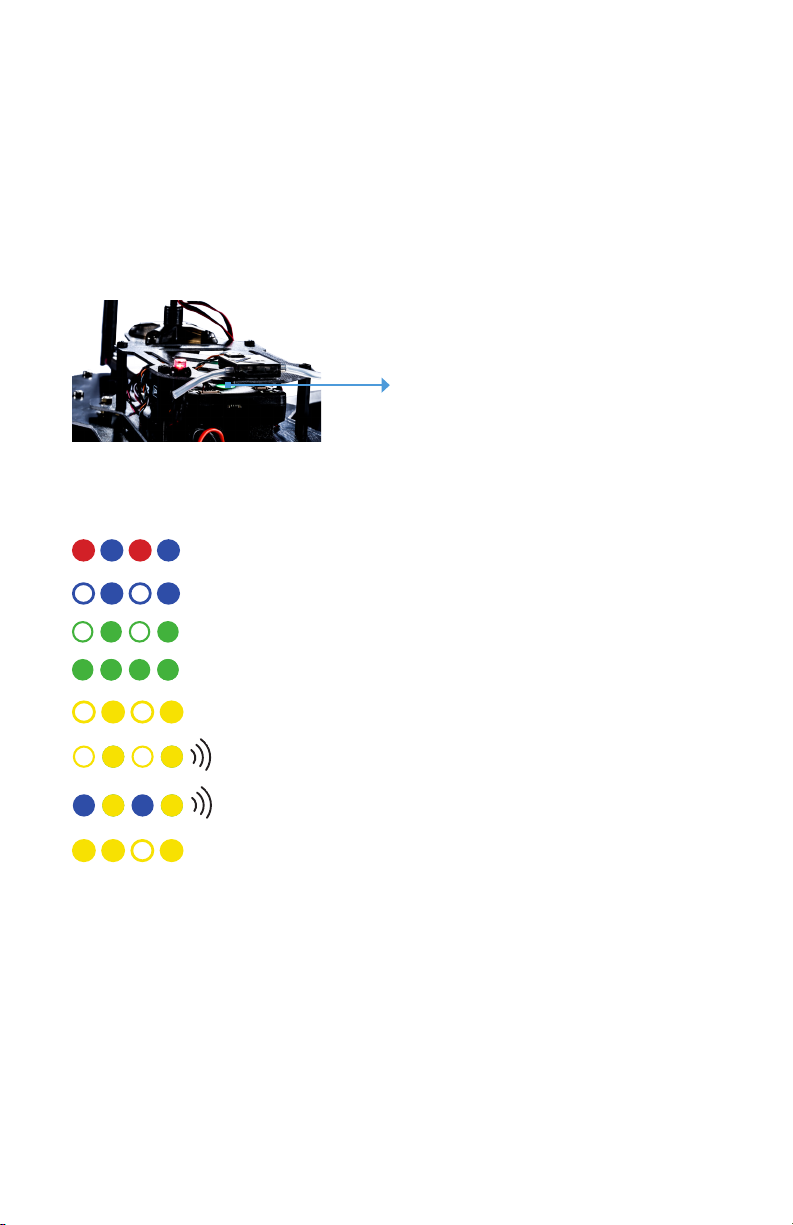
Status Indicators
LED23Safety Button
The Pixhawk LED indicates the status of the X8. During flight, the LED won’t
be visible; instead, use a ground station to view the status of the X8. Visit
3DR.com/X8/info to listen to Pixhawk’s status tones.
Status LED
X8 Status LED
Initializing, hold the X8 still and level
Acquiring GPS, please wait
Autopilot ready, GPS locked
Armed
Loss of RC signal, automatic landing
Low battery, automatic landing
Loss of GPS signal, switch to standard mode (altitude hold)
Pre-arm safety check failure—connect to a ground station
and see the troubleshooting section
22
Page 25
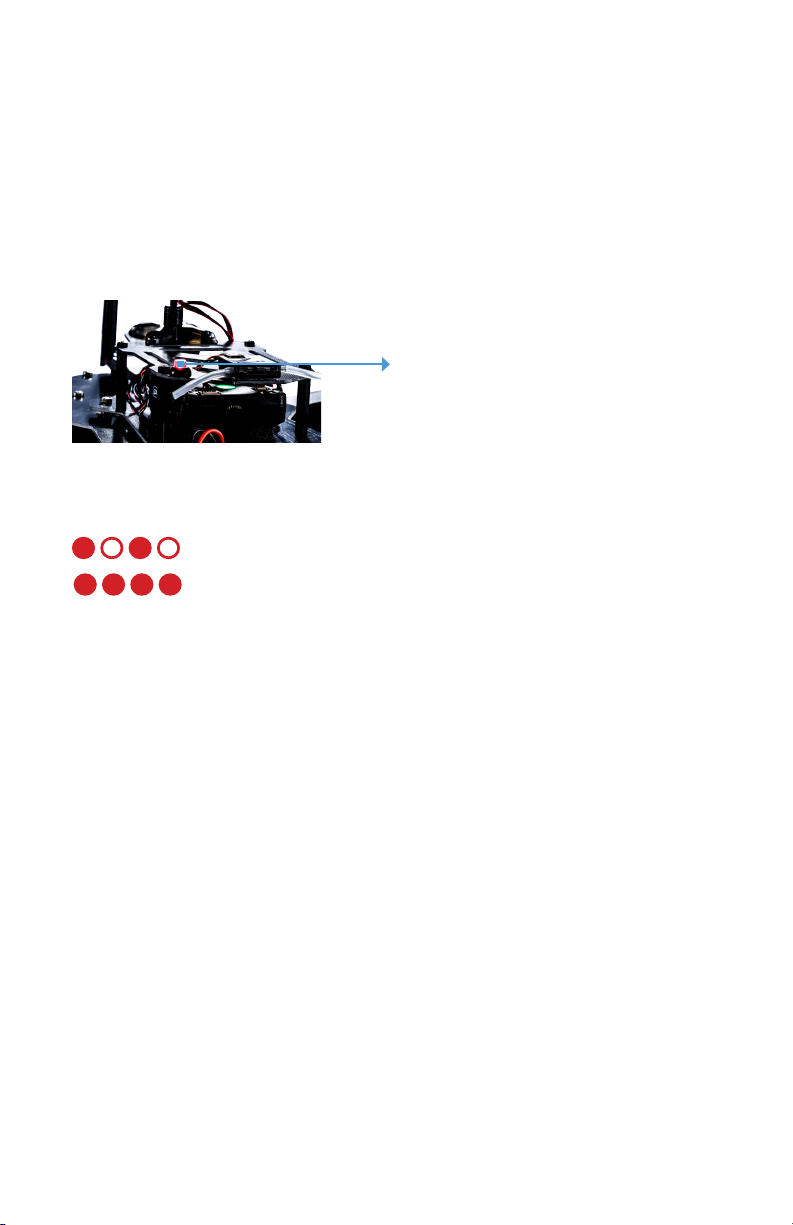
The safety button indicates the status of the motors
to allow you to arm and disarm the X8 safely.
Safety button
X8 Safety Button
Motors inactive, safe to handle
Motors active, deactivate before handling
Page 26

Flight Procedures: Takeoff
Follow these steps to take off.
Checklist
» Propellers are attached tightly to the motors in the correct order and
the GPS mast is oriented vertically.
» The X8 is powered with the battery secured to the underside of the
vehicle. (Remember to hold the X8 still and level while the sensors
initialize.)
» The controller is set to CH 7 OFF, standard (STD) mode (loiter mode for
beginners), and RTL OFF.
» The status LED displays blinking green, indicating that the X8 has
acquired GPS lock. This can take a few minutes depending on your
flying location.
» The X8 is situated at a safe, unobstructed launch point, facing away
from you.
24
Page 27
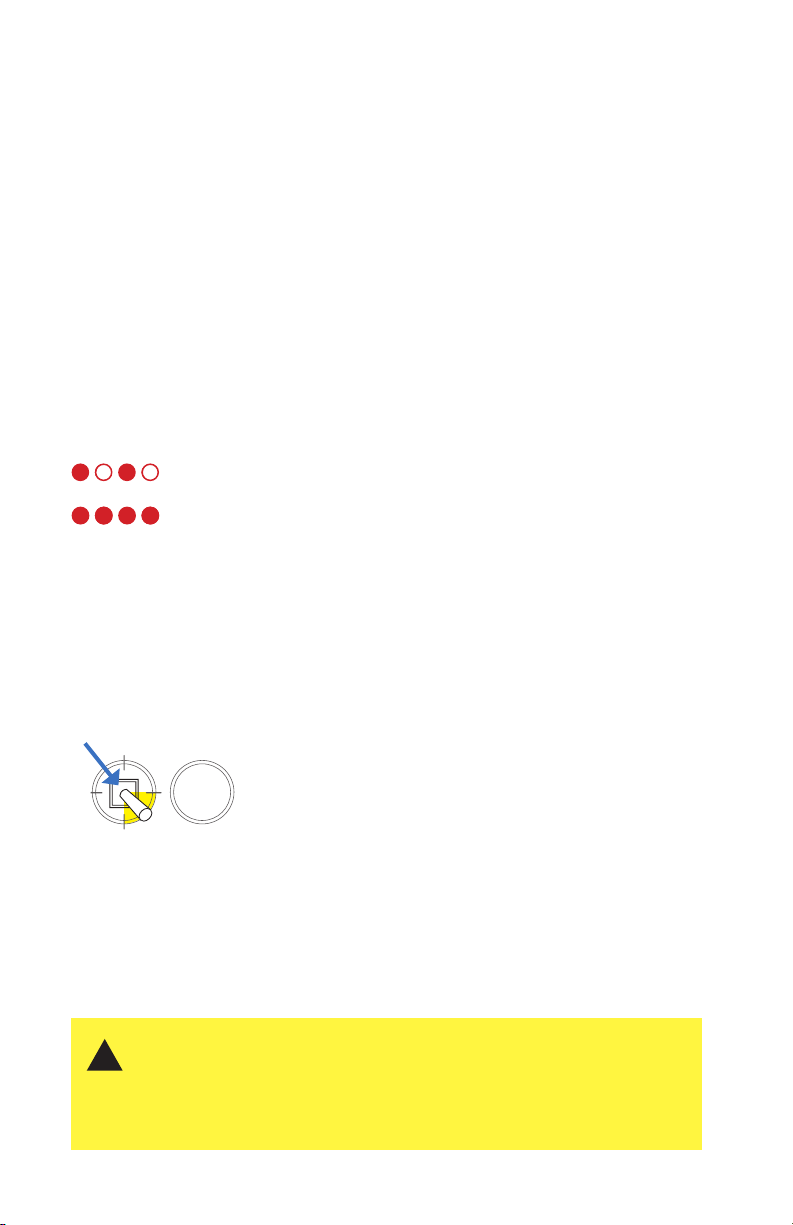
Arm
After completing the checklist, you’re ready to fly! Arming and disarming are
important steps that must be completed before takeoff and after landing.
Use the safety button and the controller to arm the X8.
1
Press and hold the safety button until it
displays solid red. This indicates that the
X8 is now active. Stand back!
Motors inactive, safe to handle
Motors active, deactivate before
handling
Safety button indicators
2
To arm the motors, hold the left stick
down/right until the motors spin.
Controller left stick: arming position
The arming and disarming procedures ensure that you can safety start and
!
stop motors without risk of injury. The X8’s motors will spin when armed! Make
sure the propellers are clear of any obstructions, including your hands, before
arming. Do not handle the propellers or pick up the X8 while the safety button
is active (solid red).
25
Page 28
Landing
If you end your flight using the Ch 7 land command or RTL, the X8 disarms
automatically; wait for the motors to stop, and proceed to powering off.
Attempting to disarm the X8 in either land mode or RTL mode can cause
the cause the copter to flip.
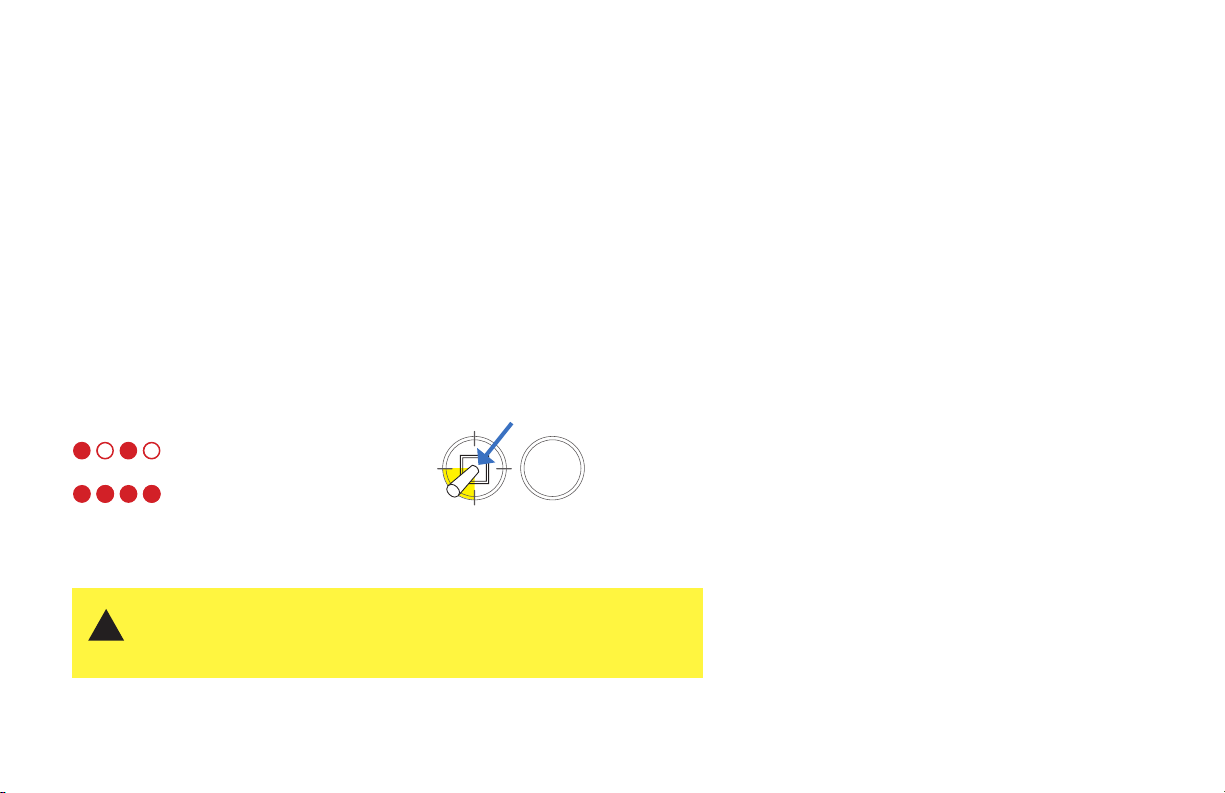
Disarm
For manual landing in standard or loiter mode:
1
Press and hold the safety button until it
blinks red. The motors are now inactive,
and the X8 is safe to handle.
Motors inactive, safe to handle
Motors active, deactivate before
handling
Do not handle the propellers or pick up the copter while the safety button is
!
active (solid red). Remember to disconnect the battery before turning off the
controller when powering off.
2
To disarm the motors, hold the left stick down/left
until the motors stop.
Controller left stick: disarming positionSafety button indicators
26
Page 29
Monitoring
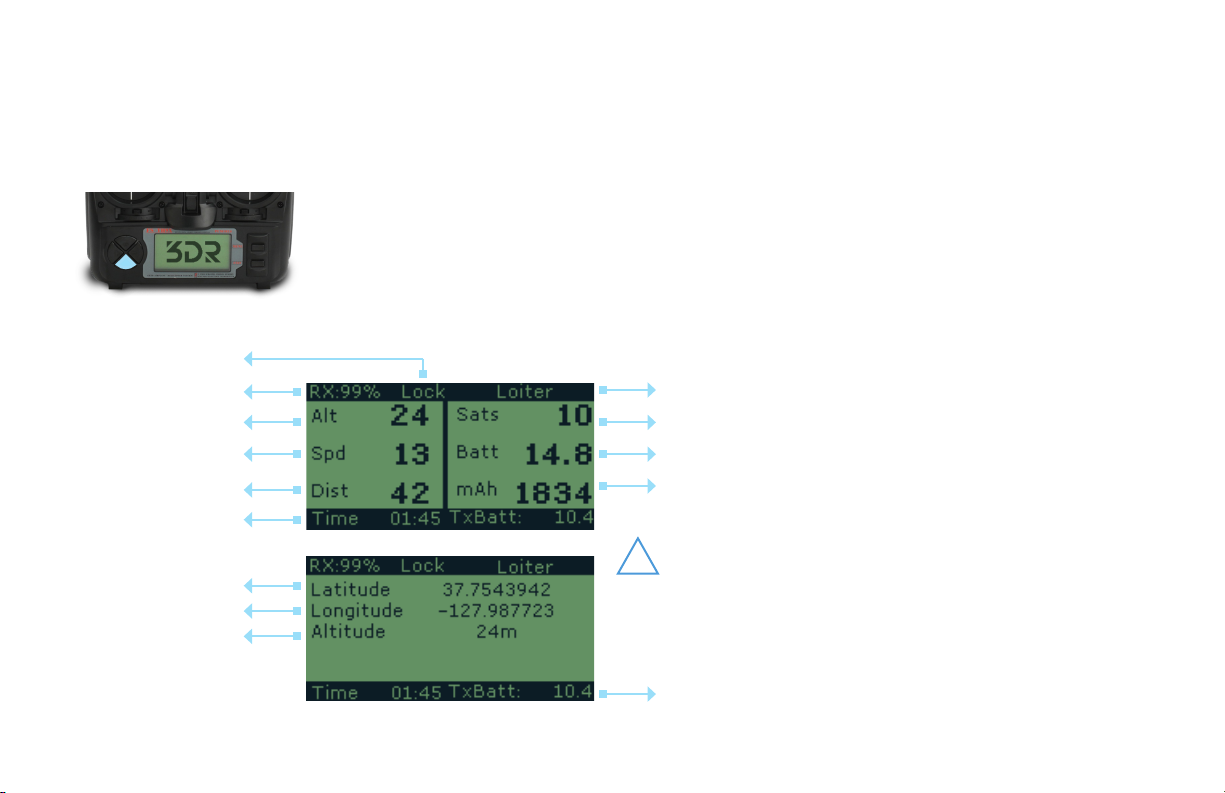
Monitor the X8 in flight using the controller’s flight data screens.
Press and hold the DN button to access the flight data screens.
Press DN again to toggle between screens.
Controller
GPS status
connection strength
altitude in meters
speed in m/s
meters from launch point
flight time
Controller Flight Data Display: Screen 1
current latitude
current longitude
altitude in meters
current flight mode
GPS signal strength in # of satellites
flight battery level (14-16.8 V)
flight battery mAh
consumed since armed
End your flight at 14.1 V.
Do not exceed 8000 mAh for a
!
fully charged X8+ battery (80% of
available capacity).
Controller Flight Data Display: Screen 2
controller battery level (9-12 V)
27
Page 30

Missions
The X8’s Pixhawk autopilot is capable of flying an autonomous mission
without operator input. Ensure that you feel comfortable operating the X8
manually before attempting an autonomous mission.
Environmental Awareness
Before you fly, assess the features of your flying area. Determine the boundaries of the safe flying area, and be prepared to recover the copter manually
if it goes outside this area. Be aware of any risks at your location, including
bodies of water, structures, trees, etc. Designate a few areas as safety zones
where you can safely land the copter in case of an unsafe situation.
Radio Signal Conditions
Flying behind solid objects, like buildings and trees, blocks radio signals.
Always maintain visual contact with the copter to ensure that the radio signal
is unobstructed. Radio towers, cell phone towers, and nearby WiFi signals
can also cause interference with the radio system and decrease its range.
Avoid flying in populated areas to avoid sources of interference.
Altitude
Select an appropriate altitude for your flying location and local regulations.
Remember the X8 cannot avoid obstacles during a mission; it completes the
mission as planned. Select altitudes that avoid any obstacles, such as trees,
and comply with the safety information in this manual.
Speed
By default, the X8 travels at 6.5 m/s (14.5 mph) during a mission.
Power
As the operator, it is your responsibility to ensure that all missions comply
with the X8’s operating limits, including flight time. Don’t forget to take into
account the effect of current wind conditions on power consumption.
Regaining Manual Control
During a mission, keep the controller easily accessible, and be prepared to
regain manual control at any time. To regain manual control during the
mission, switch to standard mode using the controller. If you observe
instability in the X8’s flight behavior or if the copter moves outside your
designated safe flying area, switch to RTL. Turning off the controller
automatically triggers an RTL and can be used in an emergency situation
as a hard recall command.
Failsafes
The X8’s default failsafe behaviors are optimized for manual flight. For
autonomous missions, we recommend re-configuring the failsafe settings
for your flying location. For instructions, visit 3DR.com/X8/info.
28
Page 31
Planning
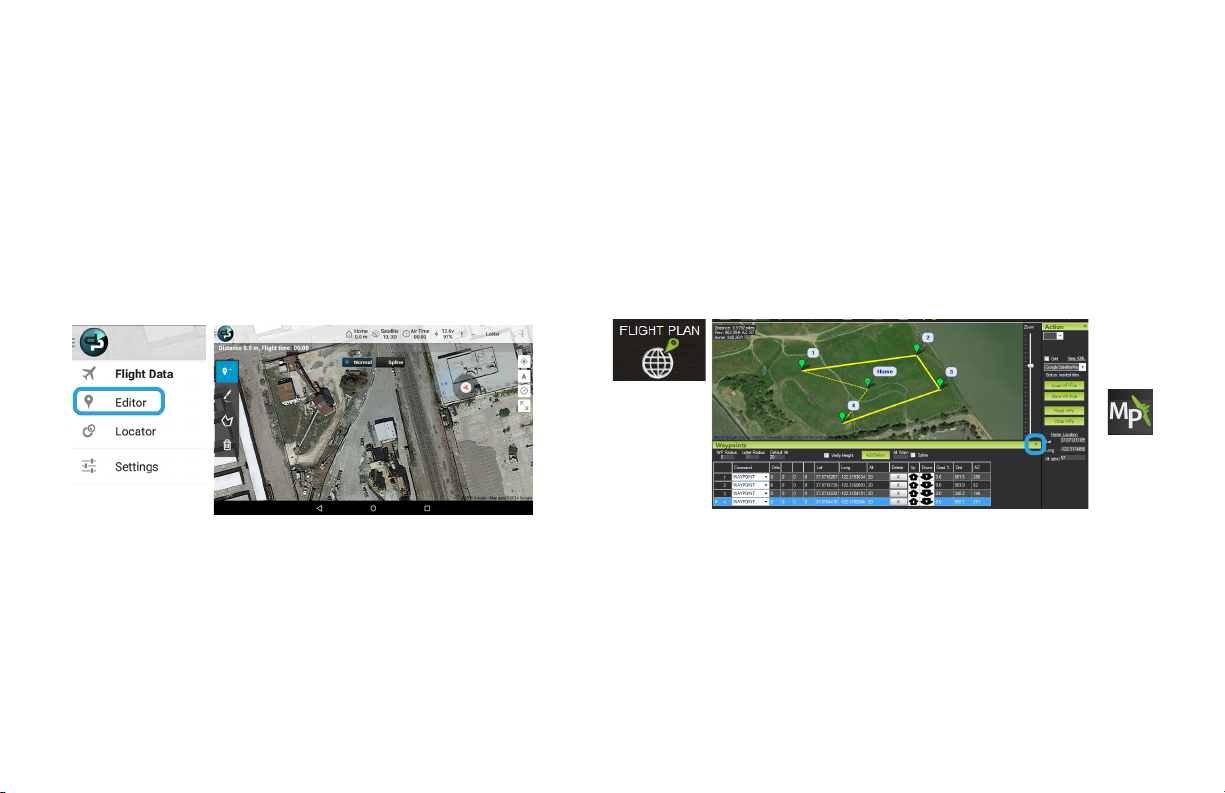
To plan a mission, power the X8 and connect to your ground station. Ground
station applications require an Internet connection to access maps.
Tablet (DroidPlanner) Laptop (Mission Planner, APM Planner)
Select the DroidPlanner icon, select Editor. Tap to add
waypoints, or select the brush tool and draw a path
for the X8 to follow.
DroidPlanner: Edit waypoints
Takeoff and Landing
Both ground station applications provide the option to configure automatic
takeoff and landing into the mission. Missions without automatic takeoff and
landing must be initiated and ended in flight.
Select Flight Plan, and click to add waypoints. Select the green arrows at
the bottom of the screen to configure altitude and change waypoint types.
Mission Planner: Flight Plan
29
Page 32
Saving
After planning the mission, save the mission to the X8. The Pixhawk autopilot
can store one mission at a time. When you initiate the mission, the X8 starts
the mission stored to the autopilot at the time.
Tablet (DroidPlanner) Laptop (Mission Planner, APM Planner)
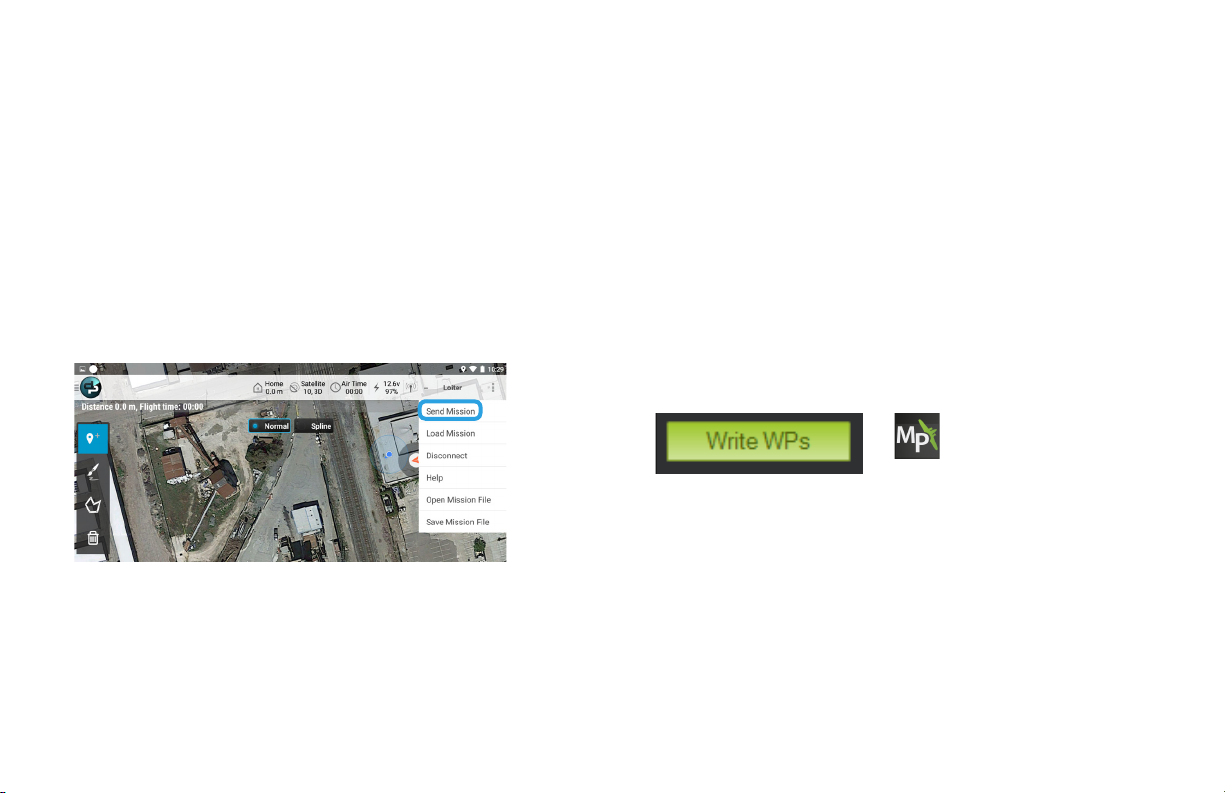
Select the option menu in the top-right corner, and
select Send Mission. This command saves the mission
to the X8.
DroidPlanner: Send Mission (option menu)
On the Flight Plan screen, select Write WPs to save the mission to the X8.
Select Save WP File to save the mission to your computer for future use.
Mission Planner: Flight Plan
30
Page 33
Initiating
Left Stick
Ending
Once you’ve saved the mission to the X8, follow these steps to fly the mission.
1 Perform a pre-mission test flight.
Follow the standard takeoff procedure, and fly a
brief test flight to verify that all controls (throttle,
yaw, roll, and pitch) are responding normally.
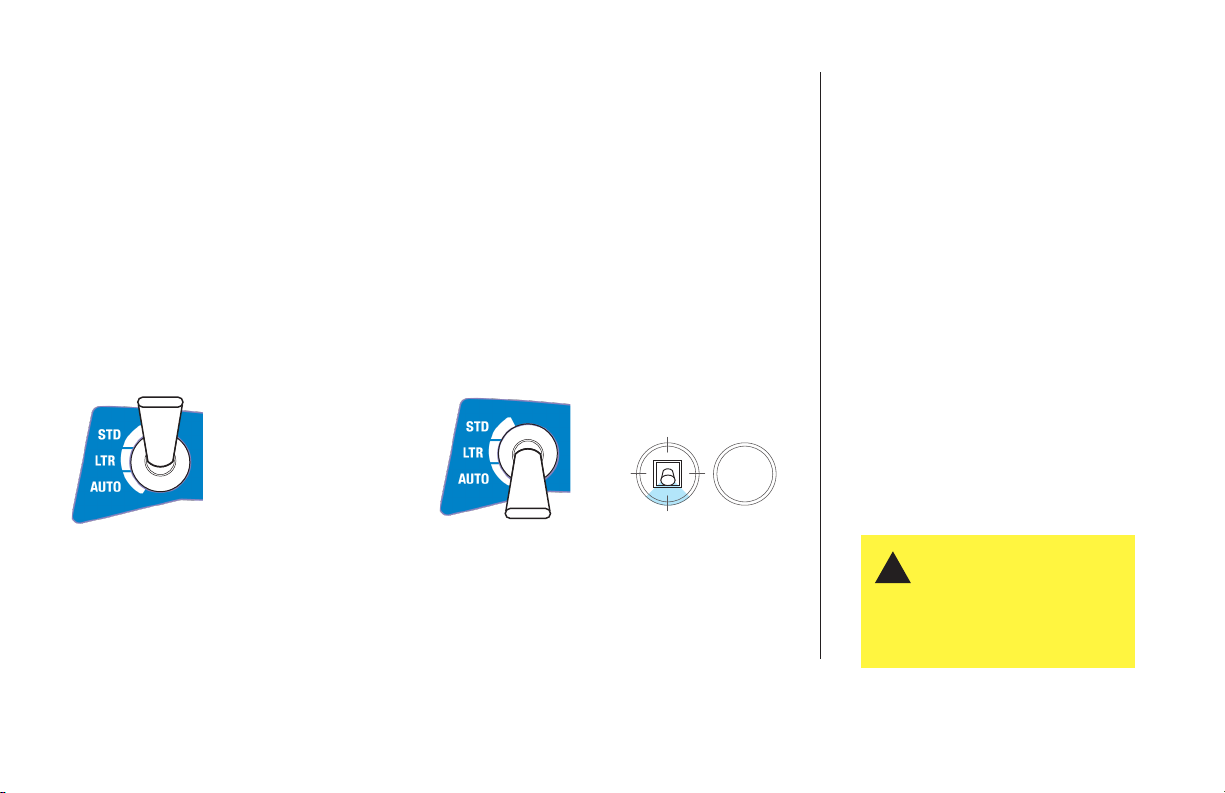
2 Arm in standard mode.
When you’re ready to start the mission,
arm the X8 in standard (STD) mode.
Controller: mode switch Controller: mode switch Controller: left stick
3 Switch to auto mode.
For automatic takeoff, arm the X8 in standard
mode. Then switch to auto mode, and raise the
throttle to initiate the mission.
For manual takeoff, initiate the mission in flight by
switching to auto mode.
For auto-takeoff, raise
throttle to start mission.
End the mission according to the type of
landing configured in the mission.
Automatic Landing
For missions configured with a land
waypoint, the X8 disarms automatically
after landing. Ensure that the throttle
stick is set fully down during landing; the
X8 cannot disarm automatically unless
the throttle stick is set fully down.
Manual Landing
For missions without a land waypoint,
switch to standard or loiter mode in flight
then land manually.
To avoid sudden changes
!
in altitude when switching
from auto mode to standard
mode, ensure that the left
stick is set to the center
position.
31
Page 34

Appendix: Troubleshooting
Pre-Arm Safety Check Failure
`
If the status LED displays blinking yellow, the X8 is failing one of the pre-arm safety checks. To determine the specific failure, check the
heads-up display on the ground station for the error message specifying the failed check.
Radio Calibration Failure: Perform radio calibration or RC controller re-binding
Accelerometer Calibration Failure: Perform accelerometer calibration
Compass Calibration Failure: Perform compass calibration
GPS Failure: Wait for improved GPS signal or move to a more open area (most common failure)
Video tutorials for performing calibrations are available at 3DR.com/X8/info.
Maintenance
Replacement parts for the X8 are available for purchase at store.3DR.com.
Instructions for replacing the wiring, plates, motors, and legs of the X8 are
available at 3DR.com/X8/info.
32
Page 35

Specs
Battery: 4S 14.8V 10,000 mAh 10C
Battery Dimensions: 6.6 in x 2.6 in x 1.4 in (16.7 cm x 6.5 cm x 3.5 cm)
Battery Weight: 803 g
Autopilot Hardware: Pixhawk v2.4.5
Autopilot Firmware: ArduCopter 3.2
GPS: 3DR u-blox GPS with Compass (LEA-6H module, 5 Hz update)
Ground Station Radio: 3DR Radio v2 (915 MHz or 433 MHz)
Motors: SunnySky V2216-12 KV800 II
Frame Type: X
Propellers: APC Propeller 11x4.7 SF (4)
APC Propeller 11x4.7 SFP (4)
Vehicle Dimensions: 13.7 in x 20.1 in x 11.8 in (35 cm x 51 cm x 20 cm)
Payload Capacity: 800 g (1.7 lbs)
Vehicle Weight with Battery: 2.56 kg (5.6 lbs)
Maximum Altitude*: 100 m
Range*: 300 m from launch point (1 km when geofence disabled)
Maximum Estimated Flight Time: 15 min
*While geofence enabled (default)
33
Page 36

Resources
Thank you for being a responsible drone operator. For more information about the X8,
visit the pages below.
Online information portal: 3DR.com/X8/info
Terms and Conditions: 3DR.com/terms
Contact 3DR Support at [email protected]
Monday through Friday, from 8 am to 5 pm PST.
Happy flying!
3D Robotics
1608 4th Street, Suite 410
Berkeley, CA 94710
3DR.com
X8+ Operation Manual
DCT0004
v.C
2014 ©3D Robotics
 Loading...