

Page 1
C
OMPACT
V
IEW
HMR-
15
SER
U
ANUAL
M
The copyright of this document is the property of 3D perception AS. The document is supplied on the
express terms that it is to be treated as confidential. No part of this document may be reproduced or
transmitted in any form or by any means, electronic or mechanical for any purpose, without the
express written permission of 3D perception AS. The information in this document is subject to
2005 3D perception AS All rights reserved.
change without notice and is provided ‘AS IS’.
Page 2

3D perception C
Revision 1 User Manual
OMPACTVIEW
HMR-15
T
ABLE OF CONTENTS
1. B
EFORE YOU START
.................................................................................................................1
1.1 Projector pack...............................................................................................................1
1.2 Accessories...................................................................................................................1
2. I
NTRODUCTION
........................................................................................................................2
2.1 Optional Modules .........................................................................................................2
2.2 Lens ..............................................................................................................................3
3. S
....................................................................................................................................4
AFETY
3.1 Safety............................................................................................................................4
3.2 Safety Instructions........................................................................................................4
4. B
EFORE SET-UP AND USE
........................................................................................................5
4.1 Overview ......................................................................................................................5
4.2 Rear Connector Panel...................................................................................................6
5. SET-UP.....................................................................................................................................7
5.1 Load CompactDesigner/CompactControl to PC ..........................................................7
5.2 Connect control interface..............................................................................................7
5.2.1 Connecting multiple projectors ....................................................................................8
5.3 Set functionality codes for projectors...........................................................................9
5.4 Set computer source for projectors.............................................................................13
6. F
OCUS AND ZOOM
.................................................................................................................14
6.1 Focus...........................................................................................................................14
6.2 Zoom...........................................................................................................................14
7. M
OUNTING THE PROJECTOR
..................................................................................................15
7.1 To a Ceiling Mount.....................................................................................................15
7.2 To a Tabletop..............................................................................................................16
8. U
SING THE PROJECTOR
..........................................................................................................17
iii
Page 3

3D perception C
Revision 1 User Manual
OMPACTVIEW
HMR-15
8.1 Projector On/Off.........................................................................................................17
8.2 Signal Source..............................................................................................................17
9. M
10. L
AINTENANCE
AMP REPLACEMENT
......................................................................................................................18
............................................................................................................19
10.1 Remove old lamp........................................................................................................19
10.2 Insert New Lamp........................................................................................................20
11. S
12. T
ERVICE INFORMATION
ECHNICAL DATA
.........................................................................................................21
..................................................................................................................22
12.1 Warping and edge blending specifications.................................................................22
12.2 Projector specifications...............................................................................................23
13. L
14. C
IMITED WARRANTY
ONTACT US
..........................................................................................................................26
, ‘FCC S
TATEMENT’ AND ‘TRADEMARKS COPYRIGHT
’.......................24
iv
Page 4
3D perception C
Revision 1 User Manual
OMPACTVIEW
HMR-15
1. B
Thank you for choosing a 3D perception C
EFORE YOU START
OMPACTVIEW
1.1 Projector pack
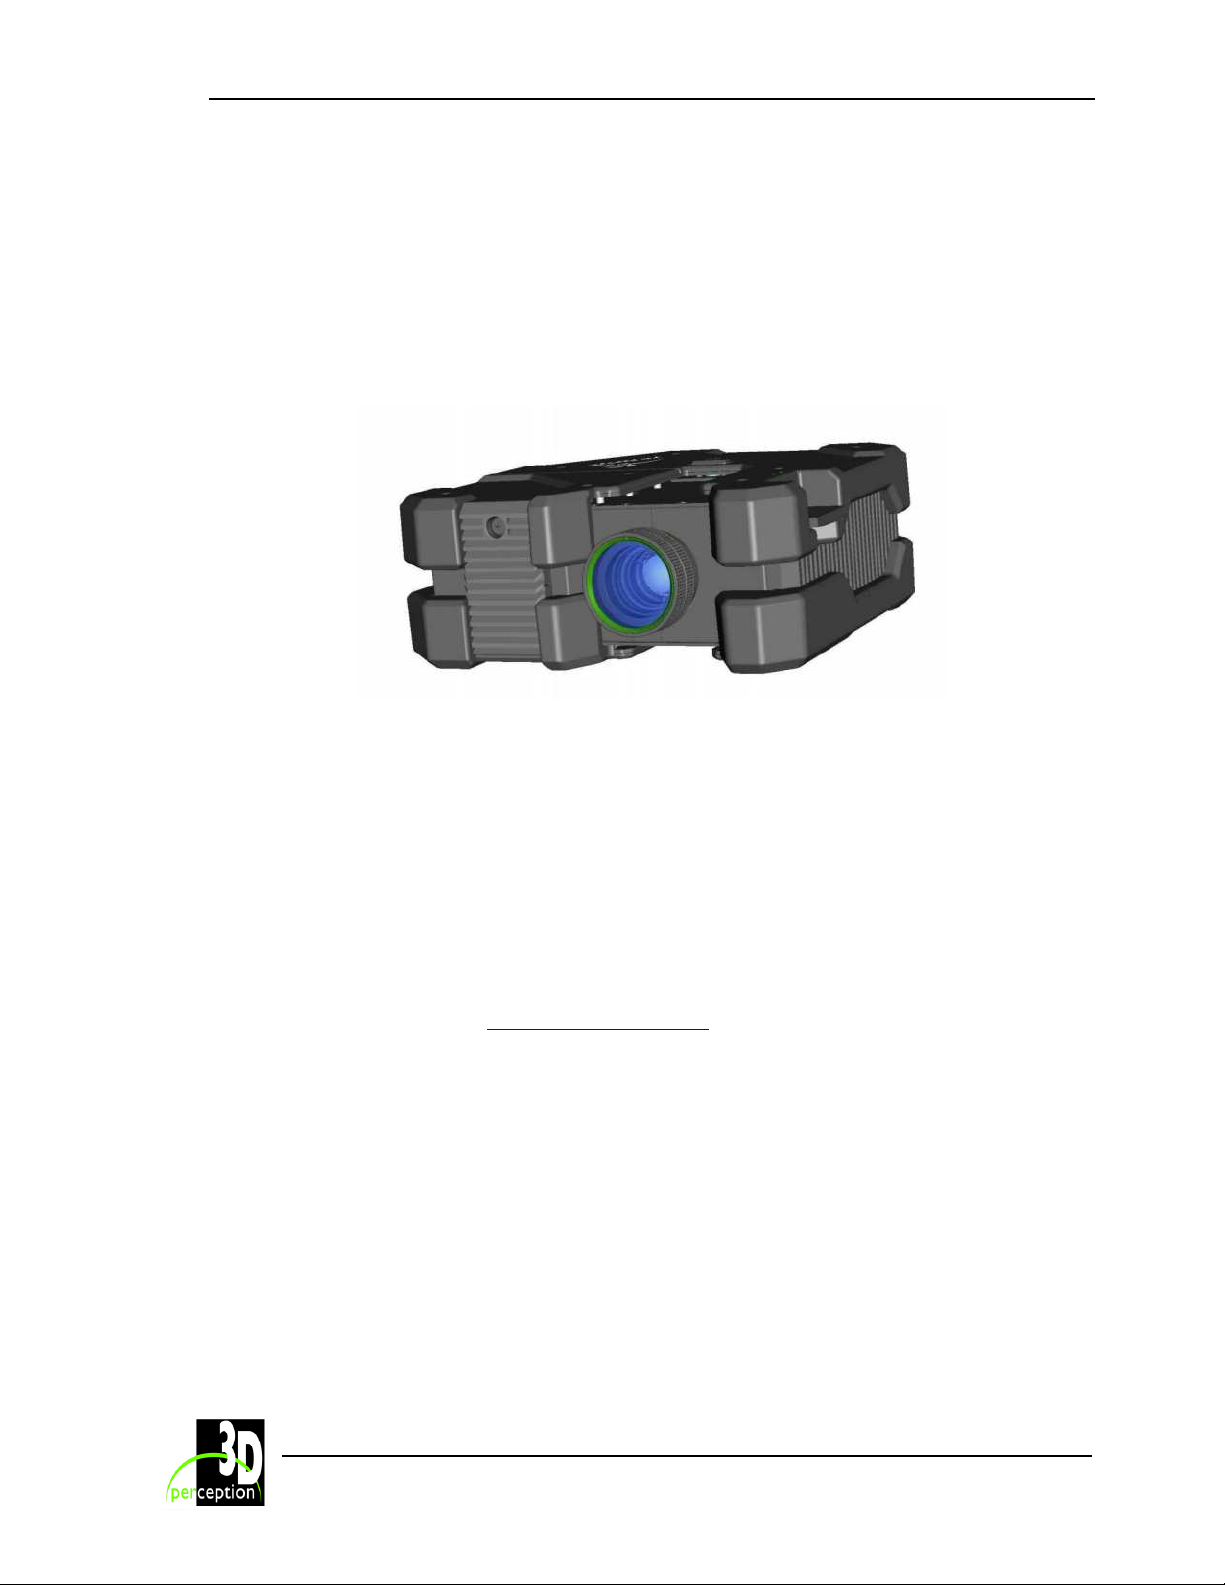
Please take a few minutes to ensure that your C
the following items.
C
OMPACTVIEW
HMR-15 Projector
Cables
VGA male Blue - VGA male Blue, 2m
DVI-I male White - DVI–I male White, 2m
Communication Cable 6’ spiral with RJ12 connectors
Power cord, 3m (European)
Power cord, 3m (US)
HMR-15 projector
OMPACTVIEW
HMR-15 projector pack contains
1.2 Accessories
Please refer to our website at www.3d-perception.com
1
Page 5

3D perception C
Revision 1 User Manual
OMPACTVIEW
HMR-15
2. I
The C
projection on to flat, curved or double curved screens with multiple projectors is the requirement.
The
C
from a list of Optional Modules (see details below) and purchase only those functionalities that
they require. An activation code is then supplied for each projector and must be loaded prior to
use (see chapter Set up).
The C
analogue and digital and provides the user with outstanding features such as:
• High resolution
• High brightness
• High contrast
• Colour control
• Gamma correction
• CompactControl interface
• Compact, low weight
Low noise
•
• Single Chip DLP technology
• Desktop and ceiling-mountable
This user guide contains important information about safety precautions and the set-up and use
of the projector.
Please read the manual carefully before you operate the projector.
NTRODUCTION
OMPACTVIEW
OMPACTVIEW
OMPACTVIEW
HMR-15 projector is the ultimate in high-resolution projectors when
HMR-15
HMR-15 projector is compatible with most data and video sources, both
is unique in that it is purchased as an empty unit and users select
2.1 Optional Modules
Optional modules within CompactView HMR-15 offer the following unique functions:
Module ID
KK100 Basic activation module
KK200 Colour matcher
KK300 Seamless edge-blending for fl at screens
KK350 Seamless edge-blending for curved screen
KK400 Image warping for fl at screens
KK450 Image warping for curved screens
KK500 Active to passive decoder
KK600 Megawall for 2 projectors
KK650 Megawall for 4 projectors (UXGA compatible)
KK700 Wireless LAN
Functionality
2
Page 6

3D perception C
Revision 1 User Manual
OMPACTVIEW
HMR-15
2.2 Lens
3 lens options are available
Lens ID Specifications
PL115 1.15 – 1.34: 1 wide zoom lens
PL140 1.38 – 1.61:1 intermediate zoom lens
PL180 1.8 – 2.1:1 long throw zoom lens
NOTE: The specifications and functionality of the product, as detailed in this manual, may
change without prior notice.
3
Page 7

3D perception C
Revision 1 User Manual
OMPACTVIEW
HMR-15
3. S
AFETY
3.1 Safety
This device complies with relevant safety regulations for data processing equipment for use in
an office environment.
Before using the projector for the first time, please read the safety instructions thoroughly.
3.2 Safety Instructions
Use only the cables and cords supplied with the projector or original replacement cables. Using
other cables or cords may lead to malfunction and permanent damage of the projector
Only open the projector to change the lamp. The projector contains no other user serviceable
parts. Refer all repairs to qualified personnel only.
When changing the lamp always replace it with a lamp of the same type and rating.
Make sure that no objects enter into the vents and openings of the projector. Do not spill any
liquids on the projector or into the vents or openings of the projector.
Do not look into the projection lens when the projector is switched on. The strong light may
permanently damage sight.
Place the projector on a stable surface, or mount it securely using an approved ceiling-mount.
Do not drop the projector.
Always operate the projector horizontally. Operating the projector in other positions may reduce
the lamp life significantly, and may lead to overheating, resulting in malfunctioning.
Always allow ample airflow through the projector. Never block any of the air vents. Never cover
the projector in any way while it is running. Allow for sufficient distance to walls and ceilings to
avoid overheating.
The projector is designed for indoor use only. Never operate it outdoors.
Do not operate the projector outside its temperature and humidity specifications, as this may
result in overheating and malfunctioning.
Only connect the projector to signal sources and voltages as described in the technical
specification. Connecting to unspecified signal sources or voltages may lead to malfunction and
permanent damage of the projector.
4
Page 8
3D perception C
Revision 1 User Manual
OMPACTVIEW
HMR-15
4. B
Be sure you have read the Safety Instructions in chapter 3 before proceeding with the set-up
and use of the
Unpack the supplied parts and familiarize yourself with the various components.
Remove the lens cap from the projection lens. If you switch the projector on with the lens cap in
place, the lens cap may melt, damaging not only the lens cap itself, but also the projection lens
and surrounding parts.
EFORE SET-UP AND USE
C
OMPACTVIEW
HMR-15
projector.
Familiarize yourself with the
C
OMPACTVIEW
HMR-15
projector before switching on.
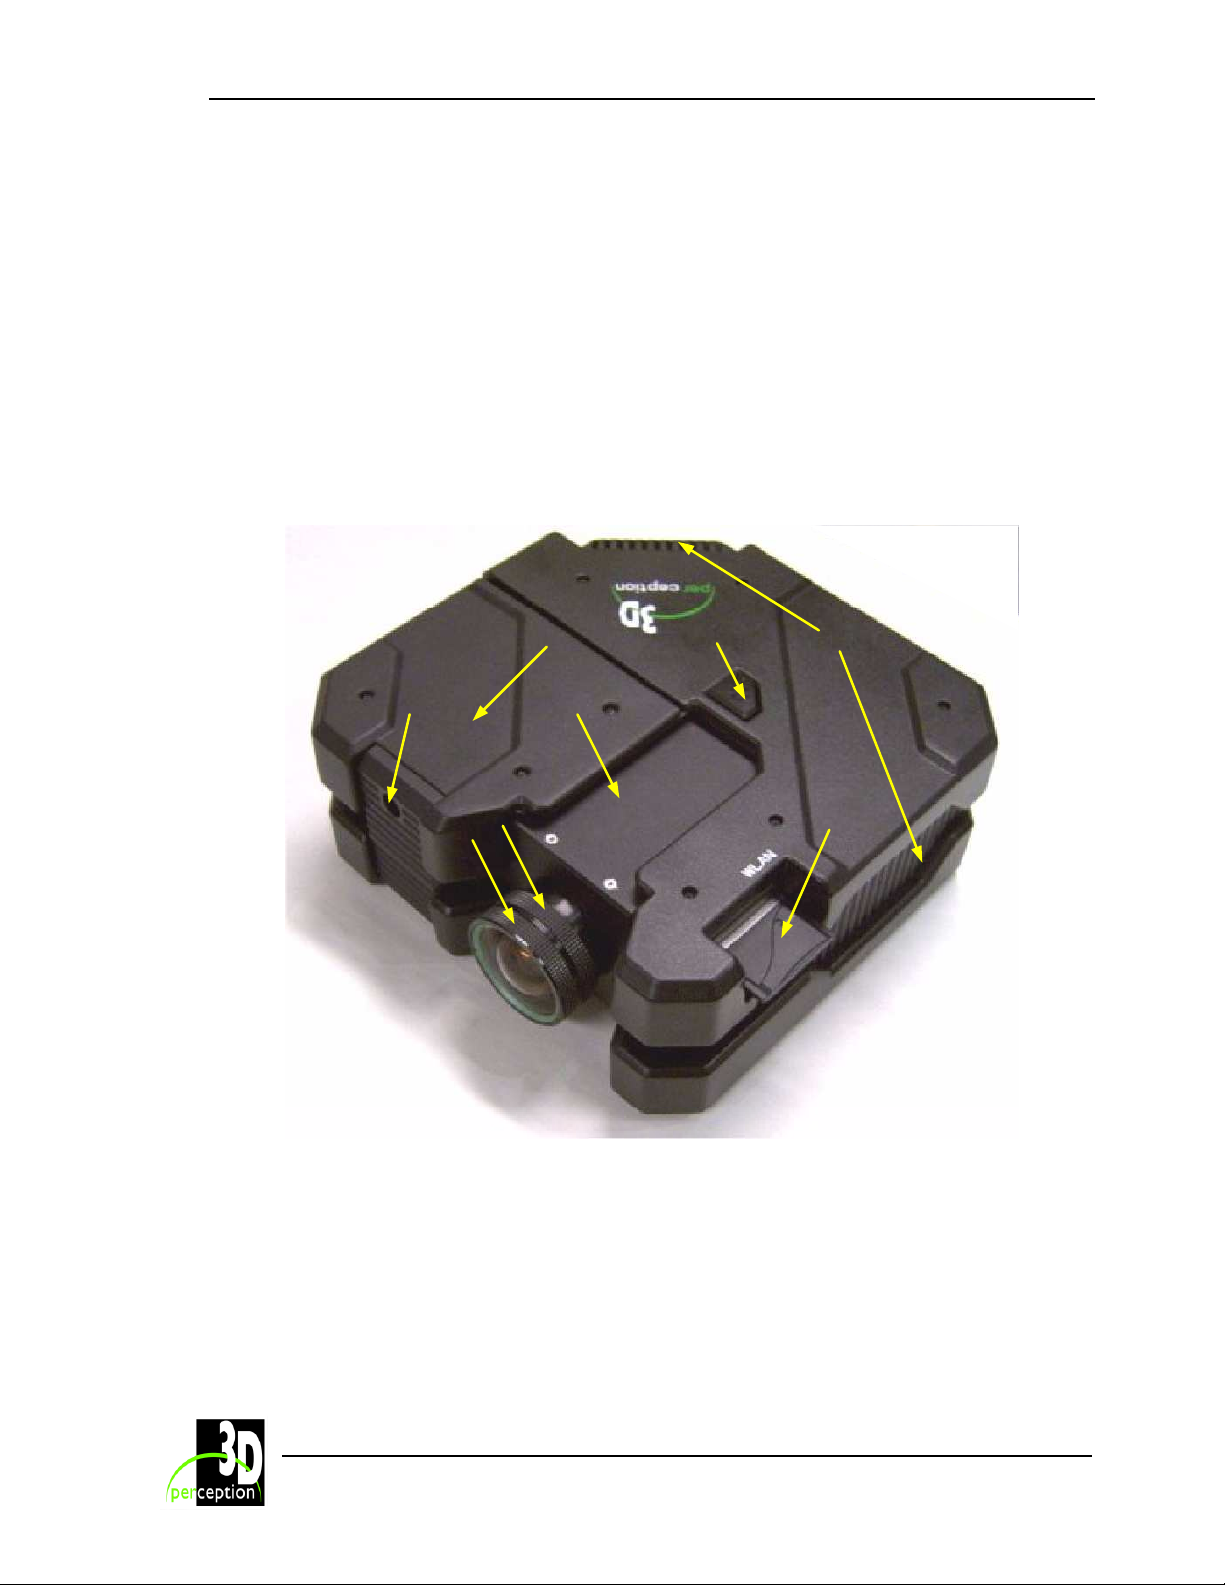
4.1 Overview
G
H
A
B
D
F
E
C
Ceiling Mount housing
A.
On/Off Button
B.
Wireless LAN (Optional)
C.
D. Ventilation H. Fixing screw for lamp housing
Focus ring
E.
Zoom ring (optional lens)
F.
Lamp housing
G.
5
Page 9
3D perception C
Revision 1 User Manual
OMPACTVIEW
HMR-15
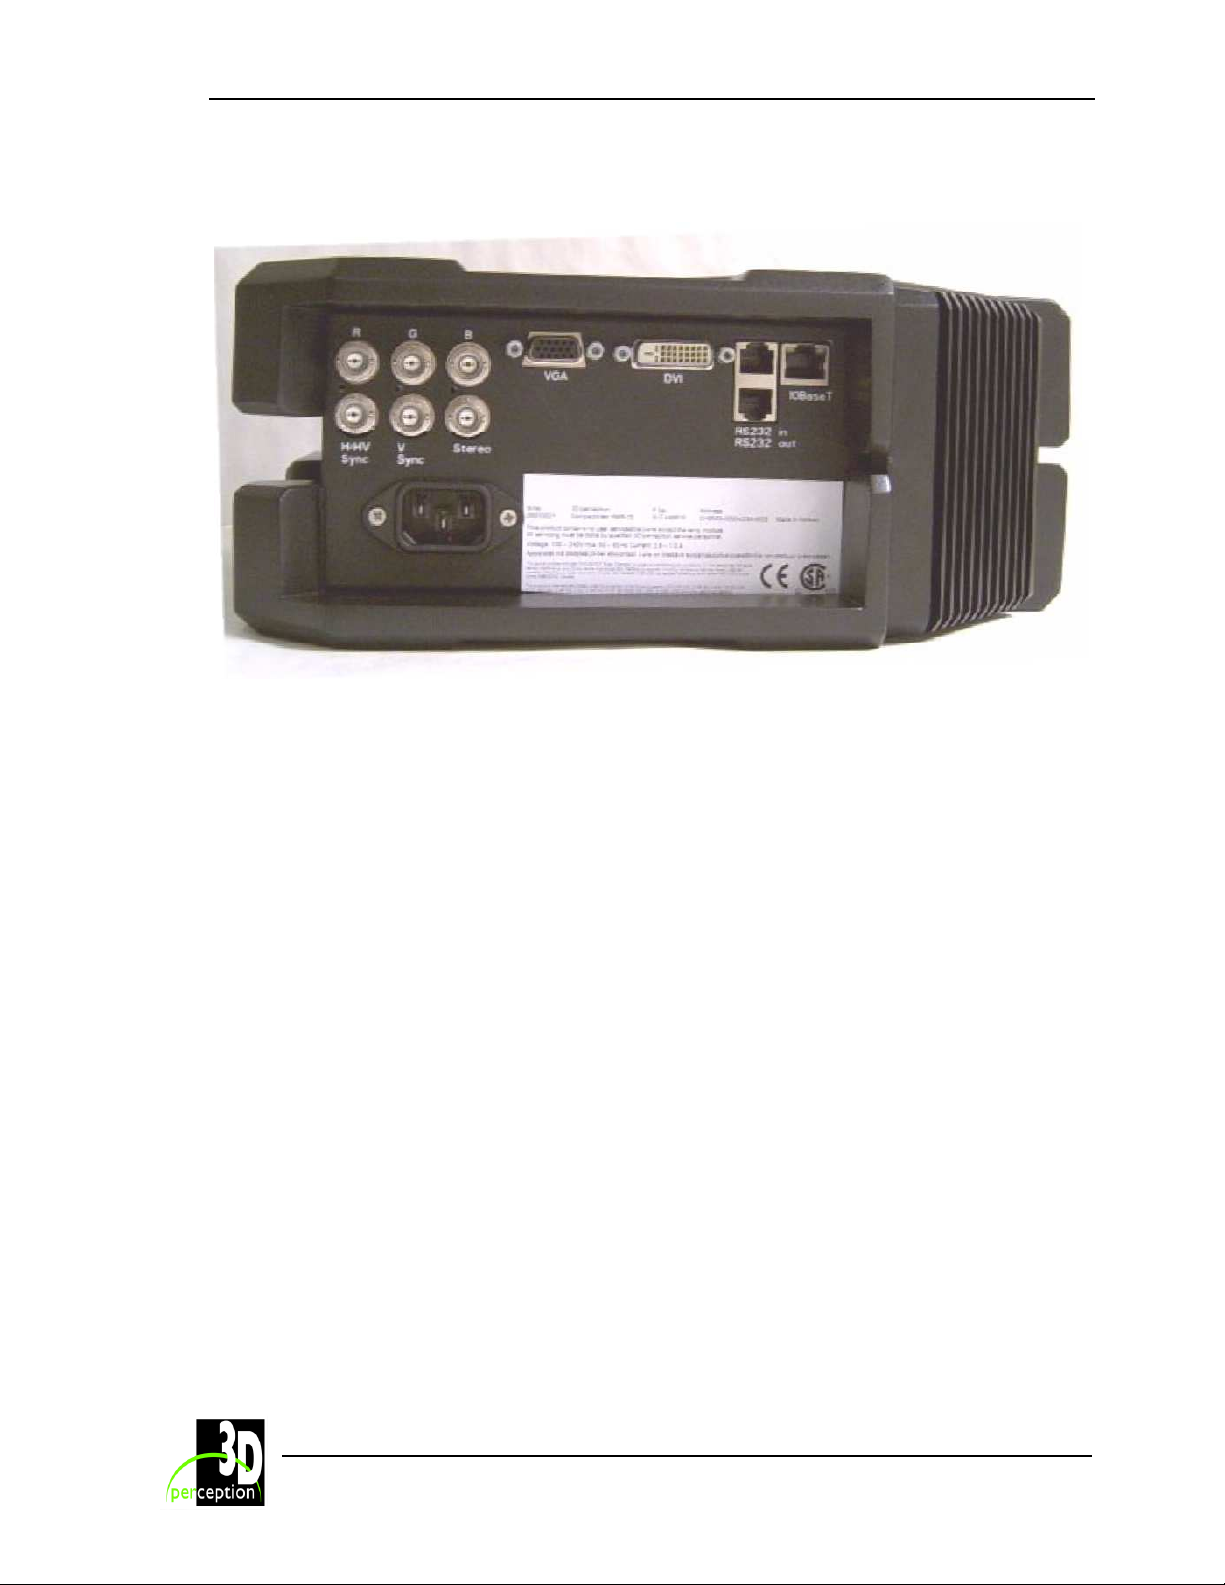
4.2 Rear Connector Panel
Analogue RGB In - Red
A.
B. Analogue RGB In - Green
C. Analogue RGB In - Blue
and Composite Sync
K. RS232 Control chain Out
Sync
F. Stereo control input
G. Ventilation
VGA – Analogue RGB In. The standard analogue
H.
computer graphics interface
I. DVI - Digital RGB. For low noise computer and
video image..
J. RS232 Control chain In D. Analogue RGB In – Horizontal
E. Analogue RGB In - Vertical
L. LAN. Provides access to control and monitoring over
a Local Area Network
Main power connector
M.
6
Page 10
3D perception C
Revision 1 User Manual
OMPACTVIEW
HMR-15
5. SET-
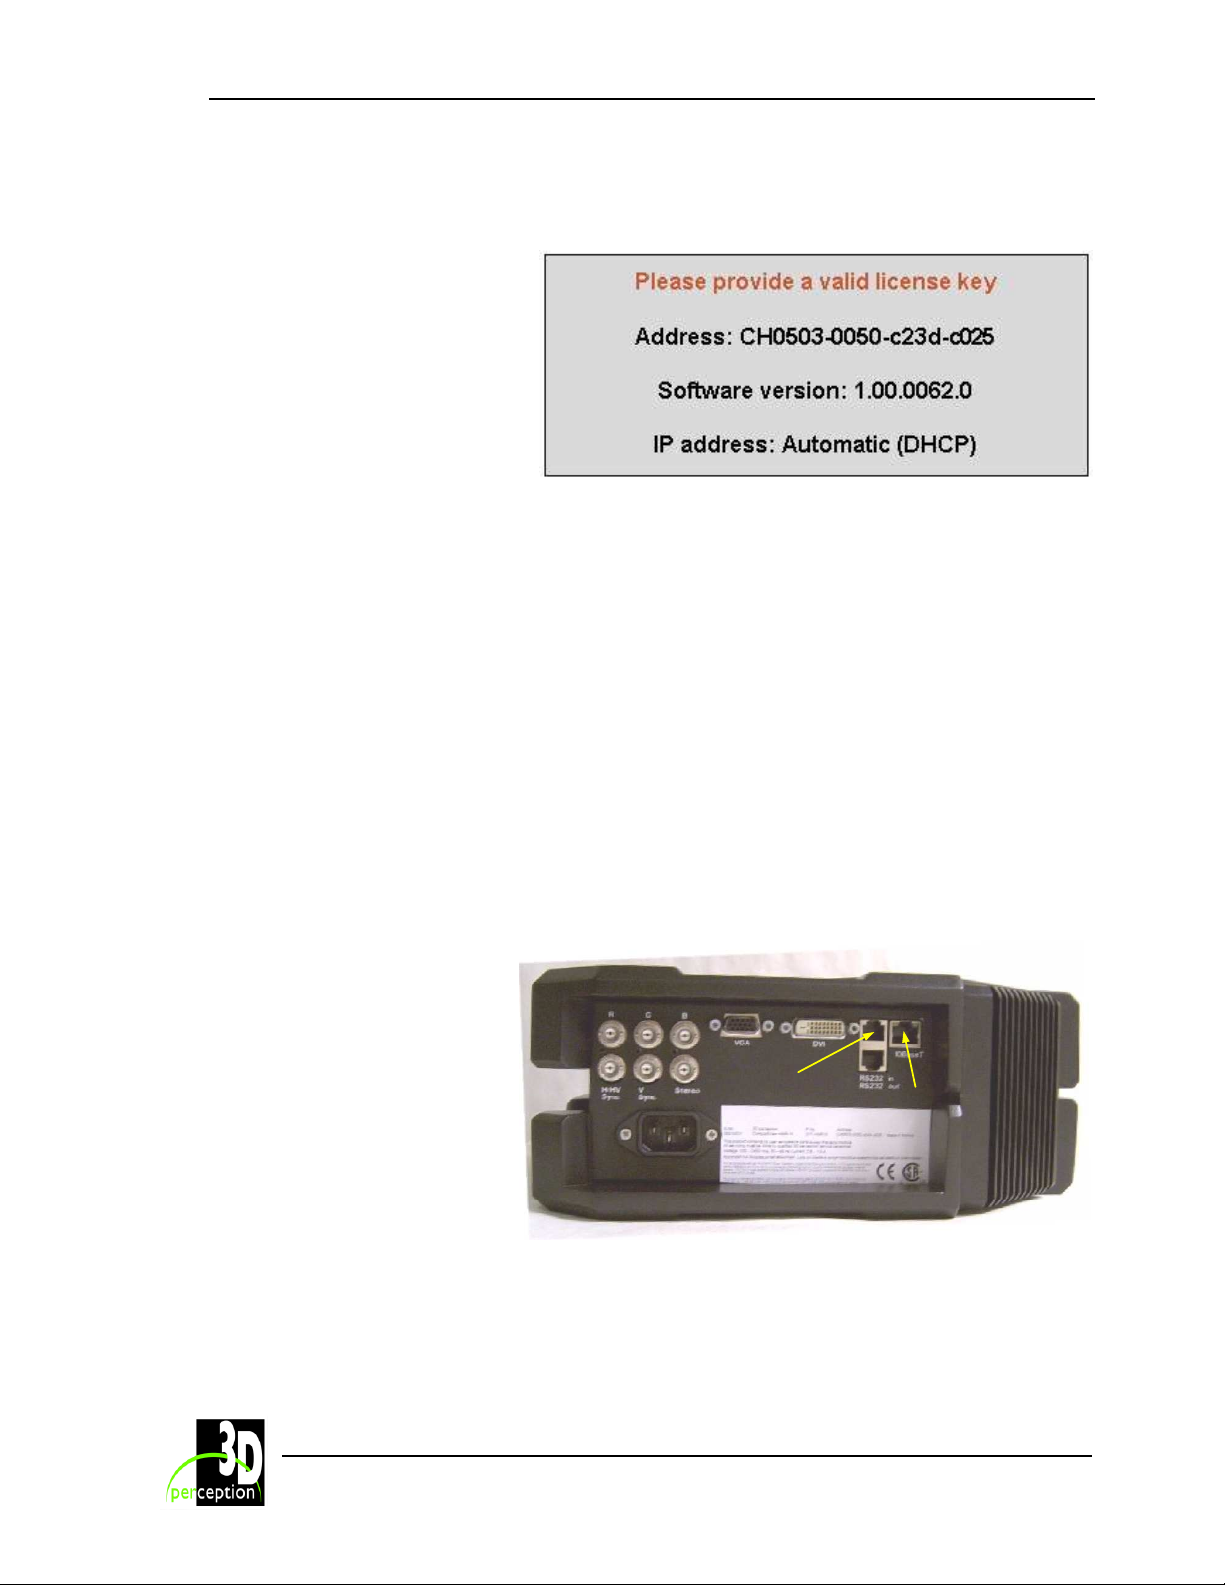
The first time the C
HMR-15
message will appear on the
screen requesting a valid license
key (activation code) for the
projector. The message box will
also indicate the following details
for the projector:
Address
The following procedures now require completion before the C
ready for use.
is switched on, a
Software version
IP address
1. Load CompactDesigner/CompactControl to PC
2. Connect control interface
3. Set functionality codes for projectors
4. Set computer source for projectors
UP
OMPACTVIEW
OMPACTVIEW
HMR-15 projector is
5.1 Load CompactDesigner/CompactControl to PC
If CompactDesigner or CompactControl software has not yet been loaded to the PC designated
as the control PC for the projection theatre, then load it now.
NOTE: CompactDesigner or CompactControl software will only be required to be loaded once
for a projection theatre, regardless of the number of projectors in the theatre.
5.2 Connect control interface
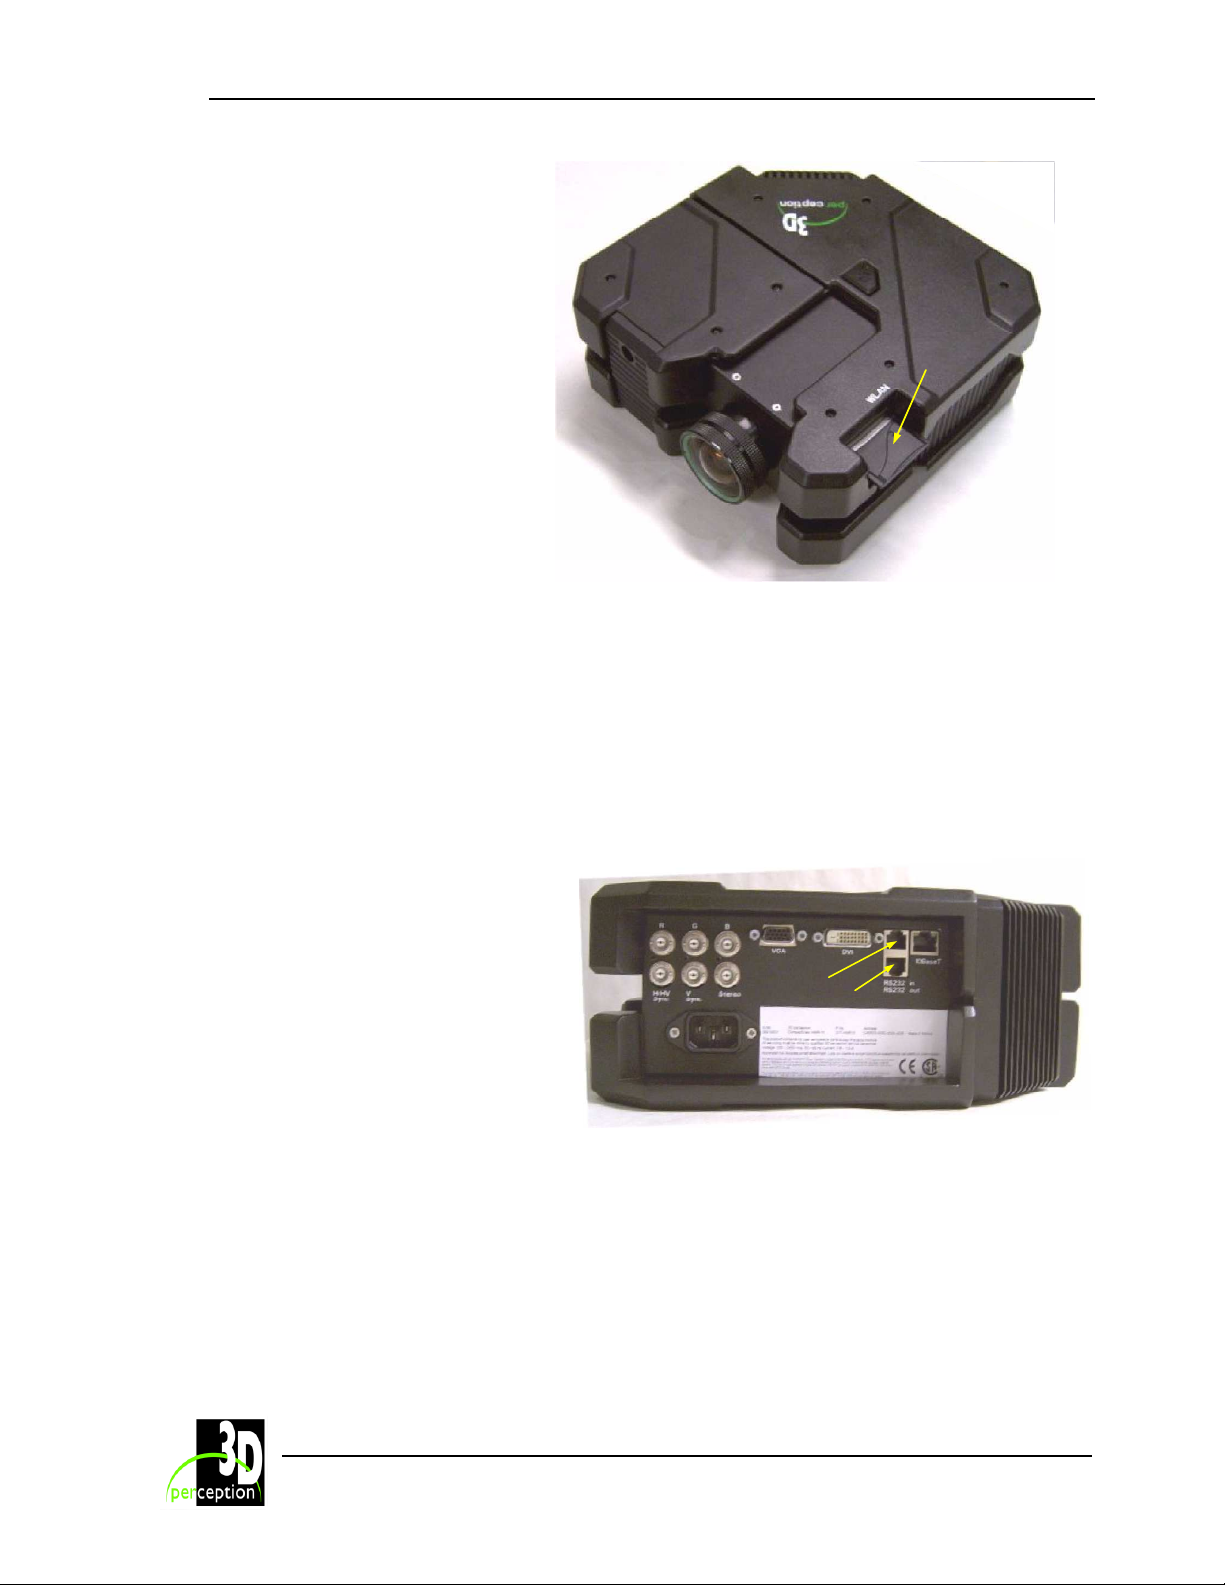
Connect the Control PC
(running CompactDesigner or
CompactControl) to the
projectors RS232 In port (A).
The supplied 6 lead cable
plugs into the Control PC’s
serial port using a RJ12 6 pin
to serial DB-9 female adapter.
Alternatively connect to either
LAN (B)
A
B
7
Page 11
3D perception C
OMPACTVIEW
HMR-15
Revision 1 User Manual
or Wireless LAN (C)
C
5.2.1 Connecting multiple projectors
Multiple projectors may be connected together in a ‘daisy chain’ by one of the following
methods:-
1. By cable
2. By LAN
3. By WLAN (Optional)
5.2.1.1 By cable
Connecting multiple projectors
together by cable is achieved by
using the input and output RS232
ports on each projector. The first
projector is connected to the control
PC via the RS232 In port (A) as
described above. Then another 6
lead cable connects between the
RS232 Out port (B) and the RS232 In
port (A) of the next projector. This
‘chain’ can be extended up to the
theoretical limit of 255 projectors.
A
B
8
Page 12
3D perception C
Revision 1 User Manual
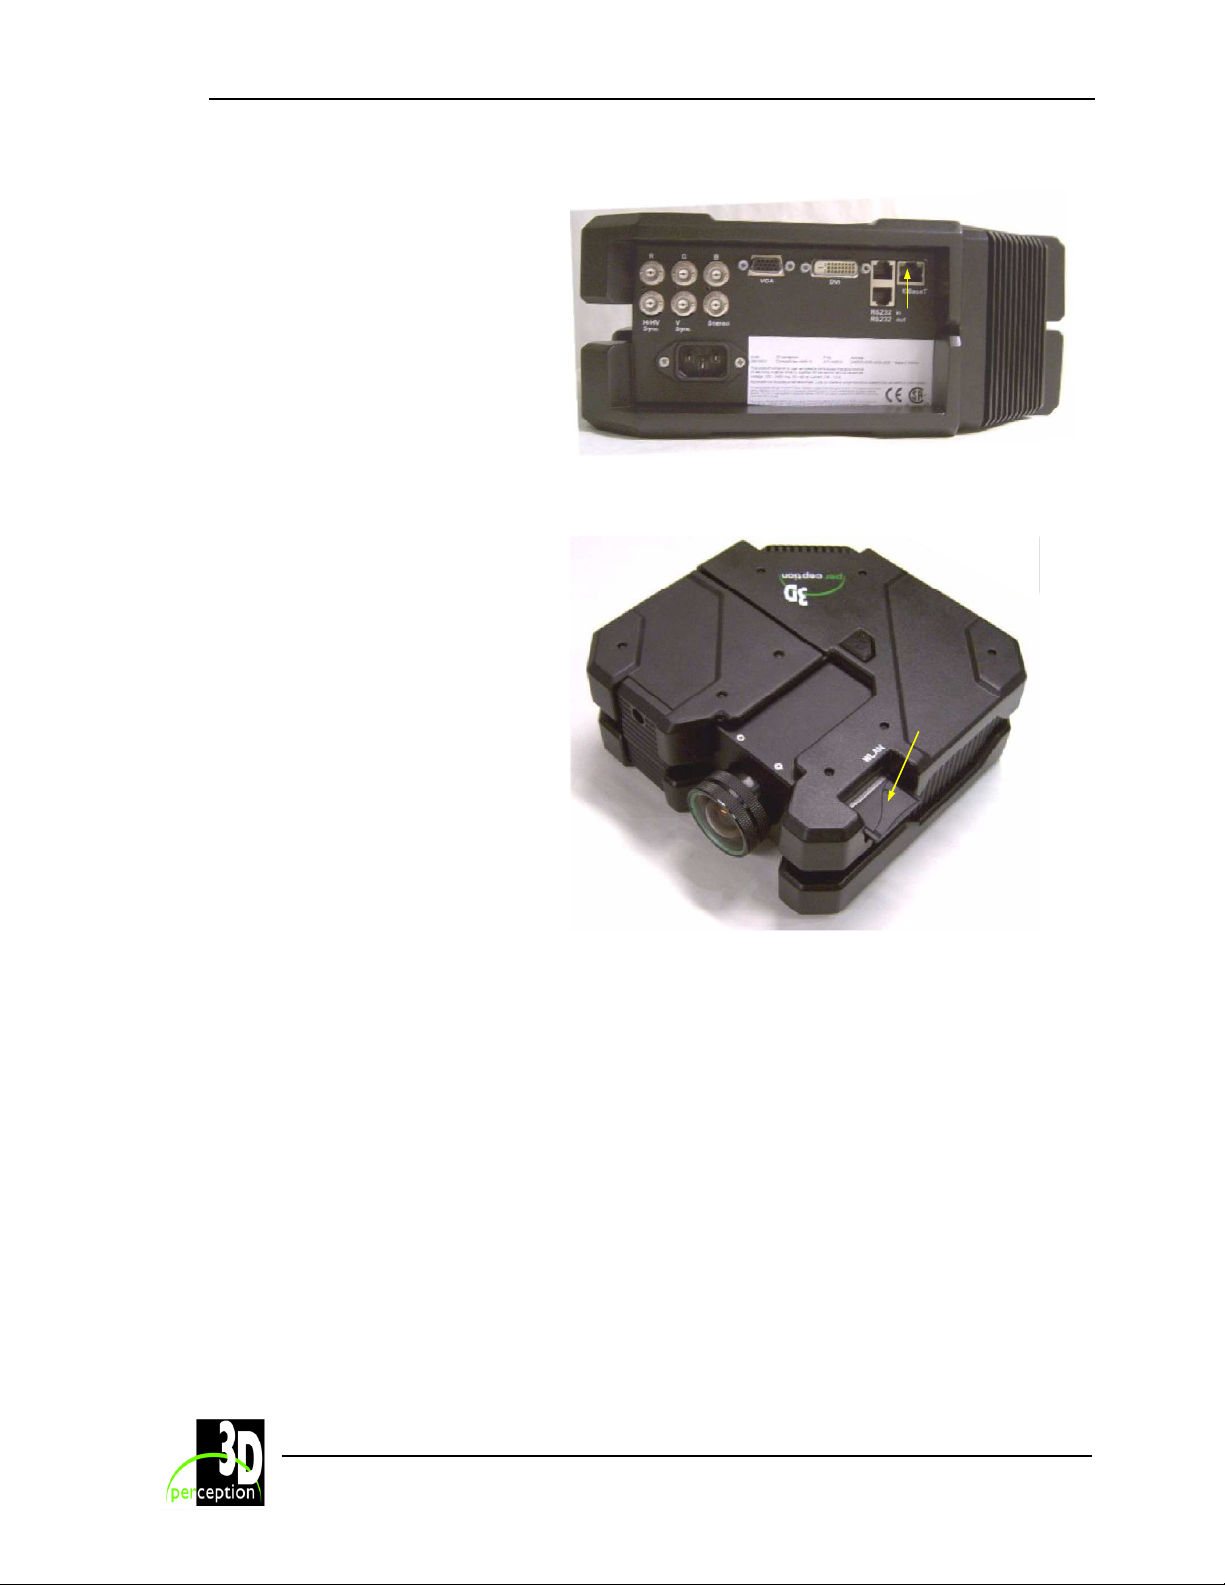
5.2.1.2 By LAN
Connect all projectors via the LAN
port (C) to the same LAN as the
control PC (running
CompactDesigner or
CompactControl) is connected.
OMPACTVIEW
C
HMR-15
5.2.1.3 By WLAN (Optional)
Only applicable if Optional module
KK700 has been purchased
To be developed
5.3 Set functionality codes for projectors
Complete the following steps within CompactControl for each C
introduced into the theatre.
OMPACTVIEW
D
HMR-15
9
Page 13
3D perception C
Revision 1 User Manual
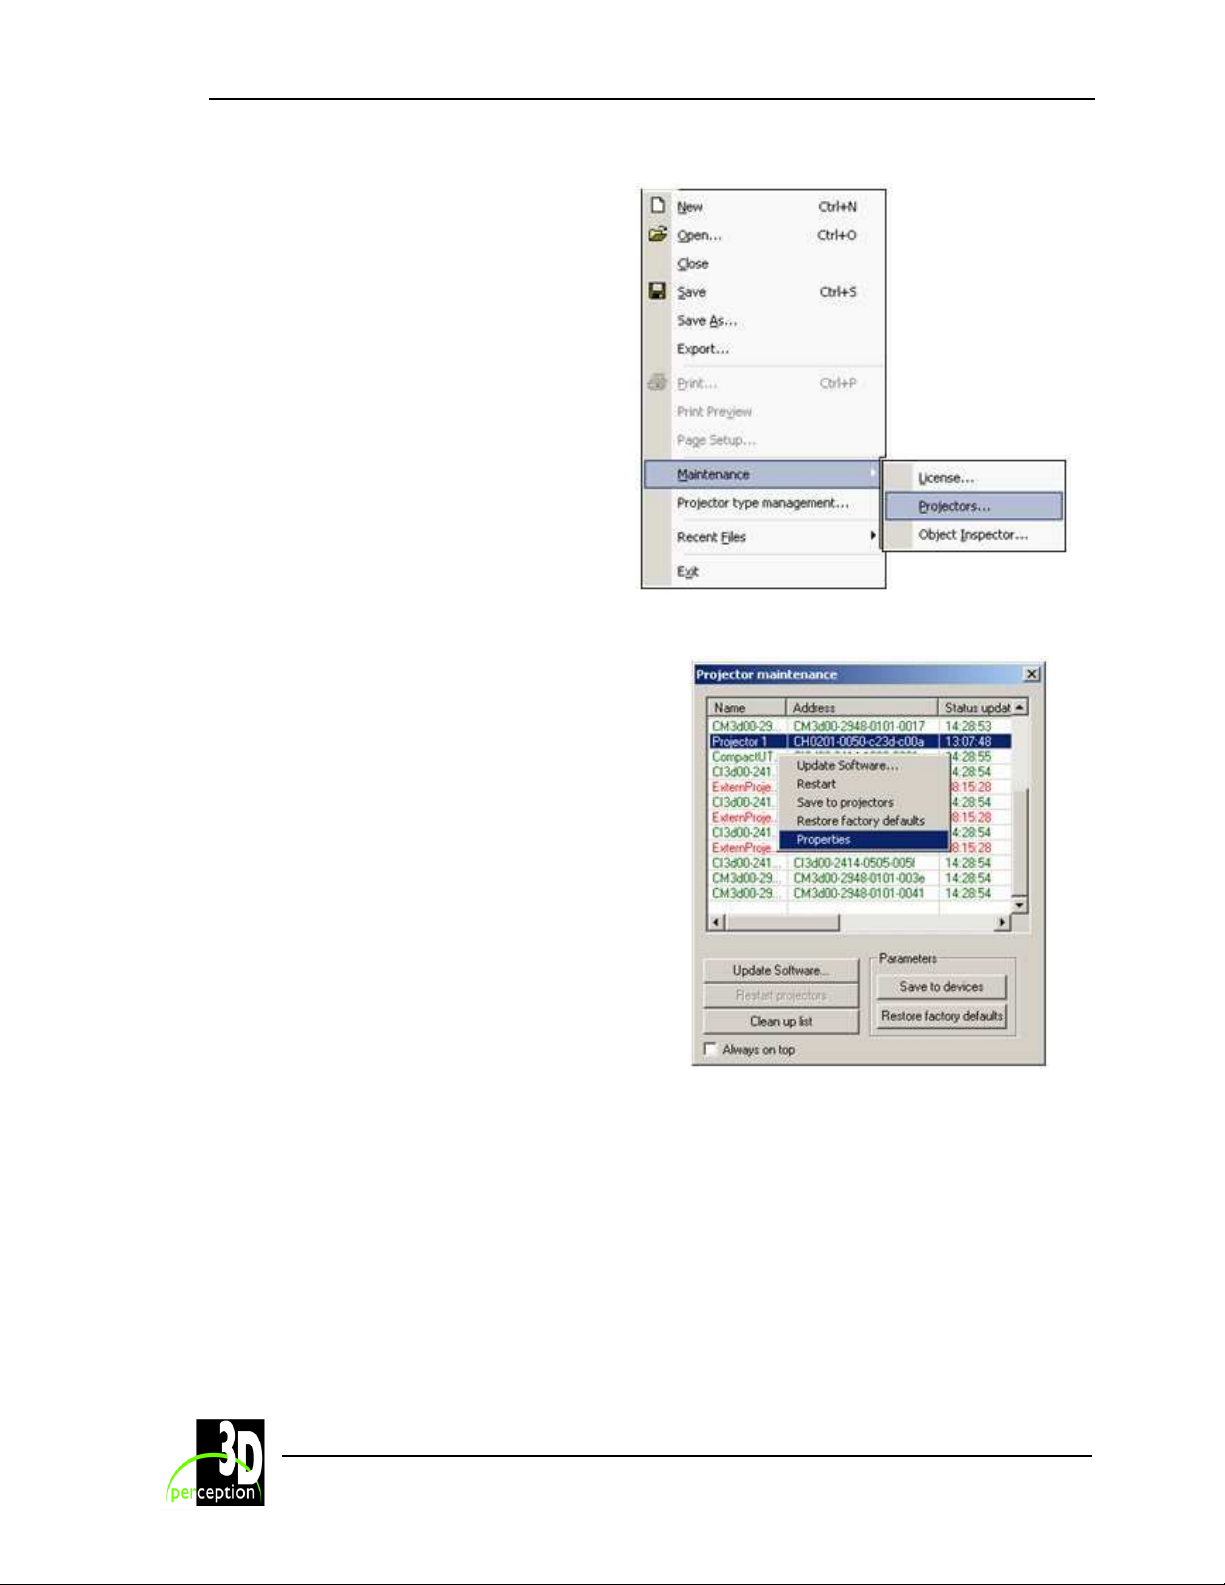
Step 1
Select Projectors on the drop-down menu
under Maintenance under the main File
menu
Step 2
On the Projector maintenance dialogue box click
right on the desired projector and select
Properties from the drop-down menu.
NOTE: The address of all CompactView HMR-15
projectors will commence with the characters CH.
OMPACTVIEW
HMR-15
10
Page 14
3D perception C
Revision 1 User Manual
Step 3
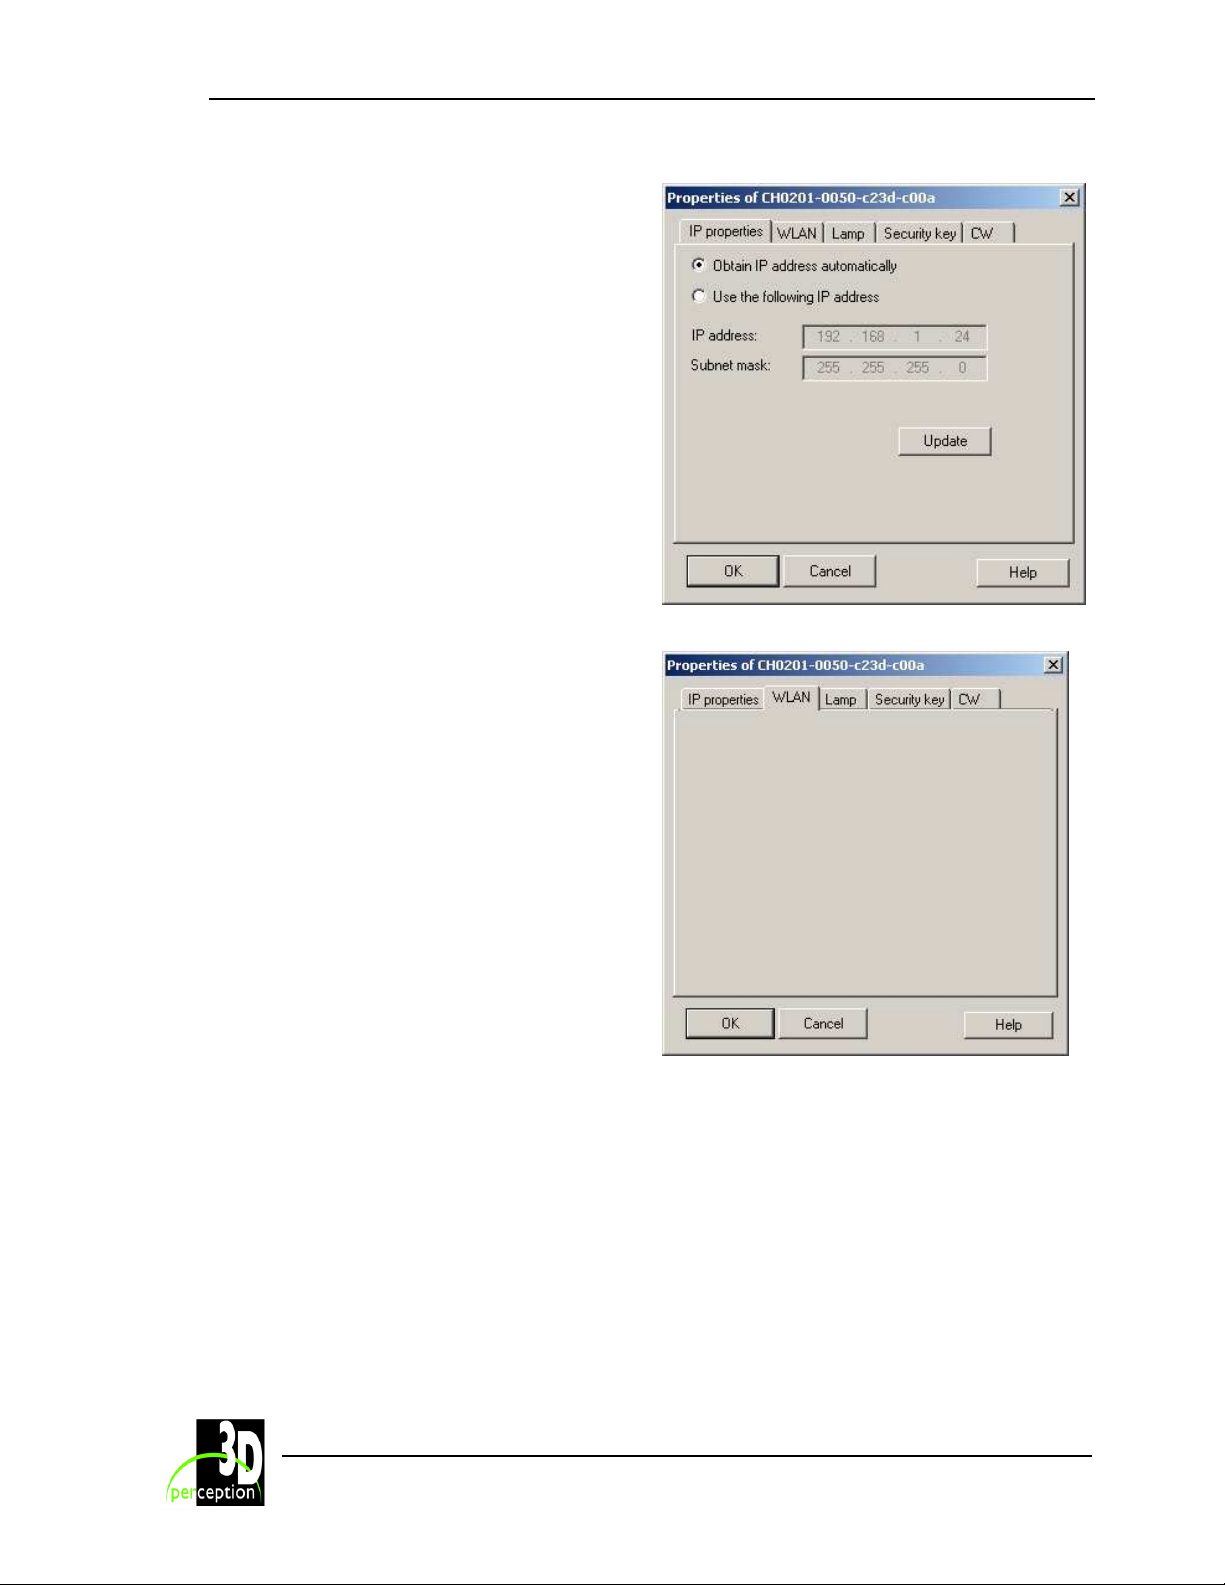
If the IP address and Subnet mask are set
automatically (default option), the DHCP
standard protocol will be used to assign the
address.
If the IP address and Subnet mask are to be
set manually, it is recommended that users
consult with their own network administrator.
OMPACTVIEW
HMR-15
Step 4
Only applicable if Optional module KK700 has
been purchased
WLAN
(To be developed)
11
Page 15
3D perception C
Revision 1 User Manual
Step 5
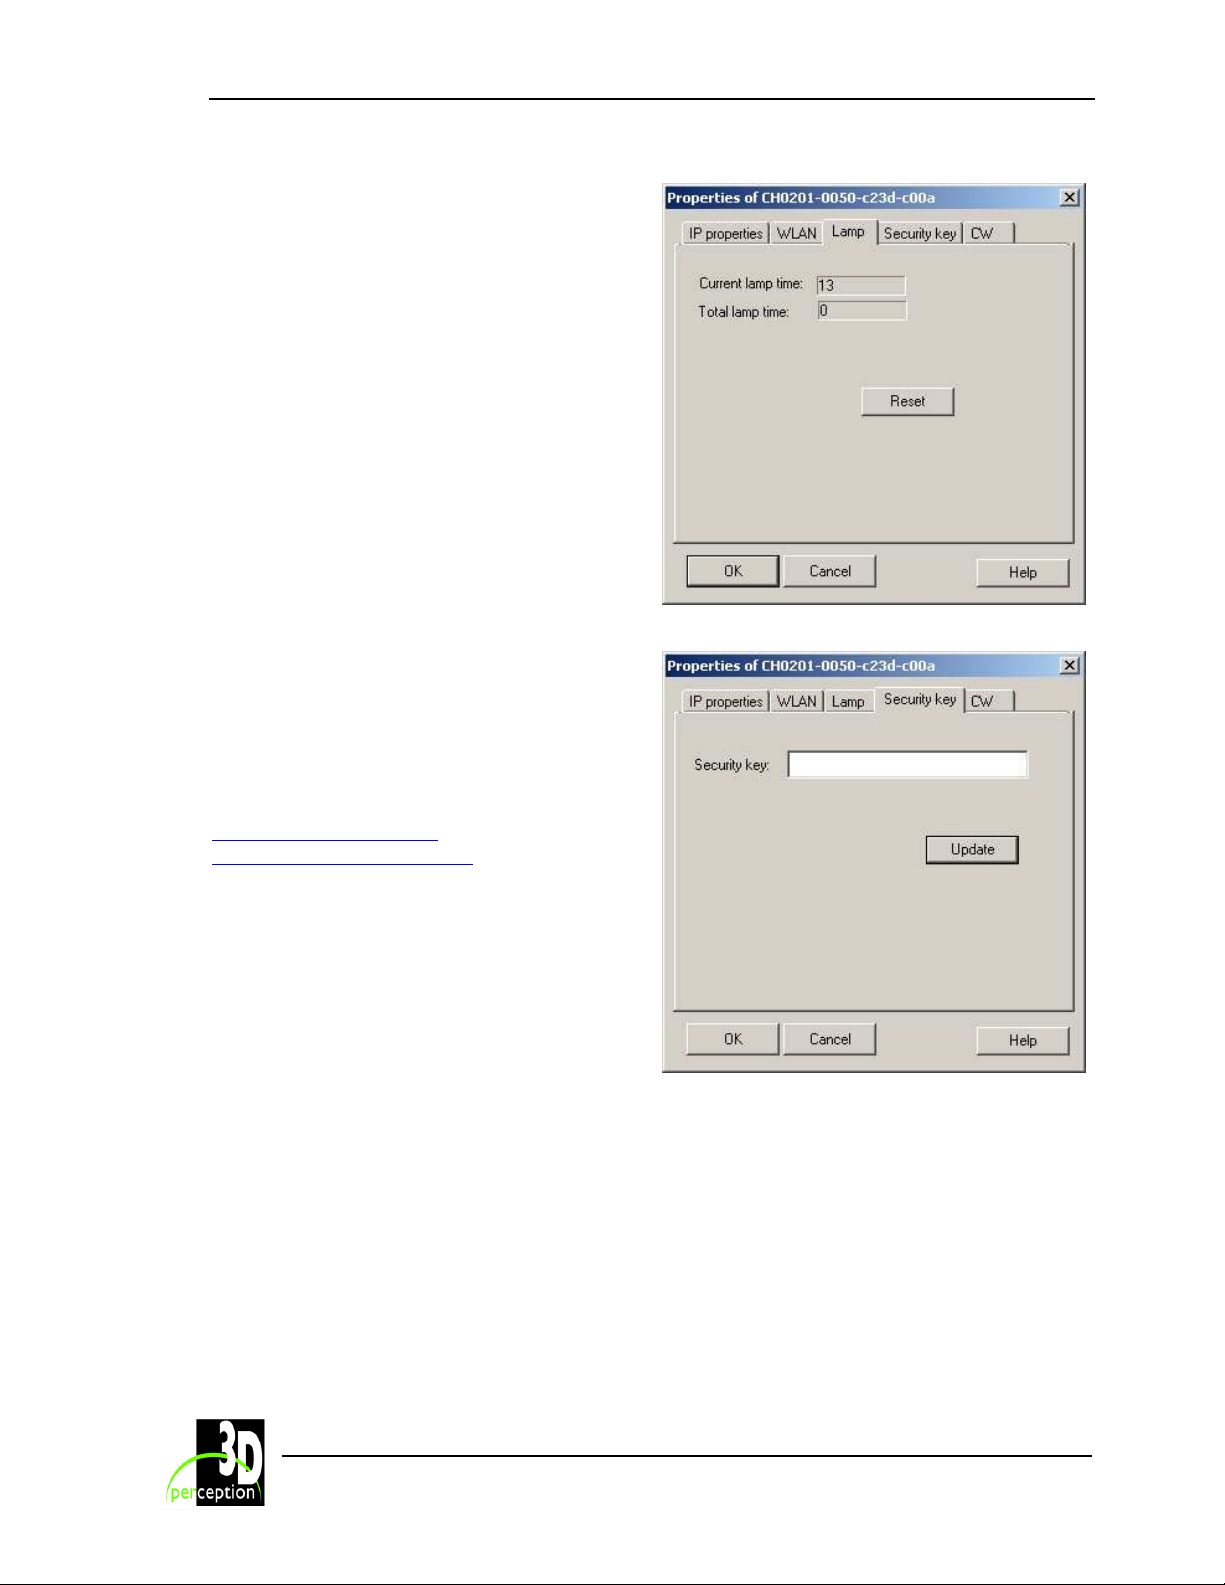
Check the Lamp time is indicated showing the
projector is switched on.
NOTE:
reset the lamp time to zero in the event that
the lamp unit has to be replaced.
This dialogue page can also used to
OMPACTVIEW
HMR-15
Step 6
Enter the unique Security key for the projector.
(The security key for each projector can be
obtained by e-mail from 3D perception. Send
the projector address [CH….] of each projector
to any of the sales staff, support staff or to
Press "Update" once and then press “OK”.
This will register and activate the optional
modules purchased.
Note: You will not see any notification or
warnings when you press the "update"
button
Wait for 30 seconds and the projector will then
start to scan for source.
12
Page 16
3D perception C
Revision 1 User Manual
Step 7
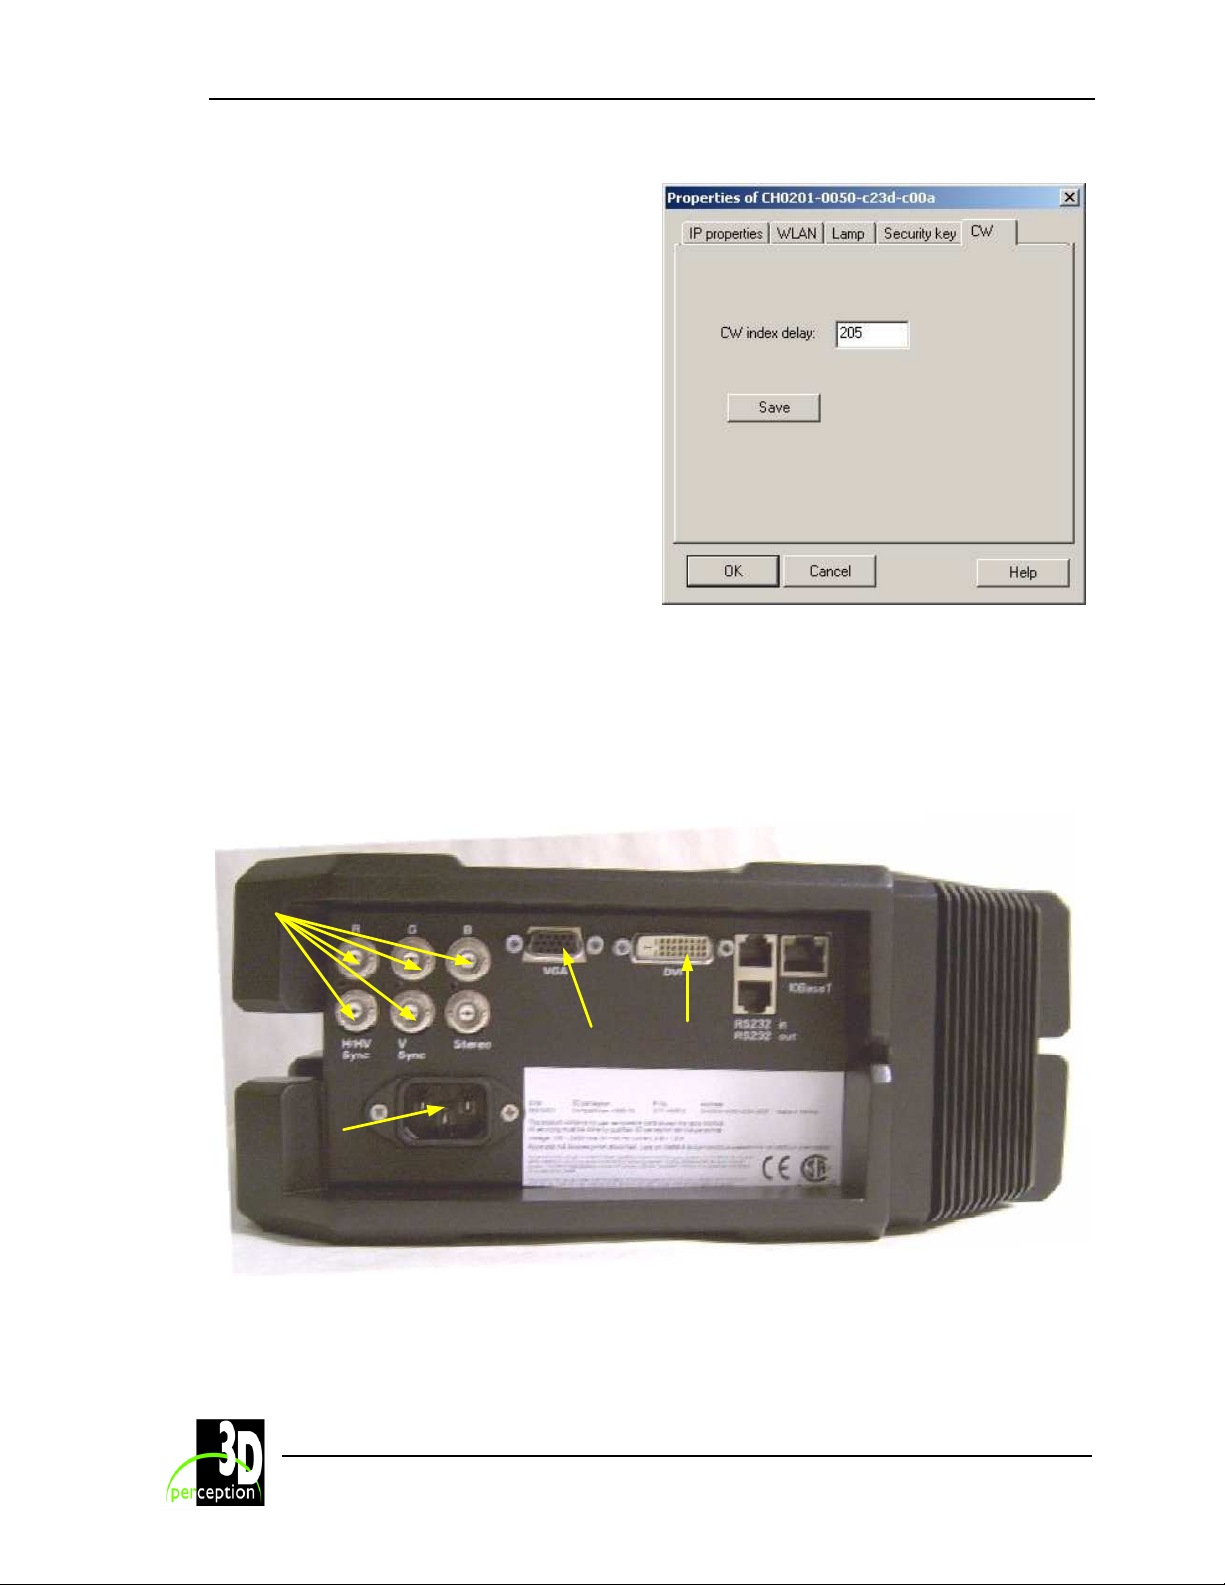
CW (Colour Wheel)
This dialogue page will indicate the colour
wheel index delay.
NOTE:
1. Changing the colour wheel index
delay will not improve or adjust the
colour on the projector.
2. Changing the colour wheel index
delay should only be performed by a
qualified technician.
OMPACTVIEW
HMR-15
5.4 Set computer source for projectors
The projector may be connected to up to 3 computer sources simultaneously, using the
Analogue RGB inputs at (A) and (B) and the Digital RGB input at (C).
Connect the power cord (D) .
A
B C
D
13
Page 17
3D perception C
Revision 1 User Manual
OMPACTVIEW
HMR-15
6. F
OCUS AND ZOOM
B
A
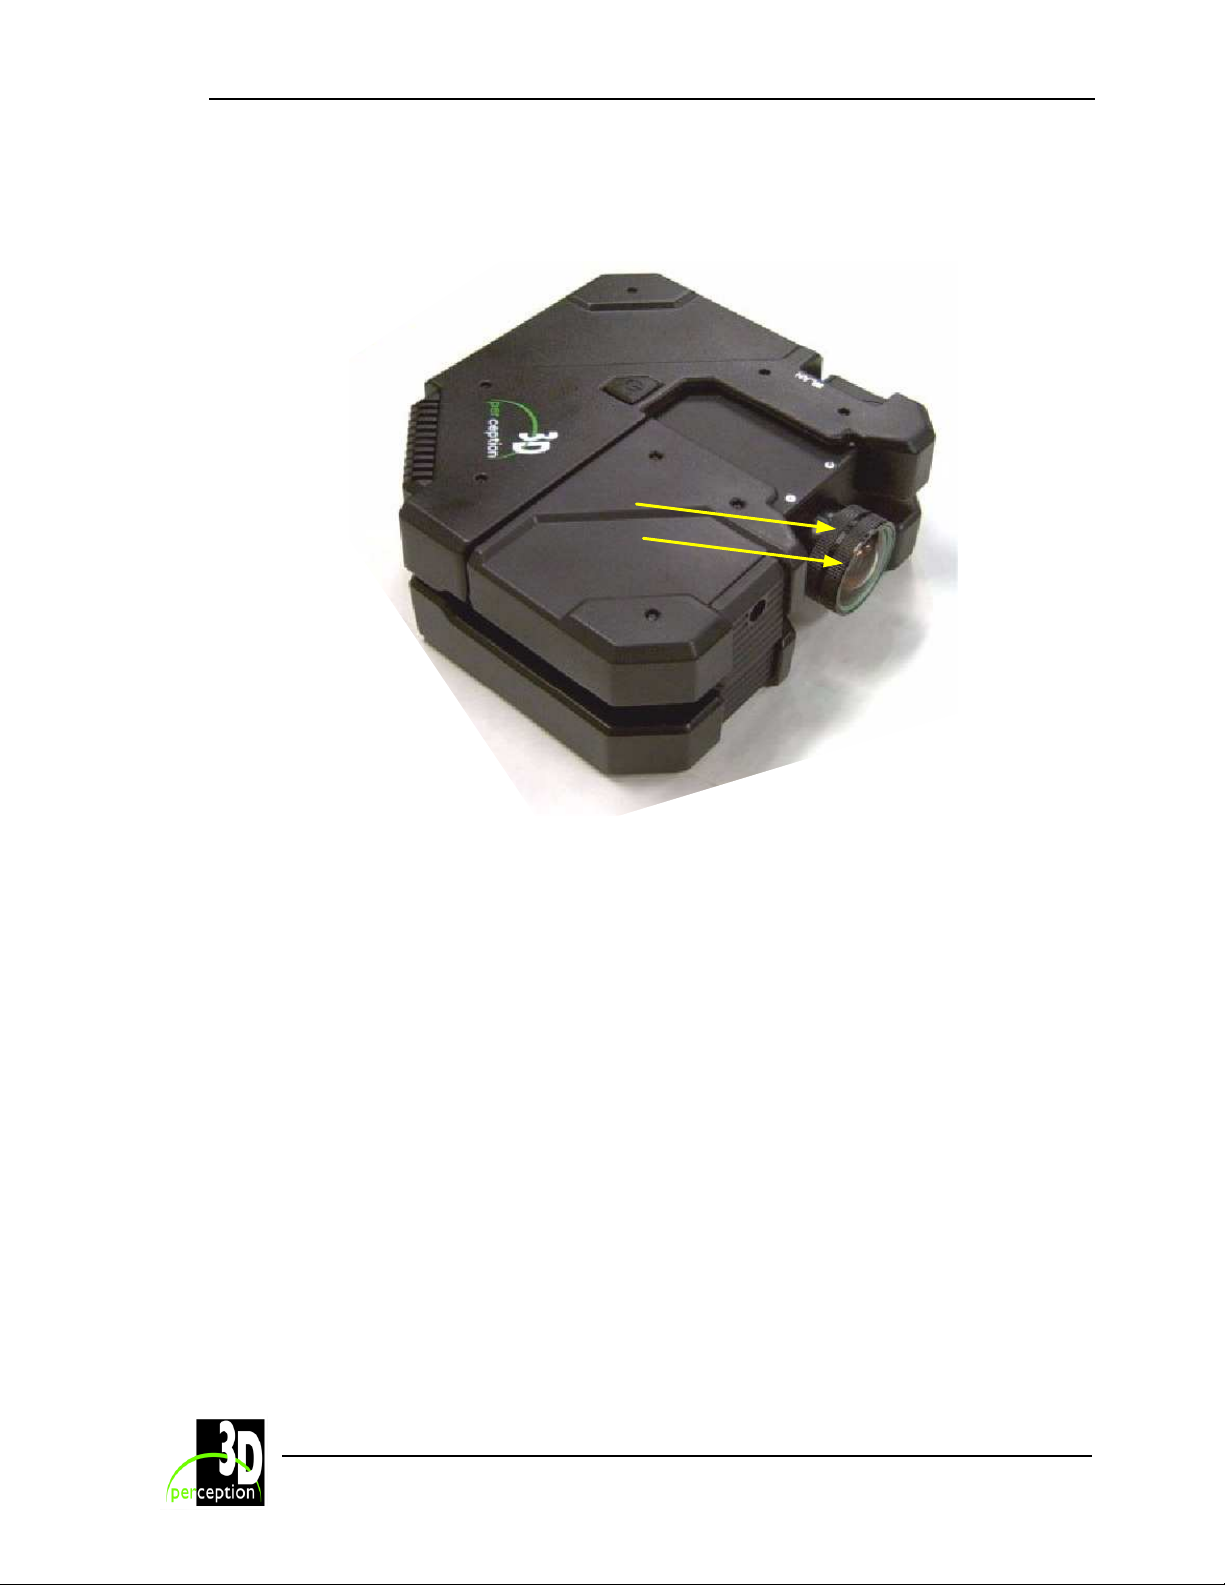
6.1 Focus
Turn the Focus ring (A) on the projection lens to get a correctly focused image.
6.2 Zoom
Turn the Zoom ring (B) on the projection lens to zoom In and Out. (This is only available on the
optional intermittent and long throw lens.)
If the desired image size cannot be achieved by adjusting the zoom ring, relocate the projector
nearer or farther away from the projection screen and re-try.
NOTE: The focus and zoom adjustment rings are deliberately stiff and difficult to move. If
adjustment is required then a certain amount of pressure must be used.
14
Page 18
3D perception C
Revision 1 User Manual
OMPACTVIEW
HMR-15
7. M
OUNTING THE PROJECTOR
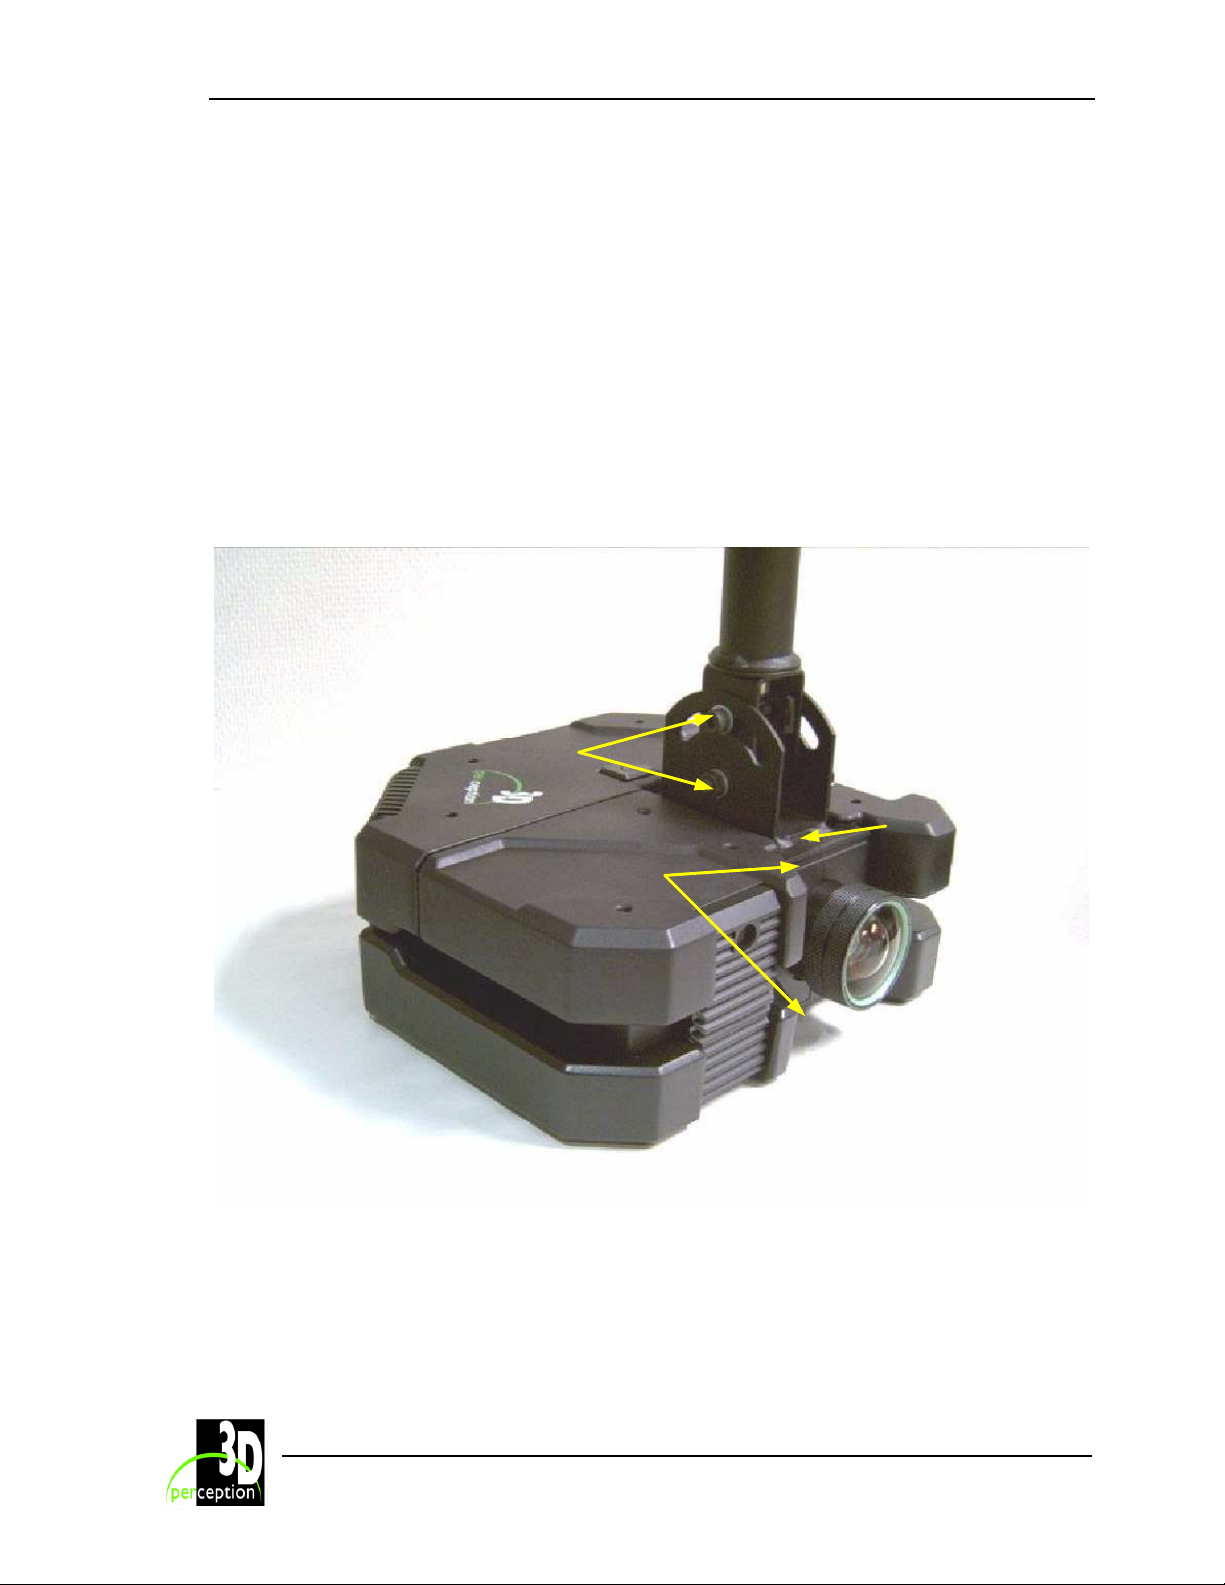
7.1 To a Ceiling Mount
The projector can be ceiling mounted using any approved UL tested/listed ceiling mount fixture
with a minimum weight capacity of 12 kg (26 lbs).
The ceiling mount obtainable through 3D perception (as illustrated below) is only approved for
C
OMPACTVIEW
For proper ventilation, the minimum distance from the ceiling/rear wall should be 30 - 50 cm, (12
- 20 inches).
The specifications and functionality of the product may change without prior notice.
HMR-15
projectors.
A
C
Locking screw for vertical adjustment
A
B Slide
C Housing for slide (1 on top and 1 on under side)
B
15
Page 19

3D perception C
Revision 1 User Manual
OMPACTVIEW
HMR-15
7.2 To a Tabletop
Although the projector is not equipped with adjustable legs it may be sited directly onto a
tabletop, however, this is only recommended for temporary use or for demonstration purposes.
It is not recommended for permanent installation such as in a simulator.
16
Page 20
3D perception C
Revision 1 User Manual
OMPACTVIEW
HMR-15
8. U
After set-up, switch on all equipment.
SING THE PROJECTOR
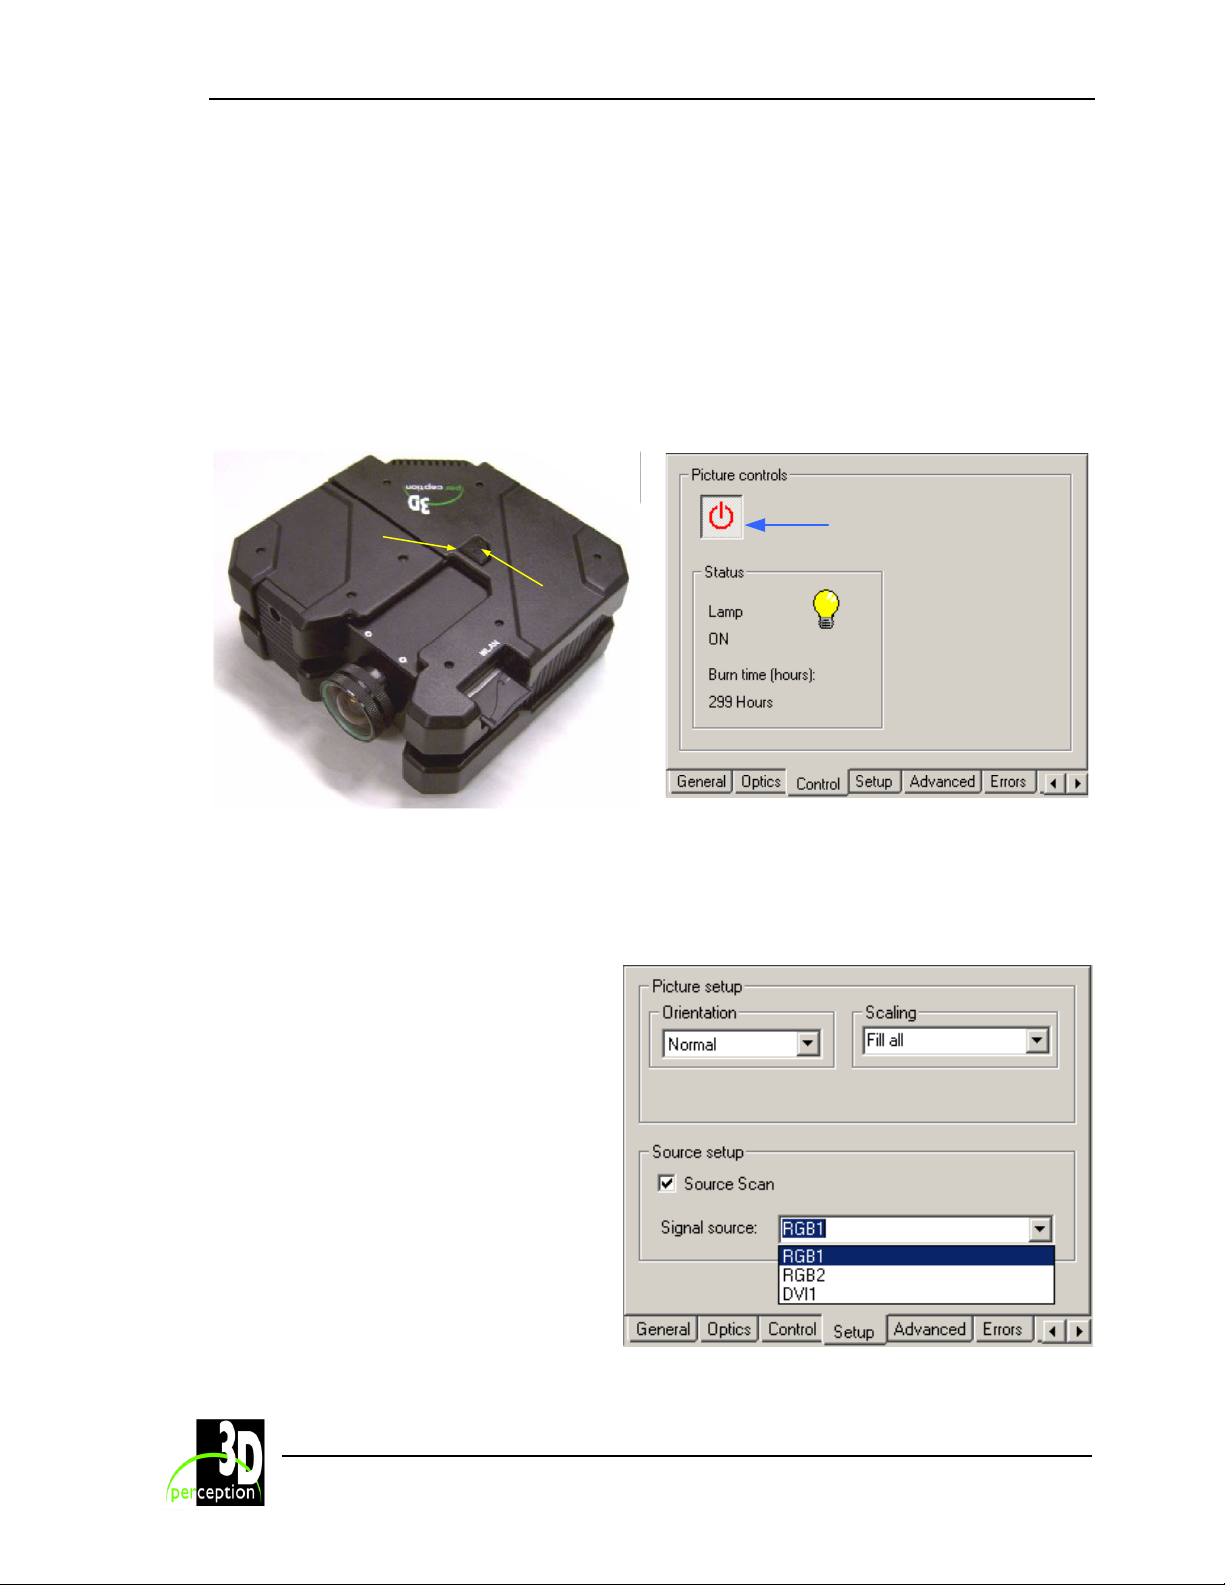
8.1 Projector On/Off
To switch the projector On, firmly press the POWER button on the top of the projector (A) or the
remote control button (B) on the Control dialogue page in CompactControl.
The STATUS indicator (C) will turn green when the projector is switched On and yellow when
the projector is switched to standby.
C
A
B
To switch the projector Off, firmly press the POWER button on the top of the projector (A) or the
remote control button (B) on the Control dialogue page in CompactControl.
8.2 Signal Source
When only one source is connected, the
projector will auto-detect that source. If
more than one source is connected, the
projector will display the source with the
highest priority according to the following
list:
RGB 1
•
• RGB 2
• DVI 1
17
Page 21

3D perception C
Revision 1 User Manual
OMPACTVIEW
HMR-15
9. M
The projector may from time to time require cleaning.
Only the exterior of the projector may be cleaned. Use a damp cloth. Make sure no liquids enter
the inside of the projector.
With the exception of when changing a lamp, never open the projector, as this will void any
warranties. Refer all service and repair work to qualified personnel.
AINTENANCE
18
Page 22
3D perception C
OMPACTVIEW
HMR-15
Revision 1 User Manual
10. L
AMP REPLACEMENT
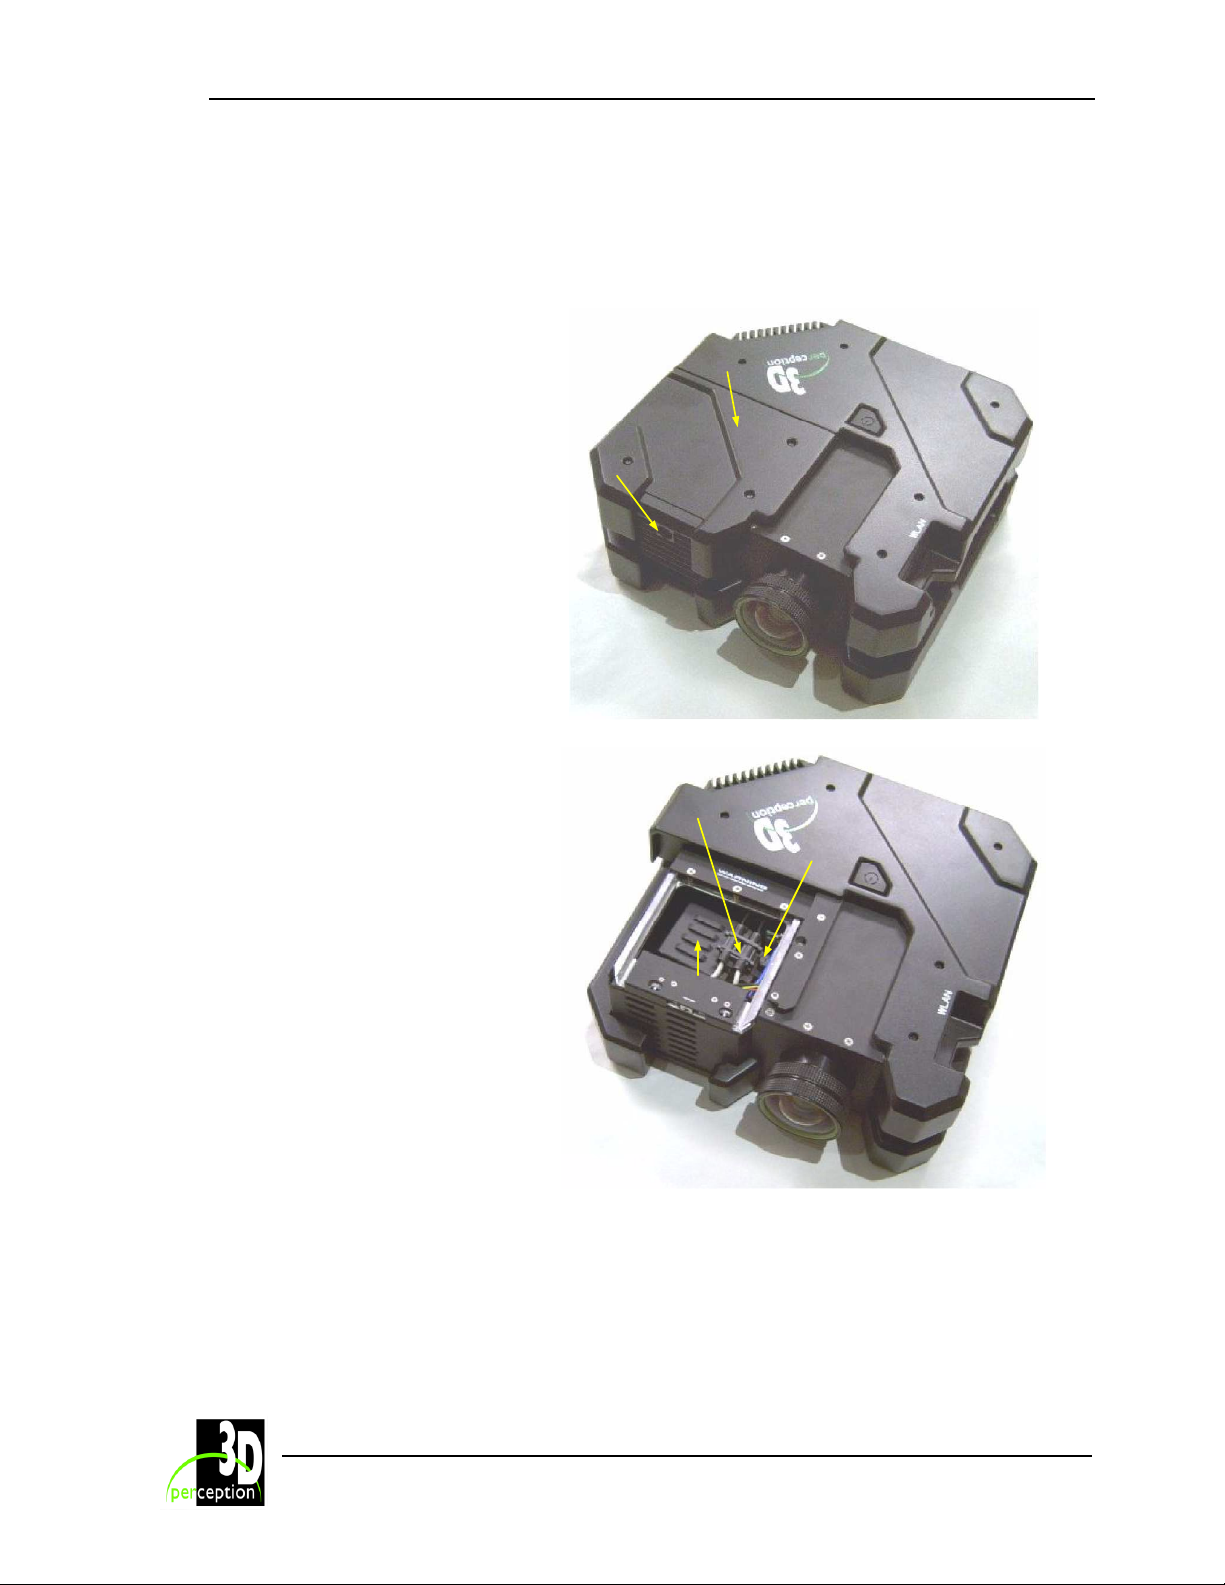
Always replace the lamp with the same type and rating.
10.1 Remove old lamp
Remove the cover of the lamp
housing (A) by undoing the
fixing screw (B) and sliding the
cover forward..
Undo the locking screw (C)
and disconnect the wiring
element (D).
Remove the lamp unit (E).
B
D
A
C
E
19
Page 23
3D perception C
OMPACTVIEW
HMR-15
Revision 1 User Manual
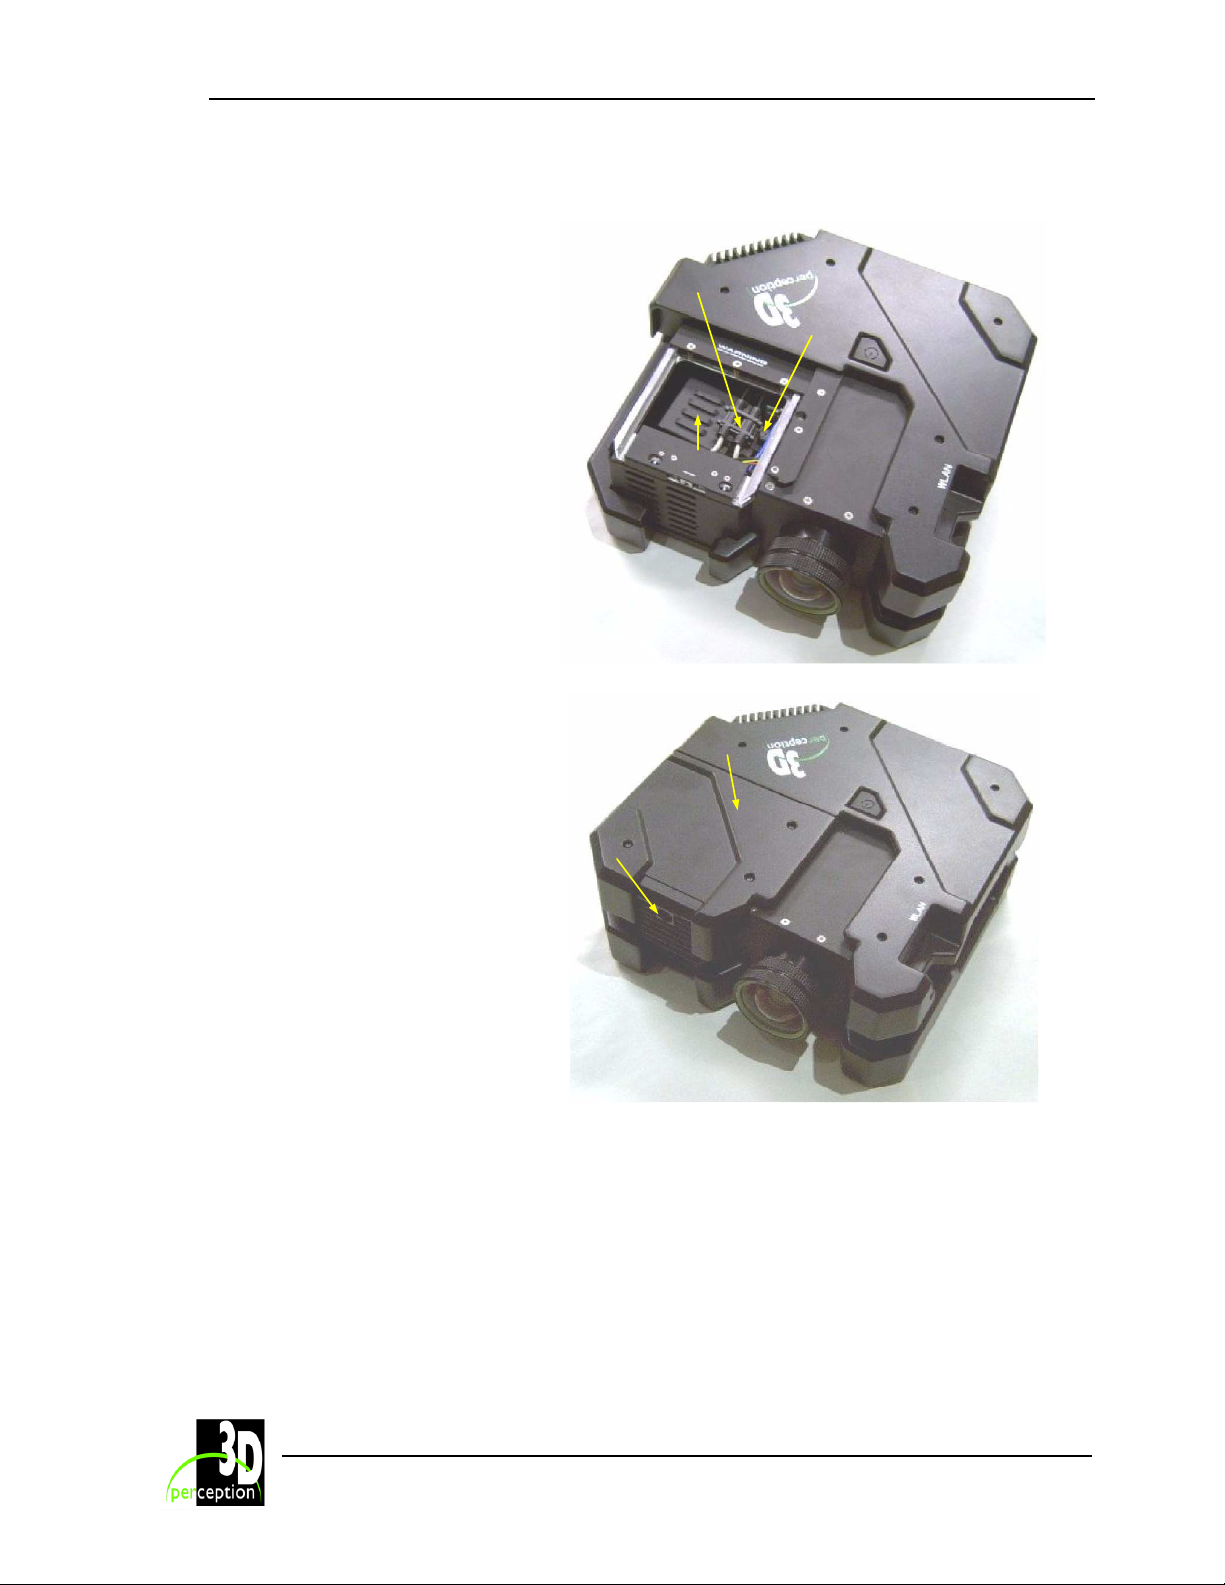
10.2 Insert New Lamp
Replace the lamp unit (E).
Re-connect the wiring element
(D).
Fasten the locking screw (C)
D
C
E
A
Slide the cover of the housing
unit (A) back into position.
B
Re-fasten the fixing screw (B)
NOTE: It is most important to ensure that the cover of the lamp housing is correctly sited back in
its slot. If it is not firmly back in position then the projector will not power up.
20
Page 24

3D perception C
Revision 1 User Manual
OMPACTVIEW
HMR-15
11. S
This product contains no user-serviceable parts.
If the product fails to function as expected complete the following steps:
1. Check that all connections are properly made, and that the power cord is properly
connected.
2. Check that the projector, the video and the computer sources are all switched on.
3. Check that the circuit breaker and the mains fuse is intact.
4. Try changing the cables and cords in case of a bad or intermittent connection (cables and
cords may break over time).
In the event that none of the above checks resolve the product failure, please contact your
reseller. You should prepare a description of the symptoms of the failure you experience,
including the projector number and serial number as printed on the label attached to the
projector.
ERVICE INFORMATION
21
Page 25

3D perception C
Revision 1 User Manual
OMPACTVIEW
HMR-15
12. T
ECHNICAL DATA
12.1 Warping and edge blending specifications
Warping Non-linear image mapping from 50% to 200%
Processing latency from 50 µs to 12 ms dependent on mapping level
Total latency 250 line period
Automatic and manual options
Up to 100 geometrical control points (compliant with curved screen requirement)
Up to 5th order approximation between geometrical control points
Soft edge
blending
Gamma adjustable from 0.25 to 4 in overlapped areas
Up to 5 geometrical control points (compliant with curved screen requirement)
Colour Individual RGB adjustments of ±20% in addition to native adjustment capabilities
Primary colour calibration (optional extra for use with CompactUTM)
Input offset and Input gain adjustments
Gamma
Multi-sided non-linear blending from 2% to 100% of total image
Alpha adjustable from 0 to 4 in overlapped areas
Individual RGB adjustments from 0.25 to 4 in addition to native adjustment capabilities
22
Page 26

3D perception C
OMPACTVIEW
HMR-15
Revision 1 User Manual
12.2 Projector specifications
Resolution (native) 1024 x 768
Technology DDR – Double Data Rate DMDTM Module
DLP
Compatibility For PC’s, Macs, SGI and other workstations
Computer interface
Inputs 1 VGA 15 pin DSUB (Analogue RGB)
5 BNC (Analogue RGB)
Remote control
1 x Ethernet 10 Base-T
Aspect ration (native) 4:3
Contrast (black on/off)
Brightness level
Noise level
Dimensions
Weight
Power 90-260 VAC, 50-60Hz, 300W
Wide zoom lens
Intermediate zoom lens
Long throw zoom lens 1.8 – 2.1:1
Conformance
Temperature (operating)
Temperature (storage)
Humidity (operating) 20-90% RH, non-condensing
Humidity (storage)
TM
by Texas Instruments
UXGA, SXGA+, SXGA, XGA and SVGA
1 DVI (Digital RGB)
via CompactControl: 2 x RS232
WLAN (optional)
2500:1
1100 – 1600 ANSI lumens
290mm x 290mm x 115mm
4.5 kg
1.15 – 1.34:1
1.38 – 1.61:1
UL, CE, FCC Class A
0-40°C / 32-104°F, 0-1500 m / 0-4950 ft
0-35°C / 32-95°F, 1500-3000 m / 4950-9900 ft
-20 - +60°C / -4 - +140°F
10-95% RH, non-condensing
23
Page 27

3D perception C
Revision 1 User Manual
OMPACTVIEW
HMR-15
13.
Limited Warranty
Except as otherwise stated herein, 3D perception warrants that a C
projector is free from defects in parts and labour under normal use during the warranty period.
The warranty period means the 24-month period from the date of purchase of a
HMR-15 projector.
During the warranty period, 3D perception will, at its option and in its sole discretion, repair or
replace defective parts, including replacement of the entire
no additional charge to the Customer. However, the Customer is responsible for all shipping
and insurance costs incurred in returning any
which does not require any repair or replacement work, as determined by 3D perception in its
sole discretion. This limited warranty does not extend to any 3D perception product that has
been damaged as a result of accident, misuse, or abuse. Nor does it extend to the use of parts
not manufactured or sold by 3D perception, by unauthorised modification of a C
HMR-15 projector, or as a result of servicing by unauthorised personnel. This limited warranty
extends only to the Customer, and is not transferable or applicable to any other third party or
user, including any one who purchases a used C
asserting a claim under this limited warranty must establish to 3D perception’ satisfaction the
date of purchase and that a C
Other warranty and liability limitations
Aside from this standard published warranty, 3D perception makes no warranty of any kind,
express or implied, including without limitation, those of merchantability and of fitness for a
particular purpose. Without limiting the generality of the foregoing, any description of a
C
OMPACTVIEW
of any bargain, and does not constitute a warranty that the item sold shall conform to that
description. The use of any sample or model is for illustrative purposes only, it is not part of the
basis of any bargain, and it is not to be construed as a warranty that a C
projector will conform to the sample or model.
No affirmation of fact or promise made by 3D perception shall constitute a warranty that a
C
OMPACTVIEW
makes no warranty that the goods are free from claims of infringement of patents, trademarks,
or copyrights. This limited warranty shall be the exclusive remedy. 3D perception shall not be
liable to customers or others for incidental, consequential, or special damages, or lost profits.
Under no circumstance shall 3D perception liability or customer’s remedy for damages against
3D perception exceed its cost for a C
LIMITED WARRANTY
‘T
RADEMARKS COPYRIGHT
OMPACTVIEW
HMR-15
HMR-15 projector will conform to the affirmation or promise. 3D perception
projector is for the sole purpose of identifying it, is not part of the basis
, ‘FCC S
TATEMENT’ AND
’
C
OMPACTVIEW
C
OMPACTVIEW
OMPACTVIEW
HMR-15 projector was purchased new.
OMPACTVIEW
HMR-15 projector.
HMR-15
HMR-15 projector. Any person
OMPACTVIEW
C
OMPACTVIEW
HMR-15
projector to the Customer
OMPACTVIEW
projector, at
OMPACTVIEW
HMR-15
HMR-15
24
Page 28

3D perception C
OMPACTVIEW
HMR-15
Revision 1 User Manual
Procedure for claims
Any and all questions or claims concerning a
C
OMPACTVIEW
HMR-15
3D perception authorised personnel through the VAR from whom the C
projector was purchased. In no case shall a
C
OMPACTVIEW
projector shall be made to
OMPACTVIEW
HMR-15
projector be returned
HMR-15
without first securing the authority of 3D perception or its authorised personnel. Any damages
to, defects in, loss of, non conformities in, or any other claim concerning a
C
OMPACTVIEW
HMR-
15 projector which could be discovered by inspection upon delivery must be reported to the
delivering carrier, and in writing to 3D perception at: the following address, promptly and in no
event later than thirty (30) days after delivery.
3D perception AS
Solbråveien 41
P.O. Box 455
N-1373 Asker
Norway
In the case of any such claim, inspection shall be promptly arranged with 3D perception or it’s
authorised personnel, and where appropriate, representatives of the carrier. Any other claim or
action respecting the condition or conformity of a
matter affecting a C
OMPACTVIEW
HMR-15 projector must be submitted in writing to 3D
C
OMPACTVIEW
HMR-15
projector or any other
perception promptly upon discovery and in no event later than expiration of the Warranty
Period. Any part of a C
OMPACTVIEW
HMR-15 projector which is subject of any claim shall be set
aside and protected, without further processing or use, until 3D perception or its authorised
personnel have an opportunity to inspect it and advice the Customer of the disposition, if any to
be made thereof. Failure to give timely written notice of any claim shall bar any remedy.
Technical advice
3D perception, or its authorised personnel, may furnish technical advice with reference to the
use of a C
OMPACTVIEW
HMR-15 projector, but there is no obligation to furnish such advice. If
any advice or assistance is furnished, it shall be given and accepted at Customer’s risk, 3D
perception shall not be responsible or liable for the advice or assistance given or the results
thereof.
FCC Statement
A C
OMPACTVIEW
HMR-15 projector has been tested and found to comply with the limits for a
'Class A' digital device, pursuant to Part 15 of the FCC rules. These limits are designed to
provide reasonable protection against harmful interference when it is operated in a commercial
environment. A
C
OMPACTVIEW
HMR-15
projector generates, uses and can radiate radio
frequency energy and, if not used in accordance with the instruction manual, may cause harmful
interference to radio communications. Operation of a
C
OMPACTVIEW
HMR-15
projector in a
residential area is likely to cause harmful interference in which case the user will be required to
correct the interference at own expense.
25
 Loading...