

Page 1
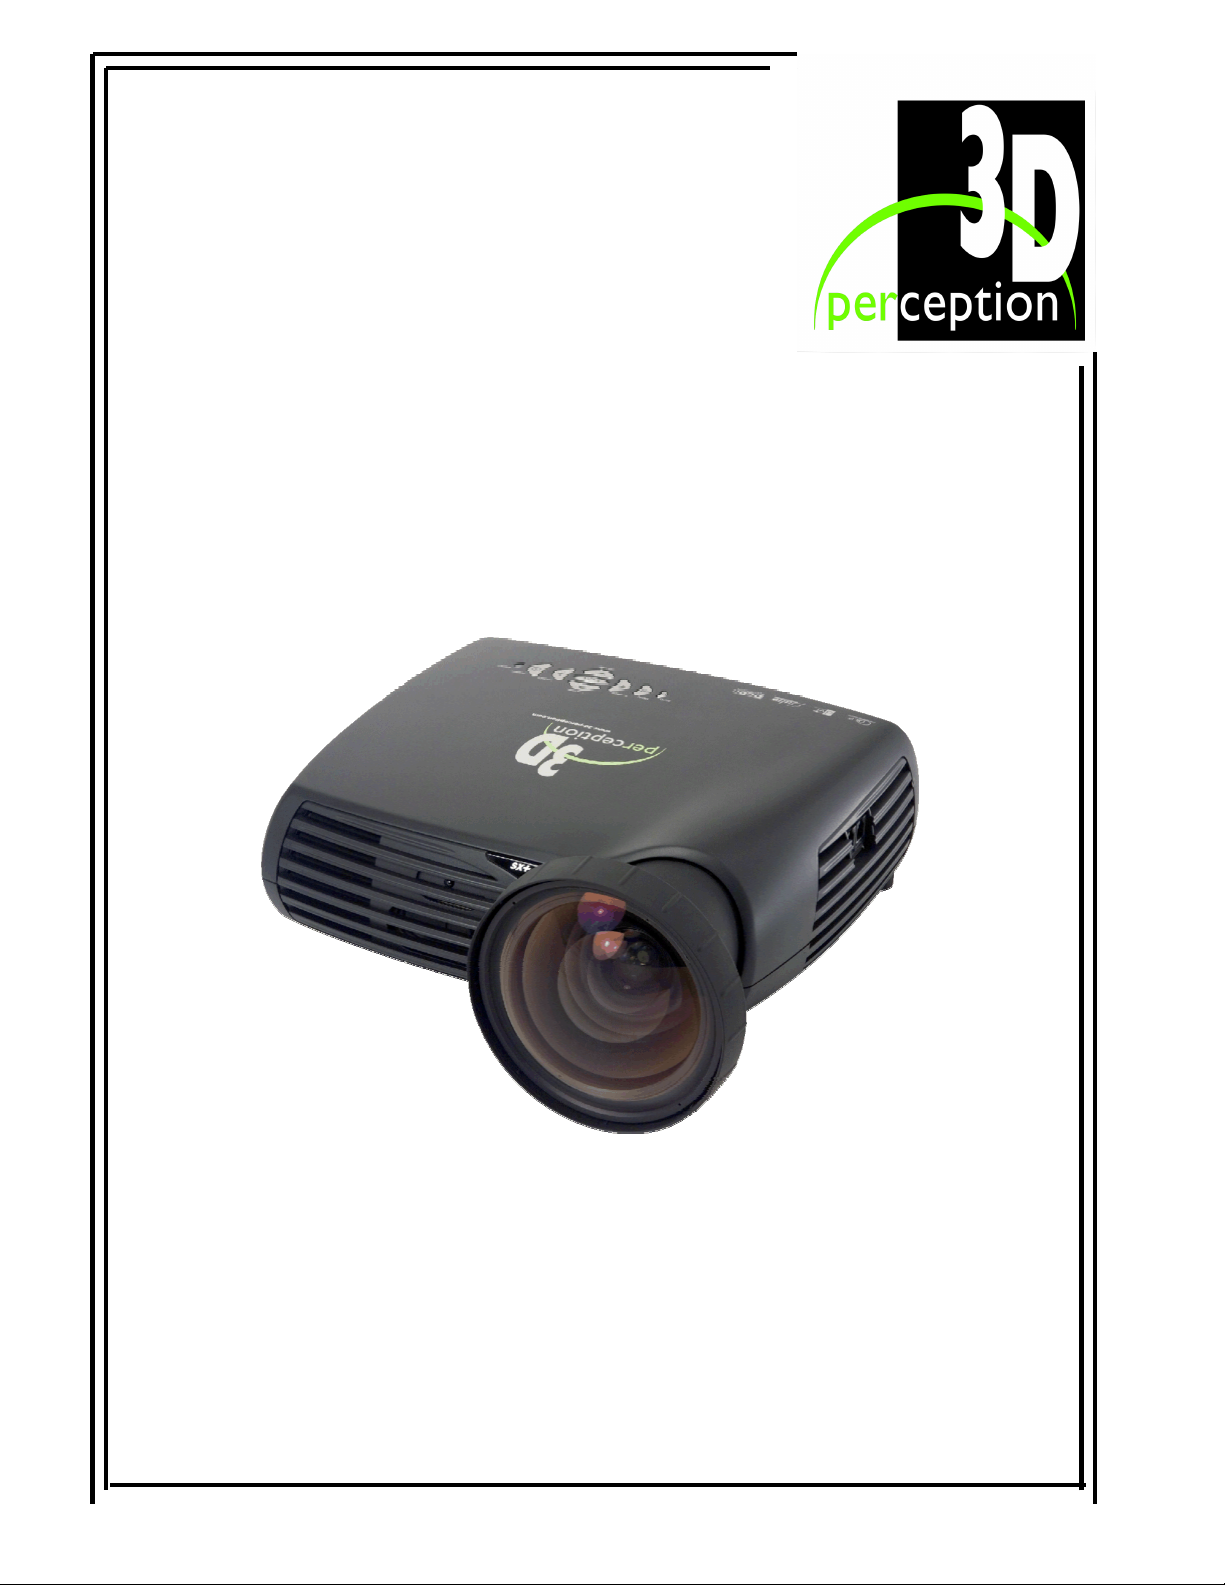
C
OMPACT
V
IEW
SX25+
U
SER
M
ANUAL
The copyright of this document is the property of 3D perception AS. The document is supplied on the
express terms that it is to be treated as confidential. No part of this document may be reproduced or
transmitted in any form or by any means, electronic or mechanical for any purpose, without the
express written permission of 3D perception AS. The information in this document is subject to
2005 3D perception AS All rights reserved.
change without notice and is provided ‘AS IS’.
Page 2

3D perception C
Revision 3 User Manual
OMPACTVIEW
SX25+
D
OCUMENT STATUS
Revision Month Year Paragraph(s) Prepared by Description of
Change
1 October 2004 All A F Rotheram Initial release
2 November 2004 16 A F Rotheram Reset
3 September 2005 22 & 24 A F Rotheram Parts list
USA address
ii
Page 3

3D perception C
Revision 3 User Manual
OMPACTVIEW
SX25+
T
ABLE OF CONTENTS
1. B
EFORE YOU START
.................................................................................................................1
1.1 Accessories...................................................................................................................1
1.2 Cables...........................................................................................................................1
1.3 Other accessories..........................................................................................................1
2. A
3. I
4. S
CCESSORIES
NTRODUCTION
AFETY
..........................................................................................................................2
........................................................................................................................3
& W
ARNINGS
.............................................................................................................4
4.1 Safety............................................................................................................................4
4.2 Warnings.......................................................................................................................4
4.3 Mercury Vapour ...........................................................................................................5
4.4 Remote Control Warning..............................................................................................6
5. B
6. O
EFORE SET-UP AND USE
VERVIEW
...............................................................................................................................8
........................................................................................................7
7. K
8. S
9. R
10. C
EYPAD
TATUS
EMOTE CONTROL
ONNECTOR PANEL
...................................................................................................................................9
..................................................................................................................................10
................................................................................................................11
...............................................................................................................13
11. SET-UP...................................................................................................................................14
11.1 Set-up computer..........................................................................................................14
11.2 Set-up Video...............................................................................................................15
12. GCM - G
EOMETRY CORRECTION MODULE
...........................................................................16
12.1 Connecting the CompactView SX25+I......................................................................16
iii
Page 4

3D perception C
Revision 3 User Manual
OMPACTVIEW
SX25+
12.2 Connecting the CompactView SX25+E.....................................................................17
13. F
OCUS AND ZOOM
.................................................................................................................18
13.1 Focus...........................................................................................................................18
13.2 Zoom...........................................................................................................................18
14. M
OUNTING THE PROJECTOR
..................................................................................................19
14.1 To a Ceiling Mount.....................................................................................................19
14.2 To a Tabletop..............................................................................................................20
15. U
16. M
SING THE PROJECTOR
ENU SYSTEM
......................................................................................................................22
..........................................................................................................21
16.1 Picture Sub-menu .......................................................................................................23
16.2 Dynamic Sub-menu....................................................................................................24
16.3 Advanced Sub-menu...................................................................................................25
16.4 Set Up Sub-menu........................................................................................................26
16.5 Utilities Sub-menu......................................................................................................27
16.6 Control Sub-menu.......................................................................................................28
17. M
18. L
AINTENANCE
AMP REPLACEMENT
......................................................................................................................29
............................................................................................................30
18.1 Remove old lamp........................................................................................................30
18.2 Insert New Lamp ........................................................................................................31
19. S
20. T
ERVICE INFORMATION
ECHNICAL DATA
.........................................................................................................33
..................................................................................................................34
20.1 Projector Specifications..............................................................................................34
20.2 GCM Specifications ...................................................................................................35
21. C
OVERS
.................................................................................................................................36
21.1 Cable cover.................................................................................................................36
21.2 Airflow cover..............................................................................................................36
iv
Page 5

3D perception C
Revision 3 User Manual
OMPACTVIEW
SX25+
22. P
ARTS LIST
............................................................................................................................37
22.1 Main products.............................................................................................................37
22.2 Spare parts ..................................................................................................................37
23. L
24. C
IMITED WARRANTY
ONTACT US
..........................................................................................................................40
, ‘FCC S
TATEMENT’ AND ‘TRADEMARKS COPYRIGHT
’.......................38
v
Page 6

3D perception C
Revision 3 User Manual
OMPACTVIEW
SX25+
1. B
Thank you for choosing a 3D perception C
EFORE YOU START
OMPACTVIEW
SX25+ projector
1.1 Accessories
Please take a few minutes to ensure that your C
the necessary parts as listed on the Accessories Page.
OMPACTVIEW
1.2 Cables
Please take a few minutes to make sure that your C
all the necessary cables, as listed on the Accessories Page.
OMPACTVIEW
1.3 Other accessories
Please refer to our website at www.3d-perception.com
SX25+ projector pack contains all
SX25+ projector pack contains
1
Page 7
3D perception C
Revision 3 User Manual
OMPACTVIEW
SX25+
2. A
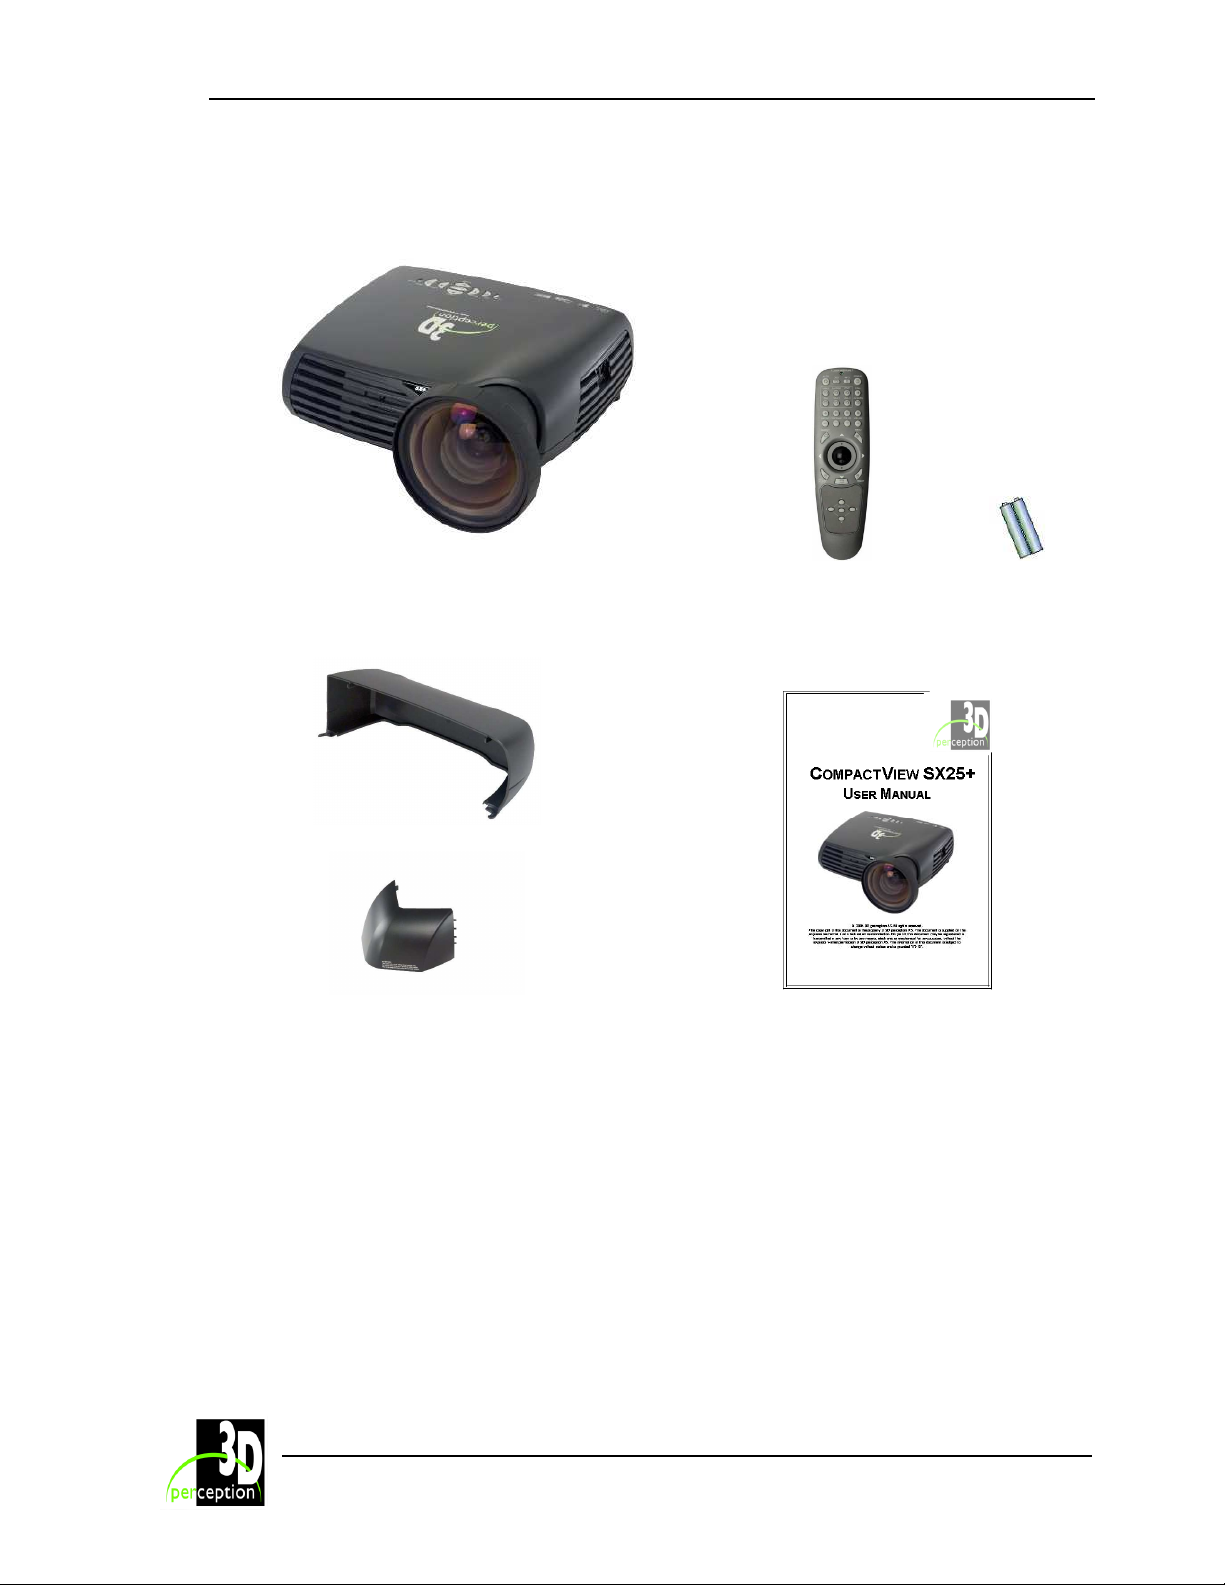
M
SX25+E
CCESSORIES
C
OMPACTVIEW
ODELS
: SX25+I
SX25+ P
ROJECTOR
R
EMOTE CONTROL AND BATTERIES
C
ABLE COVER
A
IRFLOW COVER
User Manual
Cables
VGA male Blue - VGA male Blue, 2m
DVI-I male White - DVI–I male White, 2m
A/V Cable 3 x Phono – Phono + 3,3mm stereo jack, 2m
S-Video Mini DIN 4 pin male - Mini DIN 4 pin male, 2m
Sound Cable 3,5mm stereo jack - 3,5mm stereo jack, 2m
USB A – USB B, 2m
Communication Cable 6’ spiral with RJ12 connectors
Power cord, 3m (European)
Power cord, 3m (US)
2
Page 8

3D perception C
Revision 3 User Manual
OMPACTVIEW
SX25+
3. I
The C
on to flat, curved or double curved screens with multiple projectors is the requirement.
The
C
analogue and digital, and provides the user with outstanding features such as:
• 1400x1050 pixel SX25GA DLP™ technology. Single chip DMD™ with DarkChip2™
technology by Texas Instruments®
• High resolution
High brightness
•
• High contrast
• Geometry correction functionality
• Edge blending functionality
• Faroudja DCDi™
• Lamp ECO mode
• Variable lamp power
• Multiple lens options
• Six video and graphics inputs
• Compact, low weight
• Low noise
• Desktop and ceiling-mountable
This user guide contains important information about safety precautions and the set-up and use
of the projector.
Please read the manual carefully before you operate the projector.
The specifications and functionality of the product may change without prior notice.
NTRODUCTION
OMPACTVIEW
OMPACTVIEW
SX25+ projector is the ultimate in high-resolution projectors when projection
SX25+
projector is compatible with most data and video sources, both
3
Page 9

3D perception C
Revision 3 User Manual
OMPACTVIEW
SX25+
4. S
This user manual contains important information regarding safety precautions and the set-up
and use of the projector. Please read the manual carefully before you operate the projector.
AFETY
& W
ARNINGS
4.1 Safety
This device complies with relevant safety regulations for data processing equipment for use in
an office environment. Before using the projector for the first time, please read the safety and
warning instructions thoroughly.
4.2 Warnings
Always use 3-prong power cord to ensure proper grounding of the unit. Never use 2-prong
power cords, this is dangerous and could lead to electrical shock.
Never open the unit. The projector contains no user serviceable parts. Refer all repairs to
qualified personnel only.
Make sure that no objects enter into the vents and openings of the unit.
Do not spill any liquids on the projector or into the vents or openings of the unit.
Always remove the lens cap before switching on the projector. If the lens cap is not removed, it
may melt due to the high energy light emitted through the lens. Melting the lens cap may
permanently damage the surface of the projection lens.
Do not look into the projection lens when the projector is switched on. The strong light may
permanently damage your eyesight.
Do not look into the laser beam when activated on the remote control. Laser light may
permanently damage your eyesight.
Do not point the laser beam at people.
Only place the projector on a stable surface, or mount it securely using an approved ceiling-
mount.
Do not drop the projector.
Always allow sufficient airflow through the projector. Never block any of the air vents. Never
cover the unit in any way while it is operation. Allow sufficient distance to walls and ceilings in
order to avoid overheating. Minimum safety distance to any side of the unit is 50 cm (20") in any
direction.
CAUTION! Hot air is exhausted from the side vent. Do not place objects that are sensitive to
heat nearer than 50cm (20") to the exhaust vent.
4
Page 10

3D perception C
Revision 3 User Manual
The projector is designed for indoor use only. Never operate the unit outdoors.
Do not operate the projector outside its temperature and humidity specifications, as this may
result in overheating and malfunctioning.
Only connect the projector to signal sources and voltages as described in the technical
specification chapter. Connecting to unspecified signal sources or voltages may lead to
malfunction and permanent damage of the unit.
Allow the unit to cool down for 60 minutes before lamp change.
OMPACTVIEW
SX25+
4.3 Mercury Vapour
The following information and warnings about potential health issues relate to mercury vapour.
This projector is using an extremely bright UHP™ lamp for illumination to attain the desired high
brightness image.
This technology is similar to other high-pressure discharge lamps that are extensively used in
cars, street lights and other lighting appliances today. These lamps, like fluorescent lighting,
contain small amounts of mercury. The amount of mercury present in a lamp is far below the
limits of danger set by the authorities.
It is very important that lamps containing mercury are treated properly to minimize potential
health hazards.
The UHP™ lamp, like any other high brightness projector lamp, is under high-pressure when
operating. While the lamp and the projector are carefully designed to minimize the probability of
lamp rupture, the lamp may break while operating and small amounts of mercury vapor may be
emitted from the projector. The probability of rupture increases when the lamp reaches its
nominal life. It is therefore highly recommended that the lamp is replaced when the rated lifetime
is reached.
As a general precaution, secure good ventilation in the room when operating the projector. If
lamp rupture occurs, evacuate the room and secure good ventilation. Children and pregnant
women in particular should leave the room.
When replacing a worn lamp, dispose of the used lamp carefully by proper recycling.
Mercury is a naturally occurring, stable metallic element that may pose a safety risk to people
under certain conditions. According to the Public Health Statement for Mercury published by the
Agency for Toxic Substances and Disease Registry ("ATSDR", part of the United States
Public Health Service), the brain, central nervous system and kidneys are sensitive to the
effects of mercury, and permanent damage can occur at sufficiently high levels of exposure.
5
Page 11

3D perception C
Revision 3 User Manual
Acute exposure to high concentrations of mercury vapor can cause conditions such as lung and
airway irritation, tightness in the chest, a burning sensation in the lungs, coughing, nausea,
vomiting and diarrhea. Children and fetuses are particularly sensitive to the harmful effects of
metallic mercury to the nervous system.
Seek medical attention if any of the above symptoms are experienced or if other unusual
conditions are experienced following lamp rupture.
OMPACTVIEW
SX25+
4.4 Remote Control Warning
Laser radiation class II product; wavelength 670nm; maximum output 1mW.
Remote control complies with applicable requirements of 21 CFR 1040.10 and 1040.11.
Remote control complies with applicable requirements of EN 60 825-1: 1994 + A11
6
Page 12

3D perception C
Revision 3 User Manual
OMPACTVIEW
SX25+
5. B
Be sure you have read the Safety and Warnings chapter in this manual before proceeding with
the set-up and use of the
Unpack the supplied parts and familiarize yourself with the various components.
Remove the lens cap from the projection lens. If you switch the projector on with the lens cap in
place, the lens cap may melt, damaging not only the lens cap itself, but also the projection lens
and surrounding parts.
EFORE SET-UP AND USE
C
OMPACTVIEW
SX25+
projector.
7
Page 13
3D perception C
Revision 3 User Manual
OMPACTVIEW
SX25+
6. O
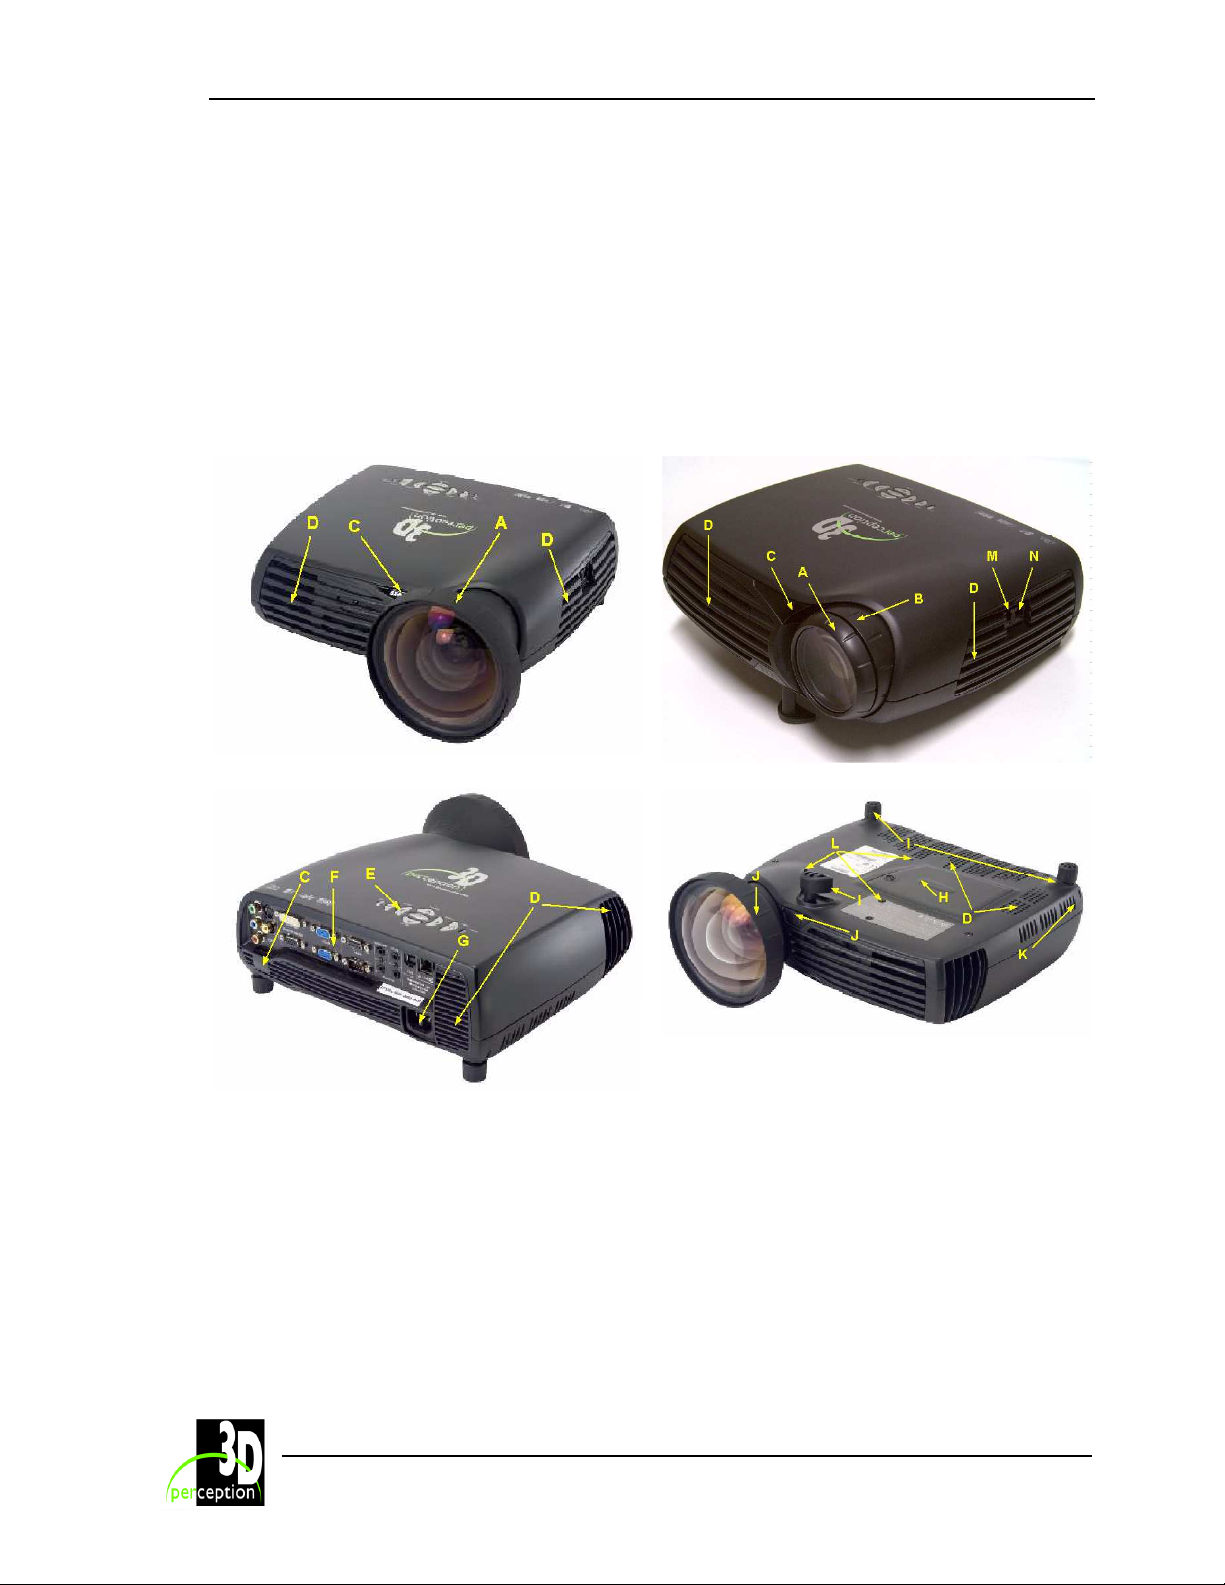
A. Focus ring
Zoom ring (optional lens)
B.
C. IR sensor
D. Ventilation
Keypad
E.
F. Connector panel
Power connector
G.
VERVIEW
Lamp house
H.
Adjustable foot
I.
Foot release
J.
Security lock
K.
Ceiling Mount
L.
Control Chain In
M.
Control Chain Out
N.
8
Page 14
3D perception C
Revision 3 User Manual
OMPACTVIEW
SX25+
7. K
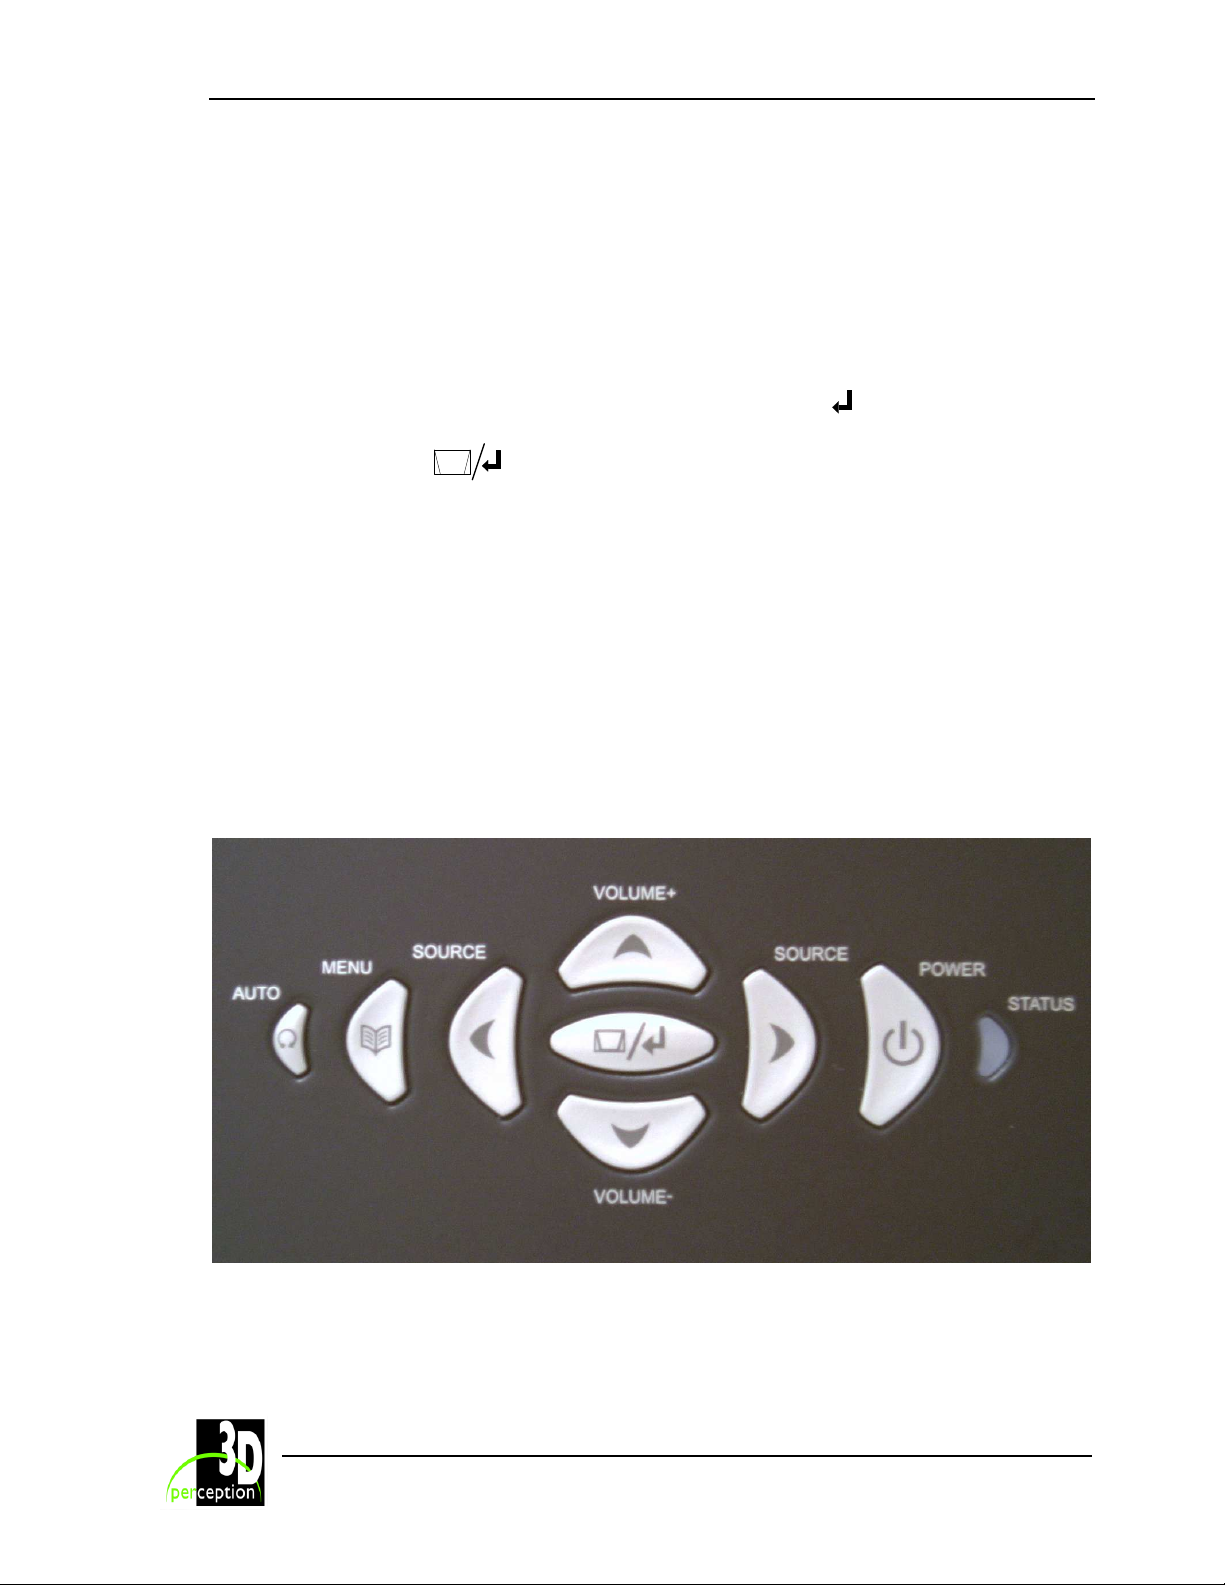
POWER
Switch the projector on and off.
AUTO
Automatically detect and synchronize to the signal source selected.
MENU
Activate the menu system. Use the four arrow keys to navigate and to activate.
SELECT/KEYSTONE
Select menu option when the menu system is activated. When the menu system is not in use
the menu button will activate the keystone correction. Use the four arrow keys to adjust
horizontally and vertically.
VOLUME +/-
Use these two arrow keys to adjust the volume when the keystone correction and the menu
system are not activated.
SOURCE
Use these two arrow keys to select the source when the keystone correction and the menu
system are not activated.
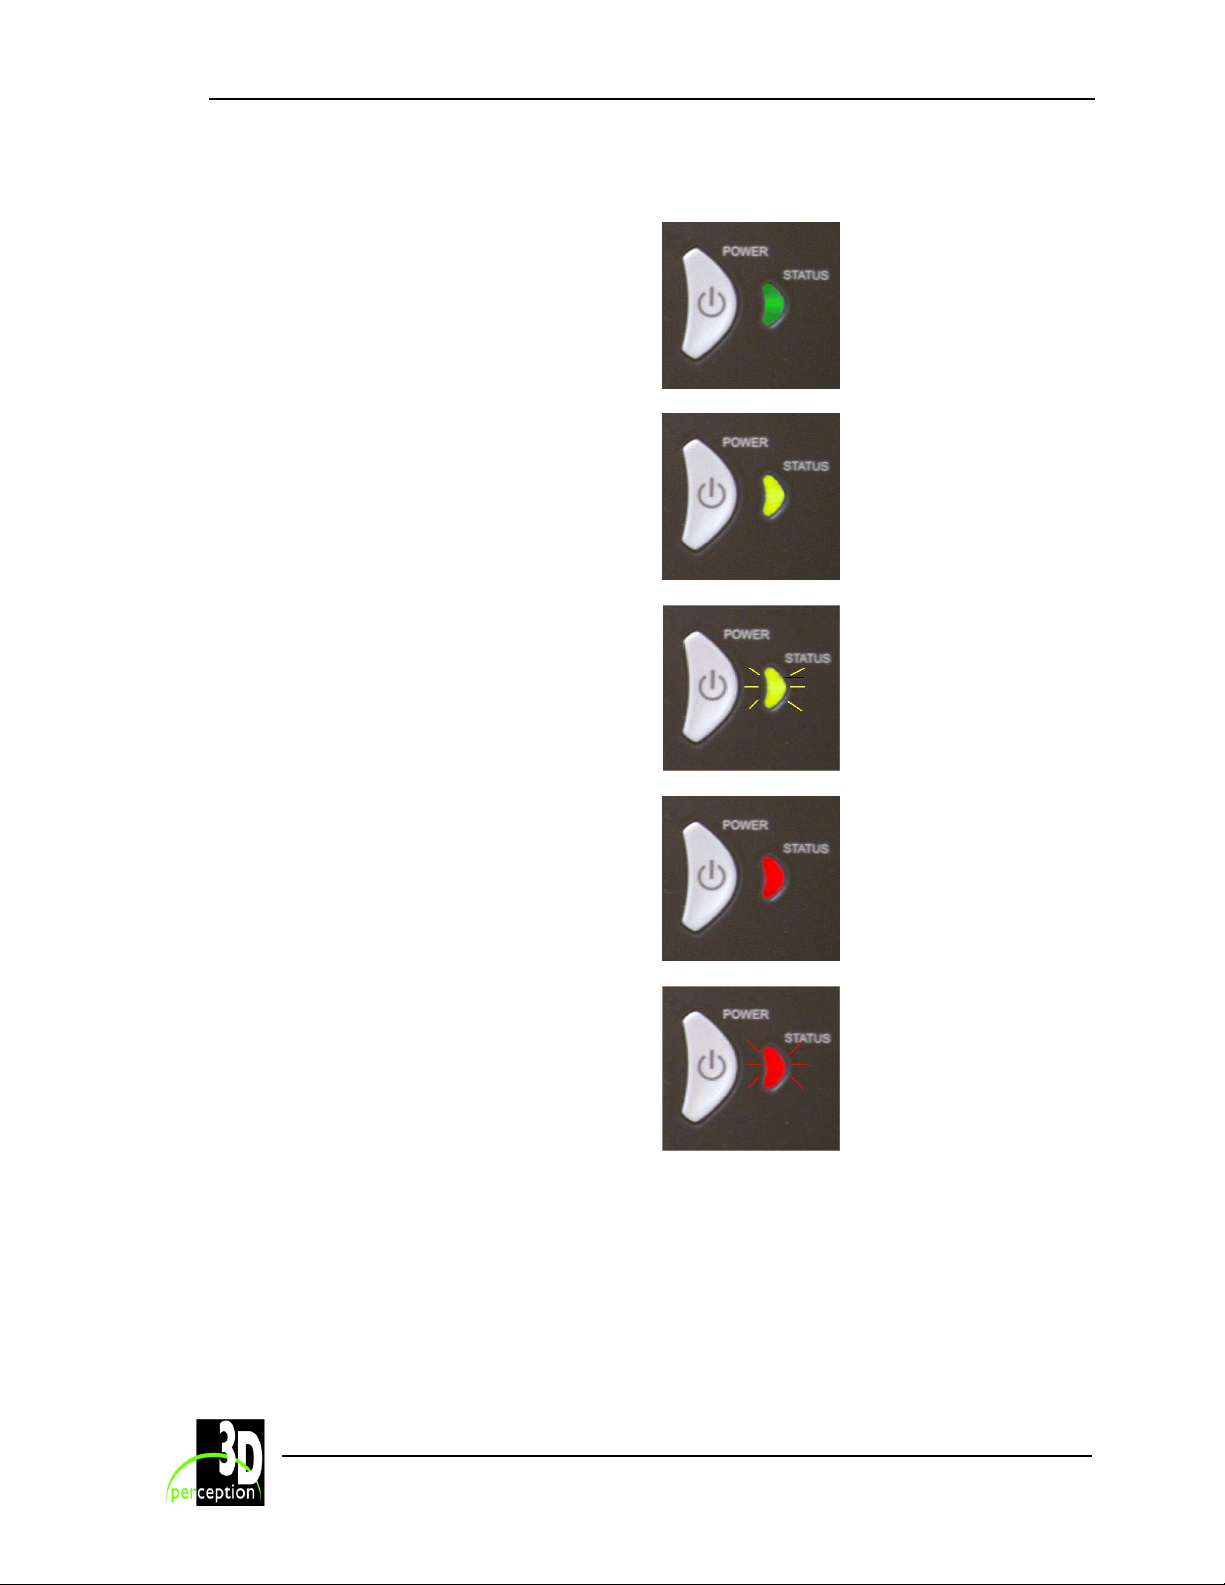
STATUS
This is not a key. The LED indicates the current projector status. See chapter Status for details.
EYPAD
9
Page 15
3D perception C
Revision 3 User Manual
OMPACTVIEW
SX25+
8. S
GREEN LIGHT
A permanent GREEN light indicates the
projector is turned on
TATUS
YELLOW LIGHT
A permanent YELLOW light indicates the
projector is either switched off or is in stand-by
mode.
YELLOW LIGHT FLASHING
A flashing yellow light indicates wait. The
yellow light will flash for a period of 10 -15
seconds after the power cord is connected and
for a period of 45 seconds after the projector
has been turned off.
RED LIGHT
A permanent RED light indicates it is time to
change the projection lamp. Failure to change
the lamp may lead to the lamp exploding.
RED LIGHT FLASHING
A flashing RED light indicates the projector is
overheated. Turn the projector off immediately.
Check if any air inlets are covered or if the
ambient temperature is outside specifications.
Do not remove the power cord.
10
Page 16
3D perception C
Revision 3 User Manual
OMPACTVIEW
SX25+
9. R
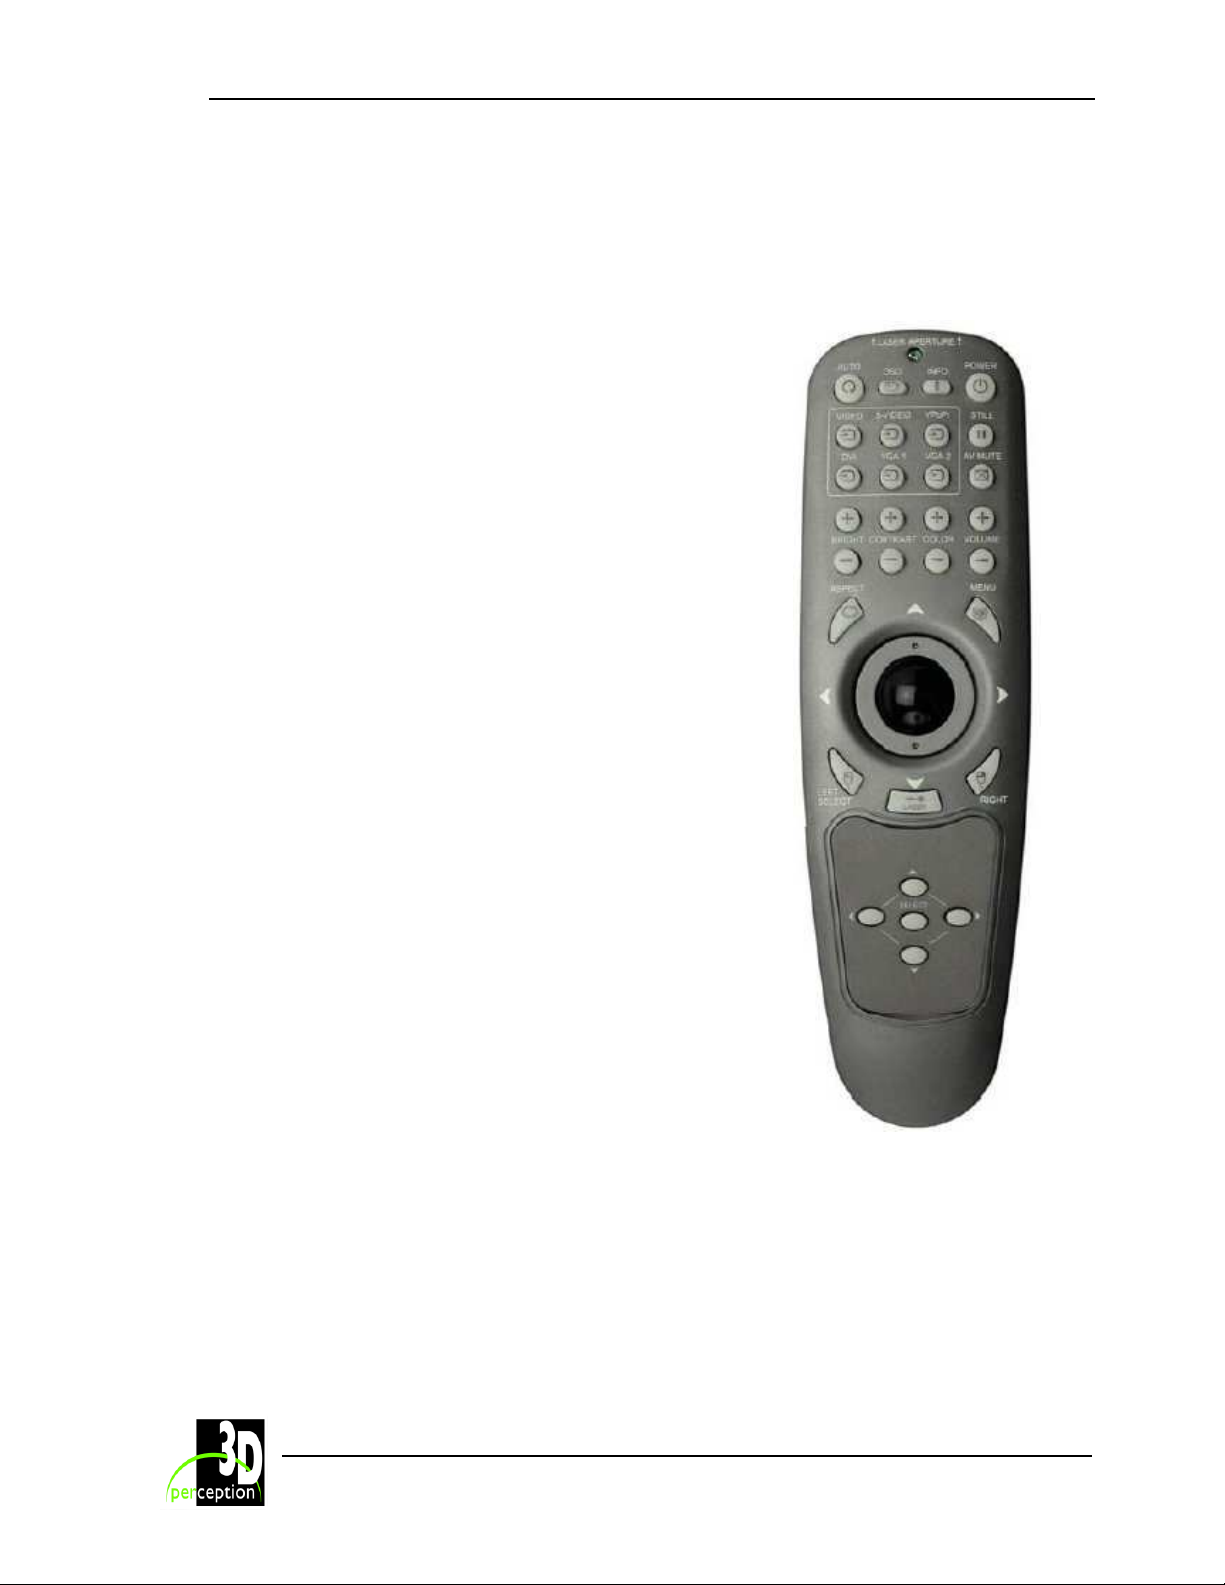
The remote control allows flexible access to the projector settings, either through direct keys, or
through the menu system. The remote control can be used to emulate the computer mouse
through the USB interface.
EMOTE CONTROL
POWER
Switches the projector between on and standby modes.
AUTO
Adjusting the projector to display a correct image,
including position, width, height, contrast, brightness
and overall stability.
OSD
Toggle On Screen Display (OSD) feedback on and off.
When on, all user commands are echoed on screen.
When off, user commands will not be echoed on
screen.
INFO
Displays source and projector status on screen.
VIDEO
Selects the composite video input as signal source
S-VIDEO
Selects the super video input as signal source
YPbPr
Selects component video input
DVI
Selects the DVI input
VGA 1
Selects the VGA 1 input
VGA 2
Selects the VGA 2 input
STILL
Toggles between live and still (frozen) image
AV MUTE
Toggles between live and no (muted) sound
11
Page 17
3D perception C
Revision 3 User Manual
OMPACTVIEW
SX25+
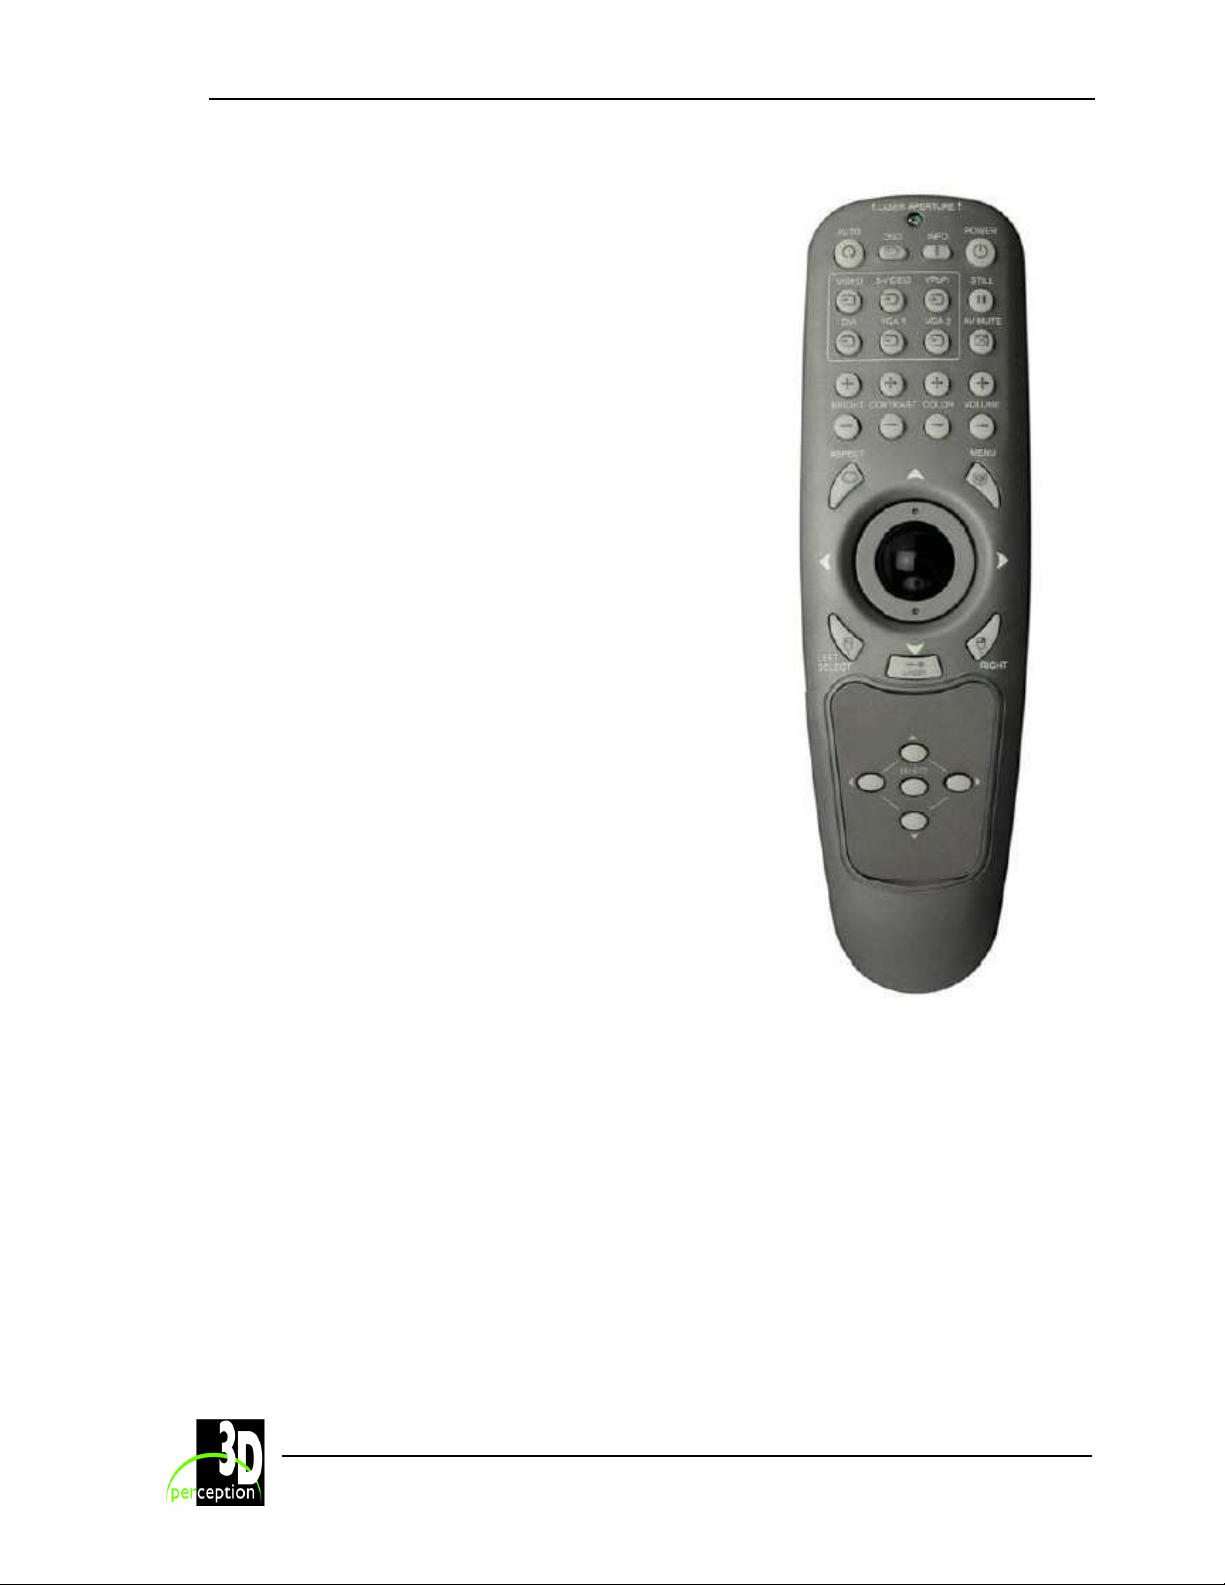
BRIGHT
Adjusts image brightness from dark to bright
CONTRAST
Adjusts the image contrast from soft to hard
COLOR
Adjusts the color of the image from pale to saturated
VOLUME
Adjusts the sound volume
ASPECT
Cycles through the aspect ratios available with the
current source
MENU
Toggles the menu system on and off
TRACKBALL
When USB cable is connected between PC and
projector, the trackball is used to move the mouse
pointer when not in the menu. Use the trackball to
navigate between options when in the menu.
LEFT/SELECT
Use as mouse LEFT key when not in the menu. Use as
SELECT key when in the menu
RIGHT
Use as mouse RIGHT key
LASER
Activates the built-in laser pointer.
CAUTION! Do not point laser beam at people. Do not
stare into laser beam.
ARROW KEYS
Use the four arrow keys as alternatives to the trackball
for menu navigation
SELECT
Select option in menu. Same function as
LEFT/SELECT above.
12
Page 18
3D perception C
Revision 3 User Manual
OMPACTVIEW
SX25+
10. C
ONNECTOR PANEL
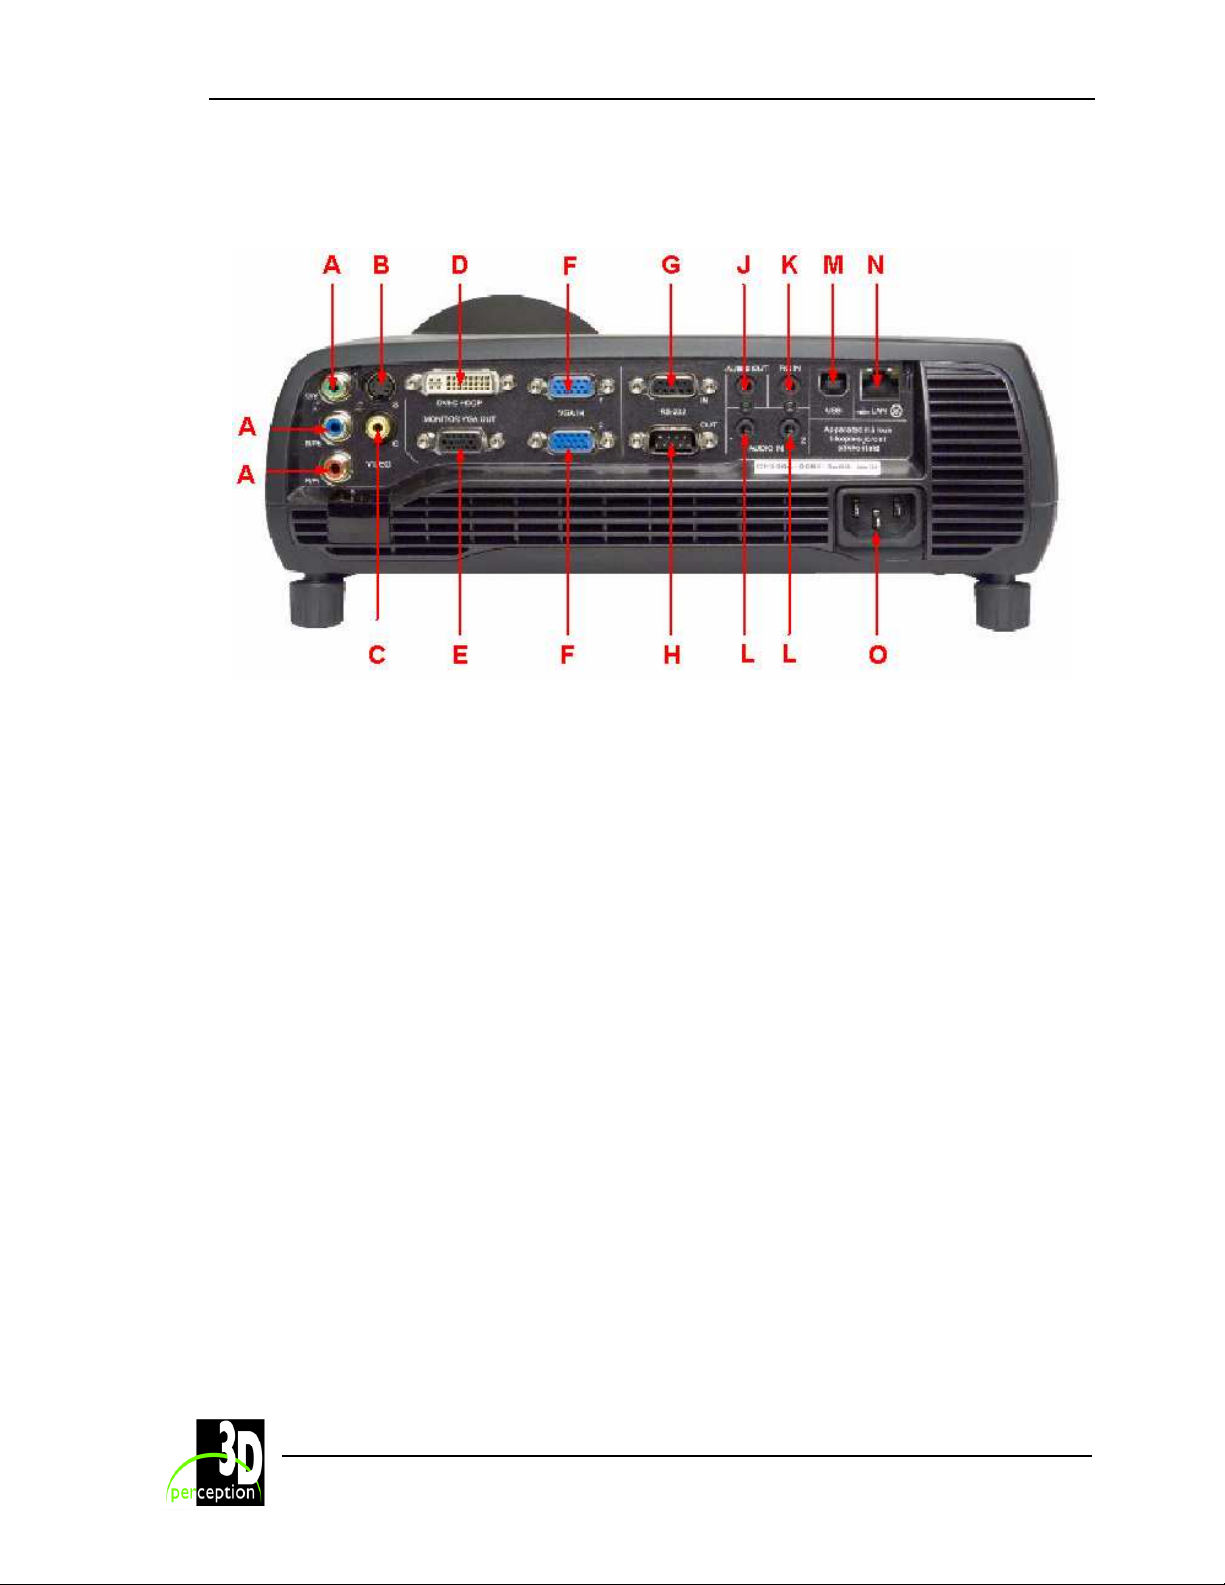
A. Component video In (YPbPr). Used for
high quality video reproduction.
B. Super video In. Used for improved
quality video.
. Composite video In. Used for standard
C
video quality.
D. DVI - Digital RGB. For a low noise
computer and video image.
E. Monitor VGA out: Allows for connection
to local VGA monitor or daisy-chaining of
several projectors using VGA. Works with
VGA inputs only.
F. VGA - Analogue RGB In (x 2). The
standard analogue computer graphics
interface.
. RS 232 control In. Allows for wired
G
remote control and monitoring of many
projector functions used in installation
environments.
H. RS 232 control Out. The secondary output
connector allows for daisy-chaining, enabling
both individual and global control and
monitoring of multiple projectors.
J. Audio Out. Connection to external audio
system.
. RC In. Allows connection of external IR
K
receiver or wired remote control.
L. Audio In (x 2). Allows for the connection of
up to two audio sources simultaneously.
M. USB interface. Allows for computer
mouse control.
N. LAN. Provides access to control and
monitoring over a Local Area Network
O. Mains power connector
13
Page 19
3D perception C
Revision 3 User Manual
OMPACTVIEW
SX25+
11. SET-
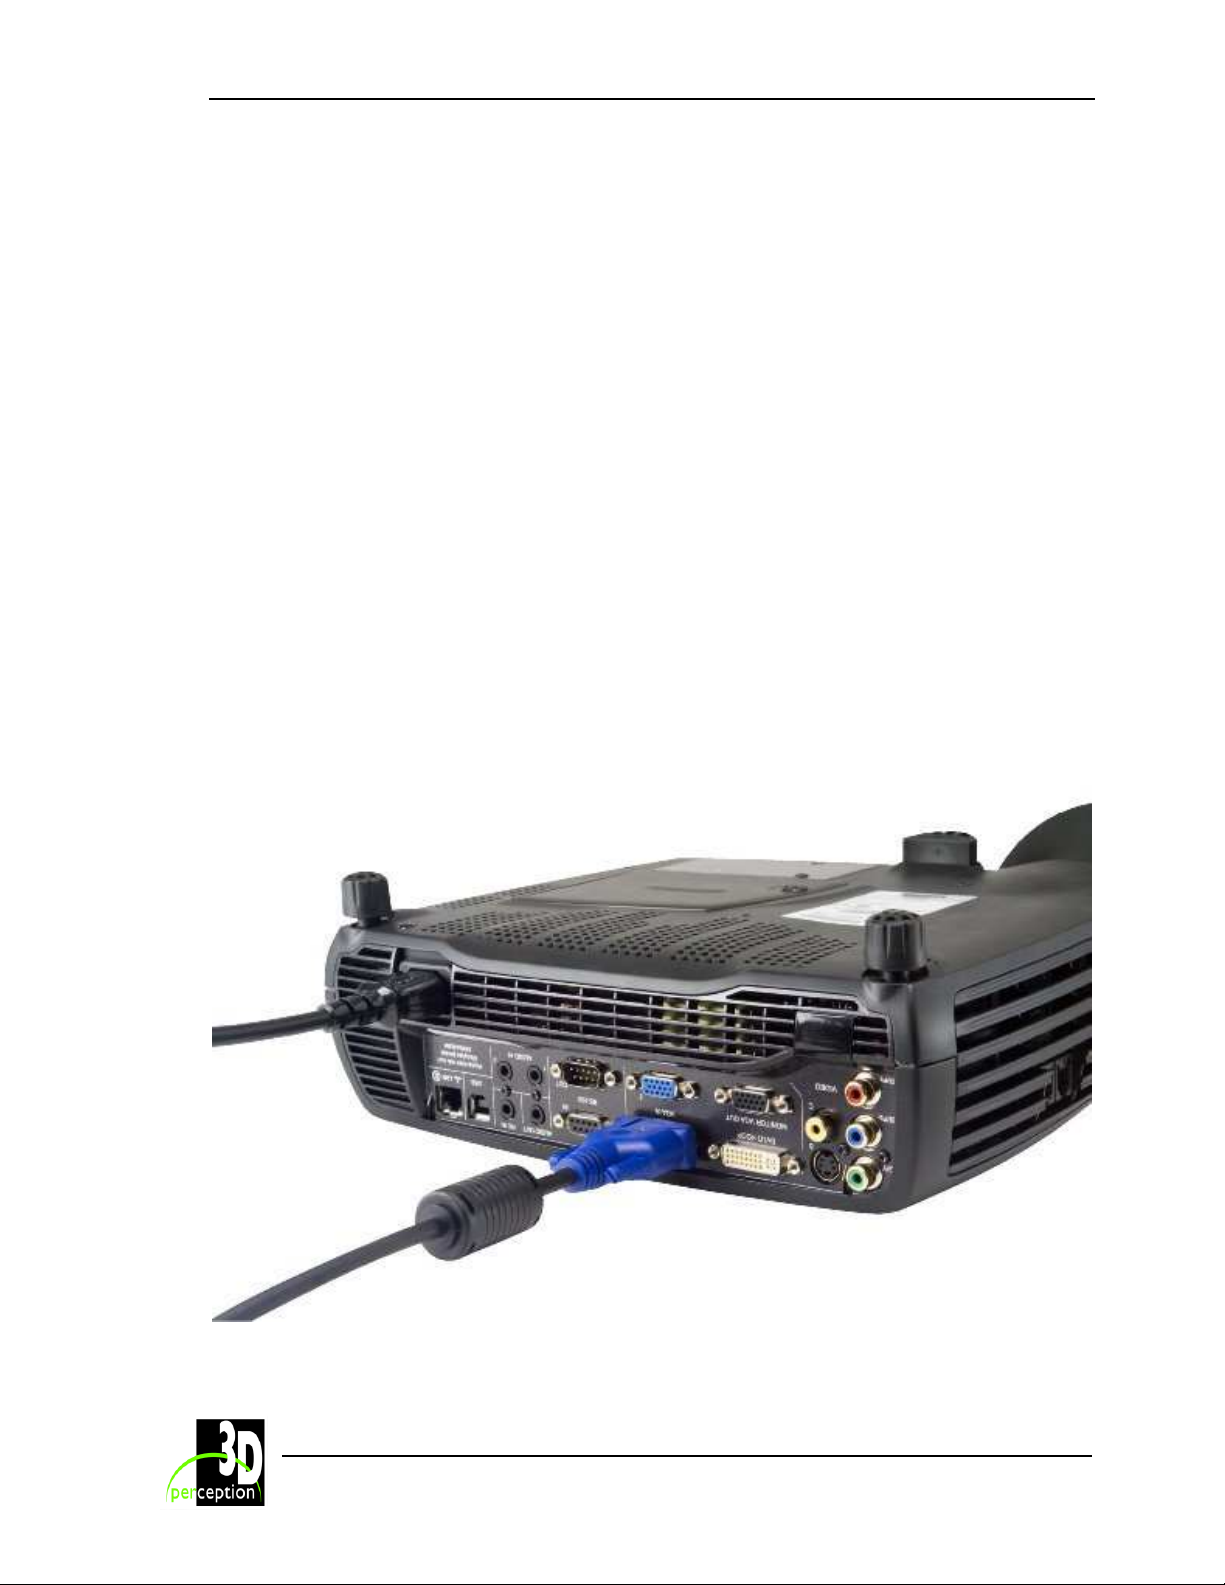
Before any set-up, switch off all equipment.
UP
11.1 Set-up computer
The projector may be connected to up to three computer sources simultaneously, using the
VGA and DVI inputs.
The VGA interface is analog and may cause some noise in the projected image, depending on
the signal quality from the VGA graphics card in the computer and cabling.
The DVI (Digital Visual Interface) interface is all digital and will yield a projected image with very
low noise.
Connect the USB cable to allow for remote mouse control.
Connect the power cord.
Connect the RS232 interface to allow for individual or global control of multiple units in a daisy
chain configuration.
Connect the LAN connector for individual control and monitoring of multiple projectors over
LAN.
14
Page 20
3D perception C
Revision 3 User Manual
OMPACTVIEW
SX25+
11.2 Set-up Video
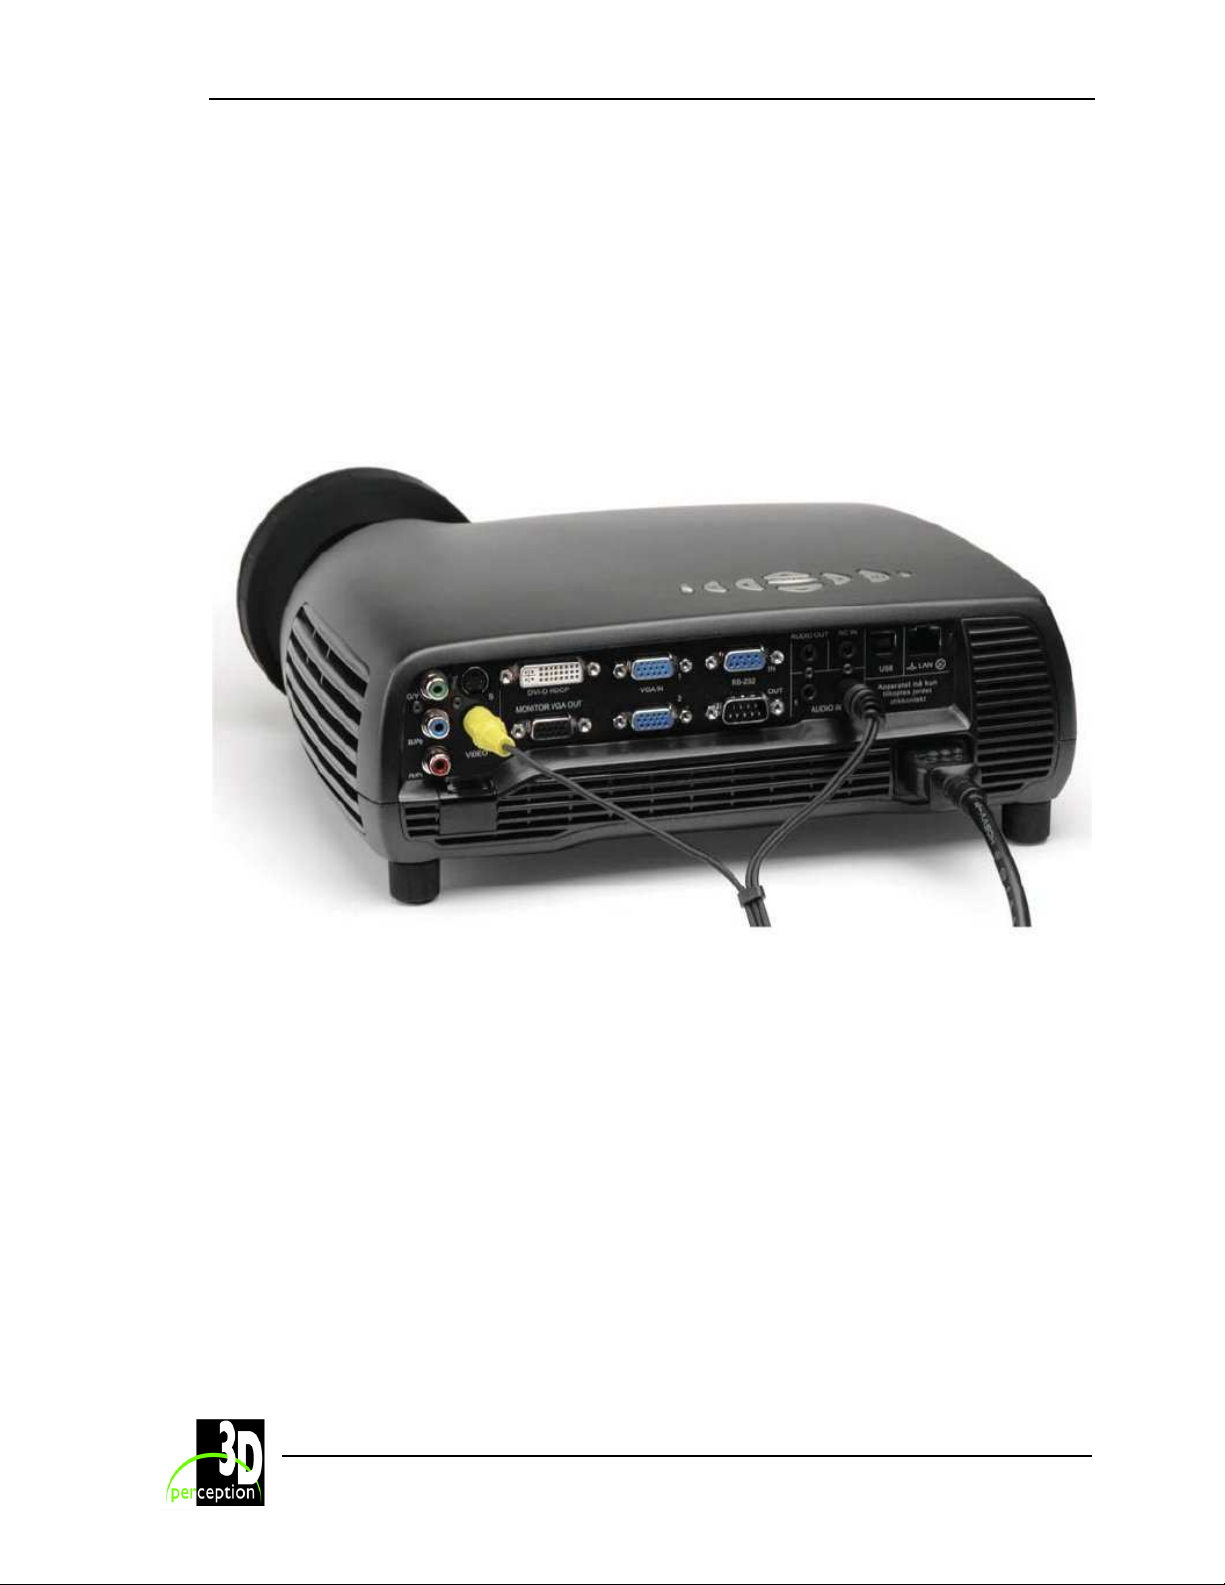
Three video sources may be connected, using the YPbPr (component), S-VIDEO (super video)
and VIDEO (composite video) inputs.
Component video will display more detailed images. Composite video yields images with less
detail.
In addition, the DVI-D input can be used with video sources (DVD player fitted with an HDCPTM
compliant DVI or HDMI connector) for a pure digital connection.
Connect the power cord.
15
Page 21
3D perception C
Revision 3 User Manual
OMPACTVIEW
SX25+
12. GCM - G
The GCM (Geometry Correction Module) facilitates, via CompactDesigner/CompactControl, the
special features unique to the 3D perception projection solutions. These include:
• Image warping
•
• Colour balance and matching
• Masks
For full details on achieving the effects of these features please read the
CompactDesigner/CompactControl User Manual.
The CompactView SX25+I is delivered with a GCM card inside it. The CompactView SX25+E
does not have a GCM card inside it, it has to been connected to a GCM card in a CompactUTM.
EOMETRY CORRECTION MODULE
Soft edge blending
12.1 Connecting the CompactView SX25+I
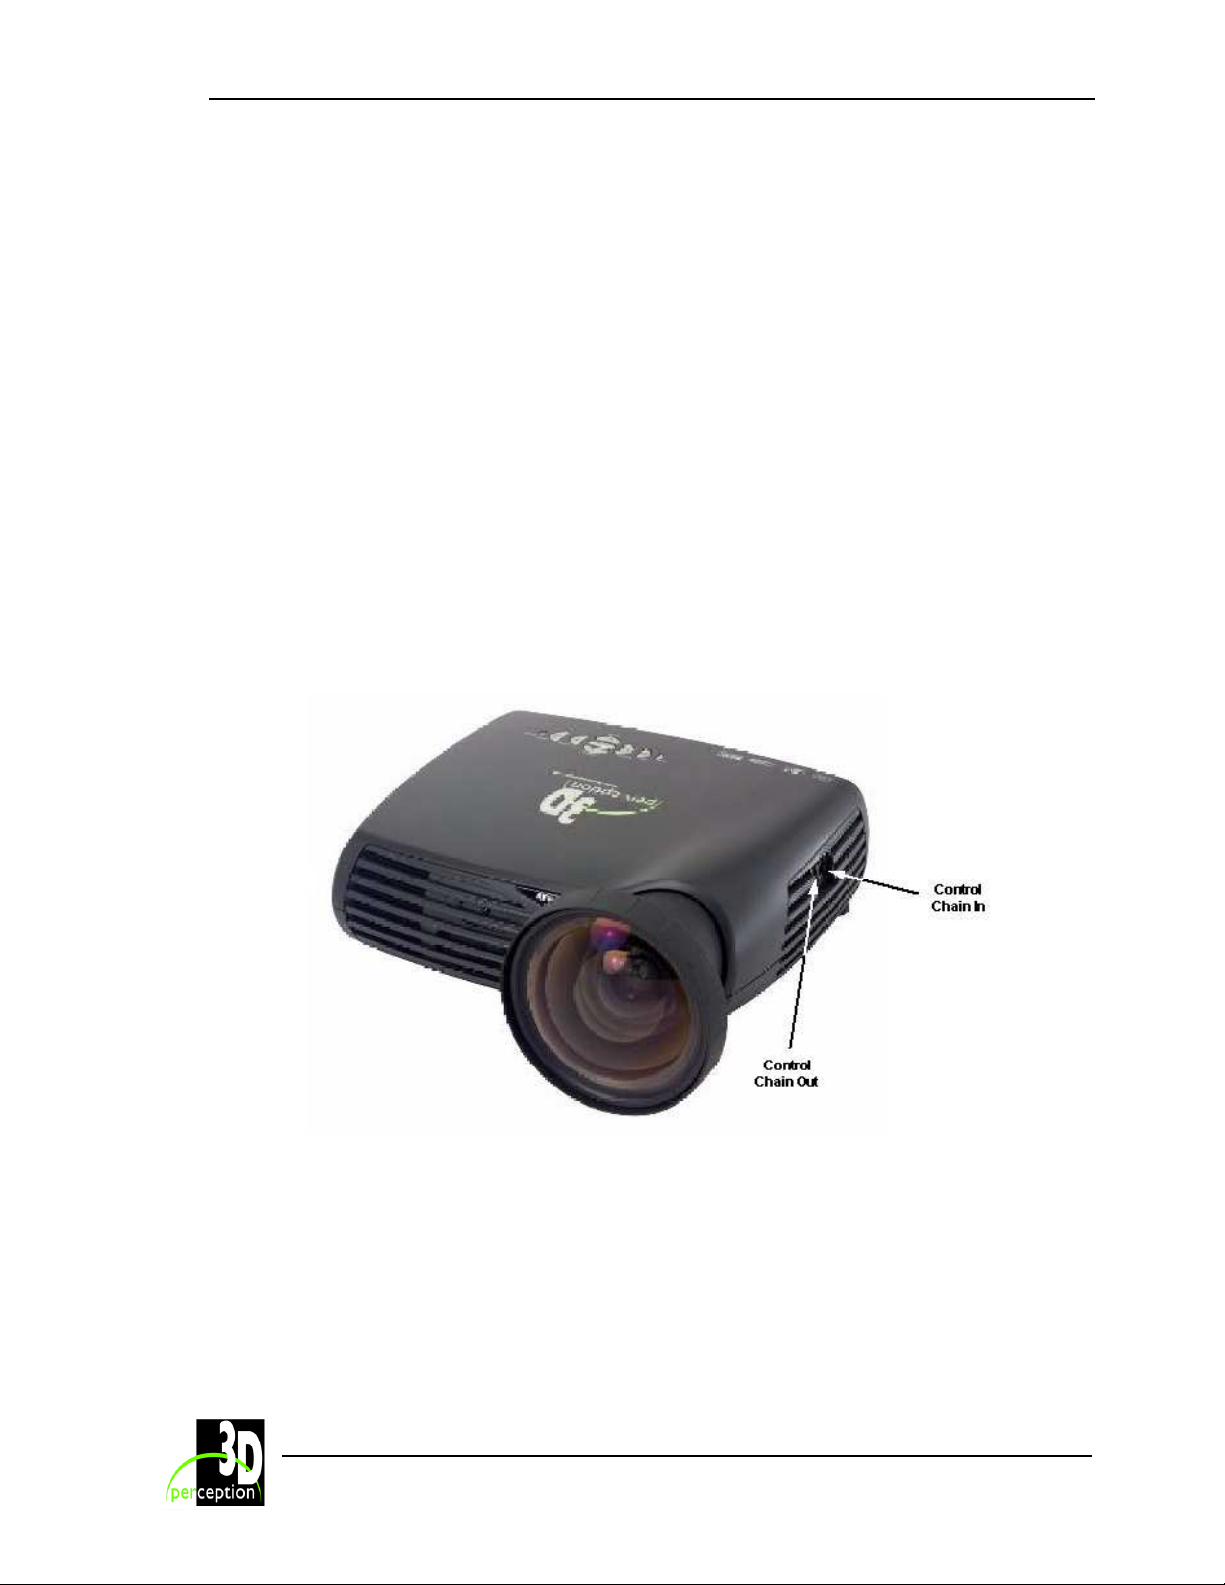
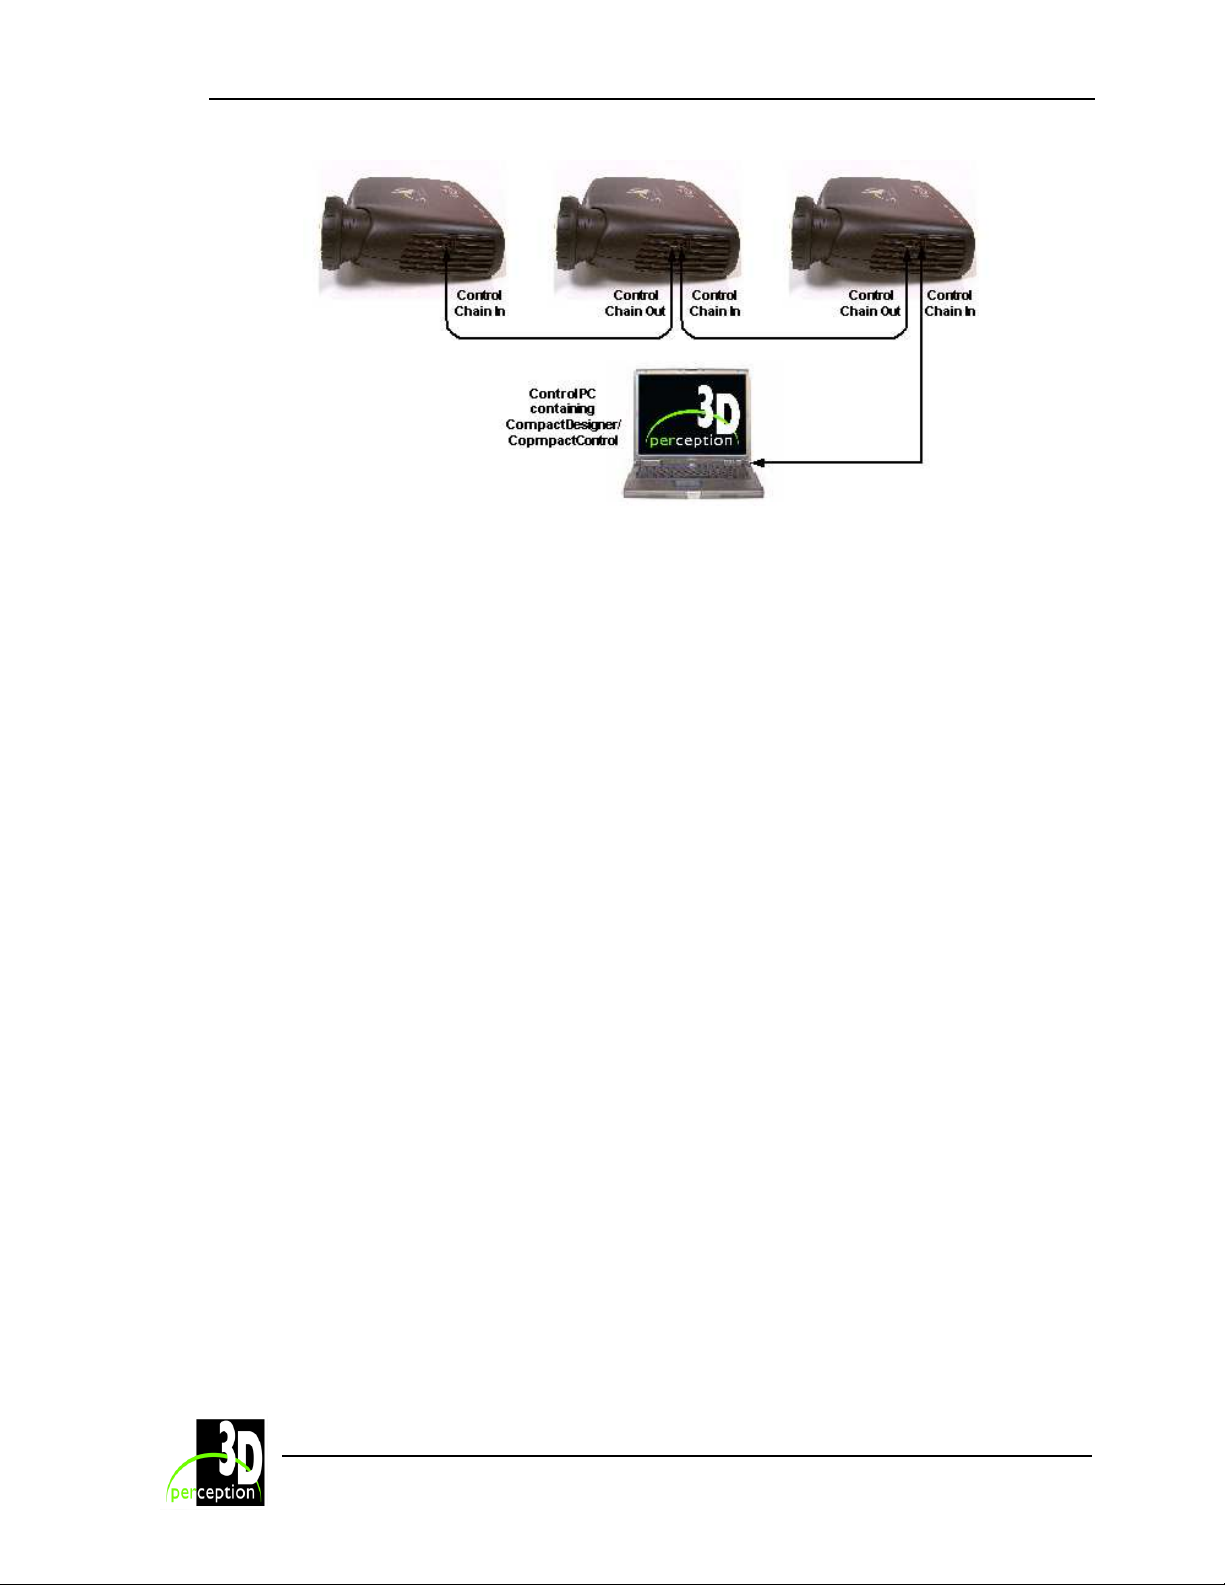
Connect the Control PC (running CompactDesigner or CompactControl) to the projectors
‘Control chain In’ port. The supplied 6 lead cable plugs into the Control PC’s serial port using a
RJ12 6 pin to serial DB-9 female adapter.
Connecting multiple projectors
Multiple projectors may be connected together in a ‘daisy chain’ by using the input and output
ports on each projector. From the first projector, another 6 lead cable connects between the
‘Control Chain Out’ port and the ‘Control Chain In’ port of the second projector. This chain can
be extended up to the theoretical limit of 255 projectors in a single chain.
16
Page 22
3D perception C
Revision 3 User Manual
OMPACTVIEW
SX25+
12.2 Connecting the CompactView SX25+E
The CompactView SX25+E must be connected to a channel in a CompactUTM. For full details
please see the CompactUTM basic/CompactUTM zer0 User Manual.
17
Page 23
3D perception C
Revision 3 User Manual
OMPACTVIEW
SX25+
13. F
OCUS AND ZOOM
13.1 Focus
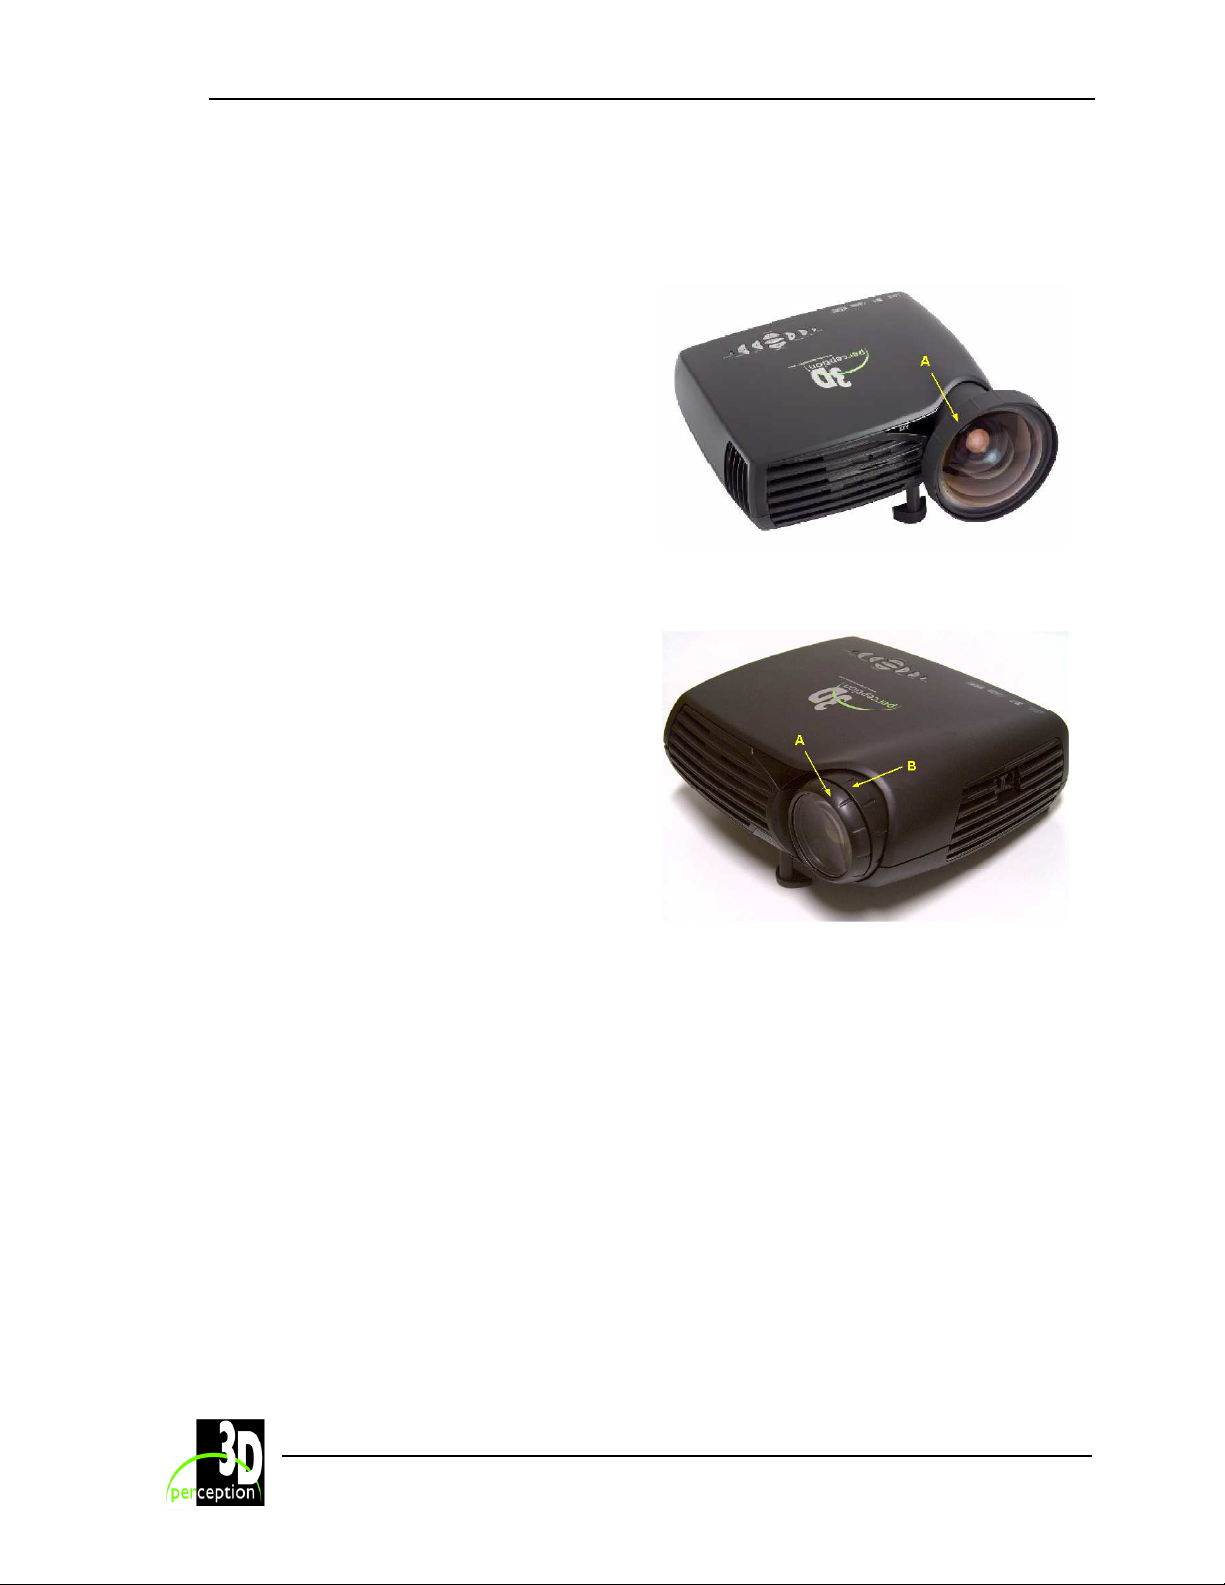
Turn the Focus ring (A) on the projection lens
to get a correctly focused image.
13.2 Zoom
Turn the Zoom ring (B) on the projection lens
to zoom In and Out. (This is only available on
the optional zoom lens.)
If the desired image size cannot be achieved
by adjusting the zoom ring, relocate the
projector nearer or farther away from the
projection screen and re-try.
18
Page 24
3D perception C
Revision 3 User Manual
OMPACTVIEW
SX25+
14. M
OUNTING THE PROJECTOR
14.1 To a Ceiling Mount
The projector can be ceiling mounted using any approved UL tested/listed ceiling mount fixture
with a minimum weight capacity of 12 kg (26 lbs).
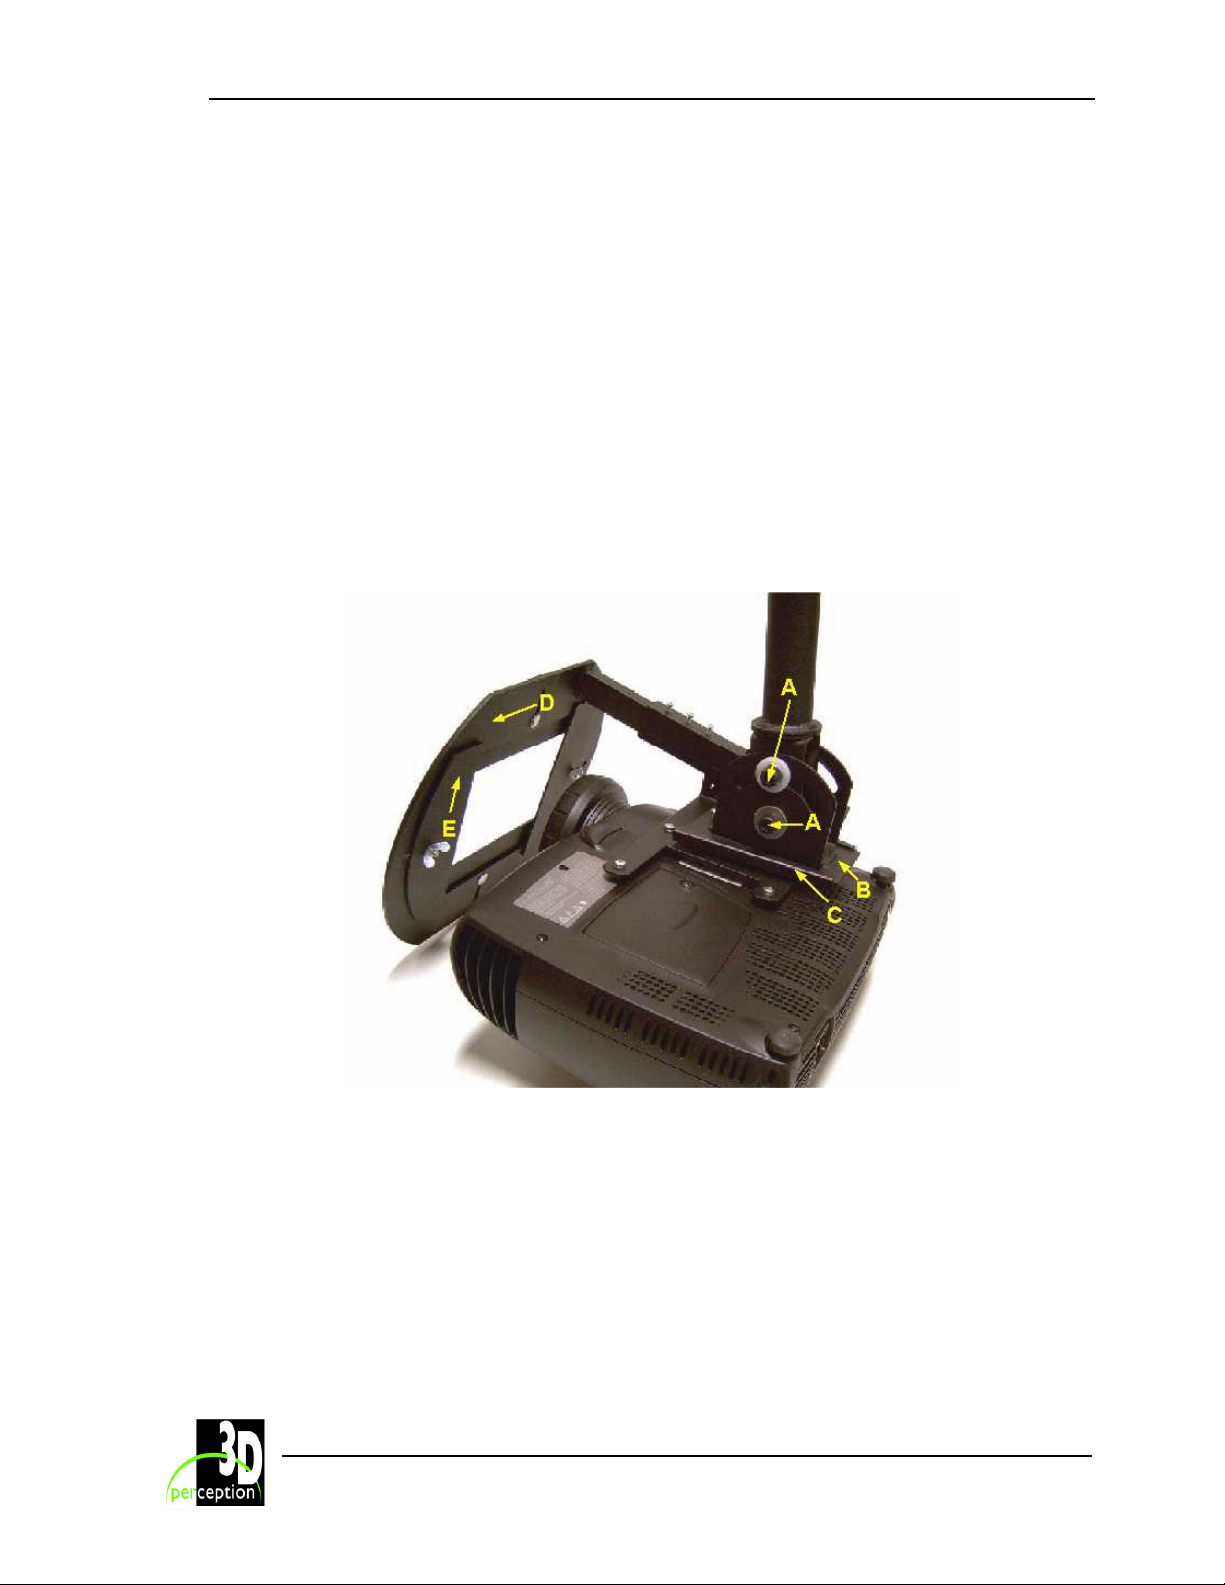
The ceiling mount obtainable through 3D perception (as illustrated below) is only approved for
C
OMPACTVIEW
For the ceiling mount use M4 screws provided.
For proper ventilation, the minimum distance from the ceiling/rear wall should be 30 - 50 cm, (12
- 20 inches).
The specifications and functionality of the product may change without prior notice.
projectors.
A Locking screws for vertical adjustment D Night aperture
B Slide E Adjustable flanges*
C Housing for slide
* Adjustable Flanges are not provided with the night aperture, they have to be manufactured by
individual users to suit their particular required shapes. Under normal circumstances it is
sufficient that the flanges are made from stiff paper or cardboard; in which case they can be
affixed to the night aperture with strong tape. Should it be deemed necessary to manufacture
metal flanges, they can be affixed to the night aperture with the bolts and wing nuts provided.
19
Page 25
3D perception C
Revision 3 User Manual
OMPACTVIEW
SX25+
14.2 To a Tabletop
The projector may be mounted or sited directly onto a tabletop.
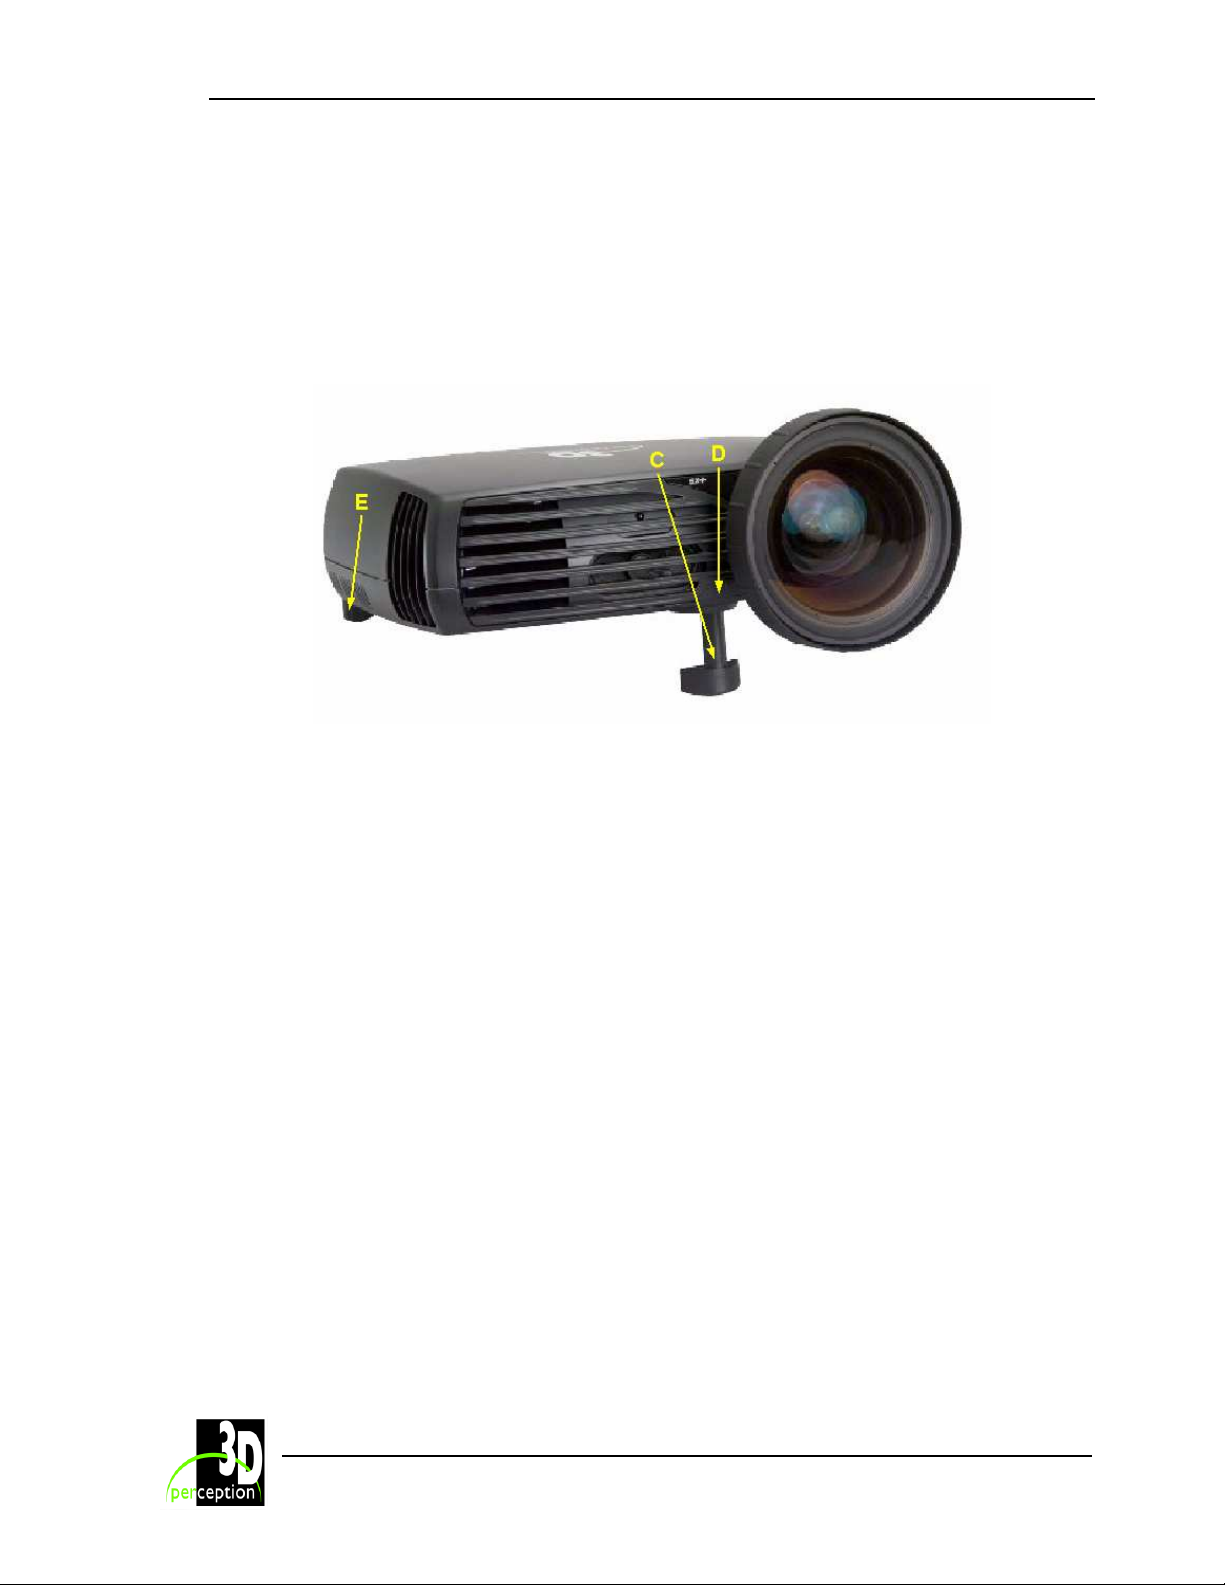
To adjust the projected image to the desired height on the screen, eject the front foot (C) by
pressing the release button (D), and adjust the angle to the right position.
To get an image level with the screen, turn the rear feet (E) to the right position.
NOTE: Although this method of mounting is suitable for temporary use such as demonstration
pruposes, is not recommended for permanent installations such as simulators.
20
Page 26

3D perception C
Revision 3 User Manual
OMPACTVIEW
SX25+
15. U
After set-up, switch on all equipment.
To switch the projector on, firmly press the POWER button on the keypad or the remote control.
The STATUS indicator will turn from yellow to green when the projector is switched on.
When only one source is connected, the projector will auto-detect the source. If more sources
are connected, the projector will display the source with the highest priority according to the
following list:
• VGA 1
• VGA 2
DVI
•
• Component
• Super video
• Composite video
Sound will follow the selected source. Select between the sources by pressing the SOURCE
buttons on the keypad or the remote control. Only sources that are active will be displayed.
If no source is active, the message “searching” will appear on the screen.
If no source is active for a long time, the projector will go into the standby mode. The projector
will be switched on if at least one source is activated/re-activated. Can be disabled in the menu.
See DPMS in the set up sub menu.
To switch the projector off, firmly press the POWER button on the keypad or the remote control
twice. The STATUS indicator will turn from green to flashing yellow, then to yellow when
switched off.
SING THE PROJECTOR
21
Page 27
3D perception C
Revision 3 User Manual
OMPACTVIEW
SX25+
16. M
The menu system gives access to a multitude of image and system controls.
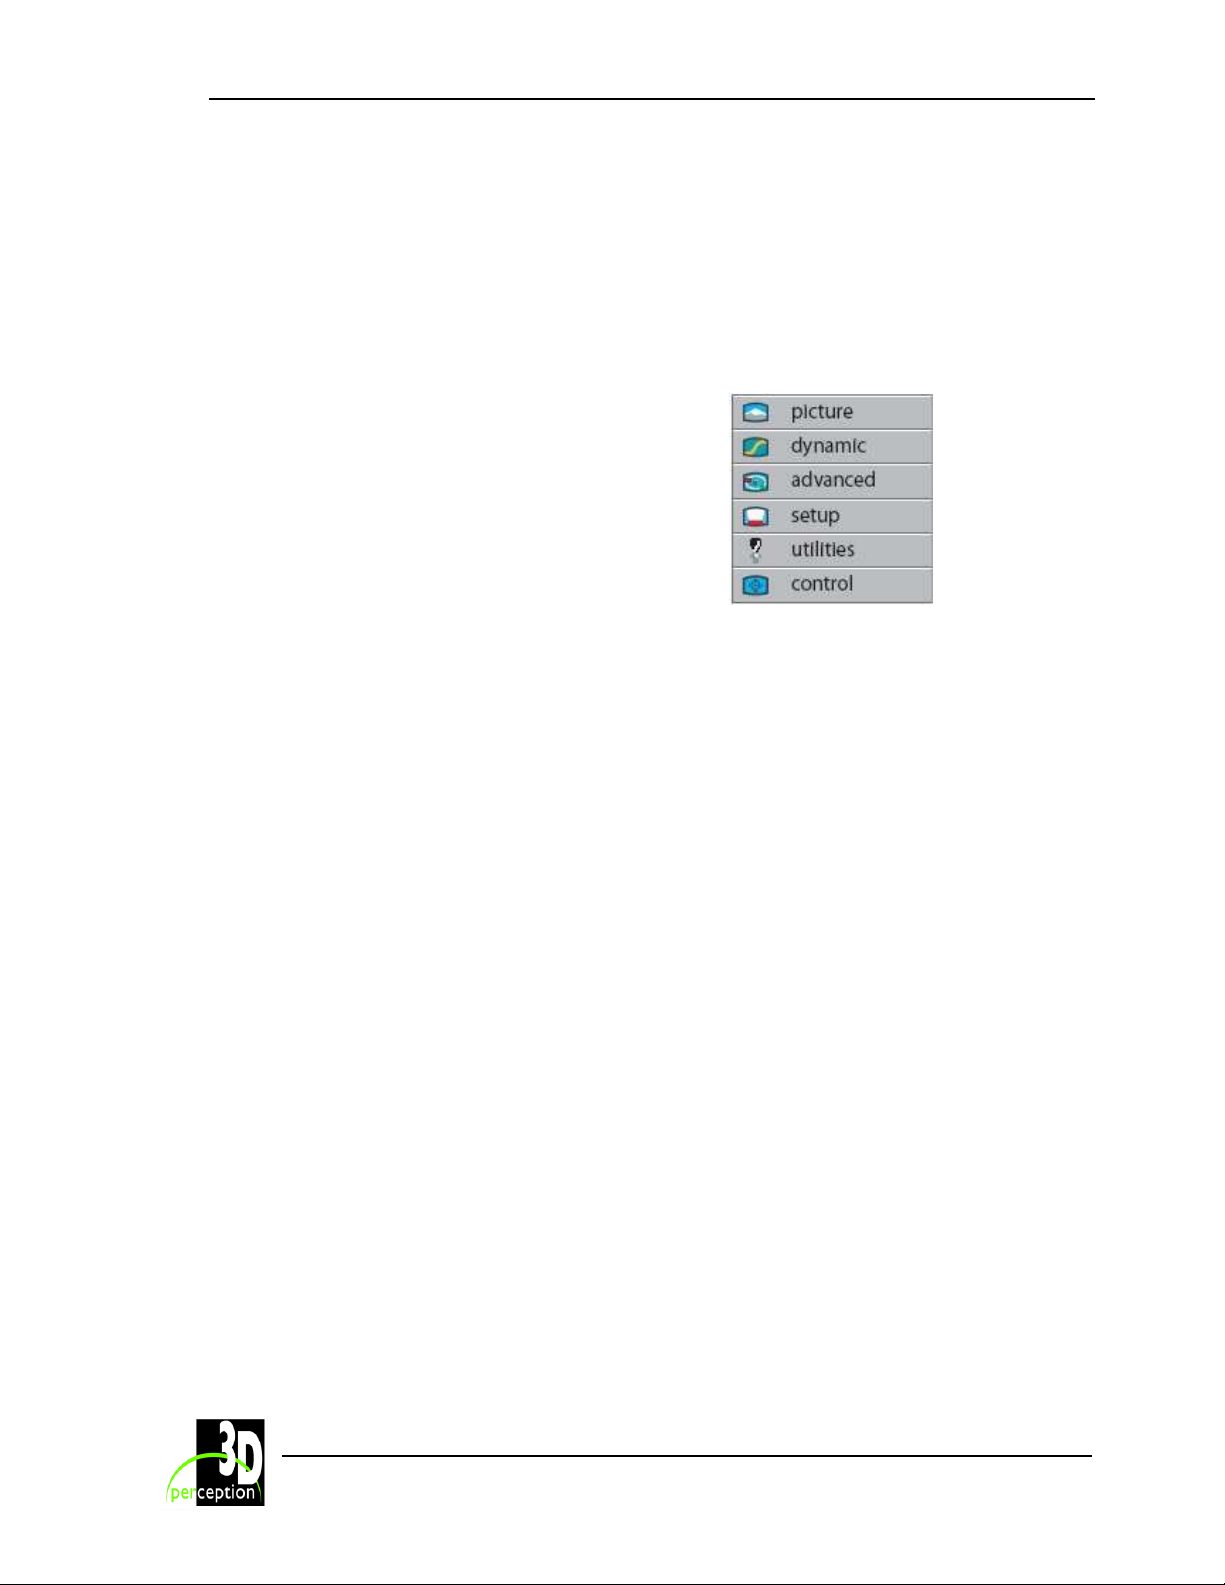
The menu system is structured through a top menu with several sub menus. The sub menus will
vary depending on the actual source selected.
ENU SYSTEM
Top Menu
picture:
Basic picture controls
dynamic:
Allows additional control over the
projected image.
advanced:
Advanced picture controls
setup:
General projector controls
utilities:
System controls and information
Control:
RS232, RIMI and LAN configurations
NOTE:
please refer to the CompactDesigner/CompactControl User Manual.
For full details on the setting up and functional use of the features of the GCM card,
22
Page 28
3D perception C
Revision 3 User Manual
OMPACTVIEW
SX25+
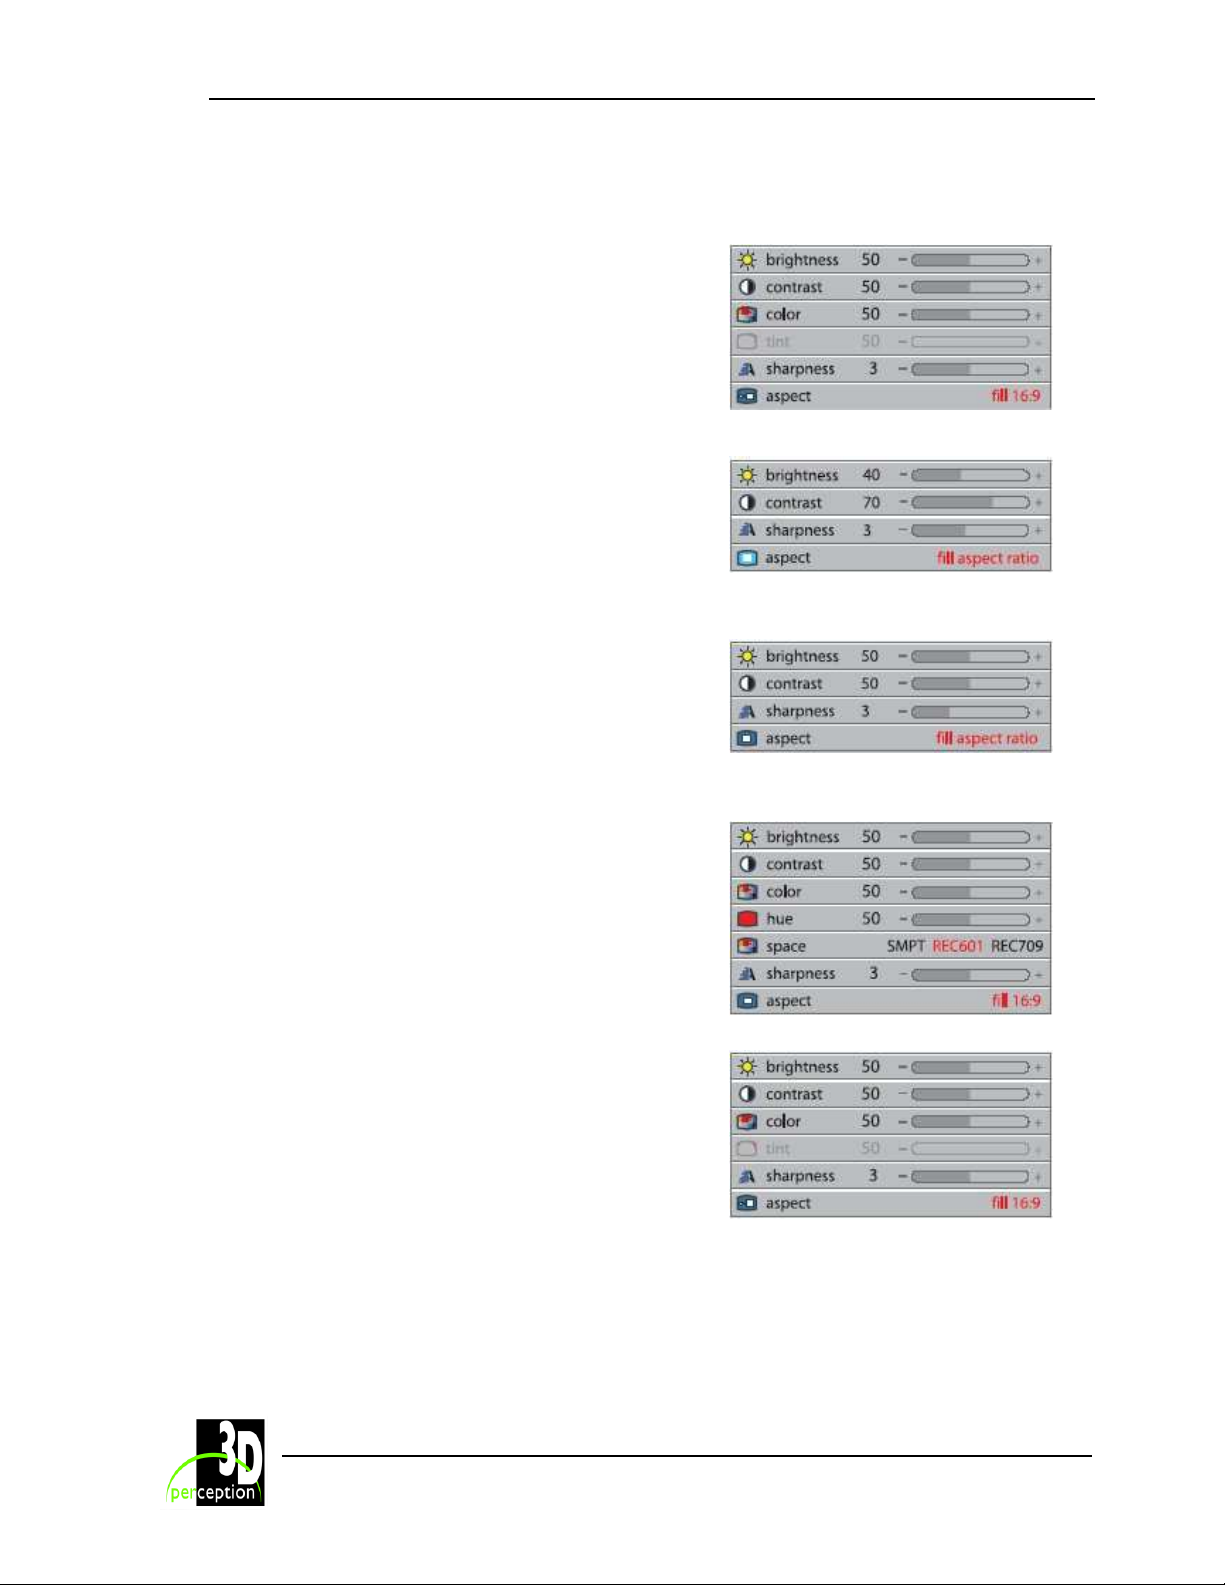
16.1 Picture Sub-menu
brightness
Adjusts the image brightness. A higher setting will
increase the brightness a lower setting will decrease
the brightness of the image.
contrast
Controls the contrast of the image. A higher setting
will yield a 'harder' image with larger difference
between shades, while a low setting will produce a
'softer' image with less difference between shades.
color
Adjusts the color saturation. A higher setting will
produce stronger coloring, while a lower setting will
yield paler colors.
tint
Adjusts the NTSC color tint. Applicable to NTSC
(American) video standard only. A higher setting will
yield a more reddish color scheme, while a lower
setting will turn colors more greenish.
hue
Controls the color hue
sharpness
Controls the image sharpness. A higher setting will
yield a harder image, with less filtering. In video
applications, this may produce more noise in the
projected image. A lower setting will soften the image,
looking more smeared out, and reducing the overall
noise.
aspect
Selects image format. An image may be displayed in
various aspect ratios. This function is used when
displaying source formats that differ from the
projectors native display format.
space
Defines the color standard used for component video
so that the image is displayed with the proper
characteristics.
S-VIDEO/COMPOSITE VIDEO
VGA
DVI
YPbPr (progressive)
YPbPr (interlaced)
23
Page 29
3D perception C
Revision 3 User Manual
OMPACTVIEW
SX25+
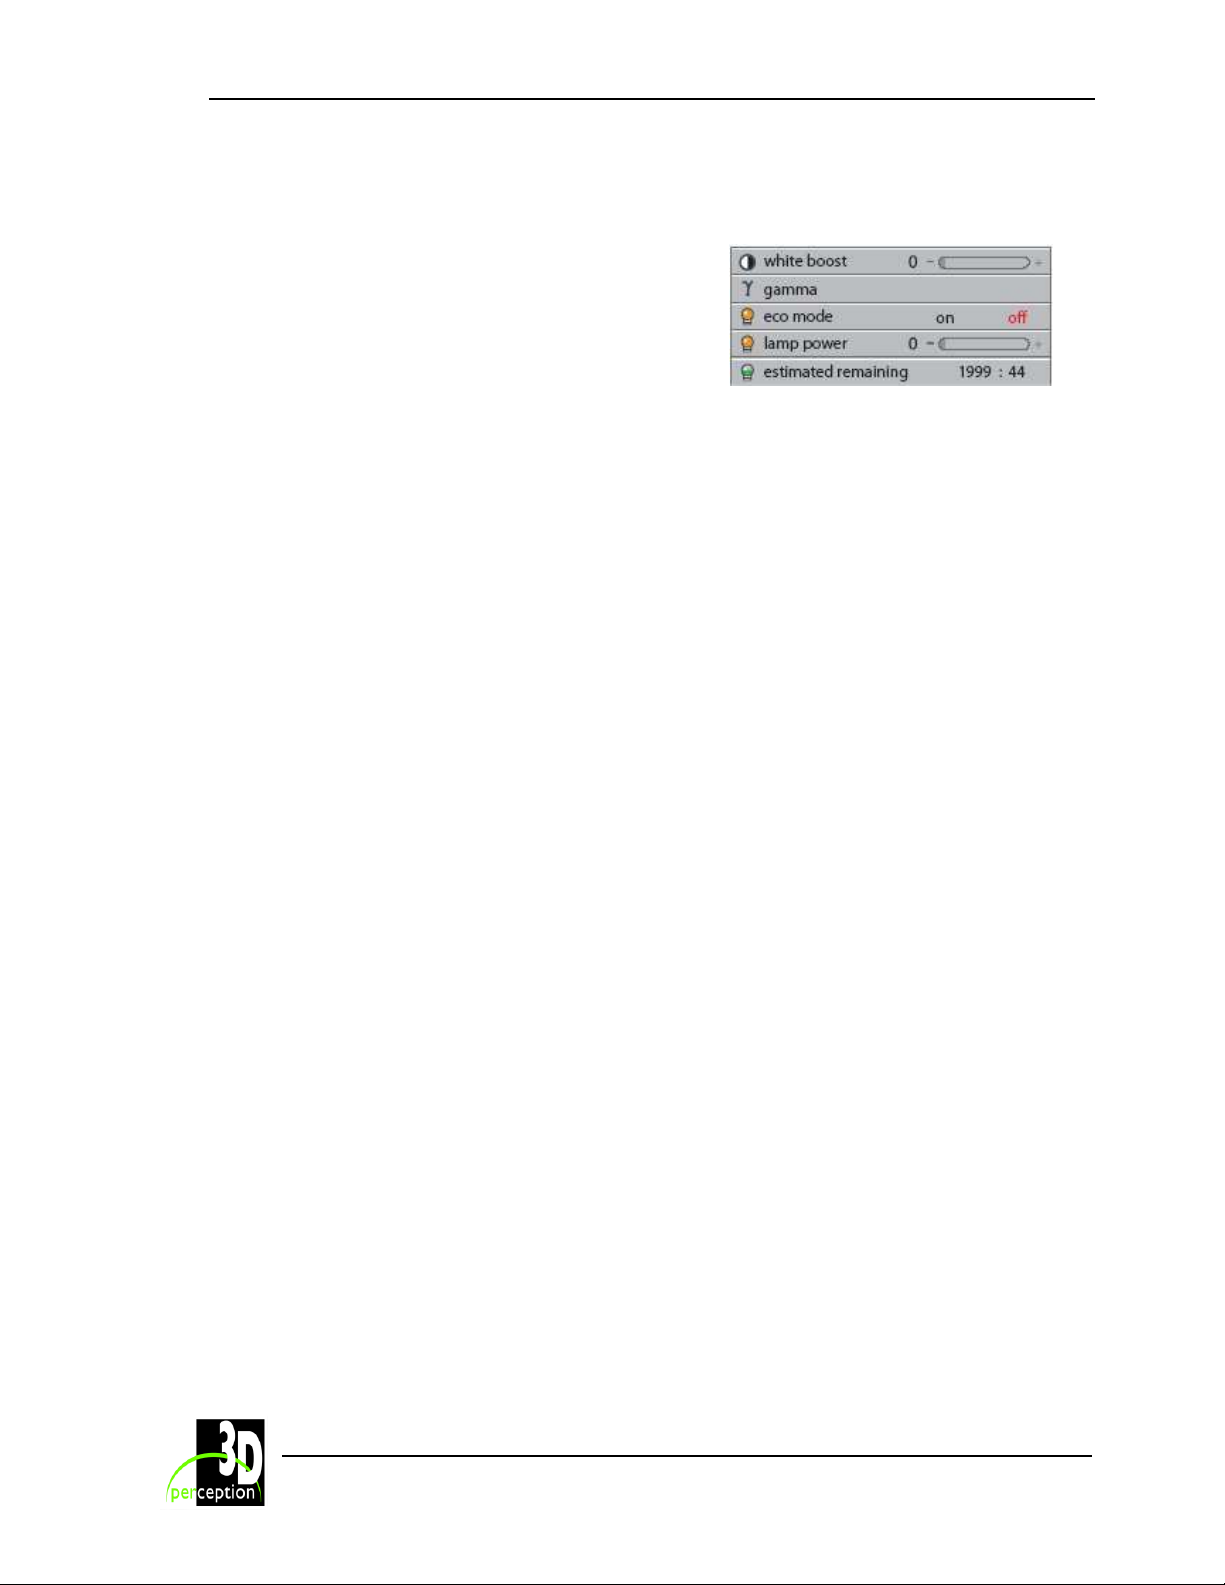
16.2 Dynamic Sub-menu
white boost
Increases the white level of the image for enhanced
contrast
gamma
The source image is adapted to characteristics typical
to certain applications. This enables an optimized
display of images, depending on whether the source
is video, computer etc.
eco mode
Reducing lamp power for maximum lamp life and
reduced power consumption
lamp power
Allows for continuously adjustable lamp power for
easier calibration of multiple screen set-ups.
estimated remaining
The estimated remaining lamp lifetime, depends on
the lamp power setting. Higher power yields less
lifetime and vice versa
FOR ALL
24
Page 30
3D perception C
Revision 3 User Manual
OMPACTVIEW
SX25+
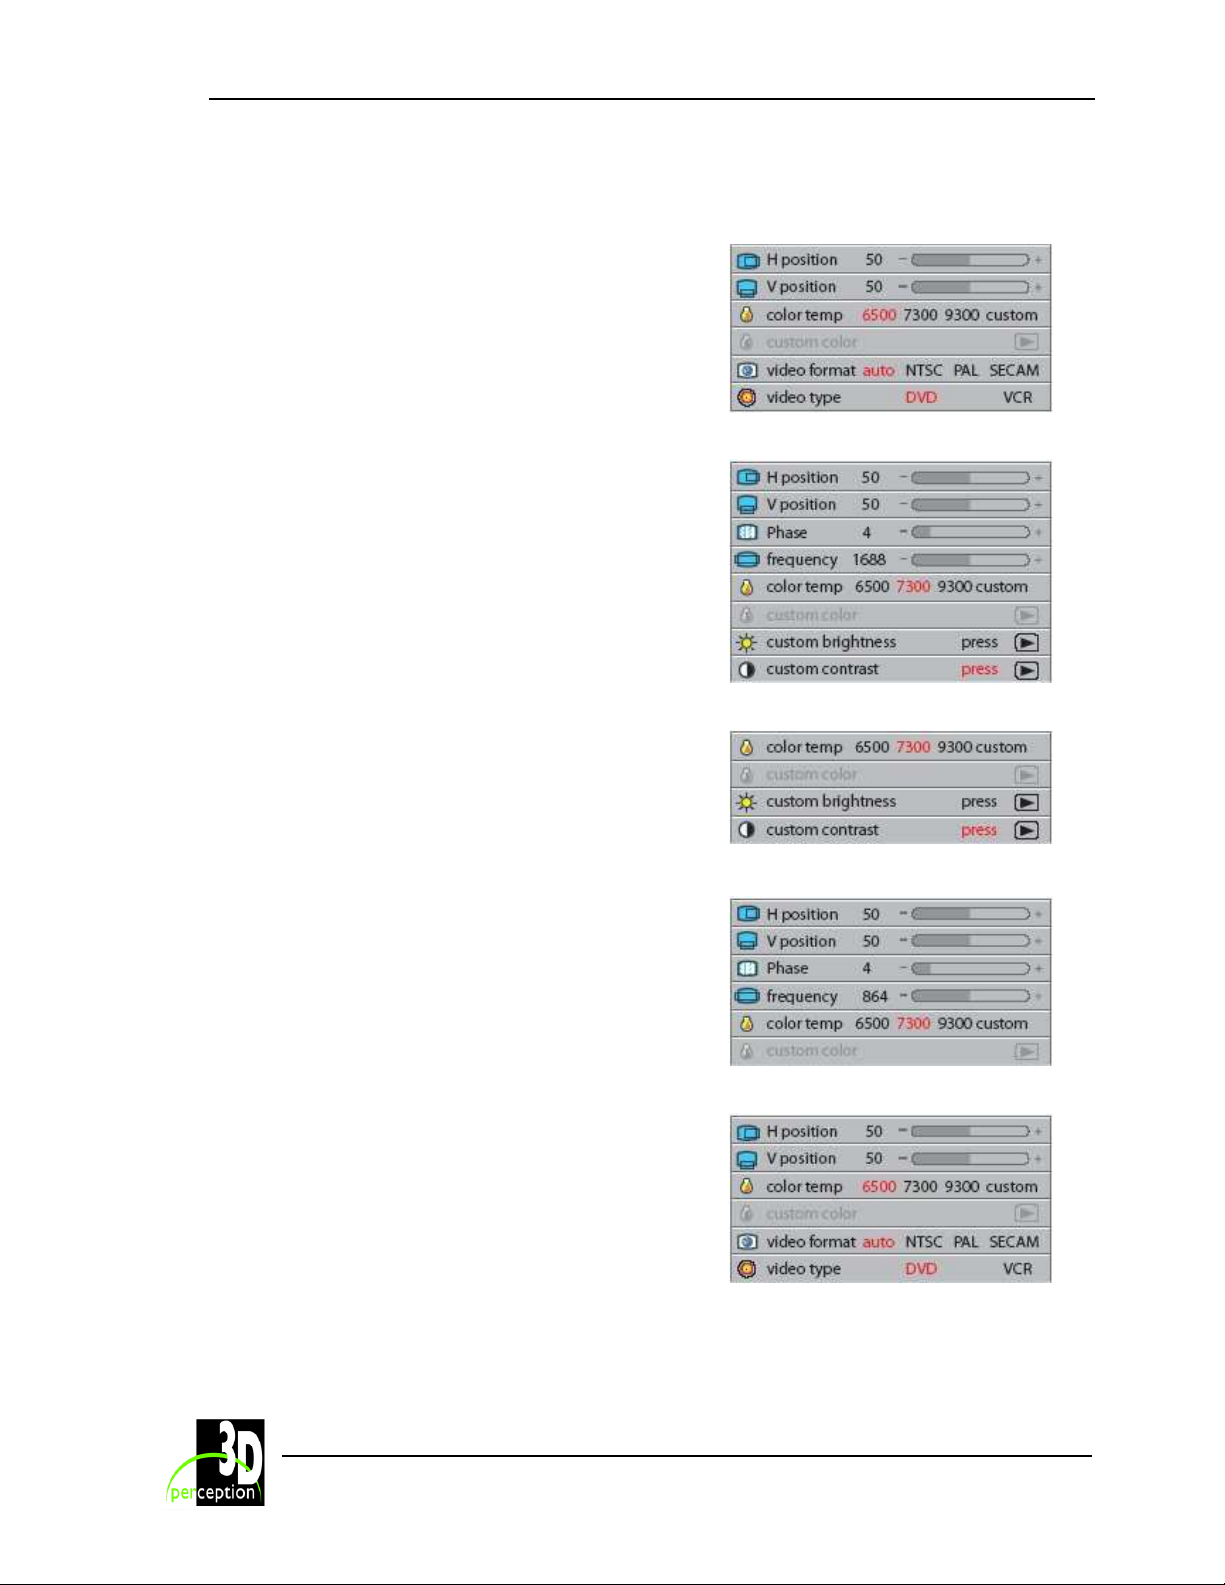
16.3 Advanced Sub-menu
h position
Shifts the image sideways.
v position
Shifts the image up and down.
phase
Adjust for stable image. A jittery image may appear
with certain VGA sources. You may also press the
AUTO button on the keypad or remote control to
optimize.
frequency
Adjust image width. An incorrect setting may produce
vertical, unstable bands in the image, and parts of the
image may not be displayed on screen. Push the
AUTO button to find a correct setting, or manually
adjust the frequency until the vertical bands
disappear.
color temp
Changes the color temperature. A video signal
demands a different color temperature than a
computer image. A higher setting yields a colder
(bluer) image, while a lower setting produces a
warmer (more yellow) image.
custom color
Defines custom color temperature. Lets you define
your own customized color temperature for your
specific application.
video format
Select between manual or auto detection of TV
standard.
video type
Select between video types; DVD and VCR. The DVD
setting is normally used and will yield well defined
video images.
custom brightness
Allows for individual user control of red, green and
blue brightness.
custom contrast
Allows for individual user control of red, green and
blue contrast.
S-VIDEO/COMPOSITE VIDEO
VGA
DVI
YPbPr (progressive)
YPbPr (interlaced)
25
Page 31
3D perception C
Revision 3 User Manual
OMPACTVIEW
SX25+
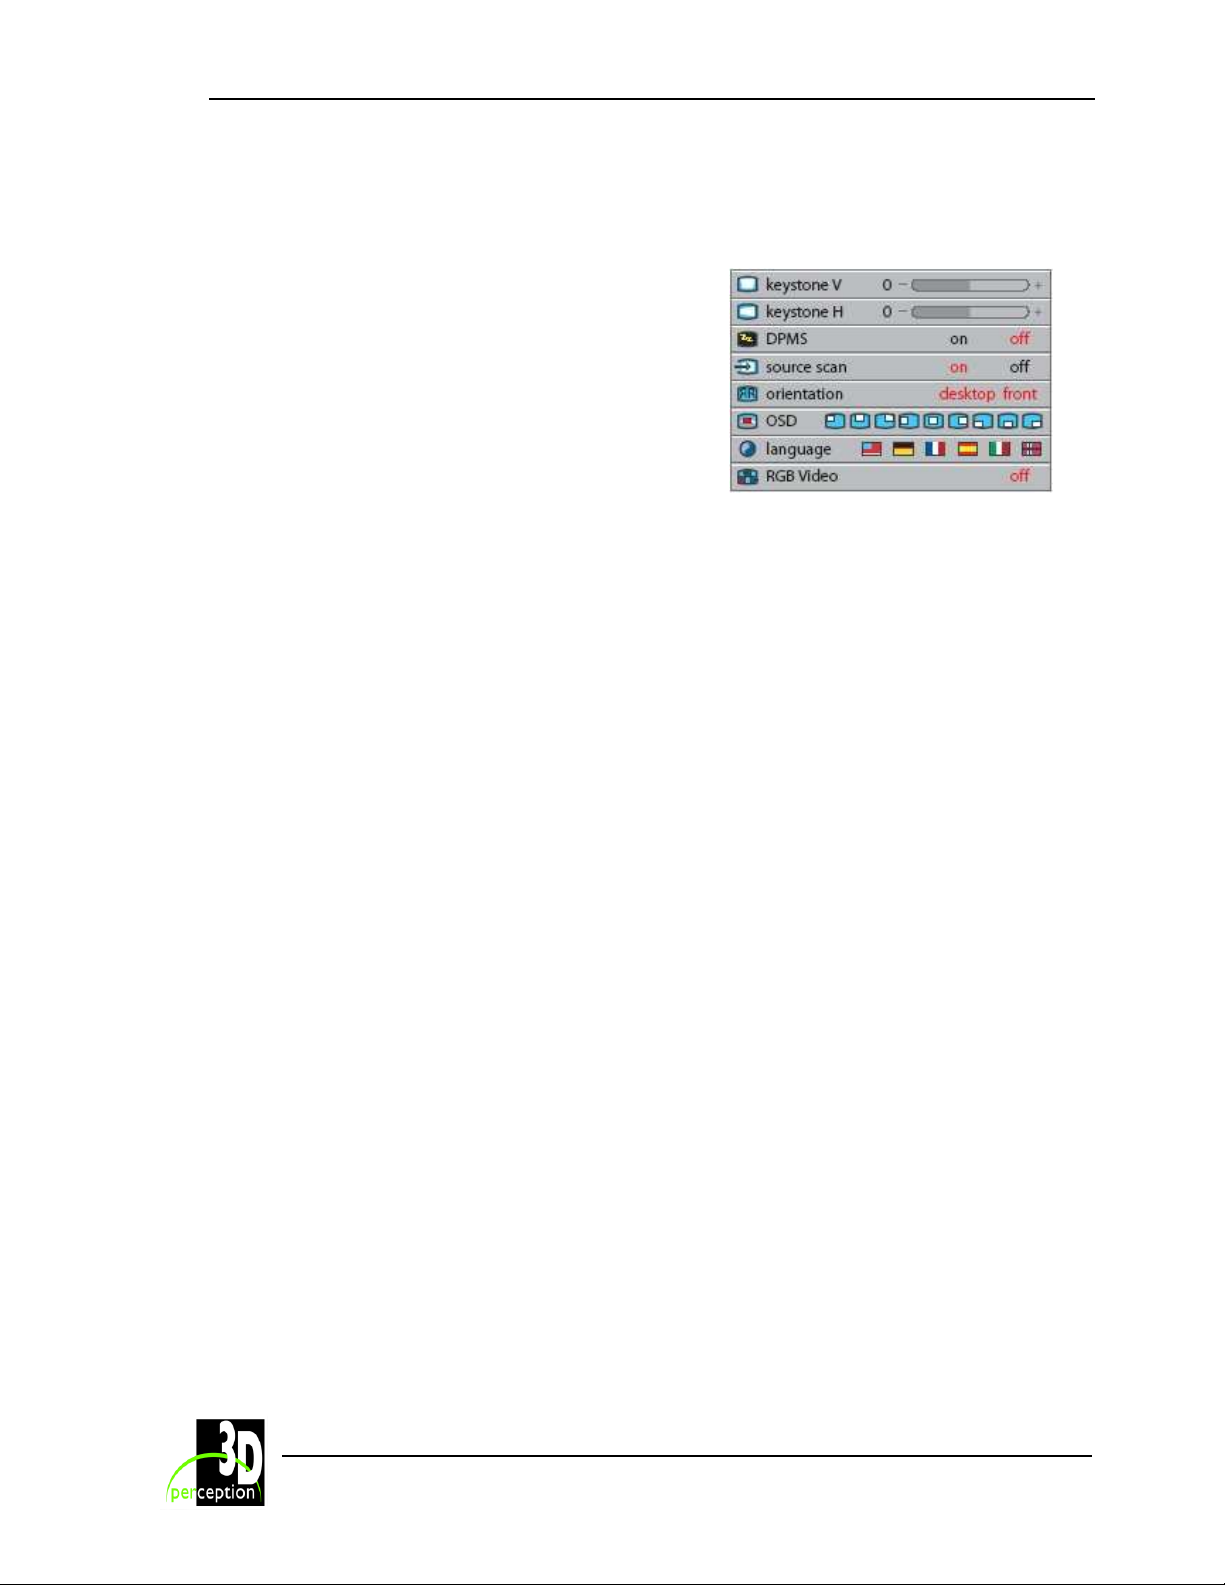
16.4 Set Up Sub-menu
keystone V
Adjust vertical keystone correction. Compensates for
the geometrical distortion of the projected image
resulting from tilting the projector to shoot higher up
on the wall.
keystone H
Adjust horizontal keystone correction. Compensates
for the geometrical distortion of the projected image
resulting from shooting the image at an angle
sideways on the screen.
DPMS
Activate/deactivate DPMS (Display Power
Management Signaling). When DPMS is on, the
projector will switch off following the powering off or
disconnection of the signal source. The projector will
switch back on when the signal source is reactivated.
source scan
Switches source scan on and off. With source scan
on, the projector will search for another source if the
current source is disconnected or switched off.
With source scan off, the projector will remain at the
selected source input even if the source is switched
off or disconnected.
orientation
Select between desktop front, desktop rear, ceiling
front and ceiling rear mode. The image will be flipped
and reversed accordingly.
OSD
Select the required position on the OSD (On Screen
Display)
language
Select between languages
RGB video
Selects RGB video on the component video input
(YPbPr). Requires composite sync connected to the
composite video input.
FOR ALL
26
Page 32
3D perception C
Revision 3 User Manual
OMPACTVIEW
SX25+
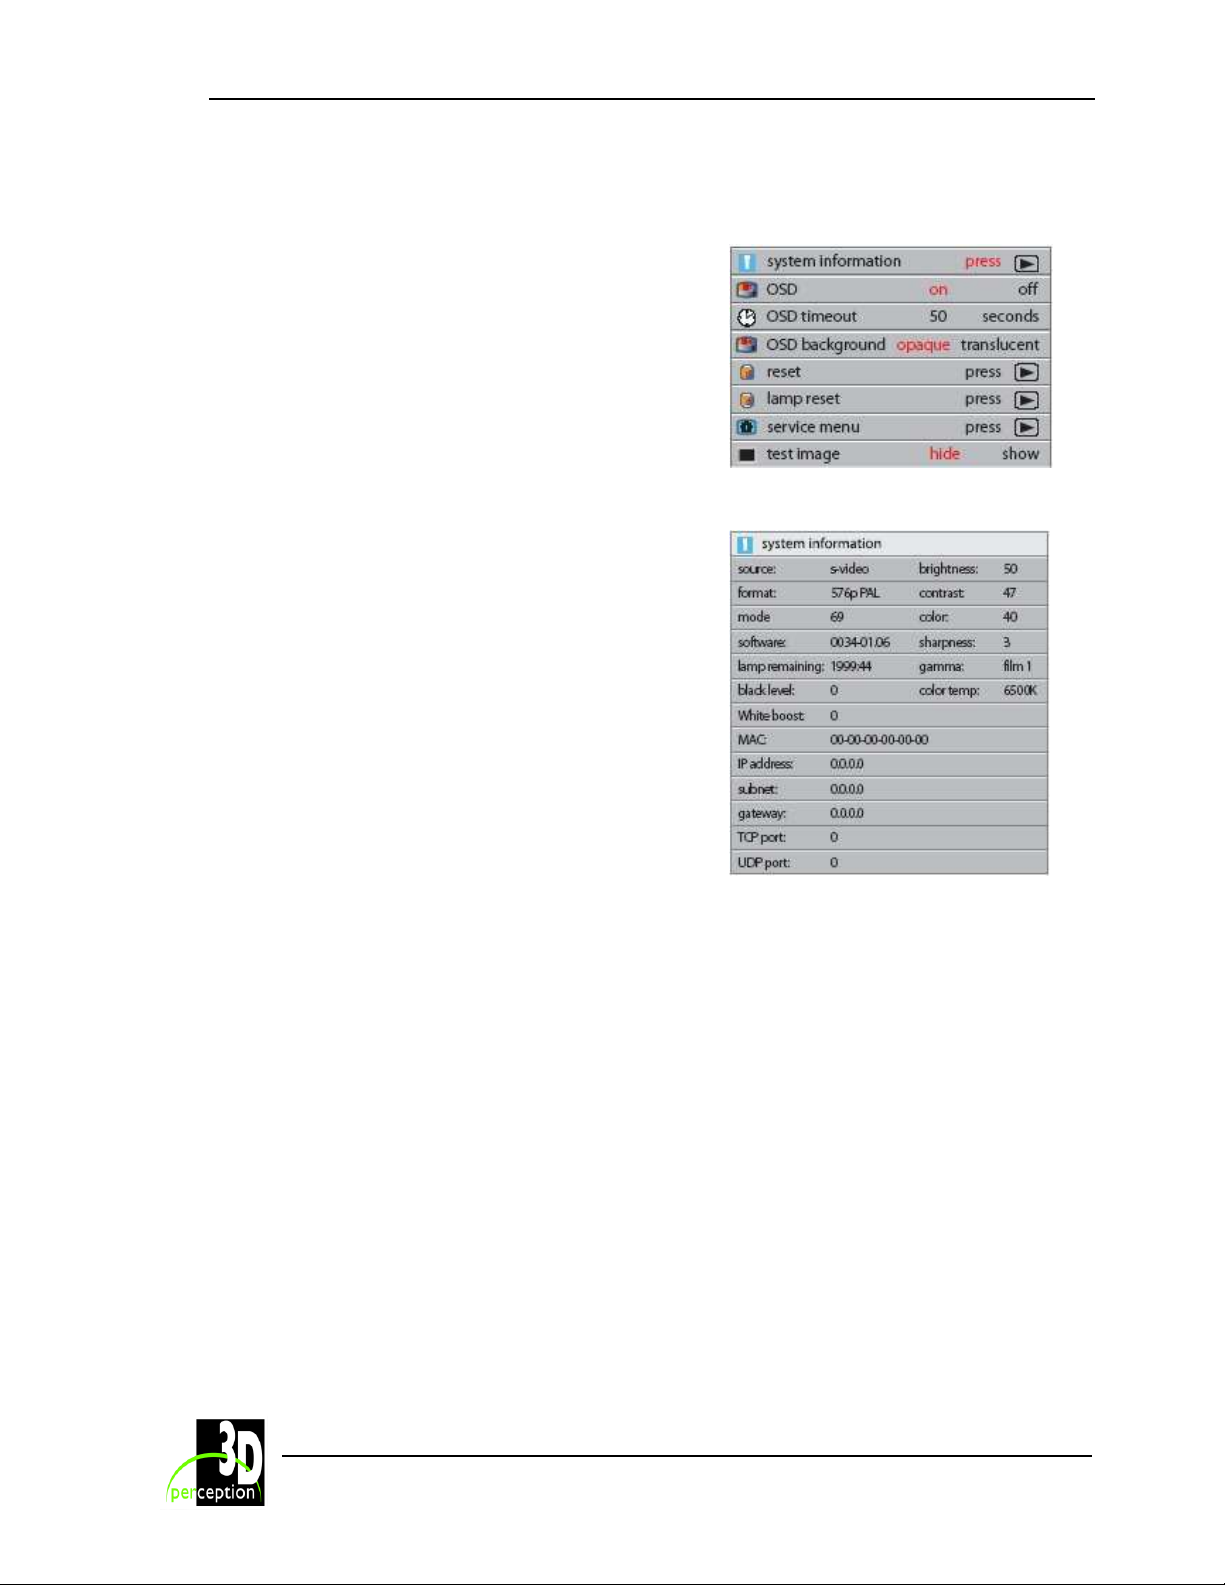
16.5 Utilities Sub-menu
information
Displays information about the source and projector
status
OSD
Turn the On Screen Display on (display) or off (hide)
during source scan.
OSD timeout
Defines how long OSD is displayed after last key
action before it disappears from the screen.
OSD background
Select background mode, whether translucent or
opaque.
reset
Resets the projector to its basic settings. All
parameters available in the various menus are reset
to their factory values.
Note: Control mode will automatically be reset to
RS232 even if the projector is a type SX25+I. A
power cycle is needed for the projector to detect
the presence of a GCM card and to select the
RIMI mode
lamp reset
Reset lamp after lamp change. Do not reset lamp
counter unless the lamp has been replaced with an
original new lamp.
service menu
For service personnel only. A special service code is
needed to access internal calibration controls and
status information. Not accessible to the user.
test image
Applies a fixed test image for set-up purposes
FOR ALL
SYSTEM INFORMATION
27
Page 33
3D perception C
Revision 3 User Manual
OMPACTVIEW
SX25+
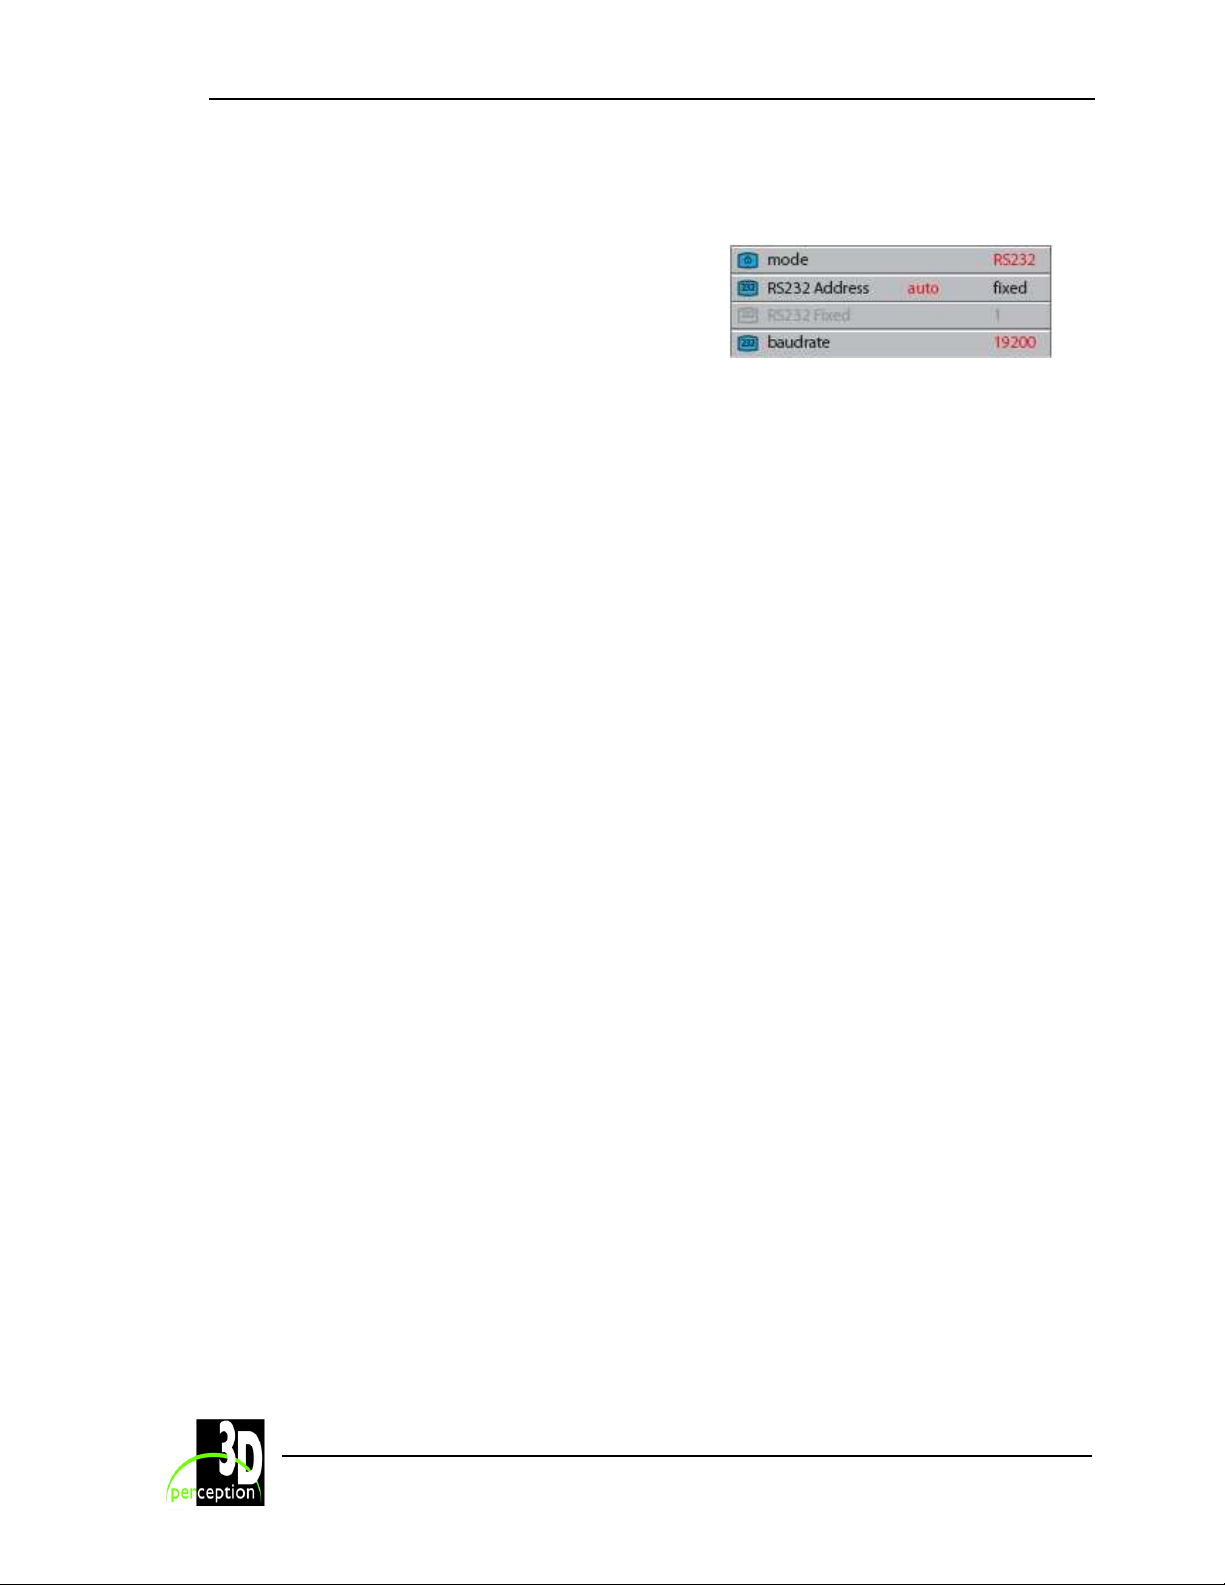
16.6 Control Sub-menu
mode
Selects between RS232, RIMI (internal) and LAN
control modes. The projector can be controlled by
only one of the modes at a time.
When using the CompactView SX25+I the mode must
be set to RIMI (Rich Media Interface). When a GCM
has been installed, the projector will detect its
presence after a power cycle and select RIMI.
Note: Reset to factory default will automatically
reset to RS232.
RS232 address
For use when daisy-chaining several units. Select
auto or fixed address. Only one address scheme is
allowed per daisy-chain. The auto address is
allocated following the relative position in the daisychain. The fixed address is an absolute address. Only
unique fixed addresses are allowed.
RS232 fixed
Select a unique fixed address in the range available.
baudrate
Selects between baud rates 4800, 9600 and 19200. A
lower baud rate may be required in installations with
long cable runs.
FOR ALL
28
Page 34
3D perception C
Revision 3 User Manual
OMPACTVIEW
SX25+
17. M
The projector may from time to time require cleaning. Never open the projector, as this will void
any warranties. Refer all service and repair work to qualified personnel.
Only the exterior of the projector may be cleaned. Use a damp cloth. Make sure no liquids enter
the inside of the projector
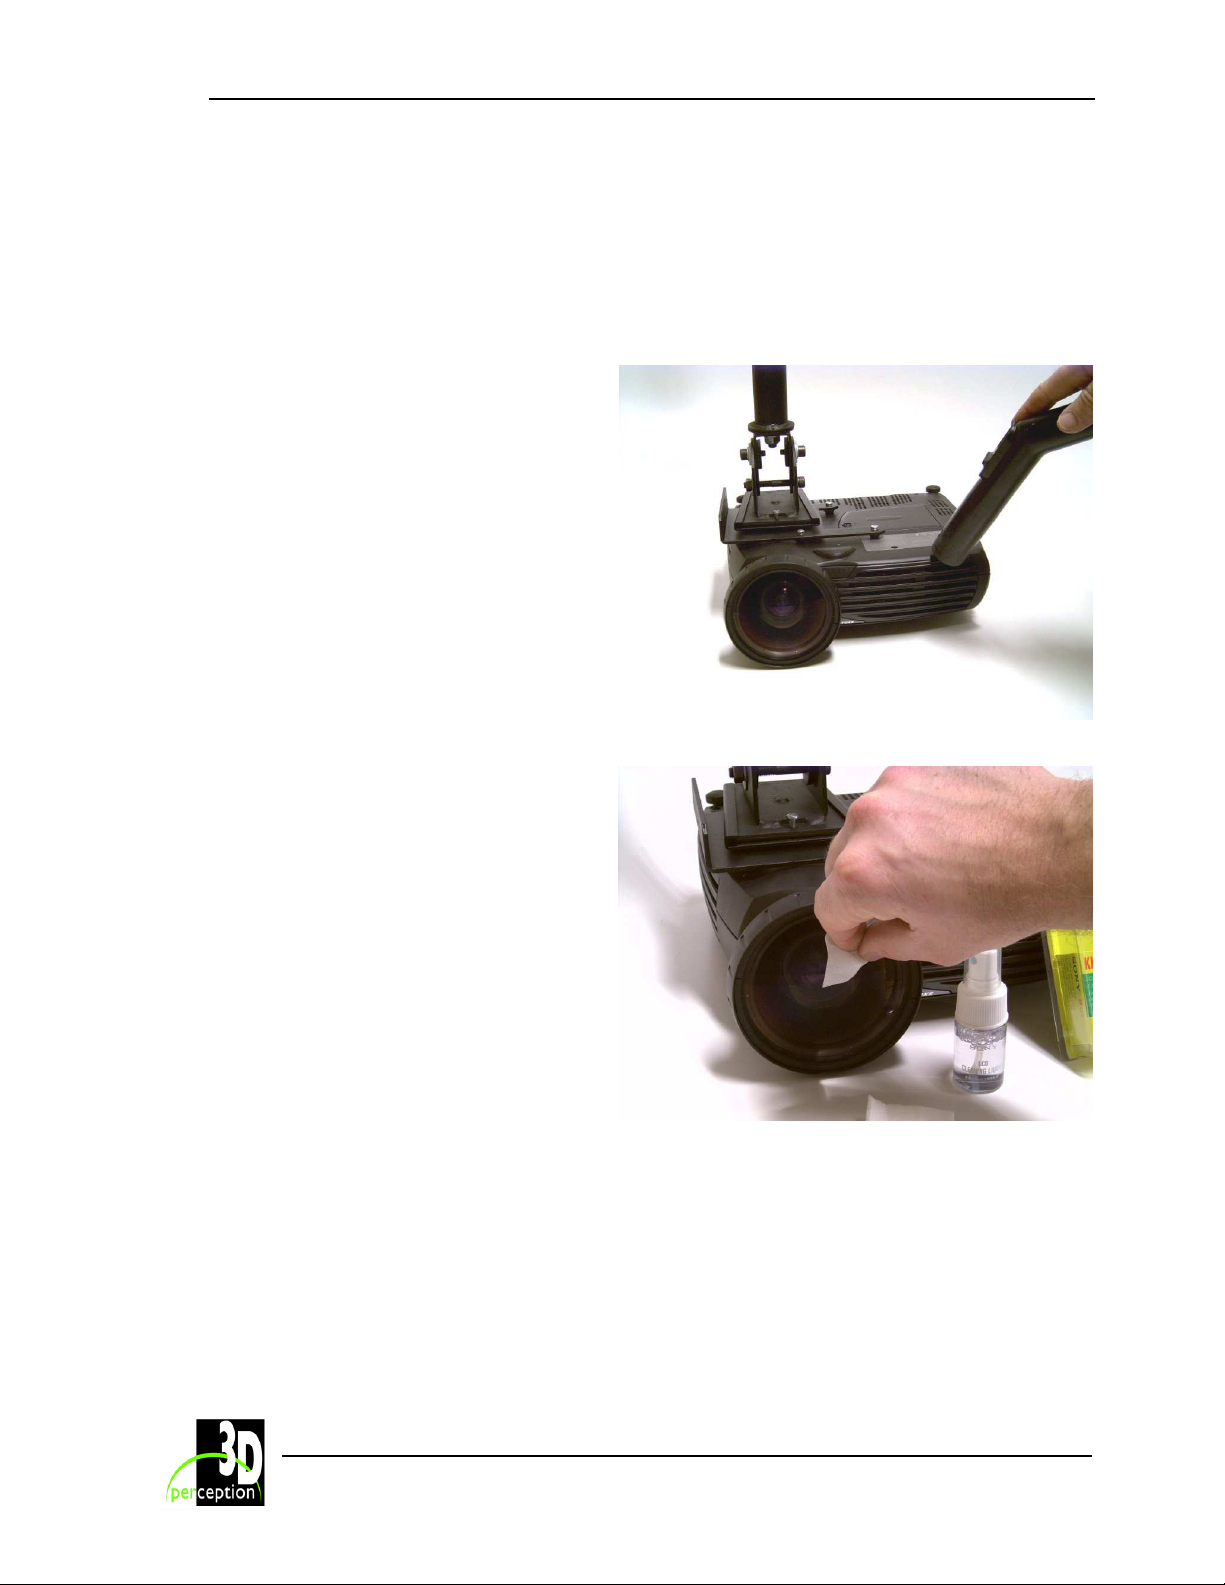
Vacuum-clean all the air vents regularly to
maintain sufficient air flow.
The projection lens is sensitive to
scratches. Use lens-cleaning tissue,
available at all photographic shops when
cleaning the projection lens. Use lens cap
when not in use.
AINTENANCE
29
Page 35
3D perception C
Revision 3 User Manual
OMPACTVIEW
SX25+
18. L
The STATUS lamp on the keypad will turn red when the lamp life expires. In addition, a
message will appear on the screen; “LAMP LIFE TIME HAS EXPIRED! Please change lamp.”
AMP REPLACEMENT
18.1 Remove old lamp
Change the lamp when its lifetime expires. Always replace the lamp with the same type and
rating.
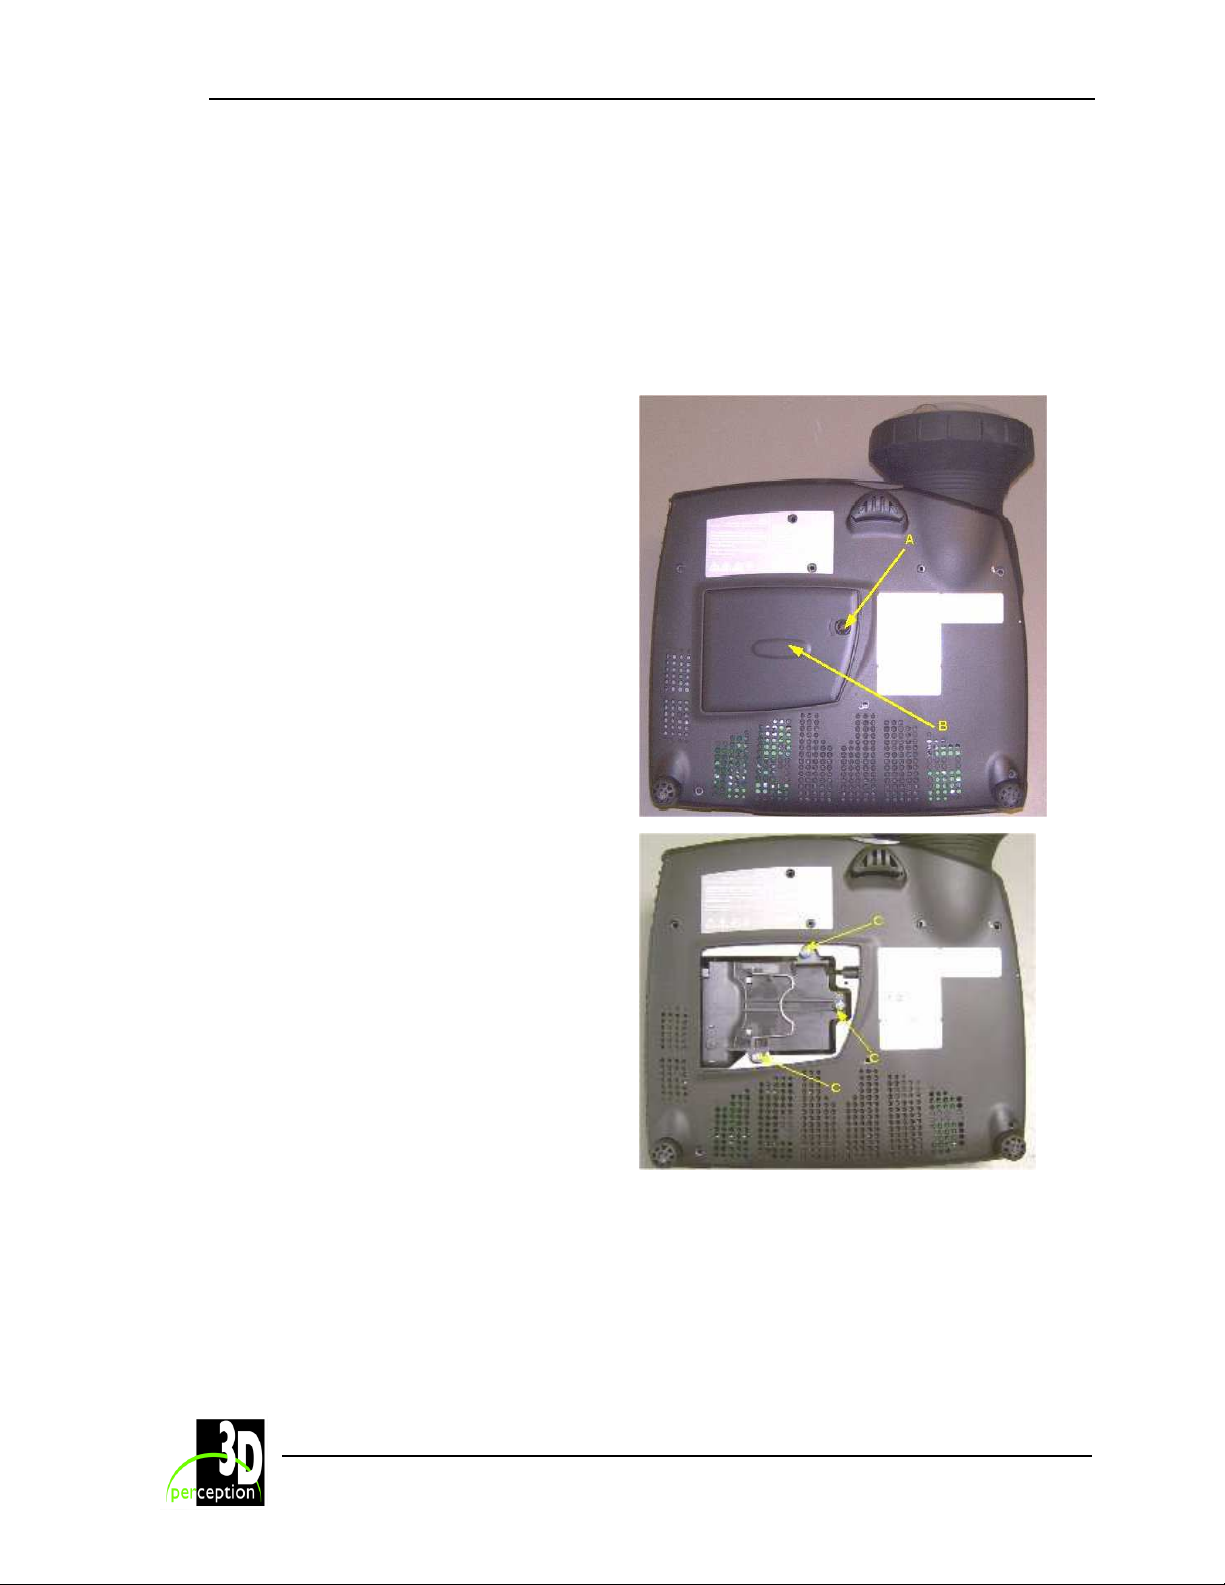
Always disconnect the power cord and wait
until the projector has cooled down (60
minutes) before opening the lamp cover.
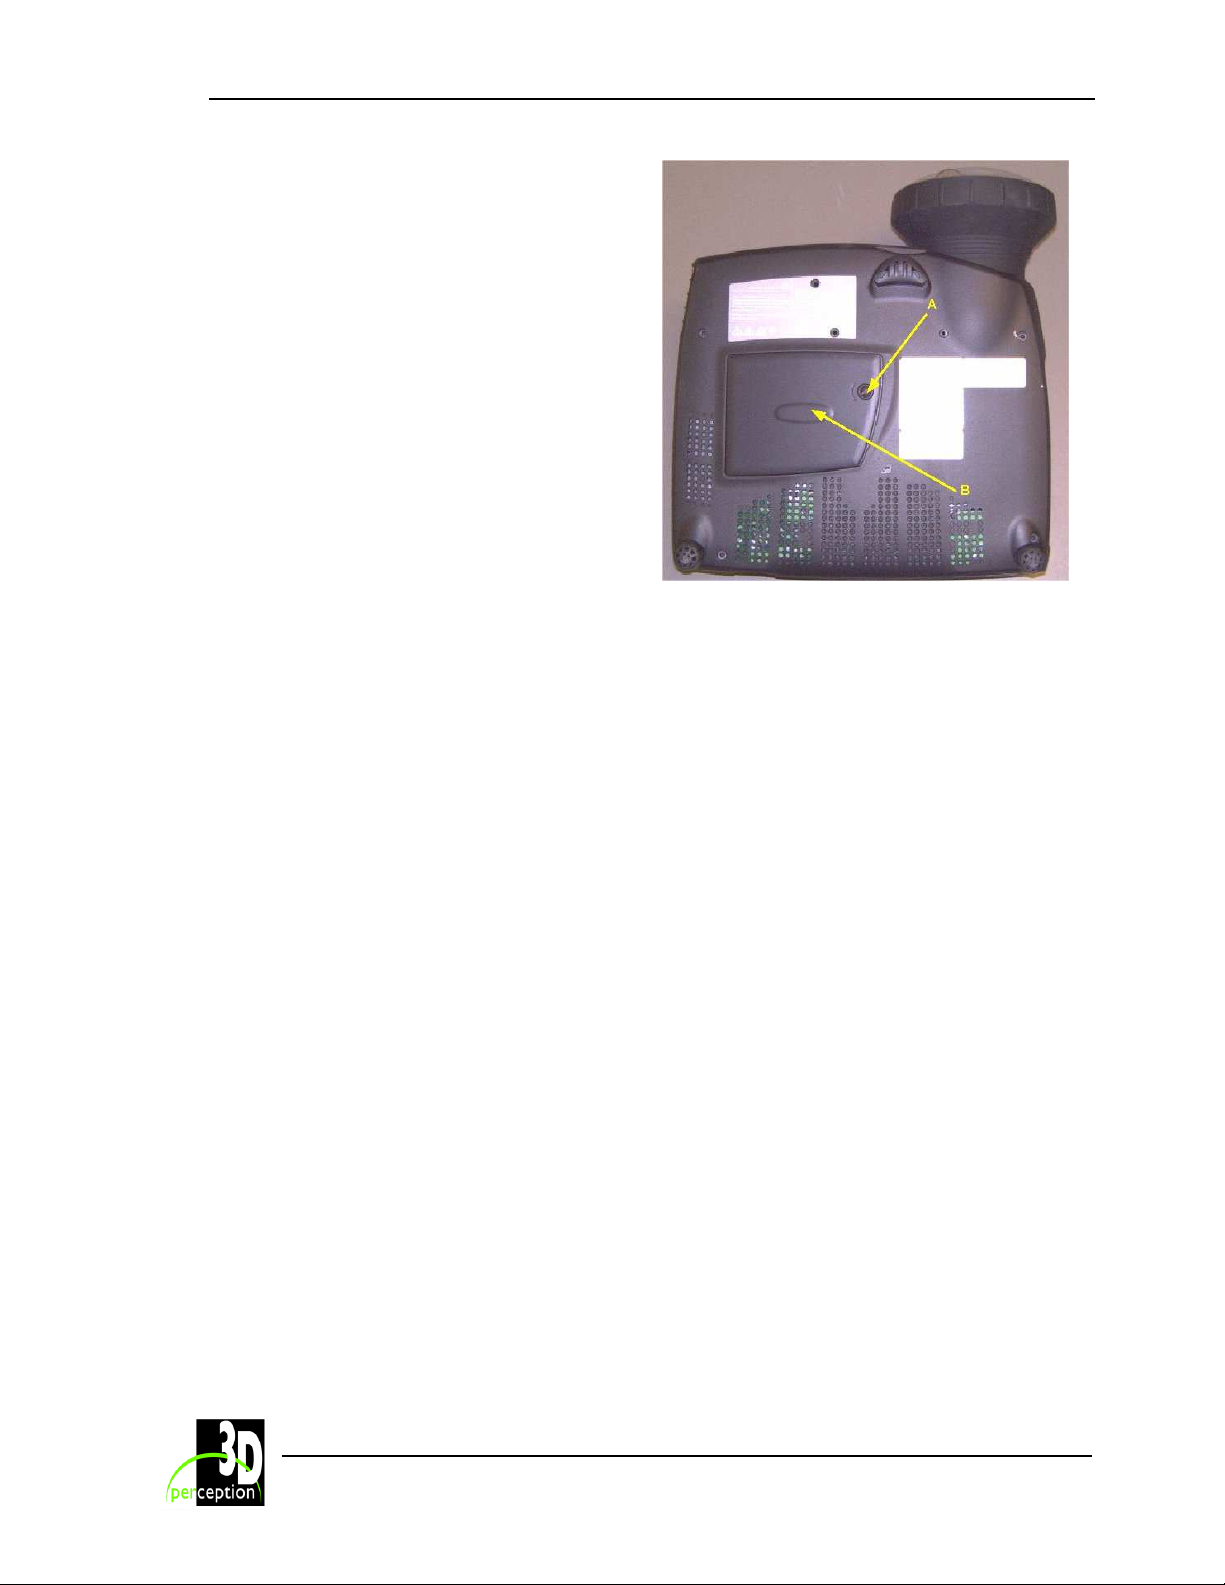
Release the screw (A).
Remove the lamp cover (B).
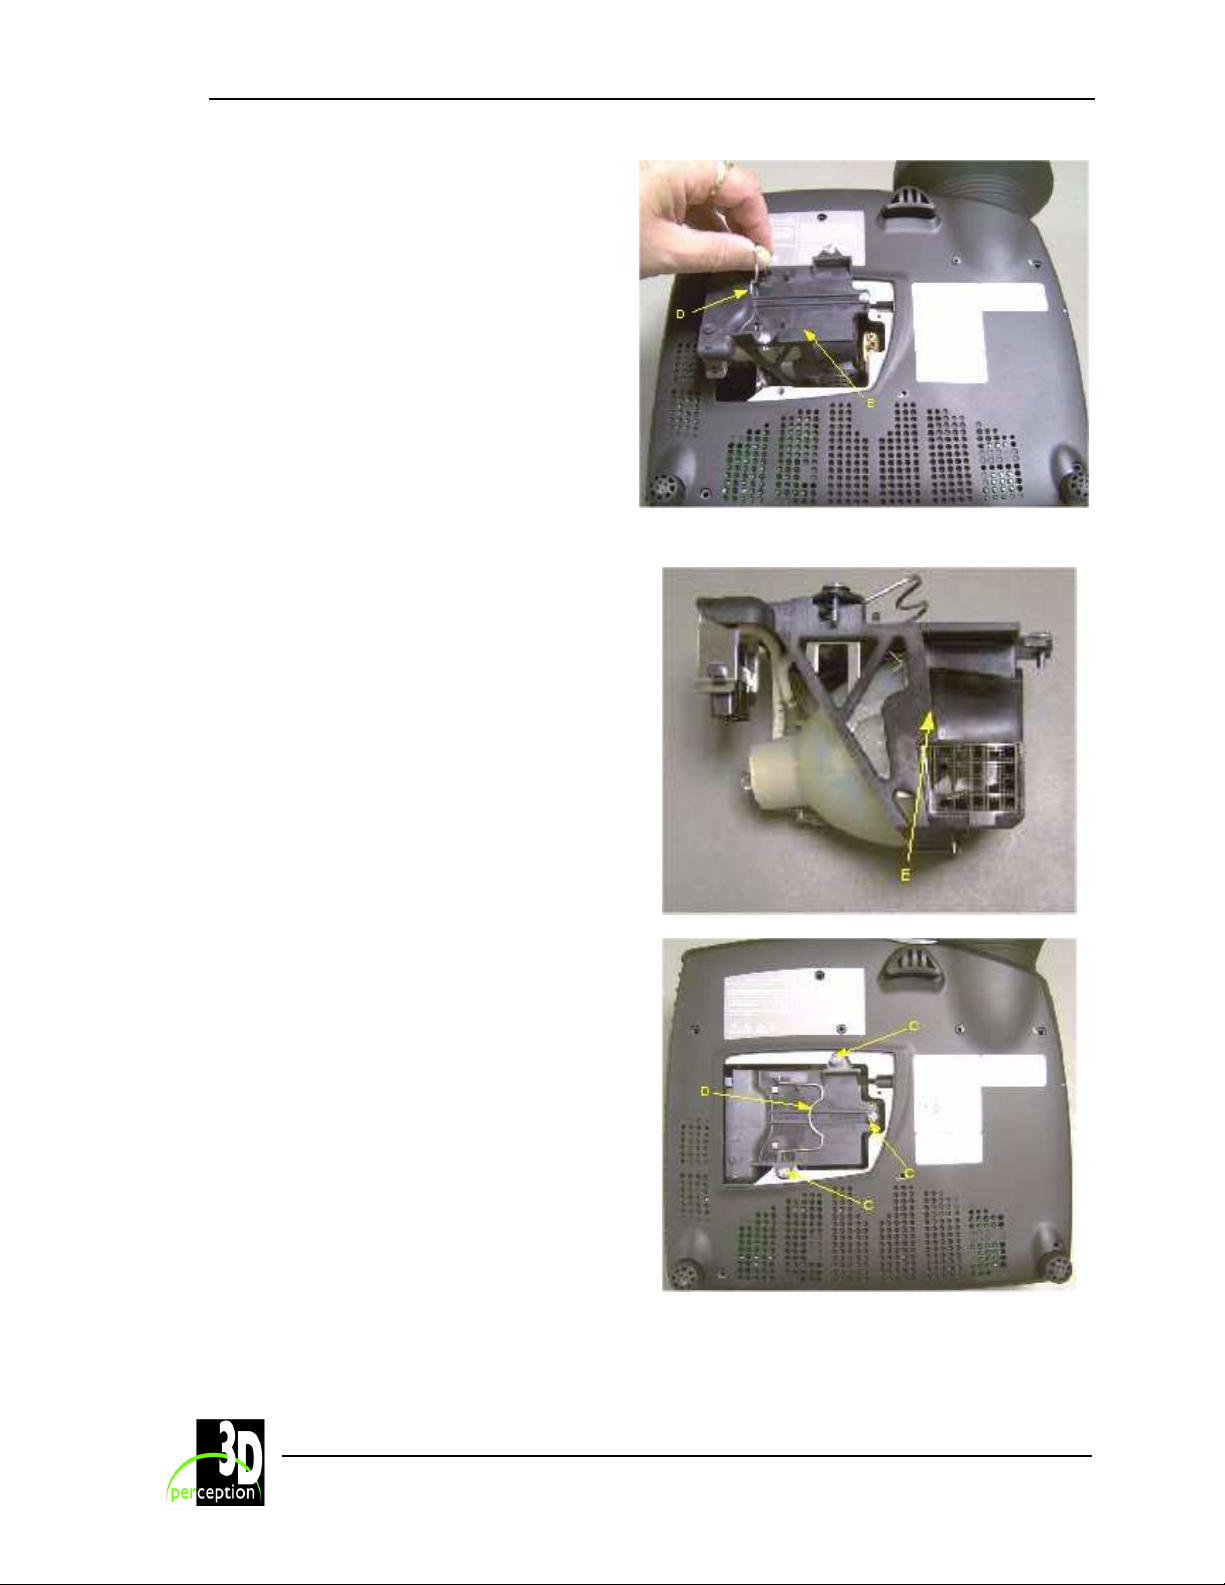
Release the 3 screws on the lamp house
(C).
30
Page 36
3D perception C
Revision 3 User Manual
Pull the handle (D).
Remove the lamp house (E).
OMPACTVIEW
SX25+
18.2 Insert New Lamp
Replace the lamp house (E)
Fold the handle (D) back in to place.
Tighten the 3 screws (C)
31
Page 37
3D perception C
Revision 3 User Manual
Replace the lamp cover (B)
Tighten the screw (A).
In the “utilities” sub menu, reset the lamp
timer.
OMPACTVIEW
SX25+
32
Page 38

3D perception C
Revision 3 User Manual
OMPACTVIEW
SX25+
19. S
This product contains no user-serviceable parts.
If the product fails to function as expected, first check that all connections are properly made,
and that the power cord is properly connected.
Check that the projector and the video and computer sources are all switched on.
Cables and cords may break over time. Try changing the cables and cords in case there is a
bad or intermittent connection.
Check if the circuit breaker or the fuse of the mains is intact.
In the event of product failure, please contact your reseller. You should prepare a description of
the symptoms of failure you experience. Also state the projector number and serial number as
printed on the label on the bottom of the projector.
ERVICE INFORMATION
33
Page 39

3D perception C
Revision 3 User Manual
OMPACTVIEW
SX25+
20. T
ECHNICAL DATA
20.1 Projector Specifications
Resolution 1400 x 1050 (native) SXGA+
Display technology Single chip DLP™ technology by Texas Instruments®
Display device LVDS DMD™ with DarkChip2™ technology
Computer Compatibility UXGA, SXGA+, SXGA, XGA, SVGA, VGA
PC, MAC, SGI and other workstations
RGBHV, RGBS, RGsB
Video Compatibility HDTV (1080i, 720p, 576i/p, 480i/p) NTSC, NTSC 4.43, PAL, PAL-M,
PAL-N, SECAM. Faroudja™ de-interlacing with
automatic film mode detection (3 : 2 and 2 : 2 pull-down)
Aspect ratio 4 : 3 (native), 16 : 9 / 5 : 4 (compatible)
Bandwidth Up to 205 MHz on analog RGB
Up to 160 MHz on DVI
Up to 75 MHz on component input
Brightness Up to 2500 lumen
Contrast Up to 2500 : 1
Wide angle lens f = 19.5
F = 2.8
throw ratio = 1 : 1 (distance : width)
throw distance = 1.5m - 20m / 5 - 66 ft.
Image width = 1.5m - 20m / 2.3 - 66 ft.
offset = 108%
Zoom lens f = 33 - 42
F = 2.75 - 3.1
Zoom factor = x 1.25
throw ratio = 1.70 - 2.2 : 1 (distance : width)
throw distance = 1.5m -10m / 5 - 33 ft.
image width = 0.7m - 5.7m / 2.3 - 18.8 ft.
offset = 108%
Lamp 250W UHP™ dimmable to 200W
Lamp life 2000 hrs (typ) to 50% brightness @ 250W
4000 hrs (typ) to 50% brightness @ 200W
Noise level 28 dB (typ), 32 dB (max) @ 20°C/68°F, sea
level
Dimensions 244 x 278 x 88 mm / 9.6" x 10.9" x 3.5", excluding lens
Weight 3.4 kg / 7.5 lbs
34
Page 40
3D perception C
Revision 3 User Manual
OMPACTVIEW
SX25+
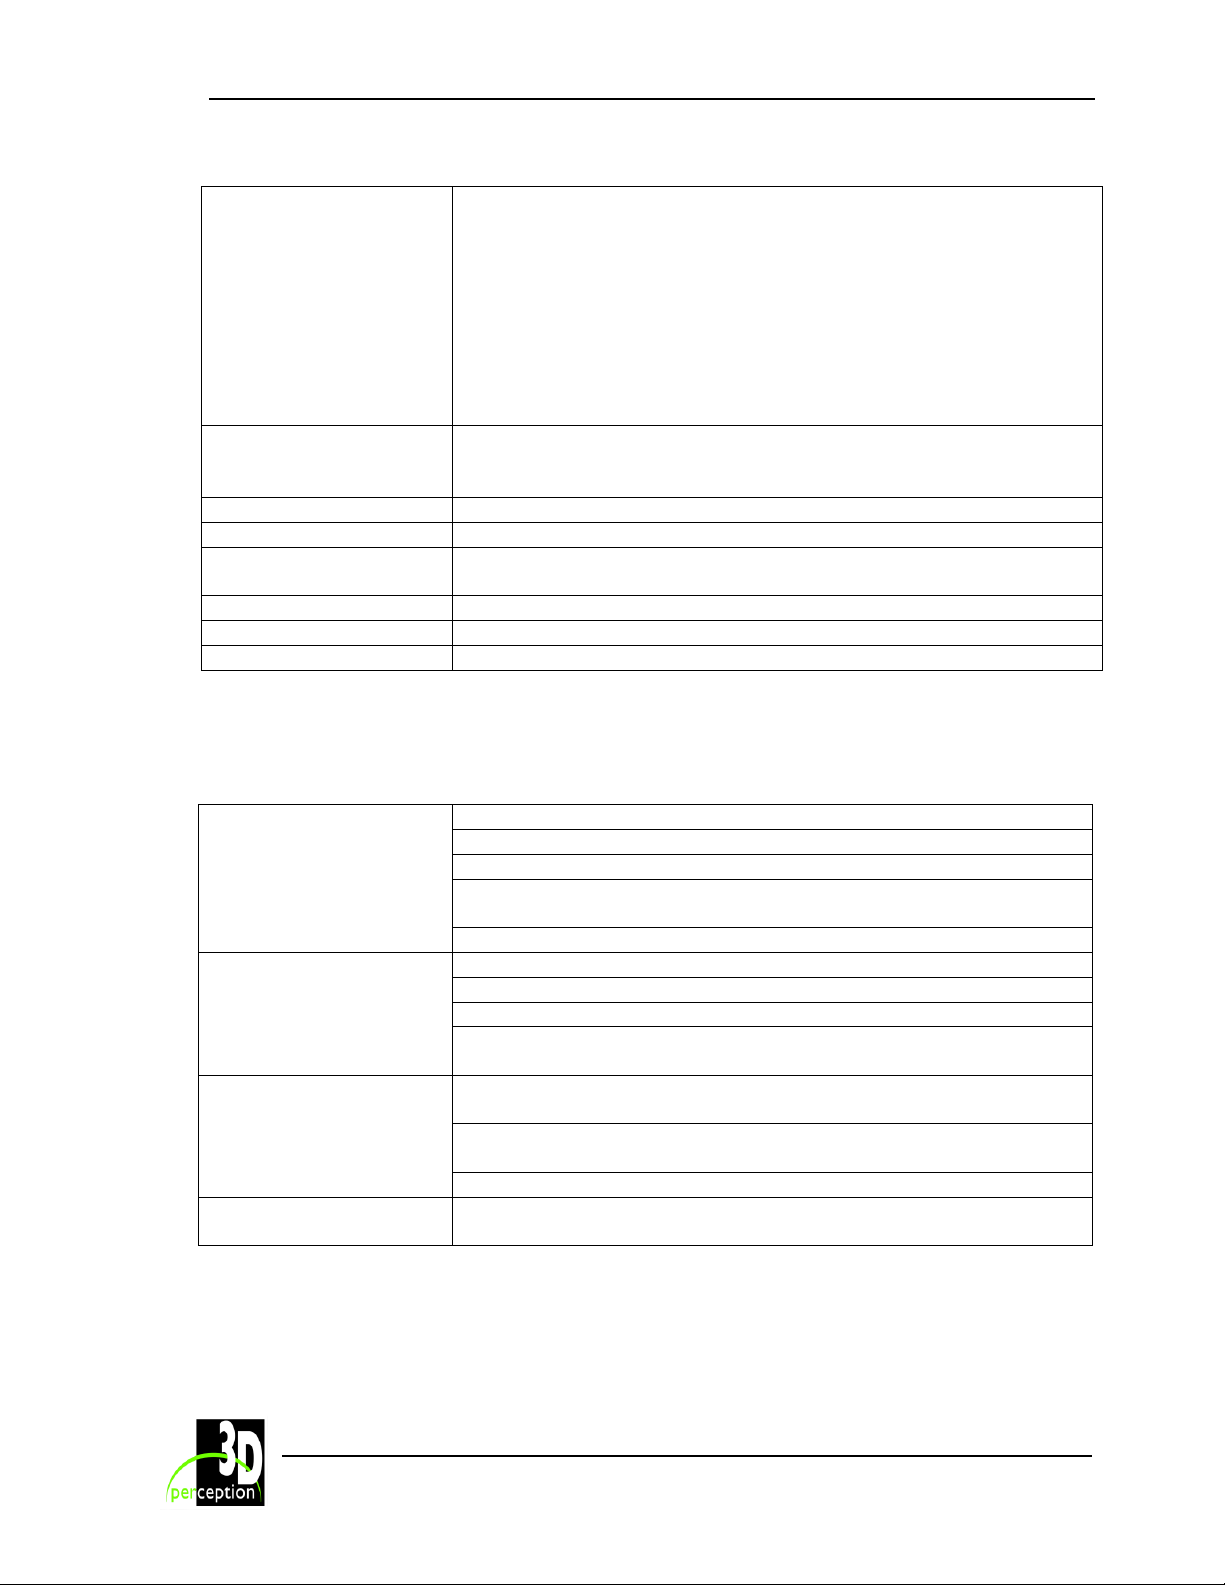
Inputs 2 VGA 15 pin female HD-DSUB analog RGBHV
1 DVI-D female digital RGB
1 Component video female 3 x RCA/phono
1 S-video female 4 pin mini-DIN
1 C-video female RCA/phono
2 Audio 3.5 mm female stereo jack
1 RS 232 9 pin female DSUB (control, firmware update)
1 USB-B female (control, firmware update)
1 LAN RJ-45 female (control, firmware update)
1 Remote Control 3.5 mm female stereo jack
Outputs 1 VGA Monitor 15 pin female HD-DSUB analog RGBHV
1 Audio 3.5 mm female stereo jack
1 RS 232 9 pin male DSUB
Power 90-260 VAC, 50-60 Hz, 350W
Conformance CE, FCC A, CSA(C,US)
Temperature operating 0-40°C / 32-104°F, 0-1500 m / 0-4950 ft
0-35°C / 32-95°F, 1500-3000 m / 4950-9900 ft
Temperature storage -20 - 60°C / -4 - 140°F
Humidity operating 20-90% RH, non-condensing
Humidity storage 10-95% RH, non-condensing
20.2 GCM Specifications
These specifications apply to the CompactView SX25+I only
Warping
Soft Edge Blending
Colour
Gamma Individual RGB adjustments from 0.25 to 4 in addition to native
Specifications are subject to change without prior notice. All values may vary up to +/- 20%.
Non-linear image mapping from 50% to 200 %
Total latency typically 250 line period
Automatic and manual options
Up to 100 geometrical control points (compliant with curved
screens requirements)
Up to 5th order approximation between geometrical control points
Multisided non-linear blending from 2% to 100% of total image
Alpha adjustable from 0 to 4 across overlapped areas
Gamma adjustable from 0.25 to 4 in overlapped areas
Up to 5 geometrical control points (compliant with curved screens
requirements)
Individual RGB adjustments of ± 20% in addition to native
adjustment capabilities
Primary Colour Calibration (For ‘E’ models with CompactUTM zer0
only)
Input Offset and Input Gain adjustments
adjustment capabilities
35
Page 41
3D perception C
Revision 3 User Manual
OMPACTVIEW
SX25+
21. C
OVERS
21.1 Cable cover
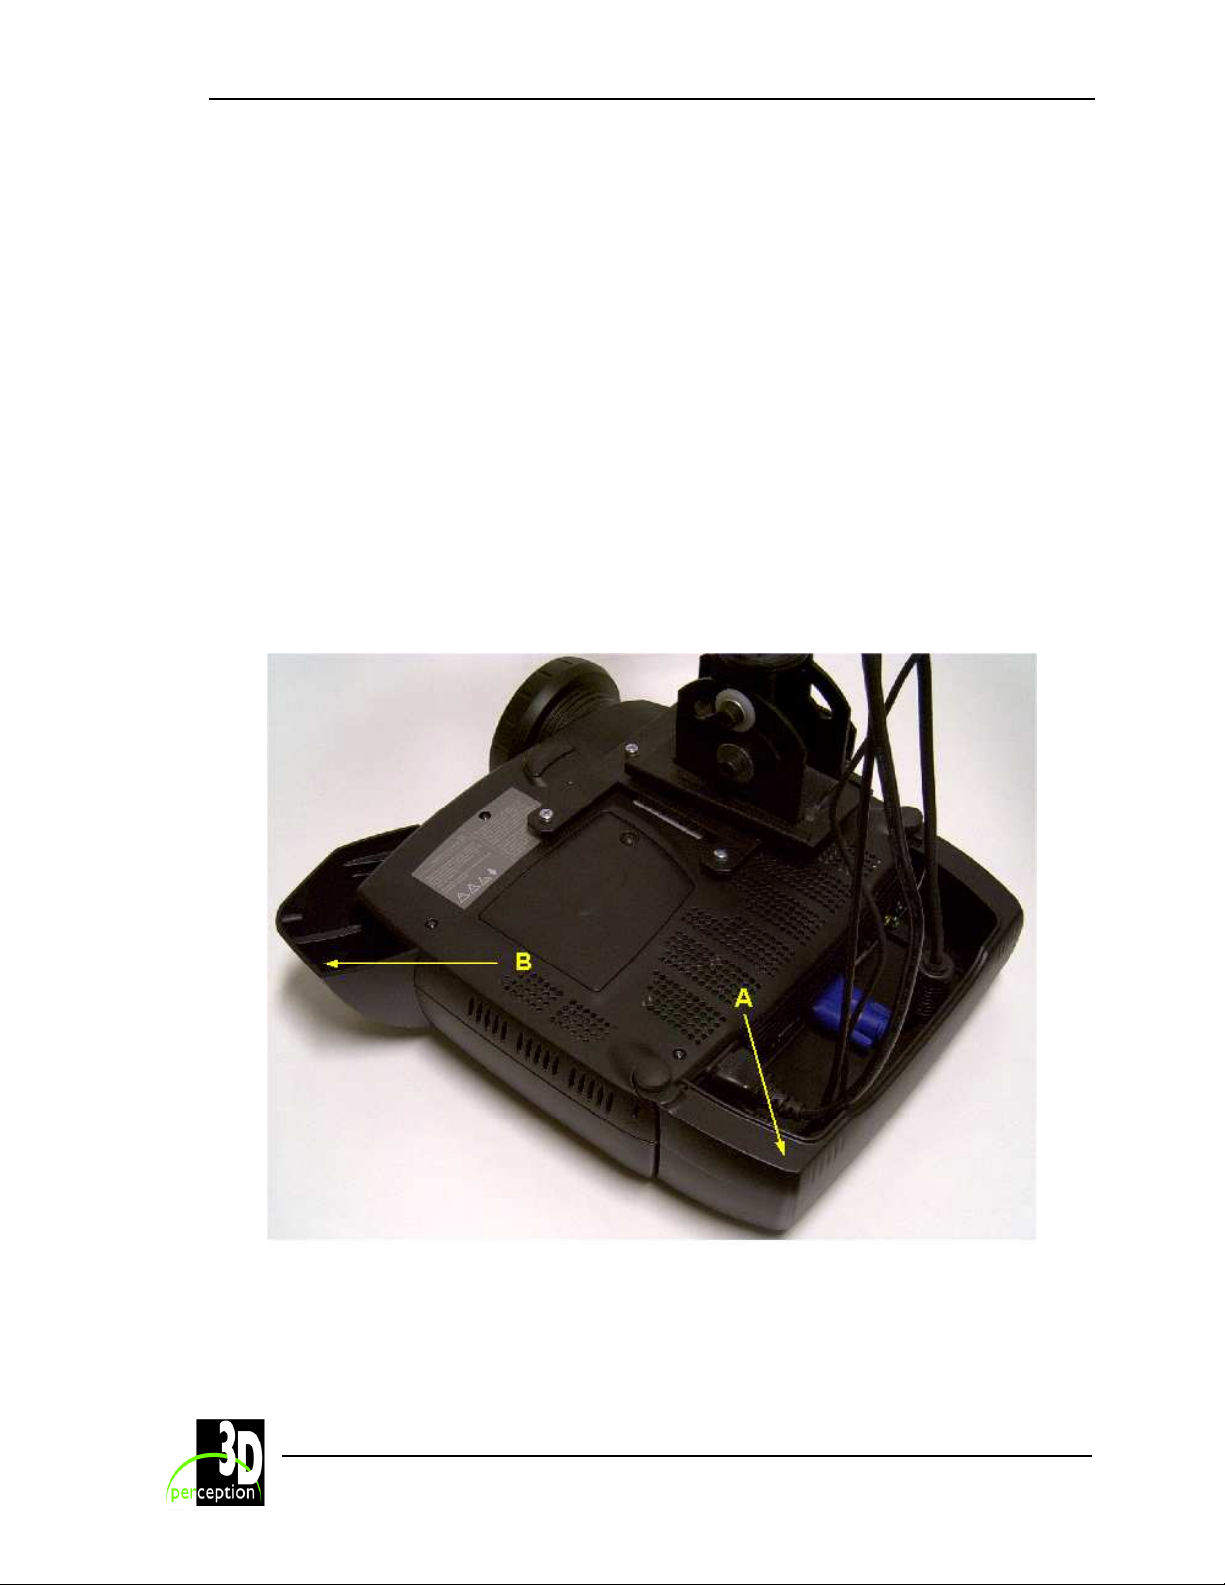
Loosen the rear adjustable feet by unscrewing them.
Align the vertical hooks on the cover with the guides on the rear of the projector.
Snap the cover into place with the lower guides clamping the rear feet.
Tighten the rear feet to fix the cable cover (A) in place.
Connect all cables and fix them in place before the cable cover (A) is attached to the
Tip:
projector.
21.2 Airflow cover
Affix Airflow cover (B).
36
Page 42

3D perception C
Revision 3 User Manual
OMPACTVIEW
SX25+
22. P
ARTS LIST
22.1 Main products
Product name Product number
CompactView SX25+E 313-SX25-E
CompactView SX25+I 313-SX25-I
22.2 Spare parts
Product name Product number
Lamp Replacement Kit 250 W 313-400-0184-00
37
Page 43

3D perception C
Revision 3 User Manual
OMPACTVIEW
SX25+
23. L
Limited Warranty
Except as otherwise stated herein, 3D perception warrants that a C
projector is free from defects in parts and labour under normal use during the warranty period.
The warranty period means the 12-month period from the date of purchase of a
SX25+ projector.
During the warranty period, 3D perception will, at its option and in its sole discretion, repair or
replace defective parts, including replacement of the entire
no additional charge to the Customer. However, the Customer is responsible for all shipping
and insurance costs incurred in returning any
which does not require any repair or replacement work, as determined by 3D perception in its
sole discretion. This limited warranty does not extend to any 3D perception product that has
been damaged as a result of accident, misuse, or abuse. Nor does it extend to the use of parts
not manufactured or sold by 3D perception, by unauthorised modification of a C
SX25+ projector, or as a result of servicing by unauthorised personnel. This limited warranty
extends only to the Customer, and is not transferable or applicable to any other third party or
user, including any one who purchases a used C
asserting a claim under this limited warranty must establish to 3D perception’ satisfaction the
date of purchase and that a C
Other warranty and liability limitations
Aside from this standard published warranty, 3D perception makes no warranty of any kind,
express or implied, including without limitation, those of merchantability and of fitness for a
particular purpose. Without limiting the generality of the foregoing, any description of a
C
OMPACTVIEW
any bargain, and does not constitute a warranty that the item sold shall conform to that
description. The use of any sample or model is for illustrative purposes only, it is not part of the
basis of any bargain, and it is not to be construed as a warranty that a C
projector will conform to the sample or model.
No affirmation of fact or promise made by 3D perception shall constitute a warranty that a
C
OMPACTVIEW
no warranty that the goods are free from claims of infringement of patents, trademarks, or
copyrights. This limited warranty shall be the exclusive remedy. 3D perception shall not be liable
to customers or others for incidental, consequential, or special damages, or lost profits. Under
no circumstance shall 3D perception liability or customer’s remedy for damages against 3D
perception exceed its cost for a C
IMITED WARRANTY
C
OPYRIGHT
SX25+
SX25+ projector will conform to the affirmation or promise. 3D perception makes
’
OMPACTVIEW
projector is for the sole purpose of identifying it, is not part of the basis of
, ‘FCC S
SX25+ projector was purchased new.
OMPACTVIEW
TATEMENT’ AND ‘TRADEMARKS
OMPACTVIEW
C
OMPACTVIEW
C
OMPACTVIEW
C
OMPACTVIEW
OMPACTVIEW
SX25+ projector.
SX25+
SX25+
projector to the Customer
SX25+ projector. Any person
OMPACTVIEW
projector, at
OMPACTVIEW
SX25+
SX25+
38
Page 44

3D perception C
OMPACTVIEW
SX25+
Revision 3 User Manual
Procedure for claims
Any and all questions or claims concerning a
C
OMPACTVIEW
SX25+
3D perception authorised personnel through the VAR from whom the C
projector was purchased. In no case shall a
C
OMPACTVIEW
SX25+
projector shall be made to
OMPACTVIEW
SX25+
projector be returned without
first securing the authority of 3D perception or its authorised personnel. Any damages to,
defects in, loss of, non conformities in, or any other claim concerning a
C
OMPACTVIEW
SX25+
projector which could be discovered by inspection upon delivery must be reported to the
delivering carrier, and in writing to 3D perception at: the following address, promptly and in no
event later than thirty (30) days after delivery.
3D perception AS
Solbråveien 41
P.O. Box 455
N-1373 Asker
Norway
In the case of any such claim, inspection shall be promptly arranged with 3D perception or it’s
authorised personnel, and where appropriate, representatives of the carrier. Any other claim or
action respecting the condition or conformity of a
matter affecting a C
OMPACTVIEW
SX25+ projector must be submitted in writing to 3D perception
C
OMPACTVIEW
SX25+
projector or any other
promptly upon discovery and in no event later than expiration of the Warranty Period. Any part
of a C
OMPACTVIEW
SX25+ projector which is subject of any claim shall be set aside and
protected, without further processing or use, until 3D perception or its authorised personnel
have an opportunity to inspect it and advice the Customer of the disposition, if any to be made
thereof. Failure to give timely written notice of any claim shall bar any remedy.
Technical advice
3D perception, or its authorised personnel, may furnish technical advice with reference to the
use of a C
OMPACTVIEW
SX25+ projector, but there is no obligation to furnish such advice. If any
advice or assistance is furnished, it shall be given and accepted at Customer’s risk, 3D
perception shall not be responsible or liable for the advice or assistance given or the results
thereof.
FCC Statement
A C
OMPACTVIEW
SX25+ projector has been tested and found to comply with the limits for a
'Class A' digital device, pursuant to Part 15 of the FCC rules. These limits are designed to
provide reasonable protection against harmful interference when it is operated in a commercial
environment. A
C
OMPACTVIEW
SX25+
projector generates, uses and can radiate radio
frequency energy and, if not used in accordance with the instruction manual, may cause harmful
interference to radio communications. Operation of a
C
OMPACTVIEW
SX25+
projector in a
residential area is likely to cause harmful interference in which case the user will be required to
correct the interference at own expense.
39
Page 45

3D perception C
Revision 3 User Manual
OMPACTVIEW
SX25+
24. C
ONTACT US
Head office 3D perception AS
Solbråveien 41
P. O. Box 455
N1373 Asker
Norway
Tel: +47 66 98 70 70
Fax: +47 66 98 70 71
Support desk: +47 66 98 70 90
[email protected]
[email protected] www.3d-perception.com
Regional offices
USA 3D perception Inc
1277 N. Semoran Blvd.
Suite 117
Orlando,
Florida 32807
Japan 3D perception AS
Mitsui Residence 102
4-2-2 Ropponngi,
Minato-ku,
Tokyo 109-0032
NOTE: Local support may be available in other countries. Please contact the head office for
further details.
40
 Loading...