

Page 1
Avion
airplanes
DUCK
user manual
Page 2

A
vion
airplanes
What you need
Filament
Hardware
Motor
PLA LW / POLYLIGHT 1.0
PLA
ø1×285mm carbon rod (fuselage)
ø1×571mm carbon rod (wing front)
ø1×487mm carbon rod (wing back)
ø1×361mm carbon rod (elevons)
ø2×385mm carbon rod (elevons axles)
Steel wire, carbon rod or clevis (pushrods)
Snap-o knife
CA glue
Activator
HGLRC Aeolus 2004 1800Kv (my setup)
or similar 20XX size motor
2x
2x
2x
2x
2x
1x
Possible to print with Prusa Slicer 2.4.0 and Cura.
Proles
Prusa Slicer
2.4.0
Cura
4.1 3.0
Use 3MF les as starting
point to nd sweet spot with
your printer.
Use included Cura proles as
starting point to nd sweet
spot with your printer.
ESC
BEC
Servos
Propeller
Main bat.
RX bat.
iFlight SucceX-E Slick 45A (my setup)
or similar (with or without BEC)
iFlight Micro 5V 3A (my setup)
external BEC is optional
Corona DS-843MG (my setup, recomended)
HQPROP T5X3 (my setup)
or similar 5“ or 6“
CNHL Ministar 450mAh 6S 70C (my setup)
or 40×18×72mm (max. size for main battery)
Turnigy Nano-Tech 460mAh 2S (my setup)
RX battery is optional
1x
Before printing big parts make sure, that everything
will t perfectly (carbon rods etc.)
1x
2x
1x
1x
1x
RC
at least 3 channel RC system (elevon mix)
DUCK user manual
f
Avion Airplanes
I
avion_airplanes
2
Page 3
A
vion
airplanes
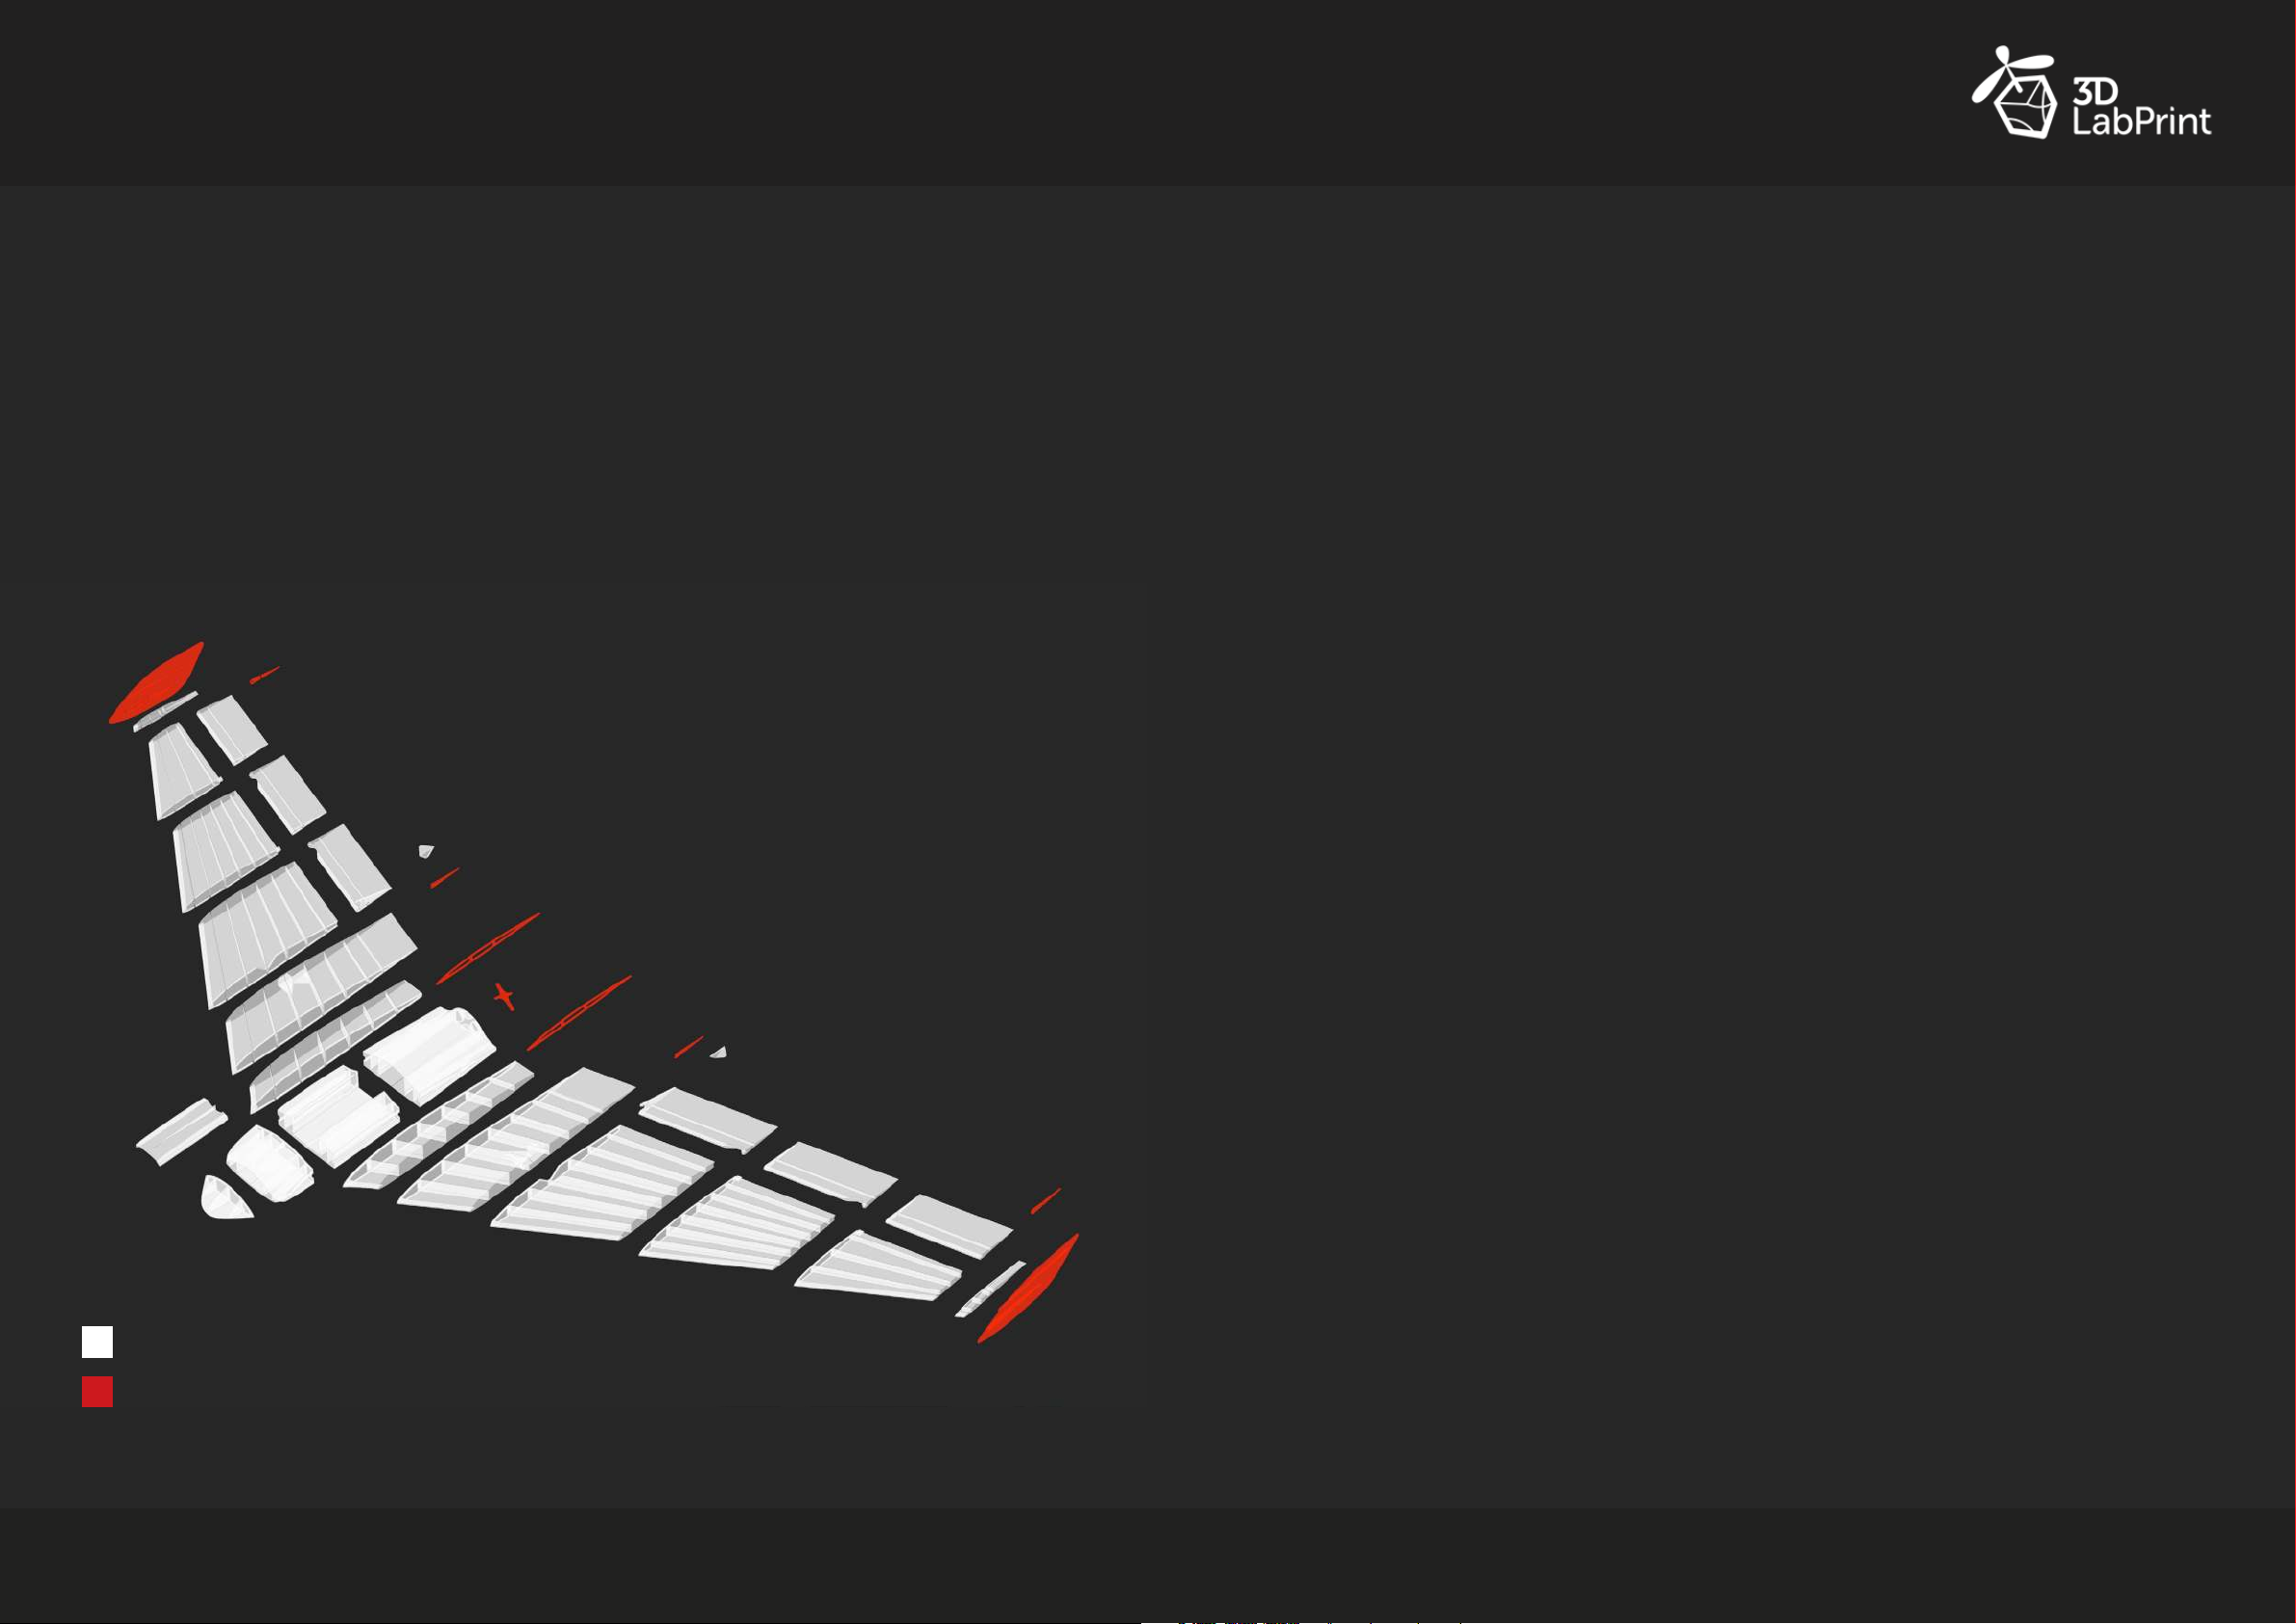
Model specications
Wingspan
Length
Print weight
Takeo weight
Wing area
Wing load
Printed parts
W_R_7
W_R_ 6
W_R_5
E_R_3_Rib
E_R_3
E_R_2
W_R _4
E_R_1
W_R_3
W_R_2
1000mm
518mm
approx 279g
approx 484g
21,5 dm²
22,5 g/dm²
W_R_3_Cover
W_R_2_Rib
Motor_mount
F_R_Rib
F_L_Rib
Parts list
Fuselage
F_1
F_2
F_3
F_4
Canopy
Motor_mount
F_L_Rib
F_R_Rib
Wing LEFT
W_L_1
W_L_2
W_L_2_Rib
W_L_3
W_L_3_Cover
W_L_4
W_L_5
W_L_6
W_L_7
3,48g
14,56g
25,29g
25,26g
4,95g
0,99g
1,42g
1,42g
9,09g
18,88g
0,49g
21,41g
0,14g
16,69g
9,35g
0,88g
7,39g
Wing RIGHT
W_R_1
W_R_2
W_R_2_Rib
W_R_3
W_R_3_Cover
W_R_4
W_R_5
W_R_6
W_R_7
9,09g
18,88g
0,49g
21,41g
0,14g
16,69g
9,35g
0,88g
7,39g
W_R_1
F_ 3
Canopy
F_ 2
F_ 1
F_4
W_L_1
LW PLA
PLA
DUCK user manual
W_L_2
W_L_3
W_L_2_Rib
E_L_1
W_L_3_Cover
W_L _4
E_L_2
W_L_5
E_L_3
W_L _6
E_L_3_Rib
W_L_7
Elevon LEFT
E_L_1
E_L_2
E_L_3
E_L_3_Rib
f
Avion Airplanes
5,91g
5,48g
5,18g
0,56g
I
avion_airplanes
Elevon RIGHT
E_R_1
E_R_2
E_R_3
E_R_3_Rib
5,91g
5,48g
5,18g
0,56g
4
Page 4
A
vion
airplanes
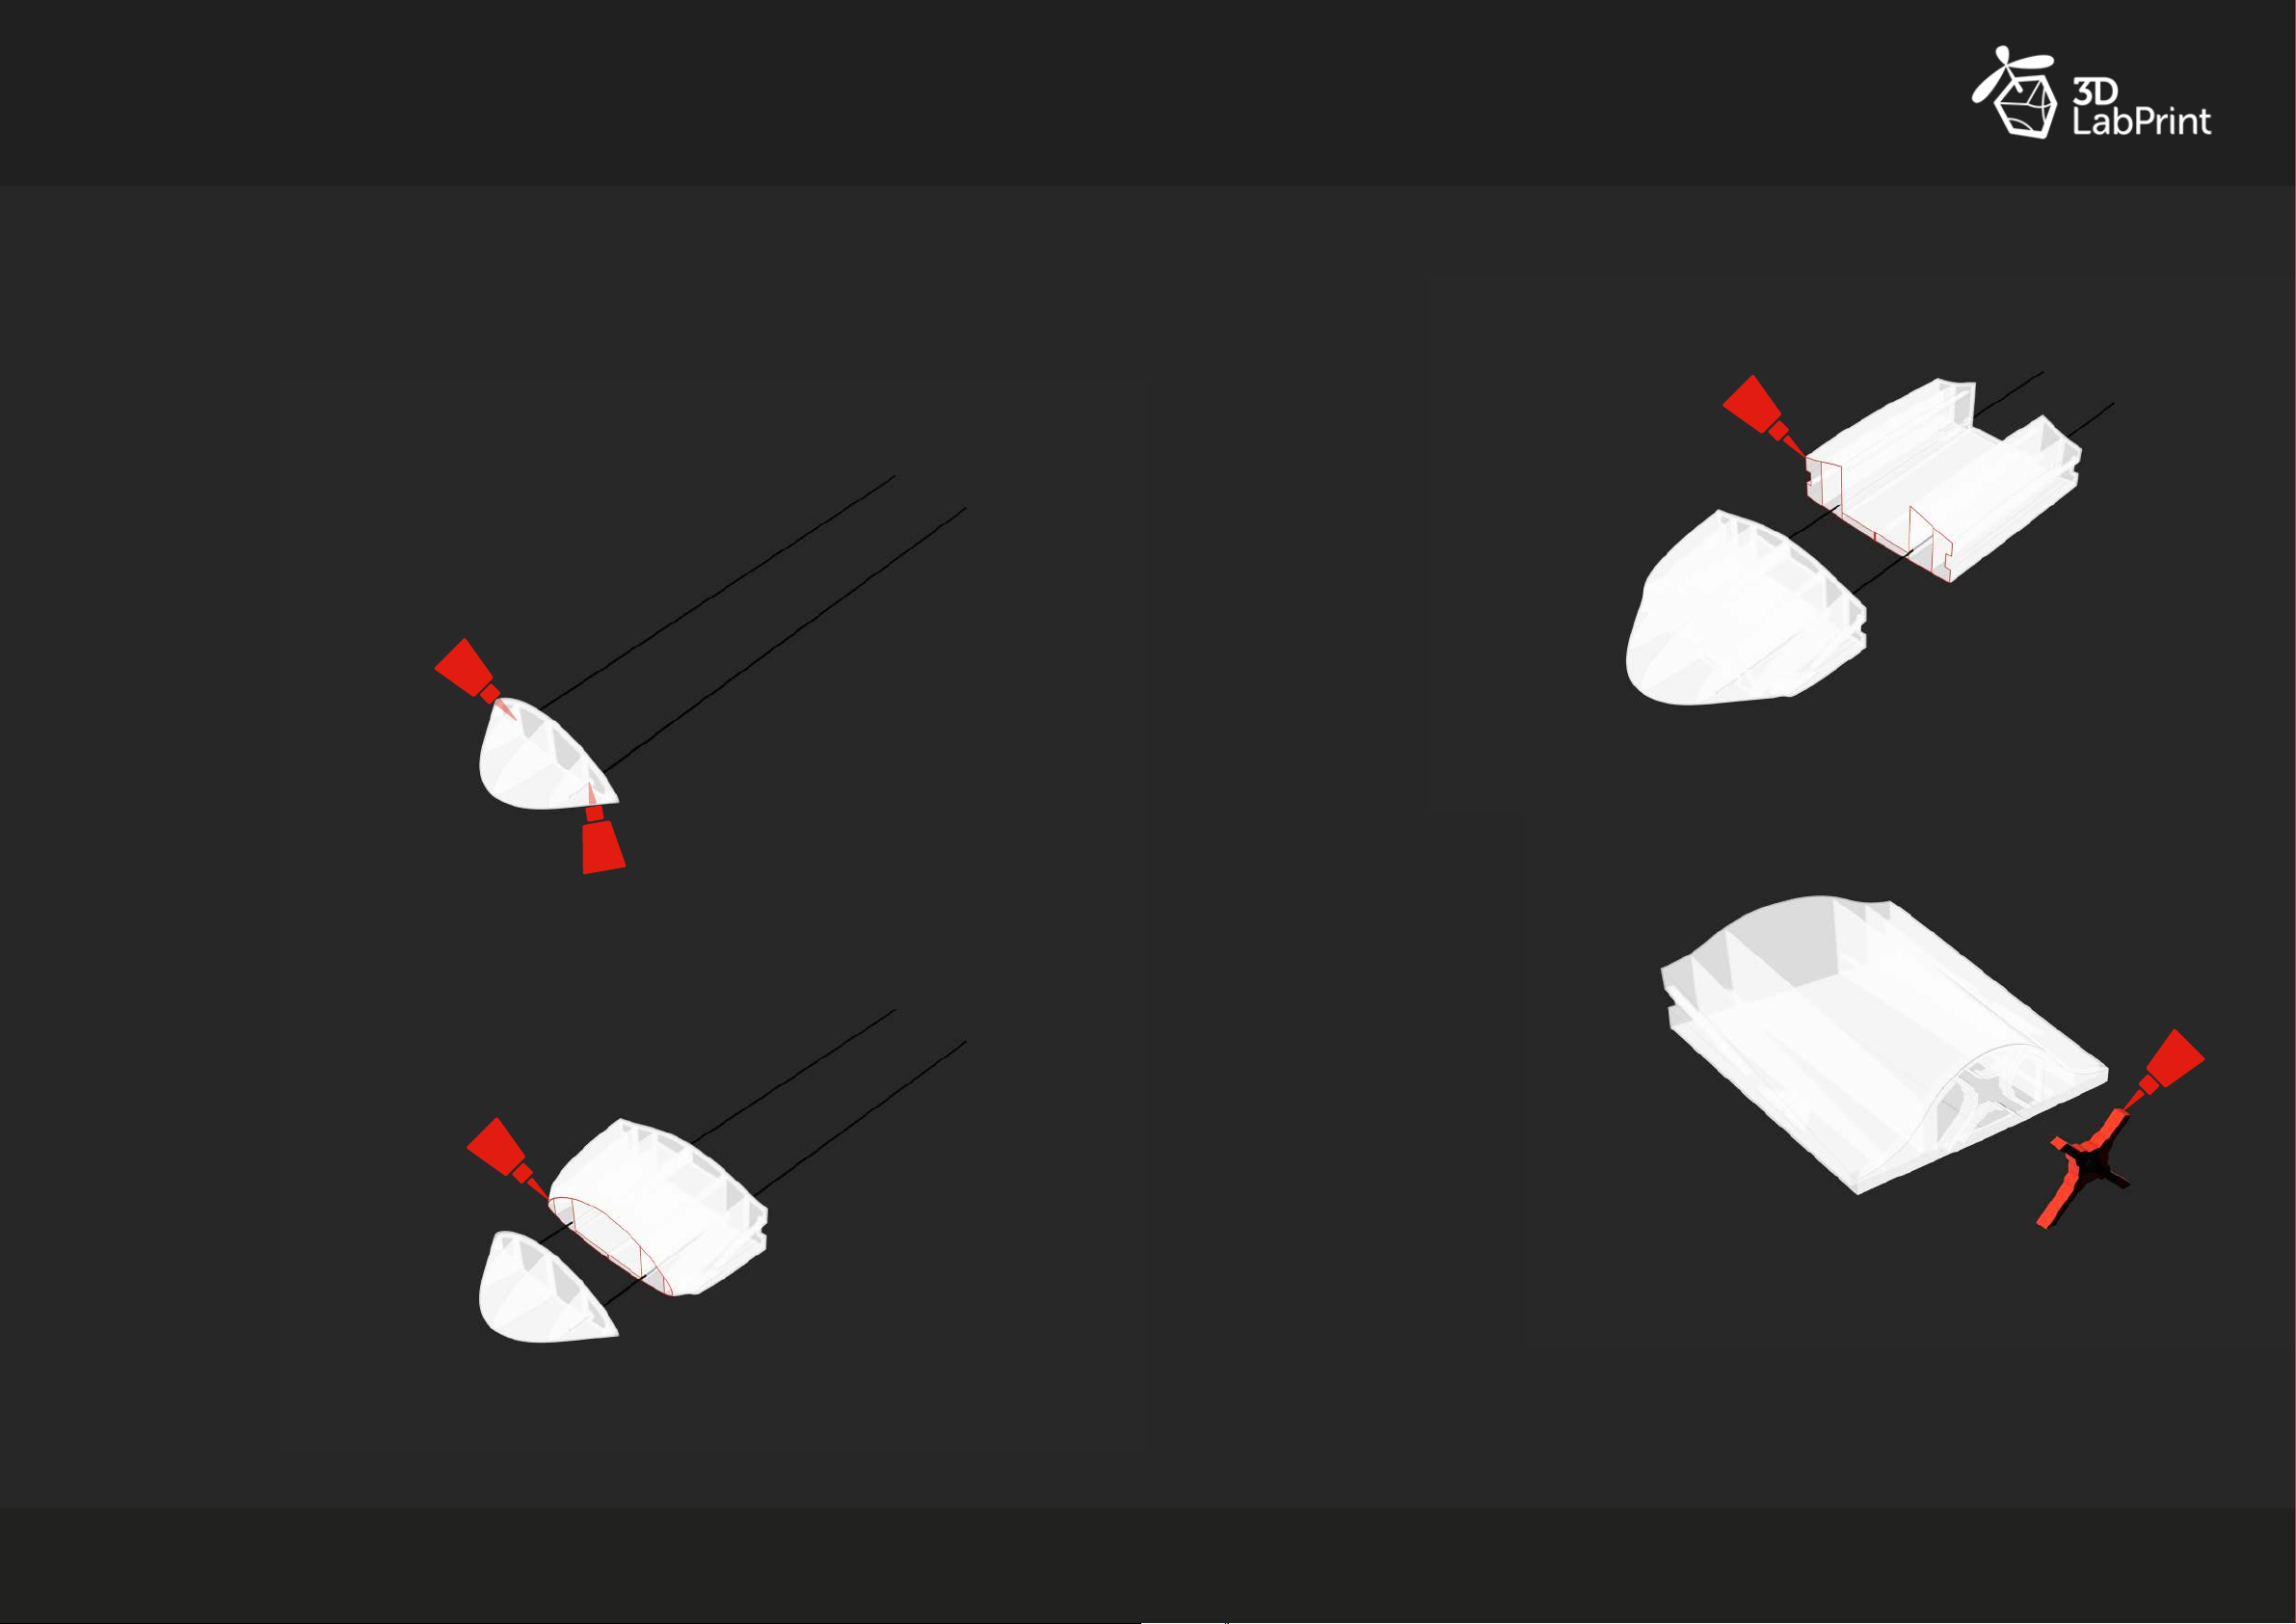
Fuselage assembly
You will need
1.
Glue ø1×285mm carbon rod 2x with
medium CA glue into F_1 part.
If you have problem with
printing very end of
the F_1 part, use putty
to ll imperfections.
F_1, F_2, F_3, F_4, F_L_Rib, F_R_Rib, Motor_mount, CA glue,
Activator, Snap-o knife, ø1×285mm carbon rod 2x
CA
Fuselage assembly
CA
3.
Glue F_ 2 and F_ 3
with medium CA.
2.
Glue F_ 1 and F_ 2
with medium CA.
CA
CA
4.
Glue
F_4 together with medium CA.
Before applying CA glue make sure,
that parts ts together easily.
Motor_mount and
CA
DUCK user manual
f
Avion Airplanes
I
avion_airplanes
6
Page 5
A
vion
airplanes
Fuselage assembly Fuselage assembly
5.
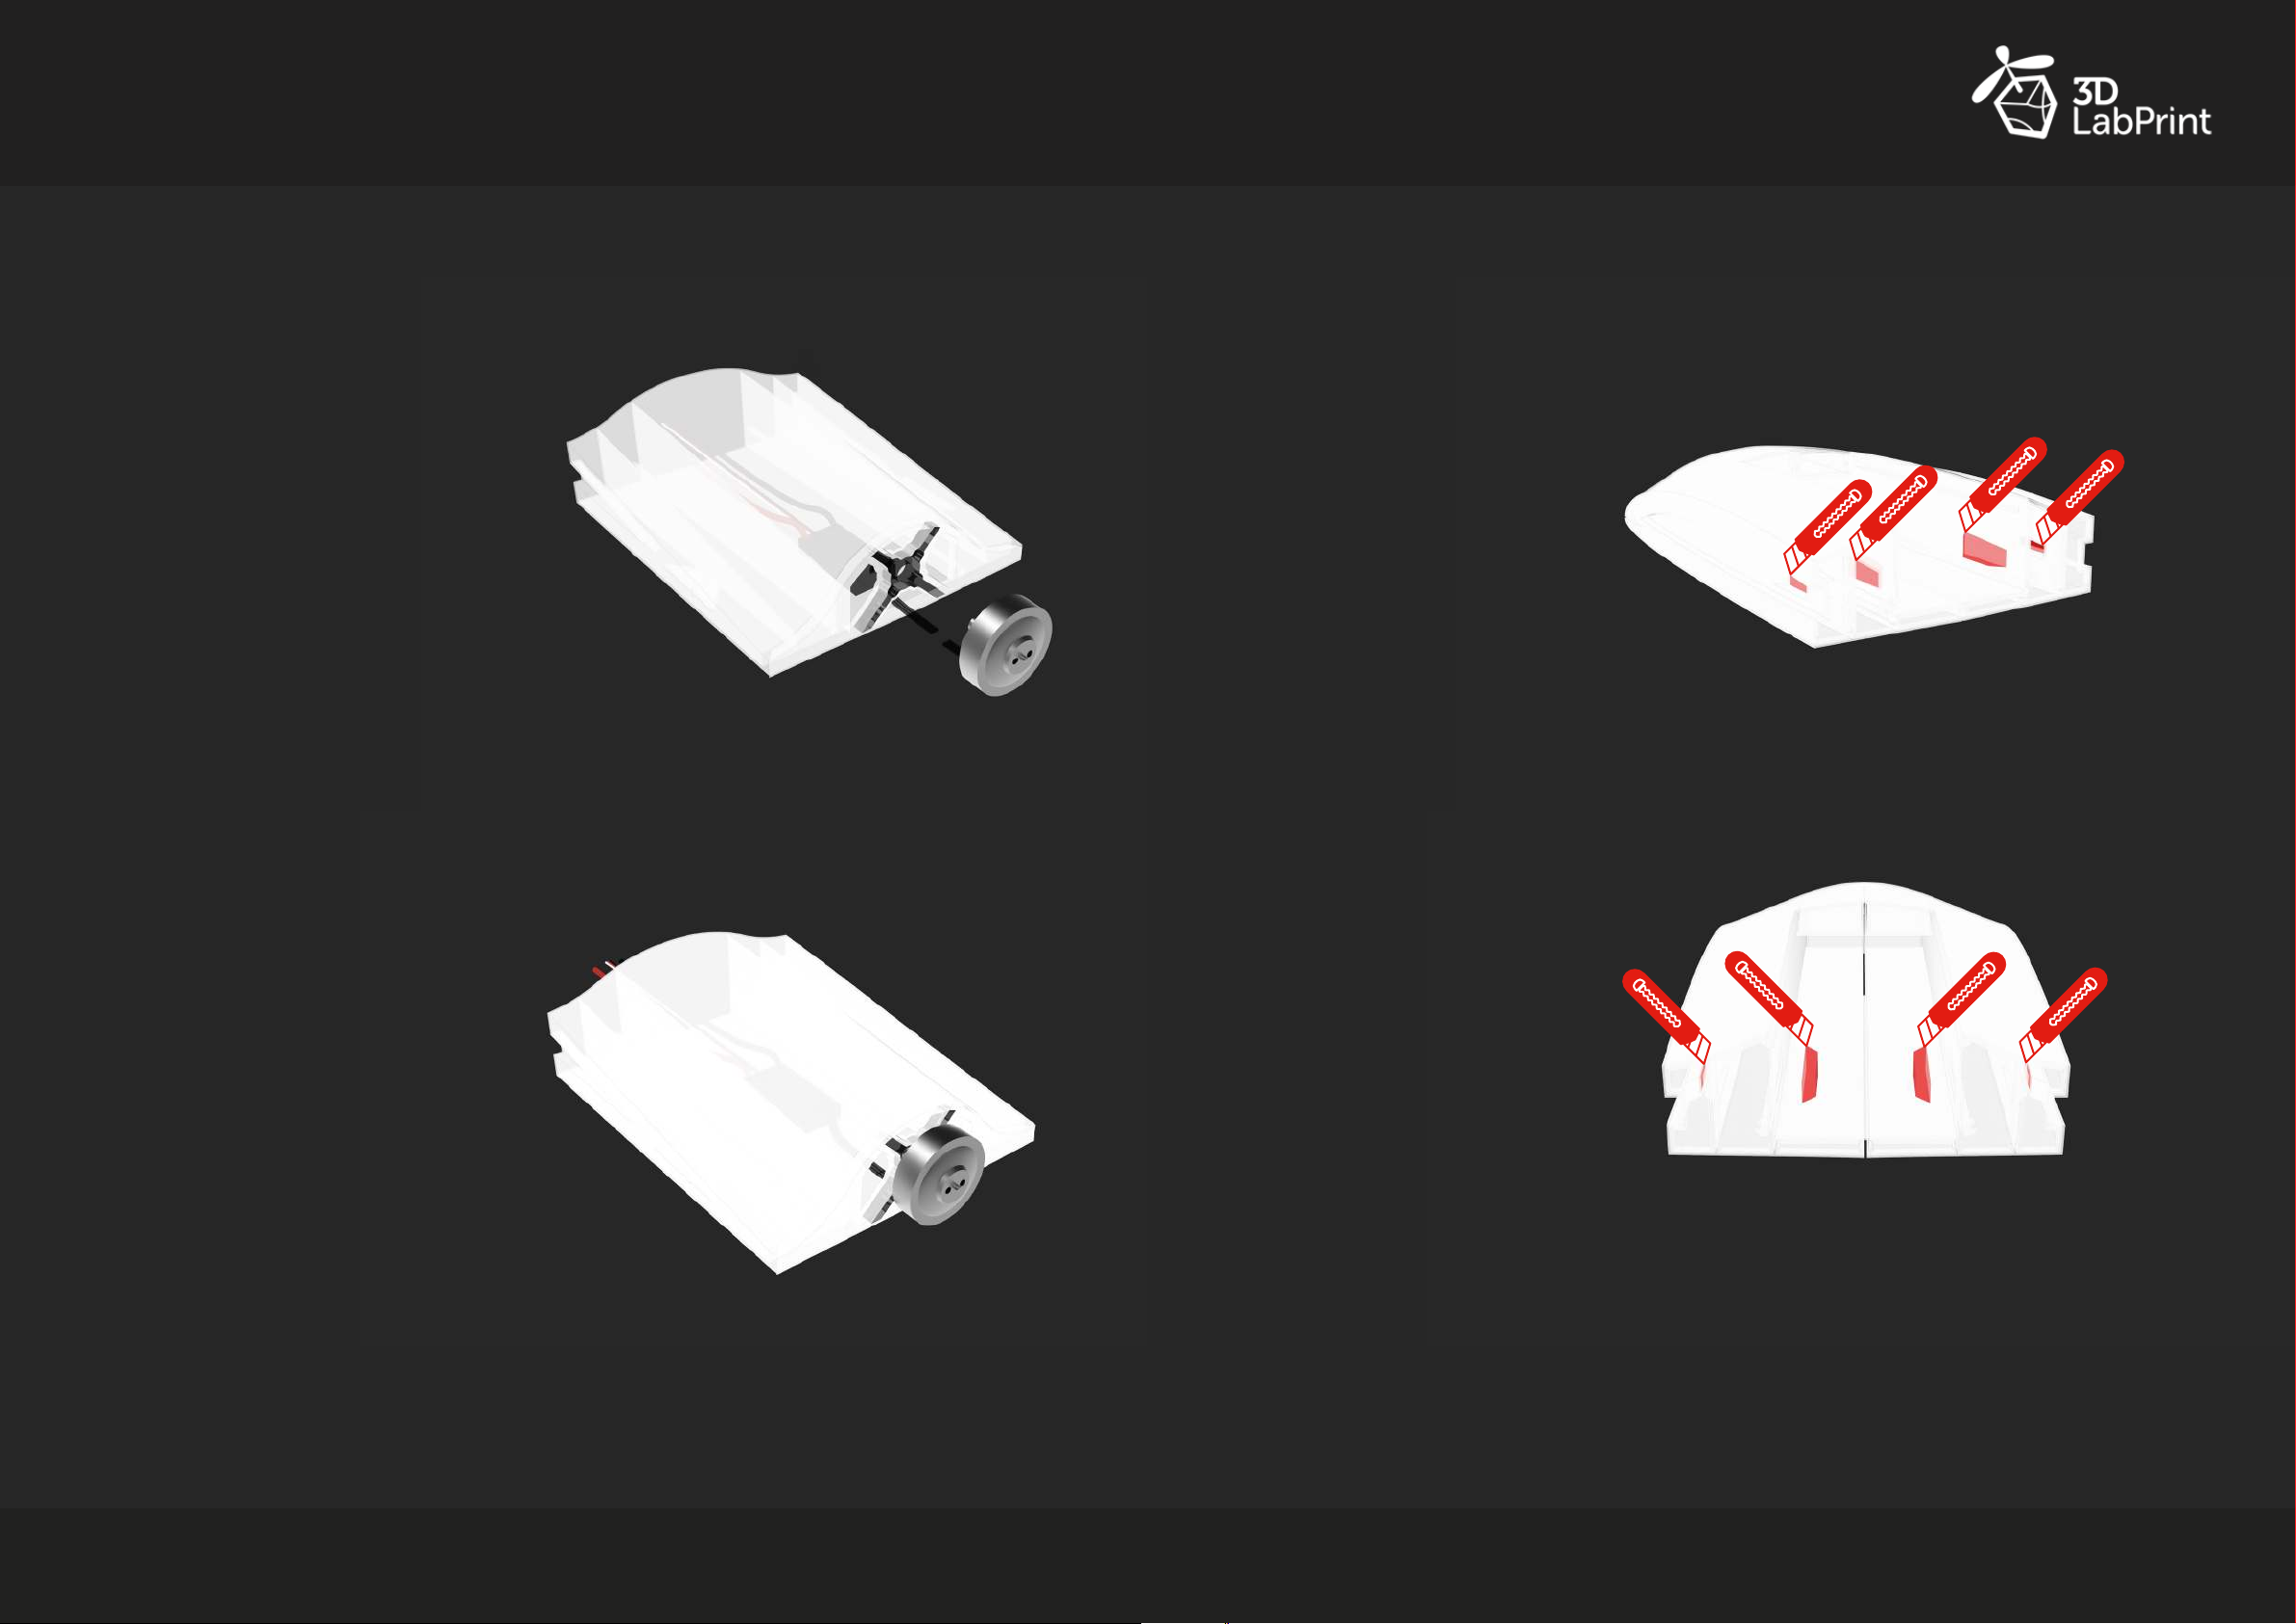
Prepare your Motorand ESC.
Before soldering Motor and ESC
together make sure, that all
cables has necessary length.
6.
Install Motor and secure ESC.
7.
Cut or drill 4x hole for
servocables into
F_3 part. Inner parts cut
compleatley o.
DUCK user manual
f
Avion Airplanes
I
avion_airplanes
8
Page 6
A
vion
airplanes
Fuselage assembly Fuselage assembly
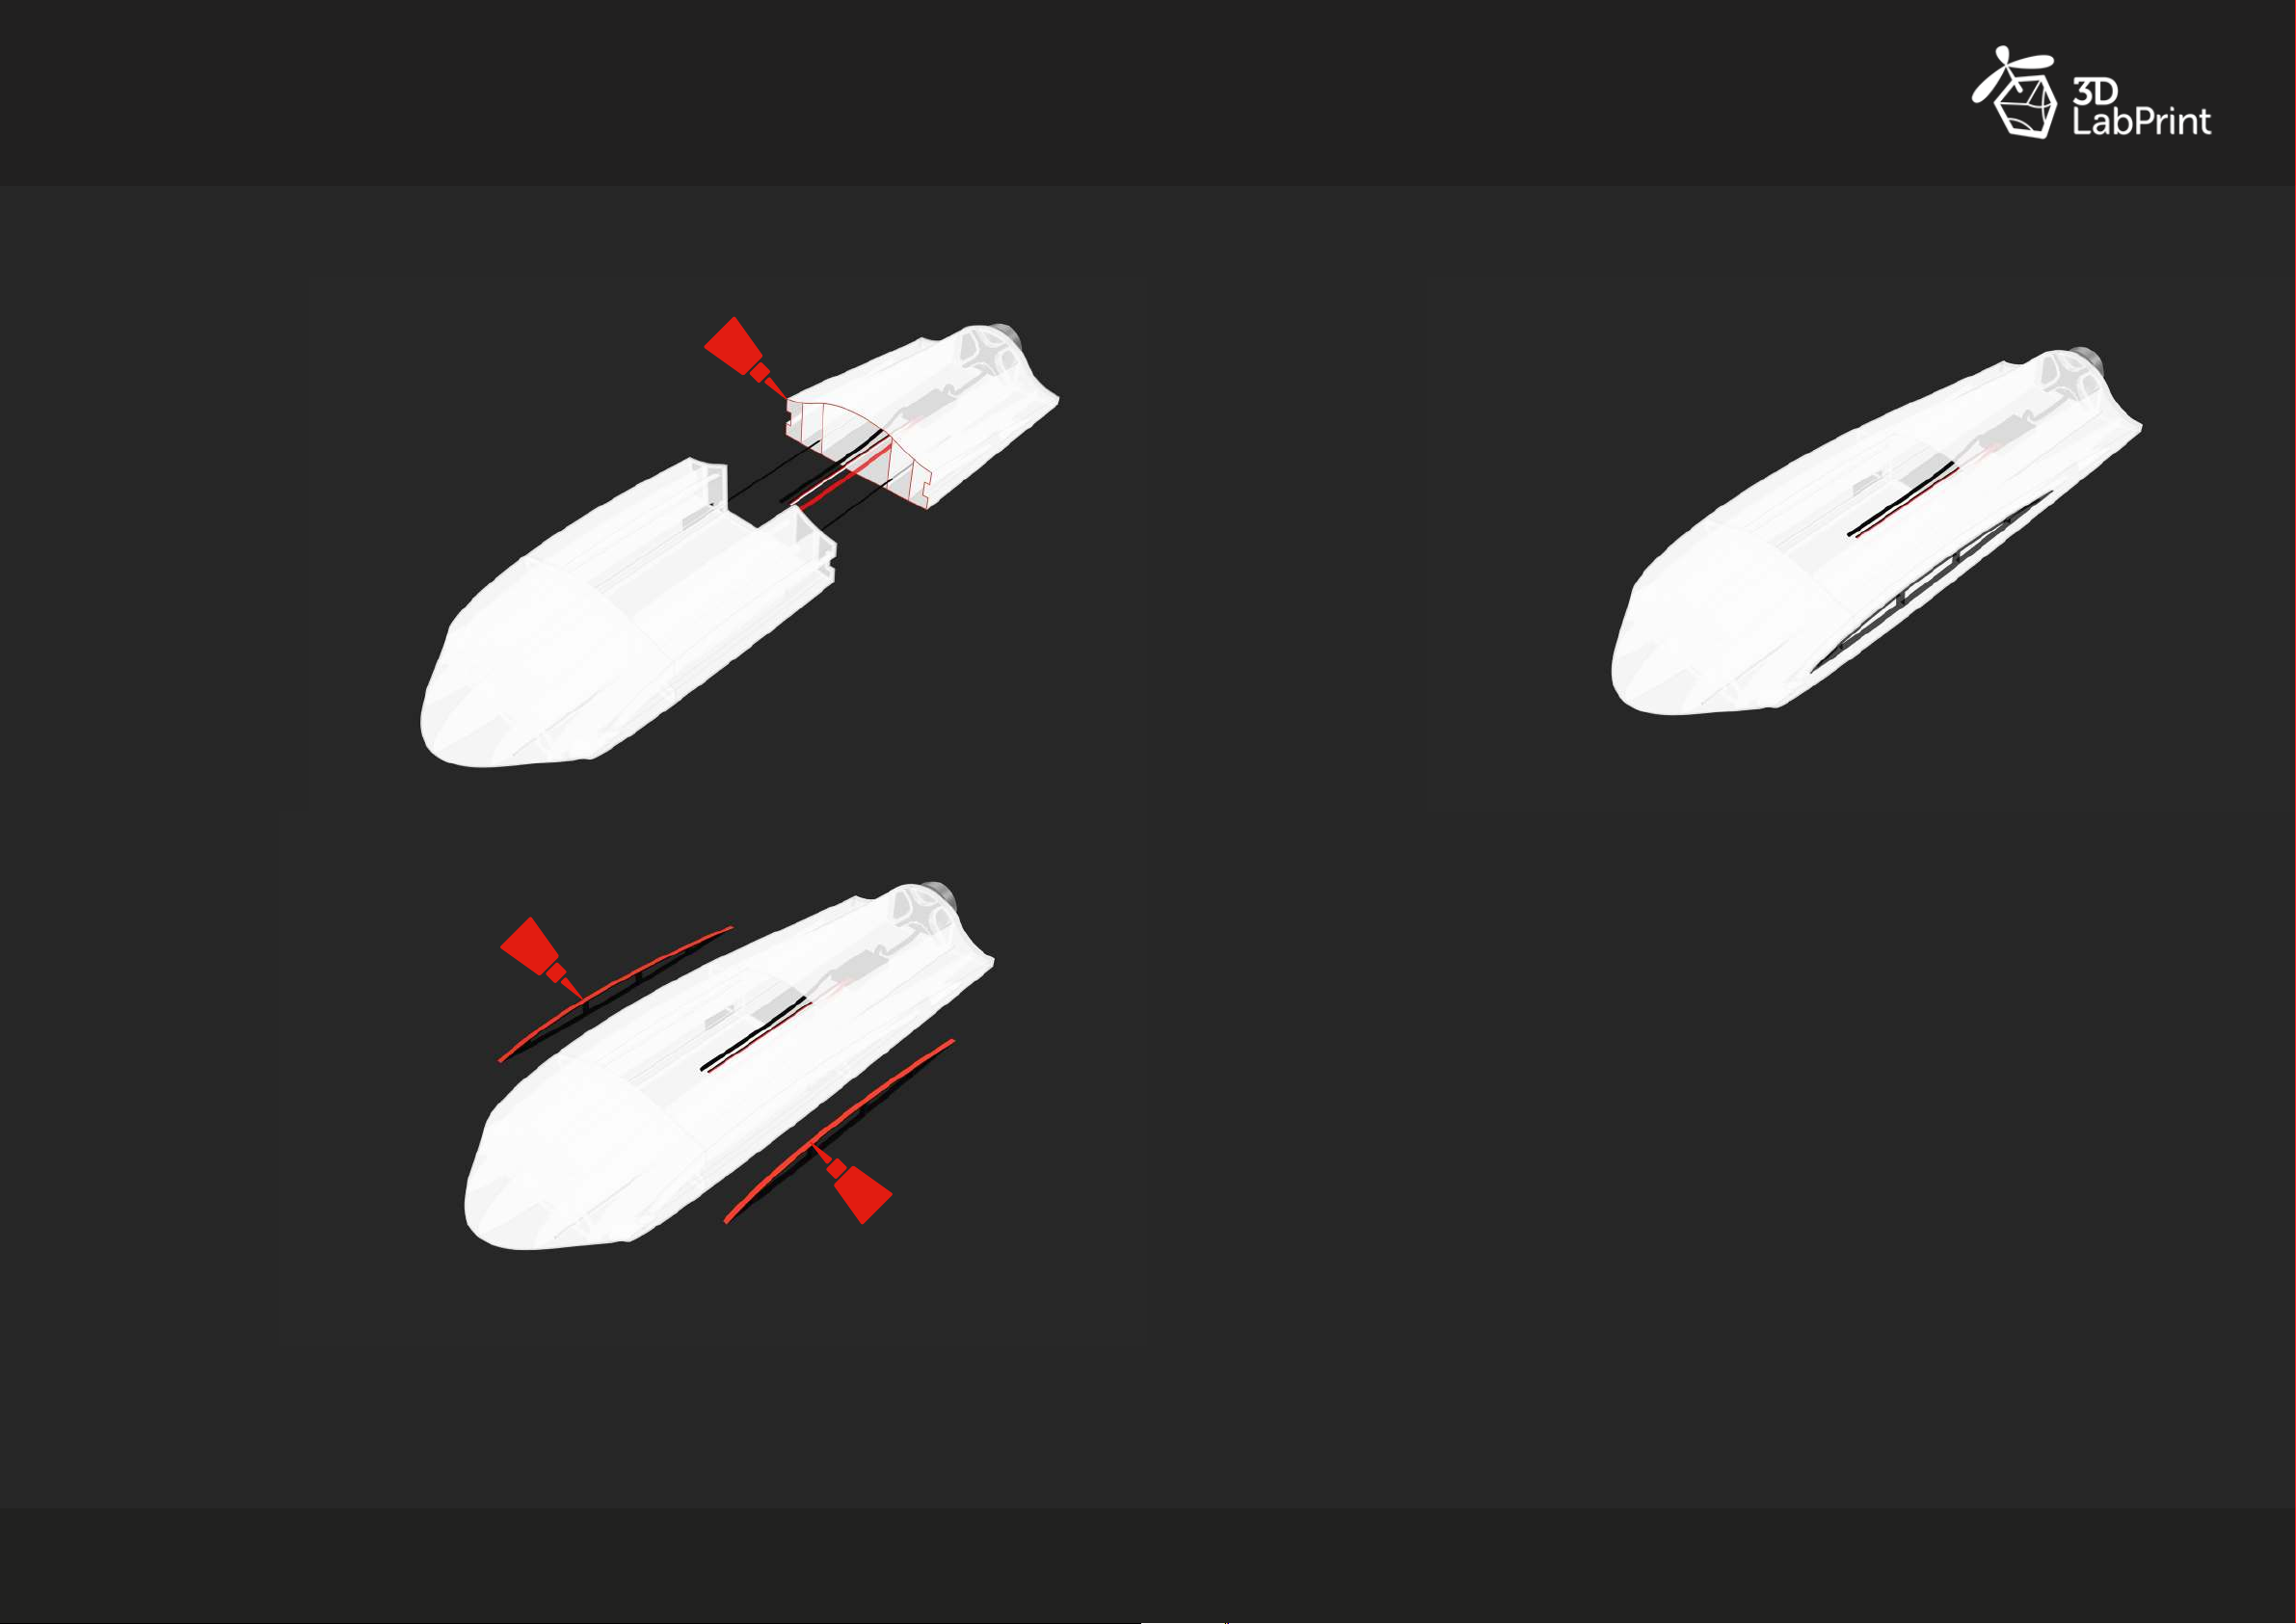
CA
8.
Glue F_ 3 and F_4
with medium CA.
9.
Glue F_L_Rib and F_R_Rib
with medium CA into fuselage.
10.
Fuselage is done.
CA
DUCK user manual
CA
f
Avion Airplanes
I
avion_airplanes
10
Page 7
A
vion
airplanes
Wings assembly
You will need
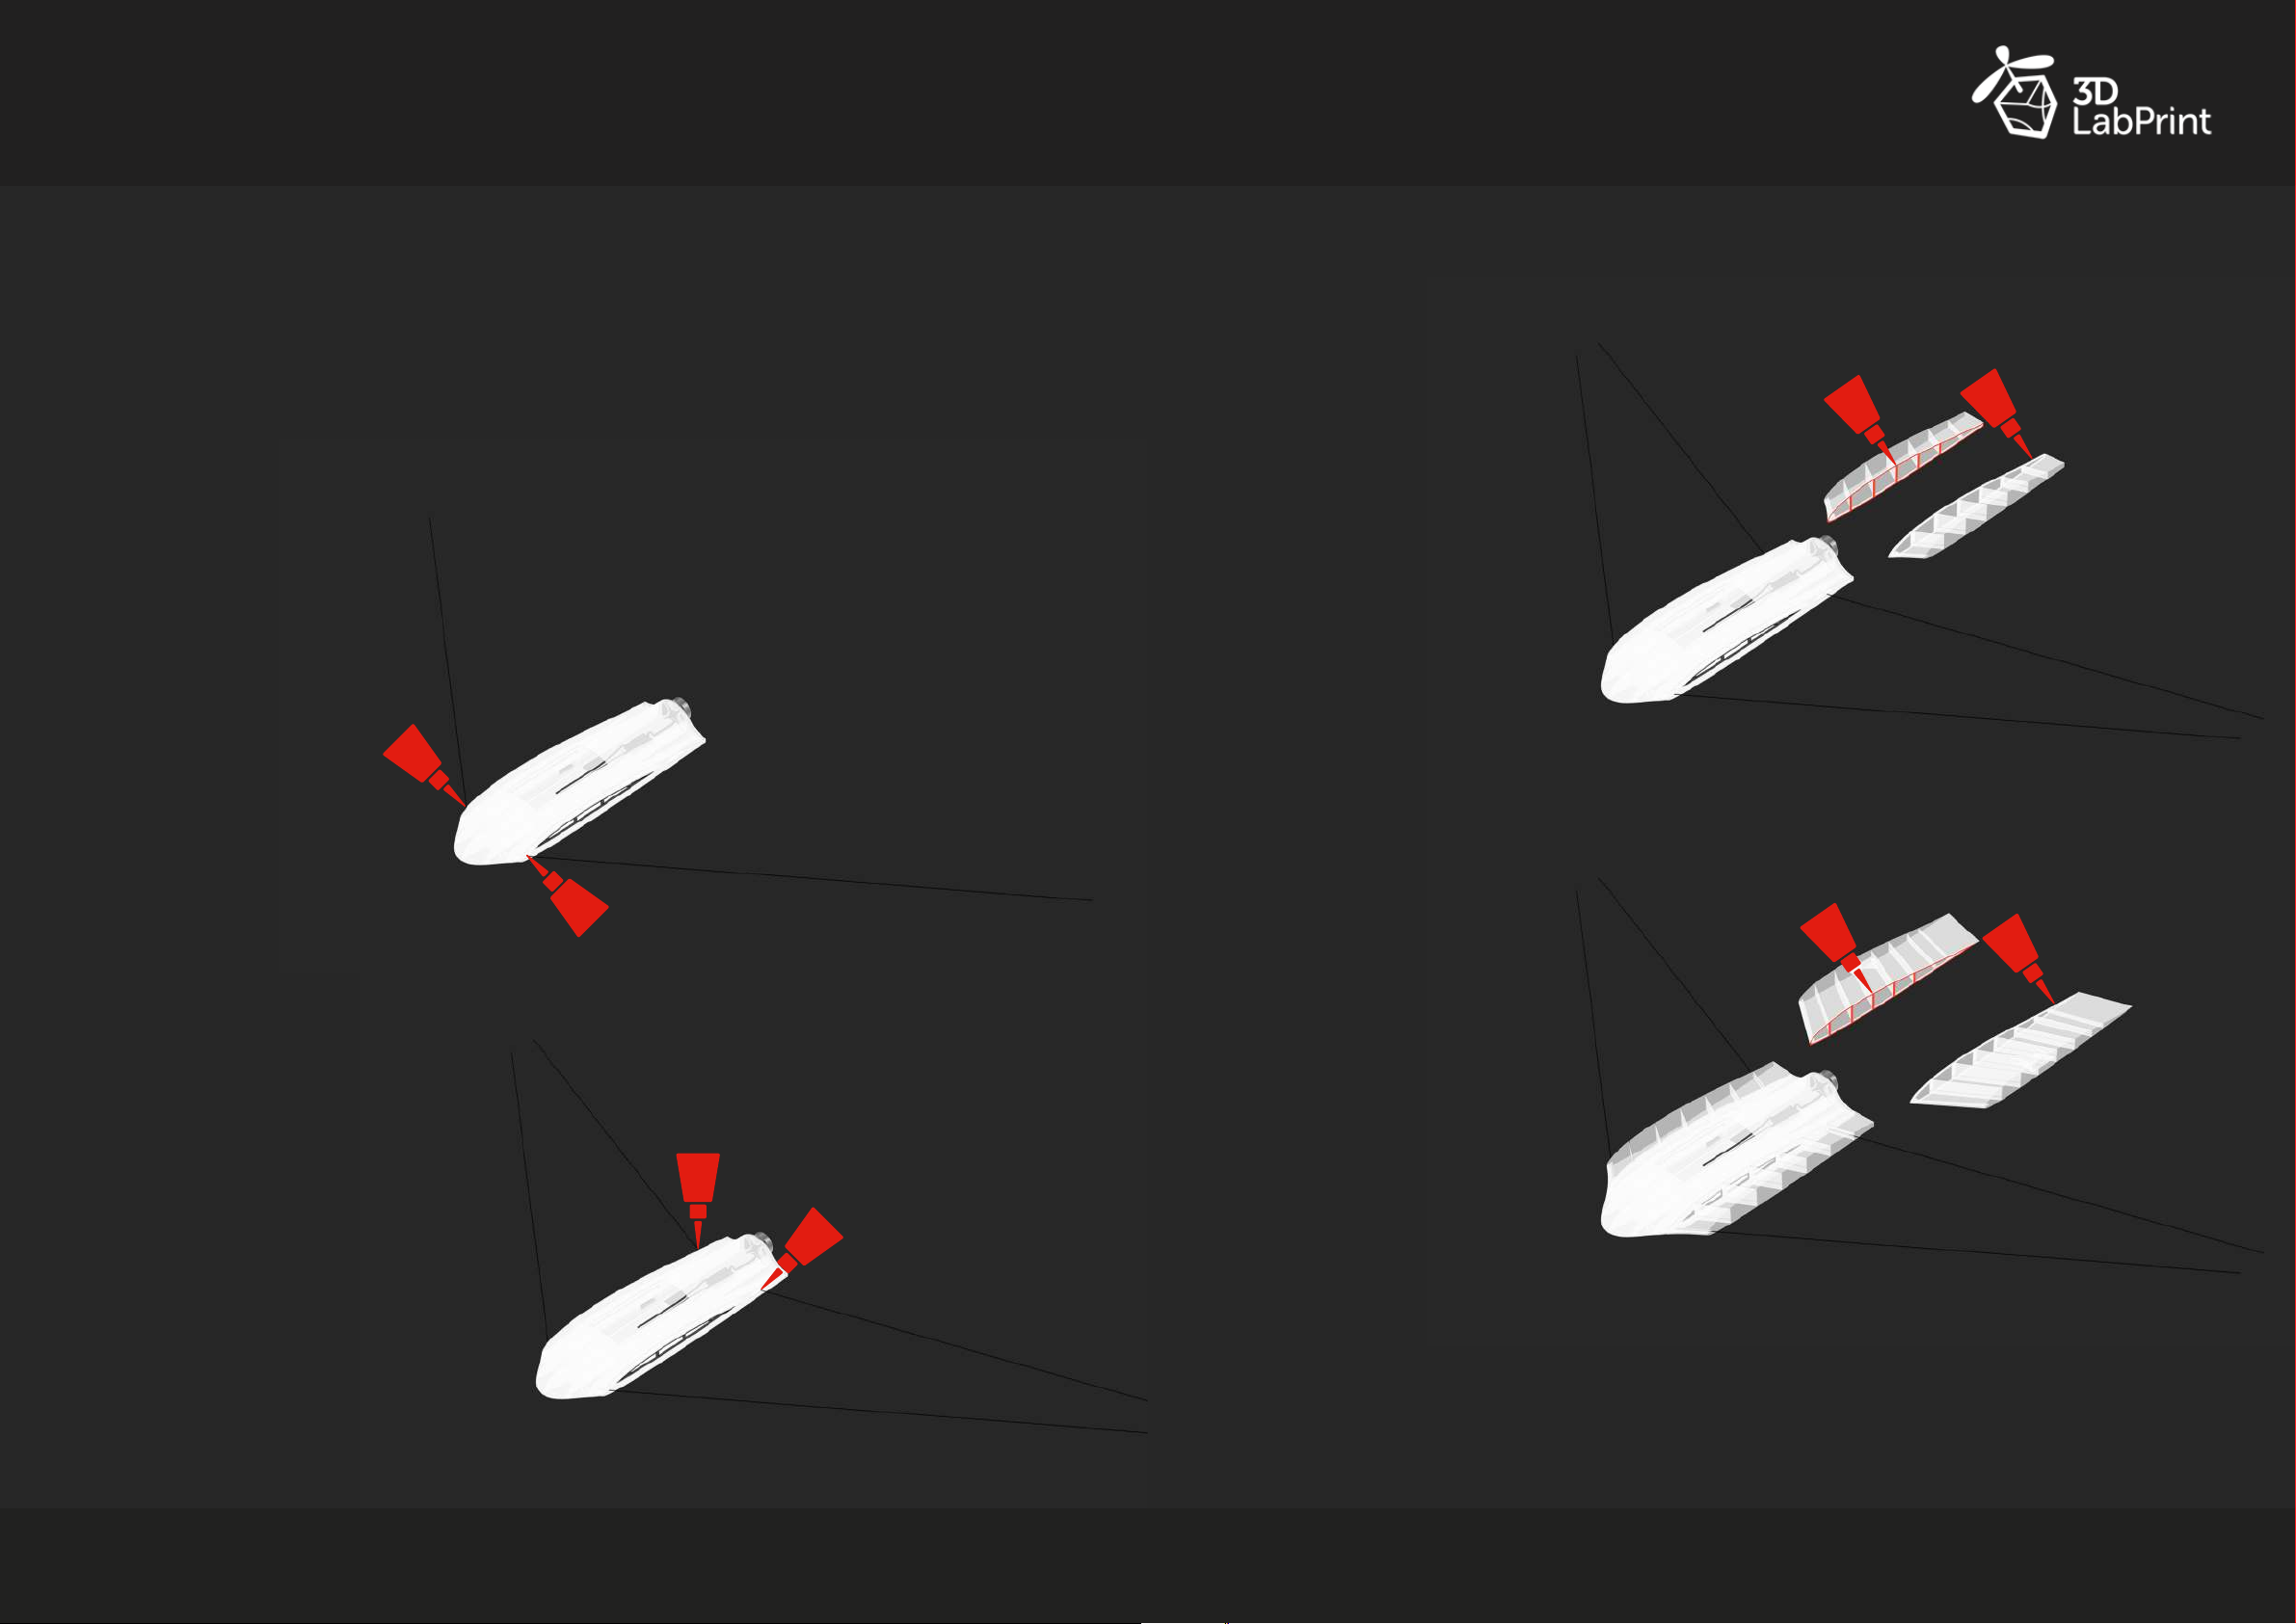
1.
Glue ø1×571mm
carbon rod 2x
with medium CA
glue into F_2 part.
Make sure, that
parts W_L_1 and
W_R_1 will t
correctly.
W_L_1, W_L_2, W_L_3, W_L_3_Cover, W_L_4, W_L_5,
W_L_6, W_L_7, W_L_2_Rib
W_R_1, W_R_2, W_R_3, W_R_3_Cover, W_R_4, W_R_5,
W_R_6, W_R_7, W_R_2_Rib
ø1×571mm carbon rod 2x (wing front)
ø1×487mm carbon rod 2x (wing back)
CA glue, Activator
CA
Wings assembly
3.
Glue parts W_L_1 and
W_R_1 to the fuselage.
Apply medium CA glue on
wing parts (or fuselage) and
then slide them on the carbon rods all the way to the
fuselage.
CA
CA
2.
Glue
carbon rod 2x
with medium CA
glue into F_4 part.
Make sure, that
parts W_L_1 and
W_R_1 will t
correctly.
ø1×487mm
CA
CA
CA
4.
Glue parts W_L_2 and
W_R_2 to the W_L_1 and
W_R_1. Apply medium CA
glue on wing parts and then
slide them on the carbon
rods all the way to the
previous part of the wing.
CA
CA
DUCK user manual
f
Avion Airplanes
I
avion_airplanes
12
Page 8
A
vion
airplanes
Wings assembly Wings assembly
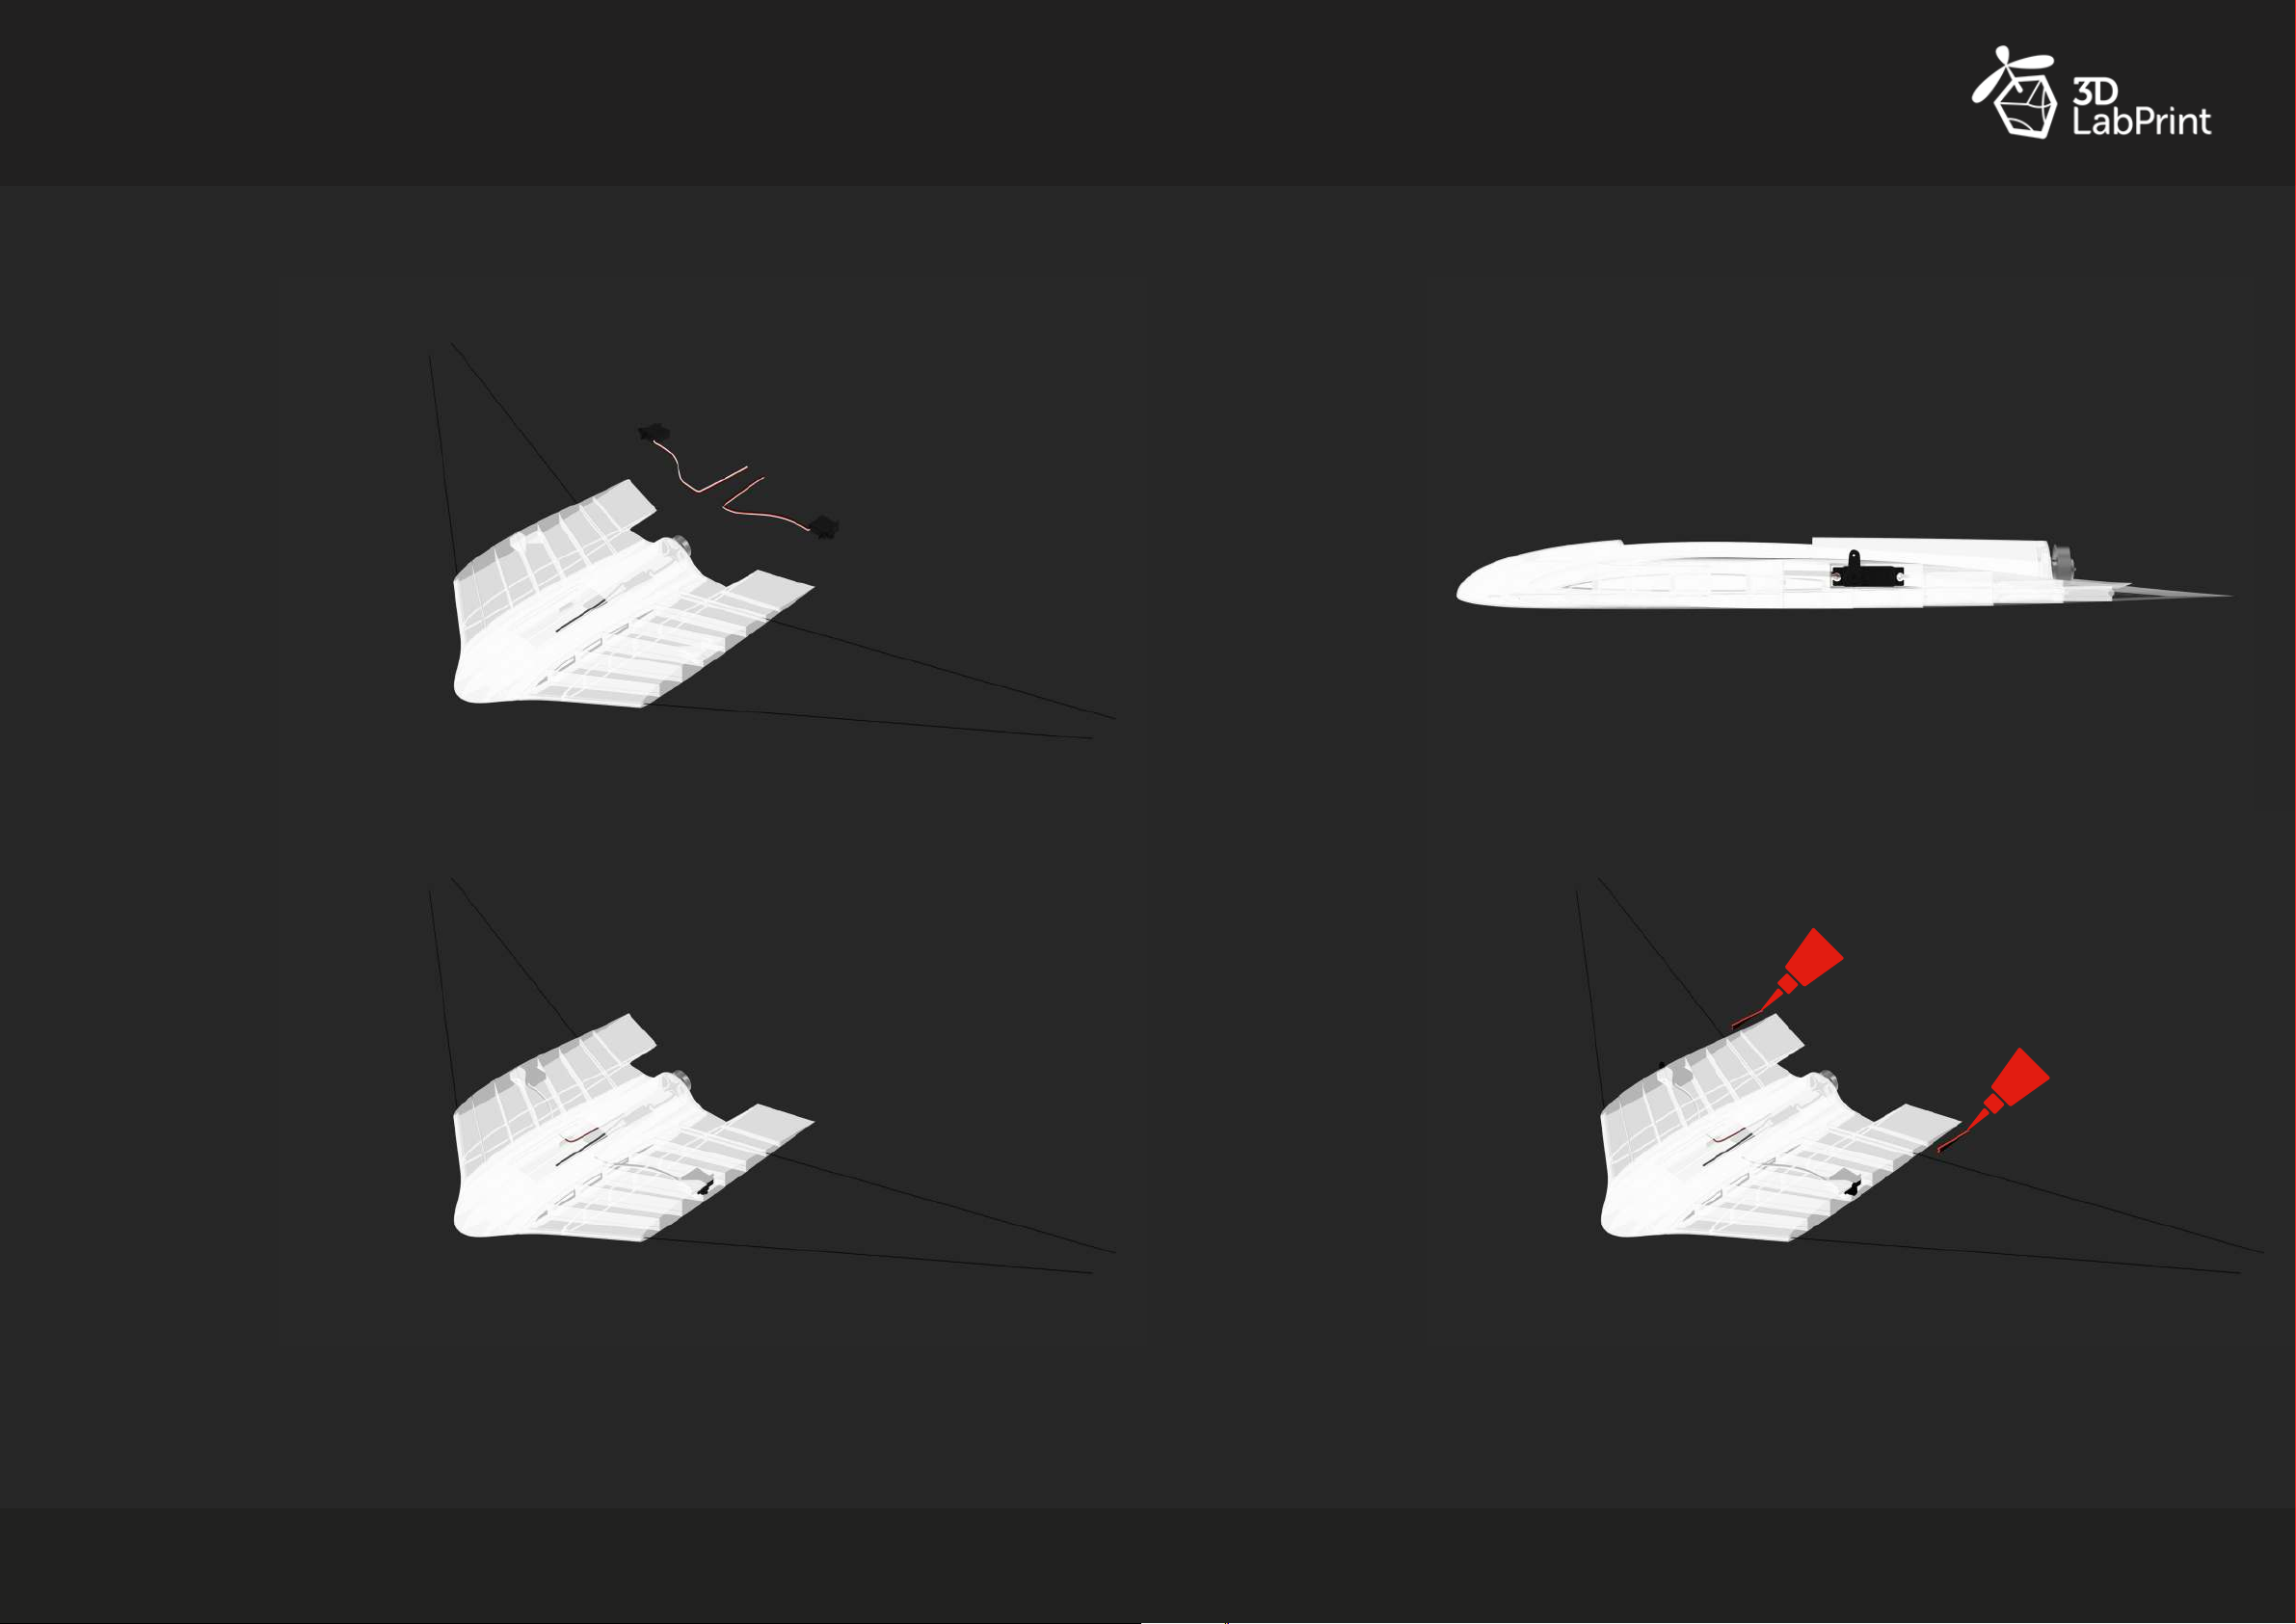
5.
Prepare Corona DS-843MG
servos and make sure, that
servo cables has necessary
length.
7.
Servo and servo horn
position.
CA
6.
Install servos into W_L_2
and W_R_2 parts with
original screws. Servo
horns must be installed
before gluing next parts
of the wing!
DUCK user manual
8.
Glue parts W_L_2_Rib and
W_R_2_Rib to the W_L_2
and W_R_2 with medium CA
glue.
f
Avion Airplanes
I
avion_airplanes
CA
14
Page 9
A
vion
airplanes
Wings assembly Wings assembly
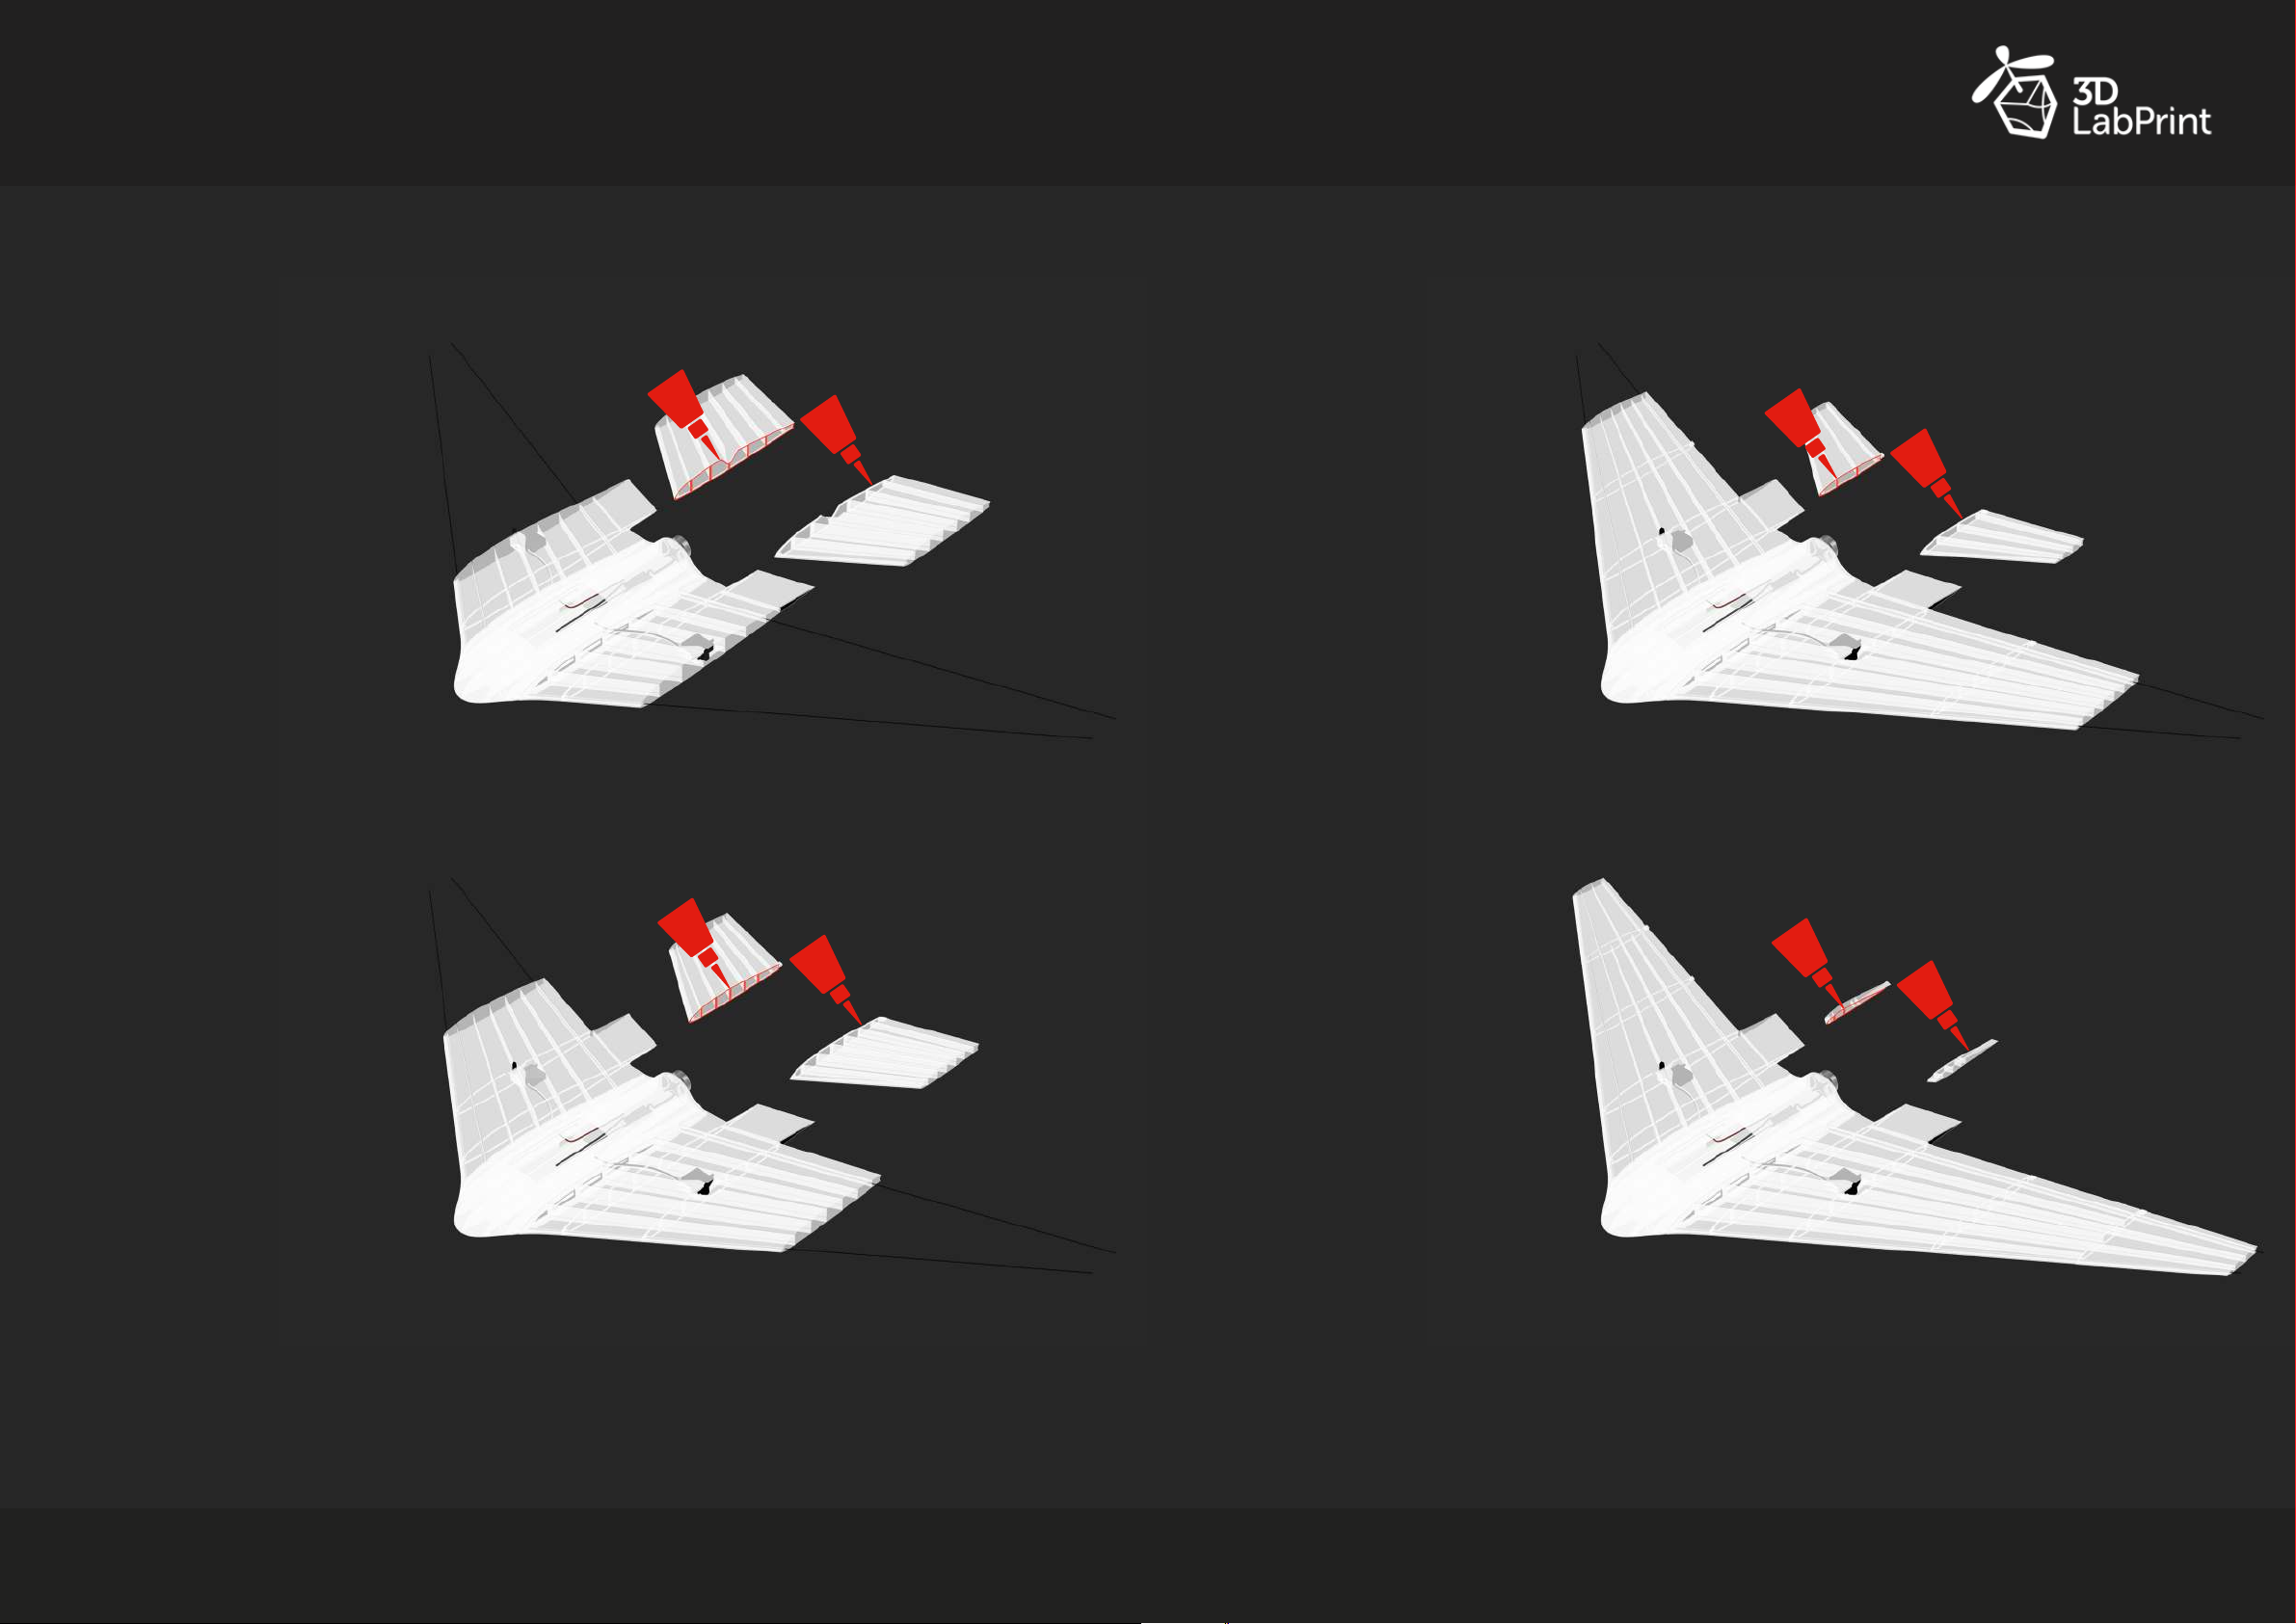
9.
Glue parts W_L_3 and
W_R_3 to the W_L_2 and
W_R_2. Apply medium CA
glue on wing parts and then
slide them on the carbon
rods all the way to the
previous part of the wing.
CA
CA
CA
CA
11.
Glue parts W_L_5 and
W_R_5 to the W_L_4 and
W_R_4. Apply medium CA
glue on wing parts and then
slide them on the carbon
rods all the way to the
previous part of the wing.
CA
CA
CA
CA
10.
Glue parts W_L_4 and
W_R_4 to the W_L_3 and
W_R_3. Apply medium CA
glue on wing parts and then
slide them on the carbon
rods all the way to the
previous part of the wing.
DUCK user manual
12.
Glue parts W_L_6 and
W_R_6 to the W_L_5 and
W_R_5. Apply medium CA
glue on wing parts and then
slide them on the carbon
rods all the way to the
previous part of the wing.
f
Avion Airplanes
I
avion_airplanes
16
Page 10
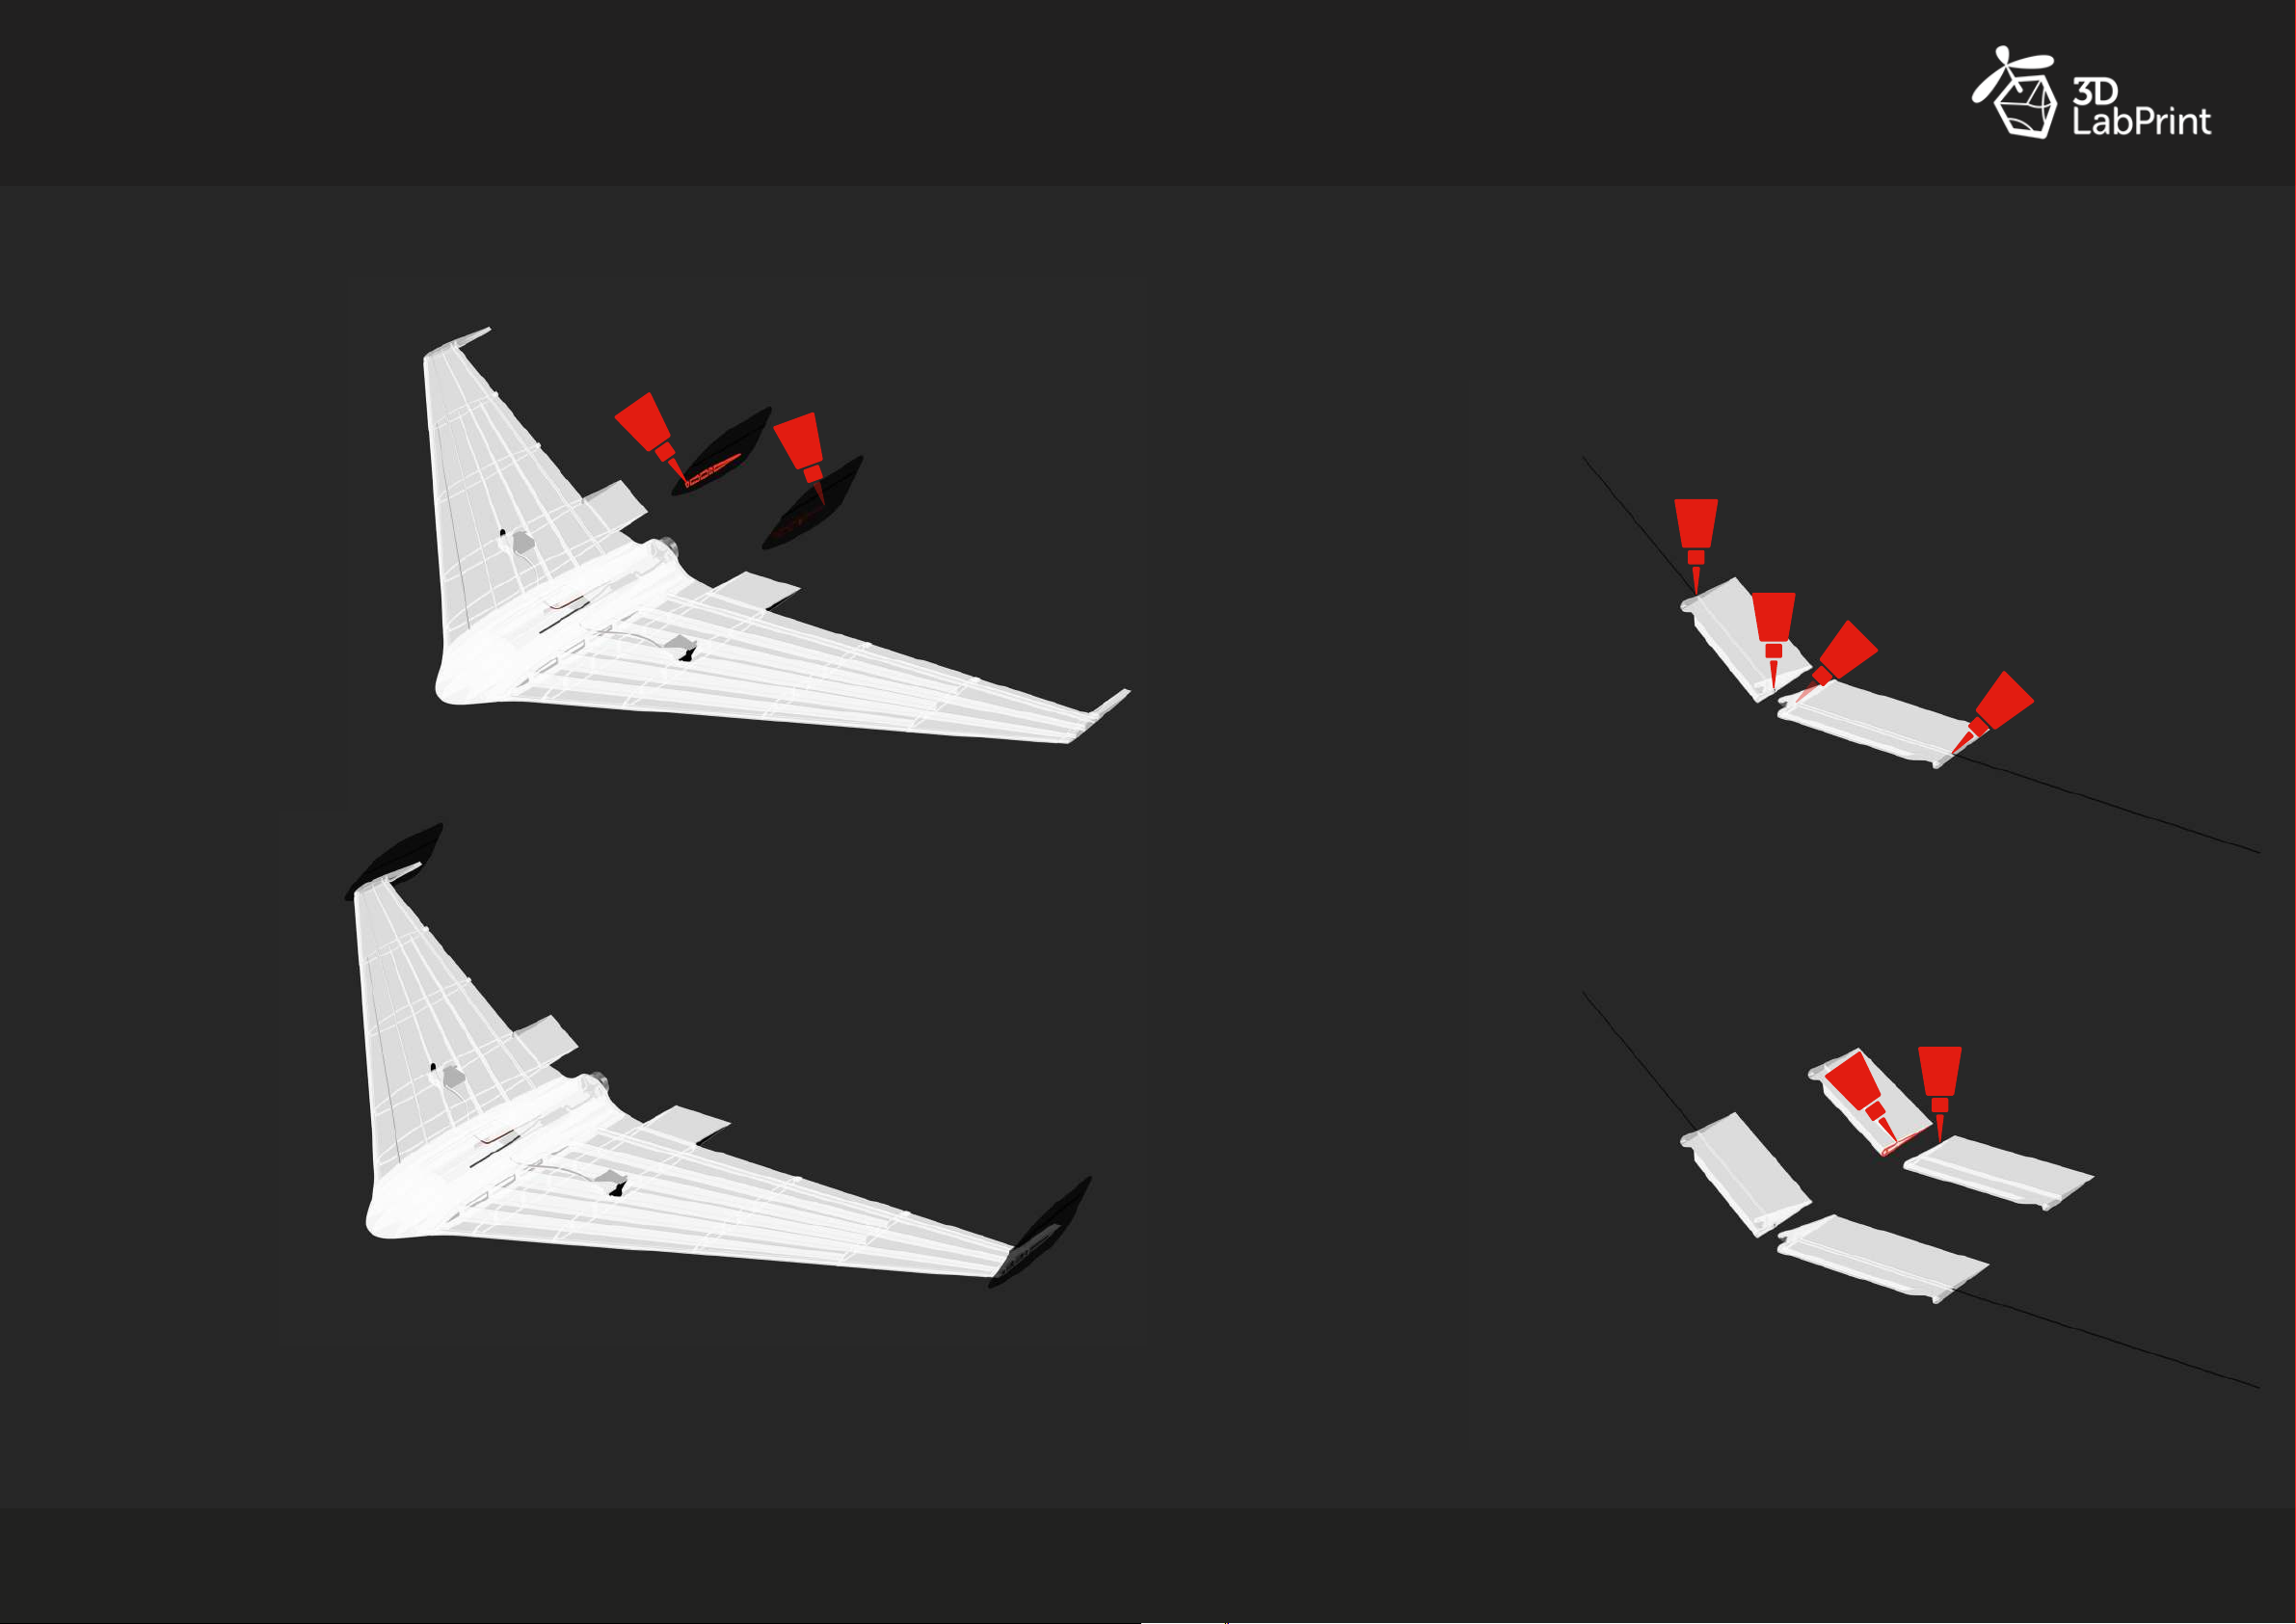
A
vion
airplanes
Wings assembly
13.
Glue parts W_L_7 and
W_R_7 to the W_L_6 and
W_R_6. Apply medium CA
glue on wing parts and then
slide them together.
CA
CA
Elevons assembly
You will need E_L_1, E_L_2, E_L_3, E_L_3_Rib,
E_R_1, E_R_2, E_R_3, E_R_3_Rib,
ø1×361mm carbon rod 2x (elevons)
1.
Glue ø1×361mm carbon rod 2x
with medium CA glue into E_L_1
and E_R_1 part.
CA
CA
CA
CA
14.
Wings are done.
DUCK user manual
2.
Glue parts E_L_2 and E_R_2
to the E_L_1 and E_R_1.
Apply medium CA glue on
elevon parts and then slide
them on the carbon rods all
the way to the previous part
of the elevon.
f
Avion Airplanes
I
avion_airplanes
CA
CA
18
Page 11
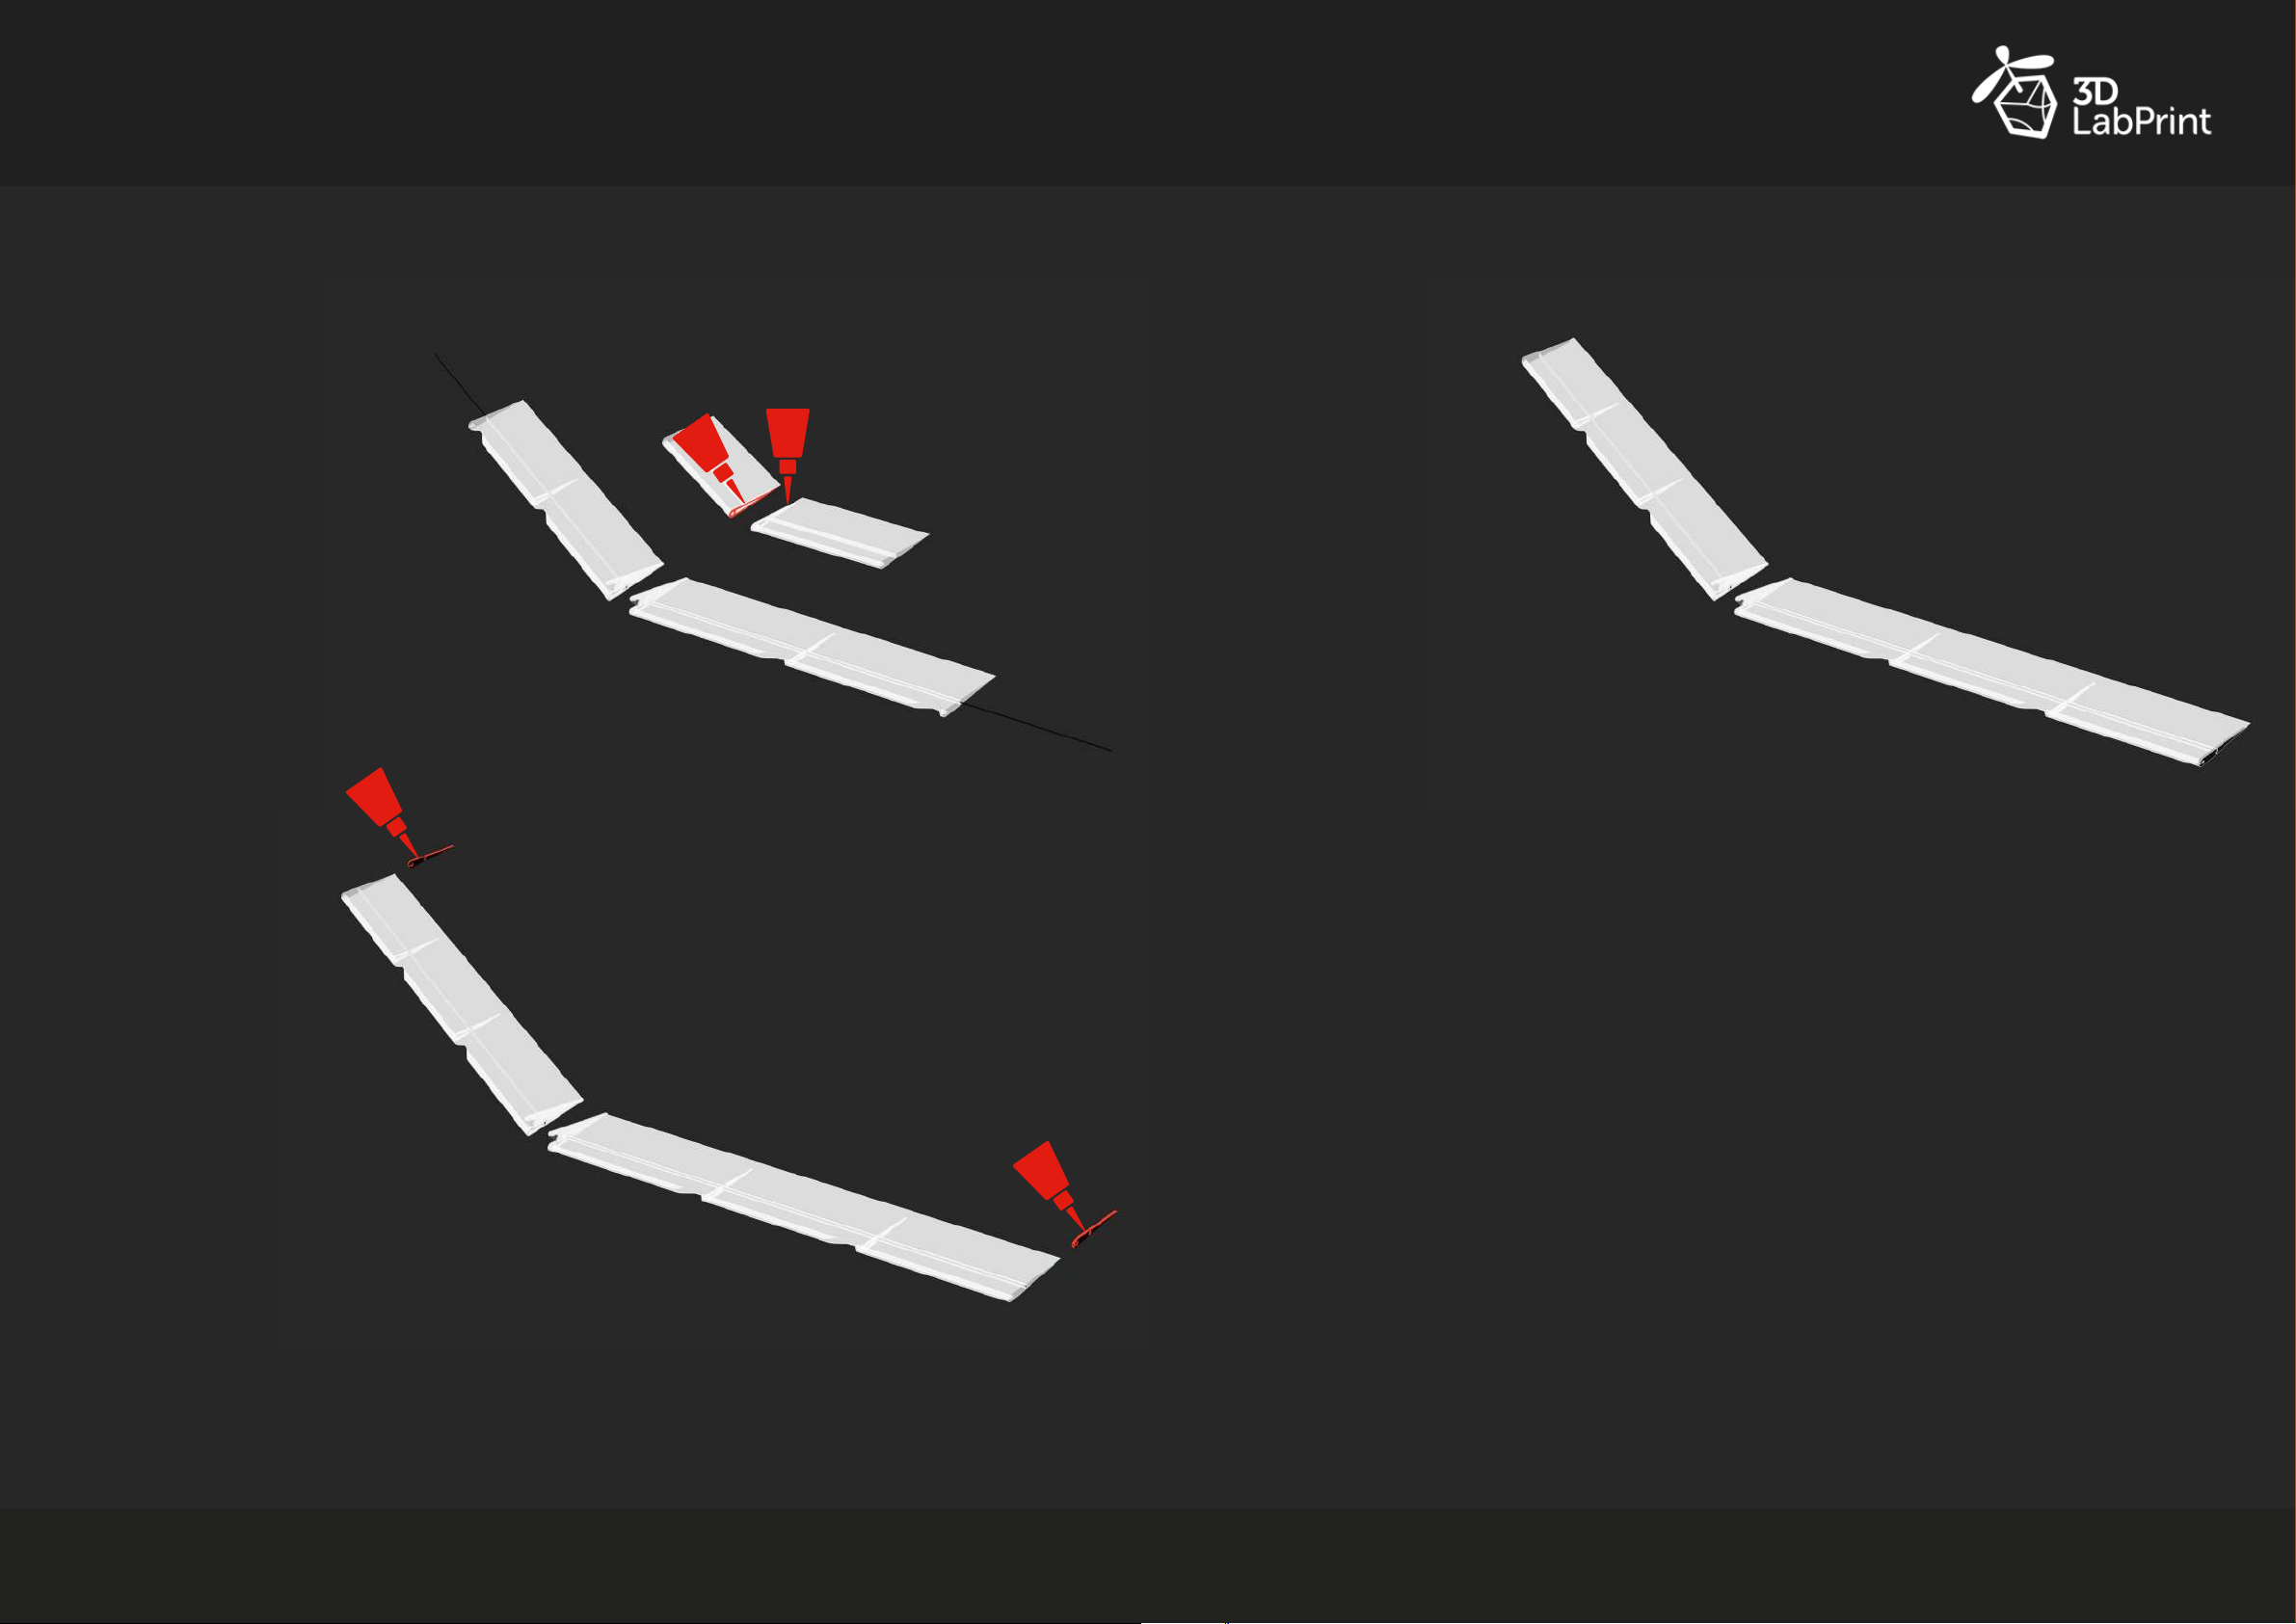
A
vion
airplanes
Elevons assembly Elevons assembly
3.
Glue parts E_L_3 and E_R_3
to the E_L_2 and E_R_2.
Apply medium CA glue on
elevon parts and then slide
them on the carbon rods all
the way to the previous part
of the elevon.
CA
CA
CA
5.
Elevons are done.
4.
Glue parts E_L_3_Rib
and E_R_3_Rib to the
E_L_3 and E_R_3 with
medium CA glue.
DUCK user manual
CA
f
Avion Airplanes
I
avion_airplanes
20
Page 12
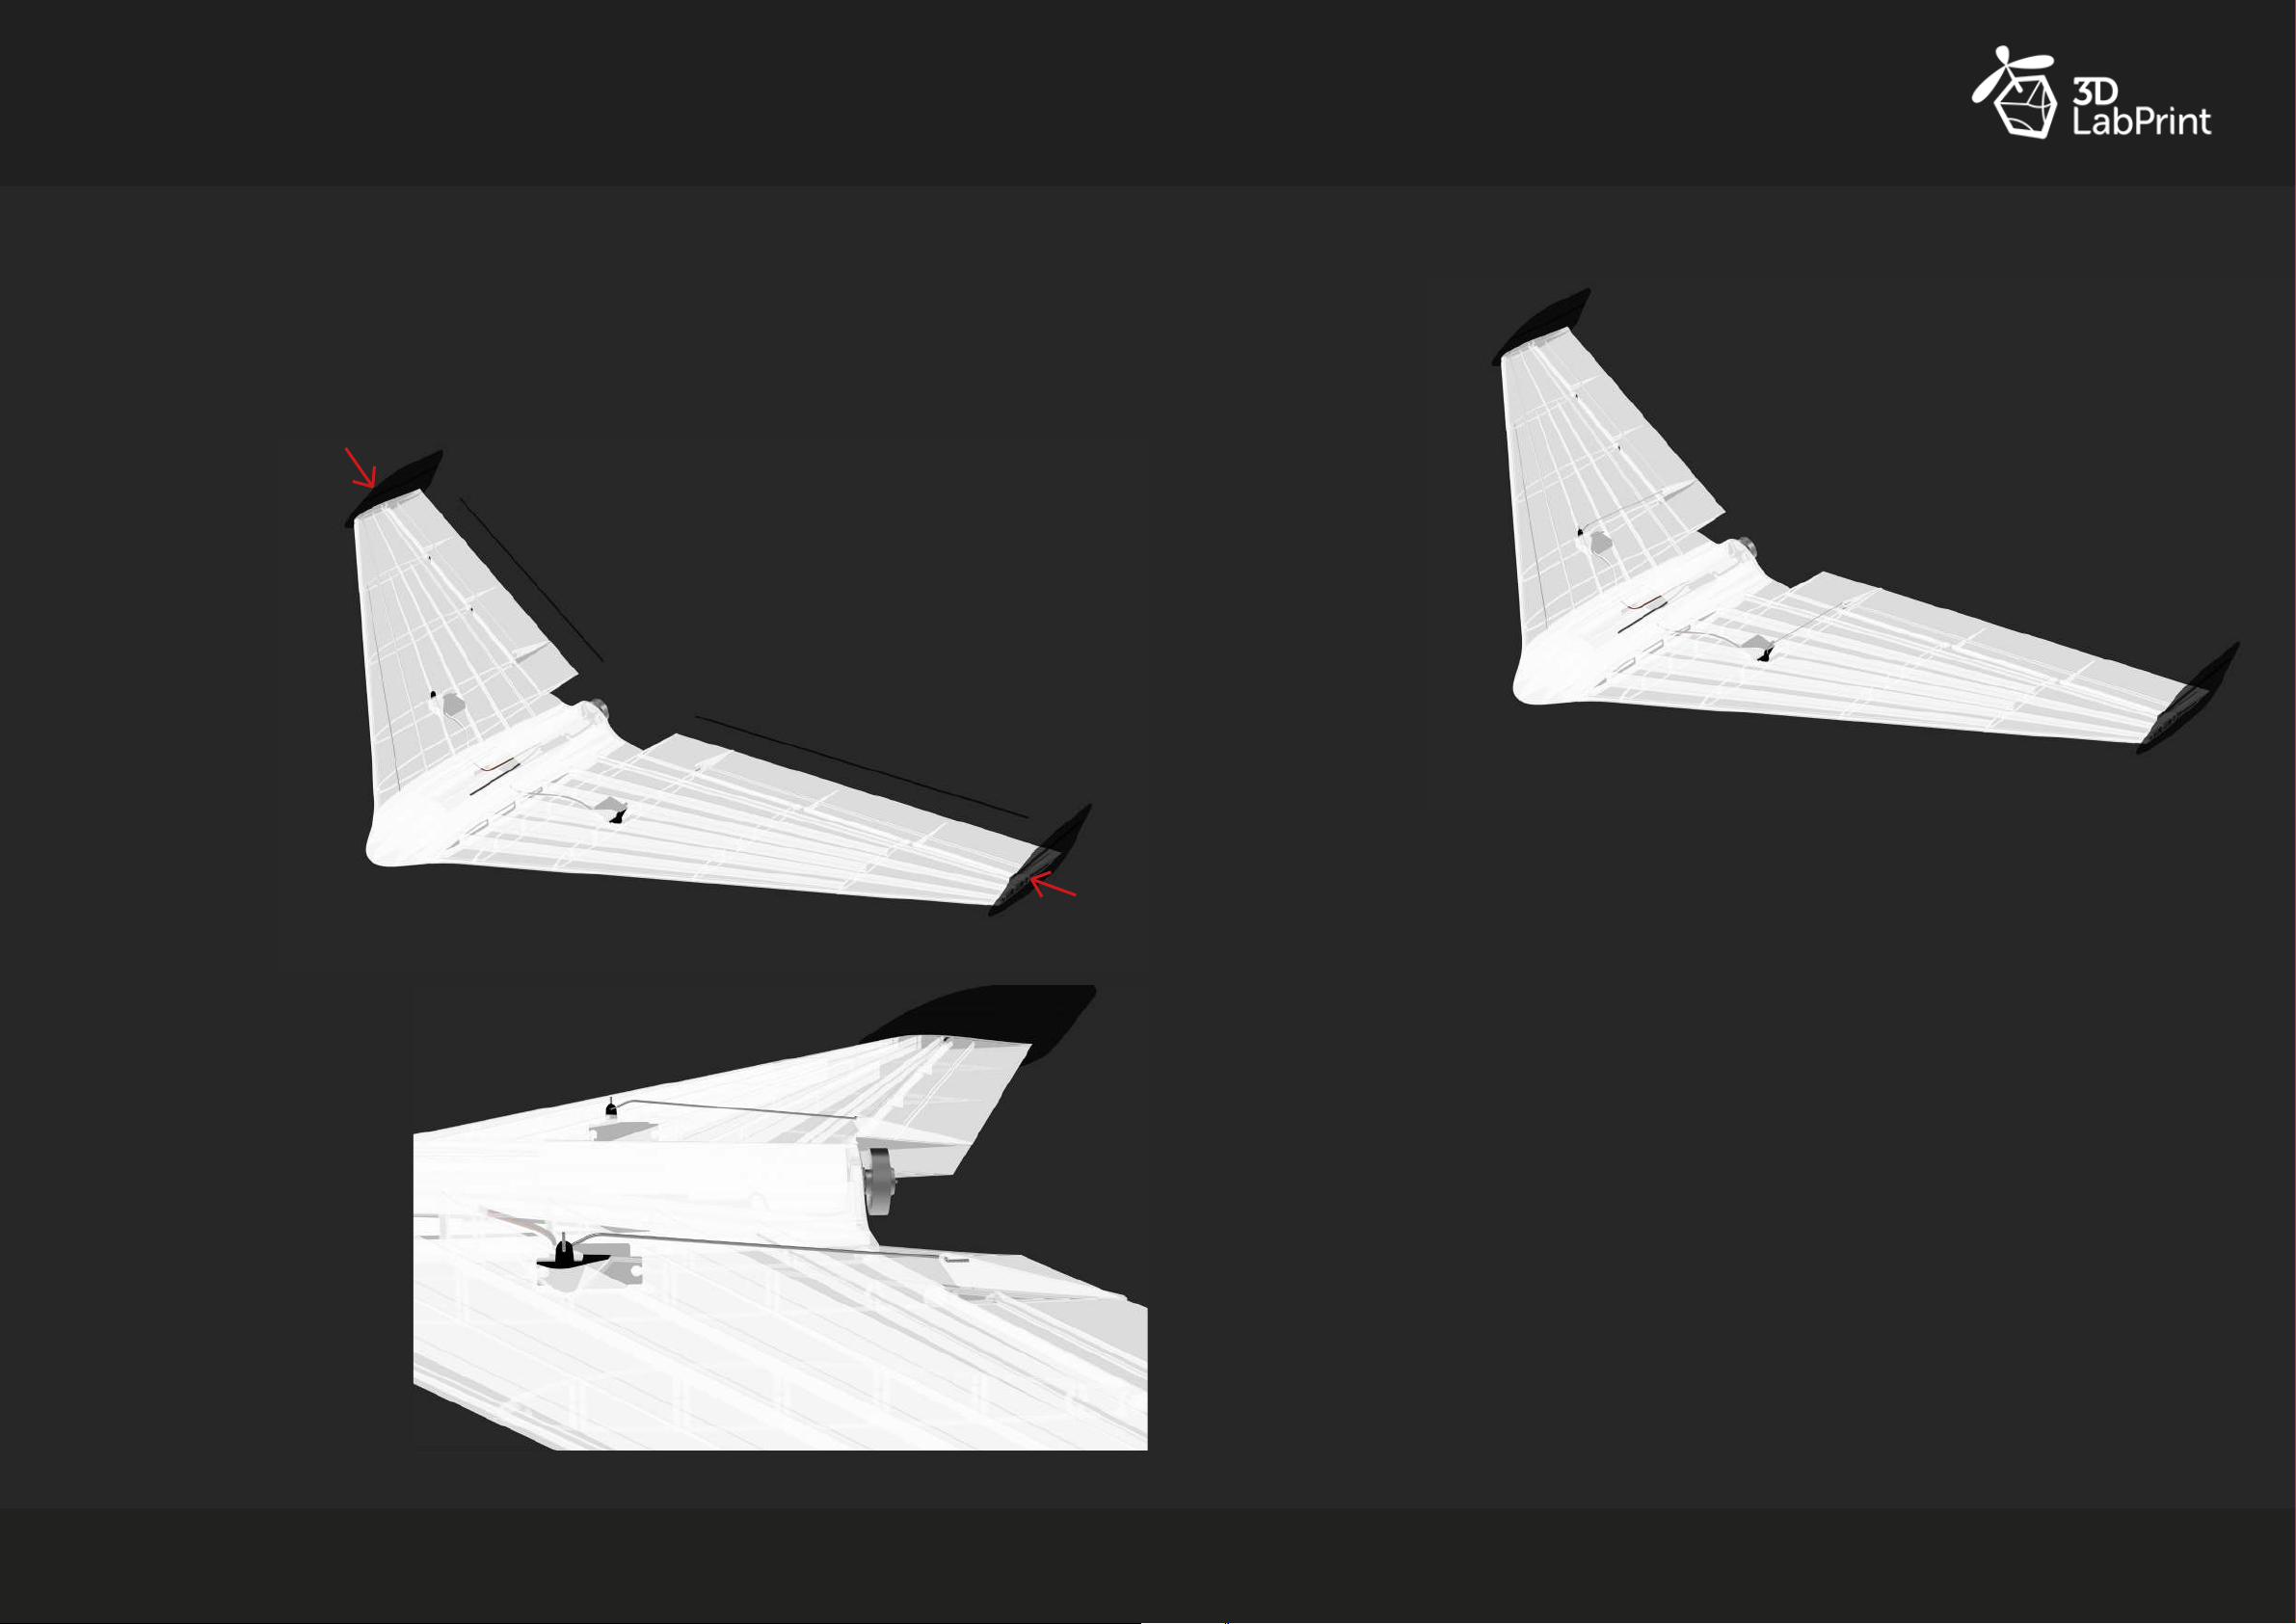
A
vion
airplanes
Completion
You will need
1.
Use ø2×385mm
carbon rod 2x as
elevons axles.
Don‘t insert them
all the way in at
this point in case
that you will need
to make pushrods
or other
adjustments.
Completion
Canopy, W_L_3_Cover, W_R_3_Cover,
ø2×385mm carbon rod 2x (elevons axles),
Steel wire, carbon rod or clevis (pushrods)
CA glue
3.
If everything moves
freely and pushrods
are installed correctly,
insert ø2×385mm car-
bon rod 2x all the way
in and secure them
with small drop of CA
glue to the elevons.
2.
Set elevons to neutral
position and install
pushrods. Make sure,
that everything moves
freely. If not, use sand
paper or drillbit and
make necessary
adjustments.
DUCK user manual
4.
Install RX and battery. Now you
are ready to start programming
servos and set right CG.
f
Avion Airplanes
I
avion_airplanes
22
Page 13
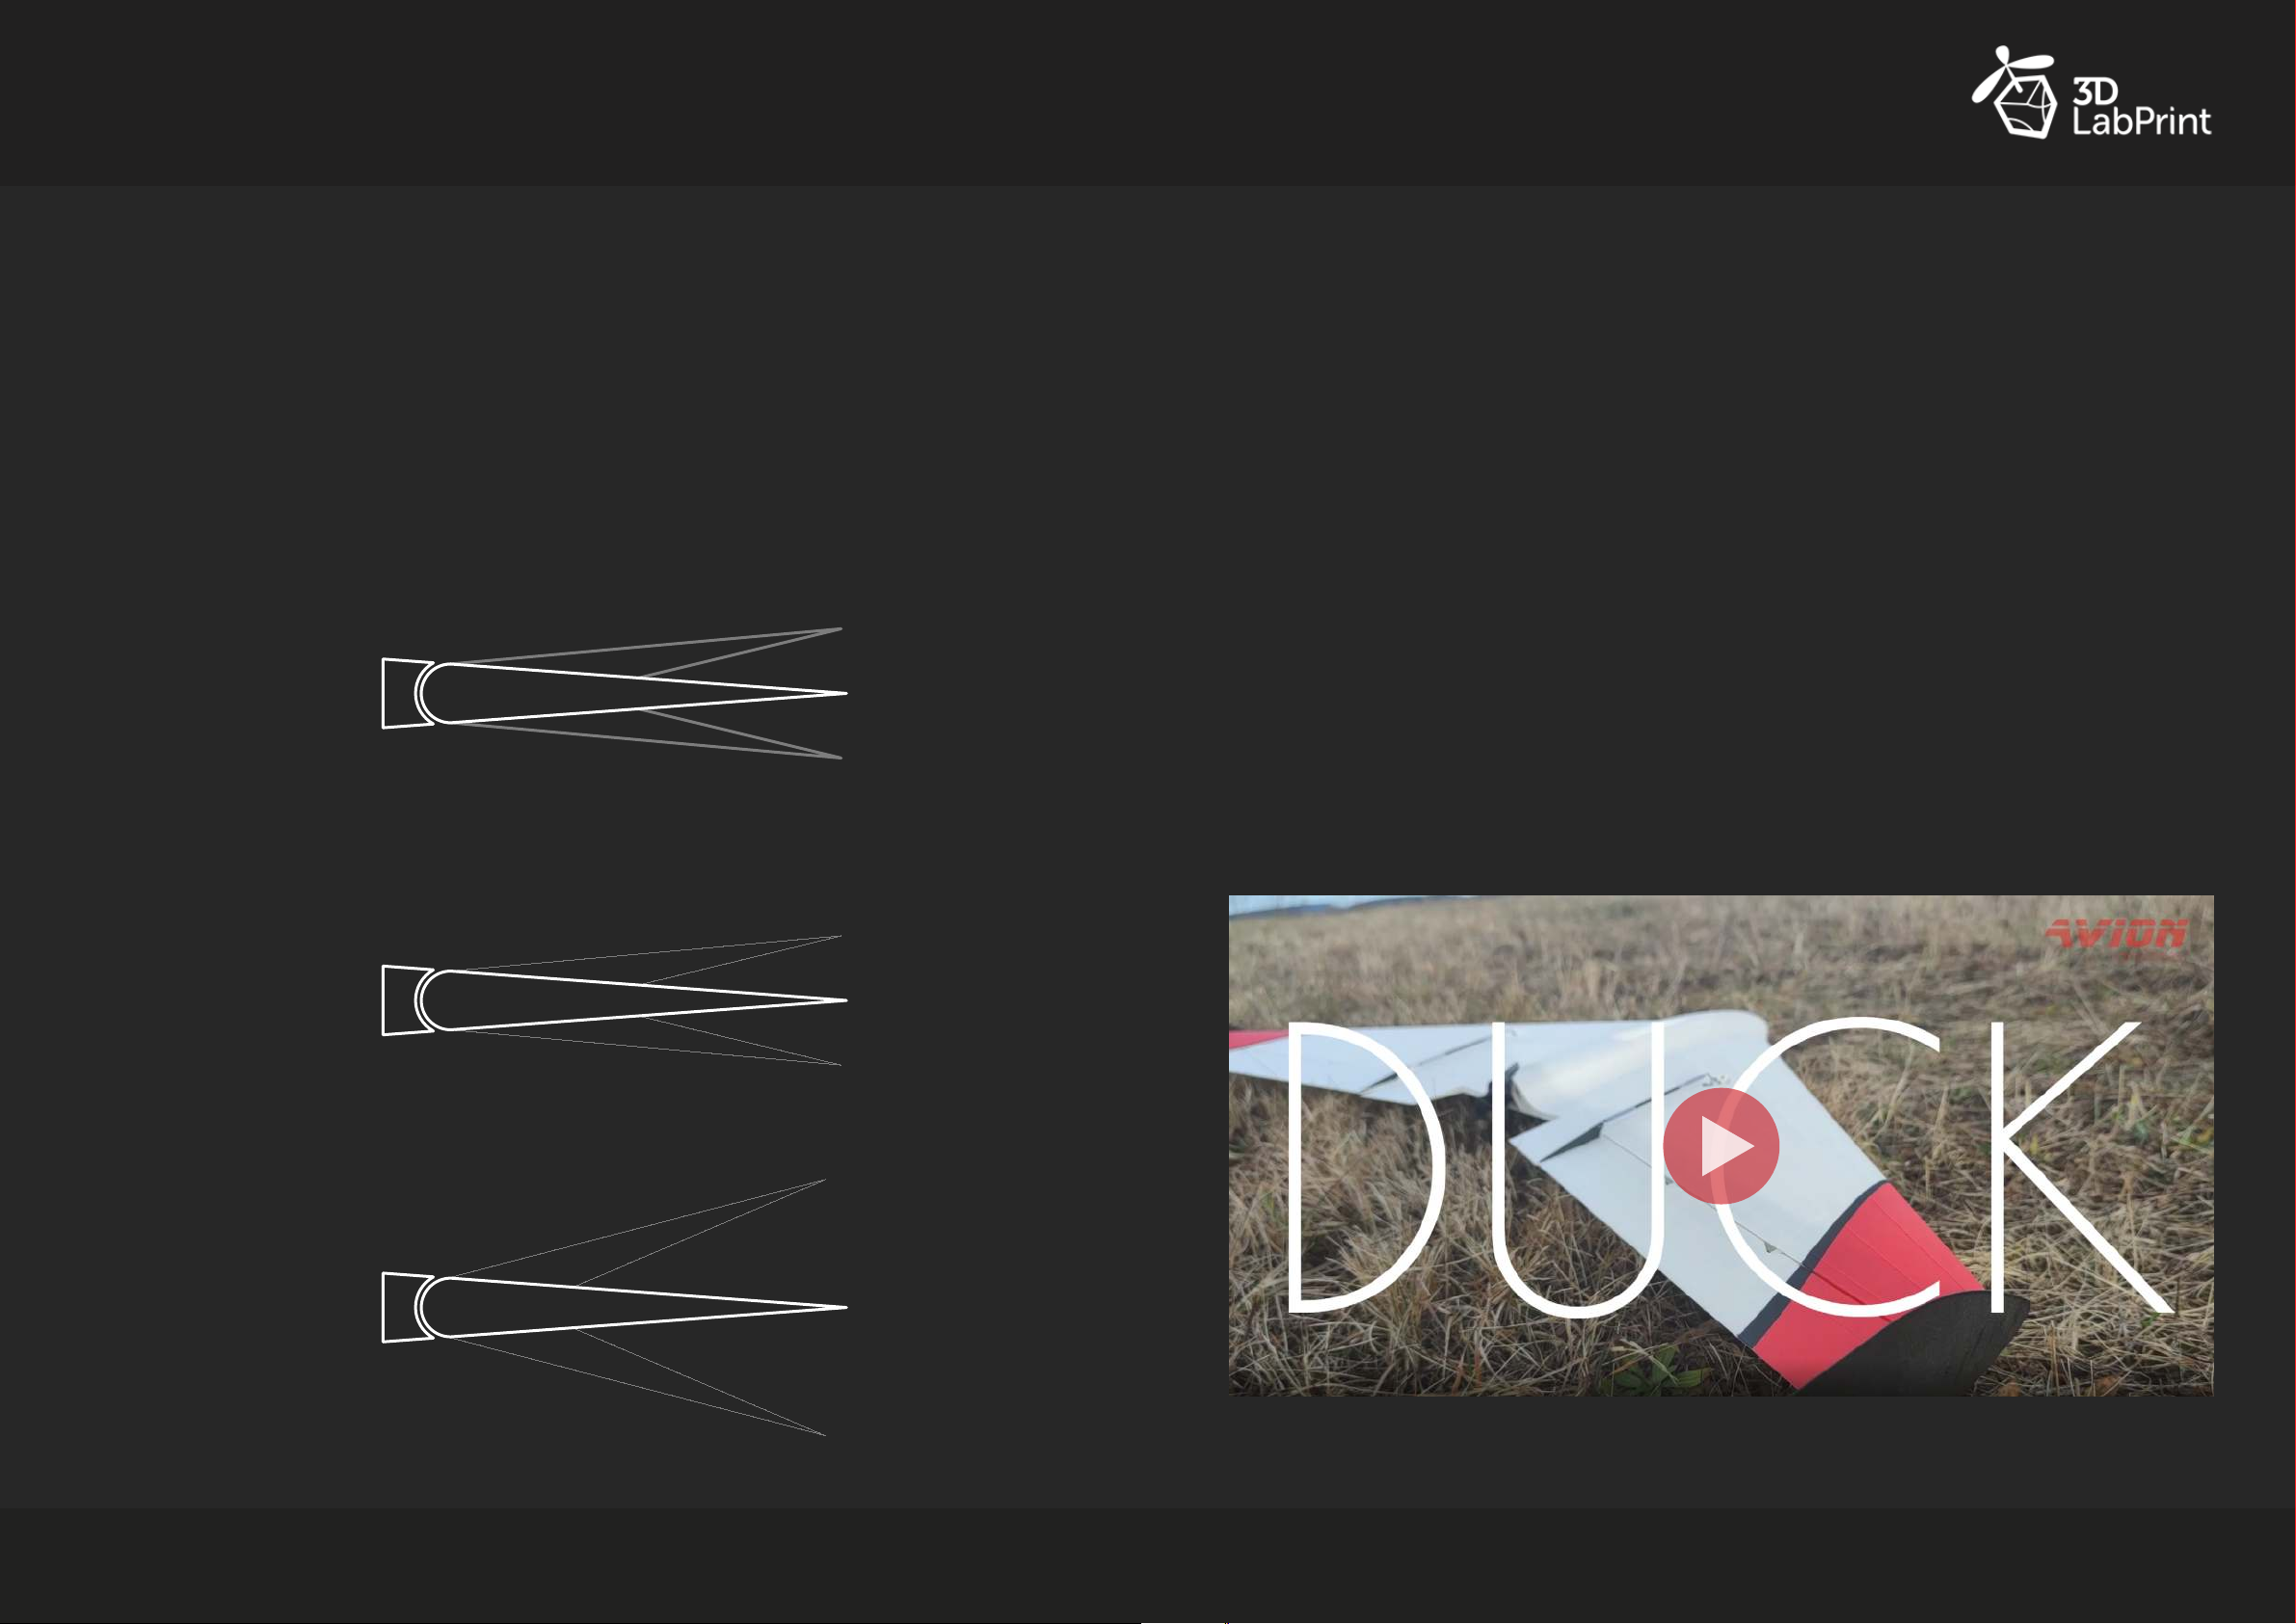
A
vion
airplanes
Center of gravity
CG is marked on
very tip of the F_1 part. After maiden ight you can shift CG slightly front or back
to t your ying style perfectly. Don‘t shift CG position too much at once, wing
can lose it‘s stability. It is also possible to change a little bit angle of the motor
with small washers to adjust behavior of the wing during ight. (It is a bit tricky
with assembled wing, but it is possible)
Elevons setup
Aileron
W_L_1 and W_R_1 on the bottom side and it is 206mm from the
+14 mm
-14 mm
Before rst ight
Make sure, that your battery is properly charged. Check position of CG and
elevon mix. Good luck.
Always y in safe zone and in good conditions. In case of accident designer or
seller is not responsible for incurred damages.
Thank you for purchasing my product and thereby supporting me in further
creation.
Please do not share your les with friends or other people.
Elevator
Aileron + elevator
Flight video
+14 mm
-14 mm
+28 mm
DUCK user manual
-28 mm
f
Avion Airplanes
I
avion_airplanes
24
 Loading...