

Page 1

The Xerox
DocuPrint NC60
ColorLaserPrinter
System
Administrator
Guide
Version 1.0
Page 2

Copyright protection claimed includes all forms and matters of
copyrightable materials and information now allowed by
statutory or judicial law or hereinafter granted, including without
limitation, material generated from the software programs which
are displayed on the screen such as styles, templates, icons, screen
displays, looks, etc.
Printed in the United States of America.
XEROX® and all Xerox product names and product numbers
mentioned in this publication are registered trademarks of the
Xerox Corporation. Other company trademarks are also
acknowledged. PCL is a trademark of the Hewlett-Packard
Company. MS, MS-DOS, Windows NT, Microsoft LAN Manager,
Windows 95 and Windows 98 are trademarks of Microsoft
Corporation. Adobe, Adobe Type Manager, Adobe PageMaker, and
PostScript are trademarks of the Adobe Systems, Inc. TrueType
and Apple ColorSync are trademarks of Apple Computer, Inc. OS/
2 is a trademark of International Business Machines Corporation.
SunOS and Solaris are trademarks of Sun Corporation.
MacroMedia FreeHand is a trademark of MacroMedia
Corporation. QuarkXpress is a trademark of Quark Corporation.
This printer contains an emulation of the Hewlett Packard
PCL 5C command language (recognized HP PCL 5C commands)
and processes these commands in a manner compatible with
Hewlett Packard LaserJet printer products.
Changes are periodically made to this document. Technical
updates will be included in subsequent editions.
© 1999 by Xerox Corporation. All rights reserved.
Page 3

Contents i
Chapter 1
Configuring the Printer
Control Panel Features......................................................... 1-2
The Display...................................................................... 1-3
The Indicator Lights.......................................................... 1-4
The Keys .......................................................................... 1-5
Navigating the Menu System............................................. 1-10
Menu Symbols ............................................................... 1-12
Setting a Menu Option ................................................... 1-13
Access to Special Operating Modes ................................. 1-15
Control Panel Locks ........................................................ 1-16
Main Menu ....................................................................... 1-17
Job Menu .......................................................................... 1-19
Password Menu ................................................................. 1-22
Tray Menu ........................................................................ 1-25
PCL Menu ......................................................................... 1-29
System Menu .................................................................... 1-34
Color Adjust Menu............................................................. 1-42
Imaging Menu .................................................................. 1-46
...........................................
1-1
DocuPrint NC60 System Administrator Guide
Page 4

Parallel Menu .................................................................... 1-50
Serial Menu....................................................................... 1-53
Ethernet Menu .................................................................. 1-57
Token Ring Menu .............................................................. 1-69
Novell Menu...................................................................... 1-83
Print Menu ........................................................................ 1-91
Media Server Menu ........................................................... 1-96
Service Menu..................................................................... 1-99
Reset Menu ..................................................................... 1-109
Chapter 2
Chapter 3
Chapter 4
Managing Printer Usage
Network Printer Services ...................................................... 2-2
CentreWare DP ................................................................... 2-3
CentreWare Internet Services ............................................... 2-4
Setup ............................................................................... 2-4
Using the Hard Drive
Hard Drive Considerations ................................................... 3-2
Disk Initialization ............................................................. 3-2
Downloading Fonts and Macros........................................... 3-3
FSDOWNLOAD Command ............................................... 3-4
FSDELETE Command ........................................................ 3-7
Using the Hard Disk Drive for Secure and Proof Jobs ............. 3-8
Creating Secure Jobs......................................................... 3-8
Creating Proof Jobs......................................................... 3-10
Printing or Deleting Secure or Proof Jobs ......................... 3-12
Maintaining the Printer
.........................................
...............................................
...........................................
2-1
3-1
4-1
Regular Printer Maintenance................................................ 4-3
Cleaning the Printer............................................................. 4-4
Cleaning the Print Drum Charger...................................... 4-4
Cleaning the Grounding Roller and Feed Rollers ................ 4-5
DocuPrint NC60 System Administrator Guide
Page 5

Adjusting Density and Color Balance .................................... 4-8
Printing a Test Page ......................................................... 4-9
Interpreting the Test Print............................................... 4-10
What To Look For........................................................... 4-11
Making Adjustments ...................................................... 4-12
Adjustment Recovery ...................................................... 4-15
Upgrading the Printer Software.......................................... 4-16
Before You Upgrade........................................................ 4-17
Upgrade Methods .......................................................... 4-18
Printer Controller Upgrade Process .................................. 4-19
Determining a Successful Upgrade .................................. 4-20
After the Upgrade........................................................... 4-20
Procedure A.................................................................... 4-21
Procedure B.................................................................... 4-22
Procedure C ................................................................... 4-24
Procedure D ................................................................... 4-26
Procedure E .................................................................... 4-28
Procedure F .................................................................... 4-29
Chapter 5
Procedure G ................................................................... 4-31
General Troubleshooting ................................................ 4-32
Troubleshooting
Control Panel Messages ....................................................... 5-2
......................................................
DocuPrint NC60 System Administrator Guide
5-1
Page 6

DocuPrint NC60 System Administrator Guide
Page 7

Configuring the Printer Chapter1
Control Panel Features ....................................................... 1-2
Navigating the Menu System ........................................... 1-10
Main Menu ..................................................................... 1-17
Job Menu ........................................................................ 1-19
Password Menu ............................................................... 1-22
Tray Menu ...................................................................... 1-25
PCL Menu ....................................................................... 1-29
System Menu .................................................................. 1-34
Color Adjust Menu ........................................................... 1-42
Imaging Menu ................................................................ 1-46
Parallel Menu .................................................................. 1-50
Serial Menu ..................................................................... 1-53
Ethernet Menu ................................................................ 1-57
Token Ring Menu ............................................................ 1-69
Novell Menu .................................................................... 1-83
Print Menu ...................................................................... 1-91
Media Server Menu ......................................................... 1-96
Service Menu ................................................................... 1-99
Reset Menu ................................................................... 1-109
Chapter 1: Configuring the Printer
1-1
❖
Page 8
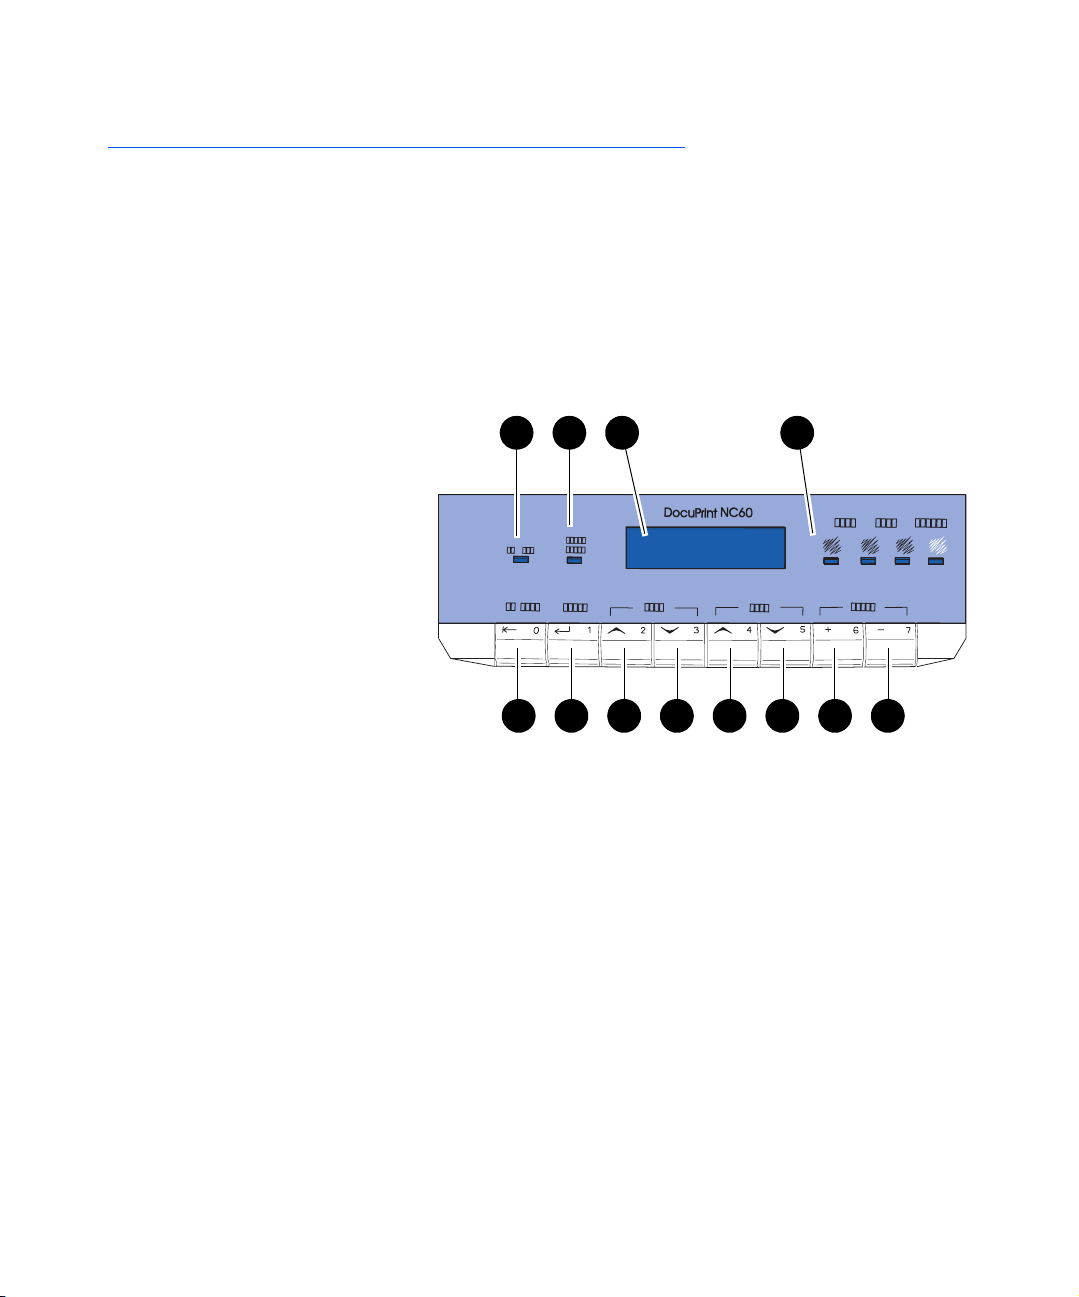
Control Panel Features
Control Panel Features
The DocuPrint NC60 Control Panel (Figure 1.1) serves
two purposes:
1. It displays information about the status of the printer
(or the job in process) and
2. It provides the means for changing printer settings to
control how the DocuPrint NC60 operates.
Figure 1.1 DocuPrint NC60 Control Panel
On Line LED
1
Press Enter LED
2
Two line, user interface
3
display
Color Process LEDs
4
On Line/Off Line key
5
Password #0
Enter key
6
Password #1
Menu Up key
7
Password #2
Menu Down key
8
Password #3
Item Up key
9
Password #4
Item Down key
10
Password #5
Value Up key
11
Password #6
Value D o wn key
12
Password #7
31 2 4
1065 7 8 9 11 12
1-2
DocuPrint NC60 System Administrator Guide
❖
Page 9

Control Panel Features
The Display
The Control Panel's display performs two functions.
• It informs you of printer status conditions, such as
when toner is low, when a paper tray is empty, when a
job is in process, and so on. For example, when you
turn on the printer, you see the following message on
the display:
Ready
This message appears whenever the printer is on-line
and ready to accept print jobs. The display will also
show:
Processing...
when processing data, and:
Waiting
when waiting for more data.
• It presents a hierarchy of menu options and settings to
configure and control the printer.
For example, when you press Menu Up or Menu
Down, you will see the following two-line message on
the display:
Menus
Item
Menu
(such as System Menu or Job Me nu)
See the section “Menu Symbols” (page 1-12) for more
information on indicators.
See the section “Main Menu” (page 1-17) for
information on the Menu system hierarchy.
Chapter 1: Configuring the Printer
1-3
❖
Page 10

Control Panel Features
The Indicator Lights
The Control Panel contains six indicator lights. Table 1.1
describes the function of each light.
Table 1.1 Control Panel indicator lights and their
functions
Light
Online
Press Enter
Black
Cyan
Magenta
Yellow
When the printer is On-line the light is On.
When the printer is Off-line, it is OFF. When
transitioning from On-line to Off-line, it flashes
at a rate of 2 times per second. It also flashes to
indicate that data are being processed by
Postscript, PCL or PJL, or are being spooled to
the disk (e.g. secure or proof job).
The light is flashing when the Enter key should
be pressed to:
• Release a print job sent as a Hold Job.
• Release a PCL job where no End of Job has
been received (PCL Form Feed).
Each light is on while the engine is processing
the corresponding toner color. When an out of
toner condition is encountered, the LED
corresponding to the low toner flashes.
Description
1-4
DocuPrint NC60 System Administrator Guide
❖
Page 11

Control Panel Features
The Keys
The Control Panel keypad consists of eight keys,
identified with international symbols and/or labeled in
English. The keys are also numbered 0 - 7. (Control Panel
overlays are available in some languages and are supplied
with the printer where applicable.)
Table 1.2 describes the function of each key.
Table 1.2 Control Panel keys and their functions
Key Description
Online
• If the Printer is On-line and not in the Menu system, pressing this key causes a
transition to Off-line. All pages currently in the paper path are printed and then
printing pauses until the printer is placed On-line. Status information via SNMP is
provided while in the Off-line state. Data are still accepted over all network
interfaces, and page formatting continues as long as memory is available. The
exception is the Parallel port running in the Compatibility mode, or the Serial port.
In Parallel, Off-line forces the “Select” line false and forces the “Fault” line true. In
Serial, Off-line sends an XOFF if this handshaking mode is selected, and forces the
DTR line false.
• If the printer is On-line and in the Menu system, pressing this key exits the menu
system. The printer remains On-line.
• If the printer is Off-line and not in the Menu system, pressing this key causes the
printer to change to the On-line state, provided no operator intervention condition
exists. This key is ignored if an operator intervention condition exists.
• If the printer is Off-line and in the Menu system, pressing this key exits the Menu
system. The printer state changes to On-line, provided no operator intervention
condition exists.
• If in the Password menu, and the display indicates “Enter Password”, pressing this
key causes a password digit “0” to be entered.
Table 1.2 Page 1 of 5
Chapter 1: Configuring the Printer
1-5
❖
Page 12

Control Panel Features
Table 1.2 Control Panel keys and their functions
(continued)
Key Description
Enter
Menu Up ( )
• If the current display is a value for an item, pressing this key causes the value to be
entered as the default value for this item. The currently displayed value is
immediately loaded in NVRAM. The display then returns to indicate the current
menu on the top line and the current item on the bottom line.
• Some values require a power cycle before taking effect.
• If the current display is an action to be invoked (e. g. “PCL Font List”, “Restart
Printer”), pressing this key causes the action to take place. Following the action, the
display returns to indicate “Ready” on the top line.
• If not in the Menu system, and the “Press Enter” LED indicates that a partial page
exists, pressing this key causes an implied PCL reset and the partial page is printed.
• If a paper mismatch condition exists, and a request to load paper is displayed,
pressing this key causes printing on the media currently loaded in the selected tray
(Print Anyway). See Value Up or Value Down for more information.
• If in the Password menu, and the display indicates “Enter Password”, pressing this
key causes a password digit “1” to be entered.
• If in the menu system, pressing this key causes the Control Panel to scroll through
>
the menus in order bottom to top unless a higher priority message is displayed,
which preempts menu navigation. Menu scrolling is available without going to the
Off-line state. Scrolling wraps, such that if the displayed menu is the top menu,
pressing this key scrolls to the bottom menu.
• If an item, value or action is displayed, pressing this key returns to the top of the
current menu and removes the display of the item, value or action.
• If not in the menu system, pressing this key enters the menu system and displays
the first menu, Job Menu.
• If in the Password menu, and the display indicates “Enter Password”, pressing this
key causes a password digit “2” to be entered.
1-6
DocuPrint NC60 System Administrator Guide
❖
Table 1.2 Page 2 of 5
Page 13

Control Panel Features
Table 1.2 Control Panel keys and their functions
(continued)
Key Description
>
Menu Down ( )
Item Up ( )
>
• If in the menu system, pressing this key causes the Control Panel to scroll through
the menus in order top to bottom unless a higher priority message is displayed,
which preempts menu navigation. Menu scrolling is available without going to the
Off-line state. Scrolling wraps, such that if the displayed menu is the bottom
menu, pressing this key scrolls to the top menu. If an item, value or action is
displayed, pressing this key returns to the top of the current menu and removes the
display of the item, value or action.
• If not in the menu system, pressing this key enters the menu system and displays
the last menu.
• If in the Password menu, and the display indicates “Enter Password”, pressing this
key causes a password digit “3” to be entered.
• If in the menu system, pressing this key causes the Control Panel to scroll through
the items in the current menu in order bottom to top unless a higher priority
message is displayed, which preempts menu navigation. Scrolling wraps, such that
if the displayed item is the top item, pressing this key scrolls to the bottom item. If a
value is displayed, pressing this key returns to the current item in the current menu
and removes the value from the display.
• If not in the menu system, this key is ignored.
• If in the Password menu, and the display indicates “Enter Password”, pressing this
key causes a password digit “4” to be entered.
Table 1.2 Page 3 of 5
Chapter 1: Configuring the Printer
1-7
❖
Page 14

Control Panel Features
Table 1.2 Control Panel keys and their functions
(continued)
Key Description
>
Item Down ( )
Value Up (+)
• If in the menu system, pressing this key causes the Control Panel to scroll through
the items in the current menu in order top to bottom unless a higher priority
message is displayed, which preempts menu navigation. Scrolling wraps, such that
if the displayed item is the bottom item, pressing this key scrolls to the top item. If a
value is displayed, pressing this key returns to the current item in the current menu
and removes the value from the display.
• If not in the menu system, this key is ignored.
• If in the Password menu, and the display indicates “Enter Password”, pressing this
key causes a password digit of “5” to be entered.
• If in the menu system, and an item is displayed, pressing this key causes the Control
Panel to scroll through the values for the current item in order bottom to top unless
a higher priority message is displayed, which preempts menu navigation. Scrolling
wraps, such that if the displayed value is the top value, pressing this key scrolls to
the bottom value. If no value for the current item is displayed (Item key was pressed
but Value key not yet pressed for this item), pressing this key displays the default
value for the current item. When setting a numeric value, pressing this key increases
the value by the step amount. It is subject to auto-repeat if held down for more
than 1 second, after which the value scrolls repeatedly until the key is released. The
increment for each step may be greater than that for a single key press.
• If not in the menu system, and a paper mismatch condition does not exist, this key
is ignored.
• If a Paper Mismatch condition exists, pressing this key scrolls through the alternate
media that may be used instead of the requested media.
• If in the Password menu, and the display indicates “Enter Password”, pressing this
key causes a password digit “6” to be entered.
1-8
DocuPrint NC60 System Administrator Guide
❖
Table 1.2 Page 4 of 5
Page 15

Control Panel Features
Table 1.2 Control Panel keys and their functions
(continued)
Key Description
Value Down (-)
• If in the menu system, and an item is displayed, pressing this key causes the Control
Panel to scroll through the values for the current item in order top to bottom unless
a higher priority message is displayed (e.g. operator intervention required, etc.),
which preempts menu navigation. Scrolling wraps, such that if the displayed value
is the bottom value, pressing this key scrolls to the top value. If no value for the
current item is displayed (Item key was pressed but Value key not yet pressed for
this item), pressing this key displays the default value for the current item. When
setting a numeric value, this key decreases the value by the step amount. It is
subject to auto-repeat if held down by more than 1 second, after which the value
scrolls repeatedly until the key is released. The decrement for each step may be
greater than that for a single key press.
• If not in the menu system, and a paper mismatch condition does not exist, this key
is ignored.
• If a Paper Mismatch condition exists, pressing this key scrolls through the alternate
media that may be used instead of the requested media.
• If in the Password menu, and the display indicates “Enter Password”, pressing this
key causes a password digit “7” to be entered.
Table 1.2 Page 5 of 5
Chapter 1: Configuring the Printer
1-9
❖
Page 16

Navigating the Menu System
Navigating the Menu System
The Control Panel contains two menu structures.
1. Main Menu and its submenus.
—Job Menu
— Password Menu (when the Hard Disk Drive is
installed)
—Tray Menu
—PCL Menu
—System Menu
— Color Adjust Menu
— Imaging Menu
— Parallel Menu
— Serial Menu
—Ethernet Menu
— Token Ring Menu (when the Token Ring Card is
installed)
1-10
— Novell Menu
— Print Menu
— Media Server Menu (when the optional Media
Server is installed)
—Service Menu
Press Menu Up or Menu Down to access the Main
Menu. Each of the submenus may have other
submenus, settings, actions or functions.
DocuPrint NC60 System Administrator Guide
❖
Page 17

Navigating the Menu System
2. Reset Menu and its functions.
— Factory Defaults
—Network Defaults
— CRU Resets
—Restart Printer
— Delete All Jobs (requires Hard Disk Drive option)
— Disk Initialize (requires Hard Disk Drive option)
— Disk Format (requires Hard Disk Drive option)
The Reset Menu is included in the menu list by simultaneously
holding down Online and Enter when the printer is being
powered up. See the section “Reset Menu” (page 1-109) for
more information.
Chapter 1: Configuring the Printer
1-11
❖
Page 18

Navigating the Menu System
Menu Symbols
Two menu symbols (= and *) are used to furnish
information about menus and settings. The purpose of
each symbol is described in Table 1.3 below.
Table 1.3 Symbols found in the Control Panel Menu systems
Symbol Purpose Example
=
*
When at a point where a value may be changed, the item
name is displayed on the top line with the
character position, and the selected value is displayed on the
bottom line.
The example at the right tells you that Language is an option
that takes a specific setting. One setting for the Language
option is Français. Another setting is English. (The list of
available settings is displayed one setting at a time on the
bottom line of the display as you press
.)
Down
When first arriving at a point where a setting may be changed,
the current value is displayed on the bottom line and a
symbol appears next to it in the last character position. Pressing
Up Value or Down Value scrolls through the possible values.
Whenever the current value is displayed, the
the last character position. Pressing Enter causes the
display in the last character position for the new value. Since
pressing Enter causes the display to indicate the current menu
and current item, the asterisk may not be seen until the item
and current value is displayed again by pressing a Value key.
The example at the right tells you that Language is currently set
to English.
symbol in the last
=
Val u e Up
or
is displayed in
*
Val ue
*
to
*
Language =
Français
Language =
English *
1-12
DocuPrint NC60 System Administrator Guide
❖
Page 19

Navigating the Menu System
Setting a
Menu Option
To set an option or to invoke a function, follow the steps
below:
Press Menu Up or Menu Down to scroll through the
1
available submenus until you locate the one you want.
You will see:
Menus
Menu Name
Where
Press Item Up or Item Down to scroll through the items
2
of the submenu (all submenus except the Password
Menu).
You will see:
Menu Name
Menu Name
is the current submenu displayed.
Item Name
Where
Job, Print, Service and Reset (with the exception of the
Language option) Menus, the bottom line of the display
indicates the action to be taken (e.g., Config. Sheet or PCL
Font List).
Item Name
is the current item displayed. For the
Chapter 1: Configuring the Printer
1-13
❖
Page 20

Navigating the Menu System
Press Value Up or Va l ue Do w n to select the appropriate
3
value for this item.
You will see:
Item Name =
Current Value
If a list of many values exists (e.g., 1 through 99 for
number of copies), you can scroll quickly by holding
down Va l ue U p or Va l u e D o w n .
When you see the value you want, press Enter to accept it.
If necessary, repeat Step 2 and Step 3 to go through other
4
menus, options, actions, functions and values.
After you press Enter to accept a value, the menu will
display:
*
Menu Name
Item Name
You may either continue to work in the Menu system by
repeating the steps above, or exit and return to normal
operation by pressing Online.
If you press Online at any time prior to pressing
Enter the new value will not be saved and the
Menu system is exited.
The printer automatically exits the Menu system
after 60 seconds of inactivity (i.e., no key has been
pressed).
1-14
DocuPrint NC60 System Administrator Guide
❖
Page 21

Navigating the Menu System
Access to Special
Operating Modes
The printer may be placed in special diagnostic or other
operating modes by turning on power while holding
down two keys on the Control Panel. The following are
the key combinations for each mode:
Table 1.4 Access to special operating modes
Key Combinations Mode
On-line and Enter
(Keys numbered 0 and 1)
Menu Up and Menu Down
(Keys numbered 2 and 3)
Sets a flag in RAM so that the
Control Panel enables the
“Reset” menu.
Forces the “Software Update”
mode on the Parallel port.
Chapter 1: Configuring the Printer
1-15
❖
Page 22

Navigating the Menu System
Control Panel Locks
Some of the menus in the Control Panel may be “locked”
to prevent unauthorized access and changes to system
parameters. This is accomplished with the PJL “CPLOCK”
command. If the user scrolls to a locked menu, pushing
either “Item” key will cause the menu name to appear on
the top line, and “Menu Locked” to appear on the second
line. Menus are unlocked only with the corresponding PJL
“CPLOCK” command. Only the following menus are
available from the Control Panel when locked:
•Job Menu
• Password Menu (if optional Hard Disk is installed)
•Tray Menu
• Print Menu
• Media Server Menu (if Media Server is installed)
•Reset Menu
If you do not want users to have access to the Reset Menu,
power OFF and power ON the printer.
1-16
DocuPrint NC60 System Administrator Guide
❖
Page 23

Main Menu
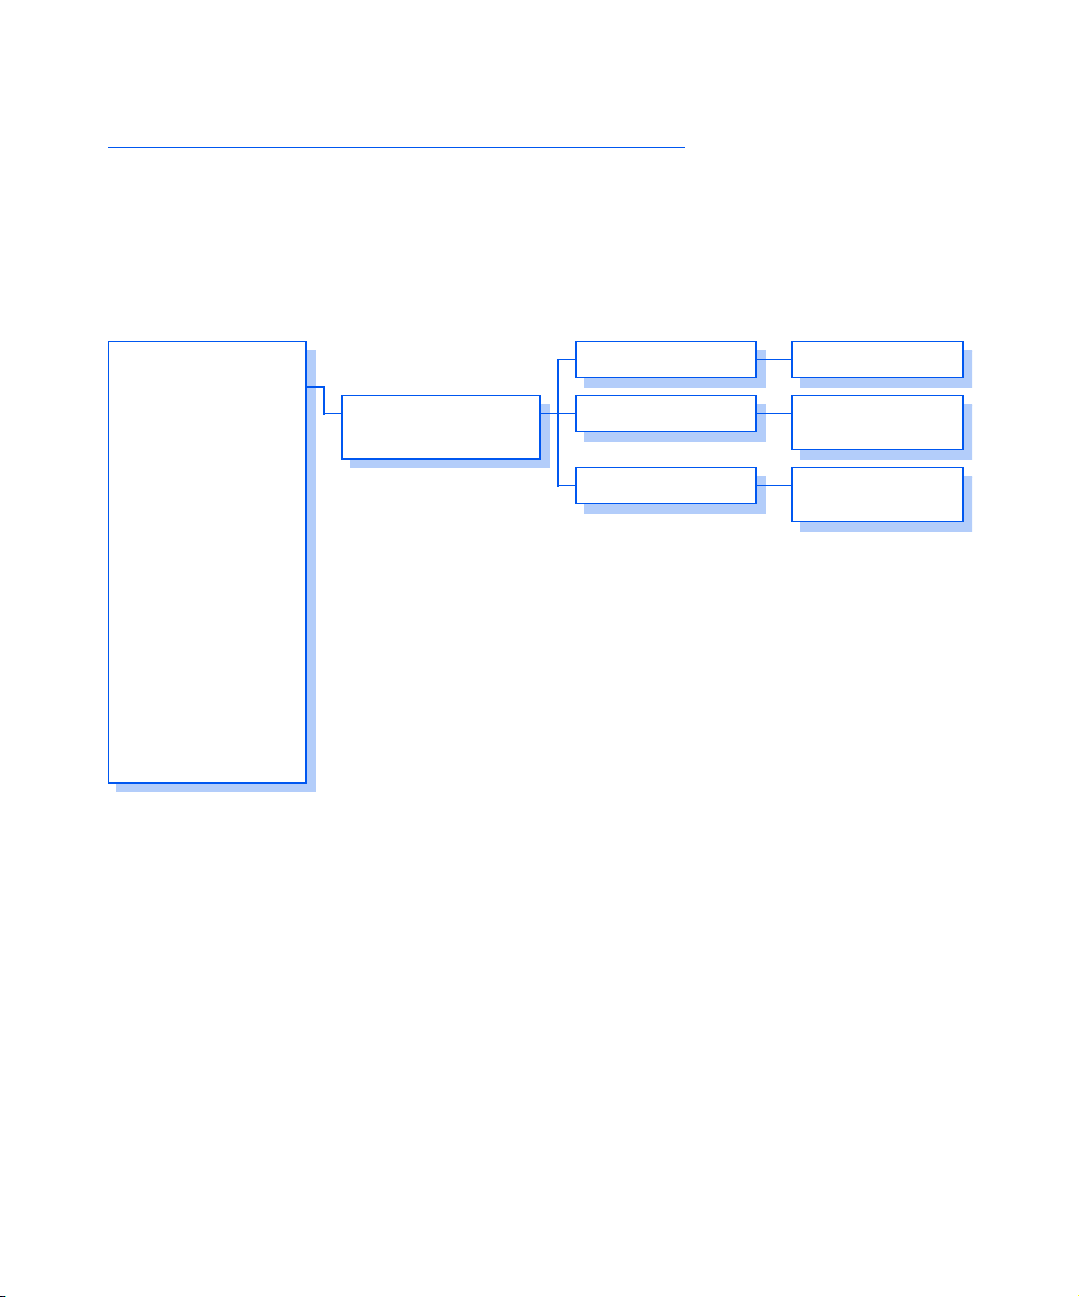
Main Menu
The Main Menu is a system of submenus, each containing
options designed to configure the printer for your
environment. The Main Menu hierarchy is depicted in
Table 1.5 on page 1-18.
In this chapter, a boldfaced value followed by an asterisk (*)
indicates the factory default for that value. See the section
“Reset Menu” (page 1-109) for information on how to revert to
factory settings.
Items and values in italics are available only when the
applicable option is installed and operational.
Chapter 1: Configuring the Printer
1-17
❖
Page 24

Main Menu
Table 1.5 Main Menu hierarchy
Main Menu
Job Menu
Password Menu
Tra y Menu
PCL Menu
System Menu
Color Adjust Menu
Imaging Menu
Parallel Menu
Serial Menu
Ethernet Menu
Token Ring Menu
Novell Menu
Print Menu
Media Server Menu
Service Menu
Reset Menu
1
Appears only when the Hard Disk Drive is installed.
2
Appears only when the option is present.
3
Appears only when
ON.
1
2
3
Online
Hierarchy and Factory Settings
See
“Job Menu”
See
“Password Menu”
See
“Tray Menu”
See
“PCL Menu”
See
“System Menu”
See
“Color Adjust Menu”
See
“Imaging Menu”
See
“Parallel Menu”
See
“Serial Menu”
See
“Ethernet Menu”
See
“Token Ring Menu”
See
“Novell Menu”
See
“Print Menu”
See
“Media Server Menu”
See
“Service Menu”
See
“Reset Menu”
Enter
and
are simultaneously held down at power
(page 1-19).
(page 1-22).
(page 1-25).
(page 1-29).
(page 1-34).
(page 1-42)
(page 1-46)
(page 1-50).
(page 1-53)
(page 1-57).
(page 1-69)
(page 1-83).
(page 1-91)
(page 1-96)
(page 1-99)
(page 1-109).
1-18
DocuPrint NC60 System Administrator Guide
❖
Page 25

Job Menu
Figure 1.2 Job Menu hierarchy
Job Menu
Use the Job Menu to cancel the job currently being
processed, force a form feed on a partially formatted job
in PCL, or restart the printer. The menu hierarchy is
shown in Figure 1.2.
Job Menu
Password Menu
Tray Men u
PCL Menu
System Menu
Color Adjust Menu
Imaging Menu
Parallel Menu
Serial Menu
Ethernet Menu
Token Ring Menu
Novell Menu
Print Menu
Media Server Menu
Service Menu
Reset Menu
Cancel Job
Formfeed
Restart Printer
Yes
No*
Yes
No*
Yes
No*
Refer to Table 1.6 on page 1-20 for step-by-step
instructions.
Chapter 1: Configuring the Printer
1-19
❖
Page 26

Job Menu
Table 1.6 Job Menu functions
Menu Item and Function Keystrokes Display Reads
Cancel Job
Cancel the job currently printing
(Postscript or PCL).
The available values are:
Yes
No*
Form Feed
Eject a partial PCL page when the
“Press Enter” LED is ON.
The available values are:
Yes
No*
1. Press
2. Press
3. Press
4. Press
5. When done, you will see:
1. Press
2. Press
3. Press
4. Press
5. Press
Menu Up
until you see:
Item Up
you see:
Value Up
you see:
Enter
Menu Up
until you see:
Item Up
you see:
Value Up
you see:
Enter
Online
or
Menu Down
or
Item Down
or
Val u e Down
. You will see:
or
Menu Down
or
Item Down
or
Val u e Down
. You will see:
. You will see:
until
until
until
until
Menus
Job Menu
Job Menu
Cancel Job
Cancel Job
Yes
Cancelling Job
Filename
Ready
Menus
Job Menu
Job Menu
Form Feed
Form Feed
Yes
Job Menu
Form Feed
Ready
1-20
DocuPrint NC60 System Administrator Guide
❖
Table 1.6 Page 1 of 2
Page 27

Job Menu
Table 1.6 Job Menu functions
(continued)
Menu Item and Function Keystrokes Display Reads
Restart Printer
Reinitialize the printer as if the
power was cycled, but bypassing
power on diagnostics.
The available values are:
Yes
No*
1. Press
2. Press
3. Press
4. Press
5. When the action is complete, you
Menu Up
until you see:
Item Up
you see:
Value Up
you see:
Enter
will see:
or
Menu Down
or
Item Down
or
Val u e Down
. You will see:
until
until
Menus
Job Menu
Job Menu
Restart Printer
Restart Printer
Yes
[Startup Messages]
Ready
Table 1.6 Page 2 of 2
Chapter 1: Configuring the Printer
1-21
❖
Page 28
Password Menu
Password Menu
Use the Password Menu (available only when the optional
Hard Drive is installed) to print or delete secure or proof
jobs. Secure and proof jobs are enabled by drivers.
The menu hierarchy is shown in Figure 1.3.
Figure 1.3 Password Menu hierarchy
Job Menu
Password Menu
Tray M e n u
PCL Menu
System Menu
Color Adjust Menu
Imaging Menu
Parallel Menu
Serial Menu
Ethernet Menu
Token Ring Menu
Novell Menu
Print Menu
Media Server Menu
Service Menu
Reset Menu
Enter Password
_xxx
Refer to Table 1.7 on page 1-23 for step-by-step
procedures.
No Jobs
All Jobs
Filename
Press Menu
Print*
Delete
n
Print*
Delete
1-22
DocuPrint NC60 System Administrator Guide
❖
Page 29

Table 1.7 Password Menu functions
Menu Item and Function Keystrokes Display Reads
Password Menu
All Jobs
Print
Print all jobs sent with a specific
password.
Filename n
Print
Print one or more jobs out of
several sent with a specific
password.
A job with a name assigned to it
will replace the “Job n” with that
name.
1. Press
2. Press
3. Enter four-digit password using the
4. Press
1. Press
2. Press
3. Enter four-digit password using the
4. Press
5. Press
Menu Up
until you see:
Item Up
will see:
numbers on the Control Panel keys.
You will see:
Enter
completed you will see:
Menu Up
until you see:
Item Up
will see:
numbers on the Control Panel keys.
You will see:
Item Up
you see:
Enter
or
Menu Down
or
Item Down
. When print is
or
Menu Down
or
Item Down
or
Item Down
. You will see:
. You
. You
until
Menus
Password Menu
Enter Password
_xxx
All Jobs
Print
Ready
Menus
Password Menu
Enter Password
_xxx
All Jobs
Print
Filename n
Print
Printing
Filename n
6. Repeat Steps 4 and 5 until you have
identified all the jobs you wish to
print. When done, press
You will see:
Chapter 1: Configuring the Printer
Online
.
Ready
Table 1.7 Page 1 of 2
1-23
❖
Page 30

Password Menu
Table 1.7 Password Menu functions
(continued)
Menu Item and Function Keystrokes Display Reads
All Jobs
Delete
Delete all jobs sent with a specific
password.
Filename n
Delete
Delete one or more jobs out of
several sent with a specific
password.
1. Press
2. Press
3. Enter four-digit password using the
4. Press
5. Press
1. Press
2. Press
3. Enter four-digit password using the
Menu Up
until you see:
Item Up
will see:
numbers on the Control Panel keys.
You will see:
Value Up
you see:
Enter
Menu Up
until you see:
Item Up
will see:
numbers on the Control Panel keys.
You will see:
or
Menu Down
or
Item Down
or
Val u e Down
. You will see:
or
Menu Down
or
Item Down
. You
until
. You
Menus
Password Menu
Enter Password
_xxx
All Jobs
Print
All Jobs
Delete
Ready
Menus
Password Menu
Enter Password
_xxx
All Jobs
Print
1-24
4. Press
5. Press
6. Press
7. Repeat Steps 4 to 6 until you have
DocuPrint NC60 System Administrator Guide
❖
Item Up
you see:
Value Up
you see:
Enter
deleted all the jobs you wish to
print. When done, press
You will see:
or
Item Down
or
Val u e Down
. You will see:
until
Online
until
.
Filename n
Print
Filename n
Delete
All Jobs
Print
Ready
Table 1.7 Page 2 of 2
Page 31

Tray Menu
Use the Tray Menu to configure tray settings for both
PostScript and PCL jobs. The menu hierarchy is shown in
Figure 1.4. Items in italics appear only when the optional
Tray 2 is installed.
Figure 1.4 Tray Menu hierarchy with factory settings
Tray Menu
Job Menu
Password Menu
Tra y M enu
PCL Menu
System Menu
Color Adjust Menu
Imaging Menu
Parallel Menu
Serial Menu
Ethernet Menu
Token Ring Menu
Novell Menu
Print Menu
Media Server Menu
Service Menu
Reset Menu
Tray1 C us t. S ize
Tray2 C us t. S ize
Tray1 Type
Tray2 Type
Tray Sequence
Statmt(5.5x8.5)
8x10
Folio(8.5x13)
SPFolio(216x315)*
A5(148x210)
B5-ISO(176x250)
Plain*
Transparency
Bond
Recycled
Color
(if 1 tray)
(if 2 trays)
Off
1-2
2-1
Refer to Table 1.8 on page 1-26 for step-by-step
procedures.
Chapter 1: Configuring the Printer
1-25
❖
Page 32

Tray Menu
Table 1.8 Tray Menu functions
Menu Item and Function Keystrokes Display Reads
Tra y1 Cust . Size
Define the paper size loaded into
Tray 1 .
The available values are:
Statmt(5.5x8.5)
8x10
Folio(8.5x13)
SPFolio(216x315)*
A5(148x210)
B5-ISO(176x250)
The factory default for paper size
is SPFolio, regardless of the
“Defaults” setting in the System
Menu.
Tra y2 Cust . Size
Define the paper size loaded into
the optional Tray 2.
The available values are:
Statmt(5.5x8.5)
8x10
Folio(8.5x13)
SPFolio(216x315)*
A5(148x210)
B5-ISO(176x250)
The factory default for paper size
is SPFolio, regardless of the
“Defaults” setting in the System
Menu.
1. Press
2. Press
3. Press
4. Press
5. Press
1. Press
2. Press
3. Press
4. Press
5. Press
Menu Up
until you see:
Item Up
you see:
Value Up
you see:
Enter
Online
Menu Up
until you see:
Item Up
you see:
Value Up
you see:
Enter
Online
or
Menu Down
or
Item Down
or
Val u e Down
. You will see:
. You will see:
or
Menu Down
or
Item Down
or
Val u e Down
. You will see:
. You will see:
until
until
until
until
Menus
Tray Menu
Tray Menu
Tray1 Cust. Size
Tray1 Cust. Size
New Value
Tray Menu
Tray1 Cust. Size
Ready
Menus
Tray Menu
Tray Menu
Tray2 Cust. Size
Tray2 Cust. Size
New Value
Tray Menu
Tray2 Cust. Size
Ready
1-26
DocuPrint NC60 System Administrator Guide
❖
Table 1.8 Page 1 of 3
Page 33

Tray Menu
Table 1.8 Tray Menu functions
(continued)
Menu Item and Function Keystrokes Display Reads
Tra y1 Type
Define the type of paper installed
in Tray 1.
The available values are:
Plain*
Transparency
Bond
Recycled
Color
1. Press
2. Press
3. Press
4. Press
Menu Up
until you see:
Item Up
you see:
Value Up
you see:
Enter
or
Menu Down
or
Item Down
or
Val u e Down
. You will see:
until
until
Menus
Tray Menu
Tray Menu
Tray1 Type
Tray1 Type
New Value
Tray Menu
Tray1 Type
Tra y2 Type
Define the type of paper installed
in the optional Tray 2.
The available values are:
Plain*
Transparency
Bond
Recycled
Color
5. Press
1. Press
until you see:
2. Press
you see:
3. Press
you see:
4. Press
. You will see:
Online
Menu Up
Item Up
Value Up
. You will see:
Enter
or
Menu Down
or
Item Down
or
Val u e Down
until
until
Ready
Menus
Tray Menu
Tray Menu
Tray2 Type
Tray2 Type
New Value
Tray Menu
Tray2 Type
5. Press
Online
. You will see:
Chapter 1: Configuring the Printer
Ready
Table 1.8 Page 2 of 3
1-27
❖
Page 34

Tray Menu
Table 1.8 Tray Menu functions
(continued)
Menu Item and Function Keystrokes Display Reads
Tra y Sequenc e
Define the order in which trays
are used when more than one
tray meets the size and type
requirements.
The available values are:
1-2
2-1
Off*
Tray switching is only available
when the optional Tray 2 is
installed.
The first tray of a sequence is
used until it runs out of paper, at
which time the next tray in the
sequence is used (if it has the
correct paper size and type).
1. Press
2. Press
3. Press
4. Press
5. Press
Menu Up
until you see:
Item Up
you see:
Value Up
you see:
Enter
Online
or
Menu Down
or
Item Down
or
Val u e Down
. You will see:
. You will see:
until
until
Menus
Tray Menu
Tray Menu
Tray Sequence
Tray Sequence =
New Value
Tray Menu
Tray Sequence
Ready
Table 1.8 Page 3 of 3
1-28
DocuPrint NC60 System Administrator Guide
❖
Page 35

PCL Menu
Figure 1.5 PCL Menu hierarchy
PCL Menu
Use the PCL Menu to establish the default configuration
for the printer when printing PCL jobs. The menu
hierarchy is shown in Figure 1.5.
Job Menu
Password Menu
Tray M e n u
PCL Menu
System Menu
Color Adjust Menu
Imaging Menu
Parallel Menu
Serial Menu
Ethernet Menu
Token Ring Menu
Novell Menu
Print Menu
Media Server Menu
Service Menu
Reset Menu
Font Number
Pitch
Point Size
Symbol Set
Orientation
Form Length
Line Termination
0*
. . . 999
10.00*
0.44 ..
12.00*
4.00 ..
Portrait*
Landscape
60*
005 ..
64*
005 ..
Off*
On
.. 99.99
.. 999.75
.. 128 (in)
.. 128 (mm)
Desktop
ISO L1
ISO L2
ISO L5
ISO-4
ISO-6
ISO-11
ISO-15
ISO-17
ISO-21
ISO-60
ISO-69
Legal
Math-8
MS Publ.
PC-8*
PC-8 DN
PC-8 Tk
PC-850
PC-852
Pi Font
PS Math
PS Text
Roman-8
Vn Int’l.
Vn Math
Vn US
Win 3.0
Win L1
Win L2
Win L5
ISO Latin Cyr
PC Cyrillic
Refer to Table 1.9 on page 1-30 for step-by-step
procedures.
Chapter 1: Configuring the Printer
1-29
❖
Page 36

PCL Menu
Table 1.9 PCL Menu functions
Menu Item and Function Keystrokes Display Reads
Font Number
Set the ID of the default font in PCL.
The available values are:
0*
- 999
To see the assigned font numbers,
print a PCL Font List.
The font number changes
incrementally to the next valid ID
each time either
is pressed. Holding down
Down
Value Up
continuous scrolling through the font
numbers.
Pitch
Set the pitch when the font selected is
a scaleable fixed pitch font. Pitch is
measured in characters per inch or
c.p.i.
The available values are:
.44 - 99.99 (
The pitch changes incrementally by
.01 each time either
Value Down
down
Val u e Up
causes continuous scrolling through
the Pitch values.
Value Up
or
Val u e Down
10.00*
)
is pressed. Holding
or
or
Val ue
causes
Value Up
Val u e D own
or
1. Press
2. Press
3. Press
4. Press
5. Press
1. Press
2. Press
3. Press
4. Press
5. Press
Menu Up
until you see:
Down
Item Up
until you see:
Valu e Up
until you see:
Enter
Online
Menu Up
until you see:
Down
Item Up
until you see:
Valu e Up
until you see:
Enter
Online
or
Menu
or
Item Down
or
Valu e Down
. You will see:
. You will see:
or
Menu
or
Item Down
or
Valu e Down
. You will see:
. You will see:
Menus
PCL Menu
PCL Menu
Font Number
Font Number =
New Value
PCL Menu
Font Number
Ready
Menus
PCL Menu
PCL Menu
Pitch
Pitch =
New Value
PCL Menu
Pitch
Ready
1-30
DocuPrint NC60 System Administrator Guide
❖
Table 1.9 Page 1 of 4
Page 37

PCL Menu
Table 1.9 PCL Menu functions
(continued)
Menu Item and Function Keystrokes Display Reads
Point Size
Set the point size when the font
selected is a scaleable font. Point size
is measured in parts per 72 of an inch.
The available values are:
4.00 - 999.75 (
The point size changes incrementally
by .25 each time either
Value Down
down
causes continuous scrolling through
the point sizes.
Symbol Set
Set the default font symbol set used in
PCL.
The available values are:
Desktop ISO-69 PS Text
ISO L1 Legal Roman-8
ISO L2 Math-8 Vn Int’l.
ISO L5 Ms Publ. Vn Math
ISO-4
ISO-6 PC-8 DN Win 3.0
ISO-11 PC-8 Tk Win L1
ISO-15 PC-850 Win L2
ISO-17 PC-852 Win L5
ISO-21 Pi Font ISO Latin Cyr
ISO-60 PS Math PC Cyrillic
The symbol set is a collection of
characters available for a font,
including uppercase and lowercase
alphabets, punctuation marks, and
special characters such as open and
close quotation marks or international
characters.
12.00*
is pressed. Holding
Val u e Up
or
PC-8*
)
Value Up
Val u e D own
Vn US
or
1. Press
2. Press
3. Press
4. Press
5. Press
1. Press
2. Press
3. Press
4. Press
5. Press
Menu Up
until you see:
Down
Item Up
until you see:
Valu e Up
until you see:
Enter
Online
Menu Up
until you see:
Down
Item Up
until you see:
Valu e Up
until you see:
Enter
Online
or
Menu
or
Item Down
or
Valu e Down
. You will see:
. You will see:
or
Menu
or
Item Down
or
Valu e Down
. You will see:
. You will see:
Menus
PCL Menu
PCL Menu
Point Size
Point Size =
New Value
PCL Menu
Point Size
Ready
Menus
PCL Menu
PCL Menu
Symbol Set
Symbol Set =
New Value
PCL Menu
Symbol Set
Ready
Table 1.9 Page 2 of 4
Chapter 1: Configuring the Printer
1-31
❖
Page 38

PCL Menu
Table 1.9 PCL Menu functions
(continued)
Menu Item and Function Keystrokes Display Reads
Orientation
Set the default orientation used in
PCL.
The available values are:
Portrait*
Landscape
1. Press
2. Press
3. Press
4. Press
Menu Up
until you see:
Down
Item Up
until you see:
Valu e Up
until you see:
Enter
or
Menu
or
Item Down
or
Valu e Down
. You will see:
Menus
PCL Menu
PCL Menu
Orientation
Orientation =
New Value
PCL Menu
Orientation
Form Length
Set the default text length (number of
lines on a page) used in PCL.
The available values are:
005 - 128
60*
(
when Default units = inches)
64*
(
when Default units = millimeters)
Form Length is automatically adjusted
when Paper Size is changed. The
Form Length is recalculated using the
formula: Form Length = ((page length
in inches - 1 inch) * 6).
The Form Length value changes
incrementally by 1 each time either
Value Up
Holding down
Down
through the Form Length values.
The value of this setting after
performing a Factory Reset depends
on the value of the Default units
(inches, millimeters).
or
Val u e Down
Value Up
causes continuous scrolling
is pressed.
or
Val u e
5. Press
1. Press
Down
2. Press
until you see:
3. Press
until you see:
4. Press
5. Press
. You will see:
Online
Menu Up
until you see:
Item Up
Valu e Up
Enter
Online
or
or
or
. You will see:
. You will see:
Menu
Item Down
Valu e Down
Ready
Menus
PCL Menu
PCL Menu
Form Length
Form Length =
New Value
PCL Menu
Form Length
Ready
1-32
DocuPrint NC60 System Administrator Guide
❖
Table 1.9 Page 3 of 4
Page 39

PCL Menu
Table 1.9 PCL Menu functions
(continued)
Menu Item and Function Keystrokes Display Reads
Line Termination
Set to add a Carriage Return after
every Line Feed appearing in PCL text.
The available values are:
Off*
On
This setting enables the
<LF>=<CR><LF> line termination
mode in PCL as the default.
1. Press
2. Press
3. Press
4. Press
5. Press
Menu Up
until you see:
Down
Item Up
until you see:
Valu e Up
until you see:
Enter
Online
or
Menu
or
Item Down
or
Valu e Down
. You will see:
. You will see:
Menus
PCL Menu
PCL Menu
Line Terminat.
Line Terminat. =
New Value
PCL Menu
Line Terminat.
Ready
Table 1.9 Page 4 of 4
Chapter 1: Configuring the Printer
1-33
❖
Page 40

System Menu
System Menu
Use the System Menu to set general printer features. The
menu hierarchy is shown in Figure 1.6.
Figure 1.6 System Menu hierarchy with factory settings
Job Menu
Password Menu
Tray M e n u
PCL Menu
System Menu
Color Adjust Menu
Imaging Menu
Parallel Menu
Serial Menu
Ethernet Menu
Token Ring Menu
Novell Menu
Print Menu
Media Server Menu
Service Menu
Reset Menu
Language
Deutsch
English*
Español
Français
Italiano
Português(BRA)
Paper Size
Paper Type
Plain*
Transparency
Bond
Recycled
Color
Page Policy
Policy Timeout
Hold Timeout
Manual Timeout
10 Minutes
5 Minutes
4 Minutes
3 Minutes
2 Minutes
1 Minute*
Off
Print Quantity
Startup Page
Yes *
No
Print PS Errors
Defaults
1
Inches*
Millimeters
Power Saver
1
Defaults = Inches in 110V configuration.
Defaults = Millimeters in 220V configuration.
Statmt(5.5x8.5)
Exec(7.25x10.5)
8x10
Letter(8.5x11)*
Legal(8.5x14)
Folio(8.5x13)
SPFolio(216x315
A4(210x297)*
A5(148x210)
B5-ISO(176x250)
Ignore Size
Ignore Type
Ignore Size/Type
Off*
300 Seconds
180 Seconds
120 Seconds
60 Seconds
30 Seconds
0 Seconds
Off
1*
. . . 999
On
Off*
180 Minutes
120 Minutes
90 Minutes
60 Minutes
30 Minutes*
15 Minutes
Off
1-34
Refer to Table 1.10 on page 1-35 for step-by-step
instructions.
DocuPrint NC60 System Administrator Guide
❖
Page 41

Table 1.10 System Menu functions
Menu Item and Function Keystrokes Display
System Menu
Language
Set the spoken language used for
Control Panel display messages,
Configuration Sheets, Font Lists,
Demo Pages, etc.
The available values are:
Deutsch
English*
Español
Français
Italiano
Português(BRA)
The value of this setting is not affected
by performing a “Factory Default”
reset; therefore it does not have a
default value apart from the initial
value of
printer is powered up for the first
time.
that is used when the
English
1. Press
2. Press
3. Press
4. Press
5. Press
Menu Up
until you see:
Down
Item Up
until you see:
Valu e Up
until you see:
Enter
Online
or
Menu
or
Item Down
or
Valu e Down
. You will see:
. You will see:
Menus
System Menu
System Menu
Language
Language =
New Value
System Menu
Language
Ready
(in the language just set)
Table1.10 Page1 of 7
Chapter 1: Configuring the Printer
1-35
❖
Page 42

System Menu
Table 1.10 System Menu functions
(continued)
Menu Item and Function Keystrokes Display
Paper Size
Set the default paper size used in
PostScript and PCL.
The available values are:
Statmt(5.5x8.5)
Exec(7.25x10.5)
8x10
Letter(8.5x11)*
Legal(8.5x14)
Folio(8.5x13)
SPFolio(216x315)
A4(210x297)*
A5(148x210)
B5-ISO(176x250)
The factory default is a function of the
Defaults setting (units=in/mm) in the
System menu.
Paper Type
Set the default paper type used in
PostScript and PCL.
The available values are:
Plain*
Transparency
Bond
Recycled
Color
1. Press
2. Press
3. Press
4. Press
5. Press
1. Press
2. Press
3. Press
4. Press
Menu Up
until you see:
Down
Item Up
until you see:
Valu e Up
until you see:
Enter
Online
Menu Up
until you see:
Down
Item Up
until you see:
Valu e Up
until you see:
Enter
or
Menu
or
Item Down
or
Valu e Down
. You will see:
. You will see:
or
Menu
or
Item Down
or
Valu e Down
. You will see:
Menus
System Menu
System Menu
Paper Size
Paper Size =
New Value
System Menu
Paper Size
Ready
Menus
System Menu
System Menu
Paper Type
Paper Type =
New Value
System Menu
Paper Type
1-36
5. Press
DocuPrint NC60 System Administrator Guide
❖
Online
. You will see:
Ready
Table1.10 Page2 of 7
Page 43

System Menu
Table 1.10 System Menu functions
(continued)
Menu Item and Function Keystrokes Display
Page Policy
Allow the printer to automatically
select an alternate paper size and/or
type if the requested size and/or type
is not loaded.
The available values are:
Ignore Size
Ignore Type
Ignore Size/Type
Off*
If the requested paper (size/type) is
not installed, you will be prompted to
load the requested paper. If the Page
Policy is
not satisfy the request, the printer will
wait indefinitely until one of the
following actions is taken:
• The job is cancelled from the
Control Panel.
• From the Control Panel,
or
an alternative tray to print from and
then
• A sheet of paper of any size or type
is inserted into the Manual Bypass
Feeder slot.
• The proper paper (size/type) is
loaded in the specified tray and the
tray designation for type and size is
corrected. See
(page 1-25).
If a Page Policy is set, the printer will
wait a time specified by the Policy
Timeout (page 1-38) before invoking
the Page Policy.
or the Page Policy does
Off
Val u e D own
Enter
is pressed to select
is pressed.
“Tray Menu”
Value Up
1. Press
2. Press
3. Press
4. Press
5. Press
Menu Up
until you see:
Down
Item Up
until you see:
Valu e Up
until you see:
Enter
Online
or
Menu
or
Item Down
or
Valu e Down
. You will see:
. You will see:
Menus
System Menu
System Menu
Page Policy
Page Policy =
New Value
System Menu
Page Policy
Ready
Table1.10 Page3 of 7
Chapter 1: Configuring the Printer
1-37
❖
Page 44

System Menu
Table 1.10 System Menu functions
(continued)
Menu Item and Function Keystrokes Display
Policy Timeout
Set how long the printer will wait
before taking the action defined by
the setting of Page Policy (page 1-37).
The available values, in seconds, are:
300
180
120
60
30*
0
Off
means immediately invoke Page
0
Policy.
Policy (i.e., wait indefinitely).
Hold Timeout
Set the length of time a print job is to
be held at the printer when
designated as a Hold Job by the
printer driver.
The available values, in minutes, are:
10
5
4
3
2
1*
Off
The Control Panel display will indicate
“HOLD JOB” and the job filename.
The job will be released by pressing
the Enter key if the Hold Timeout
value has not been reached. If the
timeout value is exceeded, the job will
print.
means never invoke Page
Off
1. Press
2. Press
3. Press
4. Press
5. Press
1. Press
2. Press
3. Press
4. Press
5. Press
Menu Up
until you see:
Down
Item Up
until you see:
Valu e Up
until you see:
Enter
Online
Menu Up
until you see:
Down
Item Up
until you see:
Valu e Up
until you see:
Enter
Online
or
Menu
or
Item Down
or
Valu e Down
. You will see:
. You will see:
or
Menu
or
Item Down
or
Valu e Down
. You will see:
. You will see:
Menus
System Menu
System Menu
Policy Timeout
Policy Timeout =
New Value
System Menu
Policy Timeout
Ready
Menus
System Menu
System Menu
Hold Timeout
Hold Timeout =
New Value
System Menu
Hold Timeout
Ready
1-38
DocuPrint NC60 System Administrator Guide
❖
Table1.10 Page4 of 7
Page 45

System Menu
Table 1.10 System Menu functions
(continued)
Menu Item and Function Keystrokes Display
Manual Timeout
Set time to force printing of a job
designated by the print driver to use
media fed from the manual feeder. If
media is not inserted into the manual
feeder before timeout, the job will be
printed on the media present based
on printer settings.
The available values, in minutes, are:
10
5
4
3
2
1*
Off
Print Quantity
Set the number of times each page is
printed (uncollated). The setting is
usually overridden by the job stream.
The available values are:
1*
- 999
The number of copies changes
incrementally by 1 each time either
Value Up
Holding down
Down
through the number of copies.
or
Val u e Down
Value Up
causes continuous scrolling
is pressed.
or
Val u e
1. Press
2. Press
3. Press
4. Press
5. Press
1. Press
2. Press
3. Press
4. Press
5. Press
Menu Up
until you see:
Down
Item Up
until you see:
Valu e Up
until you see:
Enter
Online
Menu Up
until you see:
Down
Item Up
until you see:
Valu e Up
until you see:
Enter
Online
or
Menu
or
Item Down
or
Valu e Down
. You will see:
. You will see:
or
Menu
or
Item Down
or
Valu e Down
. You will see:
. You will see:
Menus
System Menu
System Menu
Manual Timeout
Manual Timeout =
New Value
System Menu
Manual Timeout
Ready
Menus
System Menu
System Menu
Print Quantity
Print Quantity =
New Value
System Menu
Print Quantity
Ready
Table1.10 Page5 of 7
Chapter 1: Configuring the Printer
1-39
❖
Page 46

System Menu
Table 1.10 System Menu functions
(continued)
Menu Item and Function Keystrokes Display
Startup Page
Set to determine if a special startup
page shall be printed at each power
on.
The available values are:
Yes *
No
1. Press
2. Press
3. Press
4. Press
Menu Up
until you see:
Down
Item Up
until you see:
Valu e Up
until you see:
Enter
or
Menu
or
Item Down
or
Valu e Down
. You will see:
Menus
System Menu
System Menu
Startup Page
Startup Page =
New Value
System Menu
Startup Page
Print PS Errors
Set to control the use of the built in
error handler or debugger in the
PostScript interpreter.
The available values are:
On
Off*
When On, PostScript error information
is printed. When
and no information is provided.
, the job flushes
Off
5. Press
1. Press
Down
2. Press
until you see:
3. Press
until you see:
4. Press
5. Press
. You will see:
Online
Menu Up
until you see:
Item Up
Valu e Up
Enter
Online
or
or
or
. You will see:
. You will see:
Menu
Item Down
Valu e Down
Ready
Menus
System Menu
System Menu
Print PS Errors
Print PS Errors=
New Value
System Menu
Print PS Errors
Ready
1-40
DocuPrint NC60 System Administrator Guide
❖
Table1.10 Page6 of 7
Page 47

System Menu
Table 1.10 System Menu functions
(continued)
Menu Item and Function Keystrokes Display
Defaults
Sets default units. This is not changed
when a “Factory Default” is
performed.
The available values are:
Inches*
(for 110V configuration)
Millimeters (for 220V configuration)
The following defaults are affected by
changing this setting:
• System Menu>Paper Size
• PCL Menu>FormLength.
Power Saver
Set the time the printer will remain
idle before low power mode is
activated.
The available values, in minutes, are:
180
120
90
60
30*
15
Off (never enter Power Saver mode)
1. Press
2. Press
3. Press
4. Press
5. Press
1. Press
2. Press
3. Press
4. Press
5. Press
Menu Up
until you see:
Down
Item Up
until you see:
Valu e Up
until you see:
Enter
Online
Menu Up
until you see:
Down
Item Up
until you see:
Valu e Up
until you see:
Enter
Online
or
Menu
or
Item Down
or
Valu e Down
. You will see:
. You will see:
or
Menu
or
Item Down
or
Valu e Down
. You will see:
. You will see:
Menus
System Menu
System Menu
Defaults
Defaults =
New Value
System Menu
Defaults
Ready
Menus
System Menu
System Menu
Power Saver
Power Saver =
New Value
System Menu
Power Saver
Ready
Table1.10 Page7 of 7
Chapter 1: Configuring the Printer
1-41
❖
Page 48

Color Adjust Menu
Color Adjust Menu
Use the Color Adjust Menu to control and adjust color
density, black density, and color balance. The menu
hierarchy is shown in Figure 1.7.
Figure 1.7 Color Adjust Menu hierarchy
Job Menu
Password Menu
Tray M e n u
PCL Menu
System Menu
Color Adjust Menu
Imaging Menu
Parallel Menu
Serial Menu
Ethernet Menu
Token Ring Menu
Novell Menu
Print Menu
Media Server Menu
Service Menu
Reset Menu
Color Density
Black Density
Color Balance
Cancel Changes
Color Defaults
+3 CMY
+2 CMY
+1 CMY
0 CMY*
-1 CMY
-2 CMY
-3 CMY
21
20
19
18
17
16
15
14
13
12
11
10
0
Yes
No*
Yes
No*
+3 K
+2 K
+1 K
0 K*
-1 K
-2 K
-3 K
1-42
Refer to Table 1.11 on page 1-43 for step-by-step
instructions.
DocuPrint NC60 System Administrator Guide
❖
Page 49

Color Adjust Menu
Table 1.11 Color Adjust Menu functions
Menu Item and Function Keystrokes Display
Color Density
Set to allow fine adjustment to the
color density.
The available values are:
+3 CMY
+2 CMY
+1 CMY
0 CMY*
-1 CMY
-2 CMY
-3 CMY
A change to Color Density (i.e.
pressing
will cause a test print output, based
upon the changed value.
Black Density
Set to allow fine adjustment of the
black density.
The available values are:
+3 K
+2 K
+1 K
0 K*
-1 K
-2 K
-3 K
A change to Black Density (i.e.
pressing
will cause a test print output, based
upon the changed value.
after a value change)
Enter
after a value change)
Enter
1. Press
2. Press
3. Press
4. Press
5. Press
1. Press
2. Press
3. Press
4. Press
5. Press
Menu Up
until you see:
Down
Item Up
until you see:
Valu e Up
until you see:
Enter
Online
Menu Up
until you see:
Down
Item Up
until you see:
Valu e Up
until you see:
Enter
Online
or
Menu
or
Item Down
or
Valu e Down
. You will see:
. You will see:
or
Menu
or
Item Down
or
Valu e Down
. You will see:
. You will see:
Menus
Color Adjust
Color Adjust
Color Density
Color Density
New Value
Color Adjust
Color Density
Ready
Menus
Color Adjust
Color Adjust
Black Density
Black Density
New Value
Color Adjust
Black Density
Ready
Table1.10 Page1 of 3
Chapter 1: Configuring the Printer
1-43
❖
Page 50

Color Adjust Menu
Table 1.11 Color Adjust Menu functions
(continued)
Menu Item and Function Keystrokes Display
Color Balance
Set to allow fine adjustment to the
color balance.
The available values are:
21 14
20 13
19 12
18 11
17 10
16 0
15
A change to Color Balance (i.e.
pressing
will cause a test print output, based
upon the changed value.
Cancel Changes
Set to cancel all changes made to
Color Adjustment during the current
session.
The available values are:
Yes
No*
This operation cancels any changes
made to the Color Density, Black
Density, and Color Balance values
during a “session” in the Color Adjust
Menu. The values current at the
entrance to the Color Adjust Menu are
restored. Note that this cancellation
also includes canceling Color Defaults.
Cancel Changes will not cause a test
print output. This operation cannot be
undone.
after a value change)
Enter
1. Press
2. Press
3. Press
4. Press
5. Press
1. Press
2. Press
3. Press
4. Press
5. Press
Menu Up
until you see:
Down
Item Up
until you see:
Valu e Up
until you see:
Enter
Online
Menu Up
until you see:
Down
Item Up
until you see:
Valu e Up
until you see:
Enter
Online
or
Menu
or
Item Down
or
Valu e Down
. You will see:
. You will see:
or
Menu
or
Item Down
or
Valu e Down
. You will see:
. You will see:
Menus
Color Adjust
Color Adjust
Color Balance
Color Balance
New Value
Color Adjust
Color Balance
Ready
Menus
Color Adjust
Color Adjust
Cancel Changes
Cancel Changes
New Value
Color Adjust
Cancel Changes
Ready
1-44
DocuPrint NC60 System Administrator Guide
❖
Table1.10 Page2 of 3
Page 51

Color Adjust Menu
Table 1.11 Color Adjust Menu functions
(continued)
Menu Item and Function Keystrokes Display
Color Defaults
Set to allow “resetting” all color
adjustment (Color Density, Black
Density, and Color Balance) to their
factory default values.
The available values are:
Yes
No*
Executing Color Defaults will reset to
factory defaults values and cause a
test print output, based upon those
factory default values.
1. Press
2. Press
3. Press
4. Press
5. Press
Menu Up
until you see:
Down
Item Up
until you see:
Valu e Up
until you see:
Enter
Online
or
Menu
or
Item Down
or
Valu e Down
. You will see:
. You will see:
Menus
Color Adjust
Color Adjust
Color Defaults
Color Defaults
New Value
Color Adjust
Color Defaults
Ready
Table1.10 Page3 of 3
Chapter 1: Configuring the Printer
1-45
❖
Page 52

Imaging Menu
Imaging Menu
Figure 1.8 Imaging Menu hierarchy
Use the Imaging Menu to set imaging features as printer
defaults. The menu hierarchy is shown in Figure 1.8.
Job Menu
Password Menu
Tray M e n u
PCL Menu
System Menu
Color Adjust Menu
Imaging Menu
Parallel Menu
Serial Menu
Ethernet Menu
Token Ring Menu
Novell Menu
Print Menu
Media Server Menu
Service Menu
Reset Menu
Edge Smoothing
Color Mode
Blk. Overprint
Halftone Type
Enh. Alignment
Fast Black
Process Black
On
Off*
On
Off*
On
Off*
On
Off*
On
Off*
Vivid*
Photo
Unadjusted
Quad Dot
Smooth Screen*
1200 Quality
Refer to Table 1.12 on page 1-47 for step-by-step
instructions.
1-46
DocuPrint NC60 System Administrator Guide
❖
Page 53

Table 1.12 Imaging Menu functions
Menu Item and Function Keystrokes Display
Imaging Menu
Edge Smoothing
Set the default image (resolution)
enhancement mode used in PCL and
PostScript.
The available values are:
On
Off*
Edge Smoothing cannot be used
when the Halftone Type is set to
1200 Quality
Color Mode
Set to allow adjustment to the color
mode.
The available values are:
Vivid*
Photo
Unadjusted
.
1. Press
2. Press
3. Press
4. Press
5. Press
1. Press
2. Press
3. Press
4. Press
5. Press
Menu Up
until you see:
Down
Item Up
until you see:
Valu e Up
until you see:
Enter
Online
Menu Up
until you see:
Down
Item Up
until you see:
Valu e Up
until you see:
Enter
Online
or
Menu
or
Item Down
or
Valu e Down
. You will see:
. You will see:
or
Menu
or
Item Down
or
Valu e Down
. You will see:
. You will see:
Menus
Imaging Menu
Imaging Menu
Edge Smoothing
Edge Smoothing =
New Value
Imaging Menu
Edge Smoothing
Ready
Menus
Imaging Menu
Imaging Menu
Color Mode
Color Mode =
New Value
Imaging Menu
Color Mode
Ready
Blk. Overprint
Set to select Black Overprint
operation.
The available values are:
On
Off*
1. Press
2. Press
3. Press
4. Press
5. Press
Menu Up
until you see:
Down
Item Up
until you see:
Valu e Up
until you see:
Enter
Online
or
Menu
Menus
Imaging Menu
or
Item Down
Imaging Menu
Blk. Overprint
or
Valu e Down
Blk. Overprint =
New Value
. You will see:
Imaging Menu
Blk. Overprint
. You will see:
Chapter 1: Configuring the Printer
Ready
Table1.10 Page1 of 3
1-47
❖
Page 54

Imaging Menu
Table 1.12 Imaging Menu functions
(continued)
Menu Item and Function Keystrokes Display
Halftone Type
Set the halftoning method.
The available values are:
Quad Dot
Smooth Screen*
1200 Quality
1. Press
2. Press
3. Press
4. Press
Menu Up
until you see:
Down
Item Up
until you see:
Valu e Up
until you see:
Enter
or
Menu
or
Item Down
or
Valu e Down
. You will see:
Menus
Imaging Menu
Imaging Menu
Halftone Type
Halftone Type =
New Value
Imaging Menu
Halftone Type
Enh. Alignment
Set to improve image registration by
enabling a skip pitch printing mode.
The available values are:
On
Off*
5. Press
1. Press
Down
2. Press
until you see:
3. Press
until you see:
4. Press
. You will see:
Online
Menu Up
until you see:
Item Up
Valu e Up
Enter
or
or
or
. You will see:
Menu
Item Down
Valu e Down
Ready
Menus
Imaging Menu
Imaging Menu
Enh. Alignment
Enh. Alignment =
New Value
Imaging Menu
Enh. Alignment
Fast Black
Enable or disable printing on the
transfer drum seam when in
monochrome mode.
The available values are:
On
Off*
Image quality will be enhanced by not
allowing printing on seam.
1-48
DocuPrint NC60 System Administrator Guide
❖
5. Press
1. Press
2. Press
3. Press
4. Press
5. Press
Online
Menu Up
until you see:
Down
Item Up
until you see:
Valu e Up
until you see:
Enter
Online
. You will see:
or
Menu
or
Item Down
or
Valu e Down
. You will see:
. You will see:
Ready
Menus
Imaging Menu
Imaging Menu
Fast Black
Fast Black =
New Value
Imaging Menu
Fast Black
Ready
Table1.10 Page2 of 3
Page 55

Imaging Menu
Table 1.12 Imaging Menu functions
(continued)
Menu Item and Function Keystrokes Display
Process Black
Set to select process black operation.
The available values are:
On
Off*
1. Press
2. Press
3. Press
4. Press
Menu Up
until you see:
Down
Item Up
until you see:
Valu e Up
until you see:
Enter
or
Menu
or
Item Down
or
Valu e Down
. You will see:
Menus
Imaging Menu
Imaging Menu
Process Black
Process Black =
New Value
Imaging Menu
Process Black
5. Press
Online
. You will see:
Ready
Table1.10 Page3 of 3
Chapter 1: Configuring the Printer
1-49
❖
Page 56

Parallel Menu
Parallel Menu
Figure 1.9 Parallel Menu hierarchy
Use the Parallel Menu to set options for the parallel port
connection. The menu hierarchy is shown in Figure 1.9.
Job Menu
Password Menu
Tray Men u
PCL Menu
System Menu
Color Adjust Menu
Imaging Menu
Parallel Menu
Serial Menu
Ethernet Menu
Token Ring Menu
Novell Menu
Print Menu
Media Server Menu
Service Menu
Reset Menu
Port Enable
Port Timeout
Parallel PDL
Binary PS
Bi-Directional
On*
Off
30*
5 ...
Auto*
PCL
PostScript
On
Off*
On*
Off
... 300 Seconds
Refer to Table 1.13 on page 1-51 for step-by-step
instructions.
1-50
DocuPrint NC60 System Administrator Guide
❖
Page 57

Table 1.13 Parallel Menu functions
Menu Item and Function Keystrokes Display
Parallel Menu
Port Enable
Enable or disable the parallel port.
The available values are:
On*
Off
Port Timeout
Set the time for determining when to
end an incomplete print job and poll
the next port in the polling sequence.
The available values are:
5 - 300 seconds (
This item also causes an implicit job
end such as Control D in PostScript or
<ESC> E in PCL, and invokes the
emulation functions associated with
this action (e.g., formfeed, reset, etc.).
The time changes incrementally by 1
second each time either
Value Down
down
Val u e Up
causes continuous scrolling through
the values.
30*
)
Valu e Up
is pressed. Holding
or
Val u e D own
or
1. Press
2. Press
3. Press
4. Press
5. Press
1. Press
2. Press
3. Press
4. Press
5. Press
Menu Up
until you see:
Down
Item Up
until you see:
Valu e Up
until you see:
Enter
Online
Menu Up
until you see:
Down
Item Up
until you see:
Valu e Up
until you see:
Enter
Online
or
Menu
or
Item Down
or
Valu e Down
. You will see:
. You will see:
or
Menu
or
Item Down
or
Valu e Down
. You will see:
. You will see:
Menus
Parallel Menu
Parallel Menu
Port Enable
Port Enable =
New Value
Parallel Menu
Port Enable
Ready
Menus
Parallel Menu
Parallel Menu
Port Timeout
Port Timeout =
New Value
Parallel Menu
Port Timeout
Ready
Table1.13 Page1 of 2
Chapter 1: Configuring the Printer
1-51
❖
Page 58

Parallel Menu
Table 1.13 Parallel Menu functions
(continued)
Menu Item and Function Keystrokes Display
Parallel PDL
Set the default emulation for the
parallel port.
The available values are:
Auto*
PCL
PostScript
1. Press
2. Press
3. Press
4. Press
Menu Up
until you see:
Down
Item Up
until you see:
Valu e Up
until you see:
Enter
or
Menu
or
Item Down
or
Valu e Down
. You will see:
Menus
Parallel Menu
Parallel Menu
Parallel PDL
Parallel PDL =
New Value
Parallel Menu
Parallel PDL
Binary PS
Enable or disable the binary mode of
PostScript.
The available values are:
On
Off*
5. Press
1. Press
Down
2. Press
until you see:
3. Press
until you see:
. You will see:
Online
Menu Up
until you see:
Item Up
Valu e Up
or
or
or
Menu
Item Down
Valu e Down
Ready
Menus
Parallel Menu
Parallel Menu
Binary PS
Binary PS =
New Value
Bidirectional
Enable or disable bidirectional
communications through the parallel
port.
The available values are:
On*
Off
1-52
DocuPrint NC60 System Administrator Guide
❖
4. Press
5. Press
1. Press
2. Press
3. Press
4. Press
5. Press
Enter
Online
Menu Up
until you see:
Down
Item Up
until you see:
Valu e Up
until you see:
Enter
Online
. You will see:
. You will see:
or
Menu
or
Item Down
or
Valu e Down
. You will see:
. You will see:
Parallel Menu
Binary PS
Ready
Menus
Parallel Menu
Parallel Menu
Bidirectional
Bidirectional =
New Value
Parallel Menu
Bidirectional
Ready
Table1.13 Page2 of 2
Page 59

Serial Menu
Figure 1.10 Serial Menu hierarchy
Serial Menu
Use the Serial Menu to set options for the serial port
connection. The menu hierarchy is shown in Figure 1.10.
Job Menu
Password Menu
Tray Men u
PCL Menu
System Menu
Color Adjust Menu
Imaging Menu
Parallel Menu
Serial Menu
Ethernet Menu
Token Ring Menu
Novell Menu
Print Menu
Media Server Menu
Service Menu
Reset Menu
Port Enable
Port Timeout
Serial PDL
Flow Control
Binary PS
Baud Rate
On*
Off
30*
5 ...
... 300 Seconds
Auto*
PCL
PostScript
XON/XOFF
Robust XON/XOFF
Hardware*
On
Off*
38400
28800
19200
9600*
4800
2400
1200
600
Refer to Table 1.14 on page 1-54 for step-by-step
instructions.
Chapter 1: Configuring the Printer
1-53
❖
Page 60

Serial Menu
Table 1.14 Serial Menu functions
Menu Item and Function Keystrokes Display
Port Enable
Enable or disable the serial port.
The available values are:
On*
Off
Port Timeout
Set the time for determining when to
end an incomplete print job and poll
the next port in the polling sequence.
The available values are:
5 - 300 seconds (
This item also causes an implicit job
end such as Control D in PostScript or
<ESC> E in PCL, and invokes the
emulation functions associated with
this action (e.g., formfeed, reset, etc.).
The time changes incrementally by 1
second each time either
Value Down
down
Val u e Up
causes continuous scrolling through
the values.
)
30*
Valu e Up
is pressed. Holding
or
Val u e D own
or
1. Press
2. Press
3. Press
4. Press
5. Press
1. Press
2. Press
3. Press
4. Press
5. Press
Menu Up
until you see:
Down
Item Up
until you see:
Valu e Up
until you see:
Enter
Online
Menu Up
until you see:
Down
Item Up
until you see:
Valu e Up
until you see:
Enter
Online
or
Menu
or
Item Down
or
Valu e Down
. You will see:
. You will see:
or
Menu
or
Item Down
or
Valu e Down
. You will see:
. You will see:
Menus
Serial Menu
Serial Menu
Port Enable
Port Enable =
New Value
Serial Menu
Port Enable
Ready
Menus
Serial Menu
Serial Menu
Port Timeout
Port Timeout =
New Value
Serial Menu
Port Timeout
Ready
1-54
DocuPrint NC60 System Administrator Guide
❖
Table1.14 Page1 of 3
Page 61

Serial Menu
Table 1.14 Serial Menu functions
(continued)
Menu Item and Function Keystrokes Display
Serial PDL
Set the default emulation for the serial
port.
The available values are:
Auto*
PCL
Postscript
1. Press
2. Press
3. Press
4. Press
Menu Up
until you see:
Down
Item Up
until you see:
Valu e Up
until you see:
Enter
or
Menu
or
Item Down
or
Valu e Down
. You will see:
Menus
Serial Menu
Serial Menu
Serial PDL
Serial PDL =
New Value
Serial Menu
Serial PDL
Flow Control
Set the handshaking parameters for
the serial port.
The available values are:
XON/XOFF
Robust XON/XOFF
Hardware*
5. Press
1. Press
Down
2. Press
until you see:
3. Press
until you see:
. You will see:
Online
Menu Up
until you see:
Item Up
Valu e Up
or
or
or
Menu
Item Down
Valu e Down
Ready
Menus
Serial Menu
Serial Menu
Flow Control
Flow Control =
New Value
Binary PS
Enable or disable the binary mode of
PostScript.
The available values are:
On
Off*
4. Press
5. Press
1. Press
2. Press
3. Press
4. Press
5. Press
Enter
Online
Menu Up
until you see:
Down
Item Up
until you see:
Valu e Up
until you see:
Enter
Online
. You will see:
Serial Menu
Flow Control
. You will see:
or
Menu
Ready
Menus
Parallel Menu
or
Item Down
Parallel Menu
Binary PS
or
Valu e Down
Binary PS =
New Value
. You will see:
Parallel Menu
Binary PS
. You will see:
Chapter 1: Configuring the Printer
Ready
Table1.14 Page2 of 3
1-55
❖
Page 62

Serial Menu
Table 1.14 Serial Menu functions
(continued)
Menu Item and Function Keystrokes Display
Baud Rate
Set the baud rate for the serial port.
The available values are:
38400
28800
19200
9600*
4800
2400
1200
600
1. Press
2. Press
3. Press
4. Press
5. Press
Menu Up
until you see:
Down
Item Up
until you see:
Valu e Up
until you see:
Enter
Online
or
Menu
or
Item Down
or
Valu e Down
. You will see:
. You will see:
Menus
Serial Menu
Serial Menu
Baud Rate
Baud Rate =
New Value
Serial Menu
Baud Rate
Ready
Table1.14 Page3 of 3
1-56
DocuPrint NC60 System Administrator Guide
❖
Page 63

Ethernet Menu
Ethernet Menu
Use the Ethernet Menu to set options for the Ethernet
port. The menu hierarchy is shown in Figure 1.11 on
page 1-58.
Refer to Table 1.15 on page 1-59 for step-by-step
instructions.
Chapter 1: Configuring the Printer
1-57
❖
Page 64

Ethernet Menu
Figure 1.11 Ethernet Menu hierarchy
Job Menu
Password Menu
Tray M e n u
PCL Menu
System Menu
Color Adjust Menu
Imaging Menu
Parallel Menu
Serial Menu
Ethernet Menu
Token Ring Menu
Novell Menu
Print Menu
Media Server Menu
Service Menu
Reset Menu
LPR Enable
LPR Banner
LPR PDL
LPR Binary PS
DLC/LLC Enable
DLC/LLC PDL
DLC/LLC Bin PS
NetBEUI Enable
NetBEUI PDL
NetBEUI Bin PS
AppSocket Enable
AppSocket PDL
AppSocket Bin PS
EtherTalk Enable
HTTP Enable
On*
Off
On
Off*
On
Off*
On
Off*
On
Off*
On*
Off
On*
Off
On*
Off
On*
Off
On*
Off
On*
Off
Auto*
PCL
PostScript
Auto*
PCL
PostScript
Auto*
PCL
PostScript
Auto*
PCL
PostScript
1-58
IP Address Res
IP Address
Sub Net Mask
Default Gateway
Port Timeout
Speed
1
Appears only if IP Address Res = Static.
2
Appears only if 10/100 Ethernet option is installed.
DocuPrint NC60 System Administrator Guide
❖
Static
BOOTP/RARP
1
1
1
2
DHCP*
xxx.xxx.xxx.xxx
60*
5 ...
... 300 Seconds
Auto*
10/HALF
10/FULL
100/HALF
100/FULL
Page 65

Table 1.15 Ethernet Menu functions
Menu Item and Function Keystrokes Display
Ethernet Menu
LPR Enable
Enable or disable the Ethernet LPR
protocol.
The available values are:
On*
Off
LPR Banner
Enable or disable the LPR banner
sheet.
The available values are:
On
Off*
1. Press
2. Press
3. Press
4. Press
5. Press
1. Press
2. Press
3. Press
4. Press
5. Press
Menu Up
until you see:
Down
Item Up
until you see:
Valu e Up
until you see:
Enter
Online
Menu Up
until you see:
Down
Item Up
until you see:
Valu e Up
until you see:
Enter
Online
or
Menu
or
Item Down
or
Valu e Down
. You will see:
. You will see:
or
Menu
or
Item Down
or
Valu e Down
. You will see:
. You will see:
Menus
Ethernet Menu
Ethernet Menu
LPR Enable
LPR Enable =
New Value
Ethernet Menu
LPR Enable
Ready
Menus
Ethernet Menu
Ethernet Menu
LPR Banner
LPR Banner =
New Value
Ethernet Menu
LPR Banner
Ready
LPR PDL
Set the default emulation for the
Ethernet LPR protocol.
The available values are:
Auto*
PCL
PostScript
1. Press
2. Press
3. Press
4. Press
5. Press
Menu Up
until you see:
Down
Item Up
until you see:
Valu e Up
until you see:
Enter
Online
or
Menu
Menus
Ethernet Menu
or
Item Down
Ethernet Menu
LPR PDL
or
Valu e Down
LPR PDL =
New Value
. You will see:
Ethernet Menu
LPR PDL
. You will see:
Chapter 1: Configuring the Printer
Ready
Table1.15 Page1 of 10
1-59
❖
Page 66

Ethernet Menu
Table 1.15 Ethernet Menu functions
(continued)
Menu Item and Function Keystrokes Display
LPR Binary PS
Enable or disable the LPR binary mode
of PostScript.
The available values are:
On
Off*
1. Press
2. Press
3. Press
4. Press
Menu Up
until you see:
Down
Item Up
until you see:
Valu e Up
until you see:
Enter
or
Menu
or
Item Down
or
Valu e Down
. You will see:
Menus
Ethernet Menu
Ethernet Menu
LPR Binary PS
LPR Binary PS =
New Value
Ethernet Menu
LPR Binary PS
DLC/LLC Enable
Enable or disable the DLC/LLC
protocol.
The available values are:
On*
Off
5. Press
1. Press
Down
2. Press
until you see:
3. Press
until you see:
. You will see:
Online
Menu Up
until you see:
Item Up
Valu e Up
or
or
or
Menu
Item Down
Valu e Down
Ready
Menus
Ethernet Menu
Ethernet Menu
DLC/LLC Enable
DLC/LLC Enable =
New Value
DLC/LLC PDL
Set the default emulation for the DLC/
LLC protocol.
The available values are:
Auto*
PCL
PostScript
1-60
DocuPrint NC60 System Administrator Guide
❖
4. Press
5. Press
1. Press
2. Press
3. Press
4. Press
5. Press
Enter
Online
Menu Up
until you see:
Down
Item Up
until you see:
Valu e Up
until you see:
Enter
Online
. You will see:
. You will see:
or
Menu
or
Item Down
or
Valu e Down
. You will see:
. You will see:
Ethernet Menu
DLC/LLC Enable
Ready
Menus
Ethernet Menu
Ethernet Menu
DLC/LLC PDL
DLC/LLC PDL =
New Value
Ethernet Menu
DLC/LLC PDL
Ready
Table1.15 Page2 of 10
Page 67

Ethernet Menu
Table 1.15 Ethernet Menu functions
(continued)
Menu Item and Function Keystrokes Display
DLC/LLC Bin PS
Enable or disable the DLC/LLC binary
mode of PostScript.
The available values are:
On
Off*
1. Press
2. Press
3. Press
4. Press
Menu Up
until you see:
Down
Item Up
until you see:
Valu e Up
until you see:
Enter
or
Menu
or
Item Down
or
Valu e Down
. You will see:
Menus
Ethernet Menu
Ethernet Menu
DLC/LLC Bin PS
DLC/LLC Bin PS =
New Value
Ethernet Menu
DLC/LLC Bin PS
NetBEUI Enable
Enable or disable the NetBEUI
protocol.
The available values are:
On*
Off
5. Press
1. Press
Down
2. Press
until you see:
3. Press
until you see:
. You will see:
Online
Menu Up
until you see:
Item Up
Valu e Up
or
or
or
Menu
Item Down
Valu e Down
Ready
Menus
Ethernet Menu
Ethernet Menu
NetBEUI Enable
NetBEUI Enable =
New Value
NetBEUI PDL
Set the default emulation for the
NetBEUI protocol.
The available values are:
Auto*
PCL
PostScript
4. Press
5. Press
1. Press
2. Press
3. Press
4. Press
5. Press
Enter
Online
Menu Up
until you see:
Down
Item Up
until you see:
Valu e Up
until you see:
Enter
Online
. You will see:
Ethernet Menu
NetBEUI Enable
. You will see:
or
Menu
Ready
Menus
Ethernet Menu
or
Item Down
Ethernet Menu
NetBEUI PDL
or
Valu e Down
NetBEUI PDL =
New Value
. You will see:
Ethernet Menu
NetBEUI PDL
. You will see:
Chapter 1: Configuring the Printer
Ready
Table1.15 Page3 of 10
1-61
❖
Page 68

Ethernet Menu
Table 1.15 Ethernet Menu functions
(continued)
Menu Item and Function Keystrokes Display
NetBEUI Bin PS
Enable or disable the NetBEUI binary
mode of PostScript.
The available values are:
On
Off*
1. Press
2. Press
3. Press
4. Press
Menu Up
until you see:
Down
Item Up
until you see:
Valu e Up
until you see:
Enter
or
Menu
or
Item Down
or
Valu e Down
. You will see:
Menus
Ethernet Menu
Ethernet Menu
NetBEUI Bin PS
NetBEUI Bin PS =
New Value
Ethernet Menu
NetBEUI Bin PS
AppSocket Enable
Enable or disable the Ethernet
AppSocket protocol. The AppSocket
in the printer supports Ports 2000,
9100, and 2501.
The available values are:
On*
Off
5. Press
1. Press
Down
2. Press
until you see:
3. Press
until you see:
4. Press
. You will see:
Online
Menu Up
until you see:
Item Up
Valu e Up
Enter
or
or
or
. You will see:
Menu
Item Down
Valu e Down
Ready
Menus
Ethernet Menu
Ethernet Menu
AppSocket Enabl
AppSocket Enabl=
New Value
Ethernet Menu
AppSocket Enabl
AppSocket PDL
Set the default emulation for the
Ethernet AppSocket protocol.
The available values are:
Auto*
PCL
PostScript
1-62
DocuPrint NC60 System Administrator Guide
❖
5. Press
1. Press
2. Press
3. Press
4. Press
5. Press
Online
Menu Up
until you see:
Down
Item Up
until you see:
Valu e Up
until you see:
Enter
Online
. You will see:
or
Menu
or
Item Down
or
Valu e Down
. You will see:
. You will see:
Ready
Menus
Ethernet Menu
Ethernet Menu
AppSocket PDL
AppSocket PDL =
New Value
Ethernet Menu
AppSocket PDL
Ready
Table1.15 Page4 of 10
Page 69

Ethernet Menu
Table 1.15 Ethernet Menu functions
(continued)
Menu Item and Function Keystrokes Display
AppSocket Bin PS
Enable or disable the AppSocket
binary mode of PostScript.
The available values are:
On
Off*
1. Press
2. Press
3. Press
4. Press
Menu Up
until you see:
Down
Item Up
until you see:
Valu e Up
until you see:
Enter
or
Menu
or
Item Down
or
Valu e Down
. You will see:
Menus
Ethernet Menu
Ethernet Menu
AppSocket Bin PS
AppSocket Bin PS=
New Value
Ethernet Menu
AppSocket Bin PS
EtherTalk Enable
Enable or disable the Ethernet
EtherTalk protocol.
The available values are:
On*
Off
5. Press
1. Press
Down
2. Press
until you see:
3. Press
until you see:
. You will see:
Online
Menu Up
until you see:
Item Up
Valu e Up
or
or
or
Menu
Item Down
Valu e Down
Ready
Menus
Ethernet Menu
Ethernet Menu
EtherTalk Enable
EtherTalk Enable=
New Value
HTTP Enable
Enable or disable the Ethernet HTTP
Server protocol.
The available values are:
On*
Off
4. Press
5. Press
1. Press
2. Press
3. Press
4. Press
5. Press
Enter
Online
Menu Up
until you see:
Down
Item Up
until you see:
Valu e Up
until you see:
Enter
Online
. You will see:
Ethernet Menu
EtherTalk Enable
. You will see:
or
Menu
Ready
Menus
Ethernet Menu
or
Item Down
Ethernet Menu
HTTP Enable
or
Valu e Down
HTTP Enable =
New Value
. You will see:
Ethernet Menu
HTTP Enable
. You will see:
Chapter 1: Configuring the Printer
Ready
Table1.15 Page5 of 10
1-63
❖
Page 70

Ethernet Menu
Table 1.15 Ethernet Menu functions
(continued)
Menu Item and Function Keystrokes Display
IP Address Res.
Set the method used to assign the IP
address, including subnet mask and
default gateway.
The available values are:
Static
BOOTP/RARP
DHCP*
1. Press
2. Press
3. Press
4. Press
Menu Up
until you see:
Down
Item Up
until you see:
Valu e Up
until you see:
Enter
or
Menu
or
Item Down
or
Valu e Down
. You will see:
Menus
Ethernet Menu
Ethernet Menu
IP Address Res.
IP Address Res.=
New Value
Ethernet Menu
IP Address Res.
5. Press
Online
. You will see:
Ready
Table1.15 Page6 of 10
1-64
DocuPrint NC60 System Administrator Guide
❖
Page 71

Ethernet Menu
Table 1.15 Ethernet Menu functions
(continued)
Menu Item and Function Keystrokes Display
IP Address
Set the four byte IP address.
The available values are:
xxx.xxx.xxx.xxx
(where xxx = 000 to 255)
For this item (after Step 3),
moves the cursor to the right through
the displayed IP address and
moves the cursor to the left.
Down
This allows you to change characters
within the string rather than having to
reenter the entire string.
This item appears only if
IP Address Res is set to
Item Up
Item
Static
.
1. Press
2. Press
3. Press
4. Press
5. To change other characters in
Menu Up
until you see:
Down
Item Up
until you see:
Value Up
You will see:
Valu e Up
to change the value of the
character above the cursor. The
value is incremented or
decremented by 1 each time
the key is pressed. Holding
down
Val u e Up
causes continuous
Down
scrolling through the values.
the IP address, press
or
Item Down
left respectively through the
character string, then press
Value Up
change the value of the
character above the cursor (as
in Step 4).
or
Menu
or
Item Down
or
Val u e Down
or
Valu e Down
or
Val ue
to scroll right or
or
Val u e D own
Item Up
to
Menus
Ethernet Menu
Ethernet Menu
IP Address
.
IP Address =
xxx.xxx.xxx.xxx
IP Address =
xxx.xxx.xxx.xxx
IP Address =
xxx.xxx.xxx.xxx
6. When you have completed
setting the IP address, press
. You will see:
Enter
7. Press
8. Restart printer or power off/on.
Online
. You will see:
Chapter 1: Configuring the Printer
Ethernet Menu
IP Address
Ready
Table1.15 Page7 of 10
1-65
❖
Page 72

Ethernet Menu
Table 1.15 Ethernet Menu functions
(continued)
Menu Item and Function Keystrokes Display
Subnet Mask
Set the four byte Subnet Mask
address.
The available values are:
xxx.xxx.xxx.xxx
(where xxx = 000 to 255)
For this item (after Step 3),
moves the cursor to the right through
the displayed Subnet Mask address
and
Item Down
the left. This allows you to change
characters within the string rather
than having to reenter the entire
string.
This item appears only if
IP Address Res is set to
moves the cursor to
Item Up
Static
.
1. Press
2. Press
3. Press
4. Press
5. To change other characters in
Menu Up
until you see:
Down
Item Up
until you see:
Value Up
You will see:
Valu e Up
to change the value of the
character above the cursor. The
value is incremented or
decremented by 1 each time
the key is pressed. Holding
down
Val u e Up
causes continuous
Down
scrolling through the values.
the Subnet Mask address, press
Item Up
scroll right or left respectively
through the character string,
then press
to change the value of
Down
the character above the cursor
(as in Step 4).
or
or
or
or
Item Down
Valu e Up
or
Menu
Item Down
Val u e Down
Valu e Down
or
Val ue
or
to
Valu e
Menus
Ethernet Menu
Ethernet Menu
Subnet Mask
.
Subnet Mask =
xxx.xxx.xxx.xxx
Subnet Mask =
xxx.xxx.xxx.xxx
Subnet Mask =
xxx.xxx.xxx.xxx
1-66
6. When you have completed
setting the Subnet Mask
address, press
see:
7. Press
8. Restart printer or power off/on.
DocuPrint NC60 System Administrator Guide
❖
Online
. You will
Enter
. You will see:
Ethernet Menu
Subnet Mask
Ready
Table1.15 Page8 of 10
Page 73

Ethernet Menu
Table 1.15 Ethernet Menu functions
(continued)
Menu Item and Function Keystrokes Display
Default Gateway
Set the four byte Default Gateway
address.
The available values are:
xxx.xxx.xxx.xxx
(where xxx = 000 to 255)
For this item (after Step 3),
moves the cursor to the right through
the displayed Default Gateway
address and
cursor to the left. This allows you to
change characters within the string
rather than having to reenter the
entire string.
With the cursor displayed under a
character,
value of that character and
Down
Item Down
Val u e Up
decrements the value.
This item appears only if
IP Address Res is set to
increments the
Item Up
moves the
Valu e
Static
.
1. Press
2. Press
3. Press
4. Press
5. To change other characters in
Menu Up
until you see:
Down
Item Up
until you see:
Value Up
You will see:
Valu e Up
to change the value of the
character above the cursor. The
value is incremented or
decremented by 1 each time
the key is pressed. Holding
down
Val u e Up
causes continuous
Down
scrolling through the values.
the Default Gateway address,
press
Item Up
to scroll right or left
respectively through the
character string, then press
Value Up
change the value of the
character above the cursor (as
in Step 4).
or
or
or
or
or
or
or
Val u e D own
Menu
Item Down
Val u e Down
Valu e Down
Val ue
Item Down
to
Menus
Ethernet Menu
Ethernet Menu
Default Gateway
.
Default Gateway=
xxx.xxx.xxx.xxx
Default Gateway=
xxx.xxx.xxx.xxx
Default Gateway=
xxx.xxx.xxx.xxx
6. When you have completed
setting the Default Gateway
address, press
see:
7. Press
8. Restart printer or power off/on.
Online
. You will
Enter
. You will see:
Chapter 1: Configuring the Printer
Ethernet Menu
Default Gateway
Ready
Table1.15 Page9 of 10
❖
1-67
Page 74

Ethernet Menu
Table 1.15 Ethernet Menu functions
(continued)
Menu Item and Function Keystrokes Display
Port Timeout
Set the time for determining when to
end an incomplete print job and poll
the next port in the polling sequence.
The available values are:
5 - 300 seconds (
This item also causes an implicit job
end such as Control D in PostScript or
<ESC> E in PCL, and invokes the
emulation functions associated with
this action (e.g., formfeed, reset, etc.).
The time changes incrementally by 1
second each time either
Value Down
down
Val u e Up
causes continuous scrolling through
the values.
Speed
Set the speed of the 10/100 Ethernet
interface card (appears only if the
option is installed).
The available values are:
Auto*
10/HALF
10/FULL
100/HALF
100/FULL
HALF = half duplex
FULL = full duplex
30*
)
Valu e Up
is pressed. Holding
or
Val u e D own
or
1. Press
2. Press
3. Press
4. Press
5. Press
1. Press
2. Press
3. Press
4. Press
5. Press
Menu Up
until you see:
Down
Item Up
until you see:
Valu e Up
until you see:
Enter
Online
Menu Up
until you see:
Down
Item Up
until you see:
Valu e Up
until you see:
Enter
Online
or
Menu
or
Item Down
or
Valu e Down
. You will see:
. You will see:
or
Menu
or
Item Down
or
Valu e Down
. You will see:
. You will see:
Menus
Ethernet Menu
Ethernet Menu
Port Timeout
Port Timeout =
New Value
Ethernet Menu
Port Timeout
Ready
Menus
Ethernet Menu
Ethernet Menu
Speed
Speed =
New Value
Ethernet Menu
Speed
Ready
1-68
DocuPrint NC60 System Administrator Guide
❖
Table 1.15 Page 10 of 10
Page 75

Token Ring Menu
Token Ring Menu
Use the Token Ring Menu to set options for the Token
Ring port. The menu hierarchy is shown in Figure 1.12 on
page 1-70.
Refer to Table 1.16 on page 1-71 for step-by-step
instructions.
Chapter 1: Configuring the Printer
1-69
❖
Page 76

Token Ring Menu
Figure 1.12 Token Ring Menu hierarchy
Job Menu
Password Menu
Tray M e n u
PCL Menu
System Menu
Color Adjust Menu
Imaging Menu
Parallel Menu
Serial Menu
Ethernet Menu
Token Ring Menu
Novell Menu
Print Menu
Media Server Menu
Service Menu
Reset Menu
LPR Enable
LPR Banner
LPR PDL
LPR Binary PS
DLC/LLC Enable
DLC/LLC PDL
DLC/LLC Bin PS
NetBEUI Enable
NetBEUI PDL
NetBEUI Bin PS
AppSocket Enable
AppSocket PDL
AppSocket Bin PS
TokenTalk Enable
HTTP Enable
IP Address Res
IP Address
Sub Net Mask
Default Gateway
Port Timeout
On*
Off
On
Off*
On
Off*
On
Off*
On
Off*
On*
Off
Static
BOOTP/RARP
1
1
1
DHCP*
xxx.xxx.xxx.xxx
60*
5 ...
... 300 Seconds
On*
Off
On*
Off
On*
Off
On*
Off
On*
Off
Auto*
PCL
PostScript
Auto*
PCL
PostScript
Auto*
PCL
PostScript
Auto*
PCL
PostScript
1-70
Source Routing
Speed
1
Appears only if IP Address Res = Static.
DocuPrint NC60 System Administrator Guide
❖
LAA
xxx.xxx.xxx.xxx
On*
Off
Auto*
16
4
Page 77

Token Ring Menu
Table 1.16 Token Ring Menu functions
Menu Item and Function Keystrokes Display
LPR Enable
Enable or disable the Token Ring LPR
protocol.
The available values are:
On*
Off
LPR Banner
Enable or disable the LPR banner
sheet.
The available values are:
On*
Off
1. Press
2. Press
3. Press
4. Press
5. Press
1. Press
2. Press
3. Press
4. Press
5. Press
Menu Up
until you see:
Down
Item Up
until you see:
Valu e Up
until you see:
Enter
Online
Menu Up
until you see:
Down
Item Up
until you see:
Valu e Up
until you see:
Enter
Online
or
Menu
or
Item Down
or
Valu e Down
. You will see:
. You will see:
or
Menu
or
Item Down
or
Valu e Down
. You will see:
. You will see:
Menus
Token Ring Menu
Token Ring Menu
LPR Enable
LPR Enable =
New Value
Token Ring Menu
LPR Enable
Ready
Menus
Token Ring Menu
Token Ring Menu
LPR Banner
LPR Banner =
New Value
Token Ring Menu
LPR Banner
Ready
LPR PDL
Set the default emulation for the
Token Ring LPR protocol.
The available values are:
Auto*
PCL
PostScript
1. Press
2. Press
3. Press
4. Press
5. Press
Menu Up
until you see:
Down
Item Up
until you see:
Valu e Up
until you see:
Enter
Online
or
Menu
Menus
Token Ring Menu
or
Item Down
Token Ring Menu
LPR PDL
or
Valu e Down
LPR PDL =
New Value
. You will see:
Token Ring Menu
LPR PDL
. You will see:
Chapter 1: Configuring the Printer
Ready
Table1.16 Page1 of 12
1-71
❖
Page 78

Token Ring Menu
Table 1.16 Token Ring Menu functions
(continued)
Menu Item and Function Keystrokes Display
LPR Binary PS
Enable or disable the LPR binary mode
of PostScript.
The available values are:
On
Off*
1. Press
2. Press
3. Press
4. Press
Menu Up
until you see:
Down
Item Up
until you see:
Valu e Up
until you see:
Enter
or
Menu
or
Item Down
or
Valu e Down
. You will see:
Menus
Token Ring Menu
Token Ring Menu
LPR Binary PS
LPR Binary PS =
New Value
Token Ring Menu
LPR Binary PS
DLC/LLC Enable
Enable or disable the DLC/LLC
protocol.
The available values are:
On*
Off
5. Press
1. Press
Down
2. Press
until you see:
3. Press
until you see:
. You will see:
Online
Menu Up
until you see:
Item Up
Valu e Up
or
or
or
Menu
Item Down
Valu e Down
Ready
Menus
Token Ring Menu
Token Ring Menu
DLC/LLC Enable
DLC/LLC Enable =
New Value
DLC/LLC PDL
Set the default emulation for the DLC/
LLC protocol.
The available values are:
Auto*
PCL
PostScript
1-72
DocuPrint NC60 System Administrator Guide
❖
4. Press
5. Press
1. Press
2. Press
3. Press
4. Press
5. Press
Enter
Online
Menu Up
until you see:
Down
Item Up
until you see:
Valu e Up
until you see:
Enter
Online
. You will see:
. You will see:
or
Menu
or
Item Down
or
Valu e Down
. You will see:
. You will see:
Token Ring Menu
DLC/LLC Enable
Ready
Menus
Token Ring Menu
Token Ring Menu
DLC/LLC PDL
DLC/LLC PDL =
New Value
Token Ring Menu
DLC/LLC PDL
Ready
Table1.16 Page2 of 12
Page 79

Token Ring Menu
Table 1.16 Token Ring Menu functions
(continued)
Menu Item and Function Keystrokes Display
DLC/LLC Bin PS
Enable or disable the DLC/LLC binary
mode of PostScript.
The available values are:
On
Off*
1. Press
2. Press
3. Press
4. Press
Menu Up
until you see:
Down
Item Up
until you see:
Valu e Up
until you see:
Enter
or
Menu
or
Item Down
or
Valu e Down
. You will see:
Menus
Token Ring Menu
Token Ring Menu
DLC/LLC Bin PS
DLC/LLC Bin PS =
New Value
Token Ring Menu
DLC/LLC Bin PS
NetBEUI Enable
Enable or disable the NetBEUI
protocol.
The available values are:
On*
Off
5. Press
1. Press
Down
2. Press
until you see:
3. Press
until you see:
. You will see:
Online
Menu Up
until you see:
Item Up
Valu e Up
or
or
or
Menu
Item Down
Valu e Down
Ready
Menus
Token Ring Menu
Token Ring Menu
NetBEUI Enable
NetBEUI Enable =
New Value
NetBEUI PDL
Set the default emulation for the
NetBEUI protocol. The available values
are:
Auto*
PCL
PostScript
4. Press
5. Press
1. Press
2. Press
3. Press
4. Press
5. Press
Enter
Online
Menu Up
until you see:
Down
Item Up
until you see:
Valu e Up
until you see:
Enter
Online
. You will see:
Token Ring Menu
NetBEUI Enable
. You will see:
or
Menu
Ready
Menus
Token Ring Menu
or
Item Down
Token Ring Menu
NetBEUI PDL
or
Valu e Down
NetBEUI PDL =
New Value
. You will see:
Token Ring Menu
NetBEUI PDL
. You will see:
Chapter 1: Configuring the Printer
Ready
Table1.16 Page3 of 12
1-73
❖
Page 80

Token Ring Menu
Table 1.16 Token Ring Menu functions
(continued)
Menu Item and Function Keystrokes Display
NetBEUI Bin PS
Enable or disable the NetBEUI binary
mode of PostScript.
The available values are:
On
Off*
1. Press
2. Press
3. Press
4. Press
Menu Up
until you see:
Down
Item Up
until you see:
Valu e Up
until you see:
Enter
or
Menu
or
Item Down
or
Valu e Down
. You will see:
Menus
Token Ring Menu
Token Ring Menu
NetBEUI Bin PS
NetBEUI Bin PS =
New Value
Token Ring Menu
NetBEUI Bin PS
AppSocket Enable
Enable or disable the Token Ring
AppSocket protocol. The AppSocket
in the printer supports Ports 200,
9100, and 2105.
The available values are:
On*
Off
5. Press
1. Press
Down
2. Press
until you see:
3. Press
until you see:
4. Press
. You will see:
Online
Menu Up
until you see:
Item Up
Valu e Up
Enter
or
or
or
. You will see:
Menu
Item Down
Valu e Down
Ready
Menus
Token Ring Menu
Token Ring Menu
AppSocket Enabl
AppSocket Enabl=
New Value
Token Ring Menu
AppSocket Enabl
AppSocket PDL
Set the default emulation for the
Token Ring AppSocket protocol.
The available values are:
Auto*
PCL
PostScript
1-74
DocuPrint NC60 System Administrator Guide
❖
5. Press
1. Press
2. Press
3. Press
4. Press
5. Press
Online
Menu Up
until you see:
Down
Item Up
until you see:
Valu e Up
until you see:
Enter
Online
. You will see:
or
Menu
or
Item Down
or
Valu e Down
. You will see:
. You will see:
Ready
Menus
Token Ring Menu
Token Ring Menu
AppSocket PDL
AppSocket PDL =
New Value
Token Ring Menu
AppSocket PDL
Ready
Table1.16 Page4 of 12
Page 81

Token Ring Menu
Table 1.16 Token Ring Menu functions
(continued)
Menu Item and Function Keystrokes Display
AppSocket Bin PS
Enable or disable the AppSocket
binary mode of PostScript.
The available values are:
On
Off*
1. Press
2. Press
3. Press
4. Press
Menu Up
until you see:
Down
Item Up
until you see:
Valu e Up
until you see:
Enter
or
Menu
or
Item Down
or
Valu e Down
. You will see:
Menus
Token Ring Menu
Token Ring Menu
AppSocket Bin PS
AppSocket Bin PS=
New Value
Token Ring Menu
AppSocket Bin PS
TokenTalk Enable
Enable or disable the Token Ring
TokenTalk protocol.
The available values are:
On*
Off
5. Press
1. Press
Down
2. Press
until you see:
3. Press
until you see:
. You will see:
Online
Menu Up
until you see:
Item Up
Valu e Up
or
or
or
Menu
Item Down
Valu e Down
Ready
Menus
Token Ring Menu
Token Ring Menu
TokenTalk Enable
TokenTalk Enable=
New Value
HTTP Enable
Enable or disable the Token Ring HTTP
Server protocol.
The available values are:
On*
Off
4. Press
5. Press
1. Press
2. Press
3. Press
4. Press
5. Press
Enter
Online
Menu Up
until you see:
Down
Item Up
until you see:
Valu e Up
until you see:
Enter
Online
. You will see:
Token Ring Menu
TokenTalk Enable
. You will see:
or
Menu
Ready
Menus
Token Ring Menu
or
Item Down
Token Ring Menu
HTTP Enable
or
Valu e Down
HTTP Enable =
New Value
. You will see:
Token Ring Menu
HTTP Enable
. You will see:
Chapter 1: Configuring the Printer
Ready
Table1.16 Page5 of 12
1-75
❖
Page 82

Token Ring Menu
Table 1.16 Token Ring Menu functions
(continued)
Menu Item and Function Keystrokes Display
IP Address Res.
Set the method used to assign the IP
address, including subnet mask and
default gateway. The available values
are:
Static
BOOTP/RARP
DHCP*
1. Press
2. Press
3. Press
4. Press
Menu Up
until you see:
Down
Item Up
until you see:
Valu e Up
until you see:
Enter
or
Menu
or
Item Down
or
Valu e Down
. You will see:
Menus
Token Ring Menu
Token Ring Menu
IP Address Res.
IP Address Res.=
New Value
Token Ring Menu
IP Address Res.
5. Press
Online
. You will see:
Ready
Table1.16 Page6 of 12
1-76
DocuPrint NC60 System Administrator Guide
❖
Page 83

Token Ring Menu
Table 1.16 Token Ring Menu functions
(continued)
Menu Item and Function Keystrokes Display
IP Address
Set the four byte IP address.
The available values are:
xxx.xxx.xxx.xxx
(where xxx = 000 to 255)
For this item (after Step 3),
moves the cursor to the right through
the displayed IP address and
moves the cursor to the left.
Down
This allows you to change characters
within the string rather than having to
reenter the entire string.
With the cursor displayed under a
character,
value of that character and
Down
Val u e Up
decrements the value.
This item appears only if
IP Address Res is set to
increments the
Item Up
Valu e
Item
Static
.
1. Press
2. Press
3. Press
4. Press
5. To change other characters in
Menu Up
until you see:
Down
Item Up
until you see:
Value Up
You will see:
Valu e Up
to change the value of the
character above the cursor. The
value is incremented or
decremented by 1 each time
the key is pressed. Holding
down
Val u e Up
causes continuous
Down
scrolling through the values.
the IP address, press
or
Item Down
left respectively through the
character string, then press
Value Up
change the value of the
character above the cursor (as
in Step 4).
or
Menu
or
Item Down
or
Val u e Down
or
Valu e Down
or
Val ue
to scroll right or
or
Val u e D own
Item Up
to
Menus
Token Ring Menu
Token Ring Menu
IP Address
.
IP Address =
xxx.xxx.xxx.xxx
IP Address =
xxx.xxx.xxx.xxx
IP Address =
xxx.xxx.xxx.xxx
6. When you have completed
setting the IP address, press
. You will see:
Enter
7. Press
8. Restart printer or power off/on.
Online
. You will see:
Chapter 1: Configuring the Printer
Token Ring Menu
IP Address
Ready
Table1.16 Page7 of 12
❖
1-77
Page 84

Token Ring Menu
Table 1.16 Token Ring Menu functions
(continued)
Menu Item and Function Keystrokes Display
Subnet Mask
Set the four byte Subnet Mask
address.
The available values are:
xxx.xxx.xxx.xxx
(where xxx = 000 to 255)
For this item (after Step 3),
moves the cursor to the right through
the displayed Subnet Mask address
and
Item Down
the left. This allows you to change
characters within the string rather
than having to reenter the entire
string.
With the cursor displayed under a
character,
value of that character and
decrements the value.
Down
This item appears only if
IP Address Res is set to
moves the cursor to
Val u e Up
increments the
Item Up
Valu e
Static
.
1. Press
2. Press
3. Press
4. Press
5. To change other characters in
Menu Up
until you see:
Down
Item Up
until you see:
Value Up
You will see:
Valu e Up
to change the value of the
character above the cursor. The
value is incremented or
decremented by 1 each time
the key is pressed. Holding
down
Val u e Up
causes continuous
Down
scrolling through the values.
the Subnet Mask address, press
Item Up
scroll right or left respectively
through the character string,
then press
to change the value of
Down
the character above the cursor
(as in Step 4).
or
or
or
or
Item Down
Valu e Up
or
Menu
Item Down
Val u e Down
Valu e Down
or
Val ue
or
to
Valu e
Menus
Token Ring Menu
Token Ring Menu
Subnet Mask
.
Subnet Mask =
xxx.xxx.xxx.xxx
Subnet Mask =
xxx.xxx.xxx.xxx
Subnet Mask =
xxx.xxx.xxx.xxx
1-78
6. When you have completed
setting the Subnet Mask
address, press
see:
7. Press
8. Restart printer or power off/on.
DocuPrint NC60 System Administrator Guide
❖
Online
. You will
Enter
. You will see:
Token Ring Menu
Subnet Mask
Ready
Table1.16 Page8 of 12
Page 85

Token Ring Menu
Table 1.16 Token Ring Menu functions
(continued)
Menu Item and Function Keystrokes Display
Default Gateway
Set the four byte Default Gateway
address.
The available values are:
xxx.xxx.xxx.xxx
(where xxx = 000 to 255)
For this item (after Step 3),
moves the cursor to the right through
the displayed Default Gateway
address and
cursor to the left. This allows you to
change characters within the string
rather than having to reenter the
entire string.
With the cursor displayed under a
character,
value of that character and
Down
Item Down
Val u e Up
decrements the value.
This item appears only if
IP Address Res is set to
increments the
Item Up
moves the
Valu e
Static
.
1. Press
2. Press
3. Press
4. Press
5. To change other characters in
Menu Up
until you see:
Down
Item Up
until you see:
Value Up
You will see:
Valu e Up
to change the value of the
character above the cursor. The
value is incremented or
decremented by 1 each time
the key is pressed. Holding
down
Val u e Up
causes continuous
Down
scrolling through the values.
the Default Gateway address,
press
Item Up
to scroll right or left
respectively through the
character string, then press
Value Up
change the value of the
character above the cursor (as
in Step 4).
or
or
or
or
or
or
or
Val u e D own
Menu
Item Down
Val u e Down
Valu e Down
Val ue
Item Down
to
Menus
Token Ring Menu
Token Ring Menu
Default Gateway
.
Default Gateway=
xxx.xxx.xxx.xxx
Default Gateway=
xxx.xxx.xxx.xxx
Default Gateway=
xxx.xxx.xxx.xxx
6. When you have completed
setting the Default Gateway
address, press
see:
7. Press
8. Restart printer or power off/on.
Online
. You will
Enter
. You will see:
Chapter 1: Configuring the Printer
Token Ring Menu
Default Gateway
Ready
Table1.16 Page9 of 12
❖
1-79
Page 86

Token Ring Menu
Table 1.16 Token Ring Menu functions
(continued)
Menu Item and Function Keystrokes Display
Port Timeout
Set the time for determining when to
end an incomplete print job and poll
the next port in the polling sequence.
The available values are:
5 - 300 seconds (
This item also causes an implicit job
end such as Control D in PostScript or
<ESC> E in PCL, and invokes the
emulation functions associated with
this action (e.g., formfeed, reset, etc.).
The time changes incrementally by 1
second each time either
Value Down
down
Val u e Up
causes continuous scrolling through
the values.
60*
)
Valu e Up
is pressed. Holding
or
Val u e D own
or
1. Press
2. Press
3. Press
4. Press
5. Press
Menu Up
until you see:
Down
Item Up
until you see:
Valu e Up
until you see:
Enter
Online
or
Menu
or
Item Down
or
Valu e Down
. You will see:
. You will see:
Menus
Token Ring Menu
Token Ring Menu
Port Timeout
Port Timeout =
New Value
Token Ring Menu
Port Timeout
Ready
Table 1.16 Page 10 of 12
1-80
DocuPrint NC60 System Administrator Guide
❖
Page 87

Token Ring Menu
Table 1.16 Token Ring Menu functions
(continued)
Menu Item and Function Keystrokes Display
LAA
Set the six byte Locally Administered
Address.
The valid values are:
xxxx xxxx xxxx
(where xxxx xxxx xxxx can equal any
value within the valid range of 4000 0000
0000 and 7FFF FFFF FFFF)
For this item (after Step 3),
moves the cursor to the right through
the displayed LAA and
moves the cursor to the left. This
allows you to change characters
within the string rather than having to
reenter the entire string.
With the cursor displayed under a
character,
value of that character and
Down
Val u e Up
decrements the value.
increments the
Item Up
Item Down
Valu e
1. Press
2. Press
3. Press
4. Press
5. To change other characters in
Menu Up
until you see:
Down
Item Up
until you see:
Value Up
You will see:
Valu e Up
to change the value of the
character above the cursor. The
value is incremented or
decremented by 1 each time
the key is pressed. Holding
down
Val u e Up
causes continuous
Down
scrolling through the values.
the LAA, press
to scroll right or left
Down
respectively through the
character string, then press
Value Up
change the value of the
character above the cursor (as
in Step 4).
or
or
or
or
or
Item Up
or
Val u e D own
Menu
Item Down
Val u e Down
Valu e Down
Val ue
or
Item
to
Menus
Token Ring Menu
Token Ring Menu
LAA
.
LAA =
xxxx xxxx xxxx
LAA =
xxxx xxxx xxxx
LAA =
xxxx xxxx xxxx
6. When you have completed
setting the LAA, press
You will see:
7. Press
Online
. You will see:
Enter
Chapter 1: Configuring the Printer
Token Ring Menu
.
LAA
Ready
Table 1.16 Page 11 of 12
1-81
❖
Page 88

Token Ring Menu
Table 1.16 Token Ring Menu functions
(continued)
Menu Item and Function Keystrokes Display
Source Routing
Select the Source Routing option.
The available values are:
On*
Off
1. Press
2. Press
3. Press
4. Press
Menu Up
until you see:
Down
Item Up
until you see:
Valu e Up
until you see:
Enter
or
Menu
or
Item Down
or
Valu e Down
. You will see:
Menus
Token Ring Menu
Token Ring Menu
Source Routing
Source Routing =
New Value
Token Ring Menu
Source Routing
Speed
Select the Token Ring speed option.
The available values are:
Auto*
16
4
5. Press
1. Press
Down
2. Press
until you see:
3. Press
until you see:
. You will see:
Online
Menu Up
until you see:
Item Up
Valu e Up
or
or
or
Menu
Item Down
Valu e Down
Ready
Menus
Token Ring Menu
Token Ring Menu
Speed
Speed =
New Value
1-82
4. Press
5. Press
DocuPrint NC60 System Administrator Guide
❖
. You will see:
Enter
Online
. You will see:
Token Ring Menu
Speed
Ready
Table 1.16 Page 12 of 12
Page 89

Novell Menu
Use the Novell Menu to modify Novell parameters. The
menu hierarchy is shown in Figure 1.13. Items in italics
appear only if Novell Enable is set to On.
Figure 1.13 Novell Menu hierarchy with factory settings
Novell Menu
Job Menu
Password Menu
Tray M e n u
PCL Menu
System Menu
Color Adjust Menu
Imaging Menu
Parallel Menu
Serial Menu
Ethernet Menu
Token Ring Menu
Novell Menu
Print Menu
Media Server Menu
Service Menu
Reset Menu
Novell Enable
Novell PDL
Novell Binary PS
Novell Mode
Frame Type
Polling Interval
PServer Name
Primary Server
NDS Tree
NDS Context
On*
Off
Auto*
PCL
PostScript
Auto*
802.2
802.3
SNAP
Ethernet II
1 .. 2* .. 29
xxxxxxxxxxxxxxxxxxxx
xxxxxxxxxxxxxxxxxxxx
xxxxxxxxxxxxxxxxxxxx
xxxxxxxxxxxxxxxxxxxx
On
Off*
NDS
BEM
NDS/BEM*
Refer to Table 1.17 on page 1-84 for step-by-step
instructions.
Chapter 1: Configuring the Printer
1-83
❖
Page 90

Novell Menu
Table 1.17 Novell Menu functions
Menu Item and Function Keystrokes Display
Novell Enable
Enable or disable the Novell protocol.
The available values are:
On*
Off
Novell PDL
Set the default emulation for the
Novell protocol.
The available values are:
Auto*
PCL
PostScript
1. Press
2. Press
3. Press
4. Press
5. Press
1. Press
2. Press
3. Press
4. Press
5. Press
Menu Up
until you see:
Down
Item Up
until you see:
Valu e Up
until you see:
Enter
Online
Menu Up
until you see:
Down
Item Up
until you see:
Valu e Up
until you see:
Enter
Online
or
Menu
or
Item Down
or
Valu e Down
. You will see:
. You will see:
or
Menu
or
Item Down
or
Valu e Down
. You will see:
. You will see:
Menus
Novell Menu
Novell Menu
Novell Enable
Novell Enable =
New Value
Novell Menu
Novell Enable
Ready
Menus
Novell Menu
Novell Menu
Novell PDL
Novell PDL =
New Value
Novell Menu
Novell PDL
Ready
1-84
DocuPrint NC60 System Administrator Guide
❖
Table1.17 Page1 of 7
Page 91

Novell Menu
Table 1.17 Novell Menu functions
(continued)
Menu Item and Function Keystrokes Display
Novell Binary PS
Enable or disable the Novell binary
mode of PostScript.
The available values are:
On
Off*
1. Press
2. Press
3. Press
4. Press
Menu Up
until you see:
Down
Item Up
until you see:
Valu e Up
until you see:
Enter
or
Menu
or
Item Down
or
Valu e Down
. You will see:
Menus
Novell Menu
Novell Menu
Novell Binary PS
Novell Binary PS=
New Value
Novell Menu
Novell Binary PS
Novell Mode
Set the PServer mode for the Novell
protocol.
The available values are:
NDS
BEM
NDS/BEM*
5. Press
1. Press
Down
2. Press
until you see:
3. Press
until you see:
. You will see:
Online
Menu Up
until you see:
Item Up
Valu e Up
or
or
or
Menu
Item Down
Valu e Down
Ready
Menus
Novell Menu
Novell Menu
Novell Mode
Novell Mode =
New Value
4. Press
5. Press
. You will see:
Enter
Online
Novell Menu
Novell Mode
. You will see:
Chapter 1: Configuring the Printer
Ready
Table1.17 Page2 of 7
1-85
❖
Page 92

Novell Menu
Table 1.17 Novell Menu functions
(continued)
Menu Item and Function Keystrokes Display
Frame Type
Sets the frame type used for the
Novell protocol.
The available values are:
Auto*
802.2
802.3
SNAP
Ethernet II
1. Press
2. Press
3. Press
4. Press
Menu Up
until you see:
Down
Item Up
until you see:
Valu e Up
until you see:
Enter
or
Menu
or
Item Down
or
Valu e Down
. You will see:
Menus
Novell Menu
Novell Menu
Frame Type
Frame Type =
New Value
Novell Menu
Frame Type
Polling Interval
Set the rate (in seconds) at which the
PServer issues polling requests for
assigned queues.
The available values are:
1 - 29 (2*)
The Polling Interval changes
incrementally by 1 each time either
Value Up
Holding down
Down
through the values.
or
Val u e Down
Value Up
causes continuous scrolling
is pressed.
or
Val u e
5. Press
1. Press
Down
2. Press
until you see:
3. Press
until you see:
4. Press
5. Press
. You will see:
Online
Menu Up
until you see:
Item Up
Valu e Up
Enter
Online
or
or
or
. You will see:
. You will see:
Menu
Item Down
Valu e Down
Ready
Menus
Novell Menu
Novell Menu
Polling Interval
Polling Interval=
New Value
Novell Menu
Polling Interval
Ready
1-86
DocuPrint NC60 System Administrator Guide
❖
Table1.17 Page3 of 7
Page 93

Novell Menu
Table 1.17 Novell Menu functions
(continued)
Menu Item and Function Keystrokes Display
PServer Name
Set the name of the PServer in this
printer (a name of 1 to 47 characters
in length).
The available values are:
A - Z, 0 - 9, hyphen (-),underscore (_)
XRX_<macaddress>*
For this item (after Step 3),
moves the cursor to the right through
the displayed PServer name and
moves the cursor to the left.
Down
This allows you to change characters
within the string rather than having to
reenter the entire string.
With the cursor displayed under a
character,
value of that character and
Down
Val u e Up
decrements the value.
increments the
Item Up
Valu e
Item
1. Press
2. Press
3. Press
4. Press
5. To change other characters in
Menu Up
until you see:
Down
Item Up
until you see:
Value Up
You will see:
Valu e Up
to change the value of the
character above the cursor. The
value is incremented or
decremented by 1 each time
the key is pressed. Holding
down
Val u e Up
causes continuous
Down
scrolling through the values.
the PServer name, press
or
Up
Item Down
right or left respectively
through the character string,
then press
to change the value of
Down
the character above the cursor
(as in Step 4).
or
or
Item Down
or
Val u e Down
or
or
Valu e Up
Menu
Valu e Down
Val ue
Item
to scroll
or
Valu e
Menus
Novell Menu
Novell Menu
PServer Name
.
PServer Name =
xxx...xxx
PServer Name =
xxx...xxx
PServer Name =
xxx...xxx
6. When you have completed
setting the PServer Name,
press
7. Press
. You will see:
Enter
Online
. You will see:
Chapter 1: Configuring the Printer
Novell Menu
PServer Name
Ready
Table1.17 Page4 of 7
1-87
❖
Page 94

Novell Menu
Table 1.17 Novell Menu functions
(continued)
Menu Item and Function Keystrokes Display
Primary Server
Set the name of the Primary file server
(a name of 1 to 47 characters in
length).
The available values are:
A - Z, 0 - 9, hyphen (-) and underscore (_)
Null*
For this item (after Step 3),
moves the cursor to the right through
the displayed Primary Server name
and
Item Down
the left. This allows you to change
characters within the string rather
than having to reenter the entire
string.
With the cursor displayed under a
character,
value of that character and
decrements the value.
Down
moves the cursor to
Val u e Up
increments the
Item Up
Valu e
1. Press
2. Press
3. Press
4. Press
5. To change other characters in
Menu Up
until you see:
Down
Item Up
until you see:
Value Up
You will see:
Valu e Up
to change the value of the
character above the cursor. The
value is incremented or
decremented by 1 each time
the key is pressed. Holding
down
Val u e Up
causes continuous
Down
scrolling through the values.
the Primary Server name, press
Item Up
scroll right or left respectively
through the character string,
then press
to change the value of
Down
the character above the cursor
(as in Step 4).
or
or
or
or
Item Down
Valu e Up
or
Menu
Item Down
Val u e Down
Valu e Down
or
Val ue
or
to
Valu e
Menus
Novell Menu
Novell Menu
Primary Server
.
Primary Server =
xxx...xxx
Primary Server =
xxx...xxx
Primary Server =
xxx...xxx
1-88
6. When you have completed
setting the Primary Server
name, press
7. Press
DocuPrint NC60 System Administrator Guide
❖
Online
. You will see:
Enter
. You will see:
Novell Menu
Primary Server
Ready
Table1.17 Page5 of 7
Page 95

Novell Menu
Table 1.17 Novell Menu functions
(continued)
Menu Item and Function Keystrokes Display
NDS Tree
Set the NDS Tree character string
(from 1 to 64 characters in length).
The available values are:
A - Z, 0 - 9, hyphen (-) and underscore (_)
Null*
For this item (after Step 3),
moves the cursor to the right through
the displayed NDS Tree character
string and
cursor to the left. This allows you to
change characters within the string
rather than having to reenter the
entire string.
With the cursor displayed under a
character,
value of that character and
Down
Item Down
Val u e Up
decrements the value.
increments the
Item Up
moves the
Valu e
1. Press
2. Press
3. Press
4. Press
5. To change other characters in
Menu Up
until you see:
Down
Item Up
until you see:
Value Up
You will see:
Valu e Up
to change the value of the
character above the cursor. The
value is incremented or
decremented by 1 each time
the key is pressed. Holding
down
Val u e Up
causes continuous
Down
scrolling through the values.
the NDS Tree character string,
press
Item Up
to scroll right or left
respectively through the
character string, then press
Value Up
change the value of the
character above the cursor (as
in Step 4).
or
or
or
or
or
or
or
Val u e D own
Menu
Item Down
Val u e Down
Valu e Down
Val ue
Item Down
to
Menus
Novell Menu
Novell Menu
NDS Tree
.
NDS Tree =
xxx...xxx
NDS Tree =
xxx...xxx
NDS Tree =
xxx...xxx
6. When you have completed
setting the NDS Tree, press
. You will see:
Enter
7. Press
Online
. You will see:
Chapter 1: Configuring the Printer
Novell Menu
NDS Tree
Ready
Table1.17 Page6 of 7
1-89
❖
Page 96

Novell Menu
Table 1.17 Novell Menu functions
(continued)
Menu Item and Function Keystrokes Display
NDS Context
Set the NDS context string (from 1 to
255 characters in length).
The available values are:
A - Z, 0 - 9, hyphen (-), period (.),
underscore (_), equal (=)
Null*
For this item (after Step 3),
moves the cursor to the right through
the displayed NDS Context string and
Item Down
left. This allows you to change
characters within the string rather
than having to reenter the entire
string.
With the cursor displayed under a
character,
value of that character and
Down
moves the cursor to the
Val u e Up
decrements the value.
increments the
Item Up
Valu e
1. Press
2. Press
3. Press
4. Press
5. To change other characters in
Menu Up
until you see:
Down
Item Up
until you see:
Value Up
You will see:
Valu e Up
to change the value of the
character above the cursor. The
value is incremented or
decremented by 1 each time
the key is pressed. Holding
down
Val u e Up
causes continuous
Down
scrolling through the values.
the NDS Context string, press
Item Up
scroll right or left respectively
through the character string,
then press
to change the value of
Down
the character above the cursor
(as in Step 4).
or
or
or
or
Item Down
Valu e Up
or
Menu
Item Down
Val u e Down
Valu e Down
or
Val ue
or
to
Valu e
Menus
Novell Menu
Novell Menu
NDS Context
.
NDS Context =
xxx...xxx
NDS Context =
xxx...xxx
NDS Context =
xxx...xxx
1-90
6. When you have completed
setting the NDS Context, press
Enter
7. Press
DocuPrint NC60 System Administrator Guide
❖
. You will see:
. You will see:
Online
Novell Menu
NDS Context
Ready
Table1.17 Page7 of 7
Page 97

Print Menu
Use the Print Menu to print internal files or files
downloaded to the printer’s hard disk drive. The menu
hierarchy is shown in Figure 1.14.
Figure 1.14 Print Menu hierarchy with factory settings
Print Menu
Job Menu
Password Menu
Tray Men u
PCL Menu
System Menu
Color Adjust Menu
Imaging Menu
Parallel Menu
Serial Menu
Ethernet Menu
Token Ring Menu
Novell Menu
Print Menu
Media Server Menu
Service Menu
Reset Menu
Startup Page
Config Sheet
PCL Font List
PS Font List
PS Demo
Menu Map
Fault History
Tip & Tricks
Disk Files
Disk Directory
Print Quantity
Select Tray
Job 9
.
.
.
Job 0*
1*
.. 999
Tra y 1*
Tra y 2
Manual Feeder
Refer to Table 1.18 on page 1-92 for step-by-step
instructions.
Chapter 1: Configuring the Printer
1-91
❖
Page 98

Print Menu
Table 1.18 Print Menu functions
Menu Item and Function Keystrokes Display
Startup Page
Print a Startup Page.
The Startup Page is formatted for
either Letter or A4 paper size,
regardless of the default paper size or
the actual paper size loaded.
Config Sheet
Print a Configuration Sheet showing
the printer's current information and
menu settings.
The Configuration Sheet is formatted
for either Letter or A4 paper size,
regardless of the default paper size or
the actual paper size loaded.
PCL Font List
Print a list of PCL fonts currently
loaded.
The PCL Font List is formatted for
either Letter or A4 paper size,
regardless of the default paper size or
the actual paper size loaded. There are
no multiple copies. The Print Menu
setting for Print Quantity is ignored.
Source tray is determined by the
Select Tray item.
1. Press
2. Press
3. Press
4. When completed, you will see:
1. Press
2. Press
3. Press
4. When completed, you will see:
1. Press
2. Press
3. Press
4. When completed, you will see:
Menu Up
until you see:
Down
Item Up
until you see:
Enter
Menu Up
until you see:
Down
Item Up
until you see:
Enter
Menu Up
until you see:
Down
Item Up
until you see:
Enter
or
Menu
or
Item Down
. You will see:
or
Menu
or
Item Down
. You will see:
or
Menu
or
Item Down
. You will see:
Menus
Print Menu
Print Menu
Startup Page
Printing
Startup Page
Ready
Menus
Print Menu
Print Menu
Config Sheet
Printing
Config Sheet
Ready
Menus
Print Menu
Print Menu
PCL Font List
Printing
PCL Font List
Ready
1-92
DocuPrint NC60 System Administrator Guide
❖
Table1.18 Page1 of 4
Page 99

Print Menu
Table 1.18 Print Menu functions
(continued)
Menu Item and Function Keystrokes Display
PS Font List
Print the list of the fonts available in
PostScript, including resident fonts
and fonts stored on the hard disk.
The PS Font List is formatted for either
Letter or A4 paper size, regardless of
the default paper size or the actual
paper size loaded
PS Demo
Print a PostScript demonstration page
that shows the printer features.
The PS Demo page is formatted for
either Letter or A4 paper size,
regardless of the default paper size or
the actual paper size loaded
1. Press
2. Press
3. Press
4. When completed, you will see:
1. Press
2. Press
3. Press
4. When completed, you will see:
Menu Up
until you see:
Down
Item Up
until you see:
Enter
Menu Up
until you see:
Down
Item Up
until you see:
Enter
or
Menu
or
Item Down
. You will see:
or
Menu
or
Item Down
. You will see:
Menus
Print Menu
Print Menu
PS Font List
Printing
PS Font List
Ready
Menus
Print Menu
Print Menu
PS Demo Page
Printing
PS Demo Page
Ready
Menu Map
Print the menu map/Control Panel
menu tree.
Menu Maps are formatted for either
Letter or A4 paper size, regardless of
the default paper size or the actual
paper size loaded. There are no
multiple copies. The Print Menu
setting for Print Quantity is ignored.
Source tray is determined by the
Select Tray item.
1. Press
2. Press
3. Press
4. When completed, you will see:
Menu Up
until you see:
Down
Item Up
until you see:
Enter
or
Menu
or
Item Down
. You will see:
Chapter 1: Configuring the Printer
Menus
Print Menu
Print Menu
Menu Map
Printing
Menu Map
Ready
Table1.18 Page2 of 4
1-93
❖
Page 100

Print Menu
Table 1.18 Print Menu functions
(continued)
Menu Item and Function Keystrokes Display
Fault History
Print a log of the printer’s last fifty
faults.
1. Press
2. Press
3. Press
Menu Up
until you see:
Down
Item Up
until you see:
Enter
or
Menu
or
Item Down
. You will see:
Menus
Print Menu
Print Menu
Fault History
Printing
Fault History
Tips & Tricks
Print information on how to get the
most from your DocuPrint NC60.
4. When completed, you will see:
1. Press
2. Press
3. Press
Menu Up
until you see:
Down
Item Up
until you see:
Enter
or
Menu
or
Item Down
. You will see:
Ready
Menus
Print Menu
Print Menu
Tips & Tricks
Printing
Tips & Tricks
4. When completed, you will see:
Ready
Disk Files
Print files downloaded to the optional
hard disk (not Secure Jobs or Proof
Jobs).
Files can be downloaded to the hard
disk using CentreWare DP. Job
number (i.e. “Job 3”) only appears if a
file is loaded in that position.
1-94
DocuPrint NC60 System Administrator Guide
❖
1. Press
2. Press
3. Press
4. Press
5. When completed, you will see:
Menu Up
until you see:
Down
Item Up
until you see:
Valu e Up
until you see:
Enter
or
Menu
or
Item Down
or
Valu e Down
. You will see:
Menus
Print Menu
Print Menu
Disk Files
Disk Files =
Job Number
Printing
Job Number
Ready
Table1.18 Page3 of 4
 Loading...