

Page 1
DeskCycle
USER’S MANUAL
TM
TM
QUESTIONS / PROBLEMS
Support for US Customers
TOLL-FREE SUPPORT
877-426-3292
EMAIL SUPPORT
support@3dinnovations.com
Support for Non-US Customers
The support contact link for your country can
be found on the Contacts page at
www.3dinnovations.com
Visit us at www.DeskCycle.com for,
• Usage Tips
• Calorie Calculator
• Accessories
• And More
Order# _____________________
Serial# _____________________
The serial number is on the bottom of
the DeskCycle.
Page 2

Precautions And Safety
Precautions
Failure to observe these warnings could result in physical injury or damage to the DeskCycle.
• Use the DeskCycle indoors on a level surface. Keep the DeskCycle away from moisture and dust.
• Make sure that the pedals are on tight. Loose pedals will slowly come undone. Using the bike
with loose pedals can damage the threads on the crank arms. Stripped crank-arm threads are not
covered by the warranty.
• Do not subject the bike to heavy shock or treat it excessively. Do not disassemble or modify it.
Doing so will void the warranty.
• The DeskCycle has sealed bearings and is maintenance free. Lubricants are not necessary and can
actually damage the bike.
• Do not place the bike in a location where it will be in contact with direct sunlight or where it will be
exposed to high temperatures or excessive humidity.
• Do not stand on the pedals. The DeskCycle was not designed to be used while standing.
Safety
Warning! To reduce the risk of serious injury, please read the following safety precautions before using
the DeskCycle.
• Read all instructions in this manual before using the DeskCycle. Use the DeskCycle only as
described.
• It is the responsibility of the owner to ensure that all users of the DeskCycle are adequately
informed of all precautions.
• Never use this device after drinking alcohol; doing so is dangerous and could in serious injury or
accident.
• Do not place this device in a location where it may cause an obstruction.
Consult Your Physician
It is always important to consult your physician before starting an exercise program. This is
particularly true if any of the following apply to your current medical condition:
• Chest pain or pain in the neck and/or arm
• Shortness of breath
• A diagnosed heart condition
• Joint and/or bone problems
• Currently taking cardiac and/or blood pressure medications
• Have not previously been physically active
• Dizziness or blurred vision
• Those with physical handicaps should use this device only under supervision.
If none of these apply to you then start gradually and sensibly. However, if you feel any of the physical
symptoms listed above when you start your exercise program, contact your physician right away. If
one or more of the statements listed above applies for you, see your physician before beginning an
exercise program. An exercise-stress test may be used to help plan your exercise program.
Page 3

Table Of Contents
Assembly
Tips for Using the DeskCycle
Adjusting the Resistance
Using the Display
Online Calorie Calculator
Display Stand for Your Desk
Using the Tether for Slippery Floors
Removing the Pedal Straps
Optional Accessories
2
4
5
6
7
7
8
9
10
Care and Maintenance
Support
Warranty
Troubleshooting
11
11
12
13
Page 4
Assembly
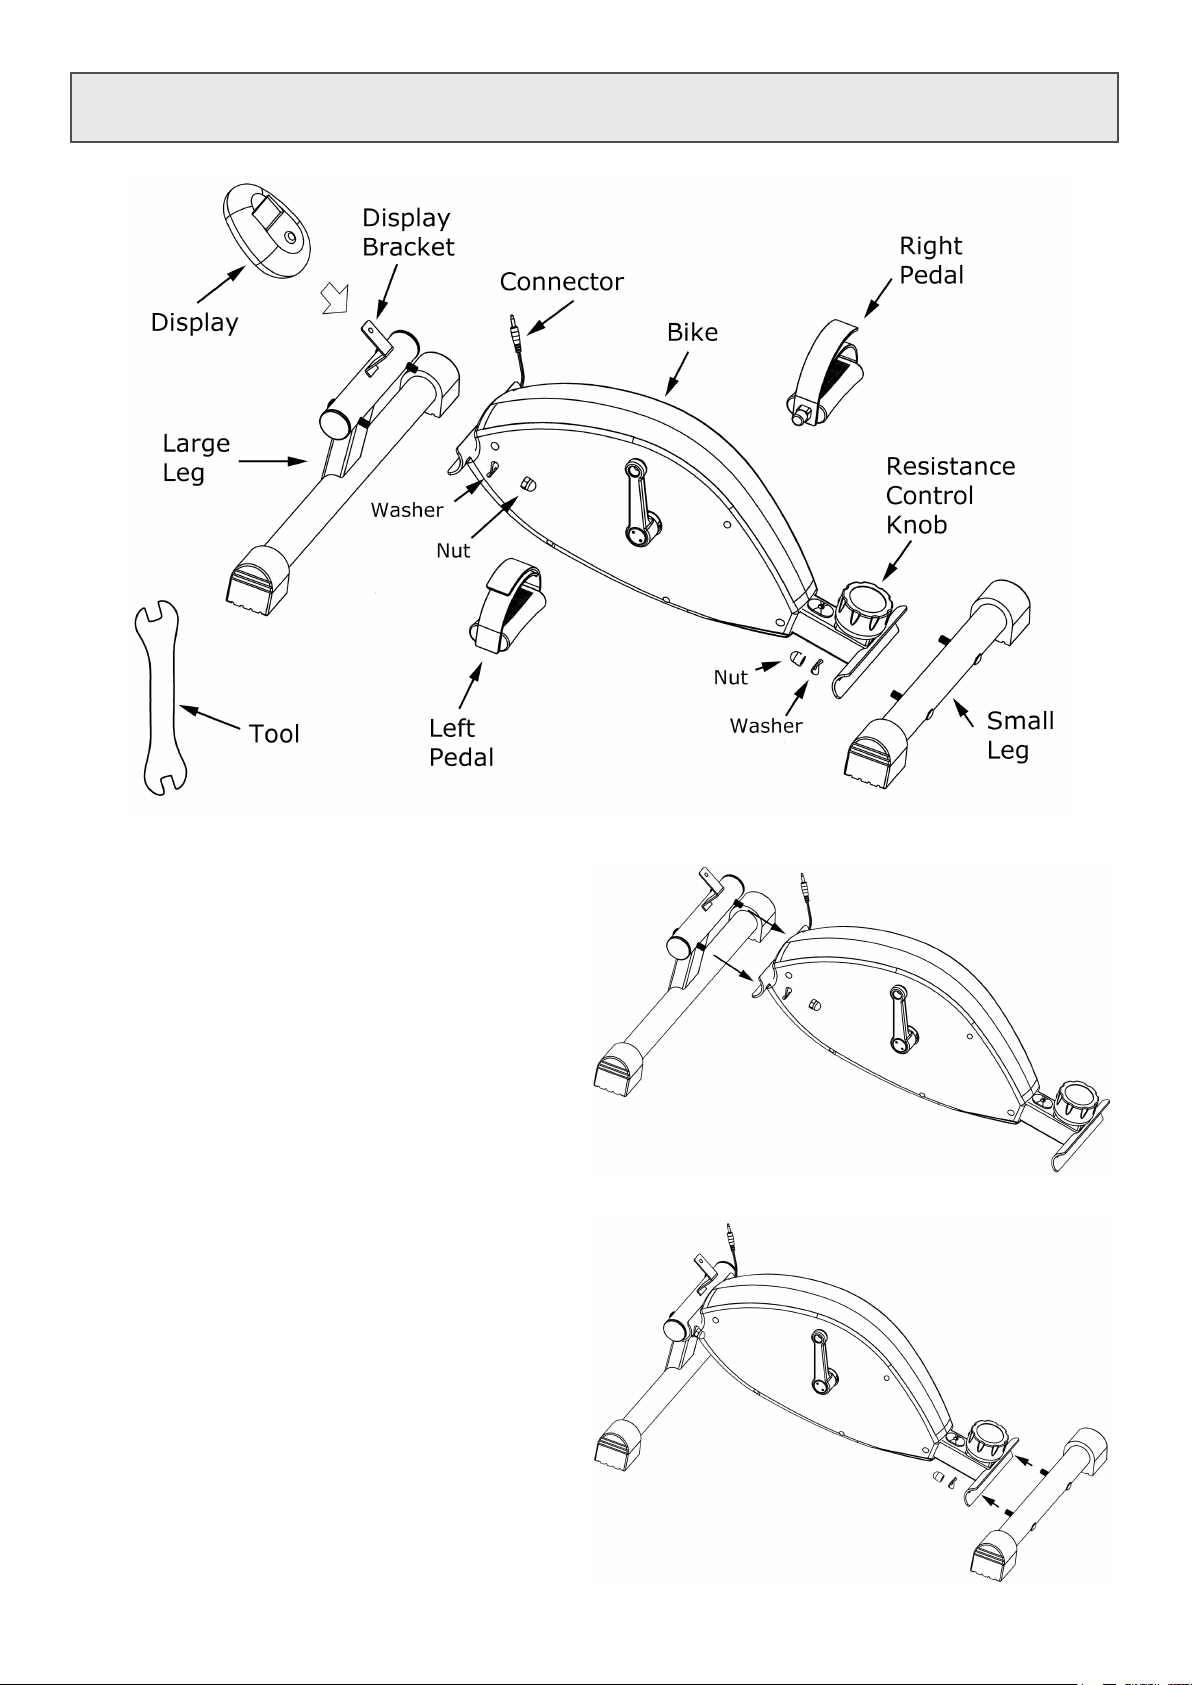
Step 1: Install the Large Leg
• Remove the nuts and washers from the Large Leg.
• Align the bolts of the Large Leg with the holes in the
Bike, and push the bolts through the holes.
• Attach a Washer and a Nut to each bolt.
Do NOT tighten the nuts until step 3.
Step 2: Install the Small Leg
• Remove the nuts and washers from the Small Leg.
• Align the bolts of the Small Leg with the holes in the
Bike, and push the bolts through the holes.
• Attach a Washer and a Nut to each bolt.
Do NOT tighten the nuts until step 3.
2
Page 5
Assembly (continued)
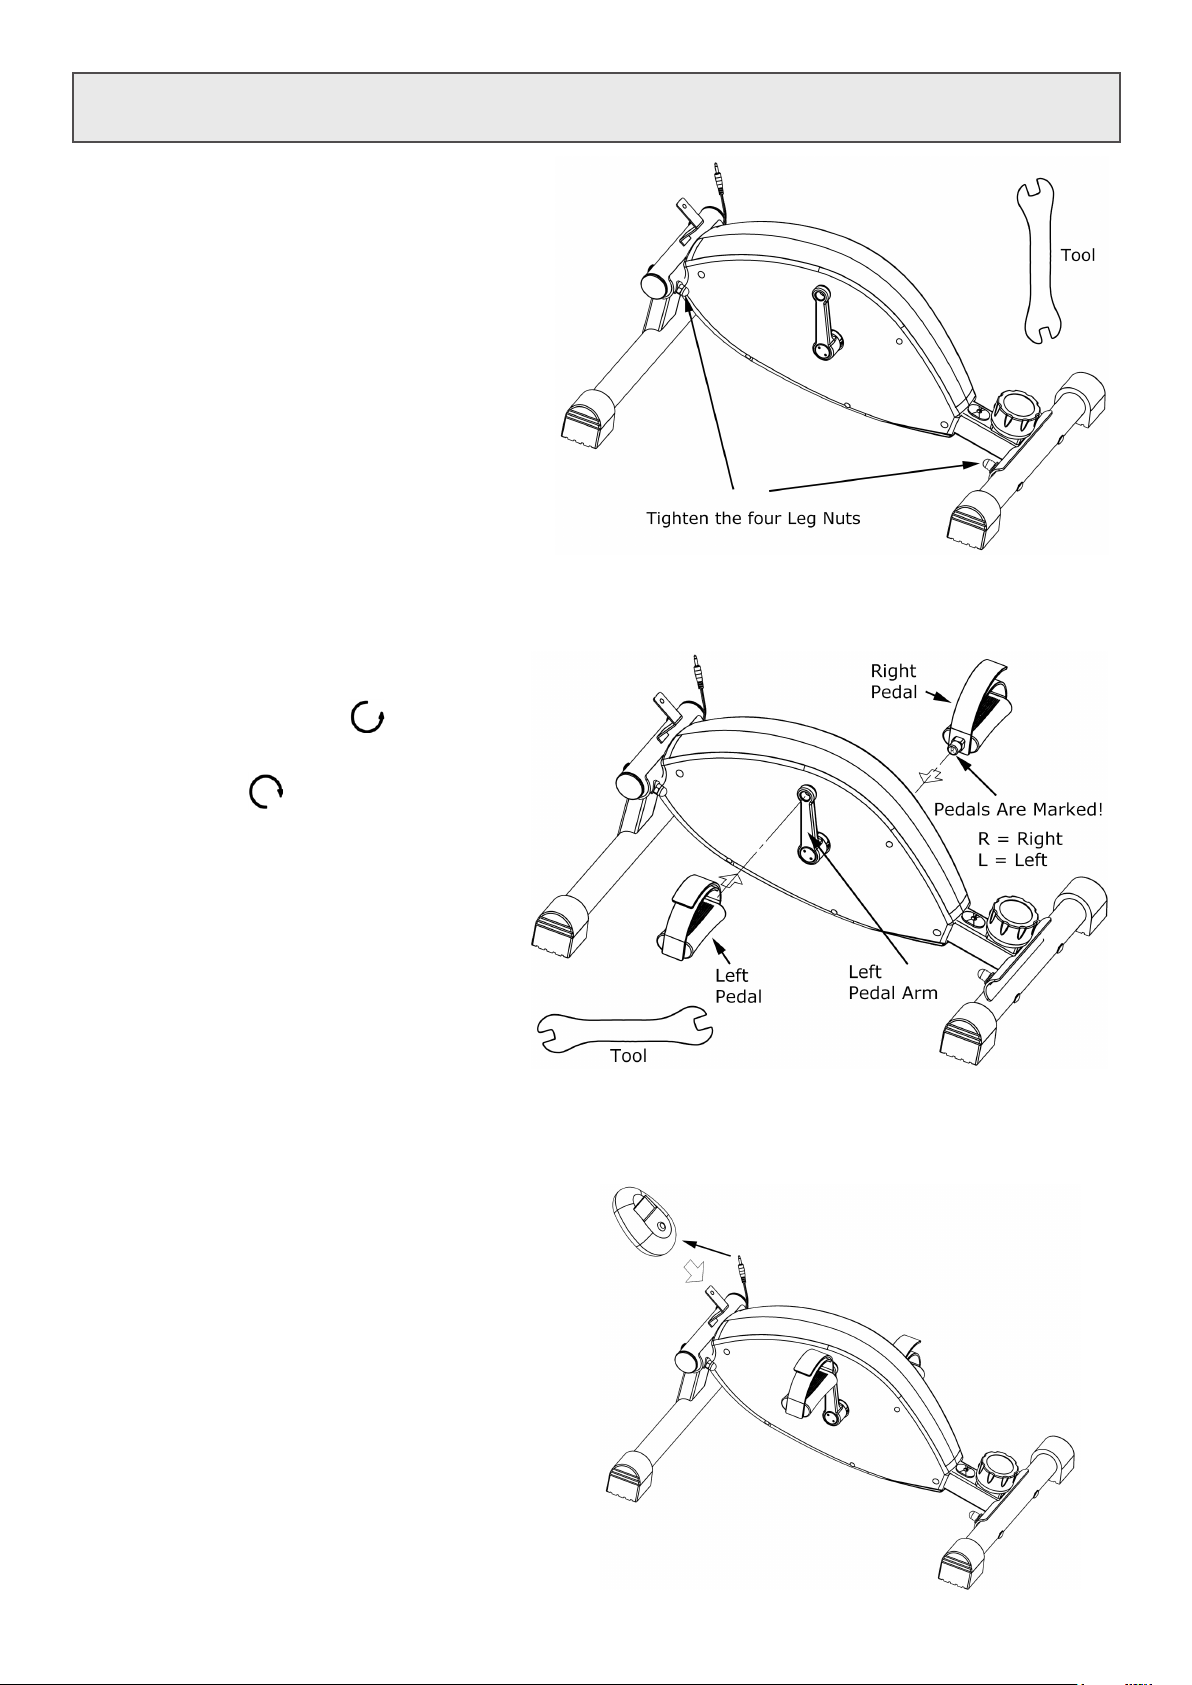
Step 3: Level the Bike & Tighten Nuts
At this point the four nuts that attach the legs
to the Bike should be loose.
• Place the Bike onto a smooth at surface.
• Tighten the four leg nuts using the supplied
Tool. Do not over-tighten the nuts!
Step 4: Install the Pedals
There is a Left Pedal and a Right Pedal. They are
marked with an L for Left or an R for Right on
the end of the pedal shaft.
• Screw the Left Pedal into the Left Pedal Arm
COUNTER-CLOCKWISE.
• Screw the Right Pedal into the Right Pedal Arm
CLOCKWISE.
MAKE THE PEDALS AS TIGHT AS POSSIBLE!!!
Using the bike with loose pedals will damage
the pedal arm threads!
Tips for Installing the Pedals:
1. Make sure the pedal is straight when
you screw it in.
2. Rotate the shaft with your ngers to get
the threads started.
3. If you can’t get the threads started with
your ngers then it is cross threaded.
Unscrew the pedal, make sure the pedal
is straight, and then try again.
Step 5: Insert the Battery into the Display
• There is a door on the back of the Display. It
snaps in and out. The latch is at the top. Pry the
top of the door out with your index nger.
• Remove any plastic wrapping from the Battery.
• Insert the Battery. Pay attention to the polarity.
• Press the door back into the display. Insert the
bottom edge rst.
Step 6: Install the LCD Display
• Plug the Connector into the Display.
• Carefully slide the Display onto the
Display Bracket as shown in the
picture.
3
Page 6

Tips for Using the DeskCycle
TIP 1. PEDAL DOWNWARD (MOST IMPORTANT!!!)
The most important advice we can give you is to pedal downward. This will keep the bike in place.
If the bike moves around, then you are not pedaling downward.
How to Pedal Correctly
1. Start pushing down on the pedal when the pedal arm is around the 1 o’clock position (just past the
highest pedal position).
2. Stop applying force to the pedal when it’s at the lowest position.
3. You should pedal downward throughout this range as shown by the arrows in the picture.
4. Point your toes forward on the downward stroke. This keeps your heels from hitting the oor or the
rear leg.
TIP 2. START OUT SLOW; LISTEN TO YOUR BODY
Start out at the minimum resistance (level 1) and pedal the bike at 10 to 15mph. This will give you
time to get used to pedaling downward. For those who don’t ride a bike regularly, it will give also you a
chance to get your muscles used to using the bike. Increase the resistance as you get used to the bike.
TIP 3. KEEP YOUR UPPER BODY STILL
Keeping your body still makes it easy to focus on your work. Your head should not move when pedaling
the bike.
• Pedal with your legs, not your body.
• Don’t rock from side to side.
• Pedaling downward makes it easier to keep your upper body still.
TIP 4. SIT UP STRAIGHT
Don’t slouch. Sit up straight. Sitting up straight while using the DeskCycle will help strengthen your
core. It’s also good for your spine.
TIP 5. KEEP YOUR BACK SUPPORTED
If your chair seat is too deep, you may need to sit towards the front of your chair in order to use the
bike. In this case you can place a lumbar cushion behind your back for support. You can nd these on
Amazon.
TIP 6. EXTEND YOUR LEGS
When the pedals are at their farthest point, your legs
should be bent at about 25 to 30 degrees from fully
extended. This is healthiest for your knees.
25 Degrees
Upper Leg
Lower Leg
For more information go to www.DeskCycle.com and click on the ‘How To Use’ menu item.
4
Page 7

Tips for Using the DeskCycle (continued)
If your Knees Hit your Desk
If your desk is short or if you are tall, your knees may hit the underside of your desk when you pedal
the bike.
Below are some tips that will lower your knees.
• Lower your chair. This can lower your knees by several inches. In most cases this is all you need to
do.
• Point your toes upward on the upward pedal stroke. When your toes are pointing upward, your
knees will be lower by an inch or two. Then point your toes forward on the downward pedal stroke.
This will exercise your calves as well.
• Move the bike farther away from you and extend your legs more. Extending your legs lowers your
knees. You may not be able to do this if your desk is not very deep underneath.
For more information go to www.DeskCycle.com and click on the ‘How To Use’ menu item.
Guidelines For Pedaling While Typing.
• Keep the resistance low. A setting of 3 or less will work for most people.
• Find a pedal speed that’s comfortable. 15mph or less is a good target.
• Keep your upper body still. See TIP 3 on the previous page.
• Sit up straight. See TIP 4 on the previous page.
• Keep your back supported. See TIP 5 on the previous page.
Other Opportunities to Use the Bike
Use the DeskCycle while sitting,
• At your desk,
• On the couch,
• Or in a comfortable chair.
Use it while,
• Working,
• Watching television,
• Playing video games,
• Reading a book,
• Or on the phone.
Use it just about any time you’re sitting down and your legs are free.
Adjusting the Resistance
Adjusting the Pedal Resistance
• There are 8 tension settings.
• The Tension Indicator arrow points to the current tension
setting.
• The higher the number, the higher the pedal resistance.
5
Page 8

Using the Display
How to Read the Display
There are two numbers displayed on the
monitor, one on the top and one on the
bottom.
Top Number:
The top number always displays your pedal
speed, in miles per hour.
Bottom Number:
The bottom number can display Distance,
Calories or Time.
The Function Button
Press this button to change what is displayed
by the bottom number. Each time you press
the Function Button the Indicator Arrow
moves between,
• TIME (total Time pedaled),
• DIST (total Distance pedaled, in miles),
• CAL (total Calories burned),
• SCAN.
The Indicator Arrow points to the function that is being displayed. For example, in the picture the
Indicator Arrow is pointing to DIST, so the lower number displays the total distance pedaled.
What is SCAN?
When SCAN is selected, the lower number will cycle between displaying Time, Distance and Calories.
Each will be displayed for about 5 seconds. Another Indicator Arrow will point to the function (Time,
Distance or Calories) that is being displayed.
How to Reset Total Time, Total Distance and Calories
Time, Distance and Calories are accumulated as you pedal. To reset these all to zero, press and hold
the Function Button for at least 3 seconds.
How to Turn the Display On and O
The display turns on automatically when you pedal the bike. You can also turn the display on by
pressing the Function Button. You do not need to turn the display o. It will turn o automatically a
few minutes after you stop pedaling.
Are the Calories on the Display Accurate?
The Calories are most accurate if the pedal resistance is at maximum.
All mini exercise bikes (and many full-sized bikes) do not measure the power put into the bike.
Measuring power is very expensive, but it is required for a reasonable calculation. We’ve come up with
a solution that does not add cost to the bike.
How to Get Accurate Calorie Counts
You can use our free Online Calorie Calculator to improve the accuracy of the calorie calculation. It
uses your gender, height, weight, age, pedal speed and the DeskCycle knob position to calculate
Calories burned. See the Online Calorie Calculator section on the next page for more information.
If You Use the DeskCycle for More than 100 Minutes per Day
After the display reaches 100 minutes, the time starts over at zero. However, you can use the Online
Calorie Calculator to calculate the actual time that you used the bike. Just enter the Time and Distance
values from the display, and your actual exercise duration will be calculated.
6
Page 9

Online Calorie Calculator
Online Calorie Calculator – Provides accurate calculation of Calories burned when using the
bike. The Calorie Calculator is located at www.deskcycle.com/CalorieCalculator.html .
The Calorie Calculator uses your,
• Height,
• Weight,
• Gender,
• And age for improved accuracy.
It also calculates the wattage of the bike
from the knob setting and the pedal speed.
Display Stand for Your Desk
The DeskCycle comes with a Display Stand for those who use the
DeskCycle at their desks.
The Display Stand lets you move your display to your desktop.
Connection Instructions:
1. Plug one end of the extension cable into
the back of the display.
2. Slide the display onto the display stand.
3. Place the stand on your desk.
4. Plug the other end of the cable into the
female connector on the DeskCycle. The
female connector is shown in the picture
to the right.
5. Route the wire so that there is no
chance that you will hit it with your feet
while pedaling.
7
Page 10

Using the Tether for Slippery Floors
The DeskCycle comes with a long Velcro® strap. It can be used to tether the bike to the chair as
shown in the picture below. The strap is made from Velcro® loop material. On the back side of one end
is Velcro® hook material.
Most People Do Not Need the Tether
Most people do NOT need the tether. Pedaling the bike downward will keep it in place on carpet even if
your chair has wheels. The tether may be needed if you use the bike on a slippery surface. Before you
decide to use the tether, read the section “Tips for Using the DeskCycle” in this manual.
Installation:
1. Position the bike in front of your chair.
2. Sit in your chair and pedal the bike. Your knees should be bent about 25 degrees from fully
extended when the pedal is farthest away from you.
3. Route the Velcro strap as shown in the picture below. Notice that the strap goes over the rear bike
leg and under the frame. Keep the strap as low as possible.
4. Stretch the loop tight and attach the end with the hook material to the loop material to make a
tight loop.
5. Pedal the bike to make sure the distance is correct. Adjust if necessary.
6. Cut away the excess Velcro strap using a pair of scissors. This will make it easy to quickly create
the same size loop later.
8
Page 11

Removing the Pedal Straps
Some people prefer to use the bike without the pedals straps. When the pedal straps are removed the
top of the pedal will always face up. This makes it easier to quickly place your feet on the pedals.
• The top and bottom pedal halves snap together.
• You can remove the straps whether the pedals are attached to
the bike or not.
Follow the steps below to remove the straps.
Step 1:
Insert a at screwdriver into one of the slots. Rotate the
screwdriver downward to pry the halves apart. You should hear
a slight pop as one of the snap-ttings comes loose. There are 4
snap-ttings holding the pedals together.
Step 2:
Insert the screwdriver into the 2nd slot and repeat step 1.
Step 3:
Now insert the screwdriver into the gap on the side of the pedal.
Twist the screwdriver to pry the halves apart.
Step 1
Step 2
Step 3
Step 4:
Slide the screwdriver to the right and twist again. Repeat until you
hear the snap-tting release.
Repeat steps 3 and 4 on the other side of the pedal.
At this point you should be able to pull the halves apart.
Step 5:
The straps are pressed onto the posts as shown in the picture on
the right. Just pull up on the ends of the straps to remove them.
Step 6:
Press the halves back together.
Step 4
Step 5
Step 6
9
Page 12

Optional Accessories
Below are some of the accessories available for the DeskCycle.
Visit the DeskCycle website www.DeskCycle.com for a complete list of accessories.
Display with Large Text
Pros:
• The numerals are twice the size as the numerals of
the standard display.
Cons:
• It only displays one function at a time. You can
press the button on the front to select which
functions is displayed.
• The Large Display is not needed when using the
DeskCycle at your desk. The Display Stand lets you
place your display on your desk as close as you
need it to be.
Short Front Leg
Pros: This leg gives you another inch of clearance between
your knees and the underneath side of your desk.
Cons:
• It places your feet closer to the ground. It becomes
more important to point your toes forward on the
downward pedal stroke to prevent your heels from
hitting the ground.
• Some people may have a physical condition that limits
how much they can point their toes.
Before purchasing this leg, read the section
“Tips for Using the DeskCycle” in this manual.
The paragraph “If your Knees Hit your Desk“ has
suggestions for lowering your knees.
10 Inch Rear Leg
In rare cases a shorter person may not be able to reach
the pedals. This is because their chair legs prevent them
from placing the DeskCycle close enough. The 10 inch leg
ts between chair legs better than the 15 inch leg.
Only a very small number of people may actually need
this leg. As an approximation you would have to be
shorter than 5 feet tall, and your chair legs would have to
be close together. Even then you may not need this leg.
Lowering your chair may solve the problem.
Pros: Lets you place the DeskCycle closer to your chair.
Cons: None.
Contact us if you need this leg. We’ll send you one for
free.
10
Page 13

Care and Maintenance
Care
• Make sure the pedals are as tight as you can possibly make them. This is especially important
if you pedal backwards. If the pedals come loose, you should apply Blue Loctite® to the pedal
threads. See the “Troubleshooting” section for details.
• Do not stand on the pedals. The DeskCycle was not designed to be used while standing.
Maintenance
The DeskCycle requires no maintenance.
Do Not Lubricate
The DeskCycle contains sealed bearings for years of maintenance-free use. No lubrication is needed.
Some lubricants contain chemicals that can actually harm the bearings.
Support (US Customers)
The best place to look for answers is the DeskCycle website www.DeskCycle.com.
If you don’t nd what you’re looking for, feel free to call or email us with your questions or
suggestions.
TOLL-FREE: 877-426-3292
EMAIL: support@3dinnovations.com
Support (Outside of the US)
The support contact link for your country can be found on the Contacts page at,
www.3dinnovations.com
11
Page 14

Warranty (US Customers)
We stand behind our products. The DeskCycle and its accessories are covered by a one year warranty
on all parts and labor.
This warranty is for US customers only. Outside of the US, the warranty depends on your local
distributor.
What Is Covered
3D Innovations warrants the DeskCycle and accessories against defects in material or workmanship for
a full year from the date of purchase. 3D Innovations will, at its option, repair or replace the object.
• Parts: All parts are covered under this warranty.
• Labor: All labor is covered under this warranty. In most cases a local bike shop can perform the
repairs and the labor charge is reimbursed to the customer.
• Shipping: For the rst 30 days, 3D Innovations pays for all shipping. After the rst 30 days, 3D
Innovations pays for the shipping to the customer and the customer pays for the shipping to 3D
Innovations. In most cases there will be no shipping cost since a local bike shop can perform most
repairs. The labor charge of the bike shop is reimbursed to the customer by 3D Innovations.
What Is Not Covered
This warranty does not cover damage caused by neglect, abuse or misuse. This includes using the bike
with loose pedals. Using the bike with loose pedals will damage the threads. See the “Troubleshooting”
section if the pedals come loose.
How do I get Service?
Contact us by phone or by email to request a warranty repair.
Please provide your order number, serial number and a description of the problem.
Phone: 877-426-3292
Email: support@3dinnovations.com
Warranty (Outside of the US)
Outside of the US, the warranty depends on your local distributor.
The support contact link for your country can be found on the Contacts page at,
www.3dinnovations.com
12
Page 15

Troubleshooting
PROBLEM: I CAN’T INSTALL ONE OR BOTH OF THE PEDALS
Are You Installing The Correct Pedal Into The Correct Pedal Arm?
The rst thing to keep in mind is that there is a left pedal and a right pedal. They are dierent from
each other.
• The Left pedal is marked with an L.
• And the Right pedal is marked with an R.
• The marking is on the end of the pedal shaft.
• The pedal arms are also marked.
Make sure you install the left pedal into the left pedal arm and the right pedal into the right pedal arm.
See the “Assembly” section in this manual for more details.
Are You Screwing The Pedals In Correctly?
• Make sure the pedal is straight when you screw it in. The pedals should not be screwed in at an
angle. This will cause cross-threading which can damage the threads.
• Rotate the shaft with your ngers to get the threads started.
• If you can’t get the thread started with your ngers then it is cross threaded. Unscrew the pedal,
make sure the pedal is straight, and then try again.
• The right pedal screws in clockwise
• The left pedal screws in counter-clockwise.
If you are still having problems, contact us for assistance.
PROBLEM: THE DESKCYCLE MAKES NOISE WHEN I PEDAL IT
Try each solution below to see if it solves your problem. If the noise is still there after you’ve tried
these solutions, contact us so that we can help you solve the problem.
Solution 1: Tighten The Pedals
Make the pedals as tight as possible using a 15mm wrench.
Important! Using the bike with loose pedals will eventually damage the pedal arm threads. If the
pedals ever come loose, you should immediately stop using the bike and apply Blue Loctite® to the
pedal threads. See section below for instructions.
Solution 2: Tighten The Nuts That Attach The Legs
Each leg is attached to the bike using two nuts. You can use a 13mm wrench to tighten these nuts. Be
careful not to over-tighten the nuts.
PROBLEM: THE PEDALS CAME LOOSE WHEN I USE THE BIKE
This can happen if the pedals were not properly tightened when the bike was rst assembled.
If this happens you should immediately stop using the bike and apply Blue Loctite® to the pedal
threads. See section below for instructions.
PROBLEM: THE PEDALS WON’T STAY TIGHTENED OR ARE STRIPPED
Using the bike with loose pedals will eventually damage the pedal arm threads. If caught early,
applying Blue Loctite® to the pedal threads will solve the problem. See section below for instructions.
If the threads are too damaged, the pedal won’t stay tightened even with Blue Loctite® applied.
In this case you can contact us about replacing the pedal arm. If the bike is under warranty we will
replace the rst pedal arm for free. Important! Once the pedal arm has been replaced, you should
apply Blue Loctite® to the threads of both pedals. This will eliminate the chance of this happening
again.
How to Apply Blue Loctite to the Threads
1. Unscrew the pedal. Use a 15mm wrench.
2. Spread Blue Loctite® on the threads of the pedal shaft. You can get Blue Loctite® at any hardware
store or on Amazon.
3. Screw the pedal back into the pedal arm. Make the pedal as tight as you possibly can.
4. Wait 24 hours before using the bike.
13
Page 16

www.3DInnovations.com
© 2015 3D Innovations, LLC
All Rights Reserved
TM
 Loading...