


TM
DeskCycleTM
USER’S MANUAL
Visit us at www.DeskCycle.com for,
•Usage Tips
•Calorie Calculator
•Accessories
•And More
QUESTIONS / PROBLEMS
Support for US Customers TOLL-FREE SUPPORT 877-426-3292
EMAIL SUPPORT support@3dinnovations.com
Support for Non-US Customers
The support contact link for your country can be found on the Contacts page at www.3dinnovations.com
Order# _____________________
Serial# _____________________
The serial number is on the bottom of the DeskCycle.

 Precautions And Safety
Precautions
Failure to observe these warnings could result in physical injury or damage to the DeskCycle.
•Use the DeskCycle indoors on a level surface. Keep the DeskCycle away from moisture and dust.
•Make sure that the pedals are on tight. Loose pedals will slowly come undone. Using the bike with loose pedals can damage the threads on the crank arms. Stripped crank-arm threads are not covered by the warranty.
•Do not subject the bike to heavy shock or treat it excessively. Do not disassemble or modify it. Doing so will void the warranty.
•The DeskCycle has sealed bearings and is maintenance free. Lubricants are not necessary and can actually damage the bike.
•Do not place the bike in a location where it will be in contact with direct sunlight or where it will be exposed to high temperatures or excessive humidity.
•Do not stand on the pedals. The DeskCycle was not designed to be used while standing.
Safety
Warning! To reduce the risk of serious injury, please read the following safety precautions before using the DeskCycle.
•Read all instructions in this manual before using the DeskCycle. Use the DeskCycle only as described.
•It is the responsibility of the owner to ensure that all users of the DeskCycle are adequately informed of all precautions.
•Never use this device after drinking alcohol; doing so is dangerous and could in serious injury or accident.
•Do not place this device in a location where it may cause an obstruction.
Consult Your Physician
It is always important to consult your physician before starting an exercise program. This is particularly true if any of the following apply to your current medical condition:
•Chest pain or pain in the neck and/or arm
•Shortness of breath
•A diagnosed heart condition
•Joint and/or bone problems
•Currently taking cardiac and/or blood pressure medications
•Have not previously been physically active
•Dizziness or blurred vision
•Those with physical handicaps should use this device only under supervision.
If none of these apply to you then start gradually and sensibly. However, if you feel any of the physical symptoms listed above when you start your exercise program, contact your physician right away. If one or more of the statements listed above applies for you, see your physician before beginning an exercise program. An exercise-stress test may be used to help plan your exercise program.

Table Of Contents
Assembly |
2 |
|
|
Tips for Using the DeskCycle |
4 |
|
|
Adjusting the Resistance |
5 |
|
|
Using the Display |
6 |
|
|
Online Calorie Calculator |
7 |
|
|
Display Stand for Your Desk |
7 |
|
|
Using the Tether for Slippery Floors |
8 |
|
|
Removing the Pedal Straps |
9 |
|
|
Optional Accessories |
10 |
|
|
Care and Maintenance |
11 |
|
|
Support |
11 |
|
|
Warranty |
12 |
|
|
Troubleshooting |
13 |
|
|

Assembly
Step 1: Install the Large Leg
•Remove the nuts and washers from the Large Leg.
•Align the bolts of the Large Leg with the holes in the Bike, and push the bolts through the holes.
•Attach a Washer and a Nut to each bolt.
Do NOT tighten the nuts until step 3.
Step 2: Install the Small Leg
•Remove the nuts and washers from the Small Leg.
•Align the bolts of the Small Leg with the holes in the Bike, and push the bolts through the holes.
•Attach a Washer and a Nut to each bolt.
Do NOT tighten the nuts until step 3.
2
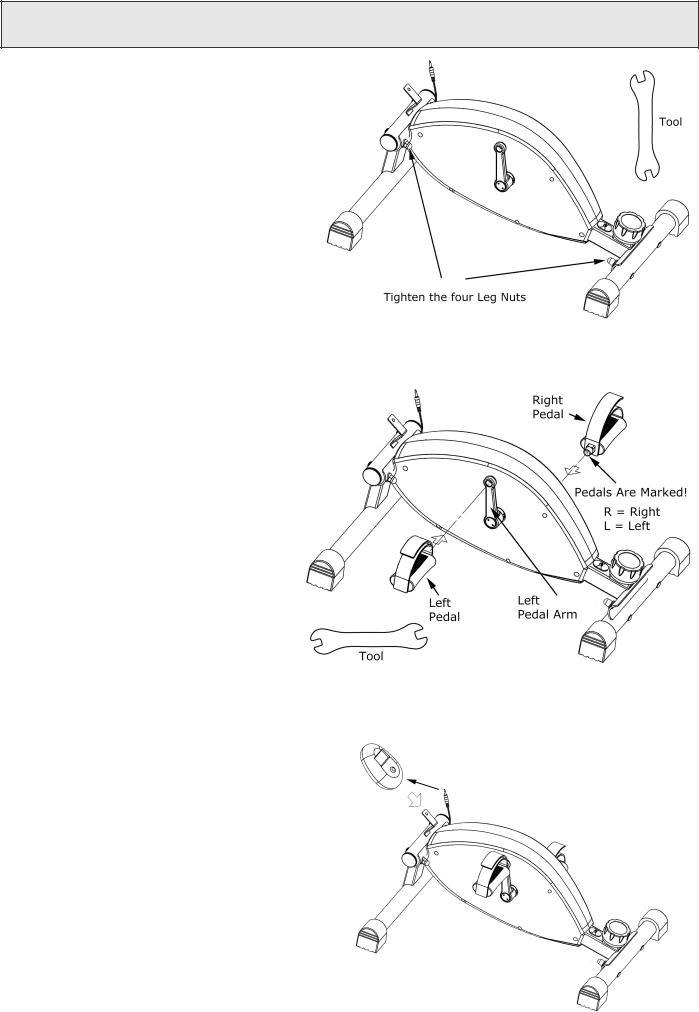
Assembly (continued)
Step 3: Level the Bike & Tighten Nuts
At this point the four nuts that attach the legs to the Bike should be loose.
•Place the Bike onto a smooth flat surface.
•Tighten the four leg nuts using the supplied
Tool. Do not over-tighten the nuts!
Step 4: Install the Pedals
There is a Left Pedal and a Right Pedal. They are marked with an L for Left or an R for Right on the end of the pedal shaft.
•Screw the Left Pedal into the Left Pedal Arm
COUNTER-CLOCKWISE. 
•Screw the Right Pedal into the Right Pedal Arm
CLOCKWISE. 
MAKE THE PEDALS AS TIGHT AS POSSIBLE!!!
Using the bike with loose pedals will damage the pedal arm threads!
Tips for Installing the Pedals:
1.Make sure the pedal is straight when you screw it in.
2.Rotate the shaft with your fingers to get the threads started.
3.If you can’t get the threads started with your fingers then it is cross threaded.
Unscrew the pedal, make sure the pedal is straight, and then try again.
Step 5: Insert the Battery into the Display
•There is a door on the back of the Display. It snaps in and out. The latch is at the top. Pry the top of the door out with your index finger.
•Remove any plastic wrapping from the Battery.
•Insert the Battery. Pay attention to the polarity.
•Press the door back into the display. Insert the bottom edge first.
Step 6: Install the LCD Display
•Plug the Connector into the Display.
•Carefully slide the Display onto the
Display Bracket as shown in the picture.
3
 Loading...