

Page 1

Voodoo 3 VGA Card Contents
CONTENTS
Voodoo3 VGA Card Photo....................................................................... A
Voodoo3 VGA Card Component Location ............................................. B
TABLE OF CONTENTS…………………………………………Contents
CHAPTER 1 Specifications …………….…..………..…………………..1
1-1 General Specifications ................................................................. 1
1-2 System Requirements .................................................................. 2
CHAPTER 2 Features Highlight …………………………………………3
2-1 Voodoo 3 2000 ……………………………..……………………..3
2-2 Voodoo 3 3000 ……………………………………………………3
2-3 Video Acceleration And Interface with Voodoo 3 ………………..3
2-4 3D Acceleration Highlights ……………………………………….4
2-5 2D Acceleration Highlights ……………………………………….4
2-6 AGP or Accelerated Graphics Port………………………………...5
CHAPTER 3
Installation ……………………………………………….…7
3-1 Hardware Installation -- To Install the VGA Card …….…………7
3-2 Driver Installation On Windows 9X………………………………8
3-3 Driver Installation On Windows NT 4.0/5.0 …………………….18
Contents
Page 2

Chapter 1 Specifications Voodoo 3 VGA Card
2
Page 3

Voodoo 3 VGA Card Chapter 1 Specifications
Chapter 1 Voodoo 3 VGA Card Specifications
1-1 General Specifications
Voodoo3 VGA Card is based on Voodoo 3 2000/3000 chipset and AGP 2x
interface, delivering the perfect balance of high-end 2D/3D performance and
affordability. Targeted for the mainstream PC systems, the Voodoo 3 chipset
features blistering 3D acceleration, the world’s fastest 2D performance and DVD
acceleration – all on a single chip.
Complete compatibility with the largest installed base of enhanced 3D
entertainment titles available, the Voodoo 3 is optimized for DirectX 6, Glide and
OpenGL, and includes support for ultra-high resolution display on PC monitors,
LCD flat panels and high-definition television sets. With unmatched performance
and value, the Voodoo 3 2000/3000 is the perfect PC entertainment solution for
the next generation of PC owners.
Specifications and Features of Voodoo 3 Series VGA Card:
1. Fully integrated 128-bit VGA/2D/3D/video accelerator.
2. True Multitexturing – 2 texture/clock
3. 3Dfx Voodoo compatibility
4. 2X AGP with sidebands
5. DVD Acceleration
6. Digital video output for NTSC, PAL and SECAM TV-out support
7. 4-16MB SDRAM, 128 bit wide frame buffer.
8. PC’99rev. 1.0 compliant.
9. DirectX 6, Open GL, Glide 2.x/3x support
10. 0.25 Micron, 5-layer metal CMOS technology.
11. Optimized Pentium II I/O architecture.
12. Card Dimension: 160mm x 90mm
1
Page 4

Chapter 1 Specifications Voodoo 3 VGA Card
13. Speed Differentiation:
Voodoo 3 2000 Voodoo 3 3000
250 Megatexels/sec. 366 Megatexels/sec.
300 MHz RAMDAC: 350MHz RAMDAC:
2048x1536 @ 65Hz 2048x1536 @ 75Hz
125 MHz Core Graphics Clock 183 MHz core Graphics Clock
4 million triangles/sec. 7 million triangles/sec.
1-2 System Requirements:
CPU: Intel Pentium II or above or equivalent
System: Win 9x, NT4.0/5.0
Interface: AGP
2
Page 5

Voodoo 3 VGA Card Chapter 2 Features Highlight
Chapter 2 Features Highlight
2-1 Voodoo 3 2000: High-Speed, High-Resolution 2D/3D Accelerator
From 3Dfx Interactive, the architect of the 3D revolution, comes a new dimension of
high-resolution gaming. A snap to install, the Voodoo3 2000 replaces tired, old 2D
cards in just a matter of minutes. Fusing the world fastest 2D with a dual 32-bit
pipeline, the Voodoo 3-2000 pumps out over 100 billion operations per second to
bring you resolutions as high as 2046x1536 and speeds of up to 60 frames per second.
Generating 6 million triangles per second to bring to life 500 of the hottest titles, the
Voodoo3 2000 Patented Single pass, Single Cycle, Multi-Texturing delivers the
brilliant color and amazing clarity that has made it the standard in PC entertainment.
2-2 Voodoo 3 3000: The ultimate in 3D/2D performance
Clocking in at over 100 billion operations per second, the Voodoo3 3000 pushes the
limits of ultra high-resolution gaming. Delivering liquid smooth frame rates of over
60 frames per second, the Voodoo3 3000 combines the world fastest 2D with a
dual 32-bit pipeline to provide a mind-altering gaming experience. Unleashing an
unrivaled 7 million triangles a second, the Voodoo3 3000's Patented Single-Pass,
Single Cycle Multi-Texturing provides awesome visual effects at resolutions as high
as 2046x1536. Designed to enhance the latest generation of computer hardware, the
Voodoo 3-3000 provides DVD hardware acceleration to ensure a seamless 30 frame
per second without frame drop. And the standard TV/S-Video jack on the Voodoo
3-3000 instantly allows you to output to a compatible TV or Monitor to create the
ultimate home entertainment experience.
2-3 Video Acceleration And Interface with Voodoo 3:
VMI video peripheral interface
YUV 4:2:2 and YUV 4:2:0 planar support
De-interlacing using Bob and Weave
Separate gamma correction for video and graphics
Auto page flipping using VBI for smooth motion video
30 Frames per second DVD playback with no dropped frames
3
Page 6

Chapter 2 Features Highlight Voodoo 3 VGA Card
2-4 3D Acceleration Highlights:
Dual 32-bit texture rendering architecture
True multi-texturing: 2 textures per-pixel per-clock
Full hardware setup of triangle parameters
Support for multi-triangle strips and fans
Single Pass, Single-cycle Bump mapping
Single Pass, single-cycle trilinear mip-mapping
Alpha blending on source and destination pixels
Per-pixel atmospheric fog with programmable for zones
Floating point Z buffer (W buffer)
Texture compositing for multi-texture special effects
8-tap anisotropic filtering
Support for 14 texture map formats
Texture compression through narrow-channel YAB format
2-5 2D Accelerastion Highlights:
128-bit Windows GUI acceleration
Full-featured 128-bit BitBit engine: Windows GDI in hardware
Source and destination chroma-keying for DirectDraw
SGRAM color expansion and single-cycle block writes
Accelerated 8, 16, 24(packed), 32-bit mode
4
Page 7

Voodoo 3 VGA Card Chapter 2 Features Highlight
2-6 AGP or Accelerated Graphics Port -- a new bus interface for graphics
accelerators.
AGP gives graphics accelerators fast, high throughput direct access to
system memory. This allows a graphics accelerator access to more
memory than available locally on the graphics card. For example, to
display a scene that contains 16MB of textures, a 4MB AGP graphics
card could access the PC system memory for the additional 12MB
required.
2-6-1 AGP delivers a peak bandwidth that is 4 times higher than the PCI
bus using pipelining, sideband addressing, and more data transfers
per clock.
It will also enables graphics cards to execute texture maps directly from
system memory instead of forcing it to pre-load the texture data to the
graphics card's local memory. AGP is based on the PCI 2.1 standard
which calls for a 66MHz PCI bus speed.
The result of AGP is a much smoother frame rate and the ability to
display 3D graphics and video that is many times more realistic and much
a higher quality than ever before found a PC.
2-6-2 The current PCI bus supports a data transfer rate up to 132 MB/s,
while AGP (at 66MHz) supports up to 533 MB/s!
AGP attains this high transfer rate due to it's ability to transfer data on
both the rising and falling edges of the 66MHz clock, and through new
design advances that have made data transfer modes more efficient.
2-6-3 Direct Memory Execute (also knows as DIME) is the most
important feature of AGP.
AGP graphic chips have the capability to access main memory directly
for the complex operation of texture mapping. AGP provides the graphics
card with two methods of directly accessing texture maps in system
memory: pipelining and sideband addressing. In pipelining, AGP makes
multiple requests for data during a bus or memory access. PCI makes one
request, and does not make another until the data it requested has been
transferred.
5
Page 8

Chapter 2 Features Highlight Voodoo 3 VGA Card
6
Page 9
Voodoo3 VGA Card Chapter 3 Installation
Voodoo3
CHAPTER 3 INSTALLATION
3-1 Hardware Installation – To install the VGA Card
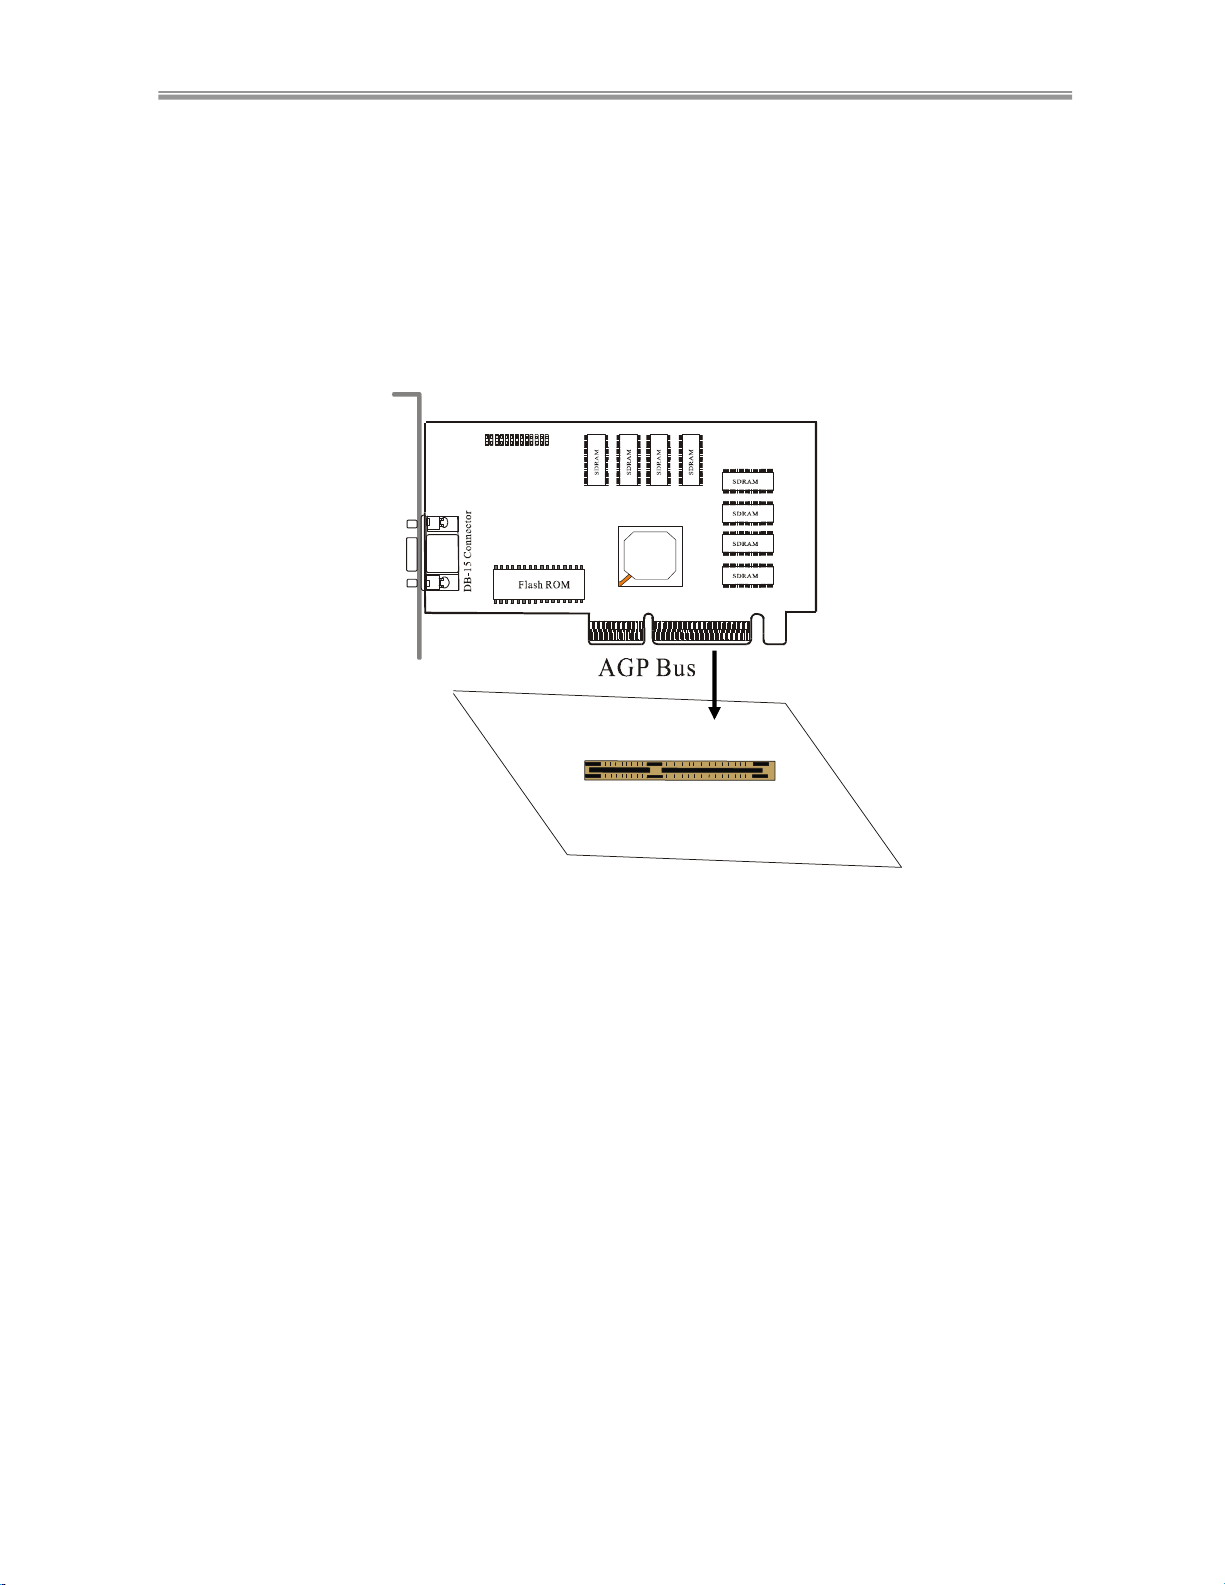
Voodoo3 VGA card is built with AGP Bus support. The AGP Slot is a 124-pin
slot as shown below.
AG P S l o t
Ma i n b o a r d
Both the AGP Edge and the AGP Slot are of foolproof design so as to assure
a correct and secured connection.
7
Page 10
Chapter 3 Installation Voodoo3 VGA Card
3-2 Driver installation on Windows 9X:
VOODOO3 VGA Card is shipped in a package which includes a Driver & Utility CD
containing Drivers for Windows 95/98, and NT 4.0/5.0
Step 1: Install your Voodoo3 card properly (See Hardware Installation Guide).
Step 2: Power on your PC.
Step 3: For first time you install Voodoo3 card, by the Plug and Play feature of
Windows 95/98, Windows will find a new hardware and ask for the driver.
(If it is not the first time you install this card, just go to Step 4 .
For Windows 9X, there are three installation variations :
(A) for Windows 95,
(B)Windows 95 OSR2
(C) Windows 98
Yet, for these three variations, there is only one main point of installation:
Get off from the Windows Auto-search and insert Manufacturer’s Driver CD.
(A) For Windows 95 (Original Version):
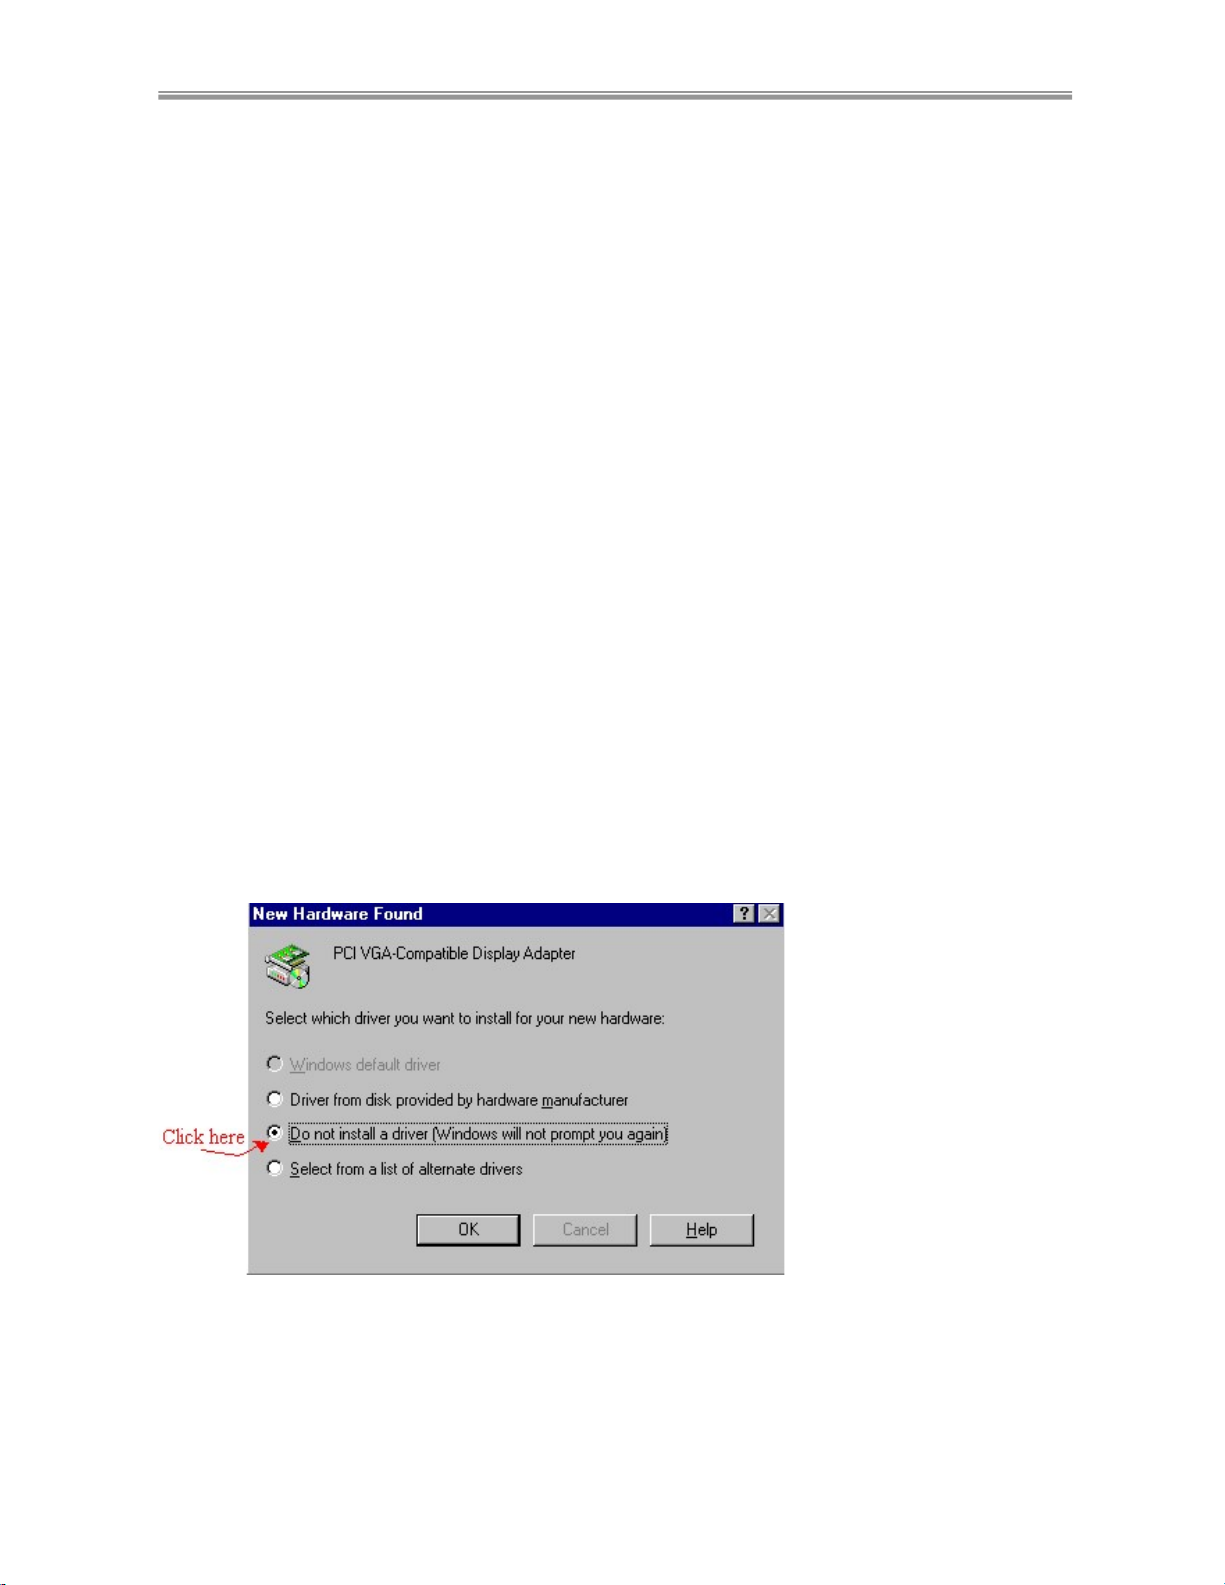
A-1. After starting Windows, You will see a dialog appear on the screen as
below:
A-2. Click “Do not install a driver ”(so as to get off and go to VOODOO3
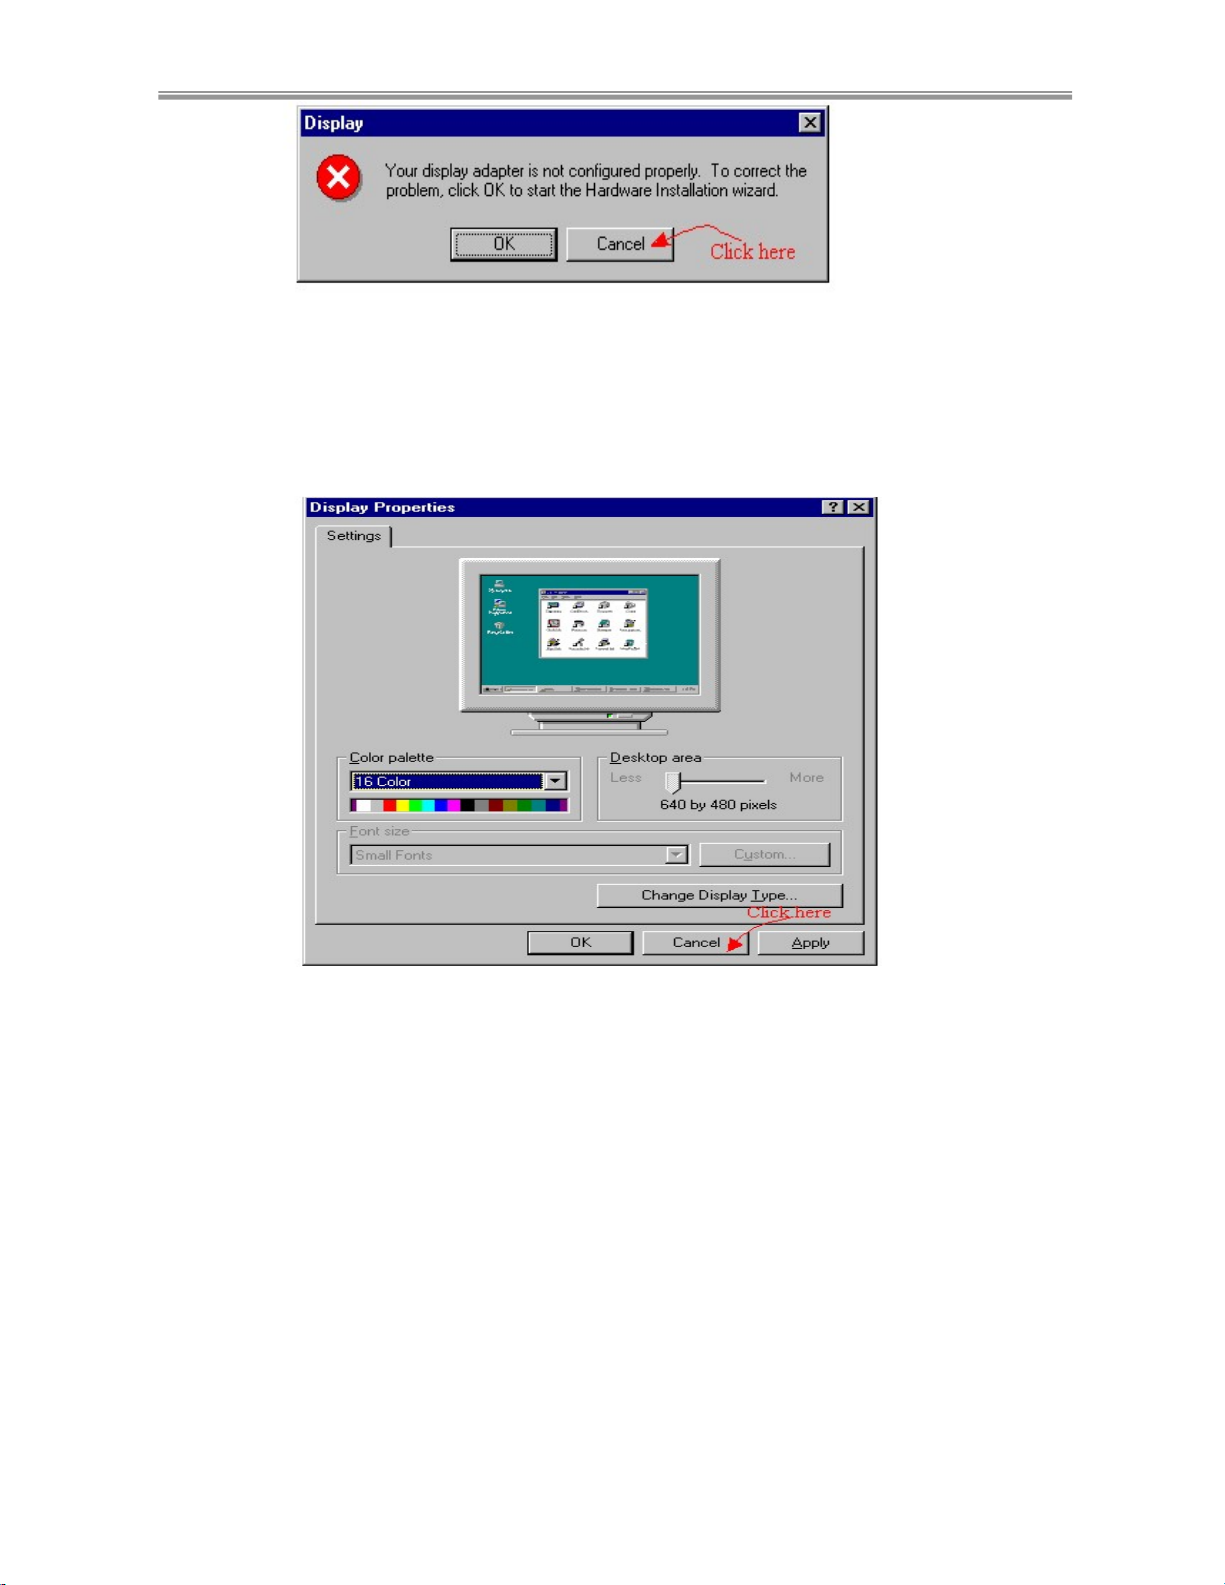
driver setup), then press “OK”. After that, you will see following window:
8
Page 11
Voodoo3 VGA Card Chapter 3 Installation
A-3. Click “Cancel” then you will see:
A-4. Click “Cancel” to get off and go to Step 4 for VOODOO3 driver setup.
9
Page 12
Chapter 3 Installation Voodoo3 VGA Card
(B) For Windows 95 OSR2:
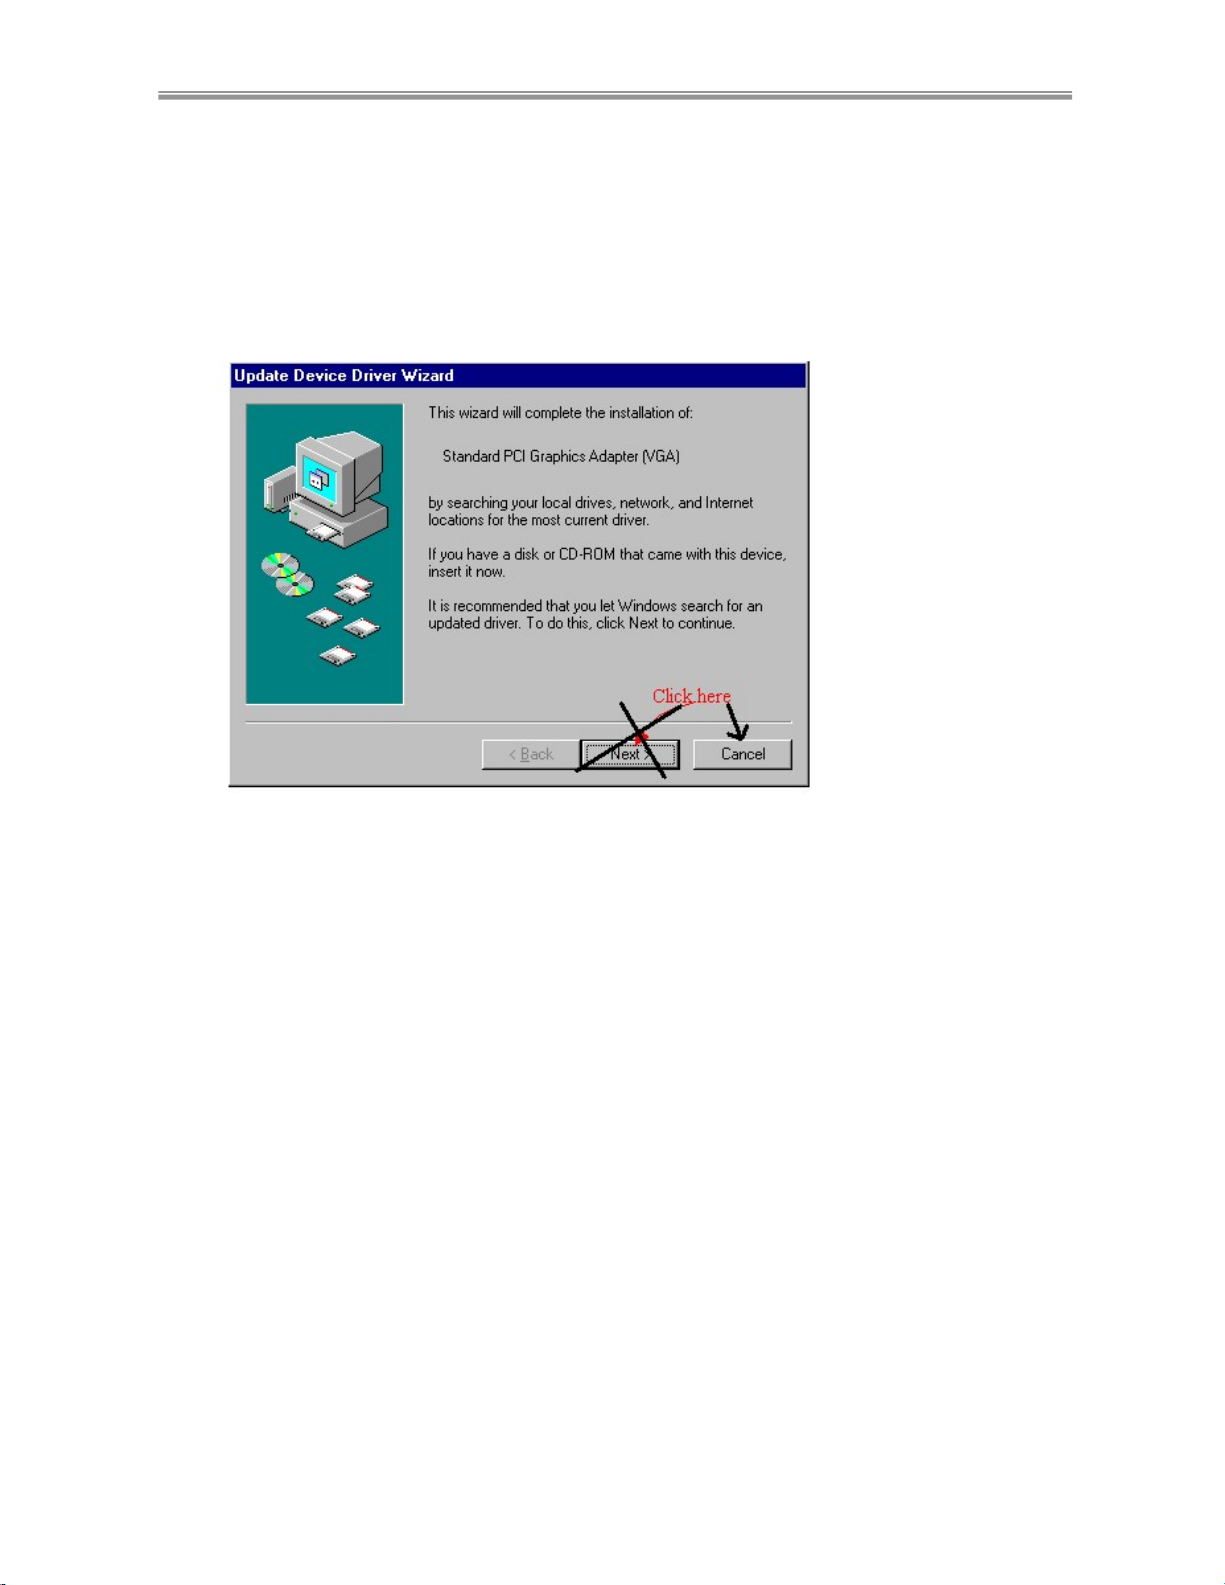
B-1. After starting Windows 95 OSR2, the system will find out the just
installed VOODOO3 card and ask you to update the VGA driver as in the
screen below:
:
B-2. Click “ Cancel” so as to get out and return to the “Start” menu.
After returning to “start’ mneu, go directly to Step-4 of this Chapter (insert
the Voodoo3 Driver & Utilities CD into your CD-ROM).
10
Page 13
Voodoo3 VGA Card Chapter 3 Installation
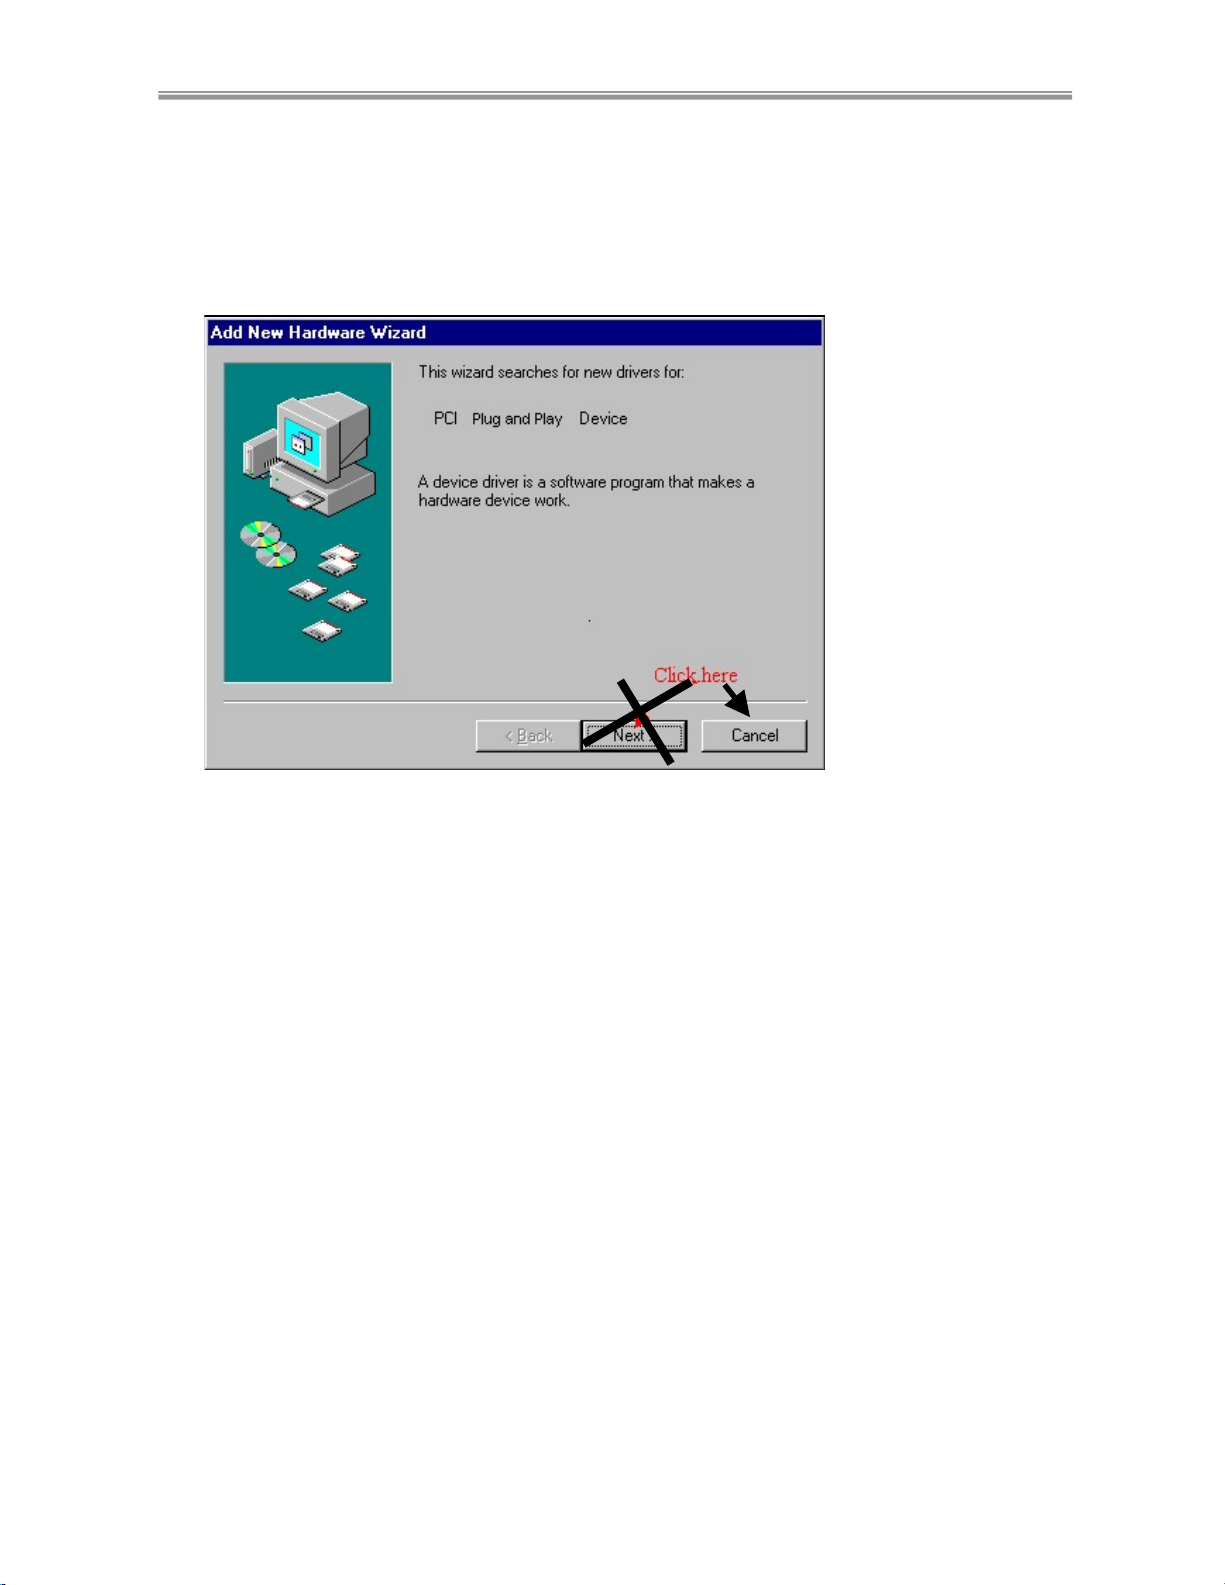
(C) For Windows 98:
C-1 After starting Windows 98, the system will find out the just installed
VOODOO3 VGA card and ask you to update the VGA driver for this new
hardware :
C-2. Click “ Cancel” so as to get out and return to the “Start” menu.
After returning to “start’ mneu, go directly to Step-4 of this Chapter (insert the
VOODOO3 Driver & Utilities CD into your CD-ROM).
11
Page 14
Chapter 3 Installation Voodoo3 VGA Card
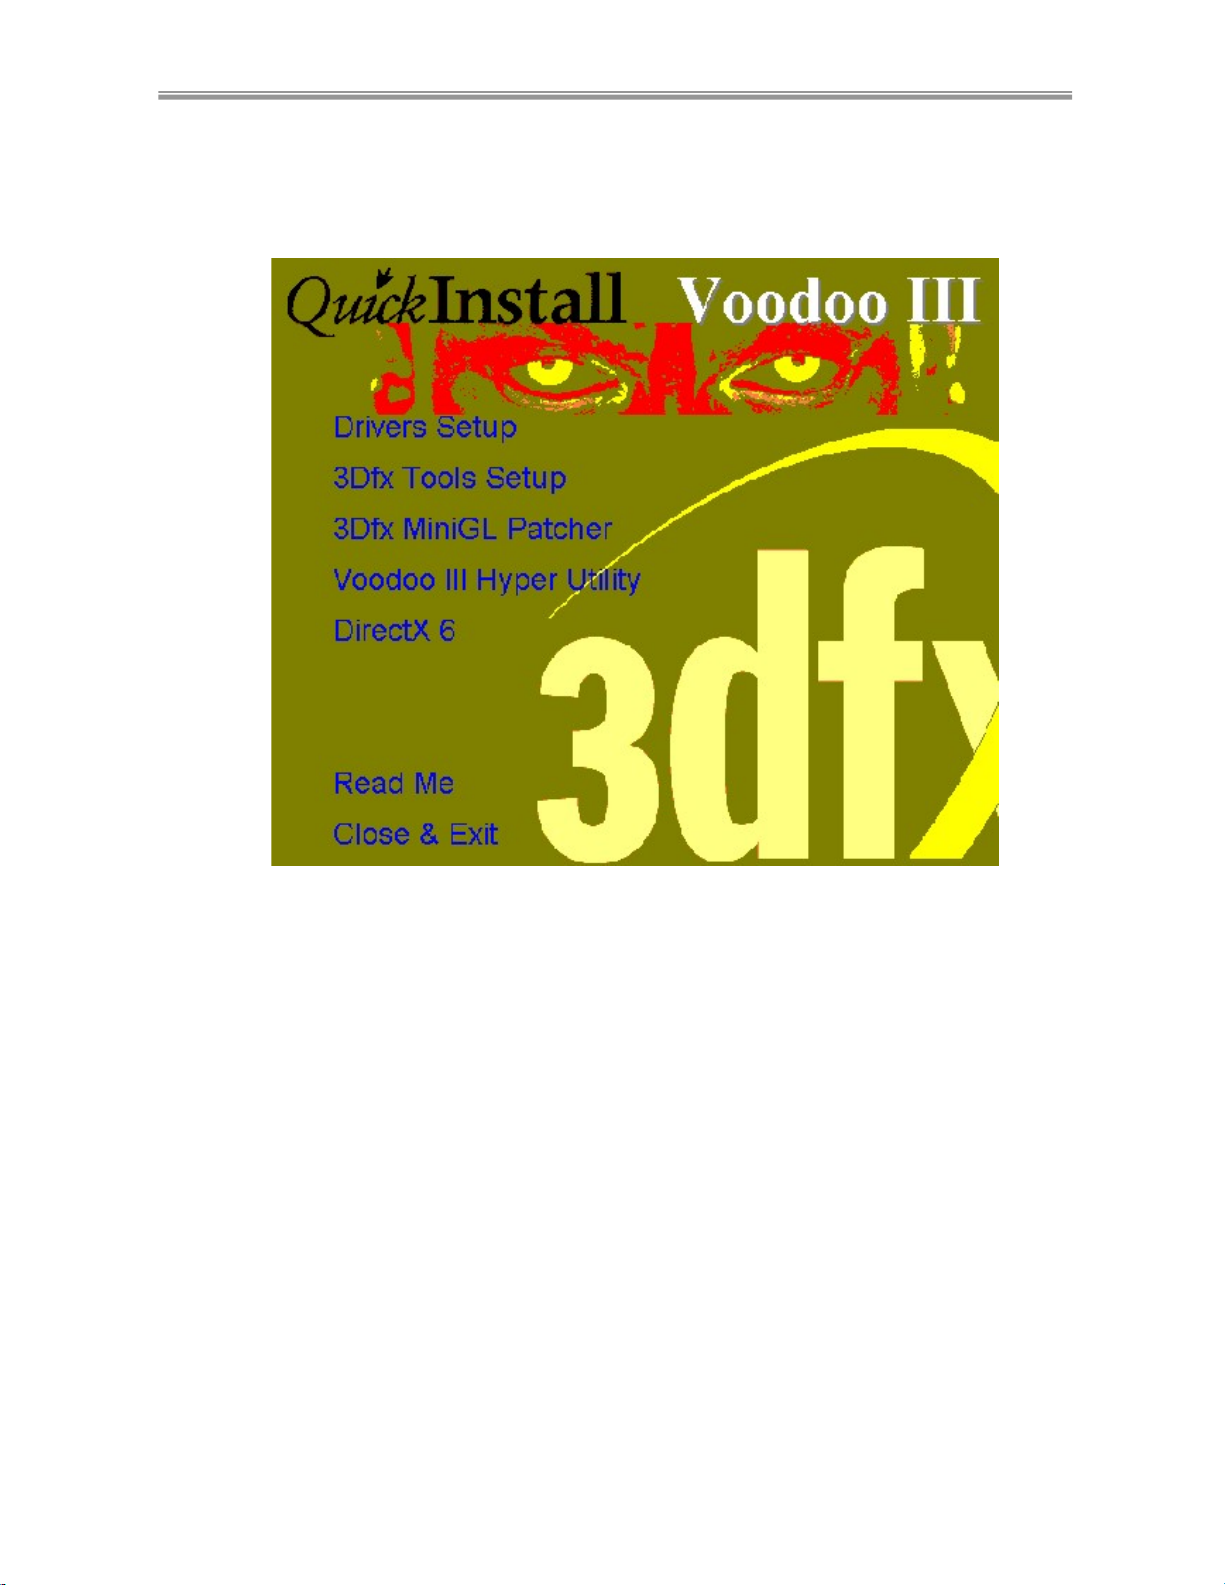
Step 4: Insert the VOODOO3 Driver and Utilities Setup CD into your CD-ROM
drive. In a second or two, the “Vodoo3 Setup” screen will show up automatically.
12
Page 15
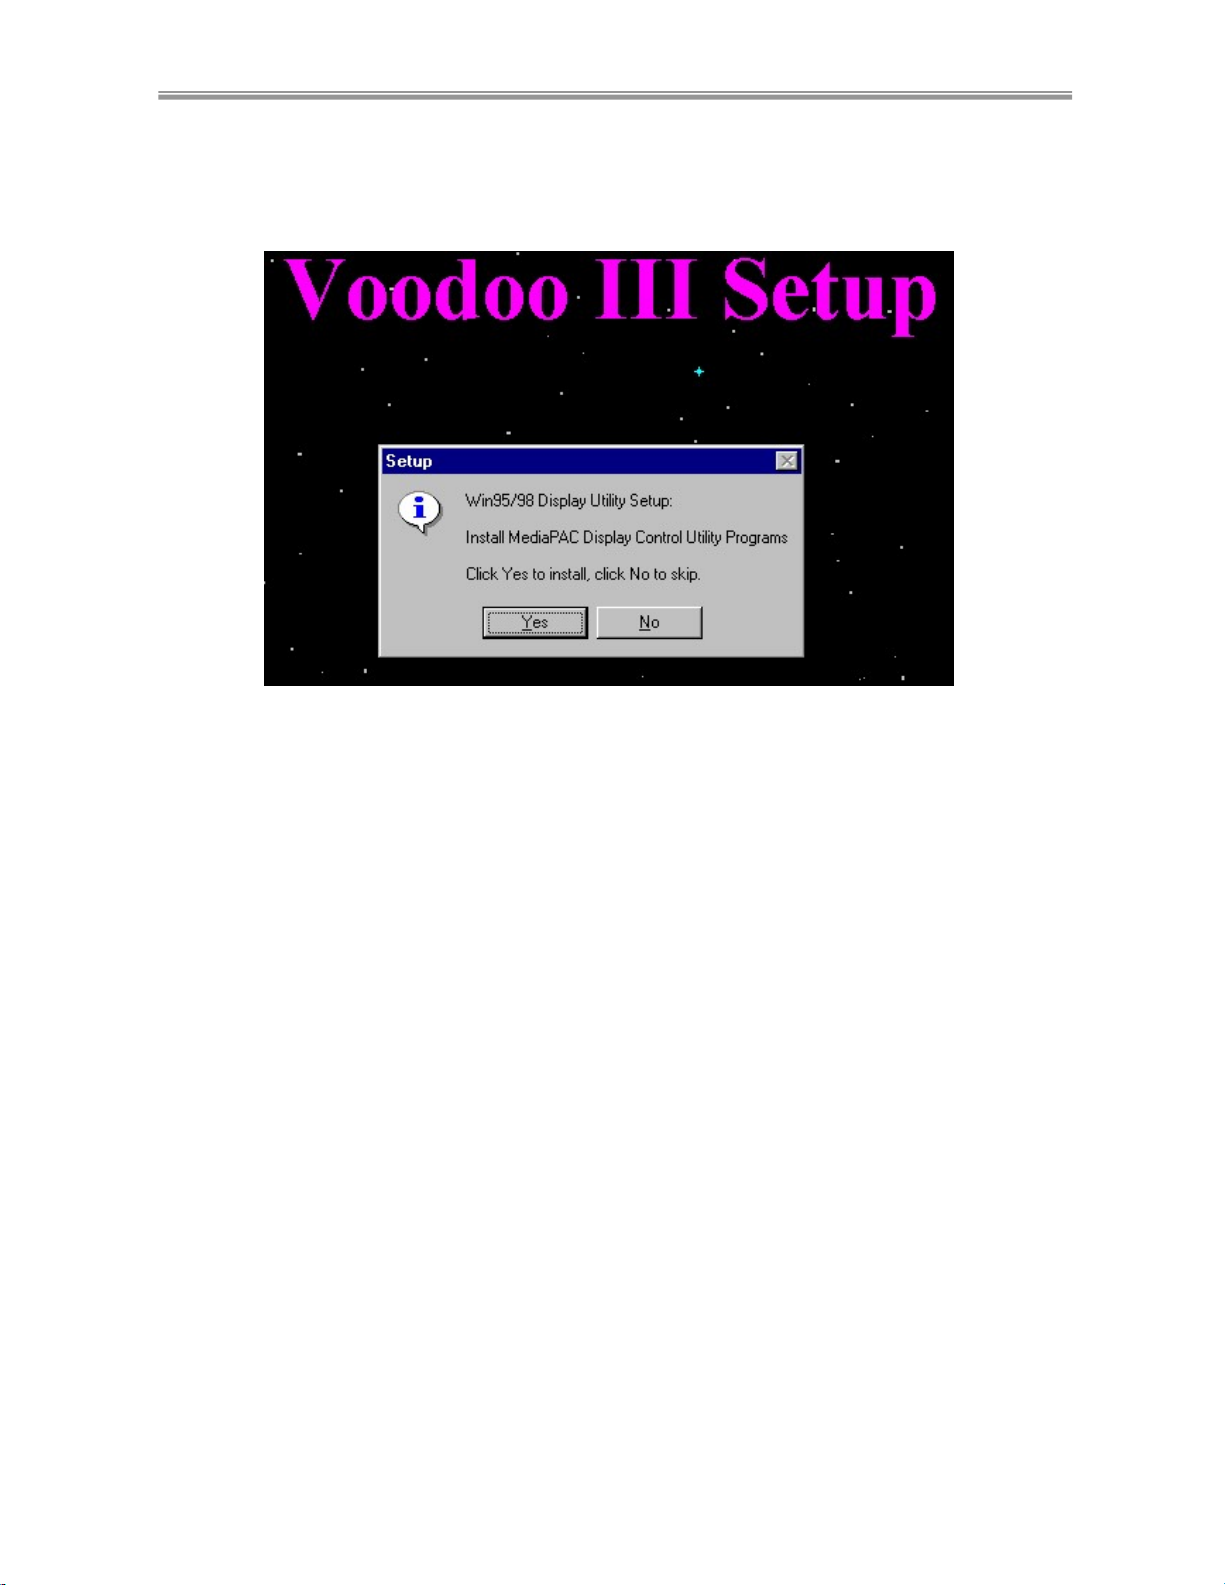
Voodoo3 VGA Card Chapter 3 Installation
Step 5: Click “Drivers Setup”, and the following screen will appear where you
should click to “Yes” to install MediaPAC Display Control Utility:
13
Page 16
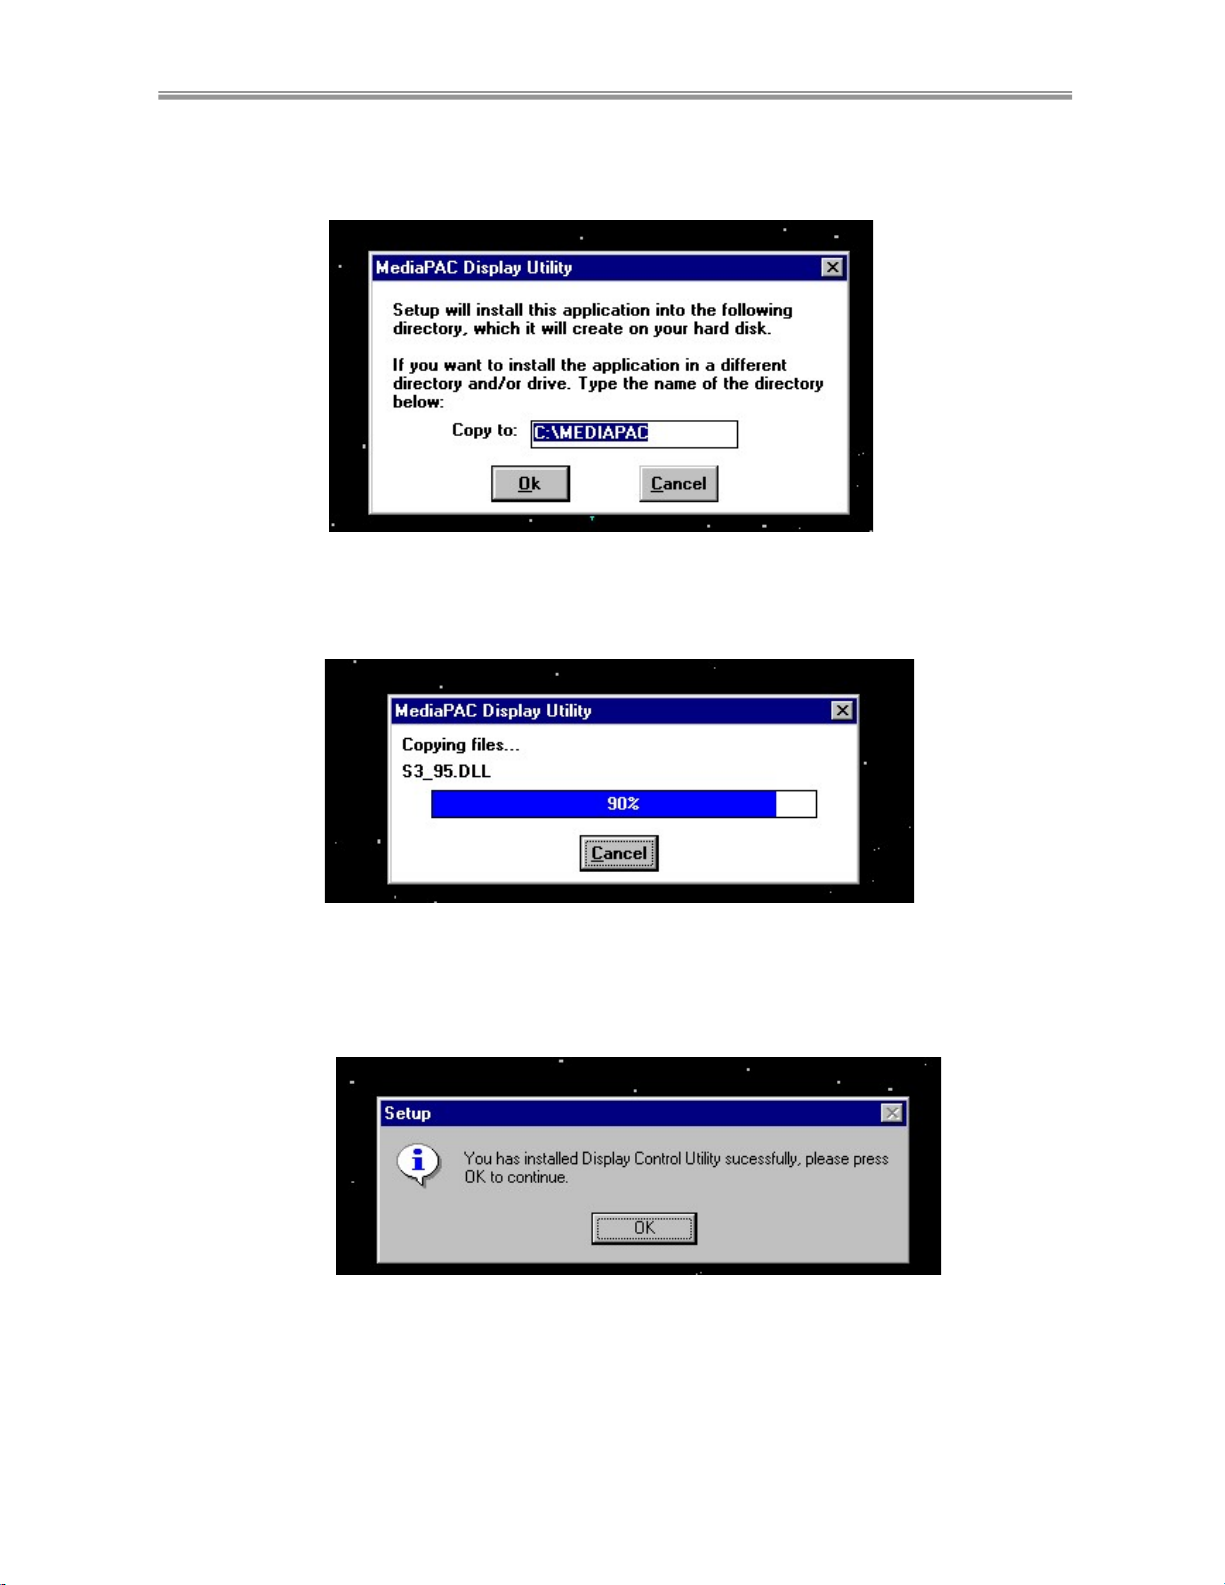
Chapter 3 Installation Voodoo3 VGA Card
Step 6: After Clciking “Yes” you can see the following 3 screens to guide you
through installation of MediaPAC Display Control Utility.
And click “OK” to go to “Voodoo III Display Driver “ setup.
14
Page 17
Voodoo3 VGA Card Chapter 3 Installation
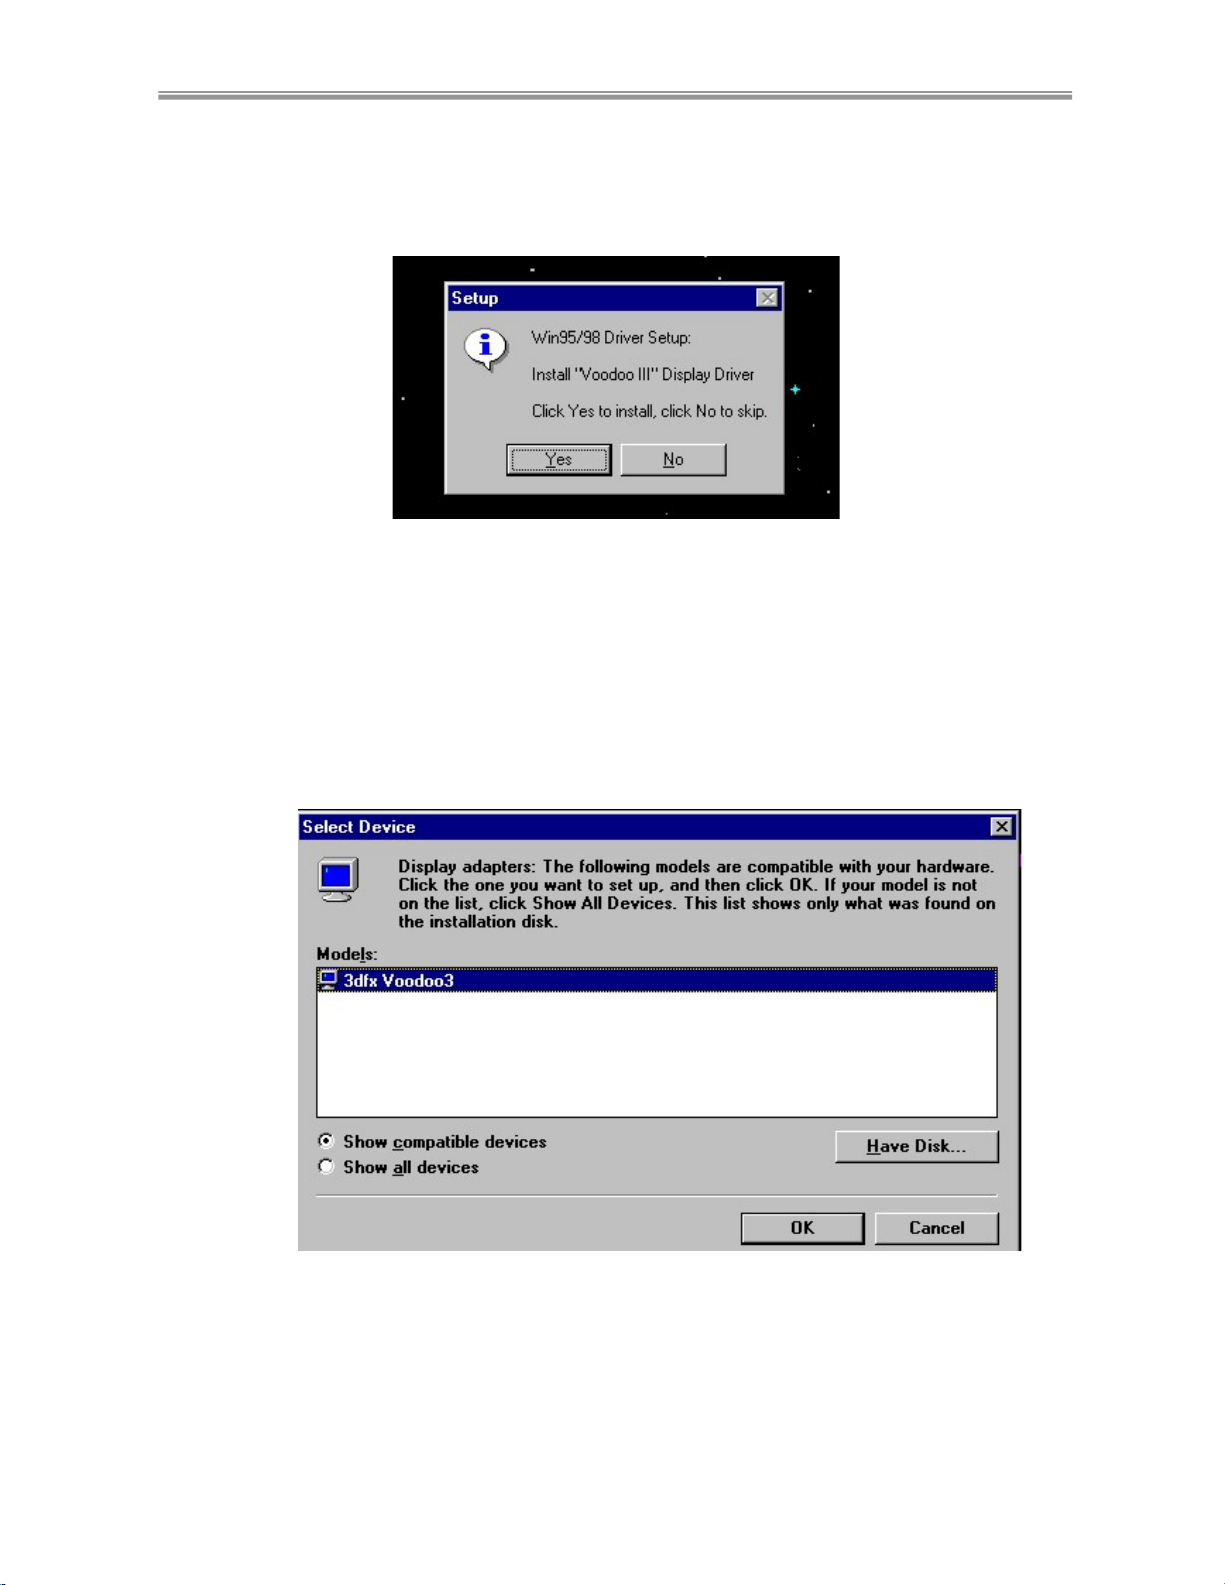
Step 7: After installing “Display Control Utility”, in a second or two the “Install
Voodoo3 display Driver” dialogue appears on screen, where you should click to
“Yes” to install it with no procrastination.
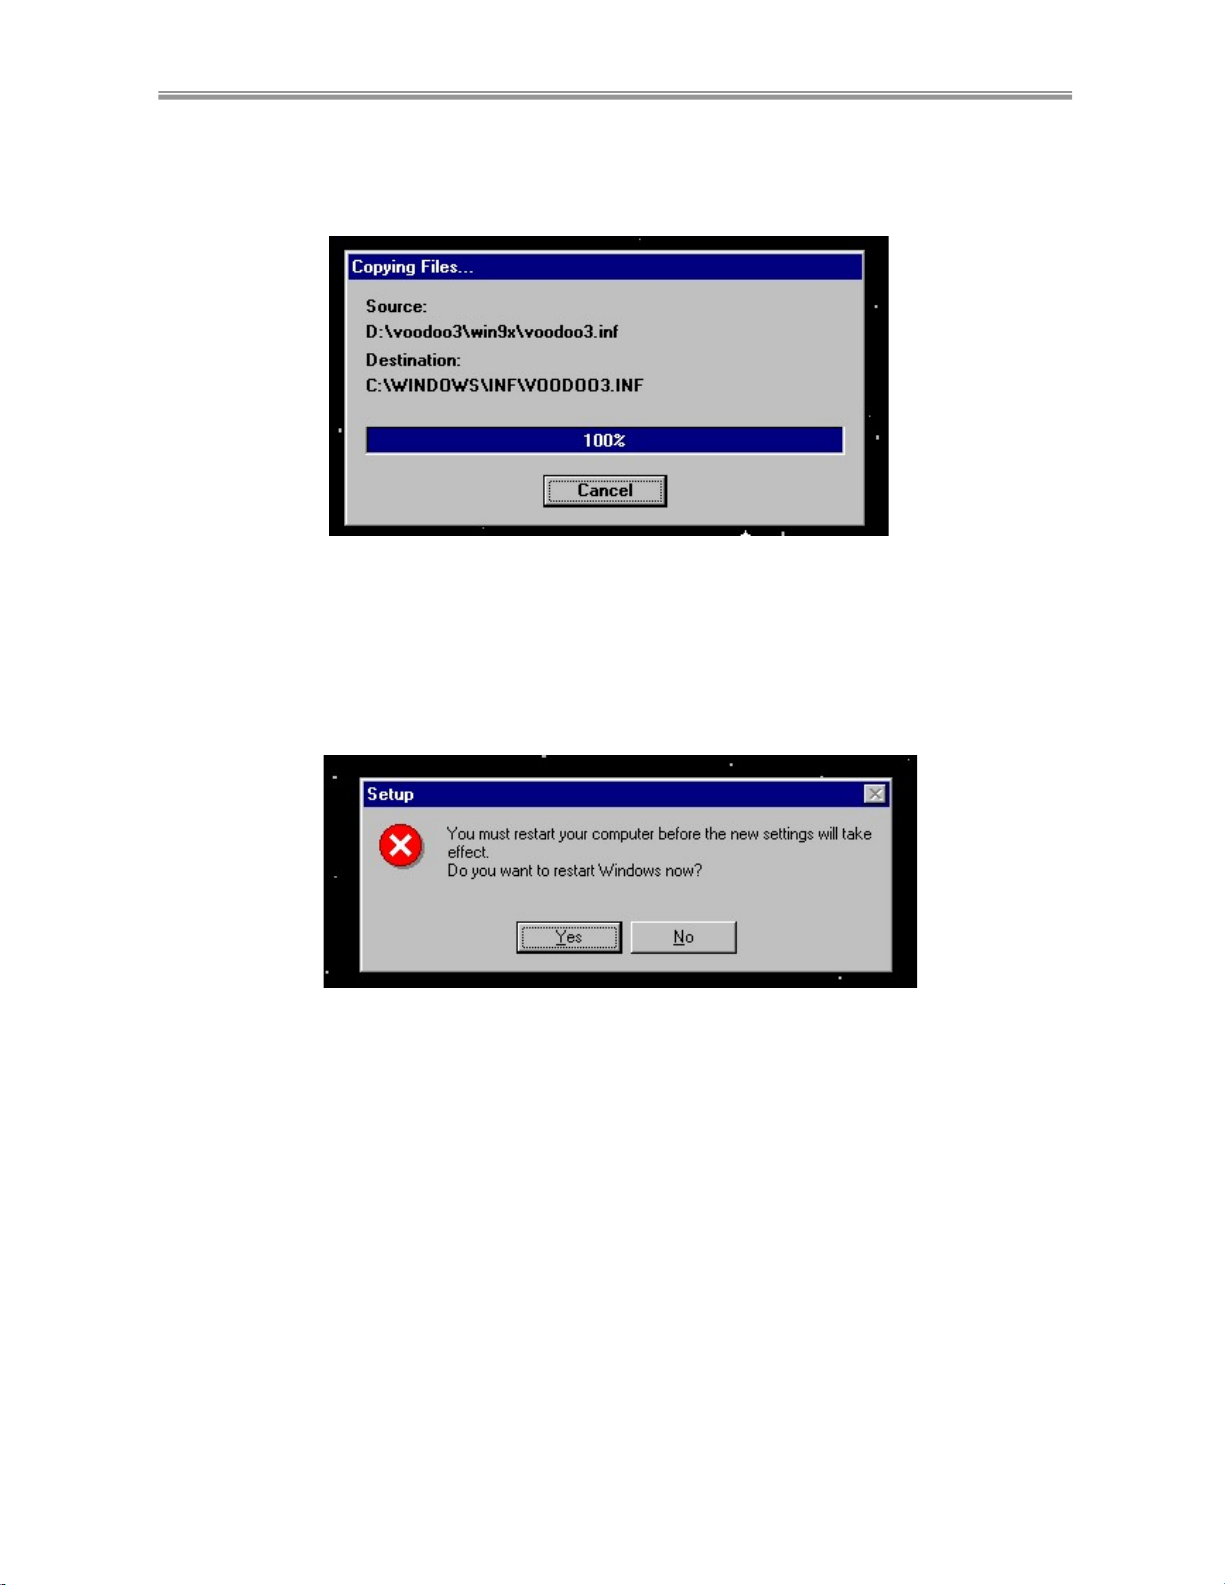
Step8: After clicking “Yes”, the following three screens appear in turn to guide you
through the installation.
15
Page 18
Chapter 3 Installation Voodoo3 VGA Card
Congratulation! You have successfully installed Voodoo3 Display Driver.
16
Page 19
Voodoo3 VGA Card Chapter 3 Installation
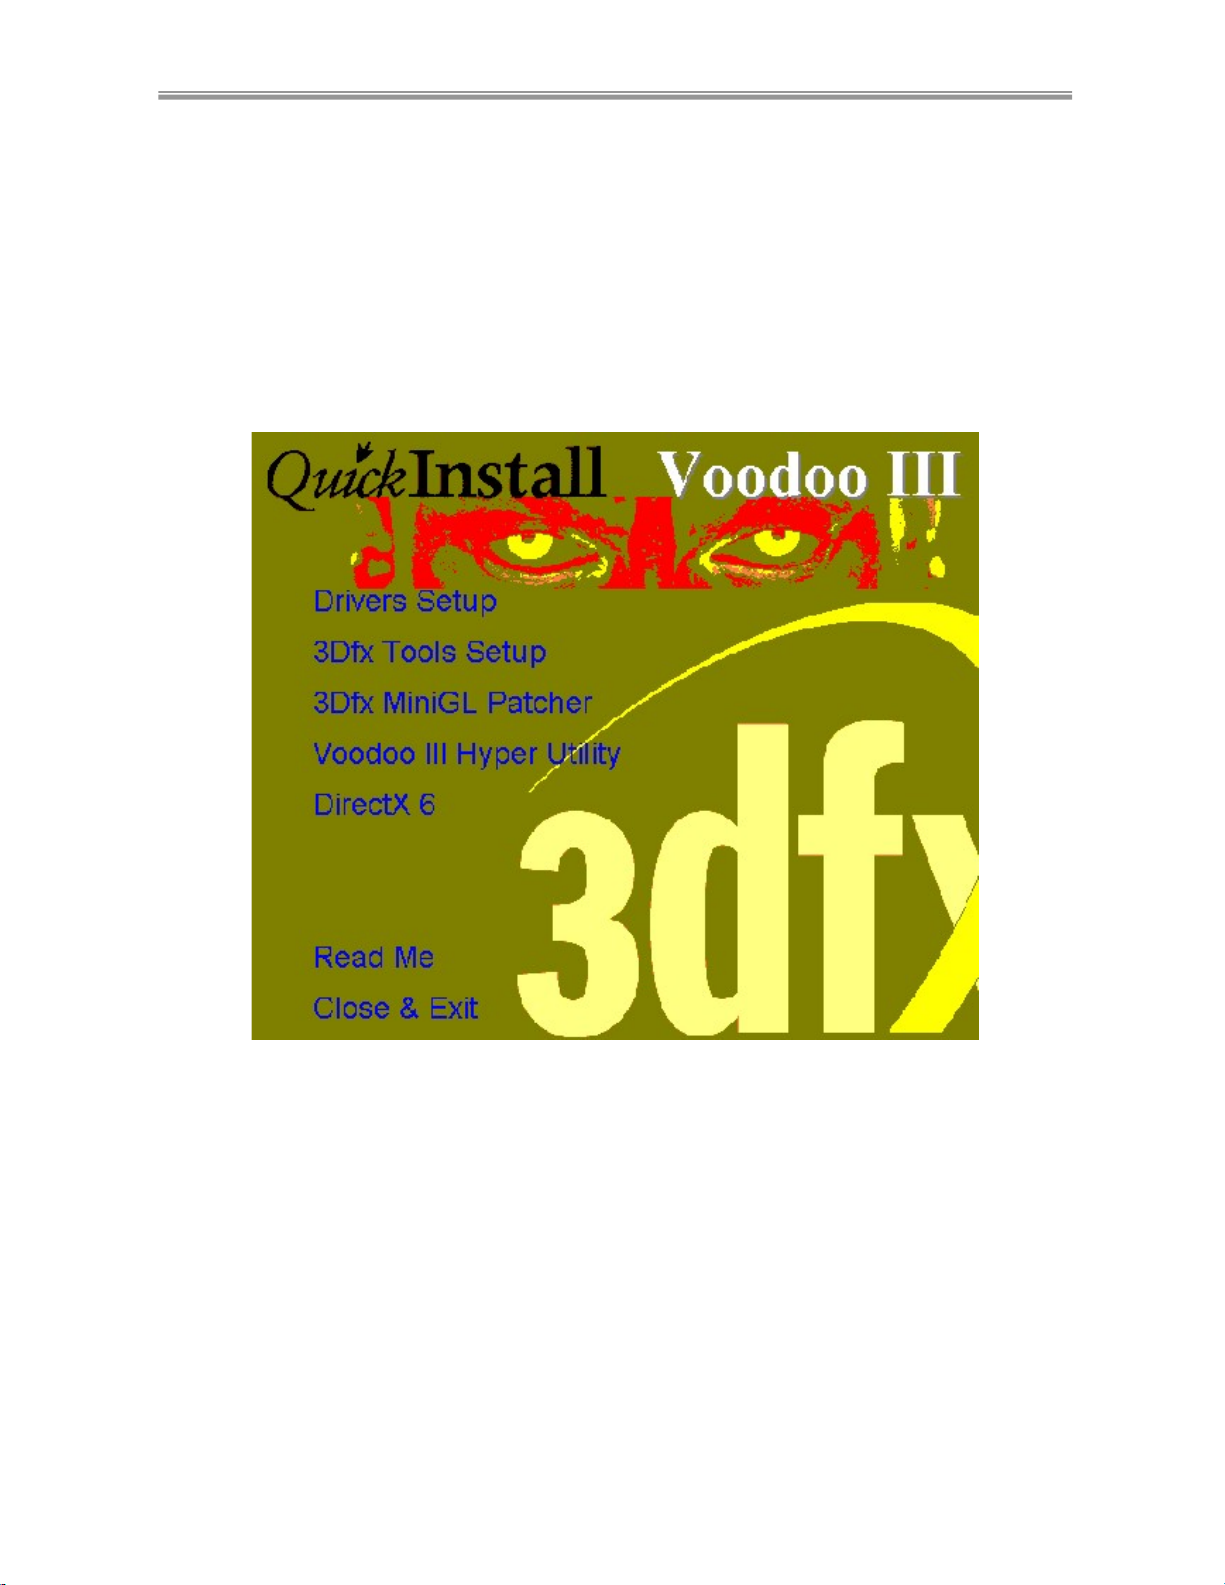
Step 9: After installing “Voodoo3 Display Driver”, it is also strongly
recommended that you should install the useful multimedia programs already
provided in the Utility CD.
Insert the Voodoo3 Utility CD into your CD-ROM and click it to enter the CD
main menu. All programs provided therein are Win 95/98 compatible and can be
easily set up with a few clicks. Just click and install the one you like.
17
Page 20
Chapter 3 Installation Voodoo3 VGA Card
3-3 Voodoo3 Driver Installation on WIN NT 4.0/5.0
After Voodoo3 VGA Card has been properly installed to your mainboard, you
could then go to Voodoo3 Driver installation on your Win NT 4.0/5.0.
Step 1 With your VGA Card installed and NT system started, insert the Voodoo3
Utilities and Driver Installation CD into the CD-ROM Drive to go to autorun setup.
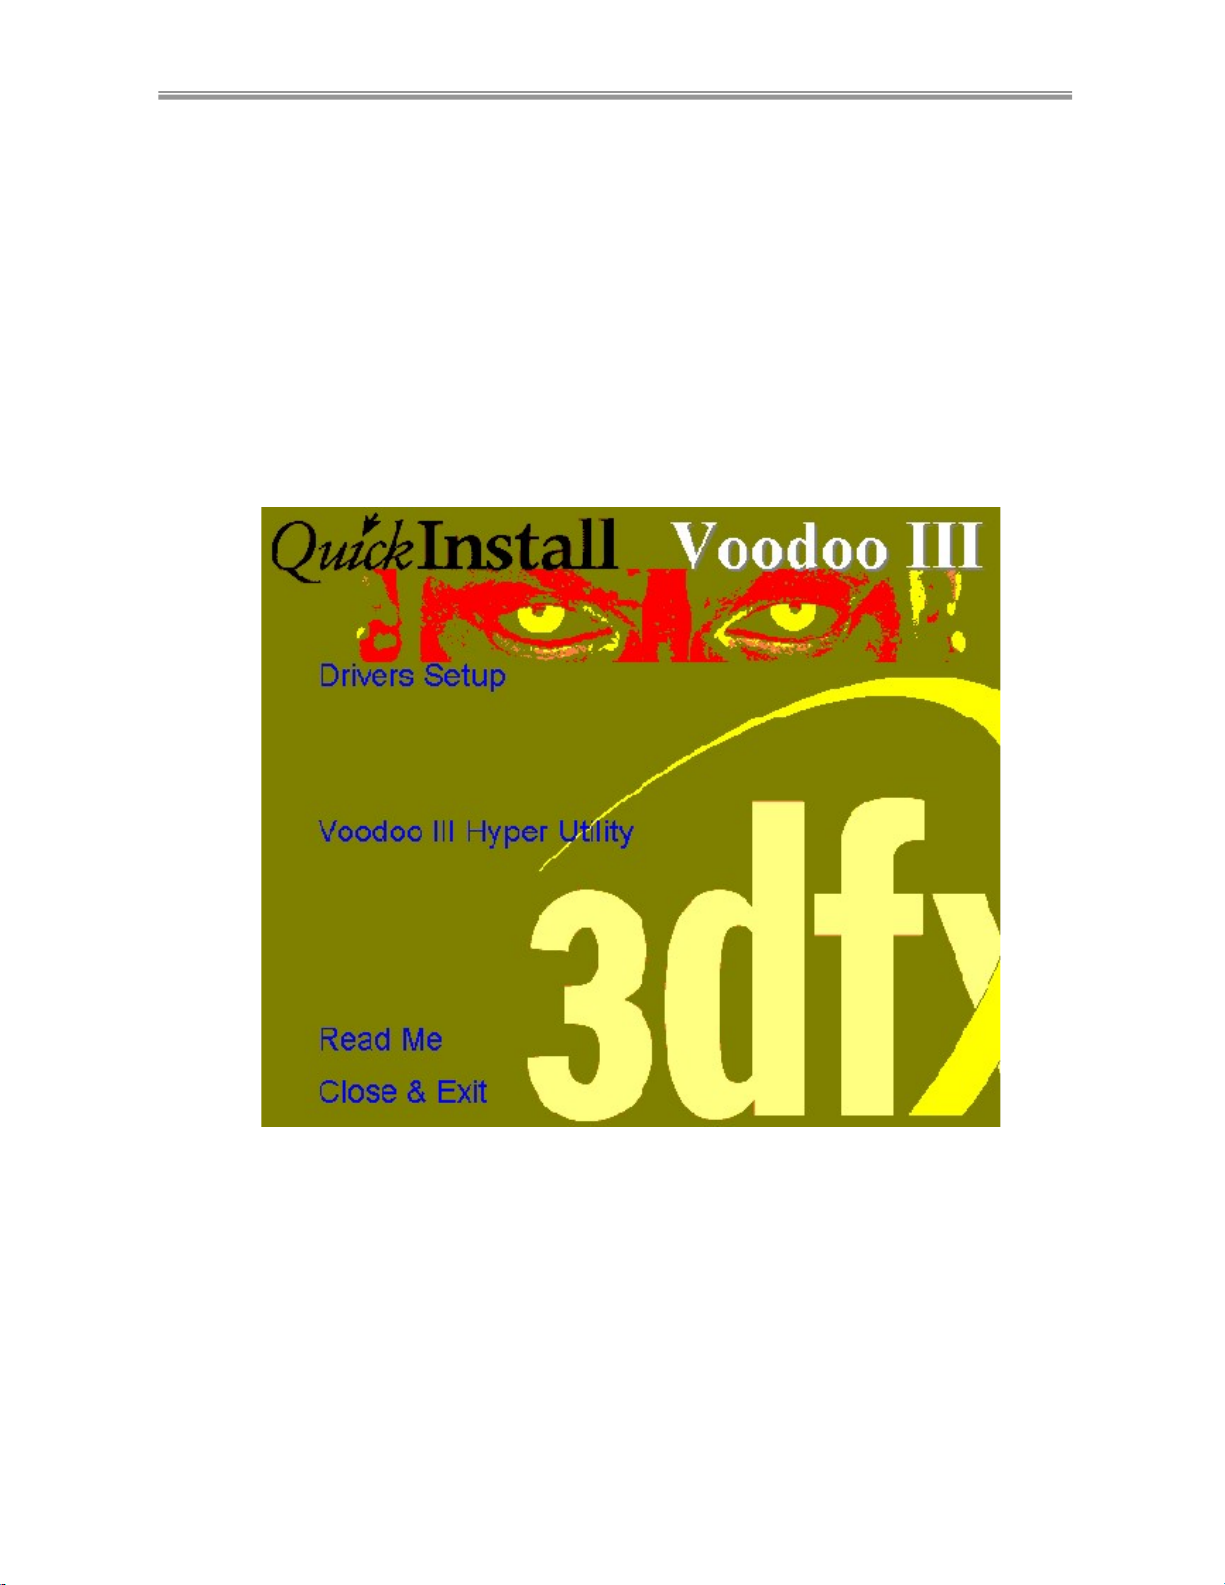
Step 2 In a second after insertion of the Utility and Driver CD, the “Quick
Install Voodoo III” main menu will show up as below:
18
Page 21
Voodoo3 VGA Card Chapter 3 Installation
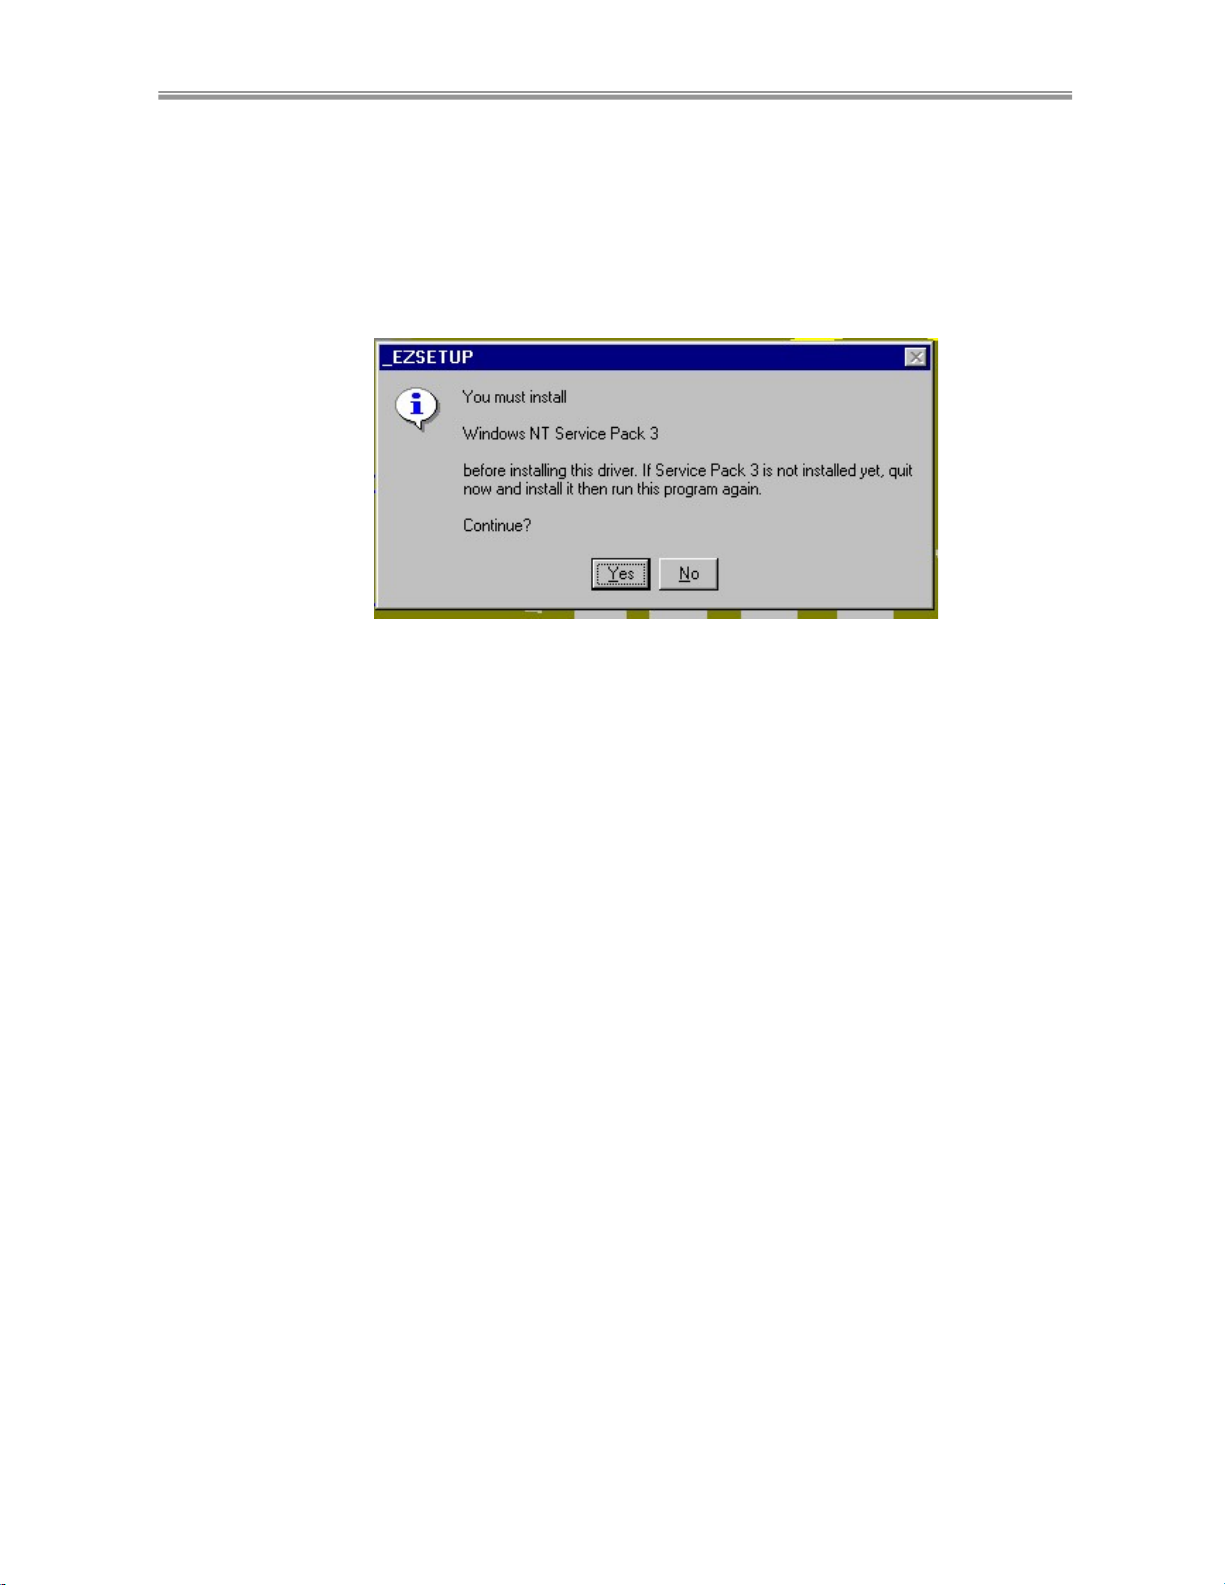
Step 3 Click “Drivers Setup” to install driver for Win NT. Instantly, a dialog box
appears on screen, advising user to install Windows NT Service Pack 3 before
setting up Voodoo3 driver. The dialog is a reminder. If you choose to install
Voodoo3 driver right away, just click “Yes” to continue setup. You can install
Service Pack later.
Note: Windows NT Service Pack 3/4 is a utility program containing
Windows NT 4.0 system update utility and Microsoft Windows Media Player
utility. It supports and updates most of the multimedia utility drivers.
19
Page 22
Chapter 3 Installation Voodoo3 VGA Card
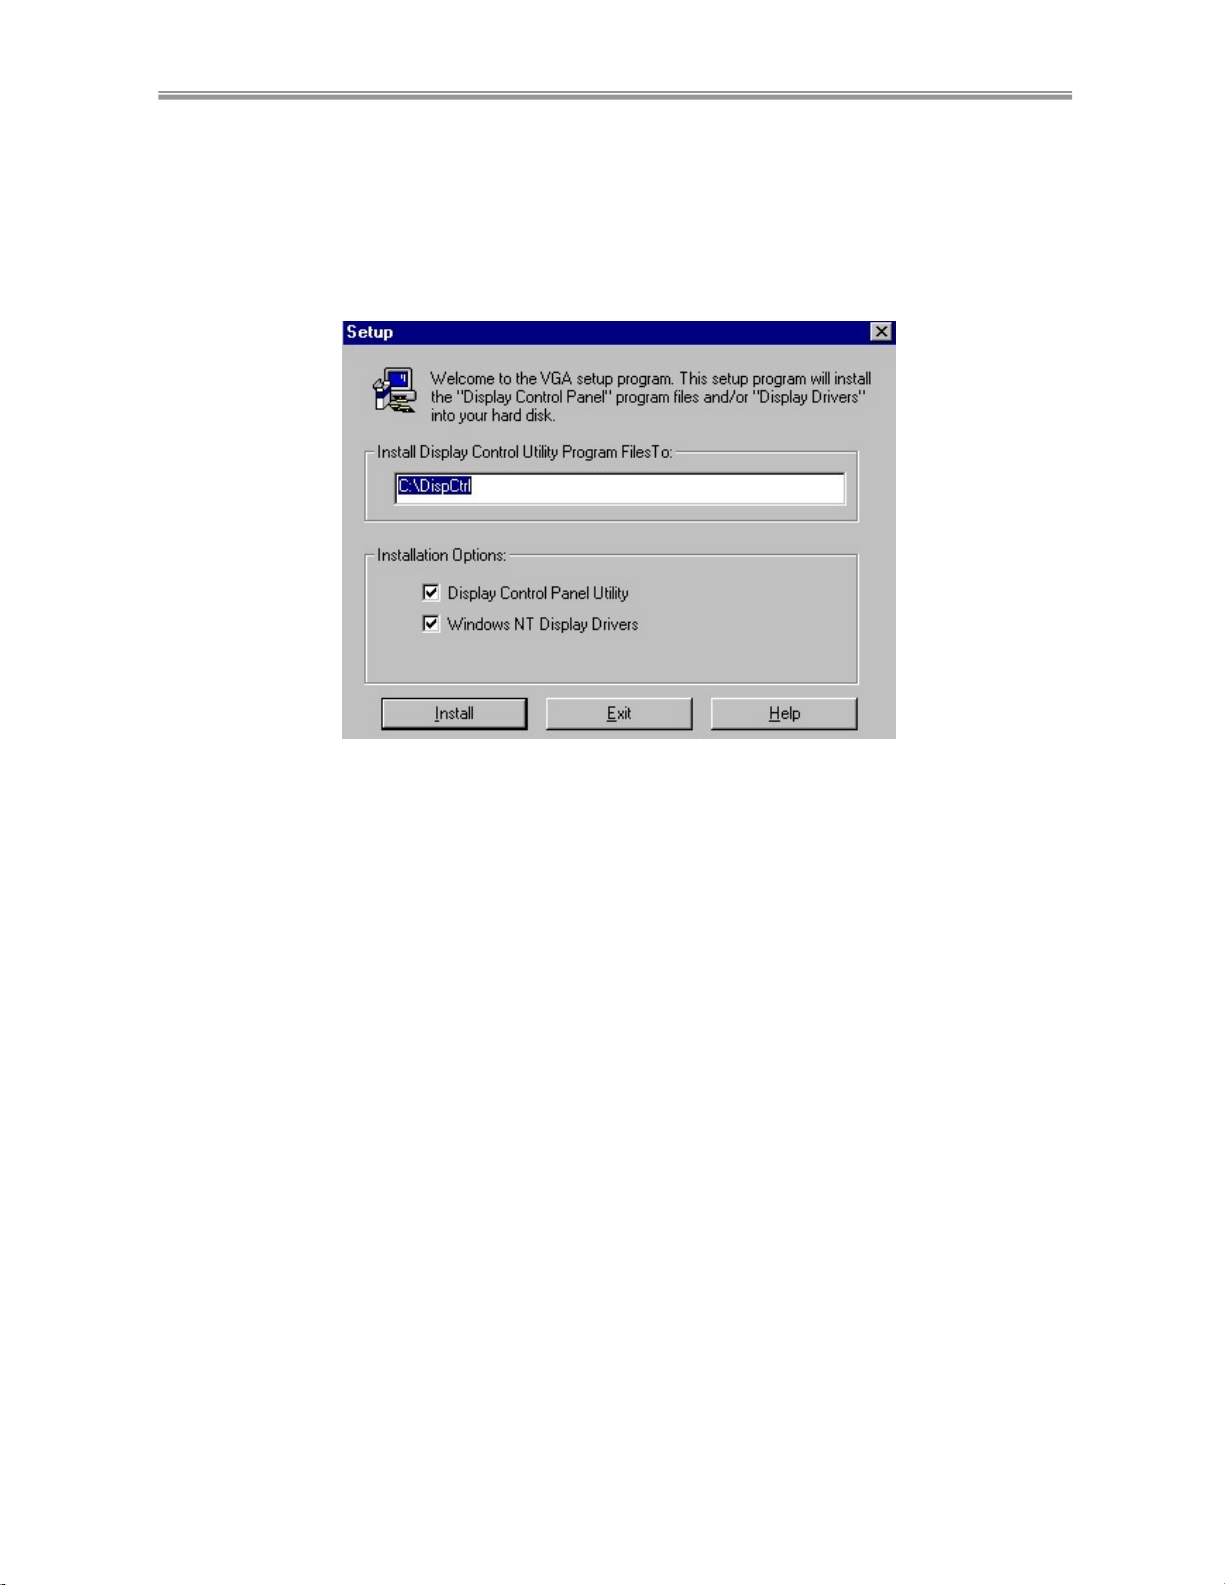
Step 4 After clicking “Yes” to continue setup, you can instantly see another dialog
box to lead you through the “ Display Control Panel Utility” and “Win NT display
Driver” installation:
20
Page 23
Voodoo3 VGA Card Chapter 3 Installation
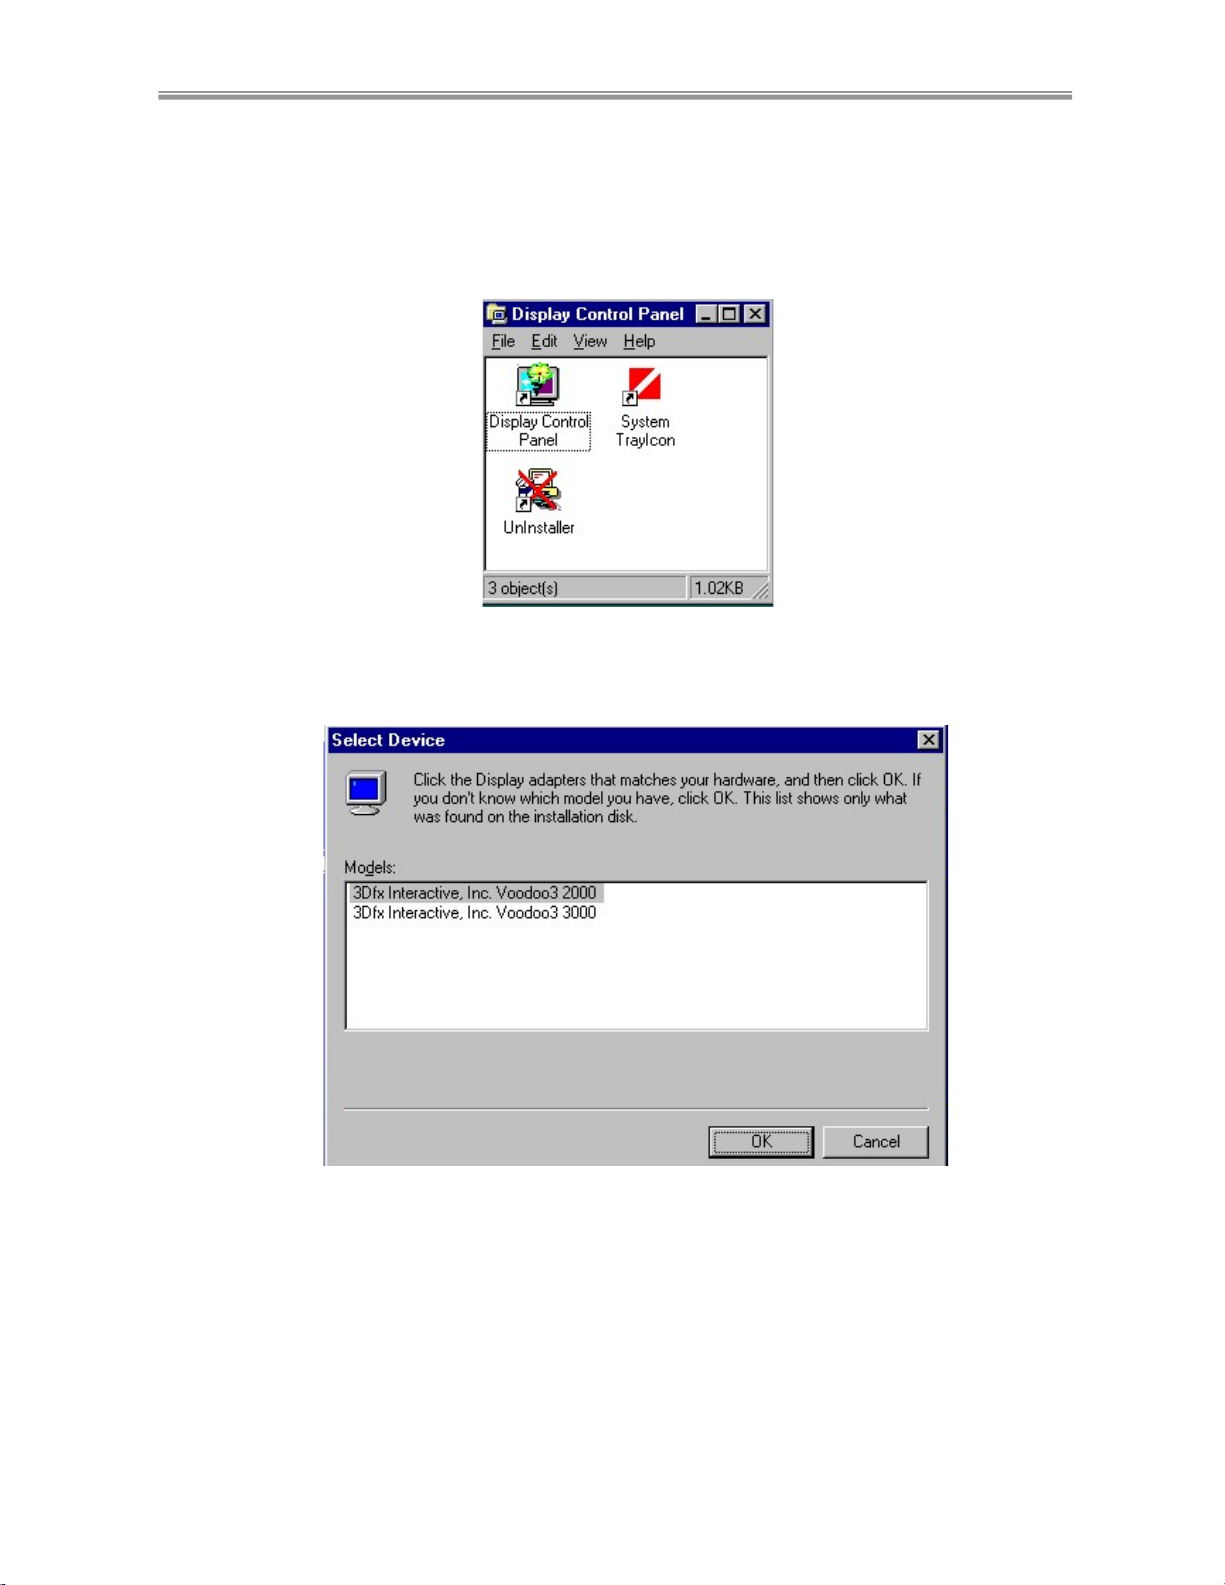
Step 5 When “Display Control Panel” installation is complete, the corresponding
icons will appear for a second and the screen will then switch to the “Select Device”
display. Click “OK” on the “Select device” screen to finish “Display Control
Panel”.
21
Page 24
Chapter 3 Installation Voodoo3 VGA Card
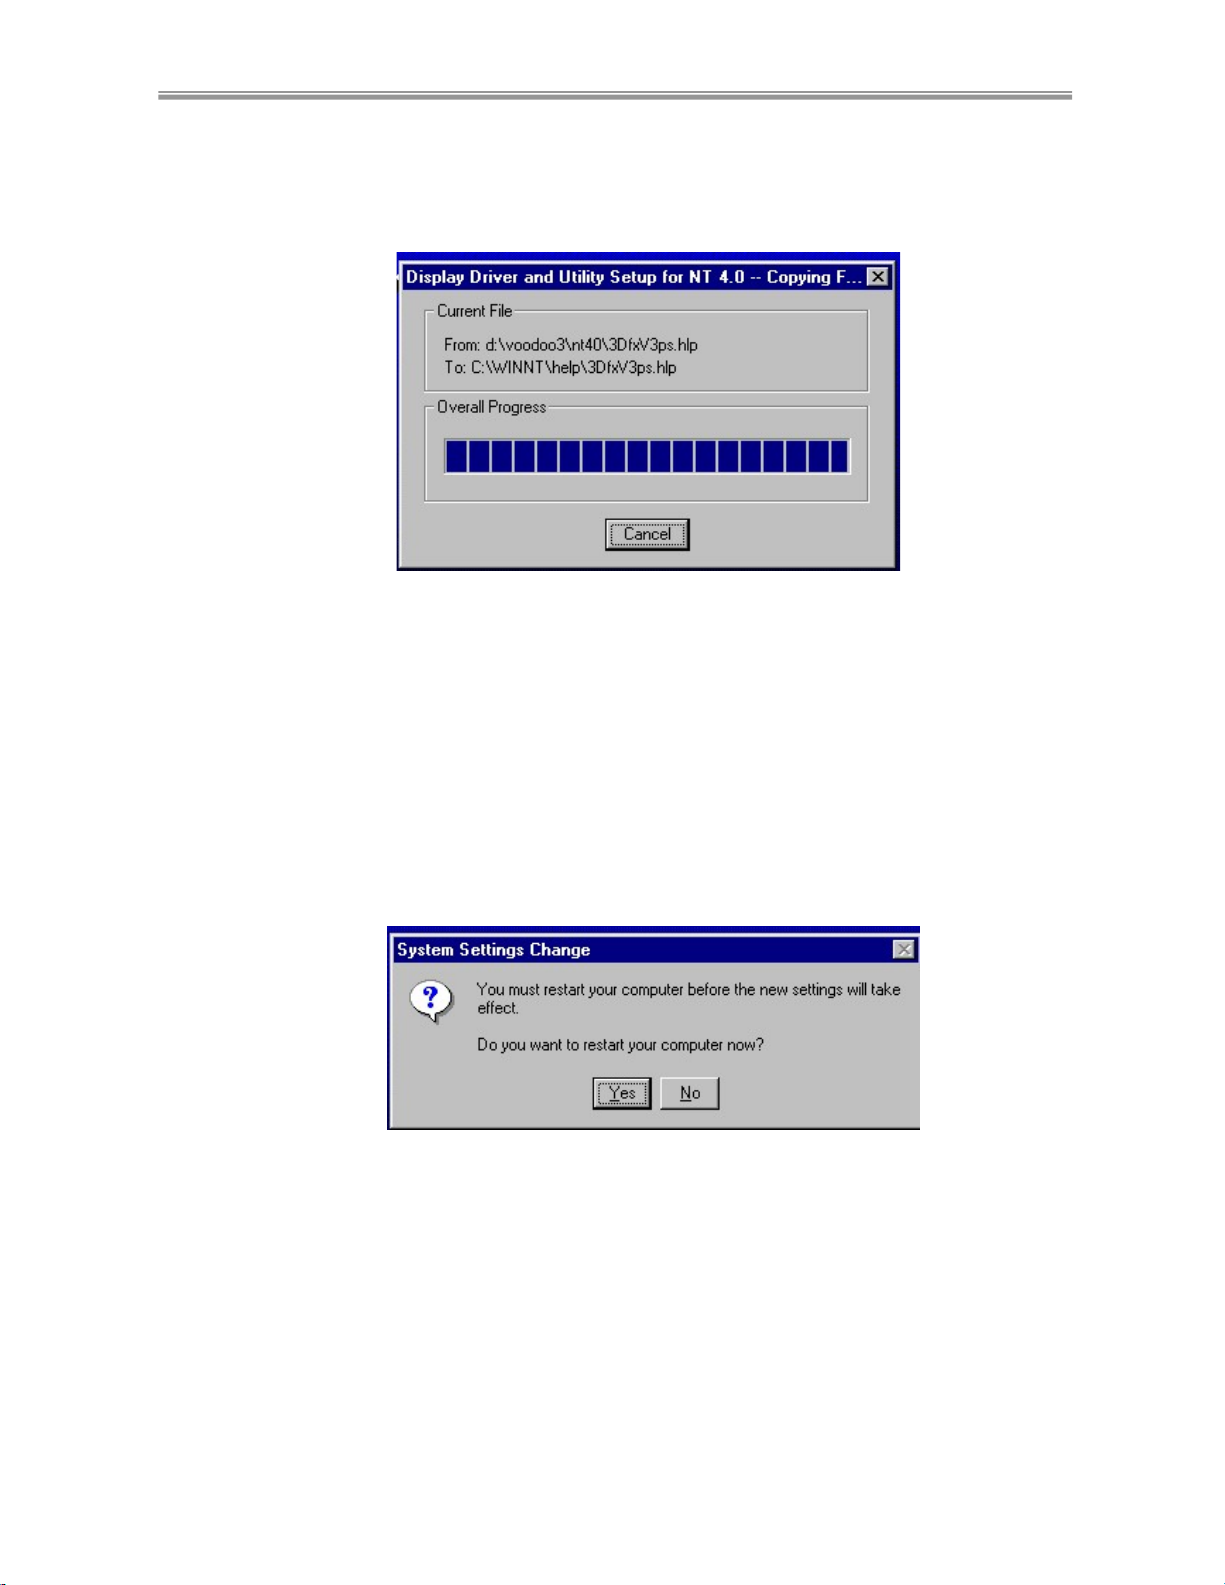
Step 6 After “Display Control Panel” installation is complete, the Setup Program
will automatically start “Copying files” for Voodoo3 driver setup.
Step 7 In a second, the “copying files” finishes, and the “System Settings Change”
screen will appear to remind you to restart your computer now.
Click “Yes” to let the new settings take effect.
Congratulations! You have successfully installed the Voodoo3 Driver on your
Windows NT 4.0/5.0.
22
 Loading...