

3B Medical Siesta User Manual

1 2 3
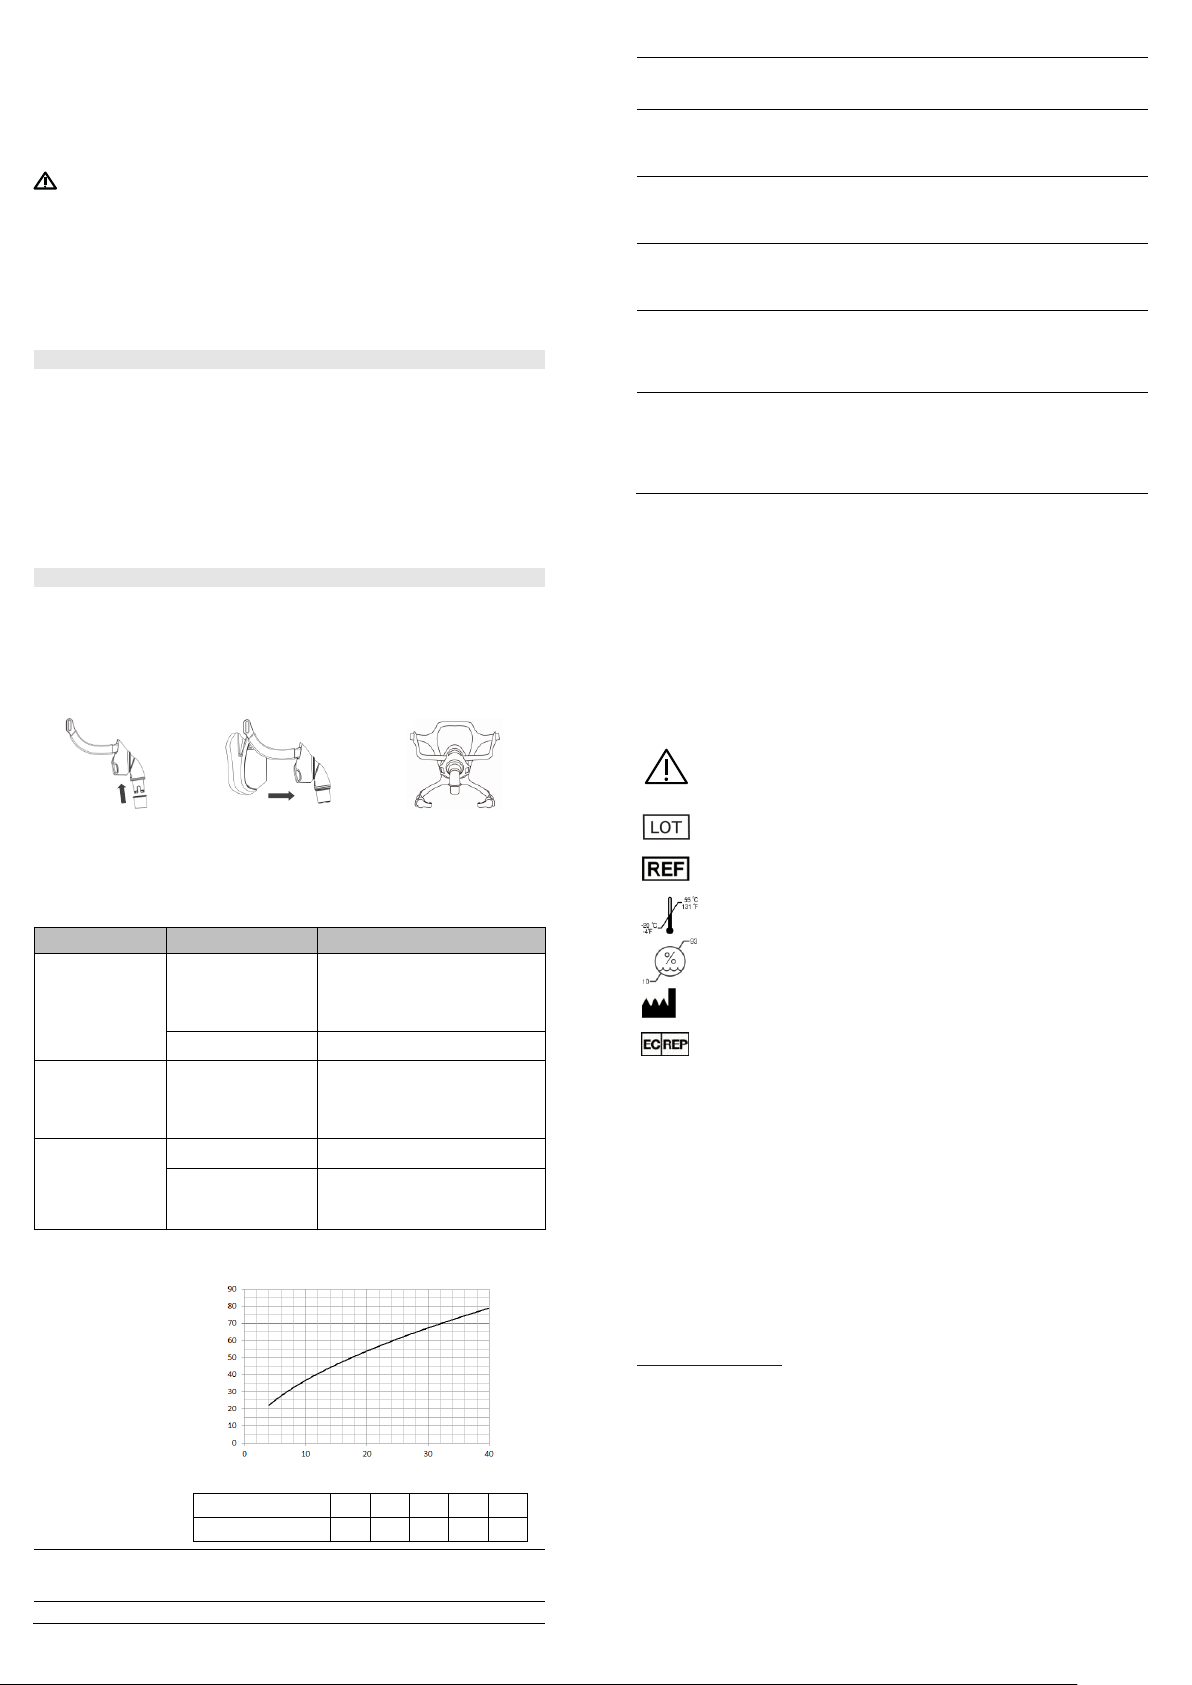
Pass the upper straps of
the headgear through the
slot of the mask arm as
shown in the figure and
secure it, repeat the
process with the lower
straps to join the headgear
clip.
Place the mask on the
face and extend the
headgear to the back of
the head / Please confirm
that the label on the back
of the headgear faces
outward when the
headgear is worn.
Bring the lower-half
straps beneath the ear
and insert the clips into
the fixed hook on the
lower part of the mask
frame.
4
5
6
Extend the upper straps of
the headgear as shown in
the above figure until the
mask is fixed properly.
Repeat the process for the
lower-half of the headgear
as shown in the above
figure until the mask is
fixed properly.
Connect the air tubing
to the swivel. Then turn
on the device and
adjust the mask to the
correct position.
1 2 3
Undo and remove the
upper-half headgear
straps out of the slot on
the mask frame.
Remove the cushion from
the mask frame.
Remove the Swivel from
the Elbow.
Headgear
Soft Sleeves
Clips
Valve
Swivel
Cushion
Elbow
Connector
Panel
H (mm)
Size
80 ≤ H ≤ 90
S
90 < H ≤ 100
M
100 < H ≤ 115
L
H
Frame
Siesta Full Face Mask
User Manual
Components of the Siesta Full Face Mask
eating or drinking for three hours before using the mask. This mask is not
recommended if the patient is taking a prescription drug that may cause
vomiting.
• Do not use the mask without the Non-Rebreathing Valve in place.
• Not applicable for silicone-allergy user.
• This mask should not be used on patients who are uncooperative,
obtunded, unresponsive, or unable to remove the mask.
• Follow all precautions when using supplemental oxygen.
• Oxygen flow must be turned off when the flow generator is not operating,
so that unused oxygen does not accumulate within the flow generator
enclosure and create a risk of fire.
• At a fixed flow rate of supplemental oxygen flow, the inhaled oxygen
concentration varies, depending on the pressure settings, patient
breathing pattern, mask, point of application and leak rate.
• The technical specifications of the mask are provided for your clinician to
check if it is compatible with the flow generator. If it is used beyond
technical specifications or used with incompatible devices, the seal and
comfort of the mask may not be effective, optimum therapy may not be
achieved, and leak, or variation in the rate of leak, may affect the function
of the flow generator.
• Stop using the Siesta Full Face Mask and consult your physician or sleep
therapist, if you have ANY adverse reaction to the use of the mask.
• Refer to your flow generator manual for details on settings and
operational information.
Getting the Right Cushion Size
• The following drawing describes the different features of the face and the
length of the face (H) you need to measure.
• The masks are available in three different sizes.
• Choose the appropriate size according to the table below.
Components of the Siesta Full Face Mask
Siesta Full Face Mask
Thank you for choosing 3B Medical’s Siesta Full Face Mask. The mask is
designed to minimize contact with your face, thus ensuring that you feel
comfortable during therapy. This user manual provides you with the
information you need for the correct use of your mask.
The Mask contains no natural rubber latex.
Intended Use
The Siesta Full Face Mask channels airflow non-invasively to the patient from
a positive airway pressure device such as a continuous positive airway
pressure (CPAP) or bi-level system.
The Siesta Full Face Mask is:
• To be used by adult patients (> 66 lb / 30 kg) for whom positive airway
pressure therapy has been prescribed.
• Intended for single-patient reuse.
CAUTION: In the US, Federal law restricts the sale of this device to sale by or
on the order of a physician.
Contraindications
This mask should be used with caution for patients with following conditions:
• Facial deformity.
• Injured facial skin which will contact with the mask during use.
Getting the Right Cushion Size
Fitting the Mask
Use a standard conical connector if pressure readings and / or supplemental
oxygen are required.
Before Using the Mask
WARNINGS
• The vent holes must be kept clear.
• This mask should only be used with CPAP or bilevel devices
recommended by a physician or respiratory therapist.
• Explanation of Warning: CPAP systems are intended to be used with
special masks with connectors which have vent holes to allow continuous
flow of air out of the mask. When the CPAP machine is turned on and
functioning properly, new air from the CPAP machine flushes the exhaled
air out through the attached mask exhalation port. However, when the
CPAP machine is not operating, enough fresh air will not be provided
through the mask, and exhaled air will be rebreathed. Rebreathing of
exhaled air for longer than several minutes can, in some circumstances,
lead to suffocation. This warning applies to most models of CPAP systems.
• At low CPAP pressures, the flow through the exhaled port may be
inadequate to clear all exhaled gas from the tube. Some rebreathing may
occur.
• To minimize the risk of vomiting during sleep, the patient should avoid
Disassembling the Mask
Notes:
1. The elbow assembly cannot be dissembled from the frame assembly.
2. The valve cannot be dissembled, or damage may be incurred and the
re-installation will become more difficult.
Cleaning the Mask at Home
1 2 3
Install the forehead pad
onto the upper-half
installation groove of
the mask frame.
Install the Cushion onto
the Frame and confirm
that the Cushion is
reliable.
Install the upper-half
headgear onto the
upper-half installation hole
of the mask frame.
Problem
Possible Reason
Possible Solution
Mask won’t seal
properly or is
uncomfortable.
Mask may have been
fitted incorrectly.
Carefully follow instructions in
“Fitting the Mask” section. Make
sure the headgear is not
over-tightened.
Mask size is wrong.
Consult your clinician.
Mask leaks around
the face.
The cushion is
misplaced on the
cushion frame.
Check insertion of the cushion and
reinsert correctly according to the
instructions in “Reassembling the
Mask” section.
Mask is too noisy.
Mask size is wrong.
Consult your clinician.
Vents are blocked or
partially blocked.
Clean the vents according to the
instructions in “Cleaning the Mask
at Home” section.
Pressure–Flow Curve
Pressure(cmH2O)
3
12
22
31
40
Flow Rate(L/min)
19
41
57
69
79
Dead Space
Information
Dead space is the empty volume of the mask up to the swivel.
The dead space of the mask varies according to cushion sizes
but is less than 225 mL.
Therapy Pressure
3 to 40 cmH2O
Resistance
Drop in Pressure measured (average for 3 sizes)
at 50 L/min: 0.15 cmH2O
at 100 L/min: 0.5 cmH2O
Inspiratory and
Expiratory Resistance
The inspiratory resistance of the mask (in combination with
the Non-Rebreathing Valve) is 1.8 cmH2O at 50 L/min.
The expiratory resistance of the mask (in combination with the
Non-Rebreathing Valve) is 2.0 cmH2O at 50 L/min.
The Non-Rebreathing
Valve
open-to-atmosphere
pressure
≤ 2.8 cmH2O
The Non-Rebreathing
Valve
closed-to-atmosphere
pressure
≤ 2.8 cmH2O
Sound
DECLARED DUAL-NUMBER NOISE EMISSION VALUES in
accordance with ISO 4871. The A-weighted sound power
level of the mask is 28 dBA, with uncertainty 3 dBA. The
A-weighted sound pressure level of the mask at a distance of
1 m is 20 dBA, with uncertainty 3 dBA.
Environmental
Conditions
Operating temperature: +5°C to +40°C (41°F to 104°F)
Operating humidity: 10% ~ 93% relative humidity
non-condensing
Storage and transport: -20°C to +55°C (-4°F to 131°F)
Storage and transport humidity: 10% ~ 93% relative
humidity non-condensing
Caution, consult accompanying documents.
Indicates a Warning or Caution and alerts you to a possible injury or
explains special measures for the safe and effective use of the
device.
Lot number
Catalog number
Temperature limitation
Humidity limitation
Manufacturer
Authorized Representative in the European Community
Flow Rate (L/min)
Mask Pressure (cmH
O)
Notes:
• The mask and headgear can only be cleaned through hand washing or
placed in the Lumin device.
• The elbow and the valve cannot be dissembled for washing.
CAUTIONS
• Do not use solutions containing bleach, chlorine, alcohol, aromatics,
moisturizers, antibacterial agents, or scented oils to clean any part of the
system or air tubing. These solutions may cause damage and reduce the
life of the product.
• Exposing any part of the system or tubing to direct sunlight or heat may
cause deterioration.
• If any visible deterioration of a component is apparent (cracking, crazing,
tears etc), the component should be discarded and replaced.
Daily / After Each Use
• Disassemble the mask components according to the disassembly
instructions.
• Thoroughly clean the separated mask components (excluding headgear),
by gently rubbing in warm (approx. 30°C) water using mild liquid
detergent (e.g., Alconox diluted at 1%) for up to 10 minutes.
• Use a soft bristle brush to clean the vent.
• Rinse all components well with drinking quality water and allow to air dry
out of direct sunlight.
• When all components are dry, reassemble according to the reassembly
instructions.
Weekly
Handwash the headgear and all components in warm (approx. 30°C) and
mild liquid detergent (e.g., Alconox diluted at 1%) for up to 10 minutes. Rinse
the components well with drinking quality water and allow them to air dry out
of direct sunlight before assembling.
Reassembling the Mask
Storage
Ensure that the mask is thoroughly clean and dry before storing it for any
length of time. Store the mask in a dry place out of direct sunlight.
Disposal
The mask does not contain any hazardous substances and may be disposed
of with your normal household refuse.
Symbols
System and Packaging
Technical Specifications
Technical Specifications
Limited Warranty
It is warranted that the Siesta Full Face Mask, including Frame assembly,
Cushion, Forehead pad, Headgear shall be free from defects in material and
workmanship for a period of ninety (90) days from the date of purchase by the
initial consumer.
To exercise the rights under this warranty, contact the local authorized
dealers.
The expected service life of Siesta Full Face Mask is one year.
For any questions or comments concerning this product or the warranty,
please contact:
3B Medical
203 Avenue A NW, Suite 300
Winter Haven, FL 33881
Email: info@3Bproducts.com
www.3Bproducts.com
391124 Issue date: August 6, 2019
 Loading...