

Page 1

INSTRUCTIONS
®
360 YDROP
ROGATOR
360 Y-DROP® REGISTRATION
Please visit productregistration.360yieldcenter.com
to complete the product registration for your
360 Y-DROP so we can better support our products
from day one and ensure you have the latest
upgrades, warranty parts and technical support.
Thank you!
360YIELDCENTER.COM
V1 11.30.2016
Page 2

INSTRUCTIONS
360 YDROP
ROGATOR
INTRODUCTION
Before beginning, it’s important to know where each mounting bracket fits relative
to the row spacing involved. The 360 Y-DROP unit should be precisely centered
on the machine, as this is critical to the assembly of the system to the sprayer and
for mounting the system to your sprayer boom. There are, however, many boom
variations among all sprayer models. Your sprayer may not be identical to the model
in the following steps of the guide, and the pictures may not exactly reflect your
model. While these steps will help you install most of your 360 Y-DROP system,
you may need to custom-fit some components with your particular boom.
RECOMMENDED TOOLS
Ratchet wrench with 1/2" and 9/16" deep well sockets
3/8" 12-point socket
1/2" and 9/16" combination wrenches
#2 Phillips screwdriver (for the shield installation)
TORQUE VALUES
Refer to these torque values when tightening all fasteners
Call our Product Support team at 888-512-4890
5/16" stainless U-bolt 15 ft/lbs
5/16" stainless Set screw 15 ft/lbs
3/8" carbon U-bolt 35 ft/lbs
5/16" carbon U-bolt 30 ft/lbs
5/16" carbon Stop bolt 30 ft/lbs
QUESTIONS
2
Page 3

INSTRUCTIONS 360 YDROP
RO GATOR
I.
ESTABLISH
DROP LOCATIONS
Figures 1 and 2
Step 1 Locate the center of the machine and
identify the location of all the drops. On
the sprayer boom, mark where each riser
mount will be located. This will ensure
that the extension tubes will not interfere
with the riser mounts.
Figure 3
Step 2 For the primary boom; starting at the
wing fold pivot pin, measure out and
make marks at 61", 131", 190", 256"
and 310" (all measurements are ±5").
Repeat for the other primary boom.
Figure 1
Figure 2
Figure 3
61"
131"
190"
256"
310"
360YIELDCENTER.COM
3
Page 4
INSTRUCTIONS 360 YDROP
RO GATOR
II.
INSTALL MOUNT ASSEMBLIES
ON THE OEM PRIMARY BOOM
NOTE: It is only on the 120' booms that the center
section wet boom is below the OEM boom. On the
80', 90' and 100' booms, the wet boom is positioned
higher. Keep this is mind, as the pictures that follow
may not exactly match your equipment. This will not
aect the installation of the 360 Y-DROP brackets.
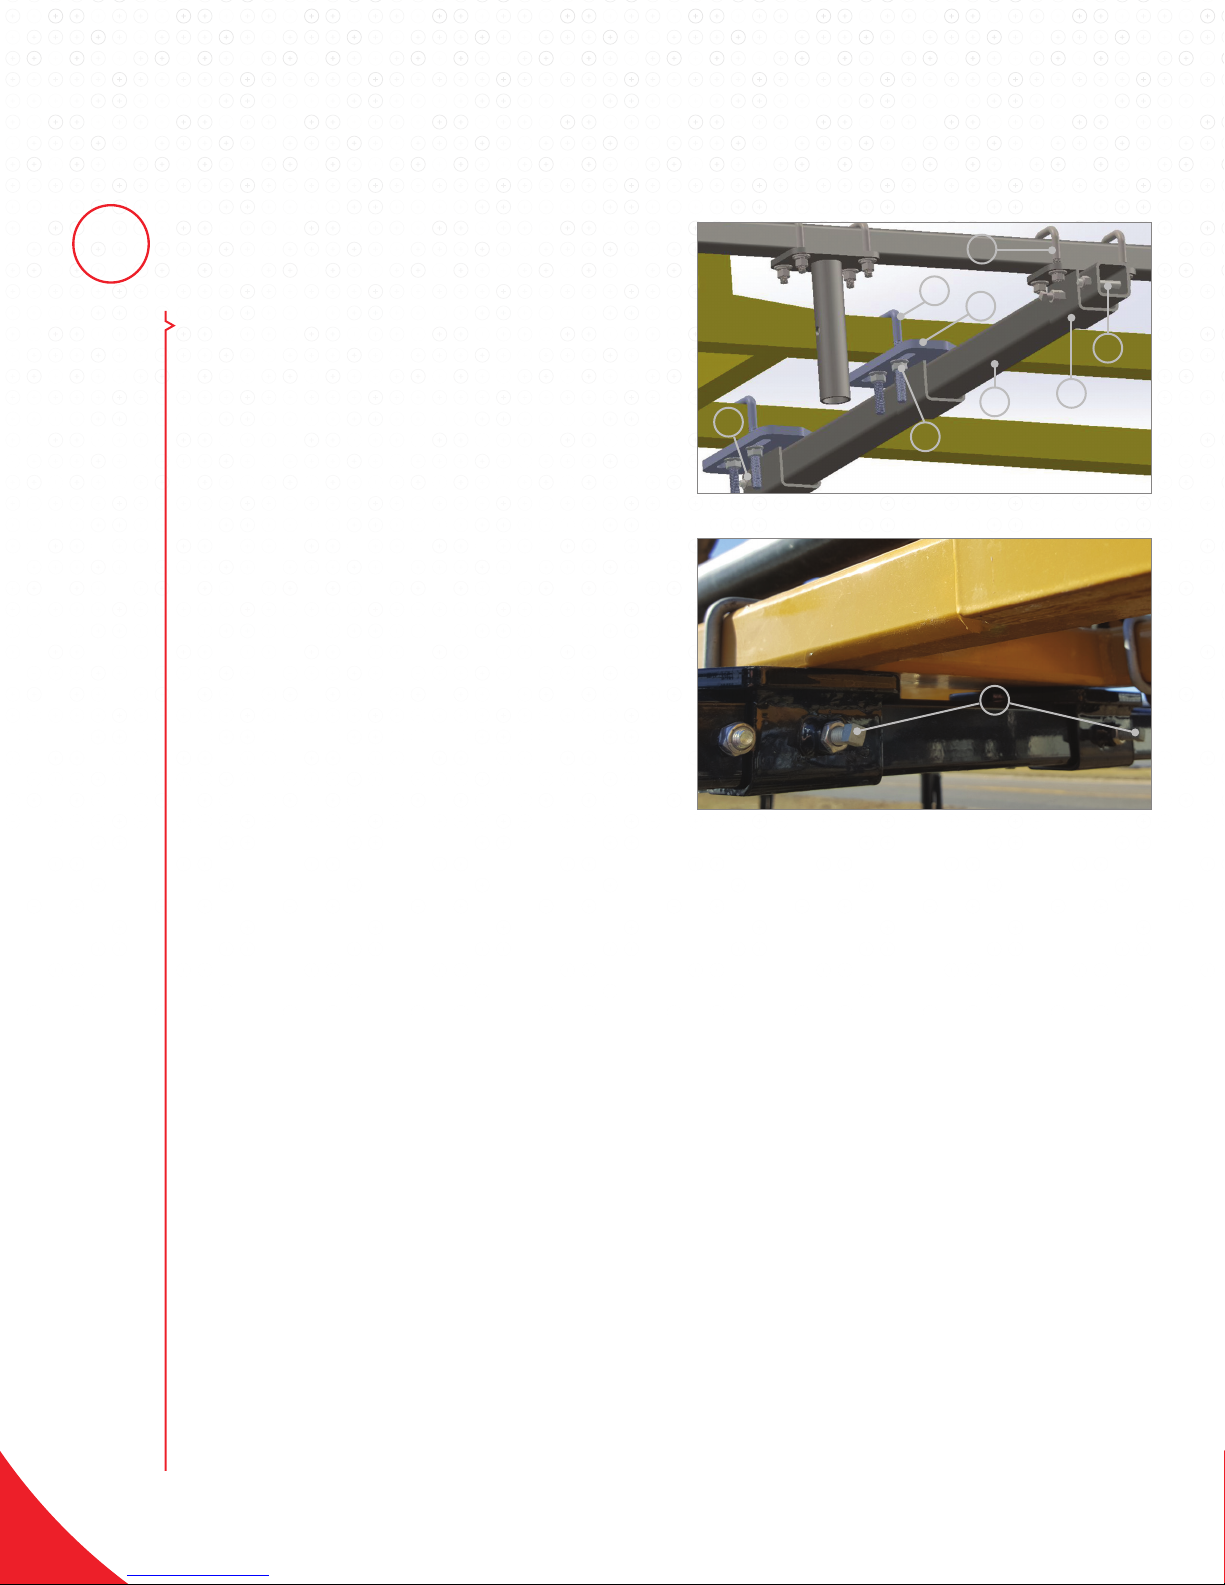
Figure 4
Step 1 With the threads pointing down, install
U-bolt (1) on the top of the OEM primary
boom.
Primary Booms:
Rogator 80, 90, 100 - Use Bag AD and Bag AJ
Rogator 120 - Use Bag AD
Step 2 Install bracket assembly (2) and flange
lock nut (3).
Hardware Kit D
7
Figure 4
Figure 5
6
1
2
7
4
5
3
1
Repeat Steps 1 and 2 for the other OEM mount
bracket kit.
Step 3 Install extension tube (4).
Step 4 Install boom bracket (5) onto the
extension tube.
Step 5 Install square U-bolts (6), the 5/16" extra
thick washers and the 5/16" nuts.
Hardware Kit A
Step 6 Install stop bolts (7) at both the front
and the rear of the extension tube.
Hardware Kit B
Figure 5
Step 7 Install stainless steel set screw and jam nut
assembly (1) onto the bracket assemblies.
Hardware Kit D
Repeat Steps 1-7 for the remaining mount
assemblies on the OEM primary boom.
360YIELDCENTER.COM
4
Page 5
INSTRUCTIONS 360 YDROP
RO GATOR
III.
INSTALL CENTER SECTION
SQUARE TUBE
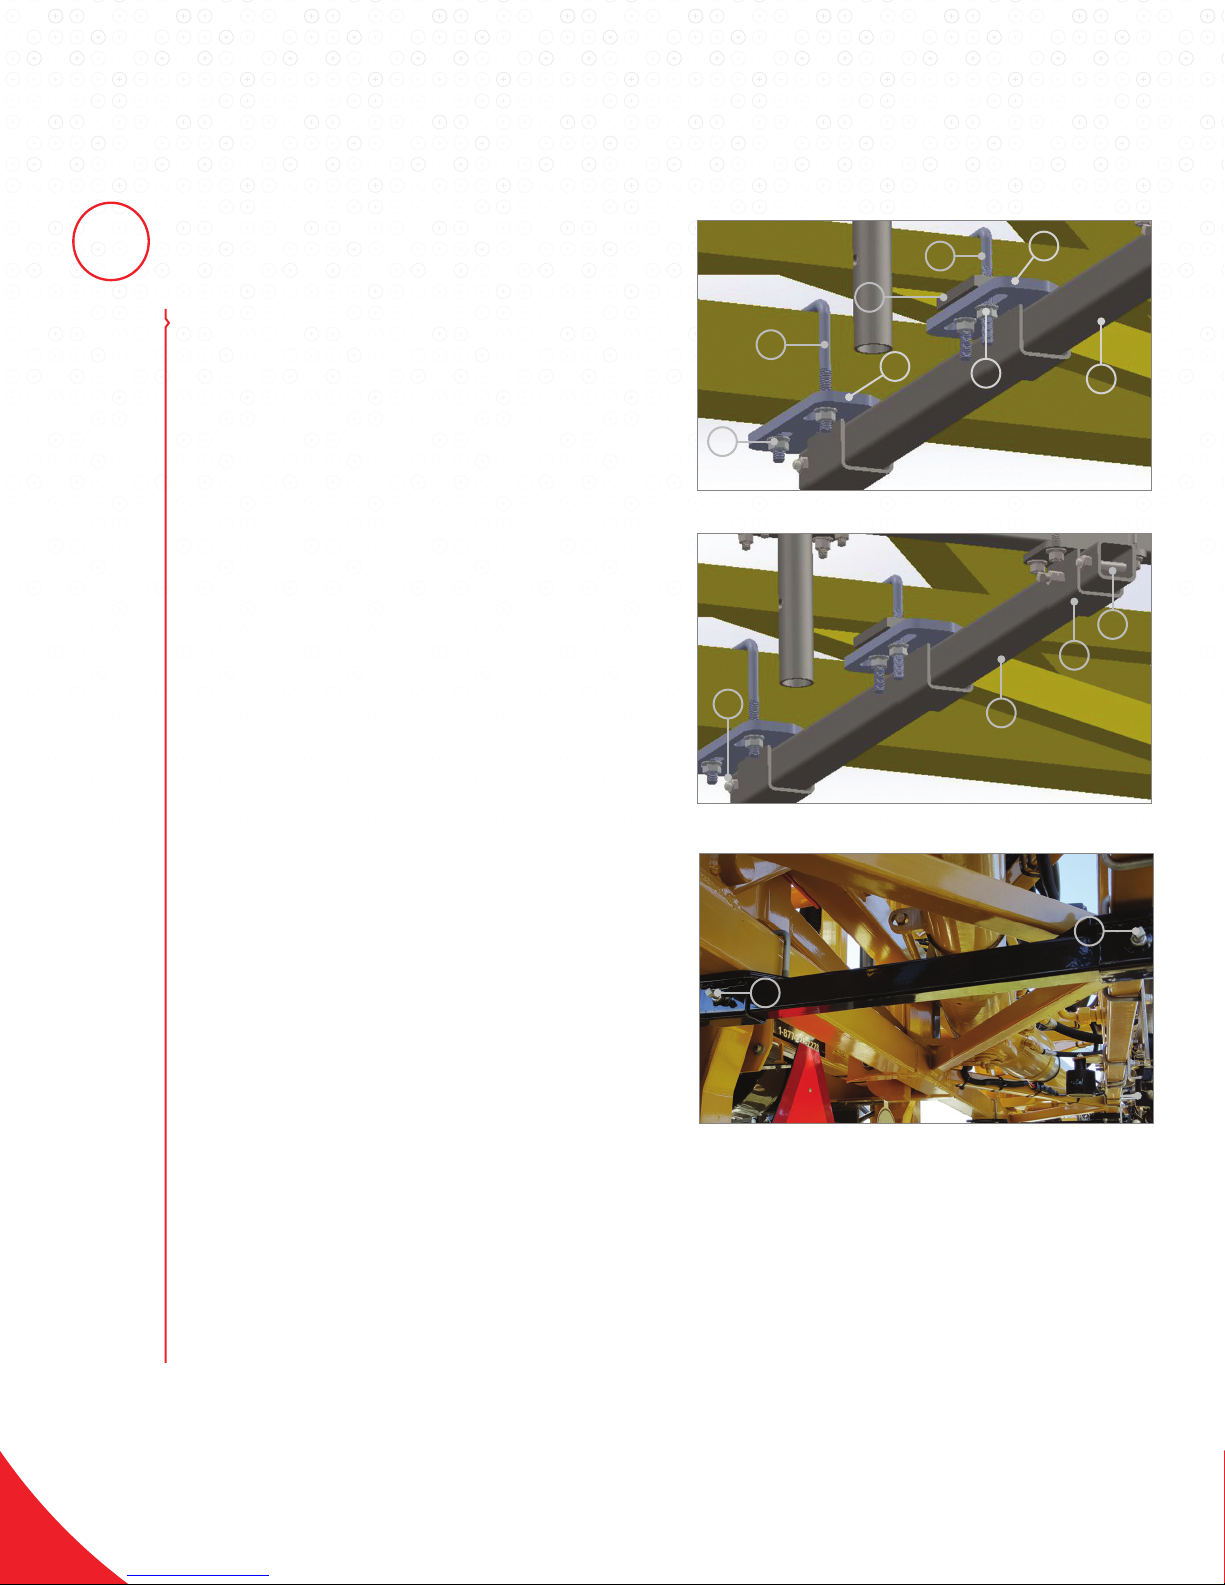
Figure 6
Step 1 With the threads pointing down, install
square U-bolt (1) on the front OEM center
section boom.
Center Section:
Rogator 80, 90, 100 - Use Bag AD and Bag AJ
Rogator 120 - Use Center Section Kit
Step 2 Position bracket assembly (2) and install
3/8" flange nuts (3).
Step 3 With the threads pointing down, install
square U-bolt (4) on the rear OEM
center section boom.
Step 4 Install adapter plate (5) and 3/8" flange
nuts (6).
3
Figure 6
3
4
2
5
1
2
6
7
3
1
2
Step 5 Install extension tube (7) onto bracket
assembly (2).
Figure 7
Step 6 Install boom bracket (1) onto extension
tube (2).
Bag BB
Step 7 Install stop bolt assemblies (3).
Step 8 Install stop bolts (3) at both the front and
the rear of the extension tube.
Repeat Steps 1-8 for the other center section mount.
Figure 8
Step 9 Install stainless steel set screw and
jam nut assembly (1) onto the bracket
assemblies.
Hardware Kit D
Figure 7
1
1
Figure 8
360YIELDCENTER.COM
5
Page 6
INSTRUCTIONS 360 YDROP
RO GATOR
IV.
INSTALL 360 YDROP
BOOM
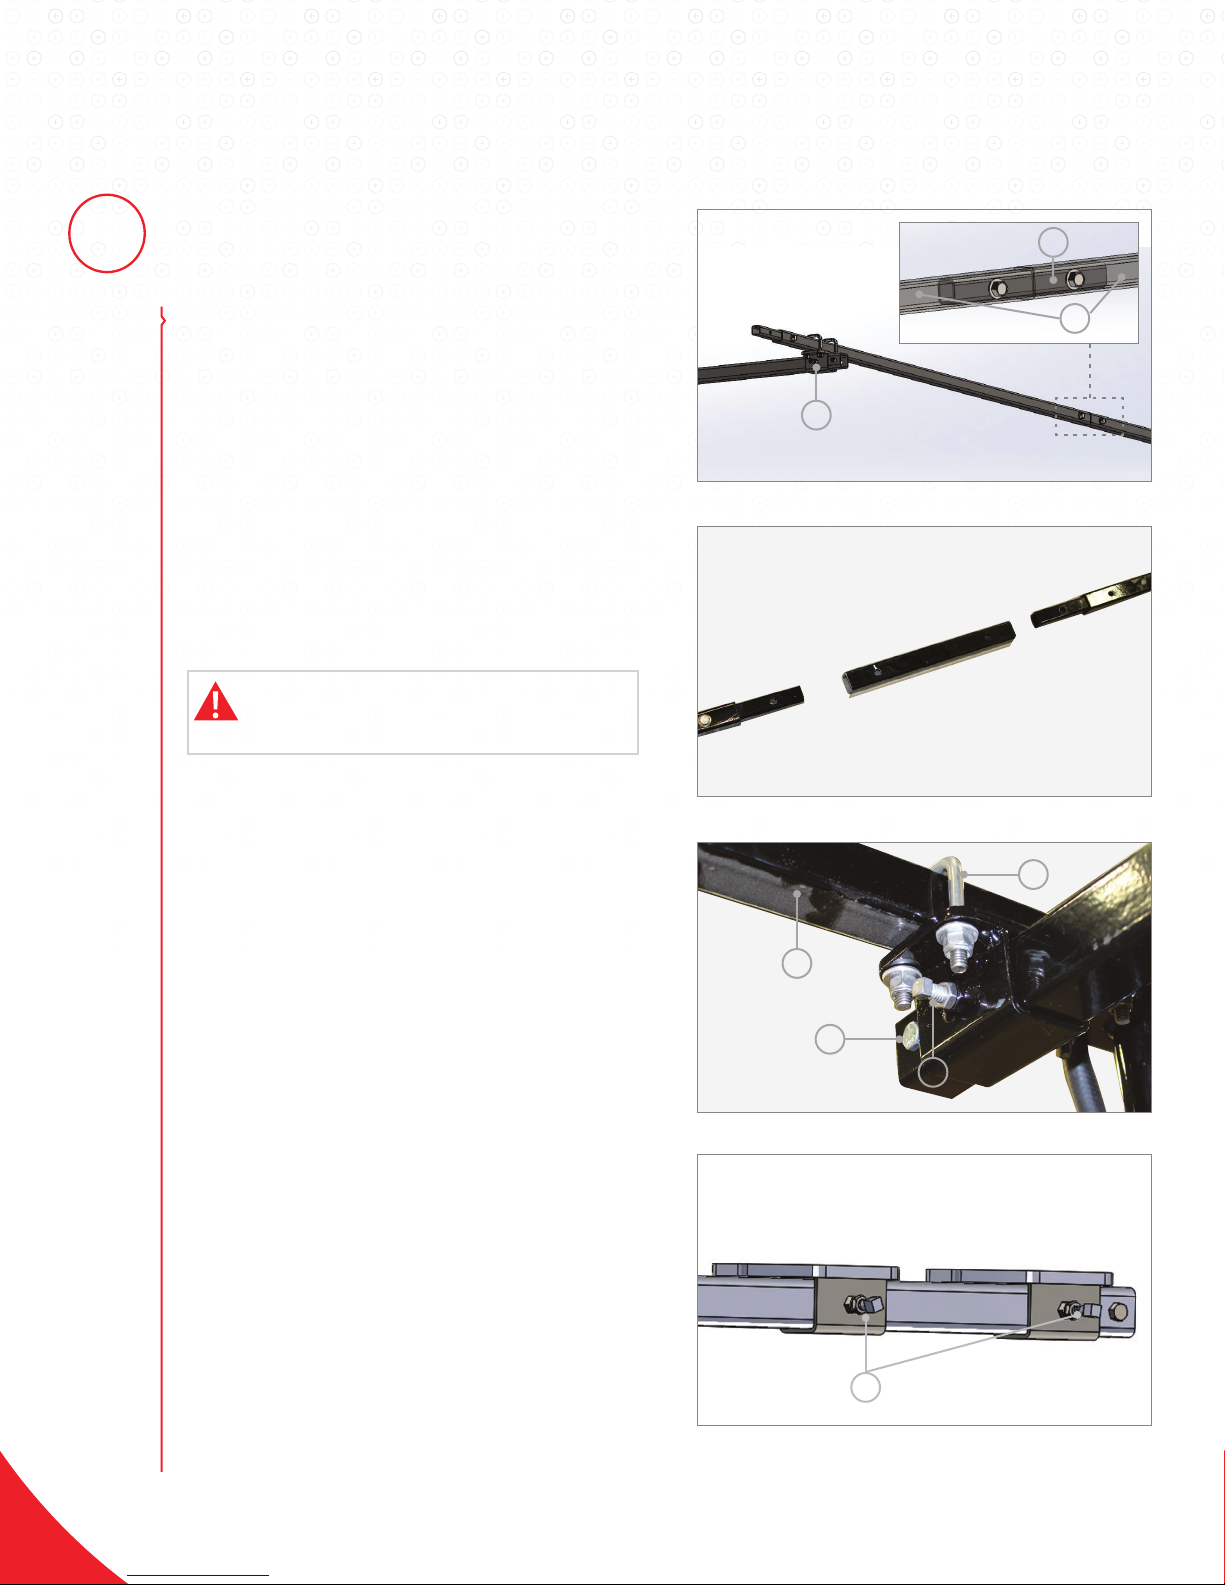
Figure 9
Step 1 Assemble 5' boom sections (1) using the
8" boom connectors (2) and the supplied
hardware.
Hardware Bag CC
Step 2 Repeat Step 1 as needed in order to
assemble the entire 360 Y-DROP boom.
Step 3 Set the 360 Y-DROP boom assembly
onto boom bracket (3).
Repeat Steps 1 -3 for the remaining boom assemblies.
CAUTION: The 360 Y-DROP boom assembly may
weigh up to 150 lbs. (68 kg). Exercise caution and
Figure 10
Step 4 In order to span the full length of the
Figures 11 and 12
Step 5 Install square U-bolt (1), the 5/16" extra
enlist help for this process.
center section 360 Y-DROP boom, you
will need to cut and drill one of the 5'
boom sections to 1'. Mount this 1' section
between two full 5' boom sections. Drill a
7/16" through hole centered 2" from the
outside edge.
thick washers, and the 5/16" nuts over
the 360 Y-DROP boom (2).
Hardware Kit A
2
1
3
Figure 9
Figure 10
1
2
3
4
Figure 11
Step 6 Install stop bolt (3) at both the front and
the rear of the extension tube. Repeat for
remaining stop bolts.
Hardware Kit B
Step 7 Install stainless steel set screw and
jam nut assembly (4). See Figure 13 for
detail. Repeat for the remaining mount
assemblies on the primary boom.
4
Figure 12
360YIELDCENTER.COM
6
Page 7
INSTRUCTIONS 360 YDROP
RO GATOR
V.
INSTALL BREAKAWAY ASSEMBLY
ONE PIECE
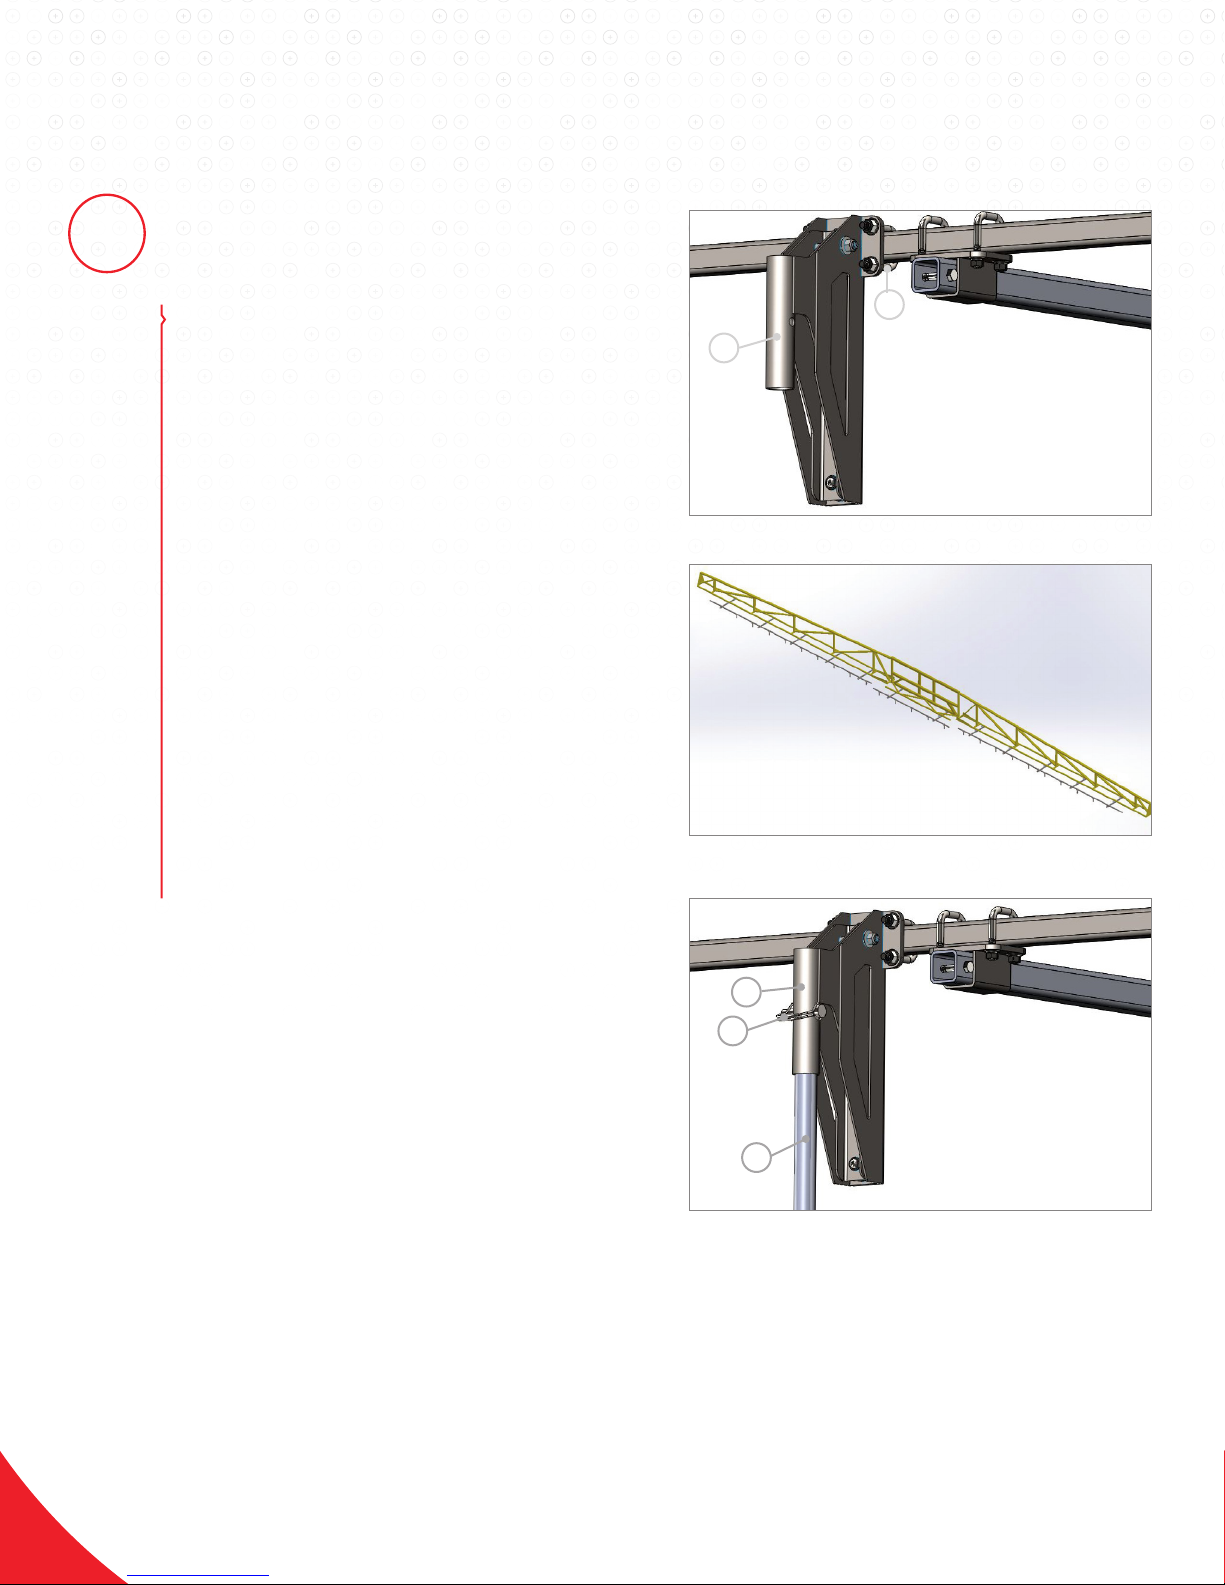
Figure 13
Step 1 Install breakaway assembly - one piece (1)
using the square U-bolts (2) and the extra
thick washer and Nylock nut. Repeat for
the remaining breakaway assemblies -
one piece.
Hardware Kit C
Figure 14
Figure 14 may show more or fewer mounts than
your installation. The alignment and quantity of the
mounts will depend on your row spacing.
Figure 15
Step 2 Install riser tube assembly (1) into the
breakaway assembly - one piece (2).
Step 3 Install pin (3).
2
1
Figure 13
Repeat Steps 2 and 3 for the remaining riser tube
assemblies.
NOTE: Included in most sprayer mount packages
are standard riser mounts to be used when primary
booms are folded and in transport mode. These
standard riser mounts should be mounted in
locations that allow you to relocate the drops away
from potential tire interference. See “Install Riser
Mounts Without Breakaway Assemblies” section on
next page for more instructions.
Figure 14
2
3
1
Figure 15
360YIELDCENTER.COM
7
Page 8
INSTRUCTIONS 360 YDROP
RO GATOR
V.
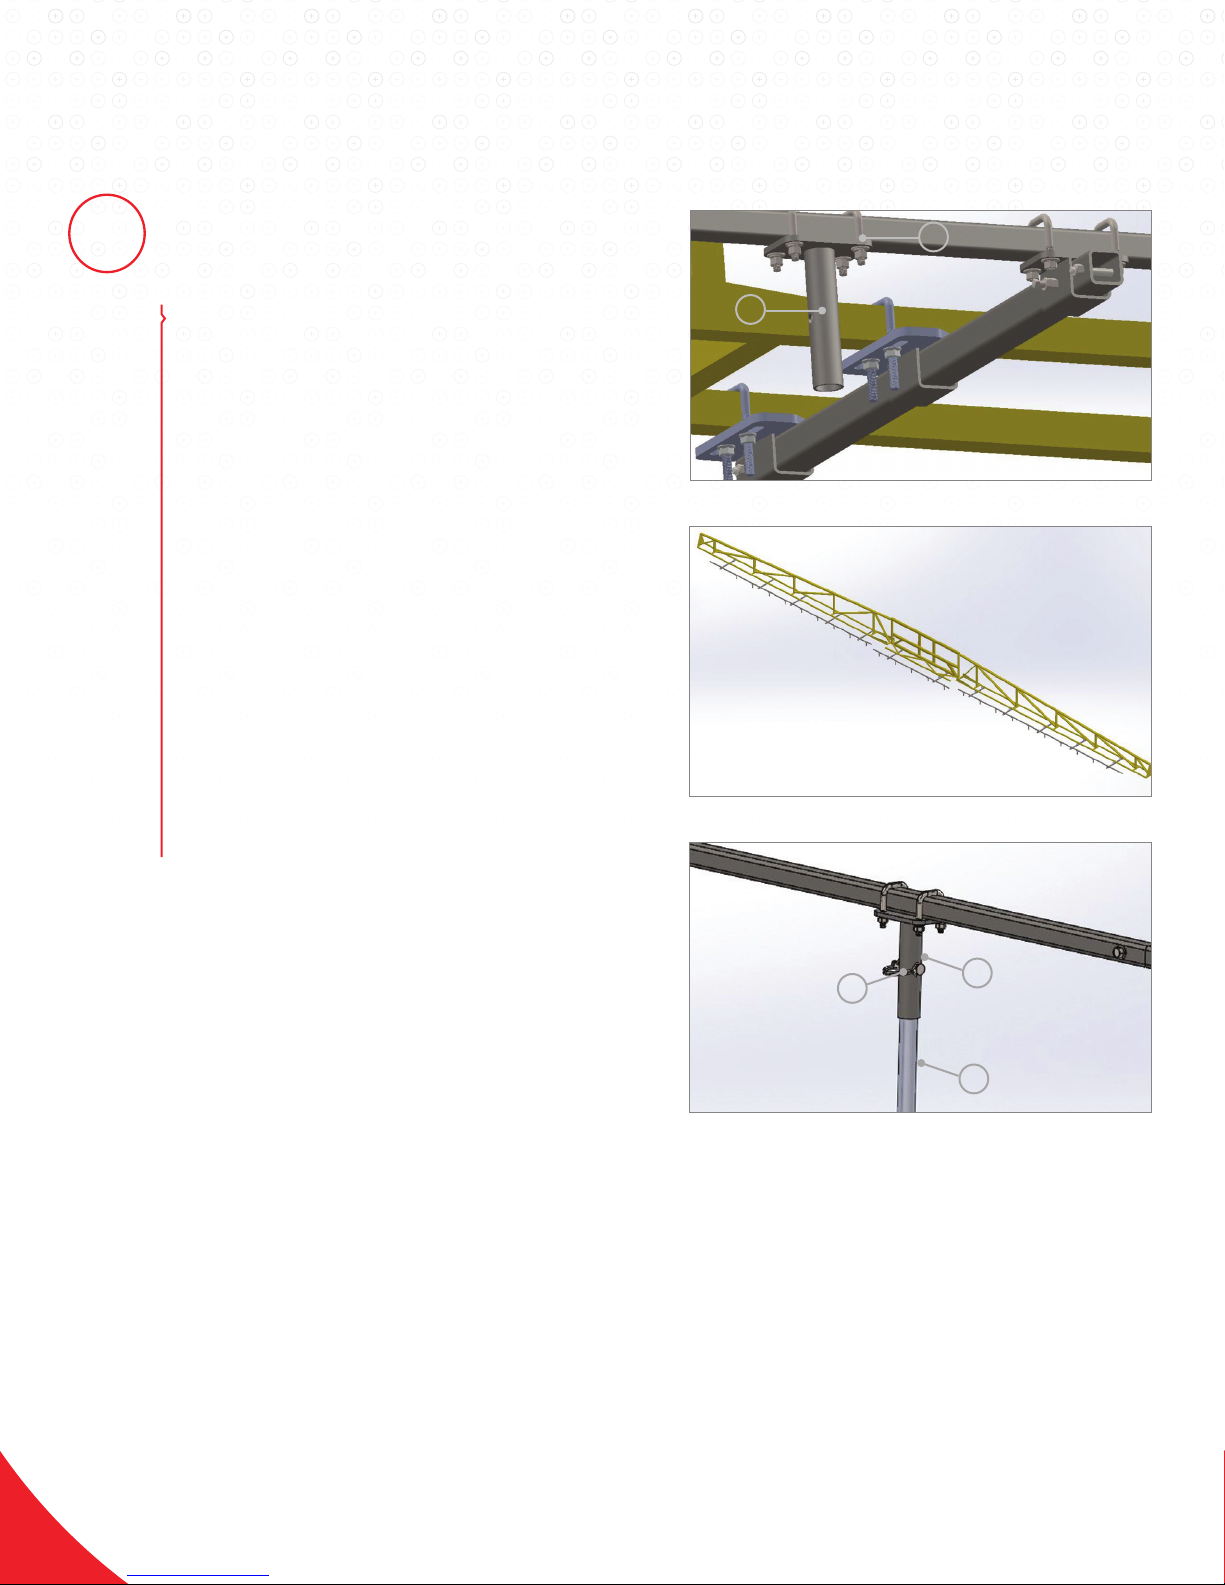
INSTALL RISER MOUNTS WITHOUT
BREAKAWAY ASSEMBLIES (OPTIONAL)
Figure 16
Step 1 Install riser mount (1) using the square
U-bolts (2) and the extra thick washer
and Nylock nut. Repeat for the remaining
riser mounts.
Hardware Kit C
Figure 17
Figure 17 may show more or fewer riser mounts
than your installation. The alignment and quantity
of the riser mounts will depend on your row spacing.
Figure 18
Step 2 Install riser tube assembly (1) into the
riser mount (2).
Step 3 Install pin (3).
2
1
Figure 16
Repeat Steps 2 and 3 for the remaining riser tube
assemblies.
Figure 17
Figure 18
3
2
1
360YIELDCENTER.COM
8
Page 9
INSTRUCTIONS 360 YDROP
RO GATOR
VI.
INSTALL SHIELDS AND
RISER HOSES
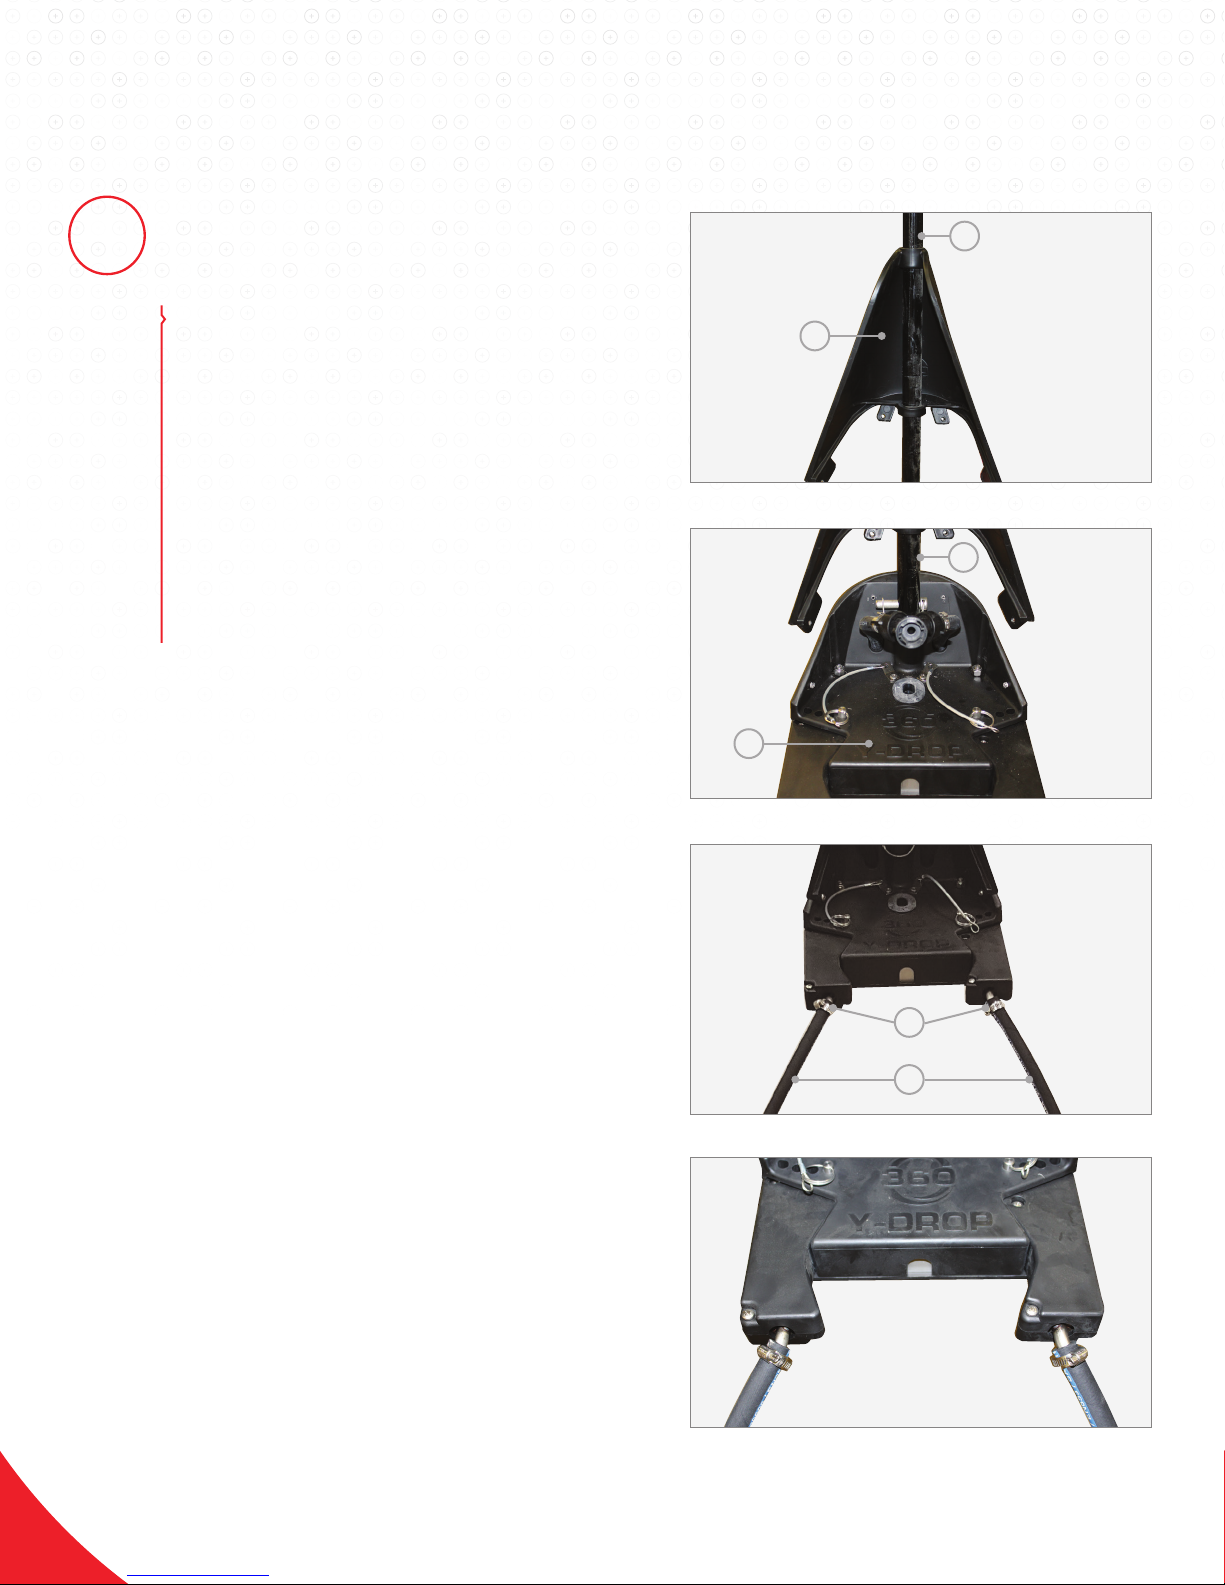
Figure 19
Step 1 Install shield (1) onto riser tube (2).
Figure 20
Step 2 Install base unit (1) onto riser tube (2).
Figure 21
Step 3 Assemble drag hoses (1) to 360 Y-DROP
base and secure with hose clamps (2).
Figure 22
Step 4 Note the orientation of the drag hose
clamps. The tails should point inward.
2
1
Figure 19
2
1
Figure 20
Figure 21
2
1
Figure 22
360YIELDCENTER.COM
9
Page 10
INSTRUCTIONS 360 YDROP
RO GATOR
VI.
INSTALL SHIELDS AND
RISER HOSES (CONTINUED)
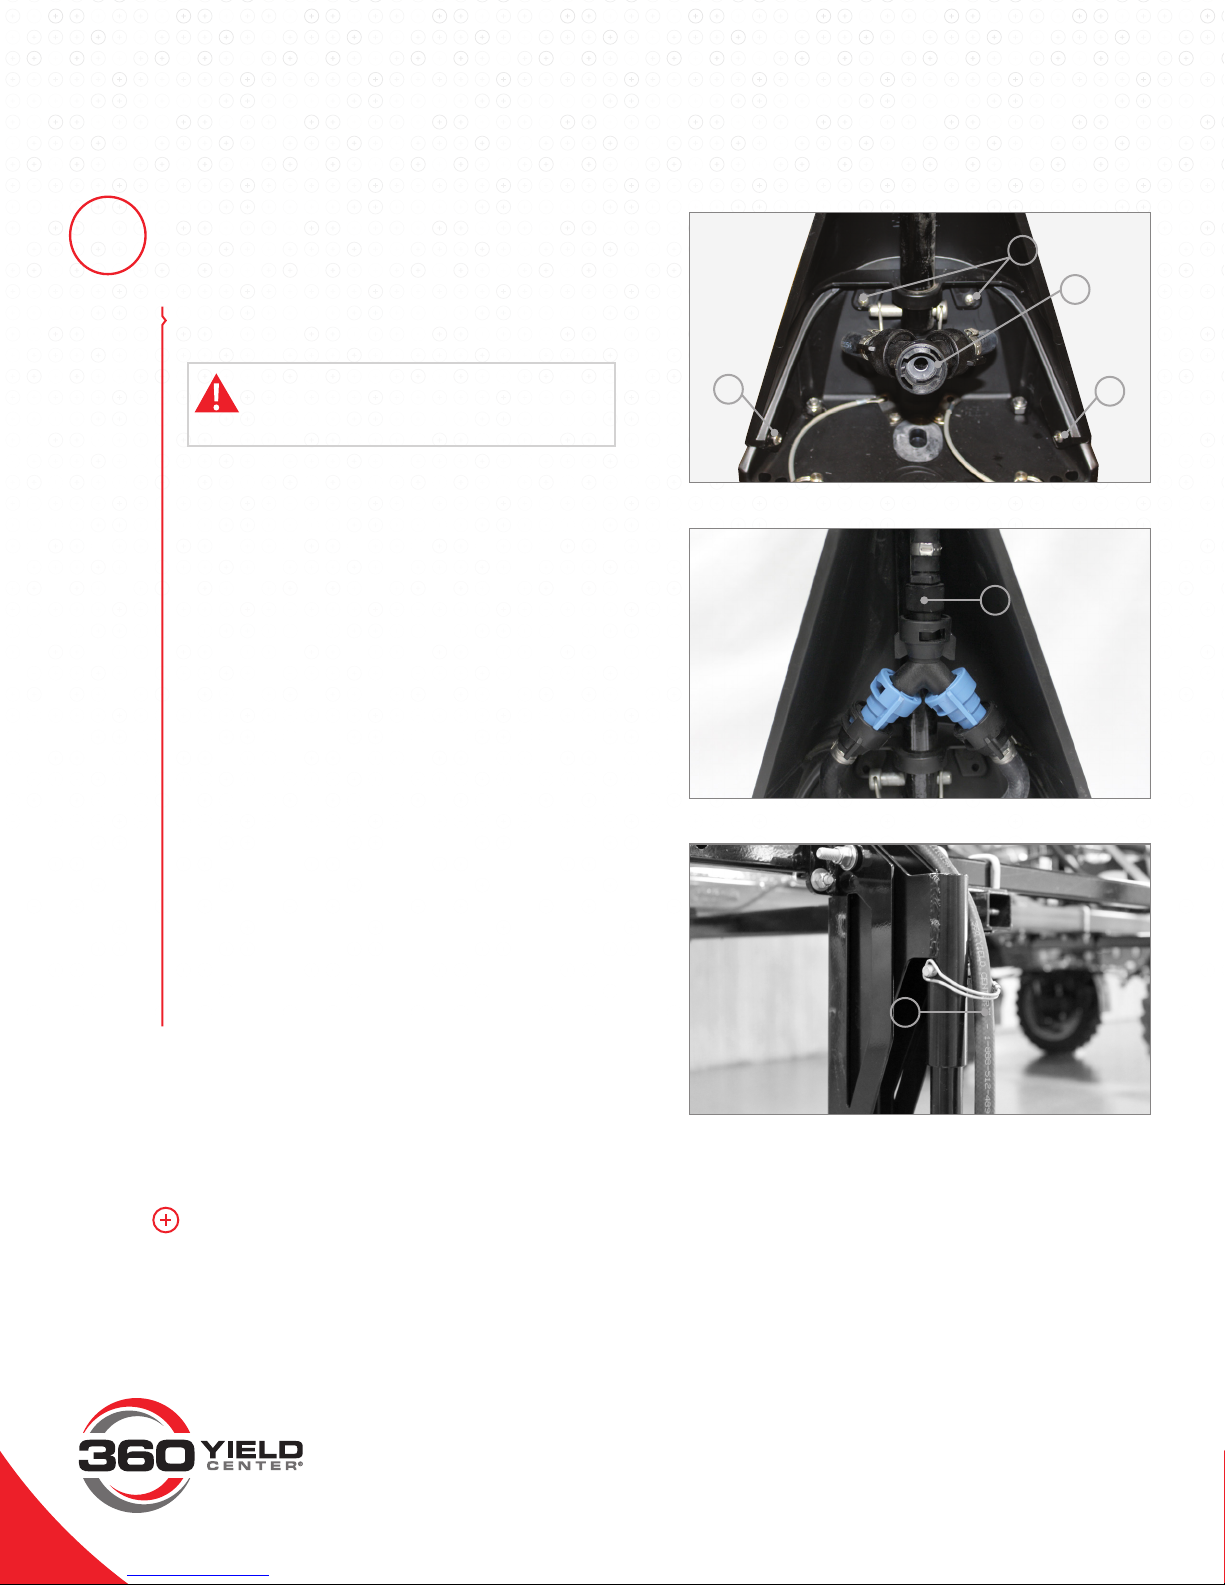
Figure 23
CAUTION: Do NOT use a drill or impact driver
Step 5 Install two ½" screws (1).
Step 6 Install two ¾" screws (2).
Step 7 Install rubber washer (3) into the “Y”.
Figure 24
Step 8 Install riser hose assembly (1) into the “Y”.
Figure 25
Step 9 Route riser hose assembly (1) as shown
Step 10 Install the riser hose assembly to the
for Steps 5 and 6.
in Figure 25.
OEM nozzle body.
1
Figure 23
Figure 24
2
3
1
1
Step 11 Use 3 equally spaced plastic ties to
secure the riser hose assembly.
Repeat Steps 1-11 for the remaining
360 Y-DROP Shields.
INSTALLATION COMPLETE.
1
Figure 25
360YIELDCENTER.COM
All oth er tradema rks are the pr operty of 3 60 Yield Cen ter, its ail iates and/or i ts licenso rs.
©2016 360 Yield Center. A ll rights reserved.
 Loading...