

Page 1

Angle Of Attack™
Game Manual
© 3000AD, Inc 2009. All rights reserved.
3000AD Inc. reserves the right to alter the contents of this manual and the product described in this manual at any time and
without notice. Unless authorized by the expressed written consent of 3000AD, no part of this document or software may be
copied, reproduced, translated, transmitted, or reproduced in any form or by any means, electronically or mechanically for any
purpose. This program is protected by United States federal and international copyright laws. Please do not make unauthorized
copies of this product, or allow others to do so.. To report copyright violations, call the Software Publishers Association at 1800-388-PIR8
TECH SUPPORT
For tech support please go to our website at www.3000ad.com
EPILEPSY WARNING
Some individuals may experience epileptic seizures when exposed to certain light patterns of flashing lights. Exposure to these
light patterns on television or monitor screens while playing computer games may induce an epileptic seizure in these
individuals.
Certain conditions may also induce undetected epileptic symptoms in persons who have no prior history of epileptic seizures.
If you or anyone in your family has an epileptic condition, consult your doctor prior to playing this game.
If you experience any of the following while playing a computer game : dizziness, altered vision, eye twitches, muscle twitches,
loss of awareness, disorientation, any involuntary movement or convulsions, you must IMMEDIATELY discontinue playing the
game and consult your doctor.
Page 1 of 18
©3000AD Inc – 2007-2009 All Rights Reserved
Page 2

TABLE OF CONTENTS
GETTING STARTED 03
GAME CONTROLS 04
COCKPIT INTERFACE 05
TACTICAL OPERATIONS 09
PLAYING ONLINE 11
GAME OPTIONS 14
GAME OBJECT SPECIFICATIONS 15
CREDITS 17
Page 2 of 18
©3000AD Inc – 2007-2009 All Rights Reserved
Page 3

GETTING STARTED
PC SYSTEM REQUIREMENTS
Windows XP SP3 or Vista SP1
Intel Pentium 4 3.4Ghz or AMD Athlon 64 X2 3.0GHz
Intel Core 2 Duo E6320 or better recommended
AMD X2 6000 or better recommended
1GB (XP) System RAM. 2GB (Vista) or higher recommended
256MB graphics card w/ Shader Model 3.0
nVidia GeForce 7900. GeForce 8600 GTS or better recommended
ATI Radeon X1300. Radeon HD2900 XT or better recommended
DirectX 9.0c compatible sound card
Multiplayer requires LAN or broadband connection
MAIN MENU
GAME
This is where you can select a game scenario to play. You can select and fly up to twelve fighters depending on which ones are
detected by the game. This allows you to select the right fighter for the mission. You can replay all the scenarios using any of
the available fighters in the hangar.
Enter your character name, then choose a fighter asset, missile loadout for it and finally the campaign mission. When done,
click on “Start Game” to launch the game.
Each time you start a new scenario, the game auto-saves it for you. So if you die, you can just load that auto-saved game to
replay the scenario quickly.
To save a game, press ESC to go to the main menu and click on NEW GAME SAVE. To load a saved game, click on the desired
game. You can also use CONTINUE to resume the game currently being played.
MULTIPLAYER
Here you can join or host multiplayer games. Refer to the multiplayer section of this manual for more information on this.
Page 3 of 18
©3000AD Inc – 2007-2009 All Rights Reserved
Page 4

OPTIONS
Here you can configure various game options. The defaults should be sufficient to run based on the minimum system
requirements for the game. You can restore the default options at any time by using the RESET option. Do this only when at
the main menu and not while you are in the game world!
You can map most of the game's commands from the CONTROLLER section. To change a key mapping, LEFT CLICK on it and
then press the desired key. You cannot change the Xbox360 controller mappings.
QUIT
Quits the game and takes you back to Windows desktop.
GAME CONTROLS
Normally, crafts are in Forward Takeoff And Landing (FTOL) mode, but they also have Vertical Takeoff And Landing (VTOL)
capability which allows them to take off from a fixed spot and hover in the air.
To take off - if you are on the ground - press and hold F (LSTICK forward if using game pad) until the aircraft is off the ground,
then press and hold W until the craft switches to FTOL mode and flies forward. The higher the thrust limit, the faster the craft
will fly.
Landing a craft can only be done in VTOL mode by flying to the lowest possible altitude, then slowing down the craft by
pressing and holding S until it auto-switches to VTOL mode. Then press and hold Z (LSTICK back if using game pad) until the
craft touches down and LANDED appears in the HUD.
If you have a joystick with a throttle, then the high/low speed settings of the throttle depend on the thrust (W, S) values. For
example, if you press W to increase thrust until your speed is 350 m/s, then push the throttle all the way forward, the craft will
not exceed 350 m/s. So if the craft can reach a max speed of 650 m/s, in order to use the throttle to reach those speeds, you
have to press and hold the W key until that speed is reached, thus setting the max range of the throttle. If you prefer not to
use your joystick throttle, you can disable it in the game's options screen.
During flight, note that the higher your altitude and pitch angle, the less thrust that the aircraft can achieve. If you remain at
such altitudes, the aircraft engines may stall and cause you to crash into the ground. You counter this by increasing throttle.
Page 4 of 18
©3000AD Inc – 2007-2009 All Rights Reserved
Page 5
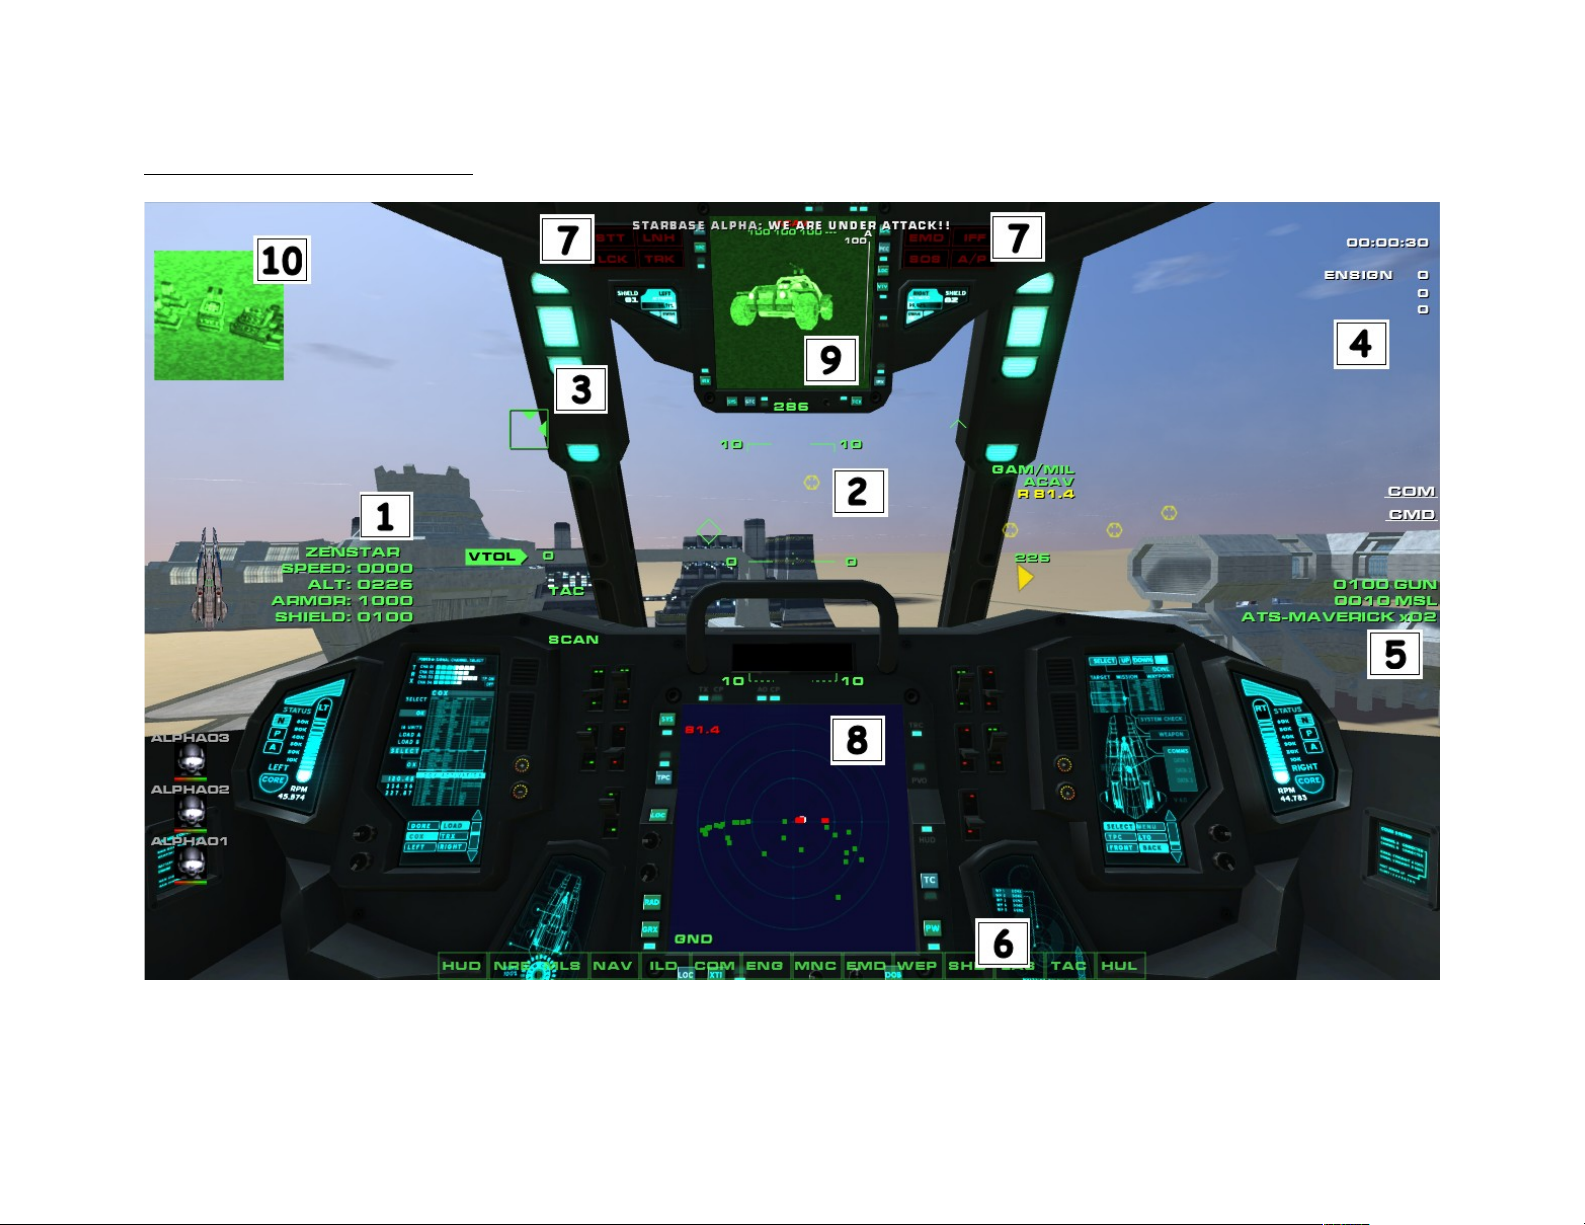
COCKPIT INTERFACE
Page 5 of 18
©3000AD Inc – 2007-2009 All Rights Reserved
Page 6

1. Your craft's image and stats, as well as your current speed and altitude above ground are shown here. If your shields
are fully breached, your armor will start to take damage. Once your shields and armor are fully breached, the ship will
start taking even more major damage and will eventually be destroyed. With you in it.
2. The center HUD display contains tactical information.
Top: Craft's directional heading.
Center: The four dots marker shows your craft’s velocity vector which predicts its future position. Near or on top of
that are two other indicators depicting the craft's lateral tilt and its horizontal pitch scale in 10-degree
marks.
When a missile is armed, the Missile Tracking Designator (MTD) diamond appears.
Right: Crafts altitude in feet Above Sea Level (ASL) or Above Ground Level (AGL) depending on where you are.
The current target name and range are displayed. Range is displayed in Red if the target is less than 50
km away.
The waypoint marker, number and range appears when you have waypoints set.
Left: Current airspeed. Depends on the current thrust (0 – 9) settings. Also shows your fighter's flight profile
which can be FTOL, VTOL or LANDED.
When a missile is armed, it goes into SCAN, TRACK or LOCK displayed on the lower left.
If you are currently matching the speed of the current target, the match target symbology (M) also
appears.
Page 6 of 18
©3000AD Inc – 2007-2009 All Rights Reserved
Page 7

3. If you have a ground target selected, the radar capabilities of the target are shown in the Track Warning Indicator (TWI)
box which has one or more carets on either edge as follows:
Top You are within the max altitude of the target's radar.
Bottom You are within the min altitude of the target's radar.
Right You are within the min distance range limit of the target's radar.
Left You are within the max distance range limit of the target's radar.
When all carets are ON, the symbol will start to flash, indicating that you have satisfied all the target's acquisition
parameters. At that point, a missile launch is very likely.
4. Your rank, Experience Points, violations and target kills are displayed here. If a mission has a timer, it is also shown
here in days:hours:minutes format.
5. Your craft's gun charge level and missiles count and type armed are shown here. If your guns are completely destroyed,
they will fail to recharge and won't fire.
6. Situation Warning Indicators
STT Radar currently in Single Target Tracking mode.
LNH A missile has been launched at you.
LCK A hostile target has a weapons lock on you.
TRK You are being tracked and scanned on hostile radar.
EMD Electromagnetic Disruptor missile jammer. If the EMD is enabled, the cockpit MFDs will display static noise
and all missile locks will be lost. The jammer doesn’t always work reliably, especially against missiles
which can “burn” through it.
SOS A craft in region is emitting an SOS signal.
IFF A friendly craft or the current target is emitting an Identify Friend or Foe signal.
A/P When the auto-pilot is on this indicator indicates its current operating mode.
7. Icons representing various states of your craft's systems. Red status indicates a destroyed or inoperable system, Yellow
indicates extensive damage and/or malfunction and Blue means some minor damage.
Page 7 of 18
©3000AD Inc – 2007-2009 All Rights Reserved
Page 8

HUD Heads Up Display NRE Nuclear Reactor
MLS Main Life Support NAV Navigation Computer
ILD Inbound Launch Display COM Communications Computer
ENG Engine MNC Main Computer
EMD Electromagnetic Disruptor WEP Weapons Systems
SHD Shield Array LAS Laser Guns Array
TAC Tactical Radar Scanner HULL Hull Armor Array
8. MFD1
This system hosts the Navigation Interface Display (NID) and the Tactical Radar Scanner (TRS) radar systems.
Navigation type and some ground targets are tracked in the NID. Use N to activate and cycle modes.
When a target is selected, the target designator box or triangle (airborne targets) will appear in the HUD if it is within the
craft’s field of view. The target's range (km) and closure rate (m/s) are then displayed in the top left/right corners of the MFD.
The range value is in meters when the target is less than 1km away.
MAP mode displays a satellite map of the area that you are flying over. The Yellow line extending from the center of the map to
the edge of the display shows your direction of travel.
The [ and ] keys are used to zoom the map.
LOC mode displays your current location, game date/time as well as the the current weather condition and weather forecast.
Strategic and tactical air and ground targets are tracked in the TRS. Use T to activate and cycle modes.
When activated, a selected target (blinking) inside the inner circle is ahead of you. In the outer circle it is behind you. And if in
the very center of the inner circle it is directly in front of you. The max range of this radar is 100km.
Targets are color coded depending on type and only appear depending on the current radar target filter. Blue (neutral,
unknown etc), Cyan (towed), Green (friendly), Red (hostile), White (missile), Grey (disabled)
When a target is selected, the target designator box or triangle (airborne targets) will appear in the HUD if it is within the
craft’s field of view. The target's range (km) and closure rate (m/s) are then displayed in the top left/right corners of the MFD.
The range value is in meters when the target is less than 1km away.
Page 8 of 18
©3000AD Inc – 2007-2009 All Rights Reserved
Page 9

The TRS has various modes which track different kinds of targets.
9. MFD2
Displays a video and data information about the currently selected target. If you launch a missile which has a camera (shows
what the missile is tracking), the image displayed by the camera will also be displayed until the missile detonates.
The target's shield and armor levels are displayed as vertical bars on the left and right sides of the image.
For certain targets, a set of numbers appear above the target image. From left to right, these numbers represent the status of
the target’s reactor, engines, weapon systems, and launch bays. During combat, the integrity of the target can be monitored
here as these values make up the target’s overall integrity. As the target’s systems are breached the indicators are adjusted to
reflect these changes.
Engine : Affects speed and turn performance
Weapon : Below 25% integrity, the weapon systems will fail
Reactor : If the reactor is destroyed, the target will explode
Launch Bay : Below 25%, target will be unable to launch other craft
Other info related to the tactical state of the target may be displayed at the bottom.
10. COMMS VIDEO
The image of a comms speaker is displayed here.
TACTICAL OPERATIONS
LOCATING & SELECTING TARGETS
You can select targets in the NID or TRS radar. A triangle (air) or square (ground) target icon is displayed when a target is
selected. The color of this icon depends on the alliance of the target where Red is hostile, Green is friendly and Blue is a
neutral or navigation target.
The target name is displayed if it is within the HUD field of view.
When a target is selected, a Yellow arrow will appear in the HUD if the target flies outside the HUD's field of view. Turn the craft
toward the direction of this triangle in order to see the target once again.
Page 9 of 18
©3000AD Inc – 2007-2009 All Rights Reserved
Page 10

A Target Lead Designator (TLD) which resembles a small dotted box will also appear near the target. This indicator attempts to
predict where the current target will be in the next few seconds. This is where the target is calculated to be by the time the
fired shot reaches it if you were to fire at the box. The TLD box will go from Green to Red if the target is predicted to exceed
the firing range of your guns. When dog fighting, try to fire at this box or near it when it is Green to increase your chances of
hitting the target. This is called leading the target.
Once committed to a guns engagement, the most important aspect is to not overshoot the target. You can use the match target
speed (M) for this. Your speed will be adjusted to match the target's. You can still use thrust adjustments to temporarily
increase/decrease your speed but if using a joystick throttle, it must be at the lowest setting for this to work effectively.
USING MISSILES
When a missile is armed, a Missile Tracking Designator (MTD) diamond appears and moves around HUD. If the target is a
friendly or an invalid target, a flashing X symbol will be displayed in the target box.
During the target search, the missile’s acquisition state will show SCAN mode.
Once the weapons computer verifies that the current target is valid, the diamond will be inside the target box and the radar
state will change to TRACK. Missiles cannot lock on targets at less than 1km range. So check the target range in MFD1.
As soon as the target comes within the valid range of the currently armed missile, the acquisition state will change to LOCK and
you will hear a beep as well as a target lock message from Mother prompting you to launch the missile.
All missiles have various capabilities.
If a launched missile is capable of hitting your craft, you will hear a rapid beeping. This is your cue to either jam or evade the
missile or you will suffer either a direct or proximity hit.
USING GUNS
When the gun is fired, it must recharge fully before it can fire again. If your guns and/or weapon systems are damaged, the
recharge rate will also be slower and the gun will be less effective until repaired.
The maximum range of the gun takes into account the size of both your fighter and the target. So the closer you are to the
target, the more powerful the gun's shots will be when they hit the target.
Page 10 of 18
©3000AD Inc – 2007-2009 All Rights Reserved
Page 11

DOING REPAIRS AND REARMING YOUR CRAFT
You can dock with a starbase to repair or rearm. Select the target in the TRS or NID radar or press CTRL+Y. Fly within 1km
distance, press E. You or your craft cannot be harmed by weapons fire when docked.
The status of each of the craft systems is color coded Green, Yellow or Red depending on the level of damage.
REPAIRS – Select this for instant repairs to all systems. In most cases, everything will be repaired immediately.
WEAPONS – Select the desired missile and the amount to add/remove. All crafts with missiles can only carry a total of ten. The
missiles are listed depending on the type of craft. e.g. vehicles do not use the same missiles/rockets as fighters.
WING COMMAND
You can give orders to your wingmen. Press C to open comms, select the wingman, then issue one of the following commands.
You can also issue orders to certain units by first selecting the unit in the TRS radar, then pressing C. If the target cannot
receive orders, then your wingmen list is displayed instead.
ESCORT/DEFEND ME : come to my aid and engage my attacker
ATTACK AT WILL : attack any detected air or ground targets
ATTACK ENEMY AIR DEFENSES : attack enemy ground units such as SAM sites, AA guns etc
ATTACK ENEMY AIRCRAFTS : attack enemy aircrafts
PLAYING ONLINE
The game supports up to 16 player deathmatch and four play co-op on a LAN or over the Internet.
You can join a server using either the in-game server browser or via direct IP:PORT connect added to the game shortcut. Using
direct IP connect bypasses the in-game server browser.
NOTE: You must add the game's AOA.EXE file to your firewall exception rules in order to be able to host or join games! The
games uses UDP ports 2302 to 2304. You may need to forward these ports on your router. See www.portforwarding.com
JOINING A GAME
Select the server from the server browser and click Join Game. To help you search for specific server types, there are various
filters which can be used to find certain server types.
Page 11 of 18
©3000AD Inc – 2007-2009 All Rights Reserved
Page 12

After finding a server, make your character choices then click Join Game to connect. If the server requires a password (case
sensitive), you will be prompted for it. You have three chances to get it right before you are rejected.
HOSTING A GAME
Click Host Game and set up the various server parameters. When done, press Host Game again to get the server running.
The game supports late joining, so anyone can join the server even after the scenario has started.
After starting a server, you can use Join Game if you wish to play on the same server. This makes it a non-dedicated server. If
you want to run a dedicated server, use the console server instead.
MULTIPLAYER CHAT
Press C, type in the message and press ENTER to send it. To send via another channel, press CTRL+ENTER, then press one of
the hotkeys (A, T, P, M) to select a channel and then press ENTER to send the message. When you select a channel, all
subsequent messages will be sent to that channel unless you change the channel again.
CHAT OPTIONS
C start chat
ESC chat log window toggle
ENTER send message
CTRL+ENTER send message using channel list
(A)ll Players send to all players on the server
(T)eam send to all players in your team
(P) send to a specific player. Select player from list using the mouse or UP/DOWN arrows
(M) send to multiple players. Select players from list using the mouse or the UP/DOWN arrows. Then check
the menu boxes for all recipients using SPACEBAR or the mouse. Click on SEND or press ENTER to send.
By default chat messages also go to the server host. To send a message only to the server host, remove all other recipients
before sending the message.
To see the list of all clients as well as the current game score and stats, press TAB
Messages in the chat log window are color coded. Your messages are Yellow, those from your team and hostiles are Green and
Red respectively, while general and server messages are White and Cyan respectively.
Page 12 of 18
©3000AD Inc – 2007-2009 All Rights Reserved
Page 13

MULTIPLAYER GAME MODES
Deathmatch / Team Deathmatch
The objective is to kill the opposing players/team. The person or team with the most combat kills wins the round.
If the scenario ends before the number of kills is reached, then the person/team with the highest kills wins.
Co-Op Versus
The objective is to fend off hostile NPC units until the scenario ends. The person/team with the most combat kills wins the
round.
Supports only four clients. Clients have to join within five minutes of the scenario starting. Clients do not re-spawn on death,
but are taken to the observer camera where they can follow the match to completion if they want. The camera control keys
work in the observer cam and clients can be cycled through using the standard target selection keys.
If all clients die before the scenario ends, the server resets the scenario.
SCORING
A scenario ends when either the timer runs out or the game conditions are met. The scores/stats are then displayed.
COMMANDLINE OPTIONS
+connect : connect using IP:PORT format e.g. +connect 127.0.0.1:2302
-logchat : Logs the chat session to a log file
+password : password to pass to server e.g. +password 123456. If the password contains spaces, it must be enclosed in
quotes. Also, the underscore character cannot be the last character in the server password. NOTE: +password
should come immediately after the IP:PORT e.g. shortcut properties
“C:\Program Files\3000AD\Angle Of Attack\AOA.EXE” +connect 192.168.1.100:2302 +password “a password”
Page 13 of 18
©3000AD Inc – 2007-2009 All Rights Reserved
Page 14

DEDICATED SERVER HOSTING
To host a dedicated server (Windows Server 2003, 2008, XP SP3, Vista SP1), install the separate dedicated console server
installation program located in the folder where the game is installed. If you are looking to host a remote server (e.g. at a data
center), then all you need to do is copy that installation setup file and run it on the target server.
Then you have to manually edit the GAME_SETUPMP.INI file with the settings you would like to use for the server. For more
information, refer to the read me document included in the server installation.
GAME OPTIONS
These options control various aspects of the game. To revert to original default values use the RESET option.
SOUNDFX Audio.
MUSICFX Music. You can play your own tracks by copying them to the MEDIA\AUDIO\MUSIC folder and
the game will automatically play them. Due to MP3 licensing issues, only OGG files are supported.
HARDWARE AUDIO
CHANNELS Determines the number of audio channels to use. For on-board audio on minimum spec
machines, this should be 16 or 32. A value of 0 falls back to software processing of 3D audio on
the CPU, resulting in a slight performance hit on minimum spec machines.
SOUNDFX VOLUME Audio volume control.
MUSICFX VOLUME Music volume control.
DISPLAY RESOLUTION The higher the resolution, the slower the game will run; especially depending on the other graphics
options.
TEXTURE FILTERING Improves visual quality of object textures. High settings impact performance. To use this setting,
ensure that you have your video card’s own settings for this option set to “Application Preference”.
TEXTURE QUALITY Determines the quality of the texture rendering. High settings use more video memory. If you
have a card with less than 512MB of memory, you need to keep this setting at low.
Page 14 of 18
©3000AD Inc – 2007-2009 All Rights Reserved
Page 15

FULL SCENE ANTI-ALIAS Improves visual quality of objects and helps reduce jaggies. High settings impact performance.
To use this setting, ensure that you have your video card’s own settings for this option set to
“Application Preference”. Turn OFF for an increase in game performance.
SHADOWS Shadows on the terrain as well as object self-shadowing. High settings impact performance
depending on the video card.
LIGHT SHAFTS Light shafts (aka God rays) from Sun's rays on the terrain. High settings impact performance
depending on the video card.
CLOUDS 3D volumetric cloud layer.
OBJECT REFLECTION Object reflection on water.
TERRAIN REFLECTION Terrain reflection on water.
GAME OBJECT SPECIFICATIONS
FIGHTER AIRCRAFTS
CLASS NAME CREW SPEED (m/s) SHIELD/ARMOR RADAR RNG (km) RATING
SUPER RAVEN 01 750 800/800 150 Very Good
VANDAL 01 710 600/1000 150 Very Good
ZENSTAR 01 720 500/1000 150 Very Good
HEAVY STARDRONE 01 650 500/400 100 Good
CORSAIR 01 600 500/600 100 Good
INTERCEPTOR MK1 01 650 400/400 100 Good
INTERCEPTOR MK2 01 675 500/500 100 Good
MEDIUM MANTIS 01 590 400/500 75 Average
STARLANCE 01 575 450/550 75 Average
AURORA 01 610 500/650 75 Average
LIGHT ZODIAC 01 715 450/400 50 Poor
STARMONK 01 725 450/450 50 Poor
Page 15 of 18
©3000AD Inc – 2007-2009 All Rights Reserved
Page 16

GROUND THREAT UNITS
SAM = Surface To Air Missile battery SAL = Surface To Air Laser battery
CLASS NAME SPEED (m/s) SHIELD/ARMOR RADAR RNG (km) HIT DAMAGE
SAM (Mobile) TSX1 35 0/500 25 500
TSX2 35 0/500 35 750
ACM 35 0/750 50 750
ADV 35 0/1000 75 500
SAM (Fixed) AX10 N/A 0/500 50 450
AX21 N/A 0/500 65 650
AX25 N/A 0/500 75 750
GDN4 N/A 0/750 85 1000
SAL (Mobile) MK1P 50 0/500 25 050 (x2)
MK2P 50 0/750 35 100 (x2)
XP10 50 0/1000 50 125 (x2)
SAL (Fixed) MK3P N/A 0/750 50 150
MK1D N/A 0/500 25 125 (x2)
MK2D N/A 0/500 35 075 (x4)
AIRCRAFT MISSILES
1. Target must remain locked until the missile detonates. If lock lost, missile loses target and flies in dumb fire mode.
2. After missile acquires lock and is launched, will continue to track the target until detonation. Can select another target
after missile launch.
3. Same as guidance type 1 but with a video camera mounted in the nose of the missile for more accurate tracking.
NAME HIT DAMAGE GUIDANCE TYPE TYPE
CLUSTER 0500 2 Air-To-Air Missile
MAGELLAN 0750 2
MARINER 0750 3
Page 16 of 18
©3000AD Inc – 2007-2009 All Rights Reserved
Page 17

WARRIOR 0850 3
PILGRIM 1000 1
SEEKER 1250 1
SPYDER 0750 2 Air-To-Surface Missile
LYNX 0750 2
MAVERICK 1000 3
HARPOON 1250 3
GAINER 1000 2
HYPERDYNE 1500 3
RADIX 0500 2 All Purpose Missile
RALIX 0750 2
CREDITS
Designer, Producer, Project Manager, Lead Programmer, Chief Technology Officer, Core Development, AI
Derek K. Smart, Ph.D.
GAME ENGINES & TOOLS PROGRAMMING Derek K. Smart, Ph.D.
Sergio Gil
ADDITIONAL PROGRAMMING SUPPORT Martin Piper, ReplicaNet
Nick Vining
LEAD ARTIST/MODELER Joerg “Fritz” Ecker
CONTENT CONTRACTORS - 2D/3D ART ASSETS CREATION Alexis Sabatovich
Ariel Chai
Digital Dreamers
Jevon Paradis
Patrick Tuten, Tuten Graphics
Ronnie Olsthoorn, Skyraider3D
Page 17 of 18
©3000AD Inc – 2007-2009 All Rights Reserved
Page 18

SCENARIO STORYBOARD, SCRIPTING, GAME MANUALS Derek K. Smart, Ph.D.
DIGITAL SOUNDFX & VOICE OVER ENGINEERING Somatone, Inc.
MUSICAL SCORES Daniel Sadowski, Soundrama, Inc.
PROFESSIONAL VOICE OVER ACTORS Adam Harrington
Carina Harman
Chuck Kourouklis
Doug Boyd
Gina Tuosto
Owen Thomas
MIDDLEWARE TECHNOLOGIES
FMOD Sound System, copyright © Firelight Technologies Pty, Ltd., 1994-2007
ReplicaNet Networking Technology, copyright © Replica Software, 2008
Optimized Collision Detection (OPCODE) by Pierre Terdiman
PhysicsFS, a portable and flexible file I/O abstraction SDK licensed under the zlib license
== THE END ==
Page 18 of 18
©3000AD Inc – 2007-2009 All Rights Reserved
 Loading...