

Page 1

User’s Manual
Car DMB & Navigation System
2MTECH Inc.
674-1 Naksan-ri
Waegwan-eup Chilgok-gun
Gyungbuk, 718-801, Korea
TEL. 82-54-977-2500
FAX. 82-54-977-2510
www.zamm.co.kr
* Thank you for buying ZAMM product.
* Please read user’s manual carefully before using ZAMM product.
Page 2

Greetings
Contents
Thank you for buying ZAMM product.
When used correctly, ZAMM product which is
Car Multimedia System enhances your
driving experience. You and your passengers
can enjoy T-DMB, Navigation, Movie, Music,
Photos and etc in the car.
Please use this product after reading this
manual carefully.
www.zamm.co.kr
We give you all the supports and information
through the above web site. You can download
the newest patch files and manuals from the
web site. Please register the customer
information card in our web site for best service.
1. Before Usage
2. Usage
1. T-DMB
2. PIP (Picture-In-Picture)
3. File List
4. Video Player
5. Audio Player
6. AV Input
7. Calendar
8. Photo Album
9. Settings
3
13
13
16
17
18
19
20
21
22
24
3. Others
1. Specifications
2. Customer Support
31
31
33
Page 3

Before Usage
Before Usage
Warnings & Notifications
1. For better performance tuning of our product,
the specifications can be changed without notice.
2. For better performance tuning of our product,
this user’s manual can be changed without notice.
3. There might be some mistakes of technical
issues and edition in this user’s manual.
4. Please read user’s manual carefully before usage.
5. This product is designed to be used in a car
with proper installation.
6. The rights of hardware, software, and data of
this product belong to 2MTECH Inc. The rights is
protected by copyright law and international treaties.
Unauthorized duplication or distribution of this rights,
or any portion of it, may result in severe civil or
criminal penalties, and will be prosecuted to the
maximum extent possible under the law.
7. This product is designed to use DC12V power.
Warnings & Notifications
1. For safety, please stop or park the car to operate
this product.
2. The voice and map information in this product cannot be
guaranteed accurate as road layout may change. Always
follow the posted road signs and traffic laws.
3. Do not mount this product in a position which may
obstruct the driver’s view or prevent the safe operation
of the vehicle.
4. Do not watch this product continuously. It may cause
an accident.
5. Please adjust the sound volume & LCD brightness
properly.
6. Do not use this product in the car when you turn off the
engine. It may cause your car battery flat.
7. Please use the provided accessories with this product.
We only guarantee the performance of this product with
provided accessories.
8. For the initial pwer up it may take up to 15 minutes
to secure satellite information on outdoor place.
9. GPS signal cannot be received properly in following
conditions; the inside of car with special metal coating, the
inside of a building, the place under a bridge, the place in a
tunnel, and etc.
10. T-DMB can be work properly in the good signal areas.
If you are in the bad signal areas, the screen quality may
looks no good.
Page 4

Before Usage
Before Usage
Before Usage
Warnings for system
1. Do not disconnect the power cable during operation and
do not disassemble this product. It may cause break-down
or fire or explosion.
2. Do not disconnect the cigarette power cord during
operation. It may cause break-down or fire or explosion.
3. Do not put the product near water. It may cause breakdown or fire or explosion.
4. If there is any failure of product, please don’t use it and
call to A/S center immediately.
5. Do not drop the product and do not give an attack to
the product. It may cause break-down or fire or explosion.
6. Do not put the product under sunshine and moisture in
long term. It may cause break-down or fire or explosion.
Minimum specfications of computer
You need a computer to use this product properly.
Please check the minimum specification of computer.
• Microsoft Windows 2000/XP
• At least Pentium III 800MHz
• At least 128MB Main Memory
• At least 2GB Hard Disk Space
•USB* Port
* It’s necessary when using the card reader provided.
Page 5

Before Usage
Before Usage Before Usage
Before Usage
Parts & Features
Parts & Features
Parts & Features
SD Card
LCD ON/OFF
Remote Receiver
Mute
OK
Volume Down
Volume Up
Channel Down
Channel Up
USB Host / USB Device
AV IN / Headphone
DMB Antenna
DC IN
Air Vent Hole
Main Power
Stand
Glass Mount
GPS Antenna
Stereo Speaker
Page 6

Before Usage
Before Usage Before Usage
Before Usage
Accessories
Main system
AV Cable
Protection Cover
1GB CF Card
Remote Controller
Cigarette Power Cord
T-DMB Antenna Multi Card Reader
User’s Manual
Glass Mount
Installation
Installation
Clean the surface of the location you
wish to place the mount bracket. Do not
mount where the drivier’s view will be
obstructed .
Slide the main system onto the mount
clip and adjust the angle properly. Please
check the mount and main system in
proper position.
Insert DC plug of Cigarette lighter lead
into the fused +12V socket of main
system and connect the other end to the
+12V cigarette lighter socket.
After starting the engine, push the power
button on the back side to start the main
system.
Put the T-DMB antenna on the top of the
car for best performance. It will stick to
the top of the car because of magnets,
however please be careful of falling of
antenna during fast driving.
Page 7

Before Usage
Before Usage
Remote Controller Usage
LCD ON/OFF
Mute
CH +.OK
MP3
AV IN
LCD Brightness
Main Menu
T-DMB/DAB
You can listen and watch T-DMB and DAB
services.
Navigation
You can use Navigation system with GPS.
Video Player
You can watch movie files.
Audio Player
You can listen music files.
AV Input
You can connect DVD player, DiVX players,
and rear camera.
Utility
You can use calendar and photo album.
VOL +,Navi
DMB
List
Multitasking (PIP/NIP)
Playing DMB, MP3, AV IN on navigation
Setting
You can adjust configurations for the system.
Page 8
2-1. T-DMB
2-1. T-DMB
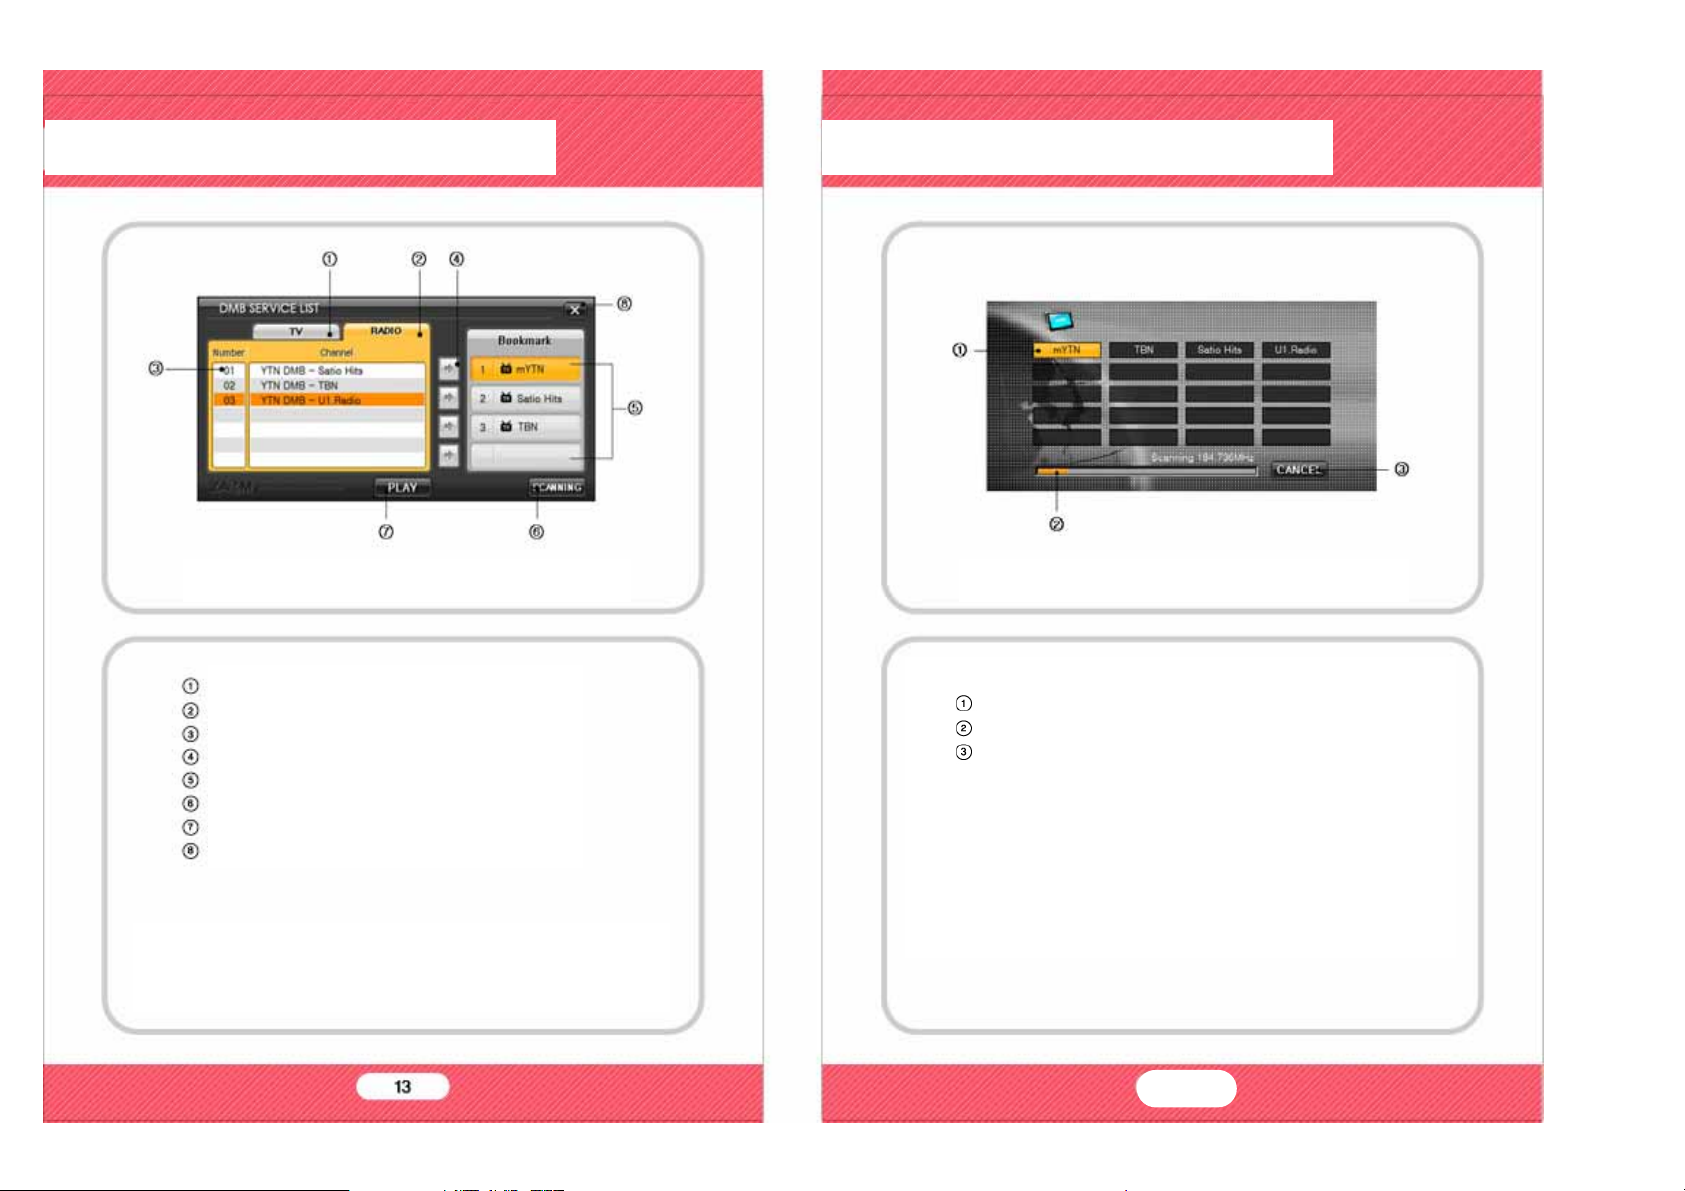
DMB Service List Screen
TV Service List
Radio Service List
Channel List
Channel Register
Registered List
Channel Scan
Play
Return to channel
* When you play the DMB for the first time, or when there is no
channel list, Channel List Screen starts.
* This product may not work well when the DMB signal is weak.
It will take some time for DMB initialaizing.
DMB Service List Scanning Screen
Scanned Channel
Scanning Status
Cancel scanning
14
Page 9
2-1. T-DMB
2-1. T-DMB
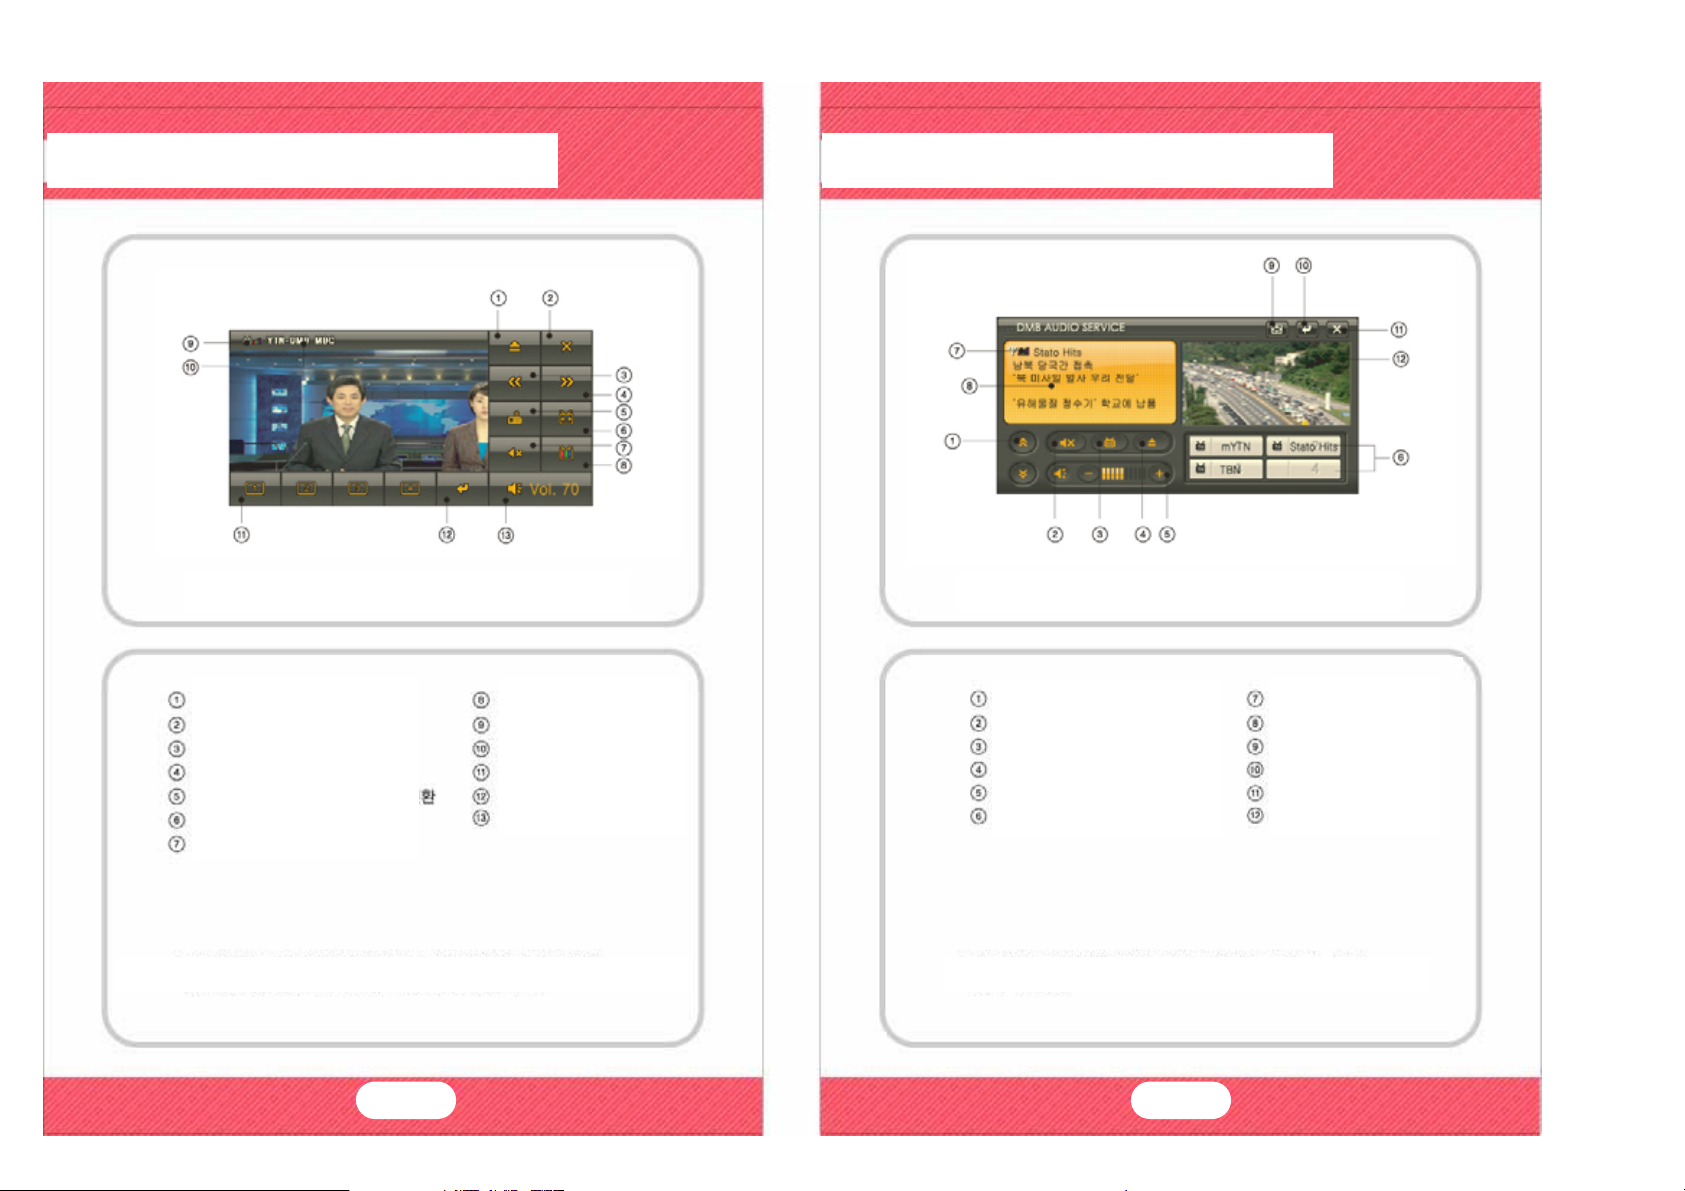
DMB TV Screen DMB Radio Screen
Open channel list
Cloase
Previous channel
Next channel
TV, Radio switch
Control screen ratio
Mute
* If the DMB signal is weak, the screen and sound may not work well. * If the DMB signal is weak, the sound may not work well.
Color setting
Signal status
Channel Info.
Channel hot key
Channel List
Volume control
Channel shift
Mute
DMB TV
Channel List
Volume
Channel Hot Key
16 15
Signal Status
DLS
Full screen
Service list
Close
JPEG slide area
Page 10
2-2. Video Player
2-2. Video Player
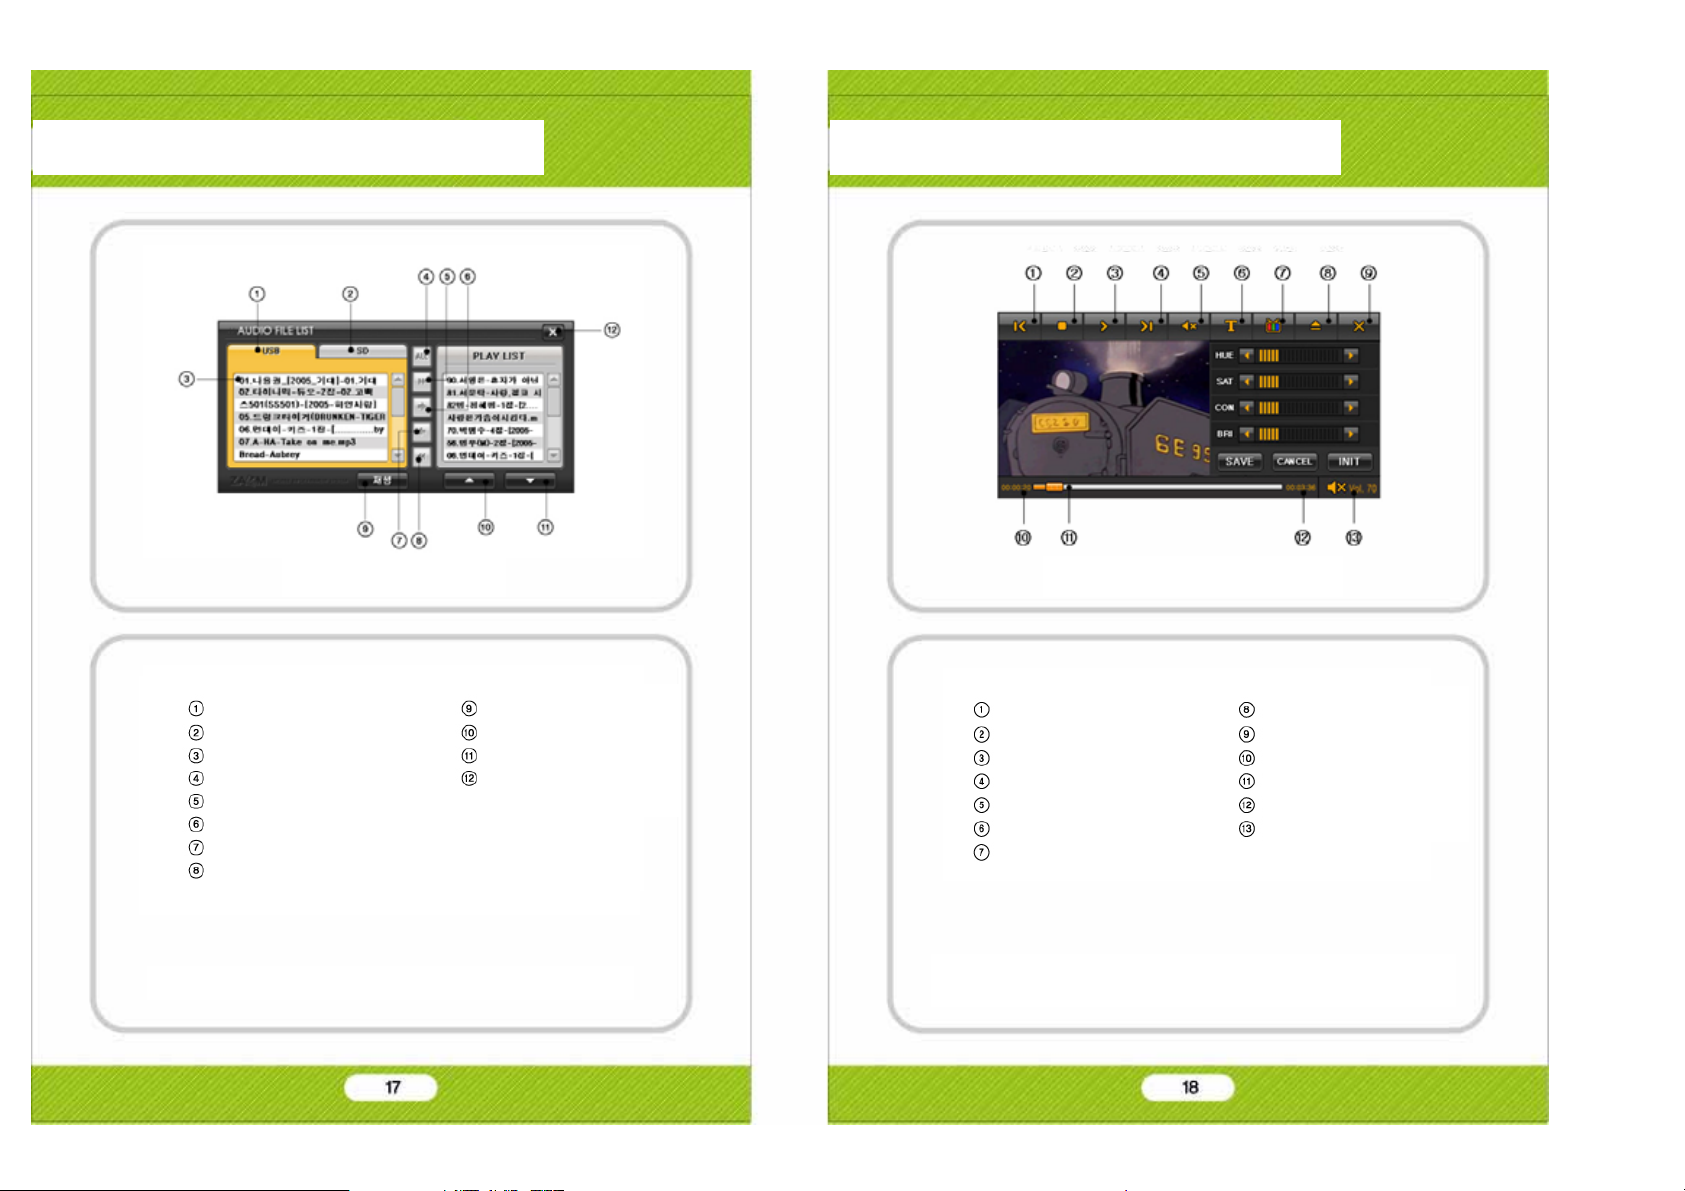
File List Screen
USB
SD Card
Directory & Files
Add all in sub-directory
Add all files
Add selected file
Delete Selected file
Delete all
* You can edit the playing list for MP3 and Video player.
Play
List Up
List Down
Close
Previous File
Stop
Play/Pause
Next File
Mute
Text Service
Color setting
* Support AVI, WMV format files (Other video formats may not
be supported.)
Video Player Screen
File List
Close
Playing time
Playing status
Total playing time
Volume
Page 11
2-3. Audio Player
2-4. AV INPUT
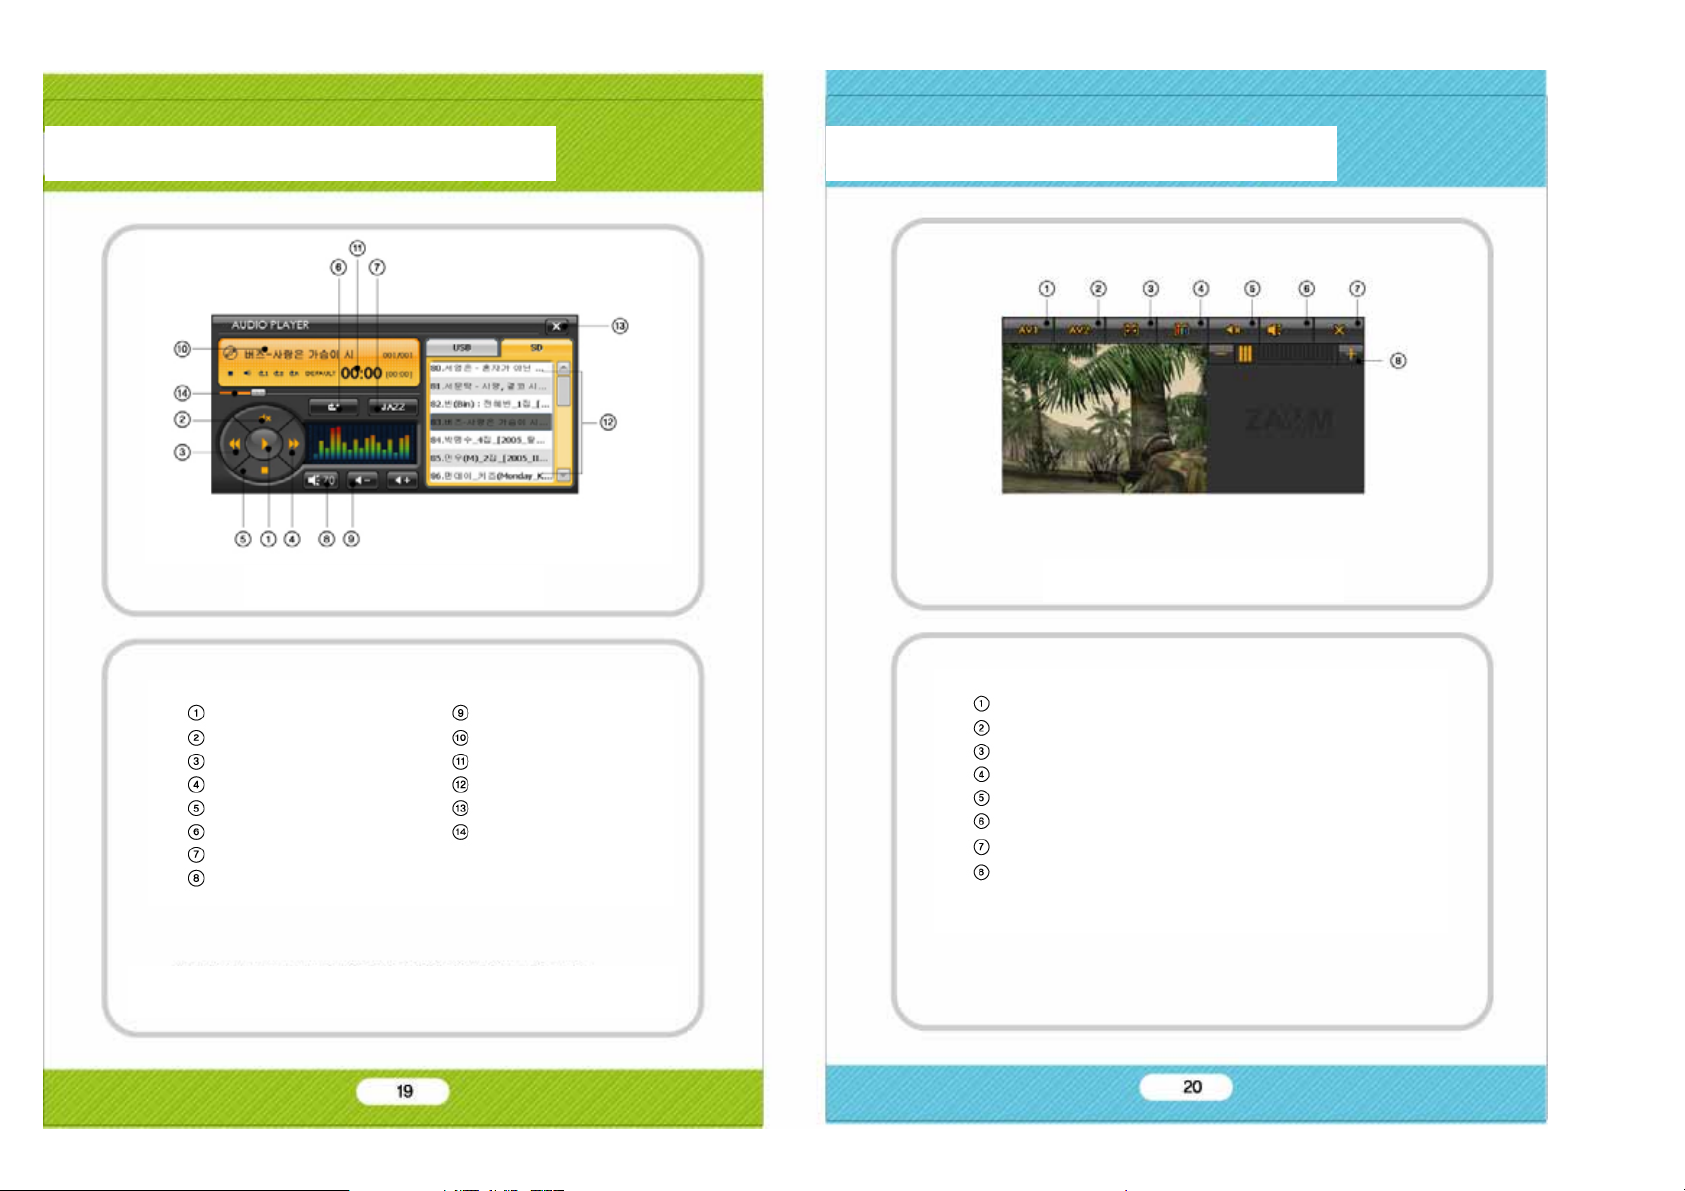
Audio Player Screen
Play/Pause
Mute
Previous File
Next File
Stop
Repeat current file
Equalizer
Volume control
* Support MP3, WMA, WAV format files (Other audio formats may
not be supported.)
Volume
File Information
Playing time
Current File List
Close
Playing Status
AV INPUT 1
AV INPUT 2
Screen ration
Color setting
Mute
Volume status
Close
Volume
AV INPUT Screen
Page 12
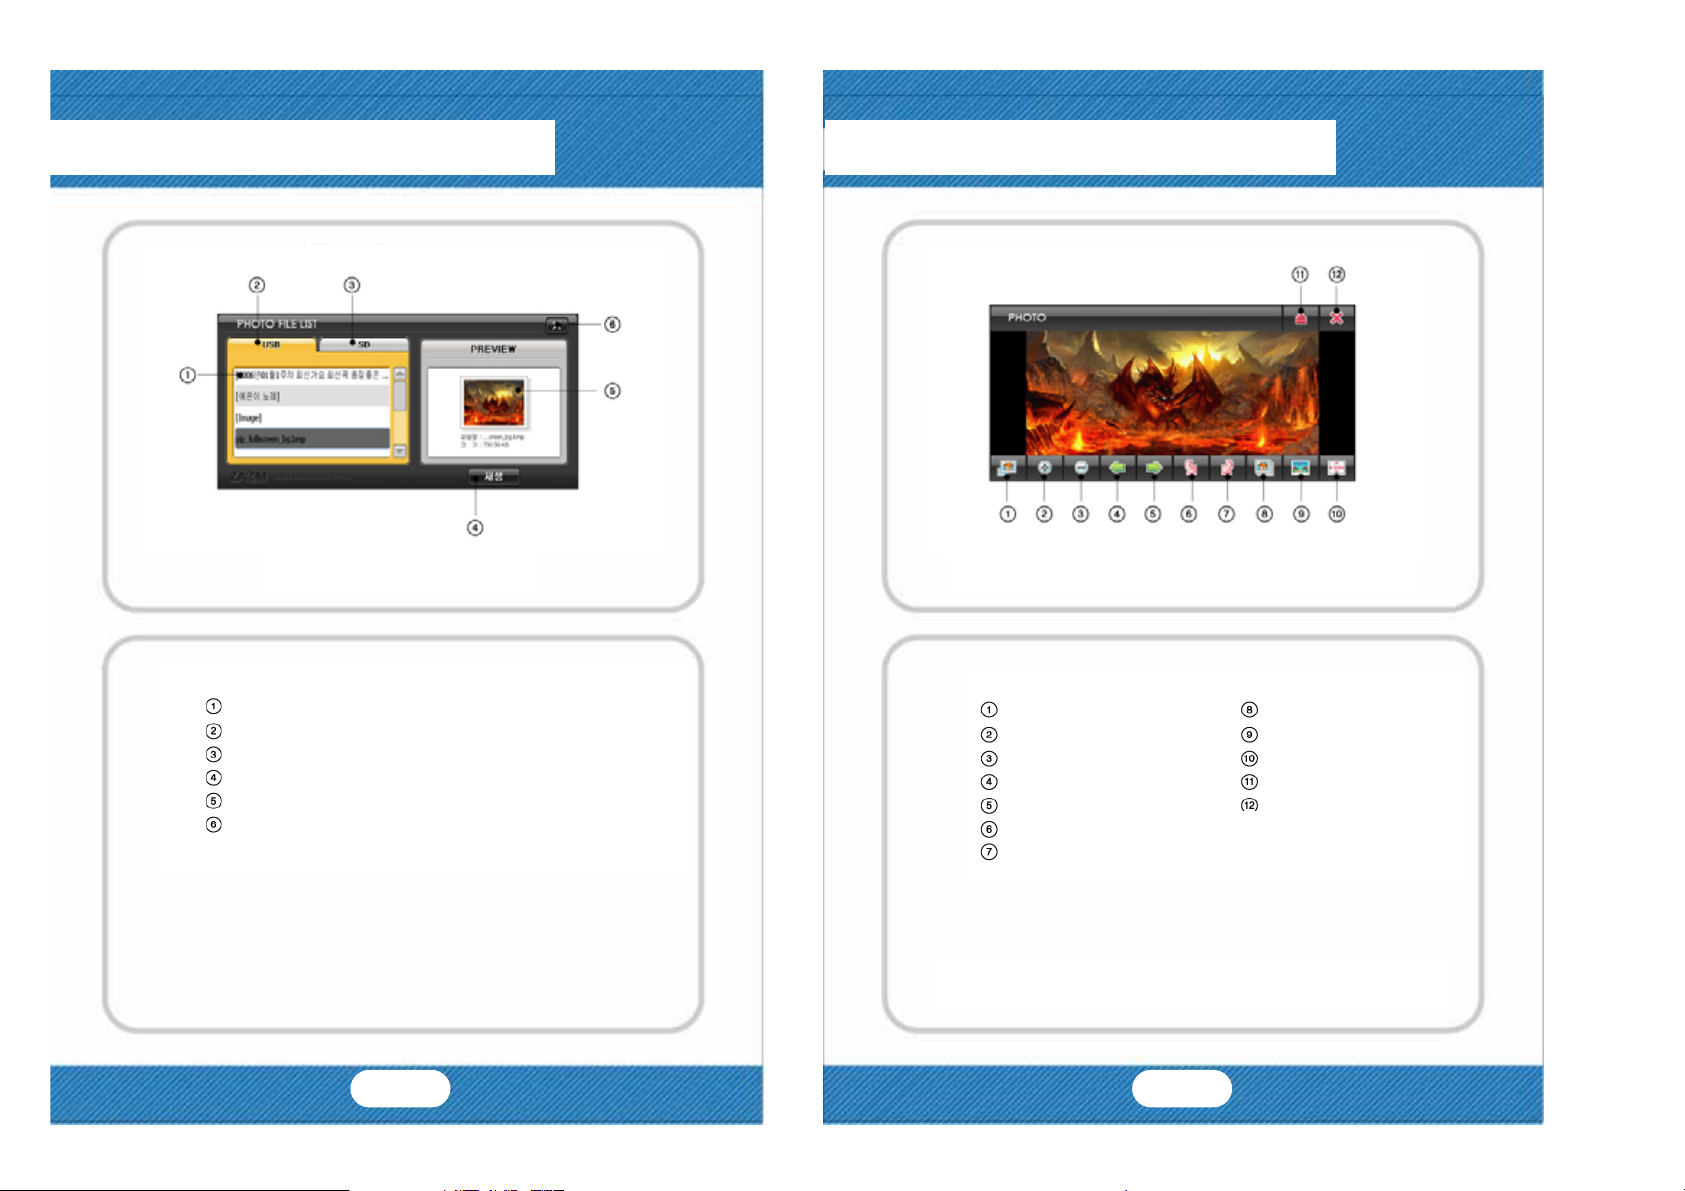
2-5. Photo Album
2-5. Photo Album
Photo Album Screen
Folders & Files
USB Folder
SD Card Foler
Show the Photos
Preview
Close
* You can register the wall paper and booting image with
your favorite images.
21 22
Photo Album Playing Screen
Fit to Screen
Enlarge
Reduce
Previous File
Next File
Rotate to counterclockwise
Rotate to clockwise
Slide Show
As Wall Paper
As Booting Image
List
Close
Page 13
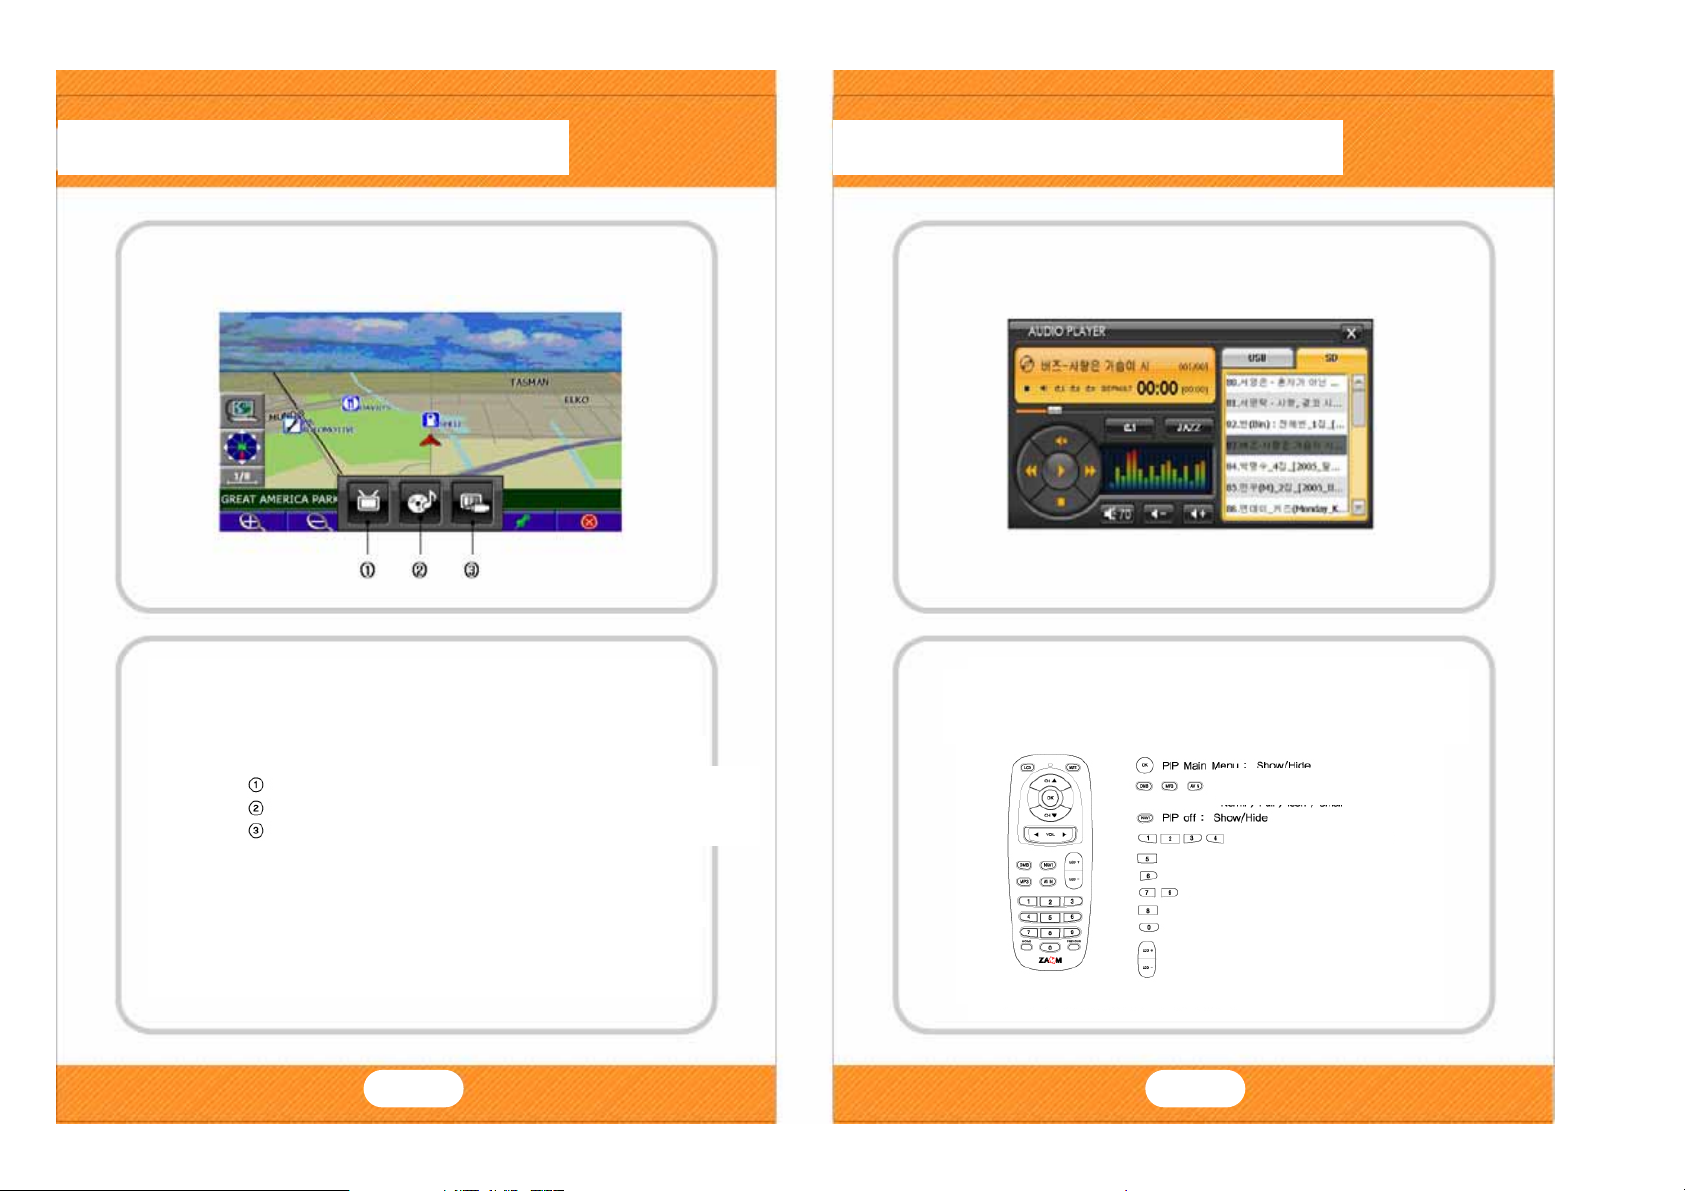
2-6. PIP
2-6. PIP
Select menu is shown on navigation if you press
OK button or CH+/CH- button when navigation
PIP Main Menu : Show/Hide
runs
PIP on / Size Change
T-DMB
Audio Player
AV IN
23 24
Normal>Full>Icon>Small
PIP off : Show/Hide
Channel Hot Key
PIP Window Position Shift
PIP Window hide/show
PIP Window volume control
PIP Window Mute
FM Trans. On/Off
DMB TV Playing with Navigation
When it’s PIP mode, you can change PIP screen size by remote controller.
If you press Navi button on PIP mode, PIP windows will be closed.
When navigation operates, push the CH+ button
or DMB key on remote controller to start DMB.
If you push NAVI key on remote controller when
DMB operates, you can watch DMB with
PIP on / Size Change
Normal>Full>Icon>Small
Navigation.
To start navigation;
- Touch the Navi Icon on main menu.
- Press the Navi key on the remote controller.
For further information about operating navigation,
please find the additional navigation manual or
refer to the web site www.zamm.co.kr.
PIP Window Position Shift
PIP Window hide/show
PIP Window Mute
FM Trans. On/Off
Navigation Zoom
Channel Hot Key
PIP Window volume control
Page 14
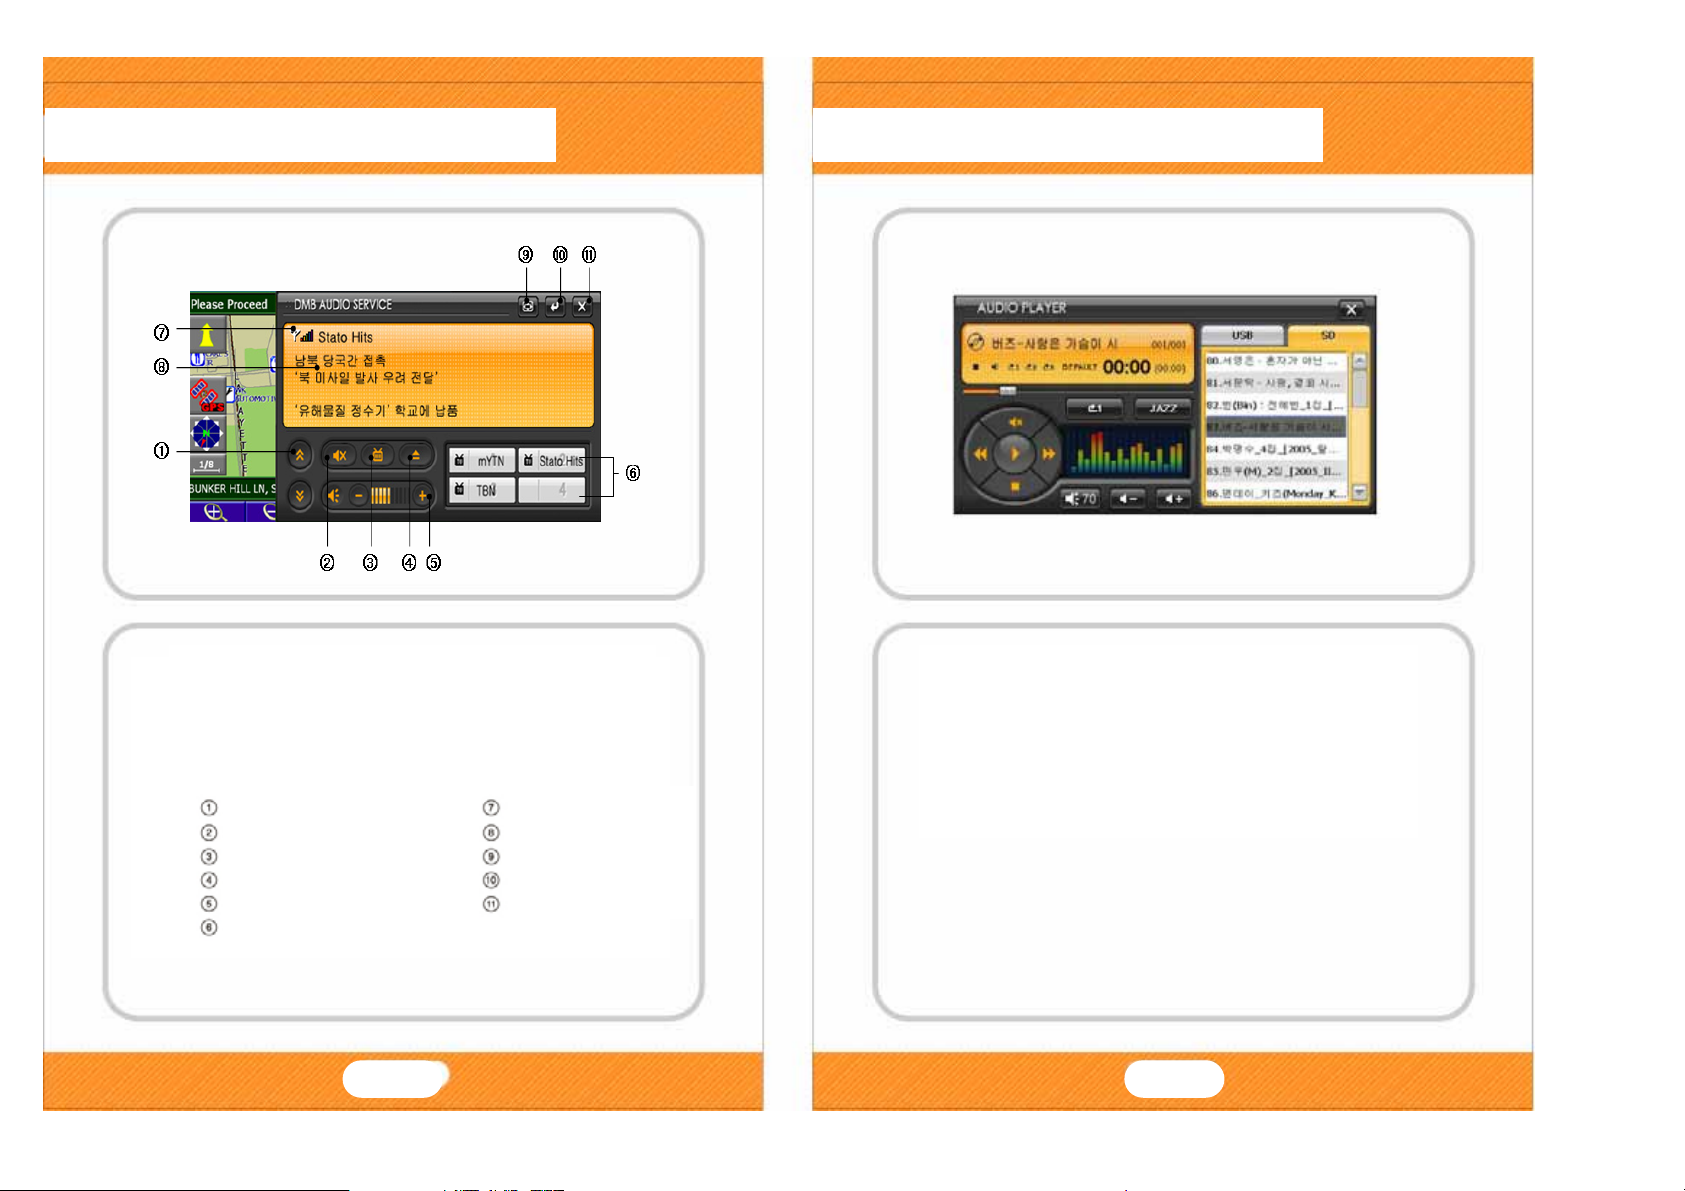
2-6. PIP
2-6. PIP
When navigation operates, push the CH+ button
or DMB key on remote controller to start DMB.
If you push NAVI key on remote controller when
DMB operates, you can watch DMB with Navigation.
Channel shift
Mute
TV mode
Channel list
Volume control
Channel hot key
25 26
Signal status
DLS
Full screen
Service list
Close
When navigation operates, push the CH- button or
MP3 key on remote controller to start MP3 player.
If you push NAVI key on remote controller when
MP3 plays, you can listen MP3 with Navigation.
Page 15
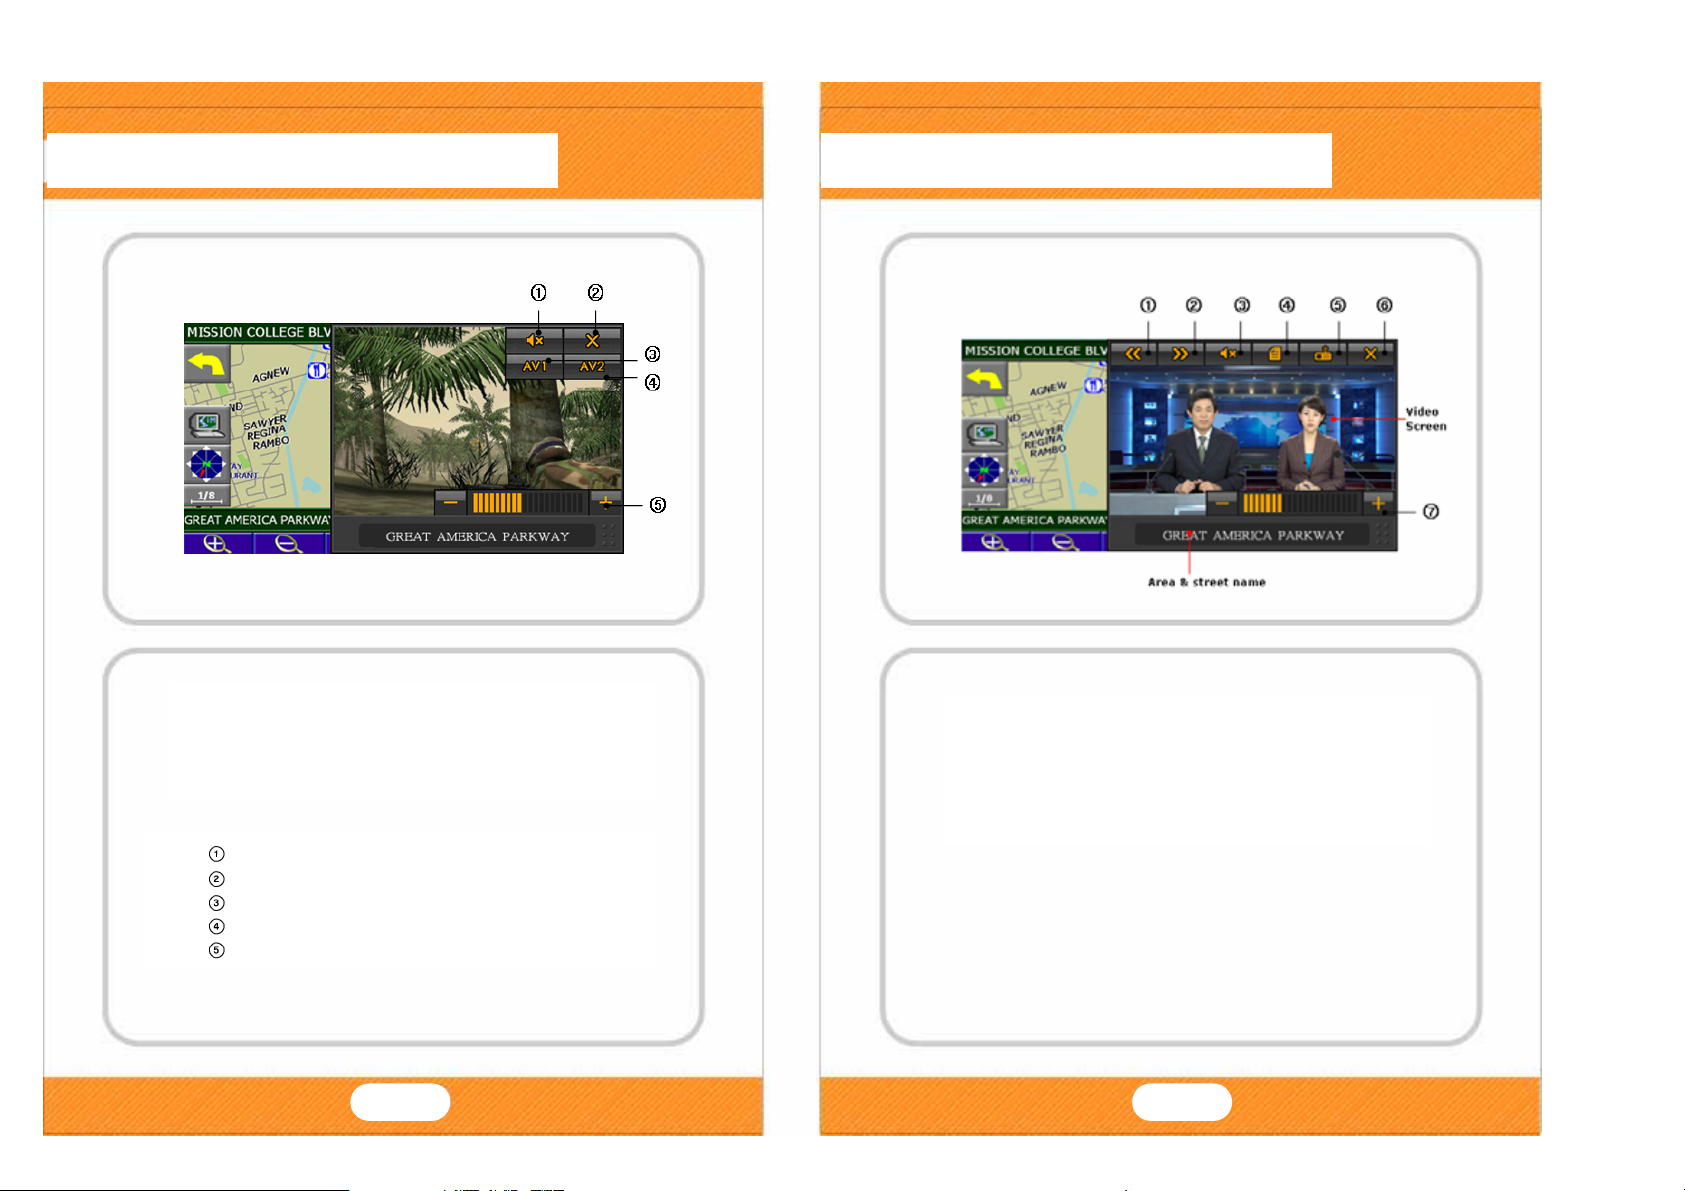
2-6. PIP
2-6. PIP
When navigation operates, push the AV IN key on
remote controller to start AV IN player.
If you push NAVI key on remote controller when
AV IN plays, you can watch AV IN with Navigation.
Mute
Close
AV IN 1
AV IN 2
Volume
27 28
When you choose full screen in the PIP mode with
DMB/AV IN/Video Play, the PIP mode changes to
NIP mode.
①Previous channel/file
②Next channel/file
③Mute
④Channel/File list
⑤ TV, Radio switch
⑥Close
⑦Volume
Page 16
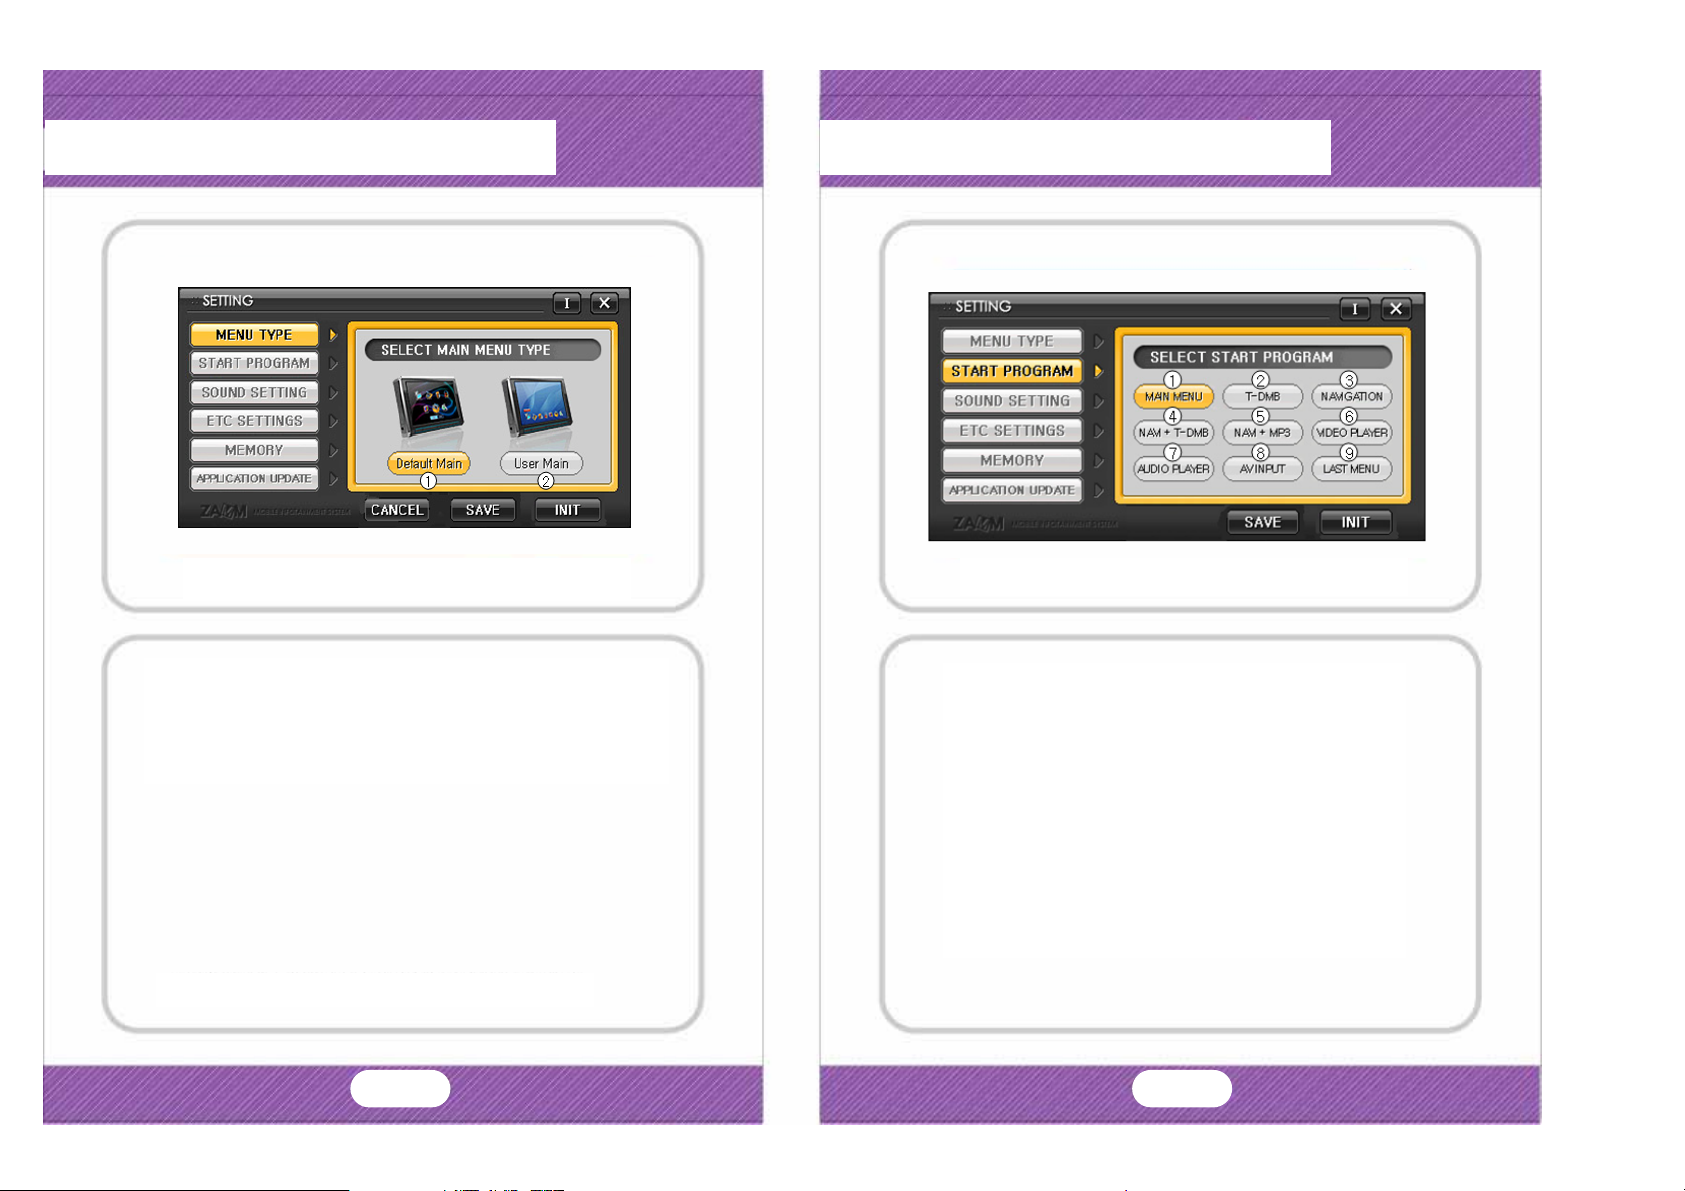
2-7. Setting
2-7. Setting
Main Menu
Start Program Setting
Sound Setting
Screen Setting
Storage Capacity
Frimware Update
Version Information
Default OK Cancel
Main Menu Setting Screen
You can change the main menu type.
① Default Menu Type
② User Menu Type
Main Menu
Start Program Setting
Sound Setting
Screen Setting
Storage Capacity
Frimware Update
Version Information
Default OK Cancel
Start Program Setting Screen
You can select the start program.
① Main Menu
② T-DMB
③ Navigation
④ Navi+DMB
⑤ Navi+MP3
⑥ Video Player
⑦ Audio Player
⑧ AV IN
⑨ Last played function
* You can change the background image.
29 30
Page 17
2-7. Setting
2-7. Setting
Main Menu
Start Program Setting
Sound Setting
Screen Setting
Storage Capacity
Frimware Update
Version Information
Default OK Cancel
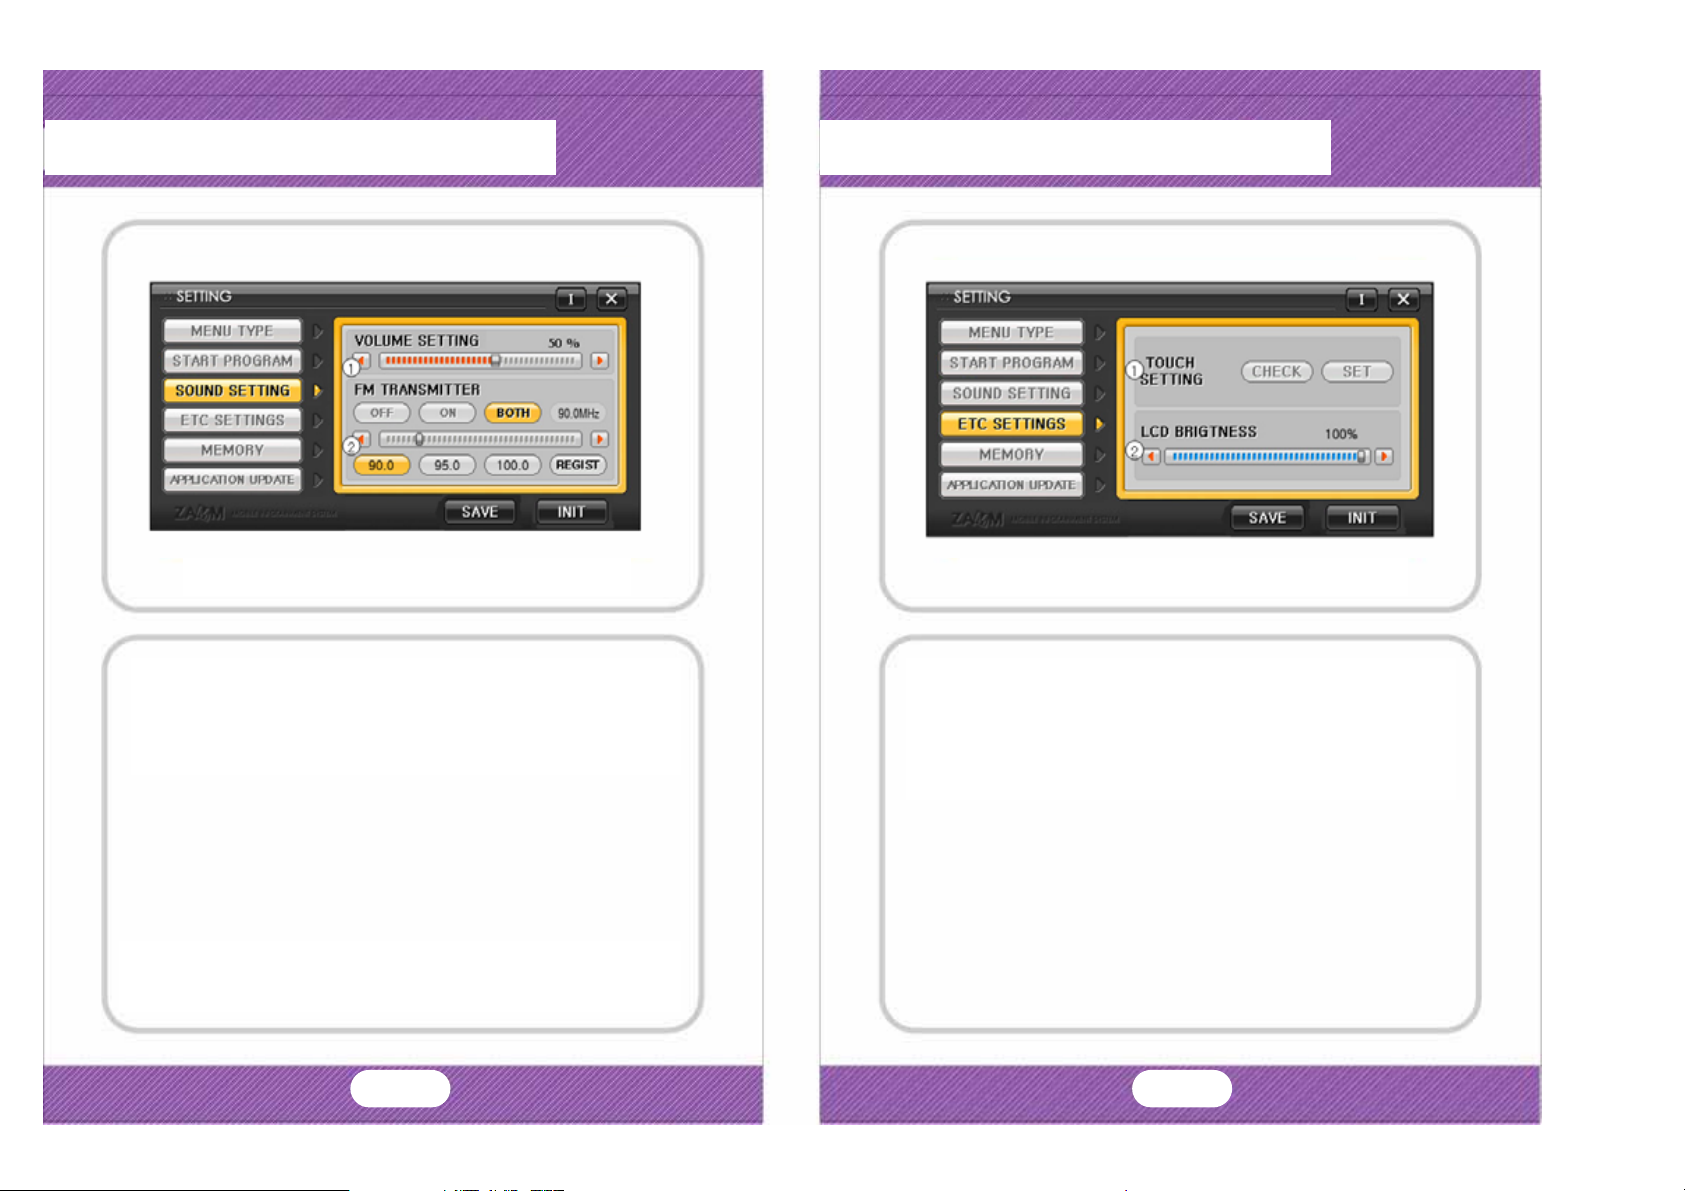
Sound Setting Screen
You can change the main sound volume and FM transmitter.
• Volume Control
• FM Transmitter Control
Main Menu
Start Program Setting
Sound Setting
Screen Setting
Storage Capacity
Frimware Update
Version Information
Default OK Cancel
Etc Setting Screen
You can change the brightness of screen and calibration of
touch screen.
① Touch Screen Calibration
② Screen Brightness Control
* You can listen the sound with your car audio speaker when you
select FM transmitter.
* It is useful when you watch the movie and listen the music.
31 32
Page 18
2-7. Setting
2-7. Setting
Main Menu
Start Program Setting
Sound Setting
Screen Setting
Storage Capacity
Frimware Update
Version Information
Default OK Cancel
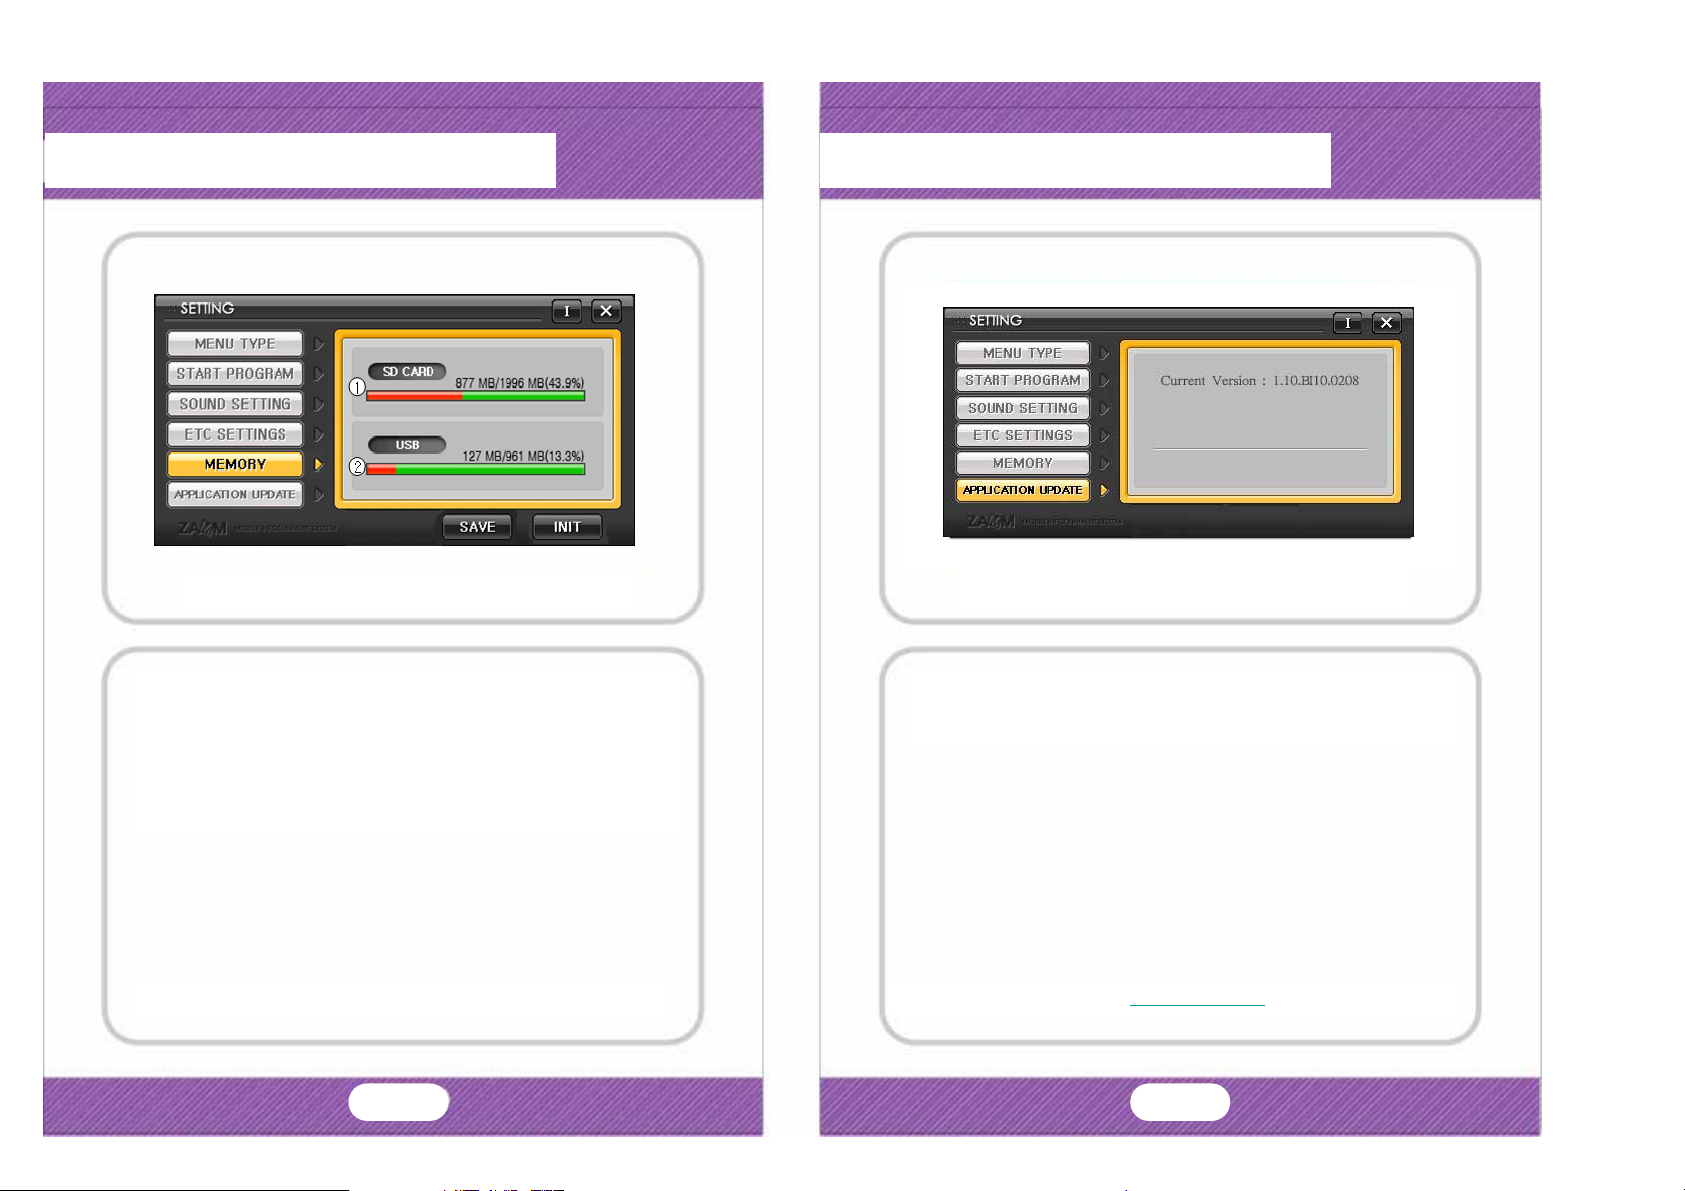
Storage Capacity Screen
You can check the storage Capacity.
① SD CARD Stroage Status
② USB Memory Stick Storage Status
Main Menu
Start Program Setting
Sound Setting
Screen Setting
Storage Capacity
Frimware Update
Version Information
Yes No
Default OK Cancel
Firmware Update Screen
You can update the firmware.
There will be the manual and update file in our web site
in the near future.
* There might be no information when CF/SD/USB slot is empty.
33 34
* Please check the web site, www.zamm.co.kr for further information.
Page 19
2-7. Setting
Main Menu
Start Program Setting
Sound Setting
Screen Setting
Storage Capacity
Frimware Update
Version Information
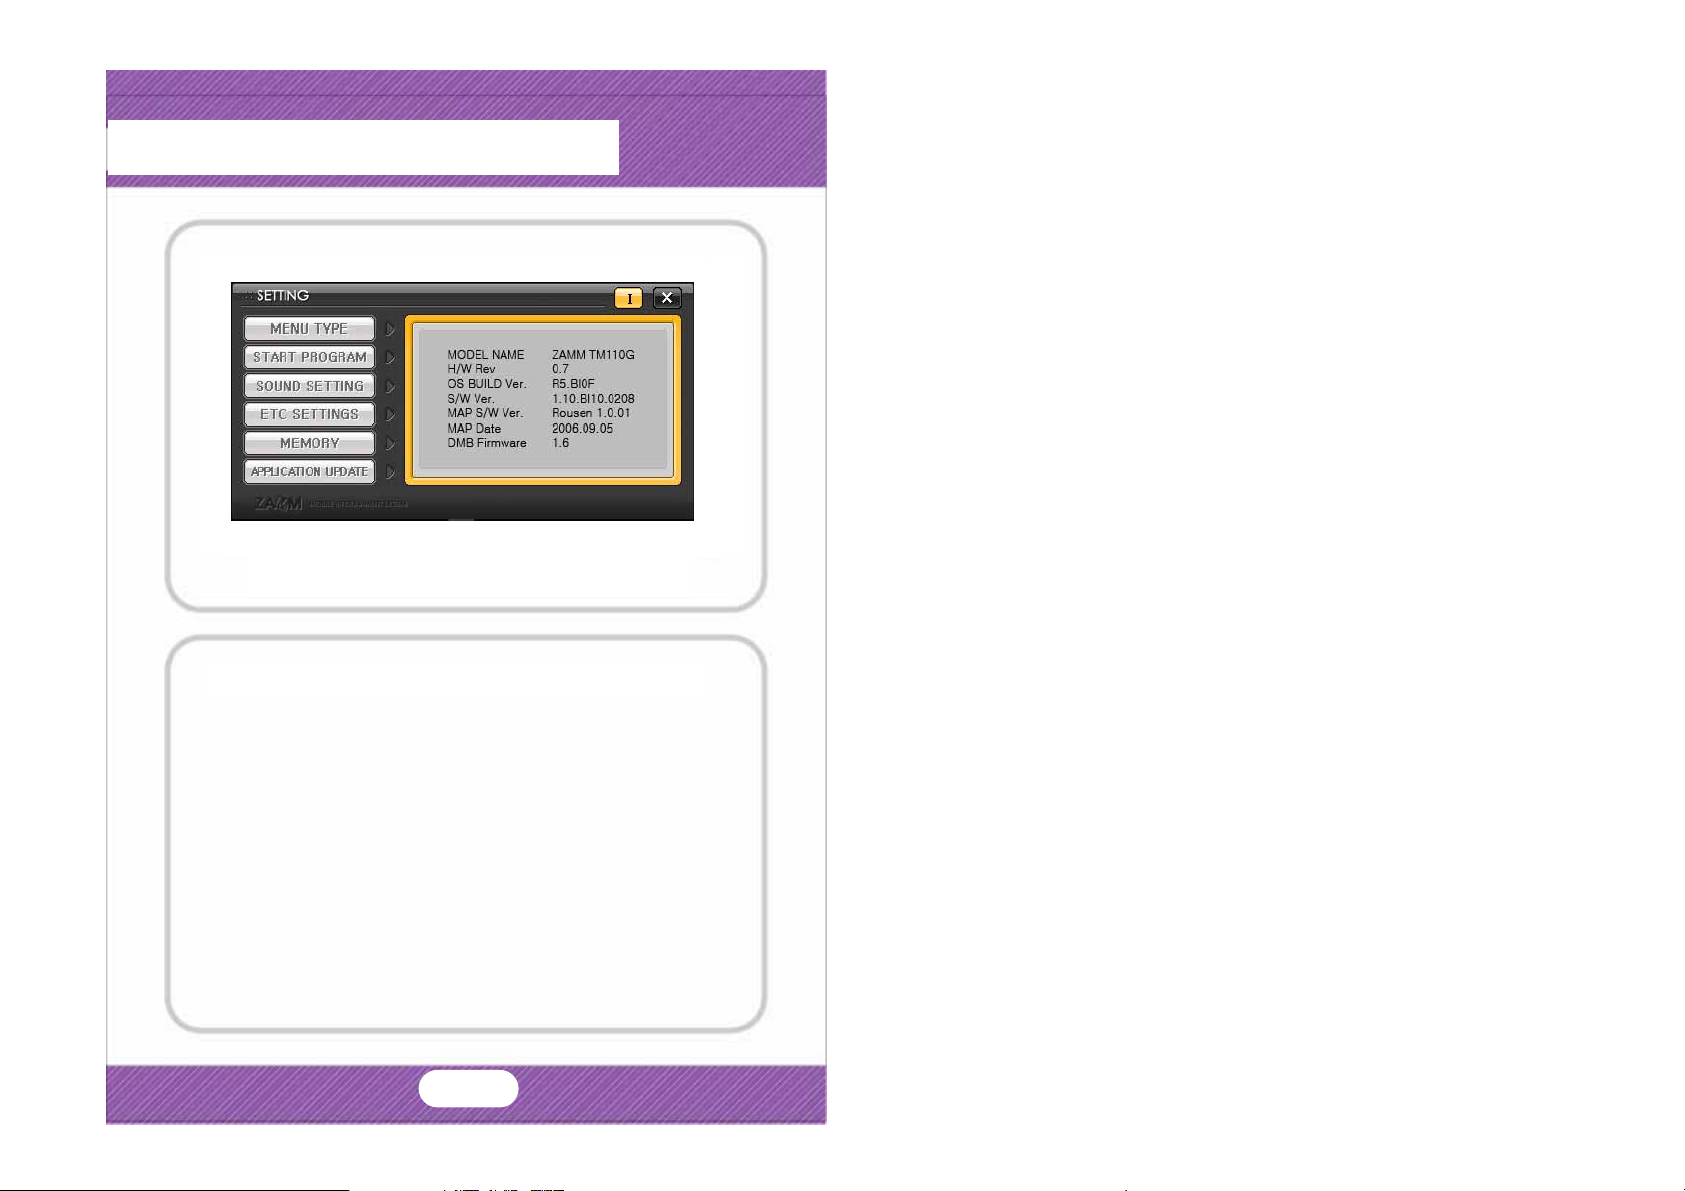
You can check the version of the product.
Default OK Cancel
Product Information Screen
35
Page 20
3-1. ETC
ETC
3-1. ETC
Product Specification
General Information
Model : ZAMM
Weight & Size : 187mm X 127mm X 26mm
Chipset : 400MHz ARM9 CPU
Memory : 64MB Nand Flash + 64MB SDRAM
OS : WIN CE 5.0 Core
LCD : DIGITAL 7” (480X234)
Power : DC 12V 1.5A
Storage : 1)SD slot
USB : 2)1.1 Host X 1
VIDEO
Supported File : MPEG, WMV
Text : SMI format
Frame : 30 F r ame Per Second
AUDIO
Speaker : 8 Ohm 1W X 2
Supported File : MP3, WMA
Additional Function : FM Transmitter
VIDEO INPUT
Video Format : NTSC/PAL
Video Type : CVBS
Audio : AV 1(Stereo), AV 2(Mono)
Product Specification
T-DMB
Frequency : 174~240MHz
Video : H.264 AVC Baseline
Audio : BSAC and MPEG Layer2 (MUSICAM)
GPS
Frequency : L1 (1575.42MHz)
Receiving Type : C/A Code 12-Channel
FM Transmitter
Sending Frequency : 88.5MHz~107.5MHz
Channel : 190 channels
Antenna Power : 500 μ V/m
Antenna Type : Wire Antenna
Modulation Type : FM
Transmission Type : One Way Transmission
① Some SD card may not be supported.
②
For emergency recovery purpose only.
③ For USB memory stick.
(Some USB memory stick may not be supported.)
36 37
Page 21
3-2. Customer Support
3-2. Customer Support
Warranty
PRODUCT : T-DMB/DAB Navigation System
MODEL : ZAMM-TM110
Serial No. :
Purchased Date :
Purchased Place :
Elements of Warranty
2MTECH warrants to the original retail owner for the duration
of this warranty; its ZAMM-TM1(hereinafter referred to as the
Product) to be free from defects in materials and
craftsmanship with only the limitations or exclusion set out
below.
Warranty Durations
This warranty to the original retail owner only, shall terminate
and be of no further effect ONE (1) Year after the date of
original retail sale. This warranty will be deemed invalid if the
Product is; (A) Damaged or not maintained as reasonable and
necessary; (B) Modified, altered or used as part of any
conversion kits, subassemblies, or any configurations not sold
by 2MTECH, (C) Improperl y installed, (D) R epaired by
someone other than an authorised 2MTECH Repair Agent, (E)
Used in conjunction with any equipment or parts or as part of
a system not manufactured by 2MTECH, (F) Installed,
programmed or serviced by anyone othyer than an authorised
2MTECH Repair Agent, (G) broken by fire, earthquake, flood
and natural disaster, or (H) Where the Serial Number label of
the product has been removed or damaged beyond recognition,
FCC Informatioin
This device complies with Part 15 of the FCC results.
Operation is subject to the following two
conditions;
(1) This device may not cause harmful interface, and
(2) This device must accept any interference rece ived,
including interference that may cause undesired operation.
Note: This equipment has be en tested and found to comply with the limits
for CLASS B digital device, pursuant to Part 15 of FCC Rules. These limits
are designed to provide reasonable protection against harmful interference
when the equipment is operated in a commercial environment. This
equipment generates, uses and can radiate radio frequency energy and, if
not installed and used in accordance with instructions, may cause harmful
interference to radio communications. However, there is no guarantee that
interference will no occur in a particular installation. If this equipment does
not cause harmful interference to radio or television reception, which can
be determined by turning the equipment off and on, the user is
encouraged to try correct the interference by one or more of the following
measures;
1.1. Reorient or reallocate the receiving antenna
1.2. Increase the separation between the equipment and receiver.
1.3. Connect the equipment into an outlet on a circuit different from that
to which receiver is connected.
1.4. Consult the dealer or experienced radio/TV technician for help.
WARNING
Changes or modifications not expressly approved by the
manufacturer could void the user’s authority to operate
the equipment.
38 39
Page 22
MEMO
MEMO
 Loading...