

Page 1
Blood glucose
monitoring system
for self testing use
Thank you for purchasing the
2in1. STEP.
Please read this User Guide carefully
before using to ensure correct use.
Please keep this User’s Guide for your
future reference.
“ * “ indicates “Available only in
2in1. STEP“.
USER GUIDE
ENG
SELF-TESTING IVD
Page 2

2in1. STEP system is very easy to carry around and able to be used
for measuring the glucose level in whole blood and steps* anytime.
It is also very simple, easy and foolproof. You don’t have to worry
about coding your meter because the
2in1. STEP meter does it
automatically. The system should be used only for testing glucose
and only with fresh capillary whole blood samples. The system is
intended for self-testing by persons with use in the home and in
clinical settings. It should not be used for the diagnosis of diabetes
or the testing of newborn.
Features 1
2in1. STEP has only one button to
navigate all functions easily with simple
operation.
2
It is small size, stylish design, and ease of
use allows you to take it everywhere.
3
It can show all information variously.
4
It requires very small volume (0.5uL) and
display the result in 5 seconds.
5
It can measure glucose in whole blood at
AST (Alternate site testing).
6
It can measure glucose concentration
when the test strip inserted without
changing the code number or using the
code chip.
Page 3

Table of Contents
Content of 2in1. STEP
Before Starting
Name and Function of the Parts
Cautions
About the STEP meter*
Obtaining Blood Drop
About Alternate Site Testing
Testing Your Blood Glucose
Control Solution Testing
Reviewing Results
Setting the Meter
Replacing the Battery
Error Messages
Troubleshooting
Performance Characteristics
System Care and Maintenance
Specifications
*Available only in
48
49
51
54
57
59
62
64
68
71
74
77
78
80
81
83
85
2in1. STEP.
Page 4
CONTENT of
2in1. STEP
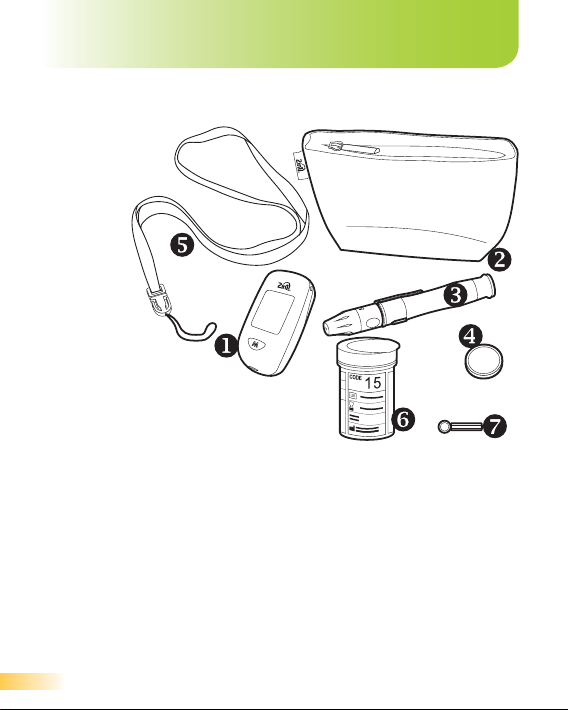
2in1. STEP system includes:
1. 2in1. STEP meter 1 pcs
2. Carrying Case 1 pcs
3. Lancing Device 1 pcs
4. Lithium Battery (CR2032) 1 pcs
5. Neck Strap (Available only with 2in1. STEP) 1 pcs
6. 2in1. STEP Blood glucose test strips 10 pcs
7. Lancets
The address and related CE marks of lancets manufacturer and
the address of lancing device manufacturer are mentioned on the
outside box of starter kit packaging. Lancets and lancing device
are covered by Medical Device Directive (MDD).
10 pcs
Documents in your system include USER GUIDE and QUICK GUIDE.
4
Page 5
Before Starting
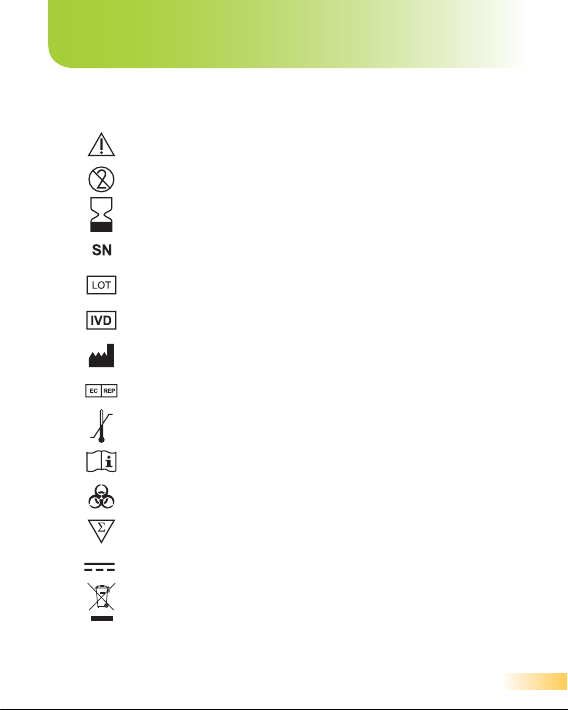
Symbols:
Caution, see instructions for use
Single use only
Expiration date
Serial number
Lot number
In Vitro Diagnostic medical device
Manufacturer
Authorised representative
Symbol for temperature limitation
Consult instructions for use
Biological risks
Contains sufficient for <n> tests
Direct current
Separate disposal from other household waste
5
Page 6

Before Starting
Intended Use
2in1. STEP system is intended for self-testing to monitor glucose
concentrations in fresh whole blood.
2in1. STEP system is for use
outside body (in vitro diagnostic use) in fingertips, forearm, upper
arm, hand, thigh and calf testing.
Test principle
The 2in1. STEP system is based on measurement of a small
electrical current produced by the reaction of glucose in the blood
sample with the reagents on the strip. This current changes with the
amount of glucose in the blood sample. The glucose concentration
in the sample is calculated based on the electrical current and
displayed on the meter.
Setting the time and date
Your 2in1. STEP meter comes preset time, date, year and measure
unit. Before using your meter for the first time or if you change the
meter battery, you should check and set the time and date. If you
do not set your meter for the first time or after changing the battery,
you can hear 3 beeps when inserting the test strip.
See page 30 (Setting the Meter) to ensure your desired settings
are saved.
6
Page 7
Names and Functions
of the Parts
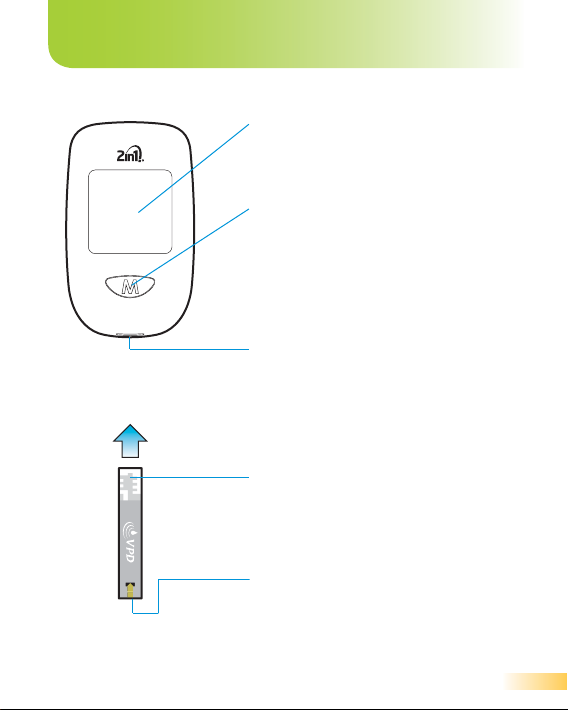
Display Screen
This is where you read your test results,
steps and other informations.
M-button
The ‘M’ button is used to recall the
stored results and adjust the
parameters in set-up mode. You can
turn the meter off by pressing and
holding the ‘M’ button for 3 seconds.
Front View
2in1. Test Strip
Test Strip Port
Insert the end of a 2in1. STEP test strip
here. The meter will turn on when you
insert the test strip.
Silver Electrodes
The end of the test strip is inserted into
the test strip port of the meter with the
silver end facing up.
Sample Tip
The end of the test strip where the
blood sample is drawn into.
7
Page 8
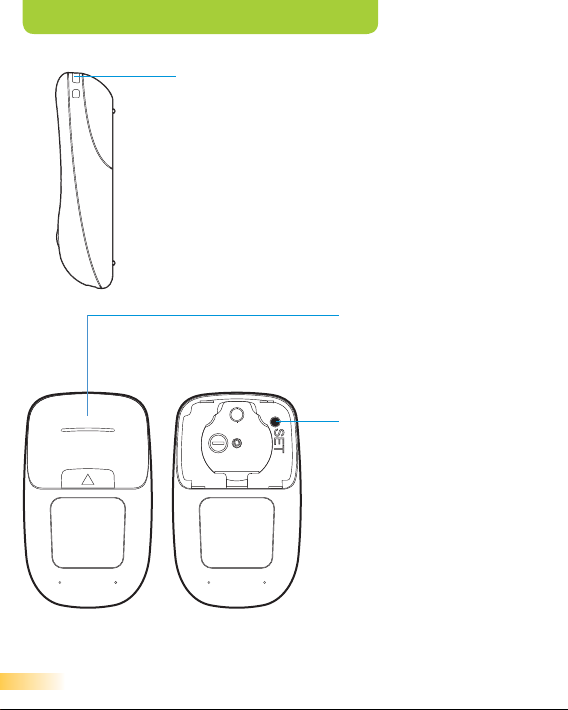
Names and Functions of the Parts
Strap Hole
It is for hand-strap or neck-strap.
Side View
Back View
8
Battery Cover
Slide cover off to
replace batteries.
SET Button
Used to enter the setup
mode for changing
the date and time and
unit of measure.
Page 9
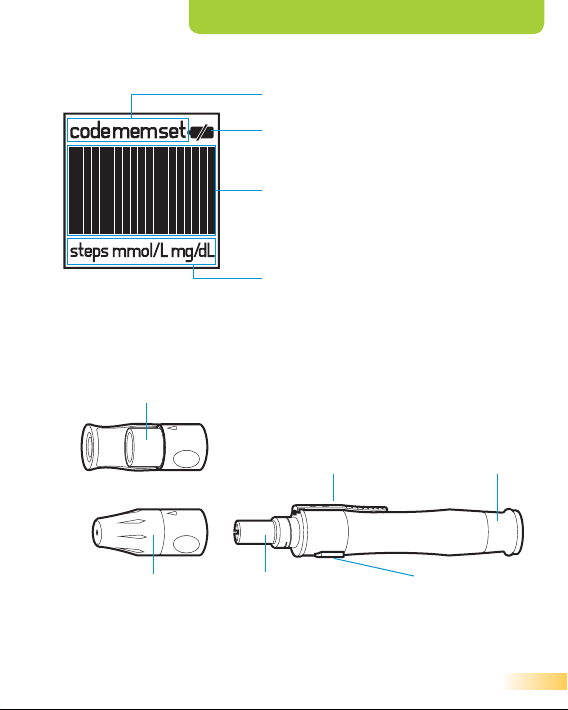
Names and Functions of the Parts
l
Displays the mode of meter.
Warns when the battery is low or must
be replaced.
Display test results, steps*, measuring
status, error messages and other
informations.
Display
Clear AST cap
* available separately
Adjustable cap Lancet holder Release button
Results are displayed along with the
units of measure.
Lancet ejector Sliding barre
Lancing Device
9
Page 10

Cautions
Cautions for
System
10
The 2in1. STEP System is intended for
use outside the body (in vitro diagnostic
use) only.
2in1. STEP System is used only for
The
measuring fresh capillary whole blood.
2in1. STEP meter should only be
The
used with
STEP Control Solution.
Do not use the
2in1. STEP Test Strip and 2in1.
2in1. STEP System for
the diagnosis of diabetes, testing on
newborns and testing of arterial blood.
2in1. STEP System contains
The
small parts that may be dangerous if
swallowed.
Check the package before starting the
measurement.
Be sure to read user guide and the test
strip insert found in the test strip box
carefully before testing.
Do not make any decision of medical
relevance without first consulting your
physician and/or having recieved
appropriate training.
Page 11

Cautions
Cautions for
Meter
Keep the meter out of reach of children.
If a child swallows battery, battery cover,
immediately consult with a doctor.
Do not swing the meter by holding the
neckstrap. You may injure yourself or
other people.
Do not throw the battery into fire.
Do not disassemble or modify the meter.
Do not subject the meter to severe
shock, drop or step on meter.
The meter is not waterproof. Do not
wash it or touch it with wet hands.
Do not wipe the meter with thinner, or
abrasive cleaners.
Avoid the meter being exposed to high
temperature, high humidity, rain and/or
dust when using or storing the meter.
Do not test glucose instantly when the
meter is moved to a place with a great
difference in temperature. Wait 20
minutes and start testing.
11
Page 12

Cautions
Cautions for
Test Strip
Store the test strip in a cool, dry place
between 2° and 32°C (36° and 90°F).
Keep away from direct sunlight and heat.
After removing test strip from the vial,
immediately close the vial cap tightly.
You may get an inaccurate if vial cap
opened long period of time.
Do not drop the blood on the surface of
test strip directly.
Do not press the test strip against your
finger. This may affect inaccurate aspiration
of blood.
Do not use a test strip that appears
damaged or has been used. Test strips are
for single use only.
Store test strips in their original vial.
After you take a test strip out of the vial, be
sure to use it within three minutes.
Always use test strips within 3
months (90 days) after first opening.
With clean, dry hands, you may touch the
test strip anywhere when removing it from
the vial or inserting it into the meter.
Do not bend, cut, or alter test strips.
12
Page 13

About the STEP meter*
*Available only with
2in1. STEP
The 2in1. STEP System is your walking partner, along with built-in
STEP meter and can help you control your diabetes by counting
your steps and testing your blood glucose level.
We recommend that you place the meter in the upper front pocket
of your jacket, in a bag you hold tightly, or wear the meter with neck
strap around your neck.
Place the meter in your pocket
Do not place the meter in the back pocket of your pants.
Place the meter in the pocket you hold tightly.
Place the meter in your bag
Place the meter in your pocket or the partition of your bag.
Wear the meter with neck strap around your neck
Use the supplied neck strap and place the meter near your chest.
Important:
The meter can count steps only in the following cases:
When the meter is off with battery installed.
‘M’ button is pressed and released when the meter
is off.
13
Page 14
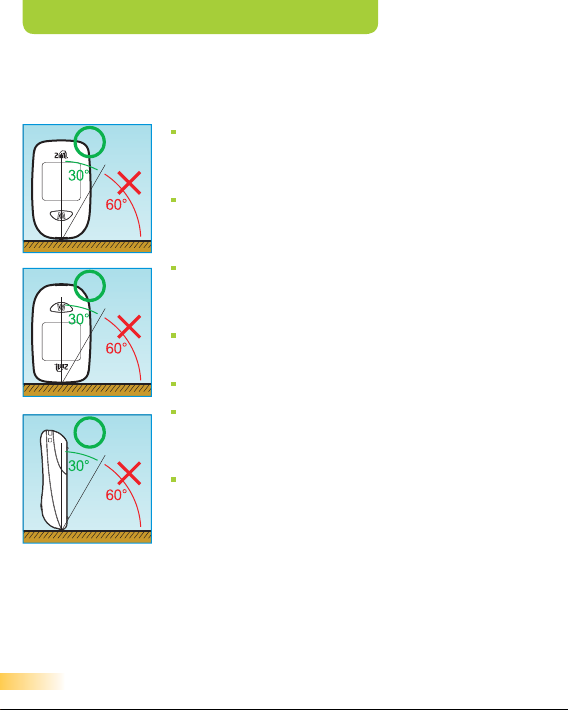
About the STEP meter
The meter may not be able to count the steps correctly in the
following cases.
When the memory is being displayed, the
blood glucose is being tested or the meter
is being set.
When the front of the meter is placed in the
angle of less than 60° or horizontally to the
ground.
When the meter is placed in the bag that
moves irregularly because it hits your foot,
your belt or the top of your pants.
When the unit hangs from your belt, the top
of your pants or a bag.
When you walk at an inconsistent pace.
When you use the meter in the place where
lots of up and down movements or vibrations
take place.
When you walk extremely slowly.
14
Page 15
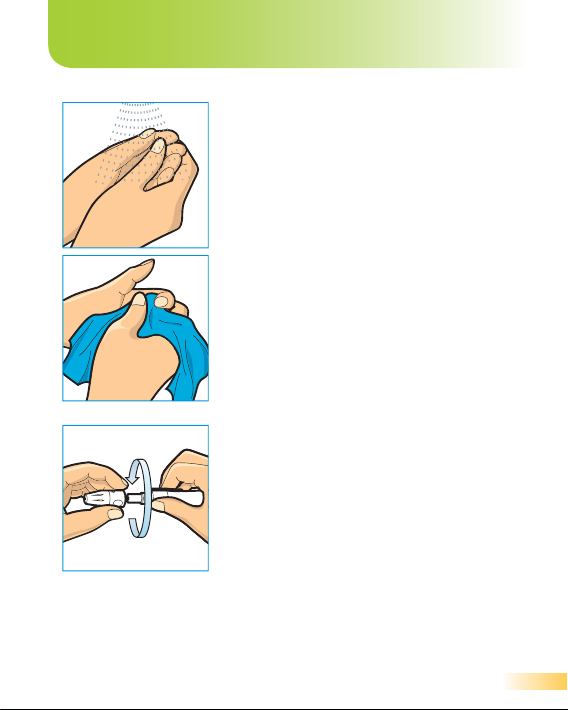
Obtaining Blood Drop
STEP 1
Wash your hands carefully with warm water
to increase the circulation of the blood into
the fingers. Dry hands thoroughly until the
finger to be pricked is completely dry.
STEP 2
Unscrew the cap of the lancing device by
turning it counter-clockwise while holding
the base firmly.
15
Page 16
Obtaining Blood Drop
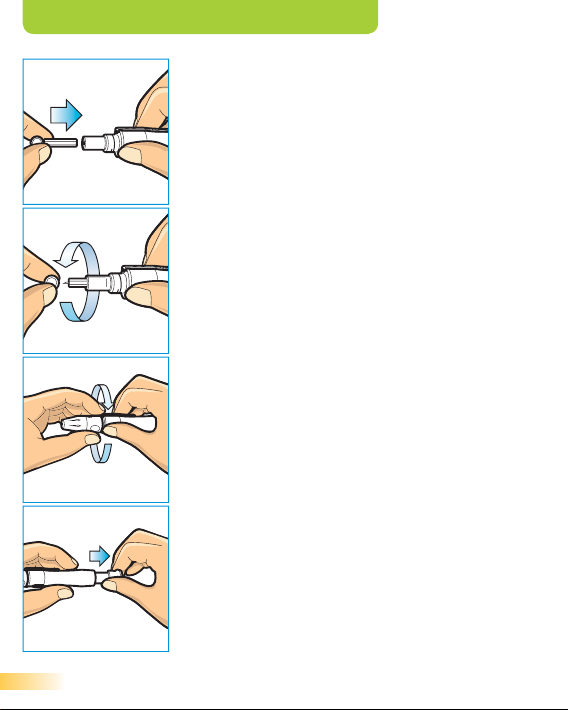
STEP 3
While holding the lancet carrier, insert a new
sterile lancet into the bottom of lancet
carrier.
STEP 4
Twist the cap of the lancet off.
STEP 5
Put the cap of the lancing device back on
and turn it clockwise.
STEP 6
Hold the tip firmly in one hand then pull out
the sliding barrel with the other hand. This
will cock the lancing device.
16
Page 17
Obtaining Blood Drop
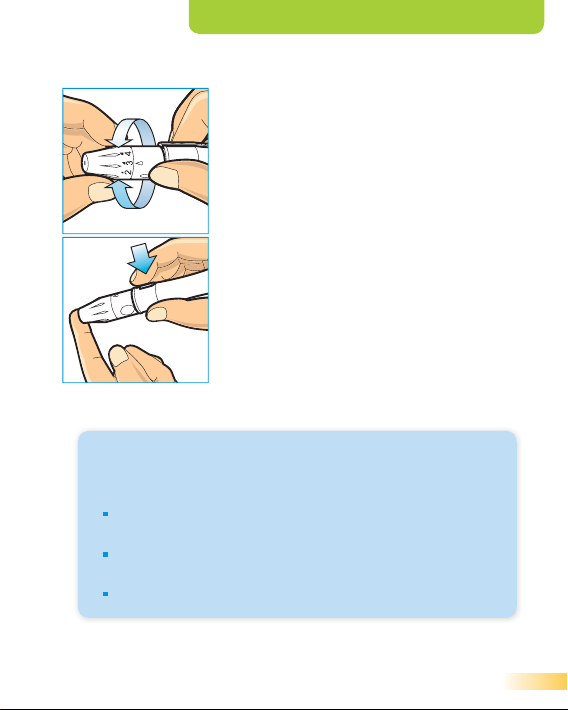
STEP 7
Set the proper depth of penetration by
rotating the cap of lancing device. 1-2 for
soft or thin skin, 3 for average skin, 4-5 for
thick or calloused skin.
STEP 8
Place the lancing device in place. Hold the
lancing device firmly against the side of the
finger, with the cap resting on the finger.
(The harder it is pressed the deeper the
puncture). Press the release button to take
a sample.
Caution: To reduce the chance of infection:
Make sure to wash the puncture site with soap and
water before sampling.
Do not share a lancet or a lancing device with
anyone.
Always use a new lancet - lancets are for single
use only.
Keep your meter and lancing device clean.
17
Page 18
About Alternate
Site Testing
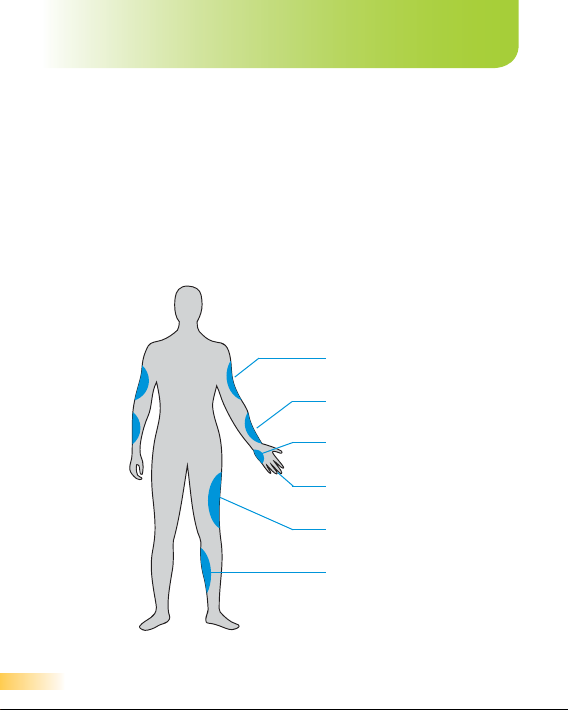
The 2in1. STEP lets you obtain a blood sample from your upper arm,
forearm, hand, thigh or calf. Obtaining a drop of blood from these
“alternate site testing” may be less painful than a fingertip sample.
Following figure shows the areas where you can test with the
STEP System. Avoid moles, veins, bones and tendons. Consult to
your healthcare professional before using alternate site testing.
Upper Arm
Forearm
Hand
Fingertips
Thigh
Calf
2in1.
18
Page 19
About Alternate Site Testing
Caution: Do not test on alternate sites:
When you think your blood glucose level is changing
rapidly, such as within two hours of exercise, a rapidacting insulin injection or insulin pump bolus or within
two hours after a meal.
If you are testing for hypoglycemia (low blood glucose)
or if you suffer from hypoglycemia unawareness.
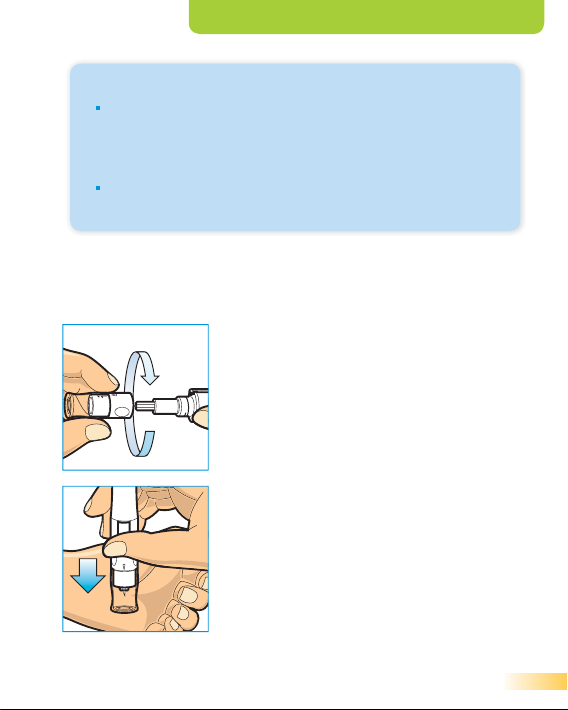
Obtaining a blood sample from alternate sites is different than
getting a sample from fingertips.
After inserting a new sterile lancet into the
bottom of lancet carrier, put the clear AST
cap to the lancing device.
Place the lancing device on the skin at the
chosen site, press and hold the lancing
device continuously for a few seconds, then
push the release button to take a sample.
Watch through the clear cap until a sufficient
blood sample is taken. If there is not enough
blood, gently massage the area until a
sufficient sample has been collected.
19
Page 20
Testing Your
Blood Glucose
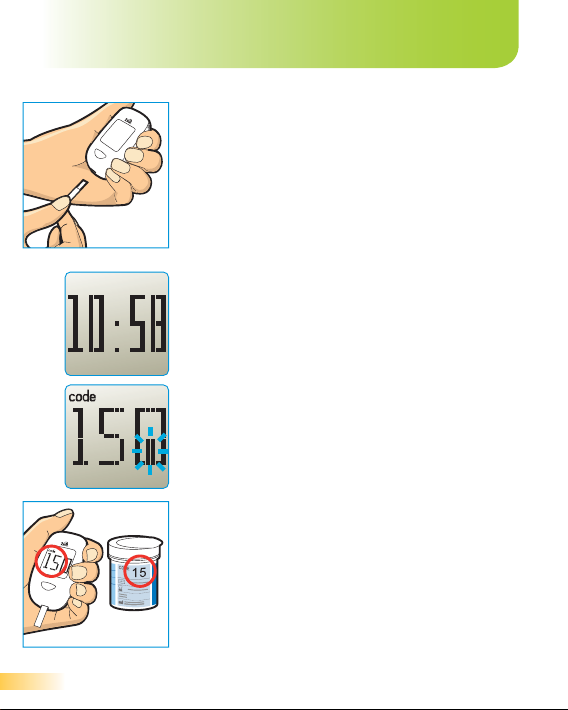
STEP 1
Hold the test strip with the silver end facing
up. Insert the silver end into the test strip
port on the meter. Insert a new test strip into
the meter until it stops. The meter will turn
on.
STEP 2
Time will be displayed for a moment. Then
Code number and strip symbol will be
displayed. A strip symbol with filling blood
will appear letting you know the meter is
ready to test.
STEP 3
Make sure the code number showed on the
screen is the same as the code number
printed in the test strip vial. If the code
number on the screen is different from the
code number printed on the strip vial, try to
insert new strip.
20
Page 21
Testing Your Blood Glucose
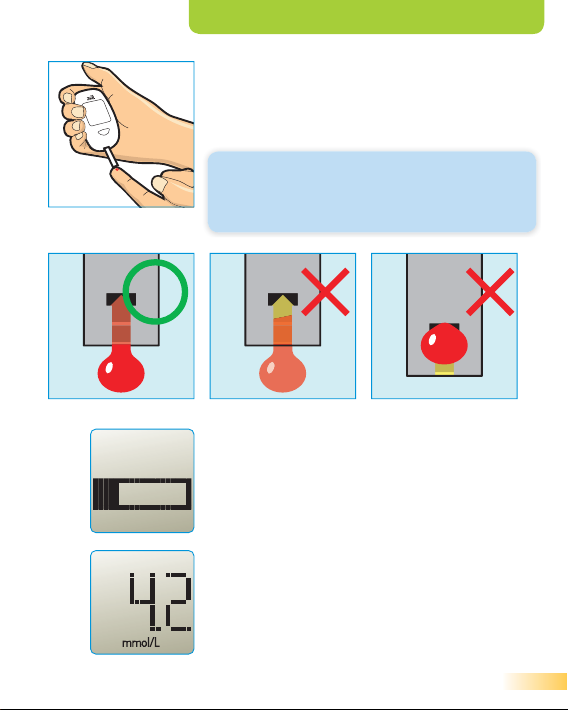
STEP 4
Bring tip of the test strip to lightly touch the
drop of blood. Hold until the Meter beeps.
Blood is automatically pulled into the test strip.
Important: The volume of blood
sample must be at least 0.5 microliter
(real size ”
.“).
STEP 5
The Meter will now show counting progress
of 5 seconds.
STEP 6
The test result is complete when you hear
beeps. Your blood glucose test result is
shown on the display screen.
21
Page 22
Testing Your Blood Glucose
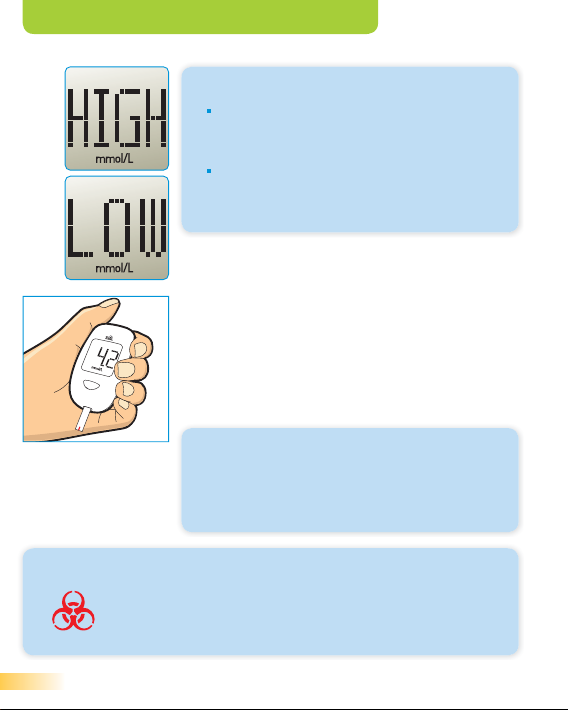
Caution:
If your test is above 600 mg/dL (33.3
mmol/L), “HIGH” will appear on the
display screen.
If your test result is lower than 10
mg/dL (0.6 mmol/L), “LOW” will
appear on the display screen.
STEP 7
To turn your Meter off, simply remove the
used test strip. The Meter turns off
automatically. Your test result will
automatically be stored in memory with your
steps* from last blood glucose test.
Important:
The meter turns off
automatically after one minute of no use.
When this happens, test results are still
saved in memory.
Caution:
Used test strips and lancets may be considered
biohazardous waste in your area. Be sure to follow
your local regulations for proper disposal.
22
Page 23

Testing Your Blood Glucose
Unexpected results
If your test result is below 50mg/dL (2.8mmol/L), above
250mg/dL (13.9mmol/L), or you see “LOW” or “HIGH” on the
mterer display, call your physician or healthcare professional
immediately. If you continue to get unexpected results, check
your system with control solution. See Control Solution Testing
(page 24).
Range of expected results
Blood glucose levels will vary depending on food intake,
medication dosages, health, stress or exercise. Consult your
healthcare professional for the target value that is appropriate for
you. Expected blood glucose levels for people without diabetes:
Fasting: Less than 100 mg/dL (5.6 mmol/L)
2 hours after meals : Less than 140 mg/dL (7.8 mmol/L)
23
Page 24
Control Solution
Testing
2in1. STEP
control solution contains a known amount of glucose
and is used to check that the meter and the test strips are working
properly. Control solution is available separately.
Control solution is not included and is not contained in the starter kit of meter or strips
package. Control solution can be ordered and purchased separately. Please contact
your distributor in your country or manufacturer in case of requirement of control
solution. For additional information about conditions for ordering and purchasing the
control solution please contact following address: VPD Bled, Pot na Lisice 4, SI –
4260 Bled, Slovenia; Customer Service, Tel: +386 457 45 070.
Do a control solution test:
to practice the test process instead of using blood,
whenever you open a new vial of test strips,
if you suspect the meter or the test strips are not working properly,
if you have had repeated unexpected blood glucose results, or
if your meter is damaged.
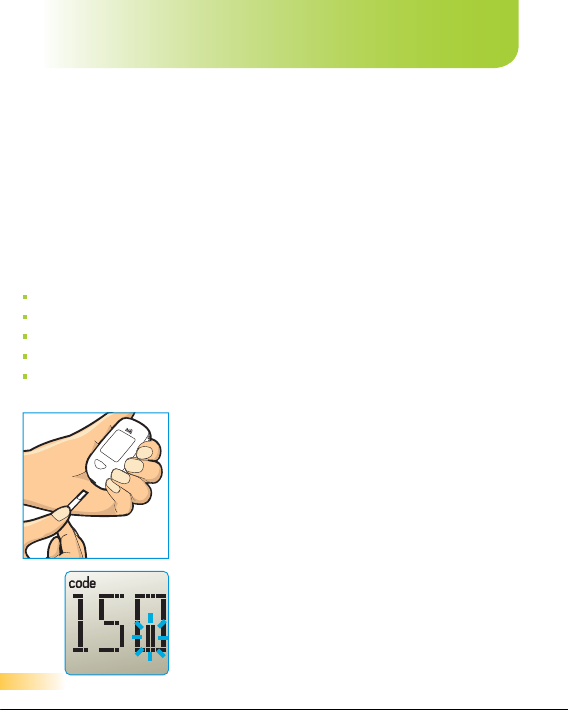
STEP 1
Hold the test strip with the silver end facing
up. Insert the silver end into the test strip
port on the meter. Insert a new test strip into
the meter until it stops. The meter will turn
on.
STEP 2
Time will be displayed for a moment. Then
Code number and strip symbol will be
displayed. A strip symbol with filling blood
will appear letting you know the meter is
24
ready to test.
Page 25
Control Solution Testing
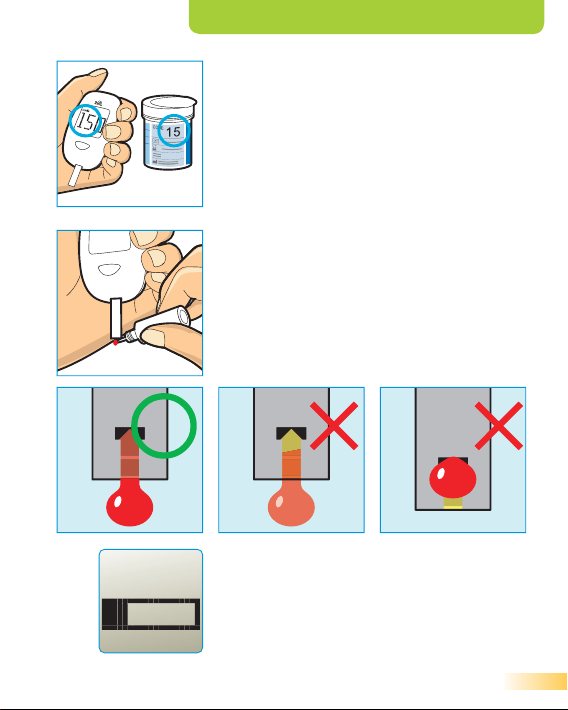
STEP 3
Make sure the code number showed on the
screen is the same as the code number
printed on the test strip vial. If the code
number on the screen is different from the
code number printed on the strip vial, try to
insert new strip.
STEP 4
Shake the control solution vial and remove
the cap. Gently touch a drop of control
solution to the tip of the test strip. Hold until
the meter beeps.
STEP 5
The meter will now show counting progress
of 5 seconds.
25
Page 26
Control Solution Testing
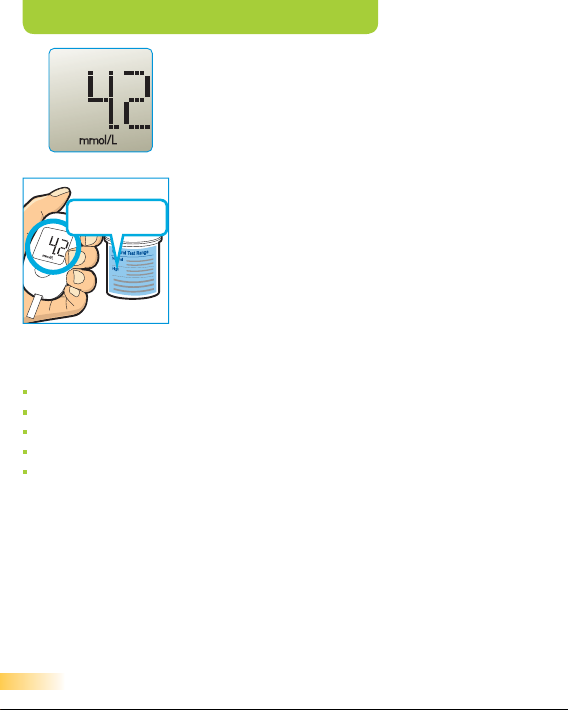
STEP 6
The test result is complete when you hear
beeps. Your control solution test result is
shown on the display screen.
STEP 7
Control Test Range
0.6-33.3 mmol/dL
Compare the result displayed on the meter
to the control solution range printed on the
test strip vial. If the results you get are not
within this range, the meter and strips may
not be working properly. Repeat the control
solution test.
Out of range results may be caused by:
not following the instructions on this USER GUIDE,
expired, contaminated or watered-down control solution,
expired or damaged test strip,
control solution test done outside 20°C to 25°C (68°F to 77°F),
or a problem with the meter.
If you continue to get control solution results that fall outside the
range printed on the test strip vial, do not use the meter, the test
strips, or the control solution. Call the local distributor.
STEP 8
To turn your meter off, remove the used test
strip.
26
Page 27
Reviewing Results
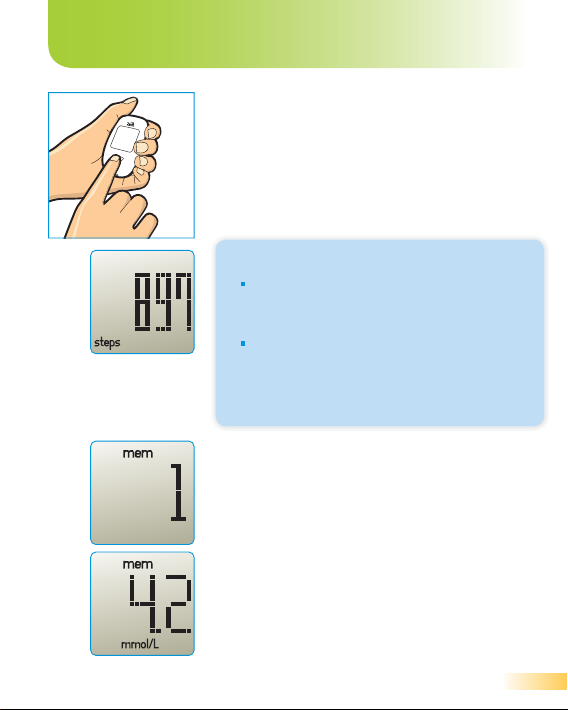
STEP 1
(To enter STEP meter mode)*
With the meter off, press and release the ‘M’
button on the meter. The number of your
steps will be displayed. If you attach the
meter properly, the meter will start to count
the number of your step.
Important:
The meter’s display will not change or
display steps until after you have
walked more than 5 steps.
The number of your step is reset to
zero at every midnight or when
pressing ‘SET’ button for 2 seconds in
STEP meter mode.
STEP 2
(To enter review mode)
In the STEP meter mode, Press and hold the
‘M’ button. The number of last glucose result
will be displayed. Release the ‘M’ button.
The last glucose result will be displayed.
27
Page 28
Reviewing Results
Important:
If there is no result, the meter will display “- - -”.
The meter will display time, date and
the result alternatively after no
pressing ‘M’ button for 3 seconds.
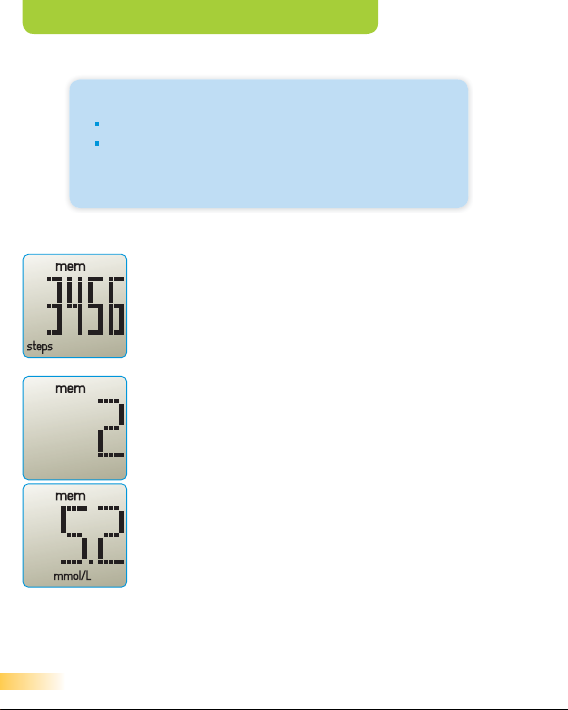
STEP 3*
Press and release the ‘M’ button. The counts
of steps between previous and next glucose
results will be displayed.
STEP 4
Press and hold the ‘M’ button. The number of
next glucose result will be displayed. Release
the ‘M’ button. The next glucose result will be
displayed. Each time you press and release
the ‘M’ button, the meter will display the next
result up to the last 500 test results.
28
Page 29
Reviewing Results
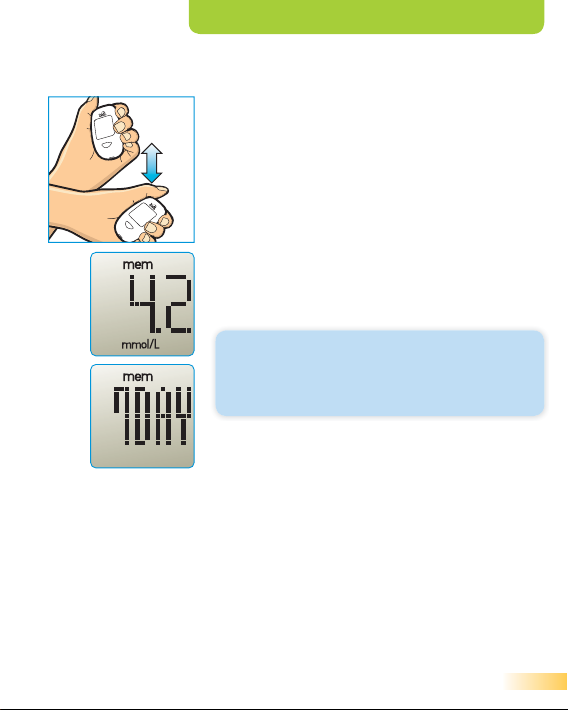
STEP 5 (To review average)
To review your 7-day average, shake the
meter slowly in the review mode. The meter
will display 7-day average and “7DAY”
alternatively.
Shaking the meter again allows you to scroll
forward to 14- and 30-day averages with
beep.
Continue to press the ‘M’ button to view
stored test results.
Important:
Your average result does not contain
control test result.
STEP 6
The Meter is off if you press and hold ‘M’
button for 2 seconds.
29
Page 30
Setting the Meter
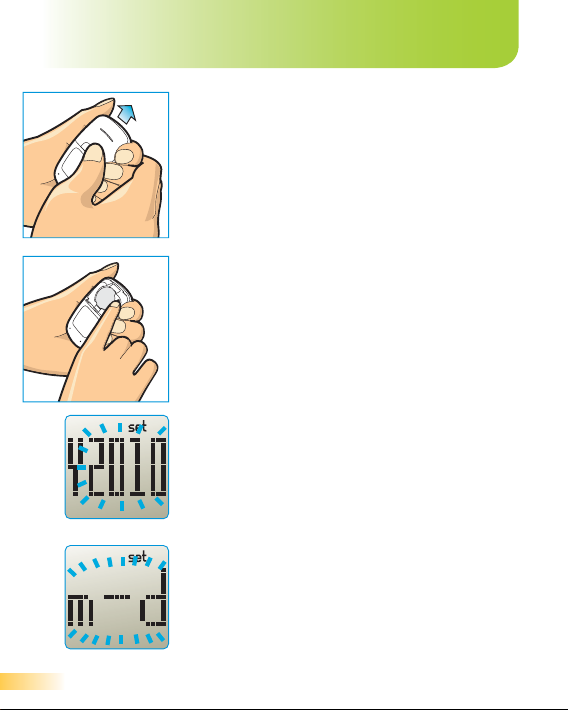
STEP 1
When the meter is off, remove the battery
cover.
STEP 2
Then press the ‘SET’ button located in the
battery compartment. The meter is now in
the setting mode. You can start setting up
the meter.
STEP 3
The year will appear first, with the year
flashing. Press the ‘M’ button until the
correct year appears. Press the ‘SET’ button
to move to the date format setting.
STEP 4
With “m-d” or “d.m” flashing, press the ‘M’
button to select “month-day” or “day. month”
format. Press the ‘SET’ button to move to the
month setting.
30
Page 31
Setting the Meter
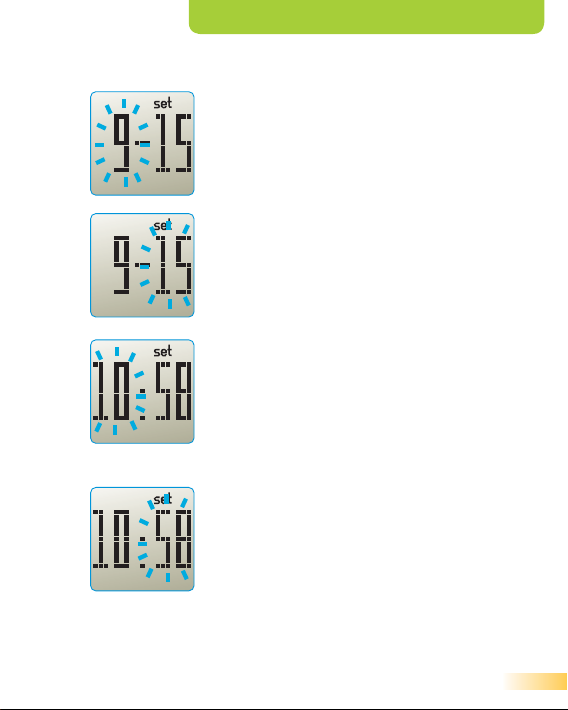
STEP 5
With the month flashing, press the ‘M’ button
until the correct month appears. Press the
‘SET’ button to move to the day setting.
STEP 6
With the day flashing, press the ‘M’ button
until the correct day appears. Press the
‘SET’ button to move to the hour setting.
STEP 7
With the hour flashing, press the ‘M’ button
until the correct hour appears. The meter
displays only the 24-hour time format. Press
the ‘SET’ button to move to the minute
setting.
STEP 8
With the minute flashing, press the ‘M’ button
until the correct minute appears. Press the
‘SET’ button to move to the unit setting.
31
Page 32

Setting the Meter
STEP 9
With the unit flashing, press the ‘M’ button to
select “mg/dL” or “mmol/L”. Press the ‘SET’
button to complete meter set-up and turn off
the meter.
32
Page 33
Replacing the Battery
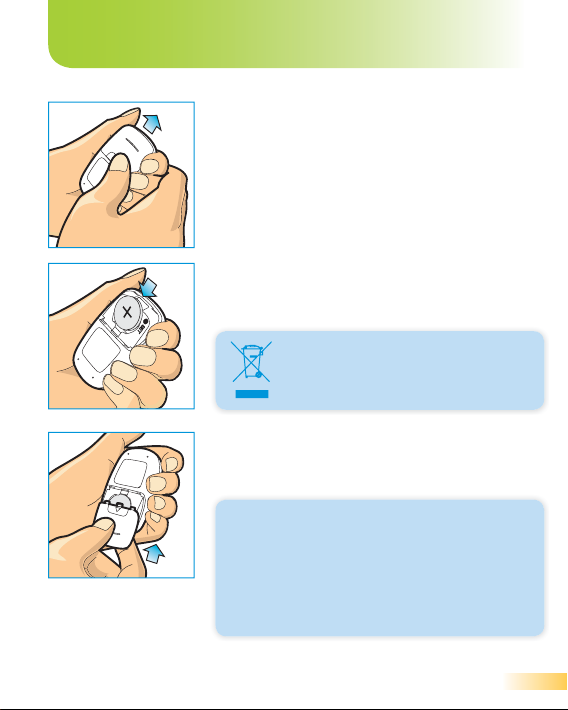
STEP 1
Prepare the 3V lithium battery (CR2032) for
replacement. Press firmly on the battery
cover and slide in the direction of the arrow.
STEP 2
Remove the old battery and place the new
one in the tray with the “+” side facing up.
Caution: Dispose of battery
according to your local
environmental regulations.
STEP 3
Slide the battery cover back into place and
close firmly.
Important: If you do not replace the
new battery within one minute of taking
the old one out, you have to reset the
date and time. Removing the battery
does not affect the meter’s memory or
user settings.
33
Page 34
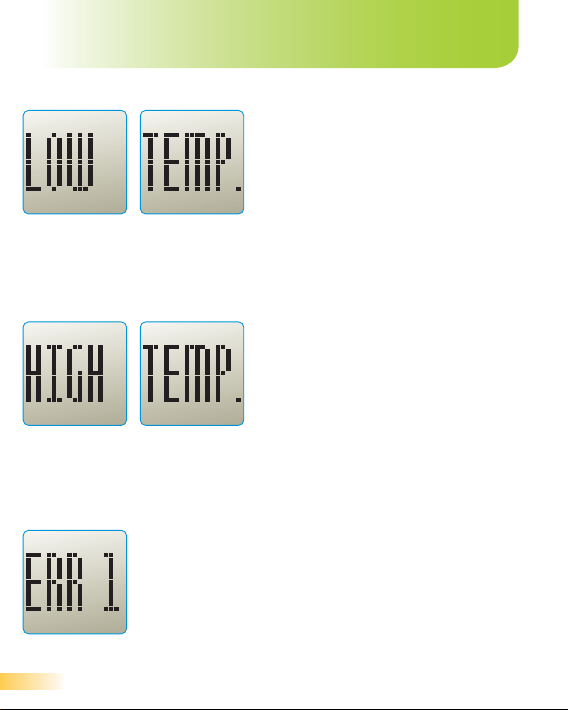
Error Messages
Appears when environmental
temperature is BELOW system
operation range. System
operation range is 10~40°C
(50~104°F). Repeat the test after
the meter and test strip have
reached the above temperature
range.
Appears when environmental
temperature is ABOVE system
operation range. System
operation range is 10~40°C
(50~104°F). Repeat the test after
the meter and test strip have
reached the above temperature
range.
Appear when inserting a used test strip. Re-test
with a new test strip.
34
Page 35
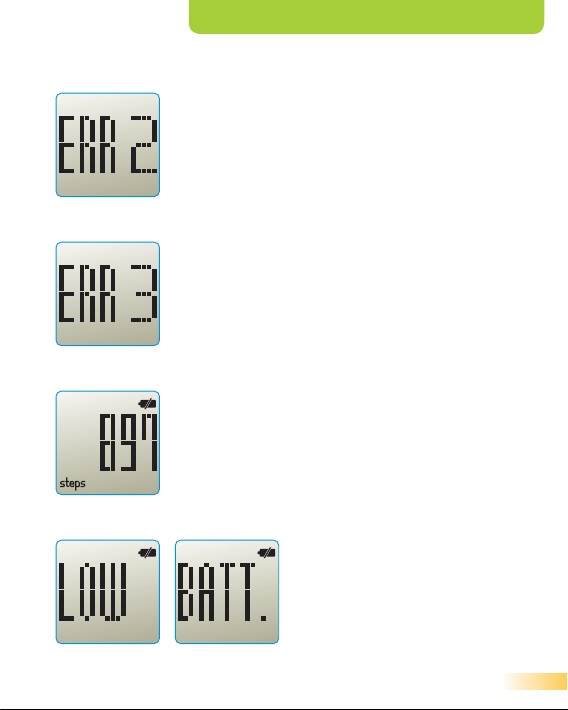
Error Messages
This error message indicates the test strip may
be inserted incorrectly or there is a problem.
Repeat to remove and re-insert the test strip or
repeat the test with a new test strip.
This error message indicates the meter has
a problem. Review the instructions and re-test
with a new test strip. If this message appears
again, contact the local dealer.
Battery is low but you can still perform a few
tests. Replace the battery as soon as possible.
Battery is too low to perform a
test. Replace the battery
immediately.
35
Page 36

Troubleshooting
Meter does not enter the test mode after inserting a test strip.
Probable cause What to do
The battery is dead. Replace the battery.
The battery is installed
incorrectly or there is no
battery in the meter.
Test strip inserted upside
down, wrong end in, or
incompletely inserted into the
meter.
Defective meter or test strips. Contact your local distributor.
Blood or foreign objects put
into the test strip port.
Test does not start after applying the blood sample.
Probable cause What to do
Blood sample is too small. Repeat the test with a new test strip
Defective meter or test strips. Repeat the test with a new test strip. If
Sample applied after meter
times out (one minutes) and
turns off.
Check that the battery is installed
correctly with the positive (+) sign
facing upward.
Insert the test strip with the printed side
up and the silver end of the strip into
the test strip port on the meter.
Contact your local distributor.
and a larger blood sample.
the same problem occurs, contact your
local distributor.
Repeat the test using a new test strip.
36
Page 37
Performance
Characteristics
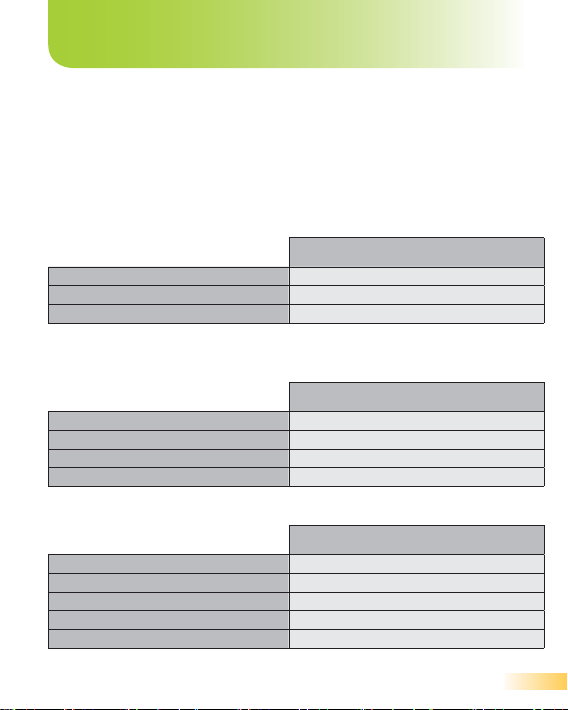
Clinical accuracy
The accuracy of the 2in1. STEP System was assessed by comparing
blood glucose results obtained by patients with those obtained
using a YSI 2300 Glucose Analyzer.
System accuracy result for glucose concentra ons
< 75 mg/dL (4.2 mmol/L)
2in1. STEP System
within ±5 mg/dL (0.28 mmol/L) 87% (26/30)
within ±10 mg/dL (0.56 mmol/L) 100% (30/30)
within ±15 mg/dL (0.83 mmol/L) 100% (30/30)
System accuracy result for glucose concentra ons
≥ 75 mg/dL (4.2 mmol/L)
2in1. STEP System
within ±5% 63% (107/170)
within ±10% 95% (162/170)
within ±15% 99% (169/170)
within ±20% 100% (170/170)
Regression sta s cs
2in1. STEP System
Slope 0,9955
Intercept -1,9843 mg/dL
2
R
No. of samples 100
Range tested 31,4~430 mg/dL
0,9954
37
Page 38
Performance Characteristics
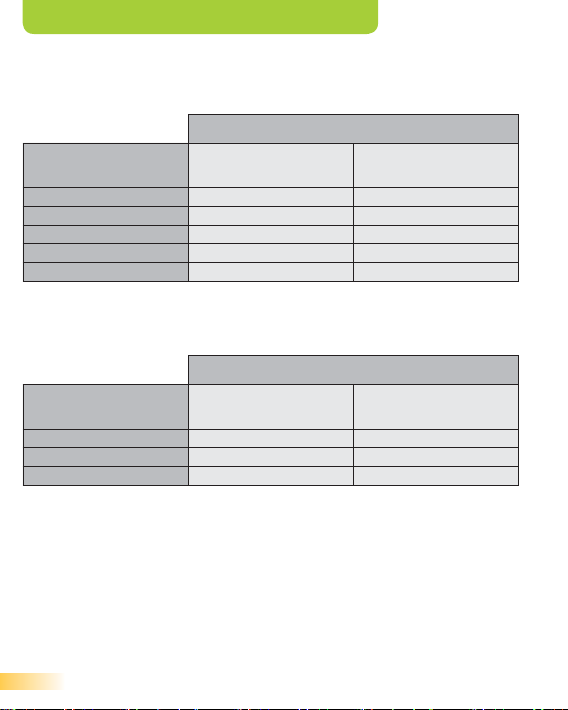
Within run precision (100 venous blood tests per glucose level)
2in1. STEP System
Mean glucose
41 mg/dL (2,3 mmol/L) 1.2 3.0
102 mg/dL (5,7 mmol/L) 2.8 2.7
147 mg/dL (8,2 mmol/L) 2.9 2.0
237 mg/dL (13,2 mmol/L) 4.3 1.8
394 mg/dL (21,9 mmol/L) 9.9 2.5
Standard deviation
(mg/dL)
Total precision (100 control solution tests per glucose level)
2in1. STEP System
Mean glucose
40 mg/dL (2,2 mmol/L) 0.8 2.1
106 mg/dL (5,9 mmol/L) 2.5 2.4
322 mg/dL (17,9 mmol/L) 7.8 2.4
Standard deviation
(mg/dL)
Coefficient of variation
(%)
Coefficient of variation
(%)
38
Page 39

System Care
and Maintenance
Your 2in1. STEP System does not need any special maintenance.
Storing your system
Store your meter, strips and control solution in your carrying case
after each use. Store each item in a cool, dry place below
32°C (90°F), but do not refrigerate. Keep all items away from direct
sunlight and heat.
Tightly close the cap on the test strip vial and/or control solution
vial immediatly after use to avoid contamination or damage. Store
test strips only in their original vial.
Checking for expiration to strips and control solution
Test strips and control solution have expiration dates printed on
their vials. When you first open a test strip or control solution vial,
you must record the opening date in the space provided on the
label. Use all test strips within 3 months after the first opening.
Caution:
Do not use the strips or control solution after the expiration
date printed on the vial or the discard date (date first opened
plus 3 months), whichever comes first, or your results may
be inaccurate.
Do not use test strips if the vial is damaged or left open to air.
This could lead to error messages or tests that read higher
than the actual result.
39
Page 40

System Care and Maintenance
Cleaning your meter
To clean your meter, wipe the outside with a soft cloth dampened
with water and mild detergent. Do not use alcohol or another
solvent to clean your meter.
Do not get any liquids, dirt, dust, blood, or control solution inside
the meter through the test port.
Cleaning your lancing device and clear AST cap
Clean and wipe the outside of the lancing device with a soft cloth,
dampened with mild soap and water. Wash the adjustable cap and
clear AST cap with mild soap. Do not immerse the lancing device in
any liquid.
40
Page 41

Specifi cations
Model
Test Method
Calibration Method
Sample
Sample Size
Test Time
Memory
Result Range
Maximum Step
Hematocrit
Operating
Temperature
Operating Relative
Humidity
Altitude
Power Source
Size
Weight
PG-201 (2in1. STEP Blood Glucose Monitoring
System)
Electrochemical sensor
Plasma
Whole blood, capillary
0.5 μL
5 seconds
2in1. STEP:
500 Blood glucose tests and steps
10~600 mg/dL (0,6~33,3 mmol/L)
99.999 steps
(available only in
20–60%
10~40°C
10–90%
Up to 3,048 meters (10,000 feets)
One CR2032, 3 volt, lithium battery, replaceable
36.7mm x 61.7mm x 15.8mm
(1.44” x 2.43’’ x 0.62’’)
30g (1.06oz)
2in1. STEP)
41
Page 42

Specifi cations
Electrical and safety standards
The meter has been tested for immunity to electrostatic discharge
as specified in IEC 61000-4-2. The meter has been tested for
immunity to radio frequency interference at the frequency range
and test levels specified in IEC 61000-4-3. The meter has been
tested for electromagnetic emissions specified in IEC 61326.
Warranty
VPD, Bled, d.o.o. warrants that your 2in1. STEP will be free of
defects in materials and workmanship for 5 years, valid from
the date of purchase. The warranty extends only to the original
purchaser and is not transferable.
42
Page 43
GLUCOSE
2in1. STEP
Page 44

VPD, Bled, d.o.o.
Pot na Lisice 4, 4260 Bled
Slovenia, EU
tel.:
+386 4 574 50 70
fax:
+386 4 574 50 71
email:
web:
www.3in1.si
EDITION DATE AND LAST REVISION DATE:
2IN1S TEP_ED2013_5_R EV02_E‐SL
PRINTED IN
SLOVENIA
 Loading...