

Page 1
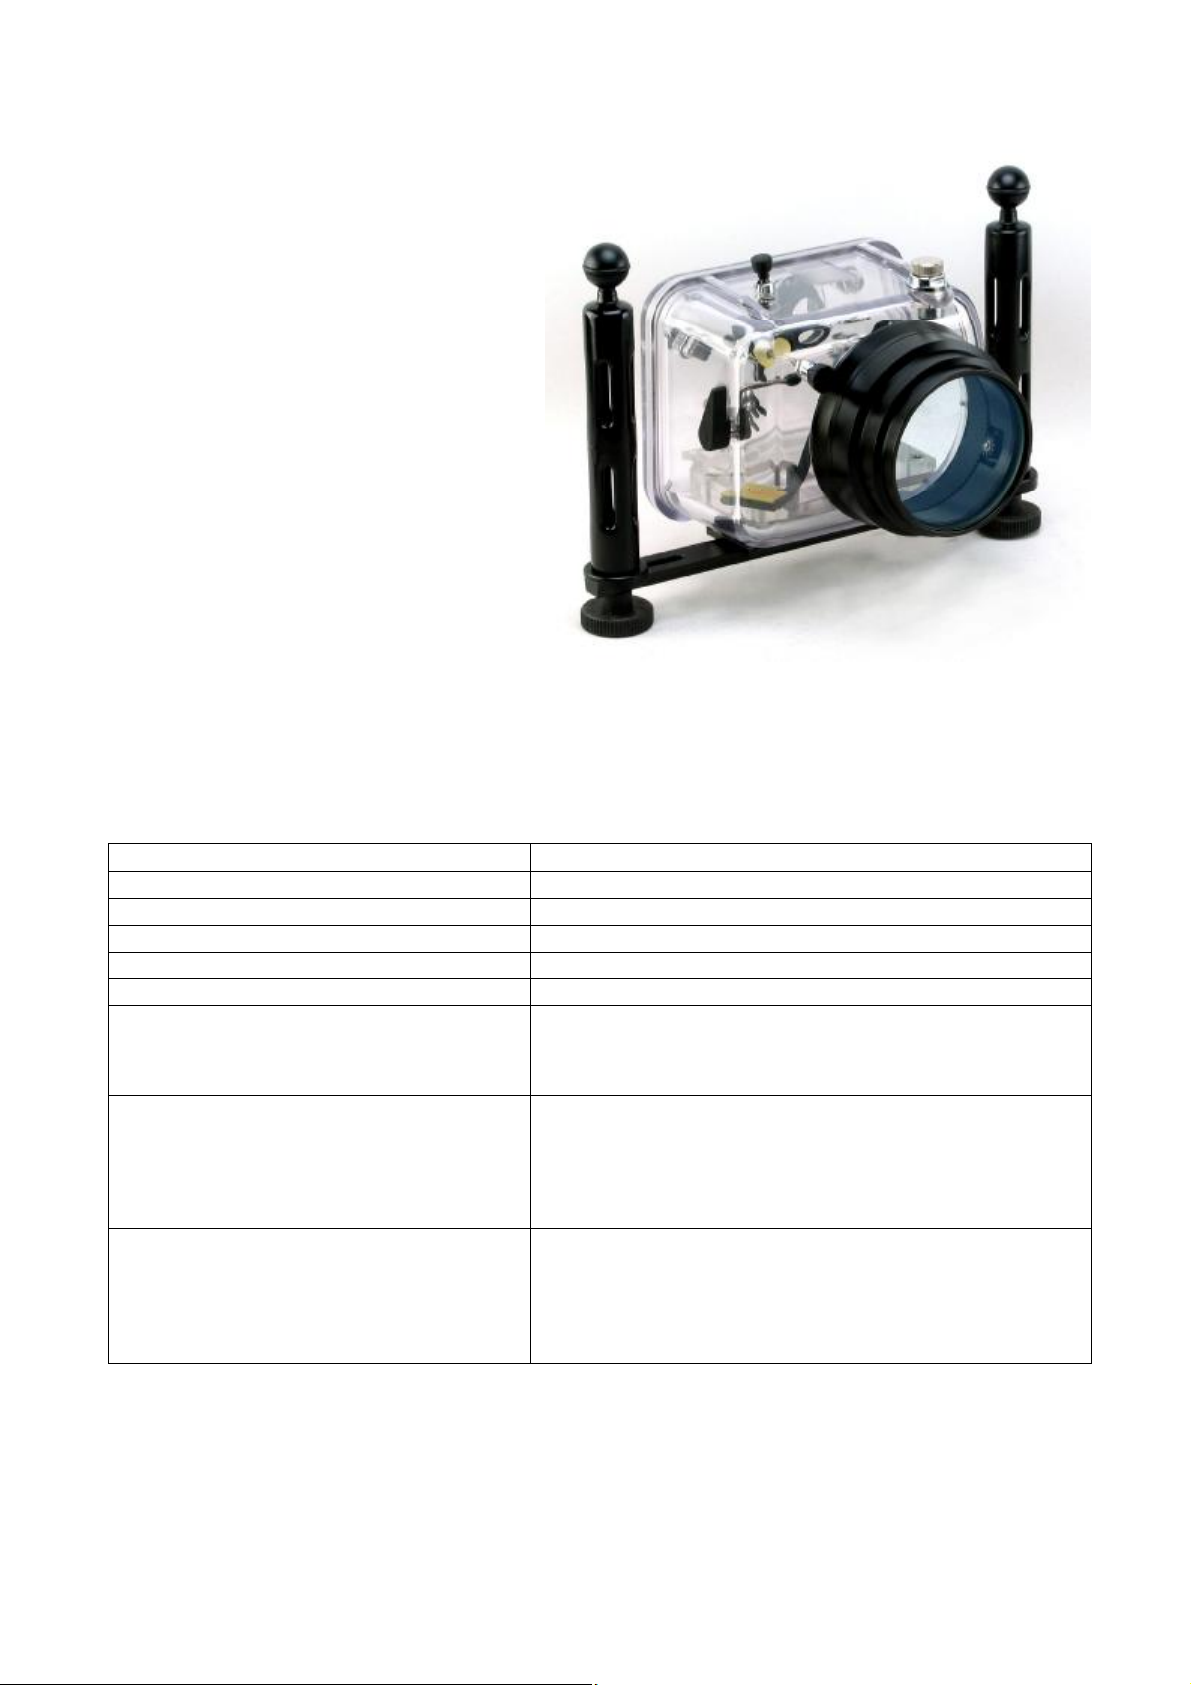
Camera Housing ¨ Model 400D (Canon)
User Manual
Contents:
1. Introduction
2. Specifications
3. Set up Instructions
4. Function Controls
5. Use & Care of Housing
6. Service
7. Warranty
1. Introduction
10 BAR Underwater Housings are small, light and rugged enough to be used on everydive. Use of clear
polycarbonate allows for visual inspection of camera condition and the O-ringseal. 10 BAR Housings are
designed for the ever -increasing variety of models of digitalstill and video cameras. Advanced computer aided
design and CNC manufacturingtechnologies ensure precise dimensions. Each housing body is first injection
molded, and thenmachined to configure to individual camera model. A range of lens ports and controls are
fitted, to tailor the housing to your camera model.
2. Specifications 400D
Test Pressure
Closure Design
Body Material Polycarbonate
Overall Size
Total Weight
Buoyancy (with camera)
Features
Accessories 400DOpening key / Lever
Optional accessories
10 Bar (300 ft.) Housings are individually tested
Air Lock
200 x 300 x 230 mm (LxWxH)
Approximately 2.6 Kg (Housing only)
Approximately neutral in salt water
Visible main O-ring for final pre-dive check
Double O-ring design on all controls
Bulkhead and hot shoe plug for External 580-EX e-TTL strobe
Standard Zoom Port18~55mm Lens
Silicone O-ring grease
Spare main O-ring
Carrying bag
Cleaning Kit
Semi-Dome Port for 10~22mm Lens
580-EX e-TTL Flashlight Housing
Flex Arm
Ball-Joint Arm
Synchronous Cord
1
Page 2
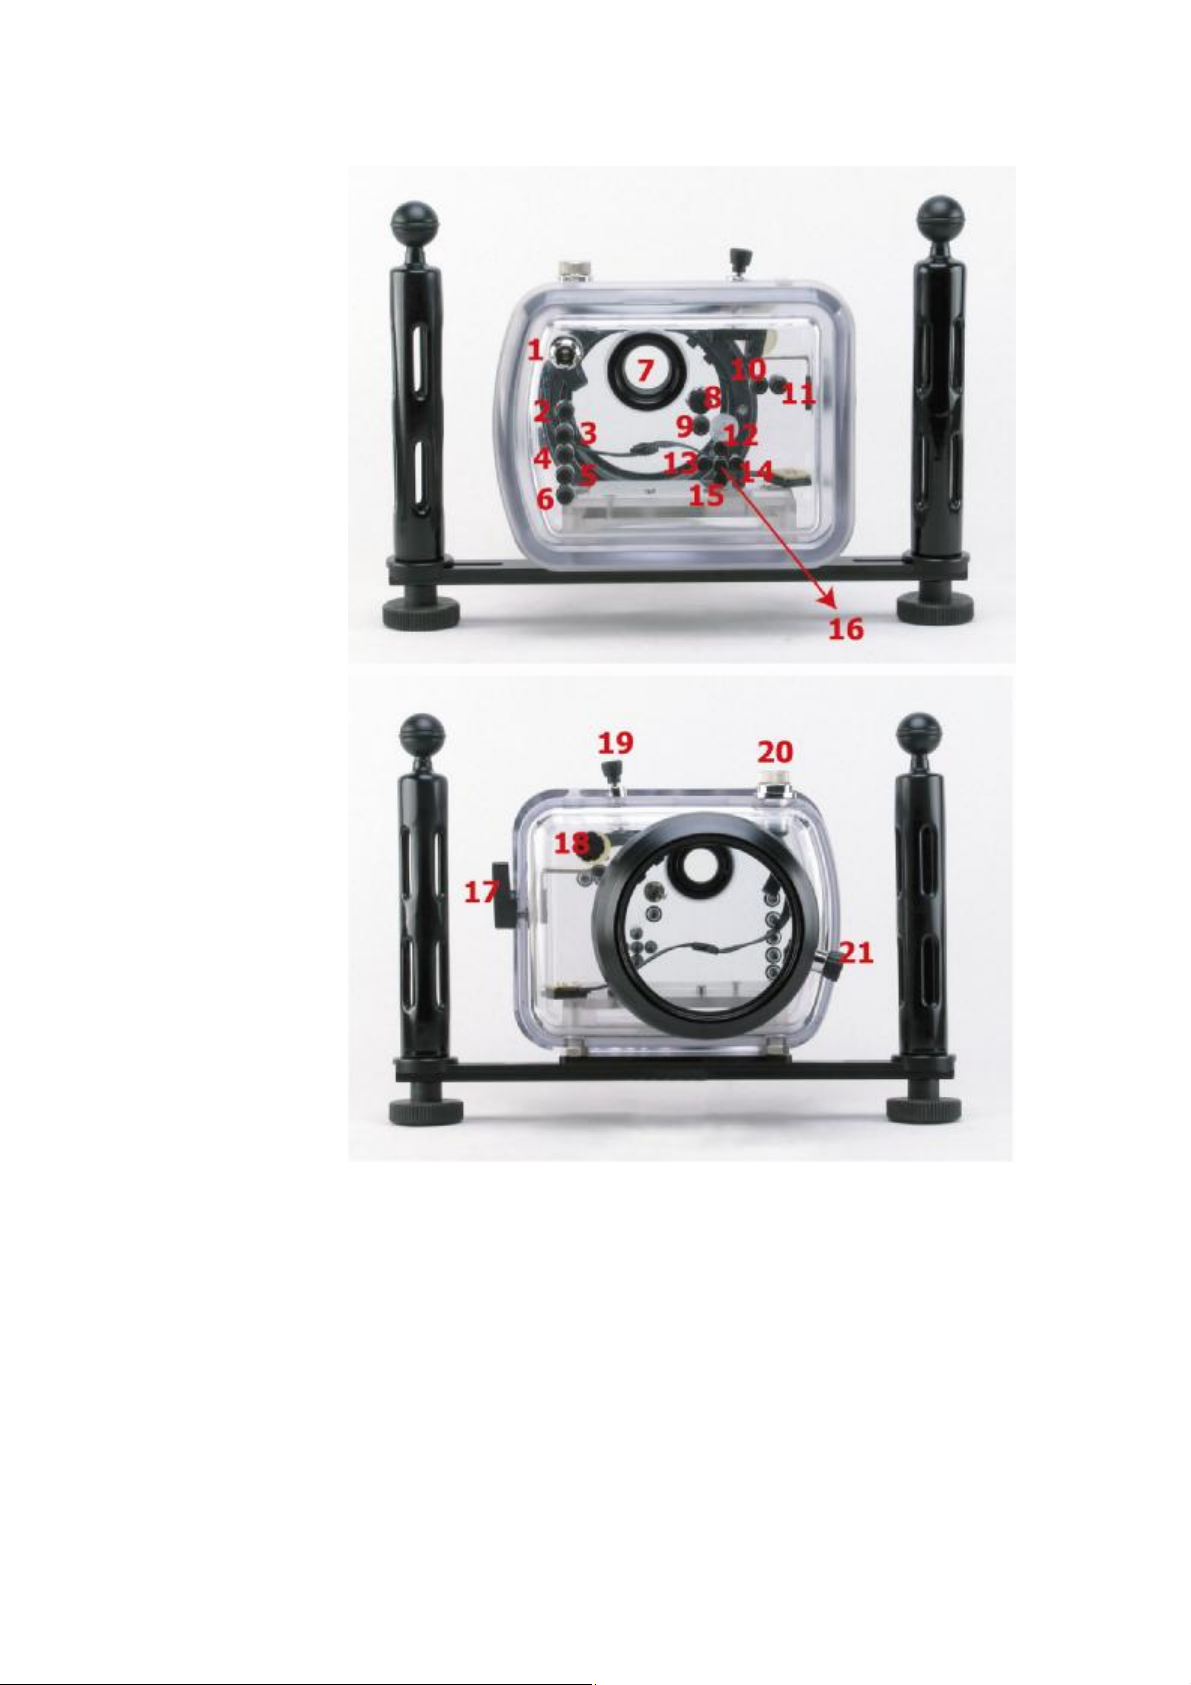
3. Function Controls 400D
1. Pressure release plug
2. Display on/off
3. Menu
4. Jump
5. Playback
6. Erase
7. Viewfinder eyepiece
8. A/E Compensation
9. Drive Mode
10. AE/FE Lock
11. AF Point Selection
12. 13.14. 15. Cross Key
16. Setting
17. Shutter
18. Main Dial
19. Mode Dail / Power on/off
20. Flashlight syn bulkhead
21. Zoom control dial
4. Set up Instructions
4.1 Air Lock:
The body and lid are designed with the Air Lock System ¡no clip¡ closure arrangement.Testing has
shown that this arrangement allow the water to exert an even pressure on the O-ring,Increase the reliability of
the watertight seal.
2
Page 3
4.2 Pressure release plug
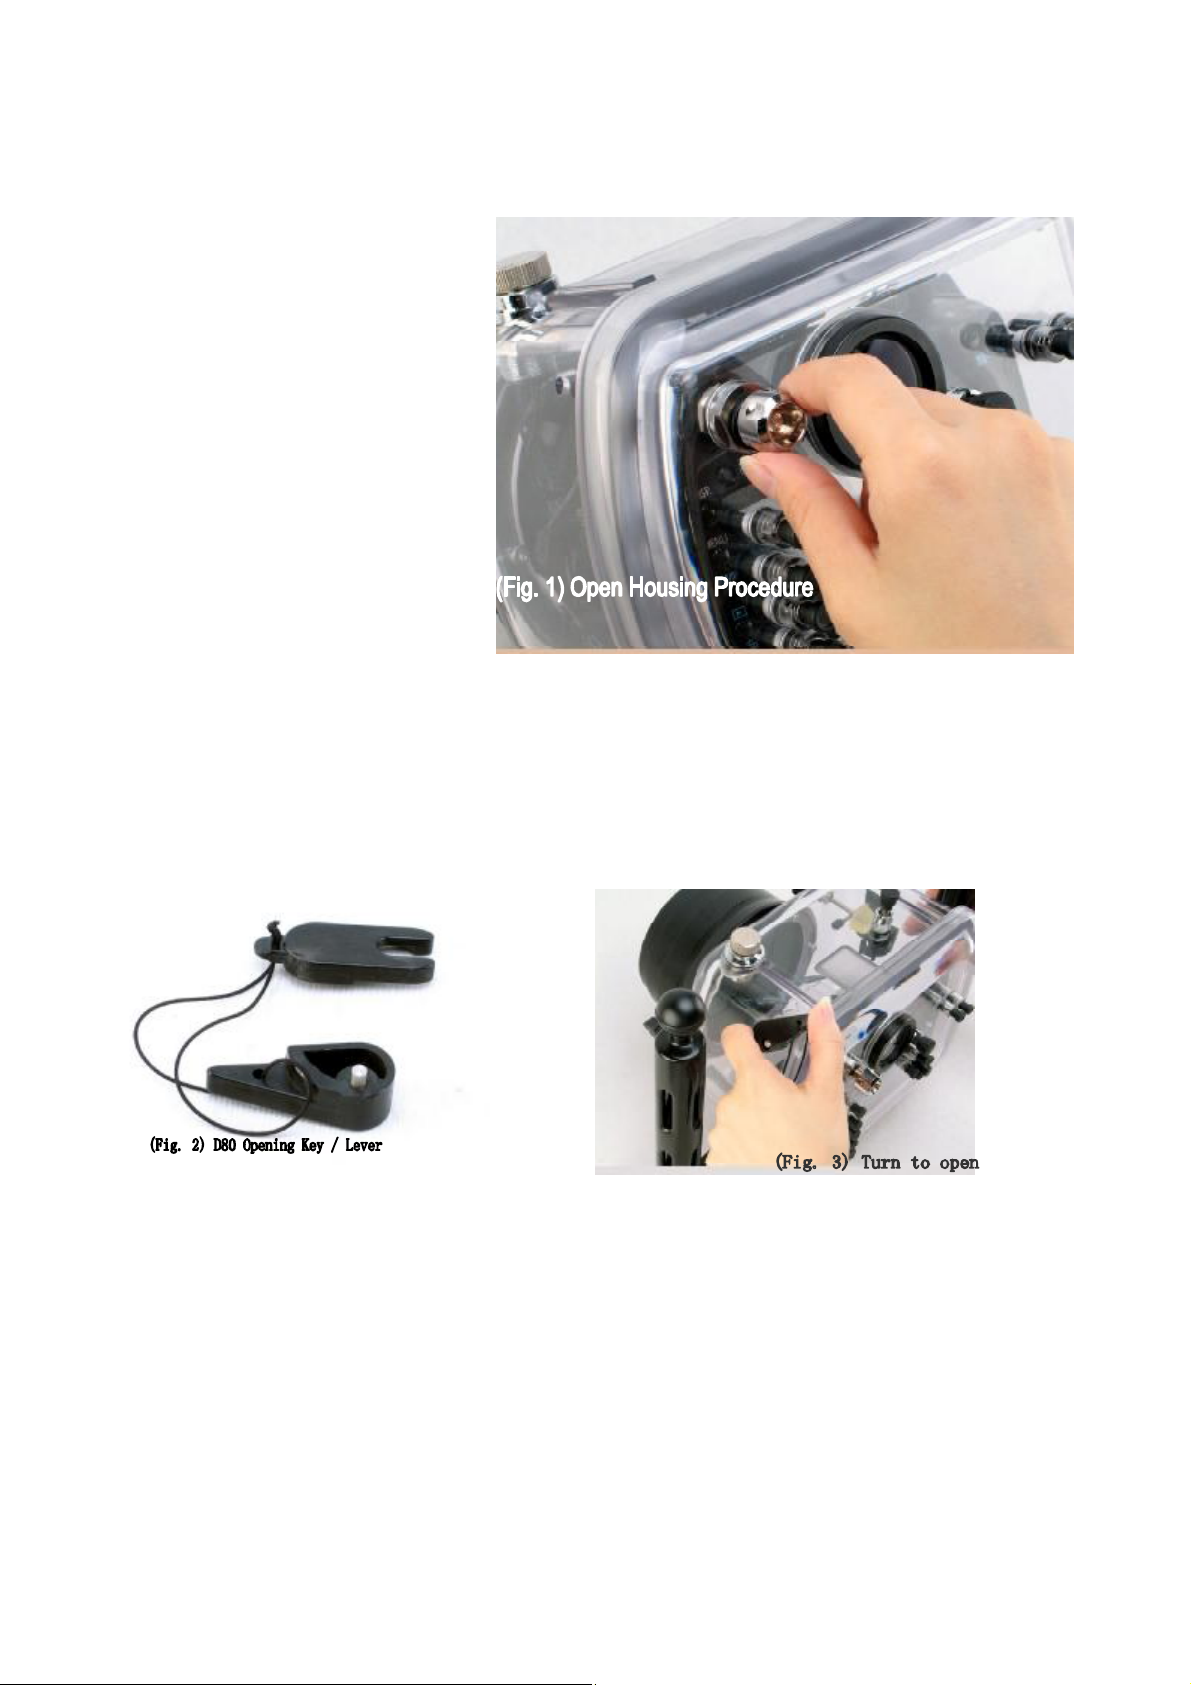
To open the housing, the pressure
release plug must be first unscrewed and
then pulled out all the way
(Counter-clockwise) (Fig 1). This
provides a passage for the air to pass
though and eliminate the pressure
different between the inside of the
housing and the ambient.The plug
consists of an internal double O-ring seal
on the stainless steel slide shaft.
These internal O-rings form the
watertight seal. There is also a large
outer O -ring under theknob.This O-ring
serves to prevent contamination of the
slide shaft, with dirt, salt etc., and isnot
required for watertight integrity. If this
O-ring should become detached, it can
simply bepushed back in place.
4.3 Opening levers:
After unscrewing and pulling out the pressure release plug, the lid can be opened. Toovercome the
friction of opening, use lever (Fig. 2) to push against the lid with a cam action.Be sure they are inserted all the
way flat to the housing before turning to avoid damaging theprotrusions on the lid. The body has four holes on
each corner edges for opening. Gentlylever off the lid with the supplied opening lever (Fig. 3) taking care not
to twist the lidexcessively. The lid should be opened keeping it approximately paralleled to the body at all
times, turn first one corner a little, then the other a little, and repeat again until the lid isopened.Remember to
unscrew and pull out the pressure release plug all the way first,otherwise the air pressure will resist attempts
at opening. Lay the lid on a flat stable surfaceafter opening.
4.4 Special note on responsibility for watertight integrity:
Each housing is individually inspected and hydrostatically tested in the factory. Thedesign of the
main piston O-ring seal is among the most reliable in the industry and thewatertight integrity is excellent. This
special O-ring design provides a perfect seal even ifthere is any movement between the body and lid due to
change of ambient pressure.However please note that responsibility for ensuring the integrity of the
watertight seal liesentirely with the user. 10 BAR accepts no liability for damage to, or loss of any equipment
used with, orplaced inside the housing. Users are highly recommended to carry out in-watertest of the
3
Page 4
housings without installing of the camera for their first dive after change of newports or alternation of any new
configuration. The test can be carried out by lowering thehousing with ballast to the working depth or dive
down to the safe diving range.
The O-ring seal is the main barrier between the water outside and the airspace within the
camera. It is an effective barrier only if the seal is properlymaintained. The O-ring seal should be
inspected before every dive. The followinginformation is providedyou¡re yourguidance in using
and maintaining the O-ring seal.
4.5 Maintaining the O-ring Seal:
If the main body to lid O-ring is not installed, install the O-ring before diving. This isthe only user
serviceable O-ring. Its care and maintenance is critical to the watertightintegrity of the housing. The O-ring
should be replaced at the service interval (see section onservice). If the O-ring is contaminated, or not already
installed, inspect grease and install theO-ring according to the following guidelines.
4.6 Inspection, cleaning and re-instillation of the O-ring
Tools:
A soft cotton bud or sponge applicator, make sure these are free of all chemicals orcontamination
such as loose fibers, and the tube of silicone grease supplied with the housing.Note othertypes of silicone
grease specifically for use with underwater camera equipmentcan usually also be used. It is advised to carry
out the following procedure on a firm cleanlevel surface, (e.g. at a table), to prevent skidding especially useful
to have when diving froma boat.
When to maintain the O-ring seal:
Remove the O-ring periodically for inspection. It is not necessary to remove, clean and
re-install the O-ring after every dive provided the O-ring did not become contaminated. As arule of thumb set
up the camera and housing before a day¡s diving. If the housing is requiredto be opened between dives for
changing memory card or re-charging batteries, make surethe outside of the housing is thoroughly toweled
dry before opening up. After removing thelid and servicing the camera, replace the lid straight away, rather
than leaving it lying around.Before replacing the lid, make sure that no contamination such as dust, hair, salt,
sand etc.has fallen onto the O-ring or O-ring recess, as a precaution we recommend to inspect the O-ring
every time the lid is opened and to carry out the maintenance if necessary.
Procedure:
Place the lid on a firm non-slip level surface.
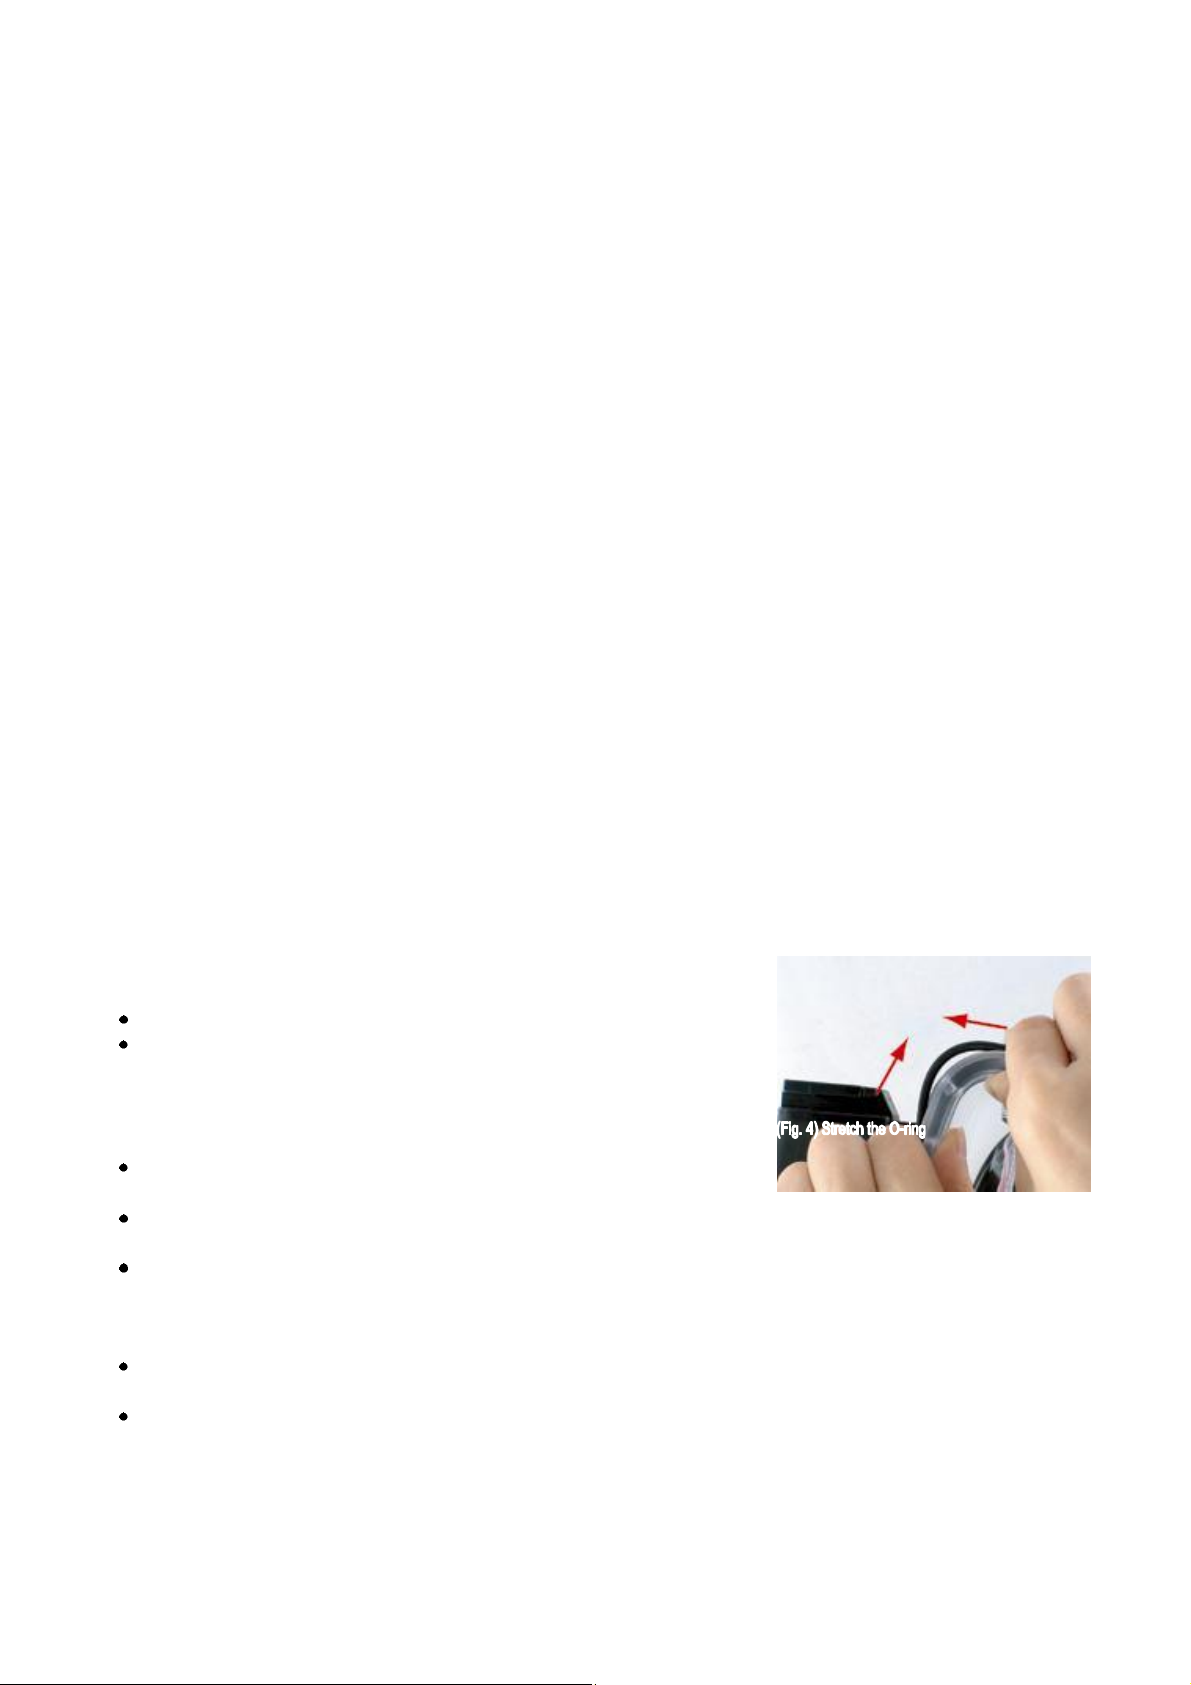
The O-ring can be extracted using an O-ring extractor tool (make sure
the tool as nosharp edges). Alternatively use the flats of the thumbs to
gently stretch the O-ring ontwo faces (Fig. 4)thus making asmall loop
protruding a few mm. The loop can thenbe grasped between finger and
thumb, to pull theO-ring over the lip.
Clean the O-ring recess (the square groove where the O-ring sits) with
a cotton bud.
Inspect the O-ring all the way round its surface for damage such as cuts tears orcontamination. Thisshould
be done visually and also by feeling the surface texturebetween finger and thumb.
IF THE O-RING IS DAMAGED OR SUSPECTED OF BEING DAMAGED, DISCARDIT IMMEDIATELY.
A spare O -ring is supplied with your housing, or a replacement O-ringcan be obtained from 10 BAR. If the
O-ring is contaminated or suspected of beingcontaminated, clean it with a cotton cloth that is free of all
chemicals or contamination.After cleaning inspect the O-ring again.
Once the O-ring has been inspected and verified fit for use, apply a SMALL amount ofSilicone grease to the
O-ring. The silicone grease must be evenly distributed round theO-ring
Replace the O-ring into the groove; run a finger round the O-ring, to make sure it issnugly seated in the
4
Page 5
groove.
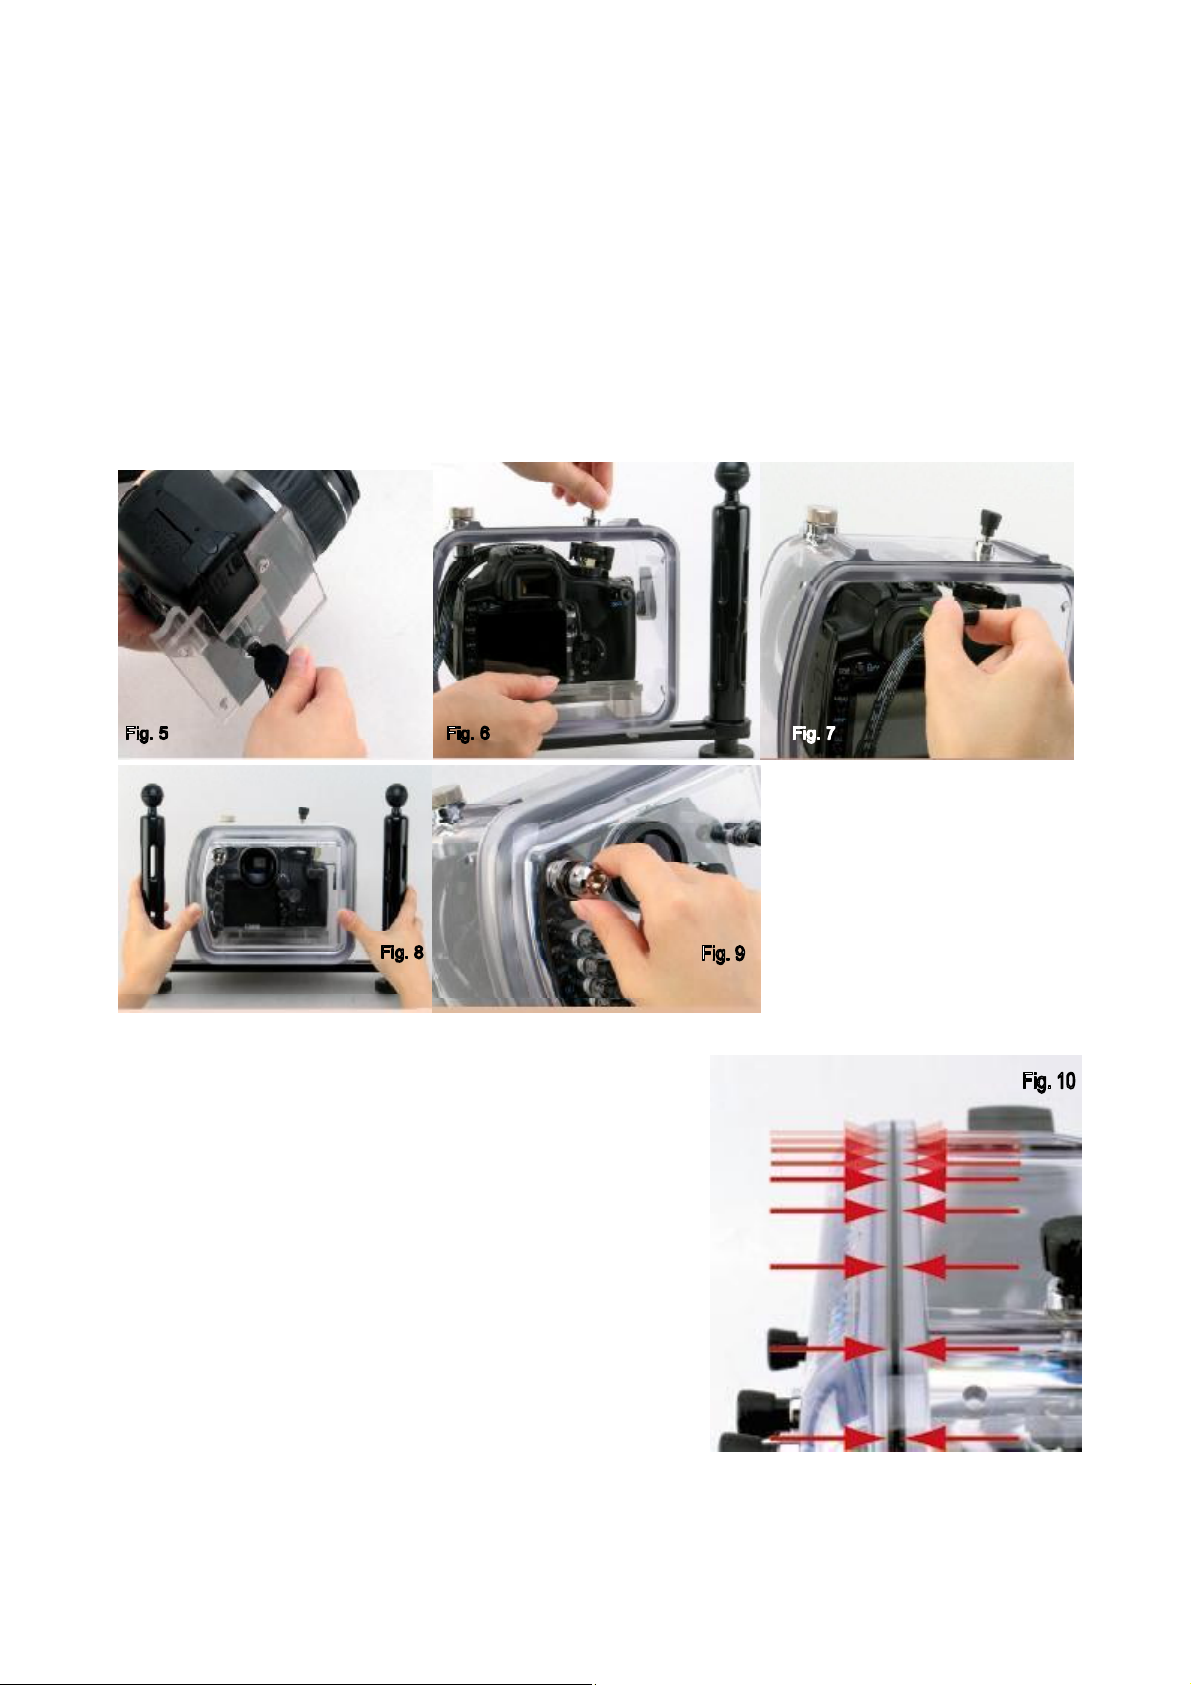
4.7 Mounting the camera in the housing:
Remove the lens cap and wrist strap. The pressure release plug should be pulled outbefore inserting
the camera. Attach the plastic slide tray to the camera¡s tripod mountingfixture with a coin, screwdriver or the
end of the universal tool supplied (Fig. 5). Take carenot to excessively tighten the screw. Slide the camera into
the body along the guide rail (Fig.6). Make sure the camera body reach the limit and test the function of the
on/of button onthe body of the housing. Slide the hot shoe plug into the hot shoe (Fig. 7) Note: If you findthat
the buttons do not align properly with the controls, please check again that the camerais properly seated to
the limit of the guide rail.
Replace the lid (Fig. 8). Remember
to ensure the pressure release plug
is pulled allthe way out while
closing, otherwise the air cannot
escape. Squeeze the lid closed all
the waywith the hissing of expelled
air. Screw home (CLOCKWISE)
the pressure release plug (Fig. 9).
There isnoneed to excessively
tighten this plug. The seal is made
by internal O-rings. The O-ring on theunderside of the plug is just to keep out dirt.
After replacing the lid, make a final visual inspection of the main
O-ring forcontamination (Fig. 10).
Note: If the O-ring is in good contact, a thin black line,
about 0.5 to 1mm in widthshould be visible, where the
O-ring is in contact with the lid. Follow this line allthe
way round the edge of the seal, as a final check that the
seal is good.The housing is now ready for the dive.
Important !!! Before diving, make sure the pressure
release plug ispushed back inside and then screwed
home, do not over tighten thisplug (finger tight only).
5
Page 6

5. Use & Care of Housing:
5.1 Pre Dive Function Check.
Just before entering the water, make a habit of reviewing that you have carried out the
proper steps to close the housing. and the pressure release plug screwed home. Make a
visual check of the O-ring seal. It is also useful to switch on the camera, and check that
controls e.g. on/off, zoom, shutter functions operate normally.
Check housing is closed.
Close pressure release plug
Check battery and memory card status on the LCD display.
Check control knob and zoom function.
If there is a large change of temperature and the housing is not opened formaintenance
between dives, it is recommended to equalize the possiblepressure difference between the
inside of the housing and the ambient byopening the pressure release plug and close it firmly
subsequently.Always avoid submerging the housing in hot water for a prolonged time or a
cleansing tank where the water may be heated up by the sun.
5.2 General Operation.
The control levers and push buttons consist of internal double O-ring seals on astainless steel shaft.
This arrangement is very reliable, however as a precaution, whenoperating the controls, avoid excessively
rapid movements, as this may distort the O-ring.Also please allow for the fact that the camera takes a few
seconds to power on. If the cameradose not appear to respond to a control action, make sure that no other
controls are pressingon the camera, i.e. locking out further actions. Wear the wrist strap; it is easy to
inadvertently let go of the housing, especially if you are distracted.
5.3 Cleaning & Storage.
The body & lid of the housing are made of polycarbonate. Polycarbonate was selectedfor its
outstanding strength stiffness, hardness and toughness. As well as its crystal cleartransparency and high gloss
surface. It has good resistance to weathering, although longtermexposure tosunlight should be avoided.
Normal operating temperature range is 3¡C to36¡C (Storage temperature: -10¡C to 50¡C)It is good practice
to rinse off your housing with fresh water after every dive. Avoidexposure to fine sand. After a series of 10 or
more dives, e.g. after a dive holiday, it isrecommended to immerse the housing for 2-3 hours in warm water to
dissolve any saltdeposits that may have built up. No chemical cleaners should be used. Mild detergents e.g.
shampoo and soap based cleaners are permitted.
Some household chemicals may harm Polycarbonate; the
housing should never be exposed to the following classes of chemicals:
benzene, toluene, xylene, chlorinated hydrocarbons, methanol, any other solvents,
strong acids and bases.For long term storage please remove the main o-ring from body.
5.4 Transportation.
When transporting by air, please ensure the housing is not sealed, to allow the airpressure to
equalize. Either remove the O -ring (recommended), or open the pressure releaseport (aspacer is provided to
keep the pressure plug in the open position, please make surethere is no bending of the plug while open).
Please protect the housing during transportation. It is recommended to remove thehandle, and shutter
extension, and wrap the camera in foam or bubble wrap.
5.5 Accidents.
The impact resistance of the housing is excellent. However after an accident thealignment of the
housing may have been damaged. Therefore in the event of your housingsuffering an impact force, e.g. being
6
Page 7
dropped, it is essential you do not use the housing fordiving. Please return the housing immediately for service.
Please put a note inside to indicatethe nature of the accident, so that the severity can be assessed.
6. Service
To ensure the continued performance of your housing, it should be serviced every year,or after
every 200 dives. Please note the terms for servicing the housing posted at ourwebsite. A full service will
include:
Inspection of all components for wears or damage (report if repairnecessary)
Cleaning of all sealing surfaces, and replacement of all O-ring seals.
Hydrostatic pressure test to 10 Bar.
Note: the replacement of damaged components (except replacement O-rings) mayrequire
additional cost.
7. Warranty
The warranty is valid within two years from the date of first purchase. Thewarranty
applies only to the housing itself. 10 BAR does not accept anyliability either implicit or otherwise
for any equipment housed inside,or used together with the housing. In the event of the housing
floodingwithin the period of warranty, 10 BAR will repair or replace the housing. Pleasenote
that disassembly of the housing will invalidate warranty. Please fill in theinformation below, and
return a copy to 10 Bar Underwater Housing at theaddress below, to validate the warranty.
Housing Type :
Date of Purchase :
Serial Number : (Labeled insidehousing)
Dealer :
Owner¡s Name :
e-mail :
Address:
Tel :
Fax :
Office & Showroom:
Unit C, 2/F., Wing Hin Factory Building, 31-33 Ng Fong St.,
San Po Kong, Hong Kong.
Tel: (852) 2573 3228 Fax: (852) 2811 9180.
Email: [email protected] Web site: http//www. 10bar.com
Please keep this document for future reference
(Note: due to continuous improvement the latest model housing may differ slightly form those described in thisdocument)
(Copy to be returned to 10 Bar Underwater Housings)
7
 Loading...