


C H A P T E R
1
Setting Up Your Computer
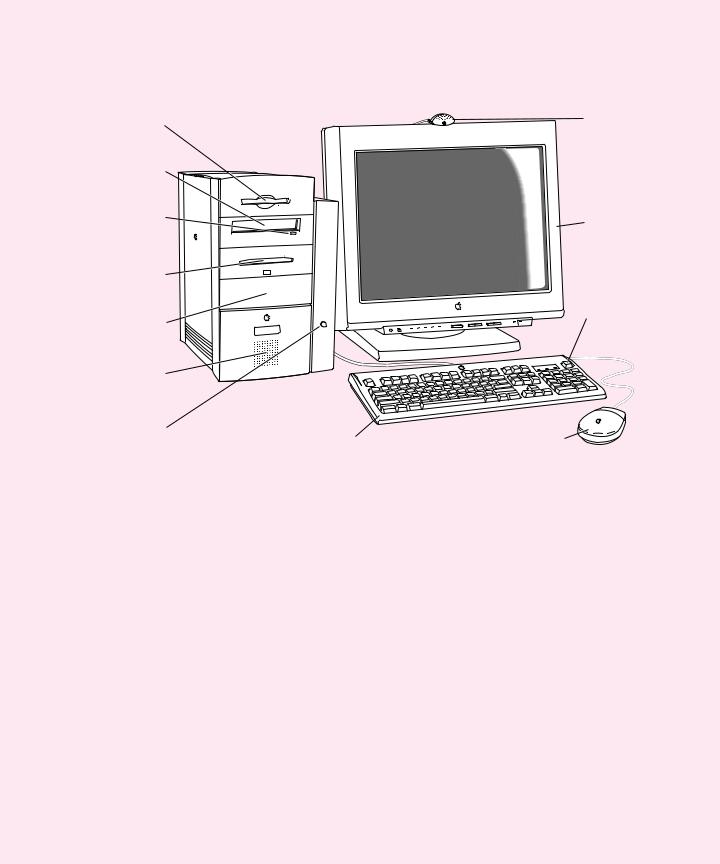
The illustration on the next page shows all the equipment you need to set up your computer and begin using it. ( Your monitor and keyboard may look slightly different.)
Before following the setup instructions in this chapter, Apple suggests that you read “Arranging Your Office” in the appendix for tips on adjusting your work furniture so that you’re comfortable when using the computer.
1

Power Macintosh computer
Keyboard cable
(sometimes built into the keyboard as shown here)
Mouse |
Keyboard |
Apple PlainTalk Microphone (optional) |
Monitor cable |
|
(sometimes built into the monitor) |
Computer power cord
Monitor power cord
(sometimes built into the monitor)
Positioning and Plugging In the Computer
Place your computer on a sturdy, flat surface near a grounded wall outlet. Your computer is designed to be placed on the floor to conserve desk space, but you can place it on any stable, flat surface.
Before you plug your Macintosh into a wall socket, carefully read all the setup instructions in this chapter. Then, before you connect any other equipment to your Macintosh, follow the instructions in this section to plug it in. The plug grounds the computer and protects it from electrical damage while you set up. When you are ready to begin setting up, follow these steps:
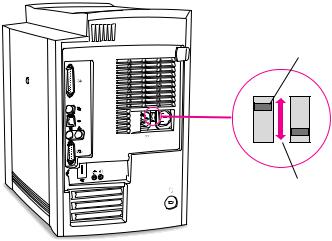
1Make sure the voltage switch on the back of the computer is set for the kind of voltage system to which you will be connecting.
The voltage switch must be set correctly to avoid damaging your computer. An adhesive label showing how to set the voltage may partly cover the voltage switch and power socket. Remove the label. If you don’t know the voltage used in the country you’re in, look at the table “Voltage Switch Settings for Different Locations” on the next page.
Check to see that the voltage switch on the back of your computer is properly set before you plug it in. If you need to change the setting, insert a small screwdriver in this slot and slide the switch.
Set the switch to show “115” for AC voltages in the 100–120 V range. Set the switch to show “230” for AC voltages in the 200–240 V range.
Setting Up Your Computer 3
Voltage switch settings for different locations
Country |
Switch setting |
Bermuda, Canada, Jamaica, Japan, Mexico, Philippines, Puerto Rico, |
115 |
Saudi Arabia, Taiwan, United States, Venezuela |
|
|
|
Bahrain, Brazil, France, Indonesia, Italy, Lebanon, Peru, South Korea, Spain1 |
115 or 230 |
|
|
Australia, Austria, Belgium, Chile, China (People’s Republic), Czechoslovakia, |
230 |
Denmark, Egypt, Finland, Germany, Greece, Greenland, Hong Kong, Hungary, Iceland, India, Iran, Israel, Jordan, Kuwait, Liechtenstein, Luxembourg, Malta, Nepal, the Netherlands, New Zealand, Northern Ireland, Norway, Oman, Pakistan, Papua New Guinea, Paraguay, Poland, Portugal, Qatar, Romania, Russia and the Commonwealth of Independent States (CIS), Singapore, South Africa, Sweden, Switzerland, United Arab Emirates, United Kingdom, Yemen, Yugoslavia
1These countries employ more than one type of power source voltage. Ask your local power provider which switch setting to use for your city or region.
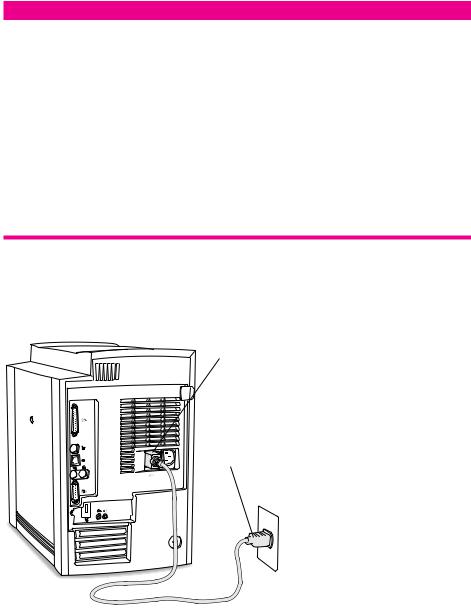
2Plug the socket end of the computer’s power cord into the recessed power socket (marked with the symbol ≤) on the back of the computer.
Power cord socket
Power cord plug
4Chapter 1

3Plug the other end of the power cord into a three-hole grounded outlet or power strip.
Important Make sure you can easily reach the plug to disconnect the computer in an emergency. The only way to completely disconnect power from the computer is by unplugging one end of the power cord from the outlet or power strip or from the back of the computer.
Warning Be sure to set the voltage switch on the back of your computer for the voltage system to which you’re connecting.
This equipment is intended to be electrically grounded. Your Macintosh is equipped with a three-wire grounding plug—a plug that has a third (grounding) pin. This plug will fit only a grounded AC outlet. This is a safety feature. If you are unable to insert the plug into the outlet, contact a licensed electrician to replace the outlet with a properly grounded outlet. Do not defeat the purpose of the grounding plug!
Connecting a Monitor
You can connect many types of monitors to your Macintosh computer. This section contains instructions for connecting most monitor types. (Also look at the instructions that came with the monitor.)
Note: If you are connecting an Apple monitor that has built-in speakers or a microphone, you may need to install monitor software after you have set up and turned on your computer. Otherwise, you may not be able to use all the monitor’s features. See the instructions that came with the monitor for more information. Also check the Read Me file on the computer’s hard disk for any additional instructions regarding the installation of monitor software.
To connect the monitor, follow these steps:
1Place the monitor near the computer.
For more detailed information about positioning and handling your computer equipment, consult “Arranging Your Office” in the appendix.
Setting Up Your Computer 5

2Connect the monitor power cord to the monitor. Some monitors already have the cord attached.
3Plug the power cord into a grounded electrical socket or the back of the computer.
Check the information that came with the monitor to find out if it must be plugged into the back of your computer or into a grounded wall outlet.
Warning The monitor power socket on the back of the computer uses the same voltage level as the electrical outlet to which the computer is connected. To protect your monitor, be sure to use the appropriate adapter or voltage converter, if one is necessary.
4Attach the monitor cable to the monitor; then attach the monitor cable to the monitor port on the back panel of the computer.
Some monitors already have the cable attached.
Monitor power socket |
Monitor power cord |
™ Monitor port |
Monitor cable |
6Chapter 1
Connecting the Mouse and the Keyboard to the Computer
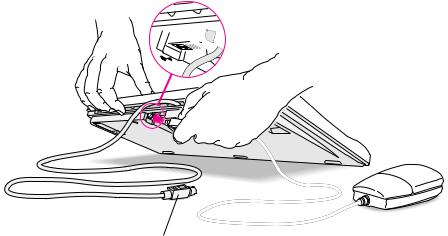
1Plug the mouse cable into the keyboard.
The mouse and keyboard cables connect via ADB ports, which are marked with the icon V. The plugs at the ends of the cables also have the icons. Align the icons on the port and the plug before you insert the plug.
Plug the mouse cable into the recessed port
on the keyboard. The flat part of the plug


 should be pointing down, as shown here.
This cable plugs into the Apple Desktop Bus (ADB) port, marked with the V icon, on the back of the computer. You may also be able to connect the cable to an ADB port on the monitor.
The position of the port and the icon on your keyboard may be different from those pictured here. Some keyboards, like the one shown here, have only one ADB port, which is recessed on the back. Other keyboards have two ADB ports: one on each side of the keyboard. If you have the second kind of keyboard, plug in the mouse on the side that makes it most comfortable for you to use. Most right-handed people prefer to use the mouse with their right hand and plug the mouse into the right ADB port.
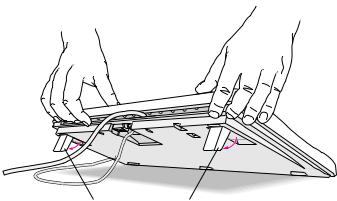
2If your keyboard has a second ADB port, plug the keyboard cable into it.
The keyboard cable has ADB plugs at both ends. Plug either end of the cable into the free ADB port.
If your keyboard has a built-in cable (like the one pictured above), skip this step.
Setting Up Your Computer 7
3If the front or side of your monitor has a port marked with the V icon, plug the keyboard cable into this port. Otherwise, plug the keyboard cable into the port marked with the V icon on the back of the computer.
4If you plugged your keyboard into the monitor in step 3, connect an ADB cable between the monitor and the computer. (Otherwise, skip to step 5.) Monitors may include one of two types of ADB cables:
m A separate ADB cable that you connect between the ports marked with the V icon on the back of the monitor and on the computer.
m An ADB connector on the monitor cable that you connect to the port marked with the V icon on the back of the computer.
For more information about ADB connections between the monitor and the computer, see the manual that came with your monitor.
5Adjust the keyboard for your comfort.
Some keyboards, like the one pictured here, have feet underneath that you can snap into position. Other keyboards have a bar on the back that slides to change the angle.
To adjust the angle of the keyboard, lower the feet until they snap into position.
8Chapter 1

Connecting a Modem
Some Macintosh models come with an internal modem already installed in the computer. If your computer did not come with an internal modem, you can attach an external modem.
Important When connecting a modem, make sure you connect the modem to an analog phone line—the kind used typically in homes.
If your computer came with an internal modem, you only need a telephone cable to connect it to a phone line. Plug one end of the telephone cable into the internal modem port (W) provided on the back of the computer by the modem and the other end into the telephone jack in the wall.
Optional internal modem port (RJ-11)
 Modem port icon
You connect an external modem to the modem (W) port on the back of the computer.
 Modem port icon
Modem port (Mini DIN-9)
Before you attach an external modem, read any instructions that came with it. These may include instructions for installing the modem’s software.
Important Disconnect your modem from the phone jack during lightning storms. This will prevent a destructive voltage overload from damaging the modem.
Setting Up Your Computer 9
Turning the Computer On
To turn on the computer for the first time, follow these steps:
1Turn on your monitor.
See the information that came with your monitor for the location of the power switch. On newer Apple monitors, the power switch is located on the front.
You may not see the monitor power come on until you turn on the computer in the next step.
By the way: Depending on the type of monitor you have, you may only need to turn it on once. Some monitors turn off automatically when you shut down the computer and turn on automatically when you start up the computer. You turn other monitors on or off separately.
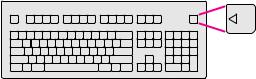
2Turn on your computer by pressing the Power key.
The Power key is marked with a triangle on your keyboard.
You should hear a tone from the computer as it starts up. If you don’t, press the Power key again and hold down the key a little longer.
As the computer starts up, a series of messages appear on the screen.
When the computer starts up, go to the section “What’s Next?” for more instructions.
If the computer does not start up, go to the next section, “Problems Turning Your Computer On?”
10 Chapter 1
Problems Turning Your Computer On?
If you don’t see anything on your screen or you think your computer did not start up properly, check these items to see if you can identify the problem:
mIs the computer plugged into a power source? If it is plugged into a power strip, is the power strip turned on?
mAre the keyboard and mouse cables connected correctly? If your keyboard is attached to the monitor, does an ADB cable connect the monitor to the computer?
Warning Don’t connect or disconnect this cable while the computer is on. You could damage your equipment. To turn off your computer, press the power button on the front of the computer.
mIs the computer turned on? The power-on light on the front panel of the computer should be on.
mIs the monitor power cord plugged in?
mIs the monitor cable—the one connected to the monitor port (™) on your computer— attached firmly to both the monitor and computer?
mIs the monitor turned on? (Check the power-on light on the front of the monitor.)
mIs the brightness control on the monitor adjusted correctly? (On most monitors, the brightness control is marked with the symbol ¤.)
mIs the computer asleep? A blinking green light on the computer’s front panel means that it
has gone into “sleep,” a low-power mode designed to save energy. To wake the computer, press the Power key (marked with a π) on the keyboard. It may take a moment or two for the computer to wake up. (Unless you change the settings, the computer goes to sleep if it is not used for 30 minutes.)
mIf you see a blinking question mark on the monitor screen or hear an unusual “breaking glass” sound when you turn on the computer, see the Emergency Handbook for help.
Setting Up Your Computer 11

What’s Next?
For more information about working with your computer’s hardware, refer to the following chapters in this manual.
mTo learn more about the basics of your computer’s hardware, such as how to use your built-in CD-ROM and floppy disk drives, how to connect external devices such as a printer, and how to attach a security device to protect against theft, go to Chapter 2.
mTo learn how to connect your computer to a computer network, see Chapter 2.
mTo learn how to install expansion cards or add memory to your computer, see Chapter 3.
If you want to turn off your computer for now, go to the next section, “Turning the Computer Off.”
Turning the Computer Off
To turn your computer off, follow these instructions:
1Press the Power key (π) on your keyboard.
The following dialog box appears on the screen:
2Press the Return key on the keyboard (or click the Shut Down button in the dialog box).
If any applications are still open, a message asks if you want to save your work before the computer shuts down.
To turn the computer on again, just press the Power key on the keyboard.
Note: You can also turn off the computer by choosing Shut Down from the Special menu.
Important Do not use the power button on the front of the computer to turn the computer off unless there is a problem that prevents it from being turned off with the Power key or the Shut Down command. ( You could lose unsaved work.) To make sure your work is saved, use the Power key.
12 Chapter 1

C H A P T E R
21
Using Your Macintosh
and Connecting Additional Equipment
This chapter tells you about the disk drives built into your computer and how you can expand your computer system by connecting other equipment to it or by connecting it to a computer network. The illustrations on the next two pages show the built-in drives and connectors for additional equipment.
This chapter describes how to connect the following types of additional equipment:
maudio devices, such as a microphone, headphones, or speakers
mvideo devices, such as a video camera or videocassette recorder ( VCR)
mexternal SCSI devices, such as a hard disk or a removable media drive
ma printer
ma second monitor
madditional ADB input devices, such as a trackball or a graphics tablet
mnetwork cables and adapters
msecurity equipment to protect your Macintosh
Important Each device you add should be compatible with your computer and must not exceed the maximum power allowance for that device. Turn off the computer before connecting a SCSI or ADB device. For more information, consult an Apple-authorized dealer, the manufacturer of the equipment you add, or the Technical Information booklet that came with your computer.
For instructions on installing internal equipment, see Chapter 3, “Installing PCI Cards,
Memory, and Internal Storage Devices.”
13
Your Computer’s Components and Front Panel Controls
Floppy disk drive |
Microphone |
(optional)
CD-ROM drive
CCD-ROM drive |
Monitor |
|
Open/Close button |
||
|
Zip drive (optional)
π Power key
Expansion bay
Speaker |
|
|
Power button/ |
|
|
Power-on light |
Keyboard |
Mouse |
14 Chapter 2

C
π
Floppy disk drive
Works with high-density and double-sided 3.5" floppy disks
CD-ROM drive
Works with CD-ROM discs and plays standard audio and Photo CDs
CD-ROM drive Open/Close button
Opens and closes the CD-ROM drive tray
Zip drive (optional) or expansion bay 1
Works with Zip disks. If a Zip drive is not present, then this is an expansion bay for an additional 3.5" or 5.25" internal storage device that is up to 1.625" (41.3 mm) high.
Expansion bay 2
Behind the front panel there is an expansion bay for an additional 3.5" or 5.25" internal storage device that is up to 1.625" (41.3 mm) high.
Power button/Power-on light
Turns your computer off in emergencies when you can’t use the Power key on the keyboard or the Shut Down command in the Special menu. A green light indicates that the computer is on. The light blinks when the computer is asleep.
Monitor
Your monitor may look different. An Apple display is shown here.
Power key
Turns your computer on and off
Using Your Macintosh and Connecting Additional Equipment |
15 |
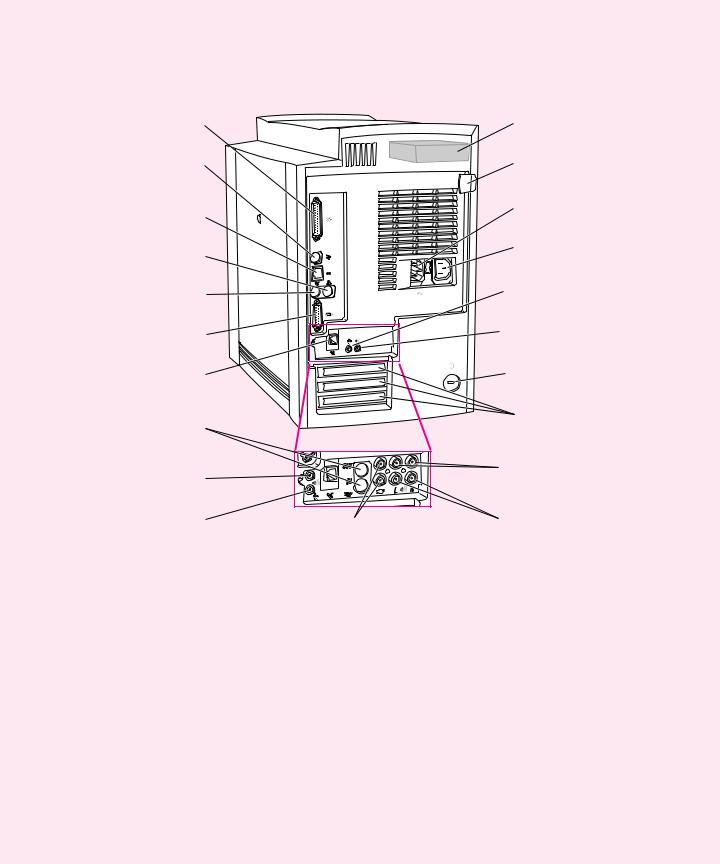
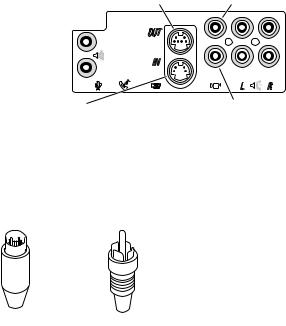
Your Computer’s Ports and Connectors
gSCSI port
VApple Desktop Bus
(ADB) port
GEthernet port (10Base-T)
[Printer port
WExternal modem port
™Monitor port
WInternal modem card
(optional)
Æ æS-video ports
(OUT and IN)
-Sound output port
≈Sound input port
Internal hard disk drive
Lockable cover latch
≤ Power socket
Monitor power socket
≈Sound input port
-Sound output port
F Security lock port
Access covers for expansion slots (3)
Optional AV ports
-Audio output ports
(left & right)
 ˜Composite video ports |
-Audio input ports |
(OUT and IN) |
(left & right) |
16 Chapter 2

Standard ports and connectors (available on all models)
g V G
[
W
™
SCSI port
Connects your Macintosh to SCSI equipment such as external hard disk drives and scanners
Apple Desktop Bus (ADB) port
Connects your Macintosh to an input device, such as a keyboard or a trackball
Ethernet port (10Base-T)
Connects your Macintosh to a high-speed 10Base-T Ethernet network
Printer port
Connects your Macintosh to a printer or LocalTalk network
External modem port
Connects an external modem cable or LocalTalk cable to your Macintosh
Monitor port
Connects your Macintosh to a monitor
Access covers for expansion slots (3)
Your Macintosh supports up to three peripheral component interconnect (PCI) cards.
Internal hard disk drive
Large-capacity permanent device for storing software, documents, and other files
FSecurity lock port and lockable cover latch
You can attach a security lock to your Macintosh and to its cover to secure the internal components. See your computer products retailer for security lock devices that work with your computer.
-Sound output port
Connects your Macintosh to headphones, externally powered (amplified) speakers, or other audio output equipment
≈Sound input port
Connects your Macintosh to an Apple PlainTalk microphone or other audio input equipment
Optional ports and connectors (available on some models)
æÆ S-video ports (IN and OUT)
Connects your Macintosh to VCRs, video cameras, or other video equipment that uses an S-video connector
-
˜Â
Audio input ports (left & right)
Connects your Macintosh to the RCA-type audio output ports of video or audio equipment, such as VCRs and tape decks
Composite video ports (IN and OUT)
Connects your Macintosh to most VCRs, laserdisc players, video cameras, and other video equipment
-Audio output ports (left & right)
Connects your Macintosh to the RCA-type audio input ports of video or audio equipment, such as VCRs and tape decks
WInternal modem port
Connects a telephone cable to the optional internal modem
Using Your Macintosh and Connecting Additional Equipment |
17 |
Using the Computer’s Built-in Drives
Follow these instructions to work with the computer’s built-in CD-ROM drive, floppy disk drive, and optional Zip drive.
Using the CD-ROM Drive
To use your CD-ROM drive, follow these instructions.
Inserting a CD-ROM Disc
1Press the Open/Close button next to the CD-ROM drive.
2Place a CD-ROM disc in the tray, with the disc label facing up. Make sure that the disc lies flat in the tray.
If you are using a small (8 cm) disc, center the disc in the tray’s inner ring.
3Gently push the tray in, or press the Open/Close button, to close the tray. In a moment an icon for the CD-ROM disc appears on your screen.
Ejecting a CD-ROM Disc
Apple recommends that you eject your CD-ROM disc before you shut down the computer. To eject a CD, follow these instructions.
1Quit all the application programs running from the CD.
2Select the disc’s icon and drag it to the Trash. The CD tray opens.
3Remove the disc and gently close the tray.
You can also eject a CD-ROM disc from the drive by selecting the CD’s icon, opening the File menu, and choosing the Put Away command or by opening the Special menu and choosing the Eject command.
If these methods don’t work, see Mac OS Help, available in the Help menu.
If problems arise while using your CD-ROM drive, the Emergency Handbook that came with your computer contains solutions.
18 Chapter 2
Using the Floppy Disk Drive and Optional Zip Drive
You can use the floppy disk drive and the optional Zip drive to back up important data and to transfer files between computers. The floppy disk drive accepts only 3.5-inch floppy disks. Although the floppy disks and Zip disks are different, you work with them in the same way. Be sure to use the right kind of disk in each drive.
Important Never force a Zip disk into or out of the drive. Never use ordinary 3.5-inch floppy disks or floppy disk cleaning disks in the Zip drive. They will damage the drive.
For information on using the floppy disk drive, see Mac OS Help (available in the Help menu). The appendix of this manual has information on handling floppy disks and Zip disks. If you are unable to eject a disk, see the Emergency Handbook that came with the computer.
For more information on using the optional Zip drive and disks, see the Iomega folder in the Apple Extras folder on your computer’s hard disk.
Connecting Audio Equipment
Your Macintosh can play and record stereo sound from a variety of sources. Your computer has sound input and output ports (also known as “jacks”) like those found on most Macintosh models. Some models also have RCA-type audio input and output ports.
The Sound Input and Output Ports
Your Macintosh can receive stereo sound from a sound input device—also called a sound source—such as a microphone, tape deck, or audio CD player.
You attach sound input devices to the sound input port, which is marked with an icon of a microphone (≈).
Your computer comes with a built-in speaker. You can attach another sound output device, such as amplified speakers or headphones.
You attach sound output devices to the sound output port, which is marked with an icon of headphones (f) or a speaker (-).
The illustration of the back of the computer in the beginning of this chapter shows where these ports are.
Note: Depending on the computer configuration you purchased, your computer’s back panel may have additional ports alongside the sound input and sound output ports.
Using Your Macintosh and Connecting Additional Equipment |
19 |

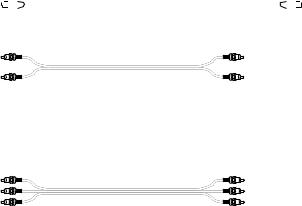
The sound input and output ports accept 3.5-mm connectors. There are two types:
Stereo miniplug |
Extended miniplug |
mThe stereo miniplug is found most often on stereo equipment; it works in both the sound input and sound output ports.
mThe extended miniplug, which is slightly longer and is found on voice-quality
microphones (such as the Apple PlainTalk Microphone), works only in the computer’s sound input port (≈). (Even though it will fit into the sound output port, it won’t work there.)
If your equipment has a different connector from those shown here, you can purchase an adapter at an electronics supply store.
The Optional Left and Right RCA-Type Audio Ports
Some models of this Macintosh also have ports that accept left and right input and output through RCA-type connectors. These connectors are found on devices like videocassette recorders ( VCRs) and tape decks. The RCA-type ports are color-coded: red for right, and white for left. (The yellow ports are for connecting video equipment.)
-Sound output port |
-Audio output ports (left & right) |
Connect your Macintosh to headphones, externally powered (amplified) speakers or other audio equipment using a 3.5-mm miniplug connector
≈Sound input port
Connect your Macintosh to an Apple PlainTalk microphone or other audio input
equipment using a 3.5-mm miniplug connector
Connect your Macintosh to the RCA-type Audio In ports of video or audio equipment such as VCRs and tape decks
-Audio input ports (left & right)
Connect your Macintosh to the RCA-type Audio Out ports of video or audio equipment such as VCRs and tape decks
20 Chapter 2
The left and right RCA-type ports accept this type of connector:
RCA-type plug
If your equipment has a different type of connector, you can purchase an adapter at an electronics supply store.
Connecting Most Audio Equipment
To connect most audio equipment, follow the steps below. For specific instructions on connecting a microphone, skip to the next section, “Connecting and Using a Microphone.”
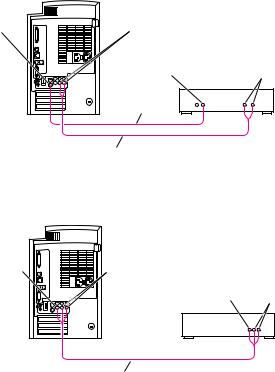
1Make sure that the audio equipment has a cable with a stereo miniplug connector. You can use a cable that looks like one of these:
|
|
|
|
|
|
|
|
|
|
Stereo miniplug |
Stereo miniplug |
||||||||
|
|
|
|
|
|
|
|
|
|
RCA plugs |
Stereo miniplug |
If your computer has the optional RCA-type audio ports, you can also use a cable like this one that has two RCA plugs at each end:
RCA plugs |
RCA plugs |
2Shut down the computer, turn off the audio equipment, and place the equipment near the computer.
3Attach cables to the audio equipment following the instructions that came with the equipment. Some equipment (such as most headphones) comes with cables already attached.
Using Your Macintosh and Connecting Additional Equipment |
21 |
4If your audio equipment is a sound input device, such as a tape deck, audio CD player, or VCR, attach it to the sound input port (≈) or to the optional RCA-type left and right audio input ports (-).
5If your audio equipment is a sound output device, such as headphones or amplified speakers, attach it to the sound output port (-) or to the optional RCA-type left and right audio output ports (-).
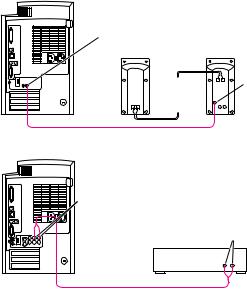
The illustration below shows two typical cable arrangements, one for amplified speakers connected with stereo miniplug connectors, and one for a tape deck connected with RCAtype connectors.
-Sound output
port
Externally |
Audio In port |
powered |
|
speakers |
|
-Audio output ports
(left and right)
Audio In ports (left and right)
Tape deck
In the first example, the two speakers are joined to each other by standard speaker wires. Some speaker pairs have two cables (one per speaker), which must be joined by a dual-plug adapter before they can be attached to the computer’s sound output port.
6Turn on the computer and the audio equipment.
If your monitor has sound controls, use them to adjust the sound. You may also need to adjust the settings in the Monitors & Sound control panel. Open the Monitors & Sound control panel and click the Sound button.
22 Chapter 2
Connecting and Using a Microphone
You can use the Apple PlainTalk Microphone that comes with some Macintosh computers (or a compatible line-level microphone) to give spoken commands to your Macintosh and to record your voice or other sounds. (The illustration of your computer in Chapter 1 shows the Apple PlainTalk microphone.)
Note: Do not use the Apple Omni microphone (the round microphone supplied with some older Macintosh models) or the attenuated RCA adapter provided with some Macintosh computers.
If your monitor has a built-in microphone that you want to use, see the information that came with the monitor to connect the microphone.
To connect and position an external microphone, follow these steps:
1Shut down the computer and plug the microphone’s connector into the sound input port (≈) on the back of the computer.
2Place an Apple PlainTalk Microphone at the top center of the monitor, so that the microphone’s Apple (K) icon faces you.
If you’re using a different microphone, position it according to these guidelines:
mThe microphone should be between 1 and 3 feet away from you.
mThe microphone should be directly in front of you to minimize the effect of background noises.
3Turn on the computer.
4Open the Monitors & Sound control panel, click the Sound button, and make sure that the microphone is the selected sound input source.
Click the button labeled hfor help.
Using Your Macintosh and Connecting Additional Equipment |
23 |
Connecting Video Equipment
Some models of this Macintosh have ports for connecting video equipment so that you can view TV and other video images on your computer monitor and store the images on your hard disk. You can also view the Macintosh desktop on a television screen attached to the computer and record images from the desktop to a videocassette recorder ( VCR).
Your Macintosh can work with two major video formats:
mComposite video, which is used by most televisions, most VCRs, and laserdisc players. Composite video devices plug into the computer’s RCA-type video ports (˜and Â).
mS-video, which is a high-quality video format used by many video cameras, VCRs, and televisions. S-video devices plug into the computer’s S-video ports (æand Æ).
The illustration below shows the computer’s video input and output ports. (The RCA-type ports are color-coded: yellow for composite video, red for right audio, and white for left audio.)
ÆS-video output port |
ÂComposite video output port |
||||||
Connects your Macintosh to the S-video In port |
Connects your Macintosh to the RCA-type |
||||||
of VCRs, or other video recording or video display |
Video In port of most VCRs, or other video |
||||||
equipment that uses an S-video connector |
recording or video display equipment |
||||||
|
|
|
|
|
|
|
|
|
|
|
|
|
|
|
|
|
|
|
|
|
|
|
|
|
|
|
|
|
|
|
|
|
|
|
|
|
|
|
|
|
|
|
|
|
|
|
|
æS-video input port
Connects your Macintosh to the S-video Out port of VCRs, laserdisc players, video cameras, or other video input equipment that uses an S-video connector
˜Composite video input port
Connects your Macintosh to the RCA-type Video Out port of most
VCRs, laserdisc players, video cameras, and other video input equipment
The S-video input and output ports accept S-video connectors, and the composite video input and output ports accept RCA-type connectors.
|
|
|
|
|
|
|
|
|
|
|
|
|
|
|
|
|
|
|
|
|
|
|
|
|
|
|
|
S-video connector |
RCA-type connector |
|||||
Note: The S-video input port is compatible with both seven-pin and four-pin S-video connectors.
24 Chapter 2
Important The S-video connector is a round plug with several small metal pins, which resembles other Macintosh connectors, such as those for a printer, modem, mouse, or keyboard. Don’t confuse the connectors; they’re not interchangeable.
Depending on what kind of ports are available on your video equipment, you’ll need different cables (available at an electronics supply store).
mIf your equipment has an S-video Out port, you’ll need a video cable with S-video connectors at each end, and two audio cables with RCA-type connectors at each end. (The audio cables can be separate, or joined like the one in the illustration.)
|
|
|
|
|
|
|
S-video plug |
S-video plug |
|||||
RCA plugs |
RCA plugs |
mIf your equipment has an RCA Video Out port, you’ll need one video cable with RCA-type connectors (plugs) at each end, and two audio cables with RCA-type connectors at each end. (The cables can be separate, or joined like the one in the illustration.)
RCA plugs |
RCA plugs |
Connecting Video Equipment for Input to the Computer
When you connect video equipment to the video input port on your computer, you can view video on your monitor, capture video images, and hear the sound from the video equipment through the computer’s speaker. The instructions that follow are for connecting a stereo VCR and video camera, but you can use them as a model for connecting your computer to any video equipment.
To connect a VCR or video camera for input, do the following:
1Shut down the Macintosh and turn off the VCR or video camera.
2Attach one end of the video cable to the Video Out port on the video equipment. Follow the directions that came with the VCR or camera.
Using Your Macintosh and Connecting Additional Equipment |
25 |
3Plug the other end of the video cable into either the S-video input port (æ) or the yellow RCA Video input port (˜) on the Macintosh.
If the S-video connector doesn’t slide easily into the port, check the pin alignment and try again. Don’t use force, which could damage the computer or cable.
4Plug the RCA-type connectors on the audio cables into the left and right RCA Audio Out ports on the VCR or camera.
5Plug the RCA-type connectors on the audio cables into the left and right RCA input ports (-) on the computer.
If the cable is color-coded, the red connector is for the right port, and the black or white connector is for the left port.
The next four illustrations show S-video connections and composite video connections for both a VCR and a camera. Your finished connections should look like one of the following:
S-video connection for input from a VCR
æS-video |
-Audio input ports |
input port |
(left and right) |
S-video Out |
Audio Out ports |
port |
(left and right) |
S-video cable |
VCR |
|
Dual RCA-plug cable
(available at most electronics supply stores)
Composite video connection for input from a VCR
˜Composite |
-Audio |
|
video |
input ports |
|
input port |
(left and right) |
|
|
Video Out |
Audio Out ports |
|
port |
(left and right) |
|
VCR |
|
|
Triple RCA-plug cable |
|
|
(available at most electronics supply stores) |
|
26 Chapter 2
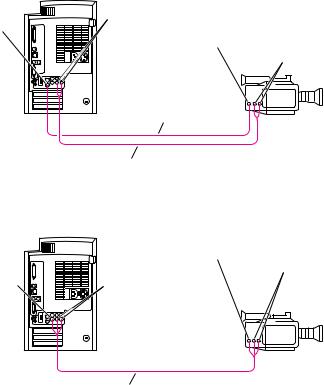
S-video connection for input from a camera
æS-video |
-Audio input ports (left and right) |
|
input port |
|
|
|
S-video Out port |
Audio Out ports |
|
|
(left and right) |
S-video cable
Dual RCA-plug cable
(available at most electronics supply stores)
Composite video connection for input from a camera
˜Composite |
-Audio |
Video Out port |
Audio Out ports |
video |
input ports |
|
(left and right) |
input port |
(left and right) |
|
|
Triple RCA-plug cable
(available at most electronics supply stores)
6Turn on the computer and the VCR or camera.
7To hear or capture on your computer the audio coming into the RCA input ports, open the Monitors & Sound control panel, click the Sound button, and make sure that the RCA input ports are the selected sound input source.
Click the button labeled hfor help.
You can now begin working with the video equipment connected to your computer. To learn more about using the AV features of your computer to play or capture video on your computer, open Mac OS Help (available in the Help menu) and look up “video” in the index.
Using Your Macintosh and Connecting Additional Equipment |
27 |
 Loading...