


P-320W
802.11g Wireless Firewall Router
Quick Start Guide
Version 2.00
Edition 1
10/2006
Table of Contents
ENGLISH 3 DEUTSCH 19 ESPAÑOL 39 FRANÇAIS 58 ITALIANO 76
РУССКИЙ 96 SVENSKA 116
135
ENGLISH
Overview
The Mer produkthjalp finns pa http://www.support.zyxel.se is a broadband router with a built-in four-port 10/ 100 Mbps switch. The Mer produkthjalp finns pa http://www.support.zyxel.se makes it easy to set up a small home or office network and share Internet access via a broadband (cable/DSL) modem.
You should have an Internet account already set up and have been given most of the following information.
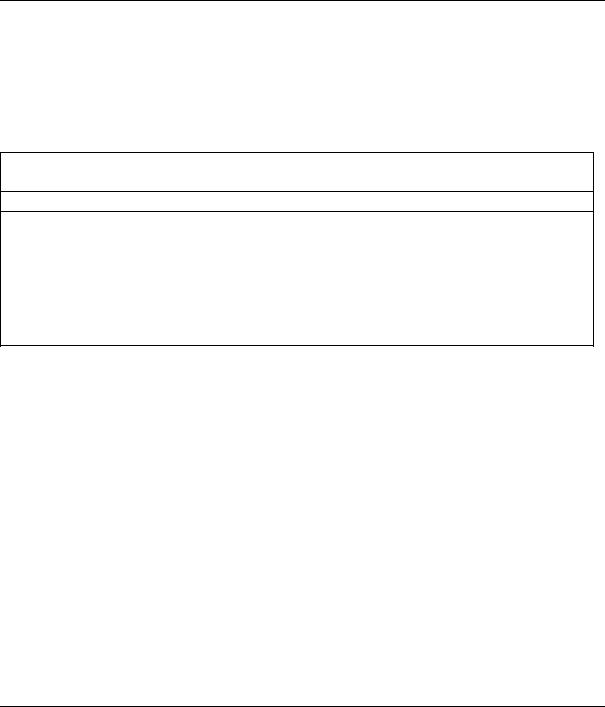
Table 1 Internet Account Information
Your device’s WAN IP Address (if given): ______________
DNS Server IP Address (if given): Primary _____________, Secondary ______________
Connection Type:
Ethernet |
Service Type: _______________________ |
Login Server IP Address: ______________ |
|
User Name: ____________ |
Password: ____________ |
|
|
|
PPTP: |
User Name: ____________ |
Password: ____________ |
|
Your WAN IP Address (if given) ____________ |
PPTP Server IP Address: ___________ |
|
Connection ID (if required): ____________ |
or PPTP Domain Name: ___________ |
|
|
|
¦PPPoE |
(PPPoE) Service Name: ____________ |
|
|
User Name: ____________ |
Password: ____________ |
See your User’s Guide for background information on all features.
The follow lists what you need to do:
1 Hardware Connections
2Accessing the Web Configurator
3Internet Access Setup
3
ENGLISH
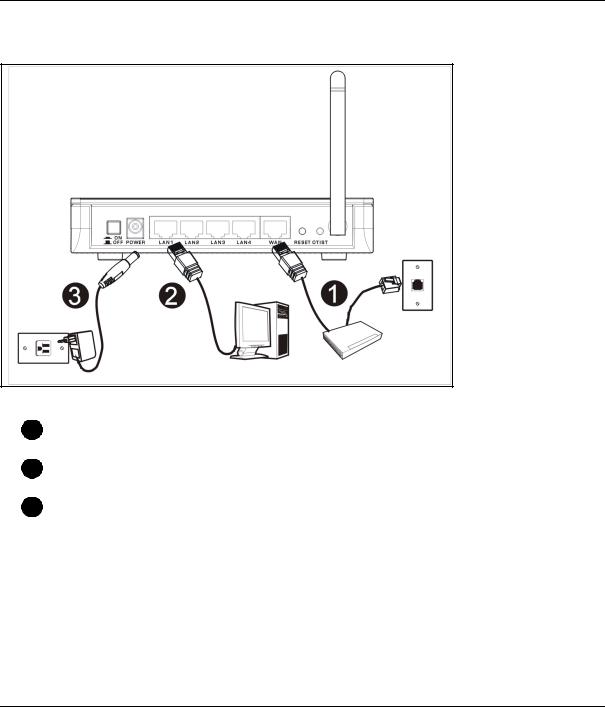
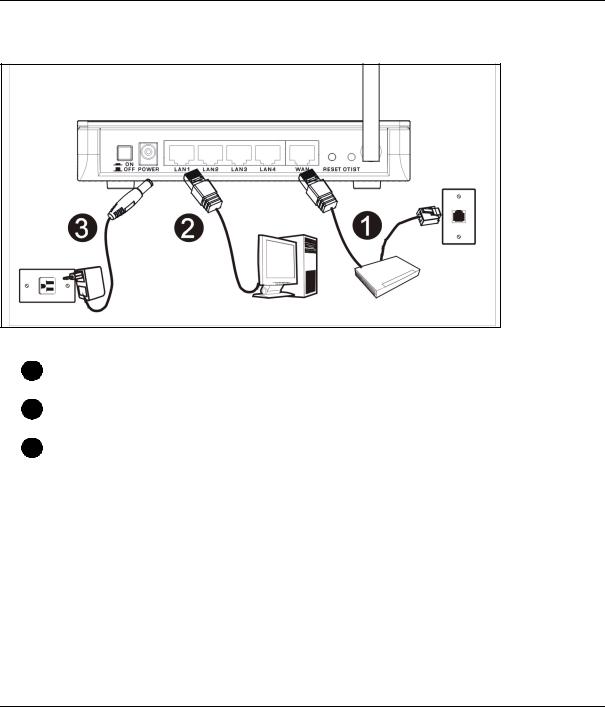
1 Hardware Connections
Do the following to make hardware connections for initial setup.
1 WAN Connection
Connect your modem to the “WAN” port using the cable that came with your modem.
2 LAN Connection
Connect your computer to a "LAN" port using the included Ethernet cable
3 POWER Connection
Use the included power adaptor to connect the POWER socket to an appropriate power source (see the User’s Guide for power adaptor specifications by region)
4
ENGLISH
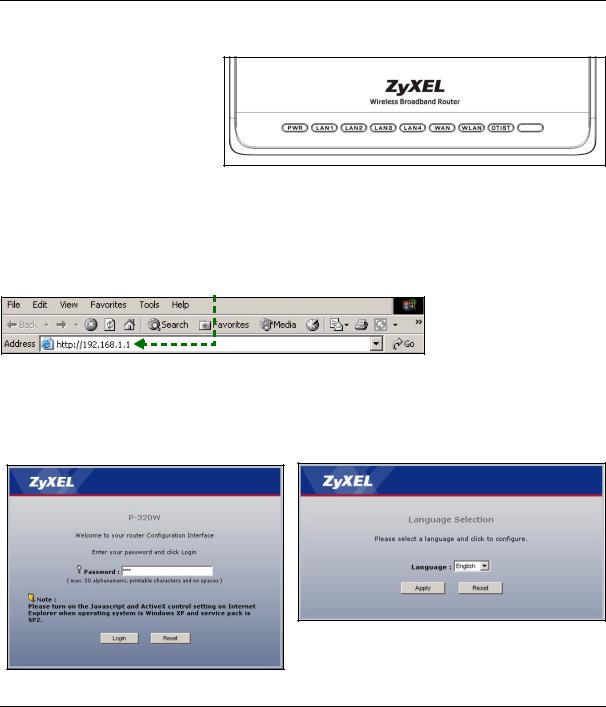
The LEDs
After you’ve made the connections, push in the power button to turn on the Mer produkthjalp finns pa http:// www.support.zyxel.se.
Look at the front panel LEDs. When you connect the power, the PWR and WLAN LEDs come on.
The LAN and WAN LEDs turn on if the corresponding connections are properly made.
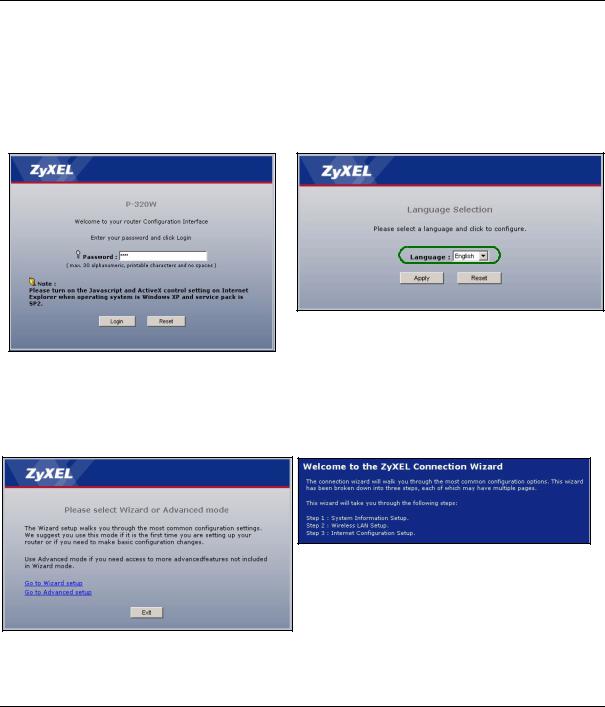
2 Accessing the Web Configurator
1 Launch your web browser. Enter “192.168.1.1” as the web site address.
Note: If you do not see the next screen, then please go to section 4.1.
2 The Password window displays. Enter the password (“1234” is the default) and click Login.
3 Change the password in the screen that follows and click Apply.
4Choose your language from the drop-down list box. Click Apply.
5
ENGLISH
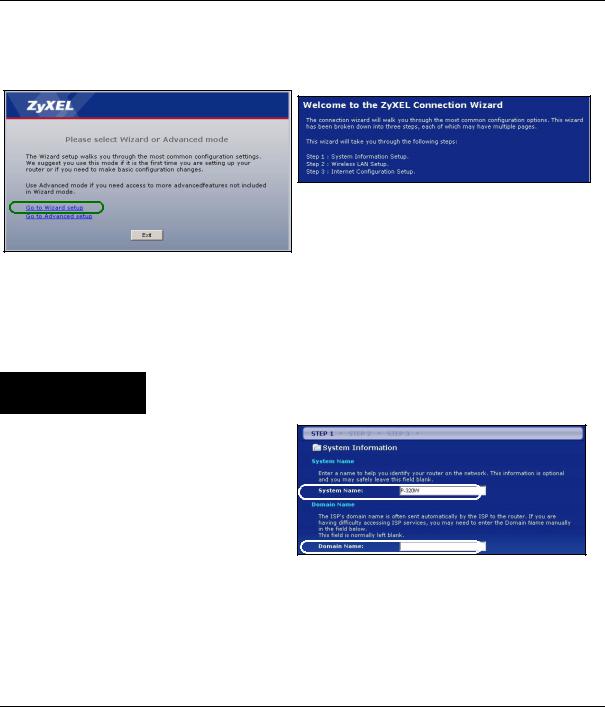
Note: The Next button is located on the bottom right of each screen.
5 Click Go to Wizard setup to set up your Mer produkthjalp finns pa http://www.support.zyxel.se for the first time..
6Choose your language from the drop-down list box. Click Next to proceed with the Connection Wizard.
3 Internet Access Setup
Note: Enter the Internet access information exactly as given to you by your ISP in each wizard screen and then click Next to continue or click Back to return to the previous screen.
Current screen information will be lost if you click Back.
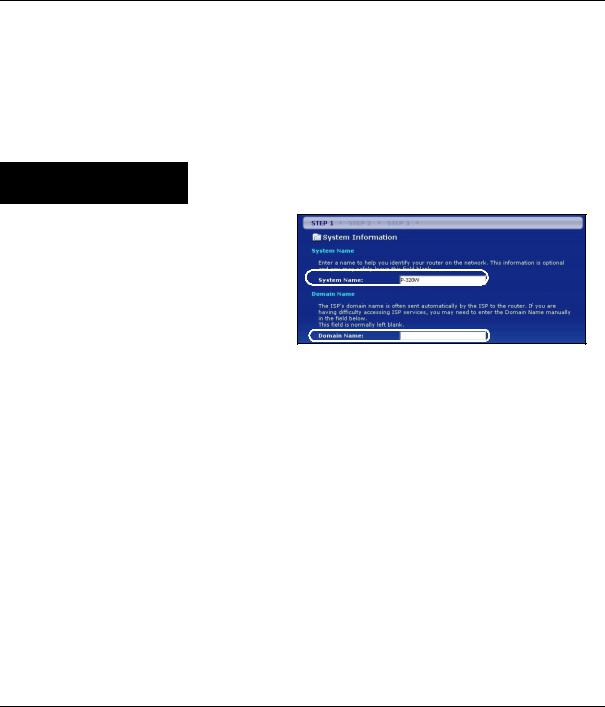
STEP 1: System Information
1 This screen is optional. You can just click Next.
•System Name is for identifying the Mer produkthjalp finns pa http://www.support.zyxel.se. You can enter your computer's "Computer Name".
• If you leave the Domain Name blank, the domain name obtained by DHCP from the ISP is used.
6

ENGLISH
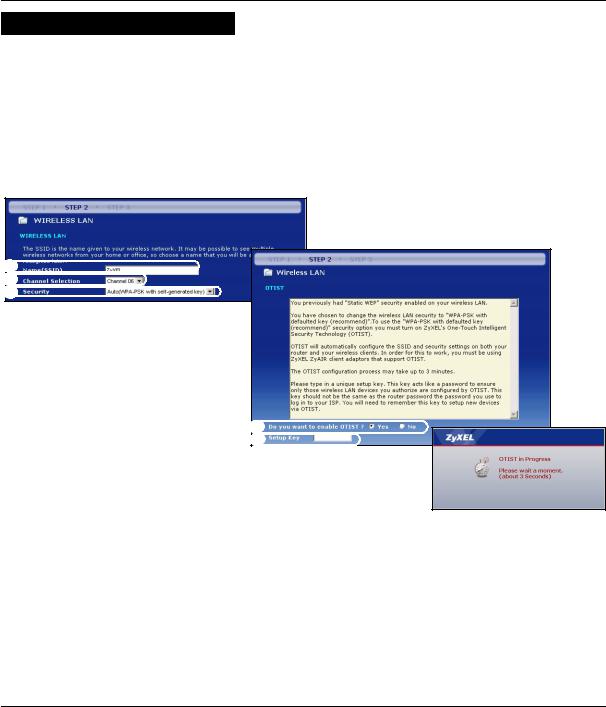
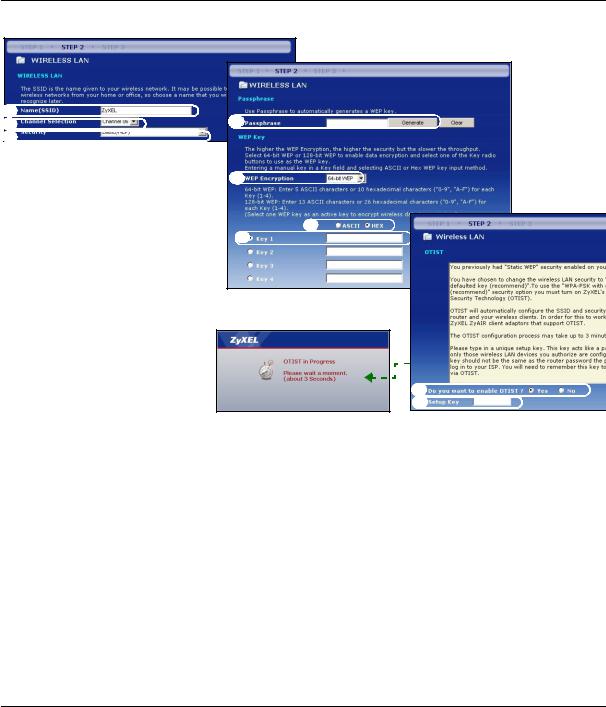
STEP 2: Wireless LAN
Configure ONE of the following wireless security types on the Mer produkthjalp finns pa http:// www.support.zyxel.se:
•Auto security: Uses WPA-PSK security with an automatically generated Pre-Shared Key. View the generated Pre-Shared Key in the Wireless LAN screen.
Note: Your wireless clients must support WPA-PSK and use the same key.
•None: Have no wireless LAN security configured. If you do not enable any wireless security on your Mer produkthjalp finns pa http://www.support.zyxel.se, your network is accessible to any wireless networking device that is within range.
•Basic security: WEP (Wired Equivalent Privacy) encrypts data frames before transmitting over the wireless network. The higher the WEP Encryption, the higher the security but the slower the throughput.
•Extend (WPA-PSK) security: Configure a Pre-Shared Key. Choose this option only if your wireless clients support WPA-PSK.
Note: The wireless clients and Mer produkthjalp finns pa http://www.support.zyxel.se must use the same SSID, channel ID and WPA-PSK (if WPA-PSK is enabled) or WEP encryption key (if WEP is enabled) for wireless communication.
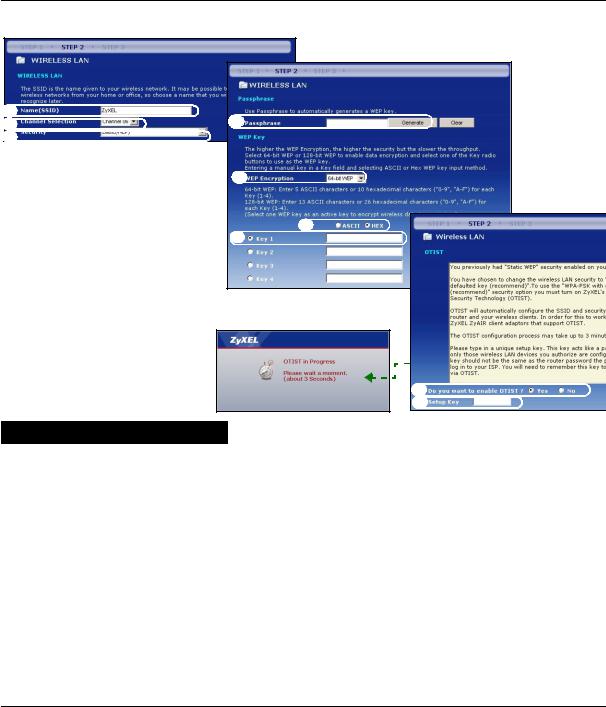
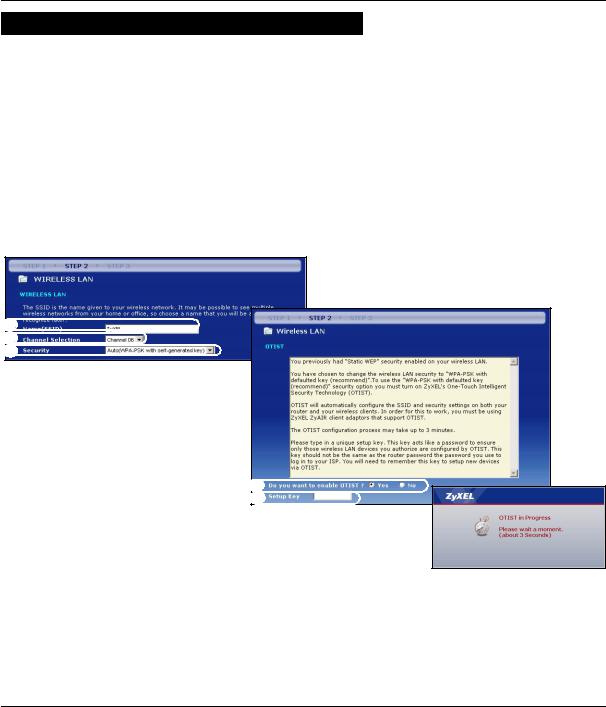
OTIST
•OTIST (One-Touch Intelligent Security Technology) allows your Mer produkthjalp finns pa http://www.support.zyxel.se to assign wireless clients the Mer produkthjalp finns pa http://www.support.zyxel.se’s SSID and static WEP or WPA-PSK encryption settings. The wireless client must also support OTIST and have OTIST enabled.
7
ENGLISH
Auto or No Wireless Security
A Enter a unique name to identify the Mer produkthjalp finns pa http://www.support.zyxel.se in the wireless LAN.
B Leave the default setting. The Mer produkthjalp finns pa http://www.support.zyxel.se and wireless client must use the same channel ID.
C Select a level of wireless security. Choose Auto or None.
D For Auto security select Yes to enable OTIST. If you select None select either Yes to enable OTIST or select the No radio button and click Next to configure OTIST later.
E The default OTIST Setup Key is “01234567”. This key can be changed in the web configurator. Be sure to use the same OTIST Setup Key on the Mer produkthjalp finns pa http://www.support.zyxel.se and wireless clients.
A |
B |
C |
D
E
8

ENGLISH
Basic(WEP) Security
A Enter a unique name to identify the Mer produkthjalp finns pa http://www.support.zyxel.se in the wireless LAN.
B Leave the default setting. The Mer produkthjalp finns pa http://www.support.zyxel.se and wireless client must use the same channel ID.
C Select Basic(WEP) security.
D You can generate or manually enter a WEP key by either:
Entering a Passphrase (up to 32 printable characters) and clicking Generate. The Mer produkthjalp finns pa http://www.support.zyxel.se automatically generates a WEP key.
Or entering manual keys in each Key (1~4) field and selecting ASCII or Hex WEP key input method. E Select 64-bit or 128-bit from the WEP Encryption drop-down list.
F Select ASCII or Hex characters.
G Select one of the Key radio buttons to use as the default WEP key.
H Select Yes to enable OTIST. Select the No radio button and click Next to configure OTIST later.
I The default OTIST Setup Key is “01234567”. This key can be changed in the web configurator. Be sure to use the same OTIST Setup Key on the Mer produkthjalp finns pa http://www.support.zyxel.se and wireless clients.
9
ENGLISH
A |
D |
B |
|
C |
|
E
F
G
D
E
Extend(WPA-PSK) Security
A Enter a unique name to identify the Mer produkthjalp finns pa http://www.support.zyxel.se in the wireless LAN.
B Leave the default setting. The Mer produkthjalp finns pa http://www.support.zyxel.se and wireless client must use the same channel ID.
CSelect WPA-PSK security.
DType a pre-shared key to have a more secure wireless connection than WEP encryption. Type from 8 to 63 case-sensitive ASCII characters.You can set up the most secure wireless connection by configuring WPA in the advanced wireless screen. You need to configure a RADIUS server to do this.
EYes is enabled by default. Select the No radio button and click Next to configure OTIST later.
FThe default OTIST Setup Key is “01234567”. This key can be changed in the web configurator. Be sure to use the same OTIST Setup Key on the Mer produkthjalp finns pa http://www.support.zyxel.se and wireless clients.
10
ENGLISH
A |
B |
C |


 D
D


 D
D
E
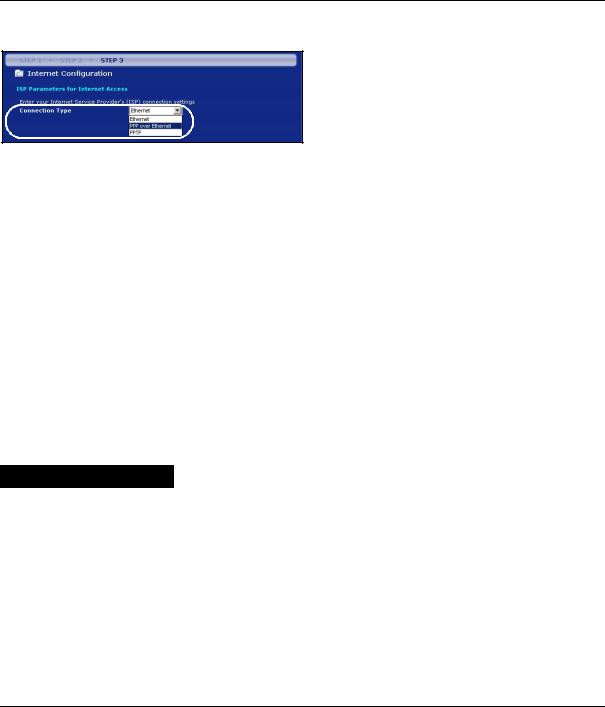
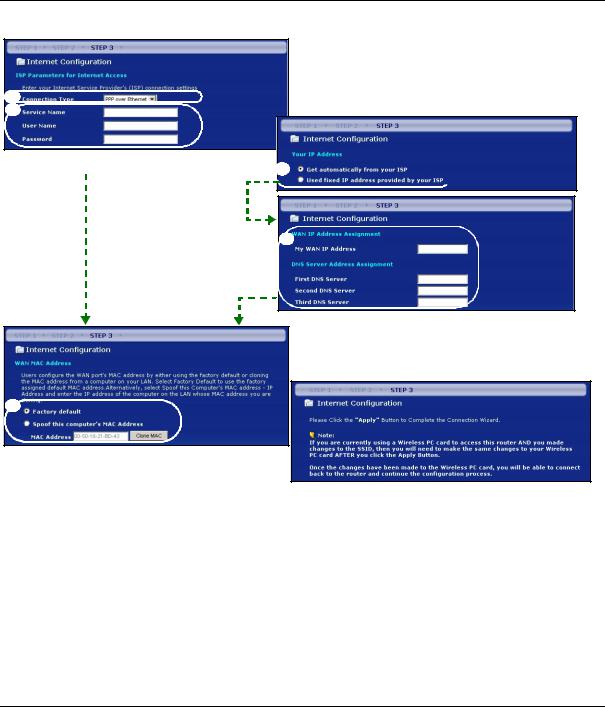
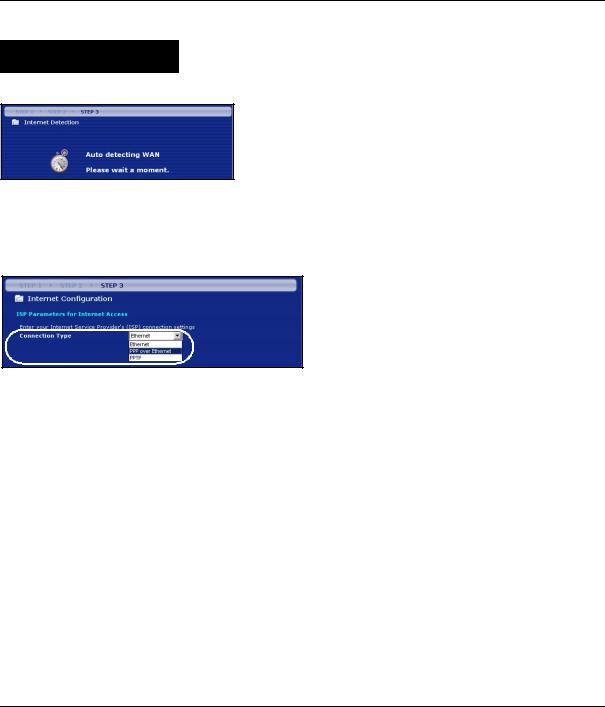
STEP 3: WAN
The wizard attempts to detect which WAN connection type you are using.
If the wizard does not detect a connection type, you must select ONE from the drop-down list box. Check with your ISP to make sure you use the correct type:
1 Ethernet
11
ENGLISH
2PPPoE
3PPTP.
Note: If you were given Internet access settings, enter them in the following fields. Otherwise leave the default settings and just click Next
Ethernet Connection
A Select Ethernet as your WAN connection type.
B Select Get automatically from your ISP if your ISP did not assign you a fixed IP address. Skip to D. Or
Select Use fixed IP address provided by your ISP to give the Mer produkthjalp finns pa http:// www.support.zyxel.se a fixed, unique IP address.
C Enter a WAN IP address and WAN IP Subnet Mask of the neighboring device, if you know it. If you do not, leave the default settings.
If you were given an IP address and/or DNS server settings, enter them in the fields. Otherwise leave the default settings and just click Next.
D Select Factory Default to use the factory assigned default MAC address.
12
ENGLISH
A |
B |
C 
D
PPPoE Connection
A Select PPPoE as your WAN connection type.
BType a Service Name (Optional), User Name and Password.
C Select Get automatically from your ISP if your ISP did not assign you a fixed IP address. Skip to E.
Or select Use fixed IP address provided by your ISP to give the Mer produkthjalp finns pa http:// www.support.zyxel.se a fixed, unique IP address.
D Enter the WAN IP address of the neighboring device, if you know it. If you do not, leave the default settings.
If you were given IP address and/or DNS server settings, enter them in the fields. Otherwise leave the default settings and just click Next.
E Select Factory Default to use the factory assigned default MAC address.
13
ENGLISH
A
B


 C
C
D
E
14

ENGLISH
PPTP Connection
A Select PPTP as your WAN connection type.
BType a User Name and Password
C Select Get automatically from ISP if your ISP did not assign you a fixed PPTP IP address.
Or select Use fixed IP address to give the Mer produkthjalp finns pa http://www.support.zyxel.se a fixed, unique PPTP IP address and subnet mask.
D Type a PPTP Server IP Address
E Type a Connection ID/Name (if provided)
F Select Get automatically from your ISP if your ISP did not assign you a fixed IP address. Skip to H.
Or select Use fixed IP address provided by your ISP to give the Mer produkthjalp finns pa http:// www.support.zyxel.se a fixed, unique IP address.
G Enter a WAN IP address and WAN IP Subnet Mask of the neighboring device, if you know it. If you do not, leave the default settings.
If you were given IP address and/or DNS server settings, enter them in the fields. Otherwise leave the default settings and just click Next.
H Select Factory Default to use the factory assigned default MAC address.
15

ENGLISH |
A |
B |
C |
D |
E |
F |
G |
H
16
ENGLISH
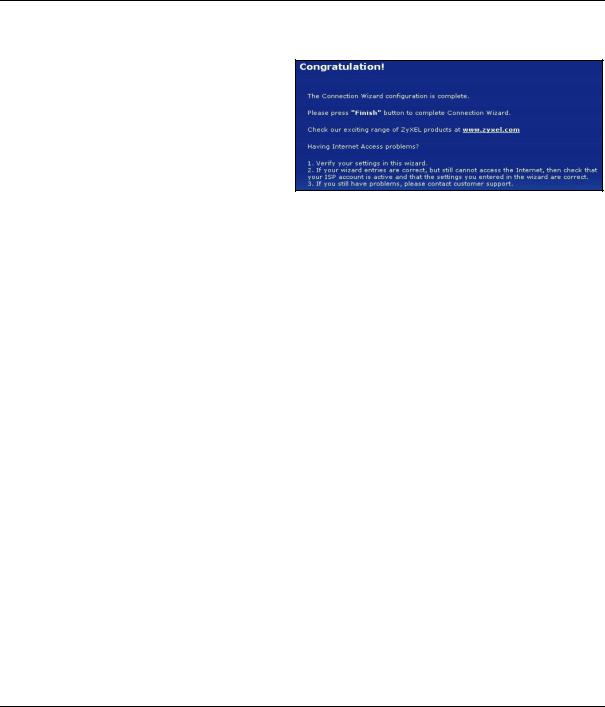
Internet Access Setup Complete
If you have any Internet access problems, follow the on-screen instructions.
Click Finish to complete the Connection Wizard.
4 Troubleshooting
Note: If your computer cannot automatically communicate with the device, then see the multimedia tutorial on how to set up your computer to receive an IP address dynamically or give it a fixed one in the range specified in section 4.1.
PROBLEM |
CORRECTIVE ACTION |
|
None of the LEDs turn on when |
Make sure that you have the correct power adaptor connected to the Mer |
|
you connect the Mer |
produkthjalp finns pa http://www.support.zyxel.se, it is plugged into an |
|
produkthjalp finns pa http:// |
appropriate power source. |
|
www.support.zyxel.se’s power. |
Check all cable connections. If the LEDs still do not turn on, you may have a |
|
|
hardware problem. In this case, you should contact your local vendor. |
|
|
|
|
Cannot access the Mer |
Check the cable connection from your computer to the Mer produkthjalp finns |
|
produkthjalp finns pa http:// |
pa http://www.support.zyxel.se. |
|
www.support.zyxel.se from my |
If the Mer produkthjalp finns pa http://www.support.zyxel.se’s IP address has |
|
computer. |
||
changed, then enter the new one as the website address. |
||
|
||
|
Make sure your computer’s IP address is in the same subnet as the Mer |
|
|
produkthjalp finns pa http://www.support.zyxel.se’s IP address (see section 4.1). |
|
|
Ping the Mer produkthjalp finns pa http://www.support.zyxel.se from a computer |
|
|
on the LAN. Make sure your computer’s Ethernet adapter is installed and |
|
|
functioning properly. In the computer, click Start, (All) Programs, Accessories |
|
|
and then Command Prompt. In the Command Prompt window, type "ping" |
|
|
followed by the Mer produkthjalp finns pa http://www.support.zyxel.se’s LAN IP |
|
|
address (192.168.1.1 is the default) and then press [ENTER]. The Mer |
|
|
produkthjalp finns pa http://www.support.zyxel.se should reply; otherwise see |
|
|
section 4.1. |
|
|
|
17
|
ENGLISH |
|
|
|
|
PROBLEM |
CORRECTIVE ACTION |
|
Cannot access the Mer |
Use Internet Explorer 6.0 and later or Netscape Navigator 7.0 and later with |
|
produkthjalp finns pa http:// |
JavaScript enabled. |
|
www.support.zyxel.se from my |
Make sure you enter the password correctly (the field is case sensitive). |
|
computer (continued). |
||
If you’ve forgotten the Mer produkthjalp finns pa http://www.support.zyxel.se’s |
||
|
||
|
password, use the RESET button. Press the button in for about 10 seconds (the |
|
|
WAN light turns off and then on again), then release it. It returns the Mer |
|
|
produkthjalp finns pa http://www.support.zyxel.se to the factory defaults |
|
|
(password is 1234, LAN IP address 192.168.1.1 etc.). |
|
|
|
|
Cannot access the Internet. |
Verify the Internet connection settings in the wizard. Make sure you entered the |
|
|
correct user name and password if you are using PPPoE or PPPoA. |
|
|
|
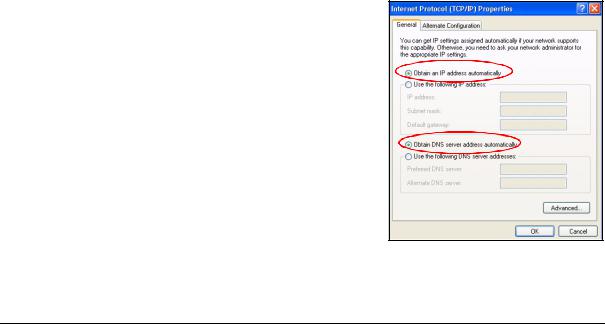
4.1 Set Up Your Computer’s IP Address
This section shows you how to set your Windows NT/2000/XP computer to automatically get an IP address. This ensures that your computer can communicate with your Mer produkthjalp finns pa http:// www.support.zyxel.se. Refer to your User’s Guide for detailed IP address configuration for other Windows and Macintosh computer operating systems.
1In Windows XP, click start, Control Panel. In Windows 2000/NT, click Start, Settings, Control Panel.
2In Windows XP, click Network Connections. In Windows 2000/NT, click Network and Dial-up Connections.
3Right-click Local Area Connection and then click Properties.
4Select Internet Protocol (TCP/IP) (under the General tab in Win XP) and click Properties.
5The Internet Protocol TCP/IP Properties screen opens (the
General tab in Windows XP).
6 Select the Obtain an IP address automatically and Obtain DNS server address automatically options.
7 Click OK to close the Internet Protocol (TCP/IP) Properties window.
8 Click Close (OK in Windows 2000/NT) to close the Local Area Connection Properties window.
9 Close the Network Connections screen.
Viewing Your Product’s Certifications
1Go to www.zyxel.com.
2Select your product from the drop-down list box on the ZyXEL home page to go to that product's page.
3Select the certification you wish to view from this page.
18
DEUTSCH
Übersicht
Der Mer produkthjalp finns pa http://www.support.zyxel.se ist ein Breitband-Router mit einem integrierten 10/ 100 Mbps Switch mit vier Anschlüssen. Mit dem Mer produkthjalp finns pa http://www.support.zyxel.se können Sie ganz einfach ein kleines Heimoder Büronetzwerk aufbauen und einen Internetzugang von mehreren Rechnern aus über ein Breitbandmodem (Kabel/DSL) nutzen.
Voraussetzung sind ein bestehendes Internetkonto und die folgenden Informationen.
Tabelle 1 Daten zum Internetkonto
Die WAN IP-Adresse Ihres Geräts (wenn vorhanden): ______________
DNS Server IP-Adresse (wenn vorhanden): Primär _____________, Sekundär ______________
Verbindungstyp:
Ethernet |
Diensttyp: _______________________ |
Login Server IP-Adresse: ______________ |
|
Benutzername: ____________ |
Passwort: ____________ |
|
|
|
PPTP: |
Benutzername: ____________ |
Passwort: ____________ |
|
Ihre WAN IP-Adresse (wenn vorhanden) |
PPTP Server IP-Adresse: ___________ |
|
____________ |
oder PPTP Domain-Name: ___________ |
|
Verbindungs-ID (wenn erforderlich): |
|
|
|
|
|
____________ |
|
|
|
|
PPPoE |
(PPPoE) Dienstname: ____________ |
|
|
Benutzername: ____________ |
Passwort: ____________ |
Ausführliche Informationen zu allen Funktionen finden Sie im Benutzerhandbuch.
Im Folgenden wird aufgeführt, welche Schritte notwendig sind:
1 Anschließen der Hardware
2Zugriff auf den Web-Konfigurator
3Einrichten des Internetzugangs
19
DEUTSCH
1 Anschließen der Hardware
Bei der Erstinstallation müssen die folgenden Hardwareverbindungen hergestellt werden.
1 Herstellen der WAN-Verbindung
Schließen Sie Ihr Modem mit dem mitgelieferten Kabel an den WAN-Anschluss an.
2 Herstellen der LAN-Verbindung
Schließen Sie Ihren Computer mit dem mitgelieferten Ethernet-Kabel an einen "LAN"-Anschluss an.
3 Anschließen an das Stromnetz
Verbinden Sie den Netzanschluss des Geräts (POWER) mit dem mitgelieferten Netzadapter mit einer geeigneten Stromquelle (eine nach Regionen geordnete Liste der Netzadapter-Spezifikationen finden Sie im Benutzerhandbuch).
20
DEUTSCH
Die LED-Anzeigen
Nachdem Sie alle Kabelverbindungen hergestellt haben, drücken Sie auf die Ein/Aus-Taste, um den Mer produkthjalp finns pa http:// www.support.zyxel.se einzuschalten.
Die LED-Anzeigen befinden sich an der Gerätevorderseite. Sobald das Gerät mit Strom versorgt wird, beginnen die LED-Anzeigen PWR und WLAN zu leuchten.
Die LED-Anzeigen LAN und WAN beginnen zu leuchten, wenn die entsprechenden Verbindungen bestehen.
2 Zugriff auf den Web-Konfigurator
1 Starten Sie Ihren Webbrowser. Geben Sie als Websiteadresse "192.168.1.1" ein.
21
DEUTSCH
Hinweis: Wenn das folgende Fenster nicht angezeigt werden sollte, gehen Sie zu Abschnitt 4.1.
2 Auf dem Bildschirm erscheint das Fenster Passwort. Geben Sie das Passwort ein ("1234" ist das Standardpasswort) und klicken Sie auf Login (Anmelden).
3 Ändern Sie im nachfolgenden Fenster das Passwort und klicken Sie auf Apply (Übernehmen).
4 Wählen Sie aus dem Listenfeld Ihre Sprache aus. Klicken Sie auf Apply (Übernehmen).
Hinweis: Die Schaltfläche Next (Weiter) befindet sich in jedem Fenster unten rechts.
5 Wenn Sie den Mer produkthjalp finns pa http:// www.support.zyxel.se das erste Mal benutzen, klicken Sie auf Go Wizard setup (Zum Einrichtungsassistenten).
6 Wählen Sie aus dem Listenfeld Ihre Sprache aus. Klicken Sie auf Next (Weiter) und fahren Sie mit dem Connection Wizard (Verbindungsassistent) fort.
22
DEUTSCH
3 Einrichten des Internetzugangs
Hinweis: Geben Sie in jedem Fenster des Assistenten die für den Internetzugang erforderlichen Informationen ein, die Sie von Ihrem Internetdienstanbieter erhalten haben. Klicken Sie dann zum Fortfahren auf Next (Weiter) oder kehren Sie mit Back (Zurück) zum vorhergehenden Fenster zurück.
Wenn Sie auf Back (Zurück) klicken, gehen alle aktuell auf dem Bildschirm vorhandenen Daten verloren.
SCHRITT 1: Systemdaten
1 Dieses Fenster ist optional. Sie können einfach auf Next (Weiter) klicken.
Der System Name (Systemname) wird für die Identifikation des Mer produkthjalp finns pa http:// www.support.zyxel.se benötigt. Geben Sie den Namen des Computers ein
Wenn Sie das Feld Domain Name (Domainname) frei lassen, wird der Domainname verwendet, der vom DHCP des Internetdienstanbieters vorgegeben ist.
23

DEUTSCH
SCHRITT 2: Wireless-LAN
Konfigurieren Sie beim Mer produkthjalp finns pa http://www.support.zyxel.se EINEN der folgenden WirelessSicherheitstypen:
Auto security (Automatische Sicherheit): WPA-PSK-Sicherheit mit einem automatisch erzeugten Pre-Shared- Key. Sehen Sie sich den erzeugten Pre-Shared-Key im Fenster Wireless LAN an.
Hinweis: Die Wireless-Clients müssen WPA-PSK unterstützen und denselben Schlüssel verwenden.
None (Keine Sicherheit): Es wird keine Wireless-LAN-Sicherheit konfiguriert. Wenn Sie beim Mer produkthjalp finns pa http://www.support.zyxel.se keine Wireless-Sicherheitsfunktion aktivieren, ist Ihr Netzwerk für jedes beliebige drahtlose Netzwerkgerät zugänglich, das sich in dessen Bereich befindet.
Basic security (Basissicherheit): WEP (Wired Equivalent Privacy) verschlüsselt die Datenframes, bevor Sie über das Wireless-Netzwerk übertragen werden. Je höher die WEP-Verschlüsselung, um so höher ist zwar die Sicherheit, jedoch wird die Übertragungsgeschwindigkeit geringer.
Extend (WPA-PSK) security (Erweiterte Sicherheit (WPA-PSK)): Konfiguriert einen Pre-Shared-Key. Wählen Sie diese Option nur, wenn die Wireless-Clients WPA-PSK unterstützen.
Hinweis: Die Wireless-Clients und der Mer produkthjalp finns pa http://www.support.zyxel.se müssen für die drahtlose Kommunikation dieselbe SSID, Channel-ID und WPA-PSK (wenn WPA-PSK aktiviert ist) bzw. dieselbe WEP-Verschlüsselung (wenn WEP aktiviert ist) verwenden.
OTIST
Mit der OTIST-Technologie (One-Touch Intelligent Security Technology) kann der Mer produkthjalp finns pa http://www.support.zyxel.se den Wireless-Clients die eigenen Einstellungen für SSID und statische WEP oder WPA-PSK-Verschlüsselung zuweisen. Der Wireless-Client muss ebenfalls OTIST unterstützen, und die OTISTFunktion muss aktiviert sein.
24
DEUTSCH
Automatische oder Keine Wireless-Sicherheit
A Geben Sie einen Namen ein, mit dem der Mer produkthjalp finns pa http://www.support.zyxel.se im WirelessLAN eindeutig identifiziert wird.
B Belassen Sie die Standardeinstellung. Der Mer produkthjalp finns pa http://www.support.zyxel.se und der Wireless-Client müssen dieselbe Kanal-ID verwenden.
C Wählen Sie eine Sicherheitsstufe für die drahtlosen Verbindungen. Wählen Sie Auto (Autmatisch) oder None (Keine).
D Um die automatische Sicherheit Auto mit OTIST zu aktivieren, wählen Sie Yes (Ja). Wenn Sie None (Keine) wählen, müssen Sie entweder mit Yes (Ja) OTIST aktivieren oder die Option No (Nein) markieren und auf Next (Weiter) klicken, um OTIST später zu konfigurieren.
E Der Standard-Setupschlüssel von OTIST ist “01234567”. Dieser Schlüssel kann im Web-Konfigurator geändert werden. Achten Sie darauf, dass Sie beim Mer produkthjalp finns pa http://www.support.zyxel.se und bei den Wireless-Clients denselben OTIST Setupschlüssel verwenden.
A |
B |
C |
D
E
25

DEUTSCH
Basis-Sicherheit (WEP)
A Geben Sie einen Namen ein, mit dem der Mer produkthjalp finns pa http://www.support.zyxel.se im WirelessLAN eindeutig identifiziert wird.
B Belassen Sie die Standardeinstellung. Der Mer produkthjalp finns pa http://www.support.zyxel.se und der Wireless-Client müssen dieselbe Kanal-ID verwenden.
C Wählen Sie die Sicherheitsstufe Basic (WEP) (Basis (WEP)).
D So können Sie einen WEP-Schlüssel erzeugen oder manuell eingeben:
Geben Sie eine Passphrase (mit maximal 32 druckbaren Zeichen) ein und klicken Sie auf Generate (Erzeugen). Der Mer produkthjalp finns pa http://www.support.zyxel.se erzeugt automatisch einen WEPSchlüssel.
Oder geben Sie in jedem Feld Key (Schlüssel) (1-4) manuell mit einem der beiden Eingabeverfahren (ASCII oder Hex WEP-Schlüssel) einen Schlüssel ein.
E Wählen Sie aus der Liste für die WEP-Verschlüsselung 64-bit oder 128-bit. F Wählen Sie ASCIIoder Hex-Zeichen.
G Wählen Sie eine der Tasten Key (Schlüssel) aus, die als Standard-WEP-Schlüssel verwendet werden soll.
H Standardmäßig ist Yes (Ja) aktiviert. Wählen Sie die Option No (Nein) und klicken Sie auf Next (Weiter), um OTIST später zu konfigurieren.
I Der Standard-Setupschlüssel von OTIST ist “01234567”. Dieser Schlüssel kann im Web-Konfigurator geändert werden. Achten Sie darauf, dass Sie beim Mer produkthjalp finns pa http://www.support.zyxel.se und bei den Wireless-Clients denselben OTIST Setupschlüssel verwenden.
26
DEUTSCH
A |
D |
B |
|
C |
|
E
F
G
D
E
27

DEUTSCH
Erweiterte (WPA-PSK)-Sicherheit
A Geben Sie einen Namen ein, mit dem der Mer produkthjalp finns pa http://www.support.zyxel.se im WirelessLAN eindeutig identifiziert wird.
B Belassen Sie die Standardeinstellung. Der Mer produkthjalp finns pa http://www.support.zyxel.se und der Wireless-Client müssen dieselbe Kanal-ID verwenden.
C Wählen Sie die Sicherheit WPA-PSK.
D Geben Sie einen Pre-Shared-Key ein, wenn die Wireless-Verbindung sicherer sein soll als mit einer WEPVerschlüsselung. Geben Sie zwischen 8 und 63 ASCII-Zeichen ein (Großund Kleinschreibung wird unterschieden). Die sicherste Wireless-Verbindung kann errichtet werden, indem Sie im Fenster Advanced Wireless (Erweitertes Wireless) WPA konfigurieren. Dazu müssen Sie einen RADIUS-Server konfigurieren.
E Standardmäßig ist Yes (Ja) aktiviert. Wählen Sie die Option No (Nein) und klicken Sie auf Next (Weiter), um OTIST später zu konfigurieren.
F Der Standard-Setupschlüssel von OTIST ist “01234567”. Dieser Schlüssel kann im Web-Konfigurator geändert werden. Achten Sie darauf, dass Sie beim Mer produkthjalp finns pa http://www.support.zyxel.se und bei den Wireless-Clients denselben OTIST Setupschlüssel verwenden.
A |
B |
C |


 D
D


 D
D
E
28
DEUTSCH
SCHRITT 3:WAN
Der Assistent versucht zu ermitteln, welche Art von WAN-Verbindung Sie verwenden.
Wenn der Assistent keinen Verbindungstyp erkennen kann, müssen Sie aus dem Listenfeld EINEN auswählen. Prüfen Sie bei Ihrem Internetdienstanbieter, ob Sie den richtigen Typ verwenden:
1Ethernet
2PPPoE
3PPTP
Hinweis: Wenn Ihnen Zugangseinstellungen für das Internet vorgegeben wurden, geben Sie diese in die folgenden Felder ein. Anderenfalls werden die Standardeinstellungen belassen. Klicken Sie auf Next (Weiter).
29

DEUTSCH
Ethernet-Verbindung
A Wählen Sie als Ihren WAN-Verbindungstyp Ethernet.
B Wählen Sie Get automatically from your ISP (Automatisch vom Internetdienstanbieter beziehen), wenn Sie von Ihrem Internetdienstanbieter keine feste IP-Adresse zugewiesen bekommen haben. Weiter mit D.
Oder
Wählen Sie Use fixed IP address provided by your ISP (Vom Internetdienstanbieter vorgegebene feste IPAdresse verwenden), um dem Mer produkthjalp finns pa http://www.support.zyxel.se eine feste und eindeutige IP-Adresse zu geben.
C Geben Sie eine WAN IP-Adresse und die WAN IP Subnet-Mask des benachbarten Geräts ein, wenn Sie diese zur Hand haben. Wenn nicht, belassen Sie die Standardeinstellungen.
Wenn Sie die IP-Adresse und/oder DNS-Servereinstellungen kennen, geben Sie diese in die Felder ein. Anderenfalls werden die Standardeinstellungen belassen. Klicken Sie auf Next (Weiter).
D Wählen Sie Factory Default (Standardwerte), um die werkseitig festgelegte Standard-MAC-Adresse zu verwenden.
30
 Loading...