


LTE3301 Series
LTE Indoor Gateway
Version 1.00
Edition 1, 06/2015
Quick Start Guide
User’s Guide
Default Login Details
LAN IP Address |
http://192.168.1.1 |
|
|
|
|
User Name |
|
admin |
www.zyxel.com |
1234 |
|
Password |
|
|
Copyright © 2015 ZyXEL Communications Corporation

IMPORTANT!
READ CAREFULLY BEFORE USE.
KEEP THIS GUIDE FOR FUTURE REFERENCE.
Screenshots and graphics in this book may differ slightly from your product due to differences in your product firmware or your computer operating system. Every effort has been made to ensure that the information in this manual is accurate.
Related Documentation
•Quick Start Guide
The Quick Start Guide shows how to connect the LTE3301 and access the Web Configurator wizards. It contains information on setting up your network and configuring for Internet access.
LTE3301 Series User’s Guide
2

|
Contents Overview |
|
Contents Overview |
User’s Guide ....................................................................................................................................... |
10 |
Introduction ............................................................................................................................................. |
11 |
Introducing the Web Configurator ........................................................................................................... |
16 |
Setup Wizard ........................................................................................................................................... |
25 |
Tutorials .................................................................................................................................................. |
30 |
Technical Reference .......................................................................................................................... |
41 |
Monitor .................................................................................................................................................... |
42 |
WAN ........................................................................................................................................................ |
49 |
Wireless LAN .......................................................................................................................................... |
61 |
LAN ......................................................................................................................................................... |
81 |
DHCP Server .......................................................................................................................................... |
83 |
NAT ......................................................................................................................................................... |
88 |
DDNS ...................................................................................................................................................... |
97 |
Routing .................................................................................................................................................... |
99 |
Interface Group ..................................................................................................................................... |
102 |
Firewall .................................................................................................................................................. |
104 |
Content Filtering .................................................................................................................................... |
109 |
IPv6 Firewall .......................................................................................................................................... |
112 |
Bandwidth Management ....................................................................................................................... |
114 |
Universal Plug-and-Play (UPnP) ........................................................................................................... |
118 |
TR-069 .................................................................................................................................................. |
124 |
Maintenance .......................................................................................................................................... |
126 |
Troubleshooting .................................................................................................................................... |
134 |
LTE3301 Series User’s Guide
3

|
Table of Contents |
|
|
|
|
|
|
Table of Contents |
Contents Overview .............................................................................................................................. |
3 |
|
Table of Contents ................................................................................................................................. |
4 |
|
Part I: User’s Guide ......................................................................................... |
10 |
|
Chapter |
1 |
|
Introduction......................................................................................................................................... |
11 |
|
1.1 |
Overview ........................................................................................................................................... |
11 |
1.2 |
Applications ....................................................................................................................................... |
11 |
1.3 |
Ways to Manage the LTE3301 .......................................................................................................... |
12 |
1.4 |
Good Habits for Managing the LTE3301 ........................................................................................... |
12 |
1.5 |
Resetting the LTE3301 ...................................................................................................................... |
12 |
|
1.5.1 How to Use the RESET Button ................................................................................................ |
12 |
1.6 |
The WPS Button ............................................................................................................................... |
12 |
1.7 |
SIM Card Slot .................................................................................................................................... |
13 |
1.8 |
LEDs ................................................................................................................................................. |
13 |
1.9 |
Wall Mounting ................................................................................................................................... |
14 |
Chapter |
2 |
|
Introducing the Web Configurator .................................................................................................... |
16 |
|
2.1 |
Overview ........................................................................................................................................... |
16 |
2.2 |
Accessing the Web Configurator ....................................................................................................... |
16 |
|
2.2.1 Login Screen ........................................................................................................................... |
16 |
|
2.2.2 Password Screen .................................................................................................................... |
17 |
2.3 |
The Main Screen ............................................................................................................................... |
18 |
|
2.3.1 Title Bar ................................................................................................................................... |
19 |
|
2.3.2 Navigation Panel ..................................................................................................................... |
19 |
2.4 |
Status Screen .................................................................................................................................... |
21 |
Chapter |
3 |
|
Setup Wizard ....................................................................................................................................... |
25 |
|
3.1 |
Overview ........................................................................................................................................... |
25 |
3.2 |
Accessing the Wizard ........................................................................................................................ |
25 |
3.3 |
Wizard Setup ..................................................................................................................................... |
25 |
Chapter |
4 |
|
Tutorials............................................................................................................................................... |
|
30 |
LTE3301 Series User’s Guide
4

Table of Contents
4.1 |
Overview ........................................................................................................................................... |
30 |
4.2 |
Set Up a Wireless Network Using WPS ............................................................................................ |
30 |
|
4.2.1 Push Button Configuration (PBC) ............................................................................................ |
30 |
|
4.2.2 PIN Configuration .................................................................................................................... |
31 |
4.3 |
Connect to LTE3301 Wireless Network without WPS ....................................................................... |
32 |
|
4.3.1 Configure Your Notebook ........................................................................................................ |
34 |
4.4 |
Using Multiple SSIDs on the LTE3301 .............................................................................................. |
36 |
|
4.4.1 Configuring Security Settings of Multiple SSIDs ...................................................................... |
37 |
Part II: Technical Reference............................................................................ |
41 |
|
Chapter |
5 |
|
Monitor................................................................................................................................................. |
|
42 |
5.1 |
Overview ........................................................................................................................................... |
42 |
5.2 What You Can Do ............................................................................................................................. |
42 |
|
5.3 |
The Log Screen ................................................................................................................................. |
42 |
|
5.3.1 View Log .................................................................................................................................. |
43 |
5.4 |
DHCP Table ................................................................................................................................... |
44 |
5.5 |
Packet Statistics ............................................................................................................................. |
44 |
5.6 |
WLAN Station Status ..................................................................................................................... |
45 |
5.7 |
LTE Modem Status ............................................................................................................................ |
46 |
Chapter |
6 |
|
WAN ..................................................................................................................................................... |
|
49 |
6.1 |
Overview ........................................................................................................................................... |
49 |
6.2 What You Can Do ............................................................................................................................. |
49 |
|
6.3 What You Need To Know .................................................................................................................. |
50 |
|
6.4 Management WAN ........................................................................................................................... |
52 |
|
|
6.4.1 Management WAN Edit ........................................................................................................... |
53 |
6.5 |
Network Scan .................................................................................................................................... |
56 |
6.6 |
IPv6 ................................................................................................................................................... |
58 |
Chapter |
7 |
|
Wireless LAN....................................................................................................................................... |
61 |
|
7.1 |
Overview ........................................................................................................................................... |
61 |
|
7.1.1 What You Can Do .................................................................................................................... |
62 |
|
7.1.2 What You Should Know ........................................................................................................... |
62 |
7.2 |
General Wireless LAN Screen ......................................................................................................... |
64 |
7.3 |
Wireless Security .............................................................................................................................. |
66 |
|
7.3.1 No Security .............................................................................................................................. |
66 |
|
7.3.2 WEP Encryption ...................................................................................................................... |
67 |
LTE3301 Series User’s Guide
5

|
Table of Contents |
|
|
|
|
|
7.3.3 WPA-PSK/WPA2-PSK ............................................................................................................. |
69 |
|
7.3.4 WPA/WPA2 .............................................................................................................................. |
70 |
7.4 |
More AP Screen ................................................................................................................................ |
71 |
|
7.4.1 More AP Edit ........................................................................................................................... |
72 |
7.5 |
MAC Filter Screen ............................................................................................................................ |
73 |
7.6 |
Wireless LAN Advanced Screen ....................................................................................................... |
75 |
7.7 |
Quality of Service (QoS) Screen ....................................................................................................... |
76 |
7.8 WPS Screen ...................................................................................................................................... |
76 |
|
7.9 |
WPS Station Screen .......................................................................................................................... |
78 |
7.10 Scheduling Screen .......................................................................................................................... |
78 |
|
7.11 WDS Screen .................................................................................................................................... |
79 |
|
Chapter |
8 |
|
LAN ...................................................................................................................................................... |
|
81 |
8.1 |
Overview ........................................................................................................................................... |
81 |
8.2 What You Can Do ............................................................................................................................. |
81 |
|
8.3 What You Need To Know .................................................................................................................. |
81 |
|
8.4 |
LAN IP Screen .................................................................................................................................. |
82 |
Chapter |
9 |
|
DHCP Server ....................................................................................................................................... |
83 |
|
9.1 |
Overview ........................................................................................................................................... |
83 |
|
9.1.1 What You Can Do .................................................................................................................... |
83 |
|
9.1.2 What You Need To Know ......................................................................................................... |
83 |
9.2 |
DHCP Server General Screen .......................................................................................................... |
83 |
9.3 |
DHCP Server Advanced Screen .................................................................................................... |
85 |
9.4 |
DHCP Client List Screen ................................................................................................................... |
87 |
Chapter |
10 |
|
NAT....................................................................................................................................................... |
|
88 |
10.1 Overview ...................................................................................................................................... |
88 |
|
|
10.1.1 What You Can Do .................................................................................................................. |
88 |
10.2 General Screen ............................................................................................................................... |
89 |
|
10.3 Port Forwarding Screen ................................................................................................................. |
89 |
|
|
10.3.1 Port Forwarding Edit Screen ................................................................................................ |
91 |
10.4 Port Trigger Screen ......................................................................................................................... |
92 |
|
10.5 ALG Screen ..................................................................................................................................... |
93 |
|
10.6 Technical Reference ........................................................................................................................ |
94 |
|
|
10.6.1 NATPort Forwarding: Services and Port Numbers ................................................................ |
94 |
|
10.6.2 NAT Port Forwarding Example .............................................................................................. |
95 |
|
10.6.3 Trigger Port Forwarding ......................................................................................................... |
95 |
|
10.6.4 Trigger Port Forwarding Example .......................................................................................... |
95 |
|
10.6.5 Two Points To Remember About Trigger Ports ..................................................................... |
96 |
LTE3301 Series User’s Guide
6

|
|
|
Table of Contents |
|
|
|
|
Chapter |
11 |
|
|
DDNS.................................................................................................................................................... |
|
|
97 |
11.1 |
Overview |
........................................................................................................................................97 |
|
11.2 |
General |
..........................................................................................................................................97 |
|
Chapter |
12 |
|
|
Routing ................................................................................................................................................ |
|
|
99 |
12.1 |
Overview ...................................................................................................................................... |
99 |
12.2 |
Static Route Screen ....................................................................................................................... |
99 |
12.2.1 Add/Edit Static Route .......................................................................................................... |
100 |
|
12.3 |
Dynamic Routing Screen ............................................................................................................. |
101 |
Chapter |
13 |
|
Interface Group ................................................................................................................................. |
102 |
|
13.1 |
Overview ....................................................................................................................................... |
102 |
13.2 |
Interface Group Screen ................................................................................................................. |
102 |
|
13.2.1 Interface Group > Add Screen ............................................................................................. |
103 |
Chapter |
14 |
|
Firewall |
|
104 |
14.1 |
Overview ..................................................................................................................................... |
104 |
|
14.1.1 What You Can Do ................................................................................................................ |
104 |
|
14.1.2 What You Need To Know ..................................................................................................... |
104 |
14.2 |
General Screen ............................................................................................................................ |
105 |
14.3 |
Services Screen ............................................................................................................................ |
106 |
Chapter |
15 |
|
Content ...............................................................................................................................Filtering |
109 |
|
15.1 ....................................................................................................................................... |
Overview |
109 |
15.2 ................................................................................................................................. |
Content Filter |
109 |
Chapter |
16 |
|
IPv6 Firewall ...................................................................................................................................... |
112 |
|
16.1 ....................................................................................................................................... |
Overview |
112 |
16.2 .................................................................................................................... |
IPv6 Firewall Screen |
112 |
Chapter |
17 |
|
Bandwidth ...................................................................................................................Management |
114 |
|
17.1 ...................................................................................................................................... |
Overview |
114 |
17.2 .........................................................................................................................What You Can Do |
114 |
|
17.3 ..............................................................................................................What You Need To Know |
115 |
|
17.4 ............................................................................................................................ |
General Screen |
115 |
17.5 ......................................................................................................................... |
Advanced Screen |
116 |
LTE3301 Series User’s Guide
7

Table of Contents
17.5.1 Add Bandwidth management Rule ..................................................................................... |
116 |
Chapter |
18 |
|
|
Universal Plug-and-Play (UPnP)...................................................................................................... |
118 |
||
18.1 |
Overview ...................................................................................................................................... |
118 |
|
18.2 |
What You Need to Know ............................................................................................................... |
118 |
|
|
18.2.1 NAT Traversal ...................................................................................................................... |
118 |
|
|
18.2.2 Cautions with UPnP ............................................................................................................. |
118 |
|
18.3 |
UPnP Screen ............................................................................................................................... |
119 |
|
18.4 |
Technical Reference ...................................................................................................................... |
119 |
|
|
18.4.1 Using UPnP in Windows XP Example ................................................................................. |
119 |
|
|
18.4.2 Web Configurator Easy Access ........................................................................................... |
121 |
|
Chapter |
19 |
|
|
TR-069................................................................................................................................................ |
|
|
124 |
19.1 |
Overview ....................................................................................................................................... |
124 |
|
19.2 |
TR-069 Screen .............................................................................................................................. |
124 |
|
Chapter |
20 |
|
|
Maintenance ...................................................................................................................................... |
126 |
||
20.1 |
Overview ....................................................................................................................................... |
126 |
|
20.2 What You Can Do ......................................................................................................................... |
126 |
||
20.3 |
General Screen ............................................................................................................................. |
126 |
|
20.4 |
Account Screen ............................................................................................................................. |
127 |
|
|
20.4.1 Edit a User Account ............................................................................................................ |
127 |
|
20.5 |
Time Setting Screen ...................................................................................................................... |
128 |
|
20.6 |
Firmware Upgrade Screen ............................................................................................................ |
130 |
|
20.7 |
Configuration Backup/Restore Screen .......................................................................................... |
131 |
|
20.8 |
Restart Screen .............................................................................................................................. |
133 |
|
Chapter |
21 |
|
|
Troubleshooting................................................................................................................................ |
134 |
||
21.1 |
Overview ....................................................................................................................................... |
134 |
|
21.2 |
Power, Hardware Connections, and LEDs .................................................................................... |
134 |
|
21.3 |
LTE3301 Access and Login .......................................................................................................... |
135 |
|
21.4 |
Internet Access ............................................................................................................................. |
136 |
|
21.5 |
Wireless Connections ................................................................................................................... |
137 |
|
21.6 |
Getting More Troubleshooting Help .............................................................................................. |
138 |
|
Appendix |
A Pop-up Windows, JavaScript and Java Permissions ................................................... |
139 |
|
Appendix |
B Setting Up Your Computer’s IP Address ...................................................................... |
148 |
|
Appendix |
C Common Services........................................................................................................ |
174 |
|
LTE3301 Series User’s Guide
8

|
|
Table of Contents |
Appendix |
D Legal Information ......................................................................................................... |
177 |
Appendix |
E Customer Support ........................................................................................................ |
184 |
Index .................................................................................................................................................. |
|
190 |
LTE3301 Series User’s Guide
9

PART I
User’s Guide
10
1
Introduction
1.1 Overview
This chapter introduces the main features and applications of the LTE3301.
The LTE3301 is a wireless router, which can connect to a mobile network and the Internet through a wireless WAN connection and provide easy network access to mobile users without additional wiring. You can set up a wireless network with other IEEE 802.11b/g/n compatible devices.
A range of services such as a firewall and content filtering are also available for secure Internet computing.
1.2 Applications
Your can have the following networks with the LTE3301:
•Wired. You can connect network devices via the Ethernet ports of the LTE3301 so that they can communicate with each other and access the Internet.
•Wireless LAN. Wireless clients can connect to the LTE3301 to access network resources. You can use WPS (Wi-Fi Protected Setup) to create an instant network connection with another WPScompatible device.
•Wireless WAN. Insert a 4G SIM card into the SIM card slot to connect to a mobile network for Internet access.
LTE3301 Series User’s Guide
11

Chapter 1 Introduction
1.3 Ways to Manage the LTE3301
Use any of the following methods to manage the LTE3301.
•WPS (Wi-Fi Protected Setup). You can use the WPS button or the WPS section of the Web Configurator to set up a wireless network with your LTE3301.
•Web Configurator. This is recommended for everyday management of the LTE3301 using a (supported) web browser.
1.4Good Habits for Managing the LTE3301
Do the following things regularly to make the LTE3301 more secure and to manage the LTE3301 more effectively.
•Change the password. Use a password that’s not easy to guess and that consists of different types of characters, such as numbers and letters.
•Write down the password and put it in a safe place.
•Back up the configuration (and make sure you know how to restore it). See Section 20.7 on page 131. Restoring an earlier working configuration may be useful if the device becomes unstable or even crashes. If you forget your password, you will have to reset the LTE3301 to its factory default settings. If you backed up an earlier configuration file, you would not have to totally reconfigure the LTE3301. You could simply restore your last configuration.
1.5Resetting the LTE3301
If you forget your password or IP address, or you cannot access the Web Configurator, you will need to use the RESET button at the back of the LTE3301 to reload the factory-default configuration file. This means that you will lose all configurations that you had previously saved, the password will be reset to “1234” (see Section 20.4 on page 127) and the IP address will be reset to “192.168.1.1”.
1.5.1 How to Use the RESET Button
1Make sure the power LED is on.
2Press the RESET button for one to four seconds to restart/reboot the LTE3301.
3Press the RESET button for longer than ten seconds to set the LTE3301 back to its factory-default configurations.
1.6The WPS Button
Your LTE3301 supports Wi-Fi Protected Setup (WPS), which is an easy way to set up a secure wireless network. WPS is an industry standard specification, defined by the Wi-Fi Alliance.
LTE3301 Series User’s Guide
12

Chapter 1 Introduction
WPS allows you to quickly set up a wireless network with strong security, without having to configure security settings manually. Each WPS connection works between two devices. Both devices must support WPS (check each device’s documentation to make sure).
Depending on the devices you have, you can either press a button (on the device itself, or in its configuration utility) or enter a PIN (a unique Personal Identification Number that allows one device to authenticate the other) in each of the two devices. When WPS is activated on a device, it has two minutes to find another device that also has WPS activated. Then, the two devices connect and set up a secure network by themselves.
You can use the WPS button ( ) on the top panel of the LTE3301 to activate WPS in order to quickly set up a wireless network with strong security.
1Make sure the power LED is on (not blinking).
2Press the WPS button for more than three seconds and release it. Press the WPS button on another WPS-enabled device within range of the LTE3301.
Note: You must activate WPS in the LTE3301 and in another wireless device within two minutes of each other.
For more information on using WPS, see Section 4.2 on page 30.
1.7 SIM Card Slot
The LTE3301 comes with a built-in 4G LTE module for 4G connections. To set up a 4G connection using the built-in 4G LTE module, just insert a 4G SIM card into the SIM card slot at the back of the LTE3301.
Note: You must insert the 4G SIM card into the card slot before turning on the LTE3301.
1.8 LEDs
Figure 1 Front Panel
|
|
|
|
|
|
|
|
|
|
|
|
|
WLAN/WPS |
|
|
Power |
|
LTE |
|
||||
|
|
|
|
||||
|
|
|
|
LAN |
|||
|
|
|
|
LTE Signal |
|||
|
Internet |
|
|
|
|||
|
|
Strength |
|
|
|||
|
|
|
|
|
|
||
LTE3301 Series User’s Guide
13

Chapter 1 Introduction
The following table describes the LEDs.
Table 1 Front panel LEDs
LED |
COLOR |
STATUS |
DESCRIPTION |
Power |
Green |
On |
The LTE3301 is receiving power and functioning properly. |
|
|
|
|
|
|
Blinking |
The LTE3301 is in the process of starting up or default restoring. |
|
|
|
|
|
Off |
|
The LTE3301 is not receiving power. |
|
|
|
|
Internet |
Green |
On |
The LTE3301’s WAN connection is ready. |
|
|
|
|
|
|
Blinking |
The LTE3301 is sending/receiving data through the WAN. |
|
|
|
|
|
Off |
|
The WAN connection is not ready, or has failed. |
|
|
|
|
LTE |
Green |
On |
The LTE3301 is registered and successfully connected to a 4G |
|
|
|
network. |
|
|
|
|
|
|
Blinking |
The LTE3301 is registered and successfully connected to a 2G/ |
|
|
(slow) |
3G network. |
|
|
|
|
|
|
Blinking |
The LTE3301 Series is looking for an available 4G/3G/2G |
|
|
(fast) |
network. |
|
|
|
|
|
Off |
|
There is no SIM card inserted, the SIM card is invalid, the PIN |
|
|
|
code is not correct or there is no service. |
|
|
|
|
LTE Signal |
Green |
On |
A valid SIM card is inserted and the wireless WAN interface is |
Strength |
|
|
enabled. |
|
|
|
Signal strength: Excellent |
|
|
|
RSRP (Reference Signal Receiving Power) >= -79 dBm |
|
|
|
|
|
Orange |
On |
Signal strength: Fair |
|
|
|
-81 dBm >= RSRP >= -95 dBm |
|
|
|
|
|
Red |
On |
Signal strength: Poor |
|
|
|
-97 dBm > RSRP |
|
|
|
|
|
|
Blinking |
There is no LTE signal because there is no valid SIM card |
|
|
|
inserted and/or the wireless WAN interface is disabled. |
|
|
|
|
WLAN/WPS |
Green |
On |
The LTE3301 is ready and the 2.4GHz wireless LAN is on, but is |
|
|
|
not sending/receiving data through the wireless LAN. |
|
|
|
|
|
|
Blinking |
The LTE3301 is sending/receiving data through the wireless |
|
|
(slow) |
LAN. |
|
|
|
|
|
|
Blinking |
The LTE3301 is negotiating a WPS connection with a wireless |
|
|
(fast) |
client. |
|
|
|
|
|
Off |
|
The wireless LAN is not ready or has failed or WPS is disabled. |
|
|
|
|
LAN |
Green |
On |
The LTE3301’s LAN connection is ready. |
|
|
|
|
|
Off |
|
The LAN connection is not ready, or has failed. |
|
|
|
|
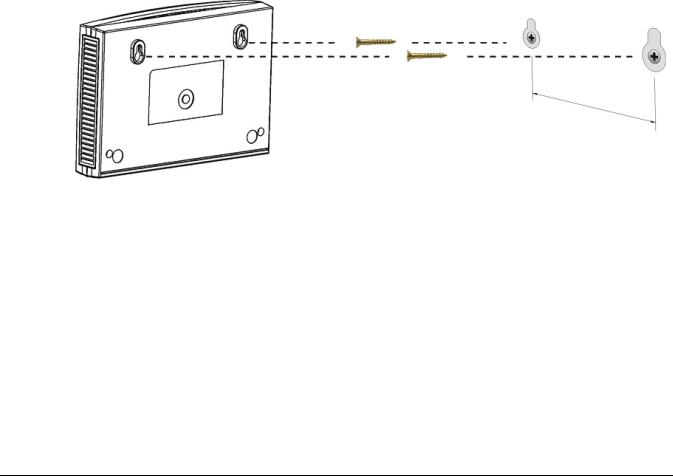
1.9 Wall Mounting
You may need screw anchors if mounting on a concrete or brick wall.
Table 2 Wall Mounting Information
Distance between holes |
11 cm |
|
|
LTE3301 Series User’s Guide
14
|
Chapter 1 Introduction |
||
|
|
|
|
|
Table 2 Wall Mounting Information |
|
|
|
M4 Screws |
Two |
|
|
|
|
|
|
Screw anchors (optional) |
Two |
|
|
|
|
|
1Select a position free of obstructions on a wall strong enough to hold the weight of the device.
2Mark two holes on the wall at the appropriate distance apart for the screws.
Be careful to avoid damaging pipes or cables located inside the wall when drilling holes for the screws.
3If using screw anchors, drill two holes for the screw anchors into the wall. Push the anchors into the full depth of the holes, then insert the screws into the anchors. Do not insert the screws all the way in - leave a small gap of about 0.5 cm.
If not using screw anchors, use a screwdriver to insert the screws into the wall. Do not insert the screws all the way in - leave a gap of about 0.5 cm.
4Make sure the screws are fastened well enough to hold the weight of the LTE3301 with the connection cables.
5Align the holes on the back of the LTE3301 with the screws on the wall. Hang the LTE3301 on the screws.
Figure 2 Wall Mounting Example
LTE3301 Series User’s Guide
15

2
Introducing the Web Configurator
2.1 Overview
This chapter describes how to access the LTE3301 Web Configurator and provides an overview of its screens.
The Web Configurator is an HTML-based management interface that allows easy setup and management of the LTE3301 via Internet browser. Use Internet Explorer 9.0 and later versions, Mozilla Firefox 21 and later versions, Safari 6.0 and later versions or Google Chrome 26.0 and later versions. The recommended screen resolution is 1024 by 768 pixels.
In order to use the Web Configurator you need to allow:
•Web browser pop-up windows from your device. Web pop-up blocking is enabled by default in Windows XP SP (Service Pack) 2.
•JavaScript (enabled by default).
•Java permissions (enabled by default).
Refer to the Troubleshooting chapter (Chapter 21 on page 134) to see how to make sure these functions are allowed in Internet Explorer.
2.2Accessing the Web Configurator
1Make sure your LTE3301 hardware is properly connected and prepare your computer or computer network to connect to the LTE3301 (refer to the Quick Start Guide).
2Launch your web browser.
3Type "http://192.168.1.1" as the website address.
Your computer must be in the same subnet in order to access this website address.
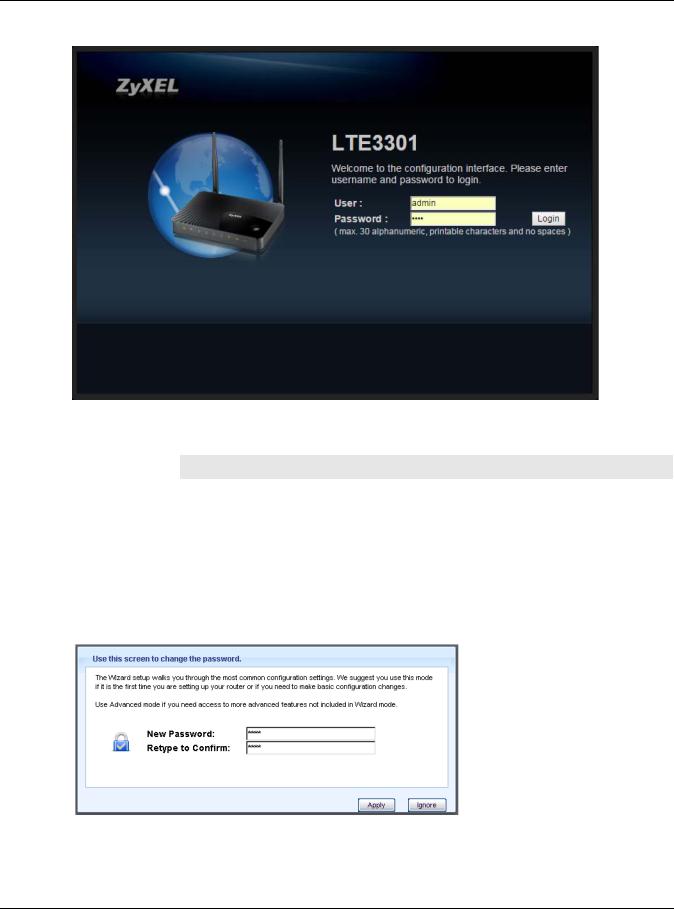
2.2.1 Login Screen
The Web Configurator initially displays the following login screen.
LTE3301 Series User’s Guide
16
Chapter 2 Introducing the Web Configurator
Figure 3 Login screen
The following table describes the labels in this screen.
Table 3 Login screen
LABEL |
DESCRIPTION |
User |
Type "admin" (default) as the user name. |
|
|
Password |
Type "1234" (default) as the password. Click Login. |
|
|
2.2.2 Password Screen
You should see a screen asking you to change your password (highly recommended) as shown next.
Figure 4 Change Password Screen
LTE3301 Series User’s Guide
17

Chapter 2 Introducing the Web Configurator
The following table describes the labels in this screen.
Table 4 Change Password Screen
LABEL |
DESCRIPTION |
New Password |
Type a new password. |
|
|
Retype to Confirm |
Retype the password for confirmation. |
|
|
Apply |
Click Apply to save your changes back to the LTE3301. |
|
|
Ignore |
Click Ignore if you do not want to change the password this time. |
|
|
Note: The management session automatically times out when the time period set in the Administrator Inactivity Timer field expires (default five minutes; go to Chapter 20 on page 126 to change this). Simply log back into the LTE3301 if this happens.
2.3 The Main Screen
The Web Configurator’s main screen is divided into these parts:
Figure 5 The Web Configurator’s Main Screen
A

B
C
LTE3301 Series User’s Guide
18
Chapter 2 Introducing the Web Configurator
•A - Title Bar
•B - Navigation Panel
•C - Main Window
2.3.1Title Bar
The title bar provides some useful links that always appear over the screens below, regardless of how deep into the Web Configurator you navigate.
Figure 6 Title Bar
The icons provide the following functions.
Table 5 Title Bar: Web Configurator Icons
LABEL |
DESCRIPTION |
||||||
Wizard |
|
|
Click this icon to open the setup wizard for the LTE3301. |
||||
|
|
|
|
|
|
|
|
|
|
|
|
|
|
|
|
About |
|
|
Click this icon to open a screen where you can click a link to visit the ZyXEL web site to see |
||||
|
|
|
|
|
|
|
detailed product information. |
|
|
|
|
|
|
|
|
|
|
|
|||||
Logout |
|
|
Click this icon to log out of the Web Configurator. |
||||
|
|
|
|
|
|
|
|
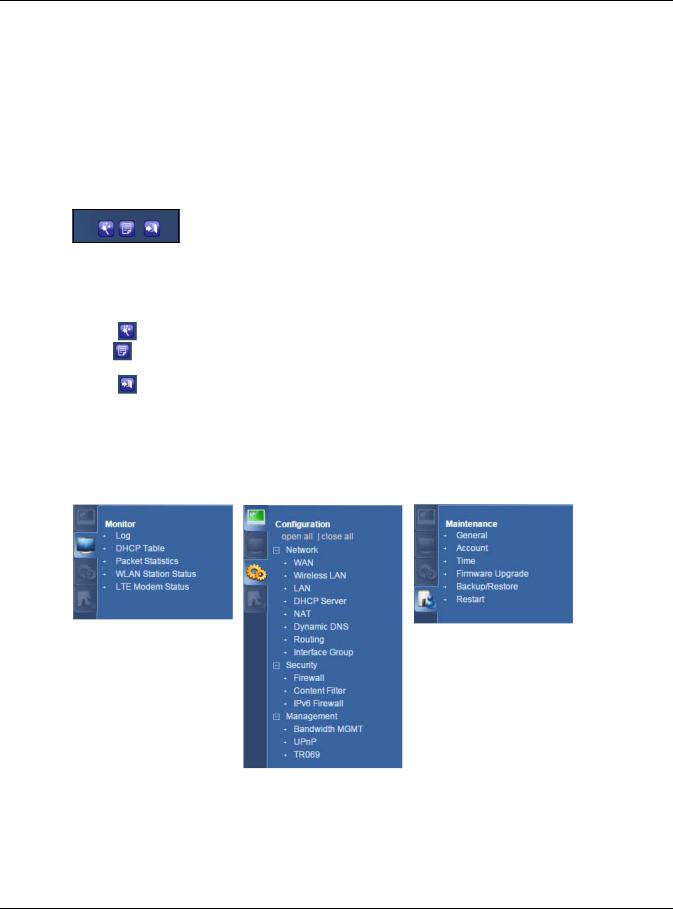
2.3.2 Navigation Panel
Use the sub-menus on the navigation panel to configure LTE3301 features.
Figure 7 Navigation Panel
LTE3301 Series User’s Guide
19

|
|
Chapter 2 Introducing the Web Configurator |
|
|
|
|
|
|
The following table describes the sub-menus. |
||
|
Table 6 Navigation Panel |
|
|
|
LINK |
TAB |
FUNCTION |
|
Status |
|
This screen shows the LTE3301’s general device, system and interface |
|
|
|
status information. Use this screen to access the summary statistics tables. |
|
|
|
|
|
Monitor |
|
|
|
|
|
|
|
Log |
|
Use this screen to view the list of activities recorded by your LTE3301. |
|
|
|
|
|
DHCP Table |
|
Use this screen to view current DHCP client information. |
|
|
|
|
|
Packet Statistics |
|
Use this screen to view port status and packet specific statistics. |
|
|
|
|
|
WLAN Station |
|
Use this screen to view the wireless stations that are currently associated |
|
Status |
|
to the LTE3301’s 2.4GHz wireless LAN. |
|
|
|
|
|
LTE Modem |
|
Use this screen to view the detailed information about the LTE module, |
|
Status |
|
cellular interface, and SIM card. You can also view the LTE connection |
|
|
|
status. |
|
|
|
|
|
Configuration |
|
|
|
|
|
|
|
Network |
|
|
|
|
|
|
|
WAN |
Management |
This screen allows you to configure ISP parameters, WAN IP address |
|
|
WAN |
assignment, and DNS servers. |
|
|
|
|
|
|
Network |
Use this screen to specify the type of the mobile network to which the |
|
|
Scan |
LTE3301 is connected and how you want the LTE3301 to connect to an |
|
|
|
available mobile network. |
|
|
|
|
|
|
IPv6 |
Use this screen to configure the LTE3301’s IPv6 settings. |
|
|
|
|
|
Wireless LAN |
General |
Use this screen to enable the wireless LAN and configure wireless LAN and |
|
|
|
wireless security settings. |
|
|
|
|
|
|
More AP |
Use this screen to configure multiple BSSs on the LTE3301. |
|
|
|
|
|
|
MAC Filter |
Use the MAC filter screen to allow or deny wireless stations based on their |
|
|
|
MAC addresses from connecting to the LTE3301. |
|
|
|
|
|
|
Advanced |
This screen allows you to configure advanced wireless LAN settings. |
|
|
|
|
|
|
QoS |
Use this screen to configure Wi-Fi Multimedia Quality of Service (WMM |
|
|
|
QoS). WMM QoS allows you to prioritize wireless traffic according to the |
|
|
|
delivery requirements of individual services. |
|
|
|
|
|
|
WPS |
Use this screen to configure the WPS settings. |
|
|
|
|
|
|
WPS Station |
Use this screen to add a wireless station using WPS. |
|
|
|
|
|
|
Scheduling |
Use this screen to schedule the times the Wireless LAN is enabled. |
|
|
|
|
|
|
WDS |
Use this screen to enable and configure the WDS settings. |
|
|
|
|
|
LAN |
IP |
Use this screen to configure LAN IP address and subnet mask. |
|
|
|
|
|
DHCP Server |
General |
Use this screen to enable the LTE3301’s DHCP server. |
|
|
|
|
|
|
Advanced |
Use this screen to assign IP addresses to specific individual computers |
|
|
|
based on their MAC addresses and to have DNS servers assigned by the |
|
|
|
DHCP server. |
|
|
|
|
|
|
Client List |
Use this screen to view information related to your DHCP status. |
|
|
|
|
|
NAT |
General |
Use this screen to enable NAT. |
|
|
|
|
|
|
Port |
Use this screen to configure servers behind the LTE3301 and forward |
|
|
Forwarding |
incoming service requests to the server(s) on your local network. |
|
|
|
|
|
|
Port Trigger |
Use this screen to change your LTE3301’s port triggering settings. |
|
|
|
|
|
|
ALG |
Use this screen to enable or disable SIP (VoIP) ALG (Application Layer |
|
|
|
Gateway) in the LTE3301. |
|
|
|
|
LTE3301 Series User’s Guide
20
Chapter 2 Introducing the Web Configurator
Table 6 Navigation Panel (continued)
LINK |
TAB |
FUNCTION |
|
Dynamic |
Dynamic DNS |
Use this screen to set up dynamic DNS. |
|
DNS |
|
|
|
|
|
|
|
Routing |
Static Route |
Use this screen to configure IP static routes. |
|
|
|
|
|
|
Dynamic |
Use this screen to enable and configure RIP on the LTE3301. |
|
|
Routing |
|
|
|
|
|
|
Interface |
Interface |
Use this screen to create a new interface group. |
|
Group |
Group |
|
|
|
|
|
|
Security |
|
|
|
|
|
|
|
Firewall |
General |
Use this screen to activate/deactivate the firewall. |
|
|
|
|
|
|
Services |
This screen shows a summary of the firewall rules, and allows you to edit/ |
|
|
|
add a firewall rule. |
|
|
|
|
|
Content |
Content Filter |
Use this screen to restrict web features and designate a trusted computer. |
|
Filter |
|
You can also block certain web sites containing certain keywords in the |
|
|
|
URL. |
|
|
|
|
|
IPv6 firewall |
Services |
Use this screen to configure IPv6 firewall rules. |
|
|
|
|
|
Management |
|
|
|
|
|
|
|
Bandwidth |
General |
Use this screen to enable bandwidth management. |
|
Management |
|
|
|
Advanced |
Use this screen to set the upstream bandwidth and edit a bandwidth |
||
|
|||
|
|
management rule. |
|
|
|
|
|
UPnP |
UPnP |
Use this screen to enable UPnP on the LTE3301. |
|
|
|
|
|
TR069 |
TR069 |
Use this screen to configure your LTE3301 to be managed by an ACS. |
|
|
|
|
|
Maintenance |
|
|
|
|
|
|
|
General |
General |
Use this screen to view and change administrative settings such as system |
|
|
|
and domain names. |
|
|
|
|
|
Account |
User Account |
Use this screen to change the user name and password of your LTE3301. |
|
|
|
|
|
Time |
Time Setting |
Use this screen to change your LTE3301’s time and date. |
|
|
|
|
|
Firmware |
Firmware |
Use this screen to upload firmware to your LTE3301. |
|
Upgrade |
Upgrade |
|
|
|
|
|
|
Backup/ |
Backup/ |
Use this screen to backup and restore the configuration or reset the factory |
|
Restore |
Restore |
defaults to your LTE3301. |
|
|
|
|
|
Restart |
System |
This screen allows you to reboot the LTE3301 without turning the power |
|
|
Restart |
off. |
|
|
|
|
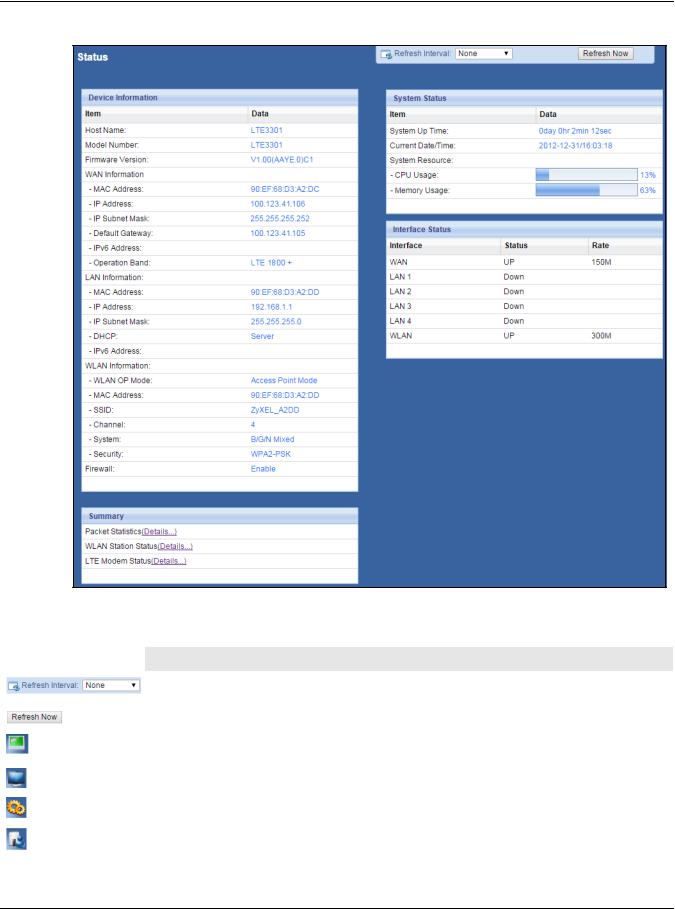
2.4 Status Screen
Click  to open the status screen.
LTE3301 Series User’s Guide
21
Chapter 2 Introducing the Web Configurator
Figure 8 Status Screen
The following table describes the icons shown in the Status screen.
Table 7 Status Screen Icon Key
ICON |
DESCRIPTION |
|||
|
|
|
|
Select a number of seconds or None from the drop-down list box to refresh all screen statistics |
|
|
|
|
|
|
|
|
|
automatically at the end of every time interval or to not refresh the screen statistics. |
|
|
|
|
|
|
|
|
|
|
|
|
|
|
Click this button to refresh the status screen statistics. |
|
|
|
|
|
|
|
|
|
|
|
|
|
|
|
|
|
|
|
Click this icon to see the Status page. The information in this screen depends on the device |
|
|
|
|
mode you select. |
|
|
|
|
|
|
|
|
|
Click this icon to see the Monitor navigation menu. |
|
|
|
|
|
|
|
|
|
Click this icon to see the Configuration navigation menu. |
|
|
|
|
|
|
|
|
|
Click this icon to see the Maintenance navigation menu. |
|
|
|
|
|
LTE3301 Series User’s Guide
22

Chapter 2 Introducing the Web Configurator
The following table describes the labels shown in the Status screen.
Table 8 Status Screen
LABEL |
DESCRIPTION |
Device Information |
|
|
|
Host Name |
This is the System Name you enter in the Maintenance > General screen. It is for |
|
identification purposes. |
|
|
Model Number |
This is the model name of your device. |
|
|
Firmware Version |
This is the firmware version and the date created. |
|
|
WAN Information |
|
|
|
MAC Address |
This shows the WAN Ethernet adapter MAC Address of your device. |
|
|
IP Address |
This shows the WAN port’s IP address. |
|
|
IP Subnet Mask |
This shows the WAN port’s subnet mask. |
|
|
Default Gateway |
This shows the WAN port’s gateway IP address. |
|
|
IPv6 Address |
This shows the IPv6 address of the LTE3301 on the WAN. |
|
|
Operation Band |
This shows the network type and the frequency band used by the mobile network to which |
|
the LTE3301 is connecting. |
|
|
LAN Information |
|
|
|
MAC Address |
This shows the LAN Ethernet adapter MAC Address of your device. |
|
|
IP Address |
This shows the LAN port’s IP address. |
|
|
IP Subnet Mask |
This shows the LAN port’s subnet mask. |
|
|
DHCP |
This shows the LAN port’s DHCP role - Server or Disable. |
|
|
IPv6 Address |
This shows the IPv6 address of the LTE3301 on the LAN. |
|
|
WLAN Information |
|
|
|
WLAN OP Mode |
This is the device mode to which the LTE3301’s wireless LAN is set - Access Point Mode. |
|
|
MAC Address |
This shows the 2.4GHz wireless adapter MAC Address of your device. |
|
|
SSID |
This shows a descriptive name used to identify the LTE3301 in the 2.4GHz wireless LAN. |
|
|
Channel |
This shows the channel number which you select manually. |
|
|
System |
This shows the wireless standards the LTE3301 supports. |
|
|
Security |
This shows the level of wireless security the LTE3301 is using. |
|
|
Firewall |
This shows whether the firewall is enabled or not. |
|
|
Summary |
|
|
|
Packet Statistics |
Click Details... to go to the Monitor > Packet Statistics screen (Section 5.5 on page 44). |
|
Use this screen to view port status and packet specific statistics. |
|
|
WLAN Station Status |
Click Details... to go to the Monitor > WLAN Station Status screen (Section 5.6 on page |
|
45). Use this screen to view the wireless stations that are currently associated to the |
|
LTE3301’s 2.4GHz wireless LAN. |
|
|
LTE Modem Status |
Click Details... to go to the Monitor > LTE Modem Status screen (Section 5.6 on page |
|
45). Use this screen to view the detailed information about the LTE module, cellular |
|
interface, and SIM card. You can also view the LTE connection status. |
|
|
System Status |
|
|
|
Item |
This column shows the type of data the LTE3301 is recording. |
|
|
Data |
This column shows the actual data recorded by the LTE3301. |
|
|
System Up Time |
This is the total time the LTE3301 has been on. |
|
|
Current Date/Time |
This field displays your LTE3301’s present date and time. |
|
|
System Resource |
|
|
|
|
|
|
LTE3301 Series User’s Guide |
23

|
Chapter 2 Introducing the Web Configurator |
|
|
Table 8 Status Screen (continued) |
|
LABEL |
DESCRIPTION |
- CPU Usage |
This displays what percentage of the LTE3301’s processing ability is currently used. When |
|
this percentage is close to 100%, the LTE3301 is running at full load, and the throughput is |
|
not going to improve anymore. If you want some applications to have more throughput, you |
|
should turn off other applications (for example, using bandwidth management.) |
|
|
- Memory Usage |
This shows what percentage of the heap memory the LTE3301 is using. |
|
|
Interface Status |
|
|
|
Interface |
This displays the LTE3301 port types. The port types are: WAN, LAN and WLAN. |
|
|
Status |
For the LAN and WAN ports, this field displays Down (line is down) or Up (line is up or |
|
connected). |
|
For the 2.4GHz WLAN, it displays Up when the 2.4GHz WLAN is enabled or Down when the |
|
2.4G WLAN is disabled. |
|
|
Rate |
For the LAN ports, this displays the port speed or is left blank when the line is disconnected. |
|
For the WAN port, it always displays the maximum transmission rate. |
|
For the 2.4GHz WLAN, it displays the maximum transmission rate when the WLAN is enabled |
|
and is left blank when the WLAN is disabled. |
|
|
LTE3301 Series User’s Guide
24

3
Setup Wizard
3.1 Overview
This chapter provides information on the wizard setup screens in the Web Configurator.
The Web Configurator’s wizard helps you configure your device to access the Internet and change the wireless LAN settings. Refer to your ISP for your Internet account information. Leave a field blank if you don’t have that information.
3.2Accessing the Wizard
1Launch your web browser and type "http://192.168.1.1" as the website address. Type "admin" (default) as the user name, "1234" (default) as the password and click Login.
2Click the Wizard icon in the top right corner of the web configurator to open the Wizard screen. Figure 9 Title Bar: Wizard icon
3.3Wizard Setup
1The first wizard screen displays showing the main steps in the wizard setup. Click Next to proceed with the time zone setup screen.
LTE3301 Series User’s Guide
25

Chapter 3 Setup Wizard
Figure 10 Wizard: Start
2The LTE3301 automatically detects your location and displays the correct time zone. If the result is not correct, click Detect Again or manually select the time zone of LTE3301’s location and click
Next.
Figure 11 Wizard: Time
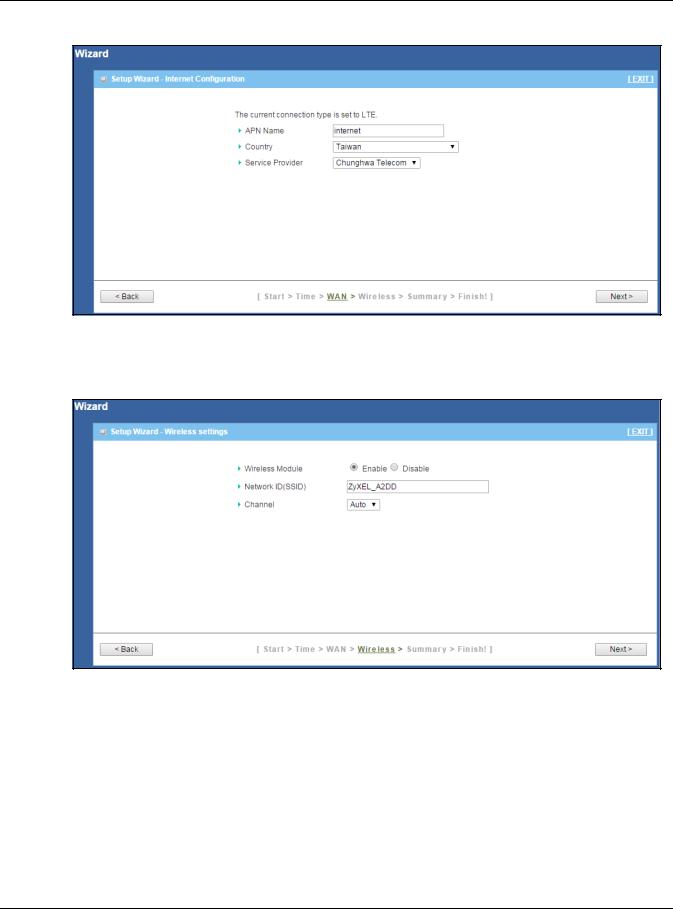
3Enter your APN (Access Point Name) provided by your service provider. Select the country where the LTE3301 is located and your service provider name. Click Next.
LTE3301 Series User’s Guide
26
Chapter 3 Setup Wizard
Figure 12 Wizard: WAN
4Use this screen to enable or disable the LTE3301’s wireless LAN, and enter the wireless network name (SSID). Select a channel or use Auto to have the LTE3301 automatically determine a channel to use. Click Next.
Figure 13 Wizard: Wireless Settings
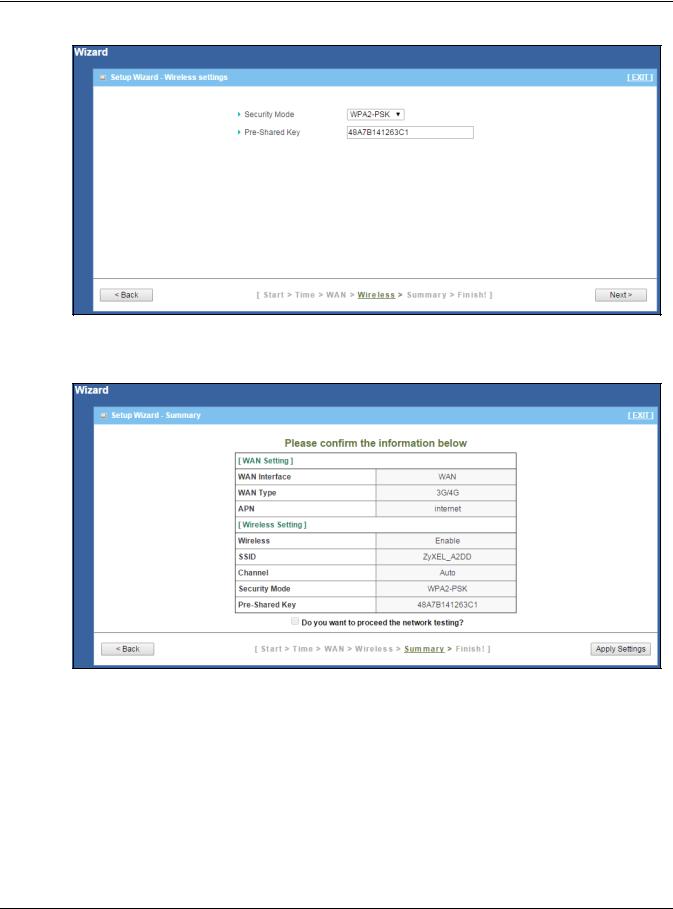
5Select WPA2-PSK and enter a pre-shared key from 8 to 63 case-sensitive characters for data encryption. The wireless clients which want to associate with this wireless network must have the same wireless security settings. Otherwise, select No Security to allow any client to associate with this network without any data encryption or authentication. Click Next.
LTE3301 Series User’s Guide
27
Chapter 3 Setup Wizard
Figure 14 Wizard: Wireless Security
6Use the read-only summary table to check whether what you have configured is correct. Click Apply Settings to save your settings. Otherwise, click Back to go back to the previous screens.
Figure 15 Wizard: Summary
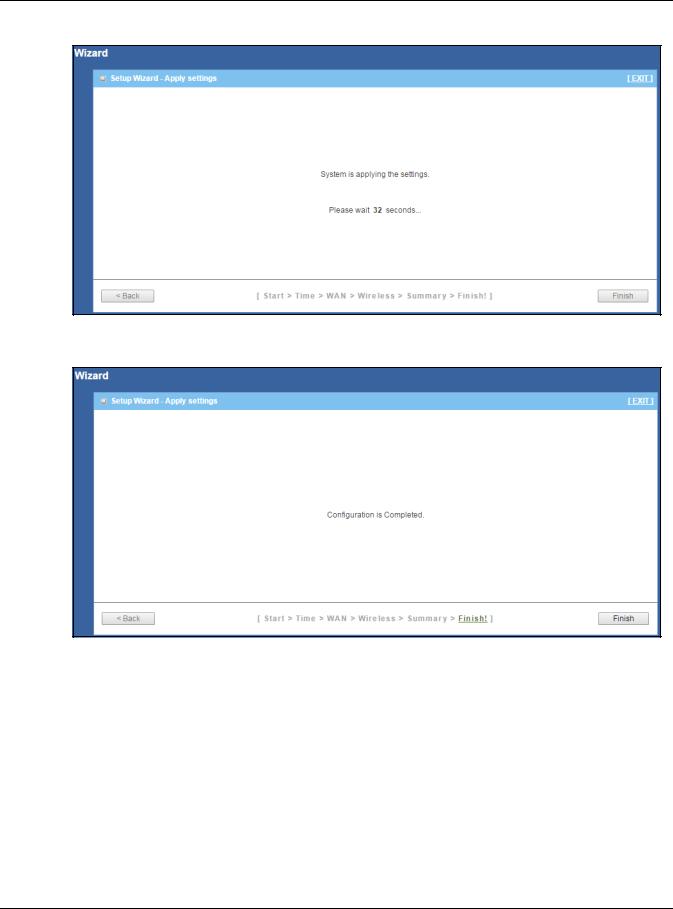
7 The system takes about 35 seconds to apply settings.
LTE3301 Series User’s Guide
28
Chapter 3 Setup Wizard
Figure 16 Wizard: Apply Settings
8Click Finish to complete the wizard setup. Figure 17 Wizard: Finish
You are now ready to connect wirelessly to your LTE3301 and access the Internet.
LTE3301 Series User’s Guide
29

4
Tutorials
4.1 Overview
This chapter provides tutorials for setting up your LTE3301.
•Set Up a Wireless Network Using WPS
•Connect to LTE3301 Wireless Network without WPS
•Using Multiple SSIDs on the LTE3301
4.2Set Up a Wireless Network Using WPS
This section gives you an example of how to set up wireless network using WPS. This example uses the LTE3301 as the AP and NWD210N as the wireless client which connects to a notebook.
Note: The wireless client must be a WPS-aware device (for example, a WPS USB adapter or PCI card).
There are two WPS methods for creating a secure connection via the web configurator or utility. This tutorial shows you how to do both.
•Push Button Configuration (PBC) - create a secure wireless network simply by pressing a button. See Section 4.2.1 on page 30. This is the easier method.
•PIN Configuration - create a secure wireless network simply by entering a wireless client's PIN (Personal Identification Number) in the LTE3301’s interface. See Section 4.2.2 on page 31. This is the more secure method, since one device can authenticate the other.
4.2.1Push Button Configuration (PBC)
1Make sure that your LTE3301 is turned on. Make sure the WIFI button (at the back panel of the LTE3301) is pushed in, and that the device is placed within range of your notebook.
2Make sure that you have installed the wireless client (this example uses the NWD210N) driver and utility in your notebook.
3In the wireless client utility, find the WPS settings. Enable WPS and press the WPS button (Start or WPS button)
4Log into LTE3301’s Web Configurator and press the Push Button in the Configuration > Network > Wireless LAN 2.4G > WPS Station screen.
LTE3301 Series User’s Guide
30
 Loading...