


Appendix A Pop-up Windows, JavaScript and Java Permissions
Opera
Opera 10 screens are used here. Screens for other versions may vary slightly.
Allowing Pop-Ups
From Opera, click Tools, then Preferences. In the General tab, go to Choose how you prefer to handle pop-ups and select Open all pop-ups.
Figure 128 Opera: Allowing Pop-Ups
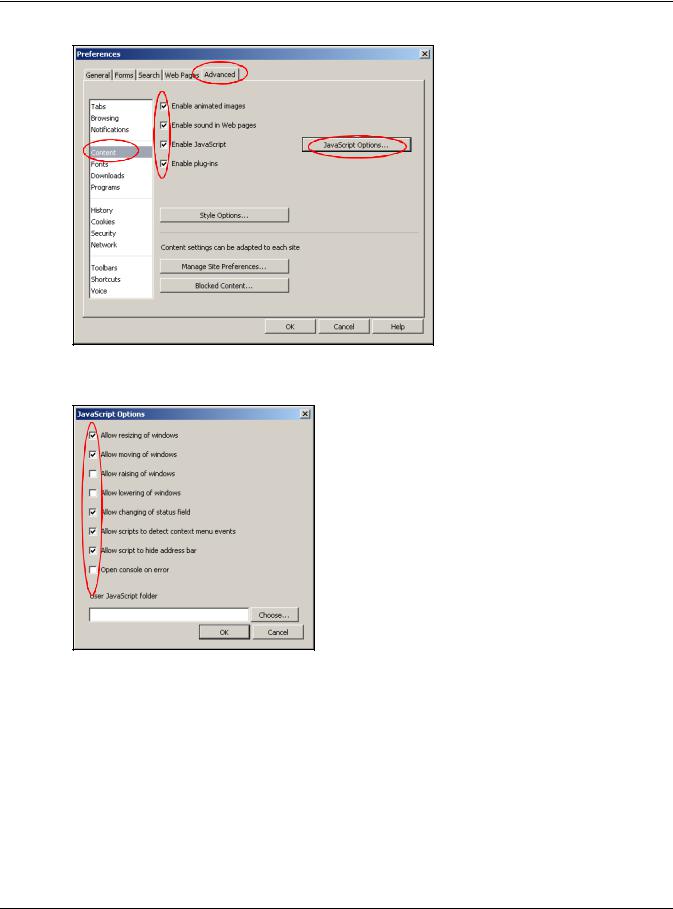
Enabling Java
From Opera, click Tools, then Preferences. In the Advanced tab, select Content from the leftside menu. Select the check boxes as shown in the following screen.
EMG3425-Q10A User’s Guide
201
Appendix A Pop-up Windows, JavaScript and Java Permissions
Figure 129 Opera: Enabling Java
To customize JavaScript behavior in the Opera browser, click JavaScript Options.
Figure 130 Opera: JavaScript Options
Select the items you want Opera’s JavaScript to apply.
EMG3425-Q10A User’s Guide
202

B
Setting Up Your Computer’s IP Address
Note: Your specific EMG3425-Q10A may not support all of the operating systems described in this appendix. See the product specifications for more information about which operating systems are supported.
This appendix shows you how to configure the IP settings on your computer in order for it to be able to communicate with the other devices on your network. Windows Vista/XP/2000, Mac OS 9/ OS X, and all versions of UNIX/LINUX include the software components you need to use TCP/IP on your computer.
If you manually assign IP information instead of using a dynamic IP, make sure that your network’s computers have IP addresses that place them in the same subnet.
In this appendix, you can set up an IP address for:
•Windows XP/NT/2000 on page 203
•Windows Vista on page 207
•Windows 7 on page 211
•Mac OS X: 10.3 and 10.4 on page 215
•Mac OS X: 10.5 and 10.6 on page 218
•Linux: Ubuntu 8 (GNOME) on page 221
•Linux: openSUSE 10.3 (KDE) on page 225
Windows XP/NT/2000
The following example uses the default Windows XP display theme but can also apply to Windows 2000 and Windows NT.
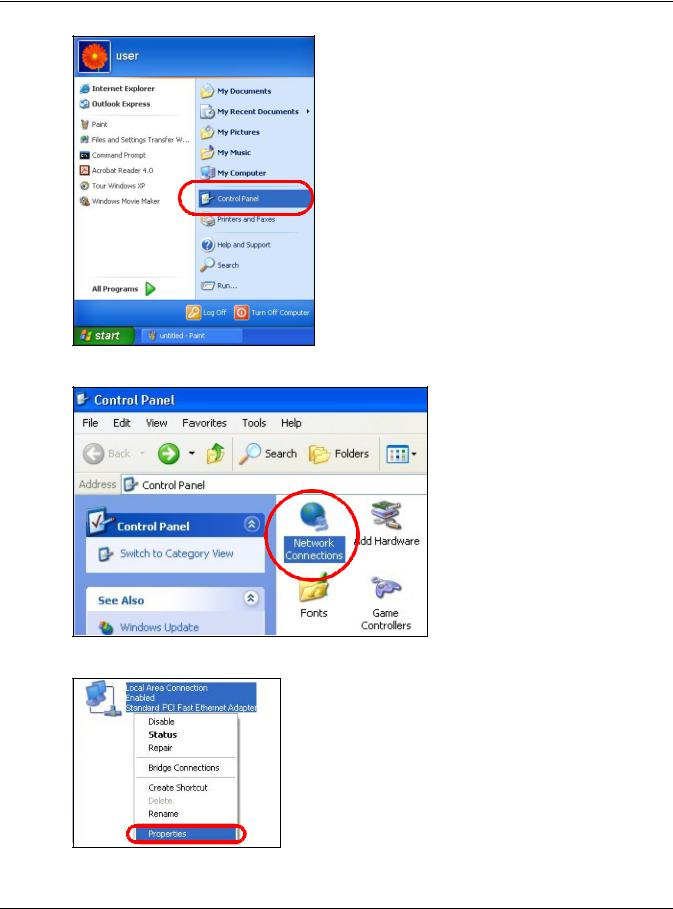
1 Click Start > Control Panel.
EMG3425-Q10A User’s Guide
203
Appendix B Setting Up Your Computer’s IP Address
2 In the Control Panel, click the Network Connections icon.
3 Right-click Local Area Connection and then select Properties.
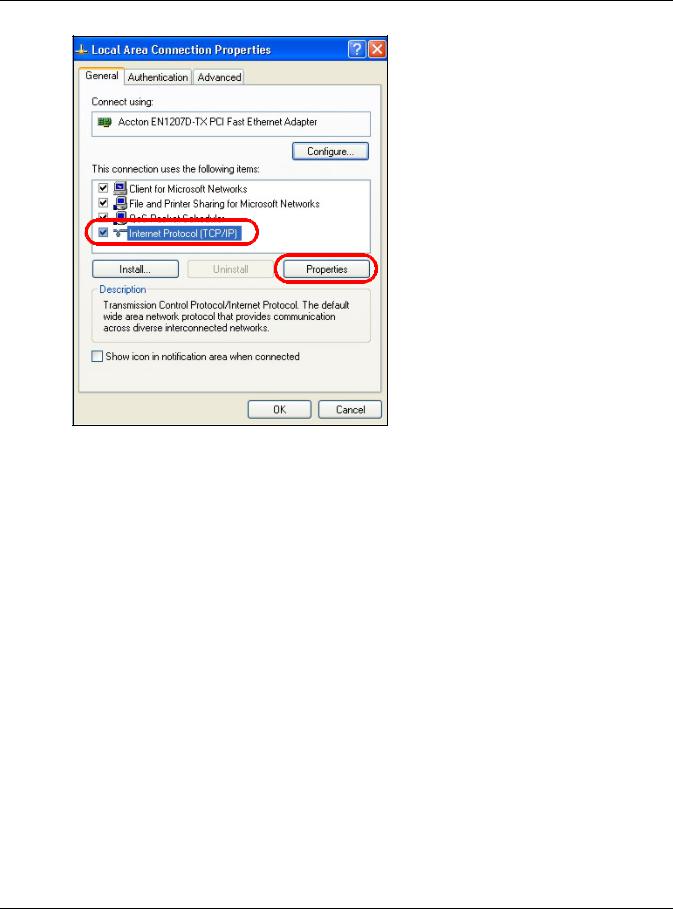
4 On the General tab, select Internet Protocol (TCP/IP) and then click Properties.
EMG3425-Q10A User’s Guide
204
Appendix B Setting Up Your Computer’s IP Address
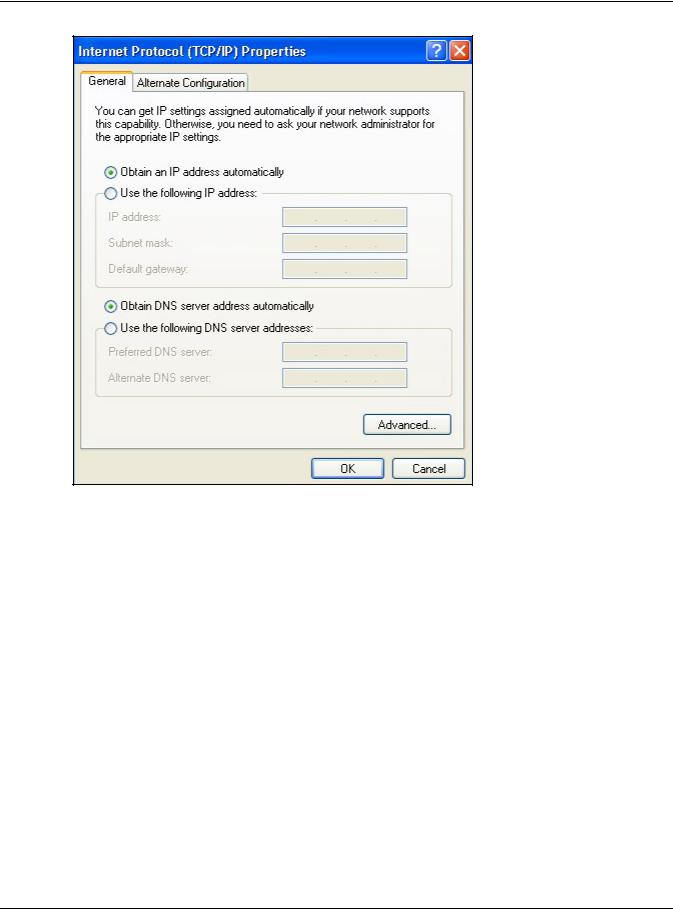
5 The Internet Protocol TCP/IP Properties window opens.
EMG3425-Q10A User’s Guide
205
Appendix B Setting Up Your Computer’s IP Address
6Select Obtain an IP address automatically if your network administrator or ISP assigns your IP address dynamically.
Select Use the following IP Address and fill in the IP address, Subnet mask, and Default gateway fields if you have a static IP address that was assigned to you by your network administrator or ISP. You may also have to enter a Preferred DNS server and an Alternate DNS server, if that information was provided.
7Click OK to close the Internet Protocol (TCP/IP) Properties window.
8Click OK to close the Local Area Connection Properties window.
Verifying Settings
1Click Start > All Programs > Accessories > Command Prompt.
2In the Command Prompt window, type "ipconfig" and then press [ENTER].
You can also go to Start > Control Panel > Network Connections, right-click a network connection, click Status and then click the Support tab to view your IP address and connection information.
EMG3425-Q10A User’s Guide
206
Appendix B Setting Up Your Computer’s IP Address
Windows Vista
This section shows screens from Windows Vista Professional.
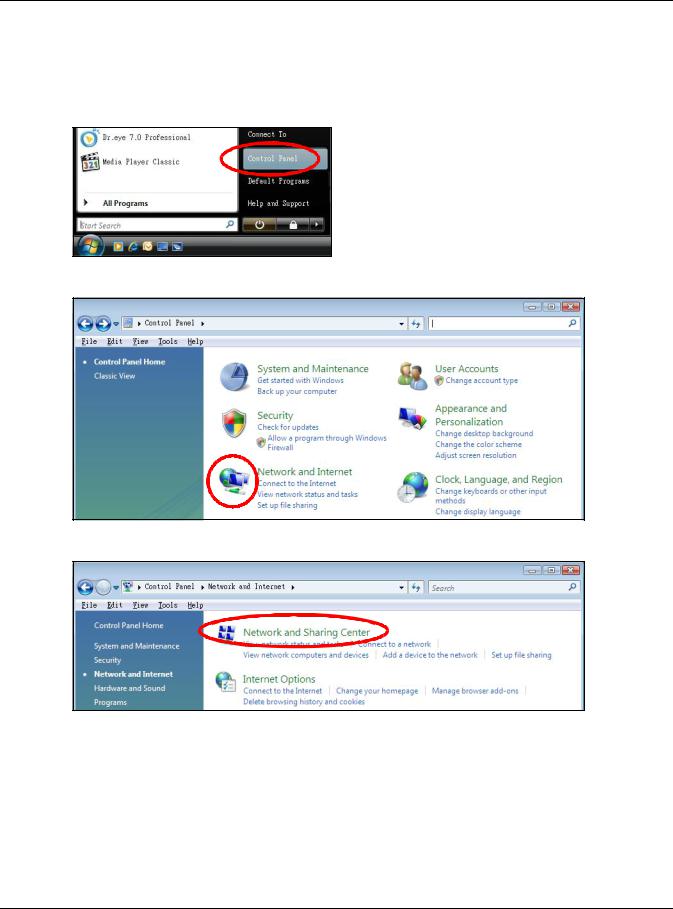
1 Click Start > Control Panel.
2 In the Control Panel, click the Network and Internet icon.
3 Click the Network and Sharing Center icon.
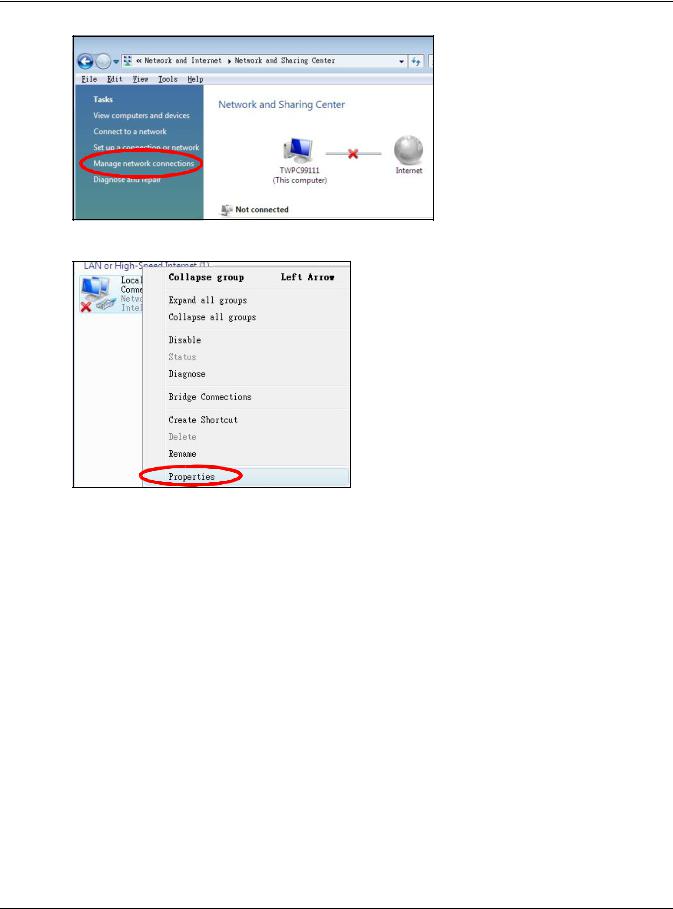
4 Click Manage network connections.
EMG3425-Q10A User’s Guide
207
Appendix B Setting Up Your Computer’s IP Address
5 Right-click Local Area Connection and then select Properties.
Note: During this procedure, click Continue whenever Windows displays a screen saying that it needs your permission to continue.
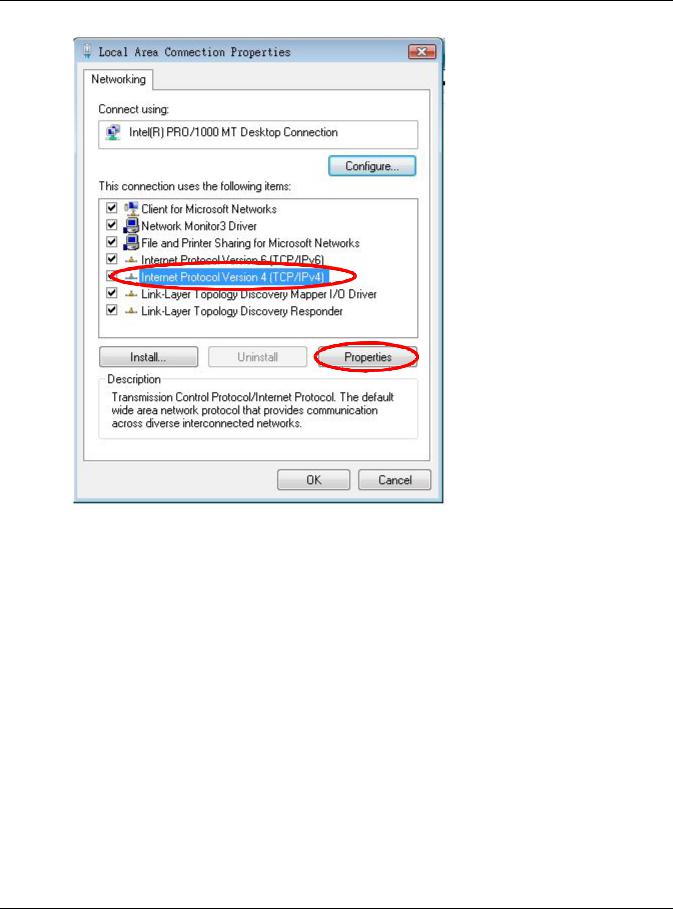
6 Select Internet Protocol Version 4 (TCP/IPv4) and then select Properties.
EMG3425-Q10A User’s Guide
208
Appendix B Setting Up Your Computer’s IP Address
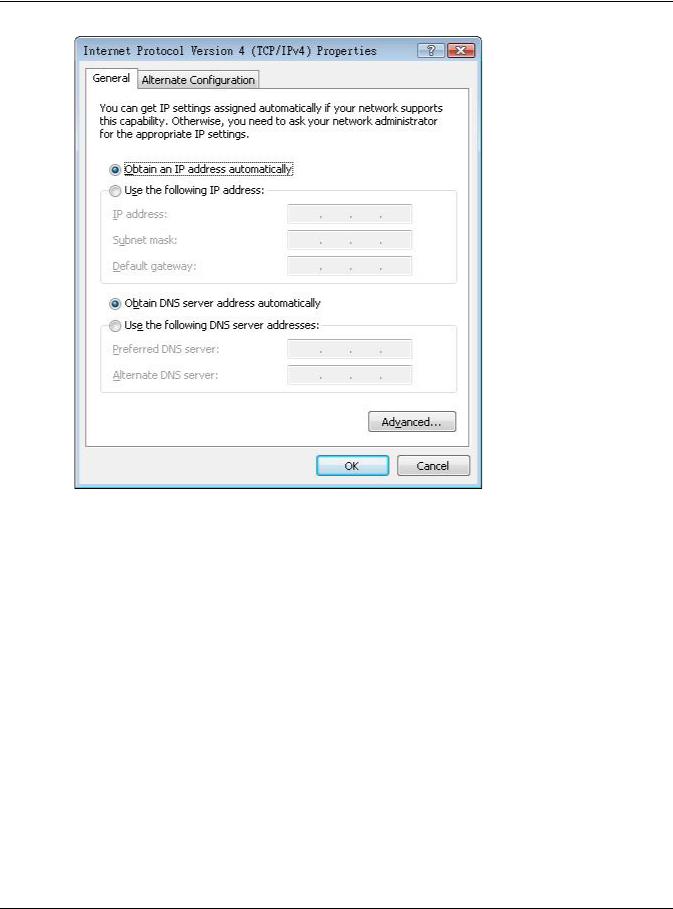
7 The Internet Protocol Version 4 (TCP/IPv4) Properties window opens.
EMG3425-Q10A User’s Guide
209
Appendix B Setting Up Your Computer’s IP Address
8Select Obtain an IP address automatically if your network administrator or ISP assigns your IP address dynamically.
Select Use the following IP Address and fill in the IP address, Subnet mask, and Default gateway fields if you have a static IP address that was assigned to you by your network administrator or ISP. You may also have to enter a Preferred DNS server and an Alternate DNS server, if that information was provided.Click Advanced.
9Click OK to close the Internet Protocol (TCP/IP) Properties window.
10Click OK to close the Local Area Connection Properties window.
Verifying Settings
1Click Start > All Programs > Accessories > Command Prompt.
2In the Command Prompt window, type "ipconfig" and then press [ENTER].
You can also go to Start > Control Panel > Network Connections, right-click a network connection, click Status and then click the Support tab to view your IP address and connection information.
EMG3425-Q10A User’s Guide
210

Appendix B Setting Up Your Computer’s IP Address
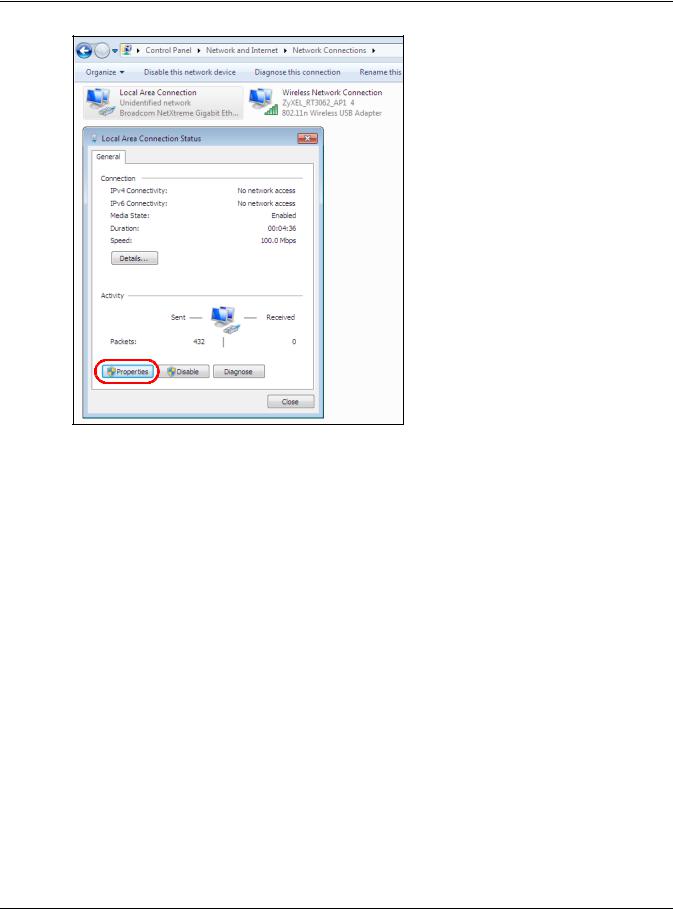
Windows 7
This section shows screens from Windows 7 Enterprise.
1 Click Start > Control Panel.
2In the Control Panel, click View network status and tasks under the Network and Internet category.
3 Click Change adapter settings.
4 Double click Local Area Connection and then select Properties.
EMG3425-Q10A User’s Guide
211
Appendix B Setting Up Your Computer’s IP Address
Note: During this procedure, click Continue whenever Windows displays a screen saying that it needs your permission to continue.
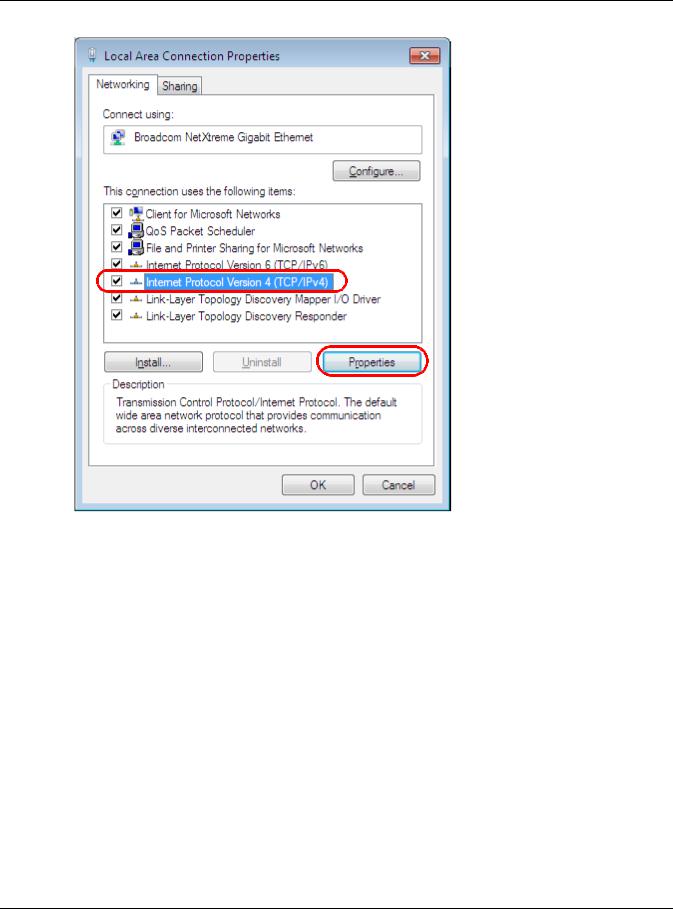
5 Select Internet Protocol Version 4 (TCP/IPv4) and then select Properties.
EMG3425-Q10A User’s Guide
212
Appendix B Setting Up Your Computer’s IP Address
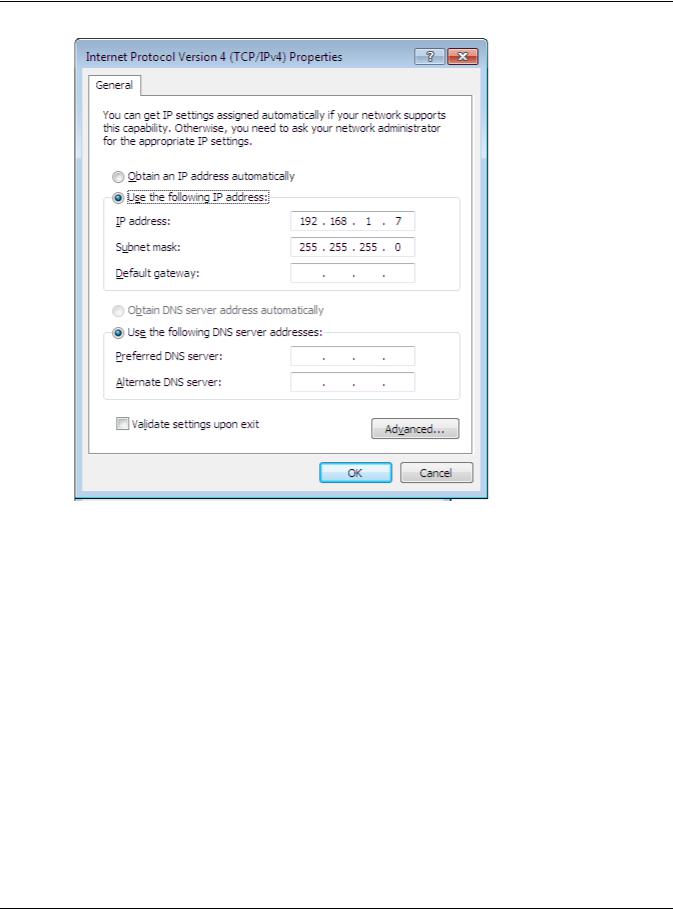
6 The Internet Protocol Version 4 (TCP/IPv4) Properties window opens.
EMG3425-Q10A User’s Guide
213
Appendix B Setting Up Your Computer’s IP Address
7Select Obtain an IP address automatically if your network administrator or ISP assigns your IP address dynamically.
Select Use the following IP Address and fill in the IP address, Subnet mask, and Default gateway fields if you have a static IP address that was assigned to you by your network administrator or ISP. You may also have to enter a Preferred DNS server and an Alternate DNS server, if that information was provided. Click Advanced if you want to configure advanced settings for IP, DNS and WINS.
8Click OK to close the Internet Protocol (TCP/IP) Properties window.
9Click OK to close the Local Area Connection Properties window.
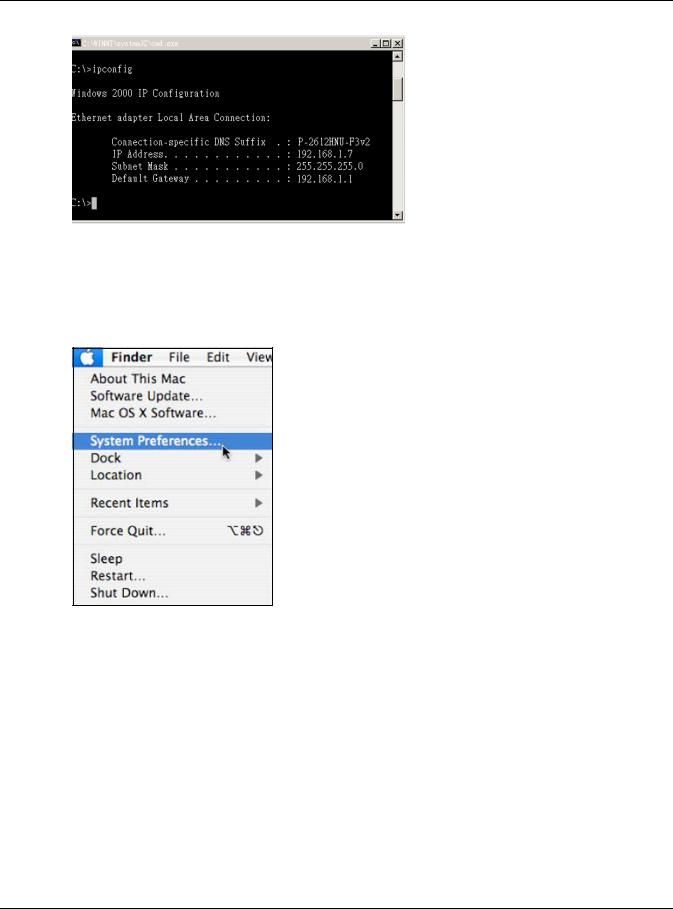
Verifying Settings
1Click Start > All Programs > Accessories > Command Prompt.
2In the Command Prompt window, type "ipconfig" and then press [ENTER].
3The IP settings are displayed as follows.
EMG3425-Q10A User’s Guide
214
Appendix B Setting Up Your Computer’s IP Address
Mac OS X: 10.3 and 10.4
The screens in this section are from Mac OS X 10.4 but can also apply to 10.3.
1 Click Apple > System Preferences.
2 In the System Preferences window, click the Network icon.
EMG3425-Q10A User’s Guide
215
 Loading...