


P-660RU-Tx v2
ADSL2+ Ethernet / USB Router
Quick Start Guide
Version 3.40
Edition 3
5/2008

P-660RU-Tx v2 Quick Start Guide
Overview
The P-660RU-Tx v2 is an ADSL router with both USB and Ethernet ports.
See your User’s Guide for background information on all features.
This Quick Start Guide shows you how to:
•Connect the hardware.
•Set up your Internet connection. The device should connect to the Internet automatically if it is preconfigured. If you were given Internet connection information from your Internet Service Provider (ISP), you may have to set up the connection manually (See section 3).
How to use the included CD
If you prefer to see a multi-media animation of how to make hardware connections, see the installation tutorial on the included CD.
1On the included CD, click Multimedia Auto Provisioner > Installation Tutorial.
2At the end of the tutorial, click Configuration Genie to set up your P-660RU-Tx v2 to connect to the Internet.
1

P-660RU-Tx v2 Quick Start Guide
1 Hardware Connections
There are two ways to connect your computer or computer network to the P-660RU-Tx v2:
Option A: Connect via Ethernet. See page 2.
Option B: Connect via USB (you will need to install the USB driver). See page 4.
Option A: Connect via Ethernet
1 ETHERNET: Use the yellow Ethernet cable to connect a computer to the ETHERNET port for initial configuration and/or Internet access.
2
P-660RU-Tx v2 Quick Start Guide
2DSL: Use the gray telephone wire to connect your P- 660RU-Tx v2’s DSL port to a telephone jack (or to a splitter, if one is already installed).
3POWER: Use the power adaptor provided with your P- 660RU-Tx v2 to connect an appropriate power source to the POWER socket. Make sure the power source is on.
4Push in the POWER button.
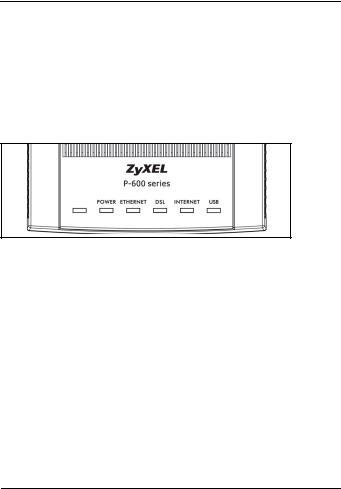
5Look at the lights on the front panel.
•The POWER light blinks while your P-660RU-Tx v2 starts up and stays on once it is ready.
•The DSL light is on when the P-660RU-Tx v2 has a DSL connection.
•The INTERNET light is on when you are able to access the Internet and blinks when the P-660RU-Tx v2 is sending or receiving data.
•The ETHERNET light stays on if the corresponding ETHERNET port is properly connected and blinks when there is traffic.
3

P-660RU-Tx v2 Quick Start Guide
If any of these lights are not on, check your connections and inspect your cables for damage. If the lights are still off, contact your local vendor.
Option B: Connect via USB
4
P-660RU-Tx v2 Quick Start Guide
"Do NOT connect the same computer to both the USB and ETHERNET ports on the P-660RU-Tx v2.
1USB: Connect the provided USB cable to the P-660RU-Tx v2’s USB port.
2DSL: Use the gray telephone wire to connect your P- 660RU-Tx v2’s DSL port to a telephone jack (or to a splitter, if one is already installed).
3POWER: Use the power adaptor provided with your P- 660RU-Tx v2 to connect an appropriate power source to the POWER socket. Make sure the power source is on.
4Push in the POWER button.
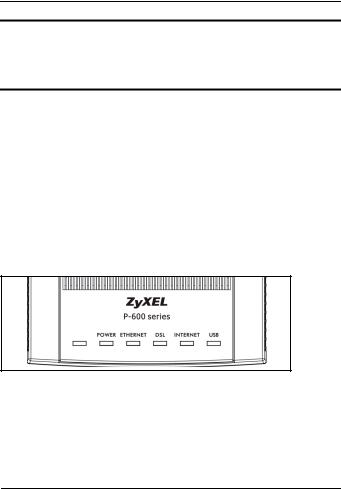
5Look at the lights on the front panel.
•The POWER light blinks while your P-660RU-Tx v2 starts up and stays on once it is ready.
•The DSL light is on when the P-660RU-Tx v2 has a DSL connection.
•The USB light turns on if the USB port is properly connected, and blinks when there is traffic.
5

P-660RU-Tx v2 Quick Start Guide
If any of these lights are not on, check your connections and inspect your cables for damage. If the lights are still off, contact your local vendor.
Install the USB Software
If you want to connect to the Internet through the P-660RU-Tx v2's USB port, install the USB driver before you connect the P-660RU-Tx v2 to the USB port. Follow the steps for your operating system to install the USB driver.
Windows Computer
System Requirements
•Windows 98 SE (Second Edition), Windows ME (Millennium Edition), Windows 2000, Windows XP, or Windows Vista
•An available USB port
Procedures
1Save your work and close all applications.
2Insert the included CD. The CD automatically runs and the main screen displays.
3Click the Setup icon on the main screen.
4Select the Windows version of your computer.
6
 Loading...