


Z557BL
CREATE 


YOUR
OWN PATH
USER
MANUAL 
Z079584509061
ZTEUSA.COM
1
About This Manual
Thank you for choosing this ZTE mobile device. In order to keep your device in its best condition, please read this manual and keep it for future reference.
Copyright
Copyright © 2017 ZTE CORPORATION
All rights reserved.
No part of this publication may be quoted, reproduced, translated or used in any form or by any means, electronic or mechanical, including photocopying and microfilm, without the prior written permission of ZTE Corporation.
Notice
ZTE Corporation reserves the right to make modifications on print errors or update specifications in this guide without prior notice. This manual has been designed with the utmost care to ensure the accuracy of its content. However, all statements, information and recommendations contained therein do not constitute a warranty of any kind, either expressed or implied. Please refer to For Your Safety to be sure to use your phone properly and safely.
We offer self-service for our smart terminal device users. Please visit the ZTE official website (www.zteusa. com) for more information on self-service and supported product models. Information on the website takes precedence.
Disclaimer
ZTE Corporation expressly disclaims any liability for faults and damages caused by unauthorized modifications of the software.
Images and screenshots used in this manual may differ from the actual product. Content in this manual may differ from the actual product or software.
Trademarks
ZTE and the ZTE logos are trademarks of the ZTE Corporation. Google and Android are trademarks of Google, Inc.
The Bluetooth® word mark and logos are registered trademarks owned by the Bluetooth SIG, Inc. and any use of such marks by ZTE Corporation is under license.
microSDHC logo is a trademark of SD-3C, LLC.
Qualcomm® Snapdragon™ processors are products of Qualcomm Technologies, Inc. Qualcomm and Snapdragon are trademarks of Qualcomm Incorporated, registered in the United States and other countries. Used with permission.
Other trademarks and trade names are those of their respective owners.
2

Contents |
|
Getting Started................................ |
5 |
Installing the nano-SIM Card (Included)..... |
5 |
Installing the Battery and a microSDHC™ |
|
Card (Not included)............................................ |
5 |
Charging the Battery......................................... |
6 |
Extending the Battery Life............................... |
7 |
Powering Your Phone On/Off......................... |
7 |
Setting Up for the First Time........................... |
7 |
Locking/Unlocking the Screen and Keys.... |
8 |
Using the Touch Screen.................................... |
9 |
Getting to Know Your Phone....................... |
10 |
Key Functions.................................................... |
12 |
Getting to Know the Home Screen........... |
13 |
Personalizing................................. |
15 |
Changing the System Language................ |
15 |
Setting the Date and Time............................ |
15 |
Changing the Ringtone and Notification |
|
Sound................................................................... |
15 |
Turning System Sounds On/Off ................. |
16 |
Adjusting Volumes.......................................... |
16 |
Switching to Silent or Vibration Mode..... |
16 |
Using Do Not Disturb Mode......................... |
17 |
Applying New Wallpapers............................ |
18 |
Changing Screen Brightness........................ |
18 |
Setting the Theme........................................... |
19 |
Setting the Home Screen |
|
Transition Effect................................................ |
19 |
Protecting Your Phone With |
|
Screen Locks...................................................... |
19 |
Protecting Your Phone With Encryption ... |
20 |
Protecting Your Phone With Screen |
|
Pinning................................................................. |
22 |
Knowing the Basics....................... |
23 |
Monitoring the Phone Status...................... |
23 |
Managing Notifications................................. |
24 |
Managing Apps and Widgets...................... |
27 |
Organizing With Folders................................ |
28 |
Rearranging the Primary Icons.................... |
29 |
Entering Text...................................................... |
29 |
Editing Text......................................................... |
32 |
Opening and Switching Apps..................... |
33 |
Using Two Apps in Split-Screen Mode..... |
34 |
Uninstalling or Disabling an App............... |
34 |
1

Contents
Connecting to Networks and |
|
Importing, Exporting, and Sharing |
|
Devices........................................... |
35 |
Contacts.............................................................. |
60 |
Connecting to Mobile Networks................ |
35 |
Working With Favorite Contacts................. |
61 |
Connecting to Wi-Fi® ..................................... |
36 |
Working With Groups..................................... |
62 |
Connecting to Bluetooth Devices.............. |
39 |
Searching for a Contact................................. |
63 |
Connecting to Your Computer via USB.... |
42 |
Editing Contacts............................................... |
63 |
Sharing Your Mobile Data Connection..... |
44 |
Accounts......................................... |
66 |
Connecting to Virtual Private Networks.. 46 |
Adding or Removing Accounts................... |
66 |
|
Phone Calls.................................... |
48 |
Configuring Account Sync............................ |
67 |
Placing and Ending Calls............................... |
48 |
Email............................................... |
68 |
Answering or Rejecting Calls....................... |
49 |
Setting Up the First Email Account............ |
68 |
Working With the Call History..................... |
49 |
Checking Your Emails..................................... |
68 |
Calling Your Contacts...................................... |
51 |
Writing and Sending an Email..................... |
68 |
Checking Voicemail......................................... |
51 |
Responding to an Email................................. |
69 |
Using Options During a Call......................... |
52 |
Adding a Signature to Your Emails............ |
70 |
Managing Multi-party Calls.......................... |
52 |
Adding and Editing Email Accounts......... |
70 |
Adjusting Your Call Settings......................... |
54 |
Changing General Email Settings.............. |
71 |
Contacts......................................... |
59 |
Messaging...................................... |
72 |
Checking Contact Details.............................. |
59 |
Opening the Messaging Screen................. |
72 |
Adding a New Contact................................... |
59 |
Sending a Text Message................................ |
72 |
Setting Up Your Own Profile........................ |
60 |
Replying to a Message................................... |
73 |
2

|
|
Contents |
|
Forwarding a Message................................... |
73 |
Working With Albums.................................... |
86 |
Deleting Messages or Threads.................... |
74 |
Working With Pictures.................................... |
86 |
Changing Message Settings........................ |
74 |
Retouching Your Pictures.............................. |
88 |
Calendar......................................... |
75 |
Making a GIF or a Collage............................. |
89 |
Viewing Your Calendars and Events.......... |
75 |
Playing Videos................................................... |
90 |
Creating an Event............................................. |
76 |
Music.............................................. |
91 |
Editing, Deleting or Sharing an Event...... |
76 |
Copying Music Files to Your Phone........... |
91 |
Changing Calendar Settings........................ |
77 |
Viewing Your Music Library.......................... |
92 |
Searching an Event.......................................... |
77 |
Setting a Song as the Default Ringtone.. 92 |
|
Browser.......................................... |
78 |
Playing Music..................................................... |
93 |
Opening the Browser..................................... |
78 |
Managing Playlists........................................... |
94 |
Using Multiple Browser Tabs........................ |
79 |
Video Player................................... |
95 |
Downloading Files........................................... |
79 |
Opening the Video Library........................... |
95 |
Changing Browser Settings.......................... |
79 |
Playing and Controlling Videos................... |
95 |
Camera........................................... |
80 |
Managing Video Files..................................... |
96 |
Capturing a Photo........................................... |
80 |
More Apps...................................... |
98 |
Using Manual Camera Mode....................... |
82 |
Calculator............................................................ |
98 |
Using Other Camera Modes......................... |
83 |
Clock..................................................................... |
98 |
Recording a Video............................................ |
83 |
Downloads......................................................... |
99 |
Customizing Camera and Video Settings.84 |
File Manager...................................................... |
99 |
|
Gallery............................................ |
86 |
Wi-Fi Utility....................................................... |
100 |
Opening Gallery............................................... |
86 |
Sound Recorder.............................................. |
100 |
3

Contents |
|
Google Apps................................ |
102 |
Chrome.............................................................. |
102 |
Drive................................................................... |
102 |
Duo ................................................................... |
102 |
Gmail.................................................................. |
102 |
Google............................................................... |
102 |
Maps................................................................... |
103 |
Photos................................................................ |
103 |
Play Movies & TV............................................ |
103 |
Play Music......................................................... |
103 |
Play Store.......................................................... |
103 |
Voice Search..................................................... |
103 |
YouTube............................................................. |
103 |
Settings........................................ |
104 |
Wireless and Networks................................. |
104 |
Device................................................................ |
106 |
Personal............................................................. |
110 |
System................................................................ |
114 |
Upgrading the Phone Software .115 |
|
Troubleshooting.......................... |
116 |
For Your Safety............................. |
120 |
General Safety................................................. |
120 |
FCC RF Exposure Information (SAR)........ |
121 |
FCC Regulations............................................. |
122 |
Hearing Aid Compatibility (HAC) |
|
regulations for Mobile Phones.................. |
123 |
Distraction........................................................ |
124 |
Product Handling........................................... |
125 |
Electrical Safety............................................... |
128 |
CTIA Requirements........................................ |
128 |
Radio Frequency Interference................... |
129 |
Explosive Environments.............................. |
131 |
Specifications.............................. |
132 |
Notes............................................ |
133 |
4
Getting Started
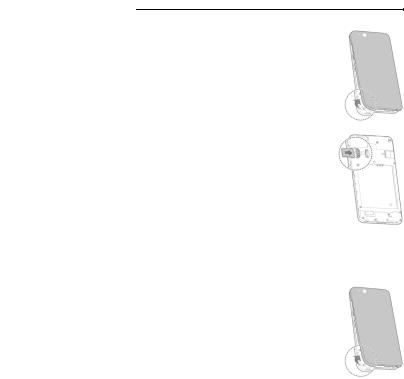
Installing the nano-SIM Card (Included)
Power off your phone before installing and removing the nano-SIM card. NOTE: Your phone will come with the nano-SIM card already installed.
WARNING! To avoid damage to the phone, do not use any other kind of SIM card, or any non-standard nano-SIM card cut from a SIM card. You can get a standard nano-SIM card from your service provider.
1.Insert your fingernail into the bottom left corner of the back cover and lift it up gently.
2.Hold the nano-SIM card with the cut corner oriented as shown and slip them into the card slot.
3.Replace the back cover.
Installing the Battery and a microSDHC™ Card (Not included)
Power off your phone before installing and removing the battery.
You have the option to install a microSDHC card of up to 32GB to expand your phone’s storage capacity.
The microSDHC card can be installed and removed while the phone is turned on. Unmount the microSDHC card before removing it.
1.Insert your fingernail into the bottom left corner of the back cover and lift it up gently.
2.Insert the battery by aligning the metal contacts on the battery with the metal contacts in the battery compartment. Gently push down on the battery until it clicks into place.
5
Getting Started
WARNING! Do not handle a damaged or leaking Li-lon battery as you can be burned.
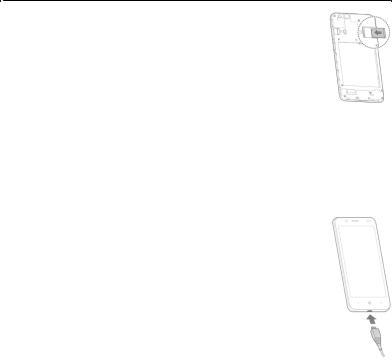
3.Hold your microSDHC card with the metal contacts facing down and slide it into the card slot.
NOTE: Some applications may require a microSDHC card to store certain data on it and to work properly. Therefore, it is recommended that you keep a microSDHC card installed and not remove or replace it unnecessarily.
Charging the Battery
Your phone’s battery should have enough power for the phone to turn on, find a signal, and make a few calls. You should fully charge the battery as soon as possible.
Do not change the built-in rechargeable battery in your phone by yourself. The battery can only be changed by ZTE or ZTE authorized service provider.
WARNING! Use only ZTE-approved chargers and cables. The use of unapproved accessories could damage your phone or cause the battery to explode.
1.Connect the adapter to the charging port.
2.Connect the charger to a standard AC power outlet. If the phone is on, you’ll see a charging icon, such as  or
or  , appear on the status bar.
3.Disconnect the charger when the battery is fully charged.
NOTE: If the battery is extremely low, you may be unable to power on the phone even when it is being charged. Contact customer service if you still cannot power on the phone after prolonged charging.
6

Getting Started
Extending the Battery Life
Active applications, screen brightness levels, Bluetooth and Wi-Fi usage and GPS functionality can drain your battery. You can follow the helpful tips below to conserve your battery power:
•Reduce the screen backlight time.
•Lower the screen brightness.
•Turn auto-sync,Wi-Fi, and Bluetooth off when not in use.
•Disable the GPS function when not in use. Most applications using this function will periodically query the GPS satellites for your current location; each query drains your battery.
Powering Your Phone On/Off
•Press and hold the Power/Lock Key to turn on your phone.
•To power it off, press and hold the Power/Lock Key to open the options menu. Tap
Power off > OK.
NOTE: If the phone freezes or takes too long to respond, press and hold the Power/Lock Key for about 10 seconds to restart your phone.
Setting Up for the First Time
When you first power on your phone after you purchase it or reset it to factory settings (see Settings – Personal – Backup & Reset), you may need to set it up before using it.
1.Flick the language field to select the language and tap LET’S GO.
2.Follow the prompts to set up Wi-Fi, Google account, Google location and other options.
7

Getting Started
Locking/Unlocking the Screen and Keys
Your phone allows you to quickly lock the screen and keys (put the phone into sleep mode) when not in use and to turn the screen back on and unlock it when you need it.
Locking the Screen and Keys:
To quickly turn the screen off and lock the keys, press the Power/Lock Key.
NOTE: To save battery power, the phone automatically turns off the screen after some time of inactivity. You will still be able to receive messages and calls while the phone screen is off.
Unlocking the screen and keys:
1.Press the Power/Lock Key to turn the screen on.
2.Press and hold a blank area of the screen to unlock the phone, Press and hold  at the bottom left of the screen to open the Google voice commands, or Press and hold
  at the bottom right to open the Camera app. You can also double-tap a notification to open the related app.
NOTE: If you have set an unlock pattern, PIN or password for your phone (see
Personalizing – Protecting Your Phone With Screen Locks), you’ll need to press and hold on the screen and draw the pattern or enter the PIN/password to unlock your screen.
8
Getting Started
Using the Touch Screen
Your phone’s touch screen lets you control actions through a variety of touch gestures.
•Tap -When you want to type using the onscreen keyboard, select onscreen items such as application and settings icons, or press onscreen buttons, simply tap them with your finger.
•Press and hold -To open the available options for an item (for example, a message or link in a web page), press and hold the item.
•Swipe or Slide -To swipe or slide means to quickly drag your finger vertically or horizontally across the screen.
•Drag -To drag, press and hold your finger with some pressure before you start to move your finger. While dragging, do not release your finger until you have reached the target position.
•Pinch - In some apps (such as Maps, Browser, and Gallery), you can zoom in and out by placing two fingers on the screen at once and pinching them together (to zoom out) or spreading them apart (to zoom in).
•Rotate the screen - For most screens, you can automatically change the screen orientation from portrait to landscape by turning the phone sideways.
NOTES:
•The Auto-rotate feature needs to be enabled for the screen orientation to automatically change. Press the Home Key >  > Settings > Display > When device is rotated and select Rotate the contents of the screen.
•You can also access the screen rotation control by sliding down the Status Bar twice and tapping Auto-rotate or Portrait.
9
Getting Started
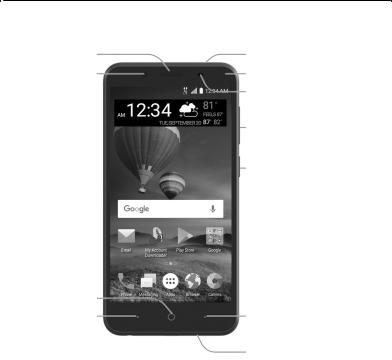
Getting to Know Your Phone
Earpiece
Front camera
Home Key
Back Key*
Microphone
Indicator Light
Proximity & Light Sensor
Volume Key
Power/Lock Key
Recent Apps Key*
Microphone
10

Getting Started
Back Camera
Flash
Back cover
Speaker |
|
Charging/ |
|
micro-USB Port |
3.5 mm Headset Jack |
*You can switch the positions of the Back Key and the Recent Apps Key. Press the Home Key >  > Settings > Navigation Key and select on option.
11

Getting Started
Key Functions
Key |
Function |
|
|
Press and hold to turn airplane mode on or off, restart, or to |
|
Power/ Lock Key |
power off. |
|
Press to change your phone to Sleep mode. |
||
|
||
|
Press to wake up your phone. |
|
|
Press to return to the home screen from any application or |
|
Home Key |
screen. |
|
|
Press and hold to use Google Now™. |
|
Recent apps Key |
Press to see recently used apps. |
|
Back Key |
Press to go to the previous screen. |
|
Volume Key |
Press or hold either end of the key to turn the volume up or |
|
down. |
||
|
12
Getting Started
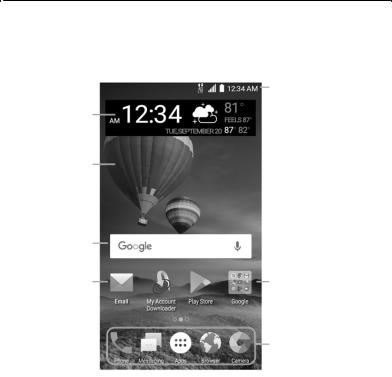
Getting to Know the Home Screen
The home screen is the starting point for your phone’s applications, functions, and menus. You can customize your home screen by adding apps, folders, widgets, and more.
|
Status & Notifications |
Widget |
|
Wallpaper |
|
Google Search |
|
Shortcut |
Folder |
|
Primary apps |
13

Getting Started
Extended Home Screens
Your home screen is extendable, providing more space for apps, folders, widgets, and more. Simply swipe left or right on the screen to see the extended panels. You can add or remove additional home screen panels, or adjust their order.
To add a new home screen panel:
1.Press the Home Key >  , or press and hold any blank area of a home screen and select Widgets.
2.Press and hold an application icon or a widget and drag it to a home screen panel and put the icon or widget on it.
To delete a home screen panel:
1.Press and hold any blank area of a home screen.
2.Tap Home and slide left or right to view the home screen thumbnails.
3.Tap  on the top right corner of a thumbnail.
4.Tap OK. The items on the panel will also be removed.
NOTES:
•A home screen panel cannot be left empty. If the icon, widget, or folder is the only item on the current home screen panel, the panel will be deleted as you remove the item.
•When there are only three home screen panels, you cannot delete any of them.
To adjust the order of a home screen panel:
1.Press and hold any blank area of a home screen.
2.Tap Home and slide left or right to view the home screen thumbnails.
3.Press and hold a thumbnail and drag it left or right to the place you need.
NOTE: Tap  at the bottom of a home screen thumbnail to set it as the main home screen.
14

Personalizing
Changing the System Language
1.Press the Home Key >  > Settings > Languages & input > Languages.
2.Tap Add a language to add a system language.
Setting the Date and Time
1.Press the Home Key >  > Settings > Date & time.
2.Set the date, time, time zone, and time format.
•To adjust the date and time automatically, tap to turn on Automatic date & time.
•To adjust the date and time manually, tap to turn off Automatic date & time and tap
Set date / Set time to change the date and time.
•To adjust the time zone automatically, tap to turn on Automatic time zone.
•To adjust the time zone manually, tap to turn off Automatic time zone and tap
Select time zone to set the correct time zone.
•To adjust the time format, tap to turn on Use 24-hour format.
Changing the Ringtone and Notification Sound
You can customize the default ringtone for incoming calls and the default notification sound quickly.
1.Press the Home Key >  > Settings > Sound.
2.Tap Phone ringtone, Default notification ringtone, or Default alarm ringtone.
3.Scroll through the ringtone list and select the ringtone you want to use.
4.Tap OK.
NOTE: See Contacts – Editing Contacts – Setting a Ringtone for a Contact for how to assign a special ringtone to an individual contact.
15

Personalizing
Turning System Sounds On/Off
1.Press the Home Key >  > Settings > Sound > Other sounds.
2.Tap the switch beside each option to turn it on or off.
Adjusting Volumes
1.Press the Home Key >  > Settings > Sound.
2.Drag the sliders below Media volume, Alarm volume, Ring volume, and
Notification volume to adjust the volume for each type of audio.
NOTE: You can adjust the media volume when a media application is in use by pressing the Volume Key. If no media application is active, press the Volume Key to adjust ringtone volume (or the earpiece volume during a call).
Switching to Silent or Vibration Mode
You can set the phone to silent or vibration mode by using one of the following methods.
•Press the Volume Key when no media application is active to show the volume management window. Drag the slider to the left or keep pressing the Volume Down Key to switch the phone to vibration mode. Press the key again in vibration mode to switch the phone to silent mode.
•Swipe down from the top of the screen to open the Notification Panel and drag the panel downward. Slide the screen to tap Sound or Vibrate to switch the phone to vibration or silent mode.
•Press the Home Key >  > Settings > Sound > Notification mode and select
Vibrate or Mute to switch to vibration or silent mode.
NOTE: To restore normal sound settings, press or hold the Volume Up Key.
16

Personalizing
Using Do Not Disturb Mode
You can limit interruptions with Do not disturb mode. This mode silences your phone so that it doesn’t make sounds or vibrate when you don’t want it to.
To turn on Do Not Disturb mode:
1.Press the Home Key >  > Settings > Sound > Do not disturb.
2.Tap Do not disturb and select Always or Scheduled.
3.Set the detailed settings.
u If you have selected Scheduled, set the days and start/end time you’d like your phone to be in Do not disturb mode.
u Tap Disturb rules to choose if you’d like to allow certain notifications or not.
–Priority only: Only notifications you have marked as priority are allowed.
–Alarms only: Only alarms are allowed.
–Total silence: No notifications are allowed.
uIf you have allowed priority interruptions, you can customize the types of allowed sounds or vibration in the Priority interruptions section.
NOTE: To turn off Do not disturb mode quickly, press the Volume Key and then tap END NOW.
To set exceptions for Do Not Disturb mode:
You can set reminders, certain calls and messages as exceptions when Do not disturb mode is on and Priority only is selected as the disturb rule, so these ringtones, sounds and vibration are not turned off.
1.Press the Home Key >  > Settings > Sound > Do not disturb.
2.Tap the switches next to the items you want to allow. Tap Messages or Calls and set who can alert you of their messages or calls.
17

Personalizing
NOTE: To set exceptions based on apps, press the Home Key >  > Settings > Notifications. Select an app and switch on Override Do Not Disturb.
Applying New Wallpapers
You can set the wallpaper for the home screen and the lock screen.
1.Press and hold an empty place on the home screen.
2.Tap Wallpapers.
3.Tap Lock screen or Home screen.
4.Swipe left or right on the wallpaper panel to select a wallpaper, or tap GALLERY or LIVE WALLPAPER to choose the image or animation you want to use as the wallpaper.
NOTES:
•In addition, you can press the Home Key >  > Settings > Display > Wallpaper to pick an image from Gallery, Photos, or Wallpapers, or an animation from Live Wallpapers.
•Some cropping may be needed for Gallery and Photos images.
Changing Screen Brightness
1.Press the Home Key >  > Settings > Display > Brightness level.
2.Drag the slider to manually adjust the screen brightness.
NOTE: With the proximity and light sensor, your phone can automatically adjust the screen brightness for available light. Tap Adaptive brightness in the Display settings screen to turn the feature on or off.
18
Personalizing
Setting the Theme
1.Press and hold an empty place on the home screen.
2.Tap Themes.
3.Tap a theme to select it.
Setting the Home Screen Transition Effect
1.Press and hold an empty place on the home screen.
2.Tap Home.
3.Tap an effect and the phone will demonstrate how it works. When you have found one you like, press the Home Key to exit.
Protecting Your Phone With Screen Locks
You can protect your phone by creating a screen lock. When enabled, you can press and hold a blank area on the screen, and then draw a pattern or enter a numeric PIN or a password to unlock the phone’s screen and keys.
1.Press the Home Key >  > Settings > Security > Screen lock.
2.Tap None, Long press, Pattern, PIN or Password.
uTap None to disable the screen lock protection.
uTap Long press to enable screen lock and allow unlocking with a ‘Press and hold’ gesture. You can unlock the screen by pressing and holding the screen.
uTap Pattern to draw and redraw a pattern that you must draw to unlock the screen.
uTap PIN or Password to set a numeric PIN or a password that you must enter to unlock the screen.
19

Personalizing
3.For Pattern, PIN, or Password lock, select whether to protect your phone by requiring your pattern, PIN, or password before it starts up. Tap CONTINUE.
4.For Pattern, PIN, or Password lock, select how you want notifications and their contents to show when the phone is locked, then tap DONE.
NOTES:
•Screen lock options are listed in the approximate order of the strength of their security, starting with None and Long press, which provide no security. A pattern provides minimal security, although it can be more convenient than the stronger options.
•Remember the pattern, PIN, or password you set. Otherwise, you will have to upgrade the phone software to use the phone. (see Upgrading the Phone Software).
Protecting Your Phone With Encryption
You can encrypt all the data on your phone: Google accounts, application data, music and other media, downloaded information, and more. If you do, you must enter a numeric PIN or password each time you power on your phone.
WARNING! Encryption is irreversible. The only way to revert to an unencrypted phone is to perform a factory data reset, which erases all your data.
Encryption provides additional protection in case your phone is stolen, and may be required or recommended in some organizations. Consult your system administrator before turning it on. In many cases the PIN or password you set for encryption is controlled by the system administrator.
20

Personalizing
Before turning on encryption, prepare as follows:
•Set a lock screen PIN or password.
•Charge the battery.
•Keep the phone connected to the charger.
•Schedule an hour or more for the encryption process.You must not interrupt it or you will lose some or all of your data.
When you’re ready to turn on encryption:
1.Press the Home Key >  > Settings > Security > Encrypt phone.
2.Read the information about encryption carefully. The ENCRYPT PHONE button is dimmed if your battery is not charged or your phone is not plugged in. If you change your mind about encrypting your phone, press the Back Key.
WARNING! If you interrupt the encryption process, you will lose data.
3.Tap ENCRYPT PHONE.
4.Enter your lock screen PIN or password and tap NEXT.
5.Tap ENCRYPT PHONE again.
The encryption process starts and displays its progress. Encryption can take an hour or more, during which time your phone may restart several times.
When encryption is complete, you’ll be prompted to enter your PIN or password.
Subsequently, you must enter your PIN or password each time you power on your phone to decrypt it.
21

Personalizing
Protecting Your Phone With Screen Pinning
You can use the screen pinning feature to keep an app in view, so others cannot switch to other apps or access your personal information.
Turning on Screen Pinning
1.Press the Home Key >  > Settings > Security > Screen pinning.
2.Tap the On/Off switch.
3.If you have set a screen lock, you can tap Ask for unlock pattern/PIN/password before unpinning. You will need to draw the pattern or enter the PIN/password to unpin the screen.
Pinning a Screen
1.Ensure that screen pinning is turned on.
2.Open the app you want to keep in view.
3.Press the Recent Apps Key.
4.If there are many app tabs, swipe up to find on the front-most tab.
5.Tap  .
.
Unpinning the Screen
1.To unpin the screen and return to normal use, press and hold the Back Key.
2.If you have checked Ask for unlock pattern/PIN/password before unpinning when pinning the screen, press and hold on the lock screen and draw the pattern or enter the PIN/password.
22

Knowing the Basics
Monitoring the Phone Status
The status bar at the top of the home screen provides phone and service status icons on the right side. Below are some of the icons you may see.
Indicators and Icons
Indicator |
What it means |
4G LTE™ connected
3G /HSPA+ connected
2G connected
Airplane mode
No signal
Signal strength
No nano-SIM card installed
Alarm set
Silent mode
Battery less than 15%
Indicator |
What it means |
Battery less than 20%
Vibration mode
Mobile data in use
Battery full
/ |
Battery charging |
|
Bluetooth® on
Connected to a Wi-Fi network
Wi-Fi in use
GPS on
23
Knowing the Basics
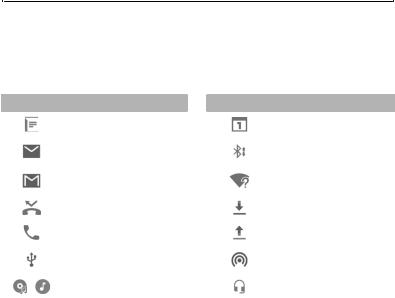
Managing Notifications
Notification Icons
The status bar at the top of the home screen provides notification icons on the left. Below are some of the icons you may see.
Indicators and Icons
Indicator |
What it means |
|
New message |
|
|
|
New email |
|
|
|
New Gmail message |
|
|
|
Missed call |
|
|
|
Call in progress |
|
|
|
USB connected |
|
|
/ |
Song is playing |
|
Indicator |
What it means |
|
Upcoming event |
|
|
|
Incoming file via |
|
Bluetooth |
|
New Wi-Fi network |
|
detected |
|
Downloading data |
|
|
|
Sending data |
|
|
|
Portable Wi-Fi hotspot |
|
is on |
|
Wired headset connected |
|
|
Open/Close the Notification Panel
Notifications report the arrival of new messages, calendar events, and alarms, as well as ongoing events, such as when you’ve configured your phone as a Wi-Fi hotspot. You can open the notification panel to view the details of notifications.
24

Knowing the Basics
•To open the notification panel, swipe your finger down from the top of the screen.
•To close the notification panel, swipe your finger up on the screen or press the Back key.
Responding to or Removing a Notification
In the Notification Panel, you can respond to a notification or remove the notifications. The Notification Panel also supports expandable notifications that let you perform additional actions right from the notification itself.
•To respond to a notification, tap it.
•To remove a notification, swipe it left or right.
•To remove all non-persistent notifications, tap CLEAR ALL below all the notifications.
•To manage notifications you have received, press and hold a notification, and then choose to silence or block the application, or tap MORE SETTINGS to customize more notification settings. See Settings – Device – Notifications.
NOTE: If you block notifications for an app, you may miss its important alerts and updates.
Using Quick Settings
The Quick Settings make it convenient to view or change the most common settings for your phone.
Open the notification panel and drag the panel downwards to find the following Quick Settings on the screen.
•Brightness: Uncheck AUTO and drag the brightness slider to adjust the screen brightness.
•Bluetooth: Tap to turn on or off Bluetooth. Press and hold to get to the settings screen.
25

Knowing the Basics
•Wi-Fi: Tap to turn on or off Wi-Fi. Press and hold to get to the settings screen.
•Data: Tap to enable or disable data access over the mobile network. Press and hold to get to the settings screen.
•Location: Tap to turn on or off the GPS function. Press and hold to get to the settings screen.
•Airplane mode: Tap to turn on or off the airplane mode.
•Flashlight: Tap to turn on or off the flash.
•Sync: Tap to turn on or off auto-sync of accounts data. Press and hold to get to the settings screen.
•Do not disturb/Priority only/Alarms only/Total silence: Tap to access the Do not disturb menu and change its settings.
•Auto-rotate / Portrait: Tap to turn on or off the auto-rotate screen feature.
•Battery Saver: Tap to turn on or off the battery saver. Press and hold to get to the settings screen.
•Sound / Vibrate / Silent: Tap to switch among silent mode, vibrate mode, and sound mode.
•Hotspot: Tap to enable the Wi-Fi hotspot feature. Press and hold to access the Wi-Fi hotspot menu.
NOTE: In the Quick Settings screen, tap  at the top to get to the Settings menu; tap
  to change control switch position.
26

Knowing the Basics
Managing Apps and Widgets
Adding Apps and Widgets
1.Press the Home Key >  to add apps.
Or, to add widgets, press and hold an empty area of the home screen and select
Widgets.
2.Slide to browse the available applications or widgets.
3.Press and hold a widget or an application icon and drag it to a home screen panel.
NOTE: While holding the item, you can drag it to the edge of the screen to create a new home screen panel and put the item on it.
Moving Apps or Widgets
1.Press and hold a widget or app on the home screen.
2.Drag it to the place you need.
Removing Apps or Widgets
1.Press and hold a widget or app on the home screen.
2.Drag it to  to remove it.
Adjusting Widget Size
1.Press and hold a widget on the home screen and then release it.
2.An outline appears around the widget. Drag the outline to resize the widget. NOTE: Not all widgets can be resized.
27

Knowing the Basics
Organizing With Folders
You can create folders on the home screen and add several shortcuts to a folder. You can move or remove folders the same way as moving or removing shortcuts.
1.On the home screen, press and hold the shortcut you want to add into a folder.
2.Drag the shortcut to  . A new folder will be created, and the shortcut is added into the folder.
3.To add more shortcuts into the folder, press and hold each shortcut and drag it over the folder before releasing it.
4.To remove a shortcut from a folder, tap the folder to open it. Press and hold the shortcut and drag it to the home screen.
NOTES:
•Tap the folder and then tap the name field to rename the folder.
•Drag the folder to  to delete the folder.
Uninstalling or Disabling an Application
1.Press the Home Key >  to open the application list screen.
2.Press and hold an application icon and drag the icon to  or
or  at the top of the screen.
3.Tap OK to uninstall or disable the app.
NOTE: To find the disabled applications, press the Home Key >  > Settings > Apps. Tap All apps and select Disabled. You can then tap an application and tap ENABLE to enable it. Not all applications can be uninstalled or disabled.
28
 Loading...