


V3
Table of contents
 Loading...
USER GUIDE
Z
OOM
V3

NOTICE
NOTICENOTICE
NOTICE
This document contains proprietary information protected by copyright, and
this Manual and all the accompanying hardware, software, and
documentation are copyrighted. No part of this document may be
photocopied or reproduced by mechanical, electronic, or other means in
any form.
The manufacturer do es not warrant that the hardwar e will work properly in
all environments and applications, and makes no warranty or representation,
either expressed or implied, with respect to the quality, performance,
merchantability, or fitness for a particular pur po s e of the software or
documentation. The manu facturer reserves the right to make changes to the
hardware, software, and documentation without obligat ion to notify an y
person or organization of the revision or change.
All brand and product names are the trademarks of their respective owners.
© Copyright 2005
All rights reserved.

Contents
OVERVIEW .......................................................................... 5
1 I
NSTALLATION INSTRUCTIONS............................................. 6
1.1 W
HAT’S IN THE PACKAGE.................................................... 6
1.2 Q
UICK START INSTRUCTIONS............................................... 8
Step 1: Installing the Software ......................................... 8
Step 2: Installing the Hardware........................................ 9
Step 3: Configuring Internet Explorer...............................12
Step 4: Configuring Your V3............................................14
Step 5: Setting up VoIP Service .......................................18
1.3 T
IPS FOR MAKING VOIP CALLS ...........................................18
1.4 S
ETTING THE V3 FOR VOIP ONLY MODE...............................19
1.5 F
RONT PANEL DESCRIPTION ...............................................20
1.6 I
F YOU NEED HELP...........................................................20
1.7 C
HANGING THE V3’S PASSWORD & RESETTING THE UNIT TO ITS
DEFAULT SETTINGS................................................................21
1.8 W
INDOWS USERS: REMOVING THE V3..................................22
2 V
OICE OVER IP SETTINGS................................................ 23
2.1 C
HANGING YOUR VOIP SETTINGS........................................23
If Your Unit Is Not Preset for VoIP...................................23
2.2 C
ALL FORWARDING AND CALL WAITING.................................28
Enabling Call Management Features.................................29
Activating Call Management Features...............................30
3 P
LAYING ONLINE GAMES.................................................. 32
3.1 U
SING YOUR V3 WITH XBOX
®
LIVE......................................32
3.2 U
SING YOUR V3 WITH PLAYSTATION
®
2...............................33
3.3 S
ETTING UP THE V3 FOR PEER-TO-PEER GAMING AND MULTIPLAYER
GAME HOSTING ....................................................................35
3.4 S
ETTING UP A VIRTUAL SERVER...........................................36
3.5 S
ETTING UP A DMZ .........................................................44
4 U
SING THE V3’S ADVANCED FIREWALL ............................... 50
4.1 M
AIN FIREWALL FEATURES.................................................52
Protection Policy.............................................................52
Hacker Log.....................................................................54
Service Filtering.............................................................. 55
4.2 C
REATING INBOUND/OUTBOUND POLICIES.............................56
Inbound Policies.............................................................57
Outbound Policies...........................................................58

4.3 SETTING UP FIREWALL DATABASES ......................................60
IP Group........................................................................60
Service Group .................................................................62
Time Group....................................................................62
A
PPENDIX A DSL INTERNET SETTINGS TABLES....................... 64
A
PPENDIX B VOIP PHONE INSTALLATION OPTIONS................. 67
Plug Multiple Phones Directly into the V3 .........................67
Use Cordless Phones to Link to the V3.............................67
A
PPENDIX C MAC AND LINUX USERS: SETTING TCP/IP NETWORK
SETTINGS ......................................................................... 68
Macintosh TCP/IP Settings ..............................................68
Linux TCP/IP Settings .....................................................69
A
PPENDIX D TROUBLESHOOTING .......................................... 71
C
ONNECTION TROUBLESHOOTING TIPS .......................................71
V
OIP AND PHONE TROUBLESHOOTING TIPS .................................75
A
PPENDIX E REGULATORY INFORMATION............................... 79

Overview 5
Overview
The V3 is a gateway/router with a TelePort
™
VoIP phone port.
You use the V3 in conjunction with an Ethernet cable modem or
Ethernet ADSL modem to connect to the Internet. The
gateway/router provides an interface between the Internet and
your local area network (LAN). It also includes an advanced
firewall, which allows you to control Internet access from your
local network and which protects your local network from
unwanted Internet traffic. The TelePort lets you use an ordinary
telephone to make VoIP calls over the Internet and regular calls
through the familiar Public Switched Telephone Network (PSTN).
This User Guide contains installation instructions and explains how
to configure the V3 for some popular applications. Most users
should go now to the next chapter, Installation Instructions.
Note:
If you are an Internet service provider, a VoI P service provider, or a system
administrator, additional information is available in the Technical Reference
Manual at
www.zoom.com
The Technical Reference manual includes information such as voice parameters
and dialing plan configurations.
6 Zoom V3 User’s Guide
1
Installation Instructions
This chapter covers the basic instructions needed to install your
V3 and place VoIP calls.
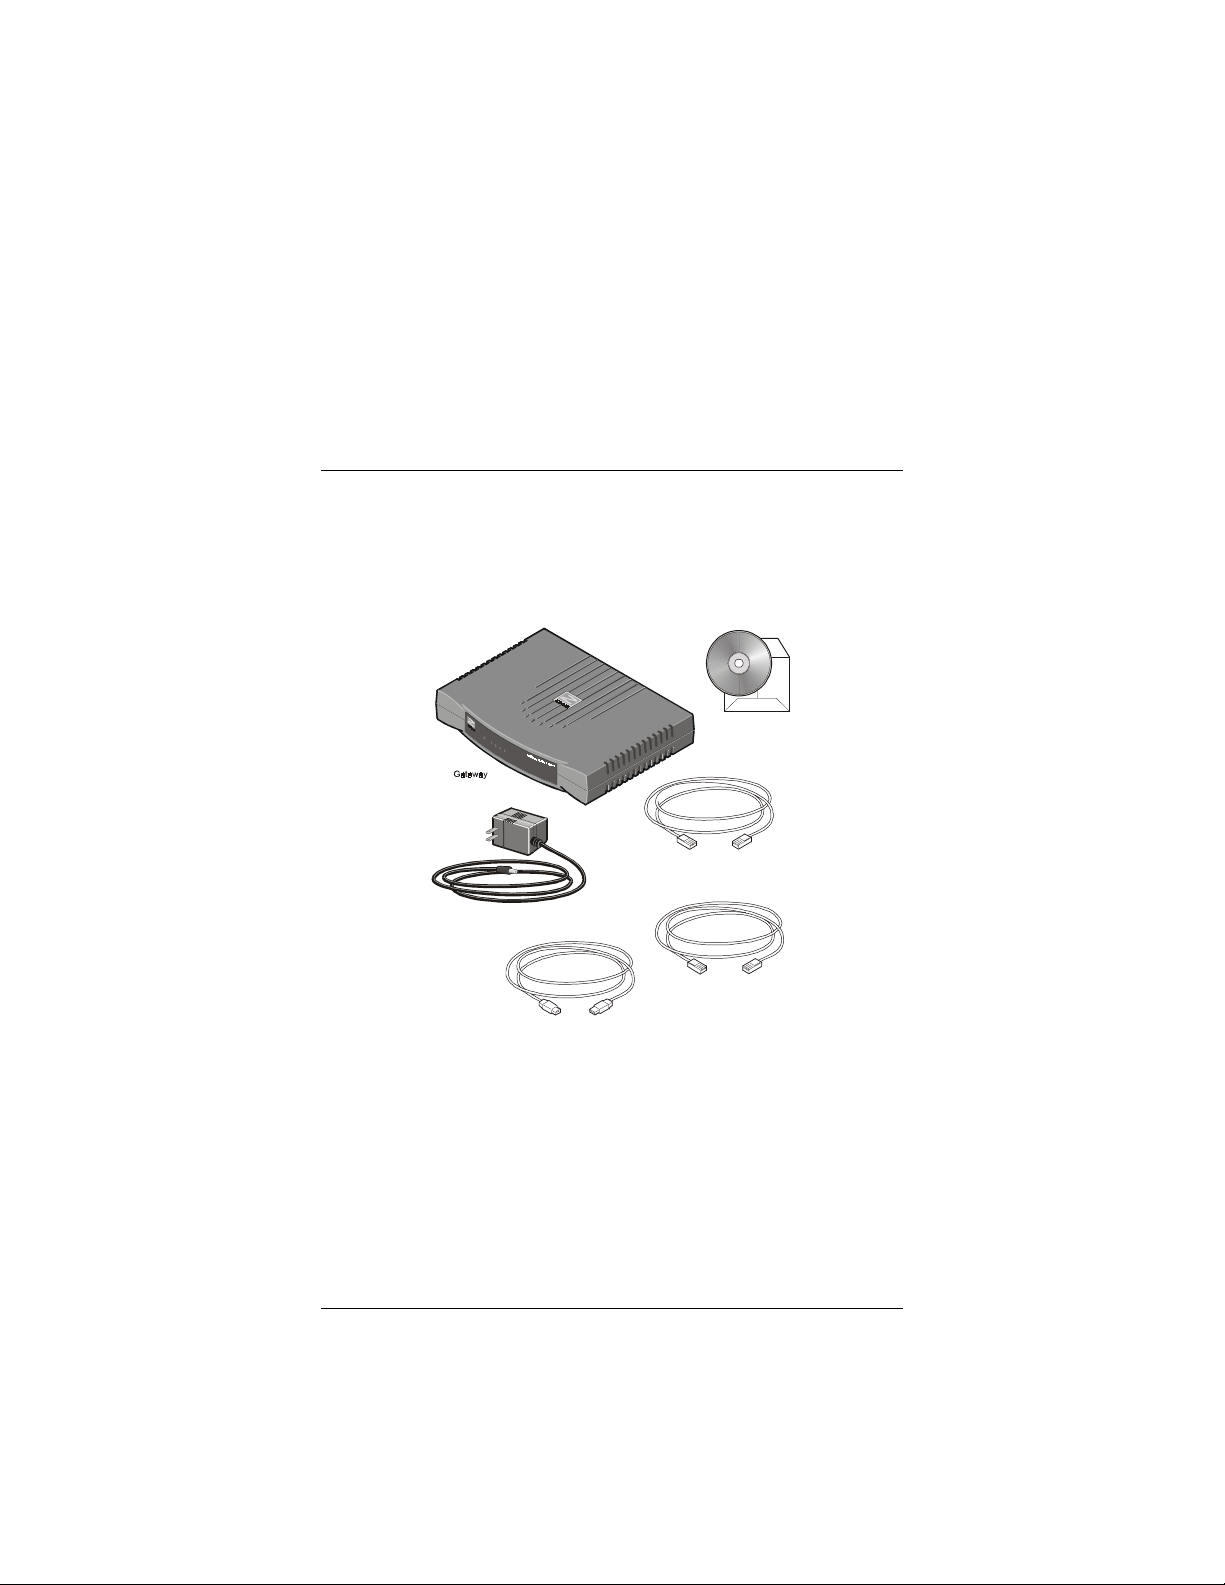
1.1 What’s in the Package
Ethernet Cable
Power Cube
USB Cable
Software CD-ROM
Phone Cord

Chapter 1: Installation Instructions 7
The CD contains the Installation Software, User Manual, Warranty,
and Customer Support information.
In addition, you may have a
phone-jack adapter
to adapt the RJ-11
phone cord for a different phone jack (certain countries only).
If anything is missing or damaged, contact Zoom Customer
Support or your retailer or distributor.
What You Will Need
•
An Ethernet cable modem or Ethernet DSL modem
.
•
A
Windows, Macintosh, or Linux computer
equipped with
a
Network Interface Card (NIC)
or a
USB port.
•
A
telephone
to plug into the V3 if you plan to use VoIP.
•
An
accessible telephone jack
(a jack where you can plug in a
regular telephone and make calls).
•
A
DSL phone filter
.

8 Zoom V3 User’s Guide
1.2 Quick Start Instructions
Installing the V3 involves five steps:
Installing the Software
,
Installing the Hardware
,
Configuring Internet Explorer
,
Configuring Your V3
, and
Setting Up VoIP Service
.
Step 1: Installing the Software
Installing the software is only required for people connecting a
Windows computer directly to the V3. All others should skip to
Step 2: Installing the Hardware.
If your computer has an available Ethernet jack, we recommend
that you use it instead of the USB jack. This will simplify
installation.
If you decide to use the V3’s USB jack, you must remove any
previously installed USB modem drivers on your computer
before installing this software.
On the desktop, click the
Start
button, point to
Settings
, and select
Control Panel
. In
Control
Panel
, double-click
Add/Remove Pro gra ms
, on the
Install/Uninstall
tab, select your old USB modem from the list,
and click
Remove
. Now continue below.
1
11
1
Your computer must be on.
Insert the supplied CD into
your computer’s CD drive. The CD should start automatically
and the
Select Language
screen should appear. (If the CD
does not start automatically, on the desktop, click the
Start
button, click
Run
, and then type
D:\setup.exe
, where
D
is
the letter of your CD drive.)
2
22
2
Select your language
and click the
Installation Wizard
button. The software installation proceeds automatically.
3
33
3 When the process is complete, you will be prompted to click
Finish
and then
Shut Down
to turn off your computer.
Remove the CD from your CD drive before you shut down
your computer.

Chapter 1: Installation Instructions 9
Step 2: Installing the Hardware
Installing the Hardware
is a two-step process,
Making the
Connections
, and
Powering Up
.
Making the Connections
1
11
1
The software must be installed before you proceed.
Then, unplug or turn off the power to your PC and
everything connected to your PC.
2
22
2
Plug your phone into the V3’s PHONE jack.
If you have a cordless phone with one or more handsets, plug
the
base station
into the V3’s
PHONE
jack.
Note:
If RJ-11 phone jacks are not used in your country, you
will need a phone adapter. Plug the adapter into the V3’s
PHONE
jack and then plug in your phone.
3
33
3
Connect the V3 to the traditional telephone network.
Plug one end of the V3’s phone cord into the V3’s
TELCO
jack and the other end into a telephone jack where you would
normally plug in a standard telephone. If you are using DSL,
this jack should have a DSL phone filter installed on it. Phone
filters block the DSL frequencies so that someone making a
normal phone call won’t hear noise on the line. They also keep
phone conversations from interfering with DSL performance.
If you do not have a DSL phone filter, they are available at
most retail stores that sell consumer electronics.
4
44
4
Connect the V3 to your cable or DSL modem.
Plug one end of an Ethernet cable into your cable or DSL
modem and plug the other end into the
WAN
port of the V3.
If
y
our cable or DSL modem is already connected to your PC
with an Ethernet cable, leave the cable plugged into the cable
or DSL modem. Then, unplug the other end from the PC and
plug the end you just unplugged into the V3’s
WAN
port.

10 Zoom V3 User’s Guide
5
55
5
If you have an existing router
, we recommend that you
replace the existing router with the V3, which has a built-in
router. If, however, you need to connect the V3 behind
another router, plug one end of the Ethernet cable into the
WAN
port of the V3 and the other end into a
LAN
port of
the router.
6
66
6
If you have a wireless access point or are using a wireless
router as an access point,
unplug it from your computer or
modem and plug it into one of the V3’s
LAN
ports.
7
77
7
Connect the V3 to your computer.
We recommend that you
use the Ethernet port if possible, because Ethernet provides a
more reliable connection.
Ethernet -
Plug one end of the included Ethernet cable into
one of the V3’s
LAN
ports (
1
,
2
,
3
, or
4
) and plug the other
end into the computer’s Ethernet port.
USB -
Plug one end of the USB cable into the V3’s
USB
port
and the other end into the computer’s USB port.

Chapter 1: Installation Instructions 11
Powering Up
To ensure that all the devices you just connected to the V3 install
correctly, you need to power up each device one at a time. Follow
these steps carefully.
1
11
1
Plug in the modem’s Power Supply, and turn on the
modem’s on/off switch if it has one.
Plug the modem’s power cube into a power outlet.
Wait for one-two minutes so that you are sure the modem has
completed its power up process before proceeding to Step 2.
2
22
2
Plug in the V3’s Power Supply.
Plug the included power cube into a power outlet and then
into the V3’s power (
PWR
) jack.
Wait for one-two minutes so that you are sure the V3 has
completed its power up process before proceeding to Step 3.
Note
: Use only the power cube shipped with the V3 or you
may cause damage to your hardware.
3
33
3
Turn the computer on.
If you are using USB
, a
Found New Hardware
box should
display, showing the progress of the installation. Follow the
prompts.
—
Windows XP users
: You may see
Hardware Installation
disclaimer boxes regarding Windows logo testing. You can
safely disregard these messages and click
Continue Anyway
.
—
Windows 2000 users
: You may see a
Digital Signature
Not Found
dialog box. You can safely disregard this message
and click
Yes
.
—Windows 98/Me users
: Restart your computer if you are
prompted to do so.

12 Zoom V3 User’s Guide
Step 3: Configuring Internet
Explorer
Macintosh and Linux users:
Your Web browser is set up
automatically, so you can skip this section. Turn to page 68 to
make sure that your computer’s TCP/IP settings are configured
correctly.
Windows users:
The software that you use to make an Internet
connection must be set for a
network connection,
not a
dial-up
connection.
If you are already using a cable or DSL modem, you
shouldn’t need to do anything. If you are just setting up your cable
or DSL Internet connection for the first time, we have included
instructions. The following instructions are for Internet Explorer, a
popular Web browser. If you are using Netscape Navigator or
another browser, set it up now to use a
network connection
(this
might be called a “Local Area Network” or “broadband”
connection).
If you use Internet Explorer, you need Version 5 or later. Most
people have the right version. If you don’t, we suggest you get a
free upgrade. If you want to check your version number, open
Internet Explorer, select
Help
, then
About Internet Explorer
.
Your version number is right under the Microsoft Internet
Explorer logo. You can ignore all the numbers after the period
following the first digit.
1
11
1 On the desktop,
right-click
(not left-click) the
Internet
Explorer
icon, and select
Properties
.
If you cannot access Internet Explorer:
Windows XP users: From the desktop, click the
Start
button,
then click
Control Panel
. In
Control Panel,
click
Network
and Internet Options
and then click the
Internet Options
icon.
Windows 98/Me/2000 users: From the desktop, click the S
tart
button, point to
Settings
, and then click
Control Panel
. In
Control Panel
, click the
Internet Options
icon.

Chapter 1: Installation Instructions 13
2
22
2 In the
Internet Properties
dialog box, click the
Connections
tab.
3
33
3 On the
Connections
tab, click
Setup
.
4
44
4
Windows XP users: In the
Welcome to the New Connection
Wizard
dialog box, click
Next
.
If you see a
Location Information
dialog box, click
Cancel
to return to the
Welcome
dialog box, and click
Next
again.
In the
Network Connection Type
dialog box, click
Connect
to the Internet
.
In the
Getting Ready
dialog box, click
“Set up my
connection manually,”
and then click
Next
.
In the
Internet Connection
dialog box, click
“Connect
using a broadband connection that is always on,”
and click
Next
.
5
55
5 Windows 98/Me/2000 users: In the
Internet Connection
Wizard
dialog box, select
“I want to set up my Internet
connection manually, or I want to connect through a local
area network (LAN)”
, and click
Next
.
In the
Setting up your Internet connection
dialog box,
change the selection to
“I connect through a local area
network (LAN)”
and click
Next
.
In the
Local area network Internet configuration
dialog
box, uncheck the box
“Automatic discovery of proxy
server”
. Then click
Next
.
A dialog box asks if you want to set up an email account. Click
No
and then
Next
.
6
66
6 When the configuration process is done, you will see a
Completing the Internet Connection Wizard
dialog box.
Windows 98/Me/2000 users: Be sure to uncheck the box that
says
“To connect to the Internet immediately, select this
box….”

14 Zoom V3 User’s Guide
7
77
7 Click
Finish
.
8
88
8 Windows XP users: Close
Control Panel
.
Windows 98/Me/2000 users: If Internet Explorer is open,
close it before going to the next step of the installation,
Configuring Your V3
.
Step 4: Configuring Your V3
•
If you have a
Cable Modem
, see below
•
If you have a
DSL Modem
, see page 15.
Configuring the V3 for a Cable
Modem
The V3 is set up by default to work with a cable modem, so
additional configuration is normally not required.
1
11
1
Go to your Web browser
(i.e., Internet Explorer or Netscape
Navigator) and
try to connect
to a familiar Web address.
2
22
2
If you connect successfully, your installation is complete
and you’re ready to browse the Web!
Continue with Step 5:
Setting up VoIP Service on page 18.
Chapter 1: Installation Instructions 15
Configuring the V3 for a DSL
Modem
1
11
1
Open the Zoom Configuration Manager.
You should have a
Zoom
icon on your desktop. You must
double-click this icon to open up the
Zoom
Configuration Manager
. (If you do not have an icon,
open your Web browser, type
http://10.2.2.2
and press
Enter
.)
2
22
2
Log in to the Zoom Configuration Manager.
Type the following User Name and Password in lowercase
letters as shown. (You will need to use this User Name and
Password each time you want to open up the
Zoom
Configuration Manager
. See
Changing the V3’s Password
in the User’s Manual on the CD if you would like to choose a
different Password.)
User Name:
admin
Password:
zoomvoip
16 Zoom V3 User’s Guide
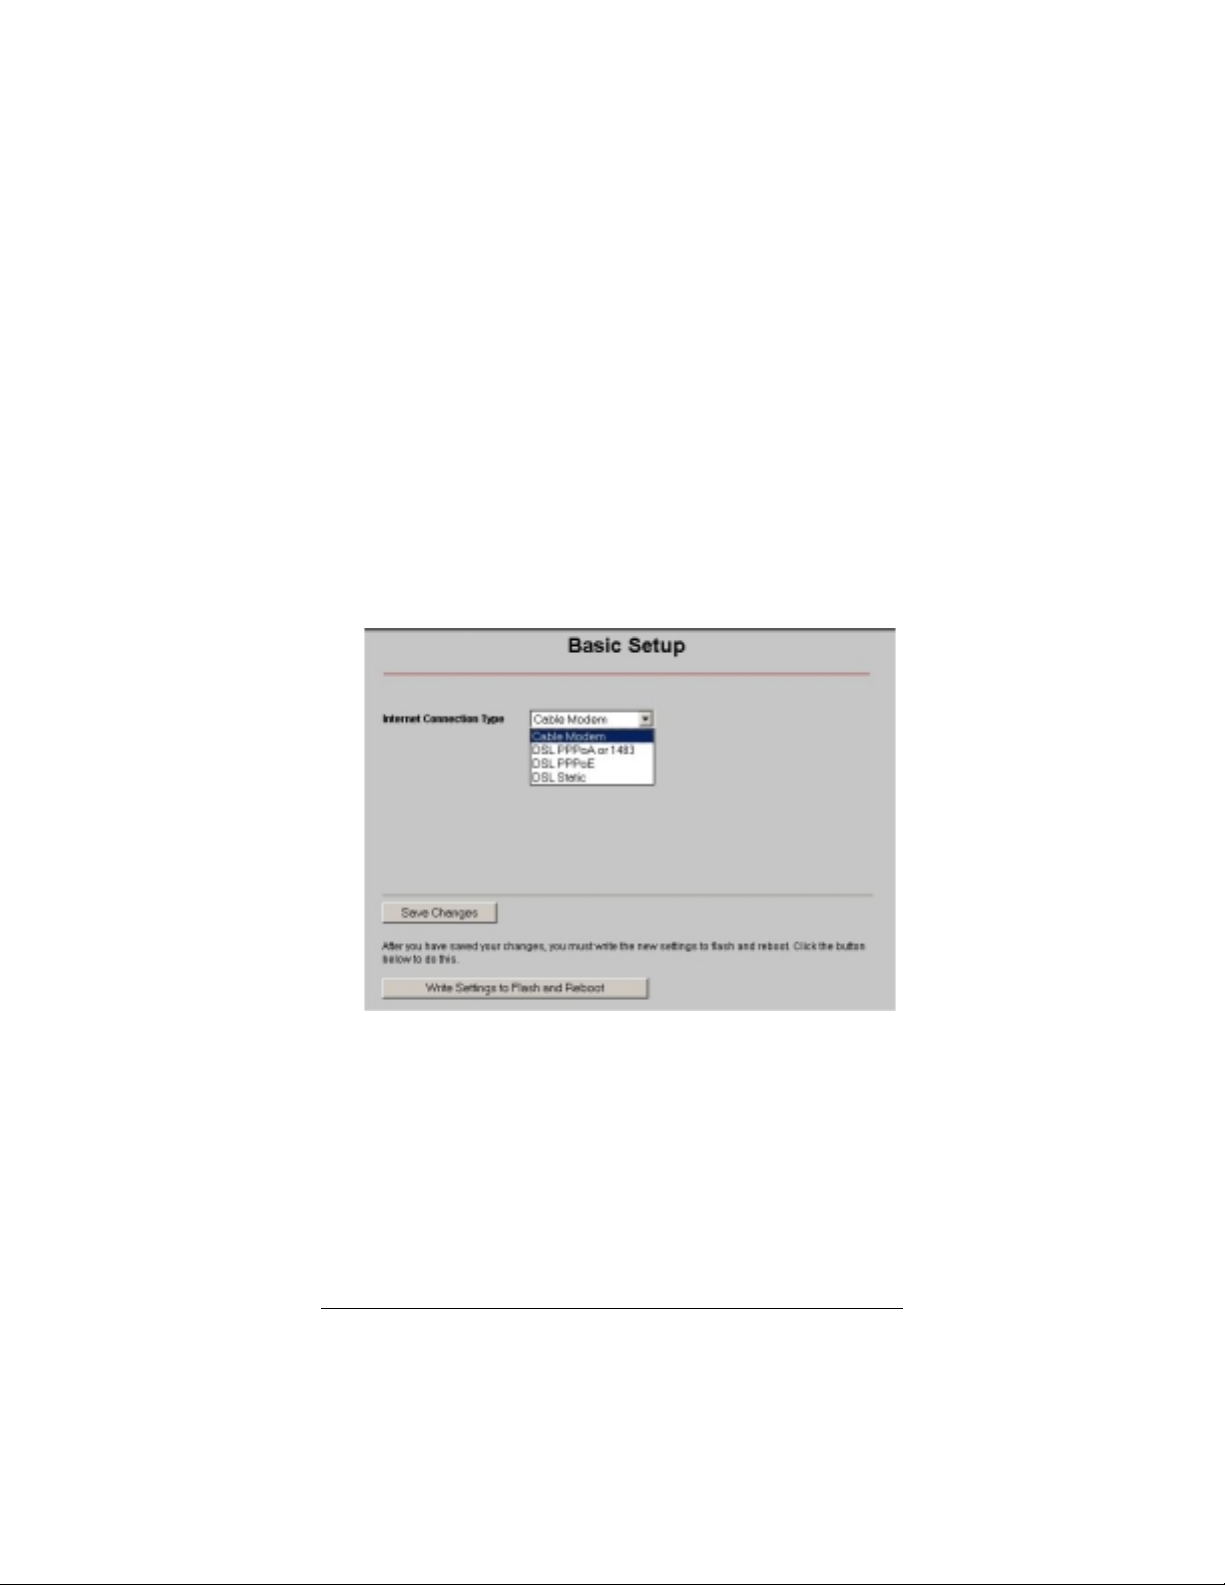
3
33
3 The
Basic Setup
page displays.
At Internet Connection Type, pull down the list of selections
and choose the type of DSL your provider uses.
If you don’t
know what type you have, read below.
The three most common types of DSL service are PPPoE, PPPoA,
and 1483. There is also Static IP, but it is very unlikely that you are
using it without knowing. You would have had to ask your service
provider for it, and there is typically an additional monthly fee.
It is very important that this selection is correct
, so if you don’t
know what type of service you have, we recommend that you call
your service provider and ask them. If you can’t call them, the
tables beginning on page should help you figure it out.
4
44
4 Click
Save Changes.
The screen may change slightly,
depending on the type of DSL you select.

Chapter 1: Installation Instructions 17
5
55
5
Configuring the V3 for DSL PPPoE, PPPoA, 1483, or
Static IP.
If you selected DSL PPPoE:
Your service provider should have given you a
username
(usually your email address or the characters preceding the @
sign in your email address) and a
password
(
NOT
the
username and password that you used to get into the
Zoom
Configuration Manager.
) If you cannot remember or cannot
find your username and password, call your service provider
and tell them you have misplaced your username and
password. Then enter them as well. Skip to Step 7.
If you selected DSL PPPoA or DSL 1483:
To make the V3 work with DSL PPPoA or 1483, you will have
to configure your DSL modem. For PPPoA, you need to “pass
through” your DSL modem’s IP Address to the V3. For DSL
1483, you need to “turn off NAT.” NAT is a kind of firewall.
You will have to do this through your DSL modem
configuration software. Unfortunately there are many different
DSL modem manufacturers and each one handles this a little
bit differently, so we can’t give specific instructions for your
modem. You should find these settings in your DSL modem
user’s manual or configuration software under “Advanced
Features” or “Advanced Configuration.”
—If you have DSL PPPoA
, the setting that you are looking
for is commonly called
PPP Half Bridge, ZIPB, DHCP
Spoofing
, or just
IP Passthrough
. When you find it,
check
or select it.
—If you have DSL 1483
, look for
Setting NAT
,
NAT
Configuration
, or something similar. When you find it,
turn
off NAT.
If you selected DSL with Static IP:
Enter the
static IP address
,
subnet mask
,
default gateway
,
and
DNS Server
IP address assigned to you by your service
provider, and then click
Add
.

18 Zoom V3 User’s Guide
6
66
6 Click
Save Changes
, then
Write Settings to Flash and
Reboot
, and then
Confirm
.
7
77
7
Go to your Web browser
(i.e., Internet Explorer or Netscape
Navigator) and
try to connect
to a familiar Web address.
8
88
8
If you connect successfully, your installation is complete
and you’re ready to browse the Web!
Continue with Step 5:
Setting up VoIP Service
If you do not connect successfully, refer to the
Troubleshooting Tips
on page 71.
Step 5: Setting up VoIP Servic e
If you purchased a V3 Model 5567, your unit has been set up for
VoIP service, so continue below with 1.3 Tips for Making VoIP
Calls. If you purchased another Model V3, please go to Chapter 2
on page 23.
1.3 Tips for Making VoIP Calls
Distinctive Ring and Dial Tone -
The V3’s ring and dial tone
sound different from your normal phone. This means that you can
easily tell by the ring that you are receiving a VoIP call. Perhaps
more important, when you make a VoIP call, you will hear a
different dial tone than you hear on the public phone network, so
that you can be sure you are making a VoIP call.
Speed dialing -
If the phone that you plugged into the V3 has a
speed dialing feature, you can use it for your VoIP calls and your
regular calls. Just be sure to start the VoIP calls with the
#
symbol
(except in VoIP Only Mode where you don’t use the
#
).
Redial -
You may redial a VoIP number just as you would redial
any other number, using the redial feature on your phone.

Chapter 1: Installation Instructions 19
Hook Flash -
If you receive a second call while you are on a VoIP
call, you will hear a call waiting tone. Momentarily press the hook
button on your phone to talk to the second caller, and press it
again to go back to your first conversation. After you have
completed a VoIP call, you can press the hook button to get a
fresh VoIP dial tone and make another VoIP call without dialing
#
(Note that redial or speed dialing will not work in this case,
however. You must hang up for at least one second if you need to
make a conventional phone call.
1.4 Setting the V3 for VoIP Only
Mode
For models outside of the US, the V3 can be set to operate in
VoIP Only Mode
. While in
VoIP Only Mode
, you do not need
to dial # before dialing a number. Use
VoIP Only Mode
when:
•
You have a cable modem and you are not near a phone jack
that you can plug the V3 into.
•
You are using a DSL modem and your DSL line also provides
your ISDN service.
•
You are using “unbundled” DSL—that is, a line without any
telephone service attached to it.
•
You intend to use the phone connected to the V3
solely
for
VoIP calls. That way, you do not have to hit
#
before every
call.
To put the V3 in
VoIP Only Mode
, follow these steps:
1
11
1 From the
Zoom Configuration Manager
, click the
Voice
Over IP
icon at the top of the page.
2
22
2 Check the
VoIP Only Mode
box.
3
33
3 Click
Save Changes
,
Write Settings to Flash and Reboot
,
and
Confirm
.
20 Zoom V3 User’s Guide
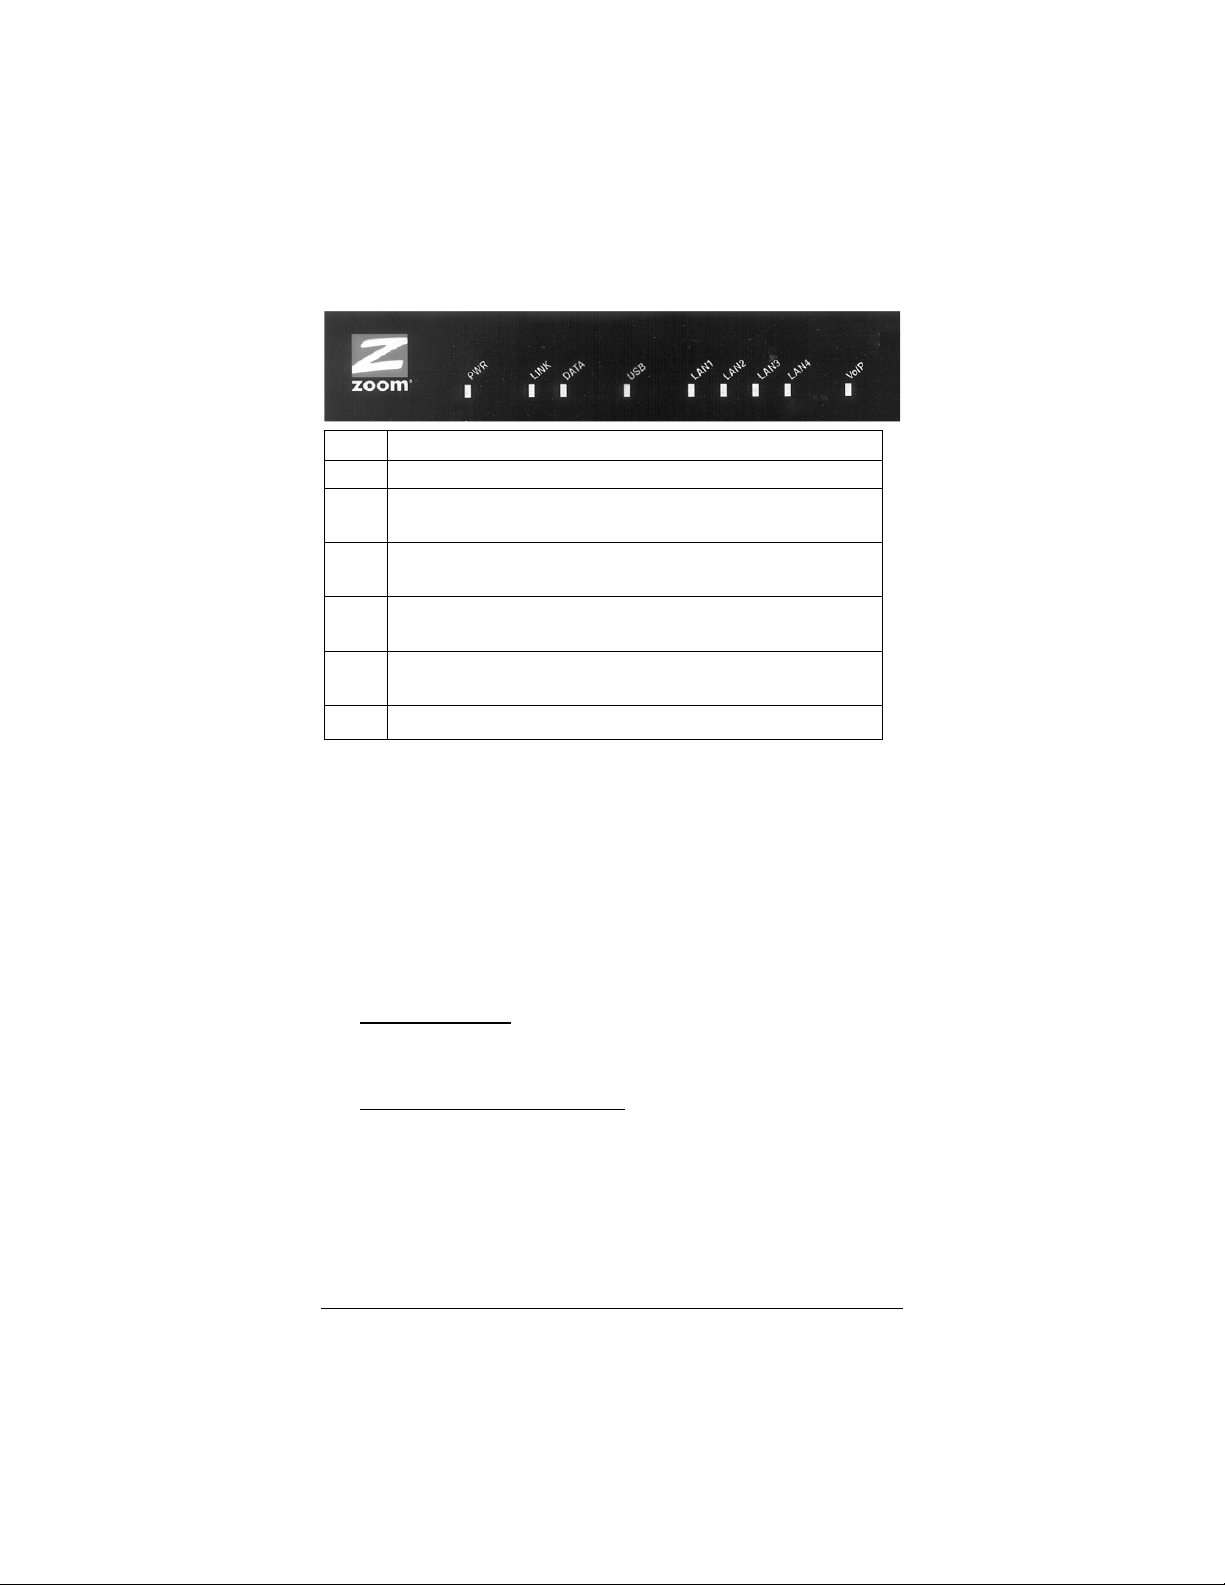
1.5 Front Panel Description
Light Description
PWR
Lights when the V3 is plugged into a power source.
LINK
Lights when the V3 is connected to its broadband WAN
connection device.
DATA
Blinks when data is being transferred through the broadband
line.
USB
Lights when the USB port of the V3 is plugged into a
powered-up computer’s USB port.
LAN
1-4
Lights when a LAN port of the V3 is plugged into the Ethernet
port of a powered-up device.
VoIP
Lights when a Voice over IP call is taking place.
If you have followed the manual to this point, your V3 gateway and
VoIP should be working. Congratulations, you’re ready to enjoy
the V3!
1.6 If You Need Help
•
If you have hardware installation problems, our Technical
Support Staff will be happy to assist you.
Windows Users:
Please see the Customer Support portion of
the CD for contact information. You may also want to refer to
the Frequently Asked Questions on the CD.
Macintosh and Linux Users:
You will find Customer
Support information and User Documentation in Adobe PDF
format in the appropriately named folders in the directory of
the CD-ROM that came with your V3.

Chapter 1: Installation Instructions 21
•
From time to time, Zoom may release improved firmware.
This is available at
www.zoom.com
, along with upgrade
instructions. We recommend that you check this site
periodically for updates.
1.7 Changing the V3’s Password
& Resetting the Unit to Its
Default Settings
To change the V3’s Password, click the
Advanced Setup
icon at
the top of the
Zoom Configuration Manager
. Under the
Administration
heading, click
Admin Password
.
•
Type the new password, then retype it for verification
purposes.
•
Click
Save Changes
,
Write Settings to Flash and Reboot
,
and
Confirm
.
Note:
The password must be at least 8 characters. If you change your
password and then forget it, your only recourse is to reset it to the
default by performing a hardware system reset (see below).

22 Zoom V3 User’s Guide
If you have changed the system settings on your V3 unit and for
some reason want to restore them to the factory default settings,
you can do so in one of two ways: You can perform a software
reset or a hard reset.
If you can open your Web browser and access your V3’s user
interface, here’s how to perform a software reset:
•
From the
Advanced Setup
page, under
Administration
, click
Reset to Default
. You will be prompted to click the
Write
Settings to Flash and Reboot
button. Once this process is
complete, your unit is reset to its factory settings. Click on any
of the icons at the top of the page to continue.
If you lose your link to the unit and cannot communicate with it
via the Web browser, here’s how to perform a hard reset.
•
Using a paper clip, press the
RESET
button on the unit’s back
panel. While holding in this button, count to five, and then
release the button. You are now guaranteed that all system
settings are restored to the unit’s factory defaults.
1.8 Windows Users: Removing
the V3
If you have Windows and want to remove your V3—for instance,
if you move your computer to a location without broadband
service—you should remove the software before disconnecting the
hardware.
1
11
1
From the desktop, select Start | Programs | Zoom VoIP
Gateway | Uninstall.
2
22
2 When prompted to confirm your choice, click Yes
.
3
33
3 When the process is complete, you will be prompted to
click Finish.
4
44
4 Unplug your V3 hardware
.

Chapter 2: Voice Over IP Settings 23
2
Voice Over IP Settings
If you purchased a V3 Model 5567, you do not need this
chapter. If you have another V3 model, please continue below.
2.1 Changing Your VoIP Settings
The V3 needs to be configured with specific information for
the VoIP service that you plan to use.
If you received the V3 from your service provider, it is likely
that it is preset for their VoIP service.
In most cases the service
provider will tell you that the unit has been preset. If you’re not
sure you can check by going to the
Advanced VoIP Setup
page
(Double-click the
Zoom V3
icon on your desktop, then the
Voice
over IP
button on the opening page, then the
Advanced VoIP
Setup
button.) If the
User ID
box is filled in, your V3 is preset;
you can now refer to
Section
1.3 Tips for Making VoIP Calls
on page 18 or
Section
2.2 Call Forwarding and Call Waiting
on page 28
. If your V3 is not preset, continue below.
If Your Unit Is Not Preset for VoIP
There are two ways to configure the V3 for VoIP.
Both require
that you enter specific information provided to you by your service
provider.
Some service providers use
Auto Account Configuration
. If your
service provider gave you a
Server Address
, they are using Auto
Account Configuration. Go to Auto Account Configuration on
page 24.
24 Zoom V3 User’s Guide
If your service provider did not give you a Server Address but
provided you with a
User ID
and a
Password
, you will configure
your V3 manually. Go to Manual Account Configuration on page
26.
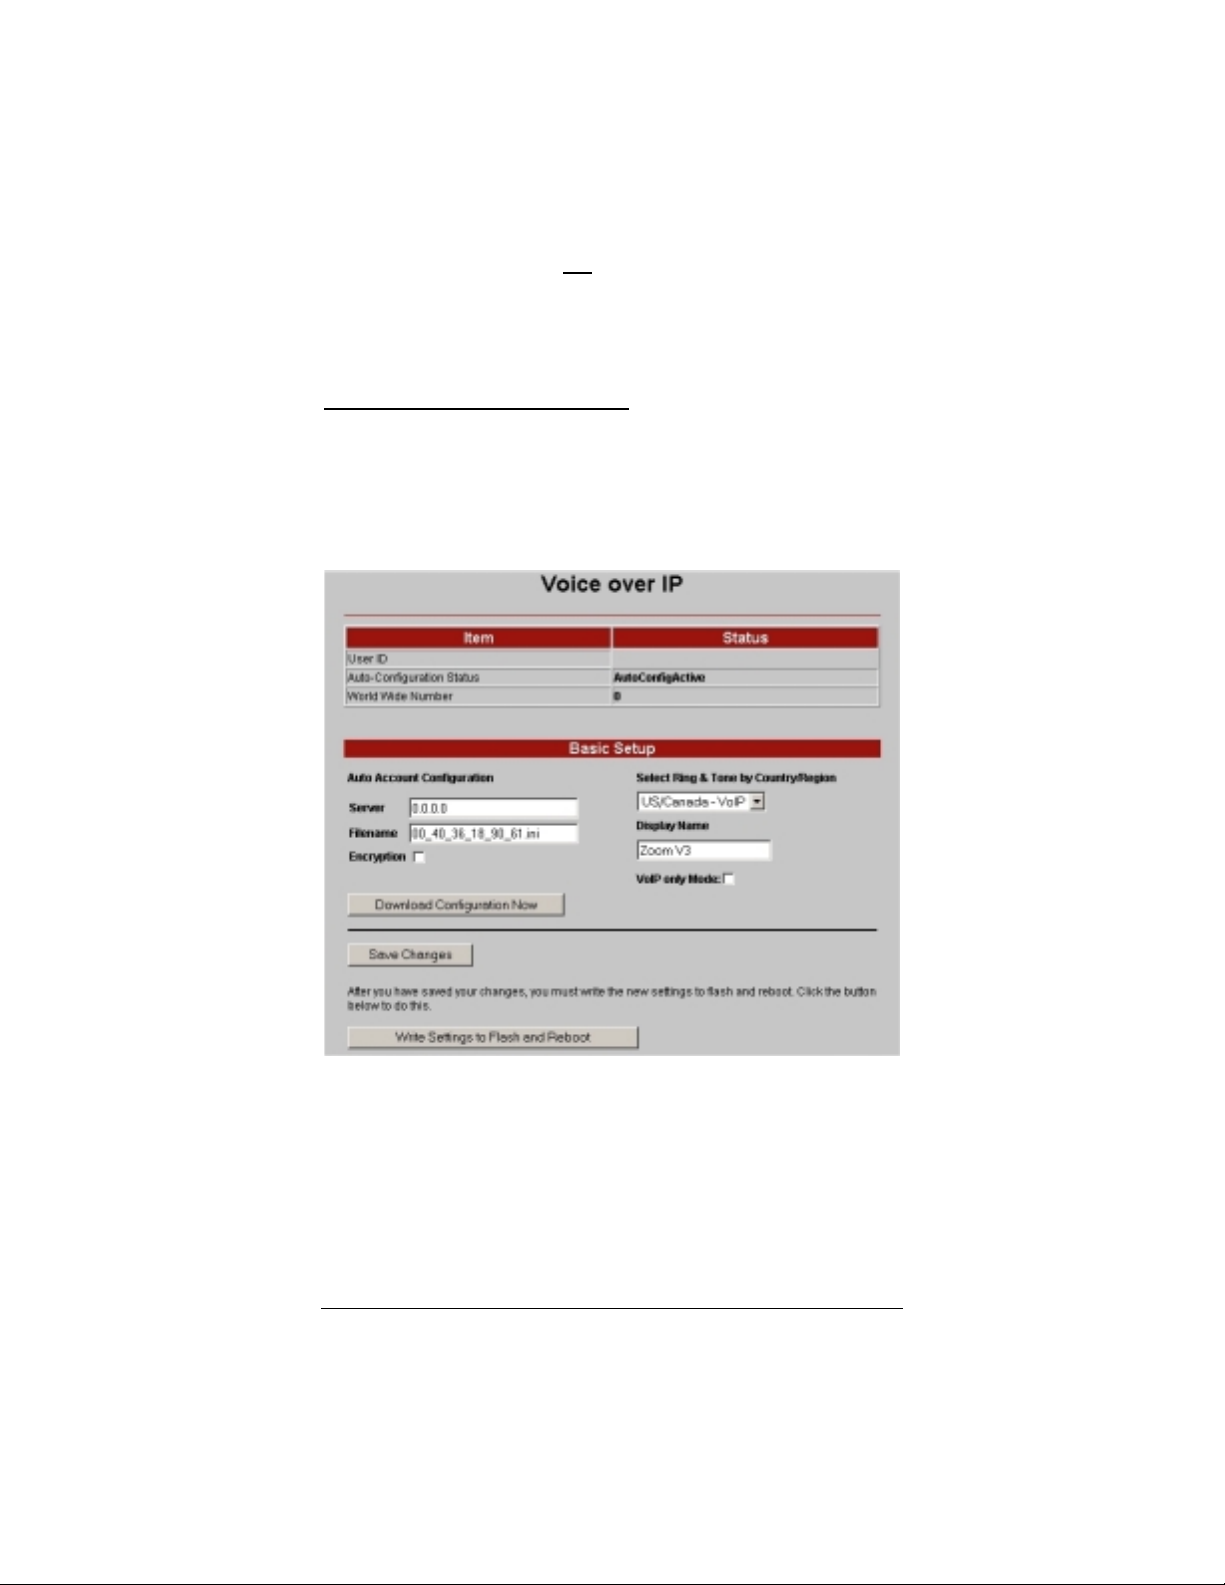
Auto Account Configuration
1
11
1
Open
the
Voice Over IP
page.
Click the
Zoom V3
icon on your desktop, then the
Voice over IP
icon at the top of the opening page to display the
Voice over IP
setup page.
2
22
2
Under
Basic Setup
, in the
Server
box enter the Server
address given to you by your provider.

Chapter 2: Voice Over IP Settings 25
3
33
3
If
your service provider gave you a
Filename
, enter it in
the Filename box.
If you did not get a Filename from
your service provider, leave the box as it is.
4
44
4
Go to the box labeled
Encryption
. Your service provider
should have told you whether encryption should be on
(box checked) or off (box unchecked). It is important that
this is right, so if you don’t have this information contact
your service provider before proceeding.
5
55
5
Click the
Download Configuration
button.
6
66
6
You can now use
Select Ring & Tone by
Country/Region
to decide what kind of ring and ring
tone you would like for your incoming VoIP calls. You
can either choose to have your ring and ring tone be the
same as your normal phone ring, slightly different, or
completely different. We recommend that you make the
ring different from your normal ring so that you can tell
the difference between an incoming VoIP call and a
regular call.
To make
your incoming ring
the same as your normal
ring,
choose your country from the pulldown menu.
To make
your incoming ring slightly different
from your
normal ring, choose your country from the pulldown menu
and pick the “VoIP” option. This will give you the same tone
as your normal ring with a different ring pattern.
For a completely different ring tone
for your VoIP calls,
you can choose any ring listed for any country.
7
77
7
Click
Save Changes
,
then
Write Settings to Flash and
Reboot
, and then
Confirm
.

26 Zoom V3 User’s Guide
8
88
8
Check that your settings are okay.
Look at the
User
ID
box near the top of the page. If this box is now filled
in, your settings are okay.
If this box is not filled in, contact your provider.
9
99
9
You can now refer to
Section
1.3 Tips for Making VoIP
Calls
on page 18 or
Section
2.2 Call Forwarding and Call
Waiting
on page 28.
Manual Account Configuration
1
11
1
Open
the
Advanced VoIP Setup
page.
Double-click the
Zoom V3
icon on your desktop. In lowercase
letters, enter
admin
for the username and
zoomvoip
for the
password. Click the
Voice over IP
icon at the top of the opening
page to display the
Voice over IP
setup page. Then click the
Advanced VoIP Setup
button at the bottom of the
Voice Over
IP
page to display the
Advanced VoIP Setup
page.
Loading...